
Эта статья посвящена особенностям организации резервного копирования виртуальных машин, запущенных в среде Microsoft Hyper-V. Мы рассмотрим требования к средствам резервного копирования Hyper-V, стратегии резервного копирования и основные бесплатные и коммерческие продукты в этой нише.
Несмотря на то, что в среде Hyper-V доступно большое количество технологий обеспечения высокой доступности и отказоустойчивости ВМ (кластера, Live Migration, репликация, и т.д.), системному администратору необходимо не забывать о классическом резервном копировании виртуальных машин.
Содержание:
- Как работает резервное копирование виртуальных машин Hyper-V?
- Основные требования к средствам резервного копирования ВМ Hyper-V
- Резервное копирование Hyper-V с помощью встроенного Windows Server Backup
- Сторонние средства резервного копирования Hyper-V
Как работает резервное копирование виртуальных машин Hyper-V?
Рассмотрим упрощенно схему работы любого современного средства для бэкапа виртуальных машин Hyper-V.
Есть два подхода к резервному копированию ВМ:
- Резервное копирование ВМ с хоста Hyper-V (host-level VM backup) – администратор управляет инструментом резевного копирования на уровне всего хоста Hyper-V;
- Резервное копирование с помощью агента, установленного в гостевой ОС (guest-level VM backup) – используются довольно редко. В основном для приложений, которые не позволяют корректно создать бэкап через VSS.
В основе всех современных средств резервного копирования ВМ Hyper-V лежит технология снапшотов (снимков). Снимок содержит состояние ВМ на определенный момент времени и содержит как содержимое виртуальных жестких дисков, так содержимое памяти и настройки виртуальной машины.
Вот как упрощенно выглядит типовой процесс резервного копирования в Hyper-V:
- Средство резервного копирования (СРК) отдает команду хосту Hyper-V на создание снимка ВМ;
- Гипервизор создает новые файлы (дельта-файлы) и ВМ продолжает свою работу, сохраняя изменения в этих файлах;
- СРК копирует оригинальные файлы ВМ (изменения в них не пишутся) на носитель резервных копий (внешний диск, папку, ленту) и после отдает команду на удаления снапшота ВМ;
- Hyper-V удаляет снапшот и производит консолидацию (слияние) исходных и дельта файлов (работа ВМ при этом не прерывается)
В качестве альтернативы полноценному резервному копированию, можно использовать встроенную возможность Hyper-V по экспорту запущенных ВМ. Hyper-V позволяет экспортировать все файлы запущенной ВМ в отдельный каталог:
Export-VM -Name win10 -Path '\\fs01\backup\win10' -CaptureLiveState CaptureSavedState
Основные требования к средствам резервного копирования ВМ Hyper-V
Это в общих чертах о резервном копировании Hyper-V, но на деле возникает куча нюансов и проблем. Попробую перечислить наиболее распространены проблемы:
- Чем дольше средство резервного копирования забирает снапшот (бэкап) к себе, тем больше изменений накапливается в дельта файлах. При большом количестве изменений внутри ВМ за время копирования файлов, процесс слияния файлов при удалении снапшота может вызывать высокую нагрузку на диски, Hyper-V хост и саму ВМ. В Hyper-V Server 2016 для ускорения процесса резервного копирования используется технологий Resilient Changed Tracking, которая позволяет средству резервного копирования копировать только блоки данных, измененные с момент последнего бэкапа. При этом не нужно «забирать» ВМ целиком.
- При копировании данных снимка ВМ по LAN сети с хоста Hyper-V на хранилище резервных копий возможно вызвать высокую нагрузку на сеть. Рекомендуется использовать отдельный интерфейс сервера для трафика резервного копирования, или копировать данные через SAN сеть.
- Если вы используете систем хранения (СХД) для хранения файлов ВМ, вы можете воспользоваться возможностями СХД по интеграции со средствами резервного копирования (аппаратные снапшоты).
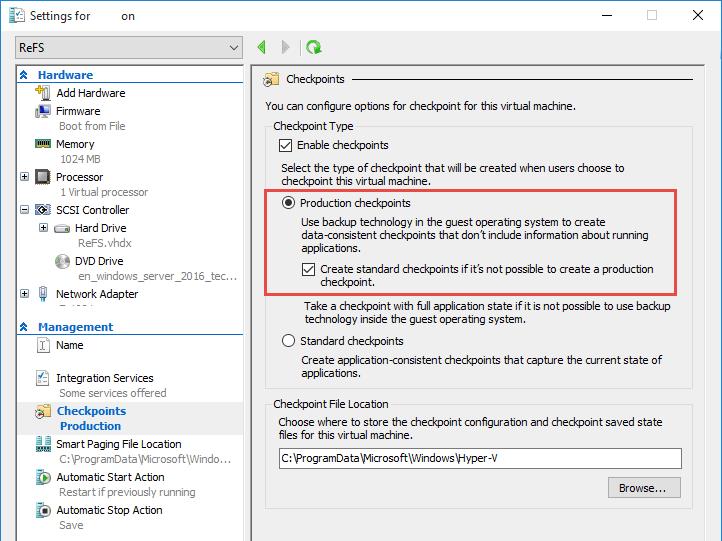
- Изначально гостевая ОС не знает о том, что создается ее резервная копия. Соответственно при попытке восстановить ВМ из такого бэкапа, ОС пытается продолжить свою работу с момента создания снимка. В некоторых случаях это может вызвать проблемы как с самой ОС, так и с потерей данных в запущенными внутри нее приложениях (особенно в транзакционных, таких как Exchange, SQL, ADDS и т.п.). Для преодоления этой проблемы в Hyper-V 2016 появился новый тип снимков — Production Checkpoints (Microsoft рекомендуется применять обычные снимки — Standard Checkpoint только в тестовых и лабораторных средах, или для бэкапа остановленных виртуальных машин);

Для работы Production Checkpoints в гостевой ОС средств должны быть установлены компоненты интеграции Hyper-V, и включена служба Volume Shadow Copy (Windows) или заморозки файловой системы fsfreeze (Linux). Однако состоянии памяти при этом не копируется. Т.е. Hyper-V уведомляет гостевую ОС о создании снимка, приложение с поддержкой VSS корректно завершает текущие транзакции, переходит в консистентное состояние и создает снимок ВМ. При восстановлении из такого снимка гостевая ОС выключена (т.к. состояние памяти не сохранялось), после включения она считает, что просто произошло аварийное отключение по питанию. Приложение (если оно поддерживает VSS) при этом начинает работу с сохранённого согласованного состояния.
- Для экономии места на устройстве хранении резервной копий рекомендуется использовать дедупликацию. Если вы используете дифференциальные диски, нужно чтобы средство резервного копирования поддерживало эту технологию. Иначе вы можете хранить одинаковые данные ВМ несколько раз.
- При большой плотности виртуальных машин на хосте желательно иметь возможность планирования времени резервного копирования ВМ, чтобы избежать чрезвычайно нагрузки на продуктивные системы в производственное время.
- Если вам нужно хранить несколько копий виртуальной машины, нужно обеспечить управление количеством хранимых копий ВМ.
- Настройте мониторинг СРК и устройства хранения резервных копий. Не хочется в определенных момент узнать, то резервное копирование не работает, т.к. на СХД под бэкапы закончилось место. Здесь же нужно вспомнить про средство верификации резервных копий.
- Некоторые СРК поддерживают гранулярное восстановление отдельных файлов/папок без необходимости развёртывания целиком ВМ или ее виртуального диска.
Примечание. Многие СРК позволяют, например, восстановления конкретные хранилища, ящики и даже отдельных писем из резервной копии ВМ с Exchange Server.
- СРК должна позволять настраивать права доступа к системе за счет ролевой модели управления резервным копированием.
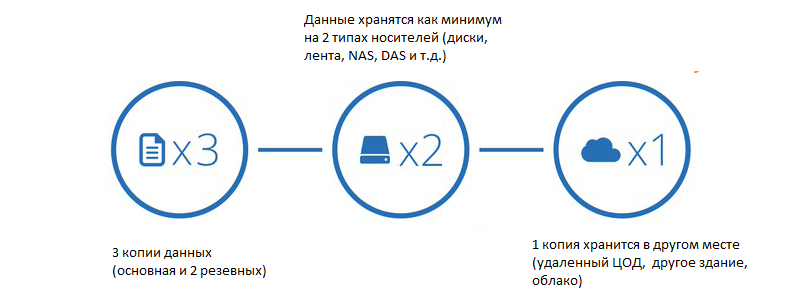
- Реализуйте классическую стратегию резервного копирования 3-2-1 (три копии, на двух разных носителях, один из которых на другой площадке).

Далее мы рассмотрим несколько популярных решений по организации резервного копирования ВМ на Hyper-V с точки зрения рассмотренных возможностей.
Резервное копирование Hyper-V с помощью встроенного Windows Server Backup
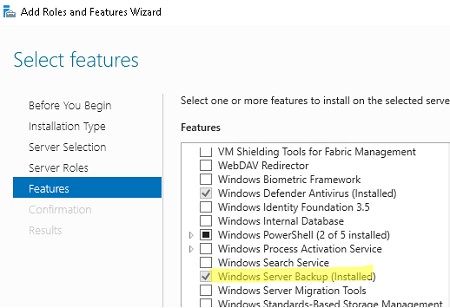
Вы можете бесплатно реализовать резервное копирование виртуальных машин Hyper-V с помощью встроенного Windows Server Backup (WSB). WSB позволяет настроить резервное копирование ВМ из графического интерфейса или с помощью утилиты командной строки wbadmin.
Windows Server Backup доступен как в полноценных версиях Windows Server Standard/Enterpriser так и в бесплатном Hyper-V Server.
Вы можете установить Windows Server Backup из консоли Server Manager или с помощью команды:
Install-WindowsFeature Windows-Server-Backup -IncludeManagementTools
Чтобы настроить задание резервного копирования ВМ из графического интерфейса, запустите оснастку
wbadmin.msc
.
- Разверните раздел Local Backup и выберите Backup Schedule;
- Выберите тип резервного копирования Custom -> и нажмите Add Items;
- Разверните Hyper-V и выберите виртуальные машины, которые вы хотите бэкапить;
- Далее вы можете настроить расписание резервного копирования ВМ;
- Выбрать хотите ли вы сохранять резервную копию на отдельный диск или в сетевую папку (UNC путь);

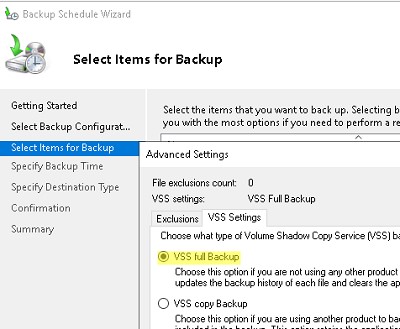
- Если вы не используете других средств резевного копирования нажмите кнпоку Advanced Settings и включите опцию VSS full Backup.

Основной недостаток графического интерфейса Windows Server Backup – вы можете создать только одно задание резервного копирования, которое будет перезатирать предыдущие копии.
Поэтому администраторы Hyper-V для настройки резервного копирования виртуальных машин предпочитают использовать утилиту командной строки wbadmin.
Выведите список ВМ на хосте Hyper-V PowerShell командой:
Get-VM
Чтобы создать резервную копию ВМ с именем
"Server 1"
на локальный диск
D:\
, выполните команду:
wbadmin start backup –backupTarget:D: –hyperv:"Server 1"
Не рекомендуется хранить резервную копию ВМ на этом самом сервере Hyper-V. Желательно использовать удаленное хранилище.
WSB создаст снапшот для ВМ, и скопирует виртуальные диски и состояние ВМ в каталог
D:\WindowsImageBackup\имявашегохостаHyper
.
Вы можете выполнить резервное копирование сразу нескольких ВМ. В этом примере вы сохраним их в сетевую папку:
wbadmin start backup -backuptarget:\\192.168.1.100\VMbackup: -hyperv:"TestVM01,TestVM02" -allowDeleteOldBackups -quiet
При хранении резервных копий ВМ в сетевой папке, Служба VSS не позволяет хранить несколько версий ВМ в сетевой папке. При использовании этого способа старая резервная копия всегда будет перезатираться.
При резервном копировании виртуальных машин с VSS-aware application (такими как контроллер домена AD, Exchange Server или MSSQL) можно сообщить приложению в ВМ о том, что нужно обновить данные в журнале архивации.
wbadmin start backup -backuptarget:\\192.168.1.100\VMbackup: -hyperv:MSK-DC1 -vssFull
В гостевой ОС должны быть установлены компоненты интеграции Hyper-V.
Вы можете создать в планировщике Windows задание с командной wbadmin для автоматического резервного копирования виртуальных машин по настроенному. Чтобы резервная копия создавалась без запроса пользователю, добавьте в команду wbadmin параметр
-quiet
.
Чтобы получить список зарегистрированных в WSB резервных копий, выполните команду:
wbadmin get versions
Удалить самую старую резевную копию:
wbadmin delete backup -backupTarget:c: -deleteOldest
Либо вы можете удалить одну из старых резервных копий ВМ по имени версии (Version identifier):
wbadmin delete backup -backupTarget:c: -version:11/08/2023-10:13
Чтобы восстановить ВМ из резервной копии Windows Server Backup, нужно получить ее идентификатор в архиве. Вывести список элементов в резервной копии.
wbadmin get items -version:11/08/2023-09:33
Скопируйте VM identifier и подставьте его в следующую команду:
wbadmin start recovery -itemtype:hyperv -version:11/08/2023-09:33 -items:7B415605-0C7B-4349-AB80-9156BCB79E44
С помощью опций
AlternateLocation
и
RecoveryTarget:path
вы можете восстановить ВМ в альтернативный каталог.
Windows Server Backup позволяет восстановить только ВМ целиком. Нельзя восстановить отдельный диск, файл или папку. Однако вы можете вручную смонтировать к вашей ВМ VHDX диск с резервной копией и самостоятельно скопировать файл, которые нужно восстановить.
При всей своей простоте WSB достаточно надежное решение для резервного копирования Hyper-V, работает довольно быстро и позволяет управлять расписанием резервного копирования. Недостатки Windows Server Backup:
- Нет средств мониторинга выполнения бэкапов, проверки целостности резервных копий ВМ;
- Сложно управлять резервным копированием в средних и крупных инсталляциях Hyper-V (подходит для небольших сред с 1-2 хостами Hyper-V);
- Нельзя автоматически восстановить конкретный файл или состояние приложения;
- При большой плотности и размерах виртуальных машин на хосте вам придется с помощью планировщика Windows настраивать порядок создания резервных копий, чтобы не вызвать перегрузки сервера, а также высокой нагрузки на сети LAN/SAN/ iSCSI в рабочие часы (если вы храните бэкапы на другом хранилище).
Сторонние средства резервного копирования Hyper-V
МАТЕРИАЛ ПОДГОТОВЛЕН ПРИ СОДЕЙСТВИИ BACKUPSOLUTION.RU
Специализированный поставщик решений для резервного копирования и восстановления данных
При большом количестве хостов Hyper-V и виртуальных машин, использовать встроенный Windows Server Backup очень сложно. Вам в любом случае придется выбирать одно из сторонних коммерческих решений. Однозначно говорить, что тот или иной продукт будет идеальным решением для резервного копирования Hyper-V нельзя, слишком много нюансов нужно учесть. Это и количество хостов, лицензионные ограничения, необходимый функционал, архитектура сети и т.д.
На рынке представлено большое количество коммерческих и бесплатных продуктов для резервного копирования, и запутаться в них очень сложно. Обычно для оценки лидеров ниши используется магический квадрант Gartner. Я нашел такую картинку, характеризующие основных игроков и лидеров на рынке резервного копирования для дата-центров.

Как вы видите, Гартнер среди лидеров решений по резервному копированию выделяет компании и продукты:
- Commvault
- Dell Technologies
- Cohesity
- Veeam (в бесплатной редакции Veeam Backup Free Edition позволяет бэкапить до 10 ВМ)
- Rubrik
- Veeam
- Veritas Technologies (Symantec — Veritas Backup Exec)
- Microfocus (HPE Data Protector)
В рамках одной статьи оценить и сравнить все продукты довольно сложно, поэтому попробуем рассмотреть возможности нескольких программ – лидеров рынка по резервному копированию Hyper-V.
- Veritas Backup Exec
- Commvault Backup
- Veeam Backup
- Acronis Backup
Я составил небольшую сравнительную таблицу с интересными мне возможностями этих средств резервного копирования (рассматривается функционал версий, актуальных на момент написания статьи).
| Функционал/ Продукт | Veritas Backup Exec 20.2 | Commvault Backup and Recovery 11 | Veeam Backup & Replication 9.5 | Acronis Backup 12.5 |
| Резервное копирование файловых систем | Windows / Linux | Windows / Linux / IBM AIX / HP-UX | Windows / Linux / IBM AIX / HP-UX. Агенты для физических систем автономны, не поддерживают совместное использование хранилищ групповые политики | Windows / Linux |
| Передача резервных копий дисковых массивов по NDMP | + Поддержка NDMP v4+. Список поддерживаемых хранилищ есть на сайте veritas. Не поддерживается инкрементальное и дифференциально копирование, бэкап только LUN целиком и нельзя восстановить отдельные файлы. |
+ Поддержка прямого резервного копирования данных с файловых устройств NAS. На сайте Commvault есть список поддерживаемых версий файловых систем разных производителей. При использовании этого типа резервного копирования данные отправляются напрямую с NAS через MediaAgent (прокси сервер) на устройство хранения, минуя управляющий сервер CommServe. Поддержка бэкапов отдельных vmdk файлов. |
+ Поддержка NDMP (v4 и выше) появилась относительно недавно. Поддерживается бэкап только LUN целиком. Поддерживается до 10 точек восстановления (на NetApp до 30). |
— |
| Передача моментальных снимков ВМ по SAN | + На сайте Veritas в секции Hardware Compatibility List представлен список совместимых HBA адаптеров, SAN свичей |
+ Поддерживается бэкап по SAN как для ESXi так и для Hyper-V хостов |
+ Необходимо дополнительная физическая машина с ролью выделенного прокси сервера Veeam, подключенного к той же сети SAN и презентованными LUN |
Поддержка моментальных снимков только в VMware vSphere для хранилищ NetApp с Data ONTAP |
| Репликация резервных копий в несколько хранилищ (в том числе на удаленную площадку) | + | + | + | + |
| Поддержка гранулярного восстановления приложений и БД | Microsoft SQL / Exchange / AD | Microsoft SQL / Exchange / AD / Domino / DB2 / MySQL / Oracle | Microsoft SQL / Exchange / AD / Oracle (только для виртуализированных приложений, не поддерживается на физических системах) |
Microsoft SQL / Exchange / AD |
| Управление аппаратными снимками СХД | + | + (IntelliSnap) | + (список поддерживаемых вендоров и моделей СХД ест ь на сайте, для некоторых необходима установка отдельного модуля интеграции) | + |
| Лицензирование для сред виртуализации | Хост / сокет / Объем данных | Сокет / Объем данных | На сокет (процессор) | На хост |
| Стоимость 1 лицензии (ориентировано) | От 85 тыс. р. | 190 тыс. р. | 70 тыс. р. (редакция Standard), 200 тыс. р. (редакция Enterprise Plus) |
45 тыс. р. (редакция Standard), 95 тыс. р. (редакция Advanced) |
Перед принятием решений о выборе того или иного решения стоит составить список требований к продукту резервного копирования Hyper-V, список имеющегося оборудования и необходимый функционал. У большинства известных продуктов резервного копирования есть бесплатные версии с некоторыми ограничениями, обычно их достаточно для оценки функционала.
Время на прочтение6 мин
Количество просмотров115K
Хочу поделиться с вами опытом о том, что у меня отняло море времени — о бэкапах виртуальных машин и обычных компьютеров. Как сделать дешево и красиво.
Пожалуй, начну с того, что если вы хотите бэкапы на VMWare, то готовьтесь платить. Бесплатный VMWare — это бесплатно до тех, пока речь не идет о миграциях, бэкапах и тому подобное. На этом месте можно начать бесконечный холивар, но без моего участия. Мои повествования будут только о Hyper-V на Windows Server 2012R2. Хотя часть статьи можно применить и к VMWare, но, вероятно, будут подводные камни.
Бэкапить на Hyper-V мы можем бесплатно, а точнее, теми средствами Windows, за которые мы уже заплатили, приобретая лицензии Windows Server. Для удобства работы с нашими бэкапами (к тому же за это мы тоже заплатили) будем использовать WDS и дедупликацию (может и групповые политики).
1. Бэкап изнутри виртуальных машин
1.1. Бэкап сегодняшнего дня
Насколько мы знаем, любой Windows умеет делать бэкап. Причем, любые настройки бэкапа Windows через интерфейс сводятся, в конечном счете, к фоновому использованию утилиты wbadmin. А что, собственно, умеет wbadmin? А умеет она делать как бэкап образа с системным разделом, так и бэкап отдельных папок. В данной части статьи нас интересует только бэкап образ (системного раздела). Остальное — это специфичные данные виртуальных машин и бэкапить нужно отдельно. Отсюда вывод: Не храните на системном разделе виртуальных машин (и на обычных компьютерах тоже) никакой ценной информации и баз данных, отдельных приложений. MS SQL Server / MS Exchange / «Сервер приложений 1С» и другое ставим только на не системные разделы или на отдельные диски.
Итак, что же нужно, чтобы бэкап отработал? А нужна всего лишь одна команда:
wbadmin.exe start backup -backupTarget:\\СерверБэкапа\ПапкаДляБэкапаВнутреннего -allCritical -quiet
На самом деле, для этой команды нужны особые права, но о них позже. Сейчас важно понять одну вещь. Данная команда делает не просто бэкап. Она делает инкрементальный бэкап.
Причем, для серверных и настольных (клиентских) Windows бэкапы формируются разные. И разница заключается в том, что для серверных ОС у нас получатся снимки каждого бэкапа, а вот для настольных — снимок останется всегда только последний. Спросите, а что это за такой инкрементальный бэкап? А «инкрементальный» он остается, потому что
бэкапим мы не весь образ, а только изменившуюся часть со времени последнего бэкапа (а значит и меньше трафика и быстрее создается бэкап).
Те, кто сталкивался с аналогичной ситуацией заметят, что бэкап всегда будет «инкрементальный» (полный). Так как бэкап происходит в нашем случае на сетевой диск.
То есть для серверной Windows снимки остаются тоже только последние.Позже, выявил, что нет никакой разницы в работе wbadmin на серверной и клиентской ОС. Разве, что разница есть в интерфейсе. wbadmin производит инкрементальный бэкап (кроме первого бэкапа), если указан жесткий диск в ключе -backupTarget (команда использует ключ по умолчанию -vssСopy). Или производит полный бэкап, если добавить ключ -vssFull.
1.2. Бэкап с историей предыдущих снимков
На данный момент, мы сделали бэкап образов виртуальных машин. Но это же у нас бэкап снимков только сегодняшнего дня. Завтра он будет совершенно другой… Но что будет, если бэкапить бэкапы? Да и ещё по-настоящему инкрементально. Так и поступим.
wbadmin.exe start backup -backupTarget:e: -allCritical -include:d: -quiet
#где диск D - бэкапы на сегодня, а диск E - бэкапы с историей
Но мне было этого недостаточно и я сделал так:
(
echo select vdisk file="\\СерверБэкапа2\ПапкаДляБэкапа2\ИмяБэкапаДляЭтогоСервера2.vhdx"
echo attach vdisk
) | diskpart
Скрипт подключает виртуальный диск из сети. После бэкапа подобный же скрипт отключает диск. ОС помнит, что у диска определена буква E. Но не дай бог подсунуть чужой диск с той же буквой E, бэкап отработает уже по полной (не инкрементально и на чужой диск). Имейте это в виду и используйте, букву, ближе к концу алфавита (X, Y, Z)…
Замечу сразу, если бэкап сегодняшний будет производиться параллельно с бэкапом с историей, то получим в итоге бэкап, который невозможно поднять.
Чтобы достать бэкап предыдущих дней можно воспользоваться интерфейсом (GUI) сервера, на котором производятся бэкапы с историей. Более того, все запуски команды wbadmin в консоли Windows знает и помнит. Служба восстановления даст возможность вам выбрать нужный архив в бэкапах с историей.
2. Бэкап файлов vhdx виртуальных машин
Производится легко и непринужденно:
wbadmin start backup -backupTarget:$BackupPath -hyperv:$VMList -Quiet
Но с некоторыми особенностями. Эта команда должна выполняться в PowerShell и с предварительным получением списка виртуальных машин в переменную. За подробным примером обращаемся в Google.
Бэкап виртуальных машин в Windows Server 2012 R2 идет с помощью моментальных снимков Hyper-V. Также замечу, что происходят приостановка работы виртуальных машин, если на них ядро Linux или отсутствуют Hyper-V драйвера. Я лично отказался бэкапить виртуальные машины таким способом. Причина в том, что на Windows Server 2012 (не R2) требовалось останавливать виртуальные машины до бекапа.
Да и сейчас на Windows Server 2012 R2 приостановки Linux меня не устраивают, когда есть первый неплохой способ бэкапа.
(в комментариях к данной статье есть замечание). После очередного обновления в Windows Server 2012 R2 бэкап любых виртуальных машин проходит без приостановок. ОС Linux также можно бэкапить «изнутри» с помощь Dump (CentOS, Ubuntu), но это отдельная тема с puppet’ами и другим ПО в моем случае.
3. Восстановление бэкапа и WDS
А теперь, по-моему мнению, самая полезная часть этой статьи про бэкапы.
WDS — это Windows Deployment Services (службы развертывания Windows) и часть функционала Windows Server 2012R2. Раньше эта служба называлась RIS, но я с ней не сталкивался. Вообщем, суть WDS проста. Прописались в DHCP (автоматически для DHCP Windows Server) в виде отдельных параметров и далее загружаем на компьютер по сети (такая настройка BIOS компьютера для загрузки по сети) через TFTP загрузчик WDS. Далее загрузчик WDS позволяет выбрать из доступных на ней образов «загрузчиков» Windows. Загрузчики бывают разные — это и образы загрузчиков установщика, и PE, и RE образы. Для загрузчика установщика ещё нужны образы самих Windows в WDS, но это в случае, если нужно установить Windows по сети. Нас интересуют RE образы, которые позволяют поднять машину из бэкапа.
Как и что работает в WDS подробно объяснять не буду. Но вот важные заметки:
- Если у вас загрузчик RE загружается на Hyper-V виртуальной машине по сети, но не работает клавиатура в ней. Поздравляю, ваш RE образ для WinXP или древнее и не знает о существовании Hyper-V драйверов.
- Если у вас система начинает восстанавливать бэкап, но останавливается. Удалите все разделы на жестком (на котором восстанавливается бэкап) и попробуйте заново. Только не забывайте, что бэкап может быть битый и после удаления всех разделов на жестком у вас может ничего не остаться от старой информации.
- Если бэкап с загрузкой UEFI, а вы хотите восстановить на комп без UEFI, то не стоит тратить время. Скорее всего развернуть бэкап не получится.
- Бэкап с загрузкой UEFI и разделами GPT можно восстанавливать на машины с другим процессором / материнкой, а вот с разделами MBR формата и с загрузкой обычного BIOS на другой машине развернуть вряд ли получится. Ну у меня точно не получалось.
- Если бэкап пытаться развернуть на диск с меньшим объемом, то сделать это не получится. Даже если диск в бэкапе был почти пуст. В этом случае помогает восстановление на виртуальную машину с динамическим диском. Далее уменьшение этого диска и создание нового бэкапа. Но такое можно только с загрузчиком UEFI в бэкапе (почему, читаем предыдущий пункт).
- Стоит перед восстановлением бэкапа отключить лишние диски, чтобы не затереть информацию на них.
4. Особенности дедупликации
Можно дедуплицировать работающие виртуальные машины. Можно дедуплицировать бэкапы сегодняшнего дня и можно дедуплицировать бэкапы с историей. Все это дает большой положительный плюс к объему жестких дисков (как для HDD, так и SSD). Но не стоит забывать о некоторых вещах:
- Если дедупликация будет работать с дисками с объемом более чем 1 ТБ, то оптимизатор дедупликации будет использовать очень много памяти.
- Если дедупликация будет работать с сжатыми данными, но с объемом сжатого более чем 10 ТБ, то длительность работы оптимизатора дедупликации будет слишком большим. Такое может получиться, если просто копировать данные ежедневно на дедуплицированный диск в разные папки.
- Бэкапы на HDD хранить можно и даже нужно, а вот рабочие виртуальные машины хранить на HDD в количестве больше 5-10 не стоит. К дедупликации это относиться с той лишь стороны, что дедупликация таких рабочих виртуальных машин сведет производительность HDD в ноль.
5. Групповые политики
Вот тут можно долго и по-разному реализовывать установку скрипта бэкапа с помощью GPO. Но хотелось бы обратить внимание на важные моменты:
- Бэкап проводить только от имени отдельной учетной записи пользователя.
- Не хранить скрипты с паролям в групповых политиках.
- Запускать скрипт с особыми правами на чтение всей информации системы.
Ну и, собственно, вывод: Бекап с помощью средств wbadmin возможен, вполне реализуем и главное жизнеспособен. Но только, если у вас есть время и много терпения на всякие мелочи. Так, например, в статье ничего не сказано, как проводить мониторинг успешно созданных бэкапов. Мне удалось сделать мониторинг на Zabbix, но об этом можно написать ещё пару статей… Надеюсь, статья будет вам полезна и сэкономит море бесценного времени.
Microsoft’s Hyper-V is a slick built-in virtualization suite for Windows Server. With it, users can deploy virtual networks and operating systems running everything from Linux to Windows, BSD, and others.
In this guide, we’re going over how you can create Hyper-V backups. From checkpoint incremental backups to exporting whole VMs. To get started, ensure you have Hyper-V working on your Windows Server system and have installed the latest updates.
Note: This guide focuses on Windows Server 2022. If you are using an older version it is advised that you upgrade before following along. However, if you choose not to upgrade, the instructions should still work with your version.
How to create Hyper-V checkpoints for incremental backups
If you’re not looking to back up the entire Hyper-V VM on your Windows Server, and want to create incremental backups before changes are made, you can utilize Hyper-V checkpoints.
What are “checkpoints?” These are Microsoft’s names for “snapshots” (like in VMware or VirtualBox.) To create a checkpoint in your VM, do the following.
- Start up your Hyper-V Manager application, and select your server in the left-hand sidebar.
- After selecting your server, make your way to the “Virtual Machines” area of the Hyper-V Manager, and right-click on the VM you wish to checkpoint.
- In the right-click menu, find “Checkpoint,” and click on it with the mouse. When you select this option, Hyper-V will immediately take a checkpoint (backup/snapshot) of the VM.
To take more checkpoints, simply follow steps 1 through 3.
How to restore a Hyper-V checkpoint
If you need to restore a Hyper-V checkpoint you’ve made previously, do the following. First, launch the Hyper-V Manager application. Then, click on your server in the Hyper-V Manager left-hand sidebar.
After selecting your server, find the “Virtual Machines” area, and right-click on it to access the right-click menu. Look through the right-click menu for the “Revert” option, and click on it with the mouse.
When you select the “Revert” button, you’ll be able to revert to the previous checkpoint. Alternatively, find the “Checkpoints” box in Hyper-V, and select a checkpoint to revert to.
How to export Hyper-V VMs for backups
It is possible to export a Hyper-V VM for backup or storage purposes. Here’s how you can do it on your system. To start, launch the Hyper-V Manager.
Once you’ve launched the Hyper-V Manager tool on Windows Server, find the left-hand sidebar in Hyper-V Manager, and select your server. After selecting your server, see the “Virtual Machines” box.
Inside the “Virtual Machines” box, right-click on the VM you wish to export. Then, select the “Export” button. Keep in mind, that your VM should be shut off during this process.
Upon right-clicking on the VM, find the “Export…” option in the right-click menu, and a pop-up window will appear. This window says “Export Virtual Machine.” Use this window to tell Windows Server where you wish to save your exported VM.
Once you’ve configured the “Export Virtual Machine” window, click on the “Export” button to begin the export process. Exporting should take a few minutes (or longer if you have a large Hyper-V VM.) When the process is complete, your VM backup will be where you specified in the “Export Virtual Machine” window.
How to import exported Hyper-V VMs
If you wish to import a Hyper-V VM you previously exported, do the following. First, launch the Hyper-V Manager app on the Windows server. Once it is open, find the “Action” menu, and click on it with the mouse.
After selecting the “Action” menu, browse for the “Import Virtual Machine” option, and click on it. You’ll then be asked to browse for the exported Hyper-V VM folder. Do so.
When you’ve located the Hyper-V VM folder you wish to import, click the “Next” button to continue to the next page. On the next page, you must select the VM you wish to import in the UI. Use the UI to select the VM. Click “Next” when done to continue.
Once you’ve chosen your VM, you must choose an import type. Select either “Register,” “Restore,” or “Copy.” When you’ve made a choice, click the “Next” button to choose your restored VM’s destination on your Windows Server.
With the destination configured, Hyper-V will present you with a summary of what will happen. Read the summary. When you’ve finished reading it, click the “Finish” button to import the VM into Hyper-V.

If you’re running Microsoft Hyper-V machines, there’s no shortage of backup approaches to ensure recovery in different scenarios – from recovering files and application objects to restoring full VMs in Hyper-V or on other platforms.
However, each approach to back up Hyper-V virtual machines (VMs) has its use cases and may differ in terms of resource efficiency and recovery options. This blog post covers methods of Hyper-V VM backup, explains how to back up Hyper-V VMs, and VM backup best practices.
Ways to Back Up Hyper-V VMs
Let’s start with the native tools for Hyper-V backup provided by Microsoft. Primarily, you can use Windows Server Backup and PowerShell cmdlets, which are integrated features that enable backing up Hyper-V VMs. There are also other solutions for large environments.
Below is a list of the main ways to back up a Hyper-V virtual machine using these native tools:
- Windows Server Backup – you can select Hyper-V and choose VMs for backup
- PowerShell with the Export-VM command or the Start-WBBackup command
- System Center Data Protection Manager, which integrates with System Center Virtual Machine Manager (can be managed in PowerShell as well)
Alternatively, administrators can use special third-party backup solutions that support Hyper-V VM backup. These solutions can leverage Microsoft’s API to access advanced backup features on Hyper-V hosts.
Host vs. Guest Hyper-V VM Backup
Whether you’re using a native tool or a third-party backup solution designed to back up Hyper-V VMs, there are two main approaches: at the guest level or at the host level. Let’s look at the features of each approach in more detail.
Guest-level backup
Guest-level VM backup relies on the use of special agent-based software installed on the guest operating system (OS) to run the backup process. This backup approach is similar to backing up a physical host.
Guest-level backup allows application-aware processing using Microsoft’s Volume Shadow Copy Service (VSS – also known as Volume Snapshot Service) to create consistent data copies. Almost all backup software developed for Windows includes VSS to allow the creation of application-aware data backups. VSS is a technology that can create snapshots, that is, point-in-time “shadow” copies, of volumes even when the VM is running. VSS writers, which are components of VSS, are used for this process. In Linux, LVM (Logical Volume Manager) is used for this purpose to create application-consistent snapshots.
Agents: definition and role
An agent is a backup software component installed on a physical computer or virtual machine to interact with the file system and applications. Agents usually run as a system process inside a guest OS, establishing a network connection with the server used for managing backups. The backup software uses agents to create copies of the entire system or individual files or programs.
Note that using agents to run VM backups is considered a legacy approach, as it is not as efficient as using agentless backup solutions. However, there are some use cases for this approach in virtual environments, which we cover in the next section.

Use cases for guest-level backup
You may have to resort to the guest-level backup approach in virtual environments in the following cases:
- If the guest OS is not officially supported by the hypervisor, creating an application-consistent backup using the host-level method is impossible.
- If the VM is connected to shared storage at the guest OS level or has a directly attached physical disk (including a pass-through disk) that is not supported by host-level backup software.
For example, suppose a VM is attached to a SAN (Storage Area Network) LUN (Logical Unit Number) via the iSCSI protocol (by using an in-guest iSCSI initiator), and software such as a database server or a file server is using that volume. In this case, Hyper-V’s VSS writer won’t be able to create a completely consistent backup of all disks used by the VM (the volumes inside the VHD virtual disks and the volumes of the directly attached physical disks). This is because in order to make a proper backup, applications and both disk types must be quiesced when the snapshot is taken.

To perform host-level backup instead, pass-through disks can be converted to VHD virtual disks. Note that the VM can be located on shared storage, such as a NAS (network-attached storage) device or SAN. These solutions are used to perform host-level backup with clustering.

Some organizations with small virtualized environments use the guest-level VM backup method to save costs. This strategy might have made sense in the past as agent-based legacy solutions were more economical for small environments with few VMs. However, today, this approach is not recommended as there are equally or more affordable host-level VM backup solutions for small Hyper-V environments.
Advantages
- Can be used when host-level backup is impossible (in the cases mentioned above).
Disadvantages
- Agents must be installed on each virtual machine, which is inconvenient and time-consuming.
- The recovery process is more difficult. A new empty VM must first be created. Then you have to configure the VM’s settings (virtual CPU, memory, disks, network, etc.). Only then can you restore the VM, and you need to restore media in order to reboot.
- Consumption of computing resources increases significantly, especially when several virtual machines residing on one Hyper-V host are being backed up at once.
- Agent-based backup software requires the use of root or administrator credentials to configure the agents, potentially compromising security.
- No VM-level snapshots.
Host-level backup
Host-level Hyper-V VM backups operate at the hypervisor level rather than the level of the guest VM and can back up VMs regardless of the OS running inside them. Virtual machines can be fully backed up, including the virtual disk files (indicated by the VHD or VHDX format in Hyper-V) and configuration files, in which the virtual hardware configuration, such as CPU, memory, network, etc., are stored.
There are two types of host-level backup: Saved State and Child VM Snapshot.

Saved State method
The Saved State method is a partially offline backup method that is not application-aware. With this method, Hyper-V’s Volume Shadow Copy Service (VSS) assigns the VSS writer to perform the backup process. If the VM is running at the time, Hyper-V’s VSS writer puts the VM into a “saved state”. This means that the VM goes offline for a short period of time while the snapshot is taken. This ensures that open files can be saved and the state of running applications can be recorded on the virtual hard disk.
How does the Saved State method work?
This process consists of the following stages:
- PrepareForSnapshot event. The backup software initiates the preparation of the VM for backup, and the VM’s state is saved using the hibernation mode.
- Taking the snapshot. Hyper-V’s VSS writer, which runs as a VMMS.exe (Virtual Machine Management Service) process, is used. The snapshot, which is also referred to as a VM checkpoint in Hyper-V, is taken. The backup software creates a backup using the snapshot. The creation of the snapshot allows the VM’s data to be backed up while avoiding any data modification during the copying process. When this is completed, the next event, PostSnapshot, is triggered.
- PostSnapshot event. The VM is returned to its previous state.
Child VM Snapshot method
The Child VM Snapshot method is an application-aware method whereby the VM stays online during the backup operation, creating a transactionally consistent backup. This method is preferred over the Saved State method for backing up running VMs and can be used for high-availability production environments.
While the Saved State method uses Hyper-V VSS outside the child VMs, the Child VM Snapshot method uses the VSS mechanism within the child VM to create backups. In more detail, the Child VM Snapshot method utilizes the VSS mechanism within the Hyper-V host, not within the child VM itself, to create backups. The VSS Requestor Service within the child VM communicates with the host’s VSS writer to coordinate the snapshot creation. Note that the term “child VM” is synonymous with “guest VM”.
How does the Child VM Snapshot method work?
The event sequence is partially similar to the Saved State method:
- PrepareForSnapshot event. The Hyper-V VSS Requestor Service in the child VM triggers the PrepareForSnapshot event to initiate backup creation.
- Taking snapshot event. After receiving the request from the VSS Requestor Service, the snapshot is created. Then the control is returned from the Hyper-V VSS Requestor Service to the Hyper-V VSS Writer.
- PostSnapshot event. The VSS writer triggers the PostSnapshot event to inform the backup software that the VM snapshot creation has been completed. The backup software can then copy the snapshot as part of the VM backup process.
The role of Hyper-V Integration Services
Hyper-V Integration Services are used to provide special interaction between the hypervisor and the child VM when creating backups with the Child VM Snapshot method. These services comprise a collection of drivers and services that can be individually enabled or disabled depending on your needs. The VSS Requestor Service discussed above is part of the suite of Integration Services, which must be installed on the virtual machine in order to perform host-level backup.
Since Windows Server 2008 R2 and Windows 7, Integration Services are included in the operating system. If you want to install or update the Integration Services on the VM manually, you can do this by using Hyper-V Manager and mounting the vmguest.iso virtual disk image on the VM’s virtual drive. To update Integration Services manually on a Hyper-V host, you can download the services from Microsoft’s site and install them through PowerShell. Windows 10 and Windows Server 2016 can update Integration Services on hosts as well as on guests via the Windows Update service.

Requirements for the Child VM Snapshot method
The following conditions must be met to create backups using the Child VM Snapshot method:
- Hyper-V Integration Services, including the Hyper-V VSS Requestor, must be installed in the child VM.
- All volumes inside the VM must be configured as basic disks rather than dynamic ones. The file systems of the disks inside the child VM must support snapshots (for example, the NTFS file system would meet this criterion).
- The VM snapshot files must be located in the same volume as the VHD files.
- The child VM must be running.
If any of these conditions are not met, the Child VM Snapshot method cannot be used. The Saved State method is used by default in this case.
Advantages
As shown above, host-level backup methods are preferred for backing up Hyper-V VMs and offer many advantages over the guest-level method. These advantages can be summarized as follows:
- A hypervisor-level backup is easier to manage. No agents are needed. The backup product can manage the entire Hyper-V host and all the VMs residing on this host. You can select the specific VMs that you want to back up.
- All the VM contents, including virtual disks, snapshots, and VM settings, are captured during the backup process. You only need to select the hypervisor along with a storage location for VM recovery without creating and manually configuring a new VM.
- Ability to perform online application-aware backup of Hyper-V VMs using the Child VM Snapshot method. This is critically important for production environments, as there is no interruption of virtual machine operation, and the backup is transactionally consistent.
- Efficient resource usage in terms of processor, memory, and disk space.
How to Back Up a Hyper-V VM with Native Tools
Microsoft System Center Data Protection Manager (DPM) is a native tool for Hyper-V backup that can be used in large environments. DPM integrates with Microsoft System Center Virtual Machine Manager (SCVMM) for VM backup. Ensure your Hyper-V hosts are properly configured and managed within SCVMM for a smooth backup experience.
Prerequisites
To back up Hyper-V virtual machines using System Center Data Protection Manager (DPM), certain prerequisites and conditions need to be met to ensure that the process is successful. These prerequisites can slightly vary depending on the versions of DPM and the Hyper-V host, but the key requirements generally include:
System level prerequisites
- Both DPM and the Hyper-V host must be running on operating systems (OSs) that are supported by their respective versions. Ensure they are up to date.
- Make sure the DPM version supports the Hyper-V version that you are using. There are specific DPM versions for every Hyper-V release.
- The Hyper-V role must be installed and enabled on the host system that you plan to back up.
- The DPM protection agent must be installed on all Hyper-V host machines that you intend to protect. If you plan to perform item-level recovery of data from within the VM, the agent should also be installed inside the VM.
Configuration requirements
- Virtual machines should be configured with fixed-size disks or dynamically expanding disks. Differencing disks and pass-through disks have specific considerations and may not be supported for backup in certain configurations.
- If your Hyper-V hosts are part of a cluster (Cluster Shared Volumes), ensure that DPM is properly configured to protect Hyper-V VMs in a clustered setup.
- Ensure proper network connectivity and permissions between the DPM server and the Hyper-V hosts. The DPM server and the Hyper-V server must be able to communicate with each other.
- DPM requires disk-based storage to back up data, so ensure that there is sufficient disk space in the DPM storage pool. For better performance and management, consider dedicating disks to DPM storage.
Software and security
- The Windows Firewall must allow DPM activities. This often means adjusting firewall rules to permit DPM agent communication.
- The DPM service account needs administrative permissions on the Hyper-V host to perform backups.
VM requirements
- Integration Services (also called VM Guest Services) must be installed and running in the VMs for certain backup functionalities, especially for the online backup of the VM.
- Make sure virtual machine snapshots (checkpoints) are supported and properly configured for your VM version and disk types.
Note that features and steps might vary between different versions of DPM.
Hyper-V VM backup procedure
Backing up Hyper-V virtual machines using System Center Data Protection Manager involves several key steps to ensure that your data is secure and can be recovered in the event of failure or data loss. The general workflow is as follows:
- Add your Hyper-V hosts to DPM. Navigate to the Management tab in the DPM Administrator Console and add the Hyper-V servers you want to back up. This involves inputting server names and ensuring DPM can communicate with them through the appropriate agents.
- Configure protection groups. Protection groups in DPM are essentially backup policies. You’ll define what to back up, how often to back up (backup frequency), and how long to keep those backups (retention policies).
Automating Hyper-V backup in DPM
You can use PowerShell to back up a Hyper-V VM using DPM. Microsoft provides a PowerShell module specifically for DPM that allows you to script and automate a wide range of DPM tasks, including creating and managing backups of Hyper-V virtual machines.
Below is a general outline of the steps to back up a Hyper-V VM using System Center DPM via PowerShell.
NOTE: Ensure that you have the DPM PowerShell module installed on your system. This module is typically installed by default with DPM. Make sure you are running the PowerShell commands or script with appropriate permissions to access DPM and perform backup operations.
- Launch PowerShell with the DPM module. First, you’ll need to launch a PowerShell session and import the DPM module. You may need to run PowerShell as an Administrator.
Import-Module DataProtectionManager - Connect to the DPM server. You need to establish a connection to your DPM server. Replace “YOUR_DPM_SERVER_NAME” with the name of your DPM server:
$DPMServer = Connect-DPMServer -DPMServerName "YOUR_DPM_SERVER_NAME" - Get the data source. Identify the VM you want to back up and get it. Replace “YOUR_VM_NAME” with the name of your Hyper-V VM:
$VMToBackup = Get-DPMDataSource -ProtectionGroup $ProtectionGroup | Where-Object { $_.Name -eq "YOUR_VM_NAME" }NOTE: If you don’t know your protection group, use
Get-DPMProtectionGroup -DPMServer $DPMServerto list all protection groups in your DPM server. - Initiate the backup. Once you have the VM data source, you can trigger the backup. If you want to perform an express full backup, you can use:
Start-DPMBackupJob -Datasource $VMToBackup
Combining the above steps, you can create a simple script to back up a specific VM in DPM:
# Import DPM PowerShell module
Import-Module DataProtectionManager
# Connect to DPM server
$DPMServer = Connect-DPMServer -DPMServerName "YOUR_DPM_SERVER_NAME"
# Get the list of protection groups (For illustration, you want to target a specific group later)
$ProtectionGroup = Get-DPMProtectionGroup -DPMServer $DPMServer
# Assuming you know which protection group your VM is in, filter to get that group
# For brevity, let's say it's your first protection group (adjust accordingly)
$ProtectionGroup = $ProtectionGroup[0]
# Get the VM to backup
$VMToBackup = Get-DPMDataSource -ProtectionGroup $ProtectionGroup | Where-Object { $_.Name -eq "YOUR_VM_NAME" }
# Start the Hyper-V backup
Start-DPMBackupJob -Datasource $VMToBackup
Take into account the following points when you configure Hyper-V VM backup with DPM:
- This script assumes you are familiar with your DPM server’s setup and you know the names of the VMs you are targeting.
- Depending on your environment, you may need to customize the script to suit your specific backup needs.
- It is essential to regularly monitor the health and status of your backups through DPM’s management tools or additional PowerShell scripts.
- For more detailed operations and options, you can refer to the DPM PowerShell documentation. Microsoft constantly updates its documentation and the PowerShell module.
How to recover VMs from backup
Recovering an entire Hyper-V virtual machine using System Center Data Protection Manager requires performing multiple steps. The workflow assumes that a DPM server is set up and an administrator is familiar with PowerShell basics. Adjustments might be required based on the specifics of your environment and the DPM version you are using.
To recover a Hyper-V VM:
- Open PowerShell with administrative privileges on the DPM server or on a workstation where the DPM Management Shell is installed and configured to communicate with your DPM server.
- Import the DPM module to your PowerShell session (if it does not automatically import). This step is sometimes necessary for older versions of DPM:
Import-Module DataProtectionManager - List the available DPM data sources to find the VM you want to recover. Use the
Get-Datasourcecmdlet to list VMs being backed up:Get-DPMProtectionGroup -DPMServerName "YourDpmServerName" | Get-DPMDatasourceReplace “YourDpmServerName” with the name of your DPM Server. Look through the output to identify the VM you want to recover.
- List available recovery points for the selected VM. Once you’ve identified the VM, you can find the recovery points available by using the
Get-DPMRecoveryPointcmdlet:$vm = Get-DPMDatasource -DPMServerName "YourDpmServerName" | Where-Object {$_.Name -eq "YourVMName"}Get-DPMRecoveryPoint -Datasource $vmReplace “YourVMName” with the name of the VM you wish to recover.
- Select the recovery point to use for the recovery. Once you’ve identified the recovery point you need based on the date, you can store this recovery point in a variable. Example:
$recoveryPoint = Get-DPMRecoveryPoint -Datasource $vm | Where-Object {$_.RepresentedPointInTime -eq "DateOfYourChoice"}Replace “DateOfYourChoice” with the actual date and time of the recovery point you need.
- Initiate the recovery. Use the
Restore-DPMRecoverableItemcmdlet to start the recovery process, specifying the target location if necessary:Restore-DPMRecoverableItem -RecoverableItem $recoveryPoint -TargetServer "YourTargetHyperVHost" -RecoveryLocation HyperVHost -RecoveryType RecoverAdjust the -TargetServer parameter to specify the Hyper-V host where you want the VM restored. The -RecoveryLocation and -RecoveryType parameters might vary depending on your exact recovery scenario (for example, restoring to the original location or to an alternate location).
- Monitor the recovery process. Depending on the size of the VM and the network speed, recovery may take some time. You can monitor the recovery jobs using the DPM Administrator Console or by using the
Get-DPMJobcmdlet.
Restore an individual file from a Hyper-V VM
It is possible to restore an individual file from a Hyper-V VM backup using System Center Data Protection Manager (SC DPM) with PowerShell. This process is typically done by first restoring the virtual machine’s disk that contains the file you need and then extracting the file from the disk.
Below are the generalized steps to accomplish this:
- Identify the recovery point. First, you need to find the recovery point for the virtual machine that contains the file you want to restore. You can use the
Get-DPMRecoveryPointcmdlet to list the recovery points:$pg = Get-DPMProtectionGroup -DPMServerName "YourDPMServer"$ds = Get-DPMDatasource -ProtectionGroup $pgGet-DPMRecoveryPoint -Datasource $ds | ft -Property CreationTime, RepresentedPointInTimeThis lists the recovery points available for selection. You would replace “YourDPMServer” with the name of your DPM server.
- Restore the VM disk. Once you have identified the correct recovery point, you can use the
Restore-DPMRecoverableItemcmdlet to restore the disk. This typically involves restoring the disk to a temporary location or directly accessing it, depending on your environment’s configuration.$recoveryPoint = Get-DPMRecoveryPoint -Datasource $ds | where-object { $_.CreationTime -eq "DateTimeOfRecoveryPoint" }$recoveryOption = New-DPMRecoveryOption -HyperVDatasource -TargetServer "TargetServerForDiskRestoration" -RecoveryLocation CopyToFolder -RecoveryType Recover -TargetLocation "PathToStoreRecoveredDisk"Restore-DPMRecoverableItem -RecoverableItem $recoveryPoint -RecoveryOption $recoveryOptionBe sure to replace “DateTimeOfRecoveryPoint”, “TargetServerForDiskRestoration” and “PathToStoreRecoveredDisk” with the appropriate details for your specific recovery operation.
- Mount the VHD and extract the file. After the virtual disk is restored to a temporary location, you need to manually mount the VHD/VHDX file in Windows and then extract the needed file:
- Mount the VHD/VHDX. You can mount a virtual disk by using the Disk Management tool (diskmgmt.msc) or by using the
Mount-VHDPowerShell cmdlet. - Extract the file. Once the disk is mounted, it will appear as a new drive in your system, and you can navigate through this drive to copy the required file.
- Mount the VHD/VHDX. You can mount a virtual disk by using the Disk Management tool (diskmgmt.msc) or by using the
Automating the process of mounting the VHD, extracting the file, and then unmounting the VHD can be somewhat complex and may require custom scripting, depending on what exactly you need to accomplish. Be careful and ensure data integrity and security when performing such operations, especially if scripting the mount and extraction process to handle sensitive data.
NOTE: The specific commands and steps may vary depending on the version of SC DPM and PowerShell you are using, as well as on the configuration of your backup environment.
How to Use the NAKIVO Hyper-V Backup Solution
An effective way to back up Hyper-V VMs is using third-party solutions that integrate native Microsoft Hyper-V features. NAKIVO Backup & Replication supports agentless, application-consistent backup of VMs on standalone Hyper-V hosts and in Hyper-V clusters. The benefits of using the NAKIVO solution over the others are ease of implementation and management, multiple automation options, integrated disaster recovery features, etc.
With this backup method, when a VM migrates from one cluster node to another, this VM is tracked automatically without additional configuration or manual intervention. You can store backups on local storage on-premises and in the cloud, including immutable storage.
Let’s briefly go over the workflow for Hyper-V backup in the NAKIVO solution. You can download a Free Trial to test this Hyper-V VM backup in your environment.
- Open the web interface of NAKIVO Backup & Replication:
- Ensure that the Hyper-V host or cluster is added to the NAKIVO inventory.
- You can use the onboard backup repository or add a new backup repository to store Hyper-V backups.
- Go to Jobs, click + to create a new job, and hit Backup for Microsoft Hyper-V. The New Backup Job Wizard for Microsoft Hyper-V opens.

- At the Source step, select the Hyper-V virtual machines you want to back up. You can select running VMs. You can select multiple VMs residing on different Hyper-V hosts and clusters. Hit Next at each step of the wizard to continue.

- Select a backup repository where to store your Hyper-V VM backup at the Destination step. An onboard backup repository is used in this example.

- At the Schedule step, configure a Hyper-V backup job schedule and retention settings. You can create multiple schedules flexibly and set the retention time for these recovery points. It is possible to configure schedule and retention settings to meet the 3-2-1 backup rule.
Note that there is a checkbox to enable backup immutability for a certain period to increase the level of protection against ransomware for your Hyper-V backups.

- Enter a Hyper-V backup job name and select other options. You can configure a wide set of features and options, including:
- App-aware mode
- Changed block tracking
- Network acceleration
- Encryption
- VM backup verification
- Periodic full backup options
Hit Finish to save settings and close a job wizard. A job will start based on scheduling settings.


Hyper-V Backup Best Practices
There are certain Hyper-V backup best practices that you can follow to optimize your VM backup process. These guidelines can help shorten backup windows, save resources, improve security, and speed up recovery when needed.
1. Back up VMs at the host level
The days of streaming backup data from within guest operating systems by means of a backup agent are over. Today’s modern enterprise infrastructure is mostly virtualized, meaning we have literally hundreds of guest operating systems running on a few physical Hyper-V nodes in a cluster configuration. Trying to manage backups efficiently and effectively from every single guest operating system by means of an agent would be a management and administrative nightmare.
Using backup software like NAKIVO Backup & Replication that can interface with your Hyper-V hosts allows you to use a single entry point to back up multiple VMs. Additionally, it’s hugely beneficial if your backup software can back up Hyper-V virtual machines at the host level in that your backup will contain all the VM-specific settings and configuration. Restoring a host-level backup of a VM will recreate the virtual machine down to the very last detail, including the VM settings themselves.
Guest-level backups have no knowledge of the Hyper-V infrastructure housing the VMs. This means that if you need to restore the entire VM from a guest-level backup, you would first have to create a “shell” VM to receive the restored data from the original VM. This would require manually reestablishing the virtual machine settings.
2. Use resilient change tracking (RCT)
When thinking about the best way to back up Hyper-V virtual machines, you should make sure you take advantage of Hyper-V’s Resilient Change Tracking or RCT. This technology first came with Windows Server 2016 Hyper-V and allows us to perform true incremental backups. Resilient Change Tracking is Microsoft’s implementation of Changed Block Tracking (CBT) for Hyper-V. In short, this Hyper-V technology allows modern VM backup software to keep a mapping of blocks that have changed since the last backup.
You first create a full backup of your Hyper-V virtual machine, then instead of having to copy down the same data with each backup cycle, the backup software only copies the data that has changed. With RCT turned on, the next incremental backup knows by the “virtual block” tracking which blocks have changed and only copies those blocks. Between the full backup and each incremental backup with the changed blocks, you have a complete representation of the Hyper-V virtual machine.
The resilient component of the RCT acronym highlights Hyper-V’s ability to maintain consistency in the change block tracking process, even if you suffer a hard crash or the unexpected shutdown of a virtual machine. Using a total of three changed tracking files, with one in memory and two on disk, spreads this information out across multiple locations and media so we have redundancy in the RCT information. NAKIVO Backup & Replication is a modern VM backup solution that can easily back up Hyper-V environments and makes use of Hyper-V’s RCT.
3. Never treat Hyper-V checkpoints as backups
Checkpoints are Hyper-V’s term for what many in the VMware world would refer to as snapshots. Many have had to learn the hard way how checkpoints/snapshots of virtual machines work. These are not backups and are not supported by Microsoft in Hyper-V as such. Checkpoints employ a mechanism to record delta changes from a point in time. However, they are dependent on the base disks they are created from.
A backup should be a completely autonomous mechanism to restore data and have no dependencies on its parent VM disks. Checkpoints/snapshots utilize files that reside on the same underlying storage infrastructure and in the same VM folder as the parent virtual machine disks. If we lose the parent disk, the checkpoint is unusable.
Checkpoints have their place, especially in situations where quick rollbacks to a known state are needed. A specific use case for checkpoints would be in a development scenario, where a developer needs to roll in code and continue the testing process. A checkpoint would allow rolling a server back to a state before the code was rolled in, and then reverting through each iteration of testing. The key point here however, is that checkpoints have a purpose, but that it does not encompass functioning as a form of backup. Thus, the best way to back up Hyper-V VMs is to always keep in mind that Hyper-V checkpoints cannot be used instead of backups.
4. Install Hyper-V Integration Services
Hyper-V’s Integration Services is a set of “VM tools” used in the Hyper-V world, which allows special interaction between the Hyper-V host and the guest operating systems loaded on Hyper-V virtual machines. This special bundled set of software installed on the VM is especially relevant when it comes to finding the best way to back up Hyper-V systems. One of the Integration Services that is installed is called Backup (volume checkpoint). This service enables backups of the guest operating system that are consistent when leveraged by a VM backup solution that can take advantage of the Integration Services capabilities.
Making sure the Integration Services bundle is installed, enabled, and running allows backups of the VM that are from the host and are live with zero downtime. Leveraging Hyper-V’s Integration Services means backups can utilize checkpoints and VSS to back up data consistently without disruption. Without Integration Services, VMs that are backed up are placed in Saved State while the VSS snapshot is taken. In Saved State mode, some Hyper-V virtual machines may go offline briefly during the initial backup process.
5. Use application-aware backup
Backing up business-critical resources generally includes applications such as Microsoft Exchange Server, Microsoft Active Directory, and Microsoft SQL Server. The aforementioned applications are generally found in most of today’s enterprise data centers. When backing up virtual resources that contain applications, it is important to make sure those VMs are backed up using “application-aware” backups.
Application-aware backups utilize the Microsoft Volume Shadow Copy service to make sure application transactions living in memory are properly flushed to disk before the backup is taken. This ensures the applications, and specifically their databases, are left in a transactionally consistent state.

There are major advantages to using application-aware backups and transactional consistency. It eliminates the risk of data corruption. It also ensures there is no additional process to perform after the backup is restored. If you were only restoring a “crash-consistent” backup or one that was unaware of the application data, you would need to follow additional processes to replay logs and carry out other tasks to ensure the database-driven application is consistent. When minutes count in a disaster recovery scenario, having a restored backup that is already consistent definitely fast-tracks your RTO time.
Specialized software solutions like NAKIVO Backup & Replication allow you to use the App-aware mode for Hyper-V jobs to make sure you are application-consistent when backing up your business-critical applications, which is the best way to back up a Hyper-V environment.
This article discusses the specifics of organizing virtual machine backups in the Microsoft Hyper-V environment. We’ll look at the basic requirements for Hyper-V backup solutions, backup strategies, and the main free and commercial products in this niche.
Although the Hyper-V environment offers a wide range of technologies to ensure high availability and fault tolerance of VMs (failover clusters, Live Migration, replication, etc.), the system administrator must not forget the traditional backup of virtual machines.
Contents:
- Methods to Backup Hyper-V Virtual Machines
- Hyper-V VM Backup: Best Practices and Requirements
- Backup Hyper-V VMs Using Windows Server Backup
- Top Third-Party Hyper-V Backup Products
Methods to Backup Hyper-V Virtual Machines
Let’s look at how any modern Hyper-V virtual machine backup solution works.
There are two approaches to backing up VMs:
- Host-level VM backup – administrator manages backups at the entire Hyper-V host level;
- Backup using an agent that is installed in the guest OS (guest-level VM backup) – used quite rarely (mainly for apps that can’t be backed up properly using VSS).
All of today’s Hyper-V VM backup tools are based on the snapshot (checkpoint) technology. The checkpoint contains the state of the virtual machine at a given time and includes the virtual hard disks, the contents of the memory, and the VM settings.
Here’s a simplified example of a typical VM backup process in Hyper-V:
- The backup tool sends a command to the Hyper-V host to create a VM checkpoint;
- The hypervisor creates new delta files and the VM continues to operate. VM saves all new changes to those delta files;
- The backup program copies the original VM files (no changes are written to them) to the backup media (external drive, shared folder, tape, etc.) and then sends a command to delete the VM checkpoint;
- Hyper-V deletes the checkpoint and consolidates (merges) the original and delta files (VM operation is not interrupted).
Hyper-V VM Backup: Best Practices and Requirements
This is general information about Hyper-V backup, but in reality, there are many nuances and issues. I will try to list the most common problems:
- The longer the backup tool is copying the checkpoint (backup), the more changes are logged in the delta files. If there are a large number of changes in the VM during file copying, the process of merging files when deleting a snapshot can place a heavy load on the disks, the Hyper-V host, and the VM itself. It means that it is better to copy the checkpoint as quickly as possible. Hyper-V Server 2016 (and newer) uses Resilient Changed Tracking (RCT) technology to make backups faster by copying only the blocks of data that have changed since the last backup. This eliminates the need to copy the entire VM;
- Copying VM snapshot data over a LAN network from a Hyper-V host to backup storage might cause a high network load. It is recommended to use a separate server network or HBA interface for the backup traffic or copy the data over SAN;
- If you use external data storage for VM files, you can take advantage of the storage system’s ability to integrate with backup tools (such the hardware snapshots);
- The guest operating system is initially unaware that it is being backed up. So when you try to restore a VM from this backup, the OS tries to resume operations from the moment the snapshot was created. In some cases, this can cause problems with the operating system itself and data loss in running applications (especially in transaction ones, like Exchange, SQL, ADDS, etc.). To address this issue, a new type of snapshot – the Production Checkpoint – was introduced in Hyper-V 2016 (Microsoft recommends that you only use Standard Checkpoints in test and lab environments, or to back up stopped VMs);

Production checkpoints are based on Hyper-V integration services in the guest OS and the Volume Shadow Copy service (Windows) or the file system freezing daemon on Linux (fsfreeze). However, the RAM state is not copied. This means that Hyper-V notifies the guest OS that a checkpoint is being created, the app that supports VSS ends the current transactions, goes into a consistent state, and the VM checkpoint is created. When recovering from such a checkpoint, the guest OS is powered off (as the memory state has not been saved), and after being turned on it thinks that an emergency shutdown has occurred. The application in the VM (if it supports VSS) starts working from the saved consistent state.
- In order to save space on the backup storage device, it is recommended that you use deduplication. If you use Hyper-V differential disks, your backup tool must have support for this technology.
- If the density of VMs on the host is high, it is worth scheduling the backup time to avoid high loads on the production systems during working hours.
- If you have to store multiple VM copies for several days, you will have to manage the number of VM copies stored.
- Backup monitoring tools are also important. It would be frustrating to find out that you cannot back up something because there is not enough free space on the data storage.
- Some backup products support granular recovery of individual files/folders, without the need for recovery of an entire VM or its virtual disk.
Note. For example, many backup solutions allow you to restore specific mailbox databases, mailboxes, and even individual emails from a VM backup with Exchange Server.
- The backup tool should allow you to configure access rights using the role-based backup management model.
- Implement the classic 3-2-1 backup strategy (three copies on two different media, one of which is stored at a remote site).

Backup Hyper-V VMs Using Windows Server Backup
You can back up your Hyper-V virtual machines by using the free, built-in Windows Server Backup (WSB) feature. WSB allows you to configure VM backup from a graphical interface or by using the wbadmin command line tool.
Windows Server Backup is available in both the full versions of Windows Server Standard/Enterprise and the free Hyper-V Server.
You can install Windows Server Backup from the Server Manager console or using the PowerShell command:
Install-WindowsFeature Windows-Server-Backup -IncludeManagementTools
To configure a VM backup task from the GUI, open the wbadmin.msc console.
- Expand the Local Backup and select Backup Schedule;
- Select backup type Custom -> and click Add Items;
- Expand Hyper-V and select virtual machines to backup;
- The next step is the configuration of the VM backup schedule;
- Select whether you want to save the backup to a separate disk or to a shared network folder (UNC path);

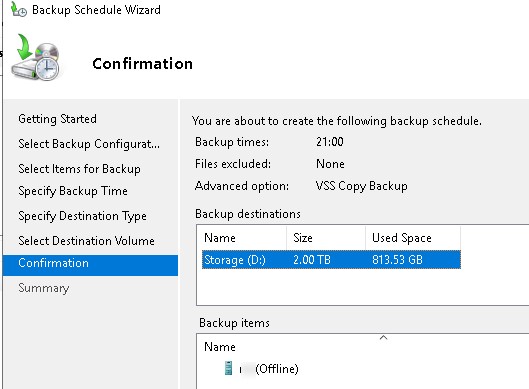
- If you are not using any other backup tools, click the Advanced Settings and enable the VSS Full Backup option.
The main disadvantage of the Windows Server Backup GUI is that you can only create a single backup task, which will overwrite any previous copies you have made. For this reason, Hyper-V administrators prefer to use the wbadmin command line tool to backup virtual machines.
List the VMs on the Hyper-V host with the PowerShell command:
Get-VM
To back up a VM named "Server 1" to a local drive D:\, just run this command:
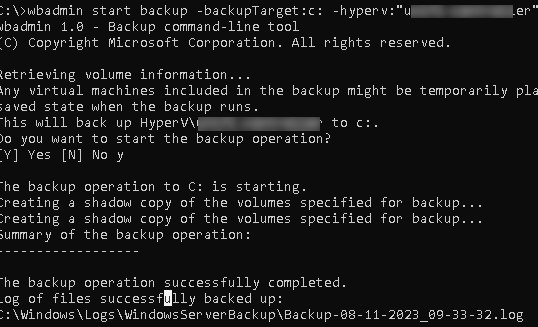
wbadmin start backup –backupTarget:D: –hyperv:"Server 1"
It is recommended that you use a remote storage location to save the VM backup. It is a bad idea to store the VM backup on the same Hyper-V host.
WSB will create a snapshot for the VM and copy the virtual disks and VM state to the directory D:\WindowsImageBackup\your_HyperV_host_name.
You can back up multiple VMs at once. In this example, we will save backup to a shared folder on a remote file server:
wbadmin start backup -backuptarget:\\192.168.1.100\VMbackup: -hyperv:"TestVM01,TestVM02" -allowDeleteOldBackups -quiet
VSS does not allow you to store more than one VM backup version on a shared network folder. When using this backup method, the previous VM backup is always overwritten.
When backing up virtual machines with a VSS-aware application (such as an AD domain controller, Exchange Server, or MSSQL), you can tell the application in the VM to update the info and flush the transaction log.
wbadmin start backup -backuptarget:\\192.168.2.15\HVMback: -hyperv:PAR-DC1 -vssFull
Hyper-V Integration services must be installed on the guest operating system.
To automatically backup virtual machines on a schedule, you can create a job in the Windows Task Scheduler with the wbadmin command. Add the -quiet parameter to the wbadmin command to perform a backup without prompting the user.
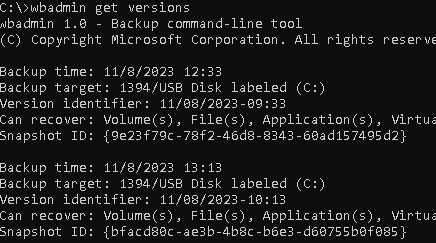
Run the following command to get a list of the backups registered in WSB:
wbadmin get versions
Delete the oldest version of the VM backup:
wbadmin delete backup -backupTarget:c: -deleteOldest
Or you can delete one of the previous VM backups by its version name:
wbadmin delete backup -backupTarget:c: -version:11/08/2023-10:13
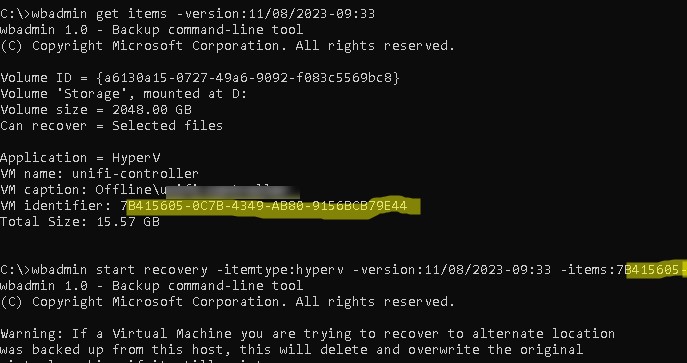
To restore a VM from a Windows Server backup, you need to find its identifier in the archive. List the items in the backup:
wbadmin get items -version:11/08/2023-09:33
Copy and paste the VM identifier into the following command:
wbadmin start recovery -itemtype:hyperv -version:11/08/2023-09:33 -items:70B51055-C078-B342-48BC-01518C87B4E4
The AlternateLocation and RecoveryTarget:path options allow you to restore the VM to a different location.
Windows Server Backup allows you to restore only the entire VM. You cannot restore a single drive, file, or folder. However, you can mount a backup VHDX image file to your VM and manually copy the file you need to restore.
WSB is a simple, but reliable solution for Hyper-V VM backup. It is quite fast and allows to manage the backup schedule. However, Windows Server Backup has its drawbacks:
- There is no way to monitor the backup process or to check the consistency of the VM backups;
- It is difficult to manage backup in medium and large Hyper-V installations (it is only suitable for small environments with 1-3 Hyper-V hosts);
- You cannot automatically restore a specific file or app state;
- With high density and large sizes of VMs on a host, you need to use the Windows scheduler to configure the order in which backups are created. This prevents Hyper-V server and LAN/SAN/iSCSI network overload during business hours.
Top Third-Party Hyper-V Backup Products
It is difficult to use the built-in Windows Server Backup with a large number of Hyper-V hosts and virtual machines. In this case, you will need to choose one of the backup solutions offered by third-party vendors. It is impossible to say that this or that product is the ideal solution for Hyper-V backup; there are too many nuances to consider. They include the number of hosts, licensing restrictions, required features, network architecture, etc.
Choosing the right backup product can be difficult, as there are many commercial and free backup products on the market. The Gartner Magic Quadrant is commonly used to identify niche leaders. I found this image showing the main players and leaders in the enterprise backup market in 2023.
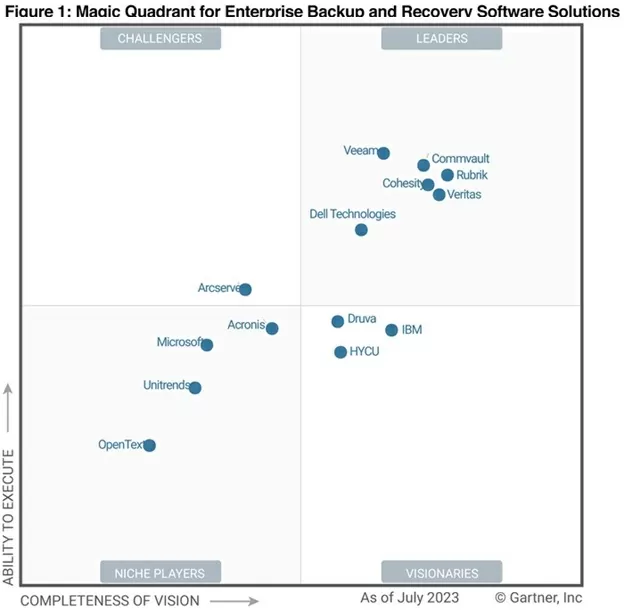
Gartner highlights the following companies and products among the leading vendors of backup solutions:
- Commvault
- Dell Technologies
- Cohesity
- Rubrik
- Veeam (Veeam Backup Free Edition allows you to backup up to 10 VMs)
- Veritas Technologies (Symantec — Veritas Backup Exec)
- Microfocus (HPE Data Protector)