
Описание и рекомендации
Гипервизор Hyper-V – платформа, позволяющая использовать несколько различных операционных систем на одном компьютере. Программный продукт реализован под ПК, управляемые Windows. Изначально это были серверные версии системы 2012 R2, 2016 и прочие.
Второе поколение Hyper V предустановленно в Windows 10, 11 и совместимо исключительно с архитектурой x64. Поскольку приложение интегрировано в операционную систему, сложно сказать насколько оно распространяется разработчиком бесплатно. Чтобы получить интерфейс виртуальной машины на русском, достаточно установить соответствующие настройки региональных параметров.
Ранние клиентские издания
Фактически гипервизор обеспечивает аппаратную виртуализацию, создавая на одном физическом сервере несколько автономных виртуальных машин. Впервые технология появилась в Windows 7.
Это была интегрированная Virtual PC, которая уже тогда не поддерживала разрядность 32-bit. В следующем релизе ОС ее сменил гипервизор. Виртуализация стала частью Windows 8.1, 8.
Второе поколение Hyper V предъявляет определенные требования к системе:
- процессор 64-bit с вложенным пейджингом (SLAT);
- поддержка CPU технологии виртуализации VM Monitor Mode Extension;
- минимум RAM – 4Гб.
Еще одно требование относится исключительно к последним выпускам операционных систем от Microsoft.
Hyper-V для Windows 10, 11
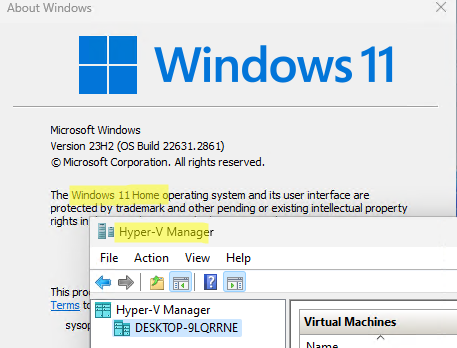
Гипервизор предустановлен в редакциях ОС Pro, Enterprise, Education, но не доступен для редакции Home. Активировать Hyper-V в домашнем релизе можно вручную. Для этого даже не требуется скачивать виртуальную машину, достаточно загрузить bat-файл.
Дальнейшая инструкция содержит несколько этапов:
- Запустить bat-файл с правами Администратора.
- Подтвердить перезапуск ПК – нажат клавишу «Y».
- Подождать, пока на компьютер установится обновление.
- Запустить командную консоль через Run или Win+R.
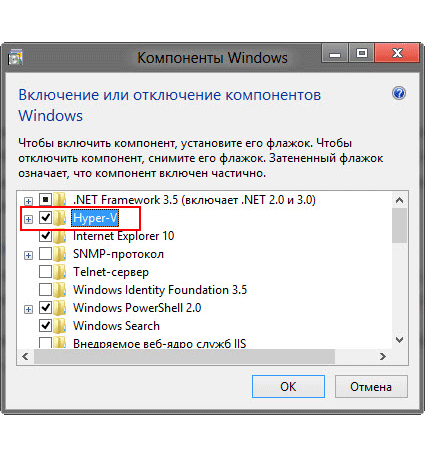
- Ввести и выполнить строку optionalfeatures, чтобы вызвать окно с компонентами среды.
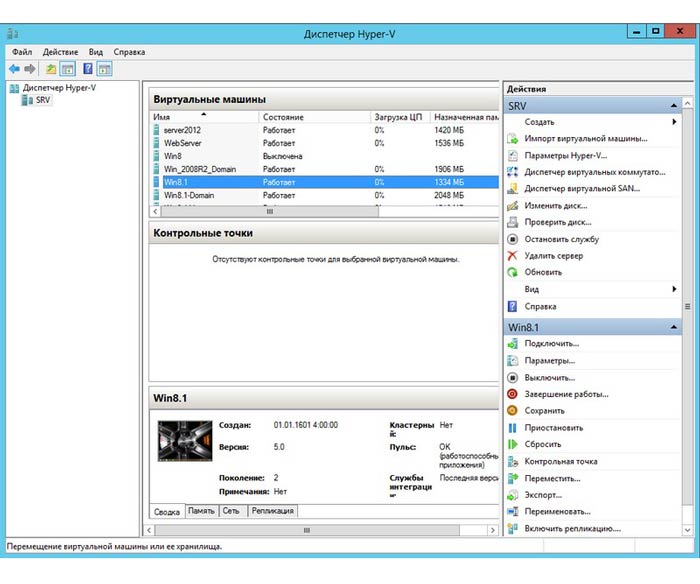
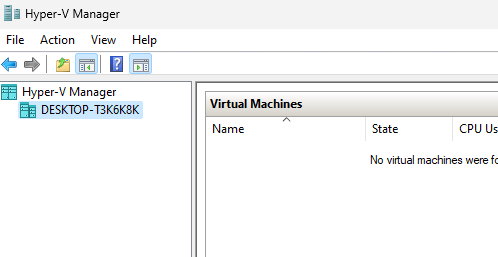
Остается убедиться, что в открывшемся блоке активна функция гипервизора. Аналогичным образом – через набор скриптов можно отключить виртуальную машину. Дальнейшая работа с виртуализацией осуществляется через диспетчер Hyper-V.
Заключение
На сайте можно скачать Hyper-V бесплатно в различных форматах. Для клиентской операционной среды достаточно загрузить скрипты, прописанные в исполняемых файлах BAT, CMD.
Запуск модуля с правами Администратора позволит активировать или отключить гипервизор. Под серверную систему мы предлагаем скачать Microsoft Hyper-V Server 2019 в формате образ ISO.
Скриншоты

Скачать скрипты установки Hyper-V для Windows (ZIP)
Скачать скрипт включения Hyper-V в Home версии Windows (ZIP)
Скачать скрипт отключения (удаления) Hyper-V для Windows (ZIP)
Похожие программы
Выберите вариант загрузки:
- скачать с сервера SoftPortal
Приложение для многопользовательского доступа к виртуальным машинам Microsoft Hyper-V через веб-интерфейс. Позволяет гибко настраивать права доступа для групп и пользователей Active Directory или локальной машины. Поддерживает claims-based авторизацию (полное описание…)

Рекомендуем популярное
DS4Windows 3.3.3
Эмулятор контроллера Xbox 360 для использования геймпада Sony DualShock 4 во многих компьютерных…
DOSBox 0.74-3
DOSBox — Программа эмулирует x86 процессор с поддержкой звука и DOS, позволяя тем самым запускать старые игры на платформах, не имеющих DOS…
Android SDK 35.0.0
Android SDK — универсальная оболочка для моделирования и разработки различных программных продуктов под операционную систему Android…
Платформа виртуализации Hyper-V доступна не только в Windows Server, но и в десктопных редакциях Windows 10 и 11. С помощью встроенного гипервизора Hyper-V пользователи могут создавать и запускать виртуальные машины. В этой статье мы рассмотрим, как включить компоненты Hyper-V в Windows 10 и 11.
Компоненты роли виртуализации Hyper-V можно установить в Pro и Enterprise редакциях Windows 10 и 11. Сначала, нужно проверить, поддерживает ли ваш компьютер виртуализацию Hyper-V. Откройте командную строку с правами администратор и выполните:
systeminfo
Промотайте в конец вывода и проверьте, что включены следующие компоненты в разделе Hyper-V Requirements:
VM Monitor Mode Extensions: Yes
Virtualization Enabled In Firmware: Yes
Second Level Address Translation: Yes
Data Execution Prevention Available: Yes

Если здесь указано Virtualization Enabled in Firmware: No, попробуйте включить аппаратную поддержку виртуализации в настройках BIOS/UEFI компьютера (может называться Intel VT-X или AMD-V).
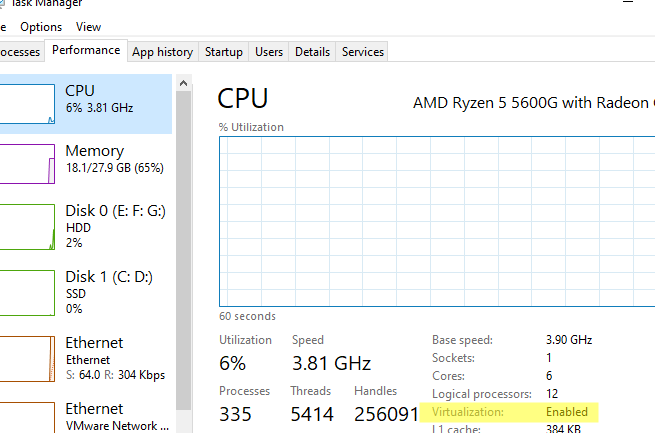
Также проверить совместимость вашего процессора можно на вкладке CPU в диспетчере задач Windows. Здесь должно быть указано
Virtualization: Enabled
.
Если тут указано
A hypervisor has been detected. Features required for Hyper-V will not be displayed
, значит компоненты Hyper-V уже установлены.
Включить роль Hyper-V в Windows 10 и 11 можно через панель управления компонентами Windows Features. Выполните команду
optionalfeatures
и выберите для установки компоненты Hyper-V Platform и Management Tools.
Также вы можете включить компоненты Hyper-V в Windows из командной строки. С помощью PowerShell команды:
Enable-WindowsOptionalFeature -Online -FeatureName Microsoft-Hyper-V -All
Или с помощью DISM:
dism.exe /Online /Enable-Feature:Microsoft-Hyper-V-All

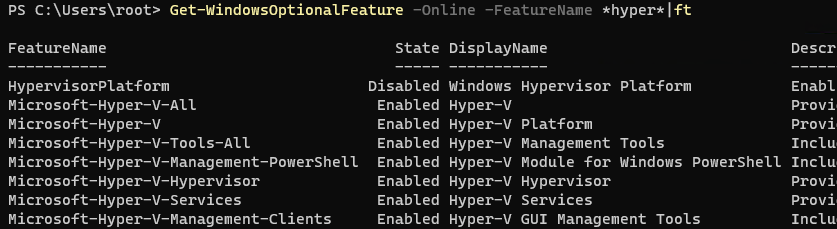
После завершения установки компонентов перезагрузите компьютер. Проверьте, что компоненты гипервизора установлены:
Get-WindowsOptionalFeature -Online -FeatureName *hyper*|ft
Включите автоматический запуск Hyper-V при загрузке:
bcdedit /set HypervisorLaunchType auto
Для управления Hyper-V и виртуальными машинами используется графическая консоль Hyper-V Manager (
virtmgmt.msc
). Запустите ее и можете начать создавать виртуальные машины.
Также для управления гипервизором и ВМ можно использовать командлеты PowerShell из встроенного модуля Hyper-V.
Компонент виртуализации Hyper-V отсутствует в домашних (Home) редакциях Windows 10 и 11. Однако есть небольшой трюк, который позволяет установить роль Hyper-V из зранилища компонентов WinSxS даже в Home редакции Windows.
Создайте на рабочем столе файл enable-hyperv.bat с кодом
pushd "%~dp0"
dir /b %SystemRoot%\servicing\Packages\*Hyper-V*.mum >hyper-v.txt
for /f %%i in ('findstr /i . hyper-v.txt 2^>nul') do dism /online /norestart /add-package:"%SystemRoot%\servicing\Packages\%%i"
del hyper-v.txt
 Dism /online /enable-feature /featurename:Microsoft-Hyper-V -All /LimitAccess /ALL
pause
Запустите BAT файл с правами администратора.
После завершения установки компонентов, перезагрузите компьютер. Проверьте, что виртуализация Hyper-V теперь доступна в вашей Home редакции Windows.
Hyper-V Launcher
Hyper-V Launcher is a powerful and user-friendly virtualization software designed to help you quickly and easily create, manage, and deploy virtual machines on your computer or network. With its intuitive interface and powerful features, Hyper-V Launcher makes it easy to create, configure, and manage virtual machines in your environment.
Hyper-V Launcher provides a simple and secure way to quickly deploy and manage virtual machines.
Features:
• Easy Setup: Hyper-V Launcher makes setting up a virtual machine a breeze. With its intuitive interface and easy to use wizards, you can quickly get up and running with virtualization.
• Virtual Machine Configuration: Hyper-V Launcher allows you to easily configure and customize your virtual machines. With its advanced settings, you can easily adjust the amount of RAM, CPU, and other settings for each virtual machine you create.
• Network Configuration: Hyper-V Launcher includes powerful network configuration tools that let you easily set up and manage your virtual machines on your home or office network.
• Security: Hyper-V Launcher offers powerful security features that let you easily secure your virtual machines. You can easily control who can access and use your virtual machines, and even limit the amount of resources each user can access.
• Remote Access: Hyper-V Launcher also offers remote access capabilities that let you access and use your virtual machines from any computer or device on your network.
• Backup and Restore: Hyper-V Launcher includes a powerful backup and restore feature that lets you easily protect your virtual machines from data loss.
• Support: Hyper-V Launcher offers comprehensive online documentation, video tutorials, and a helpful support team that are always available to answer your questions.
By using Hyper-V Launcher, you can quickly and easily create, manage, and deploy virtual machines on your computer or network. With its intuitive interface and powerful features, Hyper-V Launcher makes it easy to create, configure, and manage virtual machines in your environment.
1. Operating System: Windows 10 Pro or Windows Server 2016/2019
2. Memory: 4GB or more
3. Processor: Intel Core i3 or better
4. Hard Drive: 100GB or more
5. Network: High-speed internet connection
6. Graphics: DirectX 9.0 or higher
7. Software: Microsoft Hyper-V or compatible virtualization software
👨💻️ USER REVIEWS AND COMMENTS 💬
image/svg+xmlBotttsPablo Stanleyhttps://bottts.com/Florian Körner
Owen P*****z
I recently used Hyper-V Launcher software, and it was an easy experience. Setting up the virtual machine was straightforward, and the software was very user-friendly. It was nice to be able to customize the settings of the VM, and the software allowed me to do this with ease. I also really liked the fact that I could access the virtual machine from any computer that had the software installed. Performance-wise, the software ran without any issues. I did run into a few minor bugs, but nothing that was a major concern. All in all, Hyper-V Launcher was an enjoyable experience.
image/svg+xmlBotttsPablo Stanleyhttps://bottts.com/Florian Körner
Cole Hyon
I used Hyper-V Launcher for a project recently and found it very user friendly and easy to use. Setting up a virtual machine was straightforward and the interface was intuitive. It was great to be able to access my virtual machines from any device. The only issue I found was that it took a bit of time to launch the virtual machine initially.
image/svg+xmlBotttsPablo Stanleyhttps://bottts.com/Florian Körner
Fraser Barn
Hyper-V Launcher is a software that allows users to create, launch and manage virtual machines on a Windows operating system. It provides a user-friendly interface for managing virtual machines, creating new ones, and configuring their settings. The software supports a wide range of operating systems and hardware configurations, and allows users to easily switch between virtual machines. It also includes advanced features such as snapshot management, remote management, and integration with cloud services. Overall, Hyper-V Launcher is a powerful and versatile tool for managing virtual machines on a Windows system.
image/svg+xmlBotttsPablo Stanleyhttps://bottts.com/Florian Körner
Callum
Allows quick access and smooth management of virtual machines, making the virtualization process less complicated.
image/svg+xmlBotttsPablo Stanleyhttps://bottts.com/Florian Körner
Benjamin
Efficient virtual machine management, easy-to-use, reliable performance.
image/svg+xmlBotttsPablo Stanleyhttps://bottts.com/Florian Körner
Jay
Efficient, reliable, streamlined virtualization management.
Hyper-V is a Microsoft-owned Windows Hypervisor platform (Type-1) that allows users to run virtual machines with high performance. However, if you are using Windows 10 Home Edition, then you will not have the “Hyper-V” option in the “Turns Windows feature on or off” to run virtual computers because it is available only for Windows 10 Professional, Education, and Enterprise Editions (know the difference). However, still, there is a way to easily download, install and enable the Hyper-V feature on Windows 10 Home using the command line.
Steps to Activate Hyper-v Feature on Windows 10 Home1. Script to download Hyper v for Windows 10 home2. Run Hyper-V Enabler Batch file3. Feature installation will start4. Restart your Windows 10 System5. Run Hyper-V Manager on Windows 10 home6. Create a Virtual Machine7. Uninstall or Disable Hyper-V feature on Windows 10 Home7.1 Command line to disable windows virtualization feature (optional)7.2 Restart your system7.3- In case you want to enable it again (optional)Closing thoughts
Requirements:
- Windows 10 Home OS
- Administrator access
- Virtualization must be enabled in BIOS to create VMs
- Active Internet connection
Although, in modern systems Virtualization is enabled in BIOS by default, however, to confirm it, just right-click on Taskbar and select Task manager ⇒ Performance and find whether it is on or off.


Well, if you don’t want to use Hyper-V then try out some other best third-party Virtual machine creator software programs.
Steps to Activate Hyper-v Feature on Windows 10 Home
Here are the simple steps that we can follow to download and install Hypervisor using a Command-line script.
1. Script to download Hyper v for Windows 10 home
There is a code available on Github that allows users to automate the process of downloading and enabling the Hyper-V feature. Here is that
pushd "%~dp0" dir /b %SystemRoot%\servicing\Packages\*Hyper-V*.mum >hyper-v.txt for /f %%i in ('findstr /i . hyper-v.txt 2^>nul') do dism /online /norestart /add-package:"%SystemRoot%\servicing\Packages\%%i" del hyper-v.txt Dism /online /enable-feature /featurename:Microsoft-Hyper-V -All /LimitAccess /ALL pause
What we have to do is – Right-click on the Desktop and select Text Document. A new file will be created, now open it and paste the above code in that. After that rename that file to Hyper-V Enabler.bat
Alternative- However, to make all this easy for you, we already have created this bat file that you can download directly using this link.
2. Run Hyper-V Enabler Batch file
Once you downloaded or created a Batch file with the given code by yourself on your Desktop. Right-click on that and select “Run as Administrator“.

3. Feature installation will start
As we run the Batch file, it will open a Command prompt to run the code saved in it. Make sure you have an active internet connection on your system to download files required to install and activate Hyper-V on Windows 10 Home. This will take some time depending upon your network speed.
4. Restart your Windows 10 System
Once the installation is complete, the Hyper-v will automatically get enabled on your system. Thus, to make changes into effect, the system will ask you to restart it. Simply type Y on your command terminal and press the Enter key.

5. Run Hyper-V Manager on Windows 10 home
Let’s check whether this Microsoft Windows Hypervisor feature is on our system or not. For that, in the search box type- Turn Windows features on or off, as its icon appears, click to open it.

There scroll and find -Hyper-V and make sure all its tools are checked as shown in the above screenshot, if not already, and then hit the OK button.
Now, we know this free Microsoft virtualization software is on our system, it’s time to run it and start creating virtual machines.
Go to Windows 10 Search box again or simply press the Win key on your keyboard and this time type- Hyper-V, click on its icon when appears.
Alternatively, we can use a command to run Hypervisor- open CMD or the RUN box (shortcut key- Win key + R) and type – virtmgmt.msc

6. Create a Virtual Machine
- To create a virtual machine in Hyper-V Manager, right-click on the connected server and select the New option.

- Click on the Next button and give some name to your virtual machine. For example Ubuntu.
- Choose the Generation for your Virtual machine. If the operating system you want to install supports 32-bit or 64-bit and requires legacy BIOS features then go for Generation 1. Whereas for the latest features and only 64-bit with UEFI boot supported OS users can go for Generation 2. However, you can leave the default selection as it is if you are not sure about this.
- Assign the amount of RAM or Memory you want to use.
- Configure Network. For that select the Default Switch from the Drop-down box. If you don’t have then first create one.
- Select the Size of Virtual Disk.
- Assign the ISO file of the OS you want to install.

To get a step by step guide you can see our article- How to use hyper-v to install Linux Virtual machine on Windows 10
7. Uninstall or Disable Hyper-V feature on Windows 10 Home
Hyper-V is not compatible completely with other Type- 2 virtualizers, even though the latest version of Vmware and Virtualbox can run along with it, there will be a huge performance issue. Thus, if you are planning to use Vmware player or Virtualbox on Windows 10 Home, then first, Deactivate the Hyper-V.
To uninstall this feature, we need to uncheck it from the “Turns Windows features on or off” section. To open it you can either find it from the Search box of Windows 10 or simply press Win Key + R to open the RUN box and type- optionalfeatures.exe
Now uncheck the box given for Hyper-v.

7.1 Command line to disable windows virtualization feature (optional)
If you want then can use a very straightforward method that is either using command prompt or PowerShell command line-
On Powershell run this
Disable-WindowsOptionalFeature -Online -FeatureName Microsoft-Hyper-V-All
Whereas on Command prompt, use this one-
dism.exe /Online /Disable-Feature:Microsoft-Hyper-V-All
7.2 Restart your system
To make sure the hypervisor feature gets disabled completely, now restart your system. This uninstalls it completely.
7.3- In case you want to enable it again (optional)
In the future if you want to enable Microsoft Hypervisor again then you don’t need to run the Batch file this time, just got Windows Features and select it. Or use the command line-
Powershell
Enable-WindowsOptionalFeature -Online -FeatureName Microsoft-Hyper-V
CMD
DISM /Online /Enable-Feature /All /FeatureName:Microsoft-Hyper-V
Also See- Hyper-V vs VirtualBox: A basic comparison
Closing thoughts
Well, this was the quick way to use the Microsoft Windows hypervisor on Windows 10 Home edition. In case you are facing any problem while enabling it, let’s know, the comment section is all yours…