
Изучая процессы в диспетчере задач Windows 11 или Windows 10 пользователи могут обратить внимание на процесс HxTsr, о попытках которого установить сетевые подключения могут сообщать антивирусы. Название процесса не дает ясности о его назначении и может вызвать предположения о том, что это вирус или другое вредоносное ПО.
В этом материале о том, что представляет собой процесс HxTsr.exe, безопасен ли он и дополнительная информация, которая может быть полезной.
Назначение процесса HxTsr.exe

Процесс HxTsr.exe — один из компонентов Microsoft Office, используемый для соединений приложения Microsoft Outlook. Но: даже при отсутствии установленного Office этот же процесс будет появляться в диспетчере задач:
- При запуске встроенного приложения «Почта»
- При использовании приложения «Календарь»
- При добавлении аккаунта Майкрософт в отдельных приложениях Windows 11/10
Причина в том, что указанные приложения также используют механизмы Outlook для работы. Помимо указанного процесса, могут запускаться сопутствующие, например HxAccount или HxOutlook.
Обычно работа процесса не вызывает каких-либо проблем: он находится в состоянии «Приостановлено» или автоматически закрывается, кроме случаев, когда действительно используется соответствующими приложениями. Снятие задачи с процесса не приводит к каким-либо сбоям Windows.
Безопасность процесса
Если вы не уверены в том, что ваш экземпляр HxTsr.exe безопасен, вы можете:
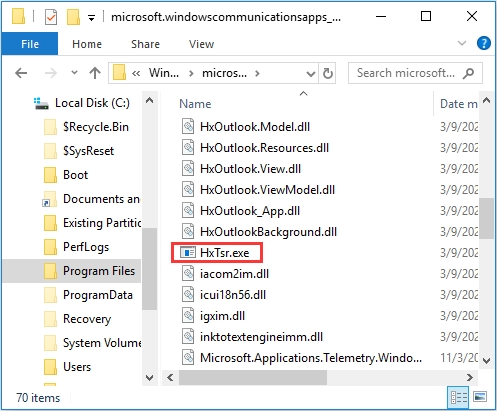
- Проверить его расположение: для этого в диспетчере задач можно нажать правой кнопкой мыши по процессу и выбрать пункт меню «Открыть расположение файла». Расположение файла по умолчанию (версия в пути может отличаться):
C:\Program Files\WindowsApps\microsoft.windowscommunicationsapps14326.21632.0_x64__8wekyb3d8bbwe

- Тем же способом открыть расположение файла, а затем выполнить проверку этого файла с помощью сервиса VirusTotal.com
- Проверить информацию о файле в его свойствах. Пример для оригинального файла — на скриншоте ниже.
- Если у вас часто возникают вопросы на тему безопасности тех или иных процессов и требуется дополнительная информация о ни, вы можете использовать такие инструменты как CrowdInspect для быстрого анализа запущенных процессов.


Если у вас остаются вопросы, касающиеся этого или других процессов Windows, вы можете задать их в комментариях — я постараюсь подсказать.
-
Home
-
News
- What Is HxTsr.exe in Windows 10 and Should You Remove It?
By Sonya |
Last Updated
If you notice that there is an executable file called HxTsr.exe on your computer, then do you know what it is and what it can do for you? If you don’t know, then this post from MiniTool will give you a full introduction about it.
As you know, there are plenty of executable files stored on your computer, such as Dwm.exe and LockApp.exe. And this post will give you some information about HxTsr.exe.
What Is HxTsr.exe?
First of all, what is HxTsr.exe Windows 10? HxTsr is short for Hidden Executable To Sync Remote Servers, and HxTSr.exe is a compressed executable file that you can find in Microsoft Windows operating system. HxTsr.exe stands for Microsoft Outlook Communications.
HxTsr.exe is not an essential executable file for Windows and it is often located in a subfolder of C:\Program Files (e.g. C:\Program Files\ WindowsApps\microsoft.windowscommunicationsapps_17.7466.41167.0_x64__8wekyb3d8bbwe\HxTsr.exe).
HxTsr.exe is used to establish a connection between Outlook 2013/2016 on your computer and the Microsoft server. Anti-malware or the firewall often marks the file as a false positive in that Hxtsr.exe operation can invade path-based identification rules.
The main tool that often detects HxTsr.exe as a suspicious file is Norton Security antivirus software, but in most cases, this file is safe, not malware. However, some cybercriminals may use the file’s name to cover up their malicious programs.
How Do You Know If HxTsr.exe Is a Virus?
As we have mentioned above, HxTsr.exe may be a virus, then how do you know that if HxTsr.exe is a virus? You should pay special attention when you encounter the following symptoms because HxTsr.exe is most likely a virus:
- exe is not in a subfolder of C:\Program Files.,
- The computer is running slowly.
- Application crashes or/and lags.
- Error messages often pop up.
- CPU usage is higher than usual.
- HxTsr.exe process name in Task Manager has a suspicious graphic icon.
If your HxTsr.exe file is a malicious program, then your personal information is likely to be stolen and data may be lost. Therefore, you need to delete this file. And it is highly recommended to use antivirus software to scan your system regularly to protect your computer.
HxTsr.exe High CPU Usage
Sometimes, HxTsr.exe consumes too much CPU that causes the computer to crash. Then how to fix HxTsr.exe high CPU usage? There are two methods you can try.
Method 1: Make Your Operating System Up to Date
If your Windows system is out of date, then you may encounter the HxTsr.exe high CPU usage error, so updating your system can solve the problem. Here is a quick guide:
Step 1: Press the Win + I keys at the same time to open Settings.
Step 2: Choose Update & Security and then go to the Windows Update tab.
Step 3: Click Check for Updates on the right panel. If there are available updates, Windows will automatically download them. Then restart your computer to perform the installation process.
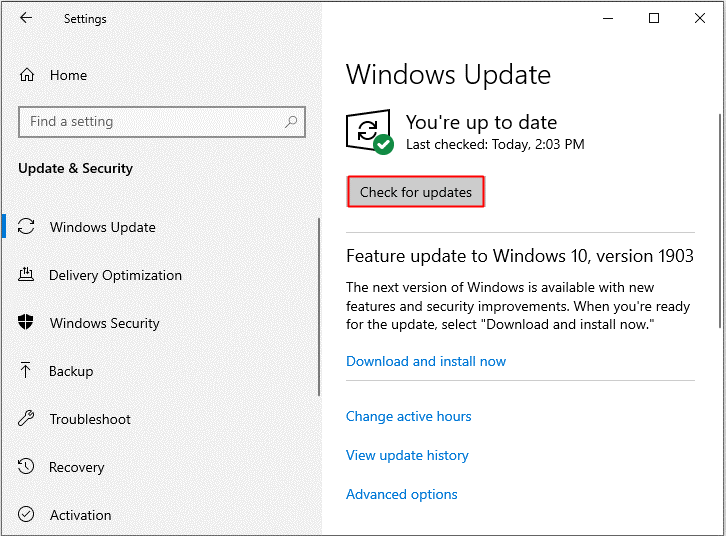
After you have updated your operating system, the HxTsr.exe high CPU usage error should be fixed.
Method 2: Reinstall Microsoft Office
If updating your system doesn’t work, then you can try to reinstall Microsoft Office to solve the problem. Here is the tutorial:
Step 1: Type control panel in the Search box and then click the best match one.
Step 2: Set View by: Small icons and then choose Programs and Features.
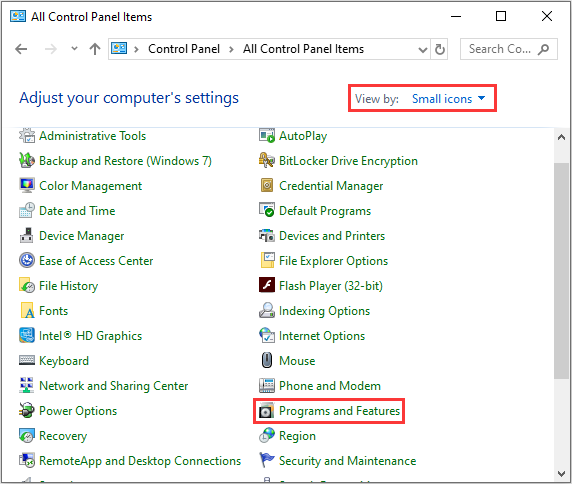
Step 3: Find Microsoft Office Pack in the list, and then right-click it to choose Uninstall. Then follow the instructions to uninstall your Microsoft Office.
Step 4: Go to the official Microsoft Office manufacture’s website and install the pack manually.
Final Words
This post has introduced what HxTsr.exe is and how to identify whether the file is a virus. What’s more, you can also find two methods to fix the HxTsr.exe high CPU usage error.
About The Author
Position: Columnist
Author Sonya has been engaged in editing for a long time and likes to share useful methods to get rid of the common problems of Windows computers, such as Windows Update error. And she aims to help more people to protect their data. What’s more, she offers some useful ways to convert audio and video file formats. By the way, she likes to travel, watch movies and listen to music.
HxTsr.exe file information

The process known as Microsoft Outlook Communications belongs to software Microsoft Office (version 2016) or Mail and Calendar by Microsoft (www.microsoft.com).
Description: HxTsr.exe is not essential for Windows and will often cause problems. HxTsr.exe is located in a subfolder of «C:\Program Files»—normally C:\Program Files\WindowsApps\microsoft.windowscommunicationsapps_17.9330.20915.0_x64__8wekyb3d8bbwe\.
Known file sizes on Windows 10/11/7 are 92,672 bytes (13% of all occurrences), 82,432 bytes and 40 more variants.
microsoft windowscommunicationsapps is a legit Windows Store app with the full package name microsoft.windowscommunicationsapps_8wekyb3d8bbwe.
The program is not visible. It is not a Windows core file.
HxTsr.exe appears to be a compressed file.
Therefore the technical security rating is 37% dangerous; however you should also read the user reviews.
Uninstalling this variant:
If you encounter difficulties with HxTsr.exe, you can also do the following:
1) completely remove Microsoft Office or Mail and Calendar (Control Panel ⇒ Uninstall a Program)
2) go to the support area [1][2] of the Microsoft website.
Recommended: Identify HxTsr.exe related errors
Important: Some malware camouflages itself as HxTsr.exe. Therefore, you should check the HxTsr.exe process on your PC to see if it is a threat. We recommend Security Task Manager for verifying your computer’s security. This was one of the Top Download Picks of The Washington Post and PC World.
Best practices for resolving HxTsr issues
A clean and tidy computer is the key requirement for avoiding problems with HxTsr. This means running a scan for malware, cleaning your hard drive using 1cleanmgr and 2sfc /scannow, 3uninstalling programs that you no longer need, checking for Autostart programs (using 4msconfig) and enabling Windows’ 5Automatic Update. Always remember to perform periodic backups, or at least to set restore points.
Should you experience an actual problem, try to recall the last thing you did, or the last thing you installed before the problem appeared for the first time. Use the 6resmon command to identify the processes that are causing your problem. Even for serious problems, rather than reinstalling Windows, you are better off repairing of your installation or, for Windows 8 and later versions, executing the 7DISM.exe /Online /Cleanup-image /Restorehealth command. This allows you to repair the operating system without losing data.
To help you analyze the HxTsr.exe process on your computer, the following programs have proven to be helpful: ASecurity Task Manager displays all running Windows tasks, including embedded hidden processes, such as keyboard and browser monitoring or Autostart entries. A unique security risk rating indicates the likelihood of the process being potential spyware, malware or a Trojan. BMalwarebytes Anti-Malware detects and removes sleeping spyware, adware, Trojans, keyloggers, malware and trackers from your hard drive.
Other processes
fontdrvhost.exe presentationfontcache.exe shellexperiencehost.exe HxTsr.exe wsappservice.exe wpdshserviceobj.dll wrtmon.exe switchboard.exe ensserver.exe productupdater.exe avp.exe [all]
HxTsr.exe is a generic name that can refer to any executable file on a Windows computer. It could be a legitimate file used by an operating system or application, or it could be malware masquerading as a legitimate file. Should you be uncertain as to whether HxTsr.exe is malicious or a false positive detection, you can submit the affected file to VirusTotal to be scanned with multiple antivirus engines.
In this article, we will cover the HxTsr.exe file which is a component of a Trojan virus that is designed to perform a variety of malicious actions on an infected computer. These actions may include stealing sensitive information, installing additional malware, and allowing attackers to gain unauthorized access and control of the affected system.

What is the HxTsr.exe Trojan?
HxTsr.exe is a file that is a component of a Trojan virus. It is designed to perform various malicious actions on an infected computer, such as stealing sensitive information, installing additional malware, and allowing attackers to gain unauthorized access and control of the affected system.
The HxTsr.exe file is a malicious program utilized by Trojans to carry out various malicious actions, such as:
- Download and install other malware.
- Use your computer for click fraud.
- Record your keystrokes and the sites you visit.
- Send information about your PC, including usernames and browsing history, to a remote malicious hacker.
- Give remote access to your PC.
- Display advertisements and redirect your browser search queries.
- Use your computer resources for mining cryptocurrencies.
How was HxTsr.exe Trojan installed on my computer?
HxTsr.exe is malware that is commonly distributed through malicious advertisements, spam emails that have infected attachments, and by utilizing vulnerabilities found in the operating system and software that are installed on a computer. This malicious software can also be spread by using cracks.
To remove the HxTsr.exe Trojan and check your computer for other malicious programs, please use the free malware removal guide below.
Removal Instructions for HxTsr.exe Trojan
This malware removal guide may appear overwhelming due to the number of steps and numerous programs that are being used. We have only written it this way to provide clear, detailed, and easy-to-understand instructions that anyone can use to remove malware for free.
Please perform all the steps in the correct order. If you have any questions or doubts at any point, stop and ask for our assistance.
To remove the HxTsr.exe Trojan from your computer, follow these steps:
- STEP 1: Uninstall malicious programs from Windows
- STEP 2: Reset browsers back to default settings
- STEP 3: Use Rkill to terminate suspicious programs
- STEP 4: Use Malwarebytes to remove for Trojans and Unwanted Programs
- STEP 5: Use HitmanPro to remove Rootkits and other Malware
- STEP 6: Use AdwCleaner to remove Malicious Browser Policies and Adware
- STEP 7: Perform a final check with ESET Online Scanner
STEP 1: Uninstall malicious programs from Windows
In this first step, we will manually check if any unknown or malicious programs are installed on the computer. Sometimes adware and browser hijackers can have a usable Uninstall entry that can be used to remove them.
Windows 11Windows 10Windows 8Windows 7
-
Press the Windows key + I on your keyboard to open the Settings app.
First, open Windows Settings by pressing Windows+I on your keyboard. You can also right-click your Start button and select “Settings” from the list.

-
In the Settings app, click on “Apps” and then “Apps & features”.
When Settings opens, click “Apps” in the sidebar, then select “Apps & Features”.

-
Find the malicious program in the list of installed apps and uninstall it.
In Apps & Features settings, scroll down to the app list and search for unknown or suspicious programs. To make things easier, you can sort all installed programs by their installation date. To do this, click “Sort by” and select “Install date”.
Look out for any suspicious program that could be behind all the drama – anything you don’t remember downloading or that doesn’t sound like a genuine program. When you find a malicious program, click the three dots button beside it and select “Uninstall” in the menu that appears.
If you have checked your computer for malicious programs and did not find any, you can proceed with the next step in this guide.
-
Follow the prompts to uninstall the program.
In the next message box, confirm the uninstall process by clicking on Uninstall, then follow the prompts to uninstall the malicious program.
Make sure to read all of the prompts carefully, because some malicious programs try to sneak things in hoping that you won’t read them closely.


-
Press the Windows key + I on your keyboard to open the Settings app.
Press the Windows key + I on your keyboard to open the Settings app. You can also ope the Settings app by clicking the Start button on the taskbar, then select “Settings” (gear icon).

-
In the Settings app, click on “Apps”.
When the “Windows Settings” window opens, click on “Apps“. By default, it should open “Apps and Features” but if it doesn’t, select it from the list on the left.

-
Find the malicious program in the list of installed apps and uninstall it.
In Apps & Features settings, scroll down to the app list and search for unknown or suspicious programs. To make things easier, you can sort all installed programs by their installation date. To do this, click “Sort by” and select “Install date”.
Look out for any suspicious program that could be behind all the drama – anything you don’t remember downloading or that doesn’t sound like a genuine program. When you find a malicious program, click on it and select “Uninstall” in the menu that appears.
If you have checked your computer for malicious programs and did not find any, you can proceed with the next step in this guide.
-
Follow the prompts to uninstall the program.
In the next message box, confirm the uninstall process by clicking on Uninstall, then follow the prompts to uninstall the malicious program.
Make sure to read all of the prompts carefully, because some malicious programs try to sneak things in hoping that you won’t read closely.


-
Go to “Program and Features”.
Right-click on the Start button in the taskbar, then select “Programs and Features”. This will take you directly to your list of installed programs.

-
Search for malicious program and uninstall it.
The “Programs and Features” screen will be displayed with a list of all the programs installed on your computer. Scroll through the list until you find any unknown or suspicious program, then click to highlight it, then click the “Uninstall” button.
Look out for any suspicious program that could be behind all the drama – anything you don’t remember downloading or that doesn’t sound like a genuine program.
If you have checked your computer for malicious programs and did not find any, you can proceed with the next step in this guide.

-
Follow the on-screen prompts to uninstall malicious program.
In the next message box, confirm the uninstall process by clicking on Yes, then follow the prompts to uninstall malicious program. Make sure to read all of the prompts carefully, because some malicious programs try to sneak things in hoping that you won’t read closely.


-
Open the “Control Panel”.
Click on the “Start” button, then click on “Control Panel“.
-
Click on “Uninstall a Program”.
When the “Control Panel” appears, click on “Uninstall a Program” from the Programs category.

-
Search for malicious programs and uninstall them.
The “Programs and Features” screen will be displayed with a list of all the programs installed on your computer. Scroll through the list until you find any suspicious or unknown program, then click to highlight it, then click the “Uninstall” button.
Look out for any suspicious program that could be behind all the drama – anything you don’t remember downloading or that doesn’t sound like a genuine program.If you have checked your computer for malicious programs and did not find any, you can proceed with the next step in this guide.

-
Follow the on-screen prompts to uninstall malicious program.
In the next message box, confirm the uninstall process by clicking on Yes, then follow the prompts to uninstall malicious program. Make sure to read all of the prompts carefully, because some malicious programs try to sneak things in hoping that you won’t read closely.


If you are experiencing difficulty while attempting to uninstall a program, you can use Revo Uninstaller to completely remove the unwanted program from your computer.
Now that the malicious programs have been removed from your computer, we can proceed with the next step in this guide.
STEP 2: Reset browsers back to default settings
In this step, we will remove spam notifications, malicious extensions, and change to default any settings that might have been changed by malware.
Please note that this method will remove all extensions, toolbars, and other customizations but will leave your bookmarks and favorites intact. For each browser that you have installed on your computer, please click on the browsers tab below and follow the displayed steps to reset that browser.
ChromeFirefoxMicrosoft EdgeInternet Explorer
Reset Chrome for Windows to default settings
We will now reset your Chrome browser settings to their original defaults. This will reset your startup page, new tab page, search engine, and pinned tabs. It will also disable all extensions and clear temporary data like cookies. Your favorites, history, and saved passwords will not be cleared.
-
Click the three dots in the top-right corner and then click on “Settings”.
Open Chrome and click on the menu button (represented by three vertical dots) in the top right corner of the window. In the dropdown menu that opens, click “Settings“.

-
Click “Advanced”.
Chrome’s “Settings” should now be displayed in a new tab or window, depending on your configuration. In the left sidebar, click on the “Advanced” link.

-
Click “Reset and clean up”.
In the left sidebar, under the “Advanced” section, click on “Reset and clean up“.

-
Click “Reset settings to their original defaults”.
In the main window, the “Reset and clean up” section is visible, as shown in the screenshot below. Click on “Reset settings to their original defaults“.
-
Click “Reset settings”.
A confirmation dialog will now be displayed, detailing the components that will be restored to their default state should you continue with the reset process. To complete the restoration process, click on the “Reset settings” button.

-
(Optional) Reset Chrome Data Sync.
In case a malicious extension reinstalls itself even after performing a browser reset, you have an additional option to reset the data sync for your browser. To do this, navigate to chrome.google.com/sync and click on the Clear Data button.


Reset Firefox for Windows to default settings
We will now reset your Firefox browser settings to their default. The reset feature fixes many issues by restoring Firefox to its factory default state while saving your essential information like bookmarks, passwords, web form auto-fill information, browsing history, and open tabs.
-
Click the three horizontal lines in the top-right corner and then click on “Help”.
Click on Firefox’s main menu button, represented by three horizontal lines. When the drop-down menu appears, select the option labeled “Help“.

-
Click “More troubleshooting information”.
From the Help menu, click on “More troubleshooting information“.

-
Click on “Refresh Firefox”
When the “Troubleshooting Information” page opens, click on the “Refresh Firefox” button.

-
Confirm that you want to reset your browser settings.
To finish the reset process, click on the “Refresh Firefox” button in the new confirmation window that opens.
-
Click “Finish”.
Firefox will now close itself and will revert to its default settings. When it’s done, a window will list the information that was imported. Click on “Finish“.
Your old Firefox profile will be placed on your desktop in a folder named “Old Firefox Data“. If the reset didn’t fix your problem you can restore some of the information not saved by copying files to the new profile that was created. If you don’t need this folder any longer, you should delete it as it contains sensitive information.


Reset Microsoft Edge to default settings
We will now reset your Microsoft Edge browser settings to their default. This will reset your startup page, new tab page, search engine, and pinned tabs. It will also disable all extensions and clear temporary data like cookies. Your favorites, history, and saved passwords will not be cleared.
-
Click the three dots in the top-right corner and then click on “Settings”.
In the top right corner, click on Microsoft Edge’s main menu button, represented by three horizontal dots. When the drop-down menu appears, click on “Settings“.

-
Click on “Reset Settings”.
On the left side of the window, click on “Reset Settings“.
-
Click on “Restore settings to their default values”.
In the main window, click on “Restore settings to their default values“.

-
Click “Reset”.
A confirmation dialog should now be displayed, detailing the components that will be restored to their default state should you continue with the reset process. To complete the restoration process, click on the “Reset” button.
Microsoft Edge will now erase all your personal data, browsing history, and disable all installed extensions. Your bookmarks, though, will remain intact and still be accessible.


Reset Internet Explorer to default settings
We will now reset your Internet Explorer browser settings to their default. You can reset Internet Explorer settings to return them to the state they were in when Internet Explorer was first installed on your computer.
-
Go to “Internet Options”.
Open Internet Explorer, click on the gear icon in the upper-right part of your browser, then select “Internet Options“.
-
Select the “Advanced” tab, then click “Reset”
In the “Internet Options” dialog box, select the “Advanced” tab, then click on the “Reset” button.
-
Click on “Reset”.
In the “Reset Internet Explorer settings” section, select the “Delete personal settings” checkbox, then click on the “Reset” button.
-
Click on “Close”.
When Internet Explorer has completed its task, click on the “Close” button in the confirmation dialogue box.
Close your browser and then you can open Internet Explorer again.
STEP 3: Use Rkill to terminate suspicious programs.
In this thrid step, we will download and run Rkill to terminate suspicious programs that may be running on your computer.
RKill is a program that was developed at BleepingComputer.com that attempts to terminate known malware processes so that your normal security software can then run and clean your computer of infections. When RKill runs it will kill malware processes and then removes incorrect executable associations and fixes policies that stop us from using certain tools.
-
Download Rkill.
You can download RKill to your computer from the below link. When at the download page, click on the Download Now button labeled iExplore.exe. We are downloading a renamed version of Rkill (iExplore.exe) because some malware will not allow processes to run unless they have a certain filename.
-
Run RKill.
After downloading, double-click the iExplore.exe icon to kill malicious processes. In most cases, downloaded files are saved to the Downloads folder.
The program may take some time to search for and end various malware programs.
When it is finished, the black window will close automatically and a log file will open. Do not restart your computer. Proceed to the next step in this guide.

STEP 4: Use Malwarebytes to remove for Trojans and Unwanted Programs
In this next step, we will we will install Malwarebytes to scan and remove any infections, adware, or potentially unwanted programs that may be present on your computer.
Malwarebytes stands out as one of the leading and widely-used anti-malware solutions for Windows, and for good reason. It effectively eradicates various types of malware that other programs often overlook, all at no cost to you. When it comes to disinfecting an infected device, Malwarebytes has consistently been a free and indispensable tool in the battle against malware. We highly recommend it for maintaining a clean and secure system.
-
Download Malwarebytes for Windows
You can download Malwarebytes by clicking the link below.
-
Install Malwarebytes
After the download is complete, locate the MBSetup file, typically found in your Downloads folder. Double-click on the MBSetup file to begin the installation of Malwarebytes on your computer. If a User Account Control pop-up appears, click “Yes” to continue the Malwarebytes installation.

-
Follow the On-Screen Prompts to Install Malwarebytes
When the Malwarebytes installation begins, the setup wizard will guide you through the process.
-
You’ll first be prompted to choose the type of computer you’re installing the program on—select either “Personal Computer” or “Work Computer” as appropriate, then click on Next.

-
Malwarebytes will now begin the installation process on your device.

-
When the Malwarebytes installation is complete, the program will automatically open to the “Welcome to Malwarebytes” screen.

-
On the final screen, simply click on the Open Malwarebytes option to start the program.

-
-
Enable “Rootkit scanning”.
Malwarebytes Anti-Malware will now start, and you will see the main screen as shown below. To maximize Malwarebytes’ ability to detect malware and unwanted programs, we need to enable rootkit scanning. Click on the “Settings” gear icon located on the left of the screen to access the general settings section.

In the settings menu, enable the “Scan for rootkits” option by clicking the toggle switch until it turns blue.

Now that you have enabled rootkit scanning, click on the “Dashboard” button in the left pane to get back to the main screen.
-
Perform a Scan with Malwarebytes.
To start a scan, click the Scan button. Malwarebytes will automatically update its antivirus database and begin scanning your computer for malicious programs.

-
Wait for the Malwarebytes scan to complete.
Malwarebytes will now scan your computer for browser hijackers and other malicious programs. This process can take a few minutes, so we suggest you do something else and periodically check the status of the scan to see when it is finished.
-
Quarantine detected malware
Once the Malwarebytes scan is complete, it will display a list of detected malware, adware, and potentially unwanted programs. To effectively remove these threats, click the “Quarantine” button.

Malwarebytes will now delete all of the files and registry keys and add them to the program’s quarantine.
-
Restart your computer.
When removing files, Malwarebytes may require a reboot to fully eliminate some threats. If you see a message indicating that a reboot is needed, please allow it. Once your computer has restarted and you are logged back in, you can continue with the remaining steps.


STEP 5: Use HitmanPro to remove Rootkits and other Malware
In this fifth step, while the computer is in normal back, we will download and run a scan with HitmanPro to remove Trojans, rootkits, and other malicious programs.
HitmanPro is a second-opinion scanner that takes a unique cloud-based approach to malware scanning. HitmanPro scans the behavior of active files and also files in locations where malware normally resides for suspicious activity. If it finds a suspicious file that’s not already known, HitmanPro sends it to its clouds to be scanned by two of the best antivirus engines today, which are Bitdefender and Kaspersky.
Although HitmanPro is shareware and costs $24.95 for 1 year on 1 PC, there is no limit on scanning. The limitation only kicks in when there is a need to remove or quarantine detected malware by HitmanPro on your system and by then, you can activate the one-time 30-days trial to enable the cleanup.
-
Download HitmanPro.
You can download HitmanPro by clicking the link below.
HITMANPRO DOWNLOAD LINK
(The above link will open a new web page from where you can download HitmanPro) -
Install HitmanPro.
When HitmanPro has finished downloading, double-click on “hitmanpro.exe” (for 32-bit versions of Windows) or “hitmanpro_x64.exe” (for 64-bit versions of Windows) to install this program on your computer. In most cases, downloaded files are saved to the Downloads folder.

You may be presented with a User Account Control pop-up asking if you want to allow HitmanPro to make changes to your device. If this happens, you should click “Yes” to continue with the installation.

-
Follow the on-screen prompts.
When HitmanPro starts you will be presented with the start screen as shown below. Click on the “Next” button to perform a system scan.


-
Wait for the HitmanPro scan to complete.
HitmanPro will now begin to scan your computer for malicious programs.
-
Click on “Next”.
When HitmanPro has finished the scan, it will display a list of all the malware that it has found. Click on the “Next” button to have HitmanPro remove the detected items.

-
Click on “Activate free license”.
HitmanPro may now require to activate the free 30-days trial to remove the malicious files. To do this, click on the “Activate free license” button to begin the free 30 days trial and remove all the malicious files from your computer.

When the malware removal process is complete, it will display a screen that shows the status of the various programs that were removed. At this screen, you should click on the Next button and then if prompted you should click on the Reboot button. If HitmanPro does not prompt you to reboot, please just click on the Close button.


STEP 6: Use AdwCleaner to remove Malicious Browser Policies and Adware
In this next step, we will use AdwCleaner to remove malicious browser policies and unwanted browser extensions from your computer.
AdwCleaner is a free popular on-demand scanner that can detect and remove malware that even the most well-known anti-virus and anti-malware applications fail to find. This on-demand scanner includes a lot of tools that can be used to fix the side effects of adware. browser hijackers and other malware.
-
Download AdwCleaner.
You can download AdwCleaner by clicking the link below.
-
Double-click on the setup file.
Double-click on the file named “adwcleaner_x.x.x.exe” to start AdwCleaner. In most cases, downloaded files are saved to the Downloads folder.

AdwCleaner program will now open and you will be presented with the program’s license agreement. After you read it, click on the I agree button if you wish to continue. If Windows prompts you as to whether or not you wish to run AdwCleaner, please allow it to run.

-
Enable “Reset Chrome policies” to remove malicious browser policies.
When AdwCleaner starts, on the left side of the window, click on “Settings” and then enable “Reset Chrome policies“.

-
Click on the “Scan” button.
On the left side of the AdwCleaner window, click on “Dashboard” and then click “Scan” to perform a computer scan.

-
Wait for the AdwCleaner scan to finish.
AdwCleaner will now scan your computer for malware. This process can take a few minutes.
-
Click on “Quarantine” to remove malware.
When the AdwCleaner scan is completed it will display all of the items it has found. Click on the “Quarantine” button to remove the malicious programs from your computer.

-
Click on “Continue” to remove the malicious programs.
AdwCleaner will now prompt you to save any open files or data as the program will need to close any open programs before it starts to clean. Click on the “Continue” button to finish the removal process.

AdwCleaner will now delete all detected malware from your computer. When the malware removal process is complete, you may be asked to restart your computer.


STEP 7: Perform a final check with ESET Online Scanner
This final step involves installing and running a scan with ESET Online Scanner to check for any additional malicious programs that may be installed on the computer..
ESET Online Scanner is a free second-opinion scanner, designed to rescue your computer from malware (viruses, trojans, rootkits, etc.) that have infected your computer despite all the security measures you have taken (such as anti-virus software, firewalls, etc.).
-
Download ESET Online Scanner.
You can download ESET Online Scanner by clicking the link below.
-
Double-click on esetonlinescanner.exe to run the installer.
When ESET Online Scanner has finished downloading, double-click on “esetonlinescanner.exe” to install it program on your computer. In most cases, downloaded files are saved to the Downloads folder.

-
Install ESET Online Scanner.
When ESET Online Scanner starts you will be presented with the start screen as shown below. Select your desired language from the drop-down menu and click Get started.

In the Terms of use screen, click Accept.
Select your preference for the Customer Experience Improvement Program and the Detection feedback system and click Continue.
-
Start a Full Scan with ESET Online Scanner
Click on Full Scan to perform an in-depth inspection of the entire computer.
Select Enable for Detection of Potentially Unwanted Applications, then click Start scan.
-
Wait for the ESET Online Scanner scan to finish.
ESET Online Scanner will now begin to scan your computer for malware. This process can take quite a while, so we suggest you do something else and periodically check on the status of the scan to see when it is finished.
-
ESET Online Scanner will automatically remove the malicious files.
At the end of the scan, the Found and resolved detections screen will be displayed. You can click View detailed results to view specific information. Detected threats are automatically cleaned and quarantined.


Your computer should now be free of the HxTsr.exe Trojan and other malware.
If your current antivirus allowed this malicious program on your computer, you may want to consider purchasing Malwarebytes Premium to protect against these types of threats in the future.
If you are still having problems with your computer after completing these instructions, then please follow one of the steps:
- Run a computer scan with ESET Online Scanner
- Ask for help in our Windows Malware Removal Help & Support forum.
Here are 10 basic security tips to help you avoid malware and protect your device:
To avoid potential dangers on the internet, it’s important to follow these 10 basic safety rules. By doing so, you can protect yourself from many of the unpleasant surprises that can arise when using the web.
Hxtsr.exe goes by Microsoft Outlook Communications. Its purpose is to connect Microsoft Outlook to Microsoft Servers to provide email access. Outlook is Microsoft’s most popular email application and comes as part of Microsoft Office. Without hxtsr.exe Microsoft’s Office 365 or Outlook.com email services are unlikely to work properly.

Publisher:
hxtsr.exe stands for Hidden Executable To Sync Remote Servers.
What does hxtsr.exe do?
Connects Microsoft Outlook to Microsoft Email Services.
Is hxtsr.exe safe? 5 easy ways to see if hxtsr.exe is safe or malware.
- 1. See who signed the hxtsr.exe (check the publisher)
- 2. Scan hxtsr.exe with Windows Security.
- 3. Check the network activity of hxtsr.exe.
- 4. Analyze hxtsr.exe with VirusTotal.
- 5. Run it in Windows Sandbox.
Why does hxtsr.exe access the network?
While investigating hxtsr.exe with the GlassWire network security monitor on our devices based in the USA we found it connects to the host settingsfd-prod-scus1-endpoint.trafficmanager.net controlled by Azure, a Microsoft Cloud Service.

About Us
Have feedback?
Have suggestions on how we can improve this page? Please let us know.
Join our Internet security newsletter!
Learn how to protect and monitor your network with GlassWire.