
-
-
#1
Hello Guys. I have bought a new notebook 1-2 month ago, its a Clevo NK60KK
11th Gen Intel(R) Core(TM) i9-11900 + Nvidia GeForce RTX 3050 Ti Laptop.
After the first days of using it started to show a me blue screen error, like once or twice a day.
I send it back to repair it but the seller «did not find anything» and send it back to me.
The bluescreen happened again, it feels like i get this bluescreen absolutely randomly, so i didnt feel like one of my programs could be the problem.
I then used the DDU Software to completely delete the GPU Drivers and installed it again. It helped only for a few days, then the blue screen came back again.
the error of the blue screen is VIDEO_TDR_FAILURE nvlddmkm.sys
The seller says it is a software issue and do not want to take this notebook back and change into a new one. So, two days ago i deleted windows and installed a completely new one. But it did not help.
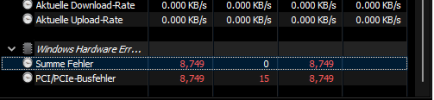
I tried deleting all drivers again with the DDU Software, the GPU Drivers and the Audio Drivers too. Because, as long as i did not have the Audio Drivers I did not have this Blue screen, and a guy in another forum wrote that this solved the problem. since that, i did not have the blue screen again, but i am still wondering if my hardware is okay as the laptop was very expensive. so i downloaded the hwinfo software and by checking the informations it gives me, i saw that i have a windows hardware errors. i had more then 8000 errors in 19 minutes, and now since i have started writing it increased to more then 17.000. When I open the Windows Event Viewer, there is no errors. So, I dont know… Is there a possibility to get to know where this errors come from? i feel like i need to prove the seller that the hardware is broken if this is the problem, so they change the laptop into a new one.
thanks in advance for your help, and please, if you answer, do it in a way that i can understand, as i am not understanding a lot about computers and have to google everything 10 times ^^. greetings
-

HWiNFO64 v7.27-4840 — Sensorstatus 12.08.2022 09_24_31.png
10.4 KB
· Views: 3
-
#1
В HWiNFO среди показателей карт есть Windows Hardware Errors(WHEA). И в GPU memory errors сыпятся ошибки. Не могу понять, что это такое и почему ошибки. Гугл говорит что WHEA связан как-то с синим экроном смерти. Может кто-то сталкивался? за 5минут 300ошибок.
-
Снимок.PNG
34,9 КБ · Просмотры: 68
-
#3
В HWiNFO среди показателей карт есть Windows Hardware Errors(WHEA). И в GPU memory errors сыпятся ошибки. Не могу понять, что это такое и почему ошибки. Гугл говорит что WHEA связан как-то с синим экроном смерти. Может кто-то сталкивался? за 5минут 300ошибок.
Мониторю 1 риг, там стоят 4х1080ти MSI Gaming, в работе стабилен, драйвер не слетает, синих экранов нет, но этих ошибок тоже целый вагон. И они постоянны. Гуглил насчет них, но нигде не видел чтобы они были как с BSOD связаны. В итоге забил. Потому как доступ к ригу только через Teamviewer. Может надо винду переставить даже.
HWiNFO64.SYS Driver Cannot Load is a driver-related issue and it occurs mostly while installing or opening HWiNFO software. Several users reported encountering this error code after they installed the recent patch update i.e. KB5028254.
In this post, we will discuss the reasons why this error appears and seven relevant ways applying which you may fix this issue on Windows PCs.
How to Disable Automatic Driver Updates in Windows 11
HWiNFO64 Driver, What is it?
HWiNFO, or Hardware Info, is a very popular and comprehensive system information and monitoring tool for Windows-based computers. Using this tool, you can get detailed information about the hardware components and system settings of your computer.
HWiNFO64, or HWiNFO AMD64 is a kernel driver and is very important for the well-functioning of the Hardware Info software. In short, it facilitates the interaction between the HWiNFO software and your device’s hardware components.
What causes this HWiNFO64 Driver Cannot Load Error?
This HWiNFO64.SYS driver not opening error typically occurs on account of different factors. The common ones are as follows –
- Insufficient Permissions: Apps and Programs require certain permission to work effectively on Windows. When they lack the necessary permissions, such errors may occur.
- Drivers Not-Signed: Microsoft allows installing only those drivers that are digitally signed. If you are trying to install some not-signed apps, make sure to disable Memory Integrity or Driver Signature Enforcement.
- Outdated Drivers: One must keep all device drivers up to date. So, check and update the outdated ones.
- Third-party Security Apps: If you use third-party security apps, make sure to uninstall or at least disable them.
- Missing or corrupt system files: External apps interact with the system files and make them corrupt. To repair these files in System32 or inside the System Image, run SFC and DISM scans.
Now that you know what may cause this HWiNFO driver issue in Windows, let’s learn the ways by which you may fix this error code.
1. Close Faulty Apps
When you install some faulty apps that rely on this HWiNFO driver and launch them, they might start causing this driver issue on your PC. Close all such apps that you know to use the HWiNFO driver and check if the issue resolves this way.
If the problem indeed resolves, make sure to uninstall those apps from your system and fresh install them by visiting the Microsoft Store.
2. Disable Memory Integrity
Memory Integrity is a security feature in Windows and it protects your computer against certain types of malware and unauthorized access. This is also referred to as “Core Isolation” inside Windows Defender.
Though this is a great feature, this may sometimes start causing compatibility issues and thus result in HWiNFO64.SYS Driver Cannot Load Error. Disable this security feature on your Windows PC and check if the driver issue resolves this way. Follow these steps on how to carry out this task –
- Open Windows Security and select Device Security from the left pane.
- Under Core Isolation, click to expand Core isolation details.
- Locate and turn off the toggle switch available under the Memory integrity section.

- After you disable this security feature, make sure to restart your PC so that the recent changes come into effect from the next login.
Sign back into your device again and check if you can use your device without encountering the same error code again.
3. Disable Driver Signature Enforcement
Driver Signature Enforcement is another important security feature in Windows that protects your device from installing unsigned drivers. By default, Microsoft keeps this feature enabled so that no harmful apps or drivers install and hinder your device’s security.
When you know of some genuine apps that are not signed by Microsoft and want to install them on your computer, you must disable this driver signature enforcement. Do note that this will keep your device at risk so proceed at your own risk.
Here’s how to download and install some device drivers by disabling the Driver Signature Enforcement security feature in Windows 11 –
- Press Windows + I to launch Settings.
- Go to System > Recovery net and click Restart now under the Advanced startup.
- Doing so will reboot your device into Advanced Startup Options, and you must go to Troubleshoot > Advanced options.
- Locate and click on Startup Repair and when a prompt appears, hit the Restart button on it.

Your operating system will restart again and this time boot into Startup settings. Press the F7 key and this will disable the driver signature enforcement in the Windows Recovery Environment.
Your device will next boot with Driver Signature Enforcement disabled. Check if you can now install the conflicting apps without getting the same error code again.
4. Rollback your device to its previous build update
If you have recently upgraded your operating system and this error started occurring afterward, you must have installed some buggy updates. In such cases, what you can do is roll back your PC to its previous OS Build update and check if the driver issue resolves this way.
Note: You may roll back your operating system only within the first 10 days of the update installation. In case this time period has exceeded, you can only use System Restore Points to revert back to an earlier stable state.
To rollback Windows 11, you must use these steps –
- Press Windows + X, and select Settings.
- Go to Windows Update > Update history and scroll down to Related settings.
- Locate and click on Uninstall updates underneath it.

- You will find n number of updates available here. Locate the recently installed update, and click the Uninstall button next to it.
- The system will next start collecting all relevant data for the chosen update and remove the same from your device.
Your PC might restart several times during this rollback process, so wait patiently. Reboot your Windows 11 PC and check if the HWiNFO64.SYS Driver Cannot Load error is resolved now.
5. Check for pending Windows Updates
Microsoft recommends keeping your device up to date so that the recent updates resolve any existing bugs or issues on your computer. If there are any pending updates for your device, make sure to download and upgrade to that OS Build version.
All you require is to visit Settings > Windows Update and hit Check for updates. The system will automatically check for the available updates, and download/install them on your computer.

6. Run SFC and DISM Scans
If none of the above solutions help to fix this HWiNFO64.SYS cannot load error, this might be due to the presence of faulty system apps and folders. Ensure disabling third-party security apps and then perform SFC and DISM Scans on your PC.
Both SFC and DISM are built-in tools in Windows and they are developed to detect missing as well as corrupt system files and repair them (if possible). Here’s how to initiate both these scans in Windows –
- Launch Command Prompt as administrator first.
- On the elevated console, type the following and press Enter.
sfc /scannow
- Wait for this scan to complete and when this is over, you may execute the DISM code next –
Dism /Online /Cleanup-Image /RestoreHealth

- While SFC detects and repairs corrupt system files, DISM resolves file corruption within the System Image.
- After you run both these tools successfully on your PC, close CMD, and restart your computer.
Hopefully, the HWiNFO64.SYS Driver Cannot Load Error resolves from the subsequent login.
7. Uninstall HWiNFO and remove all its drivers
This HWiNFO.SYS Driver Cannot Load error resolves on its own when you uninstall the relevant application from your system. In case this error is still appearing, this must be due to some leftover registry entries from previous software installations.
Remove the HWiNFO drivers from your system using the below steps –
- Open Command Prompt as administrator first.
- When the UAC prompts, hit Yes to authorize accessing CMD as admin.
- On the elevated console, execute these two codes one after another –
sc stop HWiNFO64
sc config HWiNFO64 start= disabled
- The first code will stop the HWiNFO if it’s already running while the second one changes its start status to disabled. HWiNFO software will not start on its own from the next login.
- Restart your computer and open Command Prompt as administrator again.
- This time, execute the following two codes on the elevated console –
sc delete HWiNFO64
Clear Registries
- The first code will delete the HWiNFO service and the second one will delete all associated entries from your PC.
To know if the registry entries are indeed deleted from your system, open the Registry Editor, and navigate to the below path inside it.
HKEY_LOCAL_MACHINE\SYSTEM\CurrentControlSet\Services
- Under the Services key, check if there are entries containing HWiNFO64. If yes, right-click on that entry and choose to delete the same.
- Restart your computer again so that the recent changes come into effect.
Reinstall the HWiNFO Software
Now that you have uninstalled HWiNFO and removed all instances of it from the registry, you must reinstall HWiNFO software on your Windows PC. Make sure to download and install this software by visiting its official site.
Reinstalling HWiNFO will bring back all the drivers, files, and folders that are required for the effective run of HWiNFO. Hopefully, you are now able to use this software without any issues or error codes.
Изучая просмотр событий Windows 11, Windows 10 и других версий, вы можете обнаружить ошибки, для которых в качестве источника указан WHEA Logger, описание — «Неустранимая аппаратная ошибка», либо «Устранимая аппаратная ошибка» и код события: 1, 17, 18, 19, 20, 47 и другие.
В этой инструкции подробно об ошибках WHEA Logger, причинах и возможных способах их исправить.
Что значат ошибки WHEA Logger и их возможные причины

При возникновении ошибок в работе оборудования, компонент Windows Hardware Error Architecture (WHEA) инициирует запись соответствующих ошибок в журнале событий, которые вы и наблюдаете с источником WHEA-Logger.
К сожалению, код ошибки дает мало информации о том, что именно произошло и какого оборудования касается событие. Основные же причины ошибки:
- Неправильная работа или сбои оборудования — видеокарты, оперативной памяти, жесткого диска, проблемы с процессором и другие.
- Проблемы с установленными драйверами.
- Перегрев компонентов ПК или ноутбука.
- Неправильная работа оборудования (память, видеокарта, CPU) в разгоне.
- Проблемы с питанием или управлением электропитанием.
Основные способы исправить ошибки WHEA Logger
Как было отмечено, сведения об ошибке в просмотре событий не дают информации о конкретных методах решения проблемы и её источнике. Единственный вывод, который можно сделать — произошла ошибка при работе оборудования или его драйверов.
Какие действия можно предпринять, чтобы исправить ошибку:
- Если у вас установлена Windows 11 или Windows 10, попробуйте отключить быстрый запуск, перезагрузить компьютер и посмотреть, появляется ли ошибка снова. Включенная опция на некоторых устройствах может приводить к ошибкам WHEA Logger, особенно на старом оборудовании или в ситуации отсутствия оригинальных драйверов производителя устройства.
- Попробуйте вручную установить драйверы чипсета и системных устройств (обычно также расположены в разделе «чипсет») с сайта производителя материнской платы ПК или с сайта производителя ноутбука для вашей модели вместо тех, которые были установлены автоматически Windows.
- Если вы каким-либо образом настраивали разгон каких-либо аппаратных компонентов, попробуйте отключить его и посмотреть, изменило ли это ситуацию.
- Проверьте оперативную память на ошибки.
- Обновите БИОС вашей материнской платы (в том числе для ноутбука), если на официальном сайте доступны новые версии БИОС. Внимание: обновление БИОС/UEFI потенциально небезопасная процедура, следует внимательно выполнять инструкции производителя и даже в этом случае (особенно в случае реальных неполадок оборудования) есть риск, что что-то пойдет не так.
- Если в диспетчере устройств присутствуют какие-либо неизвестные устройства, либо для части устройств установлены стандартные драйверы Майкрософт (особенно для видеокарты), вручную найдите нужные драйверы и установите их. Подробнее: Как установить драйвер неизвестного устройства.
- При использовании каких-либо приложений, напрямую меняющих параметры работы оборудования (изменение частот процессора и видеокарты, скорости вращения вентиляторов), проверьте, исчезнут ли ошибки WHEA-Logger, если отключить эти инструменты.
- В случае, если на вашем ПК или ноутбуке наблюдаются какие-то проблемы с питанием: самопроизвольные выключения, включение не с первого раза (либо компьютер включается, шумит, но не загорается монитор) или иные подобные симптомы, следует разобраться с ними и решить проблему. В случае ПК причиной обычно бывает выходящий из строя блок питания, но это не единственный возможный вариант.
- Используя программы для просмотра температуры процессора и видеокарты убедитесь, что при нагрузках отсутствует перегрев компонентов.
- Обновите Windows 10/11, особенно если обновления отключены в течение продолжительного времени.
- Выполните восстановление целостности системных файлов Windows.
- Есть сообщения, что ошибки WHEA-Logger с кодом 19 могут быть вызваны неправильной работы клавиатуры, а код 47 может говорить об ошибках жесткого диска (однако, это не всегда так).
- Если ошибки появились недавно, попробуйте использовать точки восстановления на дату, предшествующую появлению проблемы, а при их отсутствии — вспомнить, какие действия выполнялись перед возникновением ошибок WHEA-Logger: установка нового оборудования или драйверов, системного ПО, обновлений Windows или какие-либо еще и откатить эти действия вручную.
Независимо от того, сработают ли предлагаемые методы в решении проблемы, попробуйте определить закономерности появления ошибки: возможно, это сможет разобраться, какое именно оборудование вызывает сбой, а в дальнейшем решать проблемы именно с ним: обновлять драйвера, диагностировать неполадки, принимать решение о замене.