
Последнее обновление: 25.11.2023
Для работы с PHP нам потребуется веб-сервер. Обычно в связке с PHP применяется веб-сервер Apache. Официальный
сайт проекта — https://httpd.apache.org/. Там же можно найти всю подробную информацию о релизах, скачать исходный код.
Однако официальный сайт не предоставляет готовых сборок для ОС Windows.
Перед установкой Apache следует отметить, что если наша ОС Windows, то в системе должны быть установлен пакет для C++, который можно найти по адресу
для 64-битной и для 32-битной.
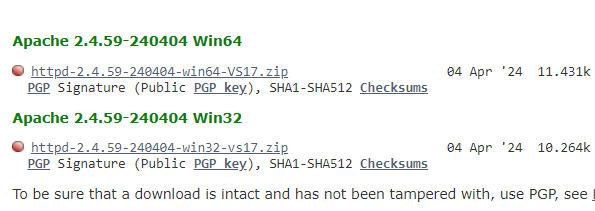
Итак, если нашей ОС является Windows, перейдем на сайт http://www.apachelounge.com/, который предоставляет дистрибутивы Apache для Windows:
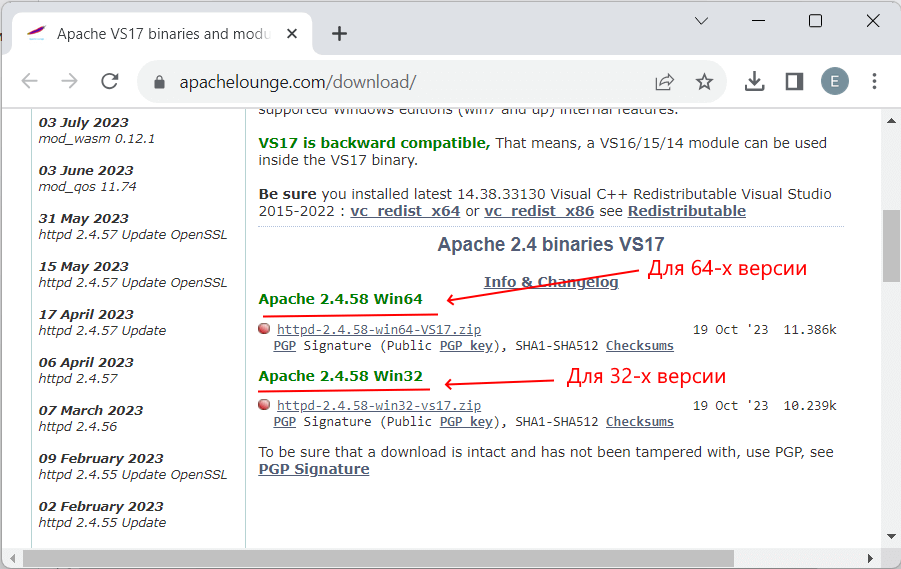
В разделе Apache 2.4 binaries VS17 выберем последнюю версию дистрибутива сервера. На странице загрузок мы можем
найти две версии пакета Apache — для 64-битных систем и для 32-битных.
После загрузки пакета Apache распакуем загруженный архив. В нем найдем папку непосредственно с файлами веб-сервера — каталог Apache24.
Переместим данный каталог на диск C, чтобы полный путь к каталогу составлял C:/Apache24.
Запуск Apache
В распакованном архиве в папке bin найдем файл httpd.exe
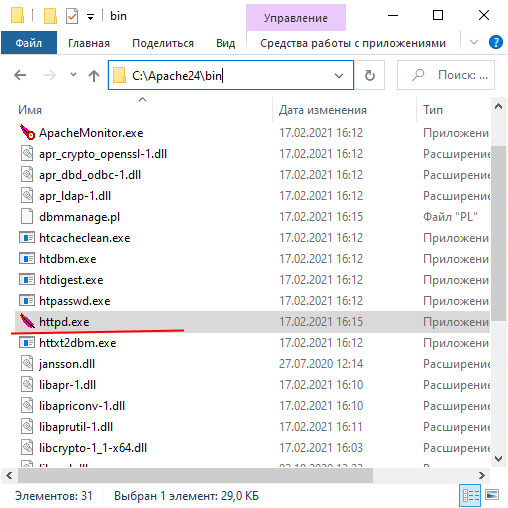
Это исполняемый файл сервера. Запустим его. Нам должна открыться следующая консоль:
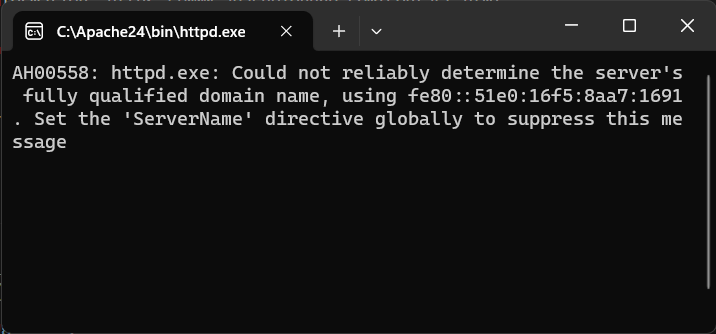
Пока работает это приложение, мы можем обращаться к серверу. Для его тестирования введем в веб-браузере адрес
http://localhost. После этого веб-браузер должен отобразить следующую страницу:

Эта страница символизирует, что наш веб-сервер работает, и мы можем с ним работать.
Конфигурация веб-сервера
Теперь проведем конфигурацию сервера, чтобы связать его с ранее установленным интерпретатором PHP.. Для этого найдем в папке веб-сервера
в каталоге conf (то есть C:\Apache24\conf ) файл httpd.conf
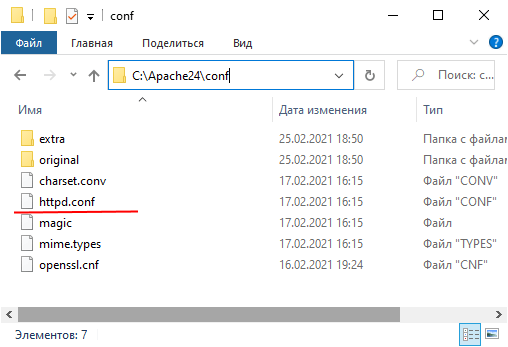
Откроем этот файл в текстовом редакторе. httpd.conf настраивает поведение веб-сервера.
Мы не будем подобно затрагивать его описания, а только лишь произведем небольшие изменения, которые потребуются нам для работы с PHP.
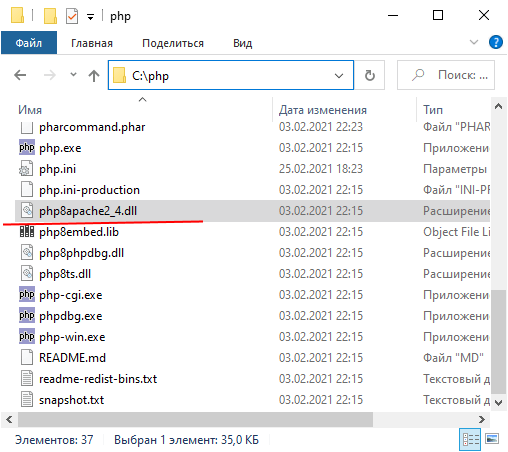
Прежде всего подключим PHP. Для этого нам надо подключить модуль php, предназначенный для работы с apache. В частности, в папке
php мы можем найти файл php8apache2_4.dll:
Для подключения php найдем в файле httpd.conf конец блока загрузки модулей LoadModule
//......................
#LoadModule vhost_alias_module modules/mod_vhost_alias.so
#LoadModule watchdog_module modules/mod_watchdog.so
#LoadModule xml2enc_module modules/mod_xml2enc.so
И в конце этого блока добавим строчки
LoadModule php_module "C:/php/php8apache2_4.dll"
PHPIniDir "C:/php"
Далее укажем место, где у нас будут храниться сайты. Для этого создадим, например, на диске С каталог localhost. Затем найдем в файле httpd.conf
строку
DocumentRoot "${SRVROOT}/htdocs"
<Directory "${SRVROOT}/htdocs">
По умолчанию в качестве хранилища документов используется каталог «c:/Apache24/htdocs». Заменим эту строку на следующую:
DocumentRoot "c:/localhost"
<Directory "c:/localhost">
Изменим пути файлам, в которые будут заноситься сведения об ошибках или посещении сайта. Для этого найдем строку
ErrorLog "logs/error.log"
И заменим ее на
ErrorLog "c:/localhost/error.log"
Далее найдем строку
CustomLog "logs/access.log" common
И заменим ее на
CustomLog "c:/localhost/access.log" common
Таким образом, файл error.log, в который записываются ошибки, и файл access.log, в который заносятся все
данные о посещении веб-сайта, будут располагаться в папке c:/localhost.
Затем найдем строчку:
#ServerName www.example.com:80
И заменим ее на
ServerName localhost
Далее найдем блок <IfModule mime_module>:
<IfModule mime_module>
    #
    # TypesConfig points to the file containing the list of mappings from
    # filename extension to MIME-type.
    #
    TypesConfig conf/mime.types
И под строкой <IfModule mime_module> добавим две строчки:
AddType application/x-httpd-php .php
AddType application/x-httpd-php-source .phps
То есть должно получиться:
<IfModule mime_module>
	AddType application/x-httpd-php .php
	AddType application/x-httpd-php-source .phps
    #
    # TypesConfig points to the file containing the list of mappings from
    # filename extension to MIME-type.
    #
    TypesConfig conf/mime.types
В данном случае мы добавили поддержку для файлов с расширением .php и .phps.
И в конце найдем блок <IfModule dir_module>:
<IfModule dir_module>
    DirectoryIndex index.html
</IfModule>
И заменим его на следующий:
<IfModule dir_module>
	DirectoryIndex index.html index.php
</IfModule>
В данном случае мы определяем файлы, которые будут выполняться при обращении к корню файла или каталога. То есть по сути определяем главные страницы
веб-сайта: index.html и index.php.
Это минимально необходимая конфигурация, которая нужна для работы с PHP.
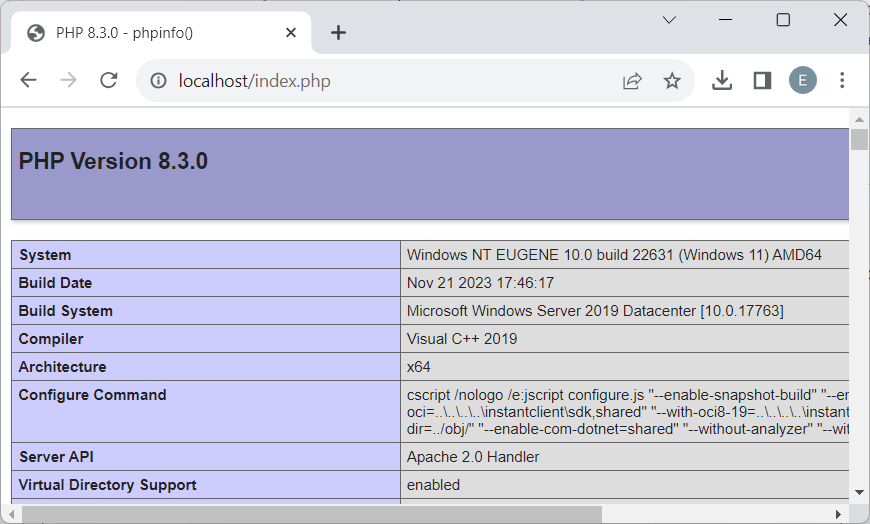
Теперь наша задача — убедиться, что php подключен и работает правильно. Для этого перейдем в папку c:/localhost, которую мы создали для хранения
файлов веб-сервера, и добавим в нее обычный текстовый файл. Переименуем его в index.php и внесем в него следующее содержание:
<?php
phpinfo();
?>
В данном случае мы создали простейший скрипт, который выводит общую информацию о PHP.
Теперь заново запустим файл httpd.exe и обратимся к этому скрипту, набрав в строке браузера
адрес http://localhost/index.php
Что тут произошло? При обращении к сайту на локальной машине в качестве адреса указывается http://localhost.
Затем указывается имя ресурса, к которому идет обращение. В данном случае в качестве ресурса используется файл
index.php. И так как в файле httpd.conf в качестве хранилища документов веб-сервера указан каталог C:\localhost, то именно в этом каталоге и будет
веб-сервер будет производить поиск нужных файлов.
И поскольку выше при конфигурировании мы указали, что в качестве главной страницы может использоваться файл index.php, то мы можем также обратиться к
этому ресурсу просто http://localhost/
Таким образом, теперь мы можем создавать свои сайты на php.
Установка веб-сервера в качестве службы
Если мы часто работаем с веб-сервером, в том числе для программиррования на PHP, то постоянно запускать таким образом сервер,
может быть утомительно. И в качестве альтернативы мы можем установить Apache в качестве службы Windows.
Для этого запустим командную строку Windows от имени администратора и установим Apache в качестве службы с помощью команды:
C:\Apache24\bin\httpd.exe -k install
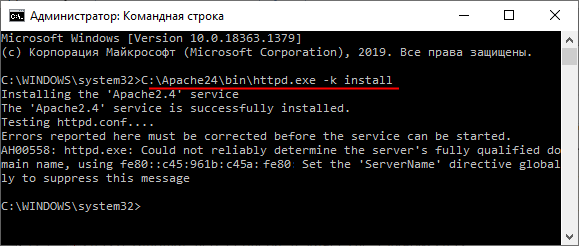
То есть в данном случае прописываем полный путь к файлу httpd.exe (C:\Apache24\bin\httpd.exe) и далее указываем команду на установку службы -k install.
Если установка завершится удачно, то в командная строка отобразит сообщение «The Apache2.4 service is successfully installed». Также будет проведено тестирование сервера.
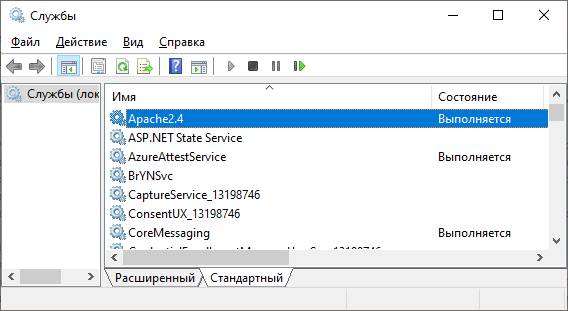
После установки службы убедимся, что она запущена
Время на прочтение8 мин
Количество просмотров277K

Доброго времени суток, уважаемые читатели. В этой статье я хочу поделиться с вами личным опытом настройки Apache под Windows 8.1 x64.
Было время – установил я себе Windows 8.1 и думаю, раз уж пошло на то, «дай ка» Я и Apache подниму! И как обычно меня он очень порадовал (табличка: «Сарказм»). Пришлось повозиться почти целую ночь, чтобы поднять сервер. И мне это удалось! После этого я решил тем самым написать небольшую статью по настройке Apache, чтобы другой человек не тратил на это столько же времени, сколько Я.
После нескольких минут раздумий, решил написать пошаговую инструкцию, которая будет состоять из нескольких разделов:
- Подготовка папок
- Настройка Apache
- Настройка PHP
- Настройка MySQL
- Устанавливаем phpMyAdmin
Ну что ж, приступим.
Подготовка папок
Я очень не люблю, чтобы у меня все валялось, где попало, так что для начала создадим папки, где у нас будут располагаться программы и сайты.
Создадим на диске «C:\» (или где вам удобней) папку «Server»:
C:\Server\
В ней создадим 2 папки:
C:\Server\web – это папка в которой у нас будут лежать программы
C:\Server\domains – а в этой папке будут лежать наши сайты
Итак, в папке \web\ мы создадим 3 папки для apache, php, mysql:
C:\Server\web\apache\
C:\Server\web\php\
C:\Server\web\mysql\
Далее перейдем в папку domains и создадим папку \localhost\
C:\Server\domains\localhost\
Внутри папки у нас будет 2 подпапки: public_html – для файлов сайта; logs – для текстовых файлов, в которых записывается «кто» получал доступ к сайту и какие ошибки в работе сайта появлялись.
C:\Server\domains\localhost\public_html\
C:\Server\domains\localhost\logs\
На этом структура папок заканчивается, переходим к настройке Apache.
Настройка Apache
Для установки Apache нам понадобиться сам Apache (Кэп). Так как у нас Windows 8.1 x64, то устанавливать будем Apache x64.
Для скачивания перейдем по ссылке:
www.apachelounge.com/download/win64
и скачиваем «httpd-2.4.6-win64.zip». Так же нам понадобиться для нормальной работы «Распространяемый пакет Microsoft Visual C++ 2010 (x64)». Для этого скачаем его по этой ссылке:
www.microsoft.com/ru-ru/download/details.aspx?id=14632
и устанавливаем.
После того как скачался наш архив с Apache, откроем его. Открыв архив, мы увидим папку «Apache24», зайдем в нее. Появиться множество папок и файлов программы, все распаковываем в заготовленную ранее папку:
C:\Server\web\apache\
Должно получиться так:
C:\Server\web\apache\bin\
C:\Server\web\apache\cgi-bin\
C:\Server\web\apache\conf\
C:\Server\web\apache\error\
C:\Server\web\apache\htdocs\
C:\Server\web\apache\icons\
C:\Server\web\apache\include\
C:\Server\web\apache\lib\
C:\Server\web\apache\logs\
C:\Server\web\apache\manual\
C:\Server\web\apache\modules\
Папки, такие как \cgi-bin\, \htdocs\, \icons\ и \manual\ нам не нужны – можете их удалить.
Перейдем в папку:
C:\Server\web\apache\conf\
И откроем файл конфигурации Apache – «httpd.conf» любым текстовым редактором. В этом файле каждая строка содержит директивы для настройки Apache, а строки, начинающиеся со знака # (решетка) – комментарий и пояснение. Приступим к настройке:
Файл конфигурации Apache
# директива Apache
ServerRoot “C:/Server/web/apache”
# Слушаем на локальном IP порт (80 по стандарту)
Listen 127.0.0.1:80
# далее подключим библиотеки расширений для Apache
LoadModule rewrite_module modules/mod_rewrite.so
LoadModule php5_module "C:/Server/web/php/php5apache2_4.dll"
# указываем Apache, что файлы с расширением php, нужно воспринимать как php-скрипты
AddHandler application/x-httpd-php .php
# укажем расположение файла настроек php
PHPIniDir “C:/Server/web/php”
# изменим имя сервера
ServerName 127.0.0.1:80
# изменим доступ к директории
<Directory />
Options Includes Indexes FollowSymLinks
AllowOverride All
Allow from all
# директория с нашими сайтами
DocumentRoot “C:/Server/domains”
# индексные файлы, по приоритету.
<IfModule dir_module>
DirectoryIndex index.php index.html index.htm index.shtml
# папка для log-файлов
ErrorLog “C:/Server/domains/logs/error.log”
CustomLog “C:/Server/domains/logs/access.log”
# добавим alias для phpMyAdmin, и поправим alias для cgi
<IfModule alias_module>
Alias /pma “C:/Server/domains/phpMyAdmin”
ScriptAlias /cgi-bin/ “C:/Server/web/apache/cgi-bin/”
# правим путь для cgi
<Directory “C:/Server/web/apache/cgi-bin”>
AllowOverride None
Options None
Require all granted
# типы файлов
<IfModule mime_module>
…
AddType text/html .shtml
AddOutputFilter INCLUDES .shtml
AddType application/x-httpd-php .php
AddType application/x-httpd-php-source .phps
# Другие конфиги:
Include conf/extra/httpd-mpm.conf
Include conf/extra/httpd-autoindex.conf
Include conf/extra/httpd-vhosts.conf
Include conf/extra/httpd-manual.conf
Include conf/extra/httpd-default.conf
<IfModule setenvif_module>
BrowserMatch "MSIE 10.0;" bad_DNT
<IfModule headers_module>
RequestHeader unset DNT env=bad_DNT
На этом заканчивается настройка httpd.conf.
В конфигурационном файле Apache httpd.conf были подключены дополнительные конфиги:
Include conf/extra/httpd-mpm.conf
Include conf/extra/httpd-autoindex.conf
Include conf/extra/httpd-vhosts.conf
Include conf/extra/httpd-manual.conf
Include conf/extra/httpd-default.conf
Откроем файл «C:\Server\web\apache\conf\extra\httpd-mpm.conf» и быстро пробежимся по нему.
# указываем, где у нас будет храниться pid-файл:
<IfModule !mpm_netware_module>
PidFile “C:/Server/web/apache/logs/httpd.pid”
Остальные параметры оставляем без изменений. Откроем файл «httpd-autoindex.conf», изменим там только строки с путем:
Alias /icons/ "c:/Server/web/apache/icons/"
<Directory "C:/Server/web/apache/icons">
Options Indexes MultiViews
AllowOverride None
Require all granted
Далее переходим к файлу «httpd-vhosts.conf», удаляем его содержимое. После того, как мы это сделали, начинаем наполнять его заново:
Файл хостов Apache
# на примере доменная localhost
<VirtualHost localhost:80>
DocumentRoot "C:/Server/domains/localhost/public_html"
ServerName localhost
ErrorLog "C:/Server/domains/localhost/logs/error.log"
CustomLog "C:/Server/domains/localhost/logs/access.log" common
# добавим для будущего phpMyAdmin (не забываем создать папку)
<VirtualHost phpmyadmin:80>
DocumentRoot "C:/Server/domains/phpmyadmin/public_html"
ServerName localhost
ErrorLog "C:/Server/domains/phpmyadmin/logs/error.log"
CustomLog "C:/Server/domains/phpmyadmin/logs/access.log" common
На этом редактирование файла заканчивается. Далее в оставшихся файлах правим только пути:
Файл «httpd-manual.conf»:
AliasMatch ^/manual(?:/(?:da|de|en|es|fr|ja|ko|pt-br|ru|tr|zh-cn))?(/.*)?$ "C:/Server/web/apache/manual$1"
<Directory "C:/Server/web/apache/manual">
В файле «httpd-default.conf» никаких изменений не производиться. На этом настройка конфигурации Apache завершается.
Настройка PHP
Раз у нас Windows 8.1 x64 и Apache x64 установлен и настроен, то и php должно быть x64.
Идем на сайт:
www.anindya.com/tag/php
и скачиваем архив php последней версии. Нам нужен php как модуль, т.е. для этого скачиваем Thread Safe. После того как архив скачался, открываем его и переносим содержимое в папку «C:\Server\web\php\». Создадим две пустые папки «tmp» и «upload». Далее в этой папке ищем файл «php.ini-development» и переименовываем его в «php.ini». Открываем файл в текстовом редакторе и изменяем директивы (комментирования строк в файле начинается с точки с запятой).
Настройка php.ini
short_open_tag = On
zlib.output_compression = On
post_max_size = 64M
include_path = ".;С:\Server\web\php\includes"
extension_dir = "C:/Server/web/php/ext"
upload_tmp_dir = "C:/Server/web/php/upload"
upload_max_filesize = 64M
extension=php_bz2.dll
extension=php_curl.dll
extension=php_gd2.dll
extension=php_mbstring.dll
extension=php_mysql.dll
extension=php_mysqli.dll
extension=php_pdo_mysql.dll
extension=php_sockets.dll
extension=php_sqlite3.dll
; в секции [Date] указываем временную зону нашего сервера (http://php.net/date.timezone)
date.timezone = "Asia/Yekaterinburg"
session.save_path = "С:/Server/web/php/tmp/"
На этом настройка php заканчивается.
Настройка MySQL
Ставим MySQL x64 как сокет под windows. Скачиваем архив с последней версией MySQL x64:
dev.mysql.com/downloads/mysql
В низу страницы находим Windows (x86, 64-bit), ZIP Archive и жмем на кнопку «Download». Вам перекинет на страницу регистрации на сайте. Нажимаем внизу страницы «No thanks, just start my download», запуститься скачивание архива MySQL. После того как скачался архив откроем его и перенесем все содержимое папки в «C:\Server\web\mysql\»
Теперь открываем файл настроек MySQL – «C:\Server\web\mysql\my-default.ini». Удаляем все его содержимое и вносим туда свои данные.
[client]
port=3306
host=127.0.0.1
[mysqld]
port=3306
bind-address=127.0.0.1
enable-named-pipe
basedir="C:/Server/web/mysql/"
datadir="C:/Server/web/mysql/data/"
sql_mode=NO_ENGINE_SUBSTITUTION,STRICT_TRANS_TABLES
Вот и всё. В конфигурационном файле мы указали, что скрипты могут обращаться к серверу и по локальному IP, и по сокет-соединению.
Осталось дело за малым. Добавим в системную переменную «PATH» пути к Apache и MySQL, для этого:
- Перетащите курсор мыши в правый нижний угол экрана
- Щелкните на значке «Поиск» и введите: панель управления
- Выберите System (Система)-> Advanced (Дополнительные параметры системы)
- Выберите Environment Variables (Переменные среды), в меню System Variables (Системные переменные), найдите переменную PATH и щелкните на ней.
- Пропишите пути к Apache и MySQL:
;C:\Server\web\apache\bin;C:\Server\web\mysql\bin
Далее установим службы Apache и MySQL. Для этого воспользуемся сочетанием клавиш «Win+X», появиться выпадающее меню в левом нижнем углу. Выберем «Командная строка (администратор)».
В командной строке вводим, для установки Apache:
httpd –k install
для установки MySQL:
mysqld.exe --install MySQL --defaults-file=”C:\Server\web\mysql\my-default.ini”
Установим пароль для MySQL-пользователя. Для этого запустим службу MySQL командой:
NET start MySQL
После того как служба запустилась, установим пароль:
mysqladmin –u root password ВашПароль
В файл «httpd-vhosts.conf» мы прописали два сайта, для того чтобы браузер мог их увидеть, названия сайтов нужно добавить в файла «hosts». Перейдем в папку:
C:\Windows\System32\Drivers\etc\
откроем файл «hosts» любым текстовым редактором (запустить от имени администратора) и в конец файла добавим:
127.0.0.1 localhost
127.0.0.1 phpmyadmin
Сохраняем файл.
Для удобства запуска и остановки служб Apache и MySQL создадим файлы start-server.bat и stop-server.bat.
Для этого перейдем в папку «C:\Server\» и создадим два этих файла.
Содержание «start-server.bat»:
@echo off
NET start Apache2.4
NET start MySQL
Содержание «stop-server.bat»:
@echo off
NET stop Apache2.4
NET stop MySQL
Настройка Apache, PHP и MySQL на этом закончена. Для того чтобы протестировать сервер, давайте в папке «C:\Server\domains\localhost\public_html» создадим файл «index.php» с содержимым:
<?php
    echo phpinfo();
Далее запустим наш сервер, для этого запустите «start-server.bat» от имени администратора. После того как сервер запустился, откройте браузер и введите в адресной строке «localhost».
Должна отобразиться страница с информацией о PHP.
Устанавливаем PhpMyAdmin
Скачиваем последнюю версию PhpMyAdmin отсюда:
www.phpmyadmin.net/home_page/index.php
Открываем скаченный архив и переносим содержимое его папки в папку для нашего домена «C:\Server\domains\phpmyadmin\public_html\».
Находим файл «config.sample.inc.php», делаем его копию и переименовываем копию в «config.inc.php». Открываем файл текстовым редактором и меняем данные:
<?php
// Желательно сменить секретный код
$cfg['blowfish_secret'] = 'a8b7c6d';
$i = 0;
$i++;
$cfg['Servers'][$i]['auth_type'] = 'cookie';
$cfg['Servers'][$i]['host'] = 'localhost';
$cfg['Servers'][$i]['connect_type'] = 'tcp';
$cfg['Servers'][$i]['compress'] = false;
$cfg['Servers'][$i]['extension'] = 'mysqli';
$cfg['Servers'][$i]['AllowNoPassword'] = false;
$cfg['UploadDir'] = '';
$cfg['SaveDir'] = '';
?>
Сохраняем и закрываем файл. Открываем в браузере сайт «http://phpmyadmin» и наслаждаемся.
Статья получилась объемная, но надеюсь полезная.
Apache Server Configuration File
Apache has a great number of directives which you can set and manipulate in order to set your server’s behavior.
Every server administrator will often update some of the directives, it all depends on their particular needs. Every person working with the Apache server is likely to encounter these directives.
Apache HTTP Server is configured by placing directives in plain text configuration files, the main configuration file is usually called httpd.conf. The Apache HTTP Server configuration file is /etc/httpd/conf/httpd.conf. The httpd.conf file is well-commented and mostly self-explanatory.
Changes to the main configuration files are only taken by Apache only if started/restarted.It stores information on various functions of the server, which can be edited by removing or adding a number sign “#” at the beginning of the line, thus setting values for each directive.
Apache configuration files contain one directive per line. The backslash “\” may be used as the last character on a line to indicate that the directive continues onto the next line. There must be no other characters or white space between the backslash and the end of the line.
Directives in the configuration files are case-insensitive, but arguments of directives are case sensitive. Lines that begin with the hash character “#” are considered comments, and are ignored.
Basic Paths of httpd.conf file in Unix/Linux system.
/var/www/conf/httpd.conf
/usr/local/apache/conf/httpd.conf
/etc/httpd/conf/httpd.conf
httpd.conf on windows
D:\xampp\apache\conf\httpd.conf
Let’s discuss some most basic directives of Apache Server:
ServerName
The ServerName directive is used to set the host name of the server, this is how the server identifies itself. It uses this name when responding to HTTP requests.
You can set this directive either in the server’s configuration or virtual hosts. The location of your configuration files depend on both the Apache version and Linux distribution.
<VirtualHost *:80>
ServerAdmin  webmaster@localhost
DocumentRoot  /var/www
ServerName  www.examplesite.com
.
</VirtualHost>
If the ServerName directive is not specified, the server tries to obtain it by performing a reverse DNS look-up on its IP address. You should always set a ServerName for the server explicitly; it is the only value you need to set to get your server running after installation.
You will have to use the IP address of your machine if you don’t yet have a registered domain name. Otherwise, you would need to add the domain name and IP address to the server’s hosts file- the same as you do with your PC’s hosts file. By doing this, the server checks its hosts file before consulting with the DNS server.
Assuming our domain name is www.examplesite.com and our server’s IP address is 117.220.48.20, you need to add the following line to the server’s hosts file (/etc/hosts):
117.220.48.20 www.examplesite.com examplesite.com
After editing the hosts file, you need to restart (or stop and start) Apache.
Listen
The Listen directive tells Apache what IP addresses and/or ports it should listen to for incoming requests. If nothing is specified, Apache listens to all addresses and ports on the machine. The default configuration sets the server to listen to port 80, the default port for HTTP communication.
If you only specify an IP address, the server will respond to requests coming to all ports of that address (also called an interface). If only a port number is specified, then Apache responds to requests on the specified port arriving at all interfaces on the machine. If an address and port combination is supplied, then Apache only responds to those specific interface/port combinations.
If your server installation has separate configuration files, you should be able to find or set this directive in the ports.conf file.
You can find this file in the same location as your Apache configuration files (mine is /etc/apache2/ports.conf, but that might be different for other Apache versions and/or Linux distributions).
Let’s assume our example site is at IP address 117.220.48.20. To set Apache to listen to ports 80 and 443, the respective default ports for HTTP and HTTPS, you need to enter the following directives in your ports.conf file:
Listen 117.220.48.20:80
Listen 117.220.48.20:443
Alternatively, if you want Apache to listen to ports 80 and 443 on all interfaces regardless of the IP address, you can enter the following:
Listen 80
Listen 443
Web User and Group
On Unix operating systems, it’s a good idea to configure Apache to run under a specific user and group instead of root. Doing so makes the server more secure and less vulnerable to attacks. Ideally, the user and group you set should not be able to login to the server (ie: have no login credentials) and no login shell; they will just be used for handling web client requests. Set the Apache user’s home directory to the web server’s document directory, usually located at /var/www or /usr/local/apache2/htdocs.
groupadd anyUserName
useradd -d /var/www  -g anyUserName -s /bin/false
The example above uses anyUserName as our web user and group; just use a name not reserved for other processes. -d /var/www sets the home directory of the new account to /var/www, and -s /bin/false ensures the new account has no shell access. Next, you need to modify your config file to use the new Apache user and group. If yours says:
User ${APACHE_RUN_USER}
Group ${APACHE_RUN_GROUP}
Then you need to find where these variables are defined and change their values. Usually, the above directive is preceded by a comment letting you know exactly where to set the new values. Otherwise, you will just insert the new user and group name in place of the old. So your final config lines could look like this:
User anyUserName
Group anyUserName
ServerRoot
Apache’s important files, like the server’s configuration, error, and log files are kept at the top of the directory tree. This location is the ServerRoot, and you can set a different value in Apache’s main config file. Depending on your installation, the default can be something like /usr/local/apache2 or /etc/apache2. Any Apache directives using a relative path will, by default, append to the root path specified in ServerRoot.
When you first install your server, the configuration and log files are placed in the ServerRoot. You can change its value to a new directory, but make sure to copy the configuration files to the new location. Also, make sure you do not to add a trailing slash to the path when you modify the value.
ErrorLog
When an error occurs, Apache logs the error to a log file. The location of the error log is determined by the value specified using the ErrorLog directive. This file is critical because you will refer to it in order to debug errors, solve server configuration problems, and optimize the server.
If the server hosts multiple sites and you want to have separate error logs for each site, you can specify a different file and location for each site in the virtual hosts file.
If you don’t, then all sites’ errors are logged in the default error log, typically located at /usr/local/apache2/logs/error_log or /var/log/apache2/error.log (once again, depending on your installation).
Please note that the above log paths are absolute.
ErrorLog logs/error_log
This is a relative path. Therefore, the actual error log location is $ServerRoot/logs/error_log.
The LogLevel directive controls the level of the messages logged in the error logs. By default, it is set to warn, meaning that all messages with the value of warning and higher (as in more critical) will be logged. You can change the value of this directive to adjust the logging level to your preference.
DocumentRoot
The DocumentRoot directive sets the location of the server’s public files, like htdocs. This is the default Apache web server document directory, and its contents are readily and publicly available to clients connecting through the web. It contains the static and dynamic content to be served once the server receives an HTTP request for them. Since files and sub-directories under htdocs are available for the public, it is very important to handle permissions correctly in order to minimize the ability to compromise the server’s safety and security.
Depending on your installation, the default DocumentRoot location could be something like /var/www or /usr/local/apache2/htdocs.
If you are hosting multiple websites on the same server, you need to set a different DocumentRoot for each site. This can be done within the respective VirtualHost directive that corresponds to each site. Let’s say you have three websites on the same server (eg: www.examplesite1.com, www.examplesite2.com, www.examplesite3.com), your virtual hosts file might look something like the following:
<VirtualHost www.examplesite1.com>
DocumentRoot  /usr/local/apache2/htdocs/example_site1
ServerName  www.examplesite1.com
.
</VirtualHost>
To set a separate error log for each of these domains, which is really a good idea, then your virtual hosts will like this:
<VirtualHost www.examplesite1.com>
DocumentRoot  /usr/local/apache2/htdocs/example_site1
ServerName  www.examplesite1.com
ErrorLog  /usr/local/apache2/logs/site1_error_log
.
</VirtualHost>

<VirtualHost www.examplesite2.com>
DocumentRoot  /usr/local/apache2/htdocs/example_site2
ServerName  www.examplesite2.com
ErrorLog  /usr/local/apache2/logs/site2_error_log
.
</VirtualHost>
PidFile
The ServerName directive is used to set the host name of the server; this is how the server identifies itself.
The Apache service first starts as root in order to bind to the privileged port 80 for HTTP (or 443 if using SSL) because port numbers less than 1024 are only reserved to the root user. After the initial execution, children processes spawn to handle client requests which are owned by the Apache user specified in the configuration file. For this reason, you will find one root process and multiple processes belonging to the web user; this root process is the first one initiated when Apache starts. It has a process ID, and this ID is stored in the Pid file on the server. You can control the location of the Pid file by using the PidFile directive in the configuration file.
If you open the file specified in the PidFile directive, you will find a number that corresponds to the parent process ID. You can stop the Apache server by killing the process using its ID number. However, kill the process only as a last resort.
File Inclusion
It is possible to separate server configuration and settings into multiple files; in fact, some Apache installations actually do so. These multiple files can then be included in the original server config file. This approach is ideal in order to keep your config file light and clear, but it also forces you to look inside multiple files residing in different locations to completely understand how Apache is configured. In any case, below is the syntax for including external config files. Whether or not you want to use file inclusion is up to you:
# Include ports listing:
Include /etc/apache2/ports.conf

# Include generic snippets of statements
Include /etc/apache2/conf.d/

# Include module configuration:
Include /etc/apache2/mods-enabled/*.load
Include /etc/apache2/mods-enabled/*.conf
As you can see from the examples above, you can include a specific file by name, a directory (and thus all files therein), or multiple files by using wildcards.
Start, Stop, and Restart Apache
Every time you edit one of Apache’s configuration files, you need to restart (or stop and start) the service so that Apache can load the new configuration.
Otherwise, your changes will just remain on file for the next restart or server start. If your changes cause syntax errors in the configuration files, restarting will show you error messages concerning those mistakes. Additionally, the
Apache web server will not start until you fix those errors.
To stop the Apache server, type in the following command in the console:
/etc/init.d/apache2 stop
To start the Apache server, type in the following command:
/etc/init.d/apache2 start
To restart the Apache server, type in the following command:
/etc/init.d/apache2 restart
Naturally, you must be logged in with a privileged user in order to execute these commands. You could, however, still run the above commands by adding sudo before each line. This basically tells the system that you are executing the command as a super user (hence the naming, sudo), in which case the system asks you to enter a password before it executes your command. If you don’t know that password, ask your server admin. Preceding the above commands with sudo:
sudo /etc/init.d/apache2 stop
sudo /etc/init.d/apache2 start
sudo /etc/init.d/apache2 restart
If you have XAMPP, then you will get a User Interface to updating these directive as well as the start and stop the Apache service on a single click.
In the day to day of PHP programming I am sure you usually need to update these Apache directive, in the same way These above information will be helpful to you.
Let me know, if you need any help related to above, I’ll be glad to help you always.
Post you comment with your suggestion or queries. Thanks!
В предыдущем материале, Что необходимо для установки веб-сервера, мы занимались поиском и скачиванием необходимых версий дистрибутивов для того, что бы установить на домашний компьютер локальный веб-сервер Apache.
В моем случае, я буду разворачивать локальный веб-сервер на базе 64-разрядной операционной системе Microsoft Windows 7.
Для этого с ресурса apachehaus.com мной был скачен архив Apache 2.4.12 (httpd-2.4.12-x64-vc11.zip) и по ссылки http://www.microsoft.com/en-us/download/details.aspx?id=30679 пакет Microsoft Visual C++ 2012.
Скачивание и установка пакета Visual C++
Первым делом устанавливаем пакет Microsoft Visual C++ 2012.
Если у Вас возникли проблемы с выбором и скачиванием пакета Visual C++, найдите в архиве Apache файл с ознакомительными сведения (файл readme). В нем должна быть ссылка на скачивание пакета Visual C++ c сайта www.microsoft.com. Скачайте и установите пакет Visual C++.
скачивание и установка пакета Visual C++
Распаковка архива Apache
Открываем скаченный с веб-сервером архив и распаковываем (копируем) директорию «Apache24» в корень локального диска C:
Для базовой настройки веб-сервера Apache перейдем в директорию «C:\Apache24\conf\» и найдем файл «httpd.conf». Откроем данный файл в текстовом редакторе, просмотрим его и по необходимости внесем изменения. Большая часть файла состоит из комментарий и пояснений, начинающихся со знака # (решетка). В качестве текстового редактора могу посоветовать Notepad++.
Конфигурационный файл httpd.conf
httpd.conf — главный файл конфигурации веб-сервера Apache, содержащий директивы, управляющие работой веб-сервера.
Notepad++ — свободный текстовый процессор (текстовый редактор) с открытым исходным кодом для Windows с подсветкой синтаксиса большого количества языков программирования и разметки.
Изменим значения основных директив конфигурационного файла httpd.conf
ServerRoot "С:/Apache24"
каталог, в котором расположен веб-сервер
Listen 80
номер порта для веб-сервера
LoadModule rewrite_module modules/mod_rewrite.so
Для загрузки модуля mod_rewrite раскомментируем строку
AddDefaultCharset utf-8
значение кодировки по умолчанию
ServerAdmin admin@example.com
Email адрес администратора веб-сервера
ServerName localhost:80
определяет имя и порт, который используется сервером для идентификации себя.
DocumentRoot "C:/Apache24/htdocs"
Назначаем корневую директорию управления сайтами
ErrorLog "logs/error.log"
расположение файла журнала ошибок.
LogLevel warn
уровень ошибок
CustomLog "logs/access.log" common
Установка сервиса (службы) Apache
Далее необходимо установить сервис Apache как службу. Для этого нам понадобится командная строка. Командная строка должна быть запущена от имени администратора.
Командная строка — позволяет вводить и выполнять команды операционной системы MS-DOS и другие компьютерные команды. Вводя команды, вы можете выполнять на компьютере различные задачи, не пользуясь мышью или сенсорным вводом.
Для того чтобы запустить командную строку необходимо нажать на кнопку «Пуск». В поле поиска введите «cmd» или «Командная строка», затем в списке результатов поиска наведите мышкой на найденный пункт («cmd» или «Командная строка»), щелкните по нему правой кнопкой мыши и выберите пункт «Запуск от имени администратора».
Перед нами появится окно консоли.
C:\Windows\system32>
Теперь необходимо перейти в директорию веб-сервера «bin» где находится файл «httpd.exe». Для этого используем команду «cd» и указываем полный путь до директории где находится файл «httpd.exe».
C:\Windows\system32>cd C:\Apache24\bin
C:\Apache24\bin>
Для того, что бы установить сервис Apache как службу, необходимо выполнить команду
C:\Apache24\bin>httpd.exe -k install
При удачном выполнение установки получаем примерно такой ответ:
Installing the Apache2.4 service
The Apache2.4 service is successfully installed.
Testing httpd.conf....
Errors reported here must be corrected before the service can be started.
Перевод:
Установка службы Apache2.4
Служба Apache2.4 успешно установлен.
Тестирование httpd.conf ….
Ошибки, описанные здесь, должны быть исправлены и услуга может быть запущена.
Строка «The Apache2.4 service is successfully installed» означает, что служба установлена.
Если после строки «Errors reported here must be corrected before the service can be started» нет никаких сообщений, это означает, что в конфигурационных файлах не найдено критических ошибок и служба Apache24 запущена. Проверить ее работу можно открыв в браузере страницу localhost или страницу 127.0.0.1. Если страница по данным адресам открывается, то Вы добились желаемого, веб-сервер Apache установлен.
В случае, если после строки «Errors reported here must be …» присутствуют сообщения, то необходимо их исправить и перезапустить службу Apache. Обращаю Ваше на фразу «перезапустить», а не установить, ведь служба Apache24 уже установлена, просто она не может быть запущена, так как имеет ошибки в конфигурации.
Рассмотрим возможные ошибки при выполнении команды установки службы Apache24
... Failed to open the Windows service manager, perhaps you forgot to log in as Administrator?
Перевод: Не удалось открыть менеджер службы Windows, возможно, вы забыли войти как администратор?
Решение: Откройте командную строку от имени администратора
... Syntax error on line N of C:/Apache24/conf/httpd.conf: ...
Перевод: Синтаксическая ошибка в строке номер N в файле httpd.conf
... Service is already installed.
Перевод: сервис уже установлен (услуга уже установлена)
Управление службой Apache
Для управления запуском и остановкой сервиса Apache можно использовать «ApacheMonitor». Откройте директорию веб-сервера bin («C:\Apache24\bin») и запустите файл: ApacheMonitor.exe. В системном трее появится значок Apache, с помощью которого можно быстро запускать/останавливать службу Apache.
А также, так как сервис Apache устанавливается как служба, после его установки, управлять его запуском/остановкой можно в окне списка служб («Пуск» → пункт «Панель управления» → «Администрирование» → «Службы»)
При установки Apache, служба, по умолчанию получает имя «Apache» или «Apache24». Если, в силу каких либо причин, имя службы нас не устраивает, есть возможность задать собственное имя, используя в командной строке параметр «-n» c указанием имени службы через пробел. (Если в имени службы содержится пробел необходимо обернуть его в кавычки, т. е. «name service»). Рассмотрим дополнительно команды для управления сервисом Apache:
устанавливаем службу
C:\Apache24\bin\httpd.exe -k install
или
C:\Apache24\bin\httpd.exe -k install -n name_service
C:\Apache24\bin\httpd.exe -k install -n "name service"
запускаем службу
C:\Apache24\bin\httpd.exe -k start
или
C:\Apache24\bin\httpd.exe -k start -n name_service
C:\Apache24\bin\httpd.exe -k start -n "name service"
останавливаем службу
C:\Apache24\bin\httpd.exe -k stop
или
C:\Apache24\bin\httpd.exe -k stop -n name_service
C:\Apache24\bin\httpd.exe -k stop -n "name service"
удаляем службу
C:\Apache24\bin\httpd.exe -k uninstall
или
C:\Apache24\bin\httpd.exe -k uninstall -n name_service
C:\Apache24\bin\httpd.exe -k uninstall -n "name service"
получаем информации о версии службы
C:\Apache24\bin\httpd.exe -V
получаем конфигурацию службы
C:\Apache24\bin\httpd.exe -k config
или
C:\Apache24\bin\httpd.exe -k config -n name_service
C:\Apache24\bin\httpd.exe -k config -n "name service"
Данная команда тестирует конфигурационный файл httpd.conf и отображает ошибки
Управлять службами также можно, используя в командной строке команду «net». Рассмотрим несколько примеров.
получаем список служб
C:\Windows\system32>net start
запускаем службу
C:\Windows\system32>net start Apache2.4
или
C:\Windows\system32>net start "name service"
останавливаем службу
C:\Windows\system32>net stop Apache2.4
или
C:\Windows\system32>net stop "name service"
Удаление службы используя командную строку
На моей практике был случай, когда я удалил файлы веб-сервера, забыв перед этим остановить службу и удалить ее. Соответственно служба не работала, так как файлы были удалены, но висела в списках. При развертывании нового веб-сервера, а именно при попытки установить службу, консоль ругалась, что данная служба уже установлена.
Для решения данной проблемы пришлось удалить службу, выполнив в командной строке следующую команду:
C:\Windows\system32>sc delete ServiceName
или
C:\Windows\system32>sc delete "Service Name"
где ServiceName или «Service Name» имя удаляемой службы
По итогам изучения данного материала мы рассмотрели процесс установки локального веб-сервера, познакомились с главным конфигурационным файлом httpd.conf и его основными директивами. Так же мы рассмотрели механизмы управления службой Apache, такие как: запуск, остановка, удаление, просмотр версии.
На следующем шаге мы подключим модуль интерпретатора языка программирование PHP к установленному веб-серверу, и тем самым укажем веб-серверу, что он должен исполнять php скрипты.
Last Updated :
06 Jun, 2024
Apache is a powerful and flexible web server widely used for hosting websites. Setting it up in a Windows environment is relatively straightforward. This guide will provide a step-by-step process to install and configure the Apache web server on a Windows machine.
Steps to configure an Apache web server
Step 1: Download Apache
1. Go to the Apache Lounge website to download the latest version of the Apache HTTP Server.
2. Download the binary version suitable for your system (usually found under the «Apache HTTPD» section).
Step 2: Install Apache
Extract the downloaded zip file to your preferred location (e.g., C:\Apache24).
Step 3: Configure Apache
1. Open the extracted folder and navigate to the conf directory.
2. Locate the httpd.conf file(C:\Apache24\conf) and open it with a text editor (e.g., Notepad).
Important Configuration Changes
1.ServerRoot: Set the server root to the directory where Apache is installed.
ServerRoot "C:/Apache24"
2.Listen: Set the port number you want Apache to listen on (default is 80).
Listen 80
3.ServerName: Specify the server name and port.
ServerName localhost:80
4.DocumentRoot: Set the directory where your web files will be located.
DocumentRoot "C:/Apache24/htdocs"
5.Directory: Update the <Directory> directive to match the DocumentRoot.
<Directory "C:/Apache24/htdocs">
    Options Indexes FollowSymLinks
    AllowOverride None
    Require all granted
</Directory>
Optional Step: Change Port and Root Directory
If you want to change the default port and root directory for serving files, follow these steps:
1. Change Port:
- Open httpd.conf and find the Listen directive.
- Change the port number to the desired value (e.g., 8080).
Listen 8080
Update the ServerName directive to reflect the new port.
ServerName localhost:8080
2. Change DocumentRoot:
- Decide on the new directory where you want to serve your web files (e.g., D:/MyWebFiles).
- Update the DocumentRoot directive.
DocumentRoot "D:/MyWebFiles"
- Update the <Directory> directive to match the new DocumentRoot.
<Directory "D:/MyWebFiles">
    Options Indexes FollowSymLinks
    AllowOverride None
    Require all granted
</Directory>
Step 4: Install Apache as a Windows Service
1.Open Command Prompt as an administrator.
2.Navigate to the Apache bin directory.
cd C:\Apache24\bin
3.Install Apache as a service:
httpd.exe -k install
Step 5: Start Apache
1.Start Apache service:
httpd.exe -k start
Alternatively, you can start and manage the Apache service via the Services management console:
- Open the Run dialog (Win + R), type services.msc, and press Enter.
- Find «Apache2.4» in the list, right-click, and select «Start».
Step 6: Verify Apache Installation
Open a web browser and navigate to http://localhost. You should see the «It works!» default Apache page.
or
open the command prompt as administrator and type the following command.
httpd -v

Step 7: Adjust Firewall Settings
Ensure that the Windows Firewall allows traffic on the port Apache is using (usually port 80).
- Open the Control Panel and go to System and Security > Windows Firewall > Advanced settings.
- In the left pane, click on Inbound Rules.
- In the right pane, click on New Rule.
- Select Port and click Next.
- Select TCP and specify the port number (80).
- Allow the connection and apply the rule to the appropriate profiles (Domain, Private, Public).
- Name the rule (e.g., «Apache HTTP») and finish the wizard.
Conclusion
You have successfully installed and configured the Apache web server on your Windows machine. You can now place your web files in the htdocs directory and start serving web content. For further customization and advanced configuration, refer to the Apache documentation.