
How do I use HP PC Hardware Diagnostic Tools?
Our diagnostic tools are used to determine if your computer’s hardware is functioning properly. HP PC Hardware Diagnostics Windows come pre-installed on new HP computers, if not on your computer, you can download it using the download button below:
Video: Learn how to use HP PC Hardware Diagnostic Tools
HP PC Hardware Diagnostics Windows
The HP PC Hardware Diagnostics Windows tool offers driver checks and updates on select components while also providing the ability to test the hardware components of your computer, quickly diagnoses hardware failures, streamlines support calls to HP, and can help avoid returns of working hardware. Supports Windows 10 and 11 Operating Systems.
Available for download on your HP PC
HP PC Hardware Diagnostics Windows v Install and stay updated
Enter the failure ID code to start the repair process.
If our support tools have determined your PC needs a repair and you received a 24 digit error code please enter it below along with your product number. You will then be directed to the resources you need to get your PC repair started..
* required field
Need to Diagnose issues outside of the Operating System?
The HP PC Hardware Diagnostics UEFI Tool is a comprehensive set of tests for identifying, isolating and diagnosing hardware issues. The tool executes (in the UEFI environment) outside of the operating system allowing hardware failures to be isolated from issues that could be caused by the operating system or other software components.
Video: Learn how to boot windows
Computer won’t boot? Try UEFI Diagnostics
The HP PC Hardware Diagnostics UEFI application is a comprehensive set of tests to help identify, isolate, and diagnose possible HP Personal Computer hardware issues. This tool runs outside of the Operating System, is easy to use, and in just a few simple steps can greatly assist in troubleshooting hardware problems quickly.
Available for download on your HP PC
HP PC Hardware Diagnostics UEFI – v
Learn how to troubleshoot your computer when it won’t start, otherwise known as “no boot”. This video will help you isolate where the problem is occuring and give you steps on how to fix it.
More troubleshooting options
Video: Learn how to turn on your PC
Troubleshooting didn’t solve the issue ?
Contact us
HP PC Docks and Displays Diagnostics Windows
HP PC Docks and Displays Diagnostics Windows is a Windows-based tool that helps HP customers and HP support personnel diagnose issues with the HP dock and display hardware connected to your PC.
Available for download on your HP PC
HP PC Docks and Displays Diagnostics Windows v
Available for download on your HP PC
Dock and Accessories Application Database and Firmware Files
Remote PC Hardware Diagnostics UEFI
The Remote PC Hardware Diagnostics UEFI can be configured to download and execute HP PC Hardware Diagnostics UEFI and optionally, upload the diagnostics log via an F10 setup. This is available only on select business products, click Learn More below for more information.
Available for download on your HP PC
Remote HP PC Hardware Diagnostics UEFI v
Learn More
HP PC Hardware Diagnostics 4-IN-1 USB KEY
For HP authorized service partners and IT professionals who need to support a mixed environment of older and newer HP/Compaq PCs, the HP PC Hardware Diagnostics 4-in-1 USB Key is a diagnostic tool that supports a wide range of HP Desktop and Notebook PCs. This Key includes HP PC Hardware Diagnostics Windows, HP PC Hardware Diagnostics UEFI, HP PC Docks and Displays Diagnostics Windows, and files supporting recovery of a corrupted BIOS on supported systems.
Available for download on your HP PC
HP PC Hardware Diagnostics 4-in-1 USB Key v
Additional Softpaqs for BIOS recovery support on 2024 (and previous) products
HP PC Hardware Diagnostics Windows — 7, 8.1 and early versions of 10
HP PC Hardware Diagnostics Windows allows you to test hardware components from your desktop while within the Windows operating system. These tests allows you to quickly know if you have a hardware failure, simplifies the troubleshooting to streamline support calls to HP, and avoids returns of working hardware components.
Available for download on your HP PC
HP PC Hardware Diagnostics Windows OS version 10 and lower.(32-bit) v No Auto Update Available
Need help with your printer?
Click below for assistance:
Does your computer make beeping sounds or have blinking lights on boot-up?
Click below for assistance:
HP PC Hardware Diagnostics UEFI is a tool for testing computer hardware. It runs outside your operating system to find issues. To exit HP PC Hardware Diagnostics UEFI, press the Esc key or F10 key on your keyboard.
If these keys don’t work, you can restart your computer. Once it reboots, it should exit the diagnostics screen. For HP laptops that open the diagnostics tool every time you turn on the device, you may need to change some settings.
The UEFI (Unified Extensible Firmware Interface) environment allows for better hardware checks than older systems. It helps find problems with your computer’s parts quickly and easily.
| Key | Action |
|---|---|
| Esc | Exit diagnostics |
| F10 | Return to main menu |
| Power button | Restart computer |
Troubleshooting with HP PC Hardware Diagnostics UEFI
HP PC Hardware Diagnostics UEFI is a valuable tool for diagnosing hardware problems on your HP computer. It runs outside of your operating system, allowing you to identify issues even if your computer won’t boot into Windows.
Accessing HP PC Hardware Diagnostics UEFI
There are two main ways to access the tool:
- During startup:
- Turn on or restart your computer.
- Immediately press the Esc key repeatedly, about once every second, until the Startup Menu opens.
- Press the F2 key to select System Diagnostics.
- From Windows:
- Search for and open the HP Support Assistant app.
- In the Troubleshooting and fixes tab, select Hardware diagnostics.
- Click Run hardware diagnostics.
- Select System Tests.
- Click Run once.
- When prompted, click Restart now.
- Follow the on-screen instructions to access the UEFI diagnostics.
Types of Tests
HP PC Hardware Diagnostics UEFI offers several types of tests:
- Fast Test: This quick test checks the main components like your processor, memory, and hard drive.
- Extensive Test: This more thorough test takes longer but checks a wider range of components.
- Symptom Tests: These tests help you pinpoint the cause of specific problems, such as system instability or overheating.
- Component Tests: These tests allow you to individually test specific components like your hard drive, memory, or keyboard.
Understanding the Results
After running a test, you’ll see the results on the screen.
- Passed: The component is working correctly.
- Failed: The component has a problem. The tool might provide a failure ID code that you can use to search for more information online or when contacting HP support.
- Warning: The component might have a problem that could lead to future issues.
Running Tests from a USB Drive
If you can’t access the diagnostics from your hard drive, you can run them from a USB drive.
- Download the latest version of HP PC Hardware Diagnostics UEFI from the HP website.
- Install the diagnostics on a blank USB drive.
- Insert the USB drive into your computer.
- Access the diagnostics by following the steps outlined earlier.
Optimizing Your HP PC’s Performance
Beyond troubleshooting, there are several ways to optimize your HP PC’s performance:
- Keep your system updated: Regularly install Windows updates and HP driver updates to ensure your system is running the latest software and security patches.
- Run disk cleanup: Use the Disk Cleanup tool to remove temporary files and free up disk space.
- Defragment your hard drive: Defragmenting your hard drive can improve performance by organizing files more efficiently.
- Uninstall unnecessary programs: Remove programs you no longer use to free up resources and improve startup times.
- Check for malware: Regularly scan your system for malware to prevent performance issues and security threats.
- Adjust power settings: Choose a power plan that balances performance and energy consumption.
- Upgrade your hardware: Consider upgrading your RAM, storage, or graphics card to improve performance for demanding tasks.
By following these tips and utilizing the HP PC Hardware Diagnostics UEFI tool, you can maintain your HP computer in optimal condition and ensure it runs smoothly.
Accessing HP PC Hardware Diagnostics UEFI
HP PC Hardware Diagnostics UEFI provides tools to check your computer’s hardware. You can access it through different methods depending on your system setup and preferences.
Using the F2 Key at Startup
To enter HP PC Hardware Diagnostics UEFI using the F2 key:
- Turn on or restart your HP computer.
- Press F2 repeatedly before the HP logo appears.
- Select “HP PC Hardware Diagnostics UEFI” from the boot options.
This method is quick and doesn’t require extra devices. It works on most HP models. If F2 doesn’t work, try Esc or F10 instead.
Booting from a USB Drive
You can create a bootable USB drive with HP PC Hardware Diagnostics UEFI:
- Download the latest version from HP’s website.
- Use a tool like Rufus to make the USB bootable.
- Restart your computer and press the boot menu key (often F9).
- Choose your USB drive from the list.
This option is useful if your computer can’t access the built-in diagnostics. It also ensures you have the most recent version.
Navigating the UEFI Environment
Once in the HP PC Hardware Diagnostics UEFI:
- Use arrow keys to move between options.
- Press Enter to select a test or option.
- Choose “Component Tests” to check specific hardware.
- Select “System Tests” for a full system check.
| Key | Function |
|---|---|
| Esc | Exit or go back |
| F1 | Help menu |
| F5 | Refresh |
| F10 | Save and exit |
Remember to disable Secure Boot if you have trouble accessing UEFI. You can re-enable it after running diagnostics.
Performing Diagnostics Tests
HP PC Hardware Diagnostics UEFI offers a range of tests to identify hardware issues. These tests help pinpoint problems with system components, specific symptoms, and overall performance.
Running System Tests
System tests evaluate your computer’s core hardware components. To start, access the HP PC Hardware Diagnostics UEFI menu at startup. Select “System Tests” from the main screen. Choose which components to test:
- Processor
- Memory
- Hard drive
- Video card
- Battery (for laptops)
The tests run automatically. Follow on-screen instructions if additional input is needed. Results appear when complete, indicating pass or fail status for each component.
Symptom Tests
Symptom tests target specific issues you may be experiencing. From the main menu, select “Symptom Tests.” Choose from options like:
- Fan noise
- Overheating
- Blue screen errors
- Boot problems
Each test focuses on the selected symptom. Answer any questions about your issue to guide the diagnostic process. The tool will run relevant checks and provide results to help identify the root cause.
Component Tests
For in-depth analysis of individual parts, use Component Tests. This option allows you to examine specific hardware in detail. Select from:
- Processor
- Memory
- Storage
- Graphics
- Network adapters
These tests are more thorough than System Tests. They may take longer to complete but offer deeper insights into potential hardware failures.
Fast Test and Extensive Test Options
HP PC Hardware Diagnostics UEFI provides two testing modes:
| Test Type | Duration | Thoroughness | Best Used For |
|---|---|---|---|
| Fast Test | 10-20 minutes | Basic checks | Quick overview |
| Extensive Test | 2+ hours | Comprehensive | Intermittent issues |
Fast Test quickly scans for common problems. It’s ideal for regular maintenance or initial troubleshooting. Extensive Test runs a complete set of diagnostics. Use this for persistent or hard-to-diagnose issues.
Interpreting Test Logs and Failure IDs
After completing tests, you’ll receive a log of results. This log includes:
- Tested components
- Pass/Fail status
- Failure IDs for any detected issues
Failure IDs are unique codes that identify specific hardware problems. Note these codes down. They help HP support or technicians understand and address the issue quickly.
To interpret results:
- Review the overall pass/fail status.
- Check individual component results.
- Note any Failure IDs.
- Use HP’s support resources to look up Failure ID meanings.
Understanding these results helps you decide on next steps, whether it’s replacing a part or seeking professional repair.
Resolving Common Hardware Issues
HP PC Hardware Diagnostics UEFI helps identify and fix various hardware problems. It provides tools to check system components and run tests for troubleshooting.
Utilizing HP Support Resources
HP offers several support options to help resolve hardware issues. The HP Support Assistant is a built-in tool that can run diagnostics and update drivers automatically. You can also access online resources like user forums and knowledge bases.
To use HP Support Assistant:
- Open the application from your Start menu
- Click on the “Troubleshooting and fixes” tab
- Select the hardware component you’re having issues with
- Follow the on-screen instructions to run tests or apply fixes
For more complex problems, contacting HP customer support directly may be necessary. They can provide personalized guidance and even arrange for repairs if needed.
Troubleshooting Software with MSConfig
MSConfig (System Configuration) is a Windows utility that can help isolate software-related issues affecting hardware performance. It allows you to control which programs and services start when your computer boots up.
To use MSConfig:
- Press Windows + R and type “msconfig”
- Go to the “Startup” tab
- Uncheck items you don’t need at startup
- Click “Apply” and restart your computer
This process can improve boot times and overall system performance. It’s especially useful if you suspect a third-party program is causing conflicts with your hardware.
Finding an Accepted Solution
When troubleshooting hardware issues, it’s important to find solutions that are proven and accepted by the community. The HP community forums are a great resource for this.
Here’s a table summarizing common hardware issues and their accepted solutions:
| Issue | Accepted Solution |
|---|---|
| Slow boot time | Update BIOS, check startup programs |
| Blue screen errors | Run memory diagnostic, update drivers |
| No display | Check connections, update graphics drivers |
| Overheating | Clean vents, replace thermal paste |
Remember to always back up your data before making significant changes to your system. If you’re unsure about any step, consult with a professional technician to avoid potential damage to your hardware.
Supporting Different Windows Versions
HP PC Hardware Diagnostics UEFI works with various Windows versions. Compatibility varies between Windows 10 and Windows 11 systems. Let’s explore the specifics for each.
Compatibility with Windows 10
Windows 10 supports HP PC Hardware Diagnostics UEFI well. You can access it through the Start menu or by pressing F2 during startup. The tool runs tests on your hardware components.
To use it:
- Open the Start menu
- Type “HP PC Hardware Diagnostics”
- Select the UEFI version
HP Support Assistant helps keep the diagnostics tool updated. It automatically checks for new versions.
If you encounter issues, try updating your BIOS. This often resolves problems with the diagnostics tool on Windows 10.
Compatibility with Windows 11
Windows 11 also works with HP PC Hardware Diagnostics UEFI. The process to access it is similar to Windows 10. However, some newer features may be available.
Key points for Windows 11:
- The latest UEFI version (7.9.0.0) is compatible
- HP Support Assistant can update the tool automatically
- You might need to enable UEFI boot mode in BIOS settings
If the tool doesn’t start, check your Windows 11 version. Ensure you have the latest updates installed. This can fix compatibility issues.
| Windows Version | UEFI Access Method | Update Tool |
|---|---|---|
| Windows 10 | Start menu or F2 at boot | HP Support Assistant |
| Windows 11 | Start menu or F2 at boot | HP Support Assistant |
Remember to run the tool regularly to check your PC’s health on both Windows versions.
Frequently Asked Questions
HP PC Hardware Diagnostics UEFI can be tricky to navigate. These common questions address key issues users face when running diagnostics and exiting the environment.
How can I exit the HP PC Hardware Diagnostics UEFI environment after completing tests?
To exit HP PC Hardware Diagnostics UEFI, press the Esc key. This will prompt a confirmation message. Select “Yes” to exit and reboot your computer.
If the Esc key doesn’t work, try pressing Ctrl+Alt+Delete. This key combination often forces a restart.
What steps should be taken to resolve an error detected by HP PC Hardware Diagnostics UEFI?
First, note down the error message and code. Restart your computer to see if the issue persists.
If the problem continues, visit HP’s support website. Enter your product details and search for solutions related to the specific error.
How do I perform a factory reset from the HP PC Hardware Diagnostics UEFI?
HP PC Hardware Diagnostics UEFI doesn’t offer a direct factory reset option. To reset your PC:
- Exit the diagnostics environment
- Boot into Windows
- Use the built-in reset feature in Windows Settings
Why does my laptop boot into HP PC Hardware Diagnostics instead of Windows?
This often happens due to a corrupted boot sector or BIOS settings issue. To fix it:
- Enter BIOS setup (usually by pressing F10 during startup)
- Check boot order settings
- Ensure the hard drive with Windows is set as the first boot device
What should be done after a test is completed in the HP PC Hardware Diagnostics UEFI?
After a test, review the results carefully. If no issues are found, exit the diagnostics tool and restart your computer.
For failed tests, note the component and error code. Use this information to seek further support from HP.
How can I remove or disable HP PC Hardware Diagnostics UEFI from my system?
You can’t completely remove HP PC Hardware Diagnostics UEFI as it’s part of the system firmware. However, you can prevent it from running at startup:
- Enter BIOS setup
- Look for an option like “HP PC Hardware Diagnostics UEFI”
- Disable this option if available
| Action | Steps |
|---|---|
| Exit Diagnostics | Press Esc, confirm exit |
| Prevent Auto-start | Disable in BIOS settings |
| Resolve Errors | Note error code, seek HP support |
| Factory Reset | Exit to Windows, use reset feature |
The HP PC Hardware Diagnostics is a Unified Extensible Firmware Interface (UEFI) that provides diagnostic tests to see if your PC hardware is working properly, by isolating hardware failures. After seeing a Blue Screen on my Windows 11/10 PC recently, on reboot, I saw the Boot Device Not Found error with an option to click on F2 for System Diagnostics. In this post, we will learn a bit about this free tool from HP for Windows 11/10.

The HP PC Hardware Diagnostics UEFI is an official application from the company that provides a broad set of tests for isolating, identifying, and diagnosing the possible issues on your PC hardware. It comes pre-installed with new HP computers. But, if the application is not available on your system, then you can also download it from the official website and install it.
While it is evident, do note that the tool runs outside the Windows 10 OS. It makes it easy to isolate hardware failures from issues caused either by the OS or any application. It checks for problems in Memory or RAM and Hard Drive. If the test fails, it will show a 24-Digit failure ID. You will need to connect with HP’s customer support with it.
HP PC Hardware Diagnostics comes in two versions — Windows version and UEFI versions. The UEFI version should be used when you cannot boot into Windows. In this post, we will talk about the UEFI version, how it works, and how you can install and use it on EFI Partition or USB drive.
- How to run the UEFI Tests
- UEFI Fast and Extensive test
- How to install HP PC Hardware Diagnostics UEFI
- HP PC Hardware Diagnostics for Windows
How to use HP PC Hardware Diagnostics UEFI
If the computer has the UEFI diagnostic tool installed on the computer, it can be launched using the F2 key. However, if the tool is not installed, you can create a USB. Lets first take a look at how you can use it when it is available on the computer.
Completely power down the computer ( hold the power button for at least five seconds to turn off the computer), and then turn it on. Immediately press the F2 key repeatedly until the UEFI menu opens.UEFI menu will give a couple of diagnostic tools, select the one you want, and follow the on-screen instructions.

In both memory and hard disk test, the tool will run the Fast Test to identify hardware issues quickly. If there is no error detected, but the computer has hardware problems, then it will run the Extensive Test. The later can take hours to complete the test.
UEFI Fast and Extensive test
The screen displays the progress bar on a Command Prompt screen along with the estimated time left to complete the test. You can always press ESC to cancel the test, but do so only when you have no other choice.

If the tool doesn’t find any error, then you should see “Passed” message, else it will kick start the extensive test.

The process is the same for Hard Disk check. In our case, while the Smart Check passed, the Short DTS check failed.
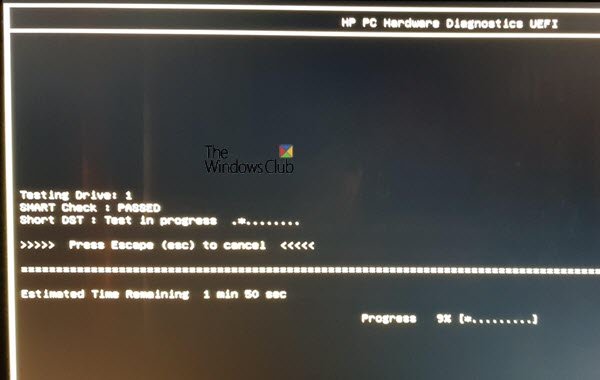
It then displayed Failure ID, Product ID, and drive number related to it.

If you receive the same, you can go to the HP customer support website and enter the code, product ID and select your country to resolve the problem further.
How to install HP PC Hardware Diagnostics UEFI
It is possible to run the UEFI diagnostics tool from a USB drive or install it on the UEFI partition on your computer. In case you cannot access Windows, we suggest using another computer to create the USB drive, and boot the computer to access the tool. However, make sure to disable Secure boot before doing that. HP says that you can use it on any HP computer where it’s not preinstalled.
Not only you can use this tool in case of a hardware issue, but if your computer is locked, you can use it to recover the computer.

- Go to the HP Hardware Diagnostics website and download HP Diagnostics UEFI.
- Locate the folder and run the EXE file.
- Follow the installation wizard, accept the terms of the license agreement, and click Next.
- Finally, you will have to select between the installation location for the Hardware Diagnostics program, then click Next
- To download onto the computer to test, choose UEFI Partition on Hard Drive
- To download to a USB drive, select USB Flash Drive
- Click Install, and then click Yes to create the HP_TOOLS partition
- Wait while the software installs. Click Finish to close the wizard
To run the tool from the USB drive, follow these steps:

-
Insert the USB device, turn on the computer, and press the Esc key repeatedly until the Startup menu displays.
-
Then press F2 to select System Diagnostics and the preferred language from the list.
-
It will launch the PP PC Hardware Diagnostics home page opens, showing the version number and USB

-
You can now choose to run
- Symptom tests
- System tests
- Component tests
- You also get access to Test logs, change language, or exit.

Download HP Diagnostics Tools
The latest version screenshots have been given below:
You can download HP UEFI Diagnostics or HP PC Hardware Diagnostics Windows Tools here from the hp.com website.
HP PC Hardware Diagnostics for Windows
If you can access your computer but have a hardware failure for audio, video, and other input devices, you can install the Windows version. They also have an app in the Microsoft Store. Similar to the UEFI tool, it offers Symptom, system, and component tests.

HP offers some incredible tools to help consumers troubleshoot their computer for any hardware issue. You will need a bit of technical knowledge to run it, and if you find it tough, you can also use HP Support Assistant, which offers one-click fixes, guided troubleshooting, and diagnostics.
Read: How to mirror Boot Hard Drive for UEFI on Windows 11
HP PC Hardware Diagnostics UEFI failed
If a component fails a test, do the following:
- Click Troubleshoot
- Follow the on-screen instructions to resolve the problem
- If the problem is resolved, Good!
- If the problem is not resolved, click Yes to contact HP Customer Support
- Use the failure ID (24-digit code) and product ID when you contact HP Customer Support
- Click NEXT to go to the HP Customer Support website.
We hope you were able to run HP PC Hardware Diagnostics UEFI when in need or install it to troubleshoot hardware issues on the computer.
TIP: You can use HP Support Assistant to update drivers and firmware.
HP PC Hardware Diagnostics UEFI
HP PC Hardware Diagnostics UEFI (UEFI) is a comprehensive diagnostic and system information tool that helps you quickly and easily diagnose and troubleshoot hardware and system issues on your HP PC.
HP PC Hardware Diagnostics UEFI helps quickly identify and troubleshoot hardware problems.
Features:
The following are some of the features of HP PC Hardware Diagnostics UEFI:
• Automated testing – Quickly and easily run a full suite of diagnostic tests on your system to identify potential hardware issues.
• System information – Quickly view system information, including memory, storage, processor, and graphics information.
• System health – Check the overall health of your system and identify potential hardware problems.
• Customizable testing – Customize the tests you run to fit your needs and requirements.
• Comprehensive coverage – Diagnose hardware components such as memory, storage, processor, and graphics.
• Easy-to-use interface – Intuitive and user-friendly interface makes it easy to use.
• Support – Get access to helpful support resources, including the HP Support Assistant.
• Advanced diagnostics – Diagnose more advanced components such as USB and RAID controllers.
• System upgrade – Update system BIOS, drivers, and firmware.
• Software updates – Automatically check for and install updates.
• Troubleshooting – Quickly diagnose and troubleshoot hardware and system issues.
• Easy installation – Easy installation with a simple setup wizard.
• Secure – Data is encrypted during transmission and storage.
• Comprehensive help – Comprehensive help and support resources available.
• Log files – Create and save log files for easy troubleshooting and diagnostics.
• Customizable settings – Create and save settings to fit your needs.
• Multiple languages – Supports multiple languages.
• Compatibility – Compatible with most Windows-based PCs.
• Free trial – Download and use the trial version for free.
Conclusion
HP PC Hardware Diagnostics UEFI is an advanced diagnostic and system information tool that offers a comprehensive suite of tests and system information to help you quickly and easily diagnose and troubleshoot hardware and system issues on your HP PC. With its intuitive and user-friendly interface, automated testing, customizable testing, comprehensive coverage, secure transmission and storage, and support resources, HP PC Hardware Diagnostics UEFI is the perfect tool for diagnosing and troubleshooting hardware and system issues.
HP PC Hardware Diagnostics UEFI software must meet the following requirements:
1. It must be compatible with the HP Business PC BIOS.
2. It must be designed to allow the user to select specific hardware components to perform diagnostics on.
3. It must be designed so that users can easily run the diagnostics and receive feedback on the results.
4. It must be designed to be used in a wide variety of hardware configurations.
5. It must be designed to run on both UEFI and legacy BIOS systems.
6. It must be able to detect and report hardware problems.
7. It must be able to provide detailed information on a specific hardware component, such as its model number, serial number, and other relevant information.
8. It must be able to provide step-by-step instructions for resolving hardware problems.
9. It must be able to detect and report potential hardware conflicts.
10. It must be designed to be easy to use and intuitive.
HP PC Hardware Diagnostics UEFI is a valuable tool for HP computer users, providing essential utilities to diagnose hardware issues. Whether you’re troubleshooting an inexplicable problem or proactively monitoring your system’s health, this built-in tool can help you ensure your hardware is functioning correctly. This comprehensive guide will walk you through using HP PC Hardware Diagnostics UEFI on Windows 11 and Windows 10, detailing its features, functionality, and best practices for optimal use.
Understanding HP PC Hardware Diagnostics UEFI
HP PC Hardware Diagnostics UEFI is a firmware-based application that operates outside of the Windows operating system. This means it can test your computer’s hardware independently of software issues, making it an invaluable resource for troubleshooting.
Key Features of HP PC Hardware Diagnostics UEFI
-
Comprehensive Testing: The tool allows users to perform various tests on their hardware components, including the processor, memory, storage devices, graphics, and more.
-
User-Friendly Interface: The interface is designed to be intuitive and straightforward, making it accessible to users with varying levels of technical expertise.
-
Quick and Extended Tests: Users can choose between quick tests for immediate diagnostics or extended tests for a thorough analysis.
-
System Information: The utility provides detailed information about your system’s hardware configuration, aiding in diagnostics and troubleshooting.
-
Error Reporting: If the utility finds issues, it provides error codes that can be used to identify specific hardware problems for further research or support.
Accessing HP PC Hardware Diagnostics UEFI
Before you can use HP PC Hardware Diagnostics UEFI, you’ll need to access it. There are a couple of methods to do this:
Method 1: Access Through a Restart
-
Restart Your Computer: To access the diagnostics utility, restart your HP PC.
-
Enter BIOS/UEFI: During the boot process, repeatedly press the
Esckey (on some models, theF2key might work) until you see the Startup Menu. -
Select F2: From the Startup Menu, select
F2to run the HP PC Hardware Diagnostics.
Method 2: Access Through Windows
-
Open Windows Settings: Click on the Start menu and select
Settings. -
Navigate to Recovery: In the Settings window, choose
Update & Securityfollowed byRecovery. -
Advanced Startup: Under the
Advanced startupsection, click onRestart now. -
Troubleshoot: After your computer restarts, select
Troubleshoot, thenAdvanced options, and finallyUEFI Firmware Settings. ClickRestartto boot directly into the UEFI firmware settings. -
Run Diagnostics: Once in the HP diagnostics environment, select
System Diagnostics.
Performing Hardware Diagnostics
Once you’ve accessed HP PC Hardware Diagnostics UEFI, you will be greeted by the main menu offering various diagnostic options. Let’s explore the core tests available:
1. System Tests
-
Quick Test: This test performs a basic check of the most critical hardware components. It typically takes only a few minutes and is a good starting point for general diagnostics.
-
Extended Test: If the Quick Test reveals potential problems or if you suspect deeper issues, use the Extended Test. It runs thorough tests on all hardware components but may take longer. This test will provide more comprehensive results.
2. Component Tests
HP PC Hardware Diagnostics UEFI lets you run specific tests on individual components such as:
-
Memory Test: Test the RAM for errors. Memory issues can manifest as system crashes or slowdowns.
-
Storage Test: Assess the integrity of your hard drive or SSD. This is important for catching failing drives before data loss occurs.
-
Graphics Test: Check the graphics card for performance and any potential failures.
-
Battery Test (for Laptops): Evaluate the health of your laptop’s battery.
-
Fan Test: Test the functionality of the cooling system.
To perform a test, select the specific component you wish to test and follow the on-screen instructions, which will guide you through the process.
Interpreting Test Results
Once you have completed your tests, you will receive results that indicate whether your hardware is functioning properly.
-
Pass: If your tests return a pass status (often indicated by a green checkmark), your hardware is generally fine.
-
Fail: Should any test fail, an error code will be displayed. It’s important to note this code, as it can provide insight into the specific issue.
Error Codes and Troubleshooting
If you encounter error codes during your diagnostics, HP provides an official list of these codes along with their meanings on their support website. Some common codes may include:
-
Memory Errors (e.g., 90B): Indicates potential issues with RAM. You may need to replace the memory modules.
-
Hard Drive Errors (e.g., 303): Suggests failing storage components and often requires replacement.
-
Battery Errors (e.g., 601): Indicates a battery health issue; the battery may need to be recalibrated or replaced.
By researching these codes, you can understand better the issues your hardware may be facing, and you can take appropriate action, such as contacting technical support or replacing faulty components.
Best Practices While Using HP PC Hardware Diagnostics UEFI
While HP PC Hardware Diagnostics UEFI is powerful, there are some best practices to bear in mind for effective usage:
-
Backup Your Data: Always ensure that you back up important files before running diagnostics, especially if you suspect a hard drive issue.
-
Use in Safe Mode: If your system is experiencing significant stability issues, try running the diagnostics in Safe Mode for the best results.
-
Document Findings: Keep a record of any errors or anomalies you encounter, including error codes, to provide context if you reach out to HP support.
-
Stay Updated: Ensure that your system’s firmware (BIOS/UEFI) is up to date, as HP regularly provides updates that can improve functionality and support new hardware.
-
Follow Manufacturer Recommendations: If hardware components are under warranty, contact HP support for guidance and repairs rather than attempting to fix them yourself.
Conclusion
HP PC Hardware Diagnostics UEFI serves as an essential tool for diagnosing hardware issues on Windows 10 and Windows 11 systems. By gaining an understanding of how to access and operate this utility, you can take proactive steps to maintain your HP computer’s health.
From performing system tests to interpreting error codes, this guide equips you with the knowledge necessary to troubleshoot effectively and confidently. Always remember that a proactive approach to hardware maintenance can dramatically extend the lifespan of your devices and ensure a smoother user experience.