
Jun. 23, 2022 / Updated by
Bessie Shaw to
Windows 10
Dozens of users recently came across the issue that HP Mobile Data Protection Sensor not working after upgrading to Windows 10 Creators Update (V1703) from Anniversary Update (V1607) or Windows 10(V1511), with the error message showing in Device Manager, “The driver for this device has been blocked from starting because it is known to have problems with Windows. Contact the hardware vendor for a new driver. (Code 48) «. If you just happen to the get stuck at that annoying HP Data Protection Sensor stopped working hitch in Windows 10 Creators Update, below are two workable fixes to resolve it.
How to Fix HP Mobile Data Protection Sensor Not Working in Windows 10 Creator Update
In most cases, the Mobile Data Protection Sensor blocked problem after installing Windows 10 CU on HP EliteBook 8570w, EliteBook 8470p, HP ProBook 2570P, ProBook 4540s and more is triggered by driver or software compatibility issues. That is to say, the Mobile Data Protection Sensor driver installed on your HP laptop after Windows OS Update may go outdated, missing or incompatible with the Creators Update for Windows 10 since Windows doesn’t always offer the best-matched device driversfor the newly released Windows Operating System in the first place. To download the proper HP Mobile Data Protection Sensor driver and repair the Mobile Data Protection Sensor disabled bug, you can either go to HP official website to search for available downloads as option 1 shows or use a professional driver update utility as option 2 guides. Below are detailed tutorials.
Option 1. Reinstall the HP Mobile Data Protection Sensor Driver for Windows 10 Creator Update
To reinstall the HP Mobile Data Protection Sensor driver, you need to uninstall the current one. For details about how to delete a device driver, please check there. And then follow below steps to get the Mobile Data Protection Sensor back to HP laptops.
Step 1. Navigate to HP support page.
Step 2. Type the HP model number to get the available Mobile Data Protection Sensor driver’s download file. Here we take HP EliteBook 8570w for example.

Step 3. Expand the Driver-Storage selection under the listed to HP EliteBook 8570w software & driver search results.

Step 4. Find the “HP 3D DriveGuard Software” and click “Download”.
Step 5. After the download completes, locate the HP 3D DriveGuard Software file in your browser or “Downloads” folder, then double-click to install it.
Option 2. Update the HP Mobile Data Protection Sensor Driver with Driver Talent
Driver Talent, an automatic driver updater, being reviewed as the safest and fastest Way to update drivers, could detect whether your HP Mobile Data Protection Sensor driver is incorrect or not and other device driver’s problem then fixes them with just one-click.
Click the button below to get Driver Talent instantly and download the WHQL HP MDP sensor driver / HP 3D DriveGuard Software driver to recover the connection between HP MDP and Windows 10 Creators Update.
Download Now
Step 1. Click “scan” to let Driver Talent scan all the drivers installed on Windows 10 CU. All the faulty drivers will show to you in the scanning results, including your Windows 10 HP MDP sensor driver if it is improper.
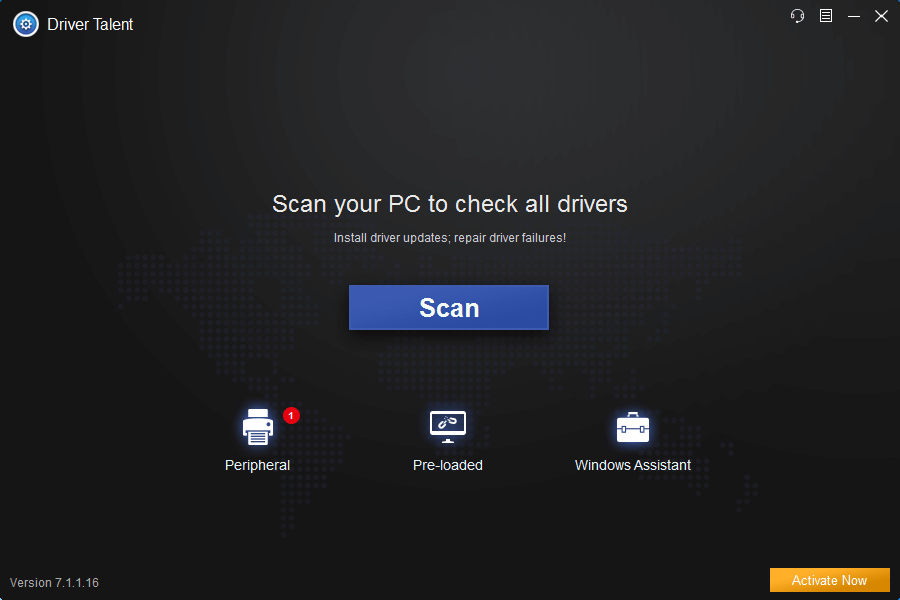
Step 2. Click “Download” to install the most compatible HP 3D DriveGuard driver or click “Update” to get the latest one to figure out the Windows 10 HP Mobile Data Protection Sensor doesn’t work glitch after upgrading to Creators Update.
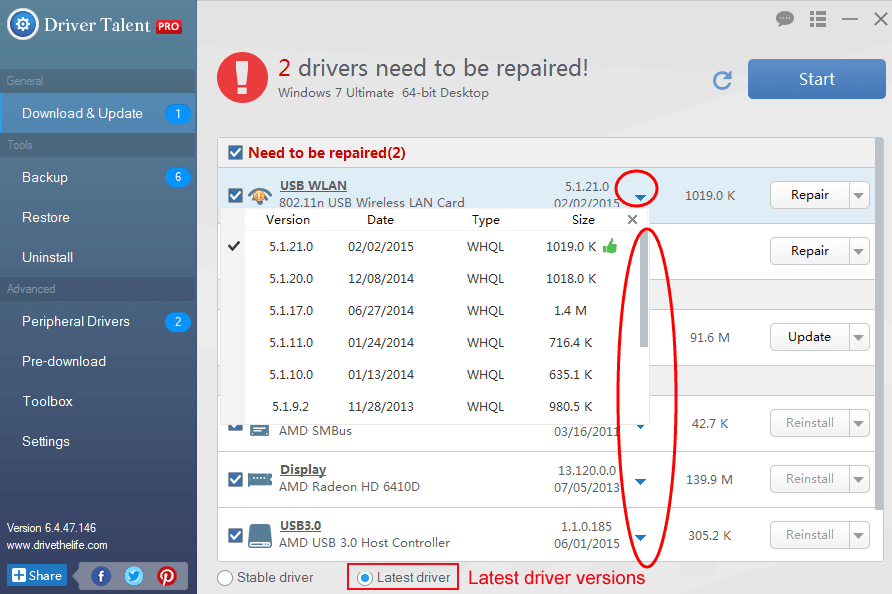
Notes: Backup your drivers in advance in case any further computer issues occur like installation stuck, blue screen etc., or you may want to roll back drivers in the future. And it is not recommended update what aren’t broken.
Step 3. Reboot your computer to make the newly updated HP 3D DriveGuard drivers come into effect.
That’s it! Hope the two solutions above could be helpful for you to troubleshoot the HP Mobile Data Protection Sensor not working hitch in Windows 10 Creators Update. Should you find more workarounds on how to fix HP MDP sensor issues on Windows 10 CU, please share with us in below comments section or go to the OStoto official forum for more discussion.
For more Windows 10 / Windows 10 Creators Update errors and troubleshooters, please refer to Windows 10 Common Issues and Fixes.
Recommended Download
|
ExplorerMax |
Driver Talent for Network Card | |||
| Smart and advanced file explorer tool for Windows platforms | Download & Install Network Drivers without Internet Connection | |||
|
30-day Free Trial |
Free Download |
Разного рода ошибки в Windows являются типичной проблемой пользователя и было бы не плохо иметь программу для автоматического их исправления. Если вы пробовали искать бесплатные программы для исправления ошибок Windows 10, 8.1 и Windows 7, то с большой вероятностью, находить вам удавалось лишь CCleaner, другие утилиты для очистки компьютера, но не что-то, что могло бы исправить ошибку при запуске диспетчера задач, ошибки сети или «DLL отсутствует на компьютере», проблему с отображением ярлыков на рабочем столе, запуском программ и тому подобные.
В этой статье — способы исправить распространенные проблемы ОС в автоматическом режиме с помощью бесплатных программ для исправления ошибок Windows. Некоторые из них являются универсальными, другие подходят для более конкретных задач: например, для того, чтобы решить проблемы с доступом к сети и Интернету, исправить ассоциации файлов и подобных.
Напомню, что в ОС присутствуют и встроенные утилиты для исправления ошибок — Средства устранения неполадок Windows 10 (аналогично и в предыдущих версиях системы).
- FixWin 10
- Kaspersky Cleaner
- Windows Repair Toolbox
- Kerish Doctor
- Microsoft Easy Fix
- File Extension Fixer и UVK
- Устранение неполадок Windows
- Anvisoft PC PLUS
- Net Adapter Repair
- AVZ
FixWin 10
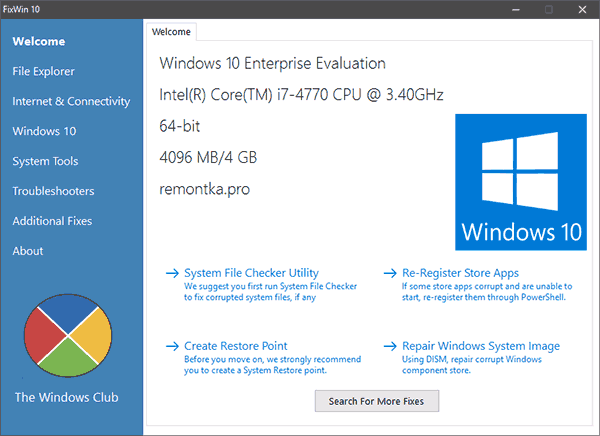
После выхода Windows 10 заслуженно набрала популярность программа FixWin 10. Несмотря на название, она подойдет не только для десятки, но и для предыдущих версий ОС — все исправления ошибок Windows 10 вынесены в утилите в соответствующий раздел, а остальные разделы в равной степени подходят для всех последних операционных систем от Microsoft.
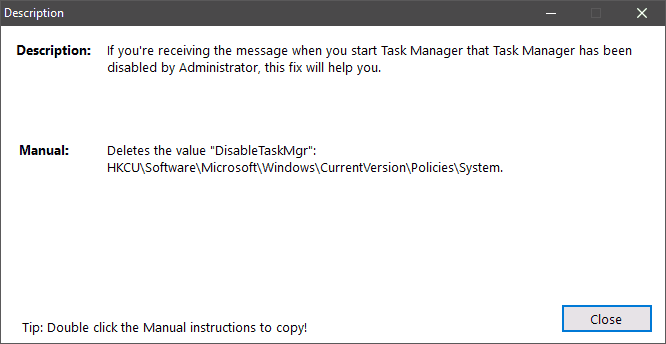
Среди преимуществ программы — отсутствие необходимости установки, широкий (очень) набор автоматических исправлений для самых типичных и распространенных ошибок (не работает меню Пуск, не запускаются программы и ярлыки, заблокирован редактор реестра или диспетчер задач и т.д.), а также информация о способе ручного исправления этой ошибки по каждому пункту (см. пример на скриншоте ниже). Главный недостаток для нашего пользователя — нет русского языка интерфейса.
Подробно об использовании программы и о том где скачать FixWin 10 в инструкции Исправление ошибок Windows в FixWin 10.
Kaspersky Cleaner
С недавних пор на официальном сайте Касперского появилась новая бесплатная утилита Kaspersky Cleaner, которая не только умеет очищать компьютер от ненужных файлов, но и исправлять самые распространенные ошибки Windows 10, 8 и Windows 7, среди которых:
- Исправление ассоциаций файлов EXE, LNK, BAT и других.
- Исправление заблокированного диспетчера задач, редактора реестра и других системных элементов, исправление их подмены.
- Изменение некоторых системных настроек.
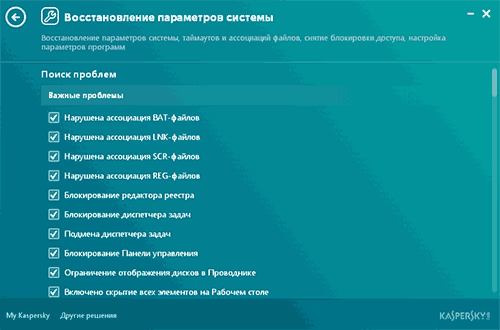
Преимущества программы — исключительная простота для начинающего пользователя, русский язык интерфейса и продуманность исправлений (навряд ли что-то получится сломать в системе, даже если вы — начинающий пользователь). Подробнее об использовании: Очистка компьютера и исправление ошибок в программе Kaspersky Cleaner.
Windows Repair Toolbox
Windows Repair Toolbox — набор бесплатных утилит для устранения самых разнообразных неполадок Windows и загрузки самых популярных сторонних утилит для этих целей. С помощью утилиты можно исправить проблемы с сетью, выполнить проверку на наличие вредоносных программ, проверку жесткого диска и оперативной памяти, просмотреть сведения об оборудовании компьютера или ноутбука.
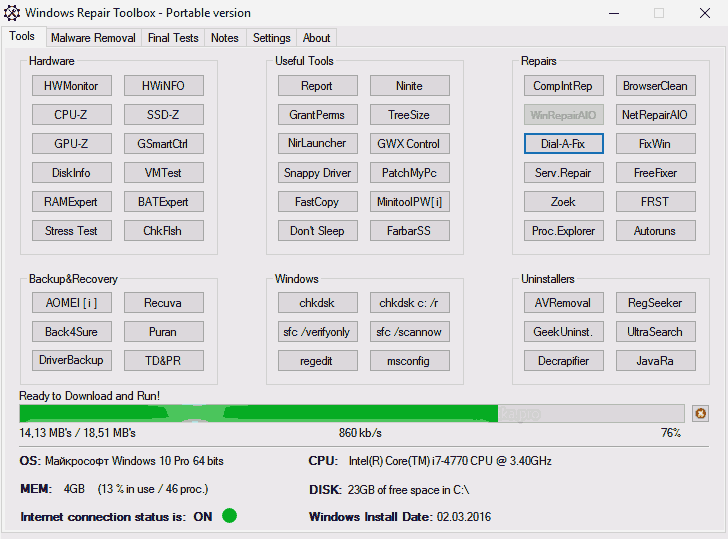
Подробно об использовании утилиты и доступных в ней средствах устранения ошибок и неисправностей в обзоре Использование Windows Repair Toolbox для исправления ошибок Windows.
Kerish Doctor
Kerish Doctor — программа для обслуживания компьютера, очистки его от цифрового «мусора» и других задач, но в рамках этой статьи поговорим лишь о возможностях по устранению распространенных проблем Windows.
Если в главном окне программы зайти в раздел «Обслуживание» — «Решение проблем с ПК», откроется список доступных действий для автоматического исправления ошибок Windows 10, 8 (8.1) и Windows 7.
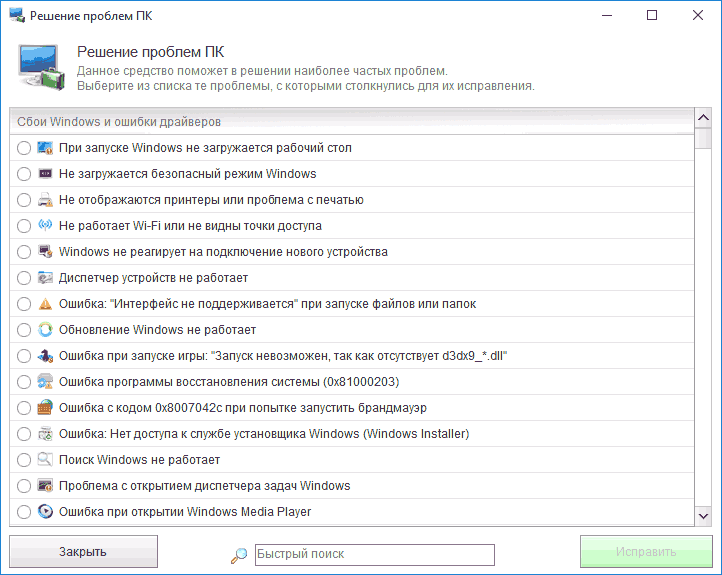
Среди них такие типичные ошибки как:
- Не работает обновление Windows, не запускаются системные утилиты.
- Не работает поиск Windows.
- Не работает Wi-Fi или не видны точки доступа.
- Не загружается рабочий стол.
- Проблемы с ассоциациями файлов (не открываются ярлыки и программы, а также другие важные типы файлов).
Это далеко не полный список доступных автоматических исправлений, с большой вероятностью в нем вы сможете обнаружить и свою проблему, если она не особо специфичная.
Программа платная, но в течение пробного периода работает без ограничения функций, что позволяет исправить возникшие проблемы с системой. Скачать пробную бесплатную версию Kerish Doctor можно с официального сайта https://www.kerish.org/ru/
Microsoft Fix It (Easy Fix)
Одна из хорошо известных программ (или сервисов) для автоматического исправления ошибок — это Центр решений Microsoft Fix It, позволяющая подобрать решение конкретно вашей проблемы и скачать небольшую утилиту, которая сможет исправить ее в вашей системе.
Обновление 2017: Microsoft Fix It судя по всему прекратил свою работу, однако теперь доступны исправления Easy Fix, загружаемые в виде отдельных файлов устранения неполадок на официальном сайте https://support.microsoft.com/ru-ru/help/2970908/how-to-use-microsoft-easy-fix-solutions
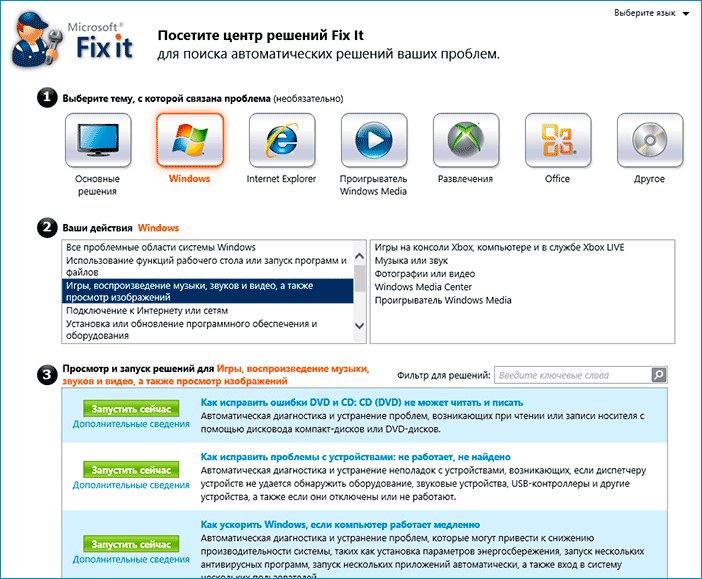
Использование Microsoft Fix It происходит в несколько простых шагов:
- Вы выбираете «тематику» вашей проблемы (к сожалению, исправления ошибок Windows присутствуют, в основном, для Windows 7 и XP, а для восьмой версии — нет).
- Указываете подраздел, например, «Подключение к Интернету и сетям», при необходимости используете поле «Фильтр для решений», чтобы быстрее найти исправление ошибки.
- Читаете текстовое описание решения проблемы (кликнуть по заголовку ошибки), а также, при необходимости скачиваете программу Microsoft Fix It для автоматического исправления ошибки (клик по кнопке «Запустить сейчас»).
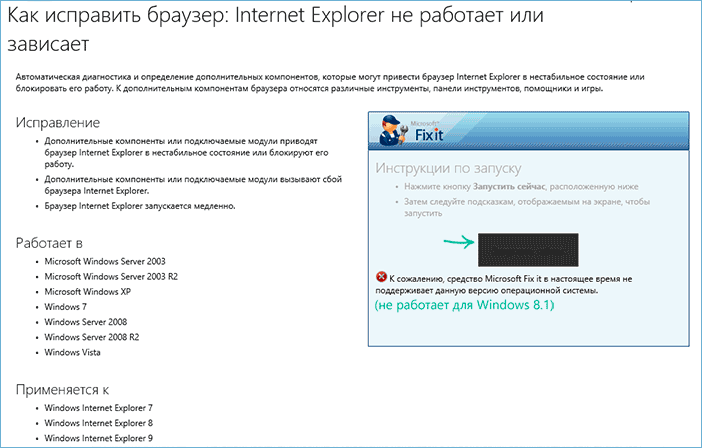
Познакомиться с Microsoft Fix It вы можете на официальном сайте http://support2.microsoft.com/fixit/ru.
File Extension Fixer и Ultra Virus Killer
File Extension Fixer и Ultra Virus Scanner — две утилиты одного разработчика. Первая из них полностью бесплатная, вторая — платная, но многие функции, в том числе исправление распространенных ошибок Windows доступны без приобретения лицензии.
Первая программа, File Extension Fixer, предназначена в первую очередь для исправления ошибок ассоциаций файлов Windows: exe, msi, reg, bat, cmd, com и vbs. При этом, на случай, если у вас не запускаются файлы .exe программа на официальном сайте http://www.carifred.com/exefixer/ доступна как в варианте обычного исполняемого файла, так и как .com файл.
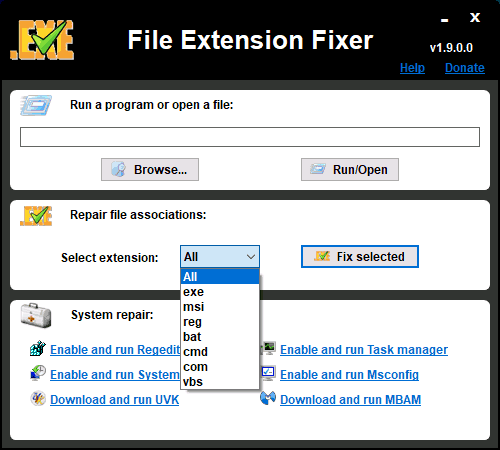
В разделе System Repair программы доступны некоторые дополнительные исправления:
- Включить и запустить редактор реестра, если он не запускается.
- Включить и запустить восстановление системы.
- Включить и запустить диспетчер задач или msconfig.
- Скачать и запустить Malwarebytes Antimalware для проверки компьютера на наличие вредоносных программ.
- Download and run UVK — этот пункт скачивает и устанавливает вторую из программ — Ultra Virus Killer, также содержащую дополнительные исправления Windows.
Исправление распространенных ошибок Windows в UVK можно найти в разделе System Repair — Fixes for common Windows Problems (исправление частых проблем Windows), впрочем и другие пункты в списке также могут оказаться полезными при устранении неполадок системы (сброс параметров, поиск нежелательных программ, исправление ярлыков браузеров, включение меню F8 в Windows 10 и 8, очистка кэша и удаление временных файлов, установка системных компонентов Windows и т.п.).
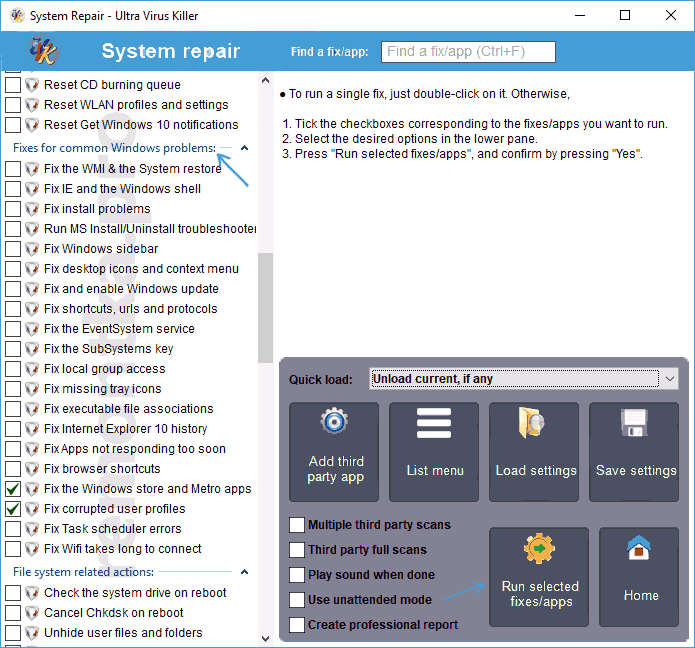
После того, как необходимые исправления были выбраны (отмечены галочкой), нажмите кнопку «Run selected fixes/apps» для начала применения изменений, для применения одного исправления просто дважды кликните по нему в списке. Интерфейс на английском языке, но многие из пунктов, думаю, вполне будут понятны почти любому пользователю.
Устранение неполадок Windows
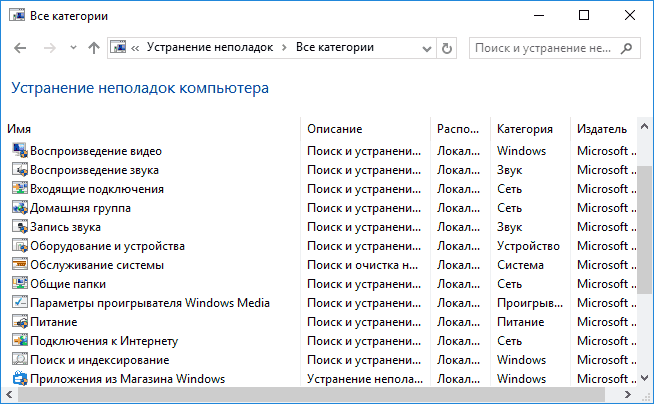
Часто незамечаемый пункт панели управления Windows 10, 8.1 и 7 — Устранение неполадок также может выручить и исправить в автоматическом режиме многие ошибки и проблемы с оборудованием.
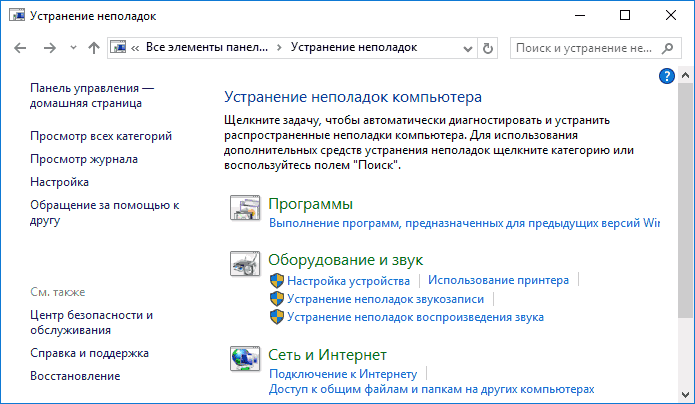
Если открыв «Устранение неполадок» в панели управления, вы нажмете по пункту «Просмотр всех категорий» вам будет доступен полный список всех автоматических исправлений, уже встроенных в вашу систему и не требующих использования каких-либо сторонних программ. Пусть не во всех случаях, но достаточно часто эти средства действительно позволяют исправить проблему.
Anvisoft PC PLUS
Anvisoft PC PLUS — недавно попавшаяся мне программа для решения различных проблем с Windows. Принцип ее работы схож с сервисом Microsoft Fix It, но, думаю, несколько более удобен. Одно из преимуществ — исправления работают и для последних версий Windows 10 и 8.1.
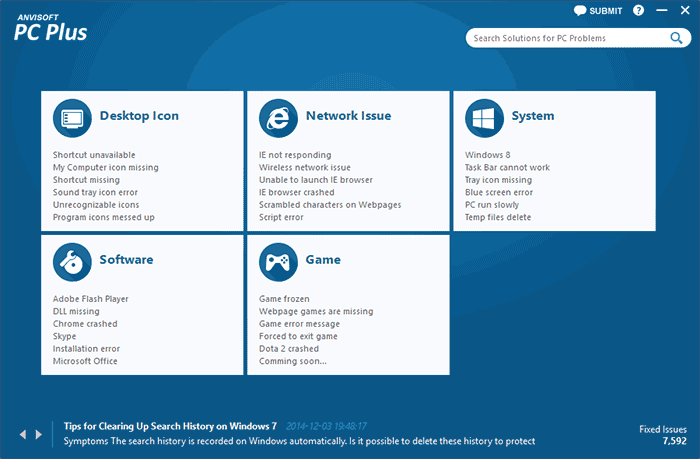
Работа с программой выглядит следующим образом: на главном экране вы выбираете тип проблемы — ошибки ярлыков рабочего стола, подключения к сети и Интернету, системы, запуска программ или игр.
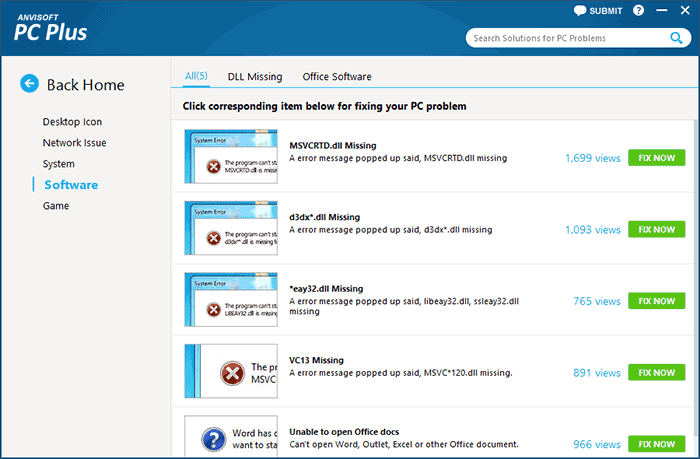
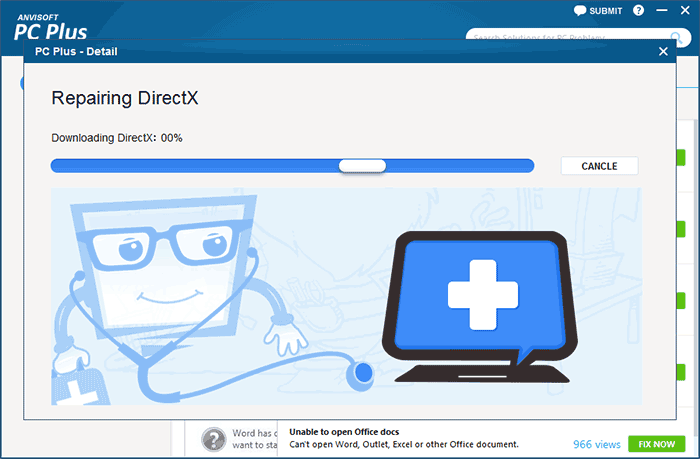
Следующим шагом находите конкретную ошибку, которую требуется исправить и нажимаете кнопку «Fix now», после чего PC PLUS автоматически предпринимает действия по решению проблемы (для большинства задач требуется подключение к Интернет для загрузки необходимых файлов).
Из недостатков для пользователя — отсутствие русского языка интерфейса и сравнительно небольшое количество доступных решений (правда, их число растет), но уже сейчас в программе присутствуют исправления для:
- Большинства ошибок ярлыков.
- Ошибок «запуск программы невозможен, так как файл DLL отсутствует на компьютере».
- Ошибок при открытии редактора реестра, диспетчера задач.
- Решения для удаления временных файлов, избавления от синего экрана смерти и тому подобные.
Ну и главное преимущество — в отличие от сотен других программ, которые изобилуют в англоязычном интернете и называются наподобие «Free PC Fixer», «DLL Fixer» и аналогичным образом, PC PLUS не представляет собой что-то, пытающееся установить нежелательное ПО на ваш компьютер (во всяком случае, на момент написания этой статьи).
Перед использованием программы рекомендую создать точку восстановления системы, а скачать PC Plus можно с официального сайта http://www.anvisoft.com/anvi-pc-plus.html
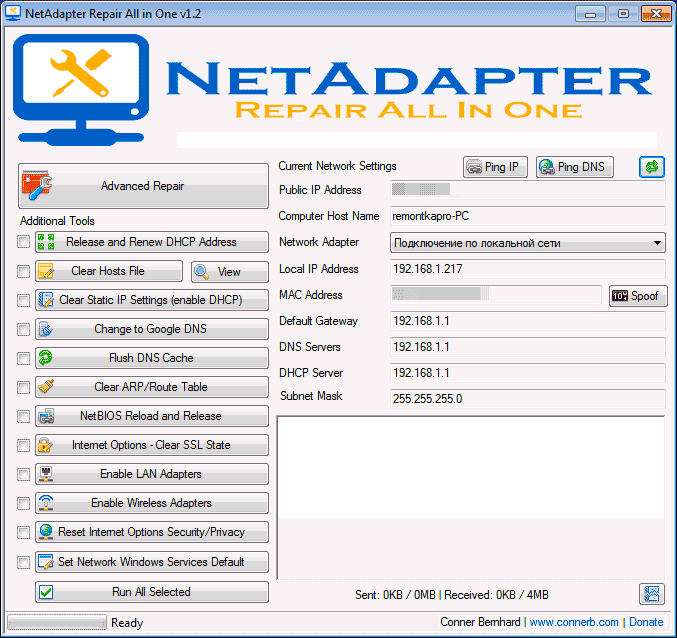
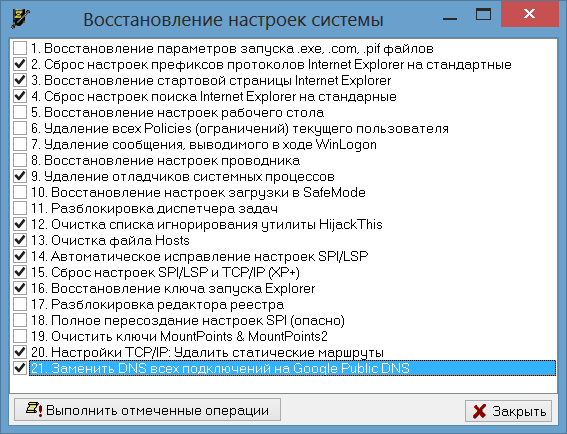
NetAdapter Repair All In One
Бесплатная программа Net Adapter Repair предназначена для исправления самых разных ошибок, связанных с работой сети и Интернета в Windows. Она пригодится, если вам требуется:
- Очистить и исправить файл hosts
- Включить Ethernet и беспроводные адаптеры сети
- Сбросить Winsock и протокол TCP/IP
- Очистить кэш DNS, таблицы маршрутизации, очистить статические IP подключений
- Перезагрузить NetBIOS
- И многое другое.
Возможно, что-то из описанного кажется и не ясным, но в случаях, когда не открываются сайты или после удаления антивируса перестал работать Интернет, не получается зайти в контакт и одноклассники, а также во многих других ситуациях эта программа способна вам помочь и очень быстро (правда, стоит понимать, что именно вы делаете, иначе результаты могут быть обратными).
Более подробно о программе и о ее загрузке на компьютер: Исправление ошибок сети в NetAdapter PC Repair.
Антивирусная утилита AVZ
Несмотря на то, что основная функция антивирусной утилиты AVZ — поиск у удаления троянов, SpyWare и Adware с компьютера, она включает в себя также небольшой, но эффективный модуль «Восстановление системы» для автоматического исправления ошибок сети и Интернета, проводника, ассоциаций файлов и других.
Чтобы открыть эти функции в программе AVZ, нажмите «Файл» — «Восстановление системы» и отметьте те операции, которые необходимо выполнить. Более подробную информацию вы можете найти на официальном сайте разработчика z-oleg.com в разделе «Документация по AVZ» — «Функции анализа и восстановления» (там же вы можете и скачать программу).
Пожалуй, это все — если есть, что добавить, оставляйте комментарии. Но только не о таких утилитах, как Auslogics BoostSpeed, CCleaner (см. Использование CCleaner с пользой)— так как это не совсем то, о чем идет речь в данной статье. Если вам необходимо исправить ошибки Windows 10, рекомендую посетить раздел «Исправление ошибок» на этой странице: Инструкции по Windows 10.
Microsoft Defender is a powerful security tool built into Windows. It protects your computer from viruses, malware, and other online threats. Many people don’t realize how capable this free security solution has become in recent years.
Microsoft Defender tips and tricks can transform your PC security experience. The built-in protection has evolved from basic antivirus to a complete security suite. You don’t need to be a tech expert to use these tips, as they’re designed for all skill levels.
This comprehensive guide shares 15 essential Microsoft Defender tips and tricks to enhance your security setup. By following these recommendations, you’ll unlock the full potential of this robust security tool.
Let’s explore how these Microsoft Defender tips and tricks can create a stronger defense system for your digital life.
Top 15 Tips and Tricks Microsoft Windows Defender
1. Run Quick Scans Daily
Quick scans are an efficient way to check your system for threats. They focus on areas where malware commonly hides, like temporary files and download folders. Running these scans takes just minutes but provides a good first line of defense.
Setting up daily quick scans ensures regular protection without disrupting your work. This habit catches many threats before they can spread through your system. Think of it as a daily health check for your computer.
Steps to set up daily quick scans:
- Open Windows Security. Click on “Virus & threat protection”. Under “Quick scan,” click “Scan now” for immediate scanning.

- For scheduling, click “Scan options” then “Automatic scan”. Toggle on “Scheduled scan” and select frequency as “Daily”
2. Use Offline Scanning
Some sophisticated malware activates only when Windows is running. These threats deliberately hide from normal scans. Offline scanning tackles this problem by running before Windows fully loads.
Offline scanning helps remove tough malware that regular scans can’t. It takes more time and needs a system restart but is more effective. Use it when persistent threats won’t go away.
Steps to run offline scan:
- Open Windows Security. Click “Virus & threat protection”. Under “Current threats,” select “Scan options”. Choose “Microsoft Defender Offline scan”.

- Click “Scan now”. Your PC will restart to perform the scan
3. Set Up Controlled Folder Access
Ransomware attacks lock up your files and demand payment. Controlled Folder Access prevents unauthorized apps from changing files in protected folders. This feature acts like a guard for your important documents.
This powerful Microsoft Defender tip creates a shield around your most valuable data. You can customize which folders receive this extra protection and which apps can access them. This feature alone can save you from costly ransomware attacks.
Steps to enable Controlled Folder Access:
- Open Windows Security. Select “Virus & threat protection”. Under “Ransomware protection,” click “Manage ransomware protection”. Toggle on “Controlled folder access”.

- Click “Protected folders” to add or view protected locations. Click “Allow an app through Controlled folder access” to add trusted programs
4. Check Your Protection History
Microsoft Defender keeps detailed records of all security actions. The Protection History shows threats detected, actions taken, and scan results. This information helps you understand your security status.
Reviewing this history regularly helps spot patterns or recurring threats. If you see the same issue appearing multiple times, you may need to investigate further. This valuable knowledge helps you make better security decisions.
Steps to check Protection History:
- Open Windows Security. Click “Virus & threat protection”. Select “Protection history”. Review the list of detected items and actions taken.

- Click on any item for more detailed information. Use filters at the top to sort by threat type if needed
5. Use Cloud Protection
Cloud protection enhances Microsoft Defender by connecting to Microsoft’s security network. It detects threats faster using artificial intelligence. When one device spots a new danger, all users get protected quickly, creating a stronger defense.
Steps to enable Cloud Protection:
- Open Windows Security. Click “Virus & threat protection”. Select “Manage settings”. The option is placed under “Virus & threat protection settings”. Toggle on “Cloud-delivered protection.”

- Also, enable “Automatic sample submission” for best protection. Click “Block at first sight” to make sure it’s enabled
6. Schedule Full Scans Weekly
While quick scans check the most common trouble spots, full scans examine your entire system. They look at every file and folder on your computer. This comprehensive approach finds deeply hidden threats.
Weekly full scans serve as a thorough security check-up. Schedule them for times when you’re not using your computer, like overnight or during lunch breaks.
Steps to schedule weekly full scans:
- Open Windows Security. Select “Virus & threat protection”. Click “Scan options”. Choose “Full scan” and click “Scan now” (for immediate scan).

- For scheduling, click back and select “Automatic scan”. Toggle on “Scheduled scan” and set frequency to “Weekly”. Choose a day and time when you won’t be using your computer
7. Add Exclusions for Performance
Some trusted programs or files trigger false alarms in Microsoft Defender. Adding these to exclusions prevents unnecessary scanning. This improves system performance and reduces interruptions.
Exclusions work well for development folders, virtual machine files, or trusted business applications. However, use this Microsoft Defender tip carefully. Only exclude locations or files you’re absolutely certain are safe.
Steps to add exclusions:
- Open Windows Security. Click “Virus & threat protection”. Under “Virus & threat protection settings,” select “Manage settings”. Scroll to “Exclusions” and click “Add or remove exclusions.”

- Click “Add an exclusion” and choose from file, folder, file type, or process. Browse to select the item you want to exclude. Confirm your selection
8. Block Unrecognized and Unwanted Apps
Before 2020, blocking potentially unwanted programs (PUPs) in Windows required manual PowerShell commands. With the update to Windows Security, users gained a built-in defense, making it much easier to keep their systems free from unnecessary and potentially harmful applications.
This added protection enhances security by automatically detecting and preventing PUPs without extra effort. By enabling reputation-based protection, users can stay ahead of unwanted software and maintain a cleaner, more efficient system.
Steps to enable Block at First Sight:
- Open Windows Security. Click App & browser control.

- Under Reputation-based protection, turn it On if prompted. Click Reputation-based protection settings to customize further.
9. Use Custom Scan for Specific Folders
Sometimes you only need to check specific files or folders. Custom scanning targets just the areas you select. This is perfect for checking new downloads or external drives.
Custom scans save time when you’re concerned about particular content. For example, when you receive files from an unknown source or connect an old USB drive. This focused approach gets quick results without scanning your entire system.
Steps to run a custom scan:
- Open File Explorer. Navigate to the folder you want to check. Right-click on the folder. Select “Scan with Microsoft Defender.”

- Wait for the scan to complete. Review results in the notification or in Protection History
10. Set Up Hardware Security
Modern computers include special security features at the hardware level. Core isolation and memory integrity protect critical parts of Windows. These features prevent malware from accessing sensitive areas.
Hardware-based security creates a fortress around vital system processes. It uses virtualization technology to isolate important security functions from the rest of the system. This Microsoft Defender tip adds a powerful layer of protection against sophisticated attacks.
Steps to enable hardware security:
- Open Windows Security. Click on “Device security”. Under “Core isolation,” click “Core isolation details.”
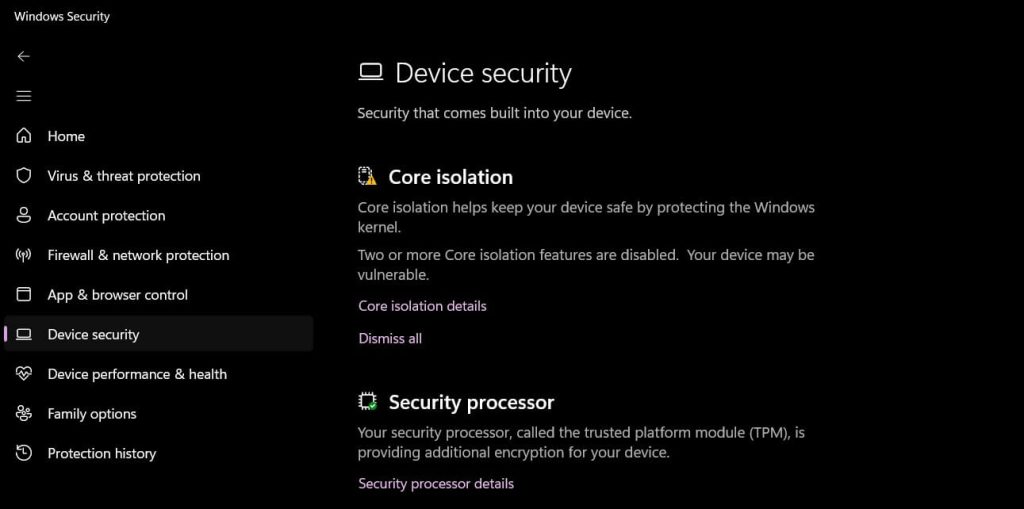
- Toggle on “Memory integrity” (if available for your hardware). Restart your computer when prompted. After a restart, confirm the feature is active
11. Check Security Report Card
Microsoft Defender provides an overall security score for your device. This report card highlights strong points and areas needing attention. It offers simple recommendations to improve your security.
Regularly checking this score helps maintain optimal protection levels. The report breaks down security by categories like account protection, firewall, and device security. This overview makes complex security measures easy to understand and implement.
Steps to check your security report card:
- Open Windows Security. View the main dashboard with colored icons. Look for any yellow or red warnings. Click each category to see detailed recommendations.
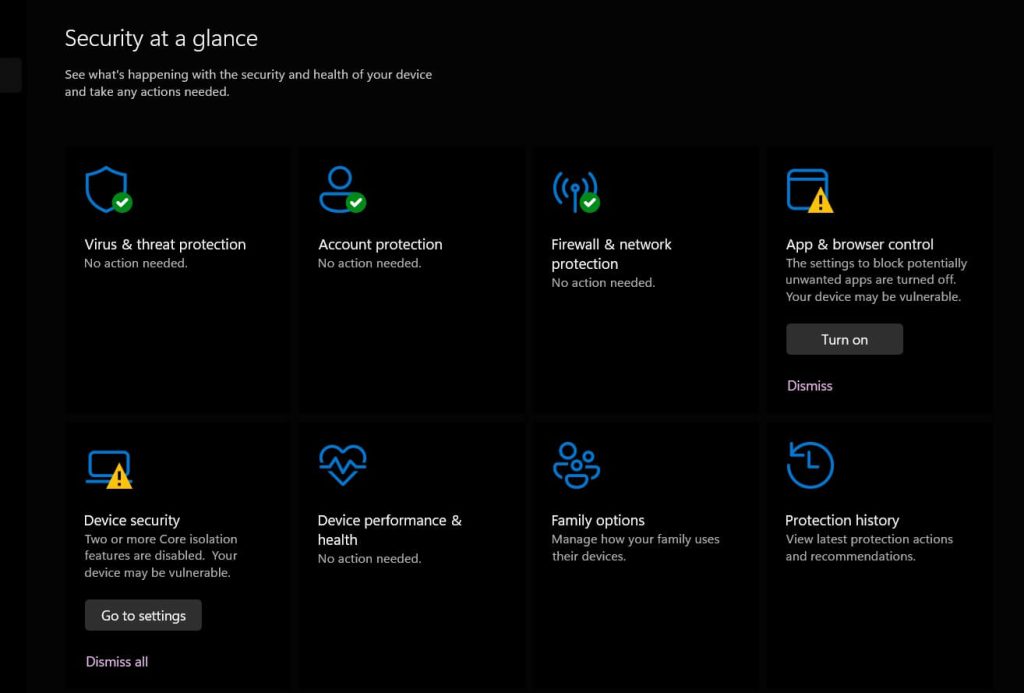
- Follow the suggested steps to improve your score. Return regularly to check your progress
12. Update Defender Regularly
Security definitions contain information about known threats. Regular updates keep Microsoft Defender current with new malware. This ensures the best possible protection against emerging threats.
Microsoft releases new security definitions daily, sometimes hourly. Each update improves detection capabilities for newly discovered threats. Making sure these updates install properly is one of the most important Microsoft Defender tips and tricks.
Steps to check and update Microsoft Defender:
- Open Windows Security. Click “Virus & threat protection”. Under “Protection Updates,” click “Check for updates.”

- Wait for the update check to complete. If updates are available, they’ll install automatically. Confirm the “Last update” time is recent
13. Use Tamper Protection
Tamper protection prevents unauthorized changes to your security settings. Some malware tries to disable Microsoft Defender first. This feature blocks those attempts, keeping your protection active.
This crucial Microsoft Defender tip ensures your security stays on, even during attacks. Without tamper protection, malware could potentially turn off your defenses. Think of it as a lock for your security settings.
Steps to enable Tamper Protection:
- Open Windows Security. Click “Virus & threat protection”. Under “Virus & threat protection settings,” select “Manage settings”. Scroll down to find “Tamper Protection.”

- Toggle it to “On” if not already enabled. Verify the setting is active by trying to disable real-time protection
14. Set Up Family Options
Microsoft Defender includes tools to protect children online. Family options filter inappropriate content and set screen time limits. They also provide reports on digital activities.
This feature extends Microsoft Defender’s protection to your entire family. Parents can receive activity reports and manage what content children can access. It creates a safer online environment without installing additional software.
Steps to set up Family Options:
- Open Windows Security. Click on “Family options”. Select “View family settings.”

- Sign in with your Microsoft account. Click “Add a family member”. Enter their email address and set permissions. Customize content filters and time limits as needed
15. Try Microsoft Defender Application Guard
Application Guard opens untrusted websites in an isolated container. This prevents malicious sites from accessing your main system. It’s like having a separate, disposable computer for risky browsing.
This advanced Microsoft Defender tip and trick creates a barrier between potential threats and your important data. If you visit a malicious site inside Application Guard, any harmful code stays trapped in the container. When you close the window, the threats disappear.
Steps to enable Application Guard:
- Open Windows Features (type “Windows Features” in the search bar). Check “Microsoft Defender Application Guard”. Click “OK” and restart when prompted.

- After a restart, open Microsoft Edge. Click the three dots menu, then “New Application Guard window”. Use this special window for untrusted sites
Conclusion
Microsoft Defender tips and tricks transform a basic security tool into a powerful protection system. The features covered in this guide provide comprehensive defense against modern threats. With these settings optimized, your digital security significantly improves.
Start applying these Microsoft Defender tips and tricks today to strengthen your digital security. Begin with the basics like daily quick scans and cloud protection. Then, gradually implement advanced features like Controlled Folder Access and Application Guard. Your online experience will be safer and more secure with these simple changes.
FAQs:
Is Microsoft Defender good enough for home users?
Yes, Microsoft Defender is now excellent for home users. Independent testing labs routinely rank it among top security solutions. When properly configured using the tips and tricks above, it provides comprehensive protection against viruses, ransomware, and other malware. The integration with Windows gives it advantages over third-party options, including better performance and seamless updates. For most home users, no additional security software is needed.
How often should I run a full scan with Microsoft Defender?
Run a full scan weekly for optimal protection. Daily quick scans catch most threats, but weekly full scans provide thorough system examination. Schedule these comprehensive scans during times you’re not using your computer, such as overnight or during lunch breaks.
Can Microsoft Defender replace paid antivirus software?
For most users, Microsoft Defender can completely replace paid antivirus software. The tips and tricks in this article unlock its full potential, providing enterprise-grade security at no additional cost. Defender now includes features previously found only in premium security suites, such as ransomware protection, hardware-based isolation, and cloud-based threat intelligence.
Hi:
The W10 driver doesn’t work on the HP Mobile Data Protection Sensor hardware revision your notebook has.
You need to manually install the Windows XP 64 bit driver from the support page…
Start by deleting the W10 driver, and software again.
Try and get back to where the accelerometer is listed as an unknown device.
Download and save this driver but do not run it.
https://ftp.hp.com/pub/softpaq/sp58001-58500/sp58201.exe
Download and install this free file utility. The 2nd file at the top of the page is for 64 bit.
https://www.7-zip.org/
After you install 7-zip, right click on the XP 3D driveguard driver file you saved.
Select 7-Zip from the list of items on the menu.
Have 7-Zip Extract to: and let it extract the file into its folder name (sp58201).
After the driver folder is created, go to the device manager, click on the problem accelerometer device needing the driver.
Click on the driver tab. Click on Update Driver.
Select the Browse my computer for driver software option, and browse to the driver folder that 7-Zip created.
Make sure the Include subfolders box is checked, and the driver should install.
Then restart the PC and the error message should be gone.
Статья обновлена: 30 января 2024
ID: 14612
Скачайте утилиту AVZ
AVZ — бесплатная утилита для создания Карантина, удаления подозрительных файлов и получения отчета о результатах исследования системы.
Запуск утилиты AVZ может потребоваться при обращении в техническую поддержку «Лаборатории Касперского».
С помощью утилиты AVZ вы сможете:
- получить отчет о результатах исследования системы;
- выполнить скрипт, предоставленный специалистом технической поддержки «Лаборатории Касперского» для создания Карантина и удаления подозрительных файлов.
Утилита AVZ не отсылает статистику, не обрабатывает информацию и не передает ее в «Лабораторию Касперского». Отчет сохраняется на компьютере в виде файлов форматов HTML и XML, которые доступны для просмотра без применения специальных программ.
Утилита AVZ может автоматически создавать Карантин и помещать в него копии подозрительных файлов и их метаданные.
Помещенные в Карантин объекты не обрабатываются, не передаются в «Лабораторию Касперского» и хранятся на компьютере. Мы не рекомендуем восстанавливать файлы из Карантина, они могут причинить вред компьютеру.
Какие данные содержатся в отчете утилиты AVZ
Как выполнить скрипт с помощью утилиты AVZ
Спасибо за ваш отзыв, вы помогаете нам становиться лучше!
Спасибо за ваш отзыв, вы помогаете нам становиться лучше!