
One day my aunt asked me if I could make her old HP LaserJet 1000 printer work
with Windows 10 Home Edition. I came to her, plugged the printer into her laptop
and saw the famous USB device not recognized error. I googled the problem to
only find that support for the driver ended with Windows XP and there’s no
drivers for this printer model since Vista. All solutions I’ve seen used either
Windows 7 32bit with XP compatibility mode (not my case) or a Virtual machine
(VM) with Windows XP shared printer (my guess is it still won’t work due to
driver is unavailable, see below). The problem is the laptop runs on a Celeron
processor and has 4GB of memory and Windows 10 is already too slow, so a VM is
not an option.
So the task is: a simple setup for a non-technical person who only needs to
switch on the printer, print some pages and switch it off.
The solution is pretty obvious: a print server. One option is to buy one,
assuming you can find the one you need and make it work. I prefer to keep as
much as possible under my control and, since I’ve already had success with
turning my HP LaserJet P1005 into a network printer,
I went with the second option and decided to make a custom print server.
I took the printer home and made it work with Linux without any problems.
NB: Windows 10 has a Windows Subsystem for Linux and installing the below
steps might work there. Still, it uses some kind of a VM machine to run Linux
so it isn’t an option either.
I settled down to the next setup:
- Raspberry Pi 3 Model B
- Raspbery Pi 3 case
- Micro USB 5V-2.1A power adapter
- Micro SD card class 10 8GB
- RJ45 Patch Cable
- AC Extension cord with 2+ plugs
NB: Some people may argue that spending $70 on the above setup is not
feasible to make a $20 printer work. But I think the device that works for more
than 20 years has earned a second life chance.
Let’s go to work…
Perform the Generic Print Server Setup from here.
Setup HP LaserJet 1000
- Plug-in and switch on the printer
- List available firmware files
$ sudo getweb ... $ ./getweb 1000 # Get HP LJ 1000 firmware file ... - Get HP LaserJet 1000 firmware file
- Restart the printer
- In the browser go to CUPS admin page
- Ensure Allow users to cancel any job (not just their own) is checked.
- Click Add Printer
- Choose Local Printers: HP LaserJet 1000 (HP LaserJet 1000)
- Click Continue
- Enable Share This Printer
- Click Continue
- Choose Model: HP LaserJet 1000 Foomatic/foo2xqx (recommended) (en)
- Click Add Printer
- Click Set Default Options
- Click Maintenance and then Print Test Page
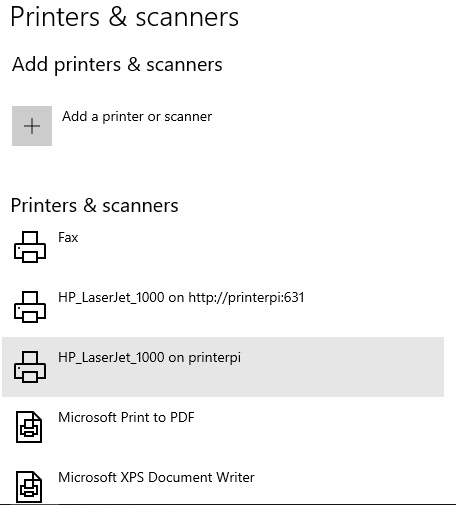
- Store the printer link: http://printerpi:631/printers/HP_LaserJet_1000
That’s it! The print server is now accessible via
IPP and Samba.
Testing on Windows 10
It’s time to test the print server on some Windows 10 machine.
I used a free Windows 10 Enterprise image from
here.
Ensure the print server is reachable:
   > ping printerpi

   Pinging printerpi [192.168.100.32] with 32 bytes of data:
   Reply from 192.168.100.32: bytes=32 time<1ms TTL=127
   ...
Connect to the printer via IPP
Ensure Internet Printing Client feature is enabled.
Run Turn Windows features on or off (optionalfeatures.exe).
The Internet Printing Client option should be enabled.
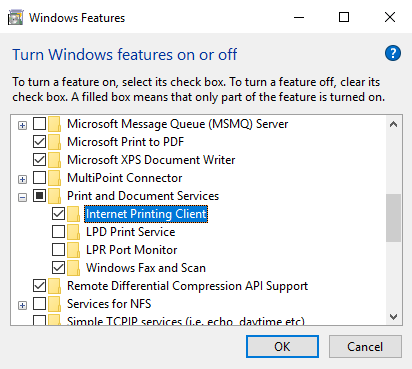
Adjust as you need. Click OK. You may need to restart.
If you prefer command line then launch PowerShell as Administrator and run:
> Enable-WindowsOptionalFeature -FeatureName Printing-Foundation-Features -Online -NoRestart
> Enable-WindowsOptionalFeature -FeatureName Printing-Foundation-InternetPrinting-Client -Online -NoRestart
> Enable-WindowsOptionalFeature -FeatureName FaxServicesClientPackage -Online -NoRestart
> Disable-WindowsOptionalFeature -FeatureName Printing-Foundation-LPDPrintService -Online -NoRestart
> Disable-WindowsOptionalFeature -FeatureName Printing-Foundation-LPRPortMonitor -Online -NoRestart
Adjust the above you need. You may need to restart.
Let’s connect to the printer via IPP.
Go to Windows -> Settings -> Devices -> Printers & scanners -> Add a printer or scanner.
If the printer is found you are done. Click on it, print the test page and you can stop reading.
NB: I don’t know how to make automatic printer discovery work.
It works on some machines and doesn’t on others. I’ve spent huge
amount of time playing with services, firewall, googled about it and no luck.
If you know how to make it work reliably, please share.
If the printer is not found click The printer that I want isn’t listed.
Choose Select a shared printer by name and past the printer link into the field.
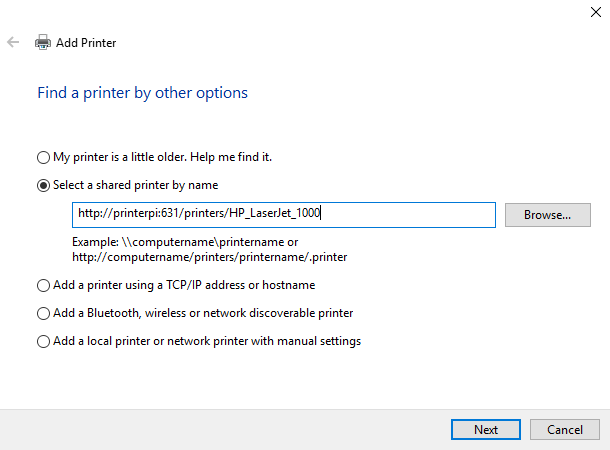
Click Next.
What?! Windows wants the driver, which we don’t have. We wouldn’t be doing all of that otherwise.
Fortunately, there’s a solution. Thanks to this
article (in Russian) for the hint.
CUPS takes printing jobs in
PostScript and converts it into a format suitable
for the printer. Windows includes two such drivers: MS Publisher Color Printer (color) and
MS Publisher Imagesetter (black and write). You won’t have full control over the printer and
printing will be slower, but this is a working solution.
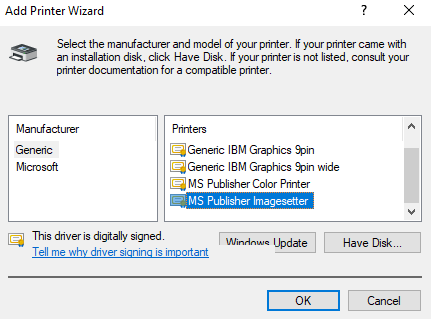
Choose MS Publisher Imagesetter and click OK.
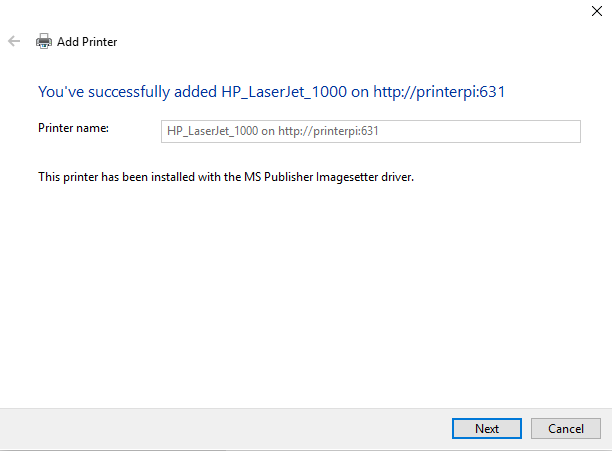
Click Next. Click Print a test page.
At this point you should be able to print the test page and you can stop reading.
Connect to the printer via Samba
NB: Support for SMBv1 is long deprecated in Windows. It’s not secure, but I think
using the client only at home is acceptable. Plus it might be the only option
for an old network printer or a NAS server. See this
link
for more detail.
Ensure SMB 1.0/CIFS Client is enabled
Run Turn Windows features on or off (optionalfeatures.exe).
The SMB 1.0/CIFS Client option should be enabled.
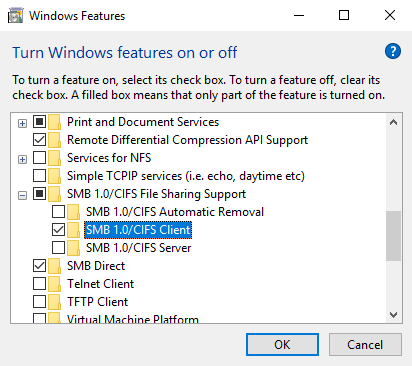
Adjust as you need. Click OK. You may need to restart.
If you prefer command line then launch PowerShell as Administrator and run:
> Enable-WindowsOptionalFeature -FeatureName SMB1Protocol -Online -NoRestart
> Enable-WindowsOptionalFeature -FeatureName SMB1Protocol-Client -Online -NoRestart
> Disable-WindowsOptionalFeature -FeatureName SMB1Protocol-Server -Online -NoRestart
> Disable-WindowsOptionalFeature -FeatureName SMB1Protocol-Deprecation -Online -NoRestart
Adjust the above you need.
Enable Samba Insecure Guest Logons
On Windows 10 Enterprise and Professional you can run Local Group Policy Editor (gpedit.msc)
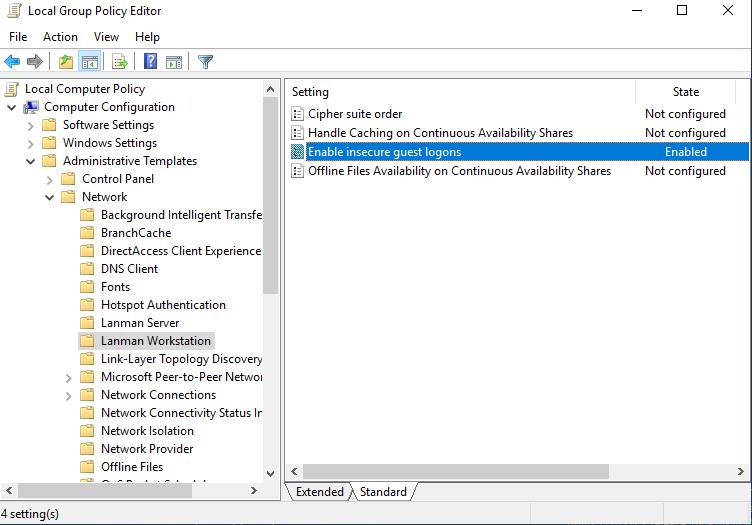
On Windows 10 Home you need to change the Windows Registry.
Launch PowerShell as Administrator and run:
> Set-ItemProperty -Path "HKLM:\SYSTEM\CurrentControlSet\Services\LanmanWorkstation\Parameters" AllowInsecureGuestAuth -Type DWORD -Value 1 -Force
Now restart Windows.
Let’s connect to the printer via Samba:
Run File Explorer -> Network. Press F5 to refresh.
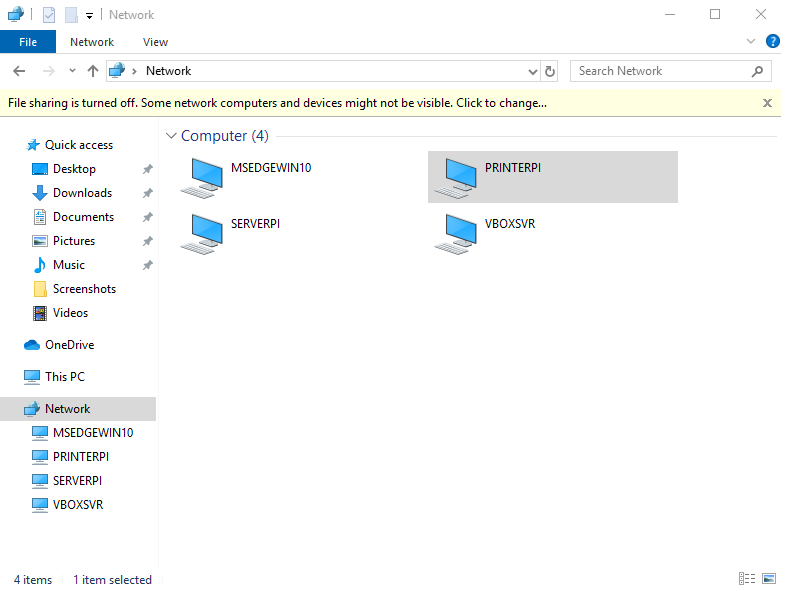
Double-click on PRINTERPI. Double-click on HP_LasetJet_1000.
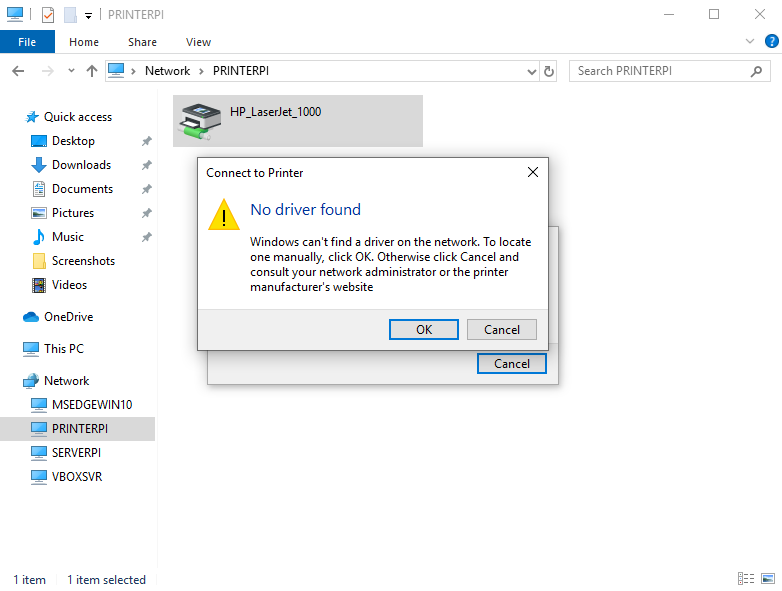
Windows again wants the driver, which we don’t have. But see the explanation above…
Click OK.
Choose MS Publisher Imagesetter and click OK.
Now you’ve connected to the printer via Samba too.
Choose HP_LaserJet_1000 on PRINTERPI -> Manage -> Print a test page.
Congratulations! The old HP LaserJet 1000 now works with Windows 10 via
IPP and Samba.
- Windows 10 might automatically detect your printer and install a generic driver, but for optimal performance, you’ll need to install the HP LaserJet 1000-specific driver.
- Use a USB cable (Type A to Type B) to connect your printer to a USB port on your computer.
- Installing your HP LaserJet 1000 on Windows 10 64-bit is a simple process that will allow you to enjoy reliable printing for all your documents and projects.
Are you trying to connect your trusty HP LaserJet 1000 to your Windows 10 64-bit system? This guide will walk you through the entire process, from initial setup to printing your first document.
The Basics: Understanding the Process
Installing the HP LaserJet 1000 on Windows 10 64-bit is a straightforward process, but it’s important to understand the steps involved:
1. Connecting the Printer: You’ll need a USB cable to connect the printer to your computer.
2. Installing the Driver: Windows 10 might automatically detect your printer and install a generic driver, but for optimal performance, you’ll need to install the HP LaserJet 1000-specific driver.
3. Testing the Connection: After installation, you’ll need to print a test page to confirm everything is working correctly.
Step-by-Step Installation Guide
Here’s a detailed guide to installing your HP LaserJet 1000 on Windows 10 64-bit:
1. Connecting Your HP LaserJet 1000
- Power on: Ensure your HP LaserJet 1000 is powered on and ready to connect.
- USB Connection: Use a USB cable (Type A to Type B) to connect your printer to a USB port on your computer.
- Wait for Detection: Windows 10 should automatically detect the printer and begin the installation process.
2. Installing the HP LaserJet 1000 Driver
- Windows Update: Windows 10 might install a generic driver. To ensure optimal functionality, you’ll need to install the specific HP LaserJet 1000 driver.
- HP Website: Visit the HP website and go to their driver download section.
- Search for Your Model: Enter “HP LaserJet 1000” in the search bar and select your printer model.
- Choose the Correct Driver: Download the driver that’s compatible with Windows 10 64-bit.
- Run the Installer: Once the download is complete, run the installer file. Follow the on-screen instructions to complete the installation.
3. Testing Your Connection
- Open a Document: Open any document you want to print, such as a text file, image, or web page.
- Print: Select the “Print” option from your document’s menu.
- Choose Your Printer: In the print dialog box, select your HP LaserJet 1000 as the printer.
- Print a Test Page: Print a test page to verify that your printer is working correctly.
Troubleshooting Tips
If you encounter issues during the installation process, here are some common troubleshooting tips:
- Check USB Connection: Ensure the USB cable is securely connected to both your computer and printer. Try a different USB port if possible.
- Restart Devices: Restart both your computer and printer. Sometimes a simple restart can resolve connectivity issues.
- Update Drivers: If you’re using an older driver, update it to the latest version from the HP website.
- Run the HP Printer Assistant: Download and run the HP Printer Assistant tool from the HP website. This tool can help diagnose and fix common printer problems.
- Check for Windows Updates: Ensure your Windows 10 system is up-to-date with the latest updates.
Enhancing Your Printing Experience
Once your HP LaserJet 1000 is successfully installed, here are some ways to enhance your printing experience:
- Configure Printer Settings: Access your printer’s settings to customize options like paper size, print quality, and duplex printing.
- Install HP Software: Download and install HP’s printer software for additional features, including scanning, faxing, and wireless connectivity (if your printer supports it).
- Optimize Print Quality: Adjust the print quality settings based on your specific needs. Higher quality settings will produce sharper images and text, but may take longer to print.
- Regular Maintenance: Keep your printer clean by removing dust and debris from the paper tray, rollers, and toner cartridge.
Beyond Installation: A Look at Advanced Features
While the HP LaserJet 1000 might be a basic printer, it still offers some advanced features that can enhance your workflow:
- Print Speed: The LaserJet 1000 delivers a decent print speed, allowing you to quickly print documents and presentations.
- Toner Cartridge Management: The printer provides a straightforward process for replacing toner cartridges.
- Paper Handling: The HP LaserJet 1000 offers a standard paper tray capacity, making it suitable for everyday printing tasks.
Final Thoughts: Your HP LaserJet 1000 is Ready!
Installing your HP LaserJet 1000 on Windows 10 64-bit is a simple process that will allow you to enjoy reliable printing for all your documents and projects. By following the steps in this guide, you can ensure a smooth installation and a seamless printing experience.
Basics You Wanted To Know
Q: What if my printer isn‘t detected by Windows 10?
A: Check your USB connection and ensure the printer is powered on. If the issue persists, try a different USB port or restart both your computer and printer.
Q: What if the driver installation fails?
A: Make sure you’re downloading the correct driver for your printer model and Windows 10 64-bit. If the issue persists, try downloading the driver from HP’s website again or contact HP support for assistance.
Q: How often should I replace the toner cartridge?
A: The frequency of toner cartridge replacement depends on your printing volume and usage patterns. You’ll typically receive a notification when the cartridge is low.
Q: Can I use a different type of USB cable?
A: It’s recommended to use the USB cable that came with your printer. Using a different type of cable might result in connectivity issues.
Q: Is there a way to print wirelessly with the HP LaserJet 1000?
A: The HP LaserJet 1000 is a wired printer and does not support wireless connectivity.
Was this page helpful?YesNo
The HP LaserJet 1000 Printer series has full-feature software for Microsoft Windows operating systems. After installing the printer, you will need to install the HP LaserJet 1000 Driver. Make sure you download the right driver for your operating system.
Listed below are the steps to install the HP LaserJet 1000 Driver. These steps are the same for both 32-bit and 64-bit versions of Windows. After you have downloaded the driver, install it to activate your printer.
Installing the HP LaserJet 1000 driver
Many HP LaserJet 1000 users opt for installing the HP LaserJet printer driver from a CD or DVD. It is important to download the correct driver for your system and follow the installation wizard.
You can also connect your printer wirelessly. The process of installing the HP LaserJet 1000 driver for Windows depends on the type of connection between your printer and PC. To install the driver manually, you should connect the printer to your computer via a USB cable.
Also Download: Canon166400 Driver
To install the printer driver, first go to the Help menu of your device. Choose “Install Printer Driver” from the list. It should be installed before rebooting your computer. If the printer still shows an error message, you should reinstall the driver.
You can also choose to remove the driver using Device Manager. If you want to delete the driver, you must uninstall it first. After removing the driver, reboot your computer.
The HP LaserJet 1000 printer driver can be installed manually or semi-automatically, depending on your PC’s operating system. Manual installation requires your close attention and is usually the best option if you are not very tech-savvy.
If you are unsure, visit HP’s official support site for instructions. There you will find helpful information on how to install the HP LaserJet 1000 driver for Windows.
Upgrading the driver
Upgrading the HP Laserjet 1000 driver can help you fix errors and improve the overall performance of your printer. This process can be done either manually with the help of Device Manager or automatically with a driver update utility.
Upgrading the LaserJet 1000 driver is important if you want to enjoy the latest features and functionality of your HP printer. The updated driver will resolve problems caused by outdated and corrupt system drivers.
You will need a USB cable to connect your printer to your computer. If it does not come with one, you can get one from the manufacturer’s website. Once you’ve downloaded the file, connect the device to your computer and run the software.
When the software detects the printer, it will continue to the next step. Once you’ve completed this process, your HP Laserjet 1000 printer is ready to use!
Software Details
Name: HP Laserjet 1000
Setup Size: 16.8 MB
You can use Easy Driver Pro to upgrade the HP Laserjet 1000 printer driver on Windows 10. This software automatically scans your PC for outdated drivers and updates them to the most compatible version. It is easy to install and can be done within minutes.
Alternatively, you can manually update the HP Laserjet 1000 printer driver from the manufacturer’s website. You can also download HP LaserJet 1000 printer drivers from official websites.
When updating the driver, make sure you back up your existing drivers first. The software will also create a restore point if you encounter incompatibility issues during the process.
Uninstalling the driver
Using the Add/Remove Programs feature in Windows, you can uninstall hp LaserJet 1000 driver for Windows. This tool will open the Control Panel in the Start menu and let you locate the HP LaserJet 1000 driver.
From here, you can follow the uninstall wizard to remove the printer driver. Generally, most computer programs come with an uninstaller built-in. However, if the software is no longer necessary, you can uninstall it manually.
After uninstalling the HP LaserJet 1000 driver for Windows, run the corresponding HP program to repair any errors. It will remove the driver, as well as any other programs that may be causing issues.
You can also perform a scan with an antivirus program to make sure your system is safe and free of malware. You can find more tips for maintaining your computer by visiting online forums and reading user guides.
You can also try downloading the latest driver for your printer. You can get the latest one from the official HP website. Just make sure to restart your system after downloading the driver.
You can also try to install the printer driver from the website of HP. This will be the easiest way to install the HP Laserjet 1000 printer for Windows. You can also use the HP Laserjet 1000 driver for Windows to install the latest version on your computer.
- Вирусная проверка:
- Добавлено: 28.08.2024
- Версии ОС: Windows 11, 10, 8, 7, Vista-XP
- Версия драйвера: v 5.51.1519.00a
- Производитель: Драйвер для принтера / HP
- Лицензия: Бесплатно
Краткое содержание
- Зачем нужен драйвер
- Скачать драйвер на HP LaserJet 1000
- Как установить драйвер
- Возможные ошибки установки и их решение

Предлагаем вам официальный драйвер для HP LaserJet 1000. Этот драйвер необходим для стабильной работы вашего устройства с операционной системой Windows, а также для его определения. Данный драйвер не только способен вернуть устройство в рабочее состояние, но и обеспечить корректное взаимодействие принтера с ОС.
Для начала работы с драйвером определите конкретную версию вашей операционной системы. Затем, используя предоставленную таблицу, выберите подходящий драйвер и нажмите кнопку “Скачать”. После успешного скачивания драйвера следуйте нашей подробной инструкции по установке. Благодаря этой инструкции вам не потребуется обращаться к услугам специалиста или изучать дополнительные руководства.

Скачать драйвер для HP LaserJet 1000
| Версии OS: Windows 11, Windows 10 32-bit, Windows 10 64-bit, Windows 8.1 32-bit, Windows 8.1 64-bit, Windows 8 32-bit, Windows 8 64-bit, Windows 7 32-bit, Windows 7 64-bit | |
| Тип драйвера | Скачать |
| HP LaserJet 1000 Software Update |
Скачать |
| HP LaserJet 1000 Host Based Driver |
Скачать |
| HP LaserJet 1000 Printing Software Solution |
Скачать |
На этой странице Вы можете скачать драйвер HP LaserJet 1000! Скачивайте бесплатно необходимые драйвера под операционную систему Windows, Linux, Mac
Как установить драйвер для HP LaserJet 1000
- Скачать драйвер из таблицы под свою версию ОС Windows
- Запустите загруженный файл
- Примите “Лицензионное соглашение” и нажмите “Далее”
- Укажите способ подключение принтера к компьютеру и нажмите “Далее”
- Ожидайте завершения установки
- Произведите перезагрузку компьютера для внесения изменений.
Перед установкой драйвера убедитесь, что на компьютере не установлена его другая версия. Если это так, удалите её перед установкой новой.
Частые ошибки и решения при установке драйвера
- Проблема обнаружения принтера: Если устройство не найдено, рекомендуем скачать другую версию драйвера.
- Проблемы с печатью: Если принтер не печатает после установки драйвера, убедитесь, что вы перезагрузили компьютер.
- Невозможно запустить файл драйвера: В случае, если файл не открывается, проверьте вашу систему на вирусы, затем перезагрузите и попробуйте заново.