
Windows Media Player / WMP as we know is an application produced by Microsoft to play audio and video files and also for observing images. Windows Media Player was there in the old versions of Windows and currently, it serves its purpose very interestingly on Windows 10 also. With an easy and smooth interface, this application serves multiple functions for its users such as arranging the media stocks, burn CDs with your favorite tracks, synchronization of media files with other gadgets, or shop favorite media tracks from online stores.
Today here in this Windows Media Player topic we will explore you different functioning and modes of the application. Hold your seat and learn many interesting facts about your favorite application!
How to Start Windows Media Player on Windows 10
- Before starting, get The Windows Media Player compatible with Windows 10 from this location. 2 files will be downloaded, hence, install both of them one after another.
- Launch your Windows 10 Cortana search.
- Type WMP in the search area and look at Windows media player at the top under Best match.
- Hit it.
- Windows Media Player (WMP) immediately opens.
How to use Windows Media Player on Windows 10
- There are two modes of Windows Media Player that you can experience while playing it. They are Now Playing and Player Library. You can easily switch between the two modes. Let’s look into their details deeply.
Now Playing
Now Playing is the mode that exhibits on the screen while turning on any track for play. In this mode, you can see DVDs and videos and also the music that is presently playing on. Here you get what item is presently playing on or you can also right-click on the player and choose Show List to see the selection of obtainable contents.
There are three areas in Now Playing mode that we will explain to you now. See the image below for a clear understanding.
- Track Information– It exhibits the information for the track that you are playing.
- Playback Control– Use the controls like pause, stop, forward, or backward button to control the track.
- Switch to Library Mode– It is the button that will make you switch between the two modes.
Player Library
Here, in this mode, you are free to arrange media stock. Five areas in Player Library serve various purposes. Lets’ see them now!
- Address Bar– It will exhibit your existing location or the folder in which you are into.
- Navigation Pane– All the sections are listed in the navigation pane which permits you to choose the favorite.
- Details Pane– When you select a particular section or category of the navigation pane, the details of that particular category is displayed in Details Pane.
- List Pane– dragging the items from Details Pane to List Pane allows you to make playlists, burn your favorite tracks into CDS or DVDs or transfer to devices.
- Playback Control – Control the flow of the track using the volume, forward, backward, play or pause buttons of the Playback Control.
Now we will go to the other interesting features of Windows Media Player.
Play From The Taskbar
When you shrink the WMP window, its icon will appear on your Taskbar. And from the Taskbar itself, you can play the track without disturbing your work on the screen. All you have to do is just take your cursor to the WMP icon on the taskbar, you will get a thumbnail preview and from there you will be able to play or pause the running track. Click the forward button to jump to the next track, or the back button to go to the previous track.
Build a Media Library
WMP by default attaches and connects the tracks to the Player Library from Music, Pictures, and Videos. If you wish to assemble a media library attach folders from further locations on the portable music devices or to your PC.
RIP CDs To Create Digital Music Files
To copy songs from phonic CDs to your computer you can use Windows Media Player and this method is termed as ripping. In the ripping process, your each song is copied by the Player and it stored in the hard disk of your computer as an MP3 or Windows Media Audio (WMA) or WAV file. And then it will be added to your Player Library.
Use Tabs To Complete Key Tasks
There must be many users like me who feel like being at the highest peak when different tasks are done at one place only. I personally got so much relaxed when I found that I can perform three tasks in one media player only. Wow! Now I don’t have to plunge into different media players or different pieces of software to Play, Burn o Sync any track. All thanks to Windows Media Player as all these tasks can be easily carried at one place. They can be easily located as they are placed just above the List Pane section of Player Library. With these options, I can play any track, burn my favorite or required tracks to a CD or DVD or even I can sync the required ones with other suitable media devices.
PLAY – The list under the Play tab exhibits the current tracks that are playing and also the tracks that you have selected to play. Suppose, if you have selected an entire album then all the songs of that album will be listed under the Play tab.
BURN – One click on this tab will permit you to produce a copy of the selected tracks to a CD or DVD so that you can enjoy them playing on compatible gadgets.
SYNC – By clicking on this option many items like music, videos, and a wide range of images will be pulled together to suitable media devices. When the suitable transferable media device is secured to your computer, the Player will start harmonizing. The automatic or manual setting is depending on the device.
Till now we have dealt with Windows Media Player and its features and functions. But what if you face any problem with the Player?! Simply use the Troubleshooter as your savior and get rid of the problem. To do so, follow the below steps –
- Launch Control Panel on your computer screen.
- Hit on Troubleshooting.
- Click View All link on the Troubleshooting window.
- Now look for Windows Media Player Settings option and click on it.
- This will fix the issues.
Windows Media Player has been around for many years. Now in its 12th version, it still has a lot to offer when it comes to listening to music on your PC.
Play music that’s stored on your computer, or directly from an audio CD. Add music to your library and best of all create playlists.
Table Of Contents
- Windows Media Player.
- Welcome To Windows Media Player.
- If Some Of Your Music Isn’t Listed.
- How To Play Music Directly From An Audio CD Or USB Drive.
- To Play Music From A USB Drive.
- Music Playlists.
- How To Create A Playlist In Windows Media Player.
To get started, left-click the Start button and type “Windows Media Player“.
If you’re using Windows 10, left click Windows Media Player (App).
And if you’re using Windows 11, left click Windows Media Player (Legacy).
WMP Might Not Be Installed On Your Computer.
Pay particular attention to the search results because WMP isn’t guaranteed to be installed on your system, especially if you have a Windows 11 machine.
If this is the very first time that you’ve started WMP, you’ll be greeted with the “Welcome to Windows Media Player” splash screen.
Select “Recommended Settings” and then click the FINISH button.
After clicking the Finish button, WMP will start. Again, if this is the first time that you’ve used Windows Media Player, it scans your music folder looking for audio files.
That might take a few minutes but eventually, it’ll display your music collection.
To play a single track you can just double left-click on it.
But you can select multiple tracks to play by holding down the CTRL key on your keyboard and then single left-clicking on all the songs you want to play.
How To Select Multiple Files In Windows
If Some Of Your Music Isn’t Listed.
By default, Windows Media Player will scan your Music folder, Video folder and Pictures folder. If WMP doesn’t show all your music collection, it’s most likely that you have it stored in another folder.
The first thing you could do, and most obvious, is to simply move your music into your Music folder. WMP will then pick it up and add it to your music library. You can use cut and paste to do that.
How To Include A Folder In Music Library.
Occasionally you’re not going to want to do that, you’re going to want to leave it where it is.
In that case, you just need to let WMP know where else to look for music files.
As an example, here I’ve got a music folder on my desktop, and I want to leave it there.
To add a folder to your music library, click the Organise button in the top left corner of the screen.
On the menu that opens, hover your pointer over Manage Libraries and then click Music.
The Music Library Locations window will open. Click the Add button.
An explorer window will open allowing you to select which other folder to include in the library. Select the folder you want to include and then click the INCLUDE FOLDER button.
So continuing with my example, I’d click Desktop in the navigation panel (left-hand panel) and then click the Include Folder button.
After clicking the Include Folder button, you’ll be returned to the “Change how this library gathers its contents” page.
If you want to add other folders, click the ADD button and do the same again.
When you’re finished adding folders, click the OK button.
How To Play Music Directly From An Audio CD Or USB Drive.
As well as playing music that’s stored on your computer, you can, of course, play your music directly from a regular old audio CD, assuming your computer has a CD/DVD drive or if you’ve got music stored on a USB drive, you can use that.
With the audio CD loaded into the CD drive, you’ll see it appear in the left-hand panel of Windows Media Player.
Usually, what you’ll see is the name of the audio CD and the drive’s letter.
Left-click once on the CD in the left panel and the contents will appear in the centre panel.
You can play the whole CD by clicking the PLAY button.
Individual tracks by double left-clicking them.
Or select multiple tracks by holding down the CTRL key and then selecting which tracks to play.
To Play Music From A USB Drive.
To play music from a USB drive, find the drive in the left-hand panel. Then click the small arrowhead beside it to expand the contents of the drive.
With the USB drive expanded, click on the MUSIC option. Windows Media Player will scan the drive for audio files. When it’s finished, your music will appear in the centre panel and you can play it by clicking the PLAY button.
You can also select multiple tracks, just as you might with an audio CD
Music Playlists.
A Playlist is simply a list of songs to be played. And they are probably the very best thing about any media player software. You can create playlists that last for just several minutes or several hours.
You can include songs from any combination of albums, artists, genres etc, and mix them all together to suit yourself or your mood.
Once created, the playlist is saved and ready for use whenever you want to listen.
To create your first playlist, open Windows Media Player. If it isn’t showing you’re music tracks, left-click the MUSIC tab in the left-hand panel.
Scroll through your music tracks until you find one to add to your new playlist. When you find a track, drag it into the right-hand panel.
If you can’t see a right-hand panel, click the PLAY tab in the top right corner of the toolbar.
Build Your Playlist.
Continue adding tracks to your playlist. You can add them one at a time, or by selecting multiple tracks and then dragging them over to the list in one go. There isn’t any real limit to how many tracks you add to your playlist.
When you’ve finished adding tracks to your playlist, you’ll need to save it. At the top of the list, you’ll see it’s as yet an “Unsaved list”.
Left click once in the “Unsaved list” box. The Unsaved Playlist becomes highlighted. Now you can type in anything that you want to name the playlist.
When you’ve named your playlist, press ENTER on your keyboard to save the list. To listen to a playlist, simply double left-click on its name.
Summary.
Windows Media Player is still a good choice for handling your audio files. It’s fairly easy to use and is created by Microsoft so should just work without any conflicts on your system.
In this beginner’s guide, we’ve only really touched on the basics, but I think that’s all we need to get started.
Have a go at creating playlists. Once you get the hang of them, you’ll never go back to playing individual tracks.
Stay Informed. Stay In Touch.
Now that you’ve found me, keep in touch. I publish new articles and update older ones constantly.
Let me send you a monthly email with all the latest guides for you to see if there’s anything you’re interested in.
At Home Computer
Signup for the At Home Computer Newsletter.
Support this website and keep up to date with all the new articles.
How to Use Windows Media Player: A Step-by-Step Guide
Windows Media Player is a popular media player software developed by Microsoft, which allows users to play audio and video files on their Windows operating system. In this article, we will provide a step-by-step guide on how to use Windows Media Player to play your favorite media files.
Basic Navigation
Opening Windows Media Player
To start using Windows Media Player, first, you need to locate the program on your computer. Here are the steps to follow:
- Step 1: Click on the Start button on your computer and select All Programs or All Applications depending on your Windows version.
- Step 2: Scroll down the list of programs and click on Windows Media Player to open the program.
Basic Functions
Playing Media Files
Once you have opened Windows Media Player, you can start playing your media files. Here’s how:
- Step 1: Click on the File menu and select Open File to open the file browser.
- Step 2: Navigate to the location where your media file is saved and select the file.
- Step 3: Click Open to start playing the media file.
Playback Controls
Playback Controls
Once a media file is opened, you can control the playback using the following buttons:
- Play/Pause: Click the Play button () or press the spacebar to start or pause the playback.
- Stop: Click the Stop button () to stop the playback.
- Previous/Next Track: Click the Previous button (<) or Next button (>) to switch between tracks.
- Volume Control: Adjust the volume using the Volume control () or use the keyboard shortcuts:
- Volume Up: Ctrl+Up Arrow
- Volume Down: Ctrl+Down Arrow
Media Library
Media Library
The Media Library is where you can find and manage your media files. Here’s how to use it:
- Step 1: Click on the Library button on the top left corner of the Windows Media Player window.
- Step 2: The Media Library will open, displaying a list of your media files. You can filter the list by Artist, Album, or Genre using the drop-down menus.
- Step 3: Right-click on a media file to perform actions such as:
- Add to Playlist: Adds the file to a new or existing playlist.
- Add to Library: Adds the file to your Media Library.
- Delete: Deletes the file from your computer.
Playlists
Playlists
Playlists allow you to create and manage a list of your favorite media files. Here’s how to use them:
- Step 1: Click on the Playlist button on the top left corner of the Windows Media Player window.
- Step 2: The Playlist window will open, listing all your playlists. You can create a new playlist by clicking File > New Playlist.
- Step 3: To add files to a playlist, right-click on a file and select Add to Playlist.
Media Format Support
Media Format Support
Windows Media Player supports a wide range of media formats, including:
| Audio Formats |
|
|---|---|
| Video Formats |
|
Troubleshooting
Troubleshooting Common Issues
If you encounter any problems while using Windows Media Player, here are some common issues and their solutions:
- Issue: Windows Media Player not opening.
- Solution: Try restarting your computer or reinstalling Windows Media Player.
- Issue: Audio or video not playing.
- Solution: Check the media file’s format and ensure it is compatible with Windows Media Player. Try updating your media player to the latest version.
Conclusion
In this article, we have covered the basic steps to use Windows Media Player to play your favorite media files. With its range of features, including playback controls, media library, and playlists, Windows Media Player is a popular choice for media enthusiasts. By following the steps outlined above, you can start enjoying your media files with ease.
Unlock the Future: Watch Our Essential Tech Videos!
This article explains how to open the new Windows Media Player app in Windows 11.
The Windows Media Player app is a built-in application that allows you to play various media files, such as videos, music, and images. It is a useful tool for managing and playing your media collection in Windows. It supports various file formats and offers basic playback controls such as play, pause, stop, rewind, and fast-forward.
If you’re new to Windows 11 and want to know how to play your media formats, follow the steps below.
Knowing how to find the Windows Media Player app can be helpful if you want to play various media files such as videos, music, and images. By following the steps to open and use the Windows Media Player app, you can easily manage and play your media files in Windows 11.
Open the Windows Media Player app
As mentioned above, if you’re new to Windows and you want to play your audio and video files, the Media Player is the app you will need.
Here’s how to open and use it.
First, open the Windows Media Player app by clicking the Start menu and selecting it on the All apps list.
If you don’t have it installed, use the link below to install it from the Microsoft Store.
When it opens, it should open and display its home page. You can configure various settings from there, including adding music and video libraries to your media files.

Our next post will show you how to add or remove media libraries in the Windows Media Player app.
Here are some keyboard shortcuts you can use with the Media Player app.
| Switches to library mode | Ctrl + 1 |
| Switches to skin mode | Ctrl + 2 |
| Switches to player mode | Ctrl + 3 |
| Add to Play | Ctrl + 7 |
| Add to Burn | Ctrl + 8 |
| Add to Sync | Ctrl + 9 |
| Selects everything in a list | Ctrl + A |
| Eject | Ctrl + J |
| Create playlist | Ctrl + N |
| Shows Open Dialog | Ctrl + O |
| Rewinds playing content | Ctrl + Shift + B |
| Skip forward | Right Arrow |
| Skip backward | Left Arrow |
| Resize player to image | Ctrl + Click |
| Return to Now Playing | Escape |
That should do it!
Conclusion:
- Opening the Windows Media Player app in Windows 11 is essential for playing various media files.
- You can easily manage and play your media files by following the simple steps above.
- The Media Player app offers basic playback controls and supports various file formats for a seamless media experience on Windows 11.
If you’re looking for an easy way to play and manage your media files in Windows 11, then Windows Media Player is what you need. It’s a free built-in application that allows you to quickly access your audio, video, and photo files with just a few clicks. In this article, we’ll show you how to open Windows Media Player in Windows 11.
If you’re seeking information about how to open Windows Media Player on your computer, the Windows Search tool is a good place to start. To open Windows Media Player using the search tool, do the following:
-
Press Win + Q on your keyboard.

- From here, type “Windows Media Player Legacy” into the search bar.

Upon doing this, you will see a list of related results; clicking on this will then open Windows Media Player automatically.
The Run dialog box is one of the most useful tools on Windows. It’s a quick and easy way to access frequently used programs and files without having to search through your computer’s file system.
To open Windows Media Player using the Run command, do the following:
- Press Win + R on your keyboard to open the Run dialog box. For more information, check out our complete guide to Windows Keyboard Shortcuts.
- In the Run dialog box, type wmplayer.exe and click OK.
That’s it. This is how you can open Windows Media Player on your PC.
Task Manager is a powerful Windows tool you can use to manage your computer’s resources as well as close unresponsive programs, but it isn’t limited to this. You can also use it to open applications, such as Windows Media Player, quickly and easily.
To open Windows Media Player using Task Manager, follow these steps:
- First, press the Ctrl + Shift + Esc keys simultaneously on your keyboard.
- In the Task Manager window, click on More details if necessary.
-
Click Run new task at the top of the page.

- Now in the text box, type wmplayer.exe and press Enter on your keyboard.
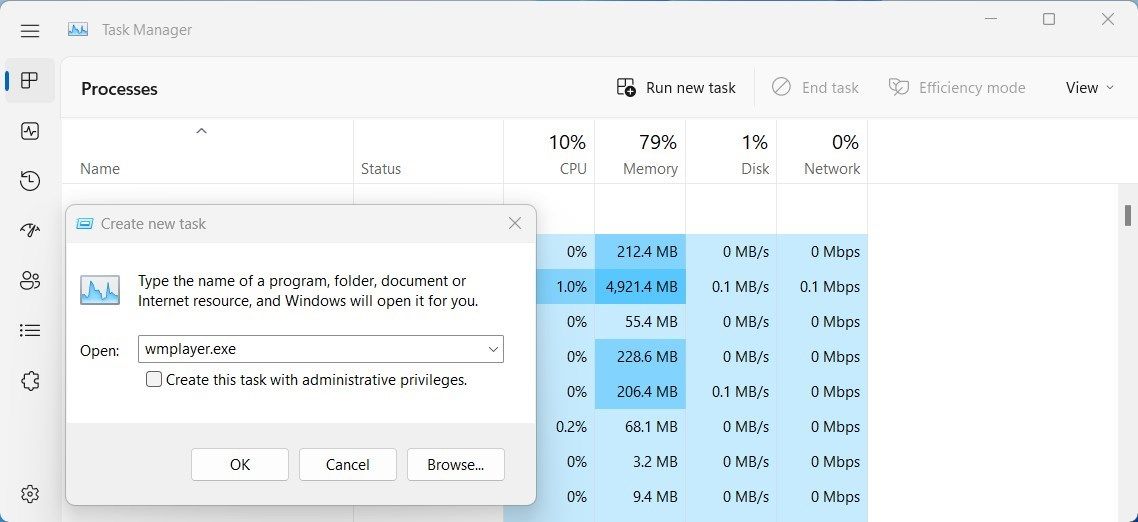
This will open up Media Player, so you can enjoy all your media files without any trouble!
Another way to access Windows Media Player is by using File Explorer. To do this, follow the below steps:
- Right-click on Start and select File Explorer or press Win + E on your keyboard. This will open the File Explorer window.
- From there, go to the address bar, type wmplayer.exe, and hit Enter.
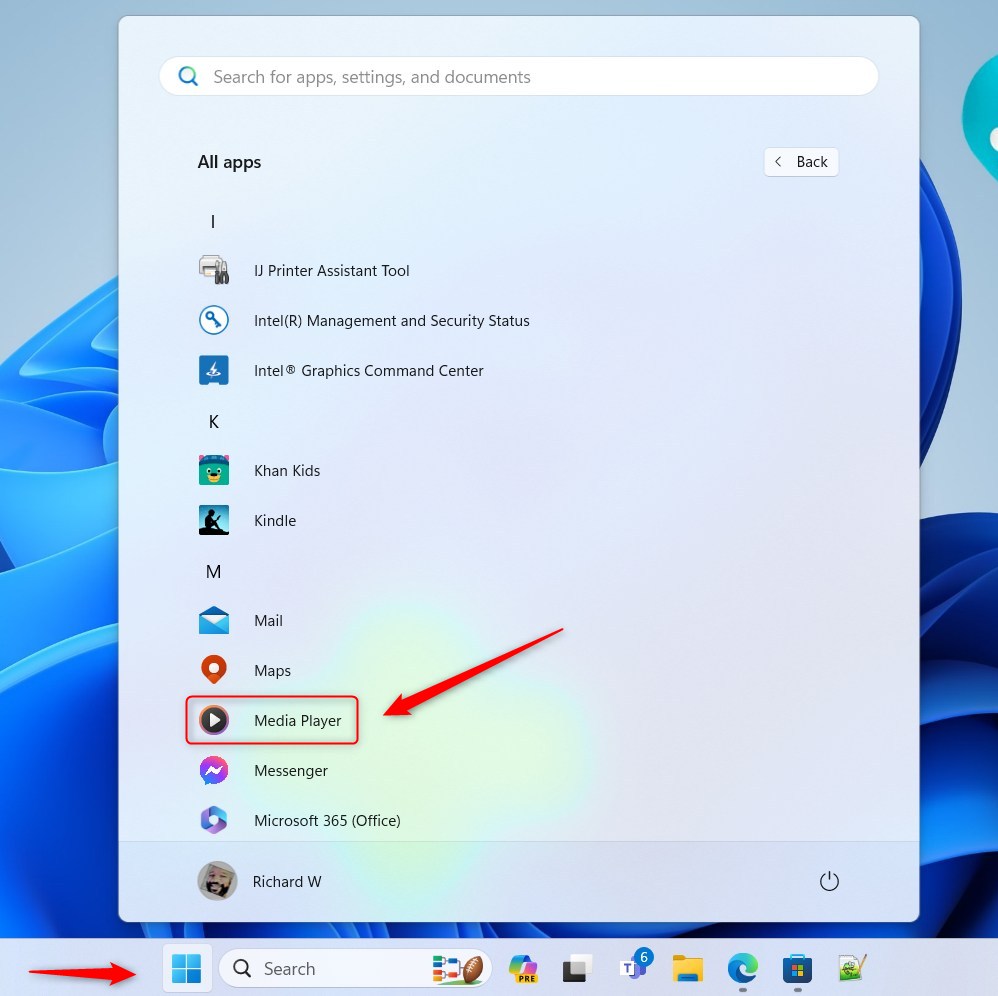
The Start menu works as a central hub on your computer from where you can access the files and programs you have installed. To open Windows Media Player from the Start Menu, follow these steps:
- The first thing you need to do is open the Start Menu by clicking on the Windows logo at the bottom left of your screen.
- From here, click All apps in the top right corner.
-
Then scroll down and click Windows Tools in the list.

- Double-click Windows Media Player Legacy on the next page.
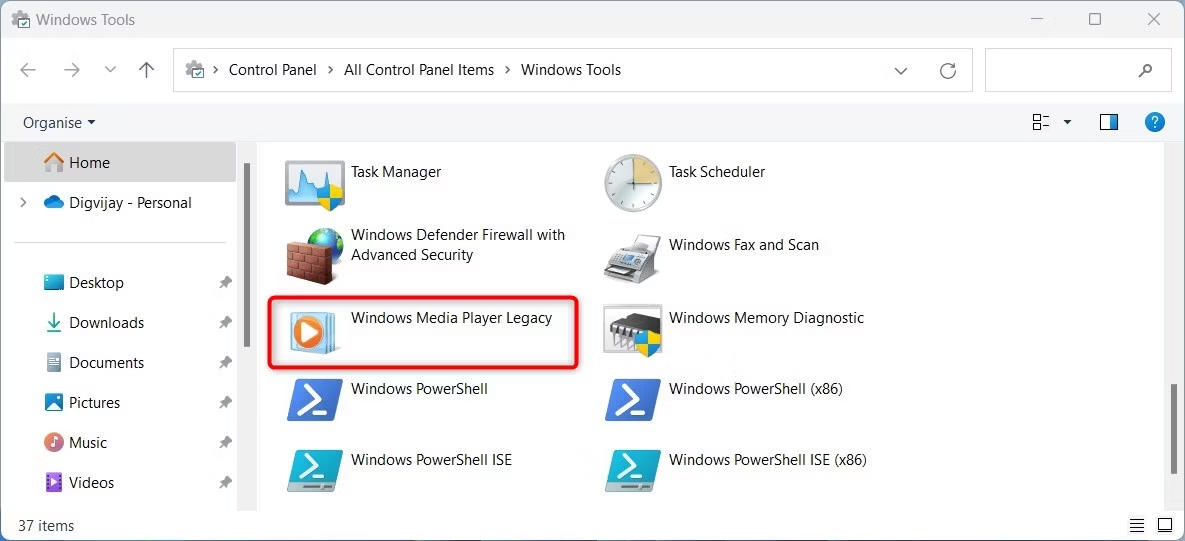
The Control Panel is a feature on Windows that allows you to access and manage system settings easily. With the help of this tool, you can access almost any application you have installed.
To start Windows Media Player from the Control Panel, follow these steps:
- Click on Start, search for Control Panel, and select it from the top of the list.
- In the Control Panel window, make sure that the View option is set to Large or Small icons.
-
Scroll down and click Windows Tools. This will open a new folder containing advanced tools for system administrators.
- Now double-click Windows Media Player Legacy to launch the tool.
Creating a desktop shortcut for Windows Media Player is one of the most convenient and efficient ways to start playing audio and video files. This can be very useful if you frequently open the Windows Media Player application on your computer. This way, you can quickly access the application without having to search your hard drive or a search engine.
To open Windows Media Player from a desktop shortcut, you must first create its shortcut. Here’s how to do it.
-
Right-click on your desktop area and select New > Shortcut.

-
In the text box, type the following path and click Next or press Enter.
C:\Program Files (x86)\Windows Media Player\wmplayer.exe
- Give the shortcut a name and click Finish.
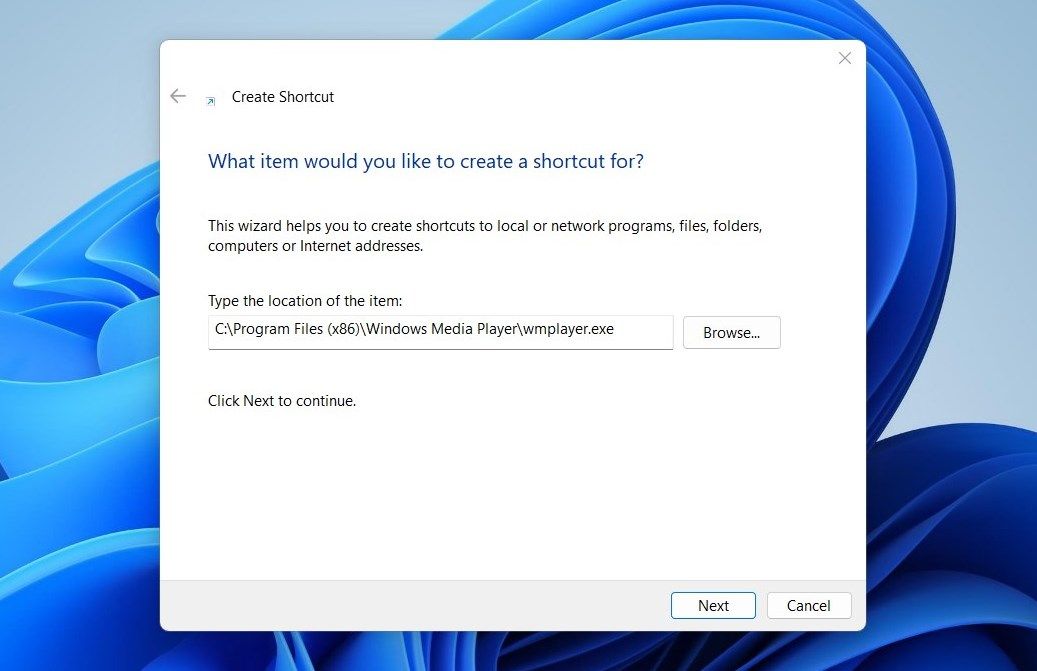
You will now have a shortcut icon on your desktop. Now, whenever you need to open the Windows Media Player tool, just double-click its shortcut.
There is another way to create a desktop shortcut that only takes a few seconds. The steps are as follows:
- Go to the Start menu and search for Windows Tools.
- Then select the result from the top of the list.
- Next, locate Windows Media Player Legacy and drag it to the desktop.
After creating the shortcut, double-click it to launch Windows Media Player Legacy.
Windows offers multiple ways to open Windows Media Player, but the keyboard shortcut is the quickest and easiest way. To use it, follow these steps:
- Make a Windows Media Player shortcut as per method number seven.
-
Right-click on the shortcut icon and select Properties.

- Type any letter or number in the shortcut field.
- Next, click Apply > OK to save the changes
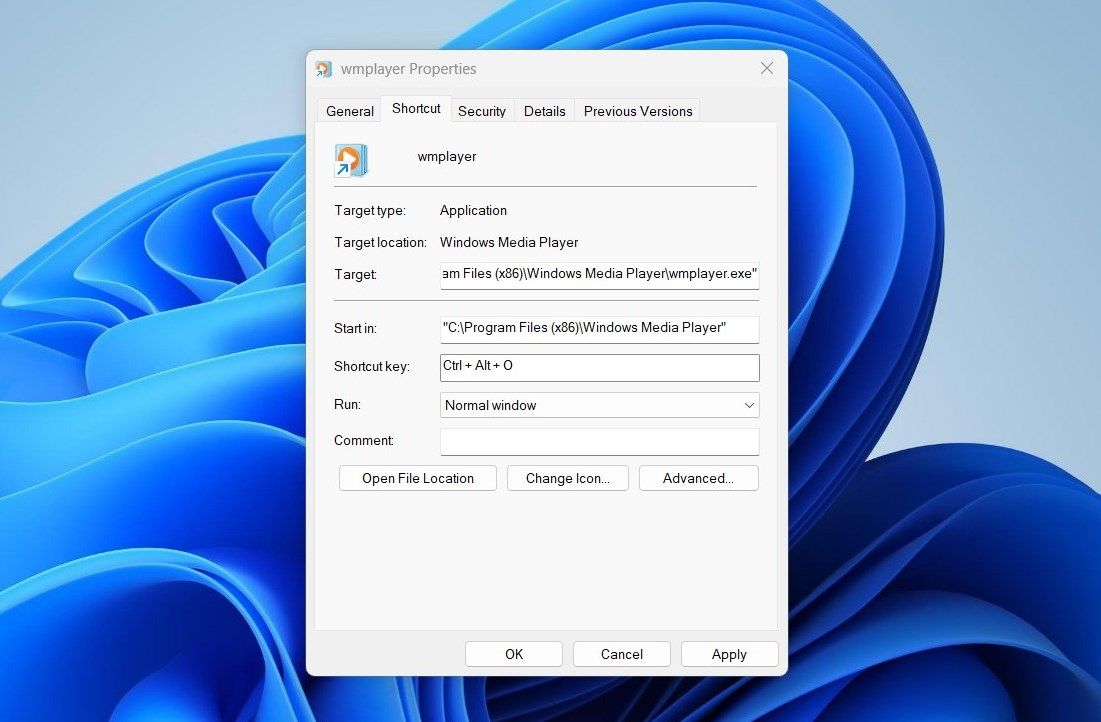
Once you have done so, just press Ctrl + Alt and type the letter or number you chose. Just remember to keep the desktop shortcut around; if you ever delete it, it’ll take down the keyboard shortcut with it.
After reading this article, you should now be familiar with nine different ways that you can use to open Windows Media Player on your Windows operating system. Try them out and choose the one that works for you.