
Как запустить Make на Windows
Make — это широко используемая для автоматизации сборки проектов утилита, которую бывает проблематично установить и запустить на windows. Сегодня я поделюсь самым простым способом, который позволит вам это сделать. Использовать мы будем Chocolatey.
Chocolatey (choco) — это менеджер пакетов для Windows, который позволяет устанавливать и управлять программным обеспечением из командной строки. Вот как установить утилиту make на Windows с помощью Chocolatey:
-
Установка Chocolatey:
-
Откройте PowerShell от имени администратора.
-
Вставьте следующую команду и нажмите Enter:
Set-ExecutionPolicy Bypass -Scope Process -Force; [System.Net.ServicePointManager]::SecurityProtocol = [System.Net.ServicePointManager]::SecurityProtocol -bor 3072; iex ((New-Object System.Net.WebClient).DownloadString('https://community.chocolatey.org/install.ps1'))Эта команда скачает и запустит скрипт установки Chocolatey. Подтвердите выполнение команды, если будет запрошено разрешение.
-
Установка make с помощью Chocolatey:
После установки Chocolatey выполните следующую команду в PowerShell:
choco install makeChocolatey автоматически загрузит и установит утилиту make и все необходимые зависимости.
-
Проверка установки:
make --versionЕсли установка прошла успешно, вы увидите вывод с информацией о версии make.
Далее, для использования make можно использовать обычный CMD, но, всегда в режиме администратора.
Если было полезно — подписывайтесь и ставьте лайки. Благодарю за внимание.
For tech enthusiasts, Make is a very neat way of building applications. Whether you’re trying to package your app or install somebody else’s, Make makes things easier.
Make isn’t available in Windows. When downloading a Windows application we download a setup file of EXE format. There’s no telling what these setup files may contain. You may even be downloading malware with exe format.
Below we have compiled a few different approaches to installing Make in Windows.
What is Make?
GNU.org tells Make is a tool that controls the generation of programs from its source files. In simple terms, the Make tool takes the source code of the application as input and produces the application as output.
Make is targeted for applications that follow the Free and Open Source Software (FOSS) principle. It was originally designed to work across Linux systems only. The source code can be modified in any way we want before we package it up for use.
Installing Make on Windows
Using Winget
Winget tool by Windows manages installation and upgrade of application packages in Windows 10 and 11. To use this tool, you need to have at least Windows 10 or later installed on your PC.
- Press Win + R together to open the Run window.
- Type cmd and press Enter to bring up the Command Prompt.
- Type the command
Winget install GnuWin32.makeand press Enter.
- Type Y to agree to source agreements.
- After installation, press Win + R again.
- Type
systempropertiesadvancedand press Enter.

- Select Environment Variables under the Advanced tab.

- Under System variables, select New.
- Under the variable name, enter make.
- Under Variable value, enter
C:\Program Files(x86)\GnuWin32\bin\make.exe. - Or, select Browse File and go to the above location.

- Press on OK.


Using Chocolatey
Using Chocolatey is a great way to install make if you do not meet the minimum requirements for Winget. It is a package manager and installer for the Windows platform. For anyone familiar with Ubuntu, it is the equivalent of apt command for software installation.
Since Make is not directly available in Windows, we need to install the package manager first. Then, we will use this package manager to install the make tool.
- Press Win + X keys together to open the Power menu.
- Select Windows Powershell(Admin).
- Type the command ‘
Set-ExecutionPolicy Bypass -Scope Process -Force; iex ((New-Object System.Net.WebClient).DownloadString('https://community.chocolatey.org/install.ps1'))'and press Enter.
- Downloads and installs chocolatey as available from their official source.
- Type
chocoto verify if the installation worked.
- Now, type the command ‘
choco install make‘ to install Make.
- Go to the installation directory
C:\Program Files(x86)\GnuWin32\to confirm the installation worked.


Using WSL
Using WSL or Windows Subsystem for Linux, we can install Make directly on our PC. WSL is released by Windows so this is the most preferred way of installing Make on Windows.
For WSL, we will install Ubuntu inside our Windows.
- Press Win + X keys together to open the Power menu.
- Select Windows Powershell(Admin).
- Type the command ‘
Wsl --install‘ and press Enter.
- Restart your PC.
- Go to the Start Menu and type Ubuntu to bring up the Ubuntu command line.
- Type the following ‘
Sudo apt install gcc build-essential make -y‘ and press Enter.
- Wait until the installation completes.


Using MinGW
MinGW is one of the older ways to install Make on Windows. MinGW is a collection of minimal GNU files for Windows. Note that using this method, you will have to type the ming32-make instead of the make command. Both do the same work except ming32-make is the MinGW version of make.
- Download the latest version of MinGW-get-setup.exe.
- Install MinGW by opening the setup file.

- Turn off installing graphical interface.
- Select Continue to start installation.

- Go to the installation directory and locate the bin folder.
- Make sure MinGW-get.exe exists.
- Press Win + R together to open the Run window.
- Type
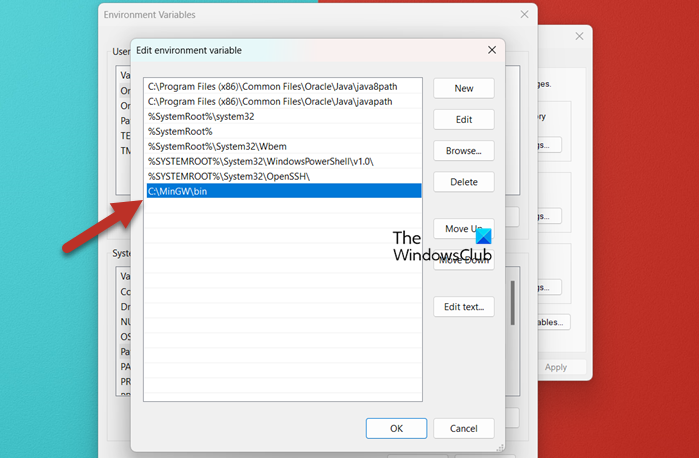
systempropertiesadvancedand press Enter. - Select Environment Variables under the Advanced tab.
- Under System variables, double-click on Path.
- Select New.

- Type the location of MinGW-get.exe. E.g.
C:\MinGW\bin
- Select OK.
- Press Win + X together to open the Power menu.
- Select Windows Powershell.
- Type the command ‘
Mingw-get install mingw32-make‘ and press Enter.


How to use Make on Windows?
Using Make on Windows is pretty much the same as Linux or other platforms. You need to start with a makefile along with the source code of the program.
- Go to the location of the source code.
- Do a right-click and select Text document under New.
- Give it the name Makefile.

- Assuming the source code is source.c, paste the following lines in your makefile as given in this tutorial.
- Finally, open Command Prompt and go to the source code location using the cmd command.
- Type make and press Enter.
- You can now share and open the output file as an application.
- You can also modify the source code source.c any number of times and make will compile it as application output.


If you want to learn more about using the Make command, there’s entire documentation on its usage.
This article explores alternatives to Makefiles on Windows. Earthly provides a consistent, containerized build environment for Windows users. Check it out.
As the field of DevOps and build release engineering continues to grow, many new tools are being developed to help make building and releasing applications easier. One of the tools that has been in use for many years is Make, which is still heavily used by engineers today.
A Makefile is a simple text file consisting of targets, which can invoke different actions depending on what has been configured. For example, with a Makefile, you can invoke a build of your application, deploy it, or run automated tests and it can dramatically increase the efficiency of your workflow.
Initially, it was Stuart Feldman who began working on the Make utility back in 1976 at Bell Labs. However, the version of Make most commonly used today is GNU Make, which was introduced in the late 1980s.
While the tool was originally meant to run on Linux, Make’s popularity has interested those working on other operating systems as well. There are several ways to run Makefiles on Windows, and in this article you’ll be introduced to each option and learn about their strengths and weaknesses.
Using Make on Windows
Before looking at the different options available, you should know why you want to run Makefiles on Windows in the first place. Or rather, if you’re working on Windows, why are you even interested in Makefiles?
Historically, the biggest reason for wanting Makefiles to run on Windows is that the developers in your organization are working on Windows. Seeing as how the de facto standard for languages like C and C++ is to use Make, it’s no wonder that Windows users want the ability to use Make as well.
As applications and infrastructure become more modern, the cloud is another reason for wanting Makefiles on Windows. Many infrastructure engineers want their applications to be run on Linux, likely led by the adoption of tools like Docker and containerization in general. Additionally, on Linux, a Makefile is the primary tool to use in many cases, especially when it comes to building native Linux applications. However, many engineers are still using Windows on their workstations, leading to the question of how to run Makefiles on Windows. Let’s dive into the possible answers.
Chocolatey

Linux users have been using package managers for decades, yet they’ve never gained much traction on Windows. Up until the release of winget, the concept of a package manager was never something that was natively included on Windows. Instead, Rob Reynolds started working on an independent package manager back in 2011 that would come to be known as Chocolatey. Chocolatey is now widely used on Windows to install packages, and you can use it to install make as well.
To do so, run the following command in an Administrative PowerShell window:
Set-ExecutionPolicy Bypass -Scope Process -Force; [System.Net.ServicePointManager]::SecurityProtocol = [System.Net.ServicePointManager]::SecurityProtocol -bor 3072; iex ((New-Object System.Net.WebClient).DownloadString('https://community.chocolatey.org/install.ps1'))You can find the newest installation instructions at any time on the Chocolatey website.
Once Chocolatey is installed, you may have to close down the PowerShell window and open it back up. After that, run the following command:
Once the script is done running, make will be installed. You may need to restart the PowerShell window again, but at this point you are ready to use Makefiles on Windows.
Chocolatey will likely be the most popular option for those who want to stick to a pure Windows installation. It’s easy to install, easy to use, and you don’t need to jump through any hoops or workarounds to get it working.
At this point, you can use make just like you otherwise would, and you can test it by running make -v.
Cygwin
Historically, one of the most popular ways of running any type of Linux functionality on Windows has been to use Cygwin. Cygwin aims to give a Linux feeling to Windows by holding a large collection of GNU and open source tools. It’s important to note that this does not mean it will give you native Linux functionality. However, it does allow you to use Linux tools on Windows. There’s a big difference between the two; for instance, Cygwin does not have access to Unix functionality like signals, PTYs, and so on. It’s a great tool for when you want to use familiar Linux commands but still want them to be run on Windows.
To use Cygwin for Makefiles, start by downloading and installing Cygwin. During the installation, you’ll see a window popping up asking you what packages you want to install. In the top left corner, make sure to select Full and then search for make.
Your search will give you a list of several different packages. You want to choose the one that’s labeled just as make. Change the dropdown menu where it says Skip to the latest version.

Now you can finish the installation by clicking Next in the bottom right corner. Once the installation is done, you can open up Cygwin and verify that make has been installed by executing make --version.
NMAKE
One of the alternatives that you’ll often hear about regarding running Makefiles on Windows is NMAKE. While it is an alternative to make, note that you cannot simply take your existing Makefiles from Linux and run them using NMAKE; they have to be ported.
First of all, the compilers are different on Windows and Linux, so if you are specifying your compiler in your Makefile, you’ll have to change that to whatever is relevant on Windows. At the same time, you’ll have to change the flags that you send to the compiler, because Windows typically denotes the flags using / instead of -.
On top of that, it doesn’t recognize all the syntax that you’re used to from GNU Make, like .PHONY. Lastly, Windows obviously doesn’t recognize the commands that work on Linux, so if you have specified any Linux-specific commands in your Makefiles, you’ll also have to port them.
All in all, if your entire organization uses Windows and you simply want the typical functionality of GNU Make, then NMAKE is a viable solution. However, if you just want to quickly run your traditional Makefiles on Windows, NMAKE is not the answer.
CMake

As with NMAKE, CMake is not a direct way to run your Makefiles on Windows. Instead, CMake is a tool to generate Makefiles, at least on Linux. It works by defining a CMakeLists.txt file in the root directory of your application. Once you execute cmake, it generates the files you need to build your application, no matter what operating system you’re on.
On Linux, this means that it creates Makefiles for you to run, but on Windows it may mean that it creates a Visual Studio solution.
CMake is a great solution if you don’t care too much about running Makefiles specifically, but you want the functionality, namely the ease of use in a build process, that you can get from Makefiles.
Windows Subsystem for Linux
The Windows Subsystem for Linux (WSL) is an honorable mention. It’s cheating a bit to say that it’s a way to run Makefiles “on Windows,” as your Makefiles won’t actually be running on Windows.
If you haven’t heard of WSL before, here’s an extremely oversimplified explanation: It uses Hyper-V to create a hyper-optimized virtual machine on your computer, in which it runs Linux. Basically, you get a native Linux kernel running on your Windows computer, with a terminal that feels as if it’s part of Windows.
You should look into WSL if what you care about most is having Windows as your regular desktop environment, but you’re fine with all of your programming and development going on inside of Linux.
Conclusion
As you can see, there are a few different ways you can be successful in running Makefiles on Windows. However, you do need to be wary of the fact that it will never be a perfect solution. Every solution is in some way a workaround, and the closest you’ll get to feeling like you’re using native Makefiles while using Windows is to install something like WSL.
If you enjoyed this tutorial you might want to grab a copy the free eBook “Makefile ins and outs”. In it you’ll learn many tips and tricks for structuring builds and scaling up a build process. From how to write a simple Makefile to how to deal with dependencies and everything in between. Download this free Makefile book right now.
A Makefile is a special file that contains information about a program’s flow, targets, and libraries. To use it, we need to access the Make command. However, it is not preinstalled on Windows. In this post, we will learn how to install and run Makefile on Windows.
A Makefile is a file that contains information about a program’s flow, targets, and libraries. It is also known as a description file as it includes a group of targets and the sources on which they depend. Additionally, the Makefile contains libraries that support the source code. This type of file is executed using the make command. To install and run Makefile on your computer, you are supposed to follow the steps mentioned below.
- Download and install MinGW
- Configure Environmental Variable
- Install the Make command
- Rename mingw32-make.exe to Make
- Create and run the Makefile
Let us talk about them in detail.
1] Download and install MinGW
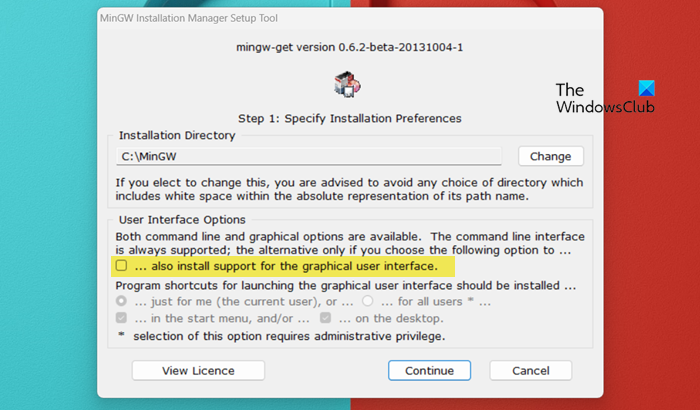
MinGW is the Windows adaptation of the GNU Compiler Collection (GCC), offering freely distributable import libraries and header files essential for developing native Windows applications. To use Make, we first need to download the MinGW installation media. Once downloaded, run the installation media, make sure to untick“also install support for the graphical user interface.”, and follow the on-screen instructions to complete the process. It will take some time to complete the installation process, so wait, and once done, click on Continue or Quit.
2] Configure Environmental Variable

After installing MinGW, we need to add the environmental variable to access the ‘Make’ command. For this, we need to first fetch the path of MinGW and add it to the environmental variables. Follow the steps mentioned below to copy the path of the mingw-get file.
- Open File Explorer by Win + I.
- Go to the location where you have installed MinGW. If you didn’t make any changes to the default location, go to C:\MinGW.
- Double-click on Bin to open the folder.
- You need to copy the path of the folder, as that would be the path of mingw-get.
Once you know the path of the file, follow the steps mentioned below to add it to the Environmental Variable.
- Open Control Panel.
- Search for “Environmental Variables”.
- Click on Edit the system environmental variable.
- Now, click on the Environmental Variable button.
- From the System variables section, click on Path, and then on Edit.
- Click on New and then paste the path we asked you to copy earlier.
- Click on Ok.
Now you can close all interfaces as we have added the environmental variable.
3] Install the Make command
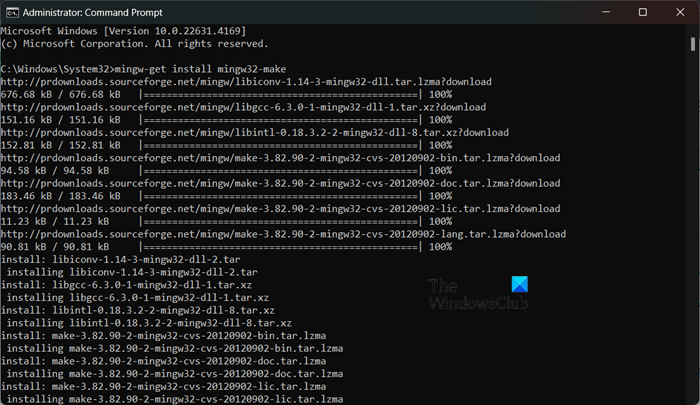
After adding the environmental variable, we can install the Make command. However, you won’t be able to run the Make command without following the previous steps. To do so, open the Command Prompt as an administrator and then run the following command.
mingw-get install mingw32-make
When you run this command, MinGW will install all the modules related to Make; however, it will take a while to do so.
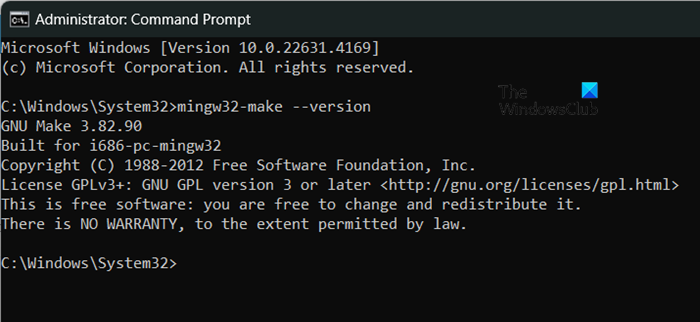
To know if it is installed, you can run mingw32-make --versioncommand. It will give you the version information about the MinGW installation.
4] Rename mingw32-make.exe to Make

Don’t you think, running ‘mingw32-make’ every time to use the ‘make’ command is a bit of a hassle? If yes, we would rename mingw32-make to Make so that next time we can just use the ‘make’ command. To do so, follow the steps mentioned below.
- Open File Explorer.
- Go to the location where you have installed mingw32.
- Now, double-click on Bin, and then rename mingw32-make file to make.
To verify this, run make --version. If the command is running without throwing any error, you can rest assured that renaming worked.
5] Create and run the Makefile
Upon installing the Make command, we can create a Makefile. There are various ways to do this, but we have listed a general guide below that you can follow.
- You can create a new folder with a name of your choice or the Makefile on your desktop; that’s what we did.
- Now, create a text file. To do so, right-click on a space and select New > Text document.
- Open the file and paste the following lines of code. Make that before starting the second line, you give a Tab.
firstmakefile:
      echo "Getting started with Makefile";
- To save it, go to File > Save as.
- Give it a name, let’s say, Makefile, change the Save as type to All files, and click on Ok.
- To run the file, open Command Prompt.
- Navigate to the location where you have created the folder, for that, run the cd command. Since my location is C:\Users\yusuf\OneDrive\Desktop, I ran cd C:\Users\yusuf\OneDrive\Desktop.
- Run dir to list all the files present in that particular directory.
- To run the file, just run
make -f filename.
That’s how you can create and run a Makefile.
Read: How to install NumPy using PIP on Windows
What is the command to run a makefile?
To run a makefile, you are required to use the make command. However, if you want to call a file, use -f option so that the command would look like make -f filename.
Read: How to create a file without Extension in Windows
How do I install Make on Windows?
To install Make on your computer, we can install MinGW first, then add the environmental variable path, and finally, install Make. We recommend that you follow the guide mentioned earlier to install Make on your system.
Read: 5 System Information Tools in Windows.
Make in Windows
Description of how to install and use Make in Windows OS.
There are several ways to install Make on Windows. In this tutorial we will use Git Bash because it is also needed for on Windows, so you might already have that if you followed the steps in . The steps follow the instructions detailed . After installing Git & Git Bash:
-
Download
make-4.4-without-guile-w32-bin.zip(get the version without guile). -
Copy the contents to your
C:\Program Files\Git\mingw64\merging the folders, but do NOT overwrite/replace any existing files.
Using Makefiles in different environments
Commands are called differently in different environments, for example, if you want to run Stata in Git Bash terminal on Windows you should use StataMP-64, but stata on Mac and Linux. Aliases don’t work well in our setting (as Make is run in Git Bash, but Make itself uses the sh shell). Although if you include an operation system detector part at the beginning of your Makefile, it provides a simple solution for a reproducible Makefile in different environments.
Let’s create a project folder called trial/, where the codes can be run with a Makefile both on Windows and Mac or Linux. There should be 2 files in the folder: trial.do and Makefile. The trial.do creates a trial.log just to see and check whether Make runs correctly. The content of trail.do is the following:
capture log close
log using "trial.log", replace text
disp "DateTime: $S_DATE $S_TIME"
log close
You can copy the following content in your Makefile:
#OS detector part
ifeq ($(OS),Windows_NT) # is Windows_NT on XP, 2000, 7, Vista, 10... STATA := StataMP-64 else STATA := stata endif

#Code starts here
trial.log: trial.do $(STATA) -e do $<
When you finished, open the Git Bash terminal, go to the trial/ folder where the trail.do and your Makefile is, and then run make.
$ cd ~/.../trial/
$ ls
  trial.do
  Makefile
$ make
Afterward, you should see the trial.log created by the Makefile.