
BlueStacks — самый быстрый, легкий и производительный эмулятор игр для Android на рынке. Это закономерный результат наших каждодневных трудов по разработке и оптимизации продукта. Помимо базовых преимуществ BlueStacks также предлагает вам множество функций, которые помогут улучшить игровой процесс. То есть, выбирая нашу платформу, вы получаете не только высокую производительность и лучшую графику, но и массу дополнительных инструментов для игры.
Хотя BlueStacks легко установить и запустить, некоторым пользователям необходимо провести дополнительные настройки, чтобы платформа работала правильно. Первое требование — включить технологию виртуализации в BIOS компьютера. Второе требование — отключить технологию Hyper-V, поскольку она мешает виртуализации и снижает производительность эмулятора. Так было до недавнего момента…
…пока мы наконец не представили решение проблемы совместимости! В обновлении BlueStacks с поддержкой Android Pie 9.0 мы пофиксили это ограничение, и теперь вы можете наслаждаться играми для Android на своем ПК со включенной системой аппаратной виртуализации Hyper-V.
Как играть на BlueStacks с включенным Hyper-V
Как мы сказали выше, вам нужна версия BlueStacks с поддержкой Android Pie 9.0. Чтобы ее установить, выполните следующие действия:
- Запустите BlueStacks. Нажмите Ctrl + Shift + 8, чтобы открыть Менеджер окон.
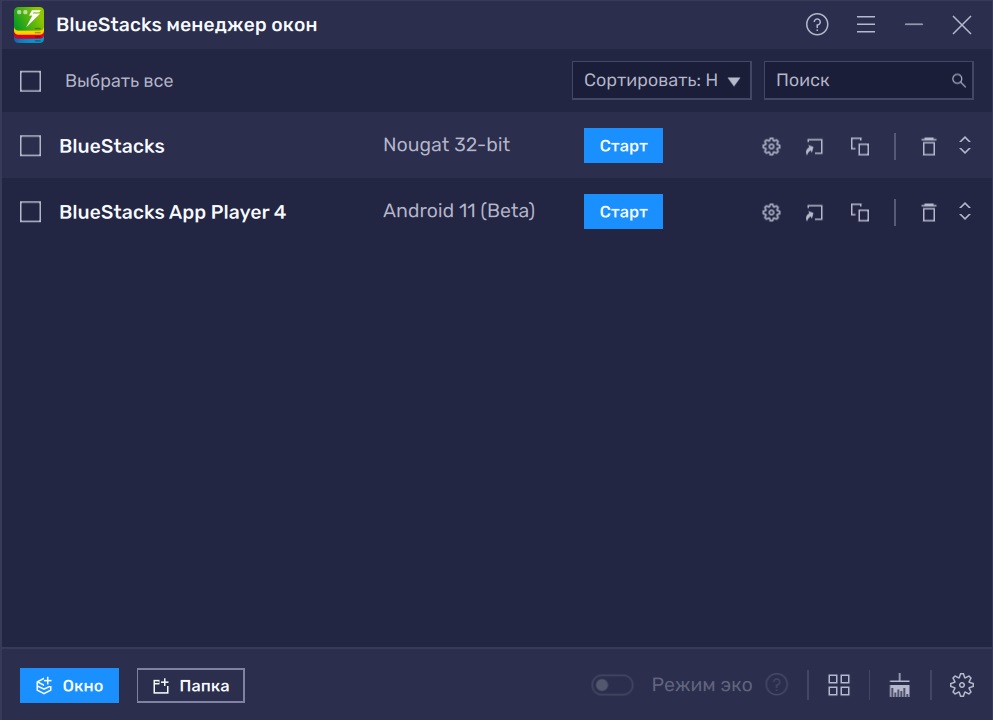
- В открывшемся меню нажмите кнопку «+ Окно», расположенную в левом нижнем углу.
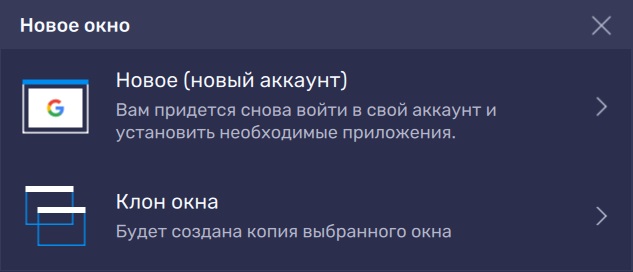
- Выберите пункт «Новое (Новый аккаунт)», а затем версию Android «Pie 64-bit» в ниспадающем меню.

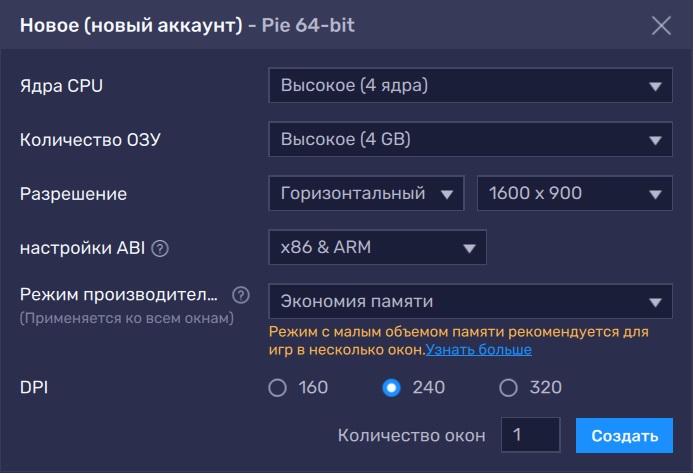
- Назначьте ресурсы системы, выделенные для поддержки этого окна, а затем нажмите кнопку «Создать».
- Подождите, пока BlueStacks загрузит и установит необходимые файлы. После завершения установки новый экземпляр эмулятора отобразится в Менеджере окон.
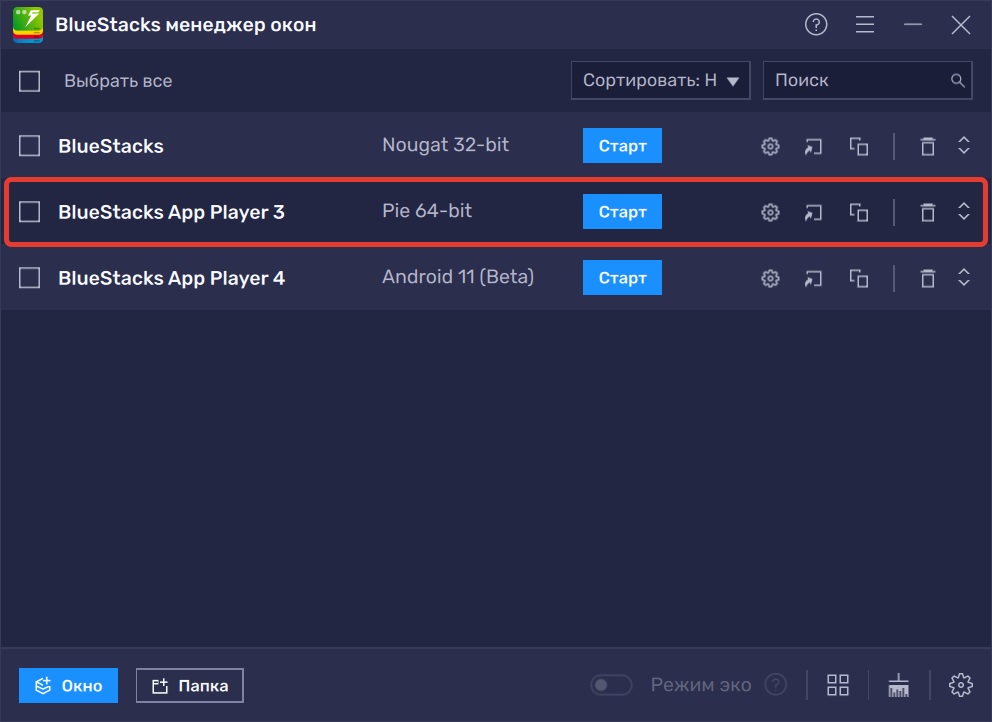
- Нажмите кнопку «Старт» рядом с созданным окном, чтобы его открыть.
Далее вам потребуется привязать к новому окну свою учетную запись Google. И все! Теперь вы сможете загружать игры и без проблем запускать их на BlueStacks даже при включенном Hyper-V. Больше никаких сообщений об ошибках и проблем с производительностью.
Однако учтите, что эта функция доступна только для BlueStacks версии Pie 64-bit. То есть, если на вашем компьютере включен Hyper-V, вы можете столкнуться с проблемами несовместимости на платформе с поддержкой других версий Android.
Что такое Hyper-V и как он работает?
Если вкратце, то это технология, которая выделяет физические ресурсы другим операционным системам, которые могут работать на компьютере. Иными словами, Hyper-V отвечает за запуск виртуальных машин.
Каждая виртуальная машина, которую вы создаете и запускаете на своей базовой ОС, действует как изолированная программа. У этого решения есть определенные плюсы. Как правило, его используют люди, которым нужно выполнять работу (хочется поиграть) на разных операционных системах, или технари, которым просто нравится копаться в коде и изучать архитектуру других ОС.
Преимущества игры с Hyper-V
Хотя Hyper-V не приносит каких-либо преимуществ или улучшений геймплея при игре на BlueStacks, последнее обновление будет полезно для геймеров, которым приходится включать и выключать Hyper-V, чтобы поиграть в BlueStacks на своем компьютере.
Как включить Hyper-V в вашей системе
Если вы уже работаете с виртуальными машинами, то, скорее всего, знакомы с тем, как использовать Hyper-V. Однако для пользователей, которые не знали об этой технологии и хотят попробовать ее, мы подготовили небольшой список действий по включению Hyper-V:
- Убедитесь, что в BIOS включена виртуализация.
- Загрузите Hyper-V с официального сайта Microsoft.
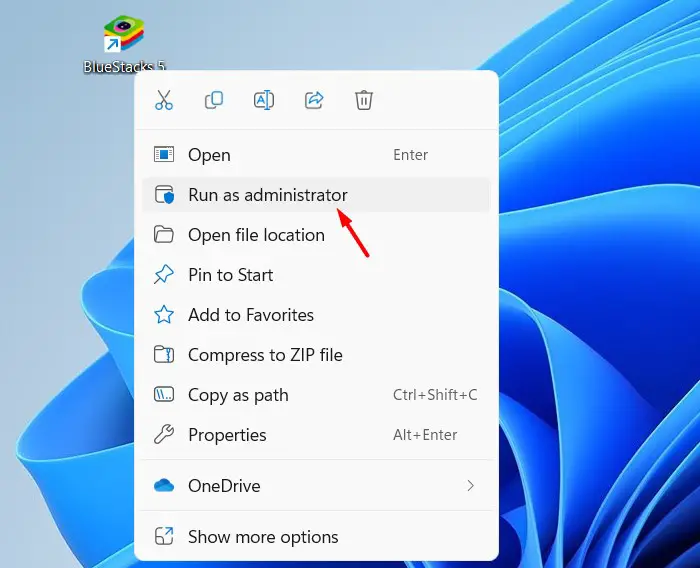
- После завершения загрузки щелкните правой кнопкой мыши на инструмент и выберите «Запуск от имени администратора».
- После установки (которая может занять довольно много времени) вы должны получить сообщением о том, что процесс успешно завершен и что ваш компьютер необходимо перезагрузить для завершения активации Hyper-V.
- После перезагрузки у вас должен быть включен Hyper-V. При этом вы сможете играть в BlueStacks, используя экземпляры Android Pie.
Это был один из самых простых способов включения Hyper-V в вашей системе. Если по какой-либо причине процесс завершается сбоем, прочитайте статью о поддержке Hyper-V, чтобы найти другие методы включения этой технологии на своем ПК.
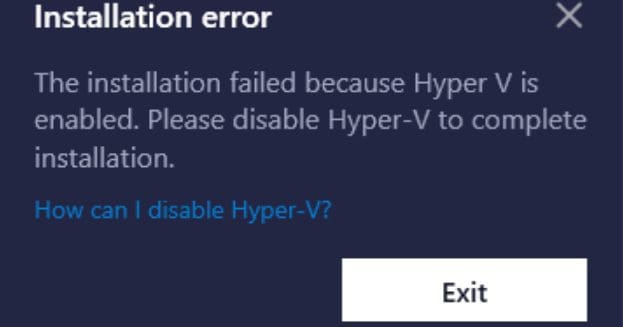
When you try to install BlueStacks or update your BlueStacks version, you may sometimes get an error message that says, “The installation failed because Hyper V is enabled.” You’re then asked to disable Hyper-V to complete the installation process. Let’s see how you can quickly do that and solve the problem.
Contents
- 1 Fix: BlueStacks Won’t Install, Hyper V Is Enabled
- 1.1 Disable Hyper V
- 1.2 Force-Stop All Hyper V Services
- 1.3 Install the Latest OS and Driver Updates
- 1.4 Repair System Files
- 1.5 Conclusion
Fix: BlueStacks Won’t Install, Hyper V Is Enabled
Disable Hyper V
First things first, disable Hyper V and try to install BlueStacks again.
- Click on the Windows Search icon.
- Select Turn Windows features on or off.
- Untick the Hyper V checkbox to disable this feature.
- Save the changes and check if you can install BlueStacks.
If the issue persists, go back to Turn Windows features on or off and disable the following features: Windows Hypervisor Platform, Windows Sandbox, Virtual Machine Platform, and Windows Subsystem for Linux.
Force-Stop All Hyper V Services
If you’re still getting the same error, open the Services App and turn off all the Hyper V services still running in the background.
- Click on the Windows Search icon.
- Type services and double-click on the Services App.
- Locate all the Hyper V services.

- Then, right-click on each service and select Stop.
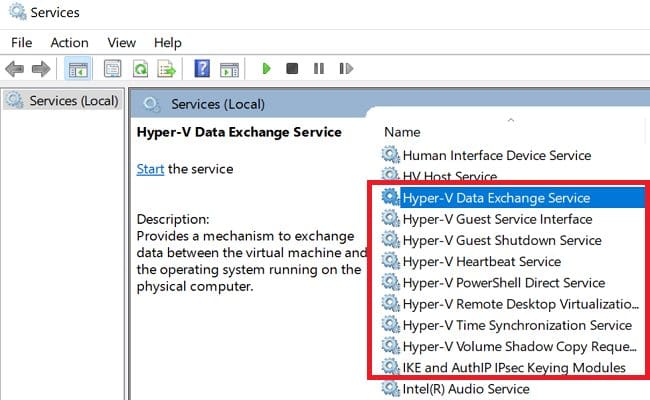
Depending on your current configuration, you may need to stop the following services:
Hyper-V Data Exchange ServiceHyper-V Guest Service InterfaceHyper-V PowerShell Direct ServiceHyper-V Time Synchronization ServiceOther Hyper-V services
Install the Latest OS and Driver Updates
Be sure to update your OS and drivers to the latest version. Go to Settings, select Windows Update, and hit the Check for updates button.
Outdated graphics drivers often cause various errors and glitches on your computer. Launch the Device Manager, and expand the list of Display Drivers. Right-click on your graphics driver and select Update driver.
If there’s an exclamation mark next to other drivers, repeat the steps above to update them.
Repair System Files
Corrupted system files may sometimes prevent you from installing new programs or changing your settings. Launch Command Prompt with admin rights, and run DISM and SFC to repair your files.
Use the commands below to get the job done: DISM.exe /Online /Cleanup-Image /Restorehealth and sfc /scannow. Restart your machine and try again.
After following all the steps above, contact BlueStacks Support if the issue persists.
Conclusion
If BlueStacks won’t install because Hyper V is enabled, disable the service. Additionally, launch the Services app and force-stop all the Hyper V services running in the background. Then, update your OS and driver to the latest version. You can also run DISM and SFC to repair faulty system files.
Did you manage to disable Hyper V and install or update BlueStacks? Let us know in the comments below.
Ever Wondered About Running Android Apps Natively on Windows?
Okay, so, you’re probably here because you’ve heard something about BlueStacks and Hyper-V. Maybe you’re wondering if they play nice together, or perhaps you’re trying to get them working and running into some snags. Well, you’ve come to the right place. We’re gonna break down what BlueStacks with Hyper-V actually means, how it works, and why you might even care. It all starts with wanting to run Android apps on your Windows PC, right?
BlueStacks is, basically, an Android emulator. It lets you run Android games and apps on your computer. Sounds crazy, right? But it’s super useful if you want to play mobile games with a mouse and keyboard, or if you just want to use some Android-only apps on your desktop. And Hyper-V? That’s Microsoft’s virtualization platform. It allows you to run virtual machines. Virtual machines are like having a whole other computer running inside your computer.
So, what happens when you combine these two? You get BlueStacks running inside a virtual machine created by Hyper-V. But why would you do that? Well, that’s what we’re going to figure out. Anyway, let’s get into it.
In this article, we’re going to cover:
- What BlueStacks and Hyper-V are, in plain English.
- The benefits (and drawbacks) of using them together.
- How to set it all up.
- Troubleshooting common issues.
Basically, everything you need to know to get started. So, buckle up!
Ready to get started? Let’s go!
I’m excited to share this with you!
Why Bother Using BlueStacks with Hyper-V?
Alright, so why even bother with this whole BlueStacks and Hyper-V thing? Good question. There are actually a few pretty solid reasons. The main one boils down to performance and compatibility. And even security, which is pretty important these days. No one wants to get hacked just from playing a game, you know?
Without Hyper-V, BlueStacks relies on some older methods to virtualize Android. This can sometimes lead to conflicts with other software, especially if you’re running other virtualization tools or have certain security settings enabled. Enabling Hyper-V allows BlueStacks to use a more modern, efficient virtualization method. This can result in better performance, especially on newer systems. Plus, it can solve compatibility issues that might prevent BlueStacks from running properly in the first place.
Another important reason is security. When BlueStacks runs within a Hyper-V virtual machine, it’s more isolated from your main operating system. This means that if something goes wrong inside BlueStacks – like, say, you accidentally download a dodgy app – it’s less likely to affect the rest of your system. Think of it like having a quarantine zone for your Android apps. Pretty neat, right?
Performance Boost? Maybe.
Okay, so let’s talk about performance. Does using Hyper-V actually make BlueStacks run faster? The answer is… it depends. For some people, enabling Hyper-V results in a noticeable performance boost. Games run smoother, apps load faster, and everything just feels more responsive. For others, the difference might be negligible, or even slightly worse. It really depends on your hardware, your system configuration, and the specific apps you’re running.
If you’ve got a relatively new computer with a decent processor and plenty of RAM, you’re more likely to see a performance improvement with Hyper-V enabled. Older systems might struggle a bit more, as Hyper-V itself can consume some resources. It’s worth experimenting to see what works best for you. I mean, you can always turn it off if it doesn’t help, right?
Compatibility is Key
One of the biggest benefits of using BlueStacks with Hyper-V is improved compatibility. Some apps simply refuse to run properly (or at all) without Hyper-V enabled. This is because Hyper-V provides a more complete and accurate virtualization environment, which some apps rely on. If you’re running into issues with apps crashing, freezing, or displaying weird graphical glitches, enabling Hyper-V might just solve the problem.
Plus, as I mentioned earlier, using Hyper-V can help avoid conflicts with other software on your system. If you’re a developer, for example, and you’re already using Hyper-V for other virtual machines, enabling it for BlueStacks can prevent conflicts and ensure that everything runs smoothly. It’s all about keeping things playing nicely together.
Security Considerations
Let’s be real: security is a big deal these days. Nobody wants their computer getting infected with malware or having their personal data stolen. Running BlueStacks inside a Hyper-V virtual machine adds an extra layer of security. Because the virtual machine is isolated from your main operating system, any potential threats are contained within the VM. This means that even if an app inside BlueStacks tries to do something nasty, it’s less likely to be able to access your files, your passwords, or your other sensitive information. It’s like having a firewall within a firewall. Pretty clever, huh?
Of course, this doesn’t mean you can just throw caution to the wind and start downloading dodgy apps from unknown sources. You should still practice good security habits, like using a strong password, keeping your software up to date, and being careful about what you click on. But using Hyper-V with BlueStacks definitely gives you an extra peace of mind.
Setting Up BlueStacks with Hyper-V: A Step-by-Step Guide
Okay, so you’re convinced that using BlueStacks with Hyper-V is a good idea. Great! Now, let’s get down to the nitty-gritty and walk through the setup process. Don’t worry, it’s not as complicated as it might sound. Just follow these steps, and you’ll be up and running in no time.
Step 1: Enable Hyper-V
First things first: you need to make sure that Hyper-V is enabled on your system. Here’s how to do it:
- Open the Start menu and search for «Turn Windows features on or off.»
- In the Windows Features window, scroll down and find «Hyper-V.»
- Check the box next to «Hyper-V» and click OK.
- Windows will now install the necessary files and prompt you to restart your computer.
Once your computer has restarted, Hyper-V should be enabled. But wait, there’s more! You might also need to enable virtualization in your BIOS or UEFI settings. This is a bit different depending on your motherboard manufacturer, but it usually involves going into your BIOS/UEFI settings during startup (usually by pressing Delete, F2, or F12) and looking for an option called something like «Virtualization Technology,» «Intel VT-x,» or «AMD-V.» Make sure this option is enabled. If you’re not sure how to do this, consult your motherboard manual or search online for instructions specific to your system.
Step 2: Download and Install BlueStacks
Next, you need to download and install BlueStacks. Head over to the BlueStacks website and download the latest version of BlueStacks 5. Once the download is complete, run the installer and follow the on-screen instructions. Make sure you select the option to enable Hyper-V during the installation process. If you already have BlueStacks installed, you might need to uninstall it and reinstall it to enable Hyper-V. Just a heads up!
Step 3: Configure BlueStacks
Once BlueStacks is installed, launch it and go through the initial setup process. This will involve signing in with your Google account and configuring your settings. Pay attention to the performance settings, as these can have a big impact on how well BlueStacks runs. You might want to experiment with different settings to find what works best for your system. For example, you can adjust the amount of RAM that BlueStacks is allowed to use, as well as the number of CPU cores. More RAM and more cores generally mean better performance, but they also consume more resources from your system. So, it’s all about finding the right balance.
Step 4: Test It Out
Now, for the fun part: testing it out! Try installing a few apps or games and see how they run. If you’re having trouble with a particular app, try adjusting the compatibility settings in BlueStacks. You can also try updating your graphics drivers, as outdated drivers can sometimes cause issues. If everything seems to be working smoothly, congratulations! You’ve successfully set up BlueStacks with Hyper-V. Now you can enjoy all your favorite Android apps and games on your Windows PC, with improved performance, compatibility, and security. Pretty cool, right?
Troubleshooting Common Issues
Okay, so you’ve followed all the steps, but you’re still running into problems. Don’t panic! Here are some common issues and how to fix them.
BlueStacks Won’t Start
If BlueStacks won’t start at all, the first thing to check is whether Hyper-V is properly enabled. Go back to the «Turn Windows features on or off» window and make sure that the box next to «Hyper-V» is still checked. Also, double-check your BIOS/UEFI settings to make sure that virtualization is enabled. If both of these things are correct, try restarting your computer. Sometimes, a simple restart is all it takes to fix the problem.
Performance Issues
If BlueStacks is running, but it’s running slowly or sluggishly, there are a few things you can try. First, make sure that you’ve allocated enough RAM and CPU cores to BlueStacks in the settings. Also, close any other applications that are running in the background, as these can consume resources and slow down BlueStacks. If you’re still having problems, try updating your graphics drivers or disabling hardware acceleration in the BlueStacks settings. Sometimes, hardware acceleration can actually cause performance issues on certain systems.
Compatibility Issues
If you’re having trouble with a particular app, try adjusting the compatibility settings in BlueStacks. You can also try installing an older version of the app, as sometimes newer versions can have compatibility issues. If all else fails, you might want to try using a different Android emulator altogether. There are several other emulators available, such as NoxPlayer and MEmu, and one of them might work better for your particular app. As we can see from Android Authority there are always other options available.
Blue Screen of Death (BSOD)
Okay, this is a serious one. If you’re getting the dreaded Blue Screen of Death, it usually indicates a hardware or driver issue. The first thing to try is updating your graphics drivers. If that doesn’t work, try disabling Hyper-V and see if the BSOD goes away. If it does, then the problem is likely related to Hyper-V or your virtualization settings. In this case, you might want to consult your motherboard manual or search online for solutions specific to your system. BSODs can be tricky to troubleshoot, so be prepared to spend some time investigating the issue.
Alternatives to BlueStacks with Hyper-V
Alright, so maybe BlueStacks with Hyper-V isn’t working out for you. Or maybe you’re just curious about other options. Either way, there are a few alternatives you might want to consider.
NoxPlayer
NoxPlayer is another popular Android emulator that’s similar to BlueStacks. It offers many of the same features, such as keyboard and mouse support, gamepad compatibility, and the ability to run multiple instances of Android. Some people find NoxPlayer to be a bit more lightweight and faster than BlueStacks, while others prefer BlueStacks’ user interface. It really comes down to personal preference. I’d say give both a try and see which one you like better.
MEmu Play
MEmu Play is another solid Android emulator that’s worth checking out. One of the things that sets MEmu Play apart is its support for both Intel and AMD processors. This means that it can run well on a wider range of systems than some other emulators. MEmu Play also offers some advanced features, such as the ability to customize the Android environment and the option to run multiple instances of Android with different configurations. That’s interesting.
Android Virtual Device (AVD) Manager
If you’re a developer, you might want to consider using the Android Virtual Device (AVD) Manager. This is part of the Android SDK (Software Development Kit) and allows you to create and run virtual Android devices for testing your apps. The AVD Manager is more geared towards developers than end-users, but it can be a powerful tool if you need to test your apps on a variety of different Android devices and configurations. I’m not sure about this, but I think it’s pretty cool.
Windows Subsystem for Android (WSA)
Microsoft has introduced the Windows Subsystem for Android (WSA), which allows you to run Android apps directly on Windows 11 without the need for an emulator. WSA is still relatively new, and it has some limitations (such as a limited selection of apps), but it’s definitely something to keep an eye on. In the future, WSA might become the preferred way to run Android apps on Windows. It’s expected to get better and better with time.
Final Thoughts: Is BlueStacks with Hyper-V Worth It?
So, is using BlueStacks with Hyper-V worth the effort? Well, it depends. If you’re having trouble running BlueStacks without Hyper-V, or if you’re concerned about security, then it’s definitely worth a try. Enabling Hyper-V can improve performance, compatibility, and security, and it’s relatively easy to set up. On the other hand, if BlueStacks is already running fine for you without Hyper-V, then there’s probably no need to bother with it. It’s all about finding what works best for your particular system and your particular needs.
The way I see it (but I could be wrong), BlueStacks with Hyper-V is a great option for people who want to get the most out of their Android emulation experience. It’s not a magic bullet, but it can definitely make a difference in some cases. So, give it a try and see what you think. And if you run into any problems, don’t hesitate to consult the troubleshooting tips in this article. Good luck, and happy emulating!
Now it’s time to take action!
FAQ
- Will enabling Hyper-V slow down my computer?
- It depends. Enabling Hyper-V can consume some resources, especially on older systems. If you have a relatively new computer with plenty of RAM and a decent processor, you might not notice any slowdown. However, if you have an older system, you might experience a slight performance decrease. It’s worth experimenting to see what works best for you.
- Can I use BlueStacks with Hyper-V on Windows 10?
- Yes, you can use BlueStacks with Hyper-V on Windows 10, but it requires Windows 10 version 2004 or later. Also, you need to have a processor that supports Second Level Address Translation (SLAT). Most modern processors support SLAT, but it’s worth checking to make sure. If you meet these requirements, you should be able to enable Hyper-V and run BlueStacks without any problems.
- It depends… Will BlueStacks with Hyper-V make my games run faster?
- It depends on a bunch of factors, honestly. It’s not a guaranteed speed boost for every game, but it can help. See, without Hyper-V, BlueStacks has to use older virtualization techniques. Enabling Hyper-V lets it tap into more modern and efficient methods. This can lead to smoother gameplay, especially if your computer’s got the horsepower to handle it (we’re talking a decent processor and enough RAM). Plus, some games just play nicer with Hyper-V because it creates a more complete virtualization environment. BUT… if your system’s already struggling, Hyper-V might actually decrease performance because it uses up more resources itself. So, it’s kind of a trial-and-error thing. Try it and see! If things get worse, you can always turn Hyper-V off again. No harm, no foul. And remember, keep your graphics drivers updated! Outdated drivers can cause all sorts of weirdness, regardless of whether you’re using Hyper-V or not.
Bluestack helps run Android games on non-android devices; we have covered a detailed step-by-step guide on how to install Bluestack on Hyper-V virtual machine in this article.

Contents
- 1 How to install Bluestack on Hyper-V virtual machine?
- 2 What are the benefits of installing Bluestack on a Hyper-V virtual machine?
- 3 How to set up a Hyper-V virtual machine for Bluestack?
- 4 What are the system requirements for Bluestack on a Hyper-V virtual machine?
- 5 How to troubleshoot errors when installing Bluestack on a Hyper-V virtual machine?
- 6 How to uninstall Bluestack from a Hyper-V virtual machine?
- 7 How to use Bluestack on a Hyper-V virtual machine?
- 8 What are the known issues when using Bluestack on a Hyper-V virtual machine?
- 9 How to get support for Bluestack on a Hyper-V virtual machine?
How to install Bluestack on Hyper-V virtual machine?
Installing Bluestack on a Hyper-V virtual machine is easy. You need to follow these simple steps:
- First, you need to enable the Intel VT-x or AMD-V in BIOS
- Then, you need to create a new virtual machine in Hyper-V and specify the operating system as Windows 7 or later.
- After that, you must allocate at least 2GB of RAM and 20GB of storage space to the virtual machine.
- You can install Bluestack on the virtual machine by following the on-screen instructions.
What are the benefits of installing Bluestack on a Hyper-V virtual machine?
There are a few benefits of installing Bluestack on a Hyper-V virtual machine. One advantage is that you can use Hyper-V to take snapshots of your device, which can be helpful if you need to roll back changes or if you want to save a particular state of your machine.
Another benefit is that you can use Hyper-V’s networking features to connect your virtual machine to the internet, which can be helpful if you want to use Bluestack for web development or testing purposes.
How to set up a Hyper-V virtual machine for Bluestack?
Bluestack is an Android emulator that allows you to run Android apps on your PC. You can use it for gaming, work, or other purposes.
To use Bluestack on a Hyper-V virtual machine, you must set up the VM and install the emulator. Here’s how:
- Create a new virtual machine in Hyper-V Manager.
- Select the operating system that you want to install Bluestack on. We recommend using a 64-bit version of Windows 10 for the best performance.
- Give the virtual machine a name and choose where you want to store it.
- Configure the virtual machine’s settings as follows:
- Processor: 2 or more virtual processors
- Memory: 4 GB or more of RAM
- Network: Internal network or bridge connection
- Display: 1024×768 or higher resolution
- Storage: 40 GB or more of space
- If you’re using an Intel processor, enable Intel VT-x and EPT in the VM settings. For AMD processors, enable AMD-V and IOMMU. It will allow you to use hardware acceleration features in Bluestack.
- If using an Nvidia graphics card, enable SLI in the VM settings. It also will improve graphics performance in Bluestack. You may also need to increase the video memory allocation to 128 MB or more.
- If you want to use a webcam with Bluestack, add a USB controller to the VM and connect your webcam to it. In the VM settings, select the USB controller and check “Allow enhanced session mode.”
What are the system requirements for Bluestack on a Hyper-V virtual machine?
To install Bluestack on a Hyper-V virtual machine your system must meet the following requirements:
- Your computer must be running Windows 8.1 or later.
- Your computer must have an Intel or AMD processor that supports hardware virtualization.
- You must have at least 4 GB of RAM.
- You must have at least 100 GB of available storage space.
How to troubleshoot errors when installing Bluestack on a Hyper-V virtual machine?
If you’re having trouble installing Bluestack on your Hyper-V virtual machine, here are a few troubleshooting tips that may help:
- Make sure your Hyper-V virtual machine is configured correctly. Check the settings and make sure everything is set up correctly.
- If you’re using a 64-bit version of Windows, make sure you’re also using a 64-bit version of Bluestack. 32-bit versions will not work.
- Try reinstalling Bluestack. Sometimes it can help to start from scratch.
- Make sure your computer meets the minimum system requirements for Bluestack. You can find these listed on Bluestack’s website.
- If all else fails, try contacting Bluestack support for help. The support may be able to offer additional troubleshooting tips or assistance.
How to uninstall Bluestack from a Hyper-V virtual machine?
If you need to uninstall Bluestack from a Hyper-V virtual machine for any reason, you can do so by following the steps below.
- Open the Hyper-V Manager and select the virtual machine from which you want to remove Bluestack.
- Right-click on the virtual machine and select “Settings.”
- In the “Settings” window, click on the “Storage” tab.
- Expand the “Hard Drives” section and select the drive that contains Bluestack.
- Click on the “Remove” button.
- Confirm that you want to remove Bluestack by clicking on the “OK” button.
How to use Bluestack on a Hyper-V virtual machine?
Bluestack is an Android emulator that allows you to run Android apps on a PC or Mac. You can use Bluestack to play Android games, use Android apps, and run Android apps on a PC or Mac. Bluestack is free to download and use.
What are the known issues when using Bluestack on a Hyper-V virtual machine?
- You may not be able to hear any audio when using Bluestack on a Hyper-V virtual machine.
- Bluestack may not be able to access the internet when using a Hyper-V virtual machine.
- You may experience lag when using Bluestack on a Hyper-V virtual machine.
How to get support for Bluestack on a Hyper-V virtual machine?
If you are using Bluestack on a Hyper-V virtual machine, you may need support from the company to ensure that everything works correctly.
While Bluestack does have some support for Hyper-V, it is not as comprehensive as it could be.
As such, you may need to contact their customer support to get answers to your questions or help with any problems you are having.
Conclusion
After following the steps in this article, you should now have Bluestack installed on your Hyper-V virtual machine.
If you run into any issues during the installation process, please get in touch with the Bluestack support team for assistance.
BlueStacks is a cloud-based cross-platform that supports playing Android games or applications on Windows as well as Apple devices. With a recent update in the Windows operating system i.e. Enabling Hyper-V, the previous versions of BlueStacks are failing on Incompatible Windows Settings error.
When this error occurs, you also see an option to Review the FAQ. The moment you click on this button, BlueStacks closes and you are redirected to the Support site on your default web browser. Attempt running BlueStacks as admin and this problem might resolve instantly.

In case the error persists, you need to disable Hyper-V by following the below sections.
- Disabling Hyper-V under Windows Features
- Reinstall BlueStacks 5 version for Hyper-V
- How do I install BlueStacks with Hyper-V enabled?
- What are some other ways to disable Hyper-V on Windows?
- How do I disable Memory Integrity on Windows?
- How to disable Ads in BlueStacks
If you are getting Incompatible Windows Settings while starting BlueStacks on your computer, go through the below set of solutions and apply them sequentially.
Note: Before you apply any workaround, make sure to right-click on the BlueStacks icon and choose the “Run as administrator” option first. Chances are pretty high that the incompatibility issue resolves this way alone.
1] Disabling Hyper-V under Windows Features
There are certain features in Windows that normally prevent BlueStacks from opening on your computer. If that’s the case, you must disable all these features by following the below steps –
- Press Windows + S, and search for Windows Features in the text field.
- Click on the top result i.e. Turn Windows features on or off.
- On Windows Features, scroll down and locate the following features –
Hyper-V
Virtual Machine Platform
Windows Hypervisor Platform
Windows Sandbox
Windows Subsystem for Linux

- Make sure to uncheck the boxes against all these features, and click OK.
- You must restart your device next so that the recent changes come into effect from the next login.
Note: If you are using the Home edition of Windows, you will not find the option to disable Windows Sandbox.
2] Reinstall BlueStacks 5 version for Hyper-V
BlueStacks fail to start primarily when Hyper-V is enabled on your Windows PC. You may disable the same as stated above or disable Hyper-V using CMD. If the Incompatible Windows Settings error is still appearing on BlueStacks, one should reinstall the BlueStacks 5 version that supports the Hyper-V feature. Here’s how to download and install the latest version of BlueStacks 5 on Windows 11 –
- First of all, launch Control Panel.
- Go to Programs and Features next, and locate BlueStacks on it.
- Right-click on this program, and choose the Uninstall button.

- The User Account Control window will appear next. Well, click on the Yes button to authorize removing this program from your device.
Note: Uninstalling BlueStacks 5 will remove all your downloaded apps, other app settings, and your game data.
Wait for the uninstallation to complete, and once this is over, navigate to BlueStacks’s official site. Locate and click on the button – Download BlueStacks 5. The setup file will immediately start downloading on your computer.
How do I install BlueStacks with Hyper-V enabled?
Assuming you have already downloaded its set-up file, double-click on the same to begin its installation. When you see the Install now button, click on it. Now, wait for the installation to complete. The installer will automatically download and install the BlueStacks latest version supporting Hyper-V.
If the Incompatible Windows Settings error appears again while opening BlueStacks, right-click on its icon, and select Run as administrator. Hopefully, BlueStacks will run normally on your Windows 11 PC.
What are some other ways to disable Hyper-V on Windows?
In certain cases, you might not find the option to disable Hyper-V on Windows using Windows Features. Well, in such cases, what you can do is launch CMD as administrator, and run the below code on it –
dism.exe /online /enable-feature /featurename:VirtualMachinePlatform /all

After this code runs successfully, the Command Prompt will ask whether you would like to restart your PC. Type Y and your system will restart automatically.
Alternatively, you may also execute the below command to disable Hyper-V and Windows Hypervisor Platform on your computer. Make sure to launch the Command prompt as administrator first and then only run the below code on it-
bcdedit /set hypervisorlaunchtype off
After you disable Hyper-V, restart your PC and check if you can run BlueStacks without receiving the compatibility issues on it.
How do I disable Memory Integrity on Windows?
Though you will find the Virtual Machine Platform and Windows hypervisor platform, there are cases when users don’t find these features inside Windows Features. Well, in that case, you need to disable Memory integrity under Windows Defender. To disable Memory integrity, follow these easy steps –
- On Windows Search, type Core isolation and click on the top result.

- Doing so will Core isolation inside Windows Security.
- Disable the toggle switch available next to Memory integrity.

- The UAC window will prompt immediately afterward, click Yes to authorize performing this task.
- Close Windows Security and restart your PC.
Sign back into your device again and check if you can open BlueStacks without getting the same Review the FAQ error.
How to disable Ads in BlueStacks
BlueStacks has now enabled displaying Ads when you are playing a game on it. The ads appearing on its interface don’t obstruct the gameplay by design, however, they might distract you from playing your normal game.
Though BlueStacks suggests not disabling ads on it, they do provide options to disable viewing ads on it. Follow the below instructions on how to remove ads from BlueStacks –
- Launch BlueStacks first, and click on the gear icon (Settings).

- When the Settings window launches, select Preferences from the left sidebar.
- On its right pane, disable the toggle switch available next to “Allow BlueStacks to show Ads during gameplay”.

- BlueStacks will confirm this request again by displaying a message – “Please keep ads enabled“.
- Click Disable and the ads will be disabled from its interface. In case you click on Sure, the ads keep on appearing during your gameplay.
- Click Save changes and exit the Settings window.
You may now start playing a game on BlueStacks without getting any ads appearing on it.