
Table of Contents
Installing Aircrack-ng from Source
Legacy information can be found here.
Requirements
-
Autoconf
-
Automake
-
Libtool
-
shtool
-
OpenSSL development package or libgcrypt development package.
-
pkg-config
Linux
-
Airmon-ng requires ethtool and rfkill
-
If USB bus is present, lsusb
-
If PCI/PCIe bus is present, lspci
-
-
LibNetlink 1 (libnl-dev) or 3 (libnl-3-dev and libnl-genl-3-dev) development packages. It can be disabled by passing –disable-libnl to configure.
-
Kernel headers and gcc as well as make have to be installed on your system (build-essential on Debian based distributions)
-
make and Standard C++ Library development package (Debian: libstdc++-dev)
Windows (Cygwin)
-
w32api is required
-
if using clang, libiconv and libiconv-devel
-
make and Standard C++ Library development package
MacOS
Install the following via Homebrew (brew):
-
autoconf
-
automake
-
libtool
-
openssl
-
shtool
-
pkg-config
-
hwloc
-
pcre
-
sqlite3
-
libpcap
-
cmocka (optional)
FreeBSD, OpenBSD, NetBSD, Solaris
Install the following via pkg:
-
gmake
-
pkgconf
-
pcre
-
sqlite3
-
gcc9 (or better)
Optional stuff
-
If you want SSID filtering with regular expression in airodump-ng (-essid-regex) pcre development package is required.
-
If you want to use airolib-ng and ‘-r’ option in aircrack-ng, SQLite development package >= 3.3.17 (3.6.X version or better is recommended)
-
If you want to use Airpcap, the ‘developer’ directory from the CD is required. It can be downloaded here.
-
For best performance on FreeBSD (50-70% more), install gcc5 via: pkg install gcc5 Then compile with: gmake CC=gcc5 CXX=g++5
-
rfkill
-
CMocka
-
hwloc: strongly recommended, especially on high core count systems where it may give a serious performance boost
Compiling and installing
Notes:
-
On OS X, *BSD and Solaris, use ‘gmake’ instead of ‘make’.
-
In order to compile with clang instead of gcc, add ‘CC=clang CXX=clang++’ to the configure command.
Current version
 wget https://download.aircrack-ng.org/aircrack-ng-1.7.tar.gz
 tar -zxvf aircrack-ng-1.7.tar.gz
 cd aircrack-ng-1.7
 autoreconf -i
 ./configure --with-experimental
 make
 make install
 ldconfig
Compiling with AirPcap support (cygwin only)
-
Copy ‘developer’ directory from the AirPcap CD at the same level as ‘Aircrack-ng’ directory
-
Append ‘- -with-airpcap=../developer’ parameter to configure:
Compiling on *BSD
Commands are exactly the same as Linux but instead of make, use gmake (with CC=gcc5 CXX=g++5 or any more recent gcc version installed).
Compiling on MacOS
Commands are exactly the same as Linux
Latest Git (development) Sources
Note: Compilation parameters can also be used with the sources from our git repository.
git clone https://github.com/aircrack-ng/aircrack-ng
cd aircrack-ng
autoreconf -i
./configure --with-experimental
make
make install
ldconfig
./configure flags
When configuring, the following flags can be used and combined to adjust the suite to your choosing:
-
with-airpcap=DIR: needed for supporting airpcap devices on windows (cygwin or msys2 only) Replace DIR above with the absolute location to the root of the extracted source code from the Airpcap CD or downloaded SDK available online. Required on Windows to build besside-ng, besside-ng-crawler, easside-ng, tkiptun-ng and wesside-ng when building experimental tools. The developer pack (Compatible with version 4.1.1 and 4.1.3) can be downloaded at https://support.riverbed.com/content/support/software/steelcentral-npm/airpcap.html
-
with-experimental: needed to compile tkiptun-ng, easside-ng, buddy-ng, buddy-ng-crawler, airventriloquist and wesside-ng. libpcap development package is also required to compile most of the tools. If not present, not all experimental tools will be built. On Cygwin, libpcap is not present and the Airpcap SDK replaces it. See –with-airpcap option above. On debian based distro, install libpcap-dev
-
with-ext-scripts: needed to build airoscript-ng, versuck-ng, airgraph-ng and airdrop-ng. Note: Each script has its own dependencies. Note: It’s only required in install phase.
-
with-gcrypt: Use libgcrypt crypto library instead of the default OpenSSL. And also use internal fast sha1 implementation (borrowed from GIT) Dependency (Debian): libgcrypt20-dev
-
with-duma: Compile with DUMA support. DUMA is a library to detect buffer overruns and under-runs. Dependencies (debian): duma
-
with-xcode: Set this flag to true to compile on OS X with Xcode 7+.
-
disable-libnl: Set-up the project to be compiled without libnl (1 or 3). Linux option only.
-
without-opt: Do not enable stack protector (on GCC 4.9 and above).
-
enable-shared: Make OSdep a shared library.
-
disable-shared: When combined with enable-static, it will statically compile Aircrack-ng.
-
with-avx512: On x86, add support for AVX512 instructions in aircrack-ng. Only use it when the current CPU supports AVX512.
-
with-static-simd=: Compile a single optimization in aircrack-ng binary. Useful when compiling statically and/or for space-constrained devices. Valid SIMD options: x86-sse2, x86-avx, x86-avx2, x86-avx512, ppc-altivec, ppc-power8, arm-neon, arm-asimd. Must be used with –enable-static –disable-shared. When using those 2 options, the default is to compile the generic optimization in the binary. –with-static-simd merely allows to choose another one.
-
enable-maintainer-mode: It is important to enable this flag when developing with Aircrack-ng. This flag enables additional compile warnings and safety features.
Troubleshooting Tips
error while loading shared libraries: libaircrack-ng.so.0
Run ldconfig as root or with “sudo” to solve the issue.
«command not found» error message
After you do “make install” then try to use any of the Aircrack-ng suite commands, you get the error message “command not found” or similar. Your system will look for the Aircrack-ng commands in the directories defined by the PATH command.
Normally, the Aircrack-ng suite programs and man pages are placed in:
 /usr/local/bin
 /usr/local/sbin
 /usr/local/man
On your system, to determine which directories have the Aircrack-ng programs enter the following. If using “locate” be sure to first run “updatedb”.
 locate aircrack-ng
 locate airmon-ng
or
 find / -name aircrack-ng
 find / -name airmon-ng
Once you know the directories (exclude the source directories) then determine which directories are in your PATH. To see which directories are included in PATH on your particular system enter:
echo $PATH
It should show something like:
/usr/local/sbin:/usr/local/bin:/usr/sbin:/usr/bin:/sbin:/bin
At this point compare the actual locations with the directories in your PATH. If the directories are missing from your PATH then you have a few options:
-
Add the directories to your PATH. See the one or more of the following web sites for details of how to do this:
 https://www.cyberciti.biz/faq/howto-print-path-variable/
 http://www.troubleshooters.com/linux/prepostpath.htm
-
Change to the particular directory with “cd” and then run the commands from within the directory. Don’t forget to add “./” in front of each command.
-
Specify the full path for each command. So if Aircrack-ng is located in the “/usr/local/bin” directory then run the command as “/usr/local/bin/aircrack-ng”.
Installing pre-compiled binaries
Linux/BSD/OSX
With the exception of Linux penetration testing distributions, packages are usually out of date (MacOS is the exception). In this case, uninstalling the package and installing from sources is the recommended way to go.
On MacOS, install it is via Macports or brew. Simply do “brew install aircrack-ng” or “sudo port install aircrack-ng”
Windows
The Windows version of the Aircrack-ng suite does not have an install program. You must manually install (unzipping archive) the software.
Here are the steps to follow for Windows:
-
Download the latest version of the Aircrack-ng suite for Windows to your computer. The link for the zip file can be found on the Wiki home page.
-
Unzip the contents of the Aircrack-ng zip file into “C:\”. This will create a directory called “aircrack-ng-1.6-win”. This directory name will vary based on the exact version that you downloaded. This main directory contains three subdirectories — “bin”, “src” and “test”.
Prior to using the software, make sure to install the drivers for your particular wireless card. See this link for the instructions. We currently only support Airpcap; other adapters may be supported but require development of your own DLL so the different tools can interact with it.
To now use the Aircrack-ng suite, start Windows Explorer and double click on Aircrack-ng GUI.exe inside “bin” subdirectory. The GUI requires .NET version 4.6.1 to run.
Alternatively, open a command prompt (Start menu → Execute → cmd.exe) and change to the “C:\aircrack-ng-1.6-win\bin” directory and execute the individual commands.
Important notes:
-
Airmon-ng is a Linux/FreeBSD tool only.
-
Remember that Windows only supports a limited subset of the commands.
-
Some troubleshooting tips specific to XP and Vista can be found on this page.
aircrack-ng_suite-under-windows_for_dummies
Table of Contents
Tutorial: Aircrack-ng Suite under Windows for Dummies
Version: 1.02 December 18, 2007
By: darkAudax
Introduction
First and foremost, Windows is virtually useless for wireless activities due to the huge number of restrictions. The restrictions do not come from the aircrack-ng suite so please don’t ask for enhancements.
Here is a quick recap of the limitations:
-
Very few supported wireless cards: There are very few wireless cards which will work with the aircrack-ng suite. Most laptops come with Intel-based cards and none of these are supported. See the following links: Compatibility, Drivers, Which Card to Purchase and Tutorial: Is My Wireless Card Compatible? for more information. It is also important to note that there is little or no documentation accurately describing which version of the third party drivers you require for each card.
-
Dependency on third parties: The Windows world is highly proprietary and thus the source code for the drivers is not available publicly. As a result, no troubleshooting or fixes are available from the aircrack-ng team for these third party drivers. If there is a problem, you are on your own.
-
Limited operating system support: The Windows version works best with WinXP. It does not support Win98, some people have reported success with Win2000 but many have been unsuccessful with it and Vista is not supported. There is some evidence that a few people have aircrack-ng working under Vista but most people report failures. So basically, your best chance of success is under WinXP.
-
Passive capture of packets: Most people want to test the WEP security on their own access point. In order to do this, you must capture in the order of 250,000 to 2,000,000 WEP data packets. This is a lot of packets. With Windows, you can only capture packets passively. Meaning, you just sit back and wait for the packets to arrive. There is no way to speed things up like in the linux version. In the end, it could take you days, weeks, months or forever to capture sufficient packets to crack a WEP key.
-
Limited GUI: Most of the aircrack-ng suite tools are oriented towards command line utilization. There is only a very limited GUI available to assist you. So you must be more technically literate to successfully use these tools. Thus, if you are used to running a Windows installer then clicking your way to happiness, you are going to be exceedingly unhappy and lost with aircrack-ng.
-
Technical Orientation: Dealing with wireless requires a fair amount of operating system, basic wireless and networking knowledge. If you don’t have this or are not prepared to do your own research, then you will find the tools and techniques bewildering. Do not expect people on the forums or IRC to answer basic knowledge questions. It is up to you to have these skills before starting out.
If you truly want to explore the world of wireless then you need to make the commitment to learn and use linux plus the aircrack-ng suite linux version. An easy way to start is to utilize the Backtrack live distribution. This distribution has the aircrack-ng suite plus patched drivers already installed which jumpstarts your learning process. BackTrack information can be found here.
Installation and Usage
OK, you have come this far and still want to proceed? Just remember that there is an expectation that you have done your homework and have some base knowledge. Again, do not post questions on the forum or IRC that are dealt with in this tutorial or on the Wiki.
Here are the basic steps to install and use the aircrack-ng suite under Windows:
-
Install the drivers: Based on step one above, install the drivers per these instructions.
-
Install aircrack-ng suite: See these instructions.
-
Use aircrack-ng suite: See Part 1 — Cracking WEP with Windows XP Pro SP2. As well, the Wiki has documentation on each command. The commands need to run via the Windows command prompt or via the Aircrack-ng GUI. You have to be in the directory which contain the commands on your PC.
Troubleshooting Tips
There is some limited troubleshooting information under the airodump-ng command.
· Last modified: 2010/11/21 16:36 by
sleek
Reading Time: 5 minutes
Aircrack-ng is a popular open-source tool suite used for wireless network auditing, packet capturing, and cracking WEP and WPA/WPA2 encryption keys. It is primarily designed for Linux systems, but it is also possible to install and use Aircrack-ng on Windows. While the Windows version doesn’t offer all the features available on Linux, such as packet injection and monitor mode support, it can still be highly useful for network analysis and security testing in a Windows environment.
In this article, we will guide you through the step-by-step process of installing Aircrack-ng on Windows, including prerequisites, installation procedures, and common troubleshooting tips. Whether you’re a penetration tester, ethical hacker, or just someone interested in network security, this guide will walk you through the process of getting Aircrack-ng running on your Windows machine.
Prerequisites for Installing Aircrack-ng on Windows
Before installing Aircrack-ng on Windows, it is important to ensure your system meets certain prerequisites. These include:
1. Supported Windows Version
Aircrack-ng supports Windows 7, Windows 8, and Windows 10. It is always a good idea to use the most up-to-date version of Windows to ensure compatibility with newer software versions and features.
2. Wireless Network Adapter
To fully use Aircrack-ng for tasks like packet injection or cracking WPA/WPA2 passwords, you need a wireless network adapter that supports monitor mode and packet injection. However, note that many consumer-grade Wi-Fi cards do not support these features on Windows, so a compatible USB adapter is recommended. Popular options for Aircrack-ng include:
- Alfa AWUS036NHA
- TP-Link TL-WN722N (v1 model)
3. WinPcap
Aircrack-ng for Windows relies on WinPcap for packet capture. This software is required to capture packets from the wireless network and send them to Aircrack-ng for analysis. WinPcap is usually bundled with the Aircrack-ng installer, but you can also install it separately if needed.
4. Administrator Privileges
You need to have administrative privileges on your Windows system to install and run Aircrack-ng, as it requires access to network interfaces and system resources.
Step-by-Step Guide to Installing Aircrack-ng on Windows
Step 1: Download the Aircrack-ng Windows Installer
The first step in installing Aircrack-ng on Windows is to download the Windows version of the tool. You can do this by following these steps:
- Visit the official Aircrack-ng website: https://www.aircrack-ng.org/
- Navigate to the Downloads section.
- Select the Windows version of Aircrack-ng. Make sure to download the latest stable release for Windows.
- Download the
.exeinstaller file for Windows. This is the most straightforward method for installation.
Alternatively, you can directly access the Aircrack-ng repository on GitHub and download the latest release for Windows from there.
Step 2: Install WinPcap (if not already installed)
WinPcap is a crucial component for Aircrack-ng to function correctly on Windows, as it allows the program to capture network packets. If you do not have WinPcap installed, follow these steps:
- Download WinPcap from the official website: https://www.winpcap.org/install/default.htm
- Run the installer and follow the on-screen instructions to install WinPcap on your system.
- After the installation is complete, restart your computer to ensure the changes take effect.
Step 3: Install Aircrack-ng
Once you have downloaded the Aircrack-ng installer, follow these steps to install it:
- Run the Installer: Double-click the
.exefile that you downloaded from the Aircrack-ng website to begin the installation process. - Select Installation Folder: The installer will prompt you to select a directory where Aircrack-ng will be installed. The default location is usually fine, but you can choose a different folder if needed.
- Install Additional Components: During the installation process, the Aircrack-ng setup may ask you to install certain components, such as WinPcap. Ensure that these components are selected for installation.
- Complete the Installation: Click on the “Install” button to begin the installation. Once the installation is complete, click on “Finish” to exit the installer.
Step 4: Verify the Installation
After the installation is complete, you can verify that Aircrack-ng has been installed correctly by opening a Command Prompt window and checking the version.
- Press Windows + R, type
cmd, and press Enter to open the Command Prompt. - In the Command Prompt, type the following command to check if Aircrack-ng was successfully installed:
If Aircrack-ng is installed correctly, this command should return the version number of Aircrack-ng, confirming that the installation was successful.
Step 5: Running Aircrack-ng
Now that Aircrack-ng is installed, you can start using it from the Command Prompt. You can navigate to the Aircrack-ng directory using the following command:
|
cd C:\Program Files (x86)\Aircrack—ng |
Once you’re in the Aircrack-ng folder, you can begin running Aircrack-ng commands. For example, to see the available commands and options, you can use:
This will display a list of all available commands and usage instructions for Aircrack-ng.
Step 1: Capture Packets with airodump-ng
Aircrack-ng can be used to capture packets from Wi-Fi networks for analysis. However, remember that your wireless network adapter must support monitor mode for this to work. In Windows, this capability is limited, but for basic packet capture, you can still use airodump-ng to listen to nearby wireless networks.
To start capturing packets, run the following command:
Replace <interface> with the name of your wireless network adapter. You can find the available network interfaces by running:
Step 2: Crack WEP/WPA Keys
Once you’ve captured enough packets (especially the WPA/WPA2 4-way handshake), you can proceed to crack the WEP or WPA keys. For WPA/WPA2, Aircrack-ng requires a dictionary file containing potential passwords. You can either use a pre-built wordlist or create your own.
Run the following command to crack the WPA key using a dictionary attack:
|
aircrack—ng —w <path—to—wordlist> —b <target—BSSID> <capture—file> |
<path-to-wordlist>is the path to your wordlist file.<target-BSSID>is the MAC address of the target router.<capture-file>is the file containing the captured handshake.
For WEP cracking, use a similar approach, but the command will be slightly different.
Step 3: Monitor and Analyse Network Traffic
Once you’ve captured enough data, you can use Aircrack-ng to analyse network traffic and look for potential vulnerabilities in the network’s security. You can inspect captured packets using Wireshark or other similar tools, though Wireshark does not work natively with Aircrack-ng on Windows.
Troubleshooting Common Installation Issues
1. “No wireless interfaces found” Error
If Aircrack-ng is unable to detect your wireless interface, ensure that your Wi-Fi adapter is compatible with monitor mode and packet injection on Windows. Some network cards are not fully supported in Windows, so it’s crucial to verify compatibility before using them with Aircrack-ng. If using a USB Wi-Fi adapter, check that the device drivers are installed correctly.
2. Packet Injection Not Working
On Windows, packet injection is often limited, as many wireless network cards do not support it. If you are not able to perform packet injection, you may need to use a different adapter or switch to a Linux-based system that provides full support for this functionality.
3. Error Message Related to WinPcap
If you encounter issues with WinPcap, ensure that it is correctly installed on your system. You can try reinstalling WinPcap from its official website or reinstalling Aircrack-ng, as it often includes a bundled version of WinPcap.
Conclusion
Installing Aircrack-ng on Windows may not provide the same level of functionality as on Linux, but it still offers a robust set of tools for wireless network auditing and security testing. By following this guide, you should be able to successfully install and run Aircrack-ng on your Windows system. Whether you’re testing the security of your own Wi-Fi network or conducting penetration testing in a legal and ethical context, Aircrack-ng is a valuable tool for cybersecurity professionals.
Always remember that cracking Wi-Fi passwords without permission is illegal and unethical. Always obtain explicit consent before testing the security of any network.
Disclaimer: This post may contain affiliate links. If you make a purchase through one of these links, Cyberly may earn a small commission at no extra cost to you. Your support helps us continue providing free tutorials and content. Thank you!
Aircrack-ng is a powerful suite of tools designed for network security professionals and penetration testers to analyze and crack Wi-Fi encryption. It supports various tasks related to Wi-Fi network auditing, making it an essential tool for security enthusiasts. This article aims to guide you through using Aircrack-ng on Windows 11, including installation, setup, and various operations for a successful Wi-Fi security test.
Understanding Aircrack-ng
Aircrack-ng can perform several tasks, including:
- Monitoring: Capturing packets from the air.
- Attacking: Performing attacks against WEP/WPA/WPA2 encryption.
- Testing: Testing Wi-Fi security by cracking encryption keys.
- Cracking: Cracking WEP/WPA/WPA2 keys using various techniques and dictionaries.
Prerequisites
Before you start, ensure you have the following:
- A computer running Windows 11.
- Reliable internet access.
- Administrative privileges to install software and drivers.
- A compatible wireless network adapter that supports monitor mode and packet injection.
Step 1: Installing the Necessary Tools
To use Aircrack-ng on Windows 11, follow these steps to set up the required tools:
1.1 Install Windows Subsystem for Linux (WSL)
Aircrack-ng is best run in a Linux environment, but you can use the Windows Subsystem for Linux (WSL) to achieve this.
-
Enable WSL:
- Press
Win + Xand select «Windows Terminal (Admin)». - Run the following command:
wsl --install
- Press
-
Install a Linux Distribution:
- After installing WSL, you can choose a Linux distribution like Ubuntu. To do this, run:
wsl --install -d Ubuntu
- After installing WSL, you can choose a Linux distribution like Ubuntu. To do this, run:
-
Restart Your Computer:
- After installation, you will be prompted to restart your computer.
-
Open Ubuntu from the Start Menu and complete the initial setup, including creating a user account.
1.2 Install Aircrack-ng
Once you’ve set up WSL and your Linux environment, you will need to install Aircrack-ng.
-
Update Package List:
- In your Ubuntu terminal, run:
sudo apt update
- In your Ubuntu terminal, run:
-
Install Aircrack-ng:
- To install Aircrack-ng, run:
sudo apt install aircrack-ng
- To install Aircrack-ng, run:
-
Verify the Installation:
- After installation, check if Aircrack-ng is installed by running:
aircrack-ng --help
- After installation, check if Aircrack-ng is installed by running:
Step 2: Setting Up Your Wireless Adapter
To conduct Wi-Fi penetration testing, your wireless adapter must support monitor mode and packet injection.
2.1 Identifying Compatible Wireless Adapter
Not all wireless adapters are created equal. You can check the compatibility of your adapter with the following commands in WSL:
iwconfigThis will show you the network interfaces available on your system. You want to ensure the adapter you will be using can work in monitor mode.
2.2 Configuring Monitor Mode
- Put the Adapter in Monitor Mode:
- Find your wireless interface name (typically
wlan0,wlan1, etc.). - Run the following command to set it to monitor mode:
sudo ip link set wlan0 down
sudo iw dev wlan0 set type monitor
sudo ip link set wlan0 up
- Find your wireless interface name (typically
Replace wlan0 with the actual interface name if different.
Step 3: Capturing Packets
The first major operation you will perform with Aircrack-ng is capturing Wi-Fi packets.
3.1 Use airodump-ng to Capture Data
-
Launch airodump-ng:
- In the terminal, run:
sudo airodump-ng wlan0This will provide a list of nearby Wi-Fi networks along with their details: BSSID, channel, security, etc.
- In the terminal, run:
-
Select Your Target:
- Identify the network (target) you want to analyze and note its BSSID and channel.
-
Capture Packets from the Target Network:
- Filter your capture to the target network by running:
sudo airodump-ng --bssid [BSSID] -c [channel] -w [output_file] wlan0Replace
[BSSID],[channel], and[output_file]with the corresponding details you noted.
- Filter your capture to the target network by running:
3.2 Collecting WPA Handshake
To crack WPA/WPA2, collect enough packets to eventually capture the WPA handshake.
-
Wait for a handshake:
- You can wait until a device connects to the network, which will display a successful handshake.
-
Monitor the Capture:
- Watch for messages indicating a successful handshake in the terminal.
Step 4: Cracking WPA/WPA2 Passwords
Once you capture the handshake, you can move on to attempting to crack the password.
4.1 Getting the Wordlist
To crack the password, you need a wordlist. You can use common ones like rockyou.txt, which can be downloaded from the internet.
- Download the Wordlist:
- You can find
rockyou.txton GitHub or other sources. Place it in your working directory or a convenient directory in your WSL system.
- You can find
4.2 Cracking with aircrack-ng
-
Run aircrack-ng:
- To start cracking, execute the command:
aircrack-ng -w [path_to_wordlist] -b [BSSID] [output_file.cap]Replace
[path_to_wordlist],[BSSID], and[output_file.cap]with the relevant details.
- To start cracking, execute the command:
-
Analyze Results:
- Aircrack-ng will attempt to crack the password using the provided wordlist. Be patient, as this can take time based on the length and complexity of the password.
Step 5: Checking WEP Security
If you want to test WEP networks, the process is slightly different.
5.1 Capture Packets
- Use airodump-ng:
- Similar to WPA/WPA2, use
airodump-ngto capture packets from the WEP network.
- Similar to WPA/WPA2, use
5.2 Cracking WEP Passwords
-
Use aircrack-ng:
- After capturing enough packets (typically around 10,000), run:
aircrack-ng [file_with_wep_packets]
- After capturing enough packets (typically around 10,000), run:
-
Analyze Results:
- Aircrack-ng will analyze the captured packets and attempt to determine the WEP key.
Step 6: Cleanup and Exiting
Once you are finished with your testing, it is essential to clean up and exit your network session properly.
-
Exit Monitor Mode:
- To exit monitor mode, use:
sudo ip link set wlan0 down
sudo iw dev wlan0 set type managed
sudo ip link set wlan0 up
- To exit monitor mode, use:
-
Close Terminal:
- Close the terminal or logout from your WSL environment.
Ethical Considerations
Using Aircrack-ng responsibly is crucial. Always ensure you have permission to test a network and never perform any unauthorized testing on networks you do not own or have explicit permission to assess. Misusing Aircrack-ng can lead to legal consequences or malicious implications.
Conclusion
Aircrack-ng is an invaluable tool for anyone interested in Wi-Fi security assessments, particularly on Windows 11 via WSL. It’s vital to approach this powerful software with responsibility and a clear understanding of ethical guidelines surrounding network security testing. By following the steps outlined in this comprehensive guide, you can effectively utilize Aircrack-ng for your Wi-Fi network analysis and security testing needs.
Additional Resources
For further reading and deeper insights into Wi-Fi security, consider exploring:
- The official Aircrack-ng documentation.
- Wi-Fi security courses and tutorials available on platforms like Udemy or Coursera.
- Ethical hacking forums for discussions and shared knowledge related to Wi-Fi testing.
By advancing your skills in Wi-Fi security, you contribute positively to the field of cybersecurity. Happy testing!
Requirements
- Have a Windows computer.
- Have a connection to the internet.
- Download Aircrack-ng: https://download.aircrack-ng.org/aircrack-ng-1.2-win.zip
Steps:
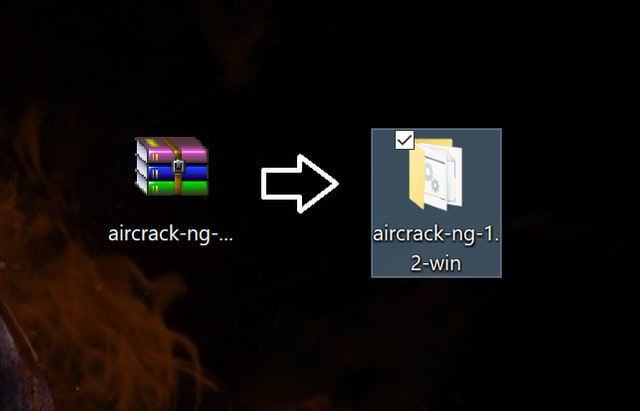
First Step: Download and uncompress the Aircrack-ng file. Personally, I prefer to move the .rar file to the desktop to have a more clear working area. If your web browser does not ask you where to save the file, then just go to your «Downloads» section of your file explorer.
This is how it should look:
Second Step: Determine if your Windows architecture is 64-bit or 32-bit.
You should get something like this:
Third Step: Go to your ‘Local Disk (C:) and open the folder «Program Files» or «Program Files (x86)» depending on your windows architecture. Since my Windows is 64-bit I will choose the ‘Program Files’ folder.
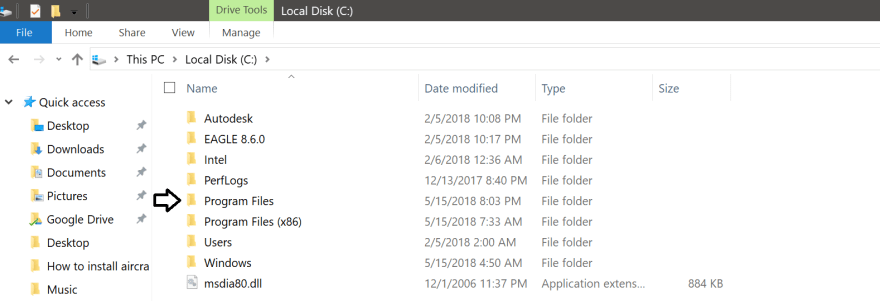
Then, copy and paste the Aircrack-ng folder that you uncompressed before inside the «Program Files» folder.
The Aircrack-ng folder should look like this inside the «Program Files» folder.
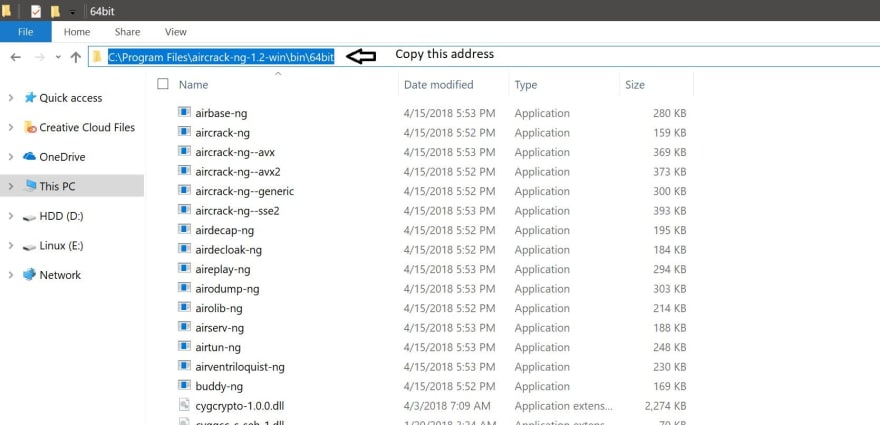
After pasting the «Aircrack-ng» folder inside the «Program files» or «Program Files (x86)» you have to go inside of that folder.
Once inside the folder you will have to open the «bin» folder.
Depending on your Windows architecture you will choose the folder according to your Windows. In my case I chose the «64-bit» folder since my Windows architecture is 64-bit.
Once inside your corresponding folder, you will have to copy the address of that folder as it is shown below:
Fourth Step: Now, you will have to go to «This PC» properties once again.
Once you get the window below, you will have to left click on «Advanced system settings» as it is on the picture shown below.
Now you will have to click on the button that says «Environment Variables…»
Once you got inside «Environment Variables» you should get a screen just like this:
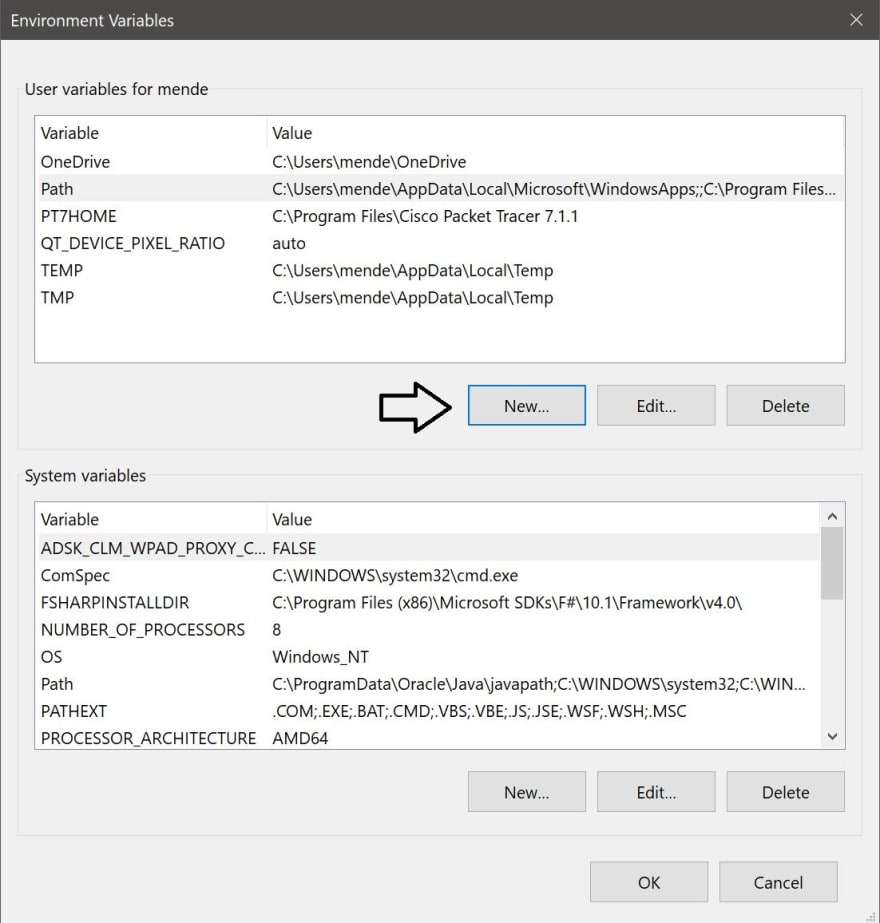
Once you got this window, you will have to click the «New» button pointed with the arrow.
In this new window, you have to write (path) inside the «Variable name:» box. Then, you will have to paste the address that you copied before in step #4 inside the «Variable value:» box. All the procedures are shown below.
After that, just click «OK» on all the windows that are open. Also, click on «Apply» if you see the option.
Final Step: Go to your desktop and press the keys «Ctrl + R» to open the «Run» program. Inside «Run» type «cmd» as it is shown below.
Then press «OK»
You should get a window like this one below
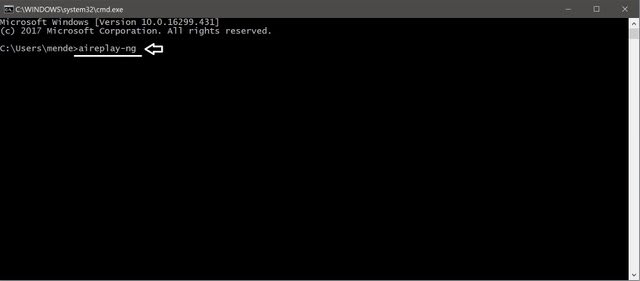
Now that you have opened the «cmd» you will have to type «aireplay-ng» inside the «cmd».
Then, press enter.
You should get a set of information just like it is on the picture above.
Now you are done and ready to use it.