
Last Updated :
02 Jan, 2023
Java is a high-level, robust, object-oriented, and secure programming language that was developed in the year 1995 by Sun Microsystems (which is now part of Oracle group), and James Gosling is known as the father of Java. It is a general-purpose programming language intended to let programmers write once, and run anywhere, meaning that compiled Java code is compatible to run on all platforms that support Java without the need to recompile which is a major advantage.
Java Update
Java Update is a feature that keeps your windows computer up to date with the latest Java releases. You can use Java’s update feature to manually force an available update on windows. But, when you have auto update enabled, your system periodically checks for new versions of Java and updates it automatically.
Auto Update in Java
We can get the auto-update feature in Java
First, you need to check whether the windows check for update automatically you can do this by following the steps:
- Open the start by clicking on the windows logo on the bottom left side of the screen, and the start menu will pop up.
- Now type configures Java and clicks on configure Java option from the list of matching programs, this will open Java control panel.
- Once Java Control Panel is launched click on the update tab to access settings.
- Select the Check for Updates Automatically check box for enabling Java updates to check for updates automatically.
Now, whenever an update is available you will receive a notification asking your permission to download the update, and a tooltip balloon appears on your Windows desktop. To install the new update, click on the notification dialog.
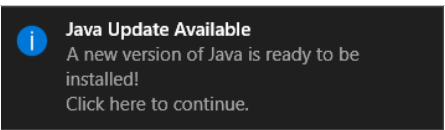
Update Notification for Java
Now an Update Available dialog appears. To start the installation, click Update. Otherwise, you can click Later to install the update at a later time. When the installation is complete a dialog appears where you can click Finish to complete the installation.
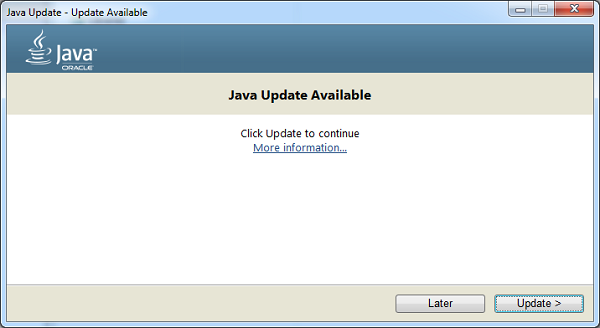
An update Available dialog box
Using the Update Schedule, you can change the frequency for updates accordingly: daily, weekly, or monthly (default). To do this follow the given steps:
- From the Java Control panel click on the Update tab, then select Advanced, now the Automatic Update Advanced Settings dialog will appear.
- Here you can change the frequency and the date and time for the Java Update, finally click OK.
Java Update scheduler will check for newer Java updates and notify you at the scheduled frequency.
Java Manual Update
1. Open the Start option by clicking the Windows logo in the bottom-left corner of the screen. The Start menu will pop up.
.png)
Main Screen with start option
2. Type in configure java in the search box and searches for matching programs will be displayed.
.png)
List of matches
3. Click on configure java option from the list of matching programs and the Java Control Panel will open.
.png)
Java Control Panel
4. Click on the update option in the Java control panel and then click on the Update now option at the bottom-right corner of the window and this initiates the Java to look for new updates.
.png)
Java Control Panel after clicking on the Update tab
5. If Java finds an available update, follow any on-screen prompts that appear to confirm the update, then allow your computer to install the latest version of Java.
You cannot update to a new version of Java if you receive a dialog box saying that you are already running the latest version of Java.
.png)
This notification appears when you are using the latest Java version
Finally, if you are not sure about the Java version then go to the official link to update to the latest version.
Download Article
Learn how to keep Java up to date in just a few simple steps
Download Article
- Updating on Windows
- Updating on Mac
- Updating on Linux
- Updating Automatically
- Changing the Update Schedule
- Installing Java
- Q&A
- Tips
|
|
|
|
|
|
|
Typically, Java checks for updates automatically and notifies you when an update is available. You can also update Java manually, and it’s easy to do on your Windows or Linux PC, as well as on your Mac. You can also change the schedule for when Java automatically checks for updates and install the latest version of Java from the internet. This wikiHow article teaches you the various ways you can update Java on any computer.
Quick Steps
- Open the Java Control Panel on your PC or Mac.
- Click the Update tab at the top.
- Click Update Now.
-

Use the following steps to update Java on Windows:
- Click the Windows Start button.
- Type «Configure Java»
- Click Configure Java in the search results.
-
This is at the top of the Java control panel window.
Advertisement
-
You’ll find this button in the bottom-right corner of the window. Doing so prompts Java to begin looking for an update.[1]
- If you receive a message that says you’re already running the latest version of Java, then Java has already been updated to the latest version.


Advertisement
-
Here’s how to open it on your Mac:
- Click the Apple icon in the menu bar at the top.
- Click System Settings.
- Scroll down and click Java in the left panel.
-
This is at the top of the Java control panel window.
-
You’ll find this button in the bottom-right corner of the window. Doing so prompts Java to begin looking for an update.[2]
- If you receive a message that says you’re already running the latest version of Java, then Java has already been updated to the latest version.


Advertisement
-
You can update Java easily using the Terminal in Linux using your package manager.
-
The way you will do this is different depending on your Linux distribution. Type one of the following commands and press Enter to update your repositories:
- Debian/Ubuntu/Mint: sudo apt update.
- Red Had/Fedora: sudo dnf update.
- OpenSUSE: sudo zypper patch.
- Arch Linux: sudo pacman -Syu.
-
The latest version of Java is JDK 23. You can also install previous versions of Java. Use one of the following commands to search for available versions of Java:
- Debian/Ubuntu/Mint: sudo apt-cache search openjdk
- Red Hat/Fedora: sudo dnf search openjdk
- OpenSUSE: sudo zypper search openjdk-devel
- Arch Linux: sudo pacman -sS java
-
Use one of the following commands to install OpenJava JDK. These commands will update Java on Linux to JDK 23. If you want to install a different version, you can modify the command to install the version of Java you want (i.e., «sudo apt install openjdk-24»). Use one of the following commands to install Java on Linux:
-
Debian/Ubuntu/Mint: sudo apt install openjdk-23.[3]
-
Red Hat/Fedora: sudo dnf install java-23-openjdk-devel.[4]
- OpenSUSE: sudo zypper install java-23-openjdk-devel.
- Arch Linux: sudo pacman -S jdk23-openjdk
-
Debian/Ubuntu/Mint: sudo apt install openjdk-23.[3]


Advertisement
-
By default, Java will check for updates automatically once a week. If an update is available, you will be notified that an update is ready to be installed. Click the notification when it appears.
- You can check your notifications by clicking the date and time on both Windows and Mac. On Windows, it’s in the taskbar in the lower-right corner. On a Mac, it’s in the menu bar in the upper-right corner.
-
If you are using Windows, a control access pop-up window will appear asking if you want to allow Java to make changes to your computer. Click Yes to continue. Then, click Update to update Java now.
- If you don’t want to install the Java update when the notification appears, you can click Later instead. You will be prompted to install the Java update at a later time.


Advertisement
-
If you want Java to update automatically on your Windows PC or Mac, you can set it up to do so on your preferred schedule. Use one of the following steps to open the Java Control Panel:
- Windows: Click the Windows Start button and type Configure Java. Click Configure Java.
- Mac: Click the Apple icon at the top and then click System Settings. Click the Java icon.
-
It’s the second tab at the top of the page. This displays the Update options.
-
Java will notify you before updating automatically. Use the drop-down menu next to «Notify Me» to select if you want to be notified before downloading the update or before installing the update.
-
It’s the checkbox below the «Notify Me» drop-down menu. This option is usually checked by default.
-
It’s the button next to the checkbox. This displays advanced update options.
-
Click one of the radio options to the left to select how often you want to check for updates. The options are «Daily,» «Weekly,» or «Monthly.»
- If you select «Monthly,» Java will check for updates weekly and then notify you within 30 days. If an update is considered critical, you will be notified within the week.
-
Use the drop-down menu next to «Every» to select a day to check for updates. You can select any day of the week.
-
Use the drop-down menu next to «At» to select the exact hour Java will check for updates.


Advertisement
-
-
Java is available for Windows, Mac, and Linux. Scroll down and click the link for your operating system.
- If you have an internet connection, click Windows Online for the fastest installation method. If you want to install Java on a computer that doesn’t have an internet connection, you’ll need to click Windows Offline or Windows Offline (64-bit) to download the executable file to install Java on an offline computer.[5]
- If you have a 32-bit and a 64-bit web browser, you will need to download and install both the 32-bit and 64-bit versions of Java.
- You need administrative privileges to install Java on a Mac.
- If you have an internet connection, click Windows Online for the fastest installation method. If you want to install Java on a computer that doesn’t have an internet connection, you’ll need to click Windows Offline or Windows Offline (64-bit) to download the executable file to install Java on an offline computer.[5]
-
By default, your downloaded files are usually found in your «Downloads» folder. Double-click the installation file once it is finished downloading. On Windows, it will be an «.exe» file. On Mac, it will be a «.dmg» file.
-
The install wizard will display a page informing you that this version of Java is for personal use only. Java requires a separate license for commercial purposes. If you agree to the terms, click Install. This will install the latest version of Java. If you don’t agree to the terms, click Remove.
-
Once Java is finished installing, click Close to close the install wizard.


Advertisement
Add New Question
-
Question
My computer is giving errors when I try to update java.
Try shutting the computer down for a few minutes then boot it back up.
Ask a Question
200 characters left
Include your email address to get a message when this question is answered.
Submit
Advertisement
-
Installing the latest version of Java will replace your current version with the updated Java installation.
-
If you receive a Java update pop-up window on a random page in your browser, close the page and attempt to update Java as outlined in this article rather than using the pop-up. Some pages will use fake update messages to get you to install a virus.
Thanks for submitting a tip for review!
Advertisement
About This Article
Thanks to all authors for creating a page that has been read 125,930 times.
Is this article up to date?
Are you struggling to update Java on your system? You’re not alone. Many users find it challenging to keep their Java installations up-to-date. Like a diligent mechanic, we need to regularly service our Java installations to keep them running smoothly.
Java updates are crucial for the security and performance of your system. They bring new features, improvements, and bug fixes that enhance your Java experience.
This guide will walk you through the process of updating Java on Windows, MacOS, and Linux. We’ll cover everything from the basics to more advanced techniques, ensuring you can easily update Java regardless of your system.
Let’s get started and master Java updates!
TL;DR: How Do I Update Java?
You can update Java by visiting the official Java website at:
https://www.java.com/en/download/. Download the latest version, and follow the installation prompts. This process may vary slightly depending on your operating system.
Here’s a simple example:
# Visit the official Java website
open https://www.java.com/en/download/

# Download the latest version
# Follow the installation prompts

# Verify the update
java -version

# Output:
# java version "1.8.0_271"
# Java(TM) SE Runtime Environment (build 1.8.0_271-b09)
# Java HotSpot(TM) 64-Bit Server VM (build 25.271-b09, mixed mode)
In this example, we visit the official Java website, download the latest version, and follow the installation prompts. After the installation, we verify the update by checking the Java version. The output shows the updated Java version.
This is a basic way to update Java, but there’s much more to learn about the process, including how to manage multiple Java versions on the same system. Continue reading for more detailed information and advanced usage scenarios.
Table of Contents
- Updating Java: A Step-by-Step Guide for Beginners
- Why Updating Java is Crucial
- The Java Update Process
- Configuring Java Update Settings
- Managing Multiple Java Versions
- Troubleshooting Common Issues with Java Updates
- Verifying the Java Update
- Understanding Java’s Release Cycle
- Checking Your Current Java Version
- Uninstalling Old Java Versions
- JDK vs JRE: What’s the Difference?
- Setting Up a Java Development Environment
- Writing a Simple Java Program
- Using Java in Web Development
- Wrapping Up: Java Updates
Updating Java: A Step-by-Step Guide for Beginners
Whether you’re using Windows, MacOS, or Linux, updating Java involves a similar process. Here’s a step-by-step guide to help you update Java on your system.
Updating Java on Windows
- Open your browser and visit the official Java website: https://www.java.com/en/download/
- Click on the ‘Java Download’ button and confirm the download on the next page.
- Once downloaded, double-click the installer to start the installation process.
- Follow the installer prompts to complete the installation.
- To verify the update, open Command Prompt and type the following:
java -version

# Output:
# java version "1.8.0_271"
# Java(TM) SE Runtime Environment (build 1.8.0_271-b09)
# Java HotSpot(TM) 64-Bit Server VM (build 25.271-b09, mixed mode)
The output shows the updated Java version.
Updating Java on MacOS
- Open your browser and visit the official Java website: https://www.java.com/en/download/
- Click on the ‘Java Download’ button and confirm the download on the next page.
- Once downloaded, double-click the installer to start the installation process.
- Follow the installer prompts to complete the installation.
- To verify the update, open Terminal and type the following:
java -version

# Output:
# java version "1.8.0_271"
# Java(TM) SE Runtime Environment (build 1.8.0_271-b09)
# Java HotSpot(TM) 64-Bit Server VM (build 25.271-b09, mixed mode)
The output shows the updated Java version.
Updating Java on Linux
- Open Terminal.
- Update the package list using the following command:
sudo apt update
- Install the default Java version using the following command:
sudo apt install default-jdk

# Output:
# Reading package lists... Done
# Building dependency tree
# Reading state information... Done
# The following additional packages will be installed:
#  default-jdk-headless
# Suggested packages:
#  openjdk-11-demo openjdk-11-source visualvm
# The following NEW packages will be installed:
#  default-jdk default-jdk-headless
# 0 upgraded, 2 newly installed, 0 to remove and 0 not upgraded.
# Need to get 1,864 B/2,014 B of archives.
# After this operation, 12.3 kB of additional disk space will be used.
# Do you want to continue? [Y/n]
- To verify the update, type the following:
java -version

# Output:
# openjdk version "11.0.11" 2021-04-20
# OpenJDK Runtime Environment (build 11.0.11+9-Ubuntu-0ubuntu2.20.04)
# OpenJDK 64-Bit Server VM (build 11.0.11+9-Ubuntu-0ubuntu2.20.04, mixed mode, sharing)
The output shows the updated Java version.
Remember, these steps are for beginners. If you’re an advanced user, you might want to customize your Java installation or manage multiple Java versions on the same system. We’ll cover that in the next section.
Why Updating Java is Crucial
Keeping Java updated is more than just accessing new features. It’s about ensuring the security and optimal performance of your system. Each Java update brings with it a series of bug fixes, improvements, and sometimes, new features.
The Java Update Process
When you update Java, your system downloads the new version from the official Java website. This version comes as an executable file that you run to install the new version. During the installation, the installer checks for previous versions and, if allowed, it will uninstall the older version before installing the new one.
Configuring Java Update Settings
Java allows you to configure its update settings. On Windows, you can access these settings from the Java Control Panel. Here’s how:
# Open Control Panel
# Click on Programs
# Click on Java
# In the Java Control Panel, click on the Update tab
# Here, you can configure the update settings
On MacOS, you can find these settings under System Preferences > Java > Update.
Managing Multiple Java Versions
Sometimes, you may need to keep older Java versions while installing a new one. This is common among developers who need to test their applications on different Java versions.
To manage multiple Java versions, you can use the update-alternatives command on Linux. Here’s an example:
# Install a new Java version
sudo apt install openjdk-11-jdk

# Configure the system to use the new Java version
sudo update-alternatives --config java

# Output:
# There are 2 choices for the alternative java (providing /usr/bin/java).
# Selection    Path                                            Priority   Status
# ------------------------------------------------------------
# * 0            /usr/lib/jvm/java-11-openjdk-amd64/bin/java      1111      auto mode
# 1            /usr/lib/jvm/java-8-openjdk-amd64/jre/bin/java   1081      manual mode
# 2            /usr/lib/jvm/java-11-openjdk-amd64/bin/java      1111      manual mode

# Press enter to keep the current choice[*], or type selection number: 2

# Verify the update
java -version

# Output:
# openjdk version "11.0.11" 2021-04-20
# OpenJDK Runtime Environment (build 11.0.11+9-Ubuntu-0ubuntu2.20.04)
# OpenJDK 64-Bit Server VM (build 11.0.11+9-Ubuntu-0ubuntu2.20.04, mixed mode, sharing)
In this example, we install a new Java version (OpenJDK 11) and configure the system to use it. The update-alternatives command allows us to choose which Java version to use. After choosing the new version, we verify the update by checking the Java version. The output shows the updated Java version.
Remember, managing multiple Java versions is an advanced technique. You should only attempt it if you’re comfortable with the command line and understand the implications of using different Java versions.
Troubleshooting Common Issues with Java Updates
Like any software, Java updates can sometimes run into problems. Here are some common issues and their solutions.
Issue: Installation Fails
Sometimes, the Java update installation may fail. This could be due to a network issue, lack of disk space, or a problem with the installer.
Solution: Try downloading the installer again. If the problem persists, check your network connection and ensure you have enough disk space. If all else fails, contact Java support or search for a solution online.
Issue: Old Java Version Still Shows After Update
After updating Java, you may find that the old version still shows when you check the Java version. This could be due to the system not recognizing the new Java version.
Solution: On Windows and MacOS, restart your system. On Linux, use the update-alternatives command to switch to the new Java version, as shown in the previous section.
Issue: Multiple Java Versions Causing Conflicts
If you have multiple Java versions installed, they could cause conflicts. This is especially common among developers who need to test their applications on different Java versions.
Solution: Use the update-alternatives command on Linux to switch between Java versions. On Windows and MacOS, you can specify the Java version when running your application.
Verifying the Java Update
After updating Java, it’s important to verify the update. You can do this by checking the Java version. Here’s how:
java -version

# Output:
# java version "1.8.0_271"
# Java(TM) SE Runtime Environment (build 1.8.0_271-b09)
# Java HotSpot(TM) 64-Bit Server VM (build 25.271-b09, mixed mode)
In this example, we check the Java version. The output shows the updated Java version.
Remember, troubleshooting is an integral part of the Java update process. It helps ensure your system is using the correct Java version and running smoothly.
Understanding Java’s Release Cycle
Java’s release cycle is crucial to keep in mind when updating. Oracle, the company behind Java, releases updates every six months. These updates include security fixes, performance enhancements, and new features. Understanding this cycle can help you plan and manage your updates effectively.
Checking Your Current Java Version
Before updating Java, it’s good practice to check your current version. This will help you verify the update later. Here’s how to check your Java version:
java -version

# Output:
# java version "1.8.0_271"
# Java(TM) SE Runtime Environment (build 1.8.0_271-b09)
# Java HotSpot(TM) 64-Bit Server VM (build 25.271-b09, mixed mode)
In this example, we check the Java version. The output shows the current Java version.
Uninstalling Old Java Versions
When updating Java, the installer usually uninstalls the old version automatically. However, if you need to uninstall an old Java version manually, here’s how:
On Windows, you can uninstall Java from the Control Panel > Programs > Programs and Features.
On MacOS, you can remove the Java plugin from System Preferences > Java > Security > Java Content in the browser > Delete Files.
On Linux, you can uninstall Java with the following command:
sudo apt remove openjdk-*
JDK vs JRE: What’s the Difference?
Java Development Kit (JDK) and Java Runtime Environment (JRE) are two components of Java. JDK is for developers who need to write Java applications. It includes JRE and other development tools. On the other hand, JRE is for users who just need to run Java applications. It includes the Java Virtual Machine (JVM) and other necessary libraries.
When updating Java, consider whether you need JDK or JRE. If you’re a developer, you’ll likely need the JDK. If you’re a user, the JRE should suffice.
Setting Up a Java Development Environment
Once you’ve updated Java, you might want to set up a development environment to start coding. This involves installing a Java Development Kit (JDK) and an Integrated Development Environment (IDE). The JDK provides the tools you need to write and compile Java code, while the IDE makes it easier to write, debug, and run your code.
Here’s an example of how to set up a Java development environment on Linux:
# Install OpenJDK
sudo apt install openjdk-11-jdk

# Install IntelliJ IDEA (a popular Java IDE)
sudo snap install intellij-idea-community --classic
In this example, we install OpenJDK 11 and IntelliJ IDEA. The --classic option allows IntelliJ IDEA to access necessary system resources.
Writing a Simple Java Program
With your development environment set up, you can write a simple Java program. Here’s an example:
public class HelloJava {
  public static void main(String[] args) {
    System.out.println("Hello, Java!");
  }
}

# Output:
# Hello, Java!
In this example, we create a Java class named HelloJava. This class has a main method that prints Hello, Java! when run.
Using Java in Web Development
Java is a versatile language that you can use in web development. There are many Java frameworks, such as Spring and Struts, that make it easier to build web applications. These frameworks provide tools and libraries that streamline the development process.
Further Resources for Java
To learn more about updating Java and using Java in your projects, check out these resources:
- Quick and Easy Java Installation on Ubuntu – Quick tips for installing Java on Ubuntu server.
-
Exploring the Java Logo – Learn about the history and design behind the Java coffee cup logo.
-
Java 11 Updates – Learn about Java Platform Module System (JPMS) improvements and updated APIs in Java 11.
-
Oracle’s Java Tutorials cover everything from the basics to advanced topics.
-
Baeldung’s Java and Spring Tutorials offers in-depth tutorials on Java and Spring for web development.
-
Java Code Geeks offers a wealth of articles on various Java updates, development, and more.
Wrapping Up: Java Updates
In this comprehensive guide, we’ve delved into the process of updating Java on various operating systems, emphasizing the importance of keeping your Java installations up-to-date.
We began with the basics, walking you through the steps to update Java on Windows, MacOS, and Linux. We then ventured into more advanced territory, discussing why it’s important to update Java and how to configure Java update settings. We also touched on how to manage multiple Java versions on the same system, a useful skill for developers testing their applications on different Java versions.
Along the way, we addressed common issues encountered when updating Java and provided solutions to help you troubleshoot these challenges. We also discussed how to verify the Java update, an essential step to ensure you’re using the correct Java version.
Here’s a quick comparison of the update process on different operating systems:
| Operating System | Update Process | Troubleshooting |
|---|---|---|
| Windows | Download and run the installer from the official Java website | Restart the system or reinstall Java |
| MacOS | Download and run the installer from the official Java website | Restart the system or reinstall Java |
| Linux | Use the package manager to install the default Java version | Use the update-alternatives command to switch Java versions |
Whether you’re a beginner learning to update Java for the first time or an experienced user looking to manage multiple Java versions, we hope this guide has provided you with the knowledge and confidence to handle Java updates effectively.
Updating Java is a crucial part of maintaining the security and performance of your system. With this guide, you’re well-equipped to keep your Java installations running smoothly. Happy coding!
Java is the backbone of countless applications and tools, yet dealing with its setup on Windows can feel like wrestling with a greased-up octopus. Fear not, though! Whether you’re checking your Java version, updating it, or setting the ever-elusive JAVA_HOME environment variable, this guide will make you feel like a Java ninja—sarcastic commentary included (free of charge).
How to Check the Java Version on Windows
Let’s start with the basics. You can’t manage your Java setup if you don’t know what you’re working with. Checking your Java version is like finding out which friend brought the weird casserole to the potluck: it’s critical information.
- Open Command Prompt:
PressWin + R, typecmd, and hit Enter. Alternatively, search for “Command Prompt” in the Start menu. - Type the Magic Words:
Type the following command and hit Enter:java -version - Interpret the Result:
You’ll see something like this:java version "17.0.3" 2021-09-14 LTS Java(TM) SE Runtime Environment (build 17.0.3+7-LTS) Java HotSpot(TM) 64-Bit Server VM (build 17.0.3+7-LTS, mixed mode)The first line tells you the installed Java version. If you see an error message likejava is not recognized, congratulations—you don’t have Java installed (or it’s hiding somewhere deep in the bowels of your PATH).
How to Check the JDK Version on Windows
If you’re working with Java Development Kit (JDK), the process is eerily similar:
- Open Command Prompt:
You know the drill—Win + R, typecmd, Enter. - Run the Command:
Enter:javac -version - Read the Output:
You’ll see something like this:javac 17.0.3If this doesn’t work, your JDK isn’t installed or your PATH hasn’t been configured properly. No judgment—fixing it is our next mission.
How to Change the Java Version on Windows
Let’s say you have multiple Java versions installed because, hey, why not make life complicated? Here’s how to switch between them:
- Check Installed Versions:
Locate all installed Java versions. These are usually inC:\Program Files\Java. - Update the PATH Variable:
- Press
Win + Sand search for Environment Variables. - Under System Variables, find
Pathand click Edit. - Remove the current Java path and add the one you want to use (e.g.,
C:\Program Files\Java\jdk-17.0.3\bin). - Click OK and restart any open Command Prompt sessions.
- Press
- Verify the Change:
Runjava -versionagain to confirm the active Java version.
How to Set JAVA_HOME on Windows
Ah, the infamous JAVA_HOME. Setting this is like deciphering ancient hieroglyphs, but once you master it, you’ll feel invincible.
- Locate Your Java Installation Directory:
Typically found inC:\Program Files\Java\jdk-XX, whereXXis your JDK version. - Open Environment Variables:
- Press
Win + S, type Environment Variables, and open it. - Under System Variables, click New.
- Press
- Create the Variable:
- Name it
JAVA_HOME. - Set the value to your Java installation directory (e.g.,
C:\Program Files\Java\jdk-17.0.3).
- Name it
- Add JAVA_HOME to PATH:
- In the same Environment Variables window, edit the
Pathvariable. - Add
%JAVA_HOME%\binto the list.
- In the same Environment Variables window, edit the
- Verify It Works:
Open Command Prompt and type:echo %JAVA_HOME%If it spits out the correct path, congratulations—you’ve done it!
How to Update Java on Windows 11
Updating Java doesn’t have to be a pain (unless you enjoy unnecessary stress, in which case, proceed without reading this).
- Check for Updates:
- Visit the Java Downloads Page.
- Compare your installed version (
java -version) with the latest available.
- Download the Latest Version:
Choose the correct version for your system (x64 for most modern PCs). - Install the Update:
Run the installer and follow the prompts. During installation, you can opt to remove older versions if you’re feeling bold. - Update PATH and JAVA_HOME:
Repeat the steps above to update your environment variables if needed. - Verify the Update:
Usejava -versionto confirm you’re running the latest version.
Quick Comparison of Commands and Tasks
| Task | Command/Steps | Difficulty Level |
|---|---|---|
| Check Java version | java -version |
Easy |
| Check JDK version | javac -version |
Easy |
| Change Java version | Update PATH variable | Medium |
| Set JAVA_HOME | Create and configure variable | Medium |
| Update Java | Download, install, reconfigure | Medium |
Final Thoughts
Dealing with Java on Windows can seem daunting at first, but with a bit of patience (and coffee, lots of coffee), it’s manageable. Whether you’re a developer, a student, or just someone trying to run that one weird application that only works with Java 8, these steps will keep you on track.
Now go forth, command-line warriors, and conquer Java setup like the coding pros you are—or at least, like someone who knows their way around cmd.
Updating Java on Windows 10 is a straightforward process that ensures you have the latest features, bug fixes, and security updates. In a nutshell, you’ll need to check your current Java version, download the latest version from the official website, and then install it. This step-by-step guide will walk you through the process.
Updating Java on Windows 10 involves a few simple steps. By following these steps, you’ll ensure your system runs smoothly and securely with the latest version of Java.
Step 1: Check Your Current Java Version
First, open the Command Prompt and type java -version.
This step is crucial because it helps you determine which version of Java you currently have installed. Knowing this will help you decide if an update is necessary.
Step 2: Visit the Official Java Website
Go to the official Java website at java.com.
This is where you can download the latest version of Java. Always use the official site to avoid downloading malicious software.
Step 3: Download the Latest Java Version
Click on the «Download» button to get the latest version.
Make sure you download the correct version for your system architecture (32-bit or 64-bit). Most modern computers use the 64-bit version.
Step 4: Run the Installer
Once the download is complete, open the installer file.
Follow the on-screen instructions to install Java. It’s usually a matter of clicking «Next» a few times.
Step 5: Verify the Installation
After installation, open the Command Prompt again and type java -version.
This will confirm that the update was successful. The new version number should be displayed.
Once you’ve completed these steps, your Java version will be updated. Your computer will now benefit from the latest features and security improvements.
Tips for Updating Java on Windows 10
- Always download Java from the official website to avoid installing malware.
- Regularly check for Java updates to keep your system secure.
- If you encounter issues, try uninstalling the current version before installing the new one.
- Keep your system’s architecture in mind; download the 32-bit or 64-bit version accordingly.
- Restart your computer after installing Java to ensure all changes take effect.
Frequently Asked Questions
Why should I update Java?
Updating Java ensures you have the latest security patches, bug fixes, and performance improvements.
How do I know if I need to update Java?
You can check your current version by typing java -version in the Command Prompt and comparing it to the latest version on the Java website.
Can I uninstall the old version before updating?
Yes, uninstalling the old version can sometimes resolve issues during the update process.
Is it safe to update Java?
Yes, as long as you download the update from the official Java website.
Do I need to restart my computer after updating Java?
It’s a good idea to restart your computer to ensure all changes take effect properly.
Summary
- Check your current Java version.
- Visit the official Java website.
- Download the latest Java version.
- Run the installer.
- Verify the installation.
Conclusion
Updating Java on Windows 10 is essential for maintaining the security and performance of your system. By following the steps outlined in this guide, you’ll ensure that your computer runs the latest version of Java, complete with all the latest features and security patches. Regular updates help prevent vulnerabilities and improve functionality, making your computing experience smoother and more secure.
Make a habit of checking for updates periodically. Regular maintenance like this can save you from potential headaches down the line. And remember, always download software from official websites to keep your system safe from malicious programs. Now that you know how to update Java on Windows 10, go ahead and ensure your device is up to date!
Matt Jacobs has been working as an IT consultant for small businesses since receiving his Master’s degree in 2003. While he still does some consulting work, his primary focus now is on creating technology support content for SupportYourTech.com.
His work can be found on many websites and focuses on topics such as Microsoft Office, Apple devices, Android devices, Photoshop, and more.