
Фильтр SmartScreen в Windows 10, также, как и в 8.1 предотвращает запуск подозрительных, по мнению этого фильтра, программ на компьютере. В некоторых случаях эти срабатывания могут быть ложными, а иногда просто необходимо запустить программу, несмотря на ее происхождение — тогда может потребоваться отключить фильтр SmartScreen, о чем и пойдет речь ниже.
В инструкции описано три варианта отключения, поскольку фильтр SmartScreen работает отдельно на уровне самой ОС Windows 10, для приложений из магазина и в браузере Microsoft Edge. Заодно приведен способ решить проблему, заключающуюся в том, что отключение SmartScreen неактивно в настройках и его нельзя выключить. Также ниже вы найдете видео инструкцию.
Примечание: в Windows 10 последних версий 1903, 1809, 1803 и в версиях до 1703 SmartScreen отключается по-разному. В инструкции сначала описан способ для последней доступной версии системы, затем — для предыдущих.
Как отключить SmartScreen в Центре безопасности Windows 10
В последних версиях Windows 10 порядок отключения SmartScreen с помощью изменения параметров системы выглядит следующим образом:
- Откройте Центр безопасности Защитника Windows (для этого можно нажать правой кнопкой мыши по значку защитника Windows в области уведомлений и выбрать «Открыть», либо, если значка нет — открыть Параметры — Обновление и безопасность — Защитник Windows и нажать по кнопке «Открыть центр безопасности»).
- Справа выбрать пункт «Управление приложениями и браузером».
- Выключить SmartScreen, при этом отключение доступно для проверки приложений и файлов, фильтра SmartScreen для браузера Edge и для приложений из магазина Windows 10.


Также в новой версии видоизменились и способы отключения SmartScreen с помощью редактора локальной групповой политики или редактора реестра.
Отключение SmartScreen Windows 10 с помощью редактора реестра или редактора локальной групповой политики
В дополнение к способу с простым переключением параметров, отключить фильтр SmartScreen можно с помощью редактора реестра Windows 10 или в редакторе локальной групповой политики (последний вариант доступен только для редакций Pro и Enterprise).
Для отключения SmartScreen в редакторе реестра выполните следующие действия:
- Нажмите клавиши Win+R и введите regedit (после чего нажмите Enter).
- Перейдите к разделу реестра HKEY_LOCAL_MACHINE\ SOFTWARE\ Policies\ Microsoft\ Windows\ System
- Нажмите в правой части окна редактора реестра правой кнопкой мыши и выберите «Создать» — «Параметр DWORD 32 бита» (даже если у вас 64-битная Windows 10).
- Задайте имя параметра EnableSmartScreen и значение 0 для него (будет задано по умолчанию).

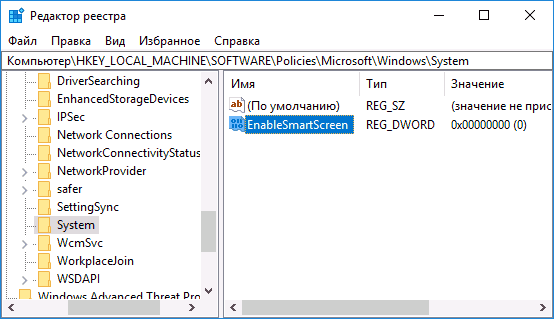
Закройте редактор реестра и перезагрузите компьютер, фильтр SmartScreen будет отключен.
Чтобы отключить SmartScreen также и для Microsoft Edge и приложений Windows 10, вы можете создать REG-файл со следующим содержимым и применить его к системе:
Windows Registry Editor Version 5.00

[HKEY_LOCAL_MACHINE\SOFTWARE\Microsoft\Windows\CurrentVersion\Explorer]

"SmartScreenEnabled"="Off"

[HKEY_CURRENT_USER\Software\Classes\Local Settings\Software\Microsoft\Windows\CurrentVersion\AppContainer\Storage\microsoft.microsoftedge_8wekyb3d8bbwe\MicrosoftEdge\PhishingFilter]

"EnabledV9"=dword:00000000

[HKEY_CURRENT_USER\Software\Microsoft\Windows\CurrentVersion\AppHost]

"EnableWebContentEvaluation"=dword:00000000
Если у вас Профессиональная или Корпоративная версия системы, сделать то же самое вы можете, используя следующие шаги:
- Нажмите клавиши Win+R и введите gpedit.msc чтобы запустить редактор локальной групповой политики.
- Перейдите в раздел Конфигурация компьютера — Административные шаблоны — Компоненты Windows — SmartScreen Защитника Windows.
- Там вы увидите два подраздела — Explorer и Microsoft В каждом из них имеется параметр «Настроить функцию SmartScreen защитника Windows».

- Нажмите дважды по указанному параметру и выберите «Отключено» в окне настройки. При отключении в разделе Explorer отключается проверка файлов в Windows, при отключении в разделе Microsoft Edge — отключается фильтр SmartScreen в соответствующем браузере.


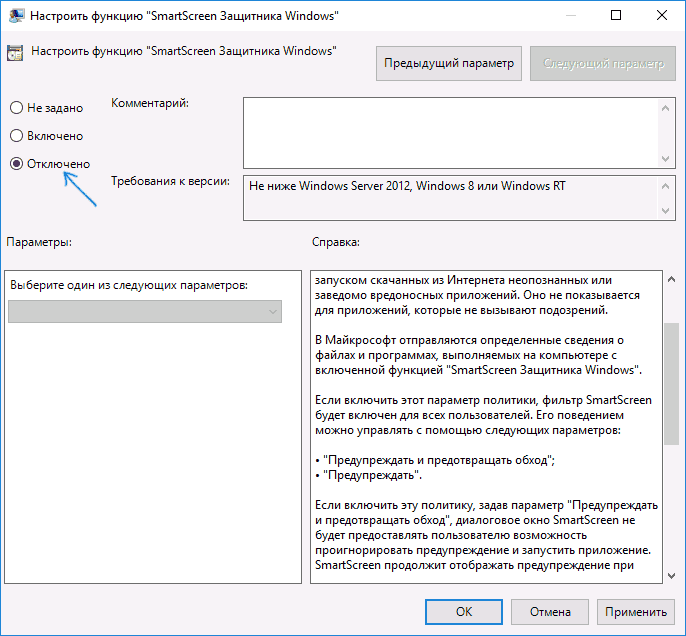
После изменения параметров закройте редактор локальной групповой политики, SmartScreen будет отключен.
Также вы можете использовать сторонние утилиты настройки Windows 10 для отключения SmartScreen, например, такая функция есть в программе Dism++.
Отключение фильтра SmartScreen в Панели управления Windows 10
Важно: способы, описанные далее, применимы для Windows 10 версий до 1703 Creators Update.
Первый способ позволяет отключить SmartScreen на уровне системы, т.е., например, он не будет срабатывать при запуске только что загруженных с помощью любого браузера программ.
Зайдите в панель управления, для этого в Windows 10 можно просто кликнуть правой кнопкой мыши по кнопке «Пуск» (или нажать Win+X), после чего выбрать соответствующий пункт меню.
В панели управления выберите пункт «Безопасность и обслуживание» (если включен вид «Категория», то «Система и безопасность» — «Безопасность и обслуживание». Затем слева нажмите «Изменение параметров Windows SmartScreen» (требуется быть администратором компьютера).
Для отключения фильтра, в окне «Что вы хотите делать с неопознанными приложениями» выберите пункт «Ничего не делать (отключить Windows SmartScreen)» и нажмите Ок. Готово.

Примечание: в случае, если в окне настроек SmartScreen Windows 10 все настройки неактивные (серые), то исправить ситуацию вы можете двумя способами:
- В редакторе реестра (Win+R — regedit) в разделе HKEY_LOCAL_MACHINE\ Software\ Policies\ Microsoft\ Windows\ System удалите параметр с именем «EnableSmartScreen». Перезагрузите компьютер или процесс «Проводник».
- Запустите редактор локальной групповой политики (только для Windows 10 Pro и выше, для запуска нажмите Win+R и введите gpedit.msc). В редакторе в разделе Конфигурация компьютера — Административные шаблоны — Компоненты Windows — Проводник кликните по параметру «Настроить Windows SmartScreen и задайте для него «Отключено». После применения, настройки через панель управления станут доступными (может потребоваться перезагрузка).
Выключаем SmartScreen в редакторе локальной групповой политики (в версиях до 1703)
Данный способ не подойдет для Windows 10 домашняя, поскольку указанный компонент отсутствует в этой версии системы.
Пользователи профессиональной или корпоративной версии Windows 10 могут отключить работу SmartScreen с помощью редактора локальной групповой политики. Для его запуска, нажмите клавиши Win+R на клавиатуре и введите gpedit.msc в окно «Выполнить», после чего нажмите Enter. Далее выполните следующие действия:
- Перейдите к разделу Конфигурация компьютера — Административные шаблоны — Компоненты Windows — Проводник.
- В правой части редактора дважды кликните по параметру «Настроить Windows SmartScreen».

- Задайте для параметра «Включено», а в нижней части — «Отключить SmartScreen» (см. скриншот).

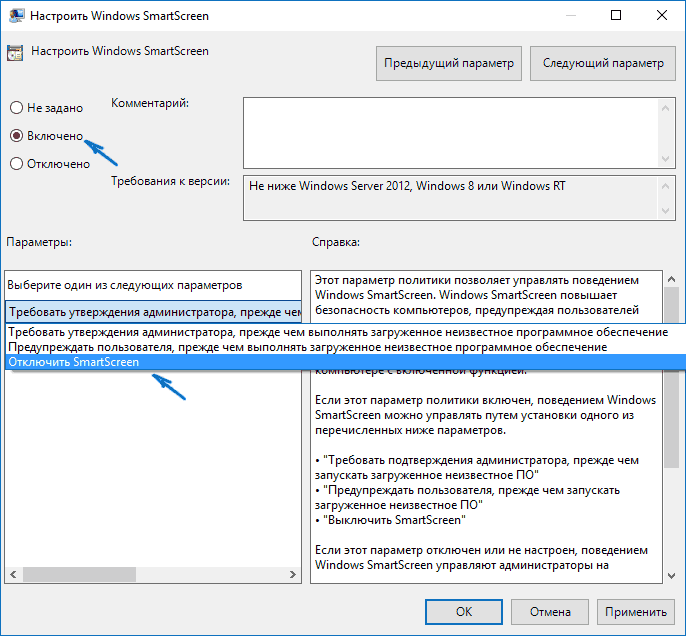
Готово, фильтр отключен, по идее, должно работать без перезагрузки, но может и потребоваться.
SmartScreen для приложений магазина Windows 10
Фильтр SmartScreen также отдельно работает и для проверки адресов, к которым обращаются приложения Windows 10, что в некоторых случаях может вызывать их неработоспособность.
Для того, чтобы отключить SmartScreen в данном случае, зайдите в Параметры (через значок уведомлений или с помощью клавиш Win+I) — Конфиденциальность — Общие.
В пункте «Включить фильтр SmartScreen для проверки веб-содержимого, которые могут использовать приложения из Магазина Windows» поставьте переключатель в положение «Откл.».

Дополнительно: то же самое можно сделать, если в реестре, в разделе HKEY_CURRENT_USER\ Software\ Microsoft\ Windows\ CurrentVersion\ AppHost установить значение 0 (ноль) для параметра DWORD с именем EnableWebContentEvaluation (при его отсутствии создать параметр DWORD 32 бита с этим именем).
Если вам также требуется отключить SmartScreen в браузере Edge (если вы им пользуетесь), то информацию вы найдете ниже, уже под видео.
Видео инструкция
В видео наглядно показано отключение фильтра SmartScreen в Windows 10 последних версий.
В браузере Microsoft Edge
И последнее местонахождение фильтра — в браузере Microsoft Edge. Если вы им пользуетесь и вам требуется отключить SmartScreen в нем, зайдите в Параметры (через кнопку в правом верхнем углу браузера).
Пролистайте параметры вниз до конца и нажмите кнопку «Показать доп. параметры». В самом конце дополнительных параметров имеется переключатель состояния SmartScreen: просто переключите его в положение «Отключено».
На этом всё. Отмечу лишь, что если ваша цель — запустить какую-то программу из сомнительного источника и именно для этого вы искали данное руководство, то это может нанести вред вашему компьютеру. Будьте осторожны, а программы скачивайте с официальных сайтов.
3 Ways To Disable SmartScreen Defender in Windows 10 PC – permanently and temporarily. Windows 10’s built-in feature is now called an antivirus defender, where this defender can detect viruses on your Windows computer and laptop.

Table of Contents
But many are complaining about this feature because according to him it is no longer useful considering there are still other antiviruses that have more optimal work than Windows Defender on Windows 10.
Read more:
- How to Activate Windows Defender on Windows 10
- How To Fix Windows 10 License Will Expire Soon
- Best Ways To Activate Windows 7 Permanently Offline
- Best Tricks To Activate Windows 8 Permanently Offline
Maybe I can help you in turning off this Windows Defender antivirus. Previously I just wanted to review a little about what is Windows Defender and the function of the antivirus.
Understanding Windows Defender Antivirus Applications
Understanding Windows Defender is a feature to maximize the performance of laptops and computers that have the Windows 10 operating system installed. Windows 10 itself has several variants including the pro and home versions. Both versions are both used in the Windows operating system that you are using now.
Windows Defender function
Windows 10 security center you can imagine as the default Windows itself. The purpose of this antivirus is made so that it can protect against all computer threats in the form of viruses, but the default Windows antivirus is not as maximum as other anti-viruses, where you can only check and know even a mild virus can not detect the presence of trojan viruses, ransomware and so on.
I usually use the function of Windows Defender only to monitor whether the file manager, host, or system32 folder there is a dangerous virus or not even though it only detects a little but is still light to use.
Other functions you can know like seeing if there are the latest Windows updates, virus scans, folder scans, and so on, you can see yourself in the latest Windows Defender when running your Windows on a laptop …
But some people assume that Windows Defender is only burdensome at startup (when booting) because it will work when the laptop or computer is turned on to process the scanning of files for your benefit when opening the computer/laptop.
Well, therefore I made a tutorial on how to disable the Windows Defender Security Center in Windows 10. I will divide the two ways in handling this case, it can be said to be permanent and only by temporarily shutting down (when the startup will be active again)
By shutting down Windows 10 antivirus you can install virus-detected software even though the software is not a virus (it could be said to be a dangerous file). For example, such as when you are looking for a keygen for activation of Adobe and Corel services, then you can read it and the following reviews for you.
How to Disable Windows Antivirus on Windows 10
Removing an active system will occur several obstacles including the laptop there will be no update notification about the Defender application and including you will not be supported directly by Microsoft. But don’t worry friend, you can still use the device safely, you can change the anti-virus to another option.
Anti-virus which in my opinion is very helpful is avg tuneup, avast, asset, and Smadav. The choice depends on which you want to use from the third category I mentioned earlier. Remember, friend, never install too much antivirus so as not to burden the device system. For those of you who can’t wait to get to the core of how to disable Windows Defender Win 10, please refer to the following.
#1. Temporarily turn off Windows Defender
The first step on how to disable antivirus on Windows 10 is only to anticipate if you want to install pirated applications that require using Keygen. If you are confused about the default Windows antivirus display, you can follow the steps below.
First, prepare a laptop that has been turned on, friend, then you can select Start Menu -> Type Defender -> Click Windows Defender / Directly Enter.
Second, after entering it will look like this, then select the Virus & Threat Protection menu.

Third, if you have changed the appearance as below you can click on the Virus & Threat Protection Settings menu to solve the problem of disabling Windows Defender.
Fourth, after entering the menu will appear as below, point your cursor to the blue deactivation icon/button in the real-time protection text.
A notification will appear that you want to turn off in the Windows Defender application if asked to select Yes or No, select Yes only. Turn it off until it turns gray.

After that, what do you want to install, now you can install programs like Keygen. So, whether deactivating Windows Defender above can help you? If not, please use the next method.
#2. Permanently Turn Off Windows Defender Via Group Policy
This second tutorial has indeed been turned off forever even though your device is restarting. It’s different from temporarily deactivating it will still run again if the laptop/ computer is restarted and restarted. Following the tutorial on disabling the protection feature.
a. Open the start menu or press the Windows key on your keyboard.
b. Then type it like this: gpedit.MSC then press enter.
c. Then there will be a UAC prompt, you can confirm it by pressing Yes.
d. After that, point the cursor to choose Local Computer Policy -> Computer Configuration -> Administrative Templates -> Windows Components -> Windows Defender SmartScreen -> Microsoft Edge -> Configure Windows Defender SmartScreen.
Read more: How to Activate Windows 10 Permanently
e. Then turn off the defender by pressing the Disabled button. Selecting disabled means that you will not receive real-time protection.
f. After that, click Apply and then OK, if you don’t believe this is a permanent method, please just check on Windows Defender, there must be dead real-time protection or you can restart it first, then check.
#3. Using the Registry Editor
If you have not succeeded in disabling the antivirus application above, you can disable it via the registry editor. Just a reminder that using a registry editor is very risky, so don’t blame me if this method doesn’t work.
1. Press the Windows key on your keyboard to open the Start menu, then type the word regedit.exe and then press enter.
2. The next step appears in a confirmation window, please click Yes.
3. Move your cursor to select HKEY_LOCAL_MACHINE -> SYSTEM -> CurrentControlSet -> Services -> SecurityHealthService. Next, you can find the right Start key. If you don’t find the option as drawn, double-click on the SecurityHealthService folder.

4. Then click the preference twice, change the value data value to 4 then click OK, then restart your computer or laptop to feel the Windows Defender is not active.
For those of you who want to revive it, you can change the value data to number 2 again then reload your computer or laptop.
Those are the three steps to turn off Microsoft’s default antivirus program, friend, if you use methods number 2 and 3, be careful, friend, because it is not certain that your device will not even work and your device will crash instead.
Thus my review of the world of laptops and computers with an interesting discussion, that way you will no longer have the name of the Windows Defender application active again when using the permanent method but if you still use the temporary method only when the laptop/computer is on.
Read more:
- How to Fix Windows Script Host Disabled In Windows PC
- The Best Antivirus Software to Protect Windows 10 PCs
- How to Remove and Clean a Virus on a Windows 10 Laptop
Conclusion:
I have ended up here about the review if there are questions you can comment below. Thank you for reading my article about how to turn off the Windows Defender application on Windows 10 temporarily and permanently.
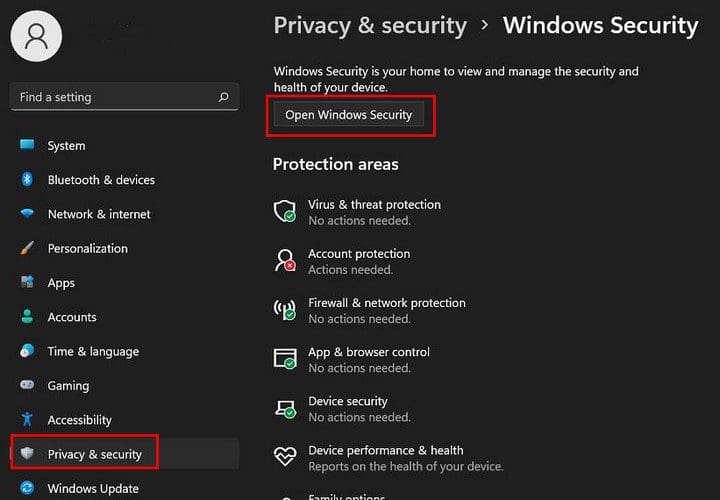
Turning off Microsoft Defender SmartScreen on Windows 10 is a straightforward task. Here’s a quick overview: Open the Windows Security app, navigate to the App & Browser Control settings, and toggle off the SmartScreen features. This will disable SmartScreen for apps, files, and web content.
Step-by-Step Tutorial: How to Turn Off Microsoft Defender SmartScreen Windows 10
In this tutorial, you’ll learn how to disable Microsoft Defender SmartScreen, a feature that helps protect your PC from malicious sites and downloads. Follow these easy steps to turn it off.
Step 1: Open Windows Security
Open the Start menu and type “Windows Security,” then click on the Windows Security app.
The Windows Security app is the central hub for managing your PC’s security settings. It houses various features, including virus protection, firewall settings, and more.
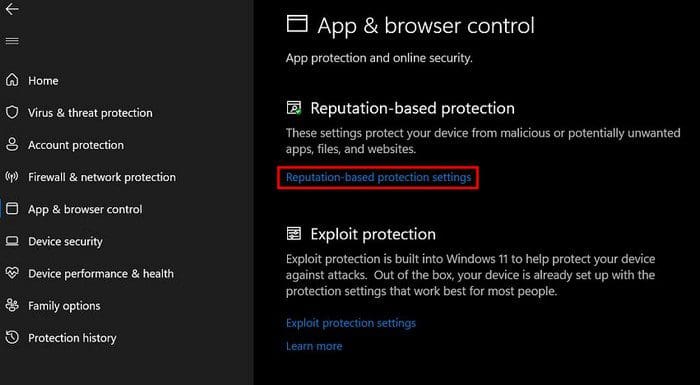
Step 2: Go to App & Browser Control
In the Windows Security app, look for the “App & Browser Control” option and click on it.
The App & Browser Control section is where you can manage settings for SmartScreen. This feature checks web content and downloads for potential threats.
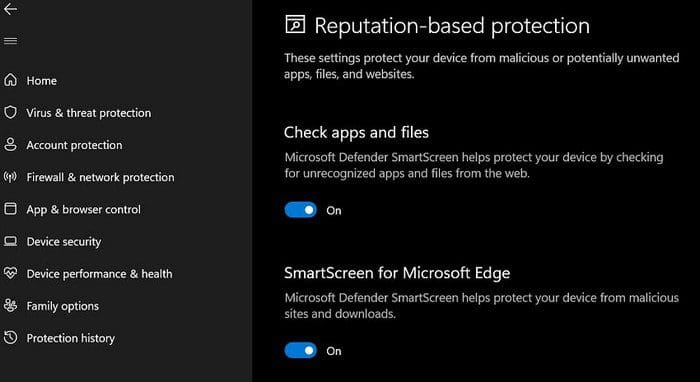
Step 3: Turn Off SmartScreen for Apps and Files
Under the Check apps and files section, toggle the option to “Off.”
When you turn off this setting, SmartScreen will no longer check downloaded files or apps for potential threats. Be cautious, as this may expose your system to risks.
Step 4: Turn Off SmartScreen for Microsoft Edge
Scroll down to the SmartScreen for Microsoft Edge section and toggle the option to “Off.”
Disabling this feature will stop Edge from checking websites you visit for malicious content. Again, this increases the risk of encountering harmful sites, so be careful.
Step 5: Turn Off SmartScreen for Microsoft Store Apps
Scroll down further to the SmartScreen for Microsoft Store apps section and toggle the option to “Off.”
Finally, turning off this setting will stop SmartScreen from checking the apps you download from the Microsoft Store. Like the previous steps, this can make your system more vulnerable to threats.
After completing these steps, Microsoft Defender SmartScreen will be disabled. Your system will no longer check files, apps, or web content for potential threats, which can increase your exposure to risks.
Tips for Turning Off Microsoft Defender SmartScreen Windows 10
- Evaluate Risks: Consider the reasons for turning off SmartScreen. If it’s for a specific task, you can turn it back on afterward for enhanced security.
- Use Alternative Protection: If you disable SmartScreen, ensure you have other security measures in place, like third-party antivirus software.
- Keep Software Updated: Make sure all your software and apps are up-to-date to mitigate risks when SmartScreen is off.
- Be Cautious Online: Avoid downloading files from untrusted sources or visiting suspicious websites.
- Regular Scans: Run regular security scans to check for viruses and malware, especially if SmartScreen is disabled.
Frequently Asked Questions
What is Microsoft Defender SmartScreen?
Microsoft Defender SmartScreen is a security feature that helps protect your computer by checking websites and downloads for potential threats.
Is it safe to disable SmartScreen?
Disabling SmartScreen can expose your system to risks, so it’s essential to have other security measures in place.
Can I turn SmartScreen back on after disabling it?
Yes, you can easily turn SmartScreen back on by following the same steps and toggling the settings to “On.”
Does turning off SmartScreen affect other security features?
No, turning off SmartScreen only disables that specific feature. Other security features in Windows Security will remain active.
Why would I need to turn off SmartScreen?
Some users turn off SmartScreen to prevent false positives or to allow the installation of apps and files that SmartScreen blocks.
Summary
- Step 1: Open Windows Security
- Step 2: Go to App & Browser Control
- Step 3: Turn Off SmartScreen for Apps and Files
- Step 4: Turn Off SmartScreen for Microsoft Edge
- Step 5: Turn Off SmartScreen for Microsoft Store Apps
Conclusion
Turning off Microsoft Defender SmartScreen on Windows 10 can be necessary for specific situations but should be done with caution. The steps outlined above are straightforward and easy to follow, allowing you to disable SmartScreen in just a few clicks. Remember, while disabling SmartScreen can help you bypass some restrictions, it also exposes your system to potential threats. It’s crucial to consider the risks and ensure you have other security measures in place.
For further reading, explore Microsoft’s official documentation on Windows Security features and stay informed about the latest in cybersecurity. If you found this guide helpful, don’t hesitate to share it with others who might benefit from learning how to turn off Microsoft Defender SmartScreen Windows 10. Stay safe and secure!
Matt Jacobs has been working as an IT consultant for small businesses since receiving his Master’s degree in 2003. While he still does some consulting work, his primary focus now is on creating technology support content for SupportYourTech.com.
His work can be found on many websites and focuses on topics such as Microsoft Office, Apple devices, Android devices, Photoshop, and more.
In Windows 11, you’ll see a program called SmartScreen. It’s there to keep your computer safe. When you use Microsoft Edge, it’s automatically enabled to warn you when you enter a site where you could be a victim of phishing or that the site isn’t safe. But, if it’s something you want to disable, you’ll see the steps to do so later on.
Contents
- 1 What Does SmartScreen Do?
- 2 How to Turn off SmartScreen in Windows 11
- 2.1 How to Turn On or off SmartScreen Through Internet Properties
- 2.2 How to Turn Off/on SmartScreen on Edge Browser
- 2.3 Conclusion
What Does SmartScreen Do?
Before you turn it off, it’s best to know what it does. If, after finding out what it does and you still want to turn it off, you can continue to the next section. Besides the previously mentioned, SmartScreen will show you a warning message that the site is not safe and will give you the options to continue or to go back. It will do the same thing with the downloads.
SmartScreen has a list that compares the sites you visit. If it’s on the list of the dangerous ones, that’s when you’ll see the warning message. The good news is that you can customize SmartScreen to inspect apps/files that are not recognized.
It goes a little further than that since it can also protect you from apps on the Microsoft Store that aren’t ranked very high and that have caused other users issues. But, you might still want to disable it since maybe it’s blocking trustworthy apps, which you don’t have to deal with if you turn it off. If you still want to disable it, follow these steps.
How to Turn off SmartScreen in Windows 11
The Easiest way:
Since you have more important things to do, here is the fastest way to turn off the SmartScreen feature. You’ll need to go into Settings. You can access Settings using your preferred method or press the Windows and I keys.
Once you are in Settings, click on Privacy and Security, followed by Windows Security. Click on the Open Windows Security option at the top, and then click on the App and browser control tab that’ll be to your left.
Look for a section called Reputation-based protection. Beneath that section, click on its Settings.
Here you’ll see all the different filters you can disable or enable. Look through them and simply toggle them on or off. Make sure to carefully read the description below them to see if that’s what you want to turn off. That’s all there is to it. You can go back and make any changes by following these steps.
How to Turn On or off SmartScreen Through Internet Properties
Note: If you are running on a newer version of Windows, you might now have the option to do the following steps.
If turning off the Windows Defender SmartScreen is easier by going through the Internet Properties, here are the following steps.
- Open Run ( Win + R)
- Type Control
- Click OK (Control Panel will open)
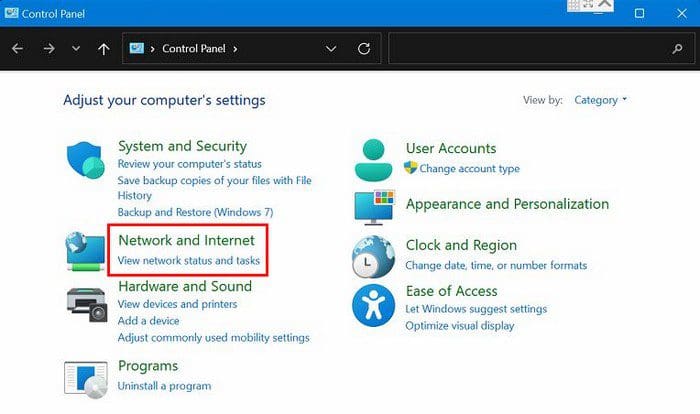
- Network and Internet
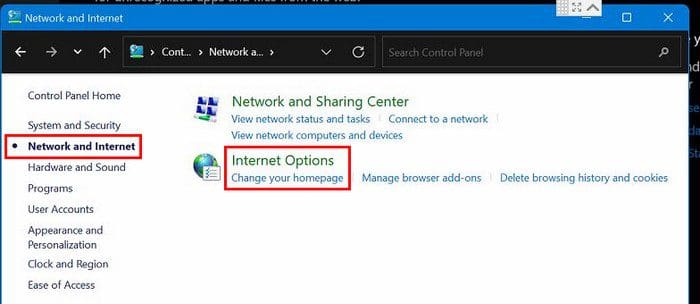
- Internet Options
- Advanced Tab
- Go to the Security Section
- Uncheck Enable Windows Defender SmartScreen
- Click Apply and then OK
How to Turn Off/on SmartScreen on Edge Browser
You also have the option of turning it off in the Microsoft Edge Browser. You can do this by following these steps. Go to Settings by clicking on the dots at the top right.
Go to Privacy, search, and services (it’ll be on your left side). Go to the Security section, where you should find the option to turn off or on the Microsoft Defender SmartScreen option.
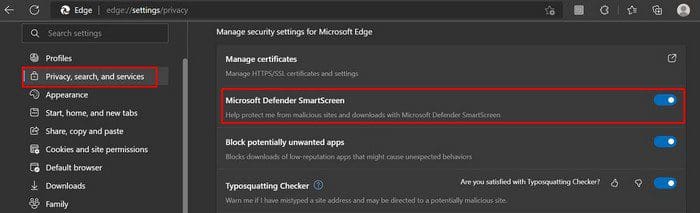
Keep in mind that if you turn it on in the future, don’t forget to enable the Block potentially unwanted apps option.
Conclusion
The Windows Defender SmartScreen is very useful, but when it starts to block trustworthy apps, it makes you think if it’s worth keeping enabled. By following these steps, you can turn it off when you want or back on. You also have the steps to turn off this program on the Edge browser as well. How useful do you think it is? Share your thoughts in the comments below, and don’t forget to share the article with others on social media.
In today’s digital landscape, cybersecurity has become an increasingly important concern for individuals and businesses alike. One such security feature that comes built-in with Windows 11 is Microsoft Defender Smartscreen. However, there may be instances where you need to turn off this feature temporarily or permanently for various reasons. So, how can you turn off Microsoft Defender Smartscreen in Windows 11?
Turning off Microsoft Defender Smartscreen in Windows 11 is a straightforward process that can be done within a few clicks. By disabling this feature, you gain more control over your browsing experience and can install applications or visit websites that may be flagged by Smartscreen. It is important to make an informed decision and weigh the potential risks before proceeding with the steps to turn off Smartscreen.
Disabling Microsoft Defender Smartscreen on Windows 11 is a simple process that can help you customize your security settings. Here’s a step-by-step guide:
- Open the Start menu and click on «Settings».
- Select «Update & Security».
- Choose «Windows Security» from the left panel.
- Click on «App & browser control».
- Under «Check apps and files», select «Off» for Microsoft Defender SmartScreen.
By following these steps, you can easily turn off Microsoft Defender Smartscreen on Windows 11 and adjust your security preferences as needed.

Introduction — Understanding Microsoft Defender Smartscreen on Windows 11
Microsoft Defender Smartscreen is a built-in feature in Windows 11 that acts as a line of defense against potential threats from malicious websites, files, and downloads. It analyzes the reputation of websites and files in real-time, helping to protect users from phishing attempts, malware, and other security risks. While this feature is designed to enhance the security of your system, there may be instances where you need to turn off Microsoft Defender Smartscreen on Windows 11.
Method 1: Using Windows Security App
To turn off Microsoft Defender Smartscreen using the Windows Security app:
- Open the Start menu and search for «Windows Security.»
- Click on the «Windows Security» app to open it.
- In the Windows Security app, click on «App & browser control» in the left-hand menu.
- Scroll down to the «Reputation-based protection» section and click on «Edit» under «Check apps and files.»
- Toggle the switch off to disable Microsoft Defender Smartscreen.
Note: Disabling Microsoft Defender Smartscreen
It’s important to note that disabling Microsoft Defender Smartscreen can potentially increase the risk of downloading and installing malicious files and visiting unsafe websites. It is recommended to only disable Smartscreen temporarily if you are confident in the source of the files or websites you are accessing. Make sure to re-enable it once you have completed the desired tasks.
Method 2: Group Policy Editor
Another way to turn off Microsoft Defender Smartscreen is by using the Group Policy Editor:
- Press the Windows key + R to open the Run dialog box.
- Type «gpedit.msc» and press Enter to open the Group Policy Editor.
- In the Group Policy Editor, navigate to «Computer Configuration» > «Administrative Templates» > «Windows Components» > «Microsoft Defender Antivirus» > «Windows Defender Smartscreen.»
- Double-click on «Configure Windows Defender Smartscreen» on the right-hand side.
- Select «Disabled» and click «OK» to turn off Microsoft Defender Smartscreen.
Note: Group Policy Editor
The Group Policy Editor is only available in Windows 11 Pro, Enterprise, and Education editions. If you are using Windows 11 Home, this method may not be applicable.
Method 3: Registry Editor
Modifying the Registry Editor can also help in turning off Microsoft Defender Smartscreen:
- Press the Windows key + R to open the Run dialog box.
- Type «regedit» and press Enter to open the Registry Editor.
- In the Registry Editor, navigate to the following path:
HKEY_LOCAL_MACHINE\SOFTWARE\Policies\Microsoft\Windows\System - Create a new key by right-clicking on the «System» folder and selecting «New» > «Key.» Name the new key as «AppHost» (without the quotes).
- Right-click on the «AppHost» folder that you just created and select «New» > «DWORD (32-bit) Value.» Name the new value as «EnableSmartScreen» (without the quotes).
- Set the value of «EnableSmartScreen» to 0 to turn off Microsoft Defender Smartscreen.
Note: Registry Editor
Modifying the Registry Editor is a sensitive task that can potentially cause system instability if not performed correctly. It is recommended to create a backup of your registry or consult with a professional before making any changes.
Method 4: PowerShell Command
If you prefer using PowerShell, you can turn off Microsoft Defender Smartscreen with a simple command:
- Open PowerShell with administrative privileges. You can do this by right-clicking on the Start menu and selecting «Windows PowerShell (Admin).»
- Enter the following command to turn off Microsoft Defender Smartscreen:
Set-MpPreference -DisableScriptScanning $true - Press Enter to execute the command.
Note: PowerShell Commands
Using PowerShell commands requires administrative privileges. Make sure to use these commands carefully, as they directly affect system settings.
Exploring Advanced Options
While the methods mentioned above focus on how to turn off Microsoft Defender Smartscreen on Windows 11, it’s essential to understand the potential implications of disabling this feature. Microsoft Defender Smartscreen provides an additional layer of protection against potential threats, and it is recommended to keep it enabled unless you have a specific need to disable it.
Why Disable Microsoft Defender Smartscreen?
There are a few scenarios where disabling Microsoft Defender Smartscreen could be necessary:
- Compatibility Issues: Certain applications or files may trigger false positives with Microsoft Defender Smartscreen, blocking their execution or causing unnecessary alerts. Disabling Smartscreen temporarily can bypass these compatibility issues.
- Trustworthy Sources: If you are downloading files or visiting websites from trusted sources, where the risk of encountering malicious content is minimal, you may choose to disable Microsoft Defender Smartscreen temporarily to streamline your workflow.
- Incompatible Downloads: In some cases, legitimate downloads from specialized software or development platforms may trigger Smartscreen warnings. Disabling it can prevent unnecessary interruptions during installations or updates.
It’s important to exercise caution and only disable Microsoft Defender Smartscreen when necessary. Regularly reviewing and updating the security settings of your system is crucial to maintain a secure computing environment.
Keeping Your System Secure
While disabling Microsoft Defender Smartscreen may provide temporary convenience or resolve specific issues, it’s crucial to remember that it removes an extra layer of protection from potential threats. To ensure the security of your Windows 11 system:
- Keep Your System Updated: Regularly update your operating system, drivers, and applications to protect against known vulnerabilities.
- Use Reliable Security Software: Install a reputable antivirus program or security suite to provide comprehensive protection against a wide range of threats.
- Practice Safe Browsing: Be cautious when visiting websites and avoid downloading files from untrustworthy sources. Stay vigilant against phishing attempts and suspicious emails.
- Enable Additional Security Features: Familiarize yourself with other security features in Windows 11, such as Windows Defender Firewall and Windows Defender SmartScreen for Microsoft Edge.
By following these best practices and utilizing the built-in security features of Windows 11, you can maintain a secure and protected computing environment.

Disabling Microsoft Defender Smartscreen on Windows 11
If you’re looking to disable Microsoft Defender Smartscreen on your Windows 11 system, here’s a simple guide to help you:
Method 1: Using Windows Security Settings
1. Open the Start menu, search for «Windows Security,» and click on it.
2. In the Windows Security app, click on «App & Browser control» in the left sidebar.
3. Under the «Check apps and files» section, click on «Off» for the «SmartScreen for Microsoft Edge» and «SmartScreen for Microsoft Store apps» options.
Method 2: Using Registry Editor
1. Press Windows + R to open the Run dialog box. Type «regedit» and press Enter to open the Registry Editor.
2. Navigate to the following path: HKEY_LOCAL_MACHINE\SOFTWARE\Microsoft\Windows\CurrentVersion\Explorer.
3. In the right pane, find the «SmartScreenEnabled» value and double-click on it.
4. Change the value data to «0» and click OK.
Method 3: Using Group Policy Editor
1. Press Windows + R to open the Run dialog box. Type «gpedit.msc» and press Enter to open the Group Policy Editor.
2. Navigate to the following path: Computer Configuration > Administrative Templates > Windows Components > Microsoft Defender SmartScreen.
3. Double-click on «Turn off Microsoft Defender SmartScreen» in the right pane.
4. Select «Enabled» and click OK.
Key Takeaways — How to Turn off Microsoft Defender Smartscreen Windows 11:
- Open Windows Security by clicking on the Start button and selecting «Settings.»
- In the Settings app, click on «Privacy & security» and then select «Windows Security.»
- Click on «App & browser control» and then click on «Reputation-based protection settings.»
- Under the «Check apps and files» section, toggle off the switch for «SmartScreen for apps and files.»
- Confirm the action by clicking on «Yes» in the User Account Control prompt.
Frequently Asked Questions
Here are some commonly asked questions about turning off Microsoft Defender Smartscreen in Windows 11.
1. Can I disable Microsoft Defender Smartscreen in Windows 11?
Yes, you can disable Microsoft Defender Smartscreen in Windows 11. However, it is important to note that disabling this feature may put your system at risk as it helps protect against potentially harmful websites and downloads. Proceed with caution.
To turn off Microsoft Defender Smartscreen in Windows 11, follow these steps:
1. Go to the Start menu and click on «Settings».
2. In the Settings window, click on «Privacy & Security».
3. Under the «Windows Security» section, click on «Open Windows Security».
4. In the Windows Security window, click on «App & browser control».
5. Scroll down and click on «Off» under the «Check apps and files» section.
Please keep in mind that disabling Microsoft Defender Smartscreen is not recommended unless you have an alternative security solution in place.
2. Will turning off Microsoft Defender Smartscreen affect my computer’s security?
Yes, turning off Microsoft Defender Smartscreen can affect your computer’s security. Smartscreen is designed to help protect your system from potentially harmful websites and downloads by checking them against a database of known threats. Disabling this feature may make your computer more vulnerable to malware and other security risks.
3. Can I turn off Microsoft Defender Smartscreen for specific apps or files?
No, it is not possible to turn off Microsoft Defender Smartscreen for specific apps or files. The feature is designed to provide system-wide protection against potentially harmful content and does not have granular control for individual applications or files.
4. How can I re-enable Microsoft Defender Smartscreen in Windows 11?
To re-enable Microsoft Defender Smartscreen in Windows 11, follow these steps:
1. Go to the Start menu and click on «Settings».
2. In the Settings window, click on «Privacy & Security».
3. Under the «Windows Security» section, click on «Open Windows Security».
4. In the Windows Security window, click on «App & browser control».
5. Scroll down and click on «Warn» or «Block» under the «Check apps and files» section.
By selecting «Warn» or «Block», you can enable Microsoft Defender Smartscreen again.
5. Are there any alternative security solutions I can use instead of Microsoft Defender Smartscreen?
Yes, there are alternative security solutions available that you can use instead of Microsoft Defender Smartscreen. Some popular options include third-party antivirus software such as Malwarebytes, Norton, or Avast. These programs offer additional features and protection beyond what Microsoft Defender provides. However, it’s important to thoroughly research and choose a reputable security software that meets your specific needs.
In conclusion, disabling Microsoft Defender SmartScreen on Windows 11 is a straightforward process that can be done through the Windows Security settings. By following a few simple steps, users can choose to turn off this feature if they prefer to rely on alternative security measures or if they find it unnecessary for their browsing activities.
Remember that disabling Microsoft Defender SmartScreen may decrease the level of protection against potentially harmful websites and downloads. It is important to ensure that alternative security measures are in place to protect your computer from threats and malicious content. Always exercise caution and only browse or download from trusted sources to keep your system secure.