
This tutorial is going to show you 3 ways to log into Linux server on Windows via SSH.
What’s SSH?
SSH stands for Secure Shell, which was invented in 1995 to replace the insecure Telnet (Telecommunication Network). It’s now the primary way for system administrators to securely log into remote Linux servers over the public Internet. Although it looks and acts the same as Telnet, all communications over the SSH protocol is encrypted to prevent packet sniffing.
If you are running a Linux or Mac computer, SSH client is installed by default. You can open up a terminal window and run the ssh command like below to connect to a remote Linux server.
ssh [email protected]
Now let’s discuss how to use SSH on Windows.
Method 1: Windows 10’s Built-in SSH Client
The Microsoft PowerShell team decided to port OpenSSH (both the client and the server) to Windows in 2015. It finally arrived in Windows 10’s Fall Creator Update in 2017 and is enabled by default in the April 2018 Update.
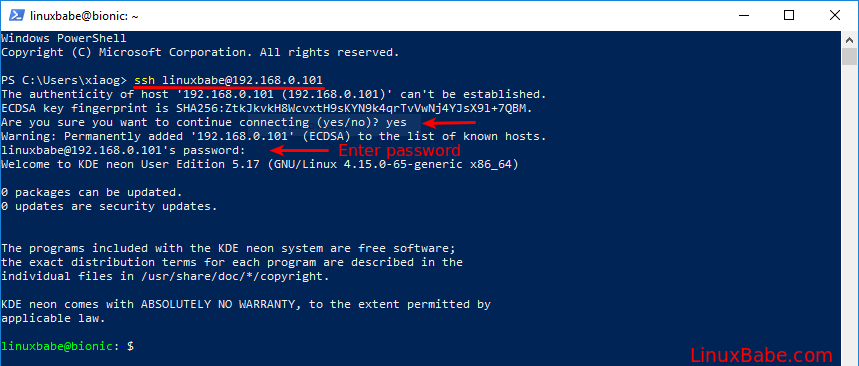
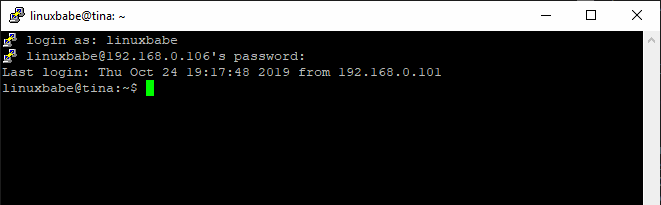
To use the OpenSSH client on Windows 10, simply open a PowerShell window or a command prompt window and run the ssh command. For example, if I want to connect to my Ubuntu desktop in the LAN, I would run
ssh [email protected]
linuxbabe is the username on my Ubuntu desktop and 192.168.0.101 is the private IP address for my Ubuntu desktop. The first time you connect to a Linux computer, you will be prompted to accept the host key. Then enter your password to login. After login, you can run Linux commands to do administrative tasks.
Note that if you want to paste a password into the PowerShell window, you need to right-click the mouse and press Enter.
To log out from the Linux box, run the exit command or press Ctrl+D.
The default font size in PowerShell Window is very small. To change it, right-click the titlebar and select properties, then you can change the font size, and the background color.

Method 2: Use SSH in Windows Subsystem for Linux
Windows Subsystem for Linux (WSL) enables you to run native Linux command-line tools directly on Windows 10. If you are a system administrator, WSL is probably an overkill for just using SSH because it would install and run a Linux distro (without graphical user interface) on your Windows 10 desktop. WSL is created for web developers or those who need to work on open-source projects. You can use not only SSH but also other Linux command line tools (Bash, sed, awk, etc).
Open the Microsoft Store and enter WSL in the search box. Select Run Linux on Windows and install a Linux distro of your choice.
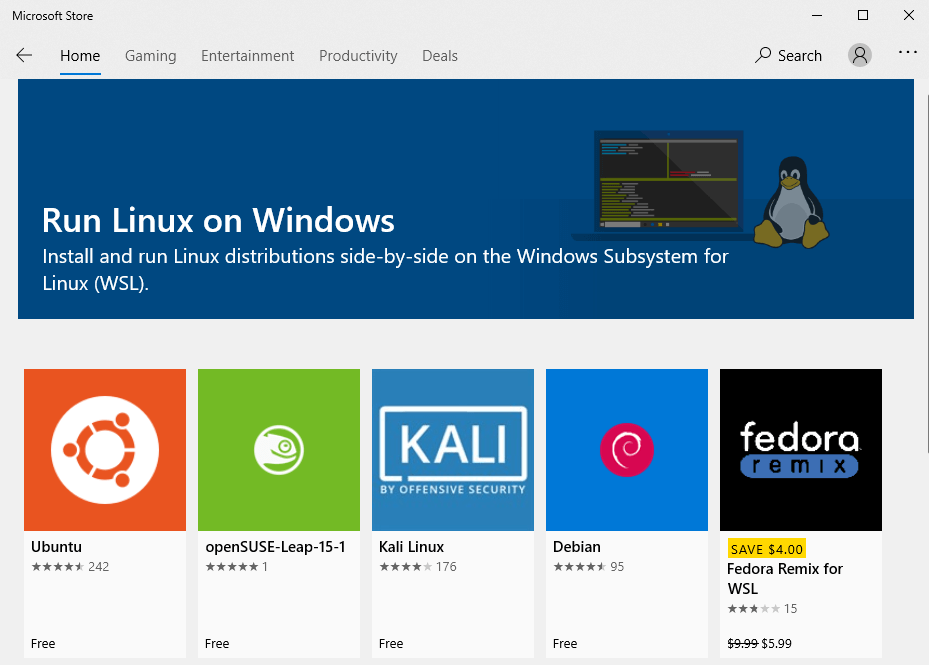
For example, I choose Ubuntu and click the Get button to install it.

Once your Linux distro is installed, open the Control Panel and select Programs -> Turn Windows features on or off. Tick on the checkbox of Windows Subsystem for Linux to enable this feature. (You may need to reboot your Windows PC for this change to take effect.)
Next, you can launch the Linux distro from the start menu by search the distro’s name. The first time you launch it, you need to create a user and set a password.
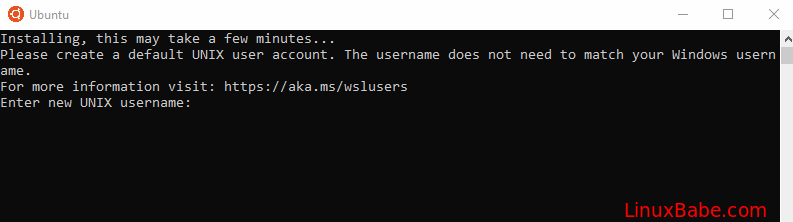
After that, you can use the ssh command like below to connect to a Linux server or PC that runs a SSH server.
ssh [email protected]
Method 3: Use Putty
Putty is a well-known and the most popular SSH client on Windows before the arrival of Windows OpenSSH client and Windows Subsystem for Linux. To use SSH with Putty, you need to download the Putty program from the official website and install it.
Launch Putty from the Start menu. Then enter the IP address or hostname of the Linux box and click the Open button to connect to it.
Accept the host key and you will be prompted to enter the username and password.
Please note that when you type in your password, the cursor doesn’t move, but it’s actually accepting your password. To paste text into Putty, first press Ctrl+C to copy the text, then go to Putty window and press the right button of your mouse.
How to Set Up SSH Key on Windows 10 (Optional)
There’re mainly two ways of authenticating user login with OpenSSH server:
- password authentication
- public-key authentication: also known as passwordless SSH login because you don’t need to enter your password.
To set up public-key authentication on Windows 10, follow the instructions below.
Open Windows Powershell, and run the following command to generate SSH keypair.
ssh-keygen -t rsa -b 4096
Where:
-tstands fortype. The above command generates an RSA type keypair. RSA is the default type.-bstands forbits. By default, the key is 3072 bits long. We use a 4096 bits key for stronger security.
When asked which file to save the key, you can simply press Enter to use the default file. Next, you can enter a passphrase to encrypt the private key, but you will need to enter this passphrase every time when you log into the Linux server. If you don’t want it, you can press Enter, so it will have no passphrase.

- The private key (your identification) will be saved in the .ssh/id_rsa file under your user directory.
- The public key will be saved in the .ssh/id_rsa.pub file.
Now we need to upload the public key to remote Linux server. You can display the public key in the Powershell with the following command.
cat .ssh/id_rsa.pub
Then log in to your server via password authentication, and run the following command to create a .ssh directory under your home directory.
sudo mkdir ~/.ssh
Create the authorized_hosts file
sudo nano ~/.ssh/authorized_keys
Copy your SSH public key and paste it to this file. Save and close the file. To save a file in Nano text editor, press Ctrl+O, then press Enter to confirm. To close a file, press Ctrl+X.
Next, change the permission of this file.
sudo chmod 600 ~/.ssh/authorized_keys
Log out of your Linux server.
exit
Now you can SSH into your server without entering a password.
Next Step
I hope this article helped you use SSH on Windows. You might also want to protect SSH service from hacking, I recommend setting up public-key authentication or two-factor authentication.
- 2 Simple Steps to Set up Passwordless SSH Login on Ubuntu
- Set Up SSH Two-Factor Authentication (2FA) on Ubuntu Server
Also, you can enable automatic security updates on your Linux server to patch vulnerabilities.
- Set Up Automatic Security Update (Unattended Upgrades) on Ubuntu
If you want FTP access to the Ubuntu server, you can set up pure-FTPd server.
- How to Set Up a Secure FTP Server with Pure-FTPd on Ubuntu
As always, if you found this post useful, then subscribe to our free newsletter to get more tips and tricks. Take care 🙂

Secure Shell (SSH) is a widely used protocol for securely connecting to remote servers. If you’re using Windows to connect to a Linux server, there are several methods available.
In this guide, I’ll walk you through three popular methods on how to SSH from Windows to Linux: Bitvise, Putty, and the Windows Command Line.
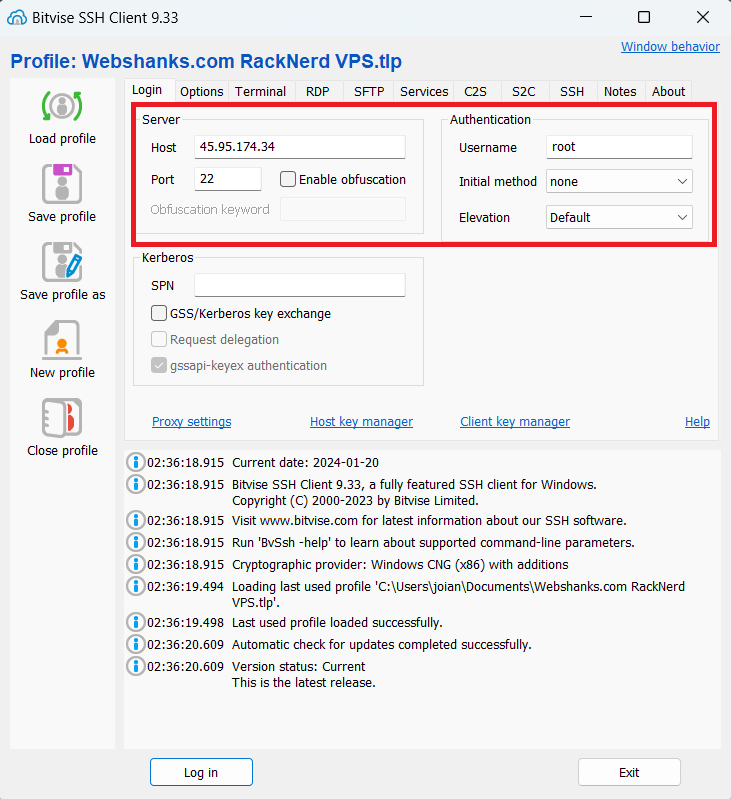
Method 1: Bitvise SSH Client
This is my favorite method how to SSH from Windows to Linux!
1. Download and Install Bitvise SSH Client:
Visit the Bitvise official website and download the Bitvise SSH Client for Windows
Run the installer and follow the on-screen instructions to install the Bitvise SSH Client.
2. Launch Bitvise SSH Client:
Open Bitvise SSH Client after installation.
Enter the IP address or hostname of your Linux server in the Host field.
Specify the SSH port (default is 22).
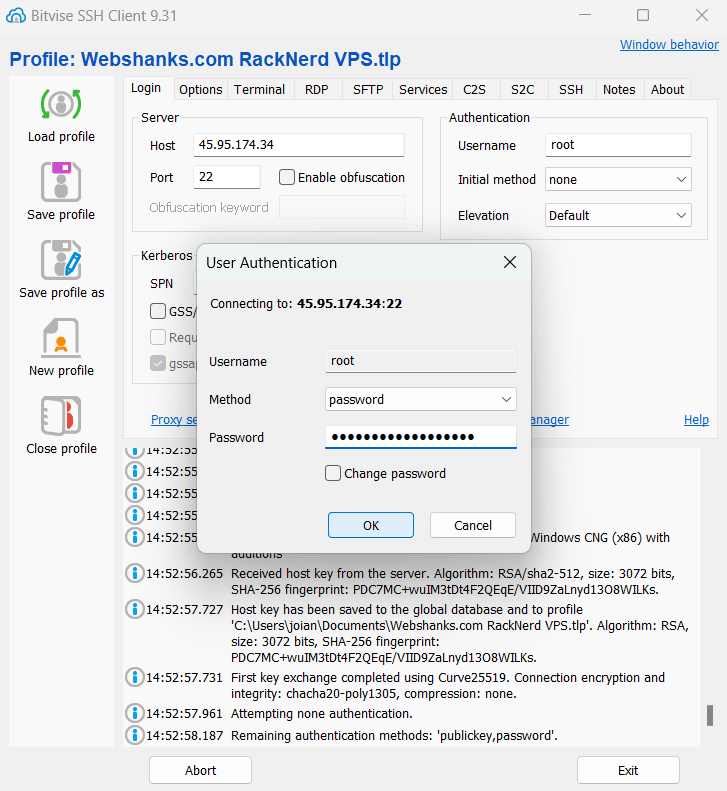
3. Establish SSH Connection:
Click on the Login button to initiate the SSH connection.
If prompted, accept the server’s key fingerprint.
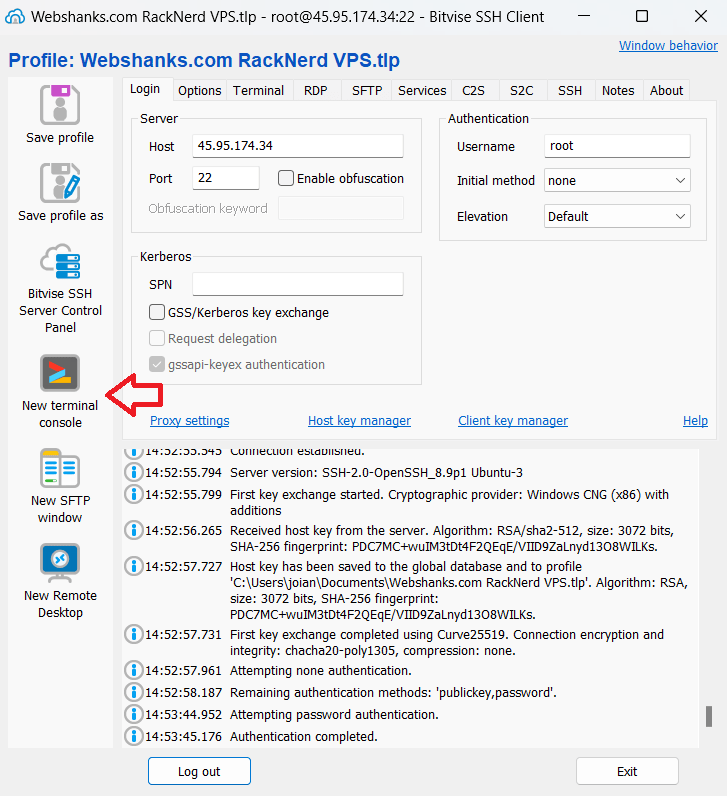
You are now connected to your Linux server via SSH using Bitvise.
Click New terminal console.
Method 2: Putty
1. Download and Install Putty:
Download Putty from the official website.
Run the installer and follow the installation instructions.
2. Launch Putty:
Open Putty after installation.
Enter the IP address or hostname of your Linux server in the Host Name field.
Specify the SSH port if it’s different from the default (22).
3. Configure Connection Settings:
In the left-hand menu, navigate to Connection > Data and enter your Linux username in the Auto-login username field.
Return to the Session category, enter a name for your session in the Saved Sessions field, and click Save for future use.
4. Establish SSH Connection:
Click on the Open button to initiate the SSH connection. Click Accept if you trust this host.
Enter your Linux username and password when prompted.
You are now connected to your Linux server via SSH using Putty.
Method 3: Windows Command Line (SSH Client)
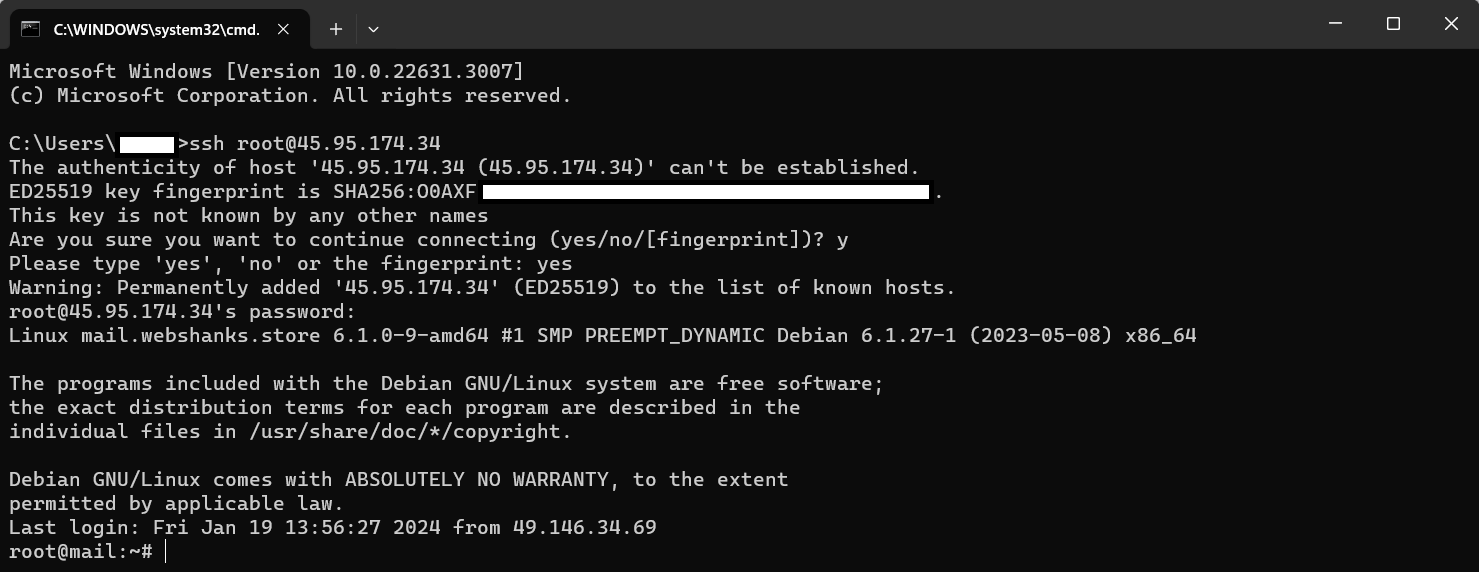
1. Open Command Prompt:
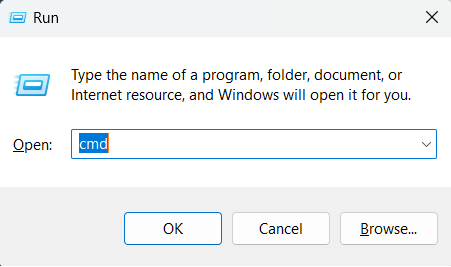
Press Win + R, type cmd, and press Enter to open the Command Prompt.
2. Establish SSH Connection:
In the Command Prompt, type:
ssh username@your_linux_server_ip
Replace username with your Linux username and your_linux_server_ip with the IP address of your Linux server.
The authenticity of host ‘45.95.174.34 (45.95.174.34)’ can’t be established.
ED25519 key fingerprint is SHA256:O0AXF0Zw*******************tNQ.
This key is not known by any other names
Are you sure you want to continue connecting (yes/no/[fingerprint])? Enter Y
Please type ‘yes’, ‘no’ or the fingerprint: Enter yes
Warning: Permanently added ‘45.95.174.34’ (ED25519) to the list of known hosts.
[email protected]’s password: Enter your root password
What’s next?
After successfully connecting to your Linux server using one of the mentioned methods, there are several tasks you might want to perform. Here are some common actions you can take:
- Update and Upgrade Packages for your OS.
- Install and Configure Software (install control panels or setup mail servers).
- Transfer Files Between Your Windows.
- Security Measures (install firewall like UWF).
- Web Server Setup (install web server for website).
Conclusion
Now you know the three methods on how to SSH from Windows to Linux. It’s time to sip some coffee and start your Linux learning journey.
Connecting to a Linux server from a Windows machine via SSH can be achieved using various tools.
Each method offers a secure and reliable way to manage your Linux server remotely, allowing for efficient and streamlined system administration.
The secure shell protocol (SSH) is the most common method for controlling remote machines over the command line in the Linux world. SSH is a true Linux original, and it is also gaining popularity in the Windows world. There is even official Windows documentation for SSH, which covers controlling Windows machines using OpenSSH.
This article describes how to establish an SSH connection from a Windows machine to a Fedora 33 Linux system using the popular open source tool PuTTY.
Ways to use SSH
SSH uses a client-server architecture, where an SSH client establishes a connection to an SSH server. The SSH server is usually running as a system daemon, so it is often called SSHD. You can hardly find a Linux distribution that does not come with the SSH daemon. In Fedora 33, the SSH daemon is installed but not activated.
You can use SSH to control almost any Linux machine, whether it’s running as a virtual machine or as a physical device on your network. A common use case is the headless configuration of embedded devices, including the Raspberry Pi. SSH can also be used to tunnel other network services. Because SSH traffic is encrypted, you can use SSH as a transport layer for any protocol that does not provide encryption by default.
In this article, I’ll explain four ways to use SSH: 1. how to configure the SSH daemon on the Linux side, 2. how to set up a remote console connection, 3. how to copy files over the network, and 4. how to tunnel a certain protocol over SSH.
1. Configure SSHD
The Linux system (Fedora 33 in my case) acts as the SSH server that allows the PuTTY SSH client to connect. First, check the daemon’s SSH configuration. The configuration file is located at /etc/ssh/sshd_config and contains a lot of switches that can be activated by commenting out related lines:
#	$OpenBSD: sshd_config,v 1.100 2016/08/15 12:32:04 naddy Exp $

# This is the sshd server system-wide configuration file.  See
# sshd_config(5) for more information.

# This sshd was compiled with PATH=/usr/local/sbin:/usr/sbin:/sbin:/usr/local/bin:/usr/bin:/bin

# The strategy used for options in the default sshd_config shipped with
# OpenSSH is to specify options with their default value where
# possible, but leave them commented.  Uncommented options override the
# default value.

Include /etc/ssh/sshd_config.d/*.conf

#Port 22
#AddressFamily any
#ListenAddress 0.0.0.0
#ListenAddress ::
The default configuration, where no line is uncommented, should work for this example. Check whether the SSH daemon is already running by typing systemctl status sshd:
$ systemctl status sshd
● sshd.service - OpenSSH server daemon
   Loaded: loaded (/usr/lib/systemd/system/sshd.service; enabled; vendor preset: enabled)
   Active: active (running) since Fri 2018-06-22 11:12:05 UTC; 2 years 11 months ago
     Docs: man:sshd(8)
           man:sshd_config(5)
 Main PID: 577 (sshd)
    Tasks: 1 (limit: 26213)
   CGroup: /system.slice/sshd.service
           └─577 /usr/sbin/sshd -D -oCiphers=aes256-gcm@openssh.com,chacha20-[...]
If it’s inactive, start it with the systemctl start sshd command.
2. Set up a remote console
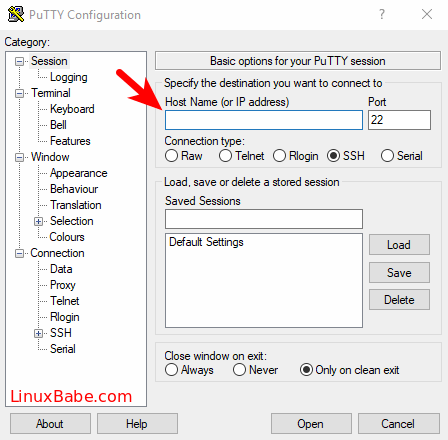
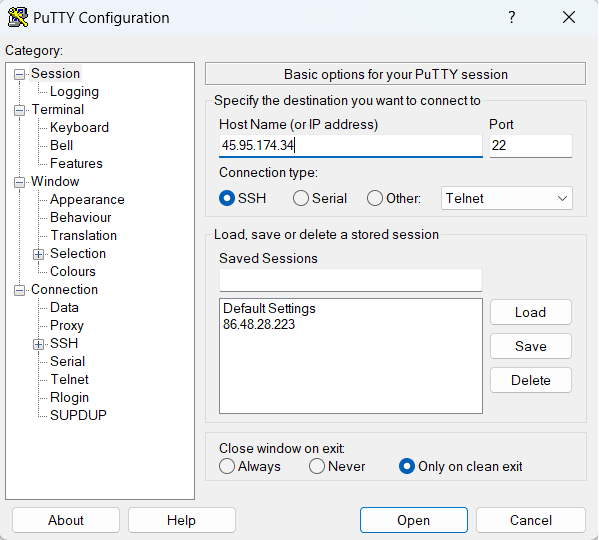
On Windows, download the PuTTY installer, then install and open it. You should see a window like this:

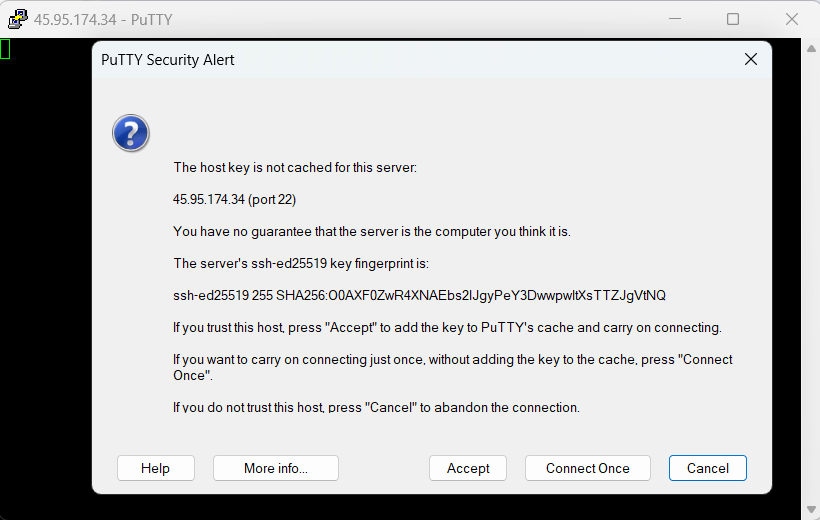
In the Host Name (or IP address) input field, enter the connection information for your Linux system. In this example, I set up a Fedora 33 virtual machine with a bridged network adapter that I can use to contact the system at the IP address 192.168.1.60. Click Open, and a window like this should open:
This is an SSH security mechanism to prevent a man-in-the-middle attack. The fingerprint in the message should match the key on the Linux system at /etc/ssh/ssh_host_ed25519_key.pub.. PuTTY prints the key as an MD5 hash. To check its authenticity, switch to the Linux system, open a command shell, and enter:
ssh-keygen -l -E md5 -f /etc/ssh/ssh_host_ed25519_key.pubThe output should match the fingerprint shown by PuTTY:
$ ssh-keygen -l -E md5 -f /etc/ssh/ssh_host_ed25519_key.pub
256 MD5:E4:5F:01:05:D0:F7:DC:A6:32 no comment (ED25519)
Confirm the PuTTY Security Alert by clicking Yes. The host system’s fingerprint is now in PuTTYs trust list, which is located in the Windows registry under:
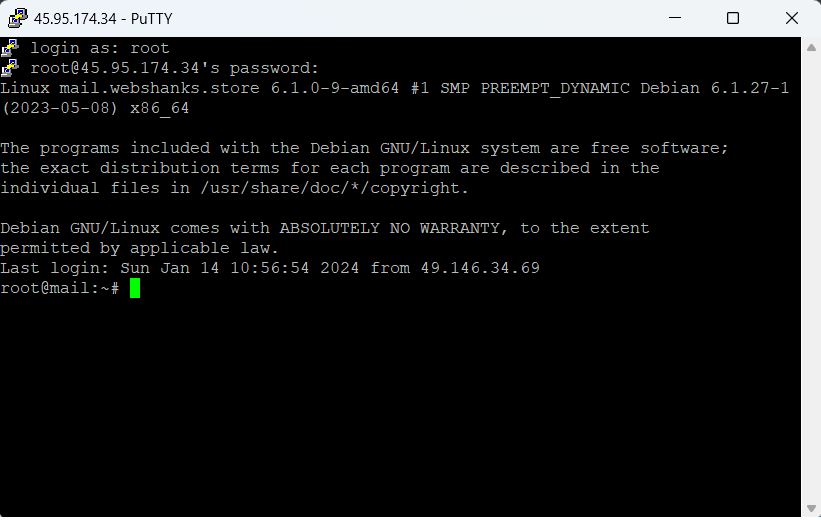
HKEY_CURRENT_USER\SOFTWARE\SimonTatham\PuTTY\SshHostKeysEnter your correct login credentials, and you should be on the console in your home directory:

3. Copy files over the network
In addition to the remote console, you can use PuTTY to transfer files via SSH. Look in the installation folder under C:\\Program Files (x86)\\PuTTY and find pscp.exe. You can use this to copy files to and from a Linux system.
Open a command prompt with Windows + R and enter cmd. Copy the file MyFile.txt from your Linux user home directory to your Windows home directory by entering:
C:\"Program Files (x86)"\PuTTY\pscp.exe stephan@192.168.1.60:/home/stephan/MyFile.txt .To copy a file from the Windows home directory to the Linux user home directory, enter:
C:\"Program Files (x86)"\PuTTY\pscp.exe MyFile.txt stephan@192.168.1.60:/home/stephan/As you may have already figured out, the copy command’s general structure is:
pscp.exe <source> <target>4. Tunnel a protocol
Imagine you have a Linux machine that is running an HTTP-based service for some arbitrary application. You want to access this HTTP service from your Windows machine over the internet. Of course, you cannot expose the related TCP port to the public because:
- The server is running HTTP, not HTTPS
- There is no user management nor login at all
At first glance, it looks like an impossible task to set up this architecture without producing a horrible security flaw. But SSH makes it relatively easy to set up a safe solution for this scenario.
I will demonstrate this procedure with my software project Pythonic. Running as a container, Pythonic exposes two TCP ports: TCP port 7000 (main editor) and TCP port 8000 (the code-server source-code editor).
To install Pythonic on a Linux machine, run:
podman pull pythonicautomation/pythonic
podman run -d -p 7000:7000 -p 8000:8000 pythonic
Switch to your Windows machine, open PuTTY, and navigate to Connection -> SSH -> Tunnels. Add the two TCP ports you want to forward:
- Source:
7000/ Destination:localhost:7000 - Source:
8000/ Destination:localhost:8000

Then go back to the Session section, and establish an SSH connection as you did before. Open a browser and navigate to https://localhost:7000; you should see a screen like this:

You have successfully configured port forwarding!
Warning: If you expose TCP Port 22 to the public, don’t use easy-to-guess login credentials. You will receive login attempts from all over the world trying to access your Linux machine with common, standard credentials. Instead, permit only known clients to log in. This login restriction can be achieved using public-key cryptography, which uses a key pair in which the public key is stored on the SSH host machine, and the private key remains at the client.
Debugging
If you are struggling to connect to your Linux machine, you can follow the processes in your SSH daemon with:
journalctl -f -u sshdThis is how an ordinary log-in process looks like with LogLevel DEBUG :

Learn more
This article barely scratched the surface about ways to use SSH. If you are looking for information about a specific use case, you can probably find it among the tons of SSH tutorials on the internet. I use PuTTY heavily at work because its easy configuration and good interoperability between operating systems make it a Swiss Army knife tool for connectivity solutions.
This work is licensed under a Creative Commons Attribution-Share Alike 4.0 International License.
Configure SSH Passwordless Login from Windows to Linux
Setting up SSH passwordless login allows you to connect from your Windows machine to a Linux server securely without typing your password every time. This is particularly useful for automation, scripting, or regular remote management tasks.
Step 1: Check and Install OpenSSH Client
-
Open PowerShell with administrative privileges:
- Press Win + S, type
PowerShell, right-click on Windows PowerShell, and select Run as Administrator.
- Press Win + S, type
-
Check if OpenSSH Client is installed:
Get-WindowsCapability -Online | Where-Object Name -like '*OpenSSH.Client*'
Enter fullscreen mode
Exit fullscreen mode
If it shows State : NotPresent, install it:
Add-WindowsCapability -Online -Name OpenSSH.Client~~~~0.0.1.0
Enter fullscreen mode
Exit fullscreen mode
Step 2: Generate an SSH Key Pair on Windows
- Open Command Prompt or PowerShell. Both tools can execute the
ssh-keygencommand; choose the one you’re more comfortable with or have easy access to. - Run the SSH key generation command:
ssh-keygen -t rsa -b 4096
Enter fullscreen mode
Exit fullscreen mode
This command generates a secure 4096-bit RSA key, which is recommended for modern usage due to its robust security against brute-force attacks.
-
When prompted:
- Save the key to the default location (e.g.,
C:\Users\YourUsername\.ssh\id_rsa) by pressing Enter. - Leave the passphrase empty for passwordless login (press Enter twice).
- Save the key to the default location (e.g.,
-
Example output:
   Generating public/private rsa key pair.
   Enter file in which to save the key (C:\Users\YourUsername\.ssh\id_rsa):
   Enter passphrase (empty for no passphrase):
   Enter same passphrase again:
   Your identification has been saved in C:\Users\YourUsername\.ssh\id_rsa
   Your public key has been saved in C:\Users\YourUsername\.ssh\id_rsa.pub
Enter fullscreen mode
Exit fullscreen mode
Step 3: Copy the SSH Public Key to the Linux Server
To enable passwordless login, your public key must be on the Linux server.
- Use the following command in PowerShell to append the public key directly to the
authorized_keysfile on the Linux server:
type $env:USERPROFILE\.ssh\id_rsa.pub | ssh username@hostname-or-ip "mkdir -p .ssh && chmod 700 .ssh && cat >> .ssh/authorized_keys && chmod 600 .ssh/authorized_keys"
Enter fullscreen mode
Exit fullscreen mode
Replace:
-
usernamewith your Linux username. -
hostname-or-ipwith the IP address or hostname of your Linux server.
- Ensure the correct permissions for the
.sshdirectory andauthorized_keysfile are applied as part of the above command.
Step 4: Test the Passwordless SSH Connection
From your Windows machine, test the connection:
- Open Command Prompt or PowerShell.
- Run the SSH command:
ssh username@hostname-or-ip
Enter fullscreen mode
Exit fullscreen mode
You should log in without being prompted for a password.
Troubleshooting
If the connection still prompts for a password:
- Verify the SSH key is correctly copied to the Linux server:
cat ~/.ssh/authorized_keys
Enter fullscreen mode
Exit fullscreen mode
Ensure it contains the public key from your Windows machine.
-
Check SSH server permissions and configuration:
- Ensure
~/.sshhas700permissions andauthorized_keyshas600. - Restart the SSH service on Linux:
sudo systemctl restart sshd - Ensure
-
Check firewall or network configurations:
- Ensure port 22 (the default SSH port) is open on the Linux server.
- Verify there are no IP-based restrictions preventing your connection.
- For cloud environments, confirm that the security group or network rules allow SSH access.
-
Enable debugging during SSH login:
ssh -vvv username@hostname-or-ip
Enter fullscreen mode
Exit fullscreen mode
Analyze the output for errors.
Conclusion
Configuring SSH passwordless login from Windows to Linux improves efficiency and security for remote connections. By setting up SSH keys, you eliminate the need for passwords while maintaining secure access. This setup is particularly useful for frequent logins, automated scripts, and system management.
Feel free to leave a comment if you encounter any issues or have tips to share! 😊
How to SSH from Windows to Linux: A Step-by-Step Guide
Prerequisites
Before we dive into the process of setting up SSH from Windows to Linux, it’s essential to understand the basics of SSH and the differences between Windows and Linux operating systems.
- SSH (Secure Shell): SSH is a secure, encrypted protocol that allows you to connect to a remote server over the internet. It’s widely used for remote access, file transfer, and other secure tasks.
- Windows and Linux: Windows and Linux are two different operating systems with distinct architectures and command-line interfaces. Windows uses the Command Prompt (cmd.exe), while Linux uses the Terminal (bash).
Setting Up SSH on Windows
To set up SSH on Windows, you’ll need to install the OpenSSH client on your system. Here’s a step-by-step guide:
- Download and Install OpenSSH: You can download the OpenSSH client from the official website: https://www.openssh.com/
- Install OpenSSH: Once you’ve downloaded the installer, follow the installation instructions to install OpenSSH on your Windows system.
- Configure OpenSSH: After installation, you’ll need to configure OpenSSH to allow remote connections. You can do this by running the following command in the Command Prompt:
ssh-keygen -t rsa -b 4096- This will create a new RSA key pair and save it to the
~/.sshdirectory. ssh-agent -s- This will start the SSH agent and prompt you to enter your password.
eval $(ssh-agent -s)- This will add the SSH agent to your system’s environment variables.
- Add SSH Key to Windows: To add the SSH key to Windows, follow these steps:
- Right-click on the Start menu and select System.
- Click on System and Security.
- Click on Users.
- Click on Family Safety.
- Click on Add a program.
- Search for
ssh-agentand select it. - Click on Next.
- Select
Addand thenAdd to this system. - Follow the prompts to add the SSH key to Windows.
Connecting to Linux using SSH
Now that you’ve set up SSH on Windows, you can connect to a Linux system using SSH. Here’s a step-by-step guide:
- Open a Command Prompt: On Windows, you can open a Command Prompt by searching for
cmdin the Start menu and selecting it. - Connect to Linux using SSH: Once you’ve opened the Command Prompt, you can connect to a Linux system using SSH by running the following command:
ssh <username>@<linux-host>
Example Connection
Here’s an example connection to a Linux system using SSH:
ssh user@linux-hostEnter password for user@linux-host:Enter Linux password for user@linux-host:Welcome to Linux shell!
Using SSH to Transfer Files
Once you’ve connected to a Linux system using SSH, you can transfer files using the scp command. Here’s an example:
scp user@linux-host:/path/to/file /local/path/Enter password for user@linux-host:Enter Linux password for user@linux-host:
Using SSH to Run Commands
You can also use SSH to run commands on a Linux system. Here’s an example:
ssh user@linux-host "ls -l"Enter password for user@linux-host:Enter Linux password for user@linux-host:
Tips and Tricks
- Use a Secure Connection: When connecting to a Linux system using SSH, make sure to use a secure connection by specifying the
ssh-agentandssh-keygencommands. - Use a Strong Password: Use a strong password for your SSH account to prevent unauthorized access.
- Use a Secure File Transfer Protocol (SFTP): If you need to transfer large files, consider using the SFTP protocol instead of SCP.
- Use a Secure Shell (SSH) Client: Consider using a dedicated SSH client like PuTTY or WinSCP to manage your SSH connections.
Troubleshooting Common Issues
- Connection refused: Check that your SSH server is running and that the
ssh-agentandssh-keygencommands are configured correctly. - Authentication failed: Check that your username and password are correct and that the
ssh-agentandssh-keygencommands are configured correctly. - Connection timed out: Check that your SSH server is configured to allow connections from your Windows system and that the
ssh-agentandssh-keygencommands are configured correctly.
Conclusion
Setting up SSH from Windows to Linux is a straightforward process that requires some basic knowledge of command-line interfaces and operating systems. By following the steps outlined in this article, you can securely connect to a Linux system using SSH and transfer files, run commands, and more. Remember to use a secure connection, use a strong password, and use a secure file transfer protocol to prevent unauthorized access.
Your friends have asked us these questions — Check out the answers!