
In this post, we will see how to show Hidden Files, Folders & Drives along with Protected operating system files in Windows 11/10/8/7, via File Explorer Options in the Control Panel or by using the Command Prompt and PowerShell.
On most days, you would not want to be bothered by the hidden Windows files on your computer. After all, the last thing that an average Windows user needs is some more data to deal with. On some rare instances though, or if you know what you’re getting yourself into, you may need access to these hidden files to make changes to Windows apps or system settings. These hidden files aren’t readily viewable when you open their parent folder(s) in the File Explorer. Ee will walk you through the steps needed to be taken to show hidden files and folders using the Explorer Options, Windows Command Prompt and the PowerShell, two of the strongest methods for the purpose.
Show Hidden Files & Folders in Windows 11/10 via Explorer Options
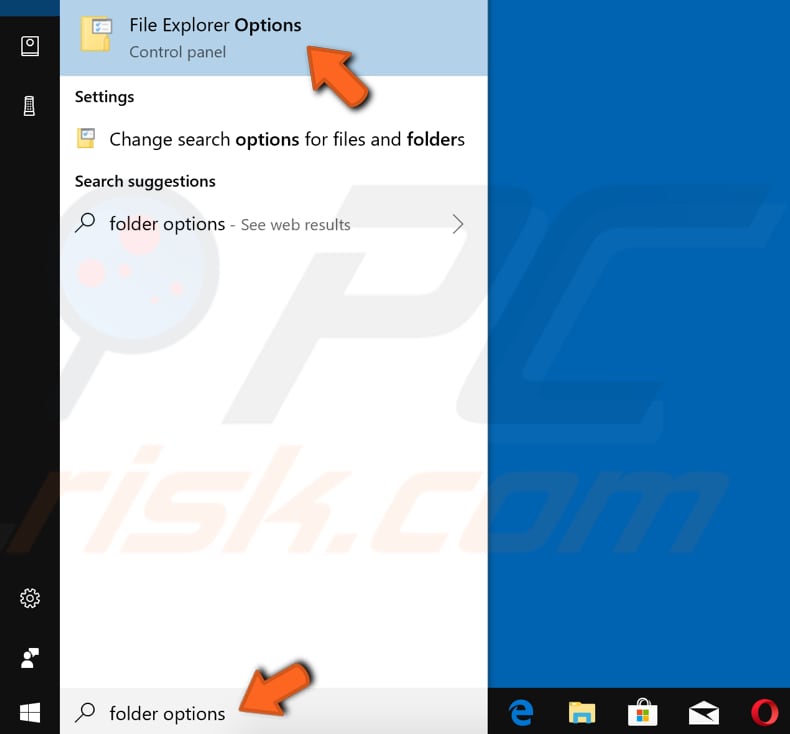
You will have to open the Control Panel and then select the File Explorer Options in Windows 11/10. File Explorer Options is referred to as Folder Options in Windows 8.1/7.
To show Hidden Files, Folders & Drives on your Windows 11/10 computer:
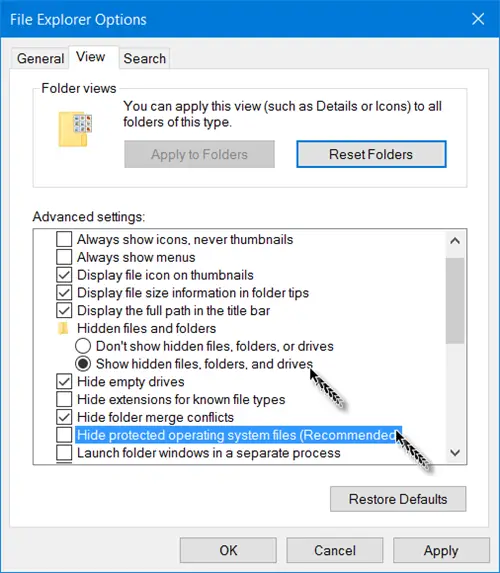
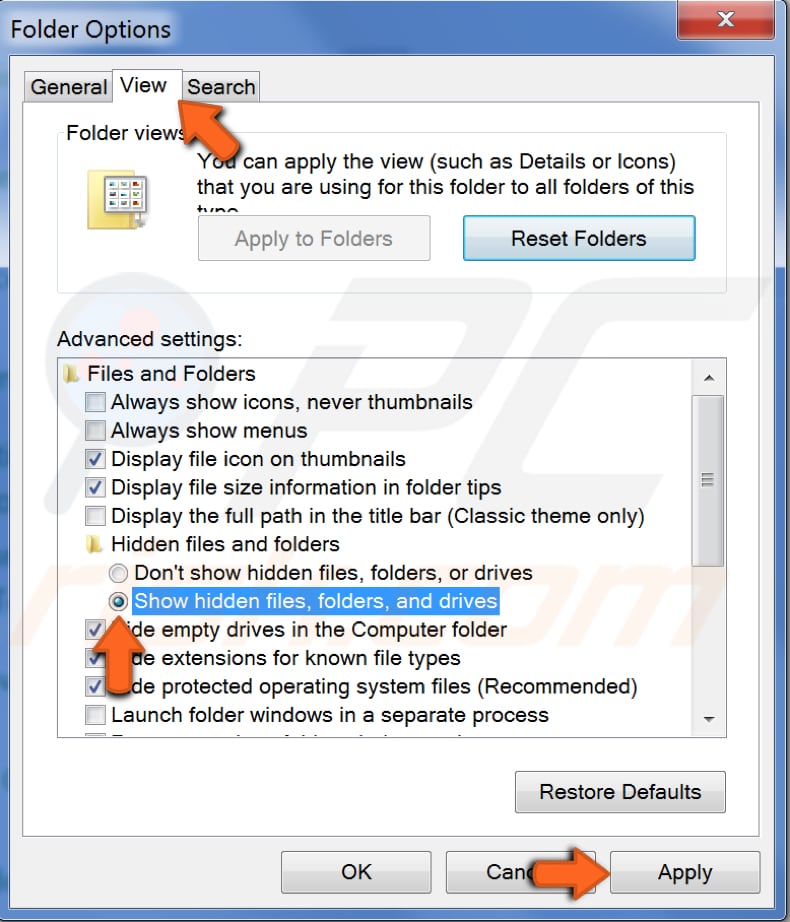
- Open File Explorer Options
- Click on the View tab
- Locate Hidden Files & Folders
- Select the Show Hidden Files, Folders and Drives option
- Click on Apply and Exit.
You can also open File Explorer Options in Windows 11 as follows:
1] Launch File Explorer on Windows 11.
2] Click on the three horizontal dots and select Option. This will open the Folder Options window.

3] In the Folder Options window, click on the View tab and select the radio button that says Show hidden files, folders, and drives.

4] Click Apply and then OK.
Alternative method via Explorer Menu bar
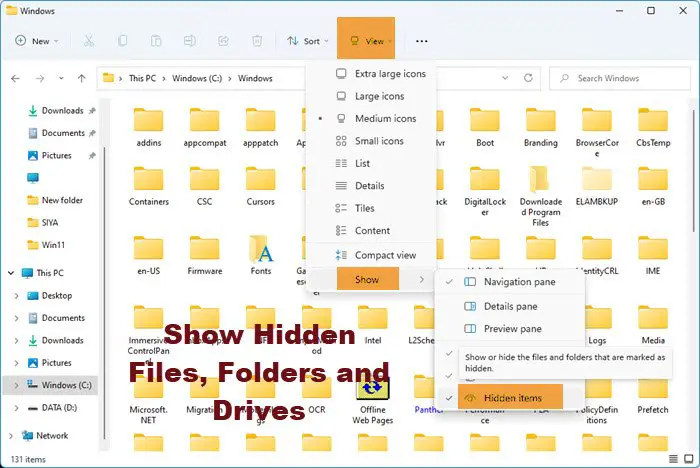
In Windows 11, you can open Explorer > View > Show > Select Hidden items.
In Windows 10, open Explorer, select the View tab and toggle the Hidden items checkbox to short or hide files and folders.
For your information, you can also access the Change folder and search options box from here.
Unhide Protected operating system files
If you wish to unhide and show the Protected operating system files, you need to also uncheck the Hide protected operating system files (Recommended) setting in File Explorer Options, and click Apply.
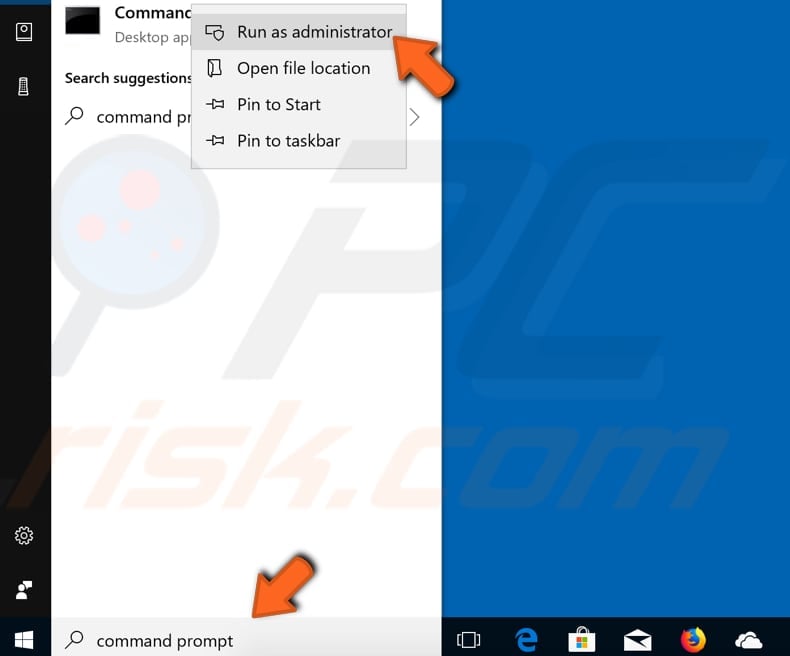
Show hidden files using Command prompt
The process here is pretty simple. Here are the steps you have to follow:
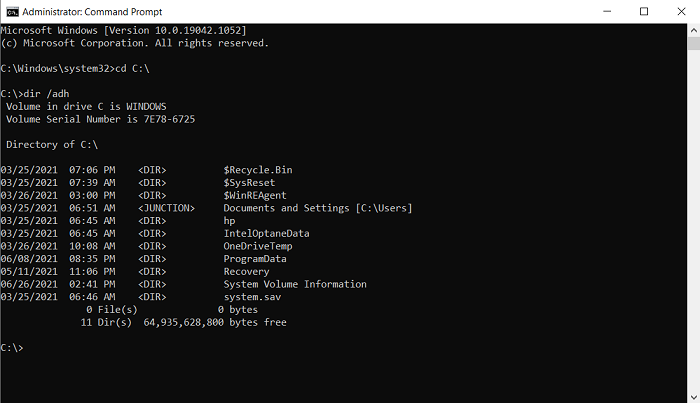
Open the start command and search for Command Prompt. Select to run it as administrator.
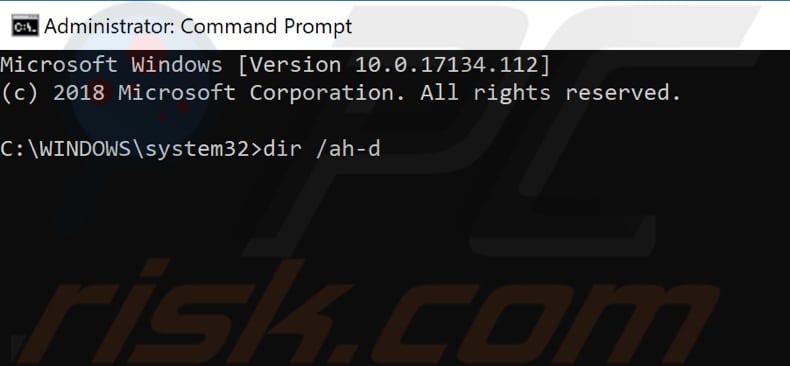
Make a note of the folder in which you want to look for hidden files. For the purposes of this article, we will be using the C:/ drive. Access your drive by using the change directory command cd. Our first command line will look something like
cd C:\
Now, type out the following command line which will show you all the hidden files in the location that you’ve chose
dir /adh
This will show to you all the hidden files, in this case, in the C:/ drive. There are some other keywords that you can use with the dir command if there is some specific information you are looking for. They’re all to be used in a similar manner:
- /a – this will show you only the hidden folders.
- /a:d – this will show you all the directories.
- /a:h – this will show only the hidden files.
- /adh – (The one we’ve used) Gives you all the above information combined.
Let’s now talk about PowerShell and how this process can be replicated there.
Show hidden files using PowerShell
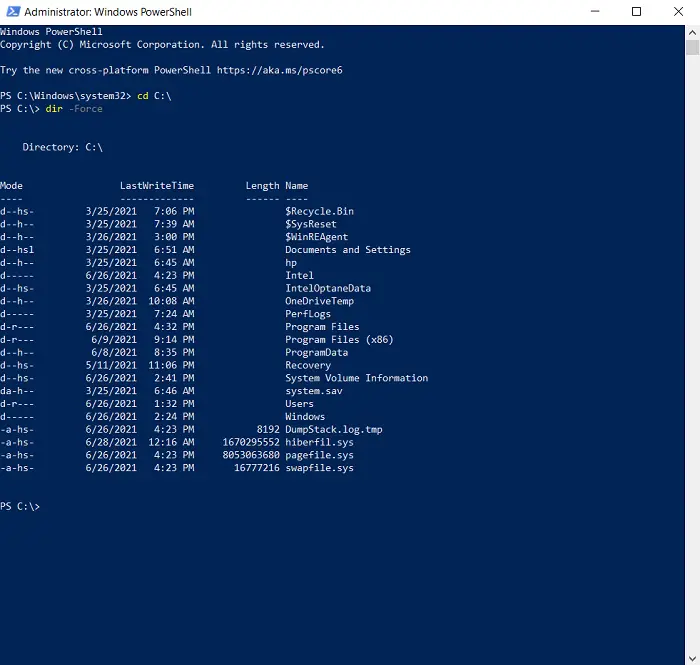
- Open the Start Menu and search for PowerShell, run it as administrator. (You can do the same via the Power User Menu too.)
- The process here is quite similar. Access the location of your choice with the change directory keyword cd. It is used the same way as it was in the Command Prompt.
- Once you’re into the location, type the following command line which will display to you all the hidden files inside it.
dir -Force
- You can browse through the hidden files in a folder inside the drive’s root folder by adding that folder’s name to the cd command. Eg., cd C:\Program Files.
- Once you’re inside this particular folder, type/copy the following command and press enter:
Get-ChildItem -Filter *.* -Recurse -Force -ErrorAction SilentlyContinue | where { $_.Attributes -match “Hidden”}
There is a strong chance that the above command line may return a very high number of hidden files and folders, making it impossible for you to actually read through them.
In that case, you can copy the resultant output and have it saved in a text document by modifying the command line. Simply add a >log.txt to the end of the above Get-ChildItem command and all the data will be saved to a text file named log.txt.
TIP: There is another way! You can use attrib.exe to change File Attributes, and/or show the hidden files.
This post will show you how to make a File or Folder Hidden or Read Only.
If you wish to, you can also list all the hidden files & folders on your Windows computer.
BONUS TIP:
- If you find that the Show Hidden Files, Folders and Drives option is missing, then this registry tweak is sure to help you.
- Alternatively, you could use our freeware FixWin to fix this problem. You will find the fix under its Explorer section.
Last Updated :
21 Apr, 2025
Hidden Files and Folders are generally system-protected features in Windows OS. This feature is generally used to hide files or folders to avoid any accidental usage. However, you can undo this setting to view hidden files and folders in Windows 10 by using a few simple steps. Here are different approaches to show hidden files and folders for Windows 10 users.
Table of Content
- 1. Using File Explorer
- 2. Using Control Panel
- 3. Using Command Prompt
- 3. Using Registry Editor
- View Hidden Files and Folders using Third-party File Managers
1. Using File Explorer
This is an in-built, straight forward and a simple method to view any hidden files or folders in Windows 10. Here’s how you can do it:
- Go to the Start menu and type “File Explorer” and hit the enter button. Alternatively, you can press Win + E to open File Explorer directly.
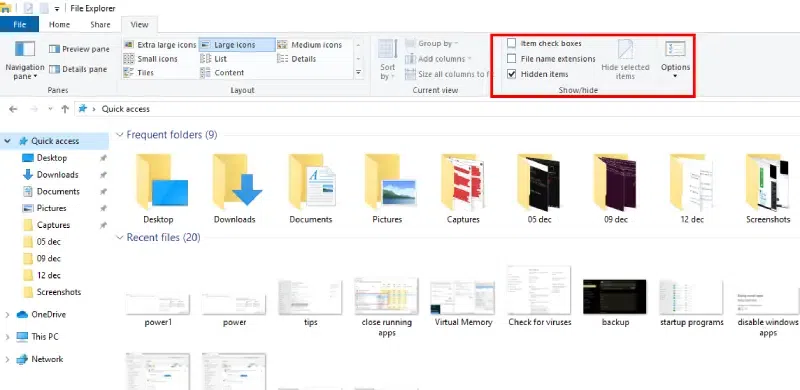
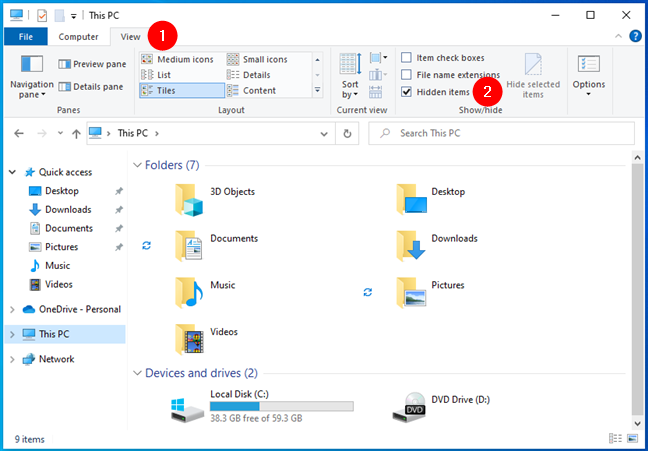
- You will find 4 options on the top of the screen i.e. File, Home, Share and View. Navigate to the “View” option
- You will now see different options to view files in different segments (Extra large icons, Small icons, Tiles, etc.) Navigate to the option “Show/Hide” with an arrow downwards, click on it and select “Hidden Items”
- Now will now notice that files and folders with hidden attributes will be displayed with a slight transparency.
Using File Explorer
2. Using Control Panel
If you face any difficulty from the above method, you may use Control Panel settings to access Hidden Files and Folders. Here’s how you can do it:
- You can access Control Panel using keyboard shortcut i.e. Win + R, open Run dialog and type “Control panel” and hit the enter button. Alternatively, click the Start Menu and type Control Panel in the search box and hit the enter button
- Go to “Appearance and Personalization” and then click on “Show hidden files and folders” under File Explorer option.
- A pop-up will come up. Look at “Hidden files and folders”, click the radio button on “Show hidden files, folders, or drives”
- Click Apply to make the desired changes. Now, you will be able to view all the hidden files or folders in Windows 10.

using control panel
3. Using Command Prompt
if you’re a geek, you might give this method a chance to hide any files or folders in you Windows 10 computer. This method is suitable to unhide and hide files and folders in your computer. Here’s how to execute:
- Click on the Start Menu and type “CMD” or Control Panel and select “Run as Administrator” or press Win + X and select “Command Prompt (Admin)”.
- Now, navigate to the folder where you’ve stored the hidden files using the ‘cd’ command
- Enter the following command to view all the hidden files from that directory:
dir /a:h
command prompt
3. Using Registry Editor
You can also use this alternate advanced method to view all the hidden files and folders of your Windows PC. However, this is not considered as a first-response method to perform but it can be suitable for those who’re looking for alternatives while trying to access hidden files and folders in Windows 10 PC. Here’s how you can access:
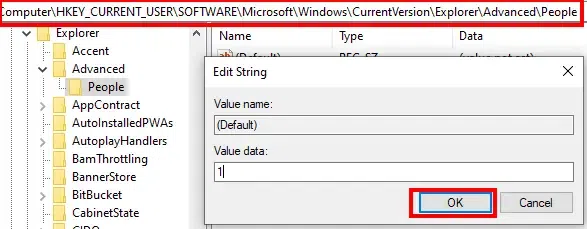
- Open the Run dialog box by pressing Win + R or press Win + X and select “Run” and type “Registry Editor” or “regedit”. Alternatively, you can click on the start menu and type “Registry Editor” and click to open it.
- Now, navigate to the following directory:
HKEY_CURRENT_USER\Software\Microsoft\Windows\CurrentVersion\Explorer\Advanced\User
- Make a double-click on the Hidden key and set the value to 1 and press OK.
- Restart your PC or the File Explorer so that the changes can take immediate effect.
Registry
If you have any specific requirement in managing files and folders including viewing hidden files/folders or making any certain modifications, then you might opt for any trusted third-party File Managers such as:
- Total Commander: Offers file management, archive handling, built-in FTP, and much more.
- EYplorer: Starting from $14.95/month, once of the best file management tool.
- FreeCommander: This tool offers 25+ features including file duplicacy search, automation view, Desktop snapshots, etc.
Points to Remember:
- Make sure to hide your files back once your work is done. Reason being, crucial system files are hidden by default to prevent from any accidental deletion.
- Structure your files and folders to view them at once in any drive.
- Always carry a backup if you choose to modify the hidden file or folder.
Conclusion
In Windows 10, viewing hidden files and folders is a simple procedure that might improve your file management using Control Panel, Command Prompt, Registry Editor, or Third-Party tools. You can quickly retrieve any hidden objects you might require for organizing, debugging, or retrieving crucial data by following these methods.
How to Show Hidden Files on Windows 10 and Windows 7
Many important system files and folders in Windows are hidden, but sometimes you may need to access them. This guide shows how to enable the «Show hidden files, folders, and drives» option in Windows 10 and 7.
The Windows operating system hides many system files and folders to avoid deletion, accidental change, moving, etc. Another reason for hiding files and folders is to make Windows clutter-free. In this way, Microsoft attempts to avoid distracting users with «unnecessary» files by hiding them.
In some cases, users might need to access these hidden files or folders, which is straightforward. Remember, though, that hidden files should generally remain hidden.
Leaving them visible could result in accidental deletion, changes, etc., potentially leading to system instability. If you need to unhide hidden files, we recommend returning them to the hidden state when you are finished.
Video Showing How to View Hidden Files
Table of Contents:
- Introduction
- View Hidden Files in Windows 10
- View Hidden Files in Windows 7
- Video Showing How to View Hidden Files
Download Computer Malware Repair Tool
It is recommended to run a free scan with Combo Cleaner — a tool to detect viruses and malware on your device. You will need to purchase the full version to remove infections. Free trial available. Combo Cleaner is owned and operated by Rcs Lt, the parent company of PCRisk.com read more.
View Hidden Files in Windows 10
To enable the «Show hidden files» option in Windows 10, type «folder options» or «file explorer options» and click the «File Explorer Options» result.
In the File Explorer Options window, find and click the «View» tab. Find the «Show hidden files, folders, and drives» option under Advanced settings. Select it and click «Apply» to save the changes.
Now all hidden files, folders, and drives will be displayed. Once you have finished working with them, we recommend that you re-enable the «Don’t show hidden files, folders, or drives» option.

You can use the Command Prompt and associated commands to view hidden files. Command Prompt is the input field of a text-based user interface screen, a command-line interpreter application available in Windows. This guide describes how to open Command Prompt and the commands used to see hidden files in a particular directory.
To launch elevated Command Prompt (to run it as administrator), type «command prompt» in Search and right-click the «Command Prompt» result, then select the «Run as administrator» option from the contextual menu.
If you want to see all hidden files and hidden directories in the current directory (the one you have open/currently working with), type the «dir /ah» command and press Enter on your keyboard.

If you want to see all hidden files in the current directory but do not need the hidden subdirectories to be displayed, type the «dir /ah-d» command and press Enter on your keyboard.
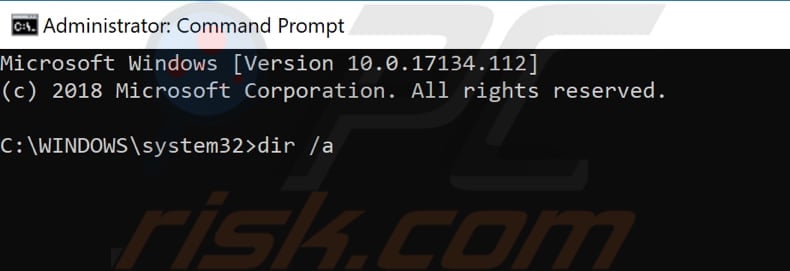
If you want all files and directories, including hidden files and hidden directories of the current directory, to be displayed, then type the «dir /a» command and press Enter on your keyboard.
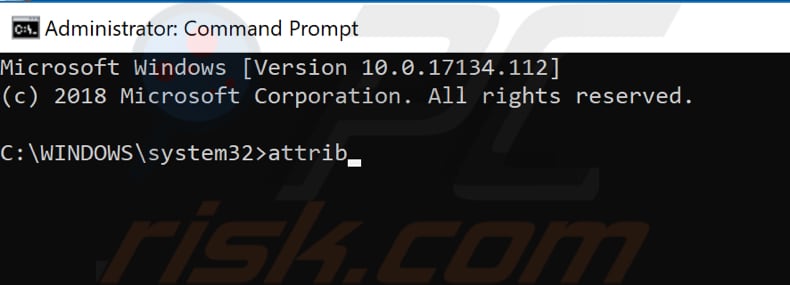
If you type and execute the «attrib» command, you will see all files stored in the current directory with their attributes to the left of the directory path and the filename. Files that have «H» letter next to them will be the hidden files.
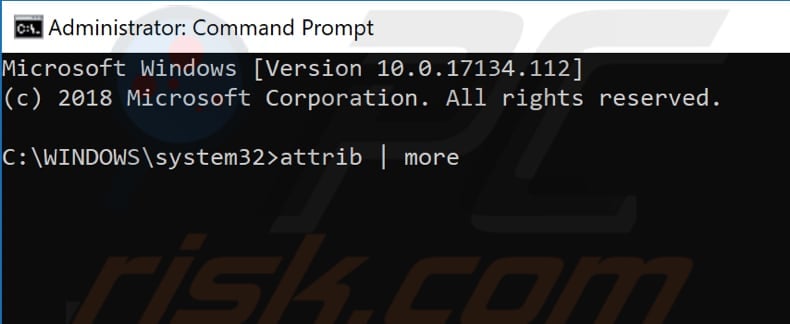
The «attrib | more» command enables you to see more files (if there are too many, and you cannot see all at once).
Now you should know how to enable and disable the «Show hidden files, folders, and drives» option in Windows 10.
[Back to Table of Contents]
View Hidden Files in Windows 7
To view hidden files and folders or drives in Windows 7, go to Control Panel — click the «Start» menu and then click the «Control Panel» option.

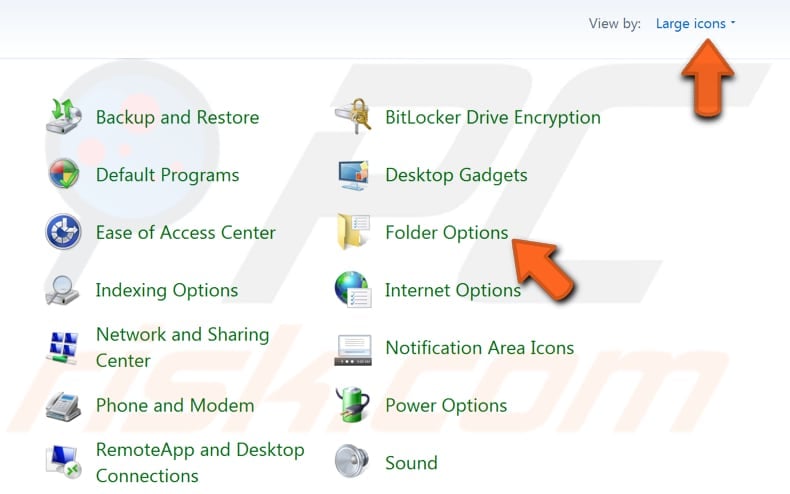
In Control Panel, find the «Folder Options» and click it. If the Control Panel menu window is displayed differently than shown here, set it to view by «Large icons» in the top-right corner.
In the Folder Options window, find and click the «View» tab, then find the «Show hidden files, folders, and drives» option under Advanced settings. Select it and click «Apply» to save the changes. Now all hidden files, folders, and drives will be displayed.
Once you have finished working with them, we recommend that you re-enable the «Don’t show hidden files, folders, or drives» option.
You can also use Command Prompt commands. The same steps apply to both Windows 10 and Windows 7.
We hope that this guide was helpful and you know more about hidden files and folders, why are they hidden, and how to view them. If you have any questions related to this topic, do not hesitate to leave a comment in the section below.
[Back to Top]
Возможность скрывать и снова отображать определенные папки позволяет сберечь какую-либо личную информацию от посторонних и просто убрать с глаз файлы, которые вам мешают.
Как отобразить скрытые папки
Сделать это можно стандартными средствами операционной системы. Зайдите в проводник и выберите пункт «Вид» в верхнем меню. Поставьте галочку в пункте «Скрытые элементы».

Также можно включить отображение через параметры папок. Этот способ, возможно, вам знаком по предыдущим версиям операционной системы. В проводнике выберите пункт «Вид», затем «Параметры». Откроется новое окно «параметры папок». Здесь нужно тоже перейти на вкладку «Вид» и в поле «Дополнительные параметры» пролистать до конца. Поставьте переключатель в положение «Показывать скрытые файлы, папки и диски».

Кроме стандартных средств, можно воспользоваться и сторонними программами. К примеру, файловый менеджер Total Commander позволяет отображать и скрывать папки одним кликом на панели инструментов.

Как скрыть файлы и папки
Папки может скрывать не только система, но и пользователь. Можно скрыть определенные папки и файлы, которые не нужно видеть посторонним или они просто мешаются. Для этого кликните правой кнопкой мыши на объекте и выберите «Свойства». Поставьте галочку в пункте «Скрытый».
Попасть в такую скрытую папку можно и не заходя в настройки. Для этого нужно знать ее точный адрес. В нашем случае это C:\GAMES. Папка скрытая, но ее содержимое нет. Если же и ее содержимое скрыто, то способ не сработает.
Это тоже интересно:
- Что делать, если завис компьютер на Windows 10
- Как узнать, какая оперативная память установлена на компьютере с Windows
By default, both Windows 10 and Windows 11 hide many files and folders from your view. First of all, they hide any items you’ve set as hidden and those set as hidden by other user accounts, certain apps you installed, and the operating system itself. Second, Windows also hides from view the files and folders critical to its operation to ensure users don’t delete them by accident or change them in ways that lead to malfunctions. If you want to show all the hidden files and folders from Windows 10 or Windows 11, read this guide to learn how to do it:
NOTE: In both Windows 10 and Windows 11, there are two categories of files that are hidden from view: “standard” hidden files and “system protected” hidden files. To learn how to view them, read all the sections of this guide. At the end, we also offer examples of the differences between the settings you can change.
How to show hidden files in Windows 10
If you want to find all the hidden files in Windows 10, you’ll need to use File Explorer. A quick way to open it is to click or tap its taskbar shortcut or simultaneously press Windows + E on your keyboard. Then, in File Explorer, select the View tab at the top of the window and, in the Show/hide section, check the box called “Hidden items.”
How to show hidden files in Windows 10
You’ll immediately start seeing the files you hid, those hidden by other user accounts, Windows 10, and the apps you’re using.
TIP: If you don’t know how to put files out of sight on your computer, here’s how to hide files and folders in Windows.
How to see all files on Windows 10, including hidden system-protected ones
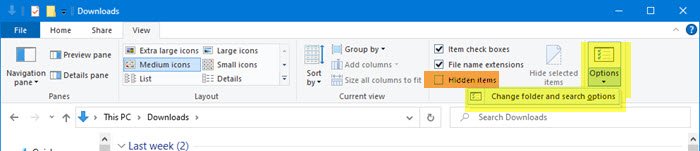
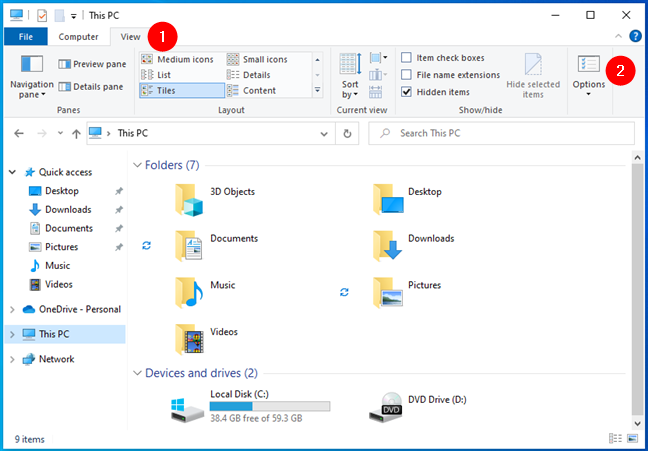
The steps you need to take in order to see all the files in Windows 10, including the hidden system-protected files, are a bit different. Still, everything starts with the same File Explorer. Launch it, select the View tab at the top of the window, and then click or tap the Options button to the right.
How to open Folder Options in Windows 10’s File Explorer
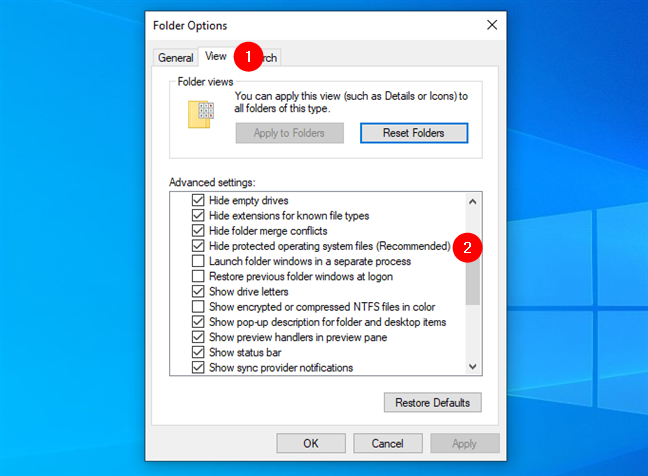
This opens the Folder Options window, where you’ll find many settings for how File Explorer works. In this window, go to the View tab. Then, in the Advanced settings list, find and uncheck the box that says: “Hide protected operating system files (Recommended).”
How to view protected operating system files in Windows 10
Windows 10 will warn you that you’ve “[…] chosen to display protected operating system files (files labeled System and Hidden) in File Explorer.” To go ahead with this change, click or tap Yes.
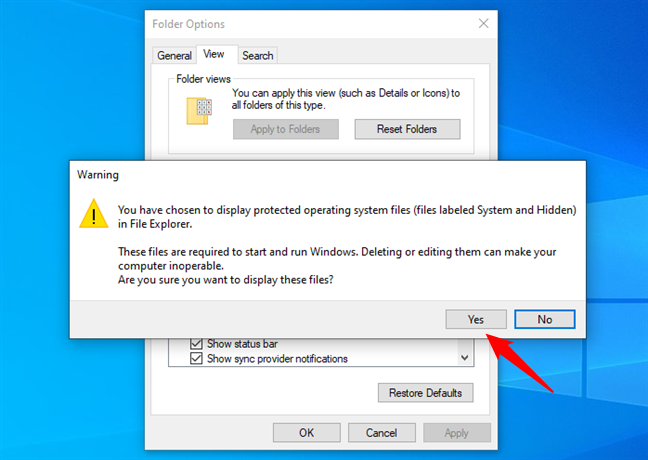
Windows 10 warning about hidden protected system files
Then, in the Folder Options window, click or tap on Apply or OK to save your settings. From now on, Windows 10 and File Explorer will make all the hidden files of the operating system visible.
How to show hidden files in Windows 11
Showing hidden files in Windows 11 is just as easy as in Windows 10. Maybe even a bit faster. Start by opening File Explorer (Win + E), and click or tap the View button from the top menu. Then, click or tap on Show at the end of the menu, and select Hidden items from the submenu displayed.
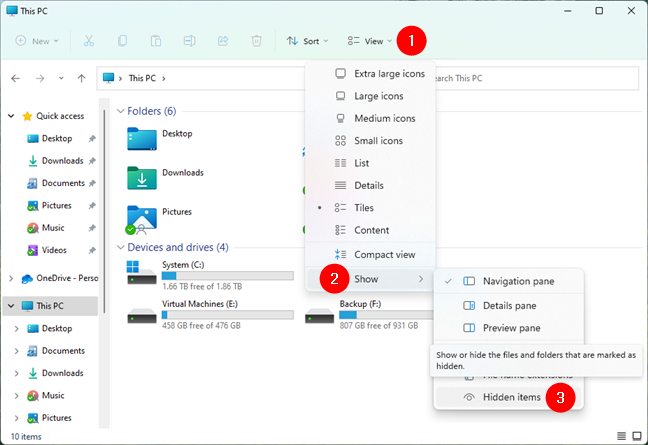
How to show hidden files in Windows 11
You’ll immediately start seeing the files hidden by Windows 11, yourself, or other user accounts, and any of the apps installed on your computer.
TIP: Did you just discover some hidden files on your computer that you no longer want to conceal? Here’s how to unhide files and folders in Windows.
How to show hidden protected operating system files in Windows 11
If you want to find all the hidden files from Windows 11, including the ones protected by the operating system, here’s how to do it:
Open File Explorer and click or tap on the … (See more) button from the top menu. Then, press Options in the menu displayed.
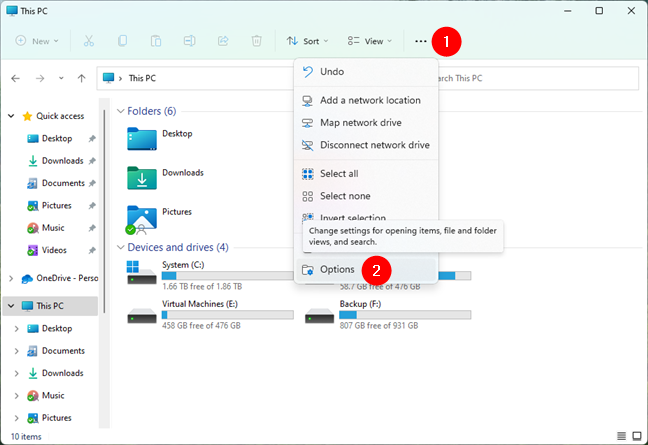
How to access the Folder Options in Windows 11’s File Explorer
This opens the Folder Options window, where you can configure the way File Explorer works. Select the View tab, and go to the Advanced settings list. Find the setting that says “Hide protected operating system files (Recommended)” and uncheck it.
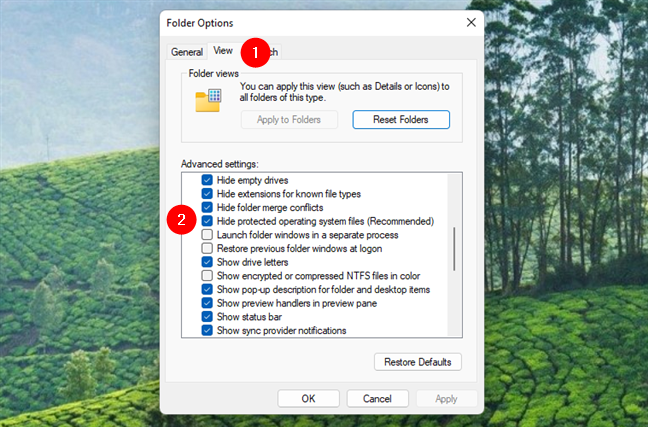
How to make Windows 11 show protected operating system files
You’re then warned that “you have chosen to display protected operating system files (files labeled System and Hidden) in File Explorer.” If you’re still sure you want that, click or tap on Yes.
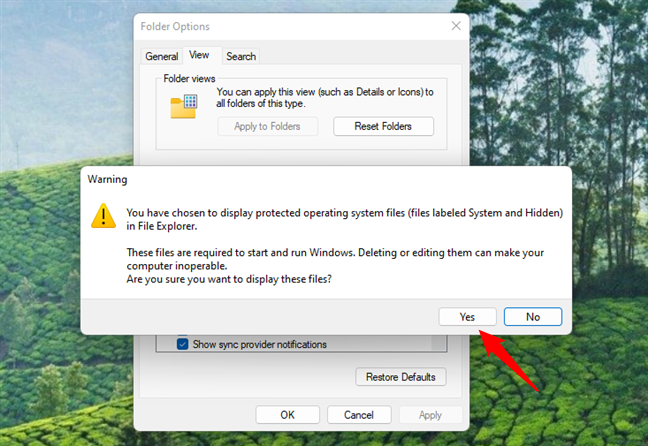
Windows 11 warns you that you’ll be able to see protected system files
In the Folder Options window, press Apply or OK to save the changes. From here on, Windows 11’s File Explorer will display all the hidden protected operating system files.
What’s the difference between seeing hidden files and protected operating system files?
By default, neither Windows 10 nor Windows 11 shows hidden files. Therefore, your desktop displays only the files and shortcuts that you or your apps have added.
The Windows 11 desktop
When you disable the “Hide protected operating system files (Recommended)” setting on your desktop, you will see two desktop.ini files that store information about how Windows displays the desktop. Not only that, but you’ll see desktop.ini files everywhere, in all the folders on your computer.
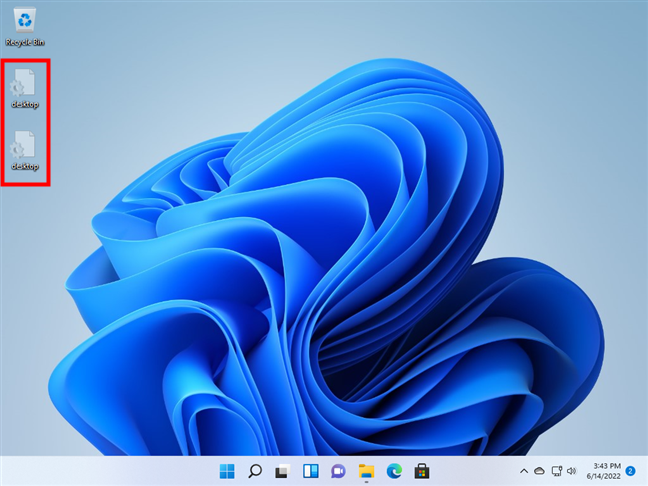
Two desktop.ini files on the Windows 11 desktop
To get a better perspective on how many hidden files and folders you might start seeing after enabling the settings discussed earlier, open File Explorer and go to “C:\Users.” Then double-click or double-tap on your user name. By default, in this location, you should see only your user’s folders, like Documents, Music, or Pictures.
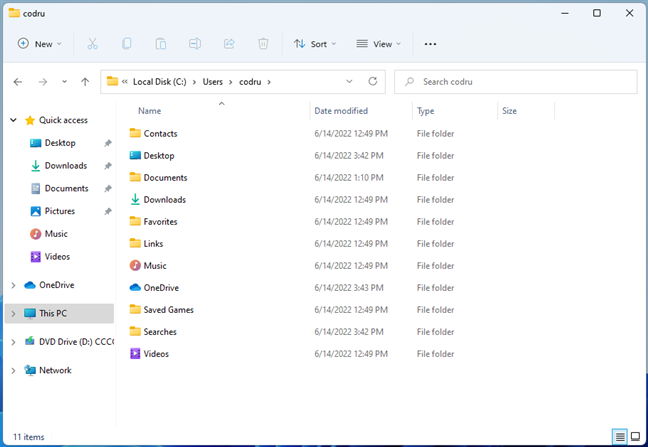
A user folder from Windows 11
When you enable File Explorer to show Hidden items, you start seeing a few new folders, like AppData, where many of your apps store data and settings for your user account.
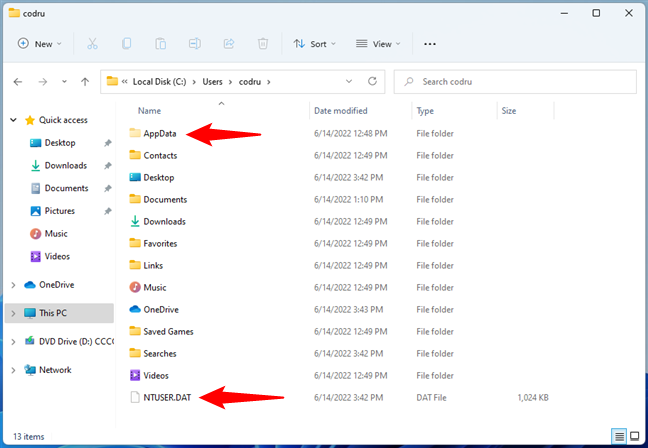
The hidden AppData folder is now visible
When you disable the “Hide protected operating system files (Recommended)” option from File Explorer, you’ll see many more folders and files. Things like Local Settings, SendTo, Start Menu, and so on. Windows uses these additional folders to interact with your user account and remember your settings.
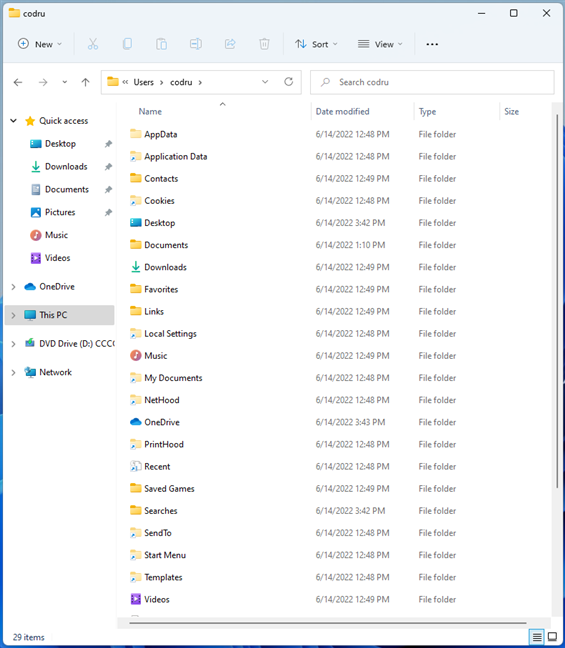
All hidden and protected operating system files are now visible
IMPORTANT: By default, the protected operating system files are hidden by Windows because they are critical to how the system works. You should not delete or edit their contents unless you know what you’re doing.
Did you find all the hidden files and folders you were looking for?
To see everything hidden on your Windows 10 or Windows 11 computer, you need to go through all the settings covered in this guide. However, we advise against displaying operating system-protected files and folders. Many users don’t know how to manage them, and they may end up messing up their Windows devices. Before you leave, let us know: Why did you choose to show hidden items on your Windows PC?