
Download Article
Download Article
- macOS
- Windows
- Debian and Fedora Linux
- Expert Interview
- Expert Q&A
|
|
|
|
This wikiHow teaches you how to run your Ruby script in Windows, macOS, and Ubuntu or Debian Linux. To run a Ruby program, you’ll need to have Ruby installed on your computer. Although macOS and most Linux distributions come with versions of Ruby pre-installed, you’ll want to make sure you’re using the latest version before attempting to run your program. Also, if the Ruby code you want to run is something you’ve written in a text editor or developer environment, you’ll want to save it as a .rb file so you can run it from the command line.
Running a Ruby Script
- To run ruby code, type ruby <scriptname.rb> into your command prompt or terminal and press Enter or Return.
- If you haven’t installed Ruby, you can get it from Rubyinstaller.org (Windows), Homebrew (Mac), or your Linux system’s package manager.
- You can check your Ruby version using the command ruby -v.
-

Your Mac has a Ruby interpreter built in to the operating system, so running Ruby scripts will be easy. To open the Terminal:
- Click the Launchpad icon on the Dock (the multicolored squares).
- Type terminal into the search field.
- Click the Terminal icon.
-
The version that comes with your Mac is old and doesn’t update with system updates. Here’s how you can install the latest version:
- If you don’t have Homebrew installed, type /bin/bash -c "$(curl -fsSL https://raw.githubusercontent.com/Homebrew/install/HEAD/install.sh)" and press Return to install Homebrew.[1]
- Type brew install ruby and press Return.
- Type open -e ~/.zshrc and press Return to open your shell configuration file in TextEdit.[2]
-
Add the following lines to the end of the file if you have an Intel-based Mac:
- if [ -d "/usr/local/opt/ruby/bin" ]; then
- export PATH=/usr/local/opt/ruby/bin:$PATH
- export PATH=`gem environment gemdir`/bin:$PATH
- fi
-
Add these lines to the end of the file if you have an Apple silicon-based Mac:
- if [ -d "/opt/homebrew/opt/ruby/bin" ]; then
- export PATH=/opt/homebrew/opt/ruby/bin:$PATH
- export PATH=`gem environment gemdir`/bin:$PATH
- fi
- Save and close the file.
- Close and re-open the Terminal window.
- Type brew pin ruby and press Return.
Advertisement
- If you don’t have Homebrew installed, type /bin/bash -c "$(curl -fsSL https://raw.githubusercontent.com/Homebrew/install/HEAD/install.sh)" and press Return to install Homebrew.[1]
-
When you open the Terminal, you’ll be in your home directory. You’ll want to open the directory in which your Ruby script is saved. For example, if your script is on your desktop, you’d type cd Desktop and press Return.
- You can see a list of files in the current directory by typing ls -a and pressing Return.
-
Replace scriptname.rb with the actual name of the Ruby script you want to run. This executes your Ruby script.


Advertisement
-
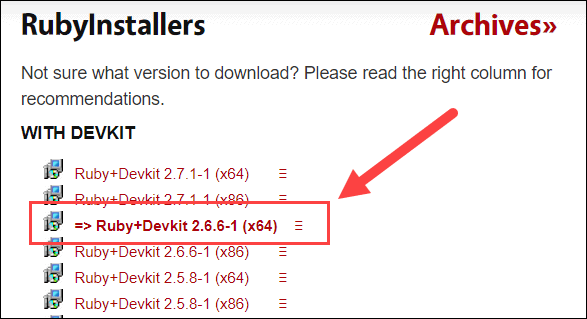
If you haven’t already done so, you’ll need to install Ruby for Windows, which you can get at https://rubyinstaller.org/downloads. Installation is easy—just double-click the downloaded file and follow the on- screen instructions to install.
- If you’re not sure which version to download, look in the right column of the installer’s website to see which is recommended.[3]
- When installing, keep the defaults settings unless you know what you need to change. The defaults will add the Ruby directory to your system path so you can run the ruby command from the command prompt.
- If you’re not sure which version to download, look in the right column of the installer’s website to see which is recommended.[3]
-
You’ll find it in your Start menu after installing Ruby.[4]
- You can also just click the Search bar (or the magnifying glass icon) next to the Start button, type Command, and then click Start Command Prompt With Ruby in the search results.
-
When you open the Command Prompt, you’ll be in your home directory (usually C:\Users\yourname). So if your Ruby script is on your desktop, you’d type cd Desktop or C:\Users\yourname\Desktop and press Enter.
-
Replace scriptname.rb with the actual name of the Ruby script you want to run. This runs your Ruby script.


Advertisement
-
You can do so by pressing Control + Alt + T or by clicking the Terminal icon in your app list.
-
This checks your version of Ruby. If you’re using a version that’s earlier than 2.7.1, you’ll want to upgrade.
-
If you don’t have Ruby or are using an earlier version, here’s how to get it:
- Type sudo apt-get update and press Enter to update your package list.
- Type sudo apt-get install ruby-full and press Enter to install the latest version of Ruby.
-
For example, if the script is in a folder called code inside of your home directory, you’d type cd code and press Enter.
- Type ls -a and press Enter to see which files are inside the current directory.
-
Replace scriptname.rb with the actual name of the Ruby script you want to run. This runs your Ruby script.


Advertisement
Add New Question
-
Question
How do I debug a Ruby code?
Kevin Burnett is a Software Developer with over 20 years of professional experience. He works for SpiffWorkflow, a Python Process Automation tool for organizations. Prior to SpiffWorkflow, he spent the majority of his career at Rosetta Stone, a language-learning software company. He has experience with both front and back-end development and works primarily in Python, Ruby, and JavaScript. He attended the first RailsConf and the most recent PyCon US. He received an MBA and a BA in Computer Science and Spanish from Eastern Mennonite University.
Software Developer
Expert Answer
The best way to debug is to use a library. The best one, in my opinion, is Byebug. It’s also the one that’s recommended. You basically require it, and then you can start a debugger by calling the Byebug commands. When you’re inside the debugger, you can do all of the things you can do within debuggers, like step through your program, figure out what variables are set, and check down your issue.
Ask a Question
200 characters left
Include your email address to get a message when this question is answered.
Submit
Advertisement
Thanks for submitting a tip for review!
About This Article
Thanks to all authors for creating a page that has been read 32,954 times.
Is this article up to date?
Content
- 1 Prerequisites
- 2 Step 1 — Installing Bash on Windows
- 3 Step 2 — Installing RVM and Ruby
- 4 Step 3 — Creating a Simple Program
- 5 Conclusion
Ruby Programming on Windows: A Step-by-Step Guide
Ruby is a dynamic programming language you can use to write anything from simple scripts to games and web applications. It was first released in Japan in 1993, but gained popularity in 2005 as a language for server-side web development. Ruby is designed to be easy to use and fun for beginners, but powerful enough to create complex systems. It’s a great choice for beginners and experienced developers alike.
While there are many ways to set up Ruby on Windows, Microsoft recommends that you use the Windows Subsystem for Linux (WSL) and Bash to do your Ruby development. WSL is a Windows 10 feature that lets you run native Linux command line tools on Windows. Many Ruby libraries are designed to run on Linux, and can exhibit problems when run on Windows.
Microsoft partnered with Canonical and other Linux distributions to enable native support for the Bash shell and Linux command line tools to solve this issue. With Bash and WSL installed, you’ll edit your files with your favorite Windows tools, but use Bash and command line tools to execute Ruby and its related tools.
Prerequisites
You will need a computer running Windows 10 with the Creators Update, and access to install software with administrative privileges.
Step 1 — Installing Bash on Windows
You’ll use the command line to install and work with Ruby. The command line is a non-graphical way to interact with your computer. Instead of clicking buttons with your mouse, you’ll type commands as text and receive text-based feedback. The command line, also known as a shell, lets you automate many tasks you do on your computer daily, and is an essential tool for software developers.
Windows offers two command line interfaces out of the box: the classic Command Prompt, and PowerShell. We’re going to install Bash, a popular shell and command language that you’d find on Linux and macOS.
First, enable Developer mode on your machine. To do this, open the Settings app, select Update & Security, and then choose the For developers entry in the sidebar. Then check the Developer mode option and accept the prompt asking you to verify this change.
Next, open the Control Panel and select Programs. Then select Turn Windows features on or off. In the list of components that appears, check the option for Windows Subsystem For Linux (Beta). Then click OK and wait while Windows installs the additional components, which may take a few minutes.
When the computer reboots, open the Command Prompt and type:
Step 2 — Installing RVM and Ruby
RVM automates the process of setting up a Ruby environment on an Ubuntu or macOS system, and since the Bash setup you’re running is based on Ubuntu, this is the quickest way to set things up on Windows as well. Let’s get it installed so we can use it to install Ruby.
gpg --keyserver hkp://keys.gnupg.net --recv-keys 409B6B1796C275462A1703113804BB82D39DC0E3 7D2BAF1CF37B13E2069D6956105BD0E739499BDB
Install the gnupg2 package:
sudo apt-get install gnupg2
Download RVM installation script:
\curl -sSL https://get.rvm.io -o rvm.sh
Step 3 — Creating a Simple Program
Let’s create a small “Hello, World” program to verify the setup.
Run the program:
Conclusion
With your local machine ready for software development, you can continue to learn more about coding in Ruby.
Posts you might be interested in:

Install Jitsi Meet on Ubuntu 20.04 with SSL & Nginx
Linux file permissions with this comprehensive guide. Understand how to utilize chmod and chown commands to assign appropriate access rights, and gain insights into special permission bits like SUID, SGID, and the sticky bit to enhance your system’s security framework.
Secure Buildbot CI/CD on CentOS 7 with SSL and Nginx
Linux file permissions with this comprehensive guide. Understand how to utilize chmod and chown commands to assign appropriate access rights, and gain insights into special permission bits like SUID, SGID, and the sticky bit to enhance your system’s security framework.
Install LEMP Stack on Rocky Linux 8: Nginx, MariaDB, PHP Guide
Linux file permissions with this comprehensive guide. Understand how to utilize chmod and chown commands to assign appropriate access rights, and gain insights into special permission bits like SUID, SGID, and the sticky bit to enhance your system’s security framework.
Last Updated :
13 May, 2024
Ruby is a dynamic, object-oriented programming language and a Ruby script is a plain text file containing code written in the Ruby programming language. Ruby scripts are saved with a .rb extension. Ruby scripts can be used to write programs as simple as «Hello, World!», to complex applications, such as web servers, automation scripts, or data processing tools.
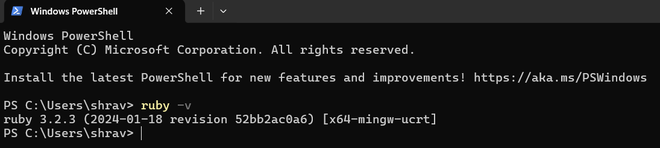
To execute the Ruby Script in Windows, you need to make sure that Ruby is installed in the system and that its path is added to the system’s environment variables.
Check if Ruby is installed and the path is added to the environment variable by typing this command in your command prompt or Powershell:
ruby -v
Output should look like this, version number can differ in your system so do not worry about it:
In case any other output or error shows then read this article to install and set up it: How to install Ruby on Windows?
Ways to execute Ruby Scripts in Windows
In Windows, you can execute Ruby scripts using various methods but these are the most common:
- Using Command Prompt or Powershell
- Using Ruby Interactive Shell (IRB)
Using Command Prompt or Powershell
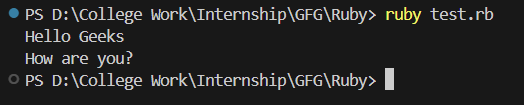
Create a file with any name and save it with «.rb» extension and write your ruby script in that file then open the Command Prompt or Powershell and locate it to the directory where you saved your Ruby Script.
Here in this example, we are executing «test.rb» script:
Ruby
puts "Hello Geeks"
puts "How are you?"
This up here is our ruby script and it can be executed with the command «ruby filename.rb», in our case its «ruby test.rb»:
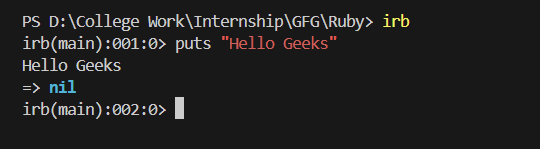
Using Ruby Interactive Shell (IRB)
The Ruby Interactive Shell, usually referred to as IRB (Interactive Ruby), is a command-line tool that allows you to interactively execute Ruby code. It provides a REPL (Read-Eval-Print Loop) environment where you can type Ruby code, and it will be executed immediately, displaying the results back to you.
You can start an IRB in your Command Prompt or Powershell just by typing «irb»:

You can execute code directly in Ruby Interactive Shell like this:
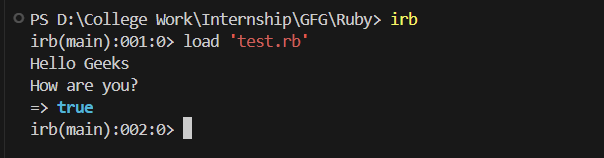
You can even run the Ruby Script file directly in Ruby interactive shell by loading it with load command:
Ruby is a programming language and development environment. It’s often used in web applications, data analysis, and other general-purpose programming.
This guide will show you two options to install Ruby on a Windows 10 system.

Prerequisites
- A system running Windows 10, updated to version 2004 (May 2020)
- A user account with administrator privileges
- Access to the command line / powershell
(click Start > type “cmd” > right-click > Run as administrator OR Start > type “powershell” >right-click > Run as administrator)
About Ruby: Ruby was developed under the Linux and macOS architecture. There are two ways to run Ruby on Windows. The more straightforward method is to use the Ruby installer to install all the software packages required. The more robust method is to install the Linux subsystem on Windows 10, then use Linux commands to install Ruby.
Installing Ruby Using the RubyInstaller Tool
This process uses the latest version from the Ruby Developer Download page. There are multiple options on this page.
If the system is used for developing software, or you aren’t sure which to choose, use a version With Devkit (Developer’s Kit). If you only need to run Ruby applications, use the version Without Devkit.
Step 1: Download the RubyInstaller Tool
Use a web browser to navigate to the Download page (linked above). If no specific version is needed, select the bolded option:
Save the file and remember its location.
Step 2: Run the Ruby Installer
1. Browse to the location of the RubyInstaller tool, and double-click.
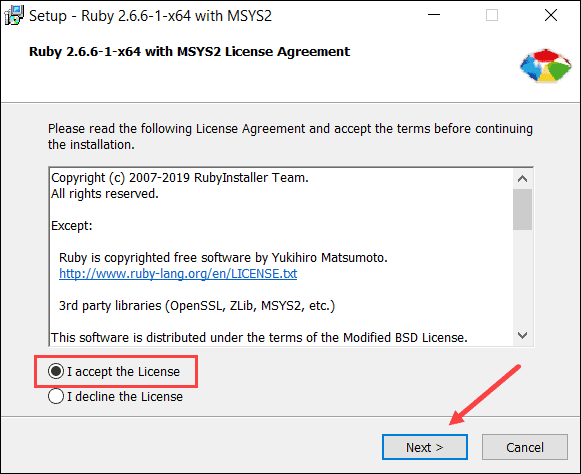
2. A Setup dialog launches and displays the License Agreement. Review it, tick the box to accept the agreement, then click Next.
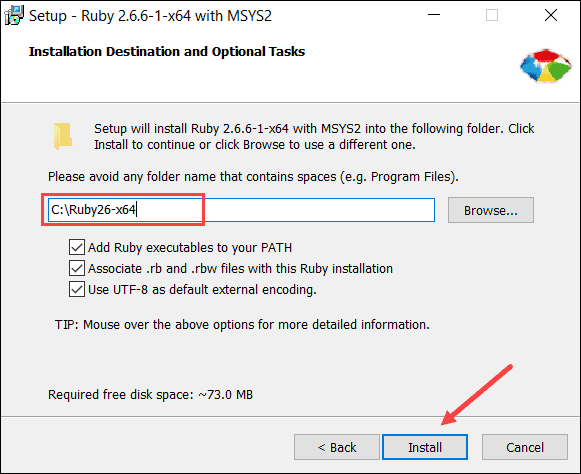
3. The installer asks to adjust the installation location and associated file types. Leave the defaults selected, unless the system requires differently, then click Install.
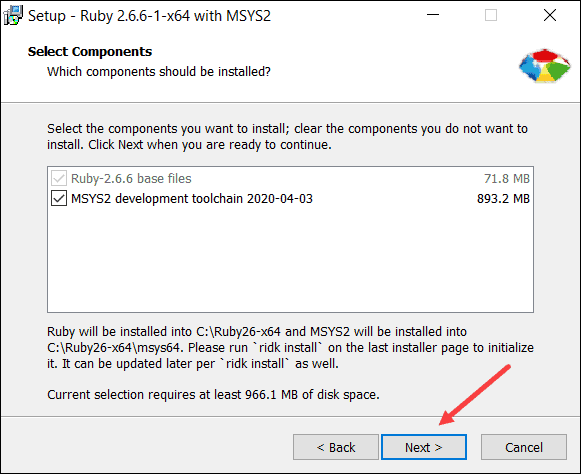
4. The system prompts to select components. Leave the default settings, and click Next.
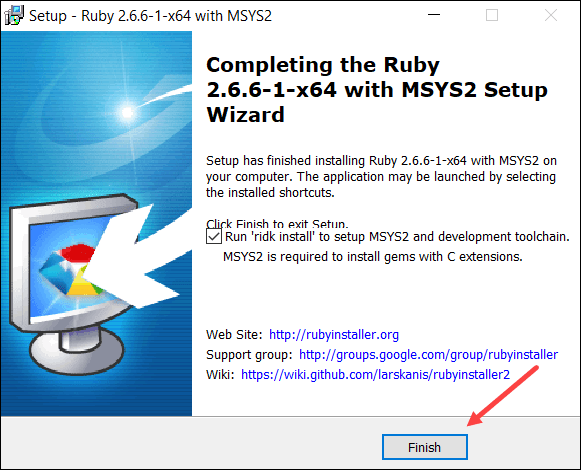
5. The Setup dialog runs for several minutes. When finished, it prompts to “Run ‘ridk install’ to setup MSYS2 and development toolchain.” Leave this checked and click Finish.
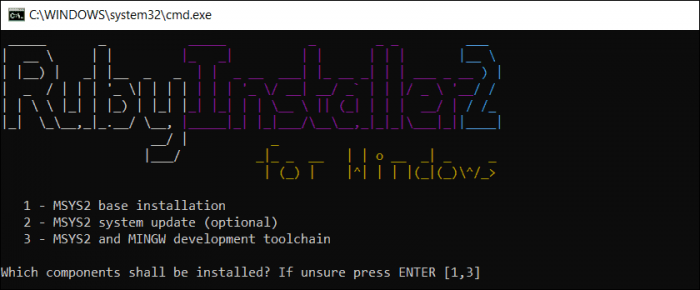
6. A black command-line-style window appears, labeled RubyInstaller2 for Windows. Select the components to install. Press Enter to install the default tools.
7. Once it finishes, press Enter again for the installer to close.
Step 3: Verify the Ruby Installation
If you have any terminal windows open, close them. Open a new terminal window, and enter the following:
ruby –vThe system displays the current version of Ruby installed on Windows 10.

Installing Ruby with the Linux Subsystem
Step 1: Enable the Windows Linux Subsystem (WSL)
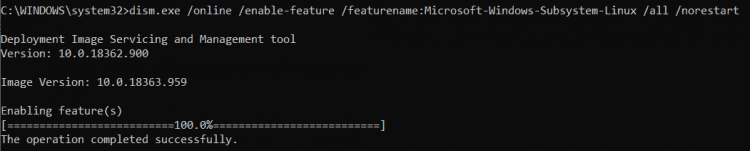
Open a command line, and enter the following command:
dism.exe /online /enable-feature /featurename:Microsoft-Windows-Subsystem-Linux /all /norestartThe system takes a few moments to enable the feature. Then, make sure to reboot the system for the changes to take place.
Step 2: Install Linux Distro
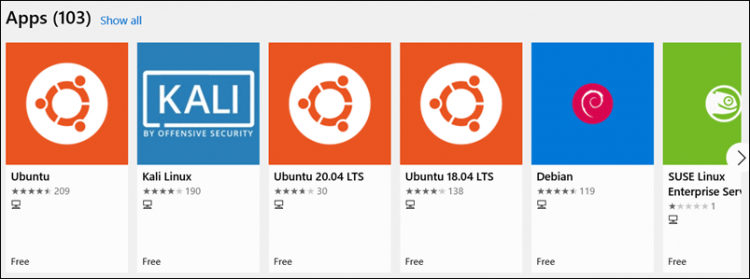
1. Once the system reboots, launch the Microsoft Store, click Search, and type Linux. The store lists several different versions of Linux that can run within Windows. If you don’t have a preference, Ubuntu 20.04 is a modern, easy-to-use version.
2. Select the version, then click Get.
3. The store displays that you now own the software. Select Install. You may be prompted to sign in with a Microsoft account. You may skip signing in.
4. Once the process finishes, you can either click Launch or exit the Microsoft Store.
5. Search for the Ubuntu Linux Subsystem in the Start Menu. Open it to complete the installation.
6. Follow the prompts and set up a user account and password for the Ubuntu subsystem. The output then notifies you have successfully installed Ubuntu.
Note: The Linux subsystem includes many tools commonly used in Linux. These include the BASH shell, the APT package manager, and others.
Step 3: Update the Linux Subsystem
When using Linux, it’s essential to update the system and software packages before installing new software.
To update your Linux subsystem, open a command line, and enter the following:
sudo apt updateAllow the process to complete. You may be prompted to confirm the installation of some packages – to do so, type y and Enter.
Note: The sudo command stands for SuperUser DO. It lets you run a single command as an administrator, maintaining security on the system while accessing essential tasks.
Step 4: Install Ruby
Once your Linux subsystem is fully installed and updated, install Ruby by entering the following:
sudo apt install ruby-fullConfirm the installation with y and Enter.
Step 5: Verify the Installation
To verify Ruby was successfully installed on Windows 10, enter the following command:
ruby –vThe system should display the current version of the installed Ruby software.
Conclusion
You should now have the Ruby programming language installed on Windows 10. Next, you may want to look into setting up Ruby on Rails.
Was this article helpful?
YesNo
3 августа, 2017 11:41 дп
5 288 views
| Комментариев нет
Ruby
Ruby – это динамический язык программирования, в котором можно написать что угодно: от простых скриптов до игр и веб-приложений. Ruby появился в Японии в 1993 году, но только в 2005 году он стал популярным языком для разработки на стороне сервера. Ruby прост в использовании и с ним легко работать даже новичкам, но он достаточно мощный, чтобы создавать сложные системы. Это отличный выбор для начинающих и опытных разработчиков.
Существует много способов установки Ruby в Windows. Microsoft рекомендует использовать для разработки Ruby Windows Subsystem for Linux (WSL) и Bash. WSL – это функция Windows 10, которая позволяет запускать инструменты командной строки Linux в Windows. Многие библиотеки Ruby предназначены для работы в Linux, и при использовании их в Windows могут возникать проблемы. Компания Microsoft сотрудничает с Linux, чтобы разрешить встроенную поддержку оболочки Bash и инструментов командной строки Linux для решения проблем совместимости Ruby и Windows. Установив Bash и WSL, вы сможете редактировать файлы с помощью инструментов Windows, а для работы Ruby и связанных с ним библиотек использовать Bash.
Данное руководство научит настраивать среду разработки Ruby на локальной машине Windows с помощью командной строки. Для тестирования среды будет создана простая программа Ruby.
Требования
- Машина Windows 10.
- Creators Update.
- Права администратора.
1: Установка Bash в Windows
Для установки Ruby будет использована командная строка. Командная строка представляет собой неграфический способ взаимодействия с компьютером. Вместо нажатия кнопок с помощью мыши вы вводите команды в виде текста и получаете обратную связь опять же в виде текста. Командная строка, также известная как оболочка, позволяет вам автоматизировать многие рутинные задачи и является важным инструментом для разработчиков программного обеспечения.
Windows предлагает два интерфейса командной строки «из коробки»: классическую командную строку и PowerShell. Для работы с Ruby рекомендуется установить строку Bash, популярный командный язык, которые используется в Linux и macOS.
Читайте также: Основы работы с терминалом Linux
Включите на машине Developer mode. Для этого откройте Settings, выберите Update & Security, в боковой панели найдите For developers. Затем выберите опцию Developer mode и подтвердите изменения.
Откройте Control Panel и выберите Programs → Turn Windows features on or off. В списке компонентов выберите опцию Windows Subsystem For Linux (Beta). Кликните OK и подождите, пока система установит дополнительные компоненты. Это может занять несколько минут.
После этого система предложит перезапустить компьютер. Сделайте это, чтобы обновить общесистемные файлы.
После перезагрузки откройте командную строку и введите:
bash
Будет предложено установить Bash из Windows Store. Это бесплатно, загрузка занимает несколько минут.
This will install Ubuntu on Windows, distributed by Canonical

and licensed under its terms available here:

https://aka.ms/uowterms

Press "y" to continue: y

Downloading from the Windows Store... 100%

Extracting filesystem, this will take a few minutes....
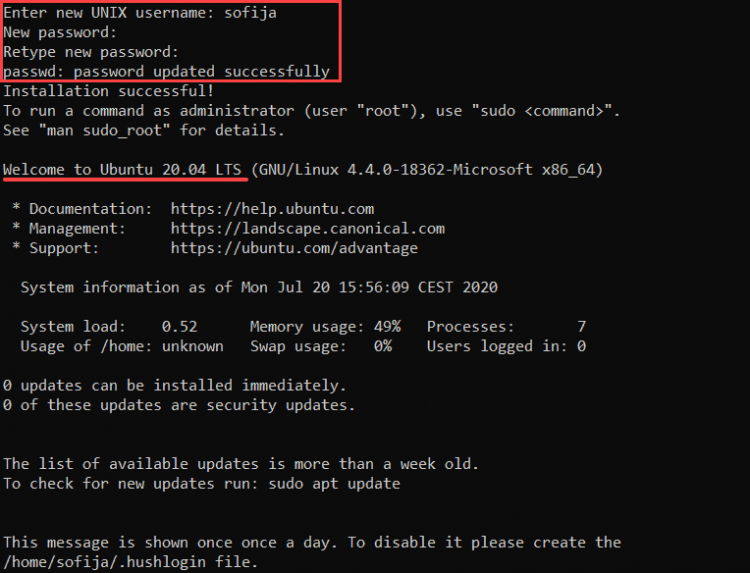
После установки инсталлятор предложит создать пользователя:
Please create a default UNIX user account. The username does not need to match your Windows username.

For more information visit: https://aka.ms.wslusers

Enter new UNIX username: 8host

Enter new UNIX password:
Укажите имя пользователя, нажмите Enter, введите пароль.
При вводе пароля символы не отображаются в окне терминала. Эта мера безопасности часто применяется при запросе паролей в командной строке. Вы не будете видеть символов, но система все равно будет фиксировать нажимаемые клавиши. Введите пароль и нажмите Enter, чтобы продолжить.
Оболочка Bash запустится. Командная строка будет выглядеть так:
8host@yourmachine:/mnt/c/Users/8host$
Важно! Windows Subsystem for Linux имеет собственную файловую систему, которая хранится в скрытом файле в операционной системе. Microsoft не поддерживает доступ приложений Windows к этой файловой системе.
Однако все существующие файлы доступны в оболочке Bash. Например, все содержимое диска C можно найти в каталоге /mnt/c. Корпорация Microsoft рекомендует работать с файлами из этой папки. Таким образом, вы можете использовать инструменты Windows для работы с файлами и по-прежнему обращаться к ним из оболочки Bash. Доступ к файлам из других частей Windows Subsystem for Linux через программы Windows, таких как текстовые редакторы, файловые менеджеры и IDE, может привести к повреждению данных и не поддерживается.
2: Установка RVM и Ruby
RVM автоматизирует процесс установки среды Ruby в системе Ubuntu, на которой основана ваша установка Bash.
Самый быстрый способ установить Ruby с помощью RVM – запустить сценарий установки, размещенный на веб-сайте RVM.
Сначала используйте команду gpg, чтобы связаться с сервером открытых ключей и запросить ключ проекта RVM, который используется для подписи каждой версии RVM. Это позволяет подтвердить подлинность релиза RVM. В домашнем каталоге выполните следующую команду:
gpg --keyserver hkp://keys.gnupg.net --recv-keys 409B6B1796C275462A1703113804BB82D39DC0E3 7D2BAF1CF37B13E2069D6956105BD0E739499BDB
Затем установите пакет gnupg2 (сценарий установки RVM будет использовать компоненты этого пакета для проверки релиза). Выполните эту команду:
sudo apt-get install gnupg2
Для установки программы нужно ввести пароль администратора. Однако при вводе пароля символы не отображаются в окне терминала. Эта мера безопасности часто применяется при запросе паролей в командной строке. Вы не будете видеть символов, но система все равно будет фиксировать нажимаемые клавиши. Введите пароль, нажмите Enter и программа будет установлена.
Затем используйте команду curl для загрузки сценария установки RVM с веб-сайта проекта. Обратный слеш в начале команды отключает все псевдонимы команды и запускает обычную команду curl.
\curl -sSL https://get.rvm.io -o rvm.sh
В команде использованы такие флаги:
- Флаг -s (–silent) отключает индикатор выполнения.
- Флаг -S (–show-error) включает поддержку сообщений об ошибках curl.
- Флаг -L (–location) включает обработку редиректов. Если сервер сообщает, что запрошенная страница переместилась на другой адрес, команда автоматически отправит запрос в новое местоположение.
После загрузки можно проверить содержимое сценария перед его запуском:
less rvm.sh
Используйте клавиши со стрелками для прокрутки файла. Чтобы вернуться в командную строку, нажмите q.
Убедившись, что сценарий не содержит ничего лишнего, выполните эту команду, чтобы установить последнюю стабильную версию RVM:
cat rvm.sh | bash -s stable
Сценарий создает в домашнем каталоге новый каталог под названием .rvm. Здесь будет установлен релиз Ruby и все связанные с ним компоненты, а также исполняемая программа rvm, которую вы используете для установки Ruby. Процесс установки изменит файл.bashrc и добавит папку .rvm/bin в переменную среды PATH. Это позволит запускать команду rvm.
Однако в текущей сессии команда rvm будет недоступна. Чтобы исправить это, введите:
source ~/.rvm/scripts/rvm
Используйте rvm, чтобы установить последнюю версию Ruby.
rvm install ruby --default
Эта команда загрузит и установит Ruby и все сопутствующие компоненты и сделает эту версию Ruby версией по умолчанию, чтобы избежать конфликтов, если у вас уже установлена версия другая Ruby.
Searching for binary rubies, this might take some time.

Found remote file https://rvm_io.global.ssl.fastly.net/binaries/ubuntu/16.04/x86_64/ruby-2.4.0.tar.bz2
Если в системе не хватает важных зависимостей, инсталлятор загрузит и установит их. При этом он может запросить пароль пользователя Linux.
Checking requirements for ubuntu.

Installing requirements for ubuntu.

Updating system....

Installing required packages: gawk, libssl-dev, zlib1g-dev, libyaml-dev, libsqlite3-dev, sqlite3, autoconf, libgmp-dev, libgdbm-dev, libncurses5-dev, automake, libtool, bison, libffi-dev, libgmp-dev, libreadline6-dev..................

Requirements installation successful.
Установив зависимости, RVM загрузит и установит Ruby.
ruby-2.4.0 - #configure

ruby-2.4.0 - #download

% Total    % Received % Xferd  Average Speed   Time    Time     Time  Current

Dload  Upload   Total   Spent    Left  Speed

100 16.4M  100 16.4M    0     0  4828k      0  0:00:03  0:00:03 --:--:-- 4829k

ruby-2.4.0 - #validate archive

ruby-2.4.0 - #extract

ruby-2.4.0 - #validate binary

ruby-2.4.0 - #setup

ruby-2.4.0 - #gemset created /home/brian/.rvm/gems/ruby-2.4.0@global

ruby-2.4.0 - #importing gemset /home/brian/.rvm/gemsets/global.gems..............................

ruby-2.4.0 - #generating global wrappers........

ruby-2.4.0 - #gemset created /home/brian/.rvm/gems/ruby-2.4.0

ruby-2.4.0 - #importing gemsetfile /home/brian/.rvm/gemsets/default.gems evaluated to empty gem list

ruby-2.4.0 - #generating default wrappers........
После выполнения сценария будет установлена последняя версия Ruby.
В дополнение к Ruby RVM устанавливает несколько сопутствующих инструментов: irb (интерактивная консоль Ruby), rake (программа для запуска сценариев автоматизации) и gem (упрощает установку и обновление библиотек Ruby, которые можно использовать в проектах).
Запросите версию Ruby:
ruby -v

ruby 2.4.0p0 (2016-12-24 revision 57164) [x86_64-linux]
Важно! Чтобы менеджер RVM мог использовать эту версию Ruby при запуске сессий Bash, нужно запустить Bash как login shell. RVM нужен доступ к файлу .bash_profile, который вызывается только в login shell. Bash for Windows не запускает login shell по умолчанию, потому для работы с Ruby нужно открыть командную строку и запустить Bash с помощью команды:
bash -l
Также вместо этого можно запускать следующую команду при каждом запуске Bash:
source ~/.rvm/scripts/rvm
3: Создание простой программы Ruby
Чтобы убедиться, что среда работает, напишите простую программу «Hello, World».
Создайте файл hello.rb:
nano hello.rb
Введите в него следующий код:
puts "Hello, World!"
Нажмите Y, чтобы сохранить файл.
Запустите программу:
ruby hello.rb
Программа выведет на экран следующую фразу:
Hello, World!
Эта простая программа подтверждает, что среда разработки настроена правильно.
Теперь локальная машина готова к разработке программного обеспечения.
Вы можете использовать эту среду для изучения Ruby и создания более сложных и интересных проектов.
Читайте также: Написание простой программы Ruby
Tags: Ruby, RVM, Windows 10