
Many users probably have encountered issues when using Windows 11 or 10 on computers. Windows 10 will not update or runs slowly, and the computer frequently appears blue or black screen or keeps crashing. The worst thing is that Windows 10 or Windows 11 will not boot. When your computers show these signals, you need to repair Windows 11 or Windows 10.
We will show you the exact method of repairing Windows 10 using CMD with DISM and SFC commands. If these Windows repair commands cannot work, you can ask for help with Windows Repair services. If your computer cannot boot, we recommend you recover data with bootable data recovery software from the PC.
Recover Data on Windows 11/10 with Bootable Data Recovery Software
If your PC unluckily fails to boot, and you don’t want to lose some essential files after repairing Windows 11/10, we recommend downloading EaseUS Data Recovery Wizard to recover the data with a bootable USB Drive.
Even if you can boot Windows successfully, you still risk losing data from Windows repair. This data recovery tool can help you recover deleted files from hard drives, USB drives, SD cards, cloud platforms, etc. It is possible to recover deleted photos Windows 10 or videos, audio, music, documents, etc.
We give you a tutorial on recovering data from computers that won’t boot using EaseUS Data Recovery Wizard Pro with Bootable Media.
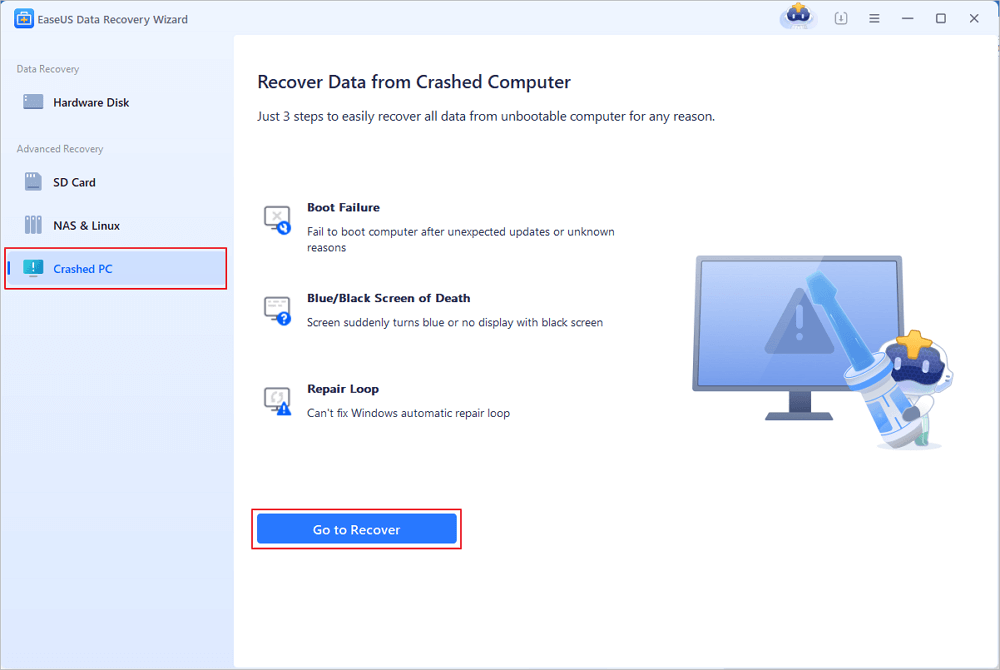
Step 1. Create a bootable disk
Launch EaseUS Data Recovery Wizard, choose «Crashed PC» and click «Go to Recover».
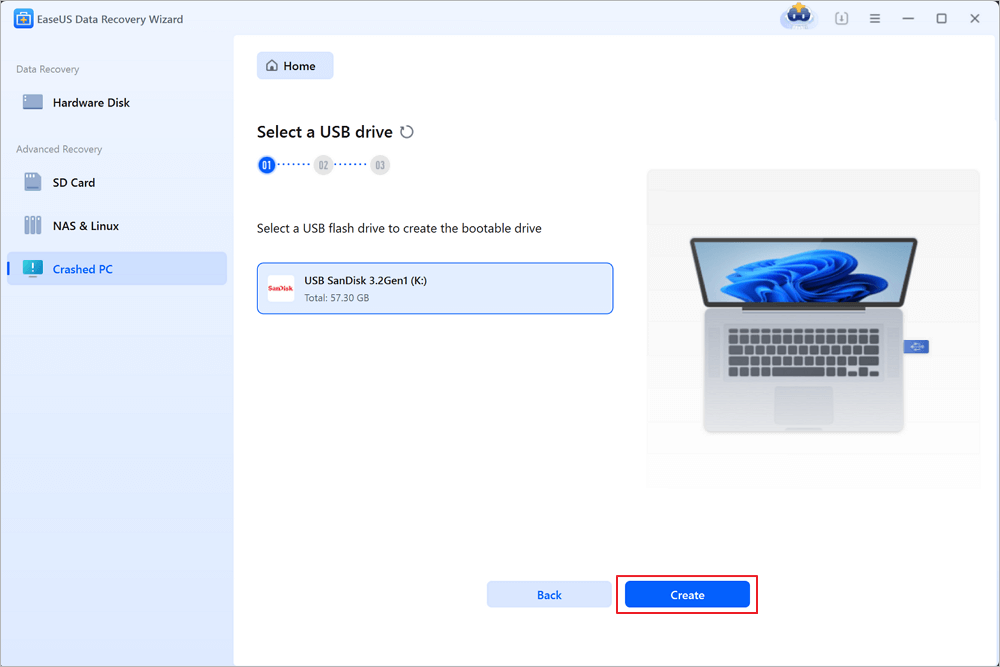
Select an empty USB to create the bootable drive and click «Create».
⚠️Warning: When you create a bootable disk, EaseUS Data Recovery Wizard will erase all data saved in the USB drive. Back up important data beforehand.
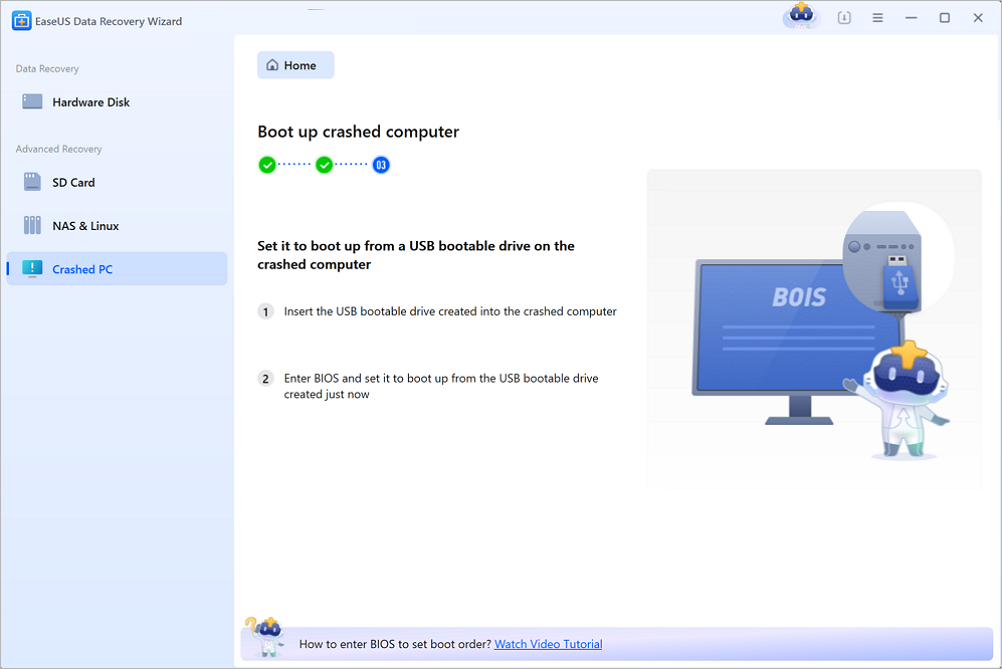
Step 2. Boot your computer from the bootable USB
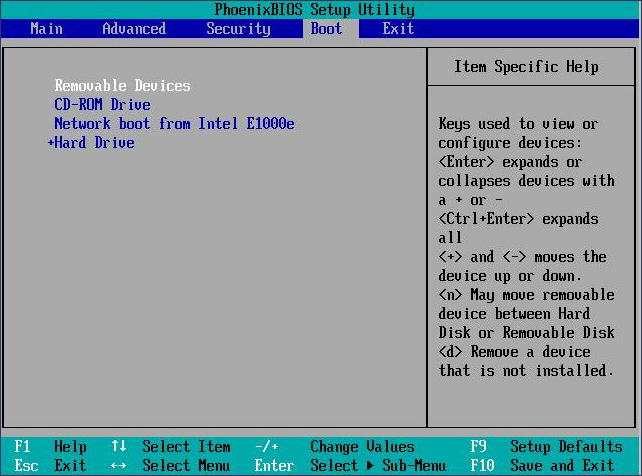
Connect the bootable disk to the PC that won’t boot and change your computer boot sequence in BIOS. For most users, it works well when they restart their computer and press F2 simultaneously to enter BIOS.
Set to boot the PC from «Removable Devices» (bootable USB disk) beyond Hard Drive. Press «F10» to save and exit.
Step 3. Recover data from a crashed system/PC
After booting from EaseUS Data Recovery Wizard bootable disk, select the drive you want to scan to find all your lost files. Preview and recover the files you need to a safe location.
💡Tip: You can restore data on the local disks, external hard drives, and also the cloud storage.

Windows 11/10/8 has a wonderful built-in tool – Windows Troubleshoot. You can use this tool to repair Windows 11/10/8 quickly. You need to create a bootable USB with a Windows bootable disc or drive for a computer that won’t boot.
To create a Windows bootable disk, you need to blank a USB drive and download a Windows operating system into a USB drive.
Before we start, here is an 8-mins video to show you how to repair Windows 10 using Command Prompt. We listed the three key moments for you:
- 01:47 Using the DISM command
- 05:16 Reset Windows with command lines.
- 07:03 Run system restore with CMD.
How to Run CMD from Windows Bootable Disk
After you create a Windows bootable disk, we can start to repair Windows 10.
Step 1. Connect the Windows bootable disk to your computer.
Step 2. Press the PC’s power button to turn on the PC. Then press Esc/F1/F2/F8/F10 key to boot into BIOS. (If you don’t know how to enter BIOS, check this link.)
Step 3. When successfully entering BIOS, move the connected USB drive to the first one in the Boot menu.
Step 4. Press the F10 button to save the changing setting and quit BIOS.
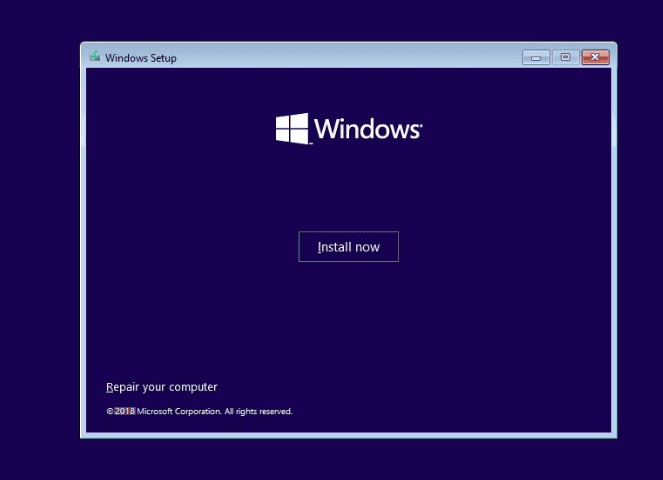
Step 5. Adjust all the settings on the Setup page and then click «Next».
Step 6. Click «Repair your computer».
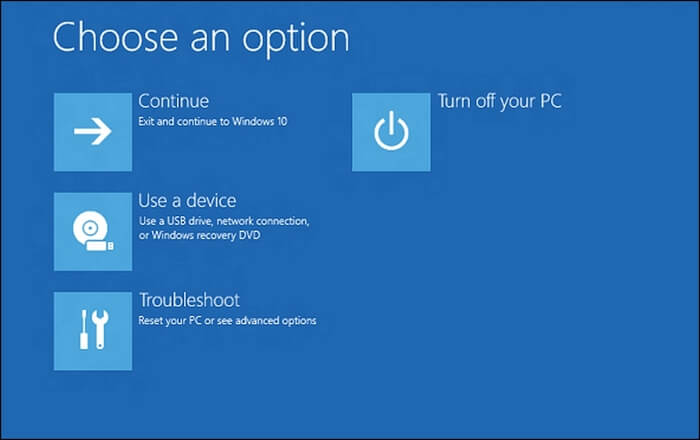
Step 7. Click the Troubleshoot button.
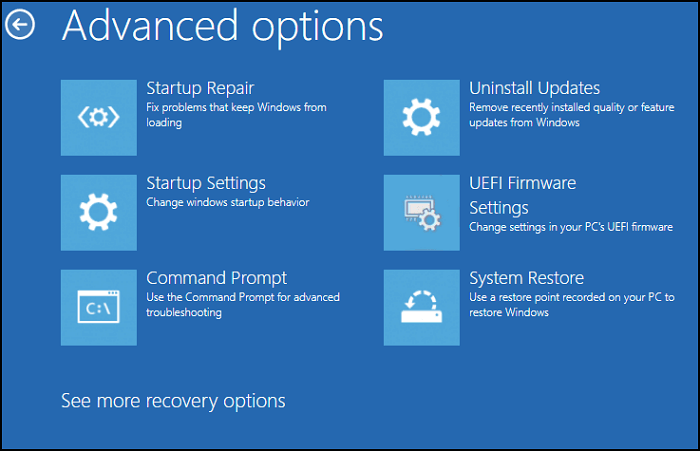
Step 8. Choose the Advanced Options button and click «Command Prompt».
Repair Windows 10 Using CMD [with SFC Command]
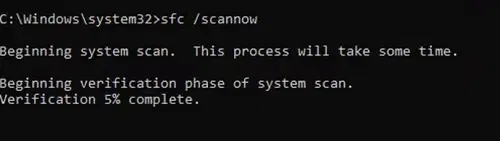
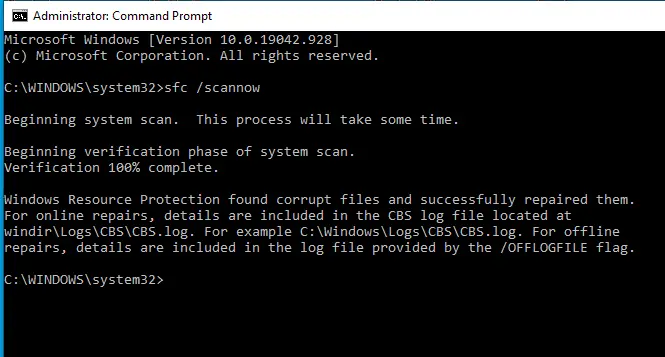
SFC is a System File Checker, and you can use this command to scan for and restore corrupted system files on Windows 11/10. After you run the Command Prompt, it is not difficult to repair Windows 10 using Command Prompt with the SFC command.
Step 1. Run CMD.
Step 2. Type in sfc /scannow, and press the Enter key.
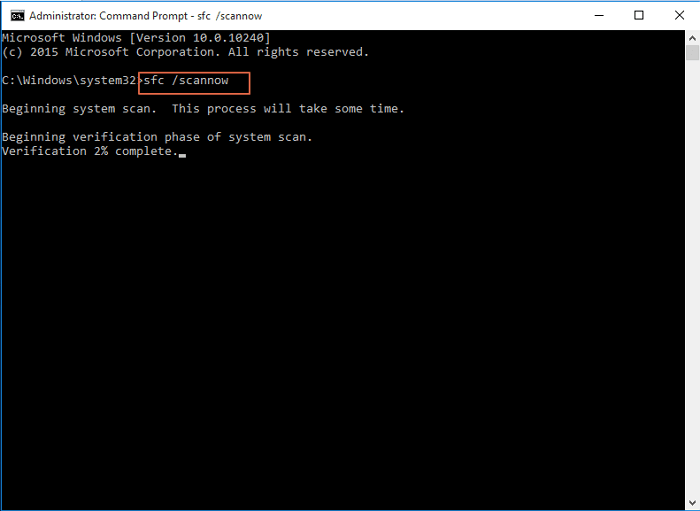
Step 3. Wait until the scanning is finished.
Note: When your SFC is not working, click the link to fix it.
Repair Windows 10 Using CMD [with DISM Command]
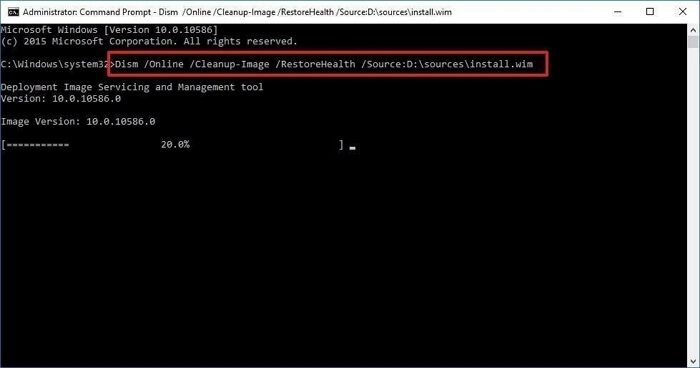
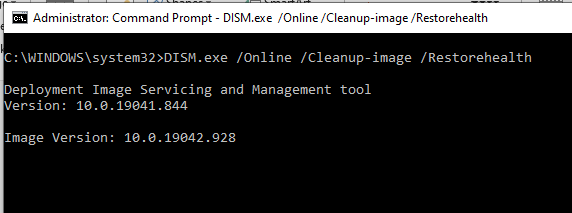
If you cannot fix the Windows issues with the SPC command, you can try DISM. DISM command is known as Deployment Image Servicing and Management, and you can use this command to repair images on Windows 10/11. We will show you how to repair Windows 10 with Command Prompt using the DISM command.
Step 1. Run CMD from a Windows bootable disk.
Step 2. Type in DISM / Online / Cleanup Image / CheckHealth to check if there are corruptions or not.
Step 3. Type in DISM /Online /Cleanup-Image /ScanHealth to scan the corruptions of Windows images.
Step 4. Type in DISM /Online /Cleanup-Image /RestoreHealth /Source:repairSource\install.wim to fix Windows image corruptions.
Repair Windows 10 with Windows Repair Services
If you fail to repair Windows 10 using Command Prompt, you can seek professional help from EaseUS Data Recovery services. Our experienced team will help you solve different system issues without data loss.
Consult with EaseUS data recovery experts for one-on-one manual recovery service. We could offer the following services after FREE diagnosis:
- Fix Windows boot issues, including BSOD
- Fix Windows error and configure Windows environment
- Restore the system when it fails to boot
- Optimize Windows computer to make it run quickly
Summary
In most cases, you can repair Windows 10 using Command Prompt with SPC command and DISM command. If the problem is not solved, you can also reset or restore Windows OS to fix some issues.
It is easy to lose data when you are repairing with Windows repair commands. If you don’t have a backup and lose some essential files, do not forget to download EaseUS Data Recovery Wizard to recover deleted files.
Repair Windows 10 Using Command Prompt FAQs
Read more questions and answers in this part to learn how to repair Windows 10 using CMD.
How do I repair Windows 10 with command prompt?
You can repair Windows 10 with CMD using the SFC and DISM commands.
- 1. Entering the CMD windows.
- 2. Type in sfc /scannow, and press the Enter key. This command can check and repair Windows 10 corruptions.
- 3. If the SFC command doesn’t work. Type in DISM / Online / Cleanup Image / CheckHealth to check if there are corruptions or not
- 4. Type in DISM /Online /Cleanup-Image /ScanHealth to scan the corruptions of Windows images.
- 5. Type in DISM /Online /Cleanup-Image /RestoreHealth /Source:repairSource\install.wim to fix Windows image corruptions.
How do I recover from Unbootable Windows 10?
We recommend downloading EaseUS Data Recovery Wizard and creating a bootable disk to recover data.
- 1. Launch EaseUS Data Recovery Wizard and create a bootable disk.
- 2. Boot from the bootable USB.
- 3. Recover essential data from a hard drive that won’t boot
What is SFC and DISM command?
SFC is a System File Checker, and you can use this command to scan for and restore corrupted system files on Windows. DISM command is known as Deployment Image Servicing and Management, and you can use this command to repair images on Windows.
Last Updated :
05 Apr, 2025
Is your Windows 10 not working right? Maybe it’s slow, keeps crashing, or won’t start properly. These problems can be annoying, but you don’t have to do something big like reinstalling Windows yet. There’s a handy tool called Command Prompt that can fix many Windows issues, and it’s already on your computer. People often overlook it, but Command Prompt is super useful and doesn’t need you to be a tech expert to use it.
In this blog, we’ll show you how to use Command Prompt to fix Windows 10. We’ll explain simple steps to solve things like startup troubles, broken system files, or even resetting your computer to how it was before. You’ll learn easy commands like CHKDSK, DISM, SFC, BCD, and NET and some tricks to get your Windows 10 running smoothly again.
Important Note
This article will highlight all the methods to Repair Windows 10 with the help of Command Prompt Only.
Best Practices to Use Command Prompt
If you’ve picked Windows to Install in your system, then Before moving ahead with the demonstration of Windows commands executed on the Windows Command Prompt to resolve Windows issues, it is time to discuss some of the best practices with CMD. You must remember these points before implementing the commands on Windows.
- Always Run in Administrator: If you make any changes on Windows OS, ensure the Command Prompt is executed in the Administrative Format. As in that case only, the Command Prompt can make necessary changes. Otherwise, the command executed will not impact the device.
- Put Proper Command: Oftentimes, users put the command wrong in the Command Prompt. This might cause Wrong Command Execution or sometimes, an error message comes on the Command Window. So, recheck the Syntax of Windows Command, before entering into the system.
- Backup Important Data: It is always necessary to backup the data to another device. If the device has encountered some fatal problems, it might be possible that the Windows gets completely shut down. And your important data has been lost forever. So, it will be better to always have a backup.
How to Repair Windows 10 Using Command Prompt — 5 Methods
Once you’re going for Windows to Install in your system, the following guidelines should be used to be fixed if any uncertain issue arises. Here, we have demonstrated the Most Important Windows Commands executed on the Command Prompt.
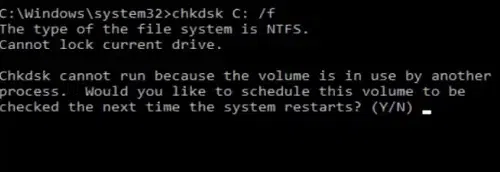
Method 1: Windows Update Repair using CHKDSK Command
Note: The CHKDSK is the Windows Command that is executed on the Disk & Drivers. It checks whether the Disk or Driver is working properly or not. You can get the Boot Errors on Windows for the same reason.
Open the Command Prompt on Windows & execute the CHKDSK Command as the following. It will check the certain Windows Driver issues.
Command: chkdsk <Drive Name> /f
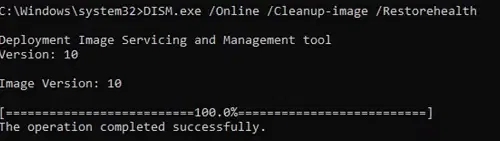
Method 2: DISM Command in CMD for Windows Repair
Note: The Deployment Image Servicing and Management or DISM Command can be executed on the Windows Image Files. If these files are not responsive, then the DISM is executed to check the issue.
Open the Command Prompt in the Administrative Format. The DISM Command should be executed in the following manner. It will check & restore the health of the files.
Command: DISM /Online /Cleanup-Image /RestoreHealth
Method 3: Use SFC Command in CMD to Repair Windows
Note: The System File Checker or SFC Command can be used on any kind of Windows System File. If the Windows has any corrupted file, then you have to execute it & all the scanning will be done.
On the CMD of Windows, the SFC Command is executed as per the following. Use the proper syntax of the command.
Command: sfc /scannow
Method 4: Repair Win 10 using BCD Command
Note: The Boot Configuration Data or BCD is the command that can be executed on Windows whenever there is any problem with the Windows Booting.
On the Command Prompt, the BCD Command can be executed as like the following. This command will check all booting problems & then it will rebuild the solution.
Command: bootrec /rebuildbcd

Method 5: Fix Windows with NET Command (Windows Update)
Note: Another important Common Windows Issue related to Windows Update. The NET Command is used to Reset Windows Update problem. You have to Stop Windows Update & Restart it with NET Command.
Step 1: On the Command Prompt, use the following NET Command. This command is going to Turn Off Windows Update.
Command: net stop wuauserv

Step 2: Now, it is time to Restart Windows Update. To do so, we have to use another version of NET Command. The following command will start the Windows Update Service.
Command: net start appidsvc

Mastering CMD commands for repairing Windows errors is a valuable skill for any user. With the right commands and troubleshooting techniques, you can fix issues, troubleshoot error codes, and keep your Windows system running smoothly. By following this guide, you’ve learned how to use CMD to fix Windows errors efficiently, empowering you to take control of your system’s health and performance.
Running Startup Repair on Windows 11 is a go-to solution when your system is having trouble booting up. This process can fix common issues that may prevent Windows from starting correctly. Here’s a quick guide to help you get your Windows 11 up and running smoothly again.
Running Startup Repair on Windows 11 aims to diagnose and, in many cases, automatically fix problems that prevent your computer from booting up properly. Follow these steps to perform a Startup Repair.
Step 1: Access Advanced Startup Options
To begin the process, you’ll need to get into the Advanced Startup Options menu.
If your computer isn’t booting up, you can force restart it a few times by holding down the power button. This should trigger Windows to load the Advanced Startup Options automatically.
Step 2: Navigate to Troubleshoot
Once you’re in the Advanced Startup Options, the next step is to locate the Troubleshoot option.
Select “Troubleshoot” from the menu. This section contains several tools to help repair Windows, including the Startup Repair feature.
Step 3: Choose Advanced Options
Within the Troubleshoot menu, there will be another set of options. Select “Advanced Options.”
This is where you’ll find more in-depth tools that can aid in diagnosing and fixing your computer’s issues, including Startup Repair.
Step 4: Select Startup Repair
In the Advanced Options menu, click on “Startup Repair.”
Windows will initiate the repair process, scanning your system files and configuration. This might take some time, so be patient.
Step 5: Follow On-screen Instructions
During the Startup Repair process, you might see some on-screen instructions or prompts. Follow these as needed.
The prompts could ask for your administrator password or other details to proceed with the repair.
After you complete these steps, Windows 11 will attempt to find and fix any issues preventing your system from booting correctly. If the repair is successful, your computer should restart and boot up as usual.
Tips for Running Startup Repair on Windows 11
- Keep a Bootable USB Drive Handy: Always have a bootable USB drive with Windows 11 setup files. It can be a lifesaver if you need to access Advanced Startup Options manually.
- Backup Regularly: Regular backups ensure that you don’t lose important data if Startup Repair cannot fix the issue.
- Check Hardware: Sometimes, startup issues can be hardware-related. Ensure all connections are secure and components are functioning properly.
- Update Drivers: Outdated drivers can cause startup problems. Keep your drivers updated to prevent such issues.
- Use Safe Mode: If Startup Repair doesn’t fix the problem, try booting into Safe Mode and diagnose the issue further.
Frequently Asked Questions
What is Startup Repair?
Startup Repair is a diagnostic tool in Windows that can fix certain problems preventing Windows from starting.
How long does Startup Repair take?
The time can vary, but it generally takes several minutes. If it takes longer than an hour, there might be a more serious issue.
Can I run Startup Repair from a USB drive?
Yes, you can use a Windows 11 installation USB drive to access the Advanced Startup Options and run Startup Repair.
What if Startup Repair doesn’t work?
If Startup Repair fails, you may need to use other tools like System Restore or a clean installation of Windows.
Will I lose data using Startup Repair?
Generally, Startup Repair does not affect personal files. However, it’s always good to have backups just in case.
Summary
- Access Advanced Startup Options.
- Navigate to Troubleshoot.
- Choose Advanced Options.
- Select Startup Repair.
- Follow On-screen Instructions.
Conclusion
Running Startup Repair on Windows 11 can be a straightforward solution to a frustrating problem. By following the steps outlined above, you can often resolve issues that prevent your computer from booting up properly. Remember, having a bootable USB drive and regularly backing up your files can save you a lot of hassle in the long run. If Startup Repair doesn’t solve your issue, don’t panic—there are other tools and methods to try. For more detailed troubleshooting, consider looking at Microsoft’s official documentation or seeking help from tech forums. Your journey to a smooth-running computer doesn’t have to be a solo one; plenty of resources are available to guide you. Happy troubleshooting!
Matthew Burleigh has been writing tech tutorials since 2008. His writing has appeared on dozens of different websites and been read over 50 million times.
After receiving his Bachelor’s and Master’s degrees in Computer Science he spent several years working in IT management for small businesses. However, he now works full time writing content online and creating websites.
His main writing topics include iPhones, Microsoft Office, Google Apps, Android, and Photoshop, but he has also written about many other tech topics as well.
Read his full bio here.
Learn how to repair Windows 10 using Command Prompt with this expert guide. Fix system issues with DISM and SFC commands. Follow our step-by-step instructions for effective troubleshooting.
I. Introduction – Repair Windows 10 Using Command Prompt
Windows 10 can sometimes encounter issues that affect its performance and stability. Knowing how to repair these problems using Command Prompt can save you time and frustration.
Whether you’re dealing with corrupted system files, startup problems, or other common issues, the Command Prompt offers powerful tools like DISM and SFC commands to help you restore your system to optimal condition.
II. Preparation
A. System Scan
Before diving into Command Prompt repairs, it’s crucial to ensure your system is free of viruses and malware. Use your antivirus software, such as Windows Defender, to scan your system. Additionally, running an anti-malware program like Malwarebytes, can help ensure that your issues aren’t caused by malicious software.
B. Data Backup
Backing up your important data is essential before performing any system repairs. This precaution helps protect your files in case something goes wrong during the repair process.
III. Accessing Command Prompt
A. Open Command Prompt as Administrator
- Type “cmd” in the search field on the bottom left of the taskbar.
- Select “Run as Administrator.” If prompted, enter the administrator password.
- You should now have the Command Prompt open with administrative privileges.
IV. Using DISM Command
A. Introduction to DISM
The Deployment Image Servicing and Management (DISM) tool is a powerful utility for repairing and preparing Windows images.
B. Running DISM to Repair Windows Images
- Type
DISM.exe /Online /Cleanup-image /Restorehealthand press Enter. - Ensure you have an active internet connection, as DISM will use Windows Update to download necessary files.
- Be patient, as this process can take some time to complete.
V. Using System File Checker (SFC)
A. Introduction to SFC
System File Checker (SFC) is a utility that scans for and repairs corrupted system files.
B. Running SFC to Scan and Repair
- In Command Prompt, type
sfc /scannowand press Enter. - This process will take some time. Keep the Command Prompt window open until it completes.
VI. Using System Restore
A. Introduction to System Restore
System Restore allows you to revert your computer’s state to a previous point in time, which can resolve many issues.
B. Running System Restore
- In Command Prompt, type
rstrui.exeand press Enter. - Follow the on-screen instructions to choose a restore point and begin the restoration process.
VII. Advanced Repairs
A. Checking and Repairing Image Health with DISM
- To scan for corruption, type Dism /Online /Cleanup-Image /ScanHealth and press Enter.
- To check for repairable corruption, type Dism /Online /Cleanup-Image /CheckHealth and press Enter.
- If the image is repairable, use DISM.exe /Online /Cleanup-image /Restorehealth to fix the issues.
B. Resetting Windows 10
If all else fails, you can reset Windows 10 to its factory settings:
- In Command Prompt, type
systemresetand press Enter. - Choose from the following options:
- Keep My Files (removes apps and settings but keeps personal files)
- Remove Everything (removes all personal files, apps, and settings)
- Cancel (abandon system reset)
- Follow the prompts to complete the reset process.
VIII. Troubleshooting and Additional Tips
A. Persistent Issues
If issues persist after using the Command Prompt, consider these additional steps:
- Check for hardware issues that might be causing problems.
- Ensure all drivers are up to date.
B. Using Boot Disks and Safe Mode
For more severe issues, boot your computer using a Windows installation disk or a recovery drive. You can also enter Safe Mode to troubleshoot and fix problems.
C. Recovery Environments
Use the Windows Recovery Environment (WinRE) for advanced troubleshooting. Access it by restarting your computer and pressing the appropriate key (usually F8 or Shift+F8) during startup.
IX. Conclusion
Repairing Windows 10 using Command Prompt can resolve many common issues and keep your system running smoothly. By following the steps outlined in this guide, you can effectively use tools like DISM and SFC to fix corrupted files and restore your system’s health. If you have any questions or need further assistance, feel free to leave a comment below.
Related articles:
- How to Clear Cache in Windows 10 PC in 11 Ways
- DISM Command Windows 10
- Mastering Command Prompt Commands
Further Reading:
- Microsoft 365 support
You can Run the Startup Repair Tool on your Windows 10/11 computer from within Desktop, from the Lock Screen and also from outside Windows environment.
The method that is required to Run Startup Repair on a Windows computer depends on the type of problem that the computer is going through.
For example, if the installation of Windows operating system on your computer has become corrupted, you will find the need to Run Startup Repair by using Recovery Drive or by forcing the computer into Recovery Mode.
You can find below different methods to Run the Startup Repair utility on your Windows 10/11 computer, depending on the type of problem that your computer is going through.
Advertisement
1. Run Startup Repair Using Recovery Mode
If your computer is going through problems or unable to load properly, it should automatically go into Recovery Mode. If it does not, Press and Hold the Power Button to Power OFF the computer.
1. After the computer is completely powered OFF, press the Power button to start the computer.
2. Since, the computer is unable to load Windows, it should start Self Diagnostic Power-On Self-Test (POST).
3. Once the Power-On Self-Test (POST) is completed, press the Power button to shut down the computer.
4. Repeat above steps (1 to 3) two more times.
5. During the third restart, your computer should enter into Windows Recovery Environment, where you will see your computer performing a number of diagnostic tests to fix booting problems.

6. When prompted, select your User Account, enter User Account Password and click on Continue.

7. After diagnostic tests are completed, click on Advanced options.

8. On Advanced options screen, you will find the Startup Repair option.
Advertisement

Note: If Startup Repair does not fix the problem, you can try other options as available on the Advanced Options screen to fix your computer.
If you are logged into your computer, you can Run Startup Repair using the Settings menu.
1. Go to Settings > Update & Security > select Recovery in the left pane. In the right-pane, click on Restart now button located under Advanced Startup section.

2. After the computer restarts, navigate to Troubleshoot > Advanced options and click on Startup Repair.
5. Run Startup Repair from Lock Screen
If you are able to start the computer but unable to Login to your User Account, you can access Startup Repair by using Power Options menu located at the login screen (bottom-right corner).
1. Click on Power icon (1) > Press and Hold down the Shift Key and click on the Restart (2) option.
2. After the computer restarts, go to Troubleshoot > Advanced options > click on Startup Repair.
6. Run Startup Repair Using Keyboard Shortcut
This method can be helpful, if your computer is stuck or if the Power or Start button is not working on your device.
1. Press Ctrl + Alt + Delete keys on the keyboard of your computer.
2. On the next screen, click on the Power button (1) located at the bottom-right corner of your screen.

3. Press and hold the Shift key and click on the Restart (2) option.
4. After computer restarts, click on Troubleshoot > Advanced options > Startup Repair.