
Download Article
Download Article
Did you accidentally delete an irreplaceable file from your Windows 10 PC? It happens to the best of us! Fortunately, there are many safeguards in place that make it easy to recover your files before they are gone forever. This wikiHow article will show you how to undelete files using free tools built into Windows and two other easy data recovery tools.
How do you retrieve permanently deleted files?
- Check the Recycle Bin on your computer and see if the file is there.
- Open up or install Windows File Recovery to restore your old files.
- Use the File History tool to recover your files, or restore your file from an older backup.
- Use Recuva, a free program that helps you restore deleted files. Alternatively, use Stellar Data Recovery, a paid service.
-

Before you panic or try another method, double-check your Recycle Bin to make sure the file isn’t still in there. You’ll usually see the Recycle Bin icon on your desktop, but if you don’t, you can also fine it by pressing the Windows key, typing recycle, and clicking Recycle Bin.[1]
-
If your Recycle Bin has a lot of files, it may be helpful to use the search bar at the top-right corner. You can also simply scroll through the files to look for the one you need.
Advertisement
-
This will return the deleted file to the folder from which you deleted it.
- To restore multiple files at once, hold down the Control key as you click each file, then right-click anywhere in the highlighted area and choose Restore.
- You can also restore all deleted files from the Recycle Bin at once by clicking Restore all items at the top of the window.


Advertisement
-
If you aren’t able to restore a file from the Recycle Bin or find it in your backup, this method can help you regain access to lost files.[2]
- You have to restore the missing files to a drive that is not the same drive the file was deleted from—this means that if you only have one hard drive, you’ll need to connect a USB flash or other external drive to your PC to restore the lost files. If you don’t have another drive to use, you won’t be able to use this method.
- It’s not possible to restore files to or from a cloud storage or networked drive with this method.
-
This utility might already be installed on some systems, but not all.[3]
- Open the Microsoft Store app from the Windows Start menu.
- Search for Windows File Recovery.
- If you see the option to do so, click Get and follow the on-screen instructions to install.
- If the app is already installed, you’ll see Open instead.
-
It’s easy—just type windows file recovery into the Windows Search field (press Windows key + S if you don’t see it), and then click Windows File Recovery in the search results. This will open a command prompt window.
- If prompted, give the app permission to make changes to your computer.
-
There are two different modes for restoring files:
- Regular mode: Use this mode if the file you deleted was from a drive formatted with NTFS and the drive is not corrupted.
-
Extensive mode: Use this mode if the file you deleted was on a drive formatted as FAT or exFAT, which is common for flash cards and other removable media, or the drive is corrupted. This mode will take a little longer.
- If you’re not sure which mode to use, start with Regular mode, and then try Extensive if that doesn’t work.
-
The command will look like this winfr source-drive: destination-drive: /mode /switches file-or-folder. The /n switch lets you specify files and folders to recover. Here are some examples you can use in both regular and extensive modes:[4]
- If you want to recover all files ending with .JPEG from your pictures directory on the C drive to a recovery folder on your F drive, you’d use winfr C: F: /regular /n *\Users\yourusername\Pictures\*.JPEG.
- You can also use /n multiple times to recover files that meet multiple criteria. For example, to recover both JPEG and PNG files from your Pictures folder, you could use winfr C: F: /regular /n \Users\yourusername\Pictures\*.JPEG /n \Users\yourusername\Pictures\*.PNG.
- To recover all files ending with .docx from any location on the original drive, you could use winfr C: F: /regular /n *.docx.
- To recover your entire Documents folder from the C: drive to the F: drive, you’d use winfr C: F: /regular \Users\yourusername\Documents\.
- Note the trailing backslash \ at the end of the folder name—this is necessary when recovering an entire folder.
-

Windows File Recovery will now attempt to recover the file(s). If the recovery is successful, the files will be saved to the destination drive in a new folder called «Recovery_(date and time).»[5]
- If you’re unable to recover the files in regular mode, run the same command again replacing /regular with /extensive.
- Some file types are hidden from results by default, including .log, .vbs, .c, .cab, .py, and .lnk. If you are unable to find the type of file you’re looking for, run the recovery again, this time adding the /e switch to disable extended filtering.


Advertisement
-
If you want to recover a file or folder you’ve accidentally overwritten or replaced with a newer version in your Documents, Music, Pictures, Videos, or Desktop folder, this method will help you get your original file(s) back. To open the tool, press the Windows key on your keyboard, type restore your files, and then click Restore your files with File History.[6]
- This method requires that you’ve enabled File History in your settings. File History works with a network or external drive, so if you don’t have one of those, you don’t have File History enabled.[7]
- If the file you want to recover no longer exists at all, you can restore its containing folder to a previous version that existed before you deleted the file.
- This method requires that you’ve enabled File History in your settings. File History works with a network or external drive, so if you don’t have one of those, you don’t have File History enabled.[7]
-
All of the files that have earlier versions saved will be visible here. Once you find the file, you’ll be able to browse the dates of previously saved versions.
-

Be sure to choose a version of the file or folder that existed before you made the change.
-
A confirmation message will appear.
- If you’d rather restore the file or folder to a different location, right-click Restore, choose Restore to, and then click another location.
-
This saves the original version of the file or folder to its original location.


Advertisement
-
Recuva is a free app that will undelete files you accidentally removed from your computer.[8]
You can get the tool from https://www.ccleaner.com/recuva.- The free version of the tool should be enough for recovering most deleted files.
-
You’ll find it in your Windows menu. If prompted, allow the app to make changes to your PC.
- The first time you open Recuva, you may see a warning message about the app being blocked. Click the warning message, select the first option in the list, select the Actions menu, and then click Allow on device to continue.
-
Now you’ll be able to use this quick-scan feature to recover deleted files.
-
If you’re not sure the type of file you’re looking for, choose All Files.
-
For example, if you deleted the file from Recycle Bin, choose In the Recycle Bin.
- To enter a specific folder, choose In a specific location, click Browse…, and then select the folder.
-
Recuva will now attempt to find deleted files.
- You’ll see that there’s a Deep Scan option here. Try the regular scan first. If you are unable to recover your file normally, you can close and re-open Recuva and check the box next to «Enable Deep Scan.» This option will take a long time, and it might not be necessary.
-
Recuva will now search for shadow copies of deleted files from the selected location. Once the scan is complete, a list of files will appear.
-
This restores the selected file(s) and/or folder(s) to the original location.


Advertisement
-
If you back up your PC to another drive, including a networked drive, or another version of Windows that was installed on your PC, you can restore files at any time from earlier backups. To get started, press the Windows key and type control panel, then click Control Panel in the search results.[9]
-
If you don’t see it, click System and Security first.
-
If you want to restore one of your own files, select Restore my files. To restore files for another user (or all users), choose Restore all users’ files.
- If you want to restore files from a different backup than the one selected by default, click Select another backup to restore files from, and then locate the backup.
-
Choose the option that applies to you based on whether you want to restore individual files or entire folders.
-
You can type any part of the file or folder name to locate the file or folder, and then click Search.
- You can use wildcards, such as *.jpg, to find all files that match a certain string of text.
-
[10]
-

To bring them back to their original location, leave the default option selected. Otherwise, you can select In the following location and click Browse to select another folder.
-
The selected file(s) and/or folder(s) will be recovered to the chosen directory.[11]


Advertisement
-
This file recovery app does have a fee, but you can do a free scan before paying to see if the app is capable of restoring the files you need. Search the web for «Stellar Data Recovery» and install the free downloadable version.
-
You’ll find it in your Windows menu after installing.
-
You can select as many of the different file types as you’d like.
-
You can choose one of the common locations at the top, such as Desktop or Documents, or select Choose Location to select a folder manually.
- If the file was saved to an external drive that’s connected to your computer right now, select that drive.
- If the file was saved to a partition that is no longer accessible, select Can’t Find Drive.
-
Once the scan is complete, you’ll see a list of files and/or folders you can restore.
- If nothing is found, click the link next to «Deep Scan» to try a more in-depth scan.
-
If you’re willing to pay for Stellar, you will be asked to do so now. Once you make your payment, you’ll receive a product key via email that you can enter into the provided field. Once validated, you’ll be able to recover the selected file(s), as well as any you need to recover in the future.


Advertisement
Add New Question
-
Question
How can I recover a file that was accidentally overwritten?
Stan Kats is a Professional Technologist and the COO and Chief Technologist for The STG IT Consulting Group in West Hollywood, California. Stan provides comprehensive technology solutions to businesses through managed IT services, and for individuals through his consumer service business, Stan’s Tech Garage. Stan holds a BA in International Relations from The University of Southern California. He began his career working in the Fortune 500 IT world. Stan founded his companies to offer an enterprise-level of expertise for small businesses and individuals.
Professional Technologist
Expert Answer
If you hadn’t turned on file versions in your operating system, and you overwrote a file with the exact same name, then unfortunately it will have been lost irrevocably. Check to see if you made backup copies.
Ask a Question
200 characters left
Include your email address to get a message when this question is answered.
Submit
Advertisement
Video
Thanks for submitting a tip for review!
References
About This Article
Article SummaryX
1. Check the Recycle Bin first.
2. Use Windows File Recovery if you have another drive, including a flash drive.
3. Restore from File History if you make backups.
4. Use the free Recuva tool to find deleted files.
5. Restore from an older backup using Backup and Restore.
6. Try Stellar Data Recovery’s free option to see if files are recoverable.
Did this summary help you?
Thanks to all authors for creating a page that has been read 291,769 times.
Is this article up to date?
Общий синтаксис
В следующей таблице кратко описано, для чего используется каждый переключатель расширенного режима.
|
Параметр или переключатель |
Описание |
Поддерживаемые режимы |
|---|---|---|
|
Source-drive: |
Указывает запоминающее устройство, на котором были потеряны файлы. Должен отличаться от конечного диска. |
Все |
|
Destination-drive: |
Указывает запоминающее устройство и папку, в которую будут помещены восстановленные файлы. Должен отличаться от исходного диска. |
Все |
|
/regular |
Обычный режим, стандартный параметр восстановления для неповрежденных дисков NTFS. |
Обычный |
|
/extensive |
Расширенный режим, параметр тщательного восстановления, подходящий для всех файловых систем. |
Расширенный |
|
/n<filter> |
Ищет определенный файл по указанному имени файла, пути к файлу, типу файла или подстановочным знакам. Например:
|
Все |
|
/? |
Сводка синтаксиса и переключателей для обычных пользователей. |
Все |
|
/! |
Сводка синтаксиса и переключателей для опытных пользователей. |
Все |
Расширенный синтаксис
В следующей таблице кратко описано, для чего используется каждый переключатель расширенного режима.
|
Переключатель |
Описание |
Поддерживаемые режимы |
|---|---|---|
|
/ntfs |
Режим NTFS — параметр быстрого восстановления для работоспособных дисков NTFS с помощью основной таблицы файлов |
NTFS |
|
/segment |
Режим сегментов, параметр восстановления для дисков NTFS с использованием сегментов записей файлов |
Сегмент |
|
/signature |
Режим подписи, параметр восстановления для всех типов файловых систем с использованием заголовков файлов |
Подпись |
|
/y:<type(s)> |
Восстановление файлов с определенными группами расширений, разделенных запятыми |
Подпись |
|
/# |
Группы расширений режима подписи и поддерживаемые типы файлов. |
Подпись |
|
/p:<folder> |
Сохраняет файл журнала операции восстановления в расположении, отличном от расположения по умолчанию на диске восстановления (например, D:\logfile). |
Все |
|
/a |
Отключает запросы пользователей, что полезно в файле сценария. |
Все |
|
/u |
Восстанавливает неудаленные файлы, например из корзины. |
NTFS |
|
/k |
Восстанавливает системные файлы. |
NTFS |
|
/o:<a|n|b> |
Указывает, следует ли всегда (a), никогда (n) перезаписывать файл или оставлять обе копии (b). По умолчанию выдается запрос на перезапись. |
NTFS |
|
/g |
Восстанавливает файлы без основных потоков данных. |
NTFS |
|
/e |
Для получения приемлемого объема результатов и нацеливания на пользовательские файлы по умолчанию некоторые типы файлов отфильтровываются. Данный переключатель удаляет этот фильтр. Полный список этих типов файлов приведен после данной таблицы. |
NTFS |
|
/e:<extension> |
Указывает, какие типы файлов фильтруются. Полный список этих типов файлов приведен после данной таблицы. |
NTFS |
|
/s:<sectors> |
Указывает количество секторов на исходном устройстве. Для получения сведений о секторах используйте fsutil. |
Сегмент |
|
/b:<bytes> |
Указывает размер кластера на исходном устройстве. |
Сегмент |
Список фильтруемых расширений файлов
Следующие типы файлов по умолчанию отфильтровываются из результатов. Используйте параметр /e , чтобы отключить этот фильтр, или фильтр /e:<extension> , чтобы указать типы файлов, которые не следует фильтровать.
_, adm, admx, appx, appx, ascx, asm, aspx, aux, ax, bin, browser, c, cab, cat cdf-ms, catalogItem, cdxm, cmake, cmd, coffee, config, cp, cpp, cs, cshtm, css, cur, dat, dll, et, evtx, exe, fon, gpd, h, hbakedcurve, htm, htm, ico, id, ildl, ilpdb, iltoc, iltocpdb, in, inf, inf_loc, ini, js, json, lib, lnk, log, man, manifest, map, metadata, mf, mof, msc, msi, mui, mui, mum, mun, nls, npmignore, nupkg, nuspec, obj, p7s, p7x, pak, pckdep, pdb, pf, pkgdef, plist, pnf, pp, pri, props, ps1, ps1xm, psd1, psm1, py, resjson, resw, resx, rl, rs, sha512, snippet, sq, sys, t4, targets, th, tlb, tmSnippet, toc, ts, tt, ttf, vb, vbhtm, vbs, vsdir, vsix, vsixlangpack, vsixmanifest, vstdir, vstemplate, vstman, winmd, xam, xbf, xm, xrm-ms, xs, xsd, ym
Looking to recover deleted files in Windows 10? Accidentally deleting photos or other files in Windows 10? You can use numerous methods to get data back, including EaseUS file recovery software. Windows also has its own built-in file recovery tools. We’ll show you the best approaches to make recovery modes in different data loss situations.
I have helped tens of thousands of users solve the problems encountered in data recovery through remote assistance and have worked in the data recovery industry for more than 10 years. The following table is verified and organized based on my experience as a data recovery expert. I have tested every method and will give you advice for every recovery solution.
| How Did You Delete Files | Deleted File Status | Available Recovery Solutions | Difficulty | Time |
|
|
🗑️Restore from Recycle Bin | Simple | 3 Mins |
| 🔂Undo Delete | Simple | 1 Mins | ||
| 😯Recover with CMD | Medium | 10 Mins | ||
|
|
⭐Windows 10 Data Recovery Software | Simple | 5-10 Mins |
| 🧿Windows File Recovery Tool | Hard | 10-15 Mins | ||
|
|
📁Retrieve Using Backup & Restore | Medium | 5-10 Mins |
| 📝Restore from File History | Medium | 5 Mins | ||
| 🌐Recover from Google Drive | Medium | 10 Mins |
Recover Deleted Files Windows 10 with Windows 10 Data Recovery Software
👨💻Author’s Advice: Stop using your Windows 10 PC and create a backup of your disk to avoid data overwriting and further loss. Disable system sleep and disable paging files (reduce automatic writes).
It is, unfortunately, all too easy to accidentally delete files in Windows 10. Microsoft has included a safety net in the form of the Recycle Bin, but this does not always help — sometimes, you can accidentally delete data permanently. Holding the Shift key while deleting a file bypasses the Recycle Bin, or trying to delete files when the Bin is full, and data will simply be wiped out.
The most reliable method to get back deleted files in Windows 10 is using professional Win10 data recovery software, and you can check more information to understand why applying recovery software is the best choice later.
EaseUS Data Recovery Wizard is a dedicated software that is compatible with different Windows versions, including Windows 10. Get the trial version here to scan your Windows 10 computer now!
It has a high success rate and remains easy to use. This file recovery software enables you to recover permanently deleted files without backup. With this Win10 recovery tool, you can easily get back photos, videos, documents, emails, and audio files that you think are permanently deleted from your computer. Check how Windows data recovery software works and recover deleted files with the offered tutorial:
Follow the steps below to recover deleted files or retrieve permanently lost files and data in Windows 10.
- Step 1. Download the EaseUS Data Recovery Wizard by clicking on the download button. To guarantee a high chance of data recovery, install the software on another disk instead of the original storage location where you lost files.
- Step 2. Launch EaseUS Windows 10 data recovery software and choose the hard disk to perform a quick or deep scan for permanently deleted files. By the way, this software can also recover data from your BitLocker encrypted drive in Windows 10.
- Step 3. Filter the recovery folder to find the files you want to undelete in Windows 10 from the results list.
- Step 4. Preview the files and click the «Recover» button to start the recovery process.

⚠️ It is essential to remember that time is of the essence when it comes to data recovery. The sooner you can start the process of locating and recovering data, the greater your chances of successful data recovery. Leave things for too long, and recovery may be impossible due to new data being overwritten or a problem arising on the drive you are trying to recover data from. If your hard disk is corrupted or the software cannot bring back your files, you’ll need professional help.
Why & How to Choose Professional Data Recovery Software
After deleting files, your files are marked as «Deleted» but remain on the storage device; data recovery software will analyze the file system’s metadata, such as NTFS and FAT32, and scan and find the file header to restore these deleted files.
With so many data recovery plans, what makes the professional Windows 10 data recovery software the best and most recommended choice? The following chart clearly shows all the advantages of applying recovery software like EaseUS.
| Win10 Recovery Methods | Limitations | Professional Recovery Software’s Pros |
| Manual recovery or CMD tools | Users can only recover or unhide part of the files based on personal technology knowledge. |
|
| Professional recovery services | Expensive and takes a long time (usually 2-4 weeks). |
|
| Restore from backups | Users need to back up files in advance, and it usually does not work for accidental deletion. |
|
After learning why you need to pick professional data recovery software, you can check more guides to learn how to choose the suitable one.
| Data Loss Scenarios | Recommend Recovery Software Types | Available Recovery Software |
| Common personal data loss such as accidental file deletion/emptied Recycle Bin, virus attack. | Open-source or other free tools | EaseUS Data Recovery Wizard Free, Recuva, Testdisk… |
| Serious data loss, such as partition loss or hard drive formatting. | Paid data recovery software that supports original signature scanning |
EaseUS Data Recovery Wizard Pro, R-Studio… |
| Enterprise data recovery such as RAID recovery, and SQLite/MySQL ibd file recovery. | Professional data rescue tool for the enterprise. |
EaseUS Data Recovery Wizard Technician, UFS Explorer… |
Video Tutorial on Restoring Deleted Files in Windows 10 in 5 Ways
- 0:00 Method 1. Recover lost data from a Recycle Bin
- 0:48 Method 2. Recover lost data Using CMD
- 3:14 Method 3. Restore files with Data Recovery Software
- 5:53 Method 4. Restore lost data using File History backup
- 7:27 Method 5. Recover deleted Files from Previous Versions

This software is reliable and has user-friendly interfaces. Check the following real reviews from our customers on Trustpilot and share them with more friends!
Review:
Share this ultimate data recovery program with your friends on Twitter, Facebook, or Instagram! You can also use this program to recover deleted files in Windows 11.
Recover Recently Deleted Files in Windows 10 from the Recycle Bin
👨💻Author’s Advice: This method will only work if you haven’t emptied the Recycle Bin and if you have not bypassed the Bin by holding the Shift key while deleting data. If you can’t find what you are looking for in the Recycle Bin, your files may have been permanently deleted; you can try data recovery software for Recycle Bin recovery.
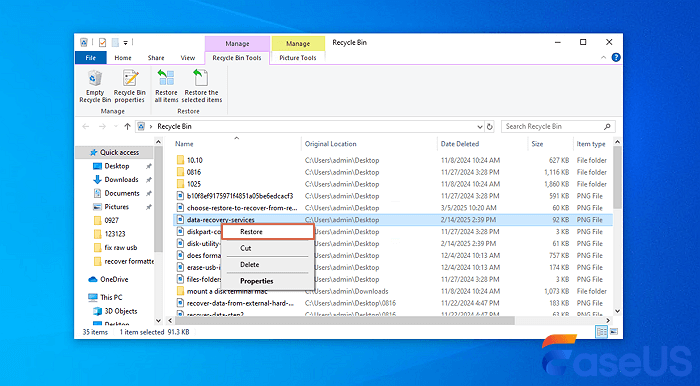
How do I restore deleted folders on my desktop? If you delete a file by hitting the «Delete» button on your keyboard or simply dragging it to the Recycle Bin, then the steps to undelete files in Windows 10 are easy. The Recycle Bin can be very helpful in recovering deleted files in Windows 10 for free.
- Step 1. Find the Recycle Bin icon on the desktop. Open it and then locate the deleted files you are interested in.
- Step 2. Browse through the content of the Recycle Bin to locate the files you need. You can also search for a specific file or use the column headings to identify files based on size, date of modification, and more.
- Step 3. Select the file you would like to get back and then right-click them.
- Step 4. Click «Restore» to recover Windows 10 deleted files.
How to Undelete Files Windows 10 Using Undo Delete
👨💻Author’s Advice: Keep in mind that ctrl+z or Undo Delete will only work if the file or folder was deleted recently. This method is not useful if you restart your computer after file loss. In that case, you should check the Recycle Bin or apply EaseUS Data Recovery Wizard to restore deleted files in Windows 10.
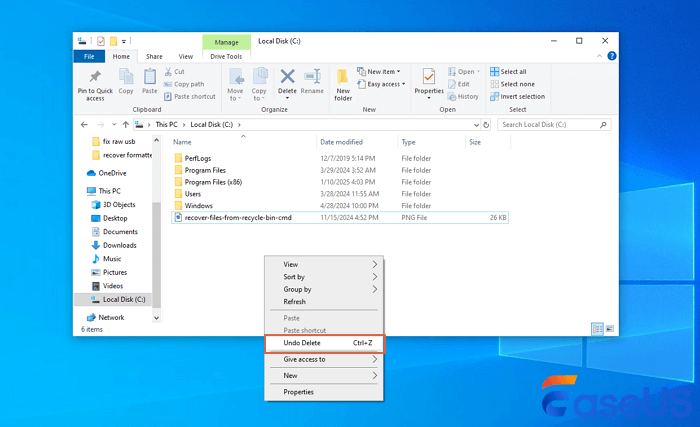
Many users know a quick way to recover recently deleted files: Ctrl+Z deleted files recovery. Or, You can right-click the folder where it was located and click «Undo Delete».
Here are the steps to undelete files with the Undo Delete feature:
- Step 1. Right-click the folder where the file was lost.
- Step 2. Click «Undo Delete» to restore the file to its original location.
- Step 3. Or, press «Ctrl+Z» directly to restore the lost data.
👨💻Author’s Advice: This method can only show the hidden files in Windows 10 that you think are «deleted,» and it’s not recommended for new computer users.
The Windows Command Prompt can be a powerful disk and file management tool. You can use CMD to recover hidden files with the attrib command lines.
But these commands can’t restore deleted files, and they can only help you show hidden files in Windows 10.
- Step 1. Type cmd in the Search box. Right-click on Command Prompt and select Run as administrator.
- Step 2. Type ATTRIB -H -R -S /S /D X:*.* and hit Enter in the command prompt window. Replace «X» with the letter of your hard drive.

Want to help others? Share this Command Prompt tutorial on your social media and start a conversation about recovering deleted files in Windows 10.
Recover Deleted Files Windows 10 Free with Windows File Recovery
👨💻Author’s Advice:This method will not be suitable for everyone because different commands are needed for every scenario. It’s also worth noting that it will not be able to help you in every instance. For example, it cannot recover lost files following a virus attack or lost partition. In these cases, looking to EaseUS Data Recovery Wizard is better, as outlined above.
As long as you have at least Windows 10 May 2020 Update (Windows 10 2004) installed, you have access to Windows File Recovery — although you will need to install it from the Microsoft Store. This is Microsoft’s own free file recovery tool, but it is very different from programs like EaseUS Data Recovery Wizard because it is a command-line tool. This means that rather than using a familiar system of icons and menus, it is text-based and, therefore, not something that everyone will be comfortable with.
Because of the potential for problems, the Windows File Recovery tool is only recommended for slightly more experienced computer users.
Before you get started with the Windows File Recovery tool, there are two things you need to prepare: there are a couple of conditions you should know:
- To recover data, you need a secondary drive — this can be a regular hard drive or an external USB drive.
- You need to know the exact location where your deleted files were originally stored.
How to use Windows File Recovery to restore deleted files in Windows 10:
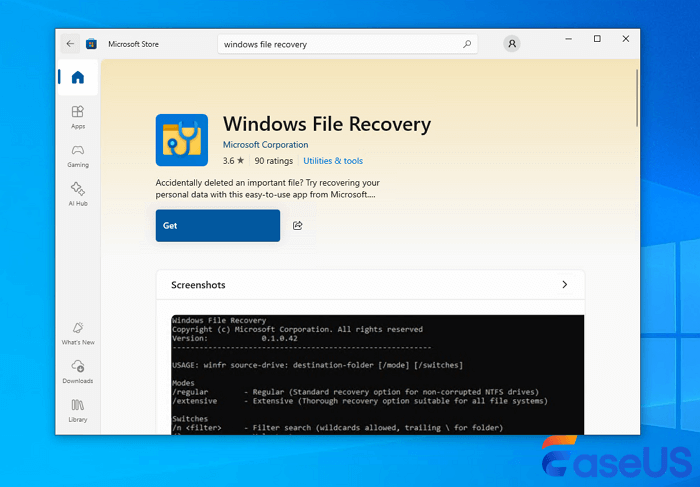
- Step 1. Open the «Microsoft Store» app and search for Window File Recovery. Now, download and install the app by clicking the «Get» button.
- Step 2. Press the Windows key and click the Search box. Enter Windows File Recovery in the Search box and select it.
-

- Solution source from Microsoft’s official website
- Step 3. Use the syntax indicated below to start the process of recovering deleted files with a deep scan. The basic command line is:
- winfr source-drive: destination-drive: [/switches].
- For example:
- winfr C: D: /n \Users\Documents\test.docx
- This particular command will recover a deleted Word document named test that had been stored on the C: drive, saving it to the D: drive.
- Step 4. You can then follow the on-screen instructions to finish restoring deleted files.
Recover Permanently Deleted Files Windows 10 from File Backup
👨💻Author’s Advice: This method will only work if you haven’t emptied the Recycle Bin and if you have not bypassed the Bin by holding the Shift key while deleting data. If you can’t find what you are looking for in the Recycle Bin, your files may have been permanently deleted; you can try data recovery software for Recycle Bin recovery.
This solution only works when you set up a backup or open the File History function before the data loss happens. If there is no backup available, you still need data loss recovery software to recover permanently deleted files on Windows 10.
Go to check your recent backups and follow the steps to get deleted files back from a Windows backup:
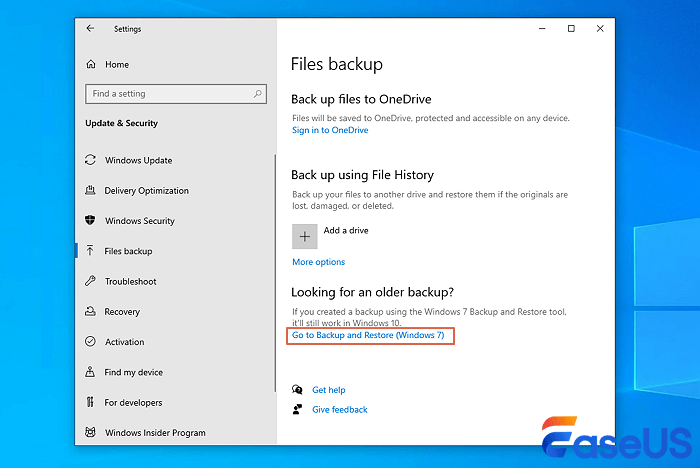
- Step 1. Open «Settings» from the Start menu and head to «Update & Security». Click the «File Backup» section to the left.
-

- Step 2. Select «Backup and Restore (Windows 7)». Click «Restore my files» > «Browse for files» or «Browse for folders» to select the previously created system image backup file.
- Step 3. Choose where to save your files. In the case of a naming conflict, Windows will warn you. Choose «Copy and Replace», «Don’t copy» or «Copy, but keep both files» according to your needs and then wait for the restoring process to complete.
Recover Deleted Files in Windows 10 with File History
👨💻Author’s Advice: Both previous versions and File History backup require you to backup files before you lose data. Otherwise, there is no backup available to restore from, and you’ll lose your files completely.
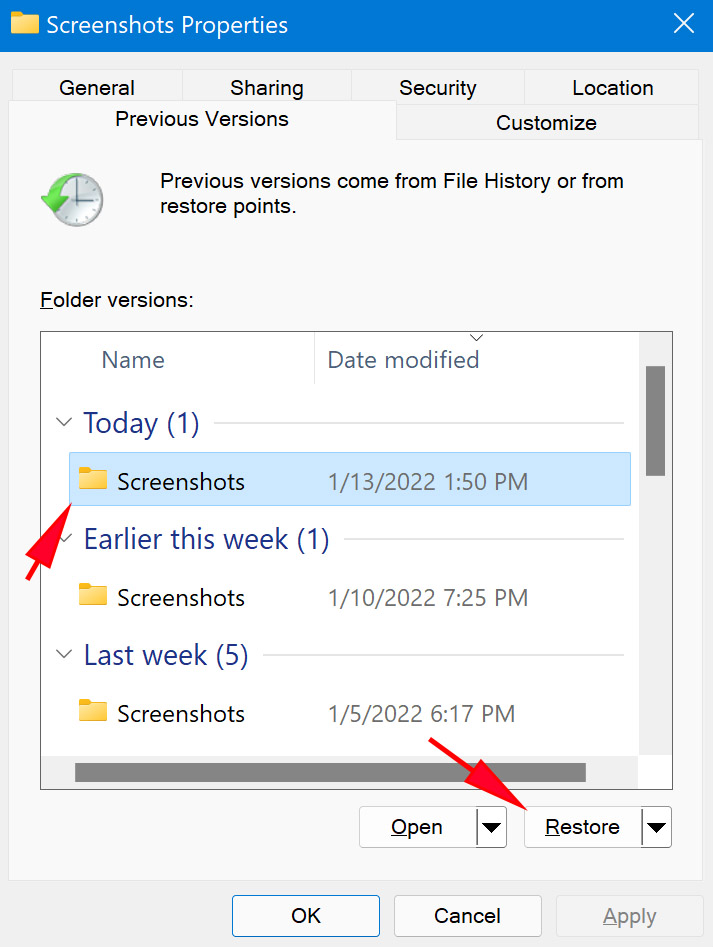
You can also recover permanently deleted files in Windows 10 files by using the «Restore previous versions» function – but you must already have enabled this feature in order for it to work. To ensure that this is an option that is available to you, you need to set up a File History backup feature to create copies automatically or start the system restore point.
Assuming you have already configured this feature of Windows, you can use the following steps to restore permanently deleted files:
- Step 1. Look for and right-click on the folder that contains the permanently deleted files.
- Step 2. Click «Restore previous versions«.
-

- Step 3. As the pop-up window explains, previous versions come from File history backup or system restore points. Select the files you are interested in, and click «Restore» to recover.

If Windows warns you that it already contains a file or folder with the same name, select «Replace the file in the destination» to overwrite it or select a new file name.
Did this solution help you recover deleted files on Windows 10 with File History? Help others discover it by sharing it on your social media.
Restore Windows 10 Permanently Deleted Files from Google Drive
👨💻Author’s Advice: This method can only recover deleted Windows 10 files that you have uploaded to Google Drive.
If you have enabled Google Drive sync on your Windows 10 PC or laptop, recovering permanently deleted files from Google Drive will be simple.
Here are the steps to recover deleted files from Google Drive on your Windows 10 computer:
- Step 1. Open one of your website browsers and visit Google Drive’s official website.
- Step 2. You can check the file list in the drive to find the files you have deleted on your Windows 10 computer.
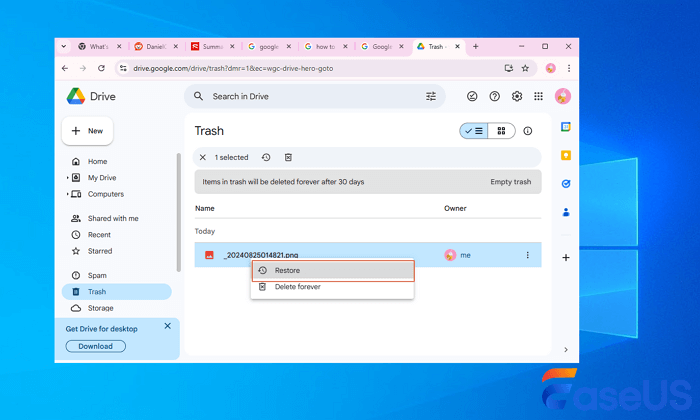
- Step 3. Check the Google Drive’s Trash can as well. Right-click the file and choose «Restore«.
-

How to Prevent Accidentally Deleted Files on Windows 10
Rather than losing data and then recovering it, effectively avoiding the accidental deletion of files is certainly the best option. Here are some tips you can use to protect your data.
| ❌Avoid human error | Be careful when accessing or editing files; do not delete them by mistake. Alternatively, do not permanently delete data all at once, making recovery more difficult. |
| ✅Backup important data regularly | Back up your data regularly in any effective way. You can use backup tools that come with Windows, like File History, or you can choose trusted third-party file backup software. |
| 😀Stop using the device and recover deleted data quickly | When you delete data from an HDD, SD card, or external drive, be sure to stop using your device promptly and use professional data recovery software to recover deleted files. |
If you want to restore Windows 10 files that were accidentally deleted immediately without backups, it’s better to download EaseUS Data Recovery Wizard.
Recover Deleted Files Windows 10 FAQs
Read further information on how to restore permanently deleted files in Windows 10.
1. Can I recover permanently deleted files from my computer?
In most cases, yes. However, a few factors will affect your chances of success, such as the type of file that was deleted and how long ago it was deleted. If you have recently deleted a file and emptied it from your computer’s Recycle Bin, you may still be able to recover it using a deleted file recovery program.
2. How to recover deleted files from Windows for free?
One option to restore deleted files for free is using a free deleted file recovery software — EaseUS Data Recovery Wizard Free, which will scan your hard drive and attempt to recover any deleted files. With this tool, you can recover deleted files up to 2GB of data for free.
- Step 1. Download and run EaseUS Data Recovery Wizard Free.
- Step 2. Scan a disk for deleted files.
- Step 3. Preview and store files to an external storage device.
3. How can I recover deleted files in Windows 10 without software?
A few ways are available to recover deleted files without using any third-party software. One way is to check the Recycle Bin to see if the file you accidentally deleted is still there. If it is, simply right-click on the deleted file and select Restore.
If the file is not in the Recycle Bin, you can restore it from a previous version. To do this:
- Step 1. Open File Explorer and navigate to the deleted file’s folder.
- Step 2. Right-click on the folder and select Properties.
- Step 3. Under the Previous Versions tab, select the most recent version of the folder that contains the deleted file and click Restore.
4. How do you restore permanently deleted files from Recycle Bin?
You can use a third-party data recovery tool to recover deleted files from your Recycle Bin.
- Step 1. Install and launch EaseUS Recycle Bin recovery software.
- Step 2. Click the Recycle Bin option under the Locations section and click Scan.
- Step 3. Select the file you need, preview it, and restore it.
5. How can I recover permanently deleted files in Windows 10 without backup?
If you accidentally deleted a file and do not have a backup from File History, you will need to use dedicated Windows 10 data recovery software to recover it. Many different file recovery programs are available, and EaseUS Data Recovery Wizard, which allows for data recovery after file corruption, is popular.
Once you have chosen and installed a file recovery program, simply run it and follow the prompts in order to attempt to recover your permanently deleted files.
Deleting important files by accident can be a big problem, but sometimes, there might be a way to restore those files. Deleting files doesn’t remove them entirely from your hard drive, so there are some ways to recover them.
Restoring deleted files is not that hard, given you know what to do and have the right tools, in this article, we will guide you through the process and hopefully help you restore accidentally deleted files on Windows 10 or Windows 11.
Before we start, we must mention that many SSD drives use a TRIM feature that permanently removes your files and significantly reduces the chance of file recovery with third-party tools. On the other hand, magnetic hard drives don’t have this feature, so you can restore your files if they were deleted recently.
That being said, you can try restoring your files using one of our solutions.
Is there a way to restore accidentally deleted files on Windows 10?
1. Check the Recycle Bin
One of the simplest ways to restore your files is to check your Recycle Bin. In most cases, your files will be moved to the Recycle Bin once you click the Delete button, so there’s a chance to restore them.
When you choose the Delete option in Windows, your files are automatically moved to the Recycle Bin. The Recycle Bin offers limited storage, and it will temporarily keep your files there. If you didn’t empty your Recycle Bin manually, it’s somewhat likely that your file is still there. To restore your files from the Recycle Bin, do the following:
- Open the Recycle Bin.
- When Recycle Bin opens, you’ll see a list of all deleted files. If your file is available, right-click it and choose Restore.


Keep in mind that Windows has a limited amount of storage dedicated to Recycle Bin, so it won’t keep your files permanently there. Sometimes, your deleted files can be in Recycle Bin for weeks or months before they are deleted, so it’s always a good idea to try restoring them.
2. Restore files from the backup
In some cases, you might be able to restore your files from the backup. Remember that this solution works only if you have Backup and Restore feature enabled. If you don’t use this feature, this solution won’t apply to you. To restore files using the Backup and Restore feature, do the following:
- Press Windows Key + S and enter control panel. Choose Control Panel from the list.
- When Control Panel opens, select Backup and Restore (Windows 7).

- Select Restore my files option and follow the instructions on the screen.

Once again, you can only restore files if Backup and Restore was enabled when you deleted the file. If you don’t use this feature at all, this solution doesn’t apply to you, so you can skip it.
- Microsoft Office Lens: A Powerful Tool for Capturing and Organizing Information
- Swap Left/Right Speaker in Realtek Audio Console [How to]
- How to Get DirectX 12 End-User Runtime and Fix Installation Issues
- Overclocking in OMEN Gaming Hub: How to Use it
- How to Disable Overlay in Razer Cortex: Hide in-game Overlay
3. Use Stellar Data Recovery
If you’re looking for a third-party solution to recover your files, you might want to consider Stellar Data Recovery. This amazing tool can recover deleted files and files from damaged disks alike.
Stellar Data Recovery is a professional tool that can help you recover data on Windows, Mac, Android & iOS. This software can help you in many situations that might have caused a loss of data, such as system crashes, formatting, accidental deletion, virus attacks, partition loss, and drive errors.
Stellar Data Recovery
Recover your lost data from any disk with this professional and powerful software.
4. Use Restore previous versions option
If you accidentally deleted a file, you might be able to restore it simply by using Restore previous versions option. Keep in mind that this feature is related to both Backup and Restore and System Restore, so if any of these features weren’t enabled when you deleted the file, this solution probably won’t work for you. To restore the deleted file, do the following:
- Locate the directory that contained the deleted file. Right-click the directory and choose Restore previous versions from the menu.
- List of previous versions should appear. Locate the desired version and double-click it.
- Now locate the desired file and drag and drop it to a new location.
This is an easy way to restore deleted files, but since this feature is related to System Restore and Backup and Restore, this method might not always work.
5. Check cloud storage services
Windows 10 comes with OneDrive service enabled by default, so it’s possible that your file was backed up to OneDrive before you deleted it. Be sure to visit OneDrive’s website and check if your file is available in the Trash section.
If you use any other cloud storage service, repeat the same steps for it as well. This isn’t the most reliable method to restore files, but it’s worth checking out.
6. Check File History feature
Windows 10 has a useful File History feature that allows you to restore your files. Unfortunately, this feature isn’t enabled by default, so if you didn’t enable it manually, you won’t be able to use it to restore the file. To restore files using File History, do the following:
- Open the directory that contained the deleted file.
- Once the directory opens, click on Home tab and choose History from the menu.

- Follow the instructions on the screen to restore the file using File History feature.

7. Use Ubuntu Live CD or USB to restore your files
If you’re using a regular hard drive and not an SSD, you might be able to restore your files using Ubuntu Live CD. There’s a chance your file isn’t physically deleted from the hard drive, and you might be able to restore it if you don’t overwrite its sector on the hard drive. To ensure that, turn off your PC and don’t install or download any additional software.
Now you need another PC to download Ubuntu Live CD or USB. After doing that, connect the Ubuntu Live USB to your PC and boot it from it. Look for ntfsundelete and photorec tools. These are powerful tools that can help you restore deleted files.
We must warn you that this is an advanced solution, so if you’re unfamiliar with Ubuntu Live USB and command line tools, you might want to skip this solution.
8. Try any other third-party recovery software
Many other tools can help you restore accidentally deleted files. Some of these tools offer a free trial, while others are free. We also have to mention that some tools might be more effective than others, so you might want to try using two or more tools to restore your files. We already wrote about the best file recovery apps, so feel free to try any of them.
To increase the chance of file recovery, download these tools on a different PC and install them on the USB flash drive. Not all applications can work from a USB flash drive, so choose ones that support portable installation.
Keep in mind that sometimes Windows can automatically delete your files, especially if you enable Storage Sense on Windows 10.
Recovering accidentally deleted files isn’t as complicated as you think, and you might be able to do it using one of our solutions. To reduce the chance of file loss in the future, be sure to use File History or Backup and Restore features and back up your files frequently.
We’ve all done it, and most of us will do it again at some point in the future. We’re talking, of course, about accidentally deleting important files using the Shift + Delete shortcut in Windows 10, which removes the possibility to simply recover them from the Recycle Bin.
The good news is that not all hope is lost when you select wrong files and accidentally delete them because there are many ways how to recover permanently deleted files on Windows 10 users should know about, and we describe them all in this article.
How to Recover Deleted Files from a Recycle Bin in Windows 10
As you may know, when you normally select a file in Windows 10 and hit Delete on your keyboard, the file moves to the Recycle Bin, where it sits until you manually empty the Recycle Bin, giving you time to change your mind and easily rescue the deleted file.
To recover deleted files from the Recycle Bin on Windows 10:
- Open the Recycle Bin by right-clicking its icon.
- Select Open from the menu to view deleted files.
- Check the box to the left of the filename you want to restore.
- Right-click on a selected file and choose ‘Restore’ to recover the file to its original location on Windows 10.
The problem with this way of deleting files is that it doesn’t immediately free up any storage space, which is why most people delete files in the first place. Only when you manually empty the Recycle Bin does Windows mark the disk space occupied by the deleted files as empty.
If you want to delete a file that you’re 100% positive won’t be needed in the future, you can skip the Recycle Bin and use the Shift + Delete shortcut to delete it permanently right away. When you delete a file using the Shift + Delete shortcut, you immediately free up storage space, but you deprive yourself of the possibility to simply recover it from the Recycle Bin.
However, just because you can’t recover permanently deleted files from Recycle Bin doesn’t mean you can’t recover them at all. Just keep in mind that you need to act quickly and recover your permanently deleted files before they get overwritten.
We start with the least user-friendly method, which involves the Command Prompt and a series of very specific commands. If you can successfully use this method, we’re convinced that you won’t have a problem with any other method described in this article.
The recovery process may take a while to finish, so be patient and don’t interrupt it. If possible, don’t do anything at all on your computer while the recovery process is running because you could overwrite the deleted files and make recovery impossible.
Recover Permanently Deleted Files from an Older Backup
Windows Vista introduced a new data recovery component called Backup and Restore, which allowed users to create backups and restore from backups created earlier.
Even though Backup and Restore was completely removed from the Windows operating system in Windows 8.1 in favor of File History (more about File History in the next chapter of this article), it’s still possible to recover data on Windows 10 computers from backups created using the Backup and Restore tool.
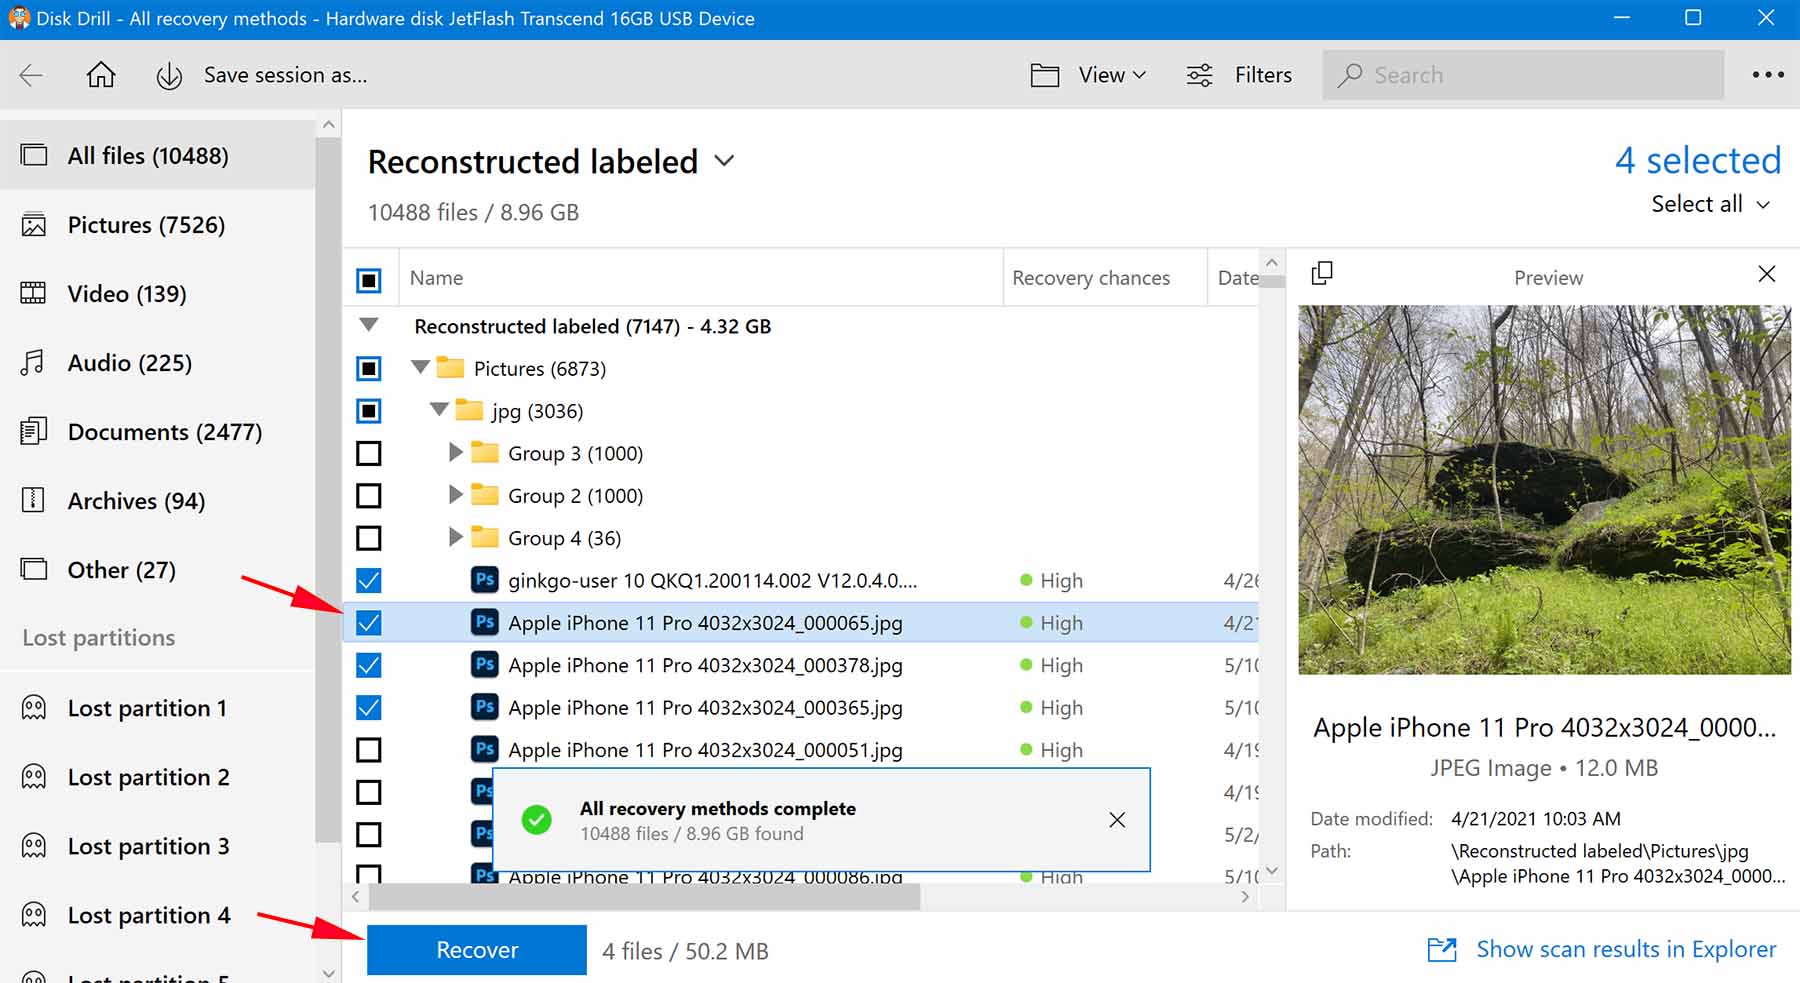
Recover Deleted Files Using Data Recovery Software ✅
Disk Drill is a professional data recovery software that’s so easy to use that it’s suitable even for complete beginners. With Disk Drill, you can recover several hundred file formats with just a few simple clicks without spending any money at all.
To Recover Deleted Files in Windows 10 follow these steps:
- Download Disk Drill by clicking on the Free Download button.
Data recovery for free
Your Companion for Deleted Files RecoveryFree Download
- Install Disk Drill just like you would any other Windows 10 application.
- Launch Disk Drill and click the
"Search for lost data"button next to the hard drive from which you want to recover permanently deleted files. - Select which files you want to recover, from the list of results
- Click the
"Recover"button to begin the recovery process.
Disk Drill allows you to recover up to 500MB of data without paying, and it comes with a tool to protect your files against data loss.
Use the Windows File Recovery Tool
Microsoft has released its own data recovery tool, called Windows File Recovery, and you can use it to recover some deleted files even if they are no longer present in the Recycle Bin.
Unfortunately, Windows File Recovery is a command-line tool, so it’s not nearly as intuitive as Disk Drill and other graphical data recovery tools. At least you can download it for free directly from the Microsoft Store—at least if you have Windows 10 build 19041 or later.
Use the following syntax to recover lost data with the Windows File Recovery tool:
- Winter 2020 release: winfr source-drive: destination-drive: [/mode] [/switches]
- Summer 2020 release: winfr source-drive: destination-drive: [/switches]
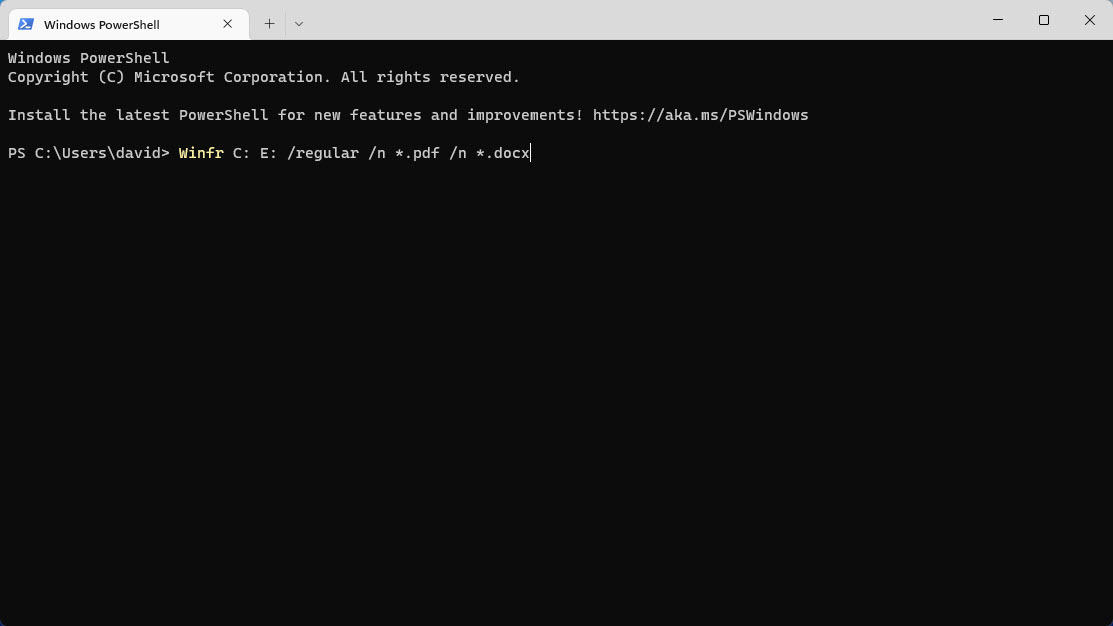
You can find more information about the available recovery modes and switches on the official support page. Here’s an example of how the latest version of the Windows File Recovery tool can be used to recover PDF files from C: drive to E: drive:
- Launch Windows Terminal.
- Enter the following command: Winfr C: E: /regular /n *.pdf /n *.docx

- Enter Y to start the recovery operation.
The tool will automatically create a recovery folder on the destination drive and copy all recoverable files there.
Restore Permanently Deleted Files in Windows 10 for Free from a File History Backup
File History is a replacement for the Backup and Restore feature that was present in older version of the Windows operating system, allowing for simply Recycle Bin recovery Windows 10 as well as for the recovery of permanently deleted files.
To Recover Deleted Files on Windows 10 for free:
- Open the Start menu.
- Type “restore files” and hit Enter on your keyboard.
- Look for the folder where you deleted files were stored.
- Select the “Restore” button in the middle to undelete Windows 10 files to their original location.

If you cannot see any folders, that’s probably because File History is turned off. In that case, you should see an option to turn it on.
Use the Restore Previous Versions Feature
Windows 10 comes with an extremely useful data recovery feature, called “Restore previous versions”, which allows you to restore previous versions of all files and folders on your computer — provided you’ve activated it. To do that:
- Open the Start menu.
- Type "system protection" and hit Enter on your keyboard.
- Choose a hard drive under “Protection Settings” and click
"Configure". - Select
"Turn on system protection"and click “OK”. -
You can now use the “Restore previous versions” feature to restore a file or folder to its previous state.
Simply right-click on any file or folder, go to the “Previous Versions” tab and select which version you would like to restore.

How to Recover Permanently Deleted Files from Google Drive
If you use Google’s cloud file storage and synchronization service, Google Drive, to store files on their servers and synchronize them across devices, you can use the 5 above-described methods to recover permanently deleted files from Google Drive.
How? Simply perform data recovery on the drive where you store the Google Drive folder to recover files that are no longer recoverable using the "Restore from Trash" option in Google Drive.
Conclusion
As you can see, even files deleted with the Shift + Delete keyboard shortcut in Windows 10 aren’t actually permanently deleted as long as you know what to do and act quickly enough. The next time someone asks you, “How do I recover permanently deleted files from my PC?” you can just point the person to this article or, better yet, recommend Disk Drill, the only data recovery solution you need.
FAQ
Follow these steps to recover lost files on Windows 10:
- Press the Windows key, enter and select Windows File Recovery.
- In the Command Prompt window, enter the command in the following format:
winfr source-drive: destination-drive: [/mode] [/switches] - There are 2 basic modes you can use to recover files: Regular and Extensive. You can read more about them here.
- Once you’ve selected the drive and entered the prompt, ensure that the source and destination drives are different.
- Now, click Y to start the recovery operation.
You can recover deleted files in Windows 10 without third-party software by restoring them from the Recycle Bin:
- Double-click the Recycle Bin icon on your desktop.
- Select the deleted files you want to recover.
- Drag them from the Recycle Bin to any folder you want.
That depends on how you define permanently deleted files. If you mean files that have recently been deleted from the Recycle Bin, then we have good news for you: such files can usually be recovered. But if you mean files that you deleted a long time ago, then you most likely won’t be able to recover them.
Yes, there are several free data recovery software solutions for Windows 10 that you can download for free:
- Disk Drill (user-friendly UI, great performance)
- TestDisk (command-line interface, average performance)
- Windows File Recovery (command-line interface, average performance)
- PhotoRec (command-line interface, average performance)
- Recuva (graphical user interface, low performance)
That depends on two things: your luck and whether you’re backing up your data. If you’re lucky, the deleted file is still present on your hard drive, which means that you can recover it with data recovery software. Of course, backups, such as those created with File History, can be used to recover any file regardless of how long it has been deleted.
When you either empty the Recycle Bin with deleted files or use the Shift + Delete shortcut to delete files, Windows marks the files as deleted and removes all pointers to them, which is why such files become invisible for the user.
Moreover, the space that was used by the deleted files becomes marked as free space. So technically, the deleted files will still be physically present on your computer until Windows overwrites them with new data.
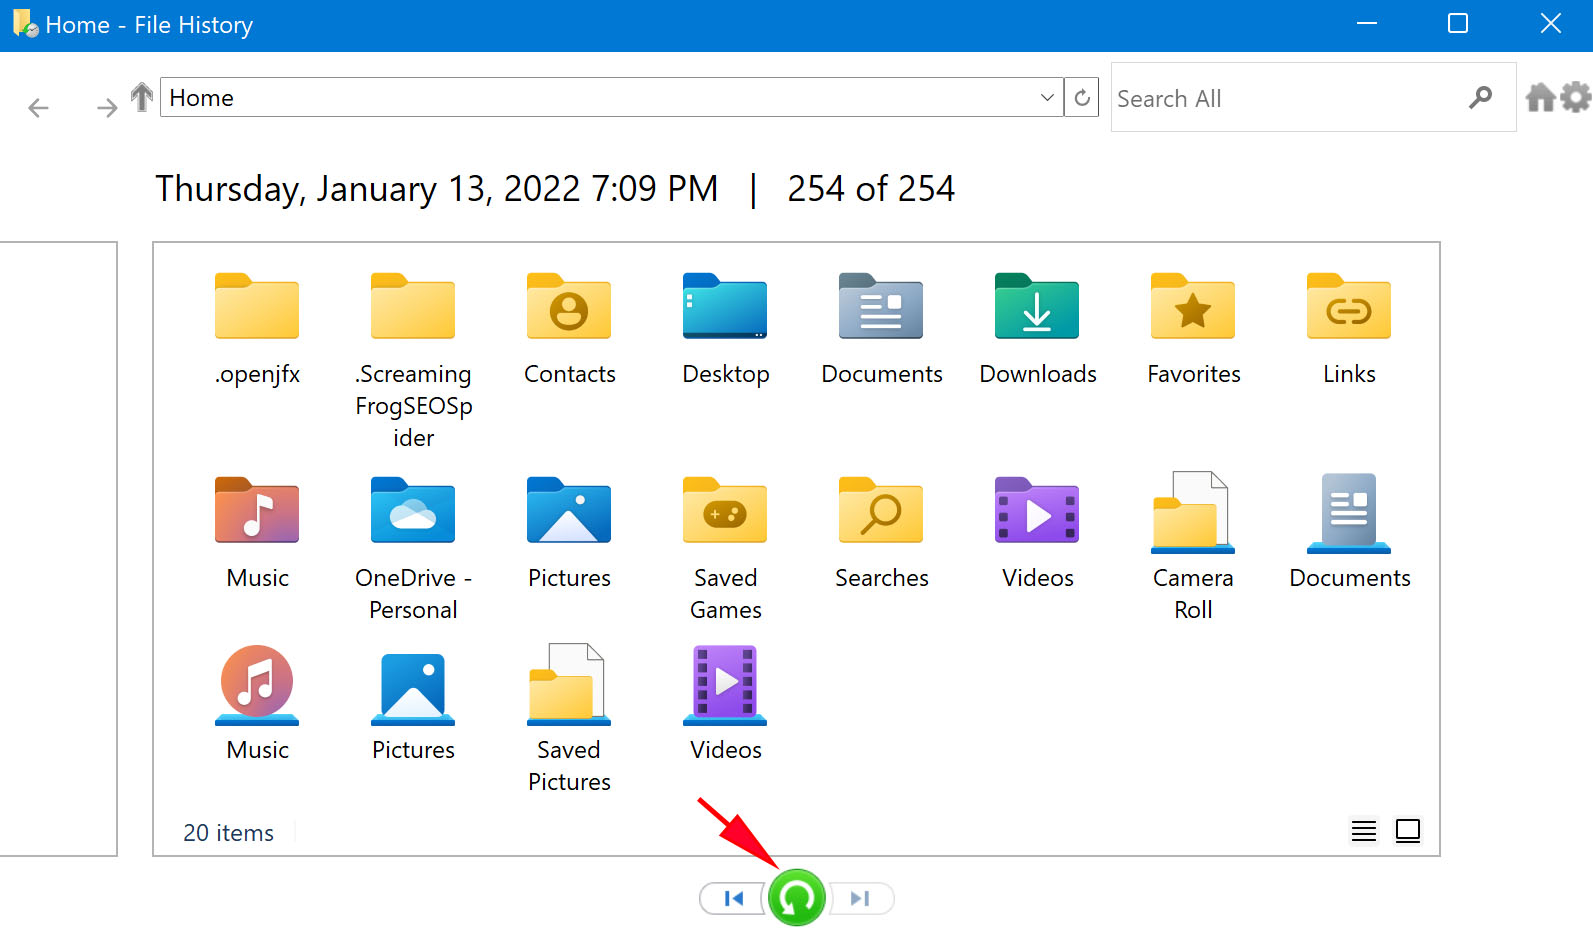
If you have the File History feature set up on your computer, you can use it to recover deleted files. Follow these steps to recover a permanently deleted file in Windows 10 via File History:
- Launch File Explorer and choose the folder where the deleted files used to be stored.
- On the ribbon, click the History button.
- Look through the backup history of the chosen folder by using the controls below.
- When ready, click the arrow on the top to recover the whole folder or click the needed file to choose it. Click the green button to complete the recovery.
- The file will get restored to its original location.
Robert Agar
Robert Agar, a dedicated data recovery writer, has been a pivotal part of the CleverFiles team for over 6 years. Before this, he enriched IBM for 13 years as a Backup and Recovery: TSM Subject Matter Expert. A proud alumn…
Read full bio
Robert Agar, a dedicated data recovery writer, has been a pivotal part of the CleverFiles team for over 6 years. Before this, he enriched IBM for 13 years as a Backup and Recovery: TSM Subject Matter Expert. A proud alumn…
Read full bio
Approved by
Brett Johnson
This article has been approved by Brett Johnson, Data Recovery Engineer at ACE Data Recovery. Brett has a Bachelor’s Degree in Computer Systems and Network, 12 years of experience.
This article has been approved by Brett Johnson, Data Recovery Engineer at ACE Data Recovery. Brett has a Bachelor’s Degree in Computer Systems and Network, 12 years of experience.