
,
If you ‘re using a Windows 10/8 or 7 personal computer (not part of a Domain) and you want to rename the user account name and the related User Profile folder name then this tutorial may be useful for you.As you may know when you change the username of a user in Windows, the related user folder remain unchanged and you must perform some additional steps to accomplish this. In this tutorial you ‘ll learn how to rename a user in Windows and how to rename the user folder in order to match the name of the user.
How to Rename User and User Profile Folder in Windows 10/8/7 *
* Important: To apply the steps below you must sign into Windows, by using an account with Administrative privileges.
Assumption: Let’s suppose that the current username and the related profile folder is named «Josh» and you want to change the account name and the profile folder name to «Joshua».
Step 1. Rename the User from User Account Properties.
To change the username of a local account in Windows:
1. Press simultaneously the Windows + R keys to open the run command box.
2. Type netplwiz & Press Enter.
3. Highlight the user that you want to rename and select Properties.
4. Then change the current User name (e.g. «Josh) with the new one (e.g «Joshua»)
5. When done click Apply and OK twice to close all open windows.
Step 2. Change the User Profile Folder Path in Registry.
1. Open Registry Editor: To do that:
-
- Press simultaneously the Windows + R keys to open the run command box.
- Type regedit & Press Enter.
2. Navigate to the following key at the left pane:
- HKEY_LOCAL_MACHINE\SOFTWARE\Microsoft\Windows NT\CurrentVersion\ProfileList
3. Click at any “S-1-5-21-xxx…” registry key, until you find which one contains the path for your profile folder at the «ProfileImagePath» REG_DWORD value.
* e.g. If your Username is “Josh” then see which S-1-5-21-xxx…” registry key, contains the “C:\Users\Josh” value at ProfileImagePath.

4. When you find that key, double click at ProfileImagePath and rename the current path (profile folder name) to the new one. *
* e.g. At this example we proceed to change the «C:\Users\Josh» folder name, with the new folder name «C:\Users\Joshua».
5. When done, click OK.

6. Close Registry Editor and Restart your computer.
Step 3. Rename the User Profile Folder.
1. After restart you ‘ll be sign to a temporary profile (empty profile) with the message «We can’t sign in to your account». (Click Close at this message and continue below).

2. Open Windows Explorer and explore the contents of the «C:\Users» folder.
3. Right click on the user profile folder (e.g. «Josh» in this example) and choose Rename.
4. Type the new name for the profile folder (e.g. «Joshua» in this example) and press Enter.
5. Click Continue when asked to provide administrator permission to rename the folder. *
* Note: If you receive an «Access denied» error, when you try to rename the user folder, then try to rename the folder in Safe Mode or try the following:
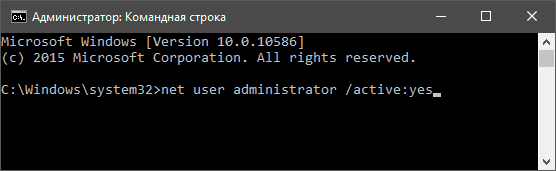
1. Open Command Prompt as Administrator.
2. Type the following command and press enter: net user administrator /active:yes
3. Restart the computer and login as Administrator
4. Rename the user profile folder.
5. Restart again and login to the (renamed) user.
6. If everything is OK, then disable the administrator account by typing this command (in Command Prompt Admin): net user administrator /active:no

6. Restart your computer to login to your profile with all files and settings untouched!
Step 4. FIX Invalid Registry References.
The next step, is to fix in the Registry, the references to the old profile folder. To do that:
1. Download the Registry Finder utility in an archive format, according your Windows version (32 or 64Bit) and extract the download file (RegistryFinder.zip).
2. From the extracted folder, double click to run the RegistryFinder application.

3. In Registry Finder, click the Edit menu and choose Find.
4. Type the old folder name (e.g. Josh») and click Find.

5. When the search is completed, click Edit and choose Replace in Find Results.

6. At ‘Find what’ field type the old name (e.g. Josh») and in the ‘Replace with’ field type the new name (e.g. Joshua). When done, click Replace.

7. When the operation is completed, you should receive an error message that says «error encountered». Just ignore the error message and click No to close the window.
8. Close the Registry Finder and restart your PC.
Step 5. Rebuild the Search Index.
The final step is to rebuild the search index. To do that:
1. Navigate to Windows Control Panel and open Indexing Options.*
* If you don’t see the Indexing Options, set the View (View by) to Small icons.
2. At Indexing Options click Advanced.
3. At Troubleshooting section, click the Rebuild button.
4. Press OK to rebuild the Index.
5. Wait until the index rebuilding is completed and then restart your computer again.
That’s all folks! Did it work for you?
Please leave a comment in the comment section below or even better: like and share this blog post in the social networks to help spread the word about this problem.
If this article was useful for you, please consider supporting us by making a donation. Even $1 can a make a huge difference for us.
- Author
- Recent Posts
Konstantinos is the founder and administrator of Repairwin.com. Since 1995 he works and provides IT support as a computer and network expert to individuals and large companies. He is specialized in solving problems related to Windows or other Microsoft products (Windows Server, Office, Microsoft 365, etc.).
If you want to change user folder name in Windows 10 but find that there is no Rename option when you right-click the user folder in C drive, this post provides 2 ways to let you rename user folder in Windows 10. FYI, MiniTool software provides some useful software to help you better manage your Windows computer incl. data recovery software, disk partition manager, etc.
To change user folder name in Windows 10, the common practice we may think of is to go to C drive and open the Users folder in Windows 10, then right-click the target user folder and click Rename to give it a new name.
However, you may find that there is no Rename option after you right-click the user folder. Then how to change user folder name in Windows 10? This tutorial provides 2 ways to help you with Windows 10 change user folder name task.
How to Change User Folder Name in Windows 10 – 2 Ways
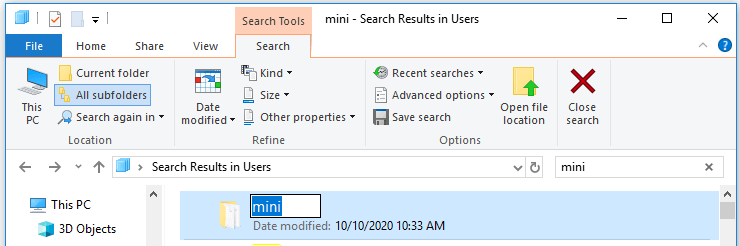
Way 1. Use the Top-right Search Bar in File Explorer
It’s tricky that you will find the Rename option to rename the user folder in Windows 10 if you follow the operation below.
- You can go to C drive (the OS drive) -> Users folder.
- Then click the search box at the upper-right in File Explorer, and search the user folder name you want to change.
- In the search result list, find the user folder and right-click it and you will see the Rename option. Click Rename to change the name for the user folder in Windows 10.
If you are wondering how to change c/users/username in Windows 10, you may try this way.
But some people find that this only changes the user folder name, but not the user account name. If you search a file in the user folder, you will find that the user folder name in the directory is still the old one. To really change user account name in Windows 10 and rename the user folder, you can try Way 2.
Attention: Changing user folder name or editing the Registry is risky and may cause data loss. Do at your own risk. You can make a backup of your Windows OS and important data with free backup tool like MiniTool ShadowMaker. You can also create a system restore point to easily restore Windows 10 OS if something bad happens.
Way 2. Change User Folder Name in Windows 10 with Registry Editor
This way is a little bit complicated, but you can try if you really want to rename a Windows 10 user folder.
Step 1. Create a new local user account.
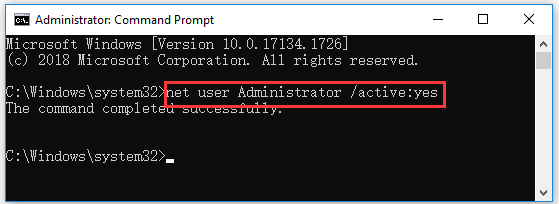
You can press Windows + R, type cmd, and press Ctrl + Shift + Enter to open elevated Command Prompt in Windows 10.
Type net user Administrator /active:yes command, and press Enter to execute the command to create a new Administrator account.
Step 2. Log in the Administrator account.
Next you can click Start -> User -> Sign out to sign out the current user account. Then select the Administrator account that you created to log in.
Step 3. Rename the user folder in OS drive.
Then you can open C drive on your computer and open Users folder. Right-click the target user folder and rename it.
Step 4. Change c/users/username in Registry Editor.
Now you can press Windows + R, type regedit, and press Enter to open Registry Editor in Windows 10.
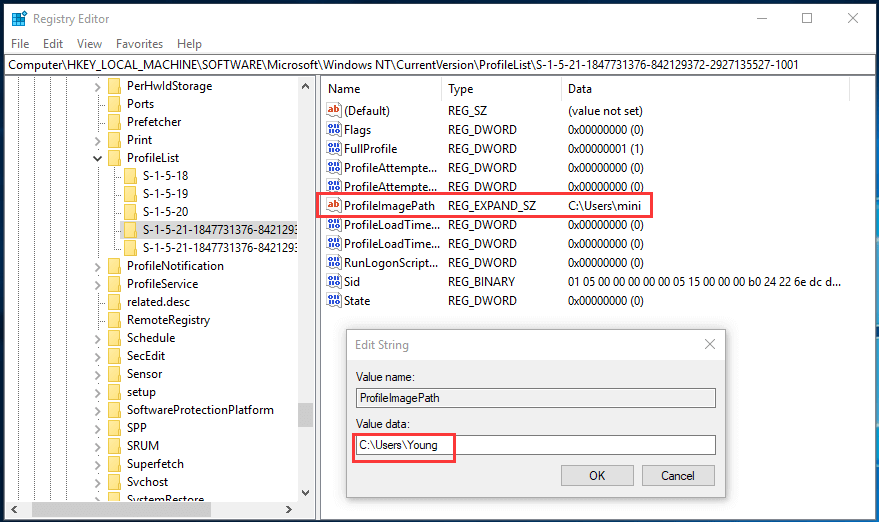
In Registry Editor window, you can expand the folder in the left panel as the following path: HKEY_LOCAL_MACHINE\SOFTWARE\Microsoft\Windows NT\CurrentVersion\ProfileList\<User SID>\.
If you find several User SIDs and don’t know which one to change, you can click each User SID and check its values in the right window to find the right one with the target user folder name you want to change.
Click the User SID and double-click ProfileImagePath key in the right window. Then you can input the new user folder name at the end of the directory under Value data. Click OK to save the changes. Restart your computer to make the changes take effect.
Attention: Before you edit the registry, it’s highly advised you back up Windows 10 Registry first in case something goes wrong. Check: How to backup and restore Registry.
Step 5. Change user profile folder name in User Accounts window.
Next you press Windows + R, type netplwiz in Run dialog, and press Enter to open User Accounts window.
Select the target user account, and click Properties to open its properties window. Change your user name. You can copy the new user name in File Explorer and paste it into the box to avoid wrong input. Click Apply and click OK to save the setting.

Step 6. Sign in with the new user account.
Then you can click Start -> User -> Sign out to sign out Administrator account. Then select the user account with the new name to sign in.
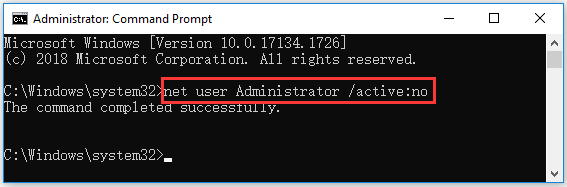
Step 7. Delete the Administrator account.
At last, you can press Windows + R, type cmd, and press Ctrl + Shift + Enter to run Command Prompt as administrator again. Type the command net user Administrator /active:no in Command Prompt, and press Enter to delete the Administrator account you created in Step 1.
Bottom Line
Please be noted that we do not advise you to change user folder name in Windows 10 or edit the registry. If you really want, Way 1 lets you change the c/users/username folder name in Windows 10 but not change the user account name. If you want to change both, you may try Way 2, but be careful, do not mess up, or you may be unable to log into your account and cause computer malfunction.
Вопрос о том, каким образом можно переименовать папку пользователя Windows 10 (имеется в виду папка, обычно соответствующая вашему имени пользователю, находящаяся в C:\Users (которая в проводнике отображается C:\Пользователи, но фактический путь к папке именно тот, что был указан) задается достаточно часто. В этой инструкции показаны способы сделать это и изменить имя папки пользователя на желаемое. Если что-то окажется не понятным, ниже имеется видео где показаны все шаги по переименованию.
Для чего это может быть нужно? Тут встречаются разные ситуации: одна из распространенных — при наличии в имени папки кириллических символов, некоторые программы, размещающие необходимые для работы компоненты в этой папке, могут работать неправильно; вторая по частоте причина — просто не нравится текущее имя (к тому же, при использовании учетной записи Microsoft, оно сокращается и не всегда удобным образом).
Предупреждение: описанные действия, даже произведенные без ошибок, могут привести к неправильной работе системы, сообщению о том, что вы вошли с использованием временного профиля или невозможности войти в ОС. Лучше всего — не переименовывать учетную запись, а создать новую и дать ей права администратора. Также не пробуйте просто переименовать папку каким бы то ни было образом, не выполняя остальных процедур. Настоятельно рекомендую создать точку восстановления, а ещё лучше — резервную копию системы перед выполнением описанных действий.
Переименование папки пользователя в Windows 10 Pro и Enterprise
Описываемый способ при проверке успешно сработал как для локальной учетной записи Windows 10, так и для аккаунта Microsoft (но есть вероятность, что не сработает в вашем случае — выполняйте только под свою ответственность). Первый шаг — добавить новую учетную запись администратора (не ту, для которой будет меняться имя папки) в систему.
Проще всего для наших целей сделать это, не создавая новую учетку, а включив встроенную скрытую учетную запись.
Для этого запустите командную строку от имени Администратора (через контекстное меню, вызываемое правым кликом по Пуску) и введите команду net user Администратор /active:yes и нажмите Enter (в случае, если у вас не русскоязычная Windows 10 или она была русифицирована путем установки языкового пакета, введите имя учетной записи на латинице — Administrator).
Следующий шаг — выйти из системы (в меню Пуск нажмите по имени пользователя — выйти), а потом на экране блокировки выбрать новую учетную запись Администратор и войти под ней (если она не появилась для выбора, перезагрузите компьютер). При первом входе некоторое время займет подготовка системы.
Зайдя в учетную запись, по порядку выполните следующие действия:
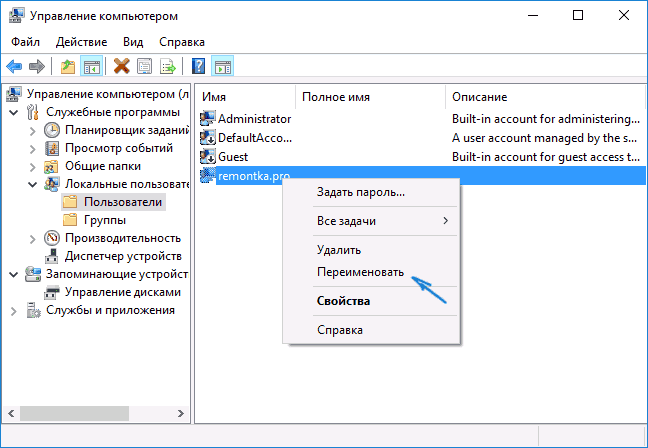
- Кликните правой кнопкой мыши по кнопке Пуск и выберите пункт меню «Управление компьютером».
- В управлении компьютером выберите «Локальные пользователи» — «Пользователи». После этого в правой части окна кликните по имени пользователя, папку для которого нужно переименовать, правой кнопкой мыши и выберите пункт меню для переименования. Задайте новое имя и закройте окно «Управление компьютером».

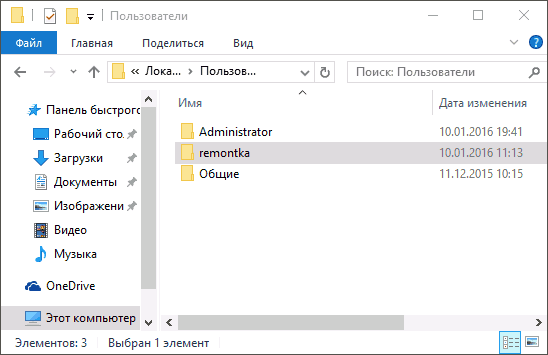
- Зайдите в C:\Users (C:\Пользователи) и переименуйте папку пользователя через контекстное меню проводника (т.е. обычным способом).

- Нажмите клавиши Win+R на клавиатуре и введите regedit в окно выполнить, нажмите «Ок». Откроется редактор реестра.
- В редакторе реестра перейдите к разделу HKEY_LOCAL_MACHINE\ SOFTWARE\ Microsoft\ Windows NT\ CurrentVersion\ ProfileList и найдите в нем подраздел, соответствующий вашему имени пользователя (можно понять по значениям в правой части окна и по скриншоту ниже).

- Дважды кликните по параметру ProfileImagePath и измените значение на новое имя папки.
- В редакторе реестра выделите корневую папку (Компьютер, в левой части вверху) затем в главном меню выберите Правка – Поиск и выполните поиск по C:\Users\Старое_имя_папки
- При нахождении, изменяйте его на новое и нажимайте правка — найти далее (или F3) для поиска расположении в реестре, где остался старый путь.

Закройте редактор реестра, выйдите из учетной записи Администратор и зайдите в свою обычную учетную запись — переименованная папка пользователя должна работать без сбоев. Для того чтобы выключить ранее активированную учетную запись администратора, выполните команду net user Администратор /active:no в командной строке.
Как изменить имя папки пользователя в Windows 10 Домашняя
Описанный выше метод не подойдет для домашней версии Windows 10, однако и тут есть способ переименовать папку пользователя. Правда я не очень его рекомендую.
Примечание: данный способ был протестирован на полностью чистой системе. В некоторых случаях, после его использования могут возникнуть проблемы с работой программ, установленных пользователем.
Итак, для переименования папки пользователя в Windows 10 домашняя выполните следующие шаги:
- Создайте учетную запись администратора или активируйте встроенную, как это описано выше. Выйдите из текущей учетной записи и войдите под новой учетной записью администратора.
- Переименуйте папку пользователя (через проводник или командную строку).
- Также, как описано выше, измените значение параметра ProfileImagePath в разделе реестра HKEY_LOCAL_MACHINE\ SOFTWARE\ Microsoft\ Windows NT\ CurrentVersion\ ProfileList на новое (в подразделе, соответствующем вашей учетной записи).
- В редакторе реестра выделите корневую папку (Компьютер, в левой части вверху) затем в меню выберите Правка – Поиск и выполните поиск по C:\Users\Старое_имя_папки
- При нахождении, изменяйте его на новое и нажимайте правка — найти далее (или F3) для поиска мест в реестре, где остался старый путь.
- По завершении, закройте редактор реестра.
По окончании всех этих шагов — выйдите из используемой учетной записи и перейдите в ту учетную запись пользователя, для которой менялось имя папки. Все должно работать без сбоев (но в данном случае могут быть и исключения).
Видео — как переименовать папку пользователя
И в завершение, как обещал, видео инструкция, в которой показаны все шаги по изменению имени папки вашего пользователя в Windows 10.
Renaming the user folder in Windows 10 might seem tricky, but it’s quite doable if you follow these steps carefully. First, you’ll create a new local user account with admin privileges. Then, you’ll transfer your files and settings to this new account. Finally, you’ll remove the old account and rename the user folder.
Let’s break down the process of renaming your user folder in Windows 10 step by step. This guide will help you create a new user account, transfer your data, and rename the folder successfully.
Step 1: Create a New Local User Account with Admin Rights
Open the «Settings» app and create a new local account with admin privileges.
For this step, go to «Settings» by pressing the Windows key + I, select «Accounts,» then «Family & other users,» and click on «Add someone else to this PC.» Choose «I don’t have this person’s sign-in information,» then «Add a user without a Microsoft account.» Set up a username and password. After creating the account, go to «Account type» and select «Administrator.»
Step 2: Log into the New Account
Log out of your current account and log into the newly created admin account.
Logging into the new account will ensure that you can modify the old user folder without any issues. This step is crucial because you can’t rename or move files that are actively in use by your current account.
Step 3: Rename the Old User Folder
Navigate to the “C:Users” directory and rename the old user folder.
Open File Explorer, go to «This PC» -> «Local Disk (C:)» -> «Users.» Right-click on the old user folder and select «Rename.» Change the name to your desired folder name. Make sure the new account has admin rights to avoid any permission issues.
Step 4: Update the Registry to Reflect the Change
Open the Registry Editor and update the profile list to reflect the new folder name.
Press Windows key + R, type «regedit» and hit Enter. Navigate to «HKEY_LOCAL_MACHINESOFTWAREMicrosoftWindows NTCurrentVersionProfileList.» Find your old account’s SID and change the «ProfileImagePath» value to the new folder name.
Step 5: Transfer Files and Settings to the New Account
Copy your files and settings from the old folder to the new user account folder.
Go back to «C:Users,» open the renamed folder, and copy all necessary files and settings to the new user account’s folder. This ensures that all your data is preserved.
What will happen after you complete the action?
Once these steps are done, your user folder will be renamed, and all your files and settings will be available in the new folder. You can now use your computer as usual, but with the correctly named user folder.
Tips for Renaming User Folder in Windows 10
- Backup Your Data: Always back up your data before making significant changes to system files.
- Use a Local Account: A local account makes it easier to rename folders without running into permission issues.
- Check for Admin Rights: Ensure your new account has administrative privileges from the get-go.
- Be Cautious with Registry: Editing the registry can be risky; double-check the SID and «ProfileImagePath» values.
- Test Before Deleting: Before deleting the old user account, make sure everything is working fine in the new account.
Frequently Asked Questions
Can I rename the user folder without creating a new account?
No, you need to create a new account with admin rights to avoid permission issues.
Will I lose my files if I rename the user folder?
No, if you transfer your files and settings to the new user account, your data will be safe.
Can I do this process using a Microsoft account?
It’s easier with a local account, but you can switch back to a Microsoft account after the process.
Is there any risk in editing the registry?
Yes, incorrectly editing the registry can cause system issues. Proceed with caution.
What if the new user account doesn’t work?
You can always revert to your old account and try the steps again.
Summary
- Create a new local user account with admin rights.
- Log into the new account.
- Rename the old user folder.
- Update the registry to reflect the change.
- Transfer files and settings to the new account.
Conclusion
Renaming the user folder in Windows 10 might seem like a daunting task, but following these steps can simplify the process. From creating a new local account to updating the registry, each step ensures that your data stays intact and accessible. Remember to back up your data and proceed with caution when editing the registry. Once complete, you’ll have a properly named user folder, making your system more organized and easier to navigate.
For further reading, you might want to check out articles on Windows user management and advanced file handling. If you have any questions, don’t hesitate to ask in the comments below. Happy computing!
Matt Jacobs has been working as an IT consultant for small businesses since receiving his Master’s degree in 2003. While he still does some consulting work, his primary focus now is on creating technology support content for SupportYourTech.com.
His work can be found on many websites and focuses on topics such as Microsoft Office, Apple devices, Android devices, Photoshop, and more.
It’s risky. But it can be done. Here are your options
Updated on March 17, 2025
D3Damon / iStock / Getty Images
What to Know
- An admin can change the name of a user folder, but it might break how some software works.
- The safer alternative is to make a new account with the Users folder name you want.
- Create the account via Settings > Accounts > Family & other users > Add someone else to this PC.
This guide explains two methods for renaming your Windows 10 user folder.
Make a New Account to Change the User Folder Name
Editing the name of your account in Windows 10 is simple, but it just updates the name seen on the Start and Welcome screens. Changing the name of the user folder is a whole different process.
Although this is possible (keep reading to find out how), doing so can easily break how some of your software works or even make the profile unusable. The safer and more reliable method is to make a new user account.
To create a new account in Windows 10, go to Settings > Accounts > Family & other users > Add someone else to this PC. As you follow the steps in that guide, be sure to name the user account whatever it is you want the Users folder name to be.
The Difference Between Local and Microsoft Accounts in Windows
Change the User Folder Name in Windows 10 Registry
The more advanced method for changing your user folder name is to do so in the registry. This method retains the original account (you don’t need to make a new profile), but any mistakes made along the way can corrupt the profile and the apps installed within it.
Make a System Restore point before you start in case something goes wrong. This method only works in Windows 10 Pro, not Windows 10 Home.
-
Open Command Prompt as an administrator from a different user account (i.e., not the one for which you want to change the folder name).
-
Enter this command:
wmic useraccount list full -
In the resulting list, find the account’s existing name and take note of its SID.
-
To rename your existing account, enter this command:
cd C:\UsersThen, enter this command, but be sure to set your new account name to what you want the user folder to be:
rename OldAccountName NewAccountNameIn our example, you can see that we’re changing the folder from Jeff to Jeffery.
If you see an ‘Access is denied’ message, it most likely means the other user is still logged in. A quick way to sign them out is through Task Manager’s Users tab.
-
Open Registry Editor to this path:
Computer\HKEY_LOCAL_MACHINE\SOFTWARE\Microsoft\Windows NT\CurrentVersion\ProfileListYou can browse the folders/keys on the left to get to this path, or copy/paste the whole thing into the navigation bar at the top of Registry Editor.
-
Open the registry key that matches the SID you recorded earlier, and then double-click ProfileImagePath on the right.
-
Change the value data to the new folder name—make sure it’s the same as your newly renamed account—and select OK.
-
Restart your computer.
If you followed the steps correctly, your Windows 10 user folder name should have your new account name. If you run into issues accessing the account or the user profile is corrupted, use your System Restore point.
FAQ
-
The easiest way to take a screenshot in Windows 10 is by using the Windows + PrtSc (Print Screen) key combination on your keyboard. Screenshots are stored in Pictures > Screenshots by default.
-
One way to perform a Windows factory reset is through Settings > Update & Security. In the Recovery section, select Get started and follow the on-screen instructions.
-
To turn on Bluetooth, go to Settings > Devices > Bluetooth & other devices and toggle on Bluetooth.
Thanks for letting us know!
Get the Latest Tech News Delivered Every Day
Subscribe