
В этой статье мы рассмотрим, как удалить драйвера оборудования или принтеров в Windows 10 и 11. При подключении нового оборудования к компьютеру, Windows пытается автоматически найти, скачать (или обновить) подходящие драйвера через Windows Update. Со временем в каталоге
C:\Windows\System32\DriverStore
может накопиться большое количество драйверов, которые не используются.
Вы можете удалить драйвер из хранилища драйверов Windows несколькими способами.
Содержание:
- Удалить драйвер принтера в Windows
- Удалить драйвер из диспетчера устройства Windows
- Как удалить драйвер в Windows из командной строки?
Удалить драйвер принтера в Windows
Если вы удалили принтер из панели управления Windows, его драйвер все еще остается в системе. Чтобы полностью удалить драйвера печати в Windows:
- Откройте консоль управления печатью
printmanagement.msc
(если консоль отсутствует, установите ее из набора администрирования RSAT с помощью команды:
dism /Online /add-Capability /CapabilityName:Print.Management.Console~~~~0.0.1.0
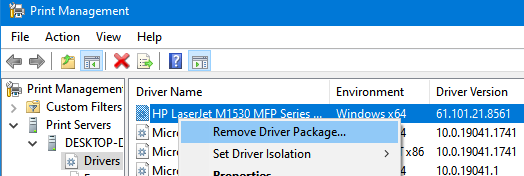
); - Перейдите в Print Manager -> Print Servers -> выберите ваш компьютер -> Drivers;
- Здесь будут перечислены все драйвера принтеров. Щелкните по драйверу, который вы хотите удалить и выберите Удалить пакет драйвера (Remove driver package);

Также вы можете удалить ненужные драйвера через свойства сервера печати. Для этого выполните команду
printui /s /t2
, выберите драйвер принтера, нажмите кнопку Remove и выберите Remove driver and driver package.
Удалить драйвер из диспетчера устройства Windows
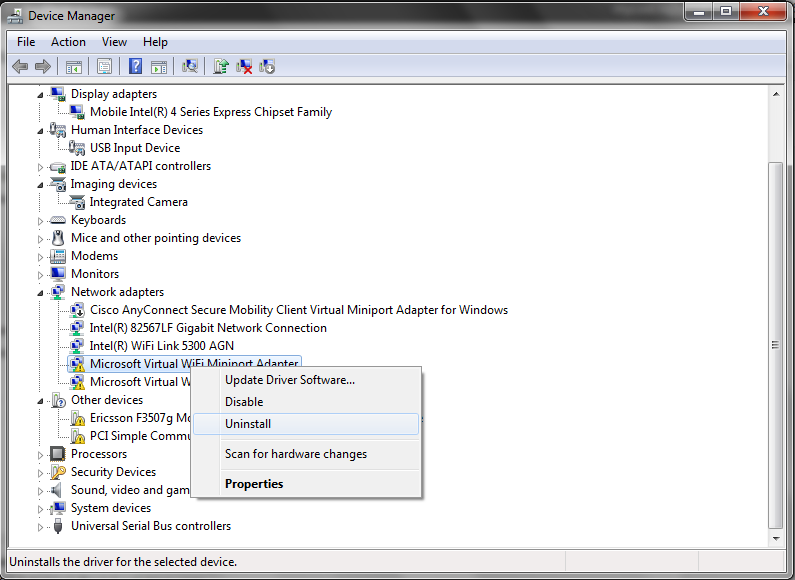
Перед удалением любого драйвера нужно отсоединить устройства, которые могут его использовать. Затем:
- Запустите консоль диспетчера устройств (
devmgmt.msc
); - В разделе View включите опцию Show hidden device;
- Найдите в списке ваше устройства, щелкните по нему правой кнопкой и выберите Uninstall device;
Если для устройства отсустствует драйвер, оно отображается в диспетчере оборудования с желтым восклицательным знаком. Вы можете найти драйвер для неизвестного устройства в Windows по этому инструкции.
- Чтобы удалить и оборудование и драйвер из хранидища драйверов, отметьте опцию Delete the driver software for this device и нажмите Uninstall.
Как удалить драйвер в Windows из командной строки?
Чтобы вывести список сторонних драйверов, установленных в Windows, выполните команду:
pnputil /enum-drivers
или
dism /online /get-drivers /format:table
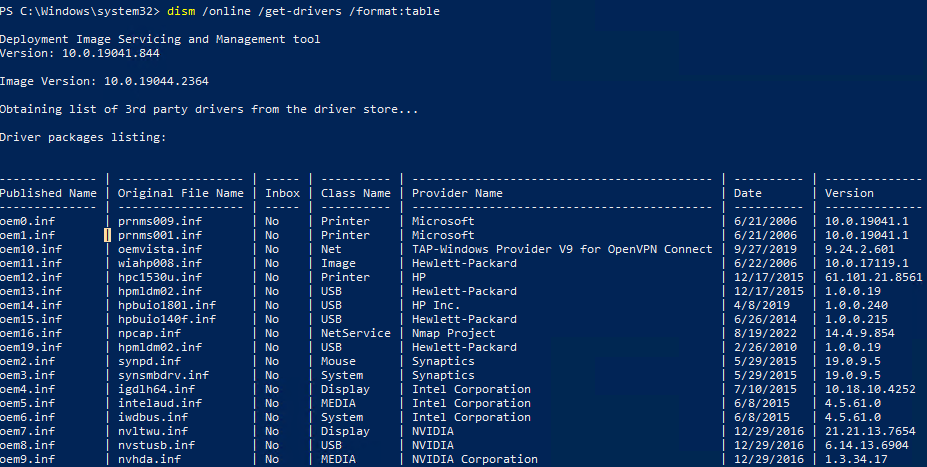
В результатах программы видны как имя INF файда драйвера, под которым драйвер установлен в хранилище драйверов (Published name в формате
oem#.inf
) так и оригинальное имя файла (Original File Name).
Найдите в списке нужный драйвер и запомните имя файла (в формате oem#.inf ). Чтобы удалить драйвер из командной строки, выполните:
pnputil /delete-driver <Published Name> /uninstall /force
Например:
pnputil /delete-driver oem15.inf /uninstall /force
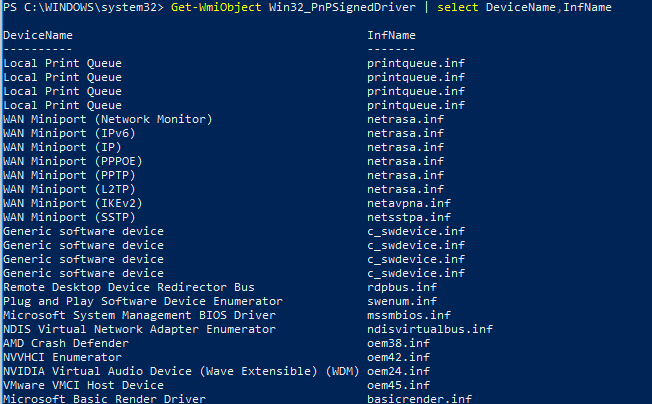
Вывести полный список установленных драйверов (включая системные) можно с помощью PowerShell:
Get-WmiObject Win32_PnPSignedDriver | select DeviceName,InfName|
Если драйвер не удаляется в Windows в онлайн режиме, вы можете попробовать удалить его из офлайн образа Windows.
Загрузите Windows в среде восстановления или WinPE. Выведите список драйверов в офлайн образе:
DISM /Image:C:\ /Get-Drivers
Где
C:\
— буква раздела с Windows.
Чтобы удалить драйвер из образа, выполните:
DISM /Image:C:\ /remove-driver /driver:oem11.inf
Нужно использовать для удаления драйвера именно DISM. При попытке удалить драйвер в офлайн образе Windows из среды WinPE с помощью PnpUtil.exe, появится ошибка:
Failed to delete driver package: The specified file is not an installed OEM INF.
Или укажите путь к INF файлу:
DISM /Image:C:\ /Remove-Driver /Driver:<полный_путь_к_inf-файлу>
Installing drivers can be a hair-raising adventure, even on today’s modern operating systems. These finicky pieces of code act as the middleman between your PC’s hardware and its operating system. Although they install with ease just like any other software, they integrate deeply into the OS, sinking their teeth into areas most other software doesn’t go near. Most of the time the driver installation process is simple, seamless, and transparent to you, as it should be.
On those occasions when things go wrong, however, they can go really wrong, and even crash your entire computer. For example, when Microsoft’s Windows Vista came out in 2007, critics lambasted it for being slow and prone to crashing; Microsoft investigated the causes and found that a majority of crashes were due to driver issues.
Thankfully, when you prepare yourself for battle with a problematic driver, you have a couple of tricks that can help. Microsoft has introduced an easy way to roll back to a previous (and, you hope, more stable) version of the driver, or remove it from the system altogether, giving you a clean slate to try again or install a different version.
Roll Back to a Previous Driver
- Click Start, type Device Manager, and press Enter.
- Find and double-click the category of device causing the issue (for instance, the graphics card would be listed under Display Adapters).
- Double-click the problematic device to bring up the Properties window.
- Click the Driver tab.
- Click the Roll Back Driver button.
- A dialog box will ask you to confirm your decision to roll back to a previous driver. Click Yes to begin the roll-back process.
Use the Properties menu to uninstall your driver software or roll back to a previous version.
At this point Windows will automatically remove the current driver for the device and reinstall the previous driver. You may then receive a notification that the system settings have changed, and Windows will ask you to reboot. If you see that message, you should reboot your computer as soon as possible.
Uninstall a Driver
When you need to uninstall a driver completely, the best and safest method is to use the device’s uninstaller program (if it has one). If you added the device to your system through an installer (as is the case with most graphics card and sound card drivers, for instance), you can uninstall it just as you would any other program.
- Click Start, type Uninstall Program, and press Enter.
- In the Uninstall window that appears, go through the list and find your device or drivers. Double-click the entry to begin the uninstallation process.
Sometimes devices won’t have an uninstaller, or the uninstaller will not appear in the list. In those instances, you can use the Device Manager to remove the driver completely.
- Click Start, type Device Manager, and press Enter.
- Find and double-click the category of device whose driver you wish to uninstall (for example, the graphics card would be listed under Display Adapters).
- Right-click the device, and click Uninstall.
- Windows will prompt you to confirm the device’s removal. Click OK to remove the driver.
- After the uninstallation is complete, reboot your computer as soon as possible.
In a pinch you can use the Windows Device Manager to uninstall troublesome driver software.
After you roll back or uninstall a problematic driver, you can try downloading and installing the latest version from the manufacturer’s website, or try a specific version that previously worked to get your computer back on its feet.
Quick Tips
- The easiest way to uninstall a driver from Windows is via the Device Manager.
- Windows 11 also allows you to uninstall drivers using the Settings app, Control Panel, or Command Prompt.
- Uninstalling critical drivers without proper knowledge could cause your Windows 11 PC to malfunction.
Method 1: Uninstall Drivers Using Device Manager
Device Manager is a handy utility for managing various hardware devices installed on your system. It can also be used to easily uninstall a driver from your computer. Here’s how.
Step 1: Right-click on the Start icon > select Device Manager from the list.

Step 2: In the Device Manager window, locate the driver you want to remove. Right-click on it and select Uninstall device.

Step 3: Select Uninstall when prompted.

Method 2: Uninstall Drivers via Settings
Another option for uninstalling drivers in Windows 11 is to use the Settings app. It’s similar to how you uninstall an app from Windows. Here are the steps you can follow.
Step 1: Press the Windows key + I to open the Settings app and head to Apps > Installed apps.

Step 2: Scroll down or use the search bar at the top to locate the driver you want to get rid of. Click the three-dot menu icon next to it and select Uninstall.

Step 4: Select Uninstall again to confirm.

Method 3: Uninstall Drivers With Control Panel
Although Microsoft intends to retire the Control Panel soon, it is still a popular option for making system-level changes on Windows. If you’re a veteran Windows user who prefers the Control Panel, employ the following steps to remove a device driver.
Step 1: Press the Windows + R keys to open the Run dialog > type control in the box > press Enter.
Step 2: Use the drop-down menu at the top right to change the view type to Large icons > click on Programs and Features.

Step 3: Locate and select the unwanted driver from the list. Then, click Uninstall at the top > follow the on-screen prompts to remove the driver.

Method 4: Uninstall Drivers With Command Prompt
If you’re a terminal geek, you may already be using Command Prompt to run batch files, troubleshoot system issues, and perform various other tasks. But did you know you can also use it to uninstall a driver from your Windows PC? We’ll show you how.
Step 1: Click the search icon on the taskbar, type cmd in the search box, and select Run as administrator.

Step 2: Paste the following command and press Enter to view a list of your PC’s available drivers.
Dism /online /Get-Drivers /Format:Table

Step 3: Note down the Published Name of the driver you want to uninstall.
Step 4: Run the following command to remove the driver.
pnputil /delete-driver [Published Name] /uninstall /force
Replace [Published Name] in the above command with the name noted in the last step.
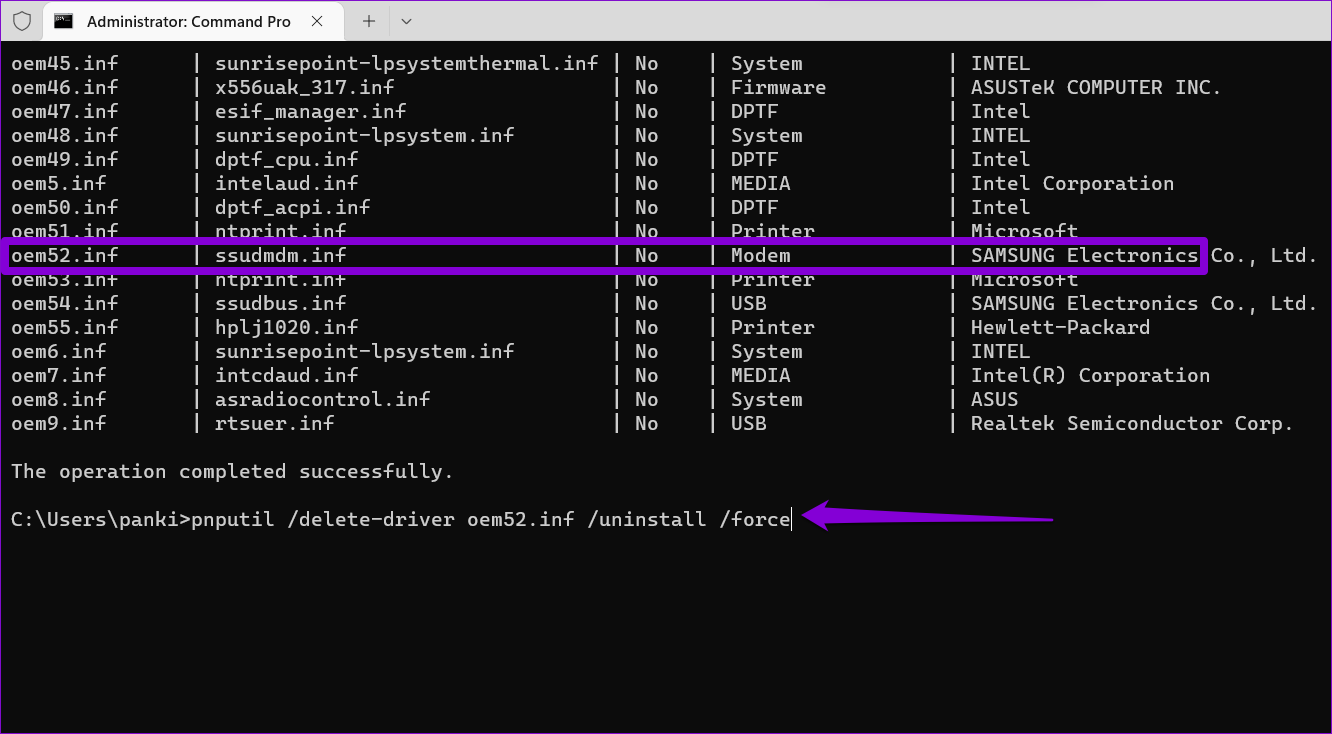
In the following example, we try removing the Samsung Electronics Modem driver. So, this is the command we used:
pnputil /delete-driver oem52.inf /uninstall /force
Was this helpful?
Thanks for your feedback!
The article above may contain affiliate links which help support Guiding Tech. The content remains unbiased and authentic and will never affect our editorial integrity.
Removing drivers from Windows 10 is straightforward. This guide will walk you through accessing Device Manager, uninstalling the driver, and cleaning up leftover files. With these steps, you’ll free up space and solve pesky hardware issues.
We’ll now get into the nitty-gritty details of removing drivers from your Windows 10 system. Follow these steps to ensure a smooth process.
Step 1: Open Device Manager
First, press the Windows key + X and select Device Manager.
Device Manager is like the control panel for all your drivers. You’ll find it under the menu that pops up. It lists all the hardware components and their drivers.
Step 2: Locate the Device
Next, find the device whose driver you want to remove.
You’ll see a list of categories like «Display adapters» or «Sound, video and game controllers.» Click the arrow next to the category to expand it.
Step 3: Uninstall the Driver
Right-click the device name and select «Uninstall device.»
A new window will pop up asking if you’re sure. Tick the box that says «Delete the driver software for this device» and click Uninstall.
Step 4: Restart Your Computer
Now, restart your computer to complete the uninstall process.
This step helps to ensure that Windows fully removes the driver and that any changes take effect.
Step 5: Delete Leftover Files
Finally, manually delete any leftover files from the system folders.
Drivers can leave behind residual files. Check the Program Files and System32 folders to ensure everything is gone.
Once you complete these actions, the driver will be removed from your system. This can help fix hardware issues or free up disk space that was being used by outdated drivers.
Tips for Removing Drivers from Windows 10
- Make a backup of your system before starting to avoid accidental issues.
- Ensure you know which driver you are removing to avoid system malfunctions.
- Use third-party software if manual removal does not work.
- Keep your system updated to prevent conflicts with new drivers.
- Reinstall drivers from the manufacturer’s website if you need them again.
Frequently Asked Questions
What if I uninstall the wrong driver?
No worries! Windows will likely reinstall a generic driver on restart, but you might need to download the specific one from the manufacturer.
Can I remove multiple drivers at once?
Yes, but it’s safer to do it one at a time to ensure nothing goes wrong.
Will removing the driver free up a lot of space?
It can, but how much depends on the driver’s size. Most drivers aren’t huge, but every bit helps!
Is it safe to use third-party software for driver removal?
Generally, yes, but always use reputable software. Some third-party tools can offer more thorough removal.
What happens if I don’t restart my computer?
The driver won’t be completely uninstalled, which could cause issues. Always restart to complete the process.
Summary
- Open Device Manager.
- Locate the device.
- Uninstall the driver.
- Restart your computer.
- Delete leftover files.
Conclusion
Removing drivers from Windows 10 doesn’t have to be a daunting task. With these steps, you’ll have the know-how to tackle it like a pro. Whether you’re troubleshooting or just cleaning up your system, these steps are your go-to guide. Always back up your system before making changes and ensure you download new drivers from reputable sources if needed.
Now that you’ve got the basics down, why not dive deeper? Explore how drivers work or look up tools that can streamline the process even more. If you found this guide helpful, share it with friends or leave a comment. Happy computing!
Kermit Matthews is a freelance writer based in Philadelphia, Pennsylvania with more than a decade of experience writing technology guides. He has a Bachelor’s and Master’s degree in Computer Science and has spent much of his professional career in IT management.
He specializes in writing content about iPhones, Android devices, Microsoft Office, and many other popular applications and devices.
Read his full bio here.
Как удалить драйвер в командной строке
Удаление драйверов Windows возможно не только в диспетчере устройств или с помощью специальных утилит, но и в командной строке. Зачем это может пригодиться? Например, при невозможности зайти в систему из-за проблем с драйвером, возможность его удаления с помощью команд в среде восстановления может быть полезной.
В этой инструкции подробно о том, как удалить драйвер в командной строке Windows 11, Windows 10 и других версиях системы. Сначала методы для работающей ОС, затем — для случая, когда нужно выполнить удаление без входа в систему.
Удаление драйверов с помощью командной строки в запущенной Windows
Если вход в Windows 11/10 возможен, базовым способом для удаления драйверов в командной строке будет использование утилиты pnputil. Необходимые шаги:
- Запустите командную строку от имени администратора.
- Введите команду
pnputil /enum-drivers
для получения списка драйверов и их опубликованных имен.
- Для удаления определенного драйвера используйте следующую команду, заменив номер на соответствующий номер из значения «Опубликованное имя» нужного драйвера:
pnputil.exe /delete-driver oemНОМЕР.inf /force


В результате вы должны будете увидеть сообщение «Пакет драйвера успешно удален».
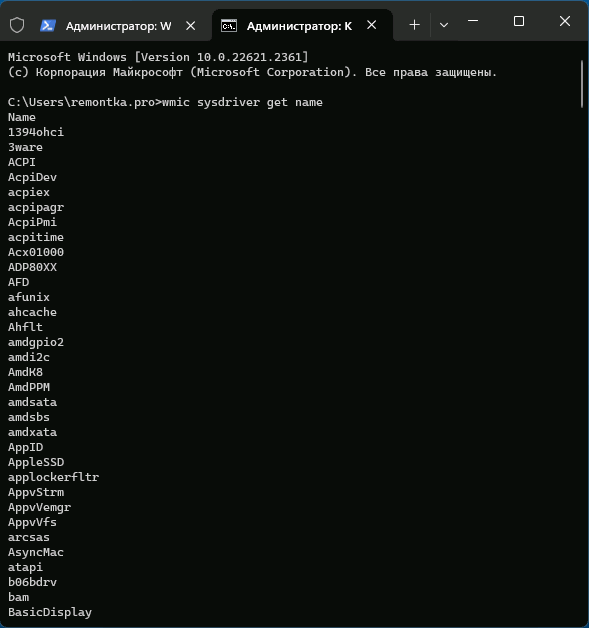
Описанный выше метод работает только для сторонних драйверов, установленных вручную или из Центра обновлений Windows, однако системные драйвера в списке отображаться не будут. Если задача — удаление системных драйверов, шаги будут следующими:
- Запустите командную строку от имени администратора.
- Введите команду
wmic sysdriver get name

- Предыдущая команда отобразит список имен системных драйверов. Для удаления драйвера по имени используйте команду:
wmic sysdriver where(name="имя") delete


Удаление драйвера в среде восстановления, WinPE или с загрузочной флешки
Предыдущие способы сработают лишь в том случае, если Windows исправно запускается и её использование возможно.
Если это не так, например, вместо загрузки вы видите синий экран с ошибкой, есть возможность использовать команды DISM для удаления драйверов в командной строке в среде восстановления, с загрузочной флешки (в программе установки Windows достаточно нажать клавиши Shift+F10 чтобы открыть командную строку) или загрузившись в WinPE.
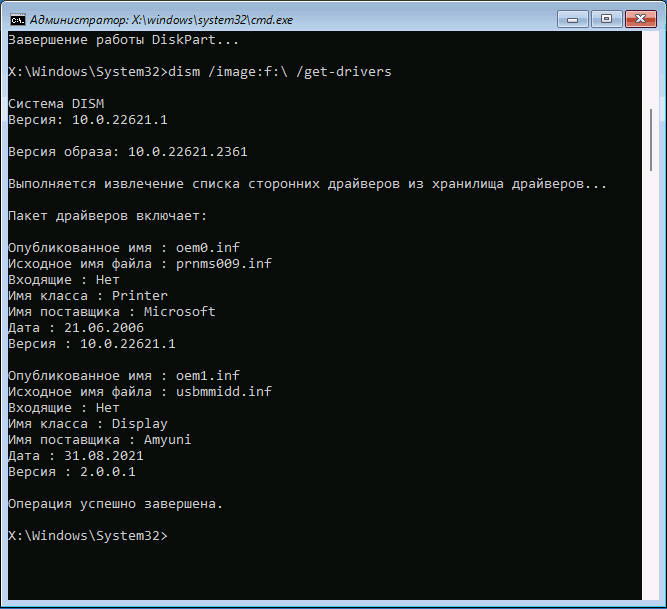
- В командной строке введите
dism /image:c:\ /get-drivers

это отобразит список установленных пакетов драйверов.
- Если предыдущая команда отобразит сообщение «Не удалось получить доступ к образу», возможно, буква диска с системой отличается от C: (такое может быть в среде восстановления). В этом случае используйте команды
diskpart
list volume
exit
чтобы определить актуальную букву системного раздела диска и использовать её в команде.

- В списке установленных драйверов будет отображаться опубликованное имя, класс устройства, поставщик драйвера. Если этого окажется недостаточно, чтобы определить, какой драйвер нужно удалить, вы можете использовать команду получения подробной информации о драйвере:
dism /image:c:\ /get-driverinfo /driver:oemНОМЕР.inf
заменив номер на номер опубликованного имени драйвера и букву диска, если это необходимо.
- Для удаления драйвера введите команду (если нужно, изменив букву системного раздела диска):
dism /image:c:\ /remove-driver /driver:oemНОМЕР.inf


В результате соответствующий драйвер будет удален из системы.
Если у вас есть дополнительные вопросы, касающейся рассмотренной темы, вы можете задать их в комментариях ниже, я постараюсь помочь.