
Голосовой помощник Cortana в последних версиях Windows так и не начал работать для русского языка, но само приложение присутствует в системе: пользы от него не много, а удаление стандартными средствами удаления приложений системы не предусмотрено.
В этой инструкции подробно о способах удалить Cortana в Windows 11 и Windows 10 как с помощью инструментов командной строки (PowerShell), так и с помощью сторонних бесплатных утилит. На близкую тему: Как убрать поиск с панели задач Windows 11.
Удаление Кортаны в PowerShell или Терминале Windows
Для удаления Cortana можно использовать команды Windows PowerShell и не прибегать к использованию сторонних утилит:
- Запустите Windows PowerShell от имени администратора, либо Терминал Windows от имени администратора, для этого можно использовать меню по правому клику по кнопке «Пуск» (или по сочетанию клавиш Win+X).
- Введите команду
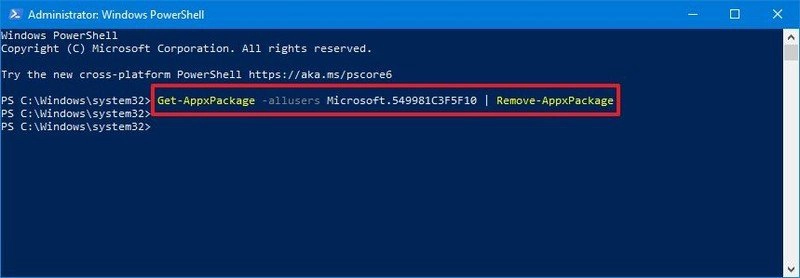
Get-AppxPackage *Microsoft.549981C3F5F10* | Remove-AppxPackage
и нажмите Enter.

- Дождитесь выполнения команды.

Готово, Cortana будет удалена из Windows 11/10 (из текущей учетной записи пользователя) и исчезнет из списка установленных программ.
В случае, если требуется удалить Cortana для всех пользователей, используйте команду:
Get-AppxPackage -allusers *Microsoft.549981C3F5F10* | Remove-AppxPackage
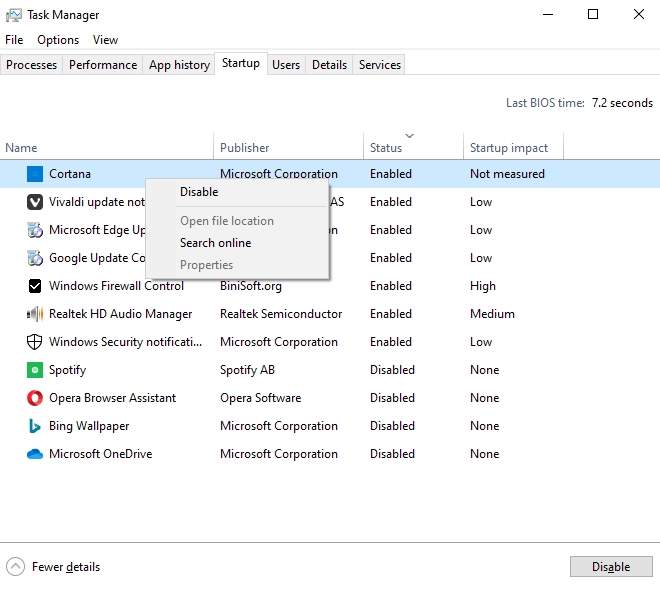
Также, если ранее вы не отключали автозагрузку Кортаны, после удаления рекомендую проверить, нет ли пункта её автозагрузки в диспетчере задач и, при наличии, отключить его во избежание ошибок. Подробнее: Как убрать программы из автозагрузки Windows 11, Автозагрузка программ Windows 10.
С помощью сторонних приложений
Большинство приложений для удаления ненужных компонентов Windows 11 и Windows 10 позволяют, в том числе, удалить и Cortana.
Среди таких приложений — BC Uninstaller, бесплатное, с открытым исходным кодом и на русском языке. Сам процесс удаления должен быть ясным из следующего скриншота:

После выбора Cortana и пункта «Удалить» достаточно будет задать несколько параметров удаления (или оставить их значения по умолчанию) и подтвердить удаление. Подробная информация по использованию этого деинсталлятора и его официальный сайт — в обзоре Bulk Crap Uninstaller.
Ещё один пример отличного приложения для этих целей — O&O AppBuster.

Другие популярные деинсталляторы программ также, в большинстве своем, позволяют удалять встроенные приложения Windows 11/10. Пример удаления Cortana в бесплатной версии Revo Uninstaller:

Подробнее о таких программах в статье Лучшие деинсталляторы (программы для удаления программ) для Windows.
Если у вас остались вопросы, касающиеся удаления Cortana или иных встроенных приложений Windows, задавайте их в комментариях ниже — постараюсь подсказать варианты решения.
You’ve come to the right place if you want to know how to uninstall Cortana from Windows 11 or Windows 10.
Thankfully, it’s rather simple to shut down Microsoft’s digital assistant, as the company continues making it less and less prevalent on devices like the best Windows laptops. Is Microsoft surrendering territory to Alexa, Google Assistant and (possibly) Siri? Perhaps, but we’re here to discuss how to uninstall Cortana — with instructions for both regular folks and power users alike.
There are two ways to disable Cortana, as outlined by Windows Latest. You can either stop it from automatically opening when you boot your PC (the easier way) or remove the Cortana app from Windows 10 (which is a little harder). We’ve got full instructions below.
Alternatively, you could just upgrade to Windows 11, because Microsoft has stripped Cortana almost entirely out of it.
How to disable Cortana in Windows 10
- Use the keyboard shortcut Ctrl + Shift + Esc.
- In Task Manager, click the Startup column.
- Select Cortana.
- Click Disable.
- Then, open the Start menu.
- Find Cortana under All Apps.
- Right-click on Cortana.
- Select More.
- Click on App settings.
- Turn off the switch next to ‘Runs at log-in.’
How to uninstall the Cortana app in Windows 10
These steps require a little tinkering, so a word of caution. Since you’re going to be poking around in PowerShell, back up your system first. Our best cloud backup solutions provide easy ways to protect your data.
- Open the Start Menu and type in PowerShell.
- Right click on Windows PowerShell.
- Select ‘Run as administrator’.
- Type the following text (minus the ‘ marks) in: ‘Get-AppxPackage -allusers Microsoft.549981C3F5F10 | Remove-AppxPackage’
- Press Enter.
Of course, power users set on eradicating Cortana will need to dive even deeper into Windows Registry — which is even riskier for everyday users. Since it’s less necessary and a bit dangerous, we recommend skipping that part.
You’ve already shut Cortana up and removed its app presence. That should be enough for some extra peace of mind.
Get instant access to breaking news, the hottest reviews, great deals and helpful tips.
How to disable Cortana in Windows 11
While Cortana comes disabled by default in Windows 11, it’s possible to bring it back, as we’ll explain below. If you, or someone else, did that to your PC, and you want to remove it you can disable it just as easily.
We’ve got two ways to do it here, and our first is arguably the easiest.
- Click Windows + I (that’s an I not an L) to open Settings.
- Select Apps from the left menu.
- Select Apps and Features on the right menu.
- Scroll to Cortana, click the three dots icon and select Advanced options
- Flip the «Run at Log-in» toggle to the OFF position.
How to disable Cortana in Windows 11 with the Task Manager
This is another way to stop it in its tracks, pulling Cortana out of your Startup apps.
- Right-click the Windows Start button from the bottom of the screen
- Select Task Manager
- Open the Startup tab
- Find and right-click Cortana
- Select Disable
How to install Cortana in Windows 11
Windows 11 doesn’t even have Cortana active by default. But, what if, just play along with us here, you wanted to enable Cortana in Windows 11?
Fortunately, it’s really easy.
- Click Windows + I (that’s an I not an L) to open Settings.
- Select Apps from the left menu.
- Select Apps and Features on the right menu.
- Scroll to Cortana, click the three dots icon and select Advanced options
- Turn the «Run at Log-in» toggle to the ON position.
Henry is a managing editor at Tom’s Guide covering streaming media, laptops and all things Apple, reviewing devices and services for the past seven years. Prior to joining Tom’s Guide, he reviewed software and hardware for TechRadar Pro, and interviewed artists for Patek Philippe International Magazine. He’s also covered the wild world of professional wrestling for Cageside Seats, interviewing athletes and other industry veterans.
If you’re looking to disable Cortana in Windows 10, you’re not alone. Many users prefer to turn off this virtual assistant to improve privacy, reduce resource usage, or simply because they don’t need it. Whether you’re looking to turn off Cortana in Windows 10 temporarily or want to disable Cortana permanently in Windows 10, this guide will walk you through the steps to manage Cortana settings and customize your Windows experience.
Table of Content
- What is Cortana?
- Why You Should Disable Cortana?
- How to Disable Cortana Temporarily?
- How to Disable Cortana Permanently?
- How to Re-activate Cortana in Windows 10?
- How to Uninstall Cortana?
- How to Disable Cortana in Windows 10 — FAQ’s
What is Cortana?
Cortana is a virtual assistant that was created by Microsoft back in 2014 to compete with rivals like Apple’s Siri, Amazon’s Alexa, and Google’s voice assistant.
Do you know? Cortana was named after the AI character in the famous video game Halo where it served as an AI assistant to the protagonist in the game.
Microsoft aimed to create a helpful assistant for users across different devices and platforms that could respond to voice commands and assist users with various tasks such as setting reminders, and alarms, searching the web directly through their voice, sending emails, and many more tasks.
Why Cortana Failed?
Like other AI assistants, Cortana couldn’t gain as much popularity and users as it was expected due to the following reasons:
- It faced stiff competition from Amazon’s Alexa, Apple’s Siri, and Google’s voice assistant.
- It needed a better user interface.
- Poor marketing by Microsoft.
- Consumed too much memory and caused trouble for the users by making their systems slow.
As a result in 2023, Microsoft finally gave up and decided to end up support service for Cortana in the latest version of Windows, and from now on Cortana might be available as an integrated service in other Microsoft apps but not as a standalone app.
However, if you are not using the latest version of Windows and want to disable Cortana and get rid of it follow the detailed methods mentioned below.
Why You Should Disable Cortana?
Here are a few reasons why you should disable Cortana in your Windows 10:
1. Resource Usage: Cortana always runs in the background waiting for your voice commands. This process consumes a lot of your RAM and makes your system slower if you have limited resources. So you should disable Cortana to make your system work faster.
2. Privacy Concerns: Cortana collects and processes user Data and personal information to improve user experience. If you are not comfortable sharing your data then you can disable Cortana to enhance your privacy.
3. Personal Choice: Some of the users may prefer other AI voice assistants over Cortana so it’s up to their choice if they want to disable Cortana or not.
4. Lack of Usefulness: Many people have found that Cortana is not very useful as compared to other AI voice assistants in the market. It failed to recognize the user’s voice in many test cases and also failed to provide useful information about a certain topic. Thus if you find that Cortana is not very helpful for you and not enhancing your productivity then you can simply disable it.
How to Disable Cortana Temporarily?
Rather than completely removing Cortana you can disable it temporarily and here is how:
Step 1: Go to Windows Settings.
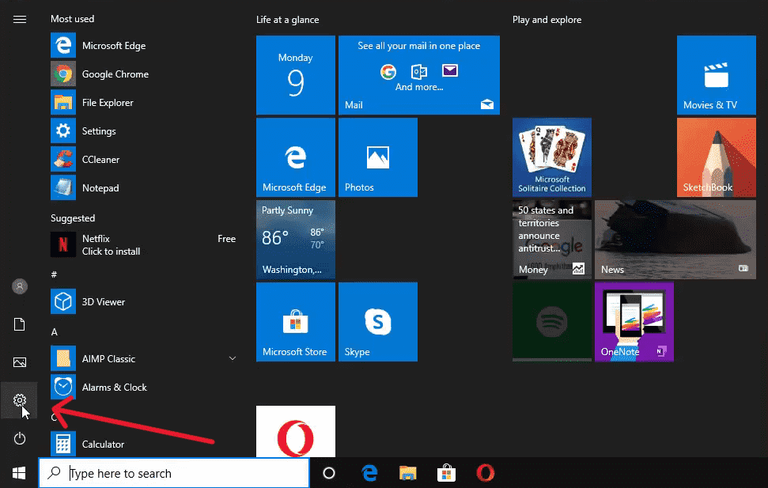
Step 2: Select Cortana.
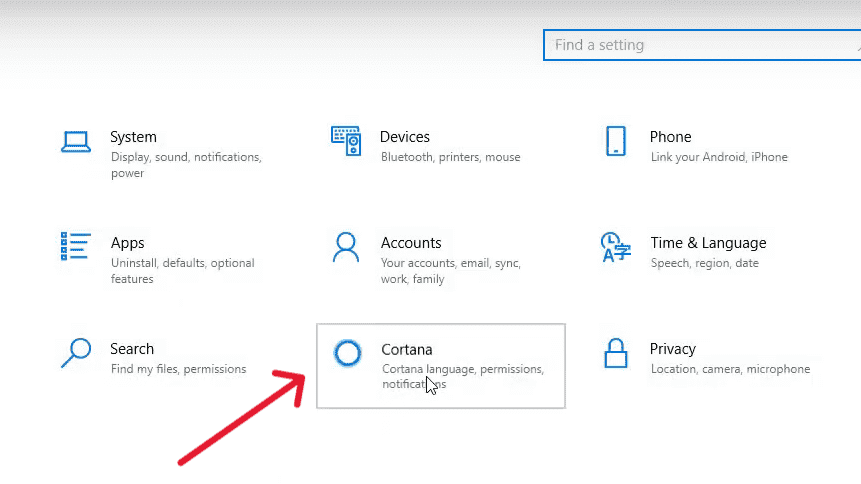
Step 3: Disable the following options.
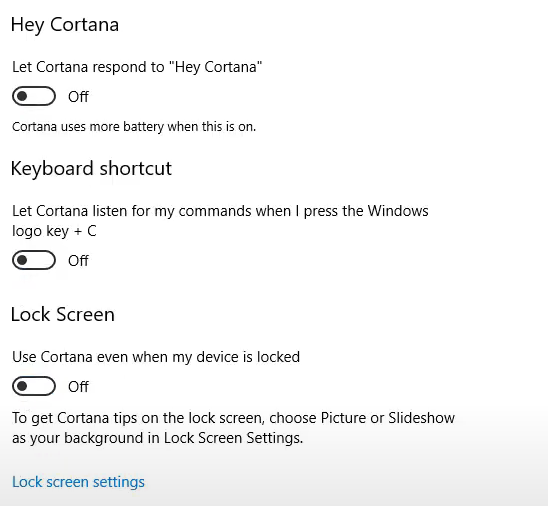
Step 4: Select this option.
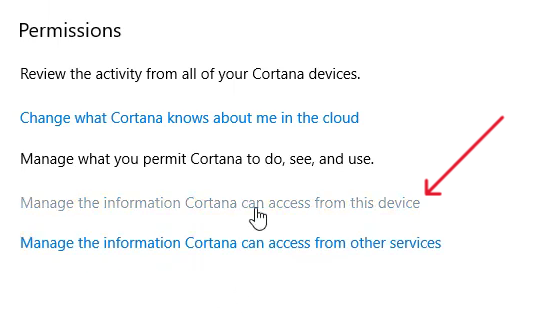
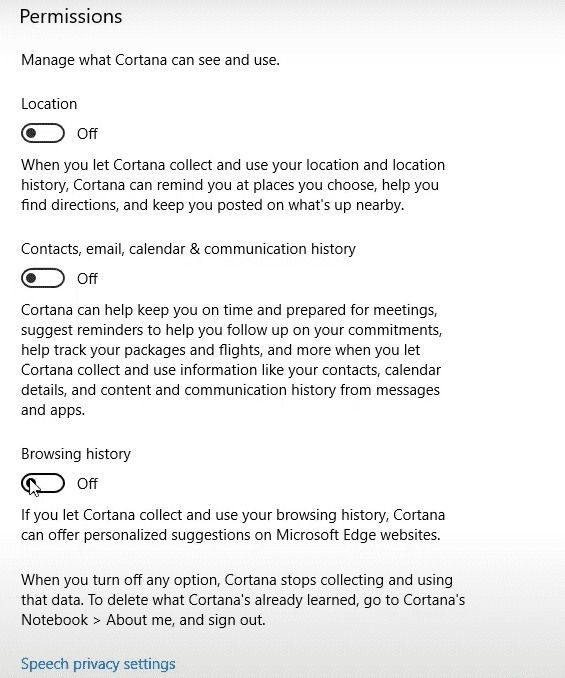
Step 5 Disable the following permissions.
Step 6: Restart your PC and Cortana will be disabled. But it can be enabled automatically after certain Windows updates.
How to Disable Cortana Permanently?
If you want to disable Cortana permanently, always create a system restore point to revert the changes to be on the safe side. So first, make up your mind and if you want to disable it, Do it by using the following steps.
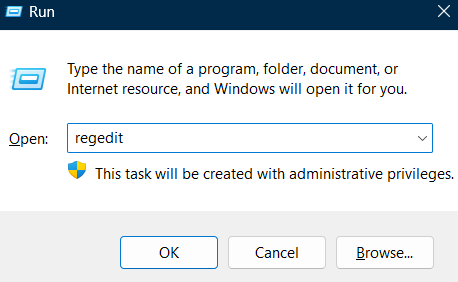
Step 1: Press windows+ R to open the Run dialog box and type regedit to open the registry editor.

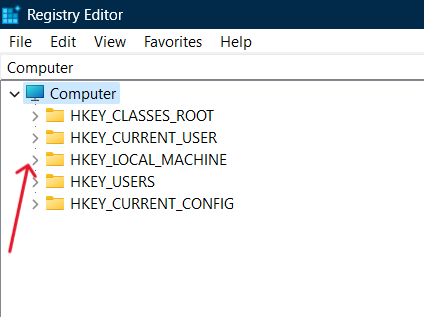
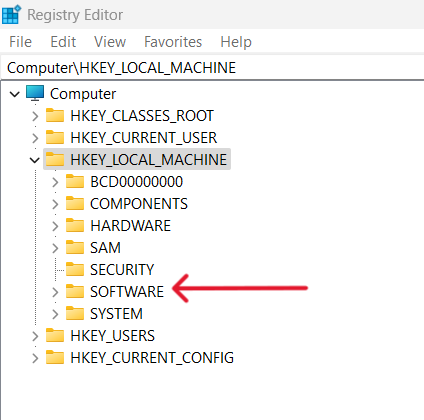
Step 2: Click on HKEY_LOCAL_MACHINE to expand it.
Step 3: Click on Software and expand it.

Step 4: Click on Policies and expand it.
Step 5: Select Microsoft under Policies.
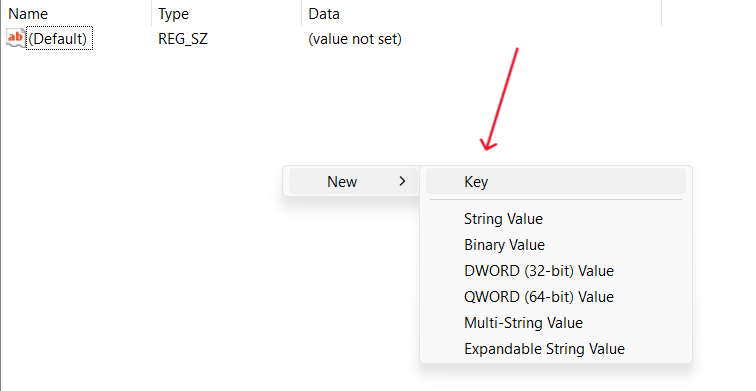
Step 6:Right-click namedRight-click on the right side of the screen and create a New Key.
Step 7: You will be allowed to create a folder named Windows Search.
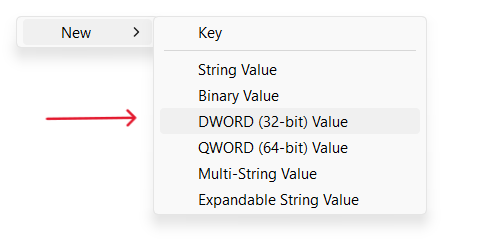
Step 8: Select the Windows Search folder and click on the right side of the screen again and now click on the DWORD (32-bitRight-click) value.
Step 9: You will be allowed to create a file name as AllowCortana. Make sure you don’t make any typing mistakes or else this will not work.
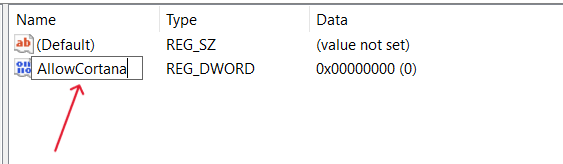
Step 10: Set the value data as 0 and click on ok. Here 0 denotes disabled and 1 denotes enabled.

Step 11: Restart your PC and now you will see that Cortana is no longer functioning and it will be disabled.
How to Re-activate Cortana in Windows 10?
If you have changed your mind and now want to enable Cortana again then follow the below steps:
Step 1: Press windows+ R to open the Run dialog box and type regedit to open the registry editor.
Step 4: Click on HKEY_LOCAL_MACHINE to expand it.

Step 4: Click on Software and expand it.
Step 4: Click on Policies and expand it.
Step 4: Select Microsoft under Policies.
Step 4: Select the AllowCortana policy and set the value data as 1. Here, 1 denotes enabled and 0 denotes disabled.

Step 4: Restart your PC and now you will see that Cortana is enabled again!
How to Uninstall Cortana?
If you want to uninstall Cortana and remove it completely from your PC, then follow the below steps:
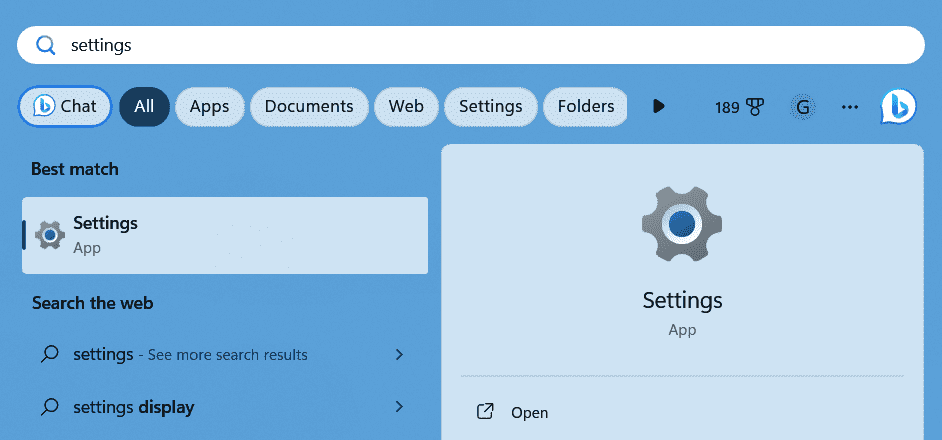
Step 1: Go to Start Windows search for settings and open it.
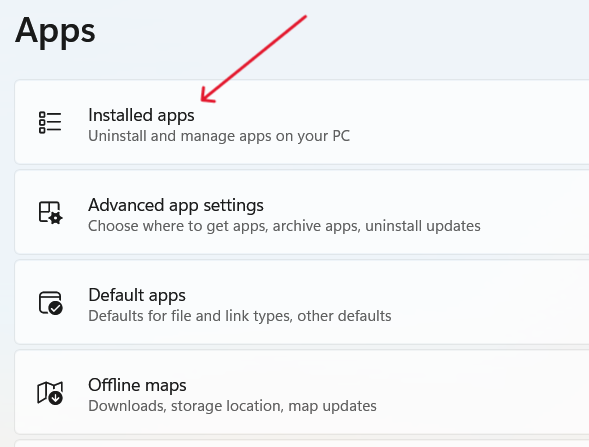
Step 2: Click on Apps.
Step 3: Click on Installed apps.
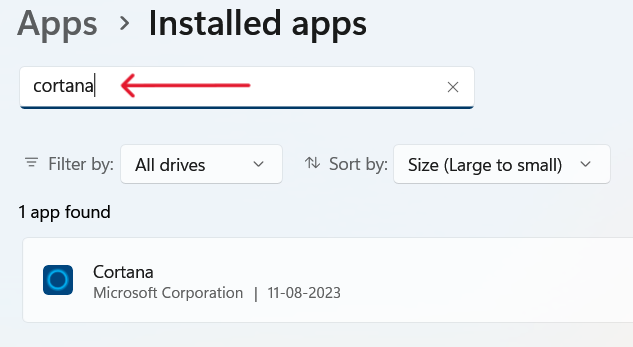
Step 4: In the search bar, search for Cortana.
Step 5: Click on the three dots on Cortana, a drop-down will appear, and then click on uninstall.
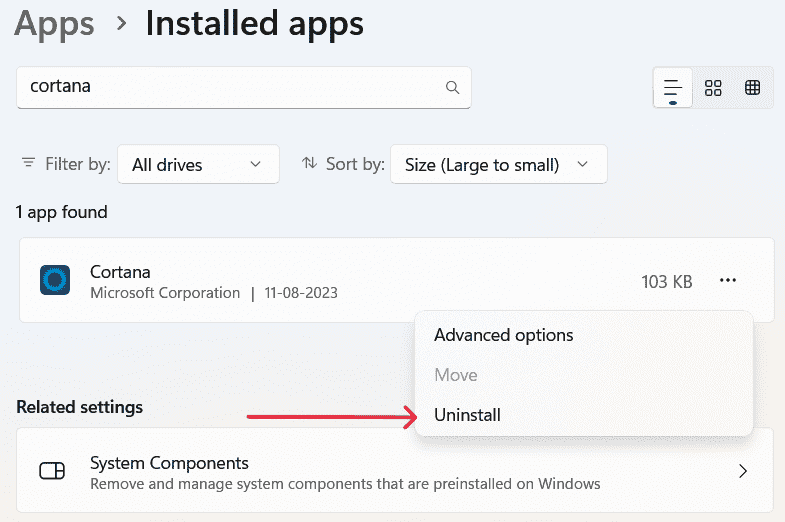
Once the uninstallation is complete, Cortana will be removed completely from your Windows 10.
Conclusion
Knowing how to disable Cortana in Windows 10 gives you better control over your system’s resources and privacy settings. By following the steps to remove Cortana in Windows 10, you can enjoy a more streamlined and efficient operating system. If needed, you can always revisit the Cortana settings in Windows 10 to turn it back on or customize its behavior.

Also Read
- How to Protect Your Privacy on Windows?
- Windows 10 Settings You Should Change Right Now!
- How to Disable Lock Screen in Windows 10?
- How to Disable the Keyboard in Windows 10?
Removing Cortana from Windows 10 can help streamline your system and free up resources. In this guide, you’ll learn how to disable Cortana using the Windows Registry Editor, ensuring it no longer runs in the background. Follow the steps carefully, and remember to back up your files before making any changes to system settings.
In this section, we’ll walk you through the process of disabling Cortana on Windows 10 using the Registry Editor. This will prevent Cortana from running and consuming system resources.
Step 1: Open the Registry Editor
Press the Windows key + R, type «regedit,» and press Enter.
The Registry Editor is a powerful tool that allows you to make changes to the system registry. It’s important to follow the instructions carefully to avoid any unintended consequences.
Step 2: Navigate to the Cortana Registry Key
Go to HKEY_LOCAL_MACHINE > SOFTWARE > Policies > Microsoft > Windows > Windows Search.
This path contains all the settings related to Windows Search, including Cortana.
Step 3: Create a New DWORD Value
Right-click on the «Windows Search» folder, select New, and then DWORD (32-bit) Value.
Creating a new DWORD value allows you to specify settings that can enable or disable certain features.
Step 4: Name the New Value
Name the new value «AllowCortana.»
The name you give this value is crucial as it corresponds directly to the setting you want to change.
Step 5: Set the Value Data
Double-click on «AllowCortana,» set the value to 0, and click OK.
Setting this value to 0 will disable Cortana, ensuring it no longer runs in the background.
Step 6: Restart Your Computer
Restart your computer to apply the changes.
A restart is necessary for the changes to take effect and for Cortana to be disabled.
After completing these steps, Cortana will be disabled on your Windows 10 system. You should notice less background activity and potentially improved system performance.
Tips for Removing Cortana from Windows 10
- Backup your Registry: Always back up your registry before making any changes. This way, you can restore it if something goes wrong.
- Use Group Policy: If you have Windows 10 Pro or Enterprise, you can use the Group Policy Editor instead of the Registry Editor.
- Disable Cortana’s Web Search: You can also disable Cortana’s web search features separately if you still want to use some of its local functions.
- Check for Updates: Ensure your Windows 10 is up-to-date to avoid any compatibility issues when disabling Cortana.
- Know the Risks: Disabling Cortana can affect the search functionality in Windows 10, so be sure this is what you want before proceeding.
Frequently Asked Questions
Is it safe to disable Cortana?
Yes, it’s generally safe to disable Cortana, but be aware it may affect some search functionalities in Windows.
Will disabling Cortana improve my computer’s performance?
Disabling Cortana can free up system resources, potentially improving performance, especially on older machines.
Can I re-enable Cortana later?
Yes, you can re-enable Cortana by changing the «AllowCortana» value back to 1 in the Registry Editor.
Do I need administrator rights to disable Cortana?
Yes, you need administrator rights to access and modify the system registry.
What happens if I accidentally delete the wrong registry key?
If you accidentally delete the wrong registry key, it could cause system instability or other issues. Always back up the registry before making changes.
Summary
- Open the Registry Editor.
- Navigate to the Cortana Registry Key.
- Create a New DWORD Value.
- Name the New Value.
- Set the Value Data.
- Restart Your Computer.
Conclusion
Removing Cortana from Windows 10 can streamline your system and potentially improve its performance. By following the steps outlined in this guide, you can disable Cortana easily and safely. Always remember to back up your files and registry before making any changes to avoid potential issues. If you ever need to re-enable Cortana, you can simply revert the changes by following the same steps. For further reading, consider exploring other ways to optimize your Windows 10 experience. Happy computing!
Matt Jacobs has been working as an IT consultant for small businesses since receiving his Master’s degree in 2003. While he still does some consulting work, his primary focus now is on creating technology support content for SupportYourTech.com.
His work can be found on many websites and focuses on topics such as Microsoft Office, Apple devices, Android devices, Photoshop, and more.
Microsoft has added the digital assistant called Cortana in Windows 10 to recognize your voice for doing things like automating a few tasks for you and giving you information that you are searching for.
It is a cool thing to have fun, but not a very useful and powerful tool than doing and searching for things manually on the web. Many users find this digital assistant highly useful, but some want to remove or uninstall it. Microsoft doesn’t allow uninstalling of Cortana, but there is nothing to worry about, as, in this post, we will look at different ways how you can do it easily.

There are two ways of uninstalling Corona in Windows 10. The current one will be appropriate for the Windows 10 2004 and 2020 versions and more. There’s the older one too, which is better for earlier releases of Windows 10. Let us check both of them.
Why Do You Want to Disable Cortana?
The most embarrassing thing is data that Cortana collects fails to find anything that is told to look for. Some users find this digital assistant completely useless and are taking up system resources. Disabling Cortana can help to regain a little privacy by preventing this from sending whatever you do on your PC back to Microsoft.
Keep in mind, it is important to create the system restore before you do any registry modifications. You may need to reboot, and this can take a little time for the search results to get an update and find relevant content.
How Can You Disable Cortana?
The first step to disable Cortana is given below:
- Use shortcut Ctrl+Shift+Esc.
- Visit the Task Manager and click on the Startup column.
- From there, select Cortana.
- And click on Disable.
- Again, open your Start menu window.
- Search Cortana under Apps.
- Then right-click on the Cortana app.
- Find More.
- Click on the App settings.
- Turn off switch ‘Runs at log-in.’
This will stop Cortana to recognize you.
Coming to the second method, let us head in Cortana’s settings and cut off any separate ways to monitor your PC habits. Let us see how:
- Click on the search box or Cortana icon on the Start key.
- Check the settings panel with a gear icon.
- Once in the setting option, make sure to turn off each toggle Off.
- Scroll to the top of its settings panel, click on Change Cortana knows in the cloud.
- From there, Microsoft will get a page from the Internet known as Personal Information in the Start panel.
- Once it loads, scroll at its bottom, hit Clear.
- And you are done.
Coming to our next and important step to uninstall Cortana completely from Windows 10
Steps to Uninstall Cortana on Windows 10
If you are looking to remove Cortana from your Windows 10 operating system, make sure you follow the given steps:
- First, open the Start Menu.
- Once on Start Menu, look for PowerShell, and right-click on the top result
- Select Run as an administrator option.
- Type the following command and uninstall Cortana, and press on Enter:
This step will uninstall Cortana from Windows 10 for the current user account.
Once finished, close down PowerShell.
You can also remove Cortana in Windows 10 for all users.
When you complete all the given steps, Cortana will get removed from the Windows 10 operating system. The button on the taskbar will remain; you have to right-click on the taskbar & clear the Show Cortana button.
Remember, when you turn off this feature, it disables dictation over Windows 10. If that is one service that you rely on, you will need to continue with Microsoft Windows ‘know you’.
Removing Cortana on Windows 10 from Taskbar Option:
First, right-click on blank space at your Taskbar, click on Cortana and choose Hidden.
If you want to show the icon of Cortana at Taskbar once again, right-click on Taskbar and click Cortana & select the Show icon.
When you go through the given steps, Cortana will not recognize your voice anymore. But still, it is running in the background, waiting for you to call upon it.
Final Words
When you restart your computer, Cortana will get removed from Windows 10. And your Cortana search will get replaced by the Windows Search box, which you may use to search the local Windows 10 computer and web, but now Cortana is gone. You have to take a final step and go to the Microsoft account from there, delete everything Cortana knows about me!