
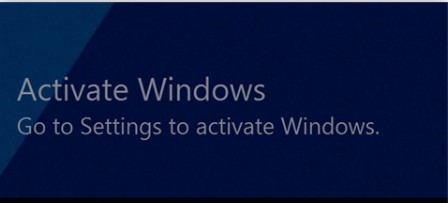
Иногда пользователи предпочитают работать в Windows 10 без активации и это вполне возможно (об этом в отдельном материале: Можно ли пользоваться Windows 10 без активации, как долго и с какими ограничениями), но через какое-то время в правом нижнем углу экрана появится надпись «Активация Windows» с пояснением: Чтобы активировать Windows, перейдите в раздел Параметры, предполагающим, что вы перейдете в Параметры — Обновления и безопасность — Активация и введете ключ продукта. Однако, убрать надпись с экрана можно и без этого.
В этой инструкции подробно о том, как навсегда убрать надпись Активация Windows на экране Windows 10 несколькими способами — вручную и с помощью сторонних программ, а также дополнительная информация, которая может оказаться полезной.
Убираем надпись «Активация Windows» с помощью редактора реестра
Первый способ — использовать редактор реестра для отключения показа надписи об активации Windows 10. Если вы уже пробовали этот метод, но параметры возвращались в исходное состояние, решение для этого также будет предложено в этом разделе.
Шаги будут следующими:
- Запустите редактор реестра: нажмите клавиши Win+R (Win — клавиша с эмблемой Windows), введите regedit и нажмите Enter.
- Перейдите к разделу реестра
HKEY_LOCAL_MACHINE\SOFTWARE\Microsoft\Windows NT\CurrentVersion\SoftwareProtectionPlatform\Activation
- Обратите внимание на параметр Manual в правой части окна редактора. Дважды нажмите по нему и задайте значение 1.
- Проделайте то же самое для параметра NotificationDisabled

- После перезагрузки надпись исчезнет, но не торопитесь перезагружать: через некоторое время система может убрать ваши изменения. Чтобы этого не произошло, нажмите правой кнопкой мыши по разделу (папке) Activation слева и выберите пункт «Разрешения».
- Выбрав пункты «Система» и «TrustedInstaller» отметьте для них «Запретить» в списке разрешений и нажмите кнопку «Применить».
- Нажмите кнопку «Дополнительно», а на следующем экране нажмите «Отключить наследования», подтвердите, а затем удалите пункты TrustedInstaller и Система, для которых в «Тип» указано «Разрешить».
- Примените сделанные настройки и перезагрузите Windows

Также можно использовать следующий код, чтобы создать reg файл и внести изменения в реестр. В коде больше параметров, чем в шагах, описанных выше:
Windows Registry Editor Version 5.00

[HKEY_LOCAL_MACHINE\SOFTWARE\Microsoft\Windows NT\CurrentVersion\SoftwareProtectionPlatform\Activation]
"ActivationInterval"=dword:000dbba0
"Manual"=dword:00000001
"NotificationDisabled"=dword:00000001
"DownlevelActivation"=dword:00000002
Еще один метод в дополнение к вышеописанному — отключение службы «Быстрая проверка». Сделать это можно в services.msc (установить тип запуска службы в «Отключена», применить и перезагрузить компьютер), либо в редакторе реестра: в разделе реестра HKEY_LOCAL_MACHINE\SYSTEM\CurrentControlSet\Services\svsvc следует изменить параметр Start на 4, а затем перезагрузить компьютер.
Программа Universal Watermark Disabler
Еще один способ убрать надпись «Активация Windows» в углу экрана — использовать простую бесплатную утилиту Universal Watermark Disabler, скачать которую можно с официального сайта https://winaero.com/download.php?view.1794. После загрузки утилиты, распакуйте архив и запустите файл uwd.exe
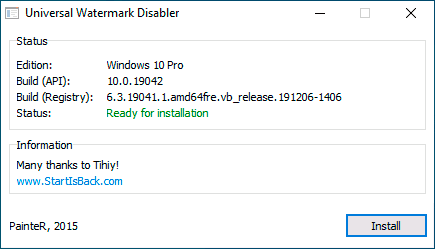
Нажмите кнопку «Install» (может потребоваться подтверждение установки в неподдерживаемой сборке, обычно всё работает), а после этого нажмите «Ок» для выхода из системы.
После автоматического выхода из системы и последующего входа надпись не всегда пропадает, но, если после этого выполнить перезагрузку компьютера или ноутбука — обычно исчезает (но, по моим тестам, не всегда).
Видео инструкция
Надеюсь, один из предложенных способов оказался работоспособным для вашей ситуации и надпись об активации в углу рабочего стола вас больше не побеспокоит.
Водяной знак «Активировать Windows 10 — перейдите в настройки, чтобы активировать Windows» появляется при окончании срока лицензии, при вводе ключа не от нужной версии или при использовании пиратского ключа. Сообщение можно убрать в реестре, специального скрипта, командной строки и т.д.
Причины появления водяного знака активации
Основные причины
- срок действия лицензии на компьютере истек;
- введен ключ, полученный из онлайн-источников, который уже используется;
- использован ключ от несравнимой версии Windows, например ключ от Professional Edition введен в версии Home Edition.
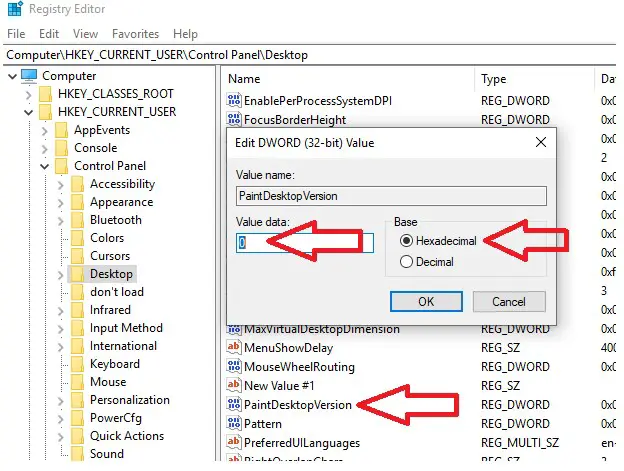
Убрать водяной знак активации Windows через Regedit
После активации Windows 10 нажмите «Пуск», в открывшемся окне введите «Regedit» и нажмите Enter (вам будет предложено UAC*, нажмите «Да»)

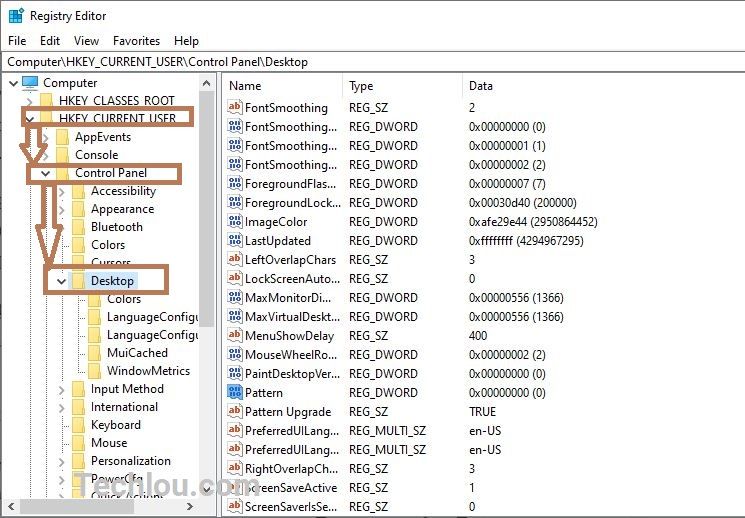
Перейдите в «HKEY_CURRENT_USER — нажмите на Панель управления — Рабочий стол».
В папке «Desktop» прокрутите вниз, чтобы найти «PaintDesktopVersion», и дважды щелкните по нему, чтобы открыть.
Убедитесь, что выбрано шестнадцатеричное число, и измените значение параметра на «0». Затем нажмите «ОК», чтобы сохранить изменения как убрать надпись активации на компьютере.

Закрываете редактор реестра и перезагружаете компьютер. Благодаря таким действиям следующий вопрос как убрать надпись активация удален.
Убрать водяной знак активации Windows с помощью специальных возможностей
Используем опцию Windows 10 Ease of Access.
Нажимаем на меню, находим «Панель управления», запускаем приложение.
Переходим в «Центр возможностей» компьютера об активации Windows.

На следующем экране нужно нажать «Оптимизация изображений на экране».
Прокручиваем вниз до нижней части экрана, и устанавливаем флажок водяного знака с «Удалить фоновые изображения (по возможности)».

Нажимаем «ОК» и нажимаем перезагрузку компьютера.
Водяной знак активации должен исчезнуть и решиться как убрать надпись активации.
Убрать водяной знак активации Windows, можно отключив советы
Заходим в «Пуск» и нажимаем «Настройки (кнопка в виде шестеренки)».
Переходим в систему и нажимаем «Уведомления и действия».
Отключаем параметр «Показывать приветствие Windows после обновлений и получать советы, рекомендации и предложения при использовании Windows» и нажать применить.

Убрать водяной знак можно с помощью центра поддержки
Запускаем «Поиск» и вводим запрос «Центр безопасности».

Второй раздел бокового меню.

Снимаем галочку со строки «Активация Windows».

Уведомление исчезнет через некоторое время, но проблема как убрать надпись активации решена не будет — система останется нелицензионной и неполноценной строка слияния.
Отключение водяного знака активации Windows с помощью скрипта
Открываем блокнот, скопируем и вставляем приведенный ниже текст в него.
@echo offtitle Activate Windows 7 / 8 / 8.1 / 10 for FREE!&cls&echo =====================================&echo #Copyright: MSGuides.com&echo =====================================&echo.&echo autoactivationoff reg #Supported products:&echo – Windows 7 Professional&echo – Windows 7 Professional N&echo – Windows 7 Professional E&echo – Windows 7 Enterprise&echo – Windows 7 Enterprise N&echo – Windows 7 Enterprise E&echo – Windows 8 Core&echo – Windows 8 Core Single Language&echo – Windows 8 Professional&echo – Windows 8 Professional N&echo – Windows 8 Professional WMC&echo – Windows 8 Enterprise&echo – Windows 8 Enterprise N&echo – Windows 8.1 Core&echo – Windows 8.1 Core N&echo – Windows 8.1 Core Single Language&echo – Windows 8.1 Professional&echo – Windows 8.1 Professional N&echo – Windows 8.1 Professional WMC&echo – Windows 8.1 Enterprise&echo – Windows 8.1 Enterprise N&echo – Windows 10 Home&echo – Windows 10 Home N&echo – Windows 10 Home Single Language&echo – Windows 10 Home Country Specific&echo – Windows 10 Professional&echo – Windows 10 Professional N&echo – Windows 10 Education N&echo – Windows 10 Education N&echo – Windows 10 Enterprise&echo – Windows 10 Enterprise N&echo – Windows 10 Enterprise LTSB&echo – Windows 10 Enterprise LTSB N&echo.&echo.&echo ====================================&echo Activating your Windows… & cscript //nologo c:\windows\system32\slmgr.vbs /ipk FJ82H-XT6CR-J8D7P-XQJJ2-GPDD4 >nul&cscript //nologo c:\windows\system32\slmgr.vbs /ipk MRPKT-YTG23-K7D7T-X2JMM-QY7MG >nul&cscript //nologo c:\windows\system32\slmgr.vbs /ipk W82YF-2Q76Y-63HXB-FGJG9-GF7QX >nul&cscript //nologo c:\windows\system32\slmgr.vbs /ipk 33PXH-7Y6KF-2VJC9-XBBR8-HVTHH >nul&cscript //nologo c:\windows\system32\slmgr.vbs /ipk YDRBP-3D83W-TY26F-D46B2-XCKRJ >nul&cscript //nologo c:\windows\system32\slmgr.vbs /ipk C29WB-22CC8-VJ326-GHFJW-H9DH4 >nul&cscript //nologo c:\windows\system32\slmgr.vbs /ipk BN3D2-R7TKB-3YPBD-8DRP2-27GG4 >nul&cscript //nologo c:\windows\system32\slmgr.vbs /ipk 2WN2H-YGCQR-KFX6K-CD6TF-84YXQ >nul&cscript //nologo c:\windows\system32\slmgr.vbs /ipk NG4HW-VH26C-733KW-K6F98-J8CK4 >nul&cscript //nologo c:\windows\system32\slmgr.vbs /ipk XCVCF-2NXM9-723PB-MHCB7-2RYQQ >nul&cscript //nologo c:\windows\system32\slmgr.vbs /ipk GNBB8-YVD74-QJHX6-27H4K-8QHDG >nul&cscript //nologo c:\windows\system32\slmgr.vbs /ipk 32JNW-9KQ84-P47T8-D8GGY-CWCK7 >nul&cscript //nologo c:\windows\system32\slmgr.vbs /ipk JMNMF-RHW7P-DMY6X-RF3DR-X2BQT >nul&cscript //nologo c:\windows\system32\slmgr.vbs /ipk M9Q9P-WNJJT-6PXPY-DWX8H-6XWKK >nul&cscript //nologo c:\windows\system32\slmgr.vbs /ipk 7B9N3-D94CG-YTVHR-QBPX3-RJP64 >nul&cscript //nologo c:\windows\system32\slmgr.vbs /ipk BB6NG-PQ82V-VRDPW-8XVD2-V8P66 >nul&cscript //nologo c:\windows\system32\slmgr.vbs /ipk GCRJD-8NW9H-F2CDX-CCM8D-9D6T9 >nul&cscript //nologo c:\windows\system32\slmgr.vbs /ipk HMCNV-VVBFX-7HMBH-CTY9B-B4FXY >nul&cscript //nologo c:\windows\system32\slmgr.vbs /ipk 789NJ-TQK6T-6XTH8-J39CJ-J8D3P >nul&cscript //nologo c:\windows\system32\slmgr.vbs /ipk TX9XD-98N7V-6WMQ6-BX7FG-H8Q99 >nul&cscript //nologo c:\windows\system32\slmgr.vbs /ipk 3KHY7-WNT83-DGQKR-F7HPR-844BM >nul&cscript //nologo c:\windows\system32\slmgr.vbs /ipk 7HNRX-D7KGG-3K4RQ-4WPJ4-YTDFH >nul&cscript //nologo c:\windows\system32\slmgr.vbs /ipk PVMJN-6DFY6-9CCP6-7BKTT-D3WVR >nul&cscript //nologo c:\windows\system32\slmgr.vbs /ipk W269N-WFGWX-YVC9B-4J6C9-T83GX >nul&cscript //nologo c:\windows\system32\slmgr.vbs /ipk MH37W-N47XK-V7XM9-C7227-GCQG9 >nulecho ————————————&echo.&echo.&set i=1:serverif %i%==1 set KMS_Sev=kms7.MSGuides.comif %i%==2 set KMS_Sev=kms8.MSGuides.comif %i%==3 set KMS_Sev=kms9.MSGuides.comif %i%==4 goto notsupportedcscript //nologo c:\windows\system32\slmgr.vbs /skms %KMS_Sev% >nulcscript //nologo c:\windows\system32\slmgr.vbs /ato | find /i “successfully” && (echo.& echo ====================================== & echo. & choice /n /c YN /m “Would you like to visit my blog [Y,N]?” & if errorlevel 2 exit) || (echo The connection to the server failed! Trying to connect to another one… & echo Please wait… & echo. & echo. & set /a i+=1 & goto server)explorer “https://productkey.net”&goto halt:notsupportedecho ======================================&echo.&echo Sorry! Your version is not supported.:haltpause >nul
В блокноте раздел «Файл», нажимаем «Сохранить как» и называем файл «windows10.cmd». Сохраняем файл на рабочем столе.

Нажимаем правой кнопкой мыши наш файл и выбираем «Запуск от имени администратора».
Перезагружаем компьютер, чтобы активировать Windows.
Убрать водяной знак активации в Windows PowerShell
-
- Нажимаем сочетание клавиш «Win + X». Выбираем «Windows PowerShell (администратор)».
-
- Вставляем команду «slmgr /renew» и дальше нужно нажать Enter.

- Перезагружаем систему.
Для избавления от водяного знака активации Windows используем CMD
В поиске Виндовс указываем «командная строка». Нажимаем «командная строка» и «Запуск от имени администратора».

Вставьте команду
«bcdedit -set TESTSIGNING OFF»
и нажмите на запуск её выполнения.

После завершения операции ОС выведет соответствующее уведомление.
Убрать водяной знак активации Windows в сторонних приложениях
Можно воспользоваться отдельными программами для решения проблемы как убрать надпись активация.
Универсальное средство отключения водяных знаков (Winaero)
-
- Загрузите «Universal Watermark Disabler» и установите его.

-
- Приложение запустится, а затем автоматически выйдет из системы.
- Снова войдите в ПК.
- Теперь водяной знак должен быть удален.
Убрать готовность об активации через KMSAuto
-
- Загрузите KMSAuto и установите его.
- Откройте программу, нажмите «Активировать Windows».

- Как только это будет сделано, ваш компьютер перезагрузится.
- Когда снова войдете в систему, Windows будет активирована, и водяной знак активации исчезнет.
Today, we’re going to show you three different methods on how to remove activate windows watermark on Windows 10. The famous “Activate Windows” watermark has created several people’s experiences with their pc or laptop rather unpleasant. It can block your read, embarrass you once attempting to record your screen, sharing your desktop or distract you once you look at the favorite movies or taking part in videogames.
Are you obtaining the note “Activate Windows- Go to settings to activate windows” watermark on your desktop or laptop? Or if you are searching for the method on how to take away activate windows watermark for good from your desktop? This can be as a result of your windows license has expired.
Remove Activate Windows Watermark
If you’ve got a valid Windows ten product key (purchased from the Microsoft store or somewhere else) you’ll be able to enter it in order to Activate Windows ten and take away the activated Windows watermark. However, if you don’t have a real Windows key with some “tricks” you can rid of activate windows watermark permanently on Windows ten.
What is the “Activate Windows” watermark?
Microsoft, rather like the other company, doesn’t like it once their products get pirated, exploited, and re-distributed for free of charge. In an endeavor to prevent the piracy of their newest software, Windows 10, they came up with the concept of inserting a watermark within the corner till the user wrongfully activates Windows.
This may not look like a large issue, because the watermark doesn’t get in your manner. Instead, it sits on high of each window, app, and even your mouse cursor.
While it’s not a ground-breaking methodology of stopping piracy, it had been enough to drive you here, and however, you’ll be able to get obviate it. Don’t worry — apart from telling you the plain answer, we’ve compiled some ways to assist people who don’t need to pay cash to remove activated Windows watermark.
It’s value noting that the majority of those ways merely take away the “Activate Windows” watermark, and don’t truly activate your system. You continue to won’t be ready to elevate limitations: like not having the ability to customize your laptop etc
With that clarified, let’s get to figure out and take away the “Activate Windows” watermark on your Windows ten system.
How to get rid of the windows 10 watermark?
There are many ways how to get rid of activate windows ten watermark for good, and we can show you all the ways below.
Method 1 – Remove activate windows watermark using Registry Editor
- Press Windows + R keyboard shortcut to bring up the Run dialog box
- Type regedit in the Run box and press Enter to open Windows Registry Editor
- If you are prompted by UAC click Yes
- First backup registry database then browse to HKEY_CURRENT_USER > Control Panel > Desktop

Remove Activate Windows Watermark Using Registry Editor
- On the right side of the window, you’ll see a list of values appear while the Desktop folder is selected. Double-click on the PaintDesktopVersion value.
- Change the Value from 1 to , and click the OK button to save this modification in your system.
Using Registry Editor
- Restart your PC and enjoy having no watermarks. If the value is 0 and the watermark is still present, please follow method number 2 below on how to remove activate windows watermark by killing the process.
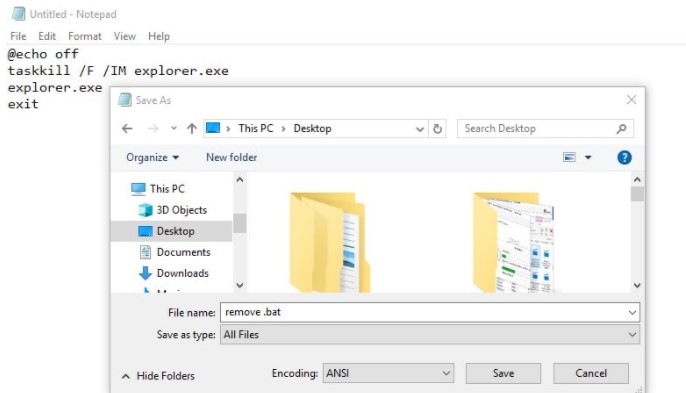
Method 2 – Remove activate windows watermark by killing the process
By pasting some text using an administrator account you’ll be able to simply get rid of the windows 10 watermark from showing on your screen. Here’s a way how to remove it:
- Open notepad on your PC (You can do this by click on the start menu search type notepad and hit the enter key )
- Type these following commands:
@echo off
taskkill /F /IM explorer.exe
explorer.exe
exit
- Go to file and click “Save as”.
- Select the location where you want to save the file.
- Change the save as type to All Files (*.*) and Give the file name as “ remove.bat”
Using Command Line
- Now open the file location where you saved it.
- Right-click on the remove.bat file and click on “Run as administrator”
- A command prompt will be opened and closed itself,
- Restart your laptop or desktop.
If this method does not work and the watermark is still present on your desktop, please follow method 3 below on how to remove activate windows watermark using the control panel.
Method 3 – Remove activate windows watermark using Control Panel
By simply disabling background images with Ease of Access, you can also get rid of the windows 10 watermark.
- Press the Windows + S keys on your keyboard to bring up the Search feature, then type in Control Panel.
- Click on the matching result to launch the classic Control Panel app.
Using Control Panel
- Click on the Ease of Access Center. Make sure your view mode is set to Large icons to see this menu.
Remove Activate Windows Watermark using Ease of Access Center
- Click on the Make the computer easier to see link under the Explore all settings section.
Using Ease of Access Center
- Scroll down until you see Remove background images (where available) and place a checkmark in the box to enable the feature.
- Click Apply and restart your laptop or desktop. Enjoy your watermark-free desktop.
Conclusions
Yes, it’d be amateurish to not embody verity: The best manner of removing activate windows watermark is by activating Windows. If you have already got the simplest way to validate your copy of the software system, rejoice!
You can activate your system, take away limitations, and never see activate windows watermark again
You can purchase Windows ten licenses from the official website, or get a hold of it through varied third-party resellers, on-line stores, and people a license or product key.
We hope this guide was helpful in guiding you removing with success Activate Windows ten Watermark for good from your system.
Please note that it’s potential for this watermark to sporadically appear — during this case, simply come and repeat any of those processes mentioned above.
The “Activate Windows” watermark reminds you that your Windows 10 version is not activated. This tutorial will guide you through the steps to get rid of the “activate windows watermark” and remove the “Activate Windows 10” message in the bottom right of your desktop.
To remove the “Activate Windows” watermark in Windows 10, open Registry Editor and go to HKEY_CURRENT_USER > Control Panel > Desktop. From there, double click on PaintDesktopVersion and set its value to 0, then click on OK and restart your computer. The “Activate Windows” watermark will be removed after restarting your PC.
Why Do I See The “Activate Windows” Watermark?
The “Activate Windows” watermark on the desktop indicates that your Windows 10 operating system is not activated with a valid license. Microsoft reminds you that your Windows version is not valid and that you need to buy an official valid key for your version of Windows to activate all its features.
Windows 10’s features are one of the reasons you should activate it. Many functions of Windows 10 are only available if the license is activated. Such as your system’s dark mode, Windows Defender & Security, Windows Hello, and plenty of other features.
You won’t be able to install Microsoft Office on a “non-activated” version of Windows 10, and you won’t get any Windows Updates, which means your machine will always be subject to bugs, crashes, and infections.
Method 1: Activate Windows” Watermark With Registry
The most effective method to remove the “activate windows” watermark is to edit the Windows registry. We will disable the capability that allows Windows to write text on the desktop by editing the Windows registry. The activate windows message in the bottom right corner of your desktop will be disabled and hidden as a result of this action.
Follow the steps below to remove the “Activate Windows” watermark in Windows 10.
Total Time: 2 minutes
Click on the Start button, type “Regedit” and hit enter
Click the Start button and type “Regedit” to open Registry Editor, and hit enter. (You will be prompted to open Regedit with administrator privileges, click on Yes)

Go to HKEY_CURRENT_USER > Control Panel > Desktop
In the left panel, go to HKEY_CURRENT_USER > Control Panel > Desktop in the folder tree, make sure to click on Desktop. A list of values will show up in the right panel.
Double click on “PaintDesktopVersion” in the right panel
Scroll down until you find PaintDesktopVersion and double-click on it.
Set the value to 0
Type 0 in the “Value data” textbox. Make sure that the selected base is Hexadecimal.

Click on OK and restart the computer.
Click OK to validate and restart your computer for changes to take effect.
This is how you get rid of and remove the “activate windows” watermark, After restarting your computer the “activate windows” watermark will be removed. (If the watermark reappears after a certain period of time, just run the script again to remove it.)
Method 2: Remove the “Activate Windows” Watermark With a .reg File
To make your life easier, We have made this small .reg script that will automatically remove the activate windows watermark once you click on it.
Follow the steps below to automatically remove the activated windows watermark with a .reg file.
1. Download the script
Click here to download this .zip archive containing a .reg file
2. Unzip the zip file
Uncompress the zip file on your computer (Download 7-zip or Winrar to be able to open the archive)
3. Double click on Remove activate windows watermark.reg
Double click on Remove activate windows watermark.reg to execute it.
4. Click on Yes to confirm
Click on Yes to allow the reg file to edit your Windows Registry.
5. Restart your computer
Restart your computer to apply the modification.
6. The activated windows watermark is now removed
After restarting your computer the “activate windows” watermark should be removed.
All this script does is automatize the registry edition that we have done in the first method.
Method 3: Remove “Activate Windows” Watermark With Powershell
With a single command, you can temporarily activate Windows for 90 days. You can repeat this method every three months and reactivate Windows 10. This solution will remove the activate Windows message for 90 days, which you may then renew.
Follow the steps below to remove the “Activate Windows“ watermark with Powershell.
1. Click on Start and type “Powershell”
Click on the Start button or hit the Windows key on your keyboard and type “Powershell“
2. Right-click on “Windows Powershell” and click on “Run as administrator”
Right-click on the “Windows Powershell” and run it as administrator.
3. Type “slmgr /rearm” in Powershell and hit ENTER
In the CMD window type “slmgr /rearm” and hit enter to activate Windows 10 for 90 days.
4. Restart PC to apply changes.
Restart your computer to apply the changes, after Windows 10 starting you will notice that the activate Windows message has been removed.
Method 4: Remove “Activate Windows” Watermark With CMD
One of the easiest and quickest ways to remove the “Activate Windows”watermark is by using to disable the test mode if it’s On. Indeed, Windows 10 has a test mode that if is activated will cause the activation message to show on your desktop.
Follow the steps below to remove the “Activate Windows” watermark using CMD
1. Click on Start and type “cmd”
Click on the Start button or hit the Windows key on your keyboard and type “CMD“
2. Right-click on “Command prompt” and click on “Run as administrator”
Right-click on the “Command prompt” and run it as administrator.
3. Type “bcdedit -set TESTSIGNING OFF” in CMD and hit ENTER.
In the CMD window type “bcdedit -set TESTSIGNING OFF” and hit enter.
4. Restart your computer
Restart your PC to apply changes. After restarting, the “activate windows” watermark should be removed.
Method 5: Remove The “Activate Windows” Watermark By Disabling Background Image
One of the ways to get rid of the “activate Windows” watermark is by disabling the background image from the Ease of Access setting.
Follow the steps below to do so:
1. Press Windows key + U to open Ease of Access settings
On your keyboard, Press Windows Key + U to open Ease of Access settings (The windows key is the key that has the Windows logo on it, located generally on the left of the Alt button)
2. Scroll down and TURN OFF “Show desktop background image”
Scroll down the list of options until you find “Show desktop background image” and switch the little button to turn it off.
This will hide the desktop background image and remove the “activate windows” watermark at the same time.
The inconvenience of this method is that you will have a black screen as a background and you will not be able to change the background image.
Method 6: Remove The “Activate Windows” watermark Using Script
Follow the steps below to remove the “activate Windows” watermark on the desktop using a .bat script:
- Open Notepad.
- Type the following commands:
- @echo off
- taskkill /F /IM explorer.exe
- explorer.exe
- exit
- Save the file as activate.bat
- Right-click and click Run as administrator.
- Restart PC.
If the watermark reappears after a certain period of time, just run the script again to remove it.
Method 7 : Activate Windows 10
You can permanently remove the Activate Windows watermark by activating Windows 10 with this simple script.
Follow the steps below to activate Windows 10 with the script and remove the activate windows watermark.
1. Open Notepad
Open Notepad on your Windows
2. Copy and paste the script below
@echo off
title Activate Windows 10 ALL versions for FREE!&cls&echo ============================================================================&echo #Project: Activating Microsoft software products for FREE without software&echo ============================================================================&echo.&echo #Supported products:&echo - Windows 10 Home&echo - Windows 10 Home N&echo - Windows 10 Home Single Language&echo - Windows 10 Home Country Specific&echo - Windows 10 Professional&echo - Windows 10 Professional N&echo - Windows 10 Education&echo - Windows 10 Education N&echo - Windows 10 Enterprise&echo - Windows 10 Enterprise N&echo - Windows 10 Enterprise LTSB&echo - Windows 10 Enterprise LTSB N&echo.&echo.&echo ============================================================================&echo Activating your Windows...&cscript //nologo slmgr.vbs /ckms >nul&cscript //nologo slmgr.vbs /upk >nul&cscript //nologo slmgr.vbs /cpky >nul&set i=1&wmic os | findstr /I "enterprise" >nul
if %errorlevel% EQU 0 (cscript //nologo slmgr.vbs /ipk NPPR9-FWDCX-D2C8J-H872K-2YT43 >nul&cscript //nologo slmgr.vbs /ipk DPH2V-TTNVB-4X9Q3-TJR4H-KHJW4 >nul&cscript //nologo slmgr.vbs /ipk WNMTR-4C88C-JK8YV-HQ7T2-76DF9 >nul&cscript //nologo slmgr.vbs /ipk 2F77B-TNFGY-69QQF-B8YKP-D69TJ >nul&cscript //nologo slmgr.vbs /ipk DCPHK-NFMTC-H88MJ-PFHPY-QJ4BJ >nul&cscript //nologo slmgr.vbs /ipk QFFDN-GRT3P-VKWWX-X7T3R-8B639 >nul&goto server) else wmic os | findstr /I "home" >nul
if %errorlevel% EQU 0 (cscript //nologo slmgr.vbs /ipk TX9XD-98N7V-6WMQ6-BX7FG-H8Q99 >nul&cscript //nologo slmgr.vbs /ipk 3KHY7-WNT83-DGQKR-F7HPR-844BM >nul&cscript //nologo slmgr.vbs /ipk 7HNRX-D7KGG-3K4RQ-4WPJ4-YTDFH >nul&cscript //nologo slmgr.vbs /ipk PVMJN-6DFY6-9CCP6-7BKTT-D3WVR >nul&goto server) else wmic os | findstr /I "education" >nul
if %errorlevel% EQU 0 (cscript //nologo slmgr.vbs /ipk NW6C2-QMPVW-D7KKK-3GKT6-VCFB2 >nul&cscript //nologo slmgr.vbs /ipk 2WH4N-8QGBV-H22JP-CT43Q-MDWWJ >nul&goto server) else wmic os | findstr /I "10 pro" >nul
if %errorlevel% EQU 0 (cscript //nologo slmgr.vbs /ipk W269N-WFGWX-YVC9B-4J6C9-T83GX >nul&cscript //nologo slmgr.vbs /ipk MH37W-N47XK-V7XM9-C7227-GCQG9 >nul&goto server) else (goto notsupported)
:server
if %i%==1 set KMS=kms7.MSGuides.com
if %i%==2 set KMS=kms8.MSGuides.com
if %i%==3 set KMS=kms9.MSGuides.com
if %i%==4 goto notsupported
cscript //nologo slmgr.vbs /skms %KMS%:1688 >nul&echo ============================================================================&echo.&echo.
cscript //nologo slmgr.vbs /ato | find /i "successfully" && (echo.&echo ============================================================================&echo.&echo #My official blog: MSGuides.com&echo.&echo #How it works: bit.ly/kms-server&echo.&echo #Please feel free to contact me at msguides.com@gmail.com if you have any questions or concerns.&echo.&echo #Please consider supporting this project: donate.msguides.com&echo #Your support is helping me keep my servers running everyday!&echo.&echo ============================================================================&choice /n /c YN /m "Would you like to visit my blog [Y,N]?" & if errorlevel 2 exit) || (echo The connection to my KMS server failed! Trying to connect to another one... & echo Please wait... & echo. & echo. & set /a i+=1 & goto server)
explorer "https://techlou.com"&goto halt
:notsupported
echo ============================================================================&echo.&echo Sorry! Your version is not supported.&echo.
:halt
pause >nul
3. Save file as activate.bat
Click on File and save the file as activate.bat. Make sure to select “All Files (*.*)” in the Save file type list and that the encoding is UTF-8.
4. Right-click on saved file and Run as Administrator
Right-click on activate.bat and click on “Run as administrator“
5. Restart PC to activate Windows 10
Restart your computer to apply the activation, after restarting your Windows 10 should be activated and the “activate windows” watermark should be removed.
Note: If you get the message “Sorry! Your version is not supported.” Open CMD as Administrator and type this command “slmgr.vbs /upk” then proceed with the activation.
Method 8: Use Third-Party Software
Last but not least, you can permanently remove the “Activate Windows” watermark using third-party software like Universal Watermark Disabler
Follow the steps below to do so:
- Download and Universal Watermark Disabler
- Unzip the uwd.zip file
- Double click on uwd.exe
- Click on Install
After installation, restart your computer to apply changes, UDW will remove any watermark on your Windows 10 operating system.
Wrap up
In this article, we have seen how to remove and get rid of the “activate windows”watermark using several methods. Please note that none of these methods will replace an activated Windows 10 system with a genuine key. Most of the methods will only help you to hide the “activate windows” message but your Windows is still not activated. Only the Windows activation with a script and Powershell method will help you get your Windows 10 activated and thus benefit from all the features that an activated Windows has to offer (Updates, Fixes, etc).
See also:
- How To Access Desktop Version Of Facebook on Android
- How To Unsubscribe From ALL Youtube Channels At Once.
- How to remove previously synced Google Account from Android Phone
- How to take background out of a picture
- Find Where Is The Hosts File in Windows 10 and Edit it.
[Guide] How to Quickly Remove the Activate Windows Watermark
Last Updated on August 11, 2024 by Peter Wood
For many Windows users, the persistent Activate Windows watermark can be an unwelcome sight, ruining the aesthetics of your desktop and alerting you to unresolved issues. Whether you’re on a new system, haven’t activated your copy of Windows yet, or have encountered this watermark by accident, there’s no need to worry. Fortunately, there are several ways to say goodbye to this intrusive watermark and restore the clean look of your desktop. In this guide, we’ll walk you through 3 effective ways to remove the Activate Windows watermark and enjoy an uninterrupted computing experience.

- Part 1: How to Remove the Activate Windows Watermark
- Part 2: How to Remove the Activate Windows Watermark on Video/Photo
- Part 3: FAQ of Removing the Activate Windows Watermark
Method 1: Using Registry Editor
The Windows Registry is a hierarchical database that stores low-level settings for the operating system and applications that choose to use it. As a powerful tool, you can remove the Activate Windows watermark from your desktop by modifying its control panel settings.
Step 1: Start your computer and use the key combination Win+R to open the Run box. Type Regedit, and click the OK button to open your computer’s Registry editor. Before editing, save a copy of the original file by clicking the Export button in the File tab.

Step 2: In the file directory on the left side of the page, look in the HKEY_CURRENT_USER subdirectory and select Control Panel to open the corresponding menu bar. Select Desktop in the subdirectory, and the corresponding ribbon will appear on the right side of the page.
Step 3: In the details menu on the right, slide the page to find PaintDesktopVersion and click on it. A dialogue box will appear. In Value Data change the value 1 to 0, click the OK button, close the registry editor, and restart your computer, you will be able to remove the Activate Windows watermark.

Method 2: Using Notepad
Notepad is a simple text editor, but you can execute commands by saving it as a .bat file. All you need to do is to create a text file with a series of commands that can be executed and interpreted to refresh Windows so that the Activate Windows watermark on the desktop can be successfully removed.
Step 1: Start your computer, click the Start icon on the desktop or the Win key on the keyboard, type Notepad in the search box of the Start menu bar, and click the Open button, you can start Notepad. Create a new file in Notepad, and make sure it has never been used before.

Step 2: Paste @echo off taskkill/F/IM explorer.exe explorer.exe exit, click the Save As button in the File tab, and a dialogue box will pop up to save the file. Select All Files for Save As Type, name the file Activation.bat, and store it at any address.

Step 3: After the file has been saved successfully, locate the file and right-click on it to bring up the shortcut menu. Select Run as Administrator in the shortcut menu, this process will refresh your computer. After a successful refresh, restart your computer and you will be able to successfully remove the Activate Windows watermark.
Method 3: Using a Product Key
When you purchase a genuine copy of Windows, you usually receive a unique product key that can be used to activate the operating system. Activating Windows with a valid product key not only removes watermarks but also unlocks various features and functionality that may be limited in unactivated versions.
Step 1: Ensure that your computer is switched on by clicking the Start icon to open your computer’s Start menu bar. Select Settings and open the corresponding dialogue box, in which click the Update & Security button to enter the details page.

Step 2: Select the Activation tab in the left toolbar, click the Change Product Key button in the right toolbar, and enter the 24-character product key in the dialogue box that appears. Click the Next button, if you get the new product key, Windows will be activated, so the Activate Windows watermark will be removed successfully.

Part 2: How to Remove Activate Windows Watermark on Video/Photo
After you have successfully removed the Activate Windows watermark, any images or videos you save afterward will not show the Activate Windows watermark. However, the images and videos saved from screenshots or video recordings you made while using an inactive Windows will still have the previous watermark, so if you want to remove the watermark from those images and videos, you need to do it with a professional watermark remover. WidsMob Watermark Cleaner is a professional watermark remover that removes watermarks from images and videos with one click and fills them in seamlessly.
1. Support removing watermarks from videos/images.
2. Custom-select the watermark location and remove it.
3. AI seamlessly fills in the watermark location.
4. Provide batch upload images and videos for editing.
Win Download Mac Download
Step 1: Download and install WidsMob Watermark Cleaner on your computer, after the installation is complete, launch the software. At this time, 4 different functions will appear on the homepage of the software, which is Add/Remove Watermark for Images and Add/Remove Watermark for Videos. When you want to remove the watermark for the recording screen, click the Video Watermark Removal button to enter the page for removing the video watermark.

Step 2: Click the Add Files button on the page, and select video files in the pop-up dialogue box, at this time you can select multiple video files at the same time and import them into the software at the same time to form a video list on the left side of the page. Select one of the videos so that the video can appear in the preview box and you can play and view the file.

Step 3: Click the Add Selection button on the right side of the preview box, then a selection box will appear on the preview video. Move, zoom in and out to make the selection box fit perfectly with the watermarked part. At this point in Selections, you will be able to see the number and duration of watermark removal.

Step 4: If you want to control the duration of watermark removal, you can select the period to remove the activated Windows watermark by moving the selection boxes on both ends of the timeline underneath the video with the watermark selection box checked. Click the Preview button, which will allow you to view the video without a watermark in real-time.

Step 5: When you are satisfied with the result, in Output Location, select the storage location for the video without the Windows activation watermark, custom settings are acceptable. After successful selection, click the Export button to save the watermark-free video.

Win Download Mac Download
Part 3: FAQ of Removing the Activate Windows Watermark
1What causes the «Activate Windows» watermark to appear?
The «Activate Windows» watermark usually appears when you are using a version of Windows that is not activated or not activated correctly. It reminds you to activate your copy of Windows to access all features and remove the watermark.
2Is it legal to use an inactive Windows?
While you can use an inactive Windows, be aware that it may not comply with Microsoft’s licensing terms. It is recommended to activate Windows with a valid product key to ensure compliance and access to all features.
3Will removing the watermark affect my system performance?
Removing the Activate Windows watermark itself will not affect system performance. However, it is important to ensure that any method used to remove the watermark is safe and does not compromise system stability or security.
Conclusion
By using one of these 3 methods, you can finally get rid of that pesky «Activate Windows» watermark on your desktop and regain a clean and distraction-free workspace. Whether you choose to activate Windows with a valid product key, utilize a third-party tool, or explore manual registry editing, make sure you proceed with caution and follow the instructions carefully. With the watermark removed, you can now fully immerse yourself in the Windows experience without waiting for an activation reminder.
Win Download Mac Download