
Playing music, whether it’s a digital audio file or a CD, is one of the things that most, if not all of us do on our Windows 10 computers and devices. Although Microsoft created the Groove Music app for Windows 10, and even if there are many third-party media players out there, some people still like the old Windows Media Player. If you’re a longtime fan of this app, you might want to continue using it in Windows 10. If that’s so, this guide is for you: we show you how to play music in Windows Media Player, regardless of whether it’s songs and other audio files found in your Library or not. We explain the different Playback Modes and how each of the Playback Controls works. We also answer questions, such as how many songs can Windows Media Player handle and how to play all music in Windows Media Player.
How to play music from your library in Windows Media Player
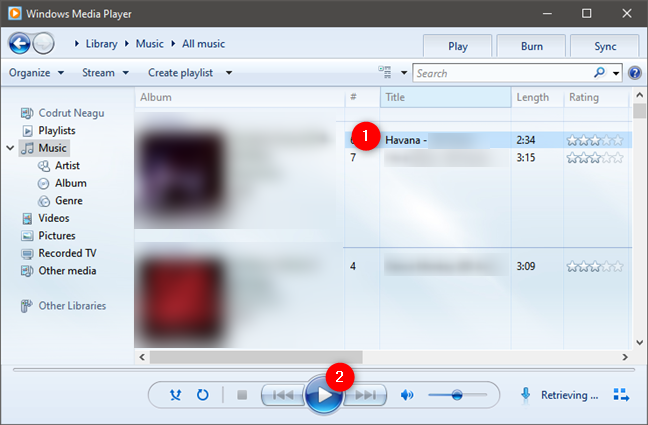
The basic playback of MP3 files and other digital audio files from your Windows Media Player Library is simple. Just navigate through Windows Media Player and double-click or double-tap on a song. Alternatively, you can also select a tune and press Play on the Playback Controls.
How to play music in Windows Media Player
The Playback Controls are always visible, but once a song is playing or selected, they become functional and are no longer grayed out.

Windows Media Player: Navigation panel and controls
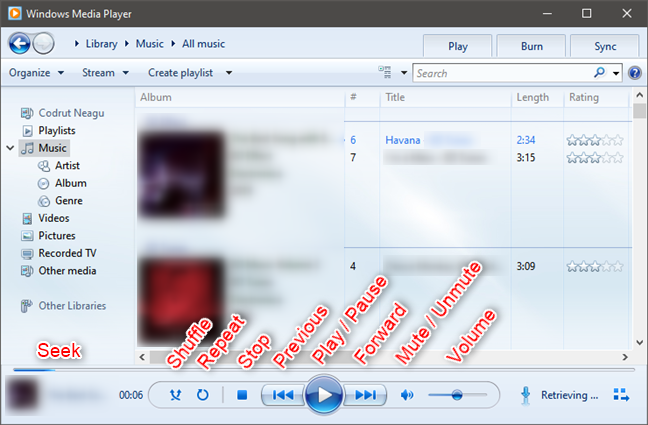
Here’s a closer look at the Playback Controls. From left to right, they are:
- Shuffle – this turns Shuffle Mode on or off. In Shuffle Mode, tracks in the album, playlist, or category you’ve chosen are played in random order.
- Repeat – this turns Repeat Mode on or off. When activated, Repeat Mode repeats the playlist, album, or category you’ve selected. For example, when it reaches the end of an album, it starts again from the first track. If you want to play one song over and over continuously, play it from a search query or create a playlist containing that one song only.
- Stop – pressing Stop ceases playback and resets the Play Position to the beginning of the song.
- Previous – it returns to the previous song in the playlist or category selected. In Shuffle Mode, this button plays the last song played, regardless of its position in the playlist or category.
- Play / Pause – if playback is stopped, this button resumes or begins play. If a song is playing, this becomes the Pause button and stops playback but retains the Playback Position. When you press Play, you start playback from where you left off.
- Next / Fast Forward – Next skips to the next song on the playlist as if the song has reached the end of its duration. Click/tap and hold this button to fast-forward playback so you can seek a specific part of the song.
- Mute – click/tap this button to mute the volume. Playback does not stop, though you do not hear any audio.
- Volume Slider – slide this left to decrease the volume and right to increase the volume.
- Seek – hover your mouse over the progress bar above the playback controls to reveal the Seek slider. Move this to the position where you’d like the song to start playing. Slide left to move towards the beginning of the song, and slide right to move closer to its end.
Windows Media Player: Playback controls
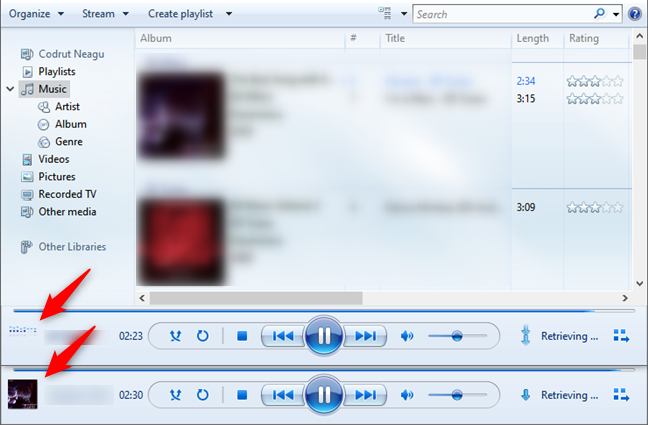
Before you move away from the Playback Controls, you should also note that Windows Media Player displays the currently played song information in the lower-left corner. Click/tap on it to switch from displaying album artwork to a small audio spectrum visualization. You can also hover your mouse over it to display additional song information.
Windows Media Player: Information about the currently played song
Also, note that in Skin Mode or Now Playing Mode, the Playback Controls may be pared down or displayed differently but function in the same way.

Windows Media Player in Now Playing Mode
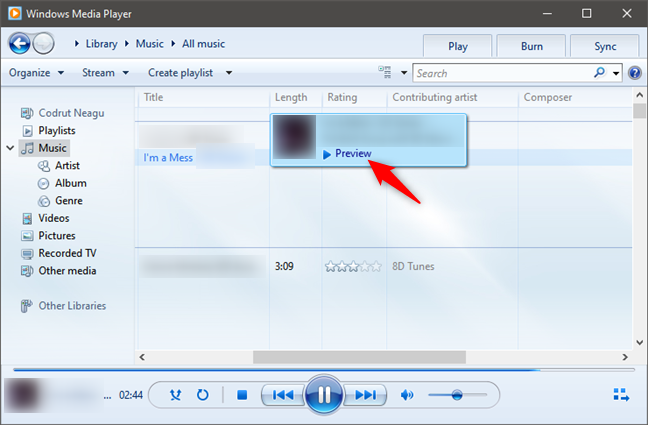
There’s also another playback feature that isn’t included on the Playback Controls. If you hover your mouse over a song, a little dialogue will pop up with the Preview button. Click it once, and the song will begin playing.
Preview a song in Windows Media Player
Once the song is playing in Preview Mode, you can skip 15 seconds into the song by clicking Skip. Move your mouse away from the dialogue box, and the song automatically stops playing. This is a handy feature if you are looking for a particular song and you aren’t sure if this is the one.
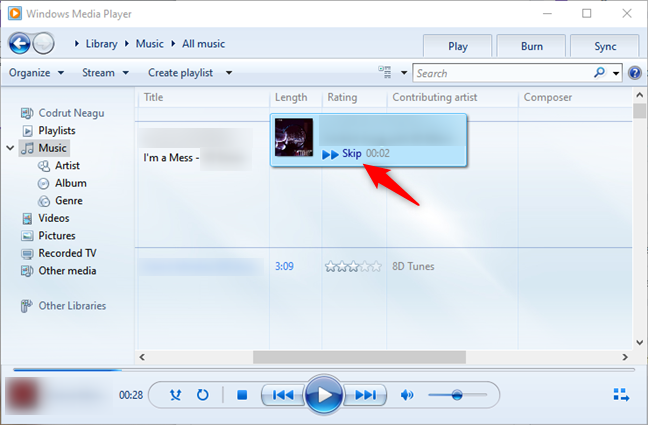
Skipping while previewing a song in Windows Media Player
How to play music in Windows Media Player from your taskbar
Windows Media Player can also play songs right from your taskbar. Simply allow your mouse to hover over its icon on the taskbar, and the Playback Controls appear. Hover over them, and a tooltip will display the name of the song playing. Click or tap Play / Pause, Previous, or Next just like you would while viewing the Windows Media Player Library.
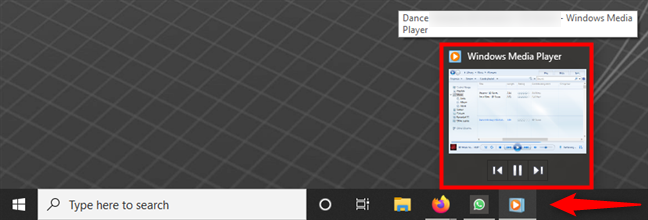
Play music in Windows Media Player from the taskbar
How to play Audio CDs in Windows Media Player
To play Audio CDs or digital audio files saved to a data disc, all you have to do is insert the disc into your computer, and it pops up in your Navigation panel. Note that these songs don’t show up in your Library unless you rip them from the CD. Click or tap on the disc’s name, and Windows Media Player displays its contents.
Note that you can also see the drive letter in the breadcrumbs at the top. Next, choose a song or hit Play just like playing a song from your Library.
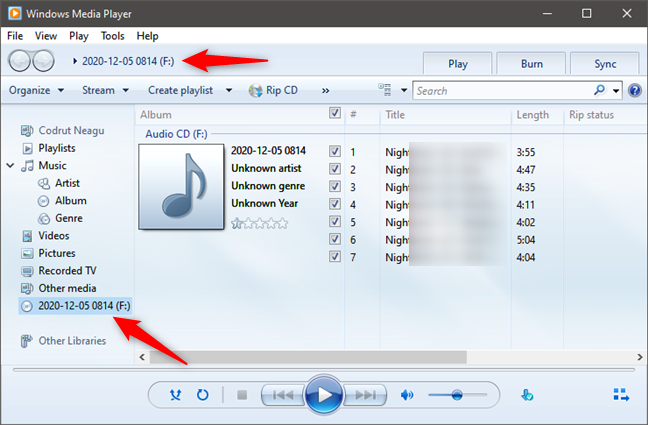
How to play an Audio CD in Windows Media Player
How to play songs that are not in your Windows Media Player library
You can also use Windows Media Player to play the music that isn’t part of your Library. Do so by dragging one or more audio files from another location, such as a folder or your desktop, and drop it on Windows Media Player’s playlist. If the playlist is not displayed, first click or tap on the Play tab from the upper-right corner of the window. The song(s) are then played by Windows Media Player but are not added to your library.

Play music in Windows Media Player that’s not part of the library
You can also right-click (press-and-hold) on an audio file in File Explorer or your desktop and select “Play with Windows Media Player” or “Add to Windows Media Player List.”
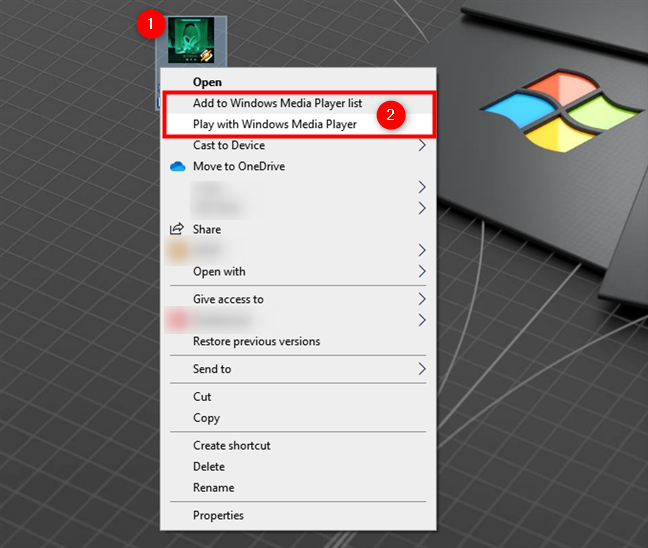
Play with Windows Media Player from the desktop or a folder
If you are viewing a folder with music files in it in File Explorer, you can select the Music Tools tab from the ribbon interface at the top, and then press Play, Play all, or “Add to playlist.” If Windows Media Player is not your default app for playing media files, you can select it from the dialog that shows up.

Play music in Windows Media Player from File Explorer
How to play all music in Windows Media Player
There are three ways we know for playing all music in Windows Media Player. The first one is probably the easiest: open Windows Media Player and just press the Play button without selecting any song from the library. That automatically creates a playlist with all your music, which Windows Media Player starts playing. Note that if you first select a song, album, category, or playlist, Windows Media Player starts playing just that item instead of all your music.
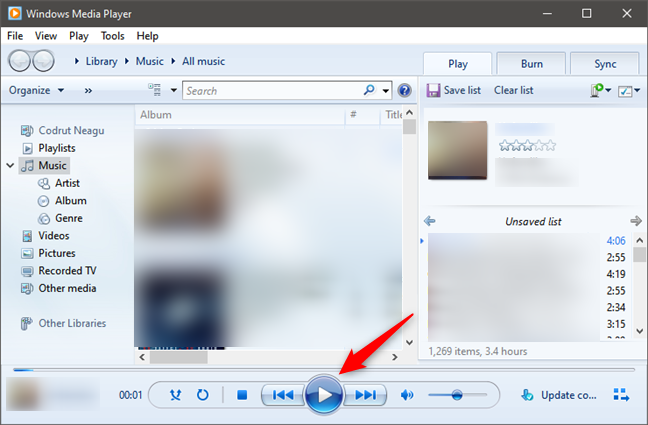
How to play all music in Windows Media Player
The second method to play all music in Windows Media Player is also easy. Open Windows Media Player and right-click or press-and-hold on its icon from the taskbar. Then, in the contextual menu that shows up, select “Play all music.”
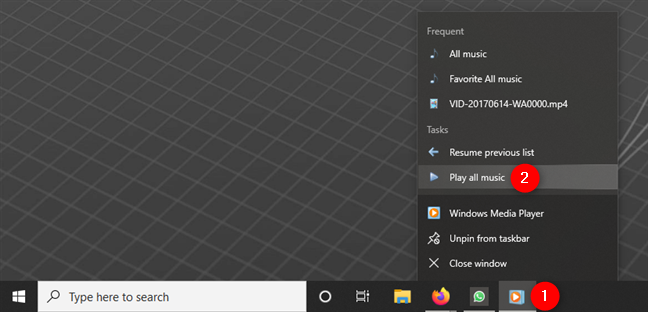
Play all music in Windows Media Player using its taskbar icon
Note that you can also pin Windows Media Player to your taskbar or Start Menu. Right-clicking or pressing-and-holding on its pinned shortcut gives you the same “Play all music” option.
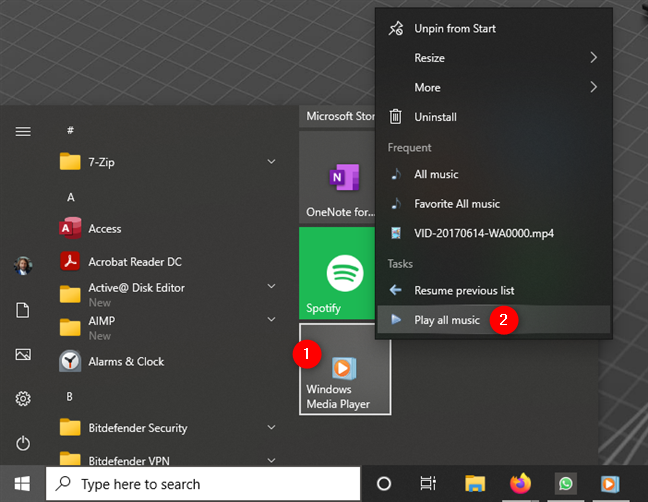
How to play all music in Windows Media Player using its pinned shortcut
Finally, there’s also a third method to play all music in Windows Media Player, but it’s a bit more complicated. Create a new playlist and add all the songs in your library to it.
How many songs can Windows Media Player handle?
Windows Media Player has no limitation when it comes to how many songs it can handle. The only problems that may occur when dealing with large music libraries are related to how fast and powerful your Windows 10 computer or device is. When dealing with massive music libraries, Windows Media Player’s performance might be negatively affected, especially if you keep your songs on slow hard drives.
Windows Media Player Supported Formats
Windows Media Player natively supports many audio and also video file types:
- Windows Media formats (.asf, .wma, .wmv, .wm)
- Windows Media Metafiles (.asx, .wax, .wvx, .wmx, wpl)
- Microsoft Digital Video Recording (.dvr-ms)
- Windows Media Download Package (.wmd)
- Audio Visual Interleave (.avi)
- Moving Pictures Experts Group (.mpg, .mpeg, .m1v, .mp2, .mp3, .mpa, .mpe, .m3u)
- Musical Instrument Digital Interface (.mid, .midi, .rmi)
- Audio Interchange File Format (.aif, .aifc, .aiff)
- Sun Microsystems and NeXT (.au, .snd)
- Audio for Windows (.wav)
- CD Audio Track (.cda)
- Indeo Video Technology (.ivf)
- Windows Media Player Skins (.wmz, .wms)
- QuickTime Movie file (.mov)
- MP4 Audio file (.m4a)
- MP4 Video file (.mp4, .m4v, .mp4v, .3g2, .3gp2, .3gp, .3gpp)
- Windows audio file (.aac, .adt, .adts)
- MPEG-2 TS Video file (.m2ts)
- Free Lossless Audio Codec (.flac)
Windows Media Player also automatically uses codecs installed by other players when possible. To check which codecs are already installed on your Windows 10 PC, first open the Help menu from Windows Media Player. If you don’t see it, click or tap on Organize, select Layout, and click or tap on “Show menu bar.”
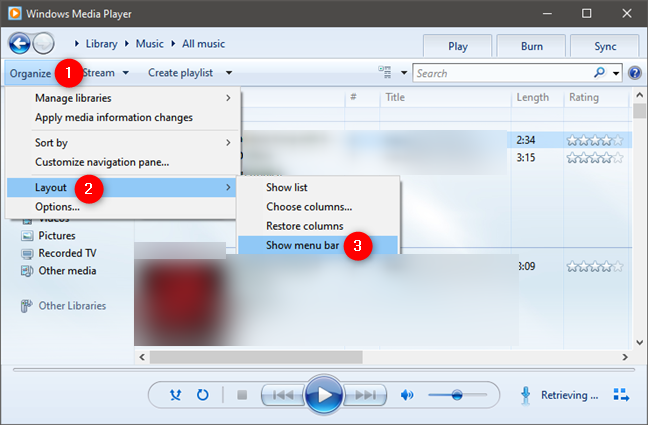
How to see the menu bar of Windows Media Player
Then click or tap Help on the menu bar and select “About Windows Media Player.”
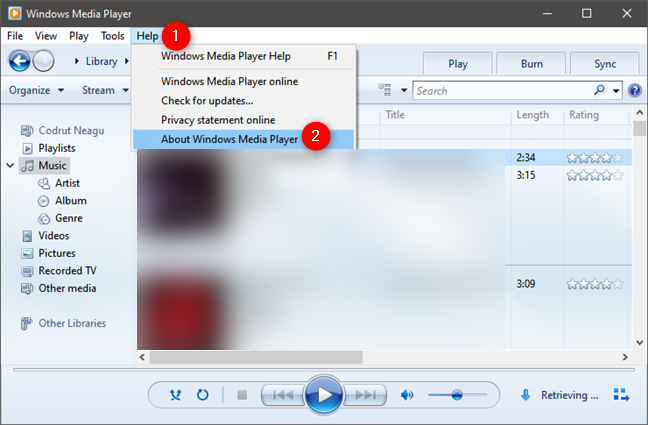
About Windows Media Player
Next, click or tap on the “Technical Support Information’” link from the “About Windows Media Player” window.
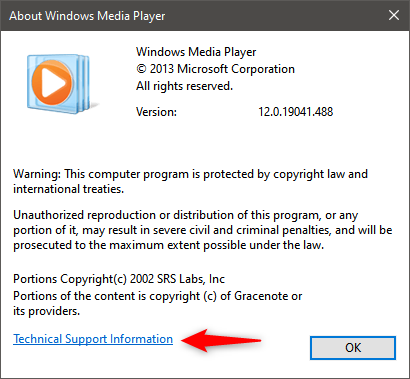
Technical Support Information for Windows Media Player
Windows Media Player now opens a webpage in your web browser with information about it. Scroll down to find details about the audio codecs installed.
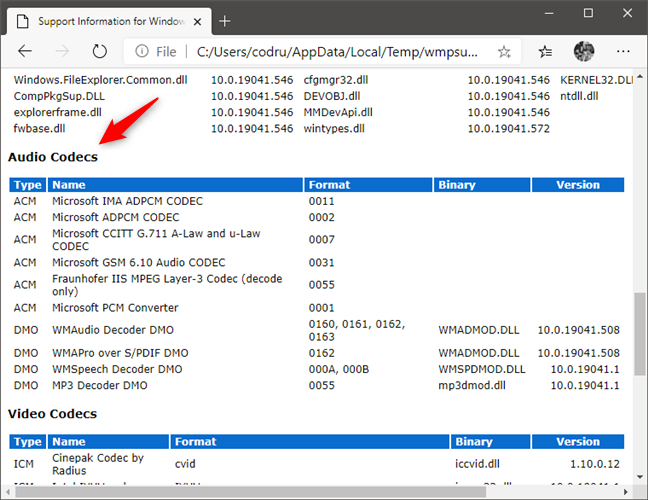
Audio Codecs used by Windows Media Player
Do you still prefer Windows Media Player to other newer apps?
That covers the basic playback functionality of Windows Media Player for listening to digital audio and audio CDs. Are you still using it in Windows 10 to play your favorite songs and maintain your music library? Feel free to add your tips or questions about Windows Media Player in the comments section.
Windows Media Player / WMP as we know is an application produced by Microsoft to play audio and video files and also for observing images. Windows Media Player was there in the old versions of Windows and currently, it serves its purpose very interestingly on Windows 10 also. With an easy and smooth interface, this application serves multiple functions for its users such as arranging the media stocks, burn CDs with your favorite tracks, synchronization of media files with other gadgets, or shop favorite media tracks from online stores.
Today here in this Windows Media Player topic we will explore you different functioning and modes of the application. Hold your seat and learn many interesting facts about your favorite application!
How to Start Windows Media Player on Windows 10
- Before starting, get The Windows Media Player compatible with Windows 10 from this location. 2 files will be downloaded, hence, install both of them one after another.
- Launch your Windows 10 Cortana search.
- Type WMP in the search area and look at Windows media player at the top under Best match.
- Hit it.
- Windows Media Player (WMP) immediately opens.
How to use Windows Media Player on Windows 10
- There are two modes of Windows Media Player that you can experience while playing it. They are Now Playing and Player Library. You can easily switch between the two modes. Let’s look into their details deeply.
Now Playing
Now Playing is the mode that exhibits on the screen while turning on any track for play. In this mode, you can see DVDs and videos and also the music that is presently playing on. Here you get what item is presently playing on or you can also right-click on the player and choose Show List to see the selection of obtainable contents.
There are three areas in Now Playing mode that we will explain to you now. See the image below for a clear understanding.
- Track Information– It exhibits the information for the track that you are playing.
- Playback Control– Use the controls like pause, stop, forward, or backward button to control the track.
- Switch to Library Mode– It is the button that will make you switch between the two modes.
Player Library
Here, in this mode, you are free to arrange media stock. Five areas in Player Library serve various purposes. Lets’ see them now!
- Address Bar– It will exhibit your existing location or the folder in which you are into.
- Navigation Pane– All the sections are listed in the navigation pane which permits you to choose the favorite.
- Details Pane– When you select a particular section or category of the navigation pane, the details of that particular category is displayed in Details Pane.
- List Pane– dragging the items from Details Pane to List Pane allows you to make playlists, burn your favorite tracks into CDS or DVDs or transfer to devices.
- Playback Control – Control the flow of the track using the volume, forward, backward, play or pause buttons of the Playback Control.
Now we will go to the other interesting features of Windows Media Player.
Play From The Taskbar
When you shrink the WMP window, its icon will appear on your Taskbar. And from the Taskbar itself, you can play the track without disturbing your work on the screen. All you have to do is just take your cursor to the WMP icon on the taskbar, you will get a thumbnail preview and from there you will be able to play or pause the running track. Click the forward button to jump to the next track, or the back button to go to the previous track.
Build a Media Library
WMP by default attaches and connects the tracks to the Player Library from Music, Pictures, and Videos. If you wish to assemble a media library attach folders from further locations on the portable music devices or to your PC.
RIP CDs To Create Digital Music Files
To copy songs from phonic CDs to your computer you can use Windows Media Player and this method is termed as ripping. In the ripping process, your each song is copied by the Player and it stored in the hard disk of your computer as an MP3 or Windows Media Audio (WMA) or WAV file. And then it will be added to your Player Library.
Use Tabs To Complete Key Tasks
There must be many users like me who feel like being at the highest peak when different tasks are done at one place only. I personally got so much relaxed when I found that I can perform three tasks in one media player only. Wow! Now I don’t have to plunge into different media players or different pieces of software to Play, Burn o Sync any track. All thanks to Windows Media Player as all these tasks can be easily carried at one place. They can be easily located as they are placed just above the List Pane section of Player Library. With these options, I can play any track, burn my favorite or required tracks to a CD or DVD or even I can sync the required ones with other suitable media devices.
PLAY – The list under the Play tab exhibits the current tracks that are playing and also the tracks that you have selected to play. Suppose, if you have selected an entire album then all the songs of that album will be listed under the Play tab.
BURN – One click on this tab will permit you to produce a copy of the selected tracks to a CD or DVD so that you can enjoy them playing on compatible gadgets.
SYNC – By clicking on this option many items like music, videos, and a wide range of images will be pulled together to suitable media devices. When the suitable transferable media device is secured to your computer, the Player will start harmonizing. The automatic or manual setting is depending on the device.
Till now we have dealt with Windows Media Player and its features and functions. But what if you face any problem with the Player?! Simply use the Troubleshooter as your savior and get rid of the problem. To do so, follow the below steps –
- Launch Control Panel on your computer screen.
- Hit on Troubleshooting.
- Click View All link on the Troubleshooting window.
- Now look for Windows Media Player Settings option and click on it.
- This will fix the issues.
Download Article
Download Article
- Connecting an Android
- Connecting an MP3 Player
- Synchronizing Content
- Troubleshooting
- Tips
- Warnings
|
|
|
|
|
This wikiHow teaches you how to connect an MP3 player or smartphone to Windows Media Player on a Windows computer. In most cases, you’ll only need to connect the item to your computer via a USB cable and then open Windows Media Player for the connection to be recognized, though some Android smartphones may require a few extra steps. Keep in mind that you cannot use an iPhone, iPad, or iPod Touch with Windows Media Player.
-

Your Android will need to be turned on before you can add music to it, so press and hold your Android’s Power button until its logo appears if it’s turned off.
-
Plug the USB 3.0 end of the cable into one of your computer’s rectangular USB ports.
Advertisement
-
The smaller end of your Android’s cable should plug into the Android’s charging port.
-
Doing so prompts a drop-down menu with your Android’s notifications in it to appear.
-
It should be in the notifications drop-down menu. Doing so enables USB synchronizing for your Android, meaning that Windows Media Player will be able to view your Android.
- If you don’t see a similar notification in the drop-down menu, try plugging your Android into a different USB port on your computer.
-
Click

, type in windows media player, and click Windows Media Player at the top of the Start menu.
- Windows Media Player isn’t available on some Windows 10 computers.
-
It’s in the top-right corner of the Windows Media Player window. Doing so prompts a pop-out pane to appear on the right side of the window.
-
You should see your Android’s name and storage capacity at the top of the pane. If so, you’re free to continue with synchronizing content to your Android.
- If you don’t see your Android’s name here, try opening your Android’s notifications menu and re-selecting the USB or MTP option. You can also check out the «Troubleshooting» section.


Advertisement
-
Most MP3 players can be charged by plugging a USB cable into a wall socket adapter and then attaching the MP3 player to the free end of the cable. You’ll need to detach the USB cable from the wall socket adapter in order to add music to the player.
- If your MP3 player has a separate syncing cable, make sure that it can be used with your computer.
-
If your MP3 player isn’t on, press (or press and hold) its Power button to turn it on. Your MP3 player must be on before you can use it with Windows Media Player.
-
This should be the rectangular USB 3.0 end of the cable.
-
The free end of the cable should plug into the MP3 player’s charging port, which you’ll usually find on the side or the bottom of the MP3 player.
-
Click
, type in windows media player, and click Windows Media Player at the top of the Start menu.
- Windows Media Player isn’t available on some Windows 10 computers.
-
It’s in the top-right corner of the Windows Media Player window. Doing so prompts a pop-out pane to appear on the right side of the window; you should see your MP3 player’s name at the top of the pane. At this point, you can begin adding content to your MP3 player.


Advertisement
-
You’ll find this in the upper-right corner of the Windows Media Player window.
-
Click a library item, such as Music, that contains content you want to sync. Doing this will open a list of the content in that library.
-
Click and drag the song(s), video(s), or picture(s) you want to add to your item into the «Sync» pop-out pane, which is on the right side of the Windows Media Player window.
- You can see the amount of space remaining on your item by looking at the storage progress bar that’s at the top of the «Sync» pane.
- Not all mobile items or MP3 players support videos and/or pictures.
-
It’s at the top of the «Sync» pane. Doing so will prompt your listed content to begin adding to your MP3 player or mobile item.
-
Once you’ve synced the content from your computer to your mobile or MP3 player, you’ll be able to start playing it immediately. The process for this will vary depending on your item:
- For MP3 players, your new songs will be available just like any song already on the player.
- For Androids, you’ll find the content in the associated apps. To play your synced music, open your music player app; to play synced video files, open your video player app.


Advertisement
-
Windows Media Player can detect most MP3 players and Androids, but it will not work with iOS items such as iPods, iPhones, and iPads.
-
If you get an error message saying that Windows could not install the drivers, you’ll need to get them yourself:
- Disconnect your MP3 player or Android.
- If the item came with an installation CD, insert the CD now.
- If you don’t have a CD, open the device manufacturer’s support website. Search for your item’s model and check the Drivers or Downloads section for an installer.
- Run the installer from the disk or the downloaded file and follow the prompts to install the driver.
-
Updating Windows Media Player may help with issues encountered while attempting to connect:
- Press Alt to display the menu.
- Select Help.
- Click Check for updates….
- Click Update if prompted to install any available updates.
-
Some users have reported that making an adjustment to Windows Services can make a device appear in Windows Media Player when it isn’t being detected:[1]
- Open Start.
- Type in services, then click Services at the top of the window.
- Right-click Portable Device Enumerator Service.
- Click Properties.
- Set Startup type to Automatic and then click Start.
- Check Windows Media Player for your item.


Advertisement
Ask a Question
200 characters left
Include your email address to get a message when this question is answered.
Submit
Advertisement
-
While technically obsolete, Windows Media Player should still support modern items such as Android smartphones and tablets.
-
One benefit to using Windows Media Player is that it simultaneously supports older items, such as MP3 players, and newer ones (like smartphones).
Thanks for submitting a tip for review!
Advertisement
-
Microsoft no longer supports Windows Media Player.
Advertisement
About This Article
Thanks to all authors for creating a page that has been read 72,492 times.
Is this article up to date?
How to Play Any DVD in Your Windows Media Player without Issue
I just put a DVD into my Windows 10, but Windows Media Player did not read it at all, how to play DVD on Windows Media Player?
Whether you believe or not, Microsoft has removed the DVD playback ability from the built-in media player on Windows 10. According to the experts’ statement, many computers now come without any sort of disc drive and stream services are increasingly popular. If you still have a DVD collection, this guide will show you how to play it on Windows smoothly.
PAGE CONTENT
- Part 1: How to Play DVD on Windows Media Player
- Part 2: How to Solve DVD Not Playing on WMP
- Part 3: Best Alternative Way to Play DVD on PC
- Part 4: FAQs about Playing DVD on Windows Media Player
Part 1: How to Play DVD on Windows Media Player
Generally speaking, Windows Media Player is able to play audio CDs and video files on DVDs. If your computer has a DVD drive and a compatible DVD decoder, you can follow the steps below to play DVD on Windows Media Player.
Step 1: Insert your optical disc into the DVD drive on your computer.
Step 2: Then Windows Media Player should pop up and start playing automatically.
If not, go to the Start menu at the bottom left side, find and open WMP.
Step 3: Go to the Library panel on the left side and select the disc. Then you will see all titles or chapters. Double-click on a chapter and the DVD video should play in Windows Media Player.
Note: The DVD playback was removed from Windows 8 and later, but you can still enjoy your discs on Windows 7 and earlier.
Part 2: How to Solve DVD Not Playing on WMP
Why does my DVD not play on Windows Media Player? The reasons are complicated. According to our research, the primary causes include lack support for DVD playback, damaged DVD, and non-compatible DVD format. Next, we will help you solve this problem quickly.
Solution 1: Install DVD Decoder
Windows Media Player won’t play DVD on Windows 10/8, partly because your computer lacks a DVD decoder. As long as you install a proper decode, the problem will disappear.
Step 1: Go to the Start menu at the bottom left corner, search and open Control Panel.
Step 2: Next, type troubleshooter in the search box and click Troubleshooting from the result list. Click view all and choose Windows Media Player.
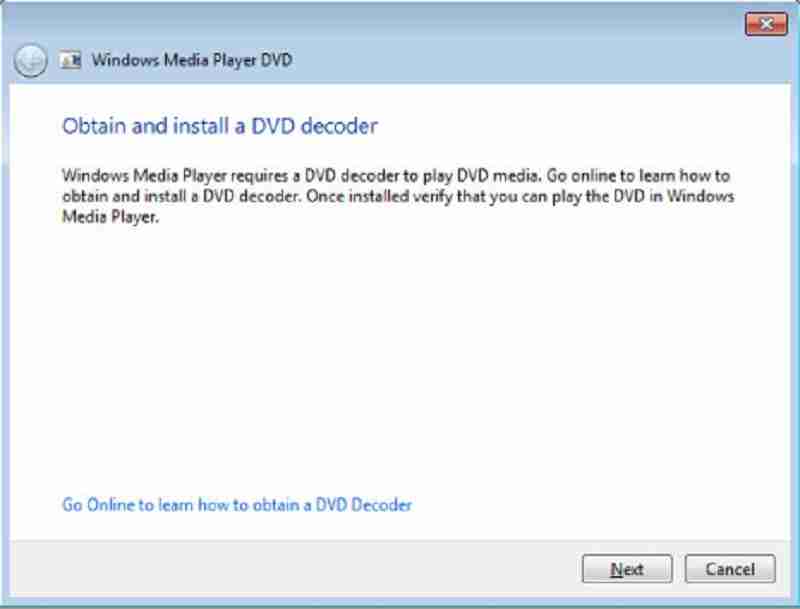
Step 3: Then you will be presented the popup dialog and ask to install Windows Media Player DVD decoder. Follow the instructions to install it. Now WMP should read and play your DVD.
Note: There are also a lot of DVD decoders on the internet. Partly of them are paid or contains virus, so we do not suggest you to search for DVD decoder in search engine.
Solution 2: Check Your DVD
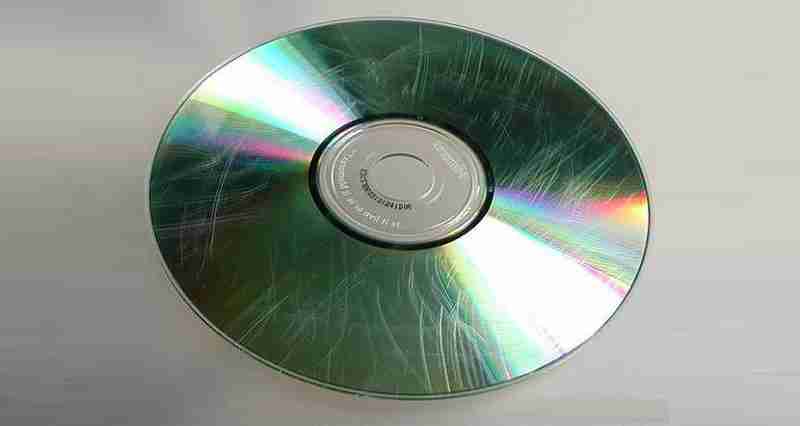
Before playing DVD on Windows Media Player, you should check your optical disc. The scratches or damage can lead to file corrupted and DVD drive fails to read it.
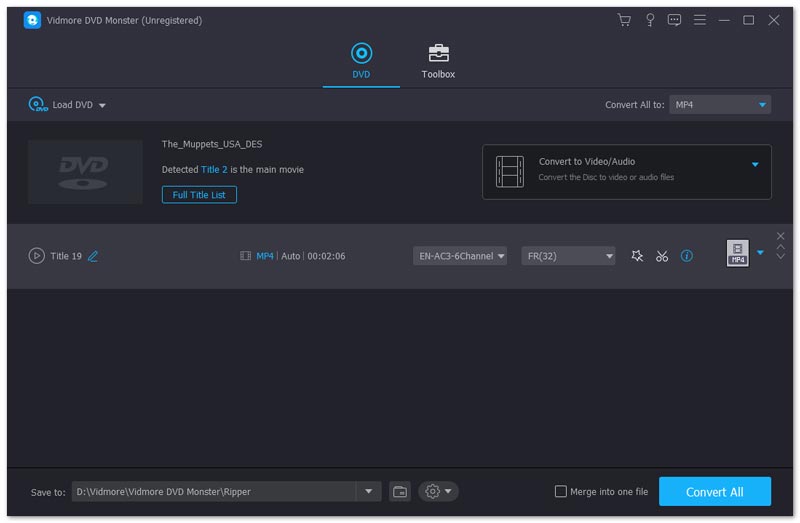
Solution 3: Rip DVD Video
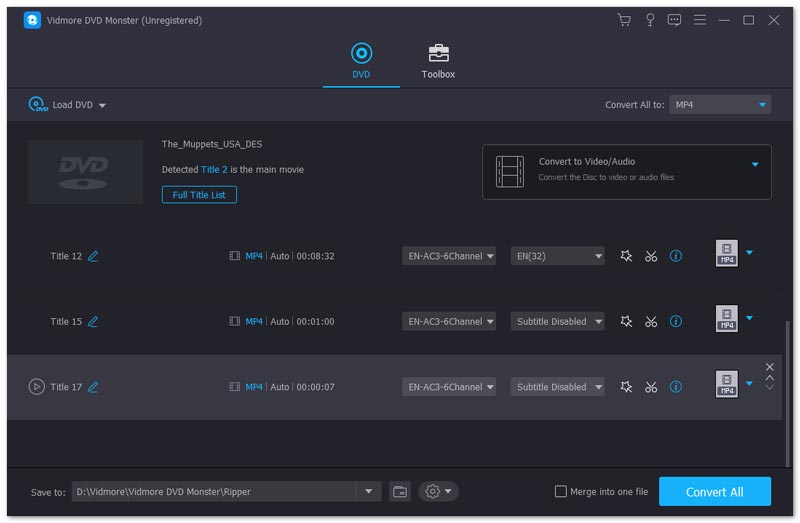
The most effective way to watch DVD on Windows Media Player is to rip the videos. Vidmore DVD Monster is the best option to do the job.
Basic Features of the Best DVD Ripper for Windows Media Player
How to Rip DVD for Windows Media Player
Step 1: Load a DVD
Run the best DVD ripper and it is compatible with Windows 10/8/7 and Mac OS X. Put the video DVD into your computer and click Load DVD. If you just want to rip specific chapters, click View/Select Title, check the desired titles, and click OK.
Step 2: Choose output format
Press the Rip All to list and choose a proper video format. To play ripped DVD on Windows Media Player, you can select WMV and pick a preset.
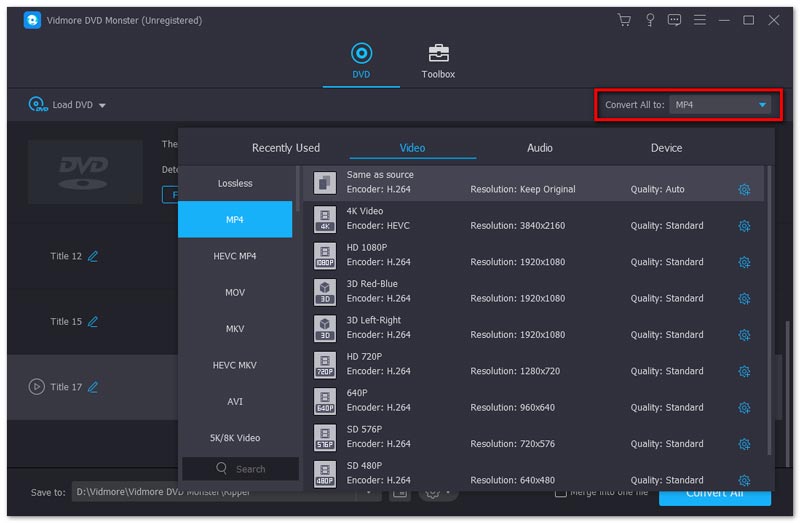
Step 3: Rip DVD
Set the destination folder in Save to field at the bottom left side. Finally, click on the Rip All button to begin ripping DVD for playing on WMP.
Part 3: Best Alternative Way to Play DVD on PC
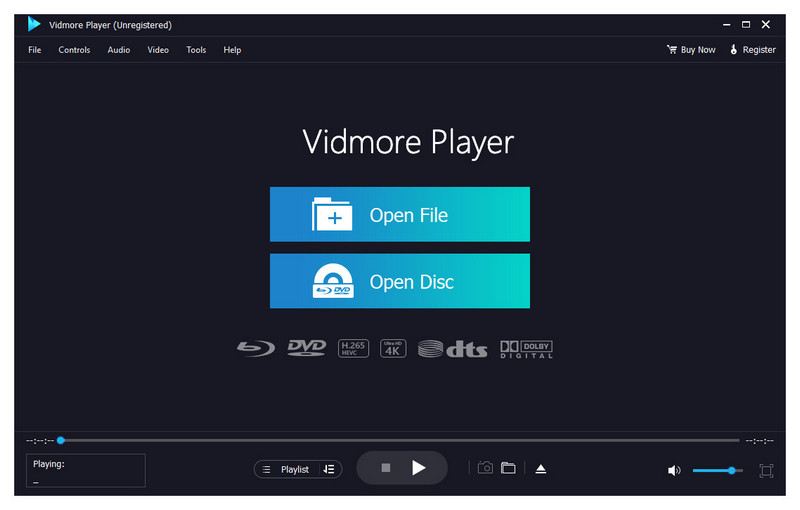
You should understand that Window Media Player is not the only way to play DVD, Blu-ray disc and digital videos on PC. Vidmore Player, for example, is a powerful alternative to WMP. It includes a large package of codecs including DVD.
Main Features of the Best Alternative to Windows Media Player
- Play any DVDs, CDs, Blu-ray discs without extra decoder.
- Protect video and audio quality using advanced technology.
- Enhance image color and audio quality automatically.
How to Play DVD without Windows Media Player
Step 1: Load DVD
Insert a video DVD into your computer. The alternative to Windows Media Player offers two versions, one for Windows 10/8/7 and the other for Mac OS X. Install the right version on your machine and launch it. Insert a video DVD into your computer. Click the Open Disc button in the home interface, select the disc and click OK to load it.
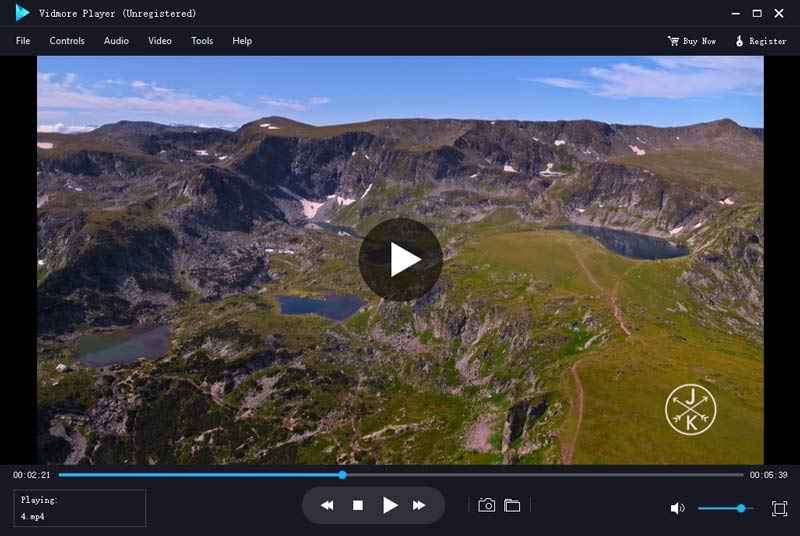
Step 2: Control DVD playback
After DVD loading, you will be presented the main interface. The buttons at the bottom help you fast forward, rewind, pause, stop and play the video. The Camera icon is used to take snapshot at important moment. More advanced controls can be found in the top menu bar.
Want to know more alternatives to Windows Media Player, read on Windows Media Player Alternatives.
Part 4: FAQs about Playing DVD on Windows Media Player
Does Windows 10 play DVDs?
There is a paid program called Windows DVD Player to help users watch DVDs on Windows 10. You can download it from Microsoft Store.
How do I start a DVD automatically?
You need three things to play a DVD automatically:
1. A DVD player program.
2. Have Autoplay enabled.
3. Set the DVD player program as default.
How to play a DVD on an external drive?
Connect the external drive to your computer using USB cable or Wi-Fi, put a DVD into it, and open your DVD player program to begin watching it.
Conclusion
This guide has shared how to play DVDs on Windows Media Player on Windows 10/8/7/XP/Vista. Even if your WMP cannot open a DVD, you can fix the problem following our solutions. The best solutions are to rip your DVDs into digital videos for playing on WMP or use an alternative DVD player, such as Vidmore Player. Undoubtedly, you can play MP4, AVI, MP3 or any other popular video & audio formats on Windows Media Player. More questions? Please leave your message below this post.
Windows Media Player has been around for many years. Now in its 12th version, it still has a lot to offer when it comes to listening to music on your PC.
Play music that’s stored on your computer, or directly from an audio CD. Add music to your library and best of all create playlists.
Table Of Contents
- Windows Media Player.
- Welcome To Windows Media Player.
- If Some Of Your Music Isn’t Listed.
- How To Play Music Directly From An Audio CD Or USB Drive.
- To Play Music From A USB Drive.
- Music Playlists.
- How To Create A Playlist In Windows Media Player.
To get started, left-click the Start button and type “Windows Media Player“.
If you’re using Windows 10, left click Windows Media Player (App).
And if you’re using Windows 11, left click Windows Media Player (Legacy).
WMP Might Not Be Installed On Your Computer.
Pay particular attention to the search results because WMP isn’t guaranteed to be installed on your system, especially if you have a Windows 11 machine.
If this is the very first time that you’ve started WMP, you’ll be greeted with the “Welcome to Windows Media Player” splash screen.
Select “Recommended Settings” and then click the FINISH button.
After clicking the Finish button, WMP will start. Again, if this is the first time that you’ve used Windows Media Player, it scans your music folder looking for audio files.
That might take a few minutes but eventually, it’ll display your music collection.
To play a single track you can just double left-click on it.
But you can select multiple tracks to play by holding down the CTRL key on your keyboard and then single left-clicking on all the songs you want to play.
How To Select Multiple Files In Windows
If Some Of Your Music Isn’t Listed.
By default, Windows Media Player will scan your Music folder, Video folder and Pictures folder. If WMP doesn’t show all your music collection, it’s most likely that you have it stored in another folder.
The first thing you could do, and most obvious, is to simply move your music into your Music folder. WMP will then pick it up and add it to your music library. You can use cut and paste to do that.
How To Include A Folder In Music Library.
Occasionally you’re not going to want to do that, you’re going to want to leave it where it is.
In that case, you just need to let WMP know where else to look for music files.
As an example, here I’ve got a music folder on my desktop, and I want to leave it there.
To add a folder to your music library, click the Organise button in the top left corner of the screen.
On the menu that opens, hover your pointer over Manage Libraries and then click Music.
The Music Library Locations window will open. Click the Add button.
An explorer window will open allowing you to select which other folder to include in the library. Select the folder you want to include and then click the INCLUDE FOLDER button.
So continuing with my example, I’d click Desktop in the navigation panel (left-hand panel) and then click the Include Folder button.
After clicking the Include Folder button, you’ll be returned to the “Change how this library gathers its contents” page.
If you want to add other folders, click the ADD button and do the same again.
When you’re finished adding folders, click the OK button.
How To Play Music Directly From An Audio CD Or USB Drive.
As well as playing music that’s stored on your computer, you can, of course, play your music directly from a regular old audio CD, assuming your computer has a CD/DVD drive or if you’ve got music stored on a USB drive, you can use that.
With the audio CD loaded into the CD drive, you’ll see it appear in the left-hand panel of Windows Media Player.
Usually, what you’ll see is the name of the audio CD and the drive’s letter.
Left-click once on the CD in the left panel and the contents will appear in the centre panel.
You can play the whole CD by clicking the PLAY button.
Individual tracks by double left-clicking them.
Or select multiple tracks by holding down the CTRL key and then selecting which tracks to play.
To Play Music From A USB Drive.
To play music from a USB drive, find the drive in the left-hand panel. Then click the small arrowhead beside it to expand the contents of the drive.
With the USB drive expanded, click on the MUSIC option. Windows Media Player will scan the drive for audio files. When it’s finished, your music will appear in the centre panel and you can play it by clicking the PLAY button.
You can also select multiple tracks, just as you might with an audio CD
Music Playlists.
A Playlist is simply a list of songs to be played. And they are probably the very best thing about any media player software. You can create playlists that last for just several minutes or several hours.
You can include songs from any combination of albums, artists, genres etc, and mix them all together to suit yourself or your mood.
Once created, the playlist is saved and ready for use whenever you want to listen.
To create your first playlist, open Windows Media Player. If it isn’t showing you’re music tracks, left-click the MUSIC tab in the left-hand panel.
Scroll through your music tracks until you find one to add to your new playlist. When you find a track, drag it into the right-hand panel.
If you can’t see a right-hand panel, click the PLAY tab in the top right corner of the toolbar.
Build Your Playlist.
Continue adding tracks to your playlist. You can add them one at a time, or by selecting multiple tracks and then dragging them over to the list in one go. There isn’t any real limit to how many tracks you add to your playlist.
When you’ve finished adding tracks to your playlist, you’ll need to save it. At the top of the list, you’ll see it’s as yet an “Unsaved list”.
Left click once in the “Unsaved list” box. The Unsaved Playlist becomes highlighted. Now you can type in anything that you want to name the playlist.
When you’ve named your playlist, press ENTER on your keyboard to save the list. To listen to a playlist, simply double left-click on its name.
Summary.
Windows Media Player is still a good choice for handling your audio files. It’s fairly easy to use and is created by Microsoft so should just work without any conflicts on your system.
In this beginner’s guide, we’ve only really touched on the basics, but I think that’s all we need to get started.
Have a go at creating playlists. Once you get the hang of them, you’ll never go back to playing individual tracks.
Stay Informed. Stay In Touch.
Now that you’ve found me, keep in touch. I publish new articles and update older ones constantly.
Let me send you a monthly email with all the latest guides for you to see if there’s anything you’re interested in.
At Home Computer
Signup for the At Home Computer Newsletter.
Support this website and keep up to date with all the new articles.