
Загрузить PDF
Загрузить PDF
Команда Ping позволяет проверить скорость соединения между вашим компьютером и другим сетевым узлом. Вы можете использовать ее для определения силы, отдаленности и доступности соединения как с вашей локальной сетью, так и с интернетом. Чтобы использовать команду Ping на любой операционной системе, следуйте указаниям данного руководства.
-

В любой операционной системе есть интерфейс командной строки, который позволит вам запустить команду Ping. Команда Ping действует практически одинаково на всех операционных системах.
- Если ваш компьютер работает под управлением Windows, откройте командную строку. Нажмите кнопку «Пуск» и введите «cmd» (без кавычек) в строке поиска. Пользователь Windows 8 могут набрать «cmd» на экране «Пуск». Нажмите Enter, чтобы запустить командную строку.
- Если вы пользуетесь macOS, запустите терминал. Откройте папку «Программы», а затем папку «Утилиты». Выберите терминал.
- Если вы пользуетесь Linux, откройте окно командной строки. Как правило, Найти его можно в меню «Приложения»→«Стандартные».
- В Ubuntu для того, чтобы открыть терминал, вы можете использовать сочетание клавиш Ctrl + Alt + T.
-
Наберите ping hostname или ping IP address.
- Обычно имя узла (hostname) — это адрес веб-страницы. Замените hostname на тот веб-сайт или сервер, который вы хотите пинговать. Например, чтобы проверить пинг главной страницы сервера wikiHow, наберите ping www.wikihow.com.
- IP-адрес — это расположение компьютера в сети, либо локальной, либо в интернете. Если вы знаете IP-адрес, который вы хотите пинговать, замените IP address на него. Например, чтобы проверить пинг IP-адреса 192.168.1.1, введите ping 192.168.1.1.
- Чтобы ваш компьютер пинговал сам себя, наберите ping 127.0.0.1.
-
Результаты будут показаны под текущей командной строкой. Ниже описано, как расшифровать результаты.
Реклама


-
Откройте папку «Программы» и выберите «Утилиты». Найдите служебную программу «Сетевая утилита».
-
Укажите имя узла или IP-адрес. Например, чтобы проверить пинг главной страницы сервера wikiHow, наберите в текстовом поле www.wikihow.com.
- Обычно имя узла — это адрес веб-страницы. Например, чтобы проверить пинг главной страницы сервера wikiHow, наберите в текстовом поле www.wikihow.com.
- IP адрес — это расположение компьютера в сети, либо в локальной, либо в интернете. Например, чтобы проверить пинг IP-адреса 192.168.1.1, наберите в текстовом поле 192.168.1.1.
-
Обычно надежные измерения можно получить с количеством пингов от 4 до 6. Когда будете готовы, нажмите Ping, и результаты отобразятся в нижней части окна[1]
Реклама


-
В первой строке указано, что делает команда. Она повторяет адрес, который вы ввели, и сообщает, какой объем данных был отправлен. Например:
Обмен пакетами с www.wikihow.com [173.203.142.5] с 32 байтами данных:
-
При успешном выполнении команды Ping будут выведены строки, отображающие, сколько времени затратил адрес на ответ. TTL отражает количество пройденных сетевых узлов в процессе передачи сетевых пакетов. Чем меньше его значение, тем через большее количество маршрутизаторов прошел пакет данных.[2]
«Время» указывает на то, как долго (в миллисекундах) производилось соединение:Ответ от 173.203.142.5: число байт=32 время=102мс TTL=48
Ответ от 173.203.142.5: число байт=32 время=105ms TTL=48
Ответ от 173.203.142.5: число байт=32 время=105мс TTL=48
Ответ от 173.203.142.5: число байт=32 время=108мс TTL=48- Для остановки пингования нажмите CTRL+C.
-
По завершении операции будет показана сводка результатов. Потерянные пакеты данных означают, что ваше соединение с адресом ненадежно, и данные теряются при передаче. В сводке также указано среднее время, затрачиваемое на соединение:
Статистика Ping для 173.203.142.5:
Пакетов: отправлено = 4, получено = 4, потеряно = 0 (0% потерь),
Приблизительное время приема-передачи в мс:
Минимальное = 102мсек, Максимальное = 108мсек, Среднее = 105мсек
Реклама


-
Наиболее часто встречаются следующий отчет об ошибке:
Хост www.wikihow.com не может быть пропингован. Пожалуйтса, проверьте имя хоста и попробуйте снова.Это обычно означает, что вы неправильно ввели имя узла.- Попробуйте повторно ввести его для исправления ошибок написания. Если это не решит проблему, попробуйте какое-нибудь другое имя известного узла, например поисковой системы или новостного сайта. Если появляется отчет «Неизвестное имя узла», тогда ошибка, вероятнее всего, допущена в адресе сервера доменных имен (DNS).
- Проверьте пинг, используя IP-адрес узла, а не его имя (например, 173.203.142.5). Если это помогло, значит используемый вами адрес сервера доменных имен, либо неверен, либо недоступен.
-
Другое возможное сообщение об ошибке выглядит так:
sendto: No route to host(система не в состоянии доставить пакеты к хосту назначения). Это может означать, что адрес шлюза неверен, или что на вашем компьютере не работает соединение с сетью.- Проверьте пинг адреса 127.0.0.1: это ваш собственный IP. Если пинг не удался, ваш TCP/IP работает неправильно, и вам необходимо изменить настройки вашего сетевого адаптера.[3]
- Проверьте беспроводное соединение или соединение вашего ПК с маршрутизатором (роутером), особенно если раньше все работало нормально.
- Большинство сетевых портов ПК имеют световой индикатор, который указывает на работающее соединение, и индикатор, который мигает при передаче данных. Поскольку команда ping передает пакеты данных со скоростью 1 пакет в секунду, вы должны увидеть, как мигает этот индикатор передачи данных.
- Проверьте, чтобы на маршрутизаторе горели соответствующие индикаторы (и отсутствовали ошибки), включая индикатор соединения с ПК. Если горит индикатор ошибки, проверьте кабель, соединяющий ПК с маршрутизатором, и убедитесь, что он правильно подключен, после чего при необходимости позвоните своему провайдеру.
Реклама
- Проверьте пинг адреса 127.0.0.1: это ваш собственный IP. Если пинг не удался, ваш TCP/IP работает неправильно, и вам необходимо изменить настройки вашего сетевого адаптера.[3]


Советы
- Зачем использовать пинг? Ping (по названию акустического сигнала в эхолокации) использует пакеты простейшего типа. Ответ производится сетевой подсистемой (TCP/IP) операционной системы. Для него не нужны дополнительные программы, ему не нужен доступ к каким-либо файлам и его не нужно настраивать. Пинг почти не влияет на другие задачи. Чтобы провести проверку пинга, не нужно, чтобы работали все устройства, шлюзы, маршрутизаторы, файерволы, DNS и промежуточные узлы. Если пинг успешно выполнен, но вы не можете получить доступ к целевому узлу с помощью браузера или другого приложения, то проблема, скорее всего, не на вашей стороне.
- Варианты опций зависят от определенных параметров. Вот некоторые из них:
- -c Счетчик. Отправить указанное число пакетов, после чего остановиться. Другой способ остановить выполнение — набрать [ctrl]-C. Эта опция удобна для скриптов, периодически проверяющих поведение сети.
- -t проверять пинг до остановки ([ctrl]-C).
- -w Тайм-аут. Количество миллисекунд, в течение которых программа будет ожидать ответа до того, как появится сообщение о том, что время вышло, или о том, что пакет утерян. Для обнаружения проблем, связанных с периодом ожидания, проверяйте пинг с большим временным интервалом. ping -w 10000. Обычно это помогает при работе с сотовыми, спутниковыми или другими сетями с высокими периодами ожидания.
- -n Только числовой вывод. Используйте для того, чтобы не контактировать с DNS.
- -p Pattern. Набор (Pattern) — это строка из шестнадцатеричных цифр, которыми оканчивается пакет. Эта опция вряд ли будет полезной в случае проблем, которые зависят от данных.
- -R Использовать опцию Маршрут данных IP для определения маршрута, по которому идут пакеты. Целевой узел может и не давать требуемую информацию.
- -r Обход маршрутных таблиц. Используйте эту опцию, когда вы подозреваете наличие проблем маршрутизации, и пинг не может найти маршрут к целевому узлу. Команда работает только для узлов, с которыми можно непосредственно связаться без использования маршрутизаторов.
- -s Размер пакета. Изменить размер пакета. Большие пакеты должны фрагментироваться.
- -V Подробный результат. Отображать дополнительные ICMP-пакеты, которые дают весьма подробную информацию.
- -f Лавинная рассылка. Отправлять пакеты максимально быстро. Используется для стресс-теста производительности сети, вам не следует использовать эту опцию без надобности.
- -l Предварительная загрузка. Отправлять предварительно загруженные пакеты максимально быстро, а затем перейти в нормальный режим функционирования. Подойдет для определения количества пакетов, которые может быстро обрабатывать ваш маршрутизатор, что, в свою очередь, неплохо для диагностики проблем, возникающих только с большими размерами окон TCP.
- -? Помощь. Используйте эту опцию для того, чтобы увидеть полный список опций команды Ping, а также правильный синтаксис.
- Когда вам понадобится пинг? Как и в случае других диагностических программ, лучшее всего использовать его в рабочей конфигурации для того, чтобы понять, как он должен работать. Вы сможете проверить пинг вашего ПК, если введете «ping -c5 127.0.0.1» . Используйте пинг для проверки вашего оборудования и конфигурации, когда вы в первый раз настраиваете ваш ПК, меняете сеть, или если интернет-страницы не загружаются.
Реклама
Об этой статье
Эту страницу просматривали 304 243 раза.
Была ли эта статья полезной?
The ping command is a Command Prompt command used to test the ability of the source computer to reach a specified destination computer. It’s a simple way to verify that a computer can communicate with another computer or network device.
How Does the Ping Command Work?
The ping command operates by sending Internet Control Message Protocol (ICMP) Echo Request messages to the destination computer and waiting for a response. The two major pieces of information that the ping command provides are how many of those responses are returned and how long it takes for them to return.
For example, you might find no responses when pinging a network printer, only to find out that the printer is offline and its cable needs replaced. Or maybe you need to ping a router to verify that your computer can connect to it to eliminate it as a possible cause for a networking issue.
The word «ping» is also used online to refer to a brief message, usually over text or email. For example, you can «ping your boss» or send them a message about a project, but the ping command has nothing to do with it.
Ping Command Availability
The ping command is available from the Command Prompt in Windows 11, Windows 10, Windows 8, Windows 7, Windows Vista, and Windows XP operating systems. It’s also available in older versions of Windows like Windows 98 and 95.
This command can also be found in Command Prompt in the Advanced Startup Options and System Recovery Options repair/recovery menus.
Ping Command Syntax
ping [-t] [-a] [-n count] [-l size] [-f] [-i TTL] [-v TOS] [-r count] [-s count] [-w timeout] [-R] [-S srcaddr] [-p] [-4] [-6] target [/?]
The availability of certain ping command switches and other ping command syntax might differ from operating system to operating system.
How to Read Command Syntax
| Ping Command Options | |
|---|---|
| Item | Explanation |
| -t | Using this option will ping the target until you force it to stop by using Ctrl+C. |
| -a | This ping command option will resolve, if possible, the hostname of an IP address target. |
| -n count | This option sets the number of ICMP Echo Requests to send, from 1 to 4294967295. The ping command will send 4 by default if -n isn’t used. |
| -l size | Use this option to set the size, in bytes, of the echo request packet from 32 to 65,527. The ping command will send a 32-byte echo request if you don’t use the -l option. |
| -f | Use this ping command option to prevent ICMP Echo Requests from being fragmented by routers between you and the target. The -f option is most often used to troubleshoot Path Maximum Transmission Unit (PMTU) issues. |
| -i TTL | This option sets the Time to Live (TTL) value, the maximum of which is 255. |
| -v TOS | This option allows you to set a Type of Service (TOS) value. Beginning in Windows 7, this option no longer functions but still exists for compatibility reasons. |
| -r count | Use this ping command option to specify the number of hops between your computer and the target computer or device that you’d like to be recorded and displayed. The maximum value for count is 9, so use the tracert command instead if you’re interested in viewing all the hops between two devices. |
| -s count | Use this option to report the time, in Internet Timestamp format, that each echo request is received and echo reply is sent. The maximum value for count is 4, meaning that only the first four hops can be time stamped. |
| -w timeout | Specifying a timeout value when executing the ping command adjusts the amount of time, in milliseconds, that ping waits for each reply. If you don’t use the -w option, the default timeout value of 4000 is used, which is 4 seconds. |
| -R | This option tells the ping command to trace the round trip path. |
| -S srcaddr | Use this option to specify the source address. |
| -p | Use this switch to ping a Hyper-V Network Virtualization provider address. |
| -4 | This forces the ping command to use IPv4 only but is only necessary if target is a hostname and not an IP address. |
| -6 | This forces the ping command to use IPv6 only but as with the -4 option, is only necessary when pinging a hostname. |
| target | This is the destination you wish to ping, either an IP address or a hostname. |
| /? | Use the help switch with the ping command to show detailed help about the command’s several options. |
The -f, -v, -r, -s, -j, and -k options work when pinging IPv4 addresses only. The -R and -S options only work with IPv6.
Other less commonly used switches for the ping command exist including [-j host-list], [-k host-list], and [-c compartment]. Execute ping /? from the Command Prompt for more information on these options.
21 Best Command Prompt Tricks
Ping Command Examples
Below are several examples of commands that use ping.
Ping Google.com
ping -n 5 -l 1500 www.google.com
In this example, the ping command is used to ping the hostname www.google.com. The -n option tells the ping command to send 5 ICMP Echo Requests instead of the default of 4, and the -l option sets the packet size for each request to 1500 bytes instead of the default of 32 bytes.
The result displayed in the Command Prompt window will look something like this:
Reply from 172.217.1.142: bytes=1500 time=30ms TTL=54Reply from 172.217.1.142: bytes=1500 time=30ms TTL=54Reply from 172.217.1.142: bytes=1500 time=29ms TTL=54Reply from 172.217.1.142: bytes=1500 time=30ms TTL=54Reply from 172.217.1.142: bytes=1500 time=31ms TTL=54Ping statistics for 172.217.1.142:Packets: Sent = 5, Received = 5, Lost = 0 (0% loss),Approximate round trip times in milli-seconds:Minimum = 29ms, Maximum = 31ms, Average = 30ms
The 0% loss reported under Ping statistics for 74.217.1.142 explains that each ICMP Echo Request message sent to www.google.com was returned. This means that, as far as this network connection goes, it can communicate with Google’s website just fine.
Ping localhost
ping 127.0.0.1
In the above example, we’re pinging 127.0.0.1, also called the IPv4 localhost IP address or IPv4 loopback IP address, without options.
Using the ping command with this address is an excellent way to test that Windows’ network features are working properly but it says nothing about your own network hardware or your connection to any other computer or device. The IPv6 version of this test would be ping ::1.
Find Hostname With Ping
ping -a 192.168.1.22
In this example, we’re asking the ping command to find the hostname assigned to the 192.168.1.22 IP address, but to otherwise ping it as normal.
The command might resolve the IP address, 192.168.1.22, as the hostname J3RTY22, for example, and then execute the remainder of the ping with default settings.
Ping Router Command
ping 192.168.2.1
Similar to the ping command examples above, this one is used to see if your computer can reach your router. The only difference here is that instead of using a ping command switch or pinging the localhost, we’re checking the connection between the computer and the router (192.168.2.1 in this case).
If you’re having trouble logging in to your router or accessing the internet at all, see if your router is accessible with this ping command, of course, replacing 192.168.2.1 with your router’s IP address.
Ping With IPv6
ping -t -6 SERVER
In this example, we force the ping command to use IPv6 with the -6 option and continue to ping SERVER indefinitely with the -t option. You can interrupt the ping manually with Ctrl+C.
The number after the % in the replies generated in this ping command example is the IPv6 Zone ID, which most often indicates the network interface used. You can generate a table of Zone IDs matched with your network interface names by executing netsh interface ipv6 show interface. The IPv6 Zone ID is the number in the Idx column.
Ping Related Commands
The ping command is often used with other networking related Command Prompt commands like tracert, ipconfig, netstat, and nslookup.
Other Ping Uses
Given the results you see above, it’s clear that you can also use the ping command to find a website’s IP address. Follow that link to learn more about how to do that.
You can also use ping on a Linux computer, and third-party ping tools exist as well which offer more features than the basic ping command.
FAQ
-
Open the command prompt and enter ping followed by the IP address of the DNS server (for example, ping 192.168.2.1).
-
To ping a port, use the telnet command. In the command prompt, enter telnet followed by the IP address (or the domain name) and the port number (for example, telnet 192.168.2.1 10).
Thanks for letting us know!
Get the Latest Tech News Delivered Every Day
Subscribe
Ping is a command line networking utility that uses ICMP packets to check if a logical route is available to communicate with a specific host. A failure of the ping command doesn’t necessarily mean that the host is down. There are many other possible reasons for the failure. Along with the primary purpose of ping, this command can also provide insights about some of the useful networking parameters, such as Round Trip Time (RTT). Ping is available by default in all three operating systems. So, usually, you don’t need any prerequisites for executing this command.
The term ‘ping‘, in computer terms, refers to sending a message to a host to check if the host is up (alive and running) or down (dead). For simplification, think of ping as a message that contains the question ‘Hey, are you there?’. This might sound simple, but it is one of the handy commands still used by network engineers to troubleshoot various network issues. In this article, we will learn how to ping a host using its IP address, from the top 3 operating systems — Windows, Mac OS, and Linux.
Syntax of ‘ping’ command
The syntax of ‘ping’ command is OS-independent, which means, you can use the same syntax in different operating systems. However, certain options might change.
ping <IP_address/Host_name/Domain_name of host machine>
hostname
You can provide any one of the following to identify the host:-
- IP address of host machine
- The hostname of the machine
- Domain name of the host (could be a web server in this case)
Options available with ping
I have provided the frequently used options of the ping command in the table below:-
|
Option |
Description |
|---|---|
|
-v (only in Linux or MacOS) |
Provides verbal support to the user while executing the command. |
|
-t (only in Windows) |
Continuously send packets till a kill signal is received through keyboard interrupt. |
|
-c (in Linux or MacOS) -n (in Windows) |
To specify the number of packets to be sent. |
|
-W (in Linux or MacOS) -w (in Windows) |
Sets waiting time while receiving packets (in seconds). |
|
-4 |
Forces ping to use IPv4 addresses only. |
|
-6 |
Forces ping to use IPv6 only. |
|
-t (in Linux or MacOS) -i (in Windows) |
To specify TTL(Time To Live) for the IP packets. |
|
-h (only in Linux or MacOS) |
To get help regarding the usage of the command. |
|
-s (in Linux or MacOS) -l (in Windows) |
To specify the size of ping packet to be sent. |
Note: For the options that work only in a specific OS, the details are provided within curved brackets. If no specification is provided, then the option remains the same in all three operating systems.
Ping in windows
1. Opening the command prompt
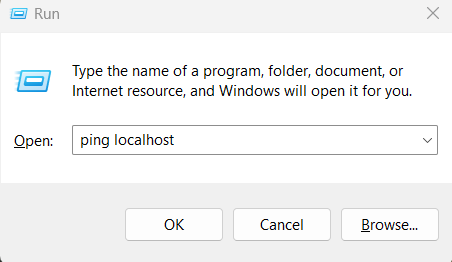
To ping an IP address in windows OS, first you need to open the command prompt. You can do this by opening the ‘run’ dialog box first, by pressing the shortcut key ‘windows_key + r’.
This will open the ‘run’ dialog box.
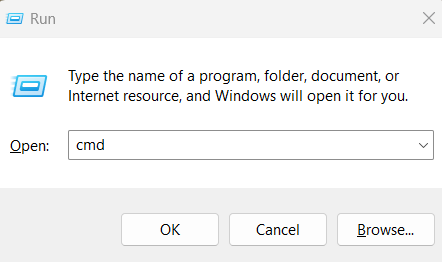
Now, type ‘cmd’ in the ‘run’ dialog box and hit the ‘enter’ key.
This will open the command prompt.
2. Viewing the options for ping
Lets explore various options to be used with ping command in windows simply typing the name of the command ‘ping’ in the terminal and pressing ‘enter’.
ping
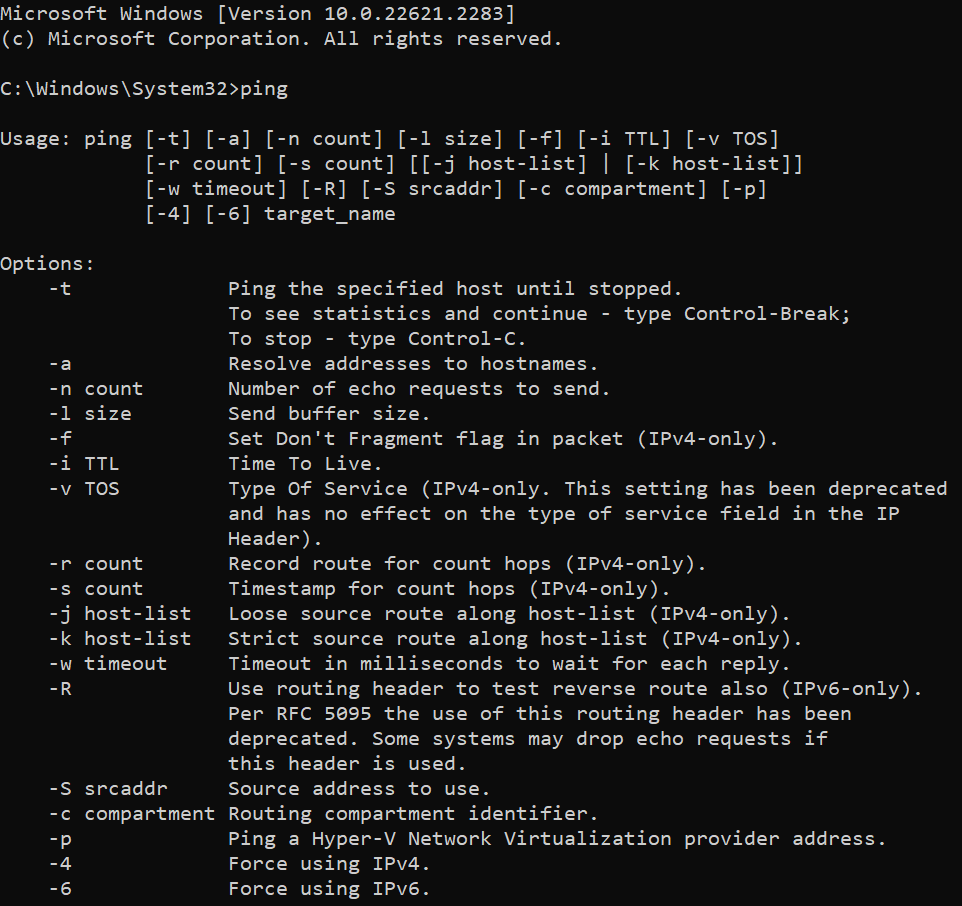
As you can see in the above screenshot, there are number of options available to use with the ping command.
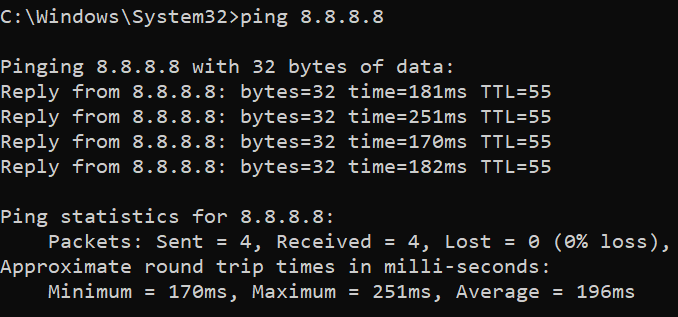
3. Executing ping
Let us test the ping command by pinging the google DNS server which has the IP address ‘8.8.8.8’.
ping 8.8.8.8
Ping in Linux
1. Opening the terminal
In Linux, all command line utilities are available in the terminal. To open terminal in Linux, use the shortcut key ‘ctrl+alt+t’.
2. Seeking help for ping
Before using a command, it is always advised to study about it first. Luckily, for Linux users, we have manuals for every standard commands in the name of man pages. To view the manual of ‘ping’ command, enter the following in the terminal.
man ping
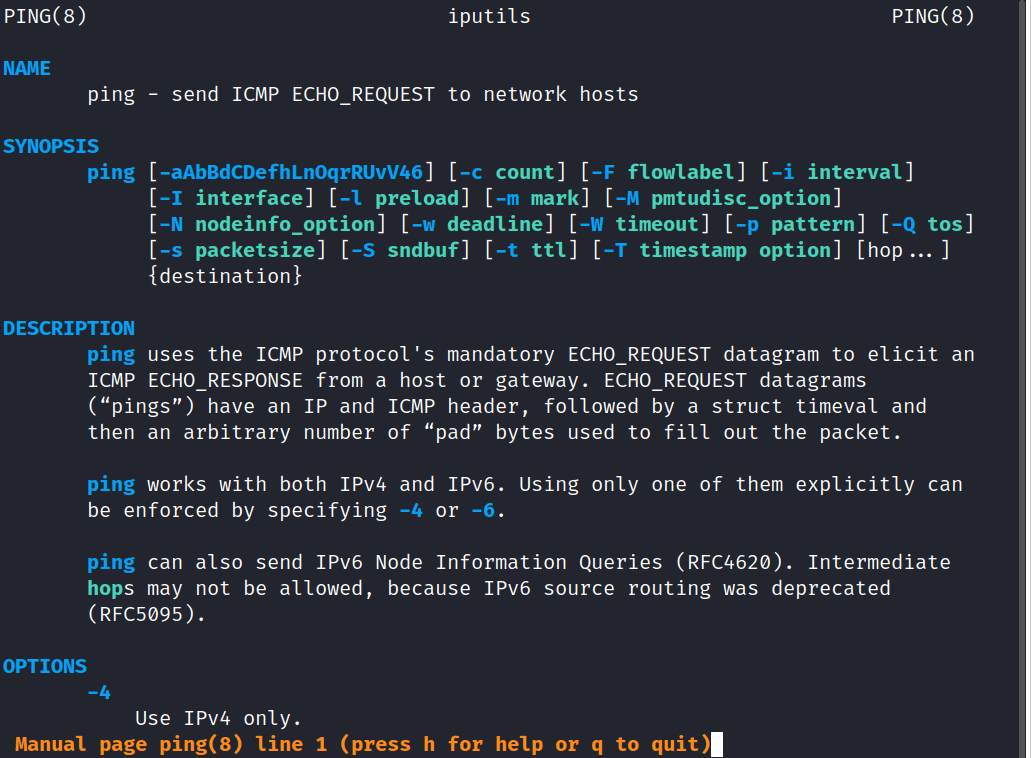
The man page provides a tons of information about the ‘ping’ command which includes the following:-
- Synopsis (syntax) of the command
- A brief description
- Options available to use
- Details of mentioning the interfaces while using IPv6 addresses with link-local scope
- ICMP packet details
- How ‘ping’ handles duplicate and damaged packets
- Experimenting with different data patterns
- TTL details
- Bugs of the current version
- History of ‘ping’
- Security details and
- Parent package of ping — iputils
3. Executing ping
Lets ping the web server in which the website with the domain name ‘practice.geeksforgeeks’ is hosted. In this example, instead of relying on the default count value, we we are going to specify the count of packets to be sent, by ourselves. This can be easily done using the ‘-c’ option in Linux.
ping -c 3 practice.geeksforgeeks.org
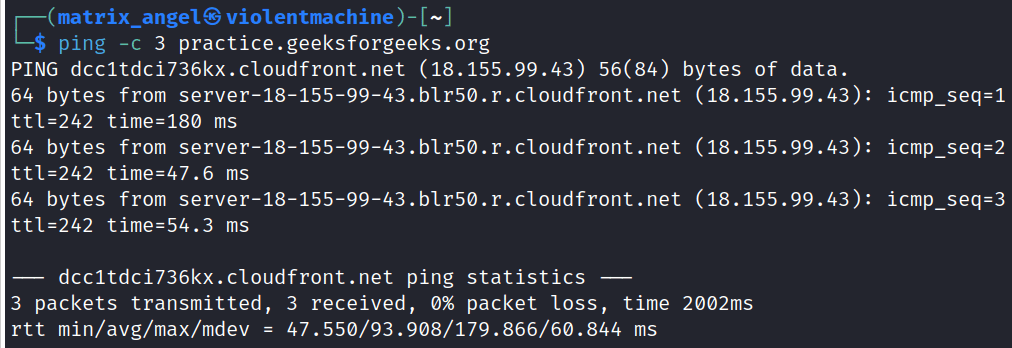
This command will send only 3 ICMP packets to the target host. We could specify any integer value as the count.
Note: You need to use a different option ‘-n’, instead of ‘-c’ to specify the count in Windows operating system.
Ping in Mac OS
Using the ‘ping’ command is very similar to using ‘ping’ in Linux as both the operating system uses the same shell — ‘zsh’. Some Linux distros may use the bash shell. However they only have minor changes between them.
1. Opening the terminal
To open the terminal in Mac OS, type ‘terminal’ in the search box at the top of the desktop.

Now, click on the terminal icon to open a new terminal.
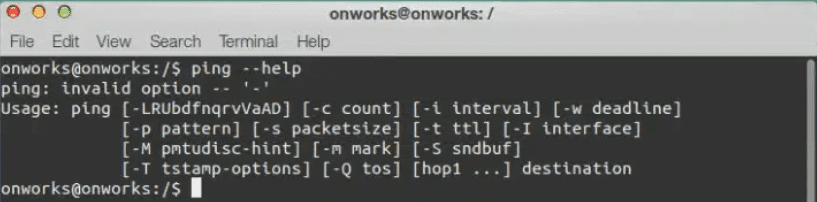
2. Finding help
Just like Linux, you can use the ‘man’ command to check out the manual pages of ‘ping’ command in Mac OS. In case, man pages are not found in your Mac terminal, don’t panic. You have another simple way to find help — The good old ‘—help‘ option.
ping --help
3. Executing ping
Executing the command is just the same executing it in Linux. Let’s specify the count using ‘-c’ option and ping the same domain name — ‘practice.geeksforgeeks.org’.
ping -c 3 practice.geeksforgeeks.org
.png)
The statistics of the ‘ping’ command will get printed on the terminal once the process has been completed. You can also interrupt the ping process and force it to terminate using the shortcut key ‘command + c‘.

Details covered by ping statistics
- Number of packets transmitted.
- Number of packets received from the target host as a response.
- Percentage of lost packets (packets that are not received).
- RTT (Round Trip Time) — Minimum RTT, Maximum RTT, Average RTT and Population standard deviation (how far RTT of each packet deviates from the average RTT).
Q3. What are the common reasons behind the failure of ping command?
Answer:
Ping command fails mainly due to two major reasons that are listed below:-
- Your machine doesn’t have a route to reach the target machine. In this case, you need to check the connection between your machine and the target.
- The target machine may be configured in such a way that it doesn’t respond to any ping requests or responds to requests only when it comes from certain pre determined hosts. This configuration is usually set for security reasons.
Q4. How do I check connectivity using Ping command, when rate of data transfer is low?
Answer:
If you have a poor network connection, packets may get lost even if you are connected to a host. This is because the default waiting time is usually 1 second. If you suspect your connectivity to be slow, you can increase the wait time to more than a second, say 10 seconds.
Example:-
ping -w 10 geeksforgeeks.org
The above example works only in Linux and MacOS. You need to use -W option in windows.
Q5. What is the size of a ping packet?
Answer:
The default size of ping packet is given below:-
- In Windows — 32 bytes.
- In Linux / MacOS — 64 bytes.
This default size can be changed using the ‘-l’ option in windows and ‘-s’ option in Linux or MacOS.
Conclusion
That is it, friends. I hope that one can get started with the ping command in all three major operating systems — Windows, Mac OS, and Linux after completely reading this article. Please note that this article helps you only to get started with the command. Feel free to explore the links of other Geeks for Geeks articles that I have provided along to way to gain in-depth knowledge about the command.
To ping an IP address or domain in the command prompt (cmd), use the `ping` command followed by the target address to check connectivity.
ping example.com
What is the Ping Command?
The ping command is a utility used to test the reachability of a host on an internet protocol (IP) network. It works by sending ICMP Echo Request packets to the target IP address or hostname and waits for ICMP Echo Reply packets. This process allows users to determine whether a particular IP address is accessible and, if so, to measure the round-trip time for messages sent between the originating host and a destination.
The ping command is commonly used for various purposes, including:
- Testing network connectivity: Verify whether your computer can communicate with another device on the network.
- Diagnosing latency: Measure the time it takes for packets to travel to the destination and back, giving an idea about network responsiveness.
- Troubleshooting network issues: Identify potential bottlenecks or unstability in a network connection.

How to Ping on Cmd: A Quick Guide to Testing Connections
Accessing CMD
Before you can use the ping command, you need to open the Command Prompt (CMD) on your Windows operating system. There are several straightforward ways to do this:
- Using the search bar: Click on the search icon in the taskbar, type «cmd» or «Command Prompt,» and select the application from the results.
- Accessing through the Run dialog: Press Win + R keys simultaneously, type `cmd`, and hit Enter.
- Keyboard shortcuts: You can also use Win + X and select «Windows Terminal» or «Command Prompt» from the menu.
Now you’re ready to start using the ping command!

How to Ping Cmd Like a Pro in Just Minutes
Basic Syntax of the Ping Command
The basic syntax for the ping command is simple:
ping [hostname or IP address]
To see the command in action, let’s look at a basic example:
ping google.com
When you run this command, your computer sends a series of packets to Google’s server. You can expect output that includes replies from the server, the number of bytes returned, the time taken for each round trip, and the TTL (Time to Live) value for the packet.

How to Run Commands in Cmd: A Quick Guide
Understanding the Ping Output
When you execute a ping command, the output gives crucial information about the network connection. Below is an example output:
Pinging google.com [172.217.10.14] with 32 bytes of data:
Reply from 172.217.10.14: bytes=32 time=14ms TTL=54
Reply from 172.217.10.14: bytes=32 time=13ms TTL=54
Reply from 172.217.10.14: bytes=32 time=14ms TTL=54
Reply from 172.217.10.14: bytes=32 time=15ms TTL=54

Ping statistics for 172.217.10.14:
    Packets: Sent = 4, Received = 4, Lost = 0 (0% loss),
Approximate round trip times in milli-seconds:
    Minimum = 13ms, Maximum = 15ms, Average = 14ms
Several key components make up the output:
- Bytes: This indicates the size of the packets sent; in this example, 32 bytes were sent each time.
- Time: Represents the round-trip time for the packet. For instance, a time of 14ms indicates that it took 14 milliseconds for the packet to travel to the destination and back.
- TTL (Time to Live): Indicates how many hops (routers) the packet passes through in the network. A value of 54 means the packet passed through 54 potential nodes before reaching its destination.
This feedback helps users gauge both connectivity and network performance.

How to List Files in Cmd Like a Pro
Extended Ping Options
The ping command is versatile and includes additional options that can enhance its functionality. Here are some commonly used options:
-
`-t`: This option makes the ping command continue pinging the specified host until it’s manually stopped (usually with Ctrl + C).
Example:ping -t google.com -
`-a`: This option resolves IP addresses to their corresponding hostnames.
Example:ping -a 8.8.8.8 -
`-n Count`: Specifies the number of Echo Request packets to send.
Example:ping -n 5 google.com -
`-l Size`: Allows you to define the size of the packets sent. By default, it’s typically set to 32 bytes.
Example:ping -l 128 google.com
Understanding and utilizing these options can significantly enhance your ability to diagnose and monitor network issues.

How to Ping IP in Cmd: A Quick Start Guide
Troubleshooting with the Ping Command
The ping command can help diagnose several issues you might encounter:
-
Request Timed Out: If you receive a response of «Request timed out,» it indicates that no reply was received from the host within the allotted time. This can mean that the host is down, there are firewall rules blocking the response, or there’s a routing issue.
-
Unknown Host: If you see «Ping request could not find host,» the hostname may be incorrect, or DNS resolution is failing. Double-check the address you’ve entered.
Interpreting these messages provides valuable insights into potential problems in the network connection.

How to Paste in Cmd: A Quick Guide to Clipboard Magic
Using Ping for Network Performance Testing
The ping command isn’t just for establishing if devices can communicate with each other; it is also a vital tool for assessing network performance. By consistently measuring the round-trip times for packets sent to different locations, you can identify how the performance of your network appears over various times.
For example, you could ping multiple servers across different geographical locations to determine which provides the best connectivity or has the lowest latency. By applying the `-t` option, you can leave the command running for an extended period to collect average ping data under various conditions.

How to Use Ping in Cmd for Quick Network Checks
Best Practices When Using the Ping Command
While using the ping command, here are some recommended best practices to keep in mind:
-
Avoid overusing the ping command: Flooding the network with an excessive number of pings can lead to unnecessary congestion and impact performance negatively.
-
Use timed intervals: When checking a connection over time, it’s better to implement a timed interval between repetitions, which can help prevent being perceived as a network threat.
-
Keep records: Documenting your ping results can be beneficial for diagnosing recurring issues or variations in performance over time.

How to Copy on Cmd: A Quick Guide
Conclusion
The ping command is an invaluable tool within the Command Prompt, primarily aimed at helping users understand and troubleshoot network connectivity issues. By mastering how to ping in CMD and exploring its various options, you can greatly enhance your ability to diagnose and improve your network performance. Don’t hesitate to try pinging different servers, experiment with the options available, and become more familiar with how this command works!
Feel free to share your questions or experiences with the ping command in the comments below, and let’s help each other navigate the world of CMD and networking!

How to Run a Cmd Command: A Quick Guide
Additional Resources
For those looking to dive deeper into CMD commands and networking, consider checking out additional reading materials or resources like Microsoft’s official documentation.
Ping – утилита командной строки, которая нужна для проверки подключения к другому компьютеру на уровне IP. Принцип работы очень простой: команда ping ip отправляет серию небольших пакетов данных на указанное устройство, а затем показывает время ответа.
Ping – основная команда TCP/IP, которая используется для устранения неполадок подключения, доступности и разрешения имени. Она также позволяет узнать имя и IP-адрес компьютера.
Синтаксис команды ping
Команда ping в Windows имеет следующие параметры, которые позволяют решать разные задачи:
ping [/t] [/a] [/n <count>] [/l <size>] [/f] [/I <TTL>] [/v <TOS>] [/r <count>] [/s <count>] [{/j <hostlist> | /k <hostlist>}] [/w <timeout>] [/R] [/S <Srcaddr>] [/4] [/6] <targetname>
Чтобы посмотреть в командной строке (cmd) ping-команды, вызовите справку:
ping /?

На Linux параметры команды отличаются. Чтобы посмотреть доступные опции, выполните в терминале команду:
ping -help

Суть команды ping проста, но примеров ее использования очень много. Давайте посмотрим, что можно делать с ее помощью.
Комьюнити теперь в Телеграм
Подпишитесь и будьте в курсе последних IT-новостей
Подписаться
Простая проверка доступности
Это то, что делали многие пользователи, – пинговали популярные ресурсы, чтобы убедиться, что интернет на их компьютере работает. Эта же команда используется для проверки доступности.
Пример запроса:
ping google.com // вместо домена можно указать IP-адрес
Windows отправит только 4 запроса, после чего выдаст статистику для указанного адреса. Можно убрать это ограничение, указав параметр -t.
Чтобы прервать отправку и получить статистику, нажимаем сочетание клавиш Ctrl+C.

По умолчанию команда ping IP-адреса на Linux посылает пакеты, пока вы не прервете их отправку вручную с помощью сочетания клавиш Ctrl+C. Чтобы ограничить количество, укажем нужное число. Например:
ping -c 3 google.com // будет отправлено 3 пакета
Изменение интервала между отправкой пакетов
По умолчанию пакеты отправляются с интервалом в одну секунду. Но можно установить другое время.
ping -i 5 IP-адрес // 5 секунд между отправкой пакетов

ping -i 0.2 IP-адрес // 2 миллисекунды между отправкой пакетов
Для установки значений меньше 0.2 секунды требуются права суперпользователя (sudo).
Массовая отправка пакетов для нагрузочного тестирования
Эта возможность также доступна только суперпользователям:
ping -f IP-адрес // за секунду будут отправлены сотни тысяч запросов
Изменение размера пакета
По умолчанию размер пакета – 32 байта. Можно установить другой размер:
$ ping -s 100 IP-адрес // значения указываются в байтах
Включение звукового сигнала
Если ответа от хоста нет, отправляем эту команду:
Затем начинаем искать причину сбоя. После ее устранения воспроизведется звуковой сигнал. Он говорит о том, что хост теперь отвечает.
Вывод статистики ping
Чтобы не засорять терминал лишней информацией, пропустим ответы хоста и сразу получим статистику:
А можно, наоборот, получать статистику выполнения без прерывания команды. Для этого нужно нажать сочетание клавиш CTRL + |.