
Download Article
A step-by-step guide to get your PC into safe mode
Download Article
- From Windows Settings (Windows 10 & 11)
- From the Login Screen (Windows 11, 10, &

- From a Blank Screen (Windows 11 & 10)
- From the Charm Bar (Windows
- Using a Startup Key (Windows 7)
- Always Boot Into Safe Mode
- Video
- Q&A
|

|
|
|
|
|
|
Windows Safe Mode is an excellent tool for troubleshooting, as it prevents startup programs from running and loads only the bare minimum software and drivers. Whether you want to boot in Safe Mode to scan for and remove malware, uninstall problematic apps, or troubleshoot other software problems, this wikiHow guide will teach you all the ways you can start any version of Windows in Safe Mode.
Quick Steps
- Press the Windows key and click Settings.
- Click Update & Security (Windows 10) or System (Windows 11).
- Click Restart Now.
- Go to Troubleshoot > Advanced options > Startup Settings.
- Click Restart.
- Select 4 to boot in Safe Mode, or 5 for Safe Mode with Networking.
-

To do this, press the Windows key on your keyboard (or click the Start menu), then click Settings.
- You can also open Settings by pressing Windows key + i at the same time.
- If you use BitLocker, consider disabling it before booting into Safe Mode. If you do not suspend BitLocker protection, then you will be asked for your recovery key to continue booting into Safe Mode.[1]
-
Advertisement
-
You’ll see this option under «Advanced startup.» Your Windows PC will now reboot to a blue screen.
-
Additional options will appear.
-
This opens several options for booting and repairing Windows.
-
It’s the option with a gear icon.
-
Windows will now reboot to a list of Safe Mode options.
-
If you want to use Safe Mode without an internet connection, select 4 or press the F4 key on your keyboard. If you need internet access in Safe Mode, select 5 or press F5 to start Safe Mode with Networking.[2]
- To exit Safe Mode, restart your computer normally.


Advertisement
-
If you want to boot into Safe Mode without logging in to Windows first, you can do so from the login screen. If your computer is frozen, press and hold the power button to reboot it to the login screen.
- Note that if you use BitLocker, you will be prompted for your recovery key to restart into Safe Mode.[3]
- Note that if you use BitLocker, you will be prompted for your recovery key to restart into Safe Mode.[3]
-
This icon, which is in the bottom-right corner of the screen, looks like a circle with a line through its top.
-
This will restart your computer and open the Advanced Options page.
- You may need to click Restart anyway after clicking Restart. If so, keep holding ⇧ Shift while you do.
-
It should be the middle option on the Advanced Options page, which is a light-blue screen with white text.[4]
-
It’s the bottom option on this page.[5]
-
This option is on the right side of the page, just below the Command Prompt option.[6]
-
It’s in the bottom-right corner of the screen. Clicking it will restart your computer to the Startup Settings menu.[7]
-
If you want to use Safe Mode without an internet connection, select 4 or press the F4 key on your keyboard. If you need internet access in Safe Mode, select 5 or press F5 to start Safe Mode with Networking.[8]
- To exit Safe Mode, restart your computer normally.


Advertisement
-
-
Pressing this again will prompt your computer to turn on.
-
You can prompt your computer to turn off as soon as you see the startup logo.
-
This will turn your computer back on.
-
You can prompt your computer to turn off as soon as you see the startup logo.
-
This will turn your computer back on in winRE (Windows Recovery Environment).
-
The Troubleshoot tile is the last option in the list next to an icon of some tools. Once you click that, you’ll need to click Advanced Options to see more.[10]
-
Your computer will restart and show you a blue screen with more options.
- If you use BitLocker, you will be prompted for your recovery key to restart into Safe Mode.[11]
- If you use BitLocker, you will be prompted for your recovery key to restart into Safe Mode.[11]
-
If you want to use Safe Mode without an internet connection, select 4 or press the F4 key on your keyboard. If you need internet access in Safe Mode, select 5 or press F5 to start Safe Mode with Networking.[12]
- To exit Safe Mode, restart your computer normally.


Advertisement
-
To do this, press Windows key + i, or swipe your mouse across the right side of your desktop.
-
This opens the Power menu.
-
This reboots your PC into the Advanced Boot Options menu.
-
Additional options will appear.
-
This opens several options for booting and repairing Windows.
-
It’s the option with a gear icon.
-
Windows will now reboot to a list of Safe Mode options.
-
If you want to use Safe Mode without an internet connection, select 4 or press the F4 key on your keyboard. If you need internet access in Safe Mode, select 5 or press F5 to start Safe Mode with Networking.[13]
- To exit Safe Mode, restart your computer normally.


Advertisement
-
It’s in the top row of keys on your computer’s keyboard. To access the Safe Mode option in Windows 7, you’ll have to press F8 while restarting your computer.
-
Do so by pressing your computer’s power button. If your computer is already on but malfunctioning, first press and hold the power button to turn it off, then press it again to turn it back on.
- You can also restart your computer by clicking the Windows logo in the bottom-left corner of the screen, clicking the power icon, and clicking Restart.
-
Do so immediately after your computer begins to turn on. This action will launch the boot menu, which is a black screen with white text.[14]
- The goal here is to press F8 before you see the «Starting Windows» screen.
- If nothing happens while pressing F8, you may need to hold the Fn key while pressing F8.
-
This key should be on the right side of your keyboard. When «Safe Mode» has a white bar over it, you’ve successfully selected it.[15]
-
Doing so will both select Safe Mode as your restart option and continue the start-up process.[16]
-
Once it finishes restarting, your computer will be in Safe Mode.
- To exit Safe Mode, restart your computer normally.


Advertisement
-
If you want to make your computer boot into Safe Mode automatically each time you restart, you can do so using this tool. To open it:
- Press the Windows key.
- Type msconfig and press Enter.
-
You’ll see it at the top of the window.
-
This is under «Boot options» in the bottom-left corner.
-
This saves your changes and reboots your Windows PC into Safe Mode.
- When you’re ready for your computer to boot normally again, just return to the System Configuration panel, remove the checkmark from «Safe boot,» and restart your PC.


Advertisement
Add New Question
-
Question
My PC audio didn’t work after I did safe mode. Why?
In safe mode, Windows will only boot with core drivers. Your audio may have not booted up in safe mode.
-
Question
What is safe mode and how does it work?
Safe mode is a stripped down version of Windows. Most people use it to remove viruses. For example, if a virus locked your computer, you could start it up in safe mode to safely remove the virus.
-
Question
What should I do if my hard drive is corrupted and cannot open even in safe mode?
You need to use a bootable disk or storage stick with emergency startup and repair software.
See more answers
Ask a Question
200 characters left
Include your email address to get a message when this question is answered.
Submit
Advertisement
Video
Thanks for submitting a tip for review!
References
About This Article
Article SummaryX
1. Restart the computer.
2. Click the power icon.
3. Hold the Shift key as you click Restart.
4. Click Troubleshoot.
5. Click Advanced options.
6. Click Startup settings.
7. Click Restart.
8. Press the 4 key.
Did this summary help you?
Thanks to all authors for creating a page that has been read 1,656,389 times.
Reader Success Stories
-
Rahat Yusufi
Jul 22, 2016
«I know about the tapping F8 and all the options appearing. My machine is facing the start-up problem. Unless it is…» more
Is this article up to date?
Applies ToWindows 11 Windows 10
Support for Windows 10 will end in October 2025
After October 14, 2025, Microsoft will no longer provide free software updates from Windows Update, technical assistance, or security fixes for Windows 10. Your PC will still work, but we recommend moving to Windows 11.
Learn more
You might need to change Windows startup settings to troubleshoot issues, optimize startup processes, or alter the system’s boot behavior for specific tasks.
For example, a common troubleshooting option is to enable Safe Mode, which starts Windows in a limited state, where only the bare essentials services and drivers are started. If a problem doesn’t reappear when you start in safe mode, you can eliminate the default settings, basic device drivers, and services as possible causes.
Other startup settings include advanced features intended for use by system administrators and IT professionals.
This article describes how to modify the Windows startup behavior, and the available options.
Change startup settings
Note: If you’ve encrypted your device, you’ll need your BitLocker key to complete this task. If you don’t know your BitLocker key, see Find your BitLocker recovery key.
-
Access the Windows Recovery Environment
-
Once in Windows RE, select Troubleshoot > Advanced options > Startup Settings > Restart
-
Select Restart
-
Once the device reboots, in the Startup Settings screen pick one of the available options, or press Enter to boot Windows normally
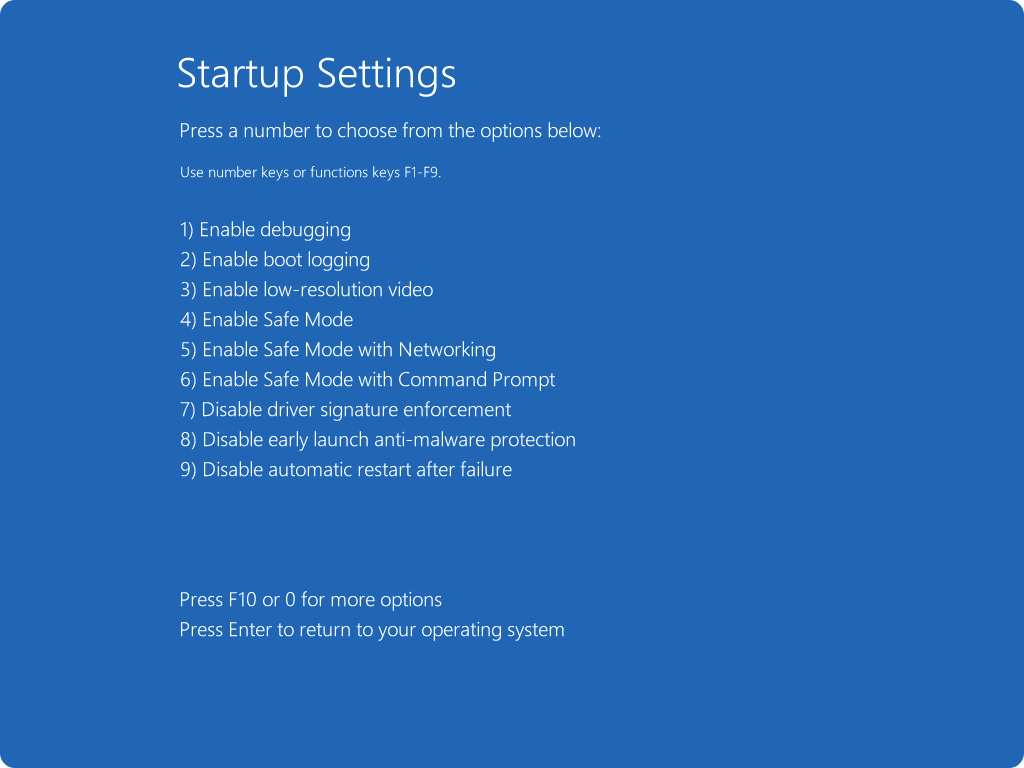
Startup settings list
Here’s a list of startup settings that you can choose from. To select one, use the number keys or function keys F1-F9:
-
Enable debugging. Starts Windows in an advanced troubleshooting mode intended for IT professionals and system administrators
-
Enable boot logging. Creates a file, ntbtlog.txt, that lists all the drivers that are installed during startup and that might be useful for advanced troubleshooting
-
Enable low-resolution video. Starts Windows using your current video driver and using low resolution and refresh rate settings. You can use this mode to reset your display settings
-
Enable Safe Mode. Safe mode starts Windows in a basic state, using a limited set of files and drivers. If a problem doesn’t happen in safe mode, this means that default settings and basic device drivers aren’t causing the issue. Observing Windows in safe mode enables you to narrow down the source of a problem and can help you troubleshoot problems on your device
-
Safe Mode with Networking. Safe Mode with Networking adds the network drivers and services you’ll need to access the internet and other computers on your network
-
Safe Mode with Command Prompt. Starts Windows in safe mode with a command prompt window instead of the usual Windows interface
-
Disable Driver Signature Enforcement. Allows drivers containing improper signatures to be installed
-
Disable early launch anti-malware protection
. Early launch anti-malware protection (ELAM) is a security feature in Windows that allows anti-malware software to start before all other third-party components during the boot process. ELAM ensures that the system does not initialize unknown boot drivers that could be malicious. Select this option to temporarily disable ELAM -
Disable automatic restart on system failure. Prevents Windows from automatically restarting if an error causes Windows to fail. Choose this option only if Windows is stuck in a loop where Windows fails, attempts to restart, and fails again repeatedly
You can press Enter to start Windows normally.
What if Windows keeps booting in Safe Mode?
Restarting your device should be sufficient to exit from Safe Mode back into normal mode. However, if for some reason your device is still booting into Safe Mode, try this:
-
Press the Windows key + R
-
In the Open box, type msconfig and then select OK
-
Select the Boot tab
-
Under Boot options, clear the Safe boot checkbox
Need more help?
Want more options?
Explore subscription benefits, browse training courses, learn how to secure your device, and more.
Safe Mode is a diagnostic startup mode in Windows. It loads only the essential drivers and services your computer needs, creating a minimal environment that allows you to troubleshoot and fix problems like software conflicts, faulty drivers, boot-related issues, and malware infections.
Safe Mode comes in handy when dealing with system crashes, the blue screen of death (BSOD), or malware removal. If that sounds like what you’re facing, keep reading — we’ll provide an overview of multiple ways to boot into Safe Mode, as well as precautions, uses, and common troubleshooting methods to help you get your system up and running again.
If you’re concerned about data loss or your troubleshooting attempts aren’t successful, contact the pros at Secure Data Recovery for a free assessment and data recovery services.
When to Use Each Safe Mode Option
There are three main Safe Mode options in your computer’s Startup settings:
- Safe Mode loads only essential drivers and services. You can use it to safely troubleshoot things like crashes and slow performance, remove problematic programs, and run scans without interruption from other apps on your computer.
- Safe Mode with Networking enables network connectivity, allowing you to access the internet to download updates or security software. It’s also helpful when using external devices like USB flash drives.
- Safe Mode with Command Prompt launches the Command Prompt, providing a different interface for more advanced troubleshooting.
The method you use to enter Safe Mode depends on what you’re dealing with. For instance, if you can’t access Windows, you might need to use multiple forced shutdowns to enter Safe Mode. But if you can access Windows, you should be able to enable Safe Mode through your system settings.
Once you’re in Safe Mode, you’ll notice some changes to your system’s appearance. The screen resolution will probably be lower than normal, and your desktop background might be a solid color. You’ll also usually see the phrase “Safe Mode” in all four corners of the screen to indicate you’re operating in that environment.
Here’s a quick summary of the main methods you can use to enter Safe Mode.
| Method | When to Use |
|---|---|
| System settings | You have full access to Windows. |
| Sign-in screen | You can view the login screen, but can’t log into your account. |
| Interrupting the boot process | Your computer won’t boot normally. |
| Bootable device | Your computer is experiencing critical issues that prevent it from loading other recovery options. |
Enter Safe Mode Through System Settings
Entering Safe Mode through system settings is the simplest and most basic way to do it. It doesn’t require any specific key combinations — you should be able to get to it as long as you have access to Windows desktop. From there, you can use it to perform software and driver updates and system scans in a simplified environment.
To enter Safe Mode through system settings:
- Open Settings.
- Go to Update & Security.
- Select Recovery.
- Click Restart Now under Advanced startup.

- Choose Troubleshoot > Advanced options > Startup Settings > Restart.
- Select the Safe Mode option you want (4 or F4 for Safe Mode, 5 or F5 for Safe Mode with Networking).
Enter Safe Mode from the Sign-in Screen
If you’re having login issues but can still get to the sign-in screen, you can also enter Safe Mode from there.
- Restart your computer.
- At the sign-in screen, hold the Shift key and click Power > Restart.
- Once your computer restarts to the Choose an Option screen, select Troubleshoot > Advanced Options > Startup Settings > Restart.

- Select the Safe Mode option you want (4 or F4 for Safe Mode, 5 or F5 for Safe Mode with Networking).

Enter Safe Mode by Interrupting the Boot Process
After three failed startup attempts, Windows 10 and 11 automatically take you to the Windows Recovery Environment (WinRE). If Windows can’t start normally, you can access Safe Mode through WinRE.
- Start your computer and wait for the Windows logo to appear. Once you see it, press and hold the power button until your computer shuts down.
- Restart and shut down your computer again.
- Start your device up for a third time to enter WinRE. Select “See advanced repair options.”
- At the Choose an option screen, select Troubleshoot > Advanced Options > Startup Settings > Restart.
- Select the Safe Mode option you want (4 or F4 for Safe Mode, 5 or F5 for Safe Mode with Networking).
Enter Safe Mode from a Bootable Device
If your computer won’t boot normally, you can use Windows installation media, like a bootable USB drive or DVD, to access Safe Mode. This is a helpful option in the event that your system is too damaged to enter Safe Mode through the other methods.
- Boot from the installation media.
- Select your preferred language and click on Repair your computer.
- Click Troubleshoot > Advanced options > Startup Settings.
- Select Restart and choose the Safe Mode option you need from the list.
What to Do Once You Enter Safe Mode
Safe Mode is a great tool for troubleshooting a variety of problems with Windows, like system crashes, sluggish performance, and malware attacks. Understanding what Safe Mode can do makes your troubleshooting efforts much more effective. Here’s an overview of what Safe Mode helps with most (though there’s plenty more you can do with it, depending on your issue).
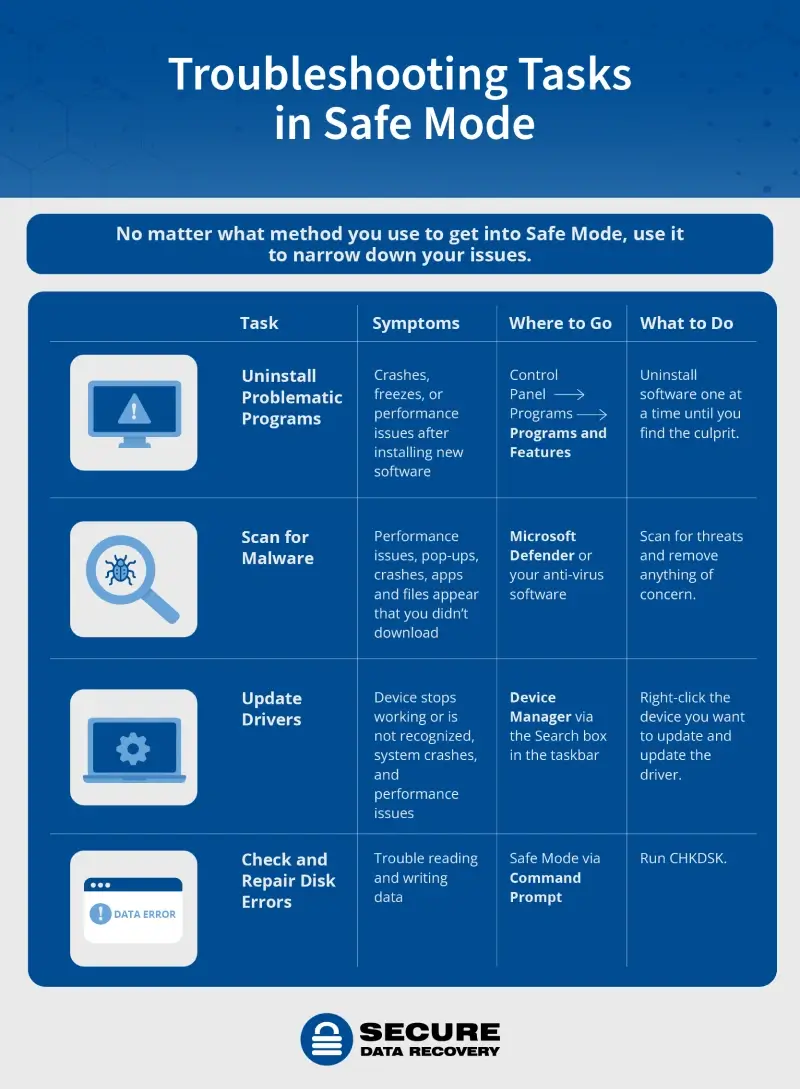
Uninstall Problematic Programs
Whether it’s glitchy or too much for your computer to run, problematic software can cause crashes, freezes, and other performance issues. If you just started experiencing problems with your computer after installing new software or recently updating a program, that might be the source.
If you can’t uninstall a program while your device is running in Normal mode, entering Safe Mode can help you bypass this and get the software removed. Update or remove software from the Control Panel one program at a time until you figure out which one is the culprit (but keep in mind that you can’t remove Windows programs).
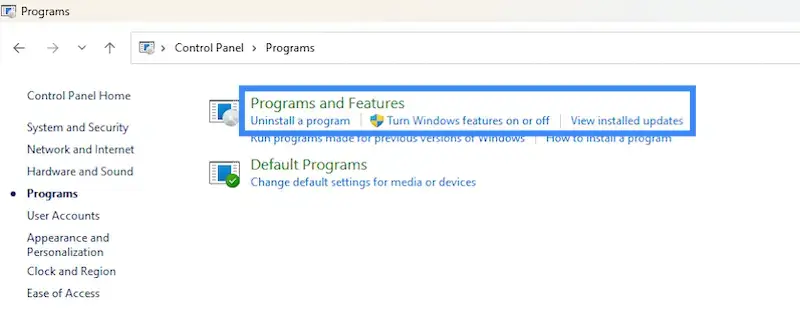
- Search for Control Panel in the search box on the taskbar and click on it.
- Select Programs > Programs and Features.

- Press and hold (or right-click) on the program you want to remove and select Uninstall or Uninstall/Change. Follow the directions that appear on screen.


Scan for Malware
Malware, short for malicious software, is designed to infiltrate your system without your consent or knowledge. It can infect your computer through several sneaky means, like downloading corrupted files, clicking on suspicious links, or opening compromised email attachments.
Since Safe Mode starts Windows with a bare bones setup — only the drivers and services necessary for operation are active — it generally keeps malware from loading and makes it easier to clear it out.
You might opt to use Safe Mode with Networking so you can download and install antivirus software to help with the cleanup. If you already have it installed, use the basic Safe Mode to keep your malware infection contained.
Once you’re in Safe Mode, follow this step-by-step checklist to scan for and remove malware:
- Delete temporary files. Open Disk Cleanup, choose a drive, select temporary files, and press OK to delete them.

- Scan for malware or viruses. Use your antivirus or antimalware software to scan for viruses. Microsoft Defender is an option, but there are plenty of reliable programs you can use. If you already had an antivirus software installed and it didn’t catch the virus, try using another one.
- Review and remove threats. The scan should show any concerning results and allow you to remove them.
- Restart your computer. Check if the issues have been resolved when your computer is in Normal mode. Make sure your antivirus software is up to date.

Update Drivers
Device drivers are software programs that help the operating system communicate with hardware devices. But when these programs are out of date, corrupted, or incompatible, you’ll usually run into problems like device malfunctions or system instability.
Because it only loads essential drivers, Safe Mode helps isolate and identify driver issues. If your system is running smoothly in Safe Mode, that means you might be having a problem with a non-essential or third-party driver, such as graphics or network drivers.
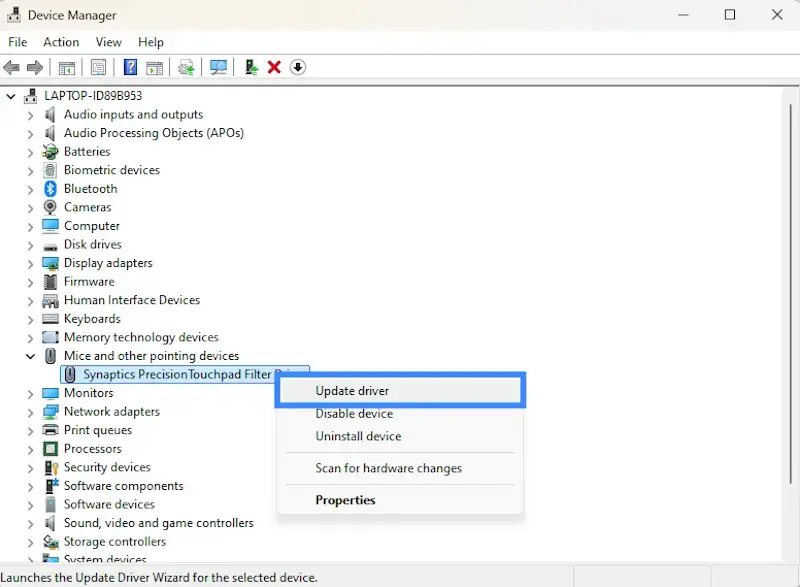
Use Device Manager to update or uninstall drivers that might be causing problems:
- In the search box on the taskbar, enter “Device Manager,” then select Device Manager.
- Select a category to see names of devices, then right-click (or press and hold) the one you want to update.
- Select Update Driver.

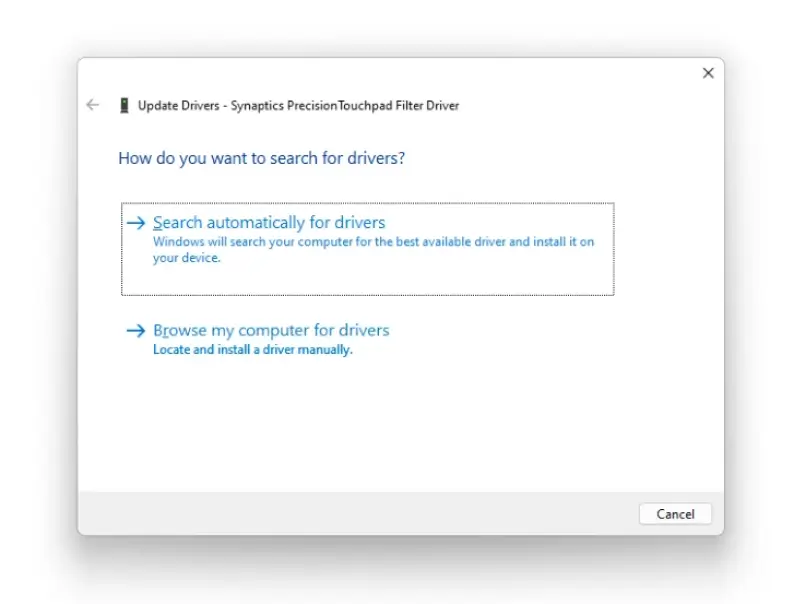
- Select Search automatically for updated driver software.

- If Windows doesn’t find a new driver, try looking for one on the device manufacturer’s website and follow their instructions.
To uninstall from Device Manager in Windows:
- Type «Device Manager» in the search bar on the taskbar and select it from the results.
- Right-click (or press and hold) the device name and choose Uninstall.
- Restart your PC. Windows will try to reinstall the driver automatically.
Check and Repair Disk Errors
Disk issues are problems with storage devices — they make it hard, or even impossible, for your operating system to read and write data. They happen as a result of corruption, physical damage, or software conflicts, leading to impaired functionality and even data loss.
Enter Safe Mode with Command Prompt to save the day. If you’re having boot issues and can’t enter Windows, you might still be able to run CHKDSK in Safe Mode.
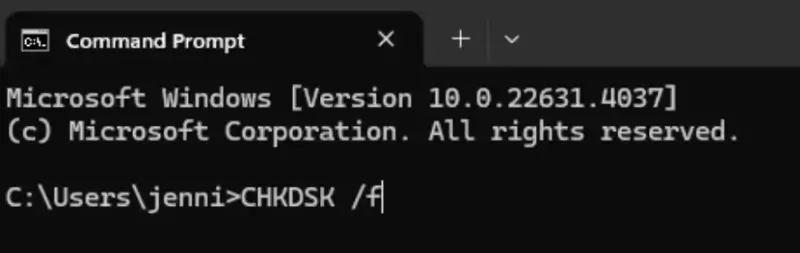
To access Safe Mode with Command Prompt, press 6 or F6. Then determine the correct CHKDSK parameters:
- /f: This parameter tells CHKDSK to fix any errors it finds on the disk.
- /r: This parameter tells CHKDSK to locate bad sectors and try to recover readable information from them.
- /x: This parameter dismounts the volume before the scan begins to make sure it’s not in use elsewhere, increasing the accuracy of the scan and reducing the risk of data loss.
Once you’ve determined your parameters, type CHKDSK followed by your parameters and then hit Enter.
Running CHKDSK can take a long time and takes up a lot of your computer’s bandwidth. Make sure you back up your data before you start the process — especially since any interruption puts your data at risk. If you don’t feel confident in your ability to use the CHKDSK tool, it might be safest to reach out to a professional.
If you’re worried about potential data loss due to disk issues, contact us today for hard drive recovery services. You’ll only pay for our services if we get your data back.
How to Exit Safe Mode
Exiting Safe Mode is a simple process that returns your computer to its normal operating state. When you’re finished using Safe Mode, it’s important to make sure you exit properly.
Try restarting your computer first. If you’re unable to exit Safe Mode that way, try the other methods:
- Restart your computer. You can usually exit Safe Mode by just restarting your computer once you’re done troubleshooting. This allows your system to boot back into its normal operating mode without any additional steps.
- Restart with the Shift key. If restarting alone doesn’t work, hold down the Shift key on your keyboard and restart your computer. On the following screen, select the Troubleshoot option. Then, click on Advanced options > Startup Settings, and choose Restart. Your computer will reboot, presenting multiple startup options; press the Enter key, and it will exit Safe Mode.
- Use Command Prompt. Right-click the Start button and select Command Prompt (Admin). In the Command Prompt window, type bcdedit /deletevalue {current} safeboot and press Enter on your keyboard. Restart your computer, and it will exit Safe Mode.
- Use System Configuration. Open the Run dialog by pressing Windows + R, type msconfig, and hit Enter. In the System Configuration window, go to the Boot tab and uncheck the Safe boot option. Click OK and restart your computer.
What to Do When Safe Mode Doesn’t Work
If you can’t enter Safe Mode, reach out to a professional. This might signal hardware issues, since faulty components like RAM or hard drives can prevent your system from booting up.
You can also try to perform a clean boot. While Safe Mode runs on a bare bones set of drivers and services, a clean boot isolates programs during startup, helping you identify if a specific one is causing system issues.
Recover Your Data with Trusted Experts
If your Windows computer isn’t acting like it should, using Safe Mode can help you get to the bottom of it fast. From malware infections to drive conflicts, Safe Mode allows you to diagnose and resolve a wide variety of system issues and get your computer back to optimal functionality.
But you don’t have to face your tech troubles alone — especially when sensitive data is at stake. If you need a pro, don’t hesitate to reach out to Secure Data Recovery for expert data recovery services. Keeping your data safe and intact is our priority. Contact us today for reliable data recovery solutions.
With extensive experience and a passion for data recovery, Scott enjoys sharing his knowledge and helping others understand the intricacies of data recovery, encryption and loss prevention.
Windows 11/10 Safe Mode loads the operating system with a minimal set of system files and device drivers – just enough to boot the Windows OS. In Safe Mode, the startup programs, add-ons, etc. settings, do not run. We usually boot into Safe Mode, when we need to troubleshoot issues. This post will show you how to enable and start or boot Windows 11/10 in Safe Mode. There may be other ways, but we will cover only 2 of the most convenient ways.
There are three easy ways you can start Windows 11/10 in Safe Mode:
- Press Shift and then click on Restart
- Open Recovery section in Update & Settings and click on Restart now.
- Use MSConfig or System Configuration Utility and select the Safe boot and Minimal options setting and restart.
- Boot in Safe Mode using Command Prompt
- Via the Logon screen
- Enable F8 key and use it
- Boot from Windows Recovery Drive
- Using Windows Installation Media
Let us take a look at them in detail.
How to startup Windows in Safe Mode
1] Press Shift and then click on Restart
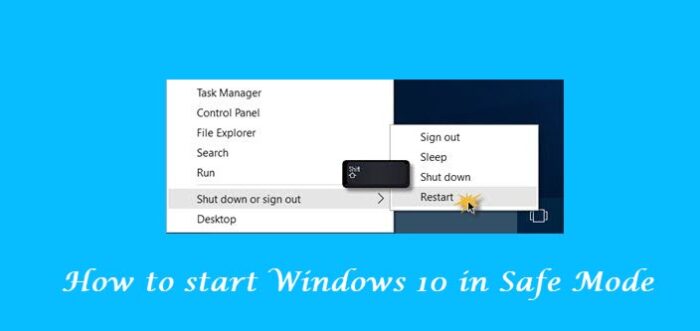
The easiest way to boot Windows into Safe Mode, would be to press Shift and then click on Restart. This will reboot your Windows computer into Advanced Startup Options.
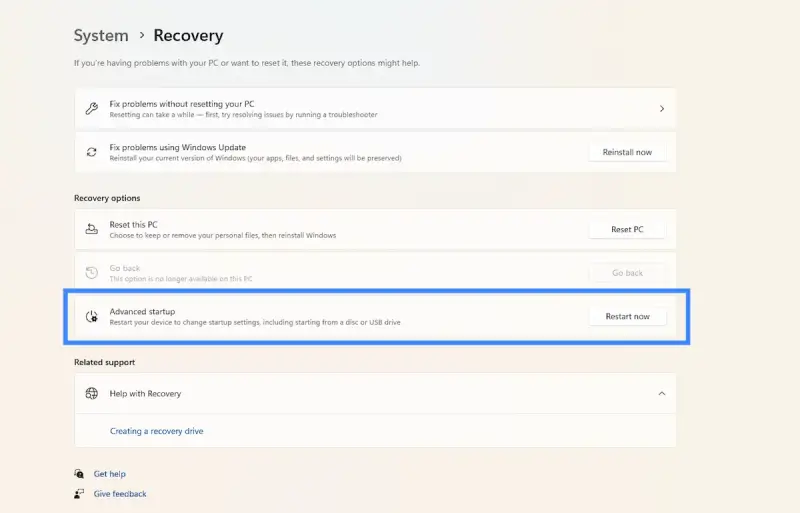
2] Open Recovery section and click on Restart now
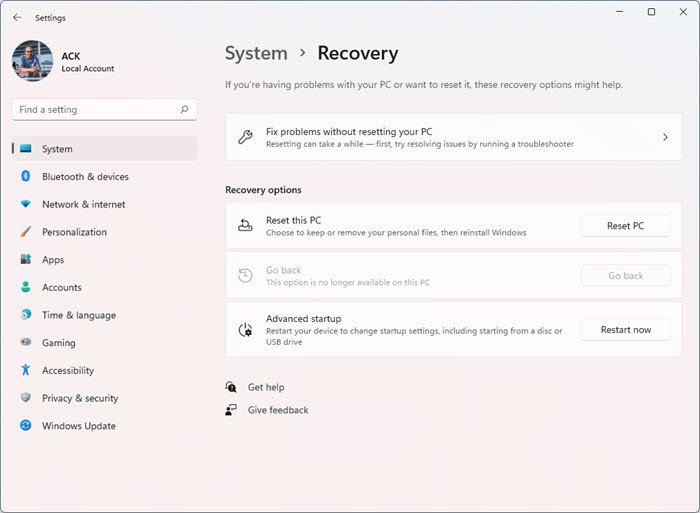
In Windows 11, open Settings > System > Recovery > Advanced startup and click on Restart now.
In Windows 10, open the Settings app > Update & Security > Recovery. Under Advanced startup, click on Restart now.
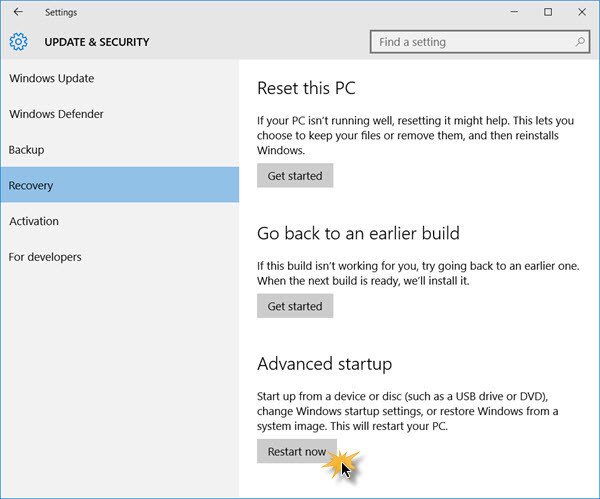
When you follow any of the two methods mentioned, your Windows computer will restart, and you will see the following screen.

Click on Troubleshoot to proceed.
Now follow the steps laid down in Advanced Startup options in Windows.
It will take you through the entire process starting with – Troubleshoot > Advanced Options > Startup Settings > Restart > Press No 4 key.
If you have followed the procedure correctly, you will finally reach Startup Settings screen, from where you will be able to enable Safe Mode.
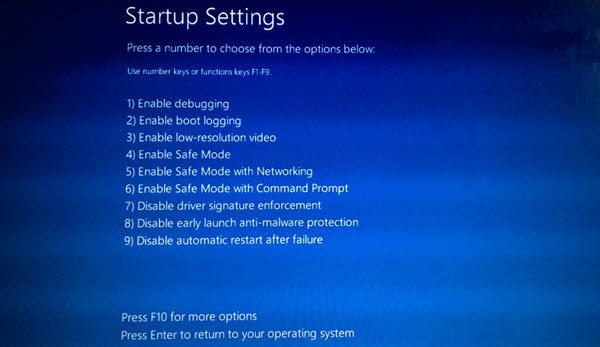
Press the ‘4’ key, and your computer will restart and enter Safe Mode. To reboot in Safe Mode with Networking, press ‘5’ key. To reboot in Safe Mode with Command Prompt, press the ‘6’ key.
You will see a black desktop with a Safe Mode watermark in the bottom left and right sides.
3] Use MSConfig or System Configuration Utility
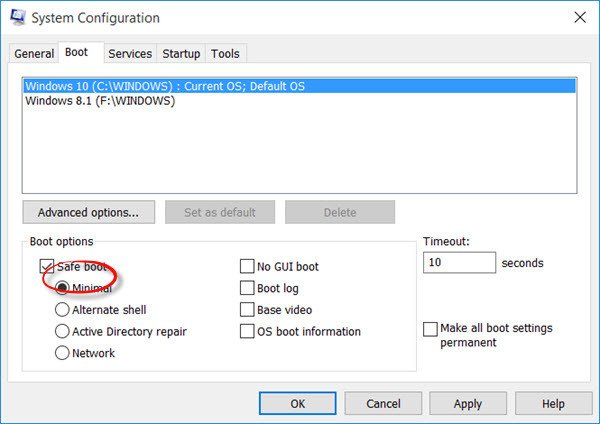
The other simple way, of course, is by using the built-in System Configuration Utility. From the Win+X Menu, open Run box, type msconfig and hit Enter.
Under the Boot tab, check the Safe boot and Minimal options. Click Apply/OK and exit. On a restart, your computer will enter Safe Mode directly.
You can now work in the Safe Mode.
Before you exit, remember to open msconfig and uncheck the Safe Boot check box, click Apply/OK and then on Restart, so that on reboot, your computer will not again boot in safe mode – but instead will boot to your desktop.
4] Boot in Safe Mode using Command Prompt
You can execute the following command in an elevated command prompt, and restart, to boot Windows 10 into Safe Mode.
bcdedit /set {current} safeboot minimal
Boot into Safe Mode with Networking
bcdedit /set {current} safeboot network
Boot into Safe Mode with Command Prompt
bcdedit /set {default} safeboot minimal bcdedit /set {default} safebootalternateshell yes
To exit Safe Mode, use:
bcdedit /deletevalue {current} safeboot
5] Via the Logon screen
- Once you reach the logon or sign-in screen, hold the Shift key down and click on the Power button and then select Restart.
- When your PC restarts, click on Troubleshoot > Advanced Options > Startup Settings > Restart.
- On the restart, select option 4 to boot into Safe Mode.
6] Enable F8 key and use it
You need to enable the F8 key first and then use it to boot into Safe Mode,
7] Boot from Windows Recovery Drive
You need to have already created a USB recovery drive.
- Now reboot the computer and boot to the recovery drive
- Select your keyboard layout based on your preferred language
- Select Troubleshoot > Advanced options > Startup Settings > Restart
- On the restart, select option 4 to boot into Safe Mode.
8] Using Windows Installation Media
Boot the computer to the Windows Installation Media
Click on Repair Your Computer
Select Troubleshoot > Advanced options > Command Prompt.
Execute the following command:
bcdedit /set {default} safeboot minimal
Select Continue to exit and boot into Safe Mode.
Is F8 Safe Mode for Windows working?
The F8 key that helped you earlier to boot the computer in Safe Mode is not enabled by default. You have to use this procedure using CMD to enable it first. Then you will be able to boot in Windows Safe Mode using the F8 key.
How do I boot into Windows Recovery?
The Windows Recovery Environment (WinRE) is a companion operating system installed alongside Windows, in a separate partition.
- You can use recovery media to boot into Windows RE.
- Execute
reagentc /boottorein an elevated command prompt and restart the device to boot into WinRE. - Execute
shutdown /r /oin an elevated command prompt and restart the device to boot into WinRE instead of Windows.
Also read:
- Cannot boot in Safe Mode in Windows.
- How to add Safe Mode to Boot Menu options in Windows.
- How to directly reboot in Safe Mode in Windows.
- PC is stuck and cannot exit Safe Mode.
Latest update: November 21, 2023
ID: 493
Optimal protection for Windows
Kaspersky for Windows protects your digital life with technologies that go beyond anti-virus.
Start your PC in Safe Mode if you need to troubleshoot issues. When you start Windows in Safe Mode, a limited selection of drivers and files is used. This decreases the likelihood of errors occurring during startup and allows you to fix issues in the operating system.
To start the computer in Safe Mode, you must know the password for the account with local administrator privileges.
How to start a PC running Windows 10 and 11 in Safe Mode
How to start a PC running Windows 8/8.1 in Safe Mode
How to start a PC running Windows 7 / Vista in Safe Mode
How to start a PC running Windows XP in Safe Mode
How to select a hard drive at startup and enter Safe Mode
What to do if you cannot start the PC in Safe Mode
Did you find this article helpful?
Thank you for your feedback! You’re helping us improve.
Thank you for your feedback! You’re helping us improve.