
-
Home
-
News
- Ways to Open Windows Programs and Features
By Shirley | Follow |
Last Updated
This article from MiniTool introduces some ways to help you easily open Windows Programs and Features tool in Windows 10. You can choose the most convenient way according to your preference.
The programs on your computer are listed in Windows Programs and Features. You can select them in the program list to change, uninstall, or repair them. So, where is Windows Programs and Features? There are detailed instructions below.
How to Open Windows Programs and Features in Windows 10
Method 1: Using the Windows Search Box
You can directly use the Windows Search Box to search for Programs and Features, which is very useful if you know the name of a certain function.
Step 1: Click the search box of your computer and type Programs and Features to search, and then select Apps and features under Best match.
Step 2: Go to Windows Programs and Features on the right of the Apps and features tab.
Related article: Windows 10 Search Bar Missing? Here Are 6 Solutions
Method 2: Using Windows Settings
We may often use Windows Settings to set the time, language, network, etc. of our computer. At the same time, Windows Settings can also help us access Windows Programs and Features. Here are the major steps:
Step 1: Input Settings in the search box to access Windows Settings.
Step 2: Select Apps > Apps and features. On the right panel, scroll down to find Programs and Features under Related settings.
Related article: What to Do When Windows 10/11 Settings App Is Not Opening?
Method 3: Using Control Panel
The Control Panel allows the user to configure the computer’s accessibility features, add hardware, and more. In addition, the Control Panel also supports us to access Windows Programs and Features to uninstall the program.
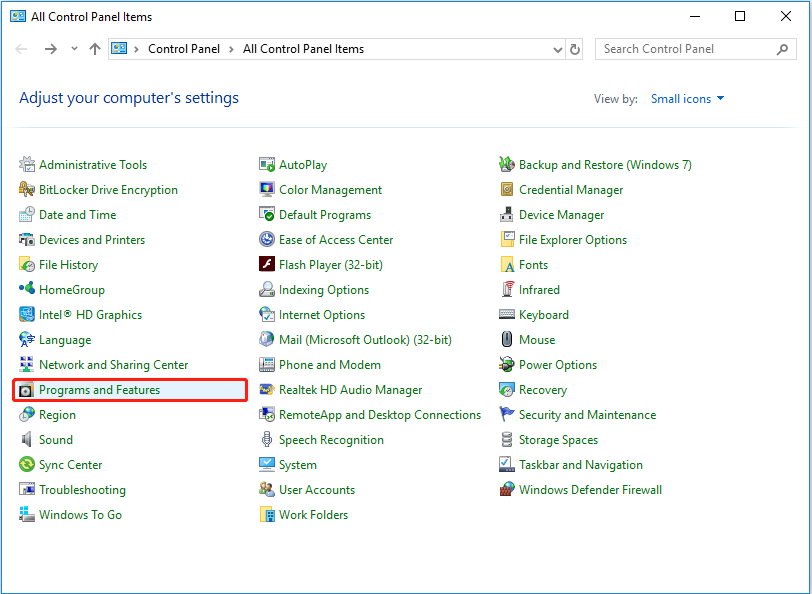
Step 1: Open the Control Panel via the Windows search box.
Step 2: Set to view by small icon and click Programs and Features in the window.
Method 4: Using a Shortcut
Compared with other methods, we may prefer to enter some programs directly from the desktop icon. To achieve this function, we need to create a desktop shortcut for Windows Programs and Features. You can read on to find detailed instructions.
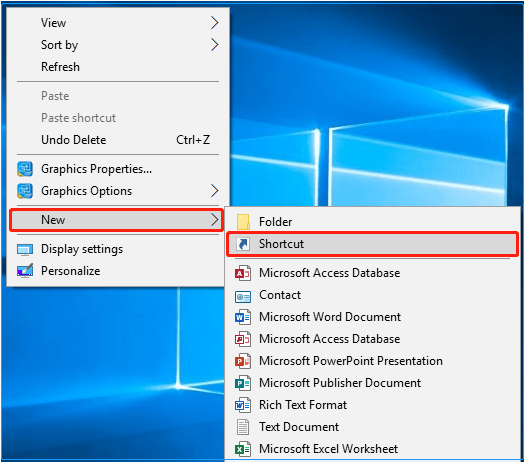
Step 1: Right-click any blank space on the computer desktop. And move the mouse to New, and select Shortcut.
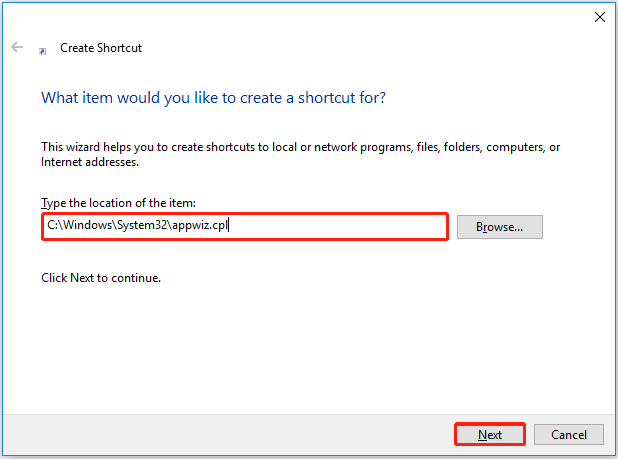
Step 2: Input: C:\Windows\System32\appwiz.cpl in the item location box and click Next.
Step 3: Type the name Programs and Features for the new shortcut and click Finish.
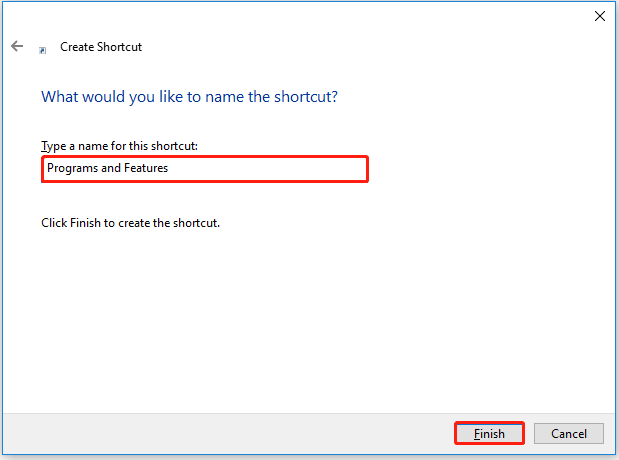
Step 4: You can find the shortcut icon of Programs and Features on the computer desktop, and then you can directly click this icon to open Windows Programs and Features.
Method 5: Using CMD
For users who are very proficient in computer use, you can also use CMD to enter Programs and Features. Follow these steps:
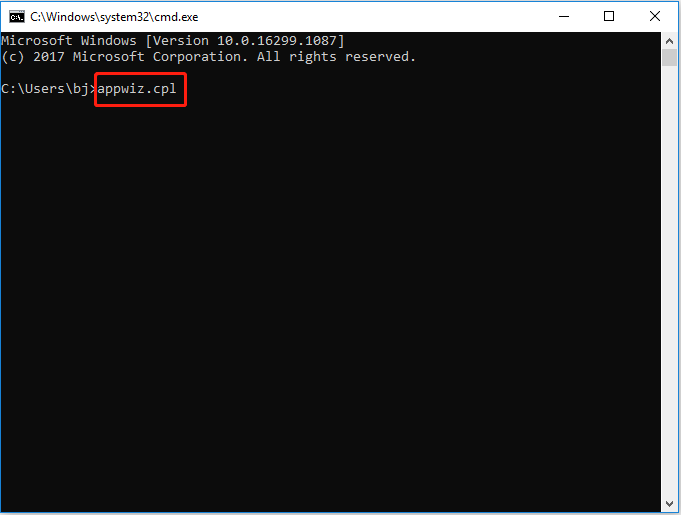
Step 1: Press Windows + R keyboard combination to type cmd in the box and press Enter.
Step 2: Input appwiz.cpl and press Enter to run the command.
Related article: Command Prompt (CMD) Not Working/Opening Windows 10?
Method 6: Using Run
You can also skip CMD and use Run to open Windows Programs and Features directly.
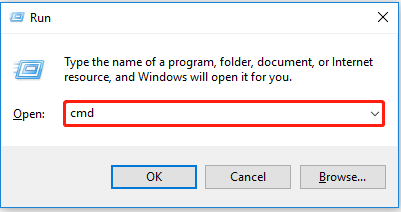
Step 1: Press Windows + R to open the Run window.
Step 2: Input appwiz.cpl in the Run box to open Programs and Features directly.
Bottom Line
This article introduces six methods to open Windows Programs and Features and lists the detailed operation steps. If you have anything to add, you can leave a message in the comment area below to discuss it with us. Go to MiniTool News Center to find more solutions to computer-related problems.
About The Author
Position: Columnist
Shirley graduated from English major and is currently an editor of MiniTool Team. She likes browsing and writing IT-related articles, and is committed to becoming a professional IT problem solver. The topic of her articles are generally about data recovery, data backup, and computer disk management, as well as other IT issues. In spare time, she likes watching movies, hiking and fishing.

Windows has your go-to Programs and Features tool for managing installed applications, updates, or other system features. This tool makes uninstalling programs or enabling/disabling a particular feature on your PC simple. Modern Windows settings are similar, but this classic tool is popular for its clarity.
In this post, you will learn three ways to walk through Programs and Features, using Windows 10 or 11.
Use the Run Command
The easy way to open Programs and Features is through the Run command dialog box.
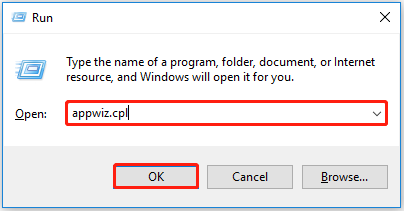
- Press Win + R from your keyboard.
- In the dialog box, enter appwiz.cpl.
- Press Enter or click OK button.

This method skips menus and gets you straight to Programs and Features (in seconds), making navigating it easier and faster.
Use Command Prompt or Terminal
If you prefer command-line tools such as Command Prompt, PowerShell, or the Windows Terminal, you can also open Programs and Features using a simple command.
- Open your command-line tool:
- Open Power User Menu → press Win + X → choose Command Prompt, PowerShell or Terminal.
- You can also hit the Windows search bar, enter cmd, and hit Enter.
- Type the command:
- start appwiz.cpl
- Press Enter to open the Programs and Features panel.

This method is useful if you are already working in a command-line environment.
Use the Control Panel
You can visit Programs and Features if you enjoy the classic Control Panel.
- Press the Windows key.
- Type Control Panel in the search bar.
- Choose Control Panel.
- Set the View by option (top-right corner) to either:
- Category: Go to Programs > Programs And Features.
- Icons: Select Programs and Features directly.

This is great if you like to browse visually instead of entering commands.
Alternative: Via Settings App
Even though Programs and Features are still useful, some options are available in the modern-era Settings app.
- To explore these options:
- Open the Settings app (press Win + I).
- Go to Apps > Apps & Features.

Run Command, Command Prompt, and Control Panel are three fast and easy methods to open Programs and Features in Windows. You will find no obstacle as you can choose whatever way of working you prefer, whether using shortcuts, command-line programs, or a conventional interface.
You can also depend on the Settings app for most day-to-day tasks, but it’s good to have access to the classic menu for those advanced operations.
Follow Us
Wikitechlibrary is written by Waqas Amjad, a full-time Passionate Blogger. With years of experience, he simplifies complex topics to help readers navigate the digital world. Waqas is committed to delivering accurate, user-friendly, and engaging content for audiences worldwide.
The Windows Programs and Features tool is a built-in feature in Windows 10 that can be used to uninstall programs, change the settings of programs, and update or upgrade installed programs. It is also known as “appwiz cpl”, “appwiz cpl.exe”, or just “CPL”.
This tool has been around since Windows Vista and it was originally called Add or Remove Programs but was renamed to Programs and Features in Windows 7. It is a very simple interface that allows you to uninstall, change settings for, update or upgrade installed programs.
There are a number of ways to open the Windows Programs and Features tool, which we are going to look at in this article.
1). Using the Run Command Dialog Box
The Windows Programs and Features tool is a built-in utility that allows you to uninstall, change, or repair a program. It’s an appwiz.cpl file that can be accessed by using the Run command dialog box.
There are two ways to open the Run command dialog box:
1) Press the Windows key and type «appwiz cpl» in the search bar.
2) Press the Start button on your desktop and type «appwiz cpl» in the search bar. Then click Ok to open the Programs and Features Tool.
2). Using the Quick Access Menu
The Windows Programs and Features tool is available from the Quick Access Menu. It can help you find and remove programs that you no longer need.
Steps to Using the Quick Access Menu to open The Windows Programs and Features tool:
1) Open the Start menu.
2) Open the Settings app.
3) Click on «Apps» in the left-hand pane of Settings app.
4) Select «Appwiz.»
5) Click on «Cpl.»
3). Using the Windows Search Bar
The Windows Programs and Features tool is a useful tool that allows you to manage your installed programs. In order to access the tool, we will need to use the Search Bar.

To open the Windows Programs and Features tool in Windows 10, follow these steps:
- Click on the search bar at the bottom of your screen.
- Type «programs» and press enter.
- Press on «Windows Settings» under Programs and Features.
4). Using the Control Panel
The Control Panel is a tool in Windows that provides an easy way to manage all the different programs and features that are installed on your computer.

Steps to Use the Control Panel to open The Windows Programs and Features tool:
1. Press the Win+X keys on your keyboard simultaneously.
2. Click on «Control Panel».
3. Select «Programs and Features».
4. Click on «Windows» in the left-hand side of the window, then select «Windows 10».
5. You will now see a list of installed programs in Windows 10, including all programs you have installed as well as all programs installed by default when you first set up Windows 10.
5). Using the Command Prompt or PowerShell
When you want to use the Command Prompt or PowerShell to open The Windows Programs and Features tool, there are a few steps that you need to take.
1) Open Command Prompt or PowerShell (Command Prompt is recommended as it has a more user-friendly interface)
2) Type «appwiz cpl» without quotes and press Enter
3) Click on «Windows features» and then click on «Turn Windows features on or off»
4) Check all of the boxes to turn them on, then click ok.
6). Using the File Explorer
The Windows Programs and Features tool allows users to change settings for their apps and hardware. It is also a good way to find out what software is already installed on your computer.

There are three steps to using the File Explorer to open the Windows Programs and Features tool:
1. Launch File Explorer from the Start menu or taskbar.
2. Click on this icon in the toolbar of File Explorer:
3. Navigate through this folder until you see a file called «Programs and Features».
7). Through System Settings
In order to go through the steps to open The Windows Programs and Features tool, you need to follow a few steps.
Step 1: Press Windows Key + X.
Step 2: Type appwiz cpl in the search bar and hit enter.
Step 3: Click on the Programs and Features tab.
Step 4: Click on Turn Windows features on or off.
Step 5: Check out the checkbox next to Open The Windows Programs and Features tool in order to turn it on or off.
8). Creating a Shortcut For Programs and Features
A Programs and Features shortcut is an appwiz shortcut that automatically opens up the Programs and Features app when you tap on it. This appwiz shortcut is a quick way to find new apps or features in Windows. It lets you quickly get to the right place without having to search through the Start menu.
Creating a Programs and Features shortcut is easy! Here’s how:
- Create a new shortcut on your home screen and give it a name (e.g., «Programs»)
- Click on «Edit» and then click on «Add Shortcut» at the bottom left corner of your screen. This will open up another menu where you can find all your apps, features, and shortcuts.
- Click on your desired app or feature and drag it into this menu.
- When you’re done creating shortcuts, click on «Done.»
FAQs
1). How can I open the Windows Programs and Features Tool?
The Windows Programs and Features tool is a built-in tool in Windows 10 that allows you to manage your installed programs.
The Windows Programs and Features Tool is a built-in tool in Windows 10 that allows you to manage your installed programs. The tools can be accessed from the Control Panel, but it is easier to use this tool as it lets you manage the programs with just one click.
2). What is the Windows Programs and Features Tool?
The Windows Programs and Features tool is a Microsoft utility that allows users to easily manage installed software and features on their computer.
The Windows Programs and Features tool is a Microsoft utility that allows users to easily manage installed software and features on their computer. It can be accessed through the Control Panel of the PC. It can help you find out what programs should be removed, which ones are outdated, or which ones may cause problems with your computer.
The Windows Programs and Features tool is accessible through Control Panel in the PC’s operating system, but it also has an app for mobile devices called «Programs & Features.»
3). Why should I use the Windows Programs and Features Tool?
The Windows Programs and Features Tool is a utility that helps you to uninstall, disable, or change the settings of programs that are currently installed on your computer.
There are many reasons why you should use this tool. It allows you to uninstall unwanted programs and give more space for other programs that are important for your work. It also helps you to disable and change the settings of any program so that it doesn’t interfere with other software or hardware.
The Windows Programs and Features Tool is a must-have utility for all users who have Windows 10 operating system.
4). What does the Windows Programs and Features Tool do?
The Windows Programs and Features Tool is a tool that helps you uninstall, disable, or remove programs.
The Windows Programs and Features Tool is a tool that helps you uninstall, disable, or remove programs from your Windows 10 PC. It can also help you find the most appropriate driver for your device.
The Windows Programs and Features Tool has been available since the release of Windows 10 in 2015.
5). How can I use the Windows Programs and Features Tool?
The Windows Programs and Features Tool can be used to find and remove programs that you don’t need. If a program has been installed by accident, then you can use the tool to uninstall it.
The Windows Programs and Features Tool is a powerful tool for users who want to remove programs on their computer. The program is located in the Control Panel, and it has two main functions:
- Find programs that aren’t necessary
- Remove unnecessary programs
The Windows Programs and Features Tool can be used as a quick way to uninstall software if you have accidentally installed it or if you want to uninstall an application that was installed by mistake.
Windows Operating System is equipped with many addons and components which may extend the functionality of Windows without using any third party software. Some of these components are enabled or installed by default. But all features need not to be enabled because it will slow down the performance of your computer. Moreover all users do not require all that features to be enabled. Some components are also required by third party software to function correctly e.g., .NET Framework 3.5.
Table of Contents
We will discuss how to turn on/off those features using command prompt and manually. Moreover we will also describe how to find and open optional features using a command line. Further, we will briefly elaborate on how to install Windows features from the installation source using command prompt and PowerShell.
Explore Windows Features Using Command Prompt
To get a list of Windows Features using Command prompt, follow the steps below:
- Open command prompt in administrative mode.
- Type the following command
DISM /online /get-features /format:table | more
It will display all the list of features enabled or disabled on your computer. Here format:table and more are optional and are used to improve the readability of the features.

Keep on pressing Enter until you get the full list. You can remove more options if you don’t want to get the full list.
If you do not open it in administrative mode you will encounter the following error.
1- How to turn Windows features on or off?
You can enable any Windows feature or you can disable them. Some features are disabled by default.
- To open the Windows Features screen, go to Run –> optionalfeatures (This can also be accessed by opening Start Menu –> Control Panel –> Programs and Features –> Turn Windows features on or off)
- To enable a feature, check the checkbox beside the component.
- To disable a feature, un-check the checkbox beside the component.

2- How to turn Windows features on or off using command line?
Windows Features can be enabled or disabled using command line. For checking the status of the features type the command mentioned above. In order to enable any feature, follow the steps below:
- Open command prompt in administrative mode and run the following command:
DISM /online /get-features /format:table | more - Copy the name of feature you want to enable.
- Now run the following command in command prompt:
DISM /online /enable-feature /featurename:[paste the feature name here] - For example, if you want to enable Hyper-V which provides services and tools for running and creating virtual machine type the following command
DISM /online /enable-feature /featurename:Microsoft-Hyper-V -All
This will install and enable all the components of Hyper-V - You may need to restart the computer to install some components.
Disabling Windows features is very similar to enabling them. Follow the steps below to disable any feature.
- Open command prompt in administrative mode and run the following command:
DISM /online /get-features /format:table | find “Enabled” | more
This command will list down all the enabled features in Windows. (You can also make use of Findstr command.) - Copy the name of the feature you want to disable.
- Now run the following command in command prompt:
DISM /online /disable-feature /featurename:[paste the feature name here] - For example, if you want to disable Hyper-V, type the following command
DISM /online /disable-feature /featurename:Microsoft-Hyper-V -All
To get detailed information about a specific component, run the following command:
DISM /online /get-featureinfo/featurename:[featurname]
You will get detailed information about the feature name, description, properties, status and whether it requires restart or not.
3- Enable or Disable Windows features using PowerShell
The benefit of PowerShell over using a command prompt is that PowerShell commands check if the feature is already enabled. If it is already enabled, the installation action is not performed saving computing time.
To get information about windows features through Powershell, open PowerShell in administrative mode and then type
Get-WindowsOptionalFeature -Online

If you want to get information regarding specific features, type
Get-WindowsOptionalFeature -Online -FeatureName *Type feature name*
In order to enable/disable any feature use the following commands.
Enable-WindowsOptionalFeature -Online -FeatureName “Type feature name” -all
Disable-WindowsOptionalFeature -Online -FeatureName “Type feature name”
4- Adding Windows features from a Windows installation source
If a feature is not available for installation in installed Windows, we will need to give external source address to install the feature. The external source can be Windows installation ISO or any drive. Make sure that the path should be given correctly and installation media should be correctly installed. Moreover, you need to know exactly the feature name you wan to add.
Using Command Prompt
To add any Windows feature, open the command prompt in administrator mode and run the following command:
Dism.exe /online /enable-feature /featurename:Type Feature name /All /Source:C:\Sources\sxs /LimitAccess
Here is the installation media is C drive. You should change the installation media according to the requirement you want to install the feature. Once successfully installed remove the installation media.
Using PowerShell
The window feature can be installed by PowerShell using the following command
Install-WindowsFeature Feature Name –Source “C:\Sources\sxs”
Enabling/Disabling features in Windows XP
All the above mentioned methods work in Windows Vista, Windows 7, Windows 8.1 and Windows 10. But if you want to use a command prompt for adding/removing features in Windows XP, you’ll need to follow the instructions below:
pkgmgr d/n
What are your favorite Windows features and which ones do you enable as essentials when you Install Windows?
Both Windows 11 and Windows 10 come with predefined sets of features and components. You can customize Windows by removing the features you’re not using and by adding the ones you need but aren’t installed by default. Moreover, if you remove unwanted components, you can theoretically save a bit of space on your hard drive. This tutorial teaches you how to add and remove Windows features in Windows 11 and Windows 10. The process is pretty straightforward, so let’s get started:
How to open Windows Features
Although opening Windows Features is quite similar in Windows 11 and Windows 10, the visuals are slightly different. For that reason, we’re going to show you how to get to them first in Windows 11 and then in Windows 10:
How to open Windows Features in Windows 11
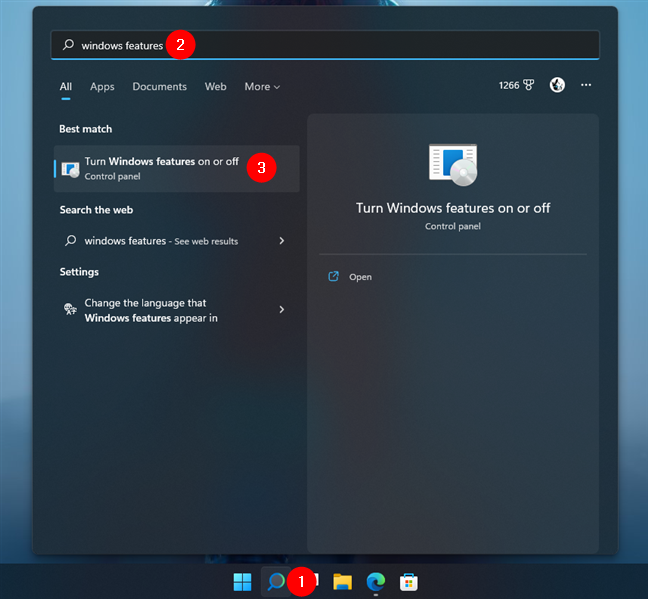
If you’re using Windows 11, click or tap the Search button on the taskbar that looks like a magnifying glass, and type “windows features” in the search field. Once the results are in, click or tap on “Turn Windows features on or off.”
Search for windows features in Windows 11
Alternatively, you can also access Windows Features using the Settings app. Open it (Windows + I), select Apps on the left sidebar, and click or tap on Optional features on the right.
TIP: The Optional features settings from Windows 11 and Windows 10 allow you to add other extra functionality for your device. If you want to learn how to install new features or remove the ones you don’t need, check this other guide that we just published: How to add or remove optional features in Windows 11 and Windows 10.
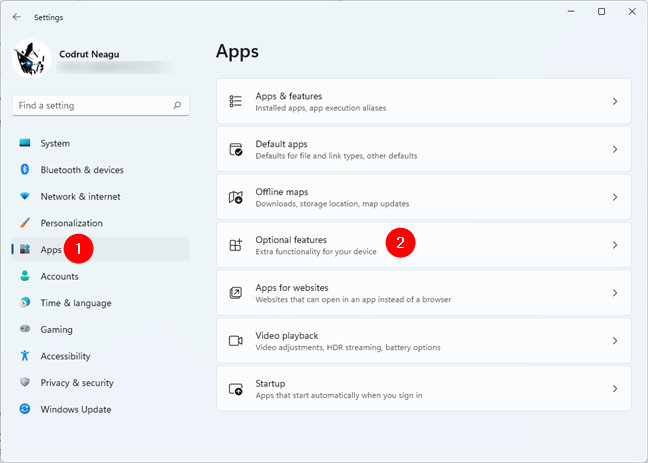
Access Optional features in Windows 11
On the Optional features page, scroll down to the Related settings section at the bottom, and click or tap on More Windows features.
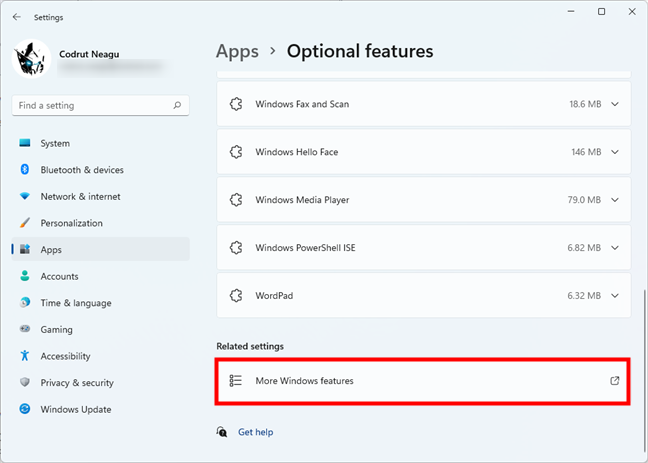
The More Windows features link in Optional features
And last but not least, a third method of getting to the Windows Features in Windows 11 is using the Control Panel. In it, go to Programs > Programs and Features and click or tap the “Turn Windows features on or off” option on the left.
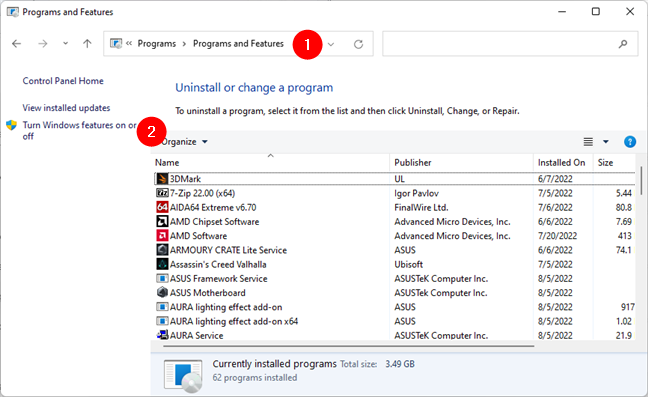
Click or tap on Turn Windows features on or off
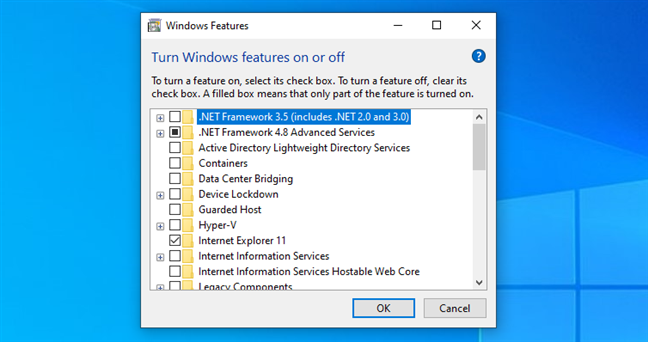
The Windows Features window opens, displaying a list of features you can add or remove according to your preferences.
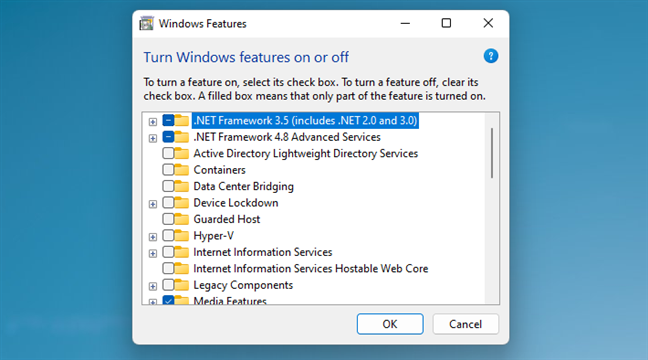
The Windows Features from Windows 11
The checked entries are already installed on your computer or device, while those unchecked are not.
How to open Windows Features in Windows 10
In Windows 10, click or tap the search field in your taskbar, and enter “windows features.” Click or tap the “Turn Windows features on or off” option from the list.
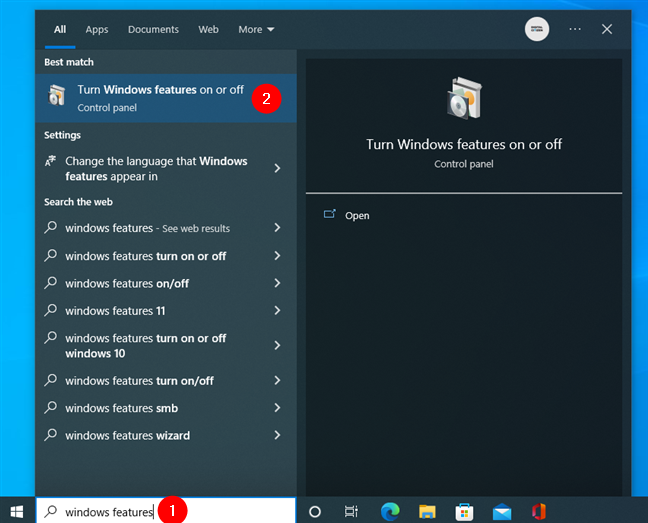
Type windows features in the taskbar’s search field
If you prefer, you can also choose the long way. Open the Settings app (Windows + I) and head to Apps > Apps & features > Optional features.
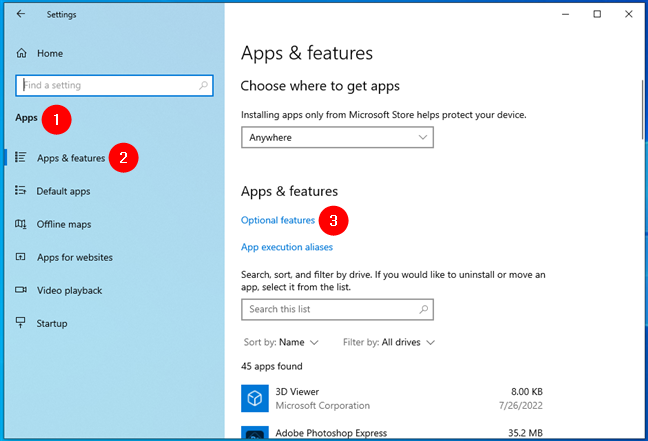
Access Optional features in Windows 10
Then scroll to the Related settings section and click or tap on the “More Windows features” link.
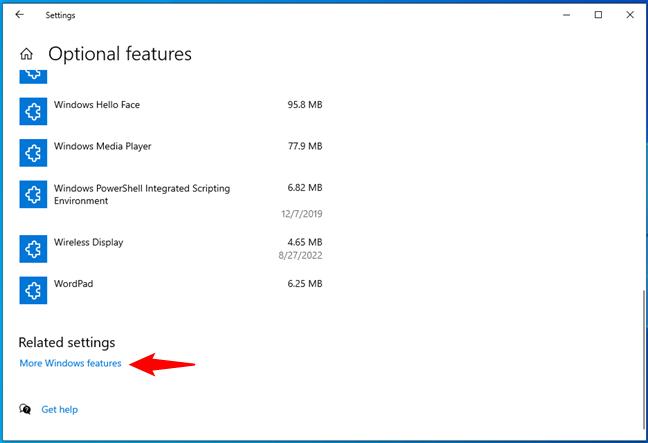
Open More Windows features in Windows 10
A third alternative method to access Windows Features in Windows 10 is provided by the Control Panel. Open it, navigate to Programs > Programs and Features, and click or tap “Turn Windows features on or off” on the left of the window.
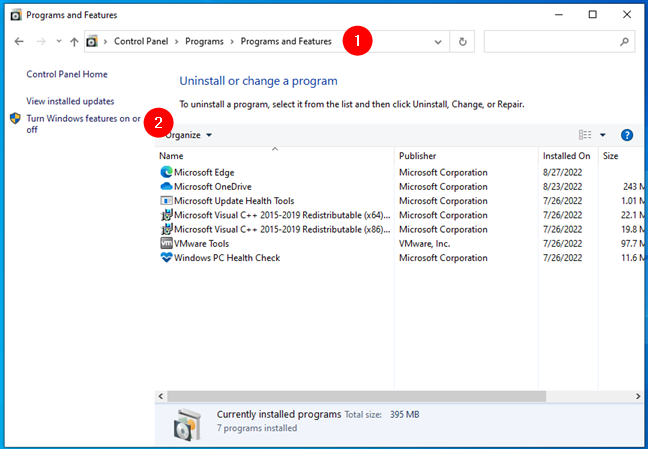
Turn Windows features on or off in Windows 10
Windows 10 then launches the Windows Features window. It shows you a list of features available to install or remove.
Windows Features and components available in Windows 10
The features with checkmarks are already installed, while those unselected are not.
NOTE: From here on, both the steps and the interface used to install or remove features and components are identical in Windows 11 and Windows 10. In consequence, we decided to use screenshots from Windows 11.
How to add Windows features or components
The Windows Features window lists all the features or components available for Windows. To view more information about a feature, hover on top of it with your mouse or tap on it, and a brief description appears. However, if you want even more details about each component, read: What are those Windows features that you can add or remove?.

A brief description is available for every Windows feature
To add features to Windows 10 or Windows 11, check their boxes in the Windows Features window, and then click or tap OK.
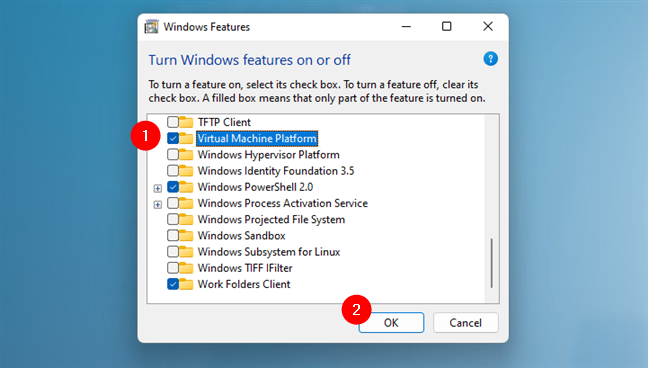
Adding the Virtual Machine Platform component
You must wait while Windows searches for the files required to install the selected feature.

A loading screen informs you of the progress
NOTE: For certain features, Windows might need to download some files from Windows Update to successfully add the requested components.
Once Windows finds the required files, it starts installing the optional feature, letting you know it’s “Applying changes.”
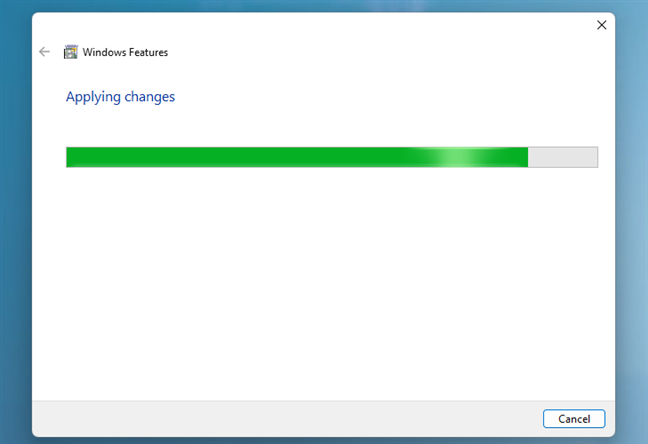
Wait while your changes are being applied
For certain components, like “Virtual Machine Platform,” rebooting your Windows computer or device is required to finish installing your changes. Click or tap “Restart now,” and remember that the reboot may take extra time to configure the added components.

Reboot to finish installing your changes
Other features, like “Windows Projected File System,” do not require a restart. Once your changes are completed, press Close to finish the process.
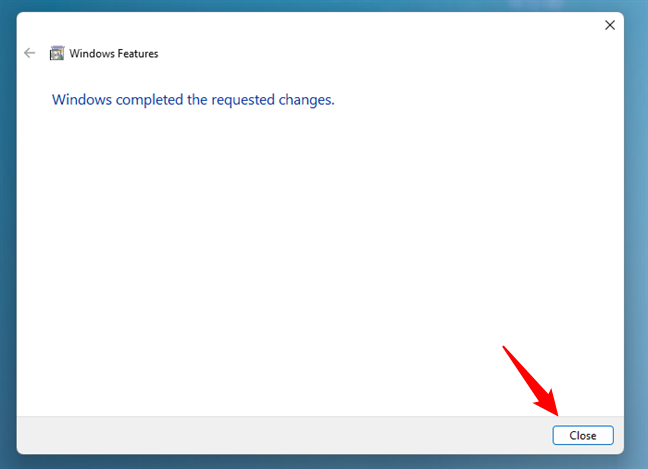
Press Close to finish completing the installation of new components
Windows now includes the feature(s) you selected for installation.
How to remove Windows features or components
Once you decide which components you want to be removed, uncheck the box next to them to uninstall unnecessary Windows features. When you uncheck certain features, like Internet Explorer 11, from Windows, you might get a warning that turning them off might affect other Windows features, programs, or default settings. If that happens, you’ll need to confirm again that you want to uninstall that certain feature.

Windows warns you about the consequences of disabling certain features
You might think that the “Go online to learn more” link might provide more specific info about the component you are disabling, but clicking or tapping on it takes you to a generic Windows help page offering more information about Windows.

The Windows help page provides generic tips and info
Either way, once you unchecked the features or components you want to remove, click or tap the OK button from the Windows Features window.
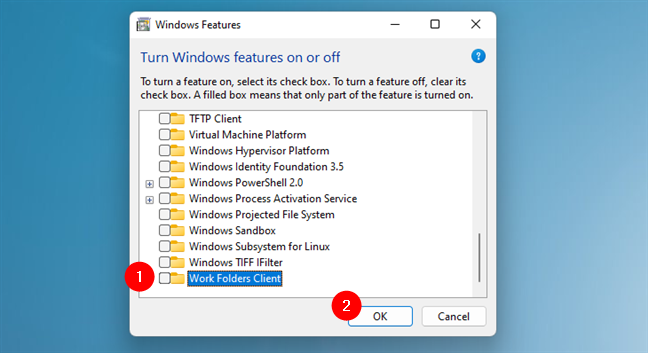
Press OK to apply your changes
A loading screen keeps you updated on the progress, letting you know your system is “Searching for required files” first.
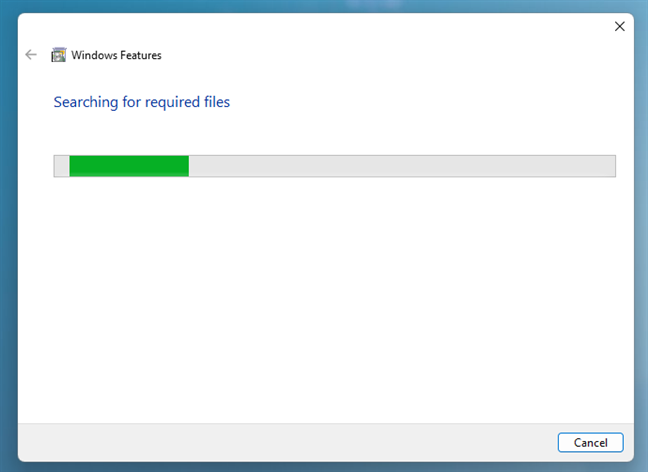
Windows is searching for the required files
You then have to wait while the changes you requested are being applied.

Wait for Windows to apply the changes
After removing certain features, Windows may inform you that it needs to restart your computer or device to apply the requested changes. Press Restart now and wait for the reboot to be performed. Keep in mind that this restart takes longer than usual because Windows needs to spend additional time configuring itself according to your instructions.
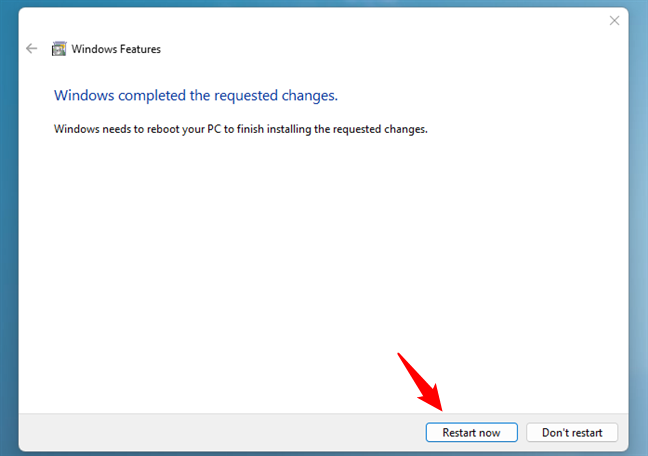
Restart your Windows PC to apply the changes
Other components may be removed without a system restart. If that is the case for the features you chose to get rid of, you are informed that “Windows completed the requested changes.” Click or tap Close, and you are done.

Press Close to exit Windows Features
TIP: If you are interested in purging your Windows computer or device of more unnecessary software, you can also read: Windows 11 and Windows 10 bloatware list (2022 update).
What Windows features or components did you add or remove?
We at Digital Citizen use certain optional features that are not installed by default in either Windows 11 or Windows 10. For example, Windows Sandbox and the Windows Subsystem for Linux. That’s why we add them to almost all our computers. On the other hand, there are features that we don’t usually need, like Internet Explorer, which we uninstall. What about you? What Windows components did you add or remove from your system? Let us know in the comments section below.