
To clear things up, the .tar extension is a file format that archive multiple files into a single file without compression. The .gz (Gzip) is a compression method in which the logical size of the files is reduced to save disk space. The .tar and .gz are usually used together to archive multiple files into a single file that is also compressed significantly, thus, with the combined extension of .tar.gz.
To open or extract a .tar, .tar.gz or .gz file in Windows operating system, the most common approach is to simply use a compression software that supports both Tar and Gzip such as 7zip and WinRAR.
You can also quickly extract a .tar or .tar.gz file in Windows 11/10 using command line in CMD without the need to install any software.
Open .gz, tar.gz or .tar file using file archiver tool
7-Zip – supports both .gz and .tar
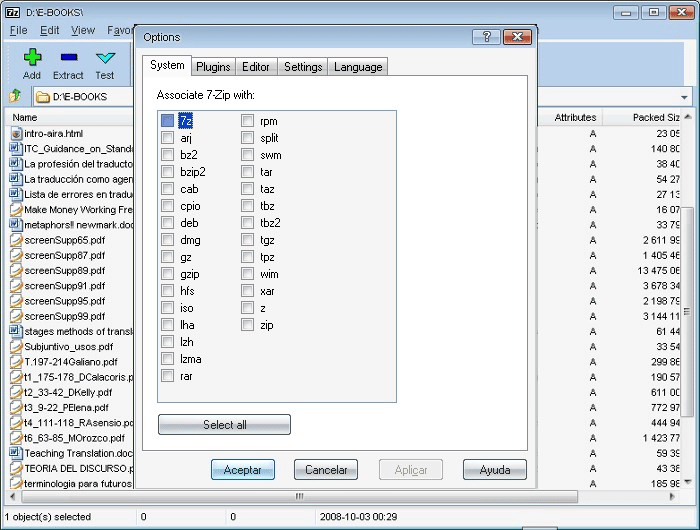
7-Zip is one of the most popular file compression software widely used by majority of users around the globe due to its simplicity and user-friendly GUI. It is also free to download and use.
7-Zip can work with most compression methods and extensions including .gz, tar.gz and .tar. You can use it to archive and compress files using any supported methods you prefer, or to open and extract any compressed file.
To open and extract a .gz, tar.gz or .tar file using 7-Zip in Windows 11 or 10:
- Download and install 7-Zip from https://www.7-zip.org/.
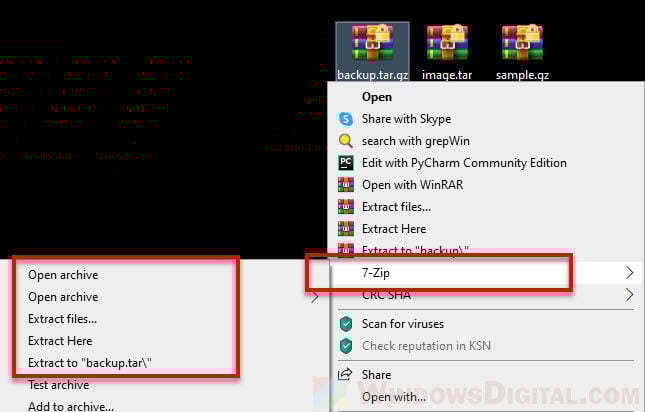
- Once installed, right-click on the tar or gz file that you want to open.
- In the context menu, select 7-Zip, then “Open archive“.

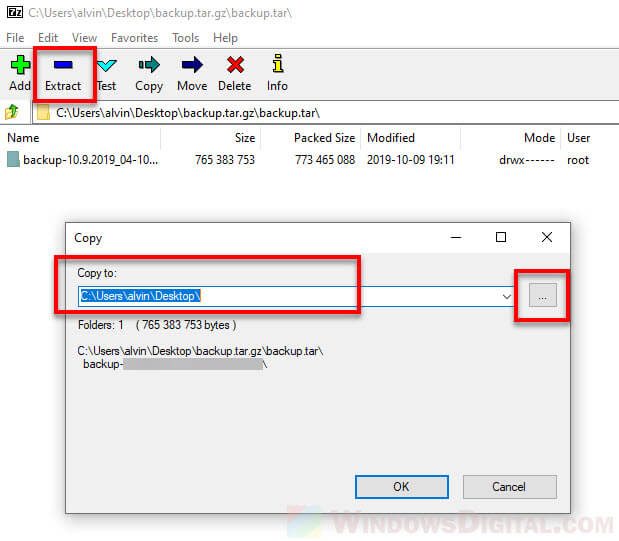
- In the 7-Zip window, select the file you want to extract and then click on “Extract“.
- Enter the location or browse to the destination where you want the files to be extracted to.

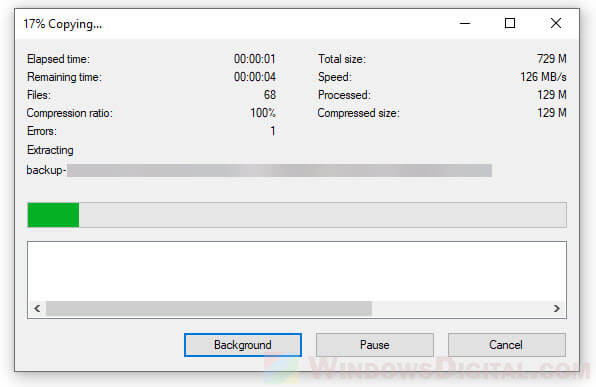
- Click OK to begin the extraction.
If it’s a .tar.gz that you’re opening, you may need to double-click the .tar file when it’s opened in 7-Zip in order to browse and extract the archived files.
WinRAR – supports both Tar and Gzip
WinRAR is yet another popular file archiver tool widely used by users around the world to compress and uncompress files. WinRAR also supports both tar and gz extensions. You can use it to easily open, view and extract any .gz, tar.gz or .tar file.
To open and extract a tar.gz, .tar or .gz file using WinRAR in Windows 10 or 11, follow the steps below.
Download and install WinRAR from https://www.win-rar.com/download.html.
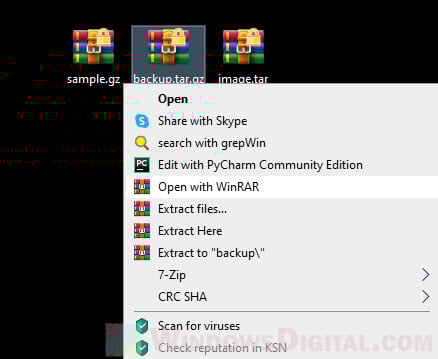
Once installed, right-click on the .gz or .tar file you want to open and extract. Select “Open with WinRAR” from the context menu.
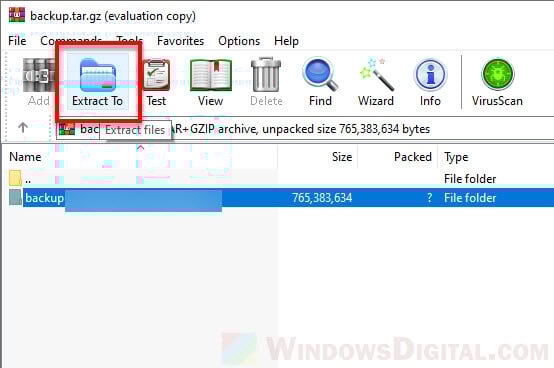
Doing so will open the compressed file in WinRAR. To extract any or all files, select the files you want to extract, then click on the “Extract to” button.
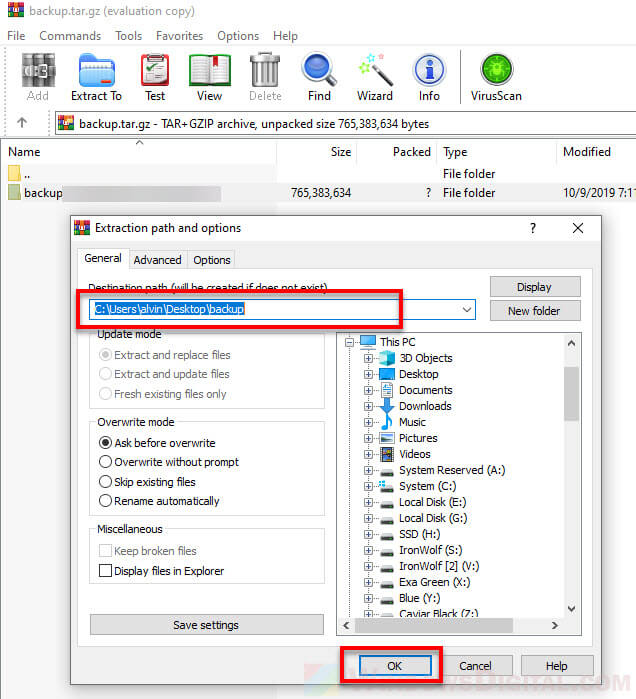
Enter or browse to the extraction destination path (the location where you want to extract the files to), then click OK to begin the extraction.
Extract tar.gz, .gz or .tar using CMD in Windows 11/10
If you don’t want to install any file compression software, you can quickly extract .gz, tar.gz or .tar files using the Tar command in command prompt on Windows 11 or 10.
To extract tar.gz or tar file using command in Windows, follow the steps below.
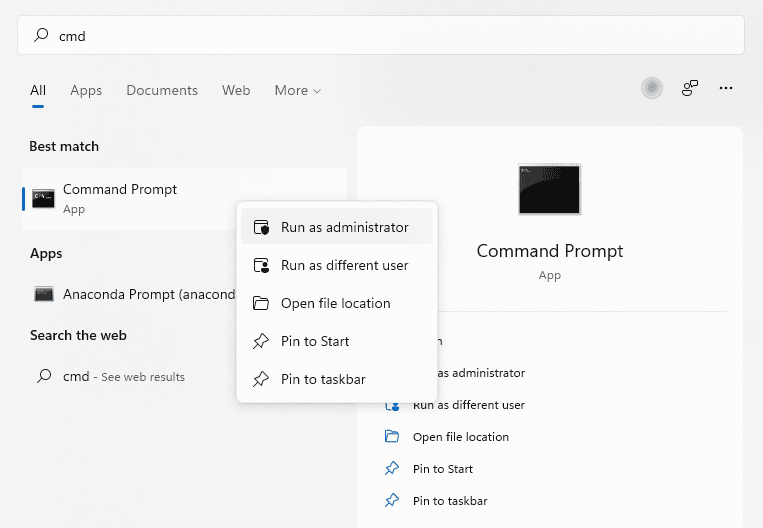
Firstly, open an elevated command prompt by search for “cmd” on the Windows 11 or 10 search bar. Right-click “Command Prompt” from the search result and select “Run as administrator“.
In the command prompt window, enter the following command.
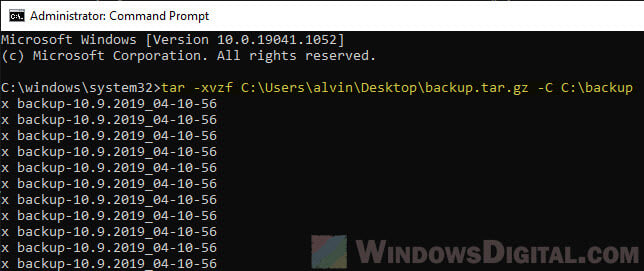
tar -xvzf "Path to the archived file" -C "Path to the extract destination"
For example:
tar -xvzf C:\Folder\Sample.tar.gz -C C:\Anywhere\
The example above will extract the sample.tar.gz file from C:\Folder\ to C:\Anywhere\ folder. Note: Make sure the -C parameter before the path to destination is uppercase letter.
The parameters used are explained as below.
- x — to tell the tar command to extract the archive file.
- v — Optional: to show the progress of the extraction by showing the list of files as they are extracted. Otherwise, you will see nothing except a blinking cursor until the extraction is completed.
- z — to tell tar to extract through gzip.
- f — to tell tar that the next argument is the file name of the archive.
The size of the files is increasing day by day owing to high quality in everything related to video, audio, document, software, etc. For the same intention, users are rummaging for newer methods to save their file in a compact form. There are various compressing software available online that can shorten the size of your file.
One such file format is tar. TAR stands for tarball which contains several files enclosed in a single file. This will further help in keeping track of all the files as it contains all in one. The files named are of extension tar.gz. TAR files are usually used in Linux and Unix Operating Systems. They are nowadays also used in Windows.
Manual approach to open tar.gz file in Windows 10
To open tar.gz file in Windows 10, we should use the command prompt in Windows 10. For doing so, follow the steps below:
- Click on the Windows button and type cmd in the search tab
- Now, right-click on the command prompt and choose Run as administrator
- Go to the location where the tar file is saved
- Next, type the command
tar-xf filename.tar
For example: tar-xf abc.tar - The file will then be extracted at the same location
Professional Approach to view or open tar.gz file in Windows 10
Sometimes, it happens that these tar files are corrupted. To recover them, we are using Tar File Opener which is know as Aryson Archive Recovery Software here. Follow the steps below to retrieve the files from the tar.gz file:
How to Open Tar.gz file – Let’s Know
- Download and Install Tar.gz File Opener Tool
- Launch the software and then select file type as tar
- In the next page, you can either select a single file or multiple files
- Soon after, the selected tar.gz file will be scanned and you can check the preview of the file and then press the Next button
- Now, click on the Browse button and select a location where you want to save the recovered file
- To start the saving process, click on the Save button
- The saving process is completed very soon and then click on the OK button
- Click on the exit button to close the application
Features of Professional Methods
The most effective way to retrieve archive files like tar, zip, rar, 7zip, etc is by using professional third-party software like Aryson Archive Recovery Software. The files are destroyed due to improper compression or incomplete downloading. To repair and recover the corrupt archive files, it is the best method. Some important features of Aryson Archive Recovery Software are as follows:
- Efficiently recovers the large archive files in a single shot
- Smartly recover and repair the Corrupt Archive files of all formats like ZIP, RAR, TAR, TAR.GZ, 7-GZ
- Fixes the corruption errors showing “unexpected end of archive”
- It can easily extract the large files of approx 1TB size
- Archive Recovery can repair the Archive files created on MAC OS and Windows
- It also recovers data from corrupted ZIP files successfully.
- By Freeware Online Archive Recovery Tool you can preview the recovered files
Conclusion
TAR file wraps up the different files in a single file. But they are prone to get corrupted and then cannot be recovered. For such scenarios, third-party software like Aryson Archive Recovery software is used.
Related Post
This Month Offer
- days
- Hours
- Minutes
- Seconds
(Offer Valid Until : )
Click Here
Last Updated :
30 Sep, 2024
If you’re trying to extract a TAR file on Windows, particularly a .tgz or tar.gz file, there are several ways to do it easily. Although Windows doesn’t natively support extracting these files, there are plenty of TAR file extraction tools for Windows that can help you. This guide will show you how to open .tgz files on Windows and outline the steps to effectively unpack TAR files using third-party tools or commands.
Table of Content
- Steps to Extract TAR Files (.tgz) in Windows
- Method 1: Extract TAR Files Using Command Prompt
- Method 2: Extract TAR Files Using Third-Party Applications
- Method 3: Extract TAR Files Using Online Converters
- How to Extract a TAR File (.tgz) on Windows — FAQs
For unzipping TAR Files on Windows, the following methods should be used. We will start with one simple command where no third-party application help will needed.
Method 1: Extract TAR Files Using Command Prompt
Step 1: Search for the Command Prompt in the Search Bar. Open the prompt in the Administrative Format.
Step 2: Execute the following command. It will help to convert the TAR File to File Explorer Format without having much time. It will take some time to complete the process.
Command: tar -xvzf <TAR-FIle-Location> -C <New-Location>

If you want to extract the TAR Files on your local device, then have any third-party application on your device. There are many third-party applications present like 7-Zip or WinZip, etc. Using any one of those, you can Open TAR FIle on Windows.
You have to download & install the third-party apps on the device. Later, select any one TAR file & it will be directly converted to the simple folder structure. To open any TAR Folder inside the new one, select it again.
Hooray! You now have one third-party application installed on the device to Unzip Linux TAR Format on Windows.
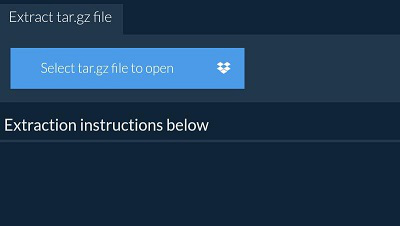
Now, if you want to get your job reduced to some folds, there is another option present. It is to Extract the TGZ File Online. There are many Online Converters present on the internet that can be used for successful conversion.
You have to select the TAR File & want to choose the operation. If you want, it will convert the TAR File to RAR file which is the Native File Compressor for Windows. Or it can directly extract the files on your desktop.
Conclusion
Extracting TAR files on Windows is simple with the right tools. Whether you’re using a third-party utility or command-line options, knowing how to extract .tgz files can help you manage compressed files efficiently. By following these steps, you’ll be able to unzip TAR files on Windows with ease and have access to the data you need without any hassle.
From videos to entire software packages, many files are compressed and stored using the .tar.gz format. While extracting a .tar.gz file isn’t quite as easy as unzipping a .zip, it’s still pretty straightforward.
With Linux, macOS, and Windows 10 offering a built-in tar utility, it’s easier than ever to unzip tar.gz files through the command line. Usually, the only command you really need is:
tar -xvzf filename.tar.gzCompressing and extracting these files, however, isn’t always intuitive. This article provides detailed guides to unzip .tar.gz files in Linux and Windows, as well as a few helpful tips and tricks.
What are .tar and .tar.gz files?
A “.tar” file is a collection of files compressed into a single file or archive. Short for “Tape ARchive,” the name “TAR” is a throwback to when files were stored on magnetic tape drives.
Thankfully, you don’t need to be a 1960s computer technician to use and extract .tar files – nor do modern .tar files even have anything to do with old computers.
Just like the more familiar .zip files, .tar files compress large files into a single package, making it easier to store and send them through email, servers, and so on. As a result, it has become a common file extension for many open-source software packages and other resources.
But with .zip being the easier of the two to use, why use .tar in the first place? The next section shows how .tar comes with a few extra features that make it the better compression format for certain files and applications.
.tar vs .zip
Where most operating systems make it easy to extract and create .zip files, the same can’t really be said for .tar files — at least not in ways that are easy to notice.
Of course, that’s not to say .tar files are some kind of “lesser” format than .zip. Rather, they both accomplish the same task (file compression) in the same way. Here’s a breakdown of how it all works.
- A .tar file is a collection of uncompressed files, sometimes known as a tarball. Since .tar doesn’t compress anything, it requires a separate compression utility for compression. As we see later, one popular compression utility is gzip, which compresses a .tar into a .tar.gz file.
- A .zip file is a collection of compressed files. Rather than use a separate compression utility to compress the entire collection, .zip automatically compresses each file within the collection.
By now, you’ve probably noticed the major difference between .tar and .zip files: compression methods.
Where .zip files consist of many individually compressed files, .tar files are compressed as a single package, leaving its files uncompressed. In other words, .zip files are a collection of compressed files, while .tar files are a compressed collection of files.
But does the compression method really matter, especially if both methods technically produce compressed files?
It depends. For sending and storing, both .zip and .tar.gz files allows you to send relatively large packages as a single file. However, there are some pretty major differences when it comes to accessing data within the files and the compression efficiency.
- .zip files are more accessible — Since data in a .zip are compressed individually, they can also be accessed individually. By contrast, data in a .tar.gz is only accessible after extracting the entire file.
- .tar.gz files are more space-efficient — Since .tar files are compressed as a single entity rather than a group of individually compressed files, compression utilities can group similarities between files and cut down on space. In other words, compressing files as a single group allows for more efficient compression methods, thereby saving space and reducing the overall size of the file.
If that’s not entirely clear, don’t worry. Technical details aside, all you need to remember is that .zip files are more accessible but less space-efficient, while .tar files are less accessible but more space-efficient. As a result, one isn’t necessarily better than the other — it’s all a matter of application.
What’s the difference between .tar and .tar.gz files?
While both .tar and .tar.gz refer to file archives, a .tar.gz file is a .tar file that’s been compressed or “zipped” using the gzip utility. Using gzip for compression is what gives the file a “.gz” double extension.
Though gzip is the most common compression utility, it’s not the only one. As you might imagine, using a different compression utility on a .tar file will result in a different double extension. Some common examples include .tar.bz2 (bzip2), .tar.br (Brotli), and .tar.zst (zstd), among many others.
As we see later, different compression utilities may require different methods for extracting and unzipping files. Though we mostly focus on .tar.gz files, check out the end of the article for some quick tips on extracting .tar files in other formats.
Otherwise, keep reading to learn how to unzip .tar.gz files in Linux, macOS, and Windows.
How do I unzip a .tar.gz file in Linux terminal?
Most Linux distributions and macOS include built-in tools for zipping and unzipping .tar and .tar.gz files. While the tar utility is enough for most purposes, you need the gzip utility to create .tar.gz files.
Unzip .tar.gz in Linux
You can unzip most .tar.gz and other compressed .tar files using the tar utility.
For the simplest method, begin by opening the terminal (CTRL+ALT+T) and navigate to the directory of the .tar.gz file you want to unzip. Then enter the following command:
Extract .tar.gz file to current working directory:
tar -xf filename.tar.gzThis command extracts (-x) the file (-f) specified (in this case, filename.tar.gz) to the current directory. Note that this command also works with other common compression formats such as .tar.bz2.
The tar command also comes with several other options. Like many Linux commands, one of these is a verbose output (-v) that prints the extracted files to the terminal window:
Extract .tar.gz file to current working directory and print output:
tar -xvf filename.tar.gzAgain, the above command extracts to the current working directory by default. You can use the -C option to extract to a different directory (in this case, /home/user/files).
Extract .tar.gz file to a different working directory:
tar -xf filename.tar.gz -C /home/user/filesOnly extract specific files or directories from .tar.gz in Linux
The tar command also provides support for extracting only specific files or directories from a .tar.gz file. Simply add a space-separated list of the files you want to extract.
Extract file1 and directory1 from .tar.gz file to current working directory:
tar -xf filename.tar.gz file1 directory1Note that this command will throw an error unless you specify the exact filename listed in the .tar file. As we cover more in the next section, you can verify file names by listing contents with the tar -tf filename.tar.gz command.
You can also use --wildcards to extract all files with a certain extension or name.
Extract all files ending with “.txt” from .tar.gz file:
tar -xf filename.tar.gz --wildcards '*.txt'Unzip .tar.gz from stdin in Linux
You can also extract .tar.gz directly from the standard input stream (stdin) by piping it into the tar command using the decompression option (-z).
For example, if you wanted to extract the .tar.gz file located at “https://kinsta.com/filename.tar.gz” (there’s not actually a .tar.gz file here, but bear with us), you’d use the wget command piped into tar.
Extract .tar.gz file from a URL:
wget -c https://kinsta.com/filename.tar.gz -O - | sudo tar -xzList contents of .tar.gz file in Linux
It’s often useful to list the contents of a .tar.gz file without having to unzip the entire archive. The -list (-t) option outputs a list of filenames.
List contents of a .tar.gz file:
tar -tf filename.tar.gzYou can also add the verbose output option (-v) to provide detailed listings, including dates, securities/permissions, and more.
List detailed contents of a .tar.gz file:
tar -tvf filename.tar.gzMany compression utilities also offer their own commands for listing the contents of compressed files. For example, gzip allows you to list the contents of a .gz file with the following command:
List detailed contents of a .gz file with gzip:
gzip -l filenameZip and unzip .tar and .tar.gz in Linux with gzip
You can create your own compressed .tar files using compression utilities such as gzip. Gzip is one of the most popular and available options, especially since it comes built in to most Linux distributions and macOS.
In the terminal, navigate to the working directory of the .tar file you want to compress and simply enter the following command:
Compress .tar file with gzip:
gzip filename.tarYou can easily unzip the resulting .tar.gz file with the decompress (-d) option.
Decompress .tar.gz file with gzip:
gzip -d filename.tarIf you want to keep the original file after compression, there are two options. The first is the -k option, and the other uses the -c option to output the compressed file to a different file, preserving the original.
Compress .tar file and keep original copy:
gzip -c filename.tarCompress .tar file and store as a different file:
gzip -c filename.tar > newfilename.tar.gzLike the tar utility, gzip also allows you to zip and unzip multiple files or entire directories at a time.
Compress multiple files:
gzip file1 file2Decompress multiple files:
gzip -d file1 file2Compress all files in a directory:
gzip -r directory1Decompress all files in a directory:
gzip -dr directory1How do I unzip a .tar.gz file in Windows 10?
Like Linux and macOS, the Windows 10 operating system also includes a built-in tar utility.
Unlike Windows’ convenient graphical user interface (GUI) for unzipping .zip files, you need to use the tar utility through the command line. However, there are also many third-party tools you can install for a more user-friendly experience.
Using the command line (cmd)
To access the Windows command line, search for “command prompt” or “cmd” in the search bar. Right-click the first result and select the “Run as administrator” option.
With the command prompt open, use the appropriate commands to change the current working directory (cd) to the location of the .tar.gz file you want to unzip. Alternatively, you can also specify a source and destination file path when using the tar utility.
Type one of the following commands and press “Enter.”
Extract .tar.gz file to current working directory:
tar -xvzf filename.tar.gzExtract .tar.gz file from source path to destination path:
tar -xvzf C:\PATH\TO\SOURCE\filename.tar.gz -C C:\PATH\TO\DESTINATIONNote that the tar utility in Windows has nearly the same syntax as it does in Linux and macOS. Here we’ve used the extract (-x), verbose (-v), decompress with gzip (-z), and file (-f) options for a complete extraction with decompression and detailed output.
Using third-party tools
If the command line isn’t your thing, there are plenty of user-friendly tools available to unzip tar.gz files.
While there are many tools to choose from, the most popular include 7-Zip and WinZip. While slightly different, they are quite lightweight and offer a much simpler alternative to using the command line.
Some third-party tools also offer extended flexibility for converting between file types, saving more time if you want to change between compression formats. Many are also available for Linux and macOS.
However, while tools like 7-Zip are free, many more “robust” solutions are only available for a price after a trial period. As a result, we recommend sticking to free (but trustworthy) tools or simply using the command line.
Troubleshooting Common Errors
Not every .tar.gz extraction is seamless — especially if you’re using the command line!
Where commands have little (if any) room for typos or omissions, many common errors are the result of small mistakes, misspellings, or incorrect formats. Thankfully, unless you’re somehow missing your tar or gzip utility, most common errors are very easy to fix.
tar: README: Not found in archive
This error occurs when trying to extract specific files or directories from a .tar.gz file using tar.
Error input:
tar -xf filename.tar.gz FILEError output:
tar: FILE: Not found in filename
tar: Exiting with failure status due to previous errors
In this example, the user tried to extract the file titled “FILE” from filename.tar.gz. However, tar was unable to find FILE within .tar.gz, meaning that the user either misspelled the name or that the file simply doesn’t exist in filename.tar.gz. Another common cause of errors is case sensitivity, where Linux treats “FILE” and “file” as two separate entities.
Solution: Check the spelling and/or verify that the file exists in the .tar.gz archive by listing the contents with tar -tf filename.tar.gz.
tar: Archive is compressed. Use -z option
This error occurs if you try to decompress a file without specifying a decompression utility, specifically -z for gzip.
Error input:
wget -c https://kinsta.com/filename.tar.gz -O - | sudo tar -xNotice that the “-z” is missing from what should be sudo tar -xz on the far right.
Error output:
tar: Archive is compressed. Use -z option
tar: Error is not recoverable: exiting now
Solution: Specify a decompression option such as gzip (-z) in the tar command.
gzip: stdin: not in gzip format
Many users report running the “right” commands only to find that their .tar.gz is “not in gzip format” – despite the .gz extension.
Error output:
gzip: stdin: not in gzip format
tar: Child returned status 1
tar: Error exit delayed from previous errors
This error usually occurs when a .tar has been saved as a .gz despite having never been compressed using the gzip utility. It may sound like a silly mistake, but it’s surprisingly common in situations where users directly rename files and their extensions (such as .tar and .gz) in the process.
Solution: Find a new copy of the .tar.gz file, or simply extract it as a .tar file using tar -xf filename.tar instead. If this command also throws an error, the next solution might help.
tar: Unrecognized archive format
Similar to the previous error, this error occurs when an archive was saved as a .tar despite not being a .tar archive.
Error output:
tar: Unrecognized archive format
tar: Error exit delayed from previous errors.
Solution: Find a new copy of the .tar or .tar.gz file, or try extracting with gunzip filename.tar.gz instead. If the gunzip command doesn’t work, try listing the contents with verbose output with tar -xvf filename.tar.gz and see if there’s a specific file causing the problem. However, it’s more likely that the file was never properly zipped as a .tar file in the first place.
FAQs
It’s easy to get confused when navigating between .tar, .tar.gz, and .gz – not to mention zipping and unzipping them. Here are a few frequently asked questions we commonly hear from users working with .tar.gz files.
How do I open a .tar.gz file?
You can open most .tar.gz files using the tar command built in to Linux, macOS, and Windows 10. If you’re not comfortable with the terminal or command line, third-party tools such as 7-Zip offer a more user-friendly alternative.
Is .gz a .tar file?
While every tar.gz file is a .tar archive, not every .gz is a .tar file. The .gz extension represents the gzip compression format, which can be applied to almost any file format to compress data and save space.
Is .tar.gz same as .zip?
Though both .zip and .tar.gz archive and compress files, they do so in different ways. Where .zip archives and compresses individual files, .tar only archives individual files, leaving a separate compression format such as .gz (gzip) to compress all of them as a single file/archive. In other words, .zip is a collection of compressed files, while .tar.gz is a compressed collection of files.
Is .tar.gz more efficient than .zip?
Yes. Since .tar.gz compresses multiple files all at once, it can take advantage of similarities between individual files to save on space. Generally speaking, a collection of files archived and compressed as a .tar.gz are more space-efficient (i.e., smaller) than the same collection compressed as a .zip.
Summary
As software becomes more powerful and media becomes more data-rich, file sizes continue to grow at exponential rates. As a result, it’s becoming increasingly common to store and send files in compressed formats as .tar.gz.
If you plan to distribute and store .tar.gz files on your website, Kinsta’s managed hosting services can help make the most of your space.
For more information and to schedule a live demo, contact a hosting expert from Kinsta today.
A .tar.gz file, also known as a tarball, is a compressed archive used in UNIX and Linux systems. This format involves multiple files bundled into a single archive and compressed using gzip compression.
Although .tar.gz is commonly associated with UNIX and Linux distributions, you can also extract these files in Windows using various third-party tools.
This tutorial will show you how to extract .tar.gz files in a Windows environment.

Requirements
- A Windows system (this tutorial uses Windows 11).
- WinRAR, WinZip, and 7-Zip installed (for specific examples).
- The tar tool (for some examples).
- Access to Command Prompt.
How to Extract .tar.gz File in Windows
Since Windows doesn’t natively support .tar.gz files, extracting involves third-party tools or non-native commands. The following text outlines the process of extracting a .tar.gz file in a Windows environment.
Extract .tar.gz File in Windows Using tar Command
The tar (tape archive) command is a command-line utility for archiving files.
The command bundles multiple files and directories into a single file archive but doesn’t compress data on its own. Therefore, it is often used with compression tools, such as gzip (tar.gz files) or bzip2 (tar.bz2 files), to reduce the overall archive size.
The tar command is not a native Windows command. It usually doesn’t come preinstalled in older Windows systems. However, newer versions (starting from Windows 10) have it preinstalled.
The following example shows how to extract a .tar.gzip file called archive_1 using the tar command. The archive_1 consists of three files: sample_file1, sample_file2, and sample_file3.
To extract the files using tar:
1. Open the Command Prompt.
2. Use the cd command to navigate to the directory the archive is in. In this case:
cd C:\files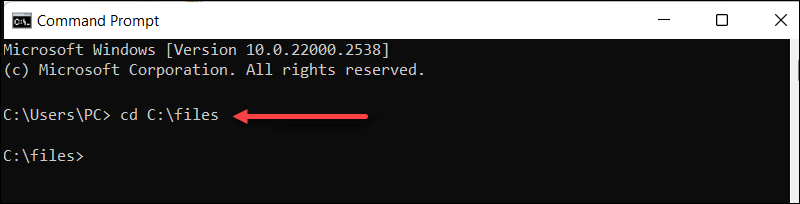
3. Use the following syntax to extract files:
tar -zxvf [archive_name.tar.gz]This command consists of:
-z.Specifies the input is compressed withgzip.-x. Stands for extract.-v. Enables verbose mode to provide detailed output during extraction.-f. Specifies the filename to be extracted.
For instance, in our case:
tar -zxvf archive.tar.gz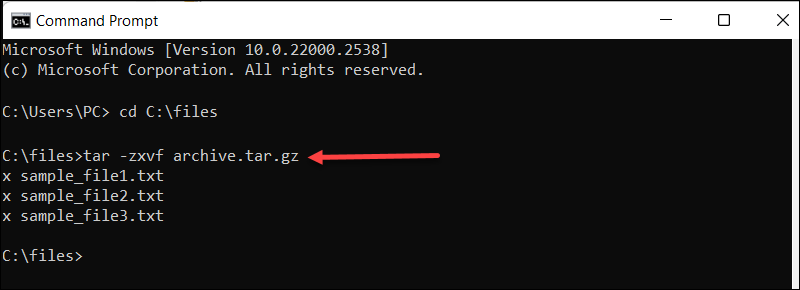
The output lists extracted files.
Note: Master the Command Prompt with our cmd commands guide which features a free downloadable cheat sheet.
Extract .tar.gz File in Windows Using 7-Zip
For a more GUI-friendly approach to extracting .tar.gz files, use 7-Zip.
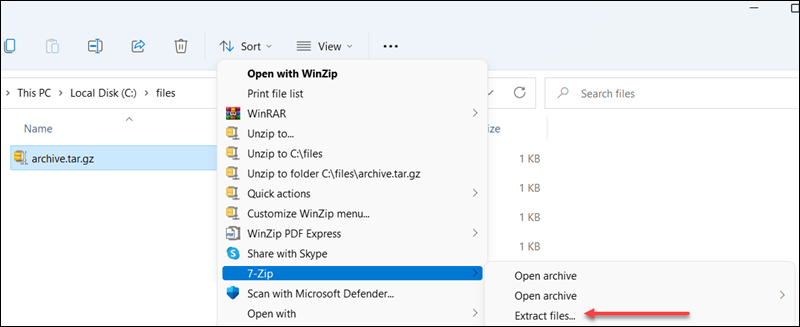
Follow these steps to extract files from a .tar.gz archive:
1. Right-click the archive.
2. Find and hover over 7-Zip.
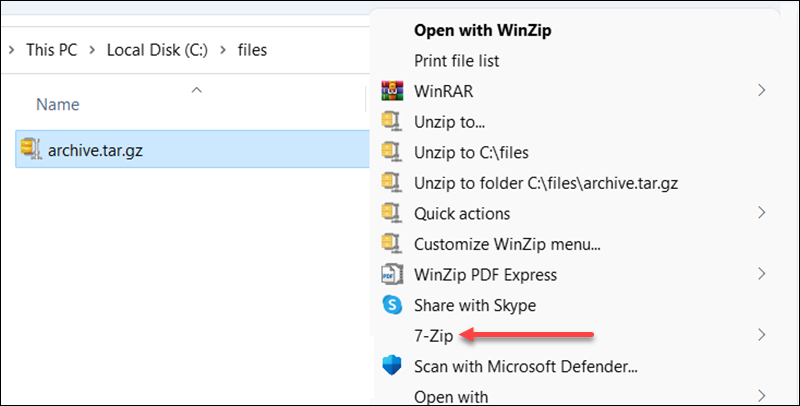
3. Choose Extract Here to extract files to the archive folder.

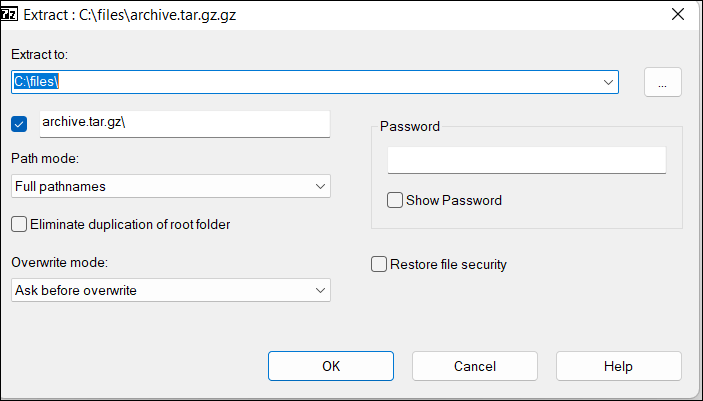
4. Alternatively, select Extract files to pick where to extract the files.
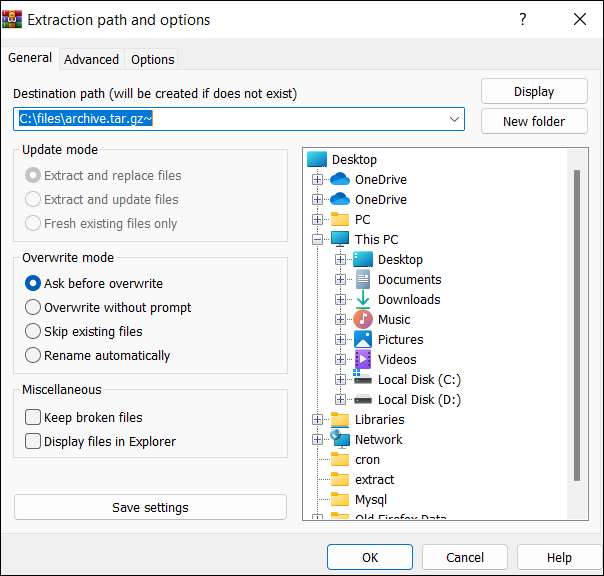
A new window opens to manage where and how to extract files.
Extract .tar.gz File in Windows Using WinRAR
Another way to access archive files is to extract them via WinRar. To accomplish this, follow these steps:
1. Right-click the archive.
2. Hover over the WinRar icon.

3. Choose Extract Here to extract the file to your current location.
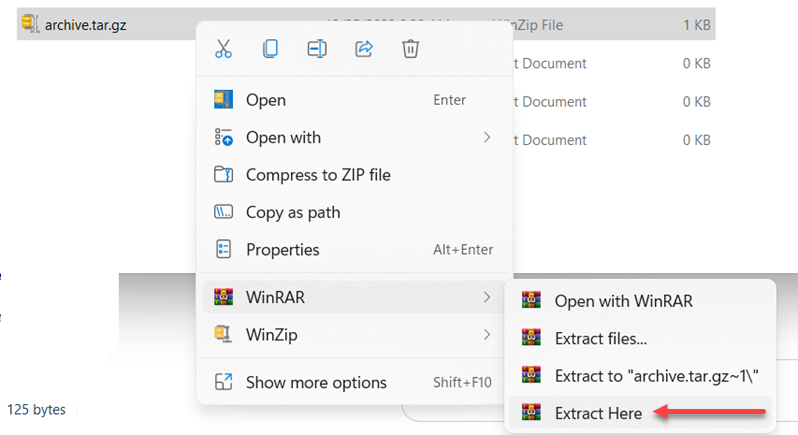
Alternatively, select one of the offered locations or set one up by clicking the Extract files… option.
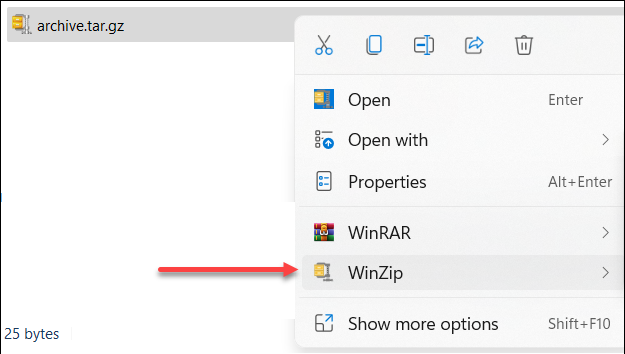
Extract .tar.gz File in Windows Using WinZip
Extracting .tar.gz files using WinZip is also quite straightforward.
To get the files, follow these steps:
1. Right-click the archive file and hover over WinZip.
2. Choose whether to unzip to one of the offered locations or define one with the Unzip to… option.
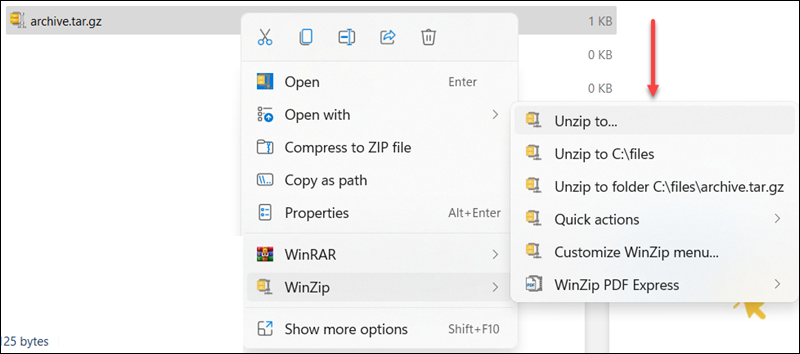
The Unzip to…option opens up another window with extra settings.
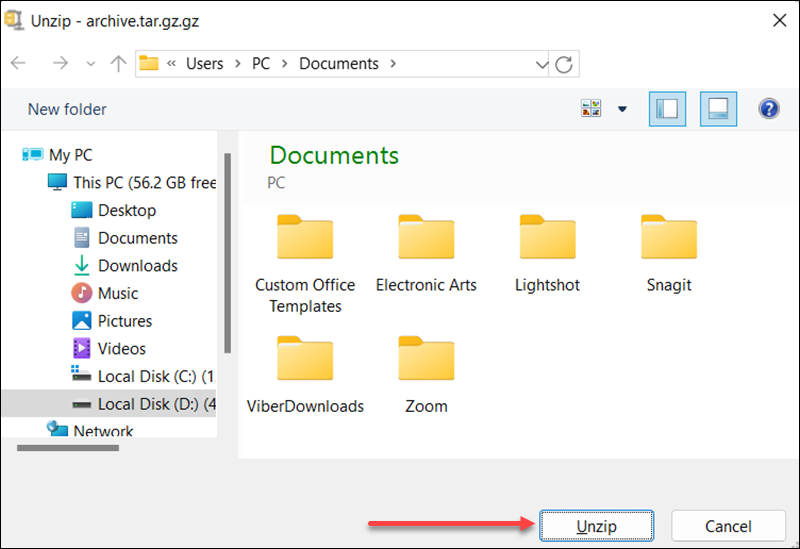
3. Select Unzip to start the process.
Conclusion
After reading this article, you know how to extract .tar.gz files in Windows using the tar command, 7-Zip, WinZip, or WinRAR.
Next, learn how to extract .tar.gz files in Linux.
Was this article helpful?
YesNo