
There are plenty of customizable settings within Windows 10, but some settings can only be changed in the BIOS, or the Basic Input-Output System. Within the BIOS, you can overclock your RAM, add a password for the BIOS, adjust fan settings, and so much more. But how do you enter the BIOS on Windows 10?
The BIOS is a pre-boot environment, as it’s firmware built directly into your computer’s motherboard. This means once you’re seeing Windows 10, you’ve gone too far. You need to access the BIOS before actually booting into Windows 10.
If you’re using an older computer (or one deliberately set to boot slowly), you can press the F1 or F2 key when powering on the computer to enter the BIOS. However, if you’re using a computer made within the past few years, it’ll likely boot too fast to register an F1/F2 keypress at startup. Instead, follow these easy steps to access the BIOS on your Windows 10 computer.
How to enter the BIOS on a Windows 10 PC
The simplest method of entering the BIOS on a Windows 10 PC is to simply hold down the Shift key while restarting your computer, which can be done by heading to the Start menu, clicking the power button, and selecting Restart.
When your computer restarts, you should see a blue screen with multiple options. If that’s the case, head to step 5. If you don’t see this blue screen and you’ve tried to access it multiple times with the above method, follow steps 1 through 4 instead.
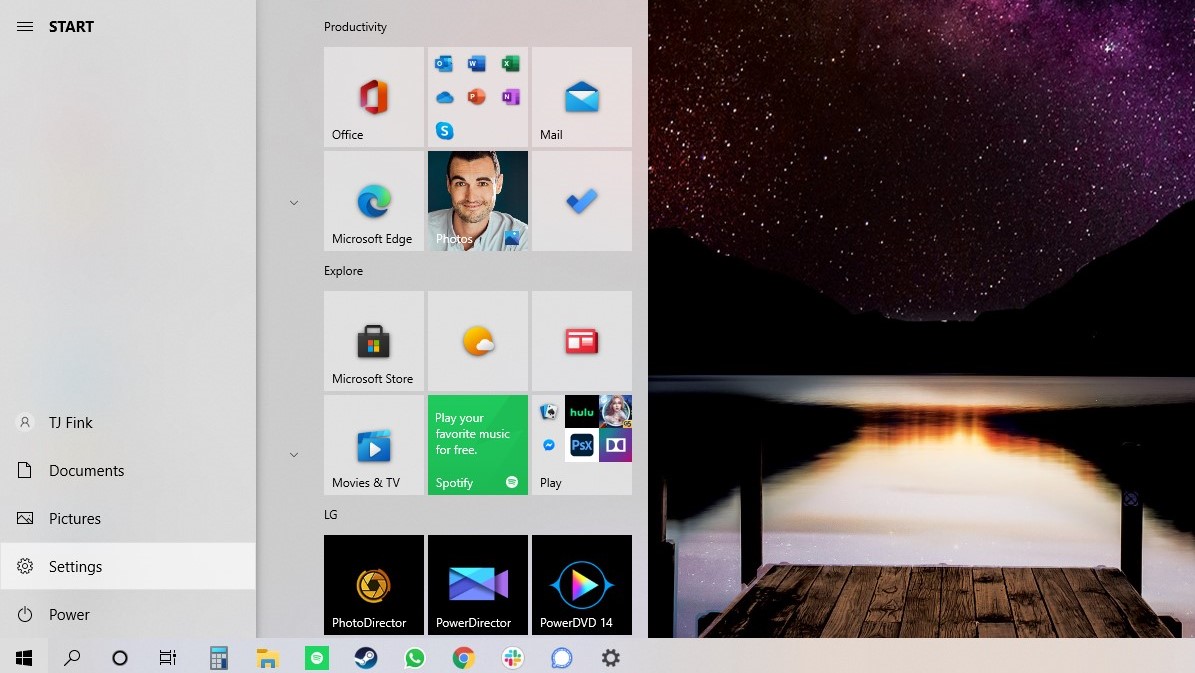
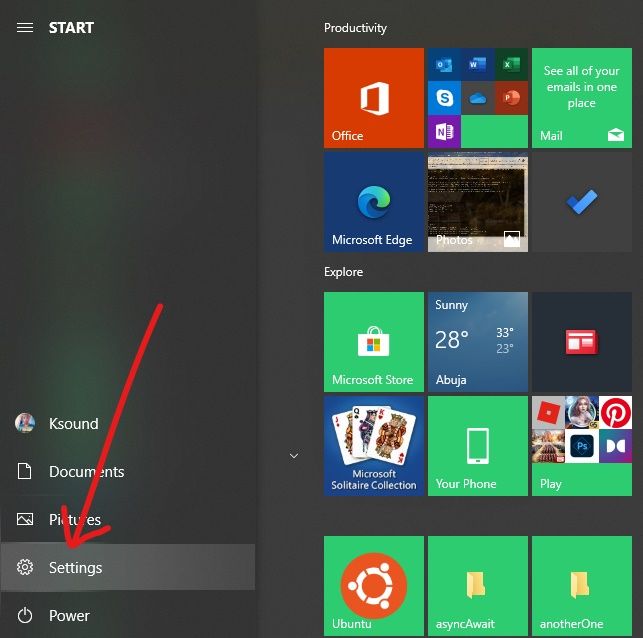
1. Navigate to Settings. You can get there by clicking the gear icon in the Start menu.
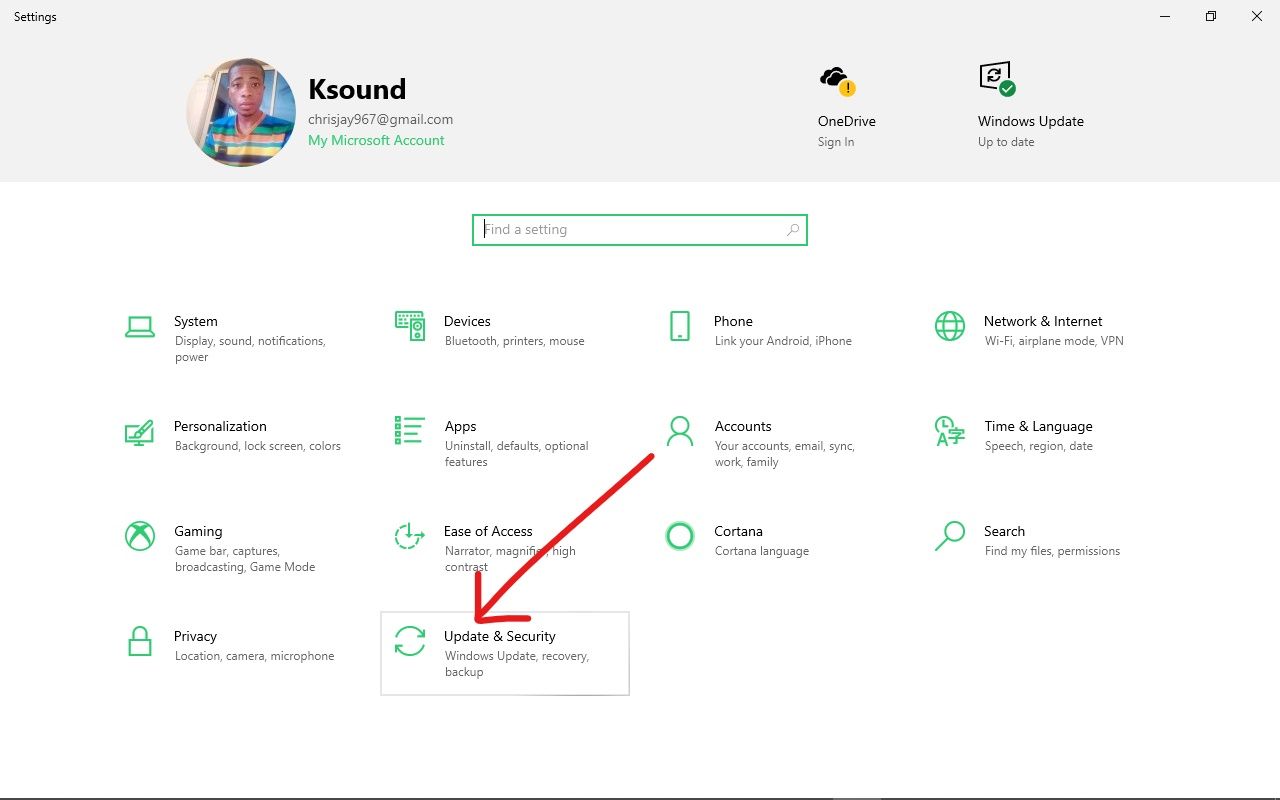
2. Select Update & Security.
Sign up to receive The Snapshot, a free special dispatch from Laptop Mag, in your inbox.

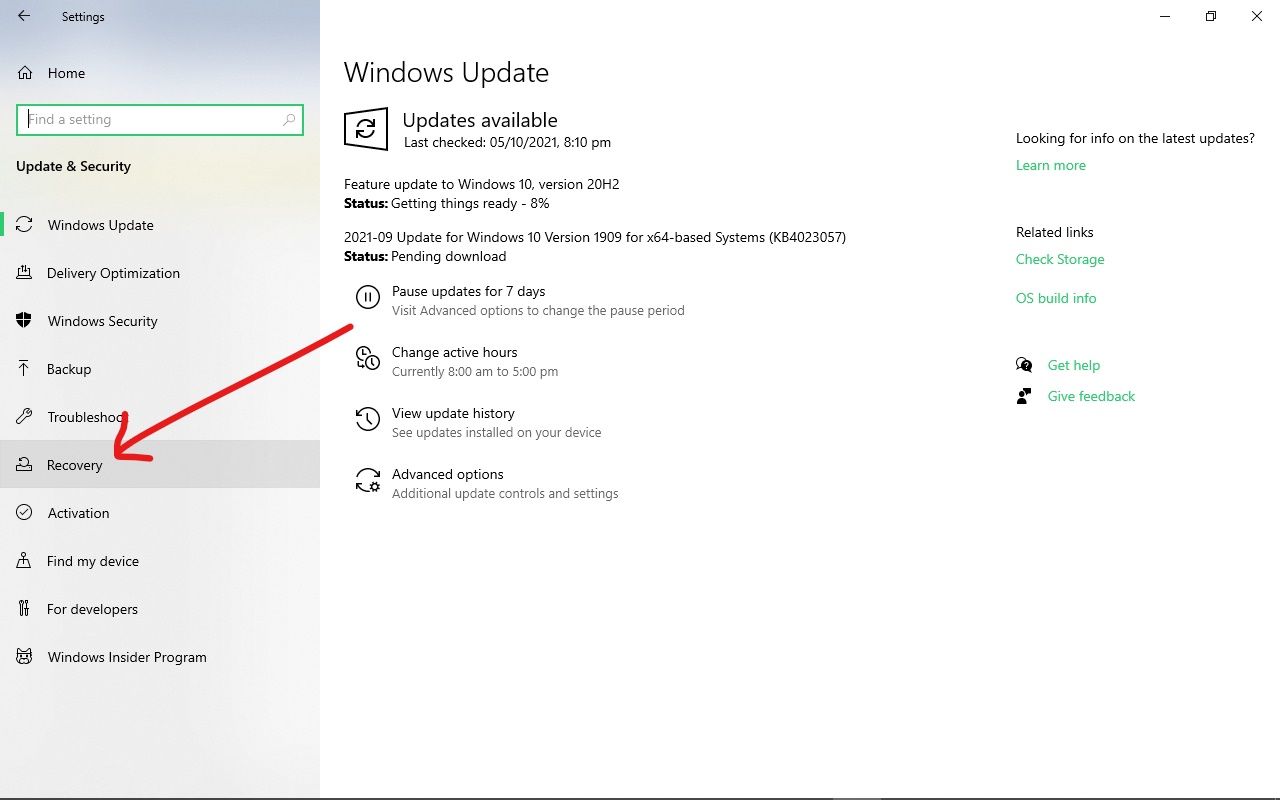
3. Select Recovery from the left menu.
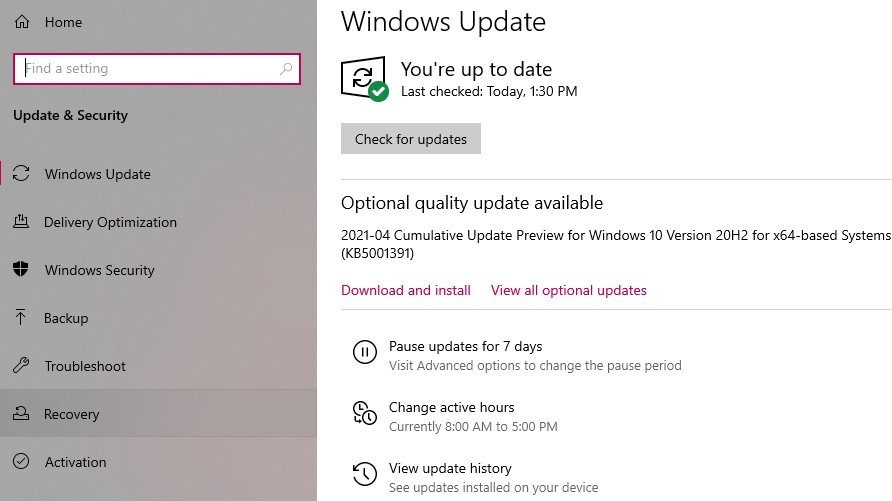
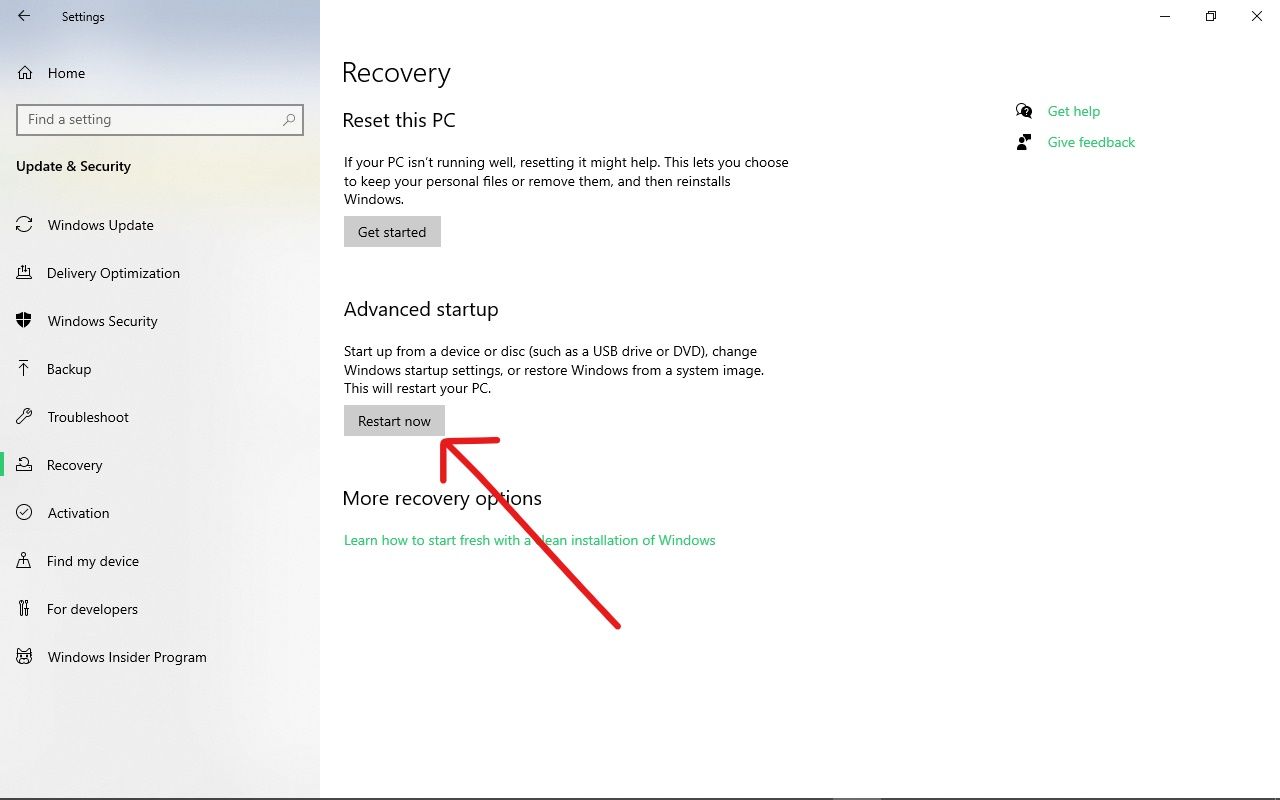
4. Click Restart Now under Advanced startup. The computer will reboot to a special menu.
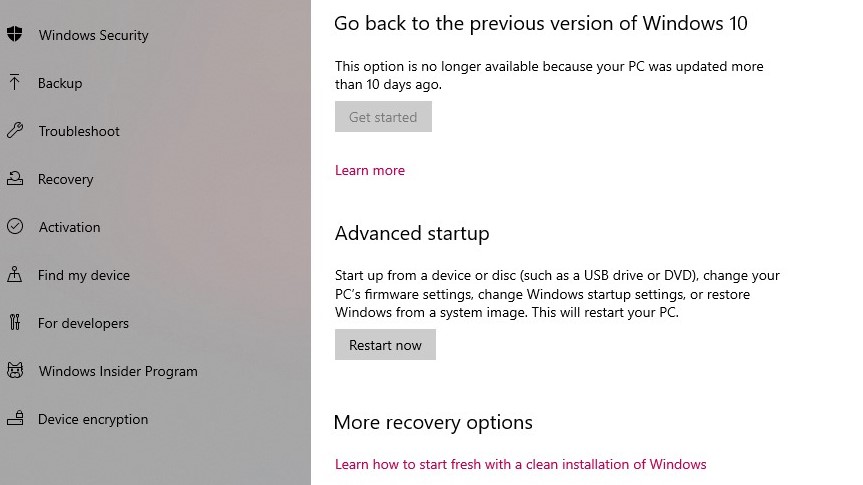
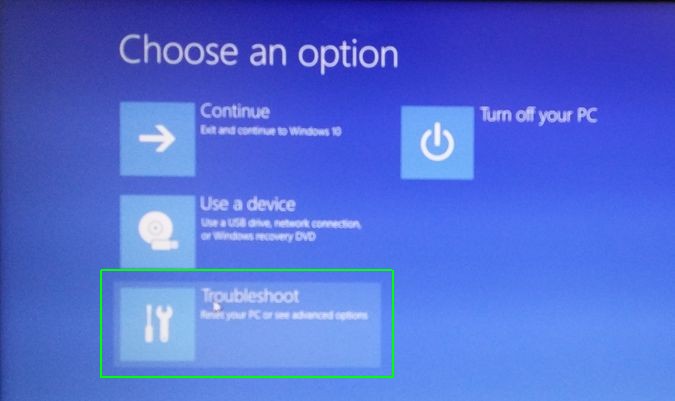
5. Click Troubleshoot.
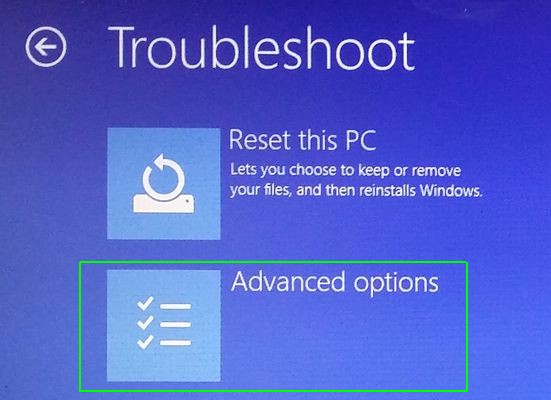
6. Click Advanced options.
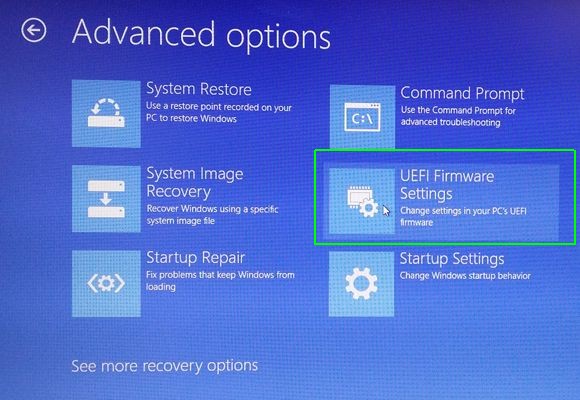
7. Select UEFI Firmware Settings. If you don’t see this icon, then press Startup Settings instead. When your PC is restarting, tap F1 (or F2) to access the BIOS.
8. Click Restart.
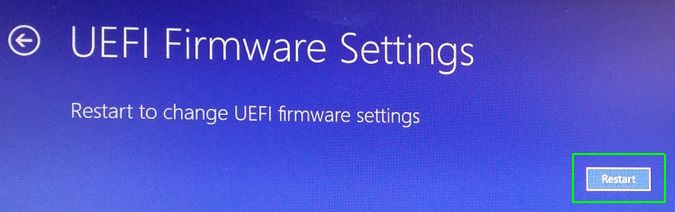
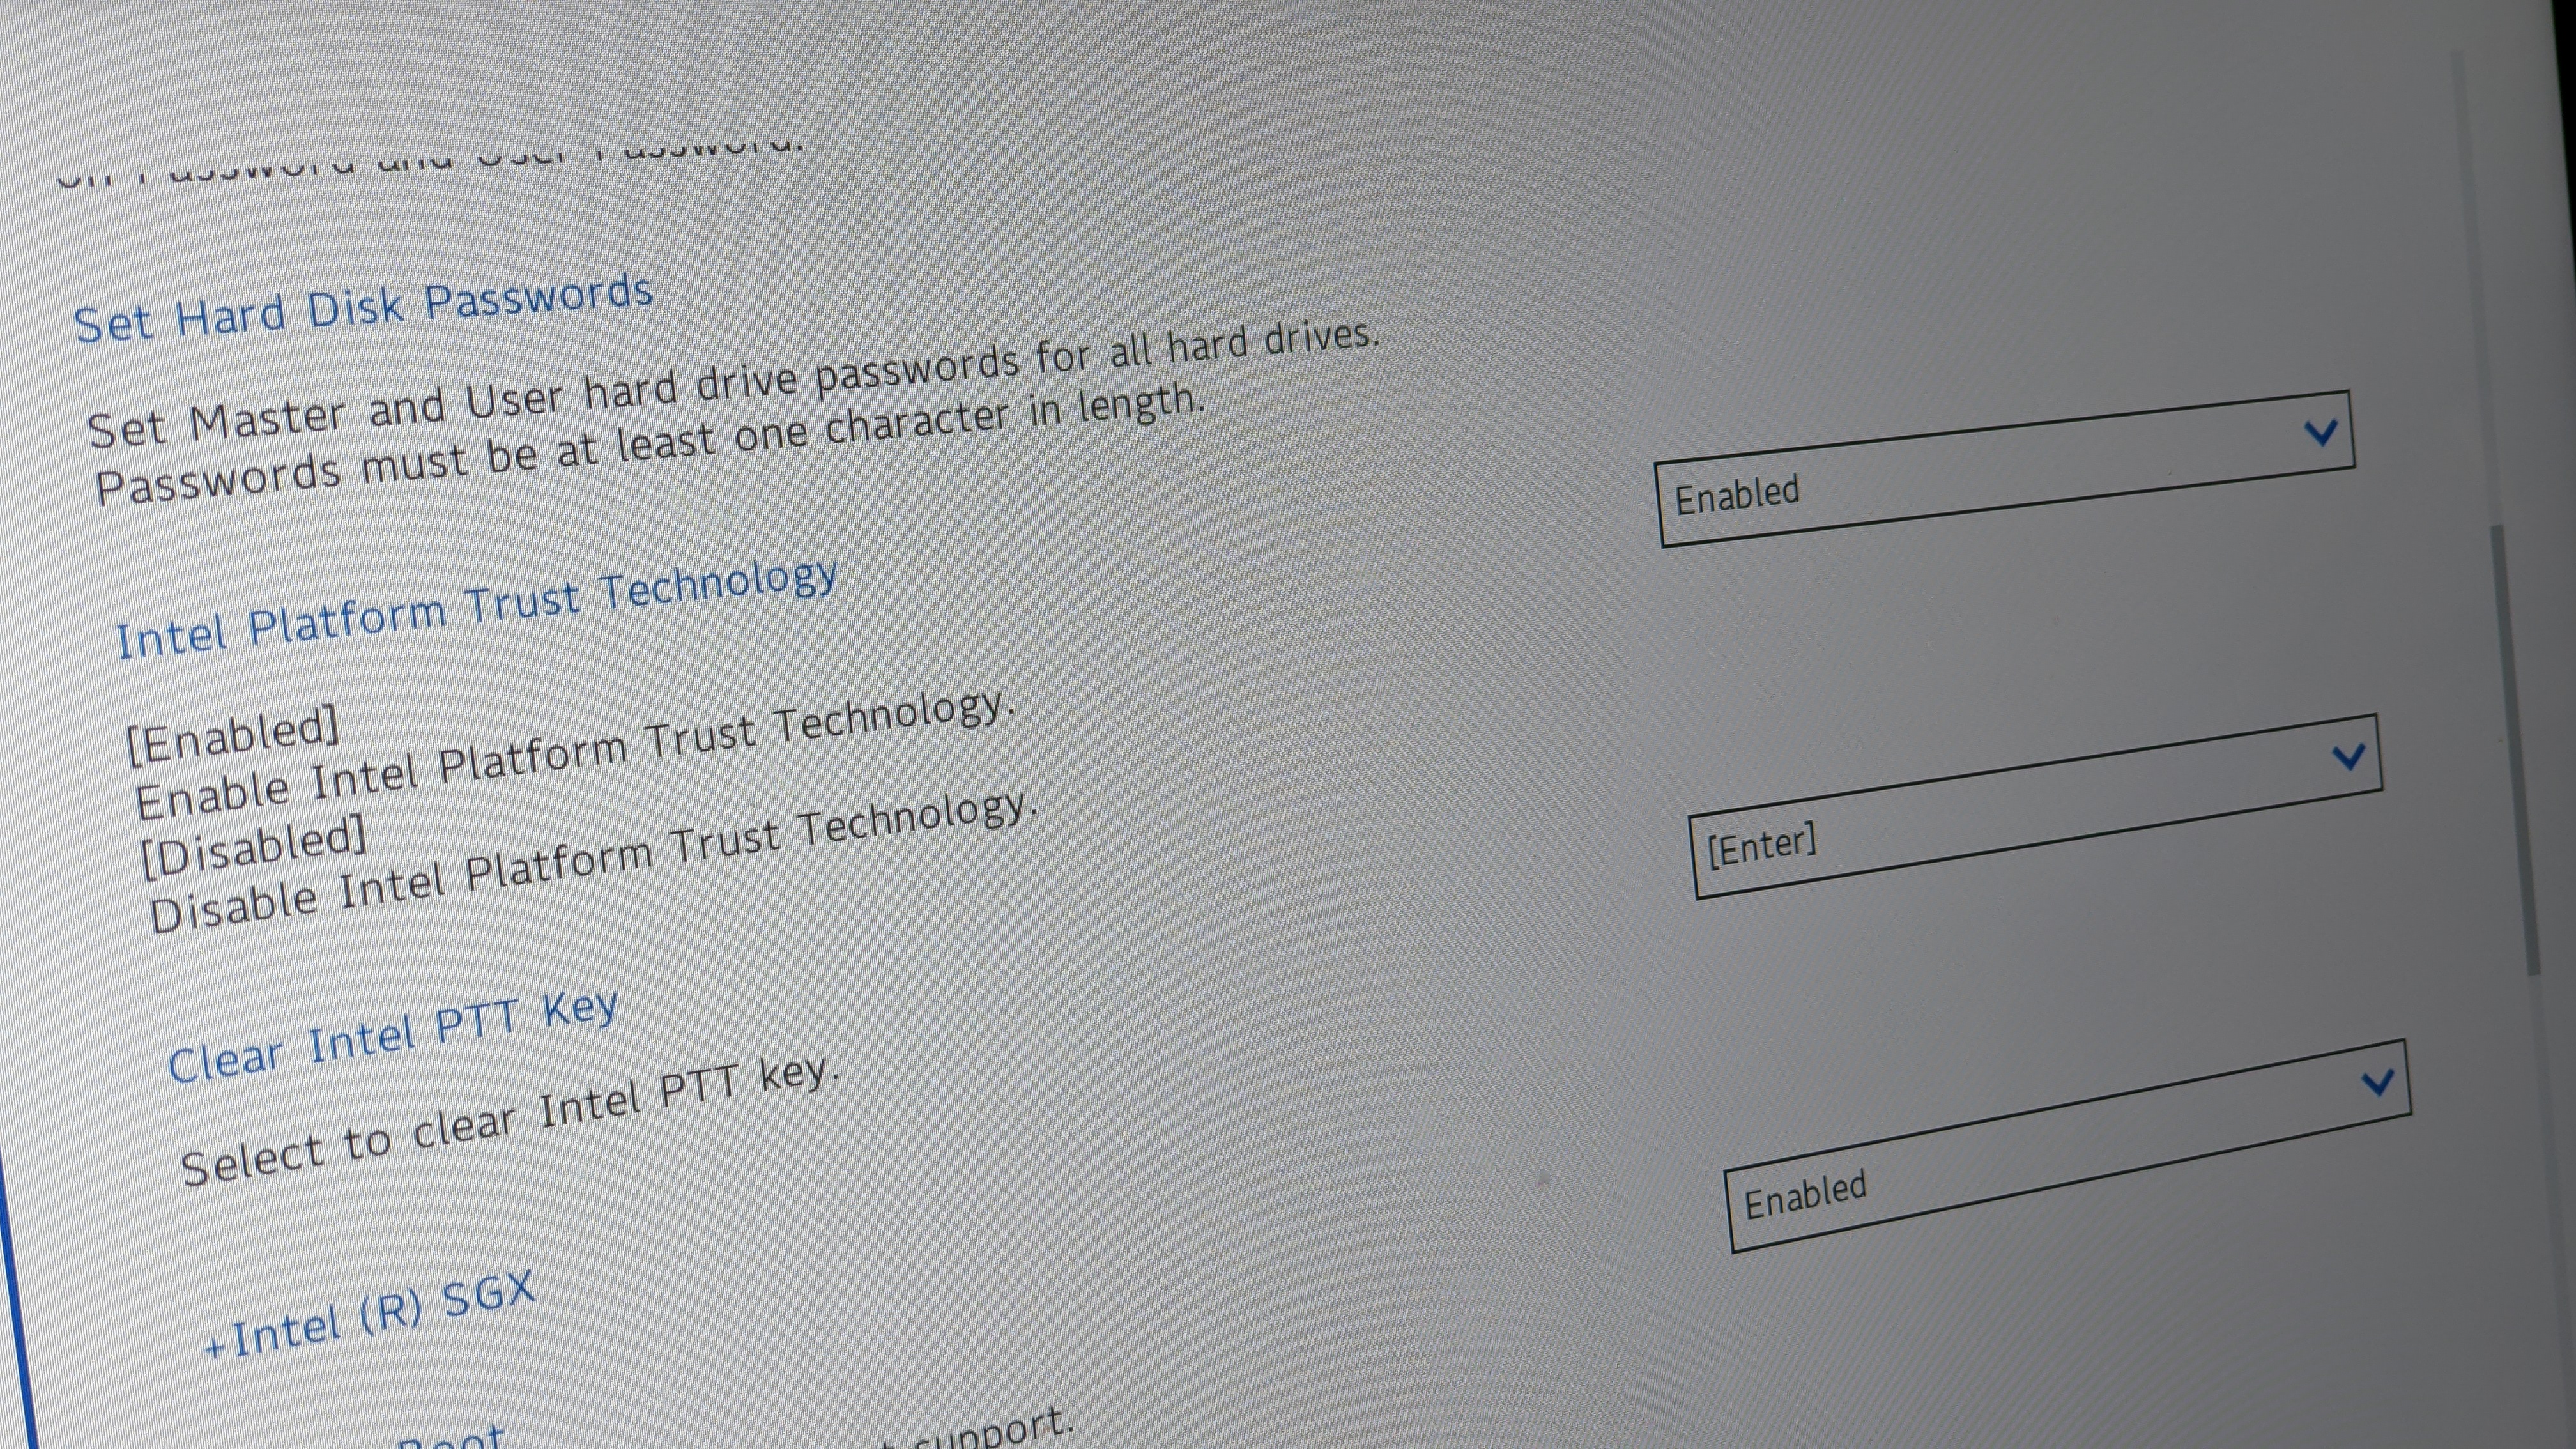
Your system will restart and immediately take you to the BIOS. Accessing the BIOS requires intentional steps because it’s possible to change settings that’ll negatively affect your computer going forward. So before changing any settings, thoroughly research its possible effects and make sure it’s a change you definitely want to make.
Back to Apple MacBook Pro
Show more
The official Geeks Geek, as his weekly column is titled, Avram Piltch has guided the editorial and production of Laptopmag.com since 2007. With his technical knowledge and passion for testing, Avram programmed several of LAPTOP’s real-world benchmarks, including the LAPTOP Battery Test. He holds a master’s degree in English from NYU.
More about windows laptops
The BIOS (Basic Input/Output System) is a vital component of your computer that initializes hardware components such as the processor, memory and drives when you start the system. It acts as an interface between your computer’s hardware and software. If you Launch BIOS, you can configure settings like the boot order, and system time, and perform critical system optimizations. If you need to access these settings, here’s a detailed guide on how to run BIOS on Windows 10 and 11.
Table of Content
- What is BIOS?
- Method 1: Access BIOS at Startup
- Method 2: Access BIOS from Windows Settings
- Method 3: Access BIOS via Shift + Restart
- Method 4: Access BIOS Using Setup Key
- Method 5: Access BIOS Through Windows Command Prompt
- Method 6: Using the Run Dialog to Access BIOS
- Troubleshooting Tips
What is BIOS?
BIOS, or Basic Input/Output System, is firmware embedded in your computer’s motherboard. It plays an essential role during the boot process by initializing hardware, making it possible for the operating system to communicate with hardware components. Accessing the BIOS allows you to change several system settings, such as boot priority, security settings, and overclocking features.
While the steps provided here generally apply to most systems, some variations may exist based on the manufacturer and BIOS version. Some newer systems use UEFI (Unified Extensible Firmware Interface), which may have different methods for accessing and using the BIOS.
6 Methods to Enter BIOS Setup on Windows 10 & 11
The BIOS (Basic Input/Output System) or UEFI (Unified Extensible Firmware Interface) is an essential component of a computer. It helps control the hardware settings and enables the operating system to interact with various hardware components such as the CPU, memory, and storage devices. If you need to adjust certain system settings such as boot order, secure boot settings, or overclocking, entering the BIOS is necessary. Below are the various methods to access BIOS on Windows 10 and 11 systems.
Method 1: Access BIOS at Startup
The most traditional way to access BIOS is during the initial boot BIOS process. When you power on your PC, pressing a specific key immediately after the system starts will allow you to enter the BIOS.
Step 1: Restart your computer and immediately press the BIOS key
Simply start with restarting your computer and as soon as logo appear press the BIOS Key to enter the BIOS. The BIOS key can vary depending on your computer’s manufacturer. Common keys include Del, F2, F10, Esc, and F12. You’ll usually see a message on the screen that says, «Press [key] to enter setup» during boot. Make sure to press the key right after powering on, before Windows begins loading.
List of Common BIOS Keys:
- F2
- Delete (Del)
- Esc
- F10
- F12
- Ctrl+Alt+Del
- Ctrl+Alt+Esc
- Fn + F2 (for some laptops)
BIOS Keys List by Manufacturer
- Acer: F2 or Del
- ASUS: F2 (for most PCs), F2 or Del (for some motherboards)
- Dell: F2 or F12
- HP: F10
- Lenovo: F1 (desktops), F2 or Fn+F2 (laptops), Enter then F1 (ThinkPads)
- MSI: Del
- Microsoft Surface Tablets: Volume Up button
- Samsung: F2
- Toshiba: F2
Step 2: Wait for the BIOS screen to appear
Once you’ve successfully pressed the key, you should see the BIOS or UEFI interface. Here, you can configure settings like boot order, secure boot, or system time.
Additional Tip: If you miss the timing and Windows starts loading, simply restart the system and try again.
Method 2: Access BIOS from Windows Settings
In Windows 10 and 11, you can access the BIOS directly from the Settings menu. This is a particularly useful method if you can’t access BIOS using the traditional key press at startup.
- Press Windows + I to open the Settings app.
- Alternatively, you can click on the Start menu and select Settings.
Step 2: Navigate to Update & Security
In the Settings window, go to Update & Security and select Recovery from the left sidebar.
Step 3: Click on Restart Now under Advanced Startup
Under the Advanced Startup section, click on Restart Now. This will restart your PC into a special menu for advanced troubleshooting.
Step 4: Select UEFI Firmware Settings and Restart
Once your computer restarts, you will be presented with a menu. Choose Troubleshoot > Advanced Options > UEFI Firmware Settings, then click on Restart.
Important Tip: This method is helpful if you are unable to press the BIOS key in time during boot-up.
Method 3: Access BIOS via Shift + Restart
You can use the Shift + Restart combination to access the BIOS without needing to navigate through the Settings menu. This method is particularly useful for users who find it difficult to press the BIOS key at the correct time.
In the Start menu, click on the Power button.
Step 2: Hold down the Shift key and click Restart
Hold the Shift key on your keyboard and then click Restart from the power options. This will initiate the Advanced Startup menu.
Step 3: Navigate to UEFI Firmware Settings
After your system restarts, select Troubleshoot > Advanced Options > UEFI Firmware Settings and click Restart
Additional Tip: This method works on both Windows 10 and Windows 11, providing a way to access BIOS without using the BIOS key during startup.
Method 4: Access BIOS Using Setup Key
On some computers, especially newer ones, you may be able to access BIOS using a «Setup» key, typically during the initial boot sequence. This method is usually available for systems with UEFI firmware.
Step 1: Power off your computer
Ensure your PC is completely powered off before proceeding.
Step 2: Press the Setup key when turning on the computer
Turn on the computer, and immediately press the Setup key (commonly F2, F12, or Del) when the manufacturer logo appears.
Here’s a list of common BIOS setup keys by manufacturer:
Desktop PCs BIOS Setup Key List
- Acer: F2 or Del
- ASRock: F2 or Del
- ASUS: F2 or Del
- Dell: F2 or F12
- ECS: Del
- Gigabyte: F2 or Del
- HP: F10
- Lenovo: F1
- MSI: Del
- Samsung: F2
Laptops BIOS Setup Key List
- Acer: F2
- ASUS: F2
- Dell: F2
- HP: F10
- Lenovo: F2 or Fn+F2
- MSI: Del
- Samsung: F2
- Toshiba: F2
Other Devices BIOS Setup Key List
- Microsoft Surface Tablets: Volume Up button
- Apple MacBooks: Command + Option + P + R
Step 3: Wait for BIOS Setup to appear
After pressing the key, the BIOS setup screen should appear, allowing you to make changes to your system settings.
Tip: If you do not see the prompt for the Setup key, you can refer to your computer’s manual or the manufacturer’s website for the exact key to press.
Method 5: Access BIOS Through Windows Command Prompt
Another option to access BIOS is by using the Command Prompt to initiate a restart into Advanced Startup. This is an ideal method for users who prefer using commands or need an alternative method when other approaches fail.
Step 1: Open Command Prompt as Administrator
Press Windows + X and select Command Prompt (Admin) or Windows PowerShell (Admin) from the menu.
Step 2: Enter the Command to Restart into Advanced Startup
Type the following command and press Enter:
shutdown /r /o /f /t 00
This command will restart your computer into the Advanced Startup Options screen.
Step 3: Select UEFI Firmware Settings and Restart
From the Advanced Startup Options menu, select Troubleshoot > Advanced Options > UEFI Firmware Settings, and then click on Restart.
Important Tip: This method is especially useful if you’re comfortable with using the Command Prompt and need a quick way to access BIOS.
Method 6: Using the Run Dialog to Access BIOS
This method allows you to access BIOS via the Run dialog box, which is another way to reach the Advanced Startup Options.
Step 1: Press Windows + R to open the Run dialog
In the Run dialog box, type msconfig and hit Enter.
Step 2: Go to the Boot Tab in System Configuration
In the System Configuration window, click on the Boot tab.
Step 3: Enable Safe Boot and Restart
Check the Safe Boot option, click OK, and restart your computer. This will bring up the Advanced Startup Options menu.
Step 4: Navigate to UEFI Firmware Settings
From the restart menu, choose Troubleshoot > Advanced Options > UEFI Firmware Settings and click Restart.
Troubleshooting Tips
- BIOS Key Not Working: If you’re unable to press the correct key at startup, it might be too fast. Try enabling the Fast Boot option in your BIOS or adjusting the Boot Priority in the UEFI firmware settings.
- No BIOS Option Displayed: If you don’t see the BIOS option when pressing the key or using the methods above, it could be that your system uses UEFI. Make sure to access the UEFI Firmware Settings instead.
- Cannot Access BIOS After Multiple Attempts: If you’re unable to enter BIOS after several tries, make sure your keyboard is connected properly, especially if you’re using a wireless or USB keyboard. Wired keyboards are generally more reliable during the boot process.
Conclusion
Accessing the BIOS on Windows 10 and 11 can be done in several ways depending on the manufacturer and your system configuration. Whether you use the traditional key press method or one of the alternative options available within Windows, each method provides a reliable way to access critical system settings. Always proceed with caution when making changes in the BIOS, as improper settings can cause system instability. If you’re unsure about a specific setting, it’s best to consult your system manual or manufacturer’s support page.
Один из частых вопросов, касающихся последних версий ОС от Майкрософт, включая Windows 10 — как зайти в БИОС. При этом чаще имеется в виде все-таки UEFI (часто характеризующийся наличием графического интерфейса настроек), новый вариант ПО материнских плат, который пришел на замену стандартному БИОС, и предназначенный для того же — настройки работы оборудования, опций загрузки и получения информации о состоянии системы.
В связи с тем, что в Windows 10 (как и в  реализован режим быстрой загрузки (представляющий собой вариант гибернации), при включении компьютера или ноутбука вы можете не увидеть приглашение наподобие Press Del (F2) to enter Setup, позволяющее зайти в БИОС по нажатию клавиши Del (для ПК) или F2 (для большинства ноутбуков). Тем не менее, попасть в нужные настройки несложно.
Вход в параметры UEFI из Windows 10
Для использования этого способа, Windows 10 должна быть установлена в режиме UEFI (как правило, так и есть), а вы должны иметь возможность либо войти в саму ОС, либо хотя бы попасть на экран входа в систему со вводом пароля.
В первом случае вам достаточно кликнуть по значку уведомлений и выбрать пункт «Все параметры». После чего в настройках открыть «Обновление и безопасность» и перейти к пункту «Восстановление».
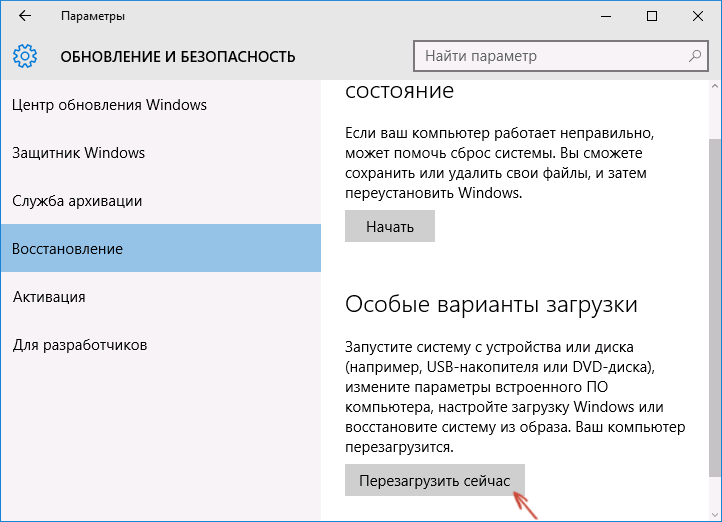
В восстановлении нажмите в разделе «Особые варианты загрузки» кнопку «Перезагрузить сейчас». После того, как компьютер перезагрузится, вы увидите экран такой же (или подобный) тому, что изображен ниже.

Выберите пункт «Диагностика», затем — «Дополнительные параметры», в дополнительных параметрах — «Параметры встроенного ПО UEFI» и, в завершение, подтвердите сове намерение, нажав кнопку «Перезагрузить».

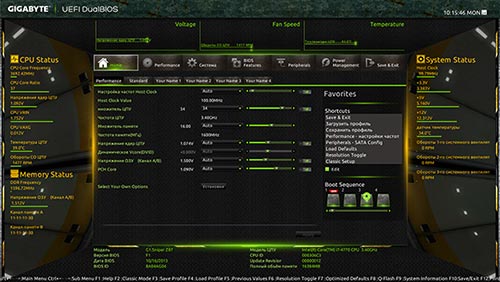
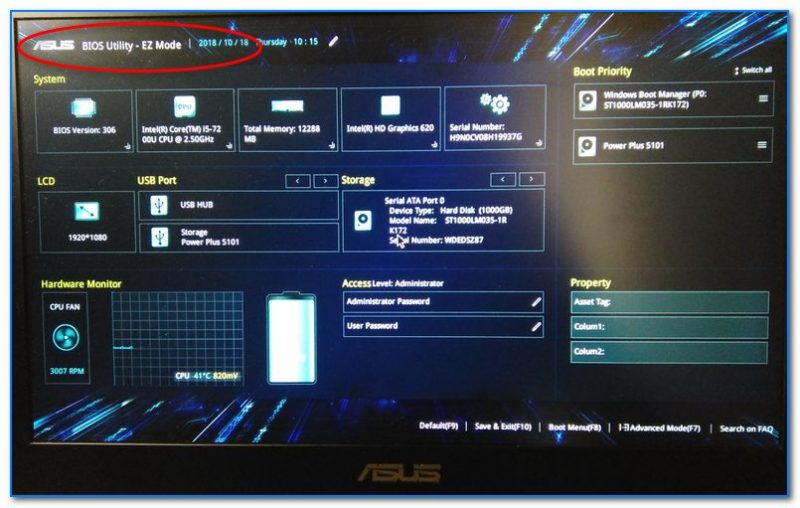
После перезагрузки вы попадете в БИОС или, если точнее, UEFI (просто у нас по привычке настройки материнской платы обычно называют БИОС, наверное, так будет продолжаться и в дальнейшем).
В том случае, когда вы не можете войти в Windows 10 по каким-либо причинам, но можете попасть на экран входа, вы также можете зайти в настройки UEFI. Для этого, на экране входа в систему, нажмите кнопку «питание», а затем, удерживая клавишу Shift нажмите пункт «Перезагрузка» и вы попадете в особые варианты загрузки системы. Дальнейшие шаги уже были описаны выше.
Вход в БИОС при включении компьютера
Есть и традиционный, всем известный метод войти в БИОС (подходит и для UEFI) — нажать клавишу Delete (для большинства ПК) или F2 (для большинства ноутбуков) сразу при включении компьютера, еще до начала загрузки ОС. Как правило, на экране загрузки внизу отображается надпись: Press Название_Клавиши to enter setup. Если такой надписи нет, вы можете ознакомиться с документацией к материнской плате или ноутбуку, там должна присутствовать такая информация.
Для Windows 10 вход в БИОС этим способом это осложняется тем, что загрузка компьютера происходит действительно быстро, и не всегда эту клавишу можно успеть нажать (или даже увидеть сообщение о том, какую именно).
Для решения этой проблемы, вы можете: отключить функцию быстрой загрузки. Для этого, в Windows 10 кликните правой кнопкой мыши по кнопке «Пуск», выберите в меню «Панель управления», а в панели управления — электропитание.

Слева кликните «Действия кнопок питания», а на следующем экране — «Изменение параметров, которые сейчас недоступны».
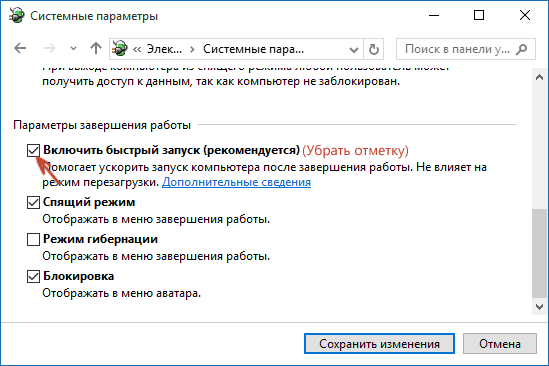
Внизу, в разделе «Параметры завершения работы» уберите отметку «Включить быстрый запуск» и сохраните изменения. После этого, выключите или перезагрузите компьютер и попробуйте войти в БИОС с помощью необходимой клавиши.
Примечание: в некоторых случаях, когда монитор подключен к дискретной видеокарте, вы можете не увидеть экран БИОС, а также информацию о клавишах для входа в него. В этом случае может помочь его переподключение к интегрированному графическому адаптеру (выходы HDMI, DVI, VGA на самой материнской плате).
Доброго времени!
Не многие пользователи знают, что в UEFI (BIOS) можно войти без использования и нажатия спец. клавиш (тех же Delete или F2). Это очень может выручить, если вы перебрали все возможные кнопки, а компьютер никак не реагирует на ваши нажатия…
Отмечу, что воспользоваться этим способом можно только при условиях, что:
- у вас установлена современная ОС Windows 8, 8.1, 10, 11 (в остальных данной возможности нет);
- ваша мат. плата должна поддерживать UEFI (если ваш ПК/ноутбук не старше 3-4 лет — то наверняка поддержка есть!);
- ОС должна загружаться и «хоть как-то» работать (если же ОС не установлена — рекомендую ознакомиться со справочной статьей с кнопками входа в BIOS для устройств разных производителей).
*
Итак, теперь ближе к теме…
*
Из Windows 11
Все действия рассмотрю по шагам (для большей наглядности и доступности).
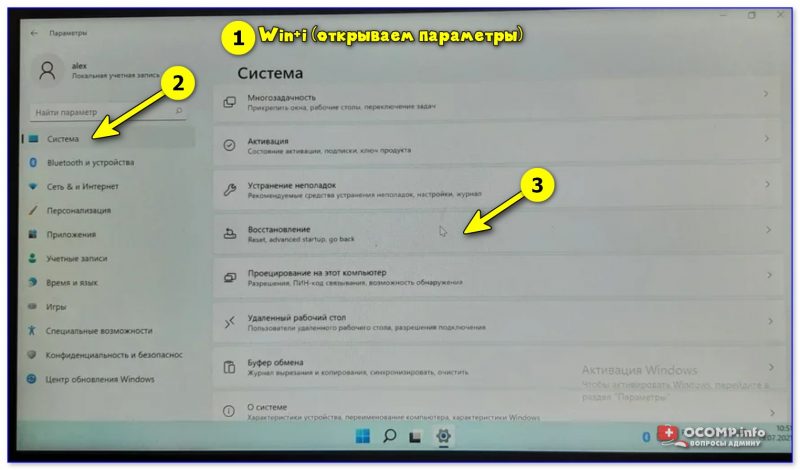
- для начала необходимо открыть параметры Windows и перейти в раздел «Система / восстановление» (сочетание клавиш Win+i // либо Win+R, и команда «ms-settings:» (без кавычек));

Открываем параметры Windows 11 — вкладку восстановление
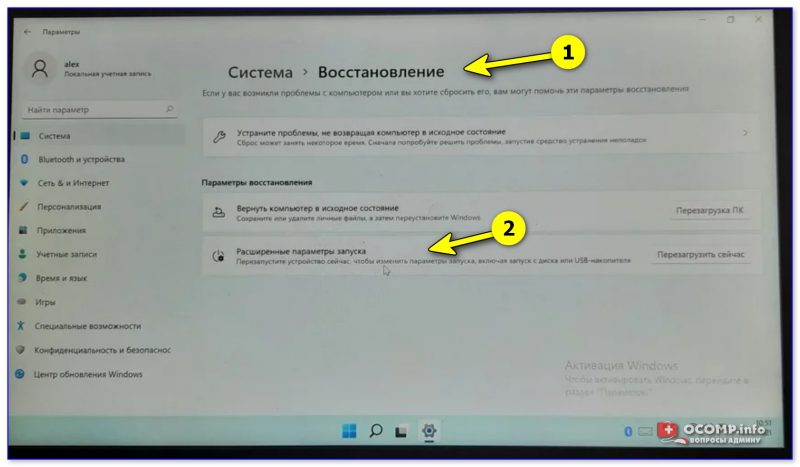
- далее согласиться на перезагрузку и запуск ПК с расширенными параметрами. См. пример ниже на фото; 👇

Расширенные параметры запуска
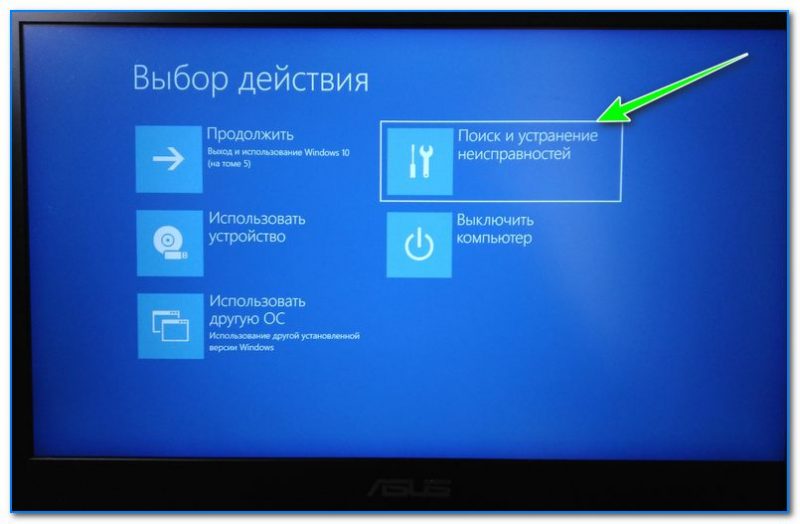
- после перезагрузки появится «синее меню»: в нем нужно будет выбрать вариант «Поиск и устранение неисправностей / доп. параметры / Параметры встроенного ПО UEFI»; 👇

Параметры встроенного ПО
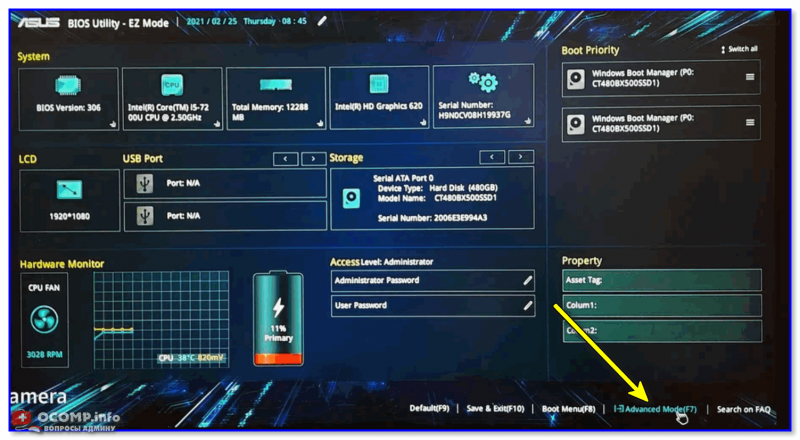
- ну и после еще одной перезагрузки — появится окно BIOS (UEFI). Можно приступить к настройкам! 👌

UEFI (Asus) — Advanced Mode

*
Из Windows 10
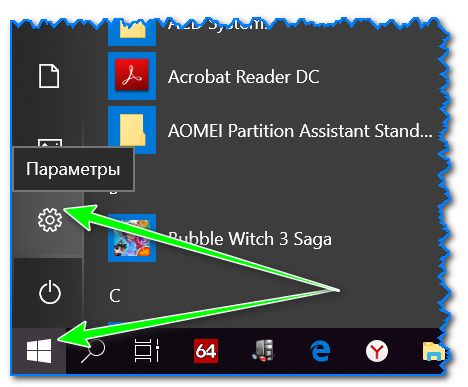
- Сначала необходимо зайти в параметры Windows (можно использовать сочетание Win+i, можно воспользоваться меню ПУСК);

Параметры (Windows 10)
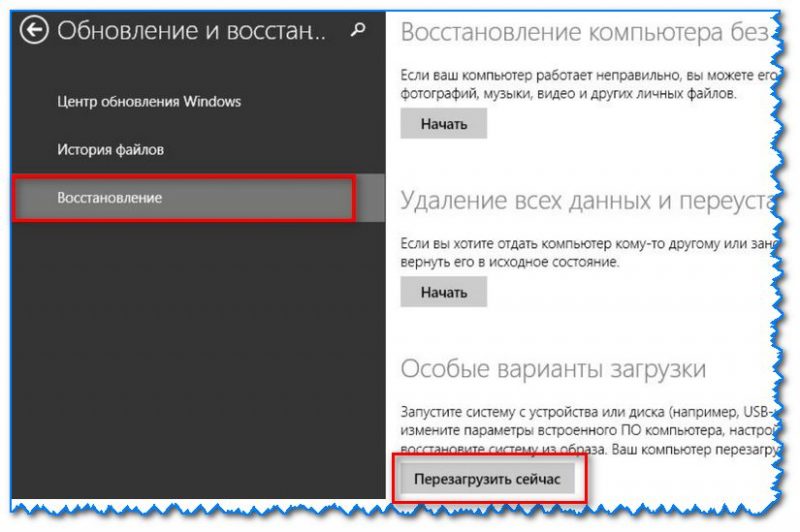
- далее необходимо открыть раздел «Обновление и безопасность/Восстановление» и найти подраздел «Особые варианты загрузки»: нажать в нем кнопку «Перезагрузить сейчас». См. пример ниже (цифры 1, 2, 3); 👇

Обновление и безопасность — восстановление (кликабельно)
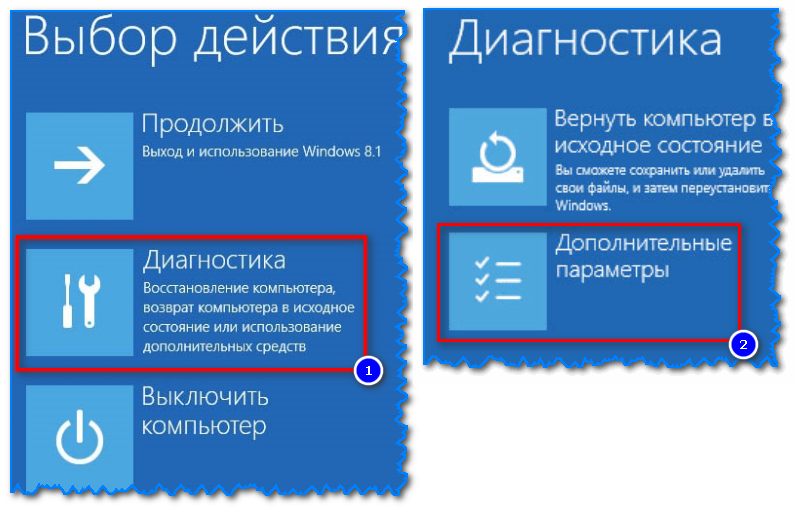
- после чего откройте раздел «Поиск и устранение неисправностей»;

Выбор действия (Windows 10)
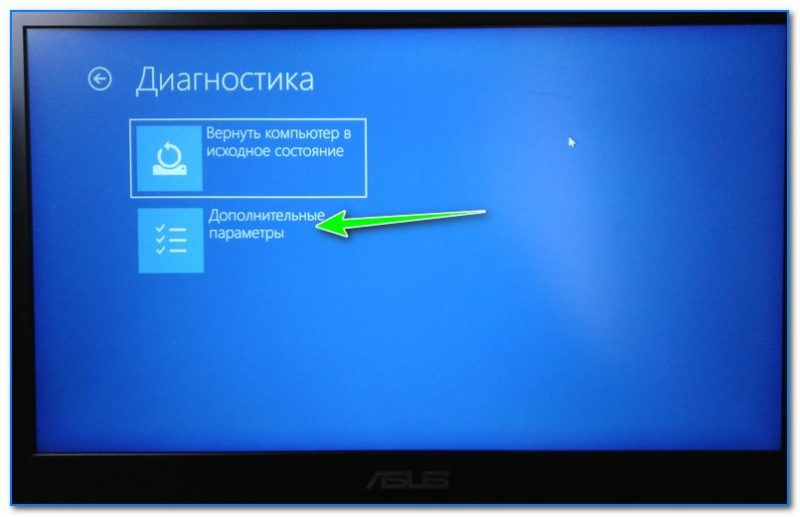
- затем подраздел «Дополнительные параметры»;

Диагностика — доп. параметры
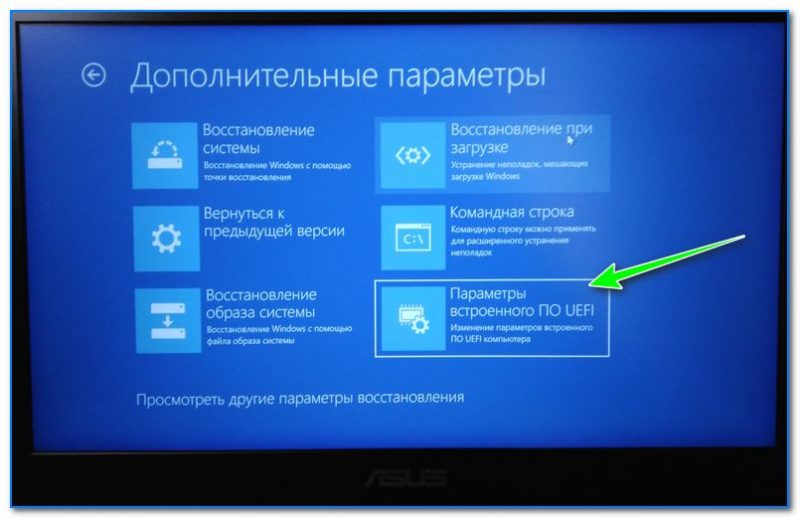
- далее вкладку «Параметр встроенного ПО UEFI» (пример на фото ниже 👇);

Параметры встроенного ПО
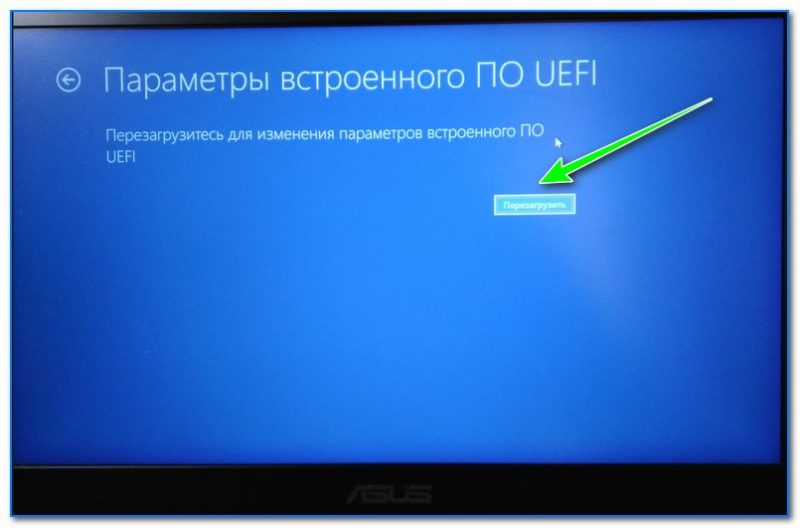
- ну и последнее, что осталось — это согласиться на перезагрузку; 👇

Перезагрузить
- после перезагрузки компьютера (ноутбука) у вас автоматически будет осуществлен вход в настройки UEFI (пример ниже 👇). Никаких кнопок дополнительно нажимать не нужно!

BIOS Utility — вход выполнен

*
Из Windows 8, 8.1
В принципе действия аналогичны, правда, интерфейс несколько отличается от Windows 10.
- сначала передвиньте ползунок мышки вправо, чтобы появилось боковое меню: выберите «Параметры» (см. скрин ниже 👇);
Windows 8 — параметры
- далее щелкните по ссылке «Изменение параметров компьютера»;
Изменение параметров компьютера
- затем откройте раздел «Обновление и восстановление»;
Обновление и восстановление
- после чего в разделе «Восстановление» найдите подраздел «Особые варианты загрузки» и щелкните по кнопке «Перезагрузить сейчас»; 👇

Восстановление — перезагрузить сейчас
- далее компьютер будет перезагружен, и вы увидите меню с выбором действия: откройте вкладку «Диагностика», затем «Доп. параметры»; 👇

Выбор действия — диагностика
- затем «Параметры встроенного ПО UEFI» и согласитесь на перезагрузку: после нее компьютер сам автоматически откроет настройки UEFI (BIOS). 👇

Параметры встроенного ПО (Windows


*
С помощью командной строки, меню ПУСК
👉 Командная строка
- открываем командную строку (если не знаете как — см. вот эту инструкцию);
- далее нужно ввести команду shutdown.exe /r /o и нажать Enter;

shutdown.exe в командной строке
- после чего увидите сообщение, что через минуту ваш сеанс будет завершен;

Ваш сеанс будет завершен
- по прошествии этой минуты, вы увидите меню с выбором действия (дальше действия аналогичны предыдущим описываемым шагам, см. выше). 👇
Выбор действия


*
Меню ПУСК
Еще один альтернативный вариант — это зайти в меню ПУСК, нажать по кнопке «Выключения», после зажать клавишу SHIFT и выбрать вариант «Перезагрузка». Дальнейшие действия аналогичны предыдущим шагам.

SHIFT + Перезагрузка
*
Дополнения по теме приветствуются…
Удачной работы.
👋
Первая публикация: 18.10.2018
Корректировка: 9.07.2021
BIOS stands for Basic Input/Output System. It is embedded into computers as a motherboard chip and is primarily responsible for booting the computer system.
Apart from booting up your computer, BIOS is responsible for a lot of other functionality behind the scenes – like managing data flow between an operating system and attached hardware devices such as printers, mouse, keyboard hard disk, and scanners.
Once everything has been certified OK during startup, your computer will boot successfully. Otherwise, an error message such as the BSOD (blue screen of death) or several others will be displayed.
If you can access BIOS on your PC, you can do various things such as change hard drive settings, create a password for BIOS to make your computer more secure, change the boot order, and more.
So, in this article, I’m going to show you two ways you can get into BIOS in Windows 10.
How to Get into BIOS in Windows 10 Through Settings
Step 1: Click on Start and select Settings to open up the Settings app. Or simply press WIN (Windows key) + I.
Step 2: Click on “Update and Security”.
Step 3: Select “Recovery”.
Step 4: Under “Advanced startup”, Click on “Restart now”. This will allow you to reboot your computer for restoration and some configurations.
Step 5: After your PC reboots, you’ll see a blue background menu containing options like “Continue”, “Troubleshoot”, and “Turn off your PC”. Click on Troubleshoot.
Step 6: Click on “Advanced options”
Step 7: Select “UEFI Firmware Settings” to finally enter your computer BIOS.
And that’s it — you should be in.
If you don’t find UEFI Firmware Settings, using hotkeys to enter BIOS will come to the rescue. Let’s look at how to use them now.
How to Get into BIOS in Windows 10 Through Hotkeys
Some computer manufacturers give users several keys or key combinations to press while booting so they can enter BIOS. This is typically the F2 key on many devices, but there are a few exceptions.
The table below shows the hotkeys for entering BIOS in different brands of computers.
HP: ESC (Escape) to enter startup menu, then F10 or F12.
| Brand | Hotkey(s) |
| ACER | F2 or DEL (Delete) |
| Toshiba | F2 |
| Lenovo Thinkpad | ENTER + F1 |
| Lenovo Desktop | F1 |
| Dell | F2 |
| MSI | DEL |
| Samsung | F2 |
| Sony | F2 |
| Origin PC | F2 |
Conclusion
In this guide, you learned how to get into BIOS in Windows 10, so you can have more control over your device. It also lets you dive into more settings you might not find in the Settings app.
Windows 10 Settings provides a better way to enter BIOS on modern computers, but if you are using older devices, using hotkeys might be your best bet to get into BIOS.
If you are wondering what UEFI is, it stands for Unified Extensible Firmware Interface. It works like BIOS but provides faster boot time, and can support drive sizes up to 9 zettabytes, whereas BIOS only supports up to 2.2 terabytes.
Be careful what you do while in BIOS because whatever you tamper with might have a long-lasting effect on your Computer.
Thank you for reading.
Learn to code for free. freeCodeCamp’s open source curriculum has helped more than 40,000 people get jobs as developers. Get started