
Quick Tips
- Windows 11 does not allow you to reposition the taskbar to the sides or top of the screen.
- You can reposition the icons in the taskbar to the center or left, as you prefer.
- To move the taskbar around, you need a third-party tool, like Start11.
In past versions of Windows, it was possible to move the taskbar around. Users could reposition it to the left or right sides of their screens, or even have it across the top, rather than the default bottom position. However, with Windows 11, Microsoft chose to remove these options.
With that said, there are still some ways you can adjust your taskbar. Let’s see how to move the taskbar on Windows 11 to make it more comfortable for you to work with.
How to Move the Taskbar on Windows 11 Using System Settings
If you don’t want to download or use any third-party tools to adjust your taskbar, you’ll have to make do with the default Windows 11 settings. As stated above, Windows 11 does not give you a lot of control over your taskbar placement, but it does let you adjust the taskbar icon alignment. Here’s how:
Step 1. Go to the Settings menu. You can get there via the Start menu or by pressing the “Windows” and “I” keys at the same time.

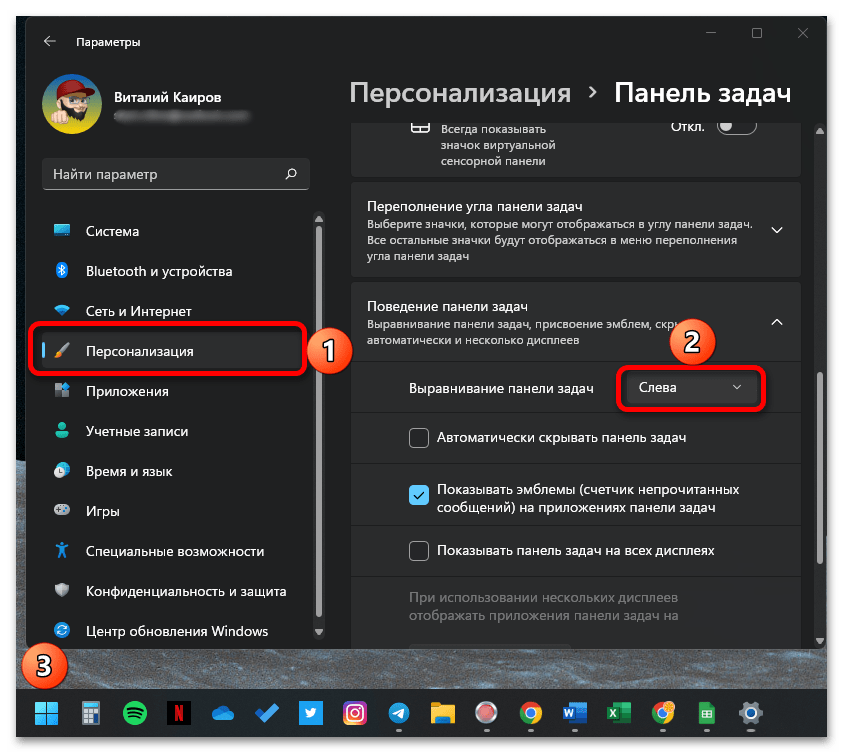
Step 2. Go to “Personalization” and then “Taskbar.”

Step 3. Find the option marked “Taskbar behaviors” and click the downward-facing arrow beside it to reveal some more settings.

Step 4. Next to “Taskbar alignment,” you can click to change between having all your icons in the center or on the left side.

If the alignment feature isn’t quite what you are looking for, and you want to move your entire taskbar to the sides of top of your screen, you have to use a third-party tool. Start11 is one such tool, which effectively restores a lot of the taskbar options from prior versions of Windows.
You have to pay for the full version of Start 11 to enjoy its features in the long-term, but new users can test it out with a free trial. Here’s a quick look at how it works:
Step 1. Download Start11 from the official site.

Step 2. Install the app and then choose from the various styles of Start Menu available when you open it up for the first time.

Step 3. Go to the “Taskbar” settings menu, and scroll down. You should see a setting labeled “Taskbar position” with some drop-down menus that let you reposition the taskbar to the top or sides of your display. You can also, in this menu, find options to adjust the taskbar size, colors, theme, and functions.

Was this helpful?
Thanks for your feedback!
The article above may contain affiliate links which help support Guiding Tech. The content remains unbiased and authentic and will never affect our editorial integrity.
Все способы:
- Вариант 1: Вверх
- Вариант 2: Влево
- Вариант 3: Вправо
- Вариант 4: Скрытие
- Восстановление панели задач
- Вопросы и ответы: 0
Вариант 1: Вверх
В актуальной на момент написания настоящей статьи версии Windows 11, в отличие от «десятки» и других «предшественников», в параметрах персонализации ОС отсутствует возможность перемещения панели задач (ПЗ). Но это все же можно сделать системными средствами – необходимо отредактировать одно из значений в системном реестре. Аналогичного результата, причем более просто и быстро, позволяют достичь специализированные программы от сторонних разработчиков. Оба решения нами ранее рассматривались в отдельной статье, ссылка на которую дана ниже.
Подробнее: Как переместить панель задач вверх в Виндовс 11

Вариант 2: Влево
С перемещением ПЗ влево задача обстоит несколько более сложно, чем в озвученном выше случае. Так, если под этим подразумевается перемещение всей панели, а не только расположенных на ней кнопок и ярлыков, то это может быть сделано только путем редактирования реестра операционной системы, причем результат сложно назвать приемлемым – большинство базовых функций станут недоступными, а значки пропадут. Вполне вероятно, что это баг, и он будет исправлен в одном из следующих апдейтов ОС. Если же требуется переместить не саму панель, а ее элементы, вернув им привычное по Windows 10 расположение, это вполне может быть сделано и через параметры персонализации. Более детально обо всех нюансах данной процедуры рассказывается в следующей инструкции.
Подробнее: Как переместить панель задач влево в Виндовс 11
Вариант 3: Вправо
Аналогично озвученному выше варианту, переместить ПЗ вправо в актуальной версии Windows 11 можно только путем редактирования одного из параметров в системном реестре. Правда, результат тоже будет неудовлетворительным – из панели исчезнут все значки, кроме тех, что по умолчанию представлены справа (трей, индикатор языковой раскладки, сетевое соединение, управление громкостью, время и дата), а основные функции окажутся недоступны. Остается надеяться, что в ближайшем обновлении данная проблема будет решена, а необходимые опции также появятся и в параметрах персонализации операционной системы. Пока же предлагаем ознакомиться с нашей статьей на данную тему.
Подробнее: Как переместить панель задач вправо в Виндовс 11
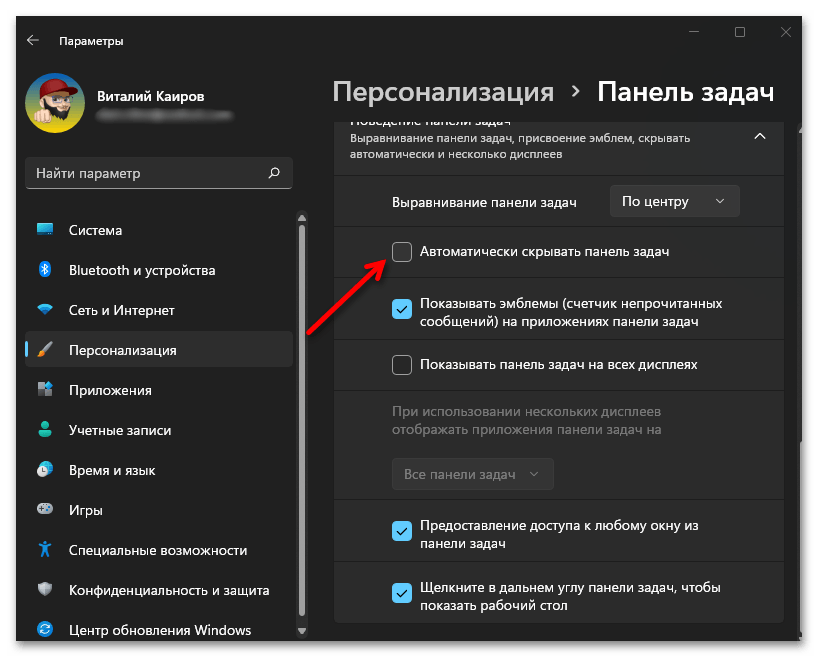
Вариант 4: Скрытие
В случае если вы хотите полностью скрыть ПЗ с экрана, можете воспользоваться одним из трех доступных методов: соответствующий пункт в параметрах персонализации Windows 11, редактирование реестра или ввод и выполнение специального набора команд в консоли. Любой из них дает один и тот же результат – панель исчезает, но может быть отображена в любой момент путем наведения курсора мышки на ее изначальное расположение. Подробнее об этом рассказывается в представленной по ссылке ниже инструкции.
Подробнее: Как скрыть панель задач в Виндовс 11
Восстановление панели задач
В каждой из статей, ссылки на которые даны выше, рассказывается не только о том, как переместить ПЗ Windows 11 в ту или иную часть экрана, но и как восстановить ее изначальное расположение. Но если кратко, то обычно для этого требуется просто выполнить обратные действия. Если же вы столкнетесь с проблемами в работе панели, например, она перестанет выполнять свои основные функции, будет некорректно отображать кнопки и ярлыки, зависать, ознакомьтесь с отдельной инструкцией на нашем сайте, посвященной данной теме.
Подробнее: Как восстановить работоспособность панели задач в Виндовс 11
Наша группа в TelegramПолезные советы и помощь
- On Windows 11, to move the Taskbar, edit the “Settings” binary key in the “StuckRects3” Registry key.
- The 01 value moves Taskbar to the top.
- The 02 value moves Taskbar to the right.
- The 00 value moves Taskbar to the left.
- The 03 value moves Taskbar to the bottom.
UPDATED 2/22/2023: Windows 11 has a redesigned Taskbar with a center alignment for the Start menu and app buttons, a new notification area, new effects and animations, and more. Although it introduces many welcome improvements, it also removes some legacy capabilities, such as the ability to move the Taskbar around.
You can’t move the Taskbar on Windows 11 because this is an entirely new design, and moving it around the screen is challenging. Microsoft has explained that only moving the Taskbar to the right side suddenly changes the entire design (including the Start menu and apps), and the current interface and animations are designed for the bottom placement. As a result, the work implicating it was not worth the effort since there was insufficient demand.
If you are among those who like the Taskbar on another location (such as at the top, left, or right side), it’s still possible to move it. The only caveat is that you can only complete this task by editing the Registry.
In this guide, you will learn the steps to change the Taskbar position to the different sides of the screen on Windows 11.
- Move Taskbar position on Windows 11 (Deprecated)
- Move Taskbar to top with ExplorerPatcher tool
- Move Taskbar to top with Start11 tool
Warning: Modifying the Windows Registry can cause serious problems if misused. It’s assumed you know what you’re doing and have created a full backup of your system before proceeding. As always, use these instructions at your own risk.
After the release of version 22H2, the Registry method seems to stop working. You can try it, but it may or may not work. If you’re using version 21H2 or an older release of the operating system, this method may still work. Using the ExplorerPatcher or Start11 apps is the best option available to move the Taskbar to the top.
Move Taskbar position on Windows 11 (Deprecated)
To move the Taskbar to the top, left, right, or bottom of the screen on Windows 11, use these steps:
-
Open Start on Windows 11.
-
Search for regedit and click the top result to open the Registry Editor.
-
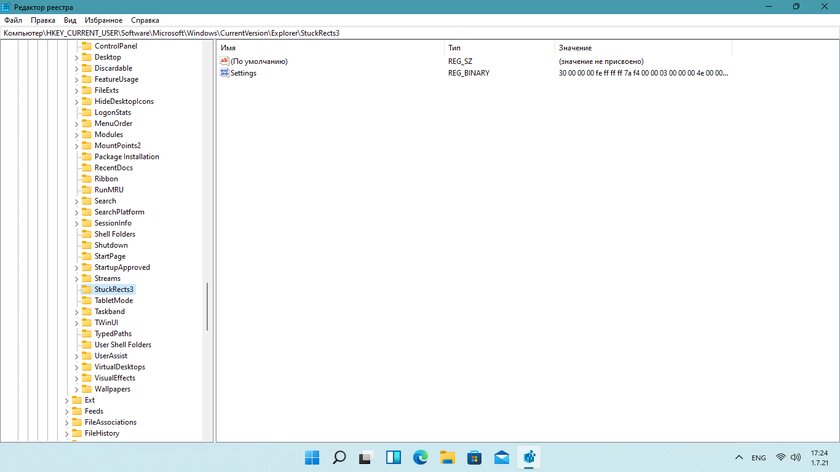
Browse the following path:
HKEY_CURRENT_USER\Software\Microsoft\Windows\CurrentVersion\Explorer\StuckRects3
-
Double-click the Settings binary key.
-
Under the “Value data” section, in the second row and the sixth column, click the 03 value, press the Delete key, and replace the value with 01 to move the Windows 11 Taskbar at the top of the screen.

-
Change the 03 value to 02 to move the Taskbar on the right side of the screen.
-
Change the 03 value to 00 to move the Taskbar on the left side of the screen.
-
Change the value to 03 to move the Taskbar at the bottom of the screen.
-
Click the OK button.
-
Right-click the Start button and select the Task Manager option.
-
Click the Processes tab.
-
Select the Windows Explorer process.

-
Click the Restart button.


Once you complete the steps, the Windows 11 Taskbar will move to the top or either side of the screen as specified in the binary key.
While you can still change the Taskbar position, this is not a supported feature on Windows 11, which means this behavior may not work as expected.
Alternatively, if you can’t use the Registry settings, you may be able to use third-party tools to move the Taskbar to the top of the screen. For example, ExplorerPatcher is a free solution that brings back the classic design of the Taskbar with legacy functionalities, such as the ability to change the bar position. It’s not a perfect solution, but this might be the best free option if you want to reposition settings.
To move the Taskbar to the top of the screen with ExplorerPatcher, use these steps:
-
Open ExplorerPatcher GitHub page.
-
Under the “Assets” section, click the ep_setup.exe link to download the app.

Quick note: The browser may complain the software is untrusted, but this is only because the app makes system changes. Although the app works as advertised, use it at your own risk.
-
Confirm you want to keep the file in the web browser (if applicable).
-
Double-click the file to install the app.
-
Right-click the Taskbar and select the Properties option.
-
Click on Taskbar.
-
Use the “Taskbar style” setting and select the “Windows 10” option.
-
Use the “Primary taskbar location on screen” setting and select the Top option to move the Taskbar to the top of the screen. (You also have the option to move it to the left or right side.)

-
(Optional) Use the “Start button style” setting and select the “Windows 11” option.
-
(Optional) Use the “Combine taskbar icons on the primary taskbar” setting and select the Always combine option.
-
Click on Start menu.
-
Use the “Start menu style” setting and select the “Windows 11” option.
-
Click the Restart File Explorer option in the bottom-left corner (if you don’t see the changes).


After you complete the steps, you can start using the Taskbar from the top of the screen.
It’s important to note that the ExplorerPatcher app is known to break sometimes due to changes that Microsoft makes to the operating system. However, the developer usually fixes the problems in a timely manner.
Move Taskbar to top with Start11 tool
Another way to change the Taskbar location on the screen is by using the Start11 app from Startdock, which is similar to the ExplorerPatcher app, but with the difference that this is a more reliable solution since it’s a paid product. At the time of this update, the app costs $9.99, but you can use the 30-day trial before purchasing using your email.
To move the Taskbar to the top with Start11, use these steps:
-
Open Start11 page.
-
Click the Try Free button to download the app on your computer.

Quick note: The browser may complain the software is untrusted, but this is only because the app makes system changes. Although the app works as advertised, use it at your own risk.
-
Double-click the setup file to launch the installer.
-
Check the option to agree to terms.
-
Click the Next button.
-
Click the Next button again.
-
Open Start11 from the Start menu.
-
Click the “Start 30 Day Trial” button.

-
Confirm your email address.
-
Click the Continue button.
-
Confirm the email to start the trial.
-
Click the Finish button.
-
Click on Start Menu.
-
Choose the “Windows 11 style” option.
-
Click on Taskbar.
-
Click the Taskbar position setting.
-
Choose the Align top option for the “Primary monitor” setting.
-
Click the Yes button.
-
(Optional) Choose the Align top option for the “Secondary monitor” setting.
-
Click the Yes button.


Once you complete the steps, the Taskbar will align at the top of the screen with the same Windows 11 Start menu.
The Start11 app has many settings to customize the Taskbar and Start menu, and it’s up to you to play around and find the best setup for you.
Also, I wanted to add more context on why Windows 11 doesn’t include an option to move the Taskbar. The biggest issue is that Microsoft has plans to update the elements of the desktop experience in future releases. Although it’s unclear, it’s expected that the company will try to do something similar to macOS, including adding a floating Taskbar docked at the bottom and a top bar at the top of the screen showing the System Tray, weather, and other information.
Update March 1, 2023: Microsoft warns that apps like ExplorerPatcher and StartAllBack can cause booting issues on Windows 11 after installing the update KB5022913 or higher releases.
Update March 2, 2023: The developer of ExplorerPatcher has released an updated version of the tool that fixes the problem and works with the new update of Windows 11.
Update August 24, 2023: The developer of ExplorerPatcher has released yet another updated version of the tool that fixes a bug with the Start menu after installing the latest update of Windows 11.
Update February 22, 2024: This guide has been updated to ensure accuracy and reflect additional information.
Панель задач вместе с меню «Пуск» подверглась значительным изменениям в Windows 11. Привычные элементы кардинально переделали, поэтому, например, от живых плиток почти спустя 10 лет окончательно отказались, календарь и быстрые настройки полностью преобразились, а в панели задач поменялись значки и всё переместилось в центр. Кроме того, расположение панели задач на экране больше нельзя изменять — это смутило огромное количество пользователей Windows 10. Но, как оказалось, изменения не означают, что подобное теперь стало невозможным.
- В тему: Всё о Windows 11 — секреты, инструкции, лайфхаки и полезные статьи
Установить панель задач Windows 11 в верхнюю часть экрана получится с помощью редактора реестра (по крайней мере в текущей тестовой сборке 22000.51). Делается всё довольно легко.
Как переместить панель задач Windows 11 в верхнюю часть экрана
- Используйте сочетание клавиш Windows + R для открытия утилиты «Выполнить» и введите в поле запуска «regedit.exe», после чего нажмите «OK». Или найдите через поиск «Редактор реестра».
- Перейдите по следующему пути:
HKEY_CURRENT_USER\Software\Microsoft\Windows\CurrentVersion\Explorer\StuckRects3.
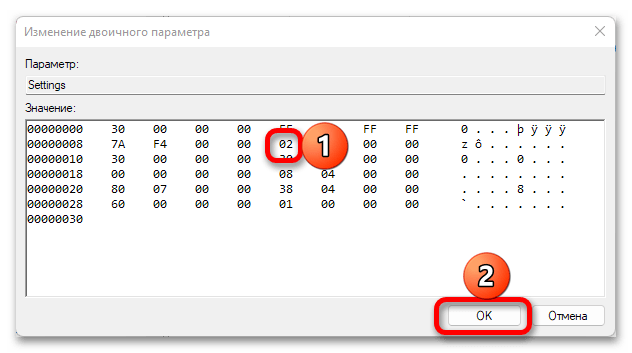
- Найдите параметр типа REG_BINARY под названием «Settings».
- Дважды нажмите на него — откроется окно изменения двоичного параметра.
- В столбце FE для параметра 00000008 (второй по списку) установите значение 01 — поместите на него курсор, удалите текущее значение и пропишите нужные цифры. По умолчанию он должен быть установлен на 03.
- Нажмите «OK» и перезапустите «Проводник» через «Диспетчер задач».
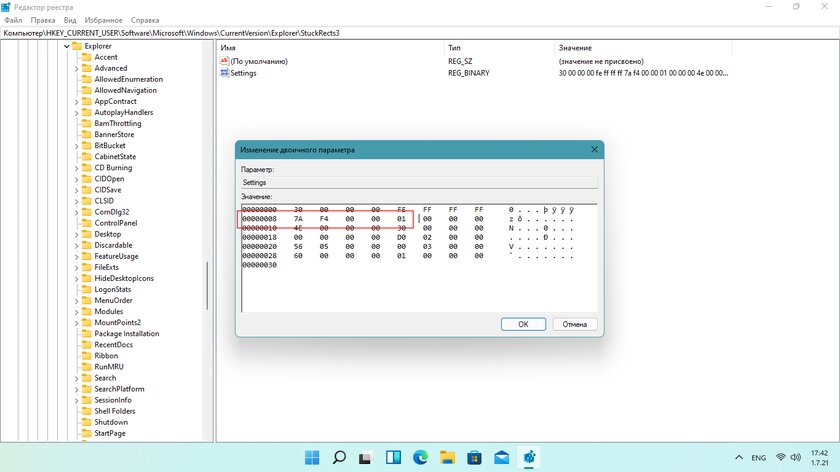
Чтобы отменить изменение, необходимо открыть тот же параметр в редакторе реестра и вернуть стандартное значение 01. Учтите, что другие значения (02 или 04) не работают, поэтому переместить панель задач на левую или правую сторону не выйдет.
⚠️ Важно: следует знать, что при перемещении панели задач в верхнюю часть экрана меню «Пуск» станет автоматически открываться только с левой стороны.
Как переместить панель задач Windows
Три проверенных способа для любой версии ОС.
Панель задач Windows с кнопкой «Пуск», ярлыками приложений и другими элементами по умолчанию находится внизу экрана. И хотя мы привыкли к этому, расположение легко сменить. Например, на ноутбуках, где экранное пространство особенно ценно, панель удобнее разместить слева или справа, чтобы не занимать место по высоте.
Передвинуть панель задач можно разными способами. В Windows 10 и более ранних версиях это делается простым перетаскиванием или через настройки. В Windows 11 Microsoft закрепила панель внизу и теперь через настройки можно изменить лишь размещение значков на ней. Однако есть вариант передвинуть её вверх с помощью специальной утилиты Taskbar11.
Как переместить панель задач Windows 10, 8 и 7 с помощью мыши
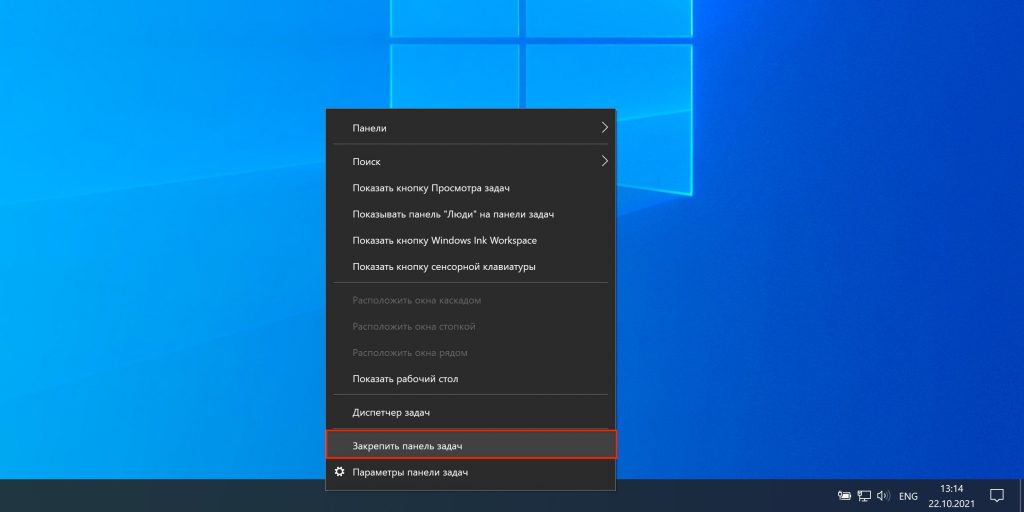
Вызовите контекстное меню, кликнув правой кнопкой мыши по панели. Убедитесь, что напротив пункта «Закрепить панель задач» нет галочки. Если есть — снимите.

Удерживая левую кнопку мыши на элементе, перетащите его к нужному краю экрана.
Чтобы зафиксировать строку от случайного перемещения, кликните по ней правой кнопкой мыши и поставьте галочку напротив опции «Закрепить панель задач».
Как переместить панель задач Windows 10, 8 и 7 через настройки

Зайдите в контекстное меню, кликнув правой кнопкой мыши по любому пустому месту на панели. Откройте пункт «Параметры панели задач» или «Свойства» в более ранних версиях Windows.

Найдите опцию «Положение панели задач на экране» и выберите из выпадающего меню желаемое место.
Как переместить панель задач в Windows 11
Скачайте утилиту Taskbar11 со страницы разработчика на GitHub и запустите её.

Установите для Taskbar Position значение Top.
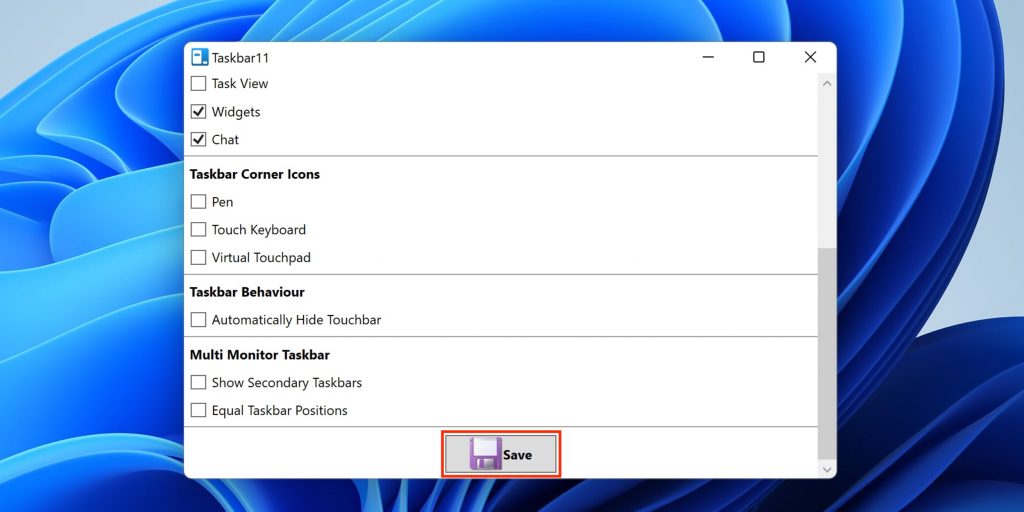
Прокрутите список настроек до конца и нажмите Save.
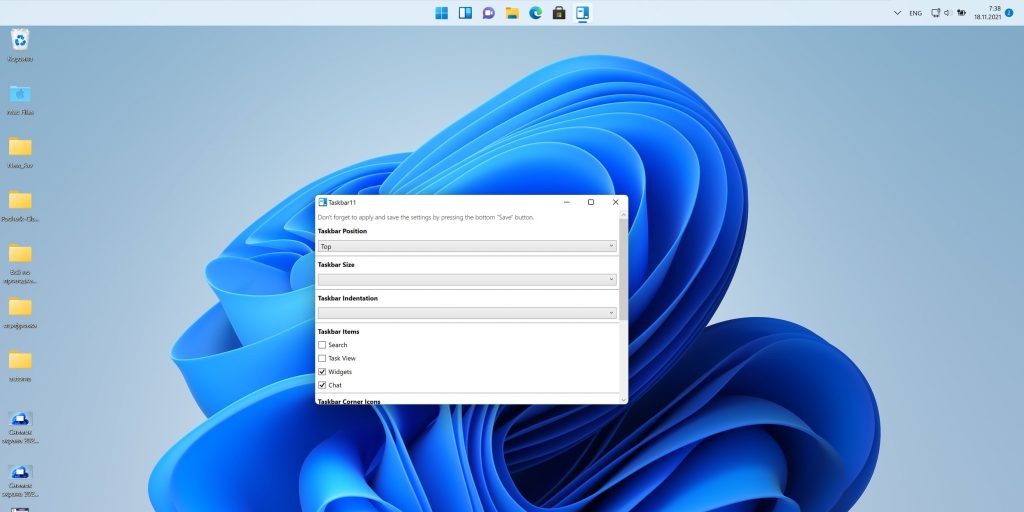
Рабочий стол мигнёт и через пару секунд панель задач переместится вверх. При желании в Taskbar11 также можно настроить размер, выравнивание и другие параметры панели задач. Не забудьте только сохранить их, чтобы применить изменения.