
Если у вас на компьютере установлены две операционные системы: Linux и Windows 8, 8.1 или 10 и вы захотите примонтировать системный раздел Windows, чтобы скопировать оттуда или записать туда файлы, то, скорее всего, столкнетесь с ошибкой.
В современных системах такие разделы монтируются в режиме только для чтения по умолчанию, но если вам надо туда что-то записать, то придется немного поработать. В этой статье мы поговорим о том как подключить диск Windows в Linux.
Содержание статьи
- Монтирование раздела Windows в Linux
- Выводы
Скорее всего, если вы попытаетесь примонтировать раздел Windows, утилита mount выдаст вот такое сообщение: Error mounting: windows is hibernated refused to mount и примонтирует его только для чтения:

Это связано с использованием в новых версиях Windows алгоритма гибридной загрузки с использованием гибернации, которая и мешает вам получить доступ к вашим файлам.
Такое сообщение может сбить вас с толку. Обычно мы выключаем компьютер, с помощью пункта Завершение работы в меню Пуск. Никаких упоминаний о гибернации там нет, но Linux утверждает система находиться в режиме гибернации. А дело в том, что современные версии Windows используют гибернацию по умолчанию для ускорения загрузки.
Когда вы выключаете современную операционную систему Windows, она выключается не полностью, часть системных процессов сохраняются на диск, чтобы загрузка выполнялась быстрее. Это ускоряет процесс загрузки, но и имеет недостаток при использовании Linux.
Чтобы исправить эту проблему можно загрузить Windows и отключить гибридную загрузку. Единственным недостатком такого метода будет замедление загрузки системы. Она будет загружаться приблизительно с такой же скоростью, как Windows 7. Но зато вы сможете выполнить подключение раздела Windows в Linux. Ещё можно войти в Windows и перезагрузить компьютер, при выборе этой опции гибернация не используется.
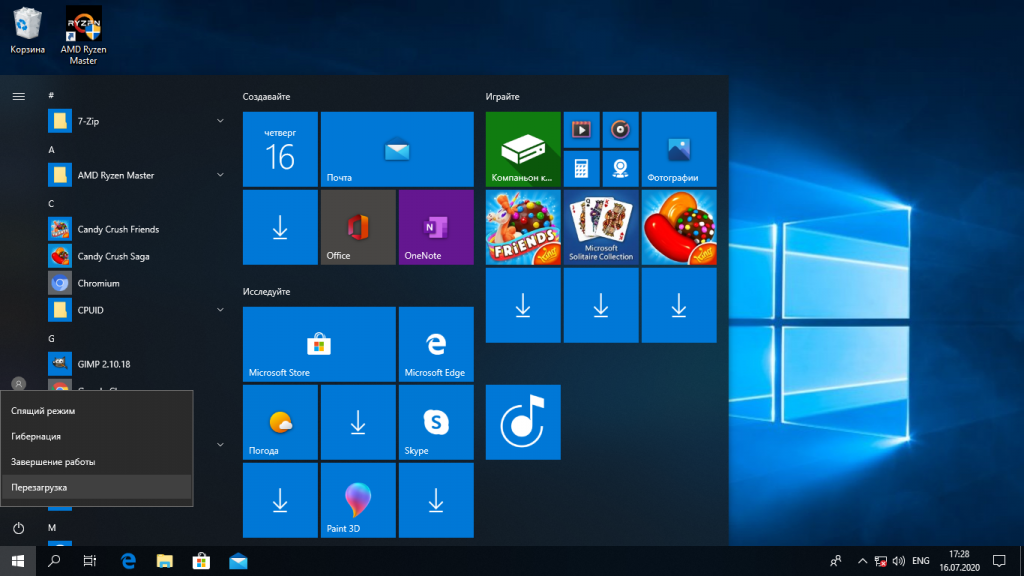
1. Перезагрузка Windows
Windows не использует гибридную загрузку во время перезагрузки. Если выбрать пункт перезагрузка, то сохраненное начальное состояние будет стерто и создано новое.
Поэтому если в следующий раз захотите перейти в систему Linux из Windows — выбирайте пункт перезагрузка. Так система не уйдет в гибернацию и у вас не возникнет ошибок во время монтирования раздела Windows в Linux.
2. Выключение с клавишей Shift
Если вам нужно именно выключить компьютер есть еще один способ. Когда выбираете пункт меню выключить удерживайте нажатой клавишу Shift. Тогда система тоже не будет использовать гибернацию и полностью выключиться.

3. Отключение гибридной загрузки
Если вы не хотите думать какую кнопку нажимать и что делать при каждой перезагрузке Windows, можно полностью отключить гибридную загрузку. Но тогда Windows будет загружаться медленнее. Это также может понадобиться если аппаратное обеспечение компьютера не поддерживает гибридную загрузку. После ее отключения вы сможете легко выполнять монтирование разделов Windows в Linux без каких-либо ошибок в режиме как для чтения так и для записи.
Для этого загрузитесь в Windows, откройте панель управления, откройте пункт Оборудование и звук. В разделе Электропитание выберите Изменение параметров, которые сейчас недоступны:
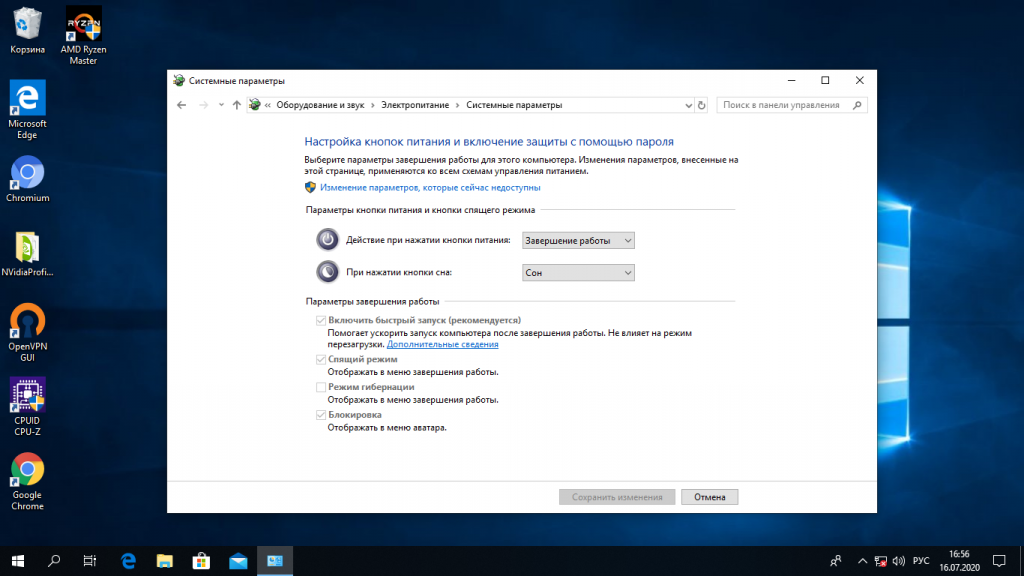
В открывшимся окне кликните по ссылке Изменить параметры, которые сейчас недоступны, затем пролистайте вниз и снимите галочку с пункта Включить быстрый запуск:

Затем нажмите кнопку Сохранить изменения.
4. Удаление файла Hiberfile.sys утилитой диски
Вместо перенастройки Windows, можно автоматически удалять файл гибернации каждый раз когда вам нужно выполнить монтирование разделов Windows в Linux. Конечно, после такой процедуры система будет загружаться медленнее, но потом она снова создаст файлы гибридной загрузки и продолжит использовать быстрый запуск. Это идеальный вариант если вы нечасто пользуетесь системным разделом Windows и не хотите терять скорость загрузки.
Но имейте в виду, что если вы действительно отправите компьютер в режим гибернации оставив открытыми программы и не сохраненные данные, то Linux все равно удалит реальный файл гибернации вместе со всеми вашими данными. Разницу между видами гибернации определить невозможно.
Для удаления файла hiberfile.sys достаточно добавить опцию монтирования файловой системы ntfs remove_hiberfile. Этот же совет вы можете видеть когда пытаетесь монтировать системный раздел с помощью ntfs3g.
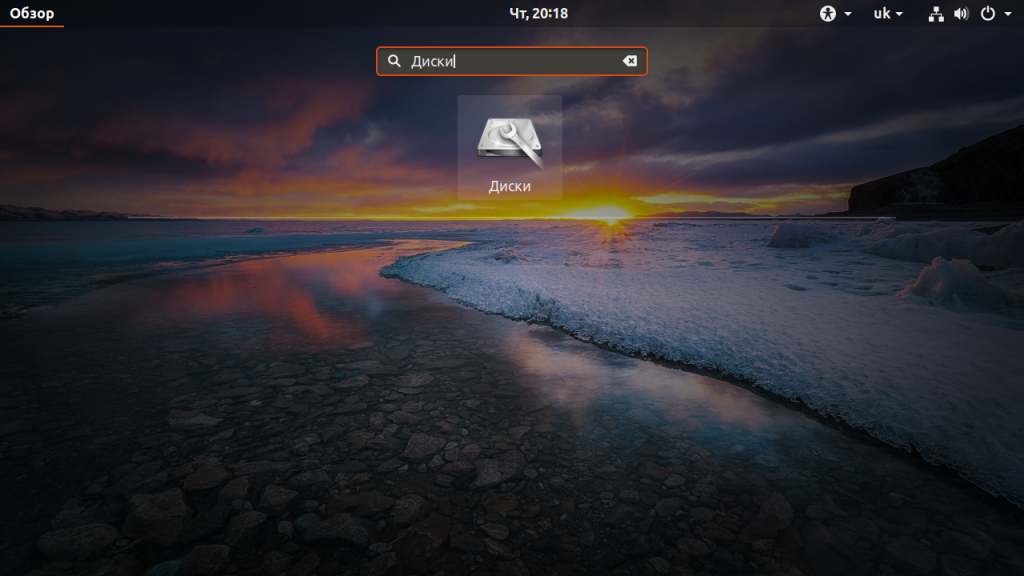
В Ubuntu и других дистрибутивах с оболочкой Gnome это можно сделать с помощью утилиты Диски:
В правой части окна программы выберите жесткий диск с Windows, затем выберите системный раздел Windows. Кликните по кнопке с шестерней и выберите Изменить параметры подключения:
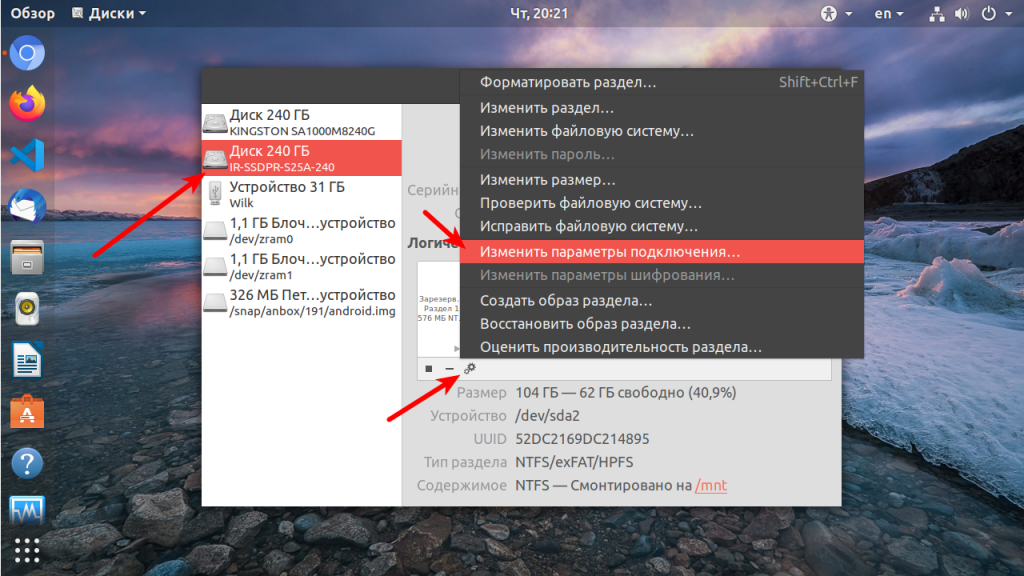
Переключите выключатель Automatic Mount Options в положение Off, затем вставьте следующую строку в конец опций монтирования внизу окна:
,remove_hiberfile
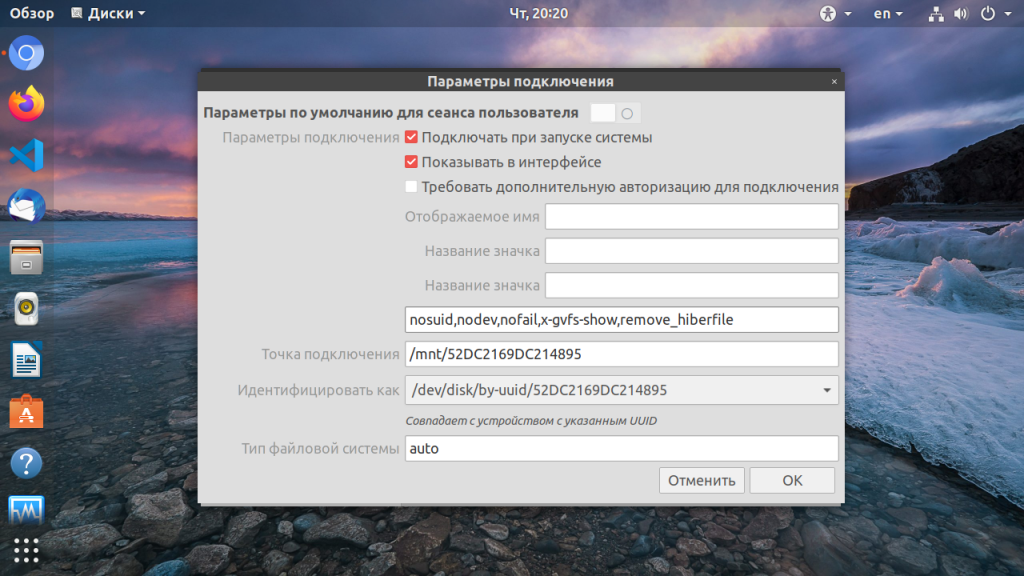
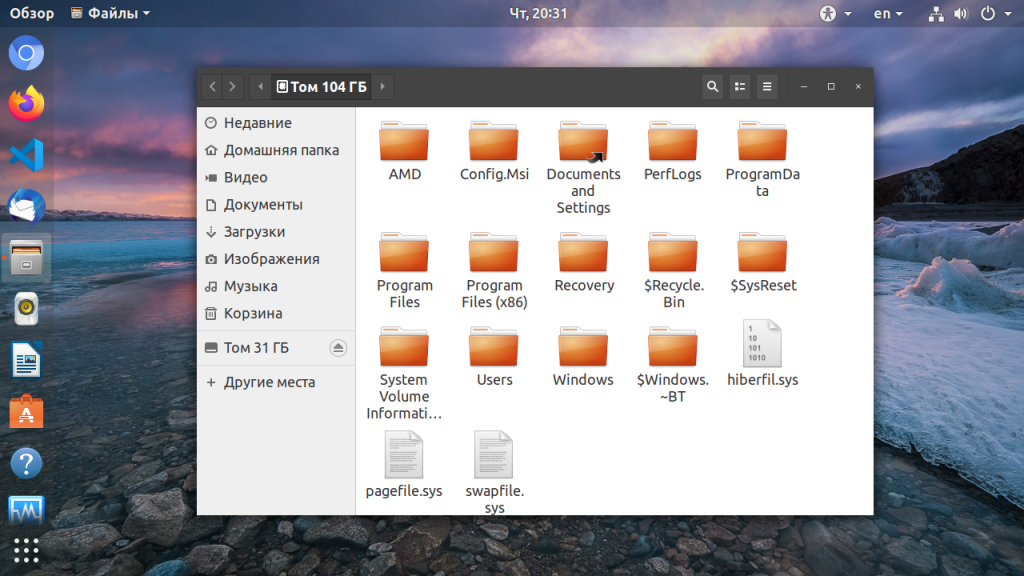
Нажмите OK и введите свой пароль. Теперь можете попробовать примонтировать системный раздел Windows в файловом менеджере Nautilus. Как видите, монтирование выполняется успешно, без каких-либо ошибок. Если файл гибернации был включен система его попросту удалит.
5. Удаление файла hiberfile.sys утилитой mount
Если вам нужно просто один раз подключить Windows раздел в Linux, несмотря на ошибку error mounting windows is hibernated и не настраивая никаких автоматических опций воспользуйтесь утилитой mount. Команде нужно передать имя системного раздела Windows включить ту же самую опцию, например:
mount -o defaults,rw,remove_hiberfile -t ntfs /dev/sda2 /mnt/ntfs
Здесь /dev/sda2 — раздел диска с Windows, а /mnt/ntfs — точка монтирования.
Эти действия необходимы, только если вам нужен доступ для записи файлов на системный раздел Windows. Если же вам просто нужно просмотреть или скопировать тот или иной файл можно выполнить монтирование разделов windows в Linux в режиме только для чтения. Например:
mount -o defaults,ro -t ntfs /dev/sda1 /mnt/ntfs
В Linux можно монтировать системные разделы в режиме только чтение, даже когда система Windows в гибернации.
Выводы
Независимо от того какой способ вы выбрали, в результате вы должны получить возможность подключить раздел Windows для чтения и записи:
Использование нескольких систем на одном компьютере — очень часто практикуется новичками. Обмен файлами между двумя системами — нормальное явление, а поэтому вы очень часто будете сталкиваться с этой ошибкой. Но эта статья поможет вам решить ее раз и навсегда. Если остались вопросы, пишите в комментариях!
If you are using a dual-boot setup on your PC while using Linux as well as Windows, on different drive or partitions, then it might be necessary for you to set up auto mount the Windows partition on boot in case you need to access data on that partition or drive, because Linux operating systems don’t mount it by default.
Well, In this tutorial we will learn how to manually mount the Windows drive/partition on your Linux system as well as set up auto-mount on every reboot so that you won’t have to go through the hassle again and again.
Check your Kernel version
Since Windows uses the NTFS file system unlike Linux which uses Ext4 or BTRFS, you will need additional drivers on Linux distributions in order to support NTFS. Now, these drivers are already built into the Linux kernel versions 5.15 and above, and you don’t need to install anything if you are using the required kernel versions. To check which kernel is being used by your PC, you can type the following command in your Terminal:

If your Linux kernel version is less than 5.15, then you can either choose to update your system, or simply install the ntfs-3g driver by typing the following commands:
# On Debian and Ubuntu based distributions:
sudo apt install ntfs-3g

# On CentOS or Red Hat Linux:
sudo dnf install ntfs-3g

# For Manjaro or Arch Linux based distributions:
sudo pacman -S ntfs-3g
Since my Nobara PC uses the 6.11 kernel, I don’t have to install anything, and We can proceed to the next section, which is setting up the auto-mount.
Recognizing the Drive
First of all, you should recognize the drive or partition you are going to mount from the command line. This can be done by understanding the size of the Windows partition or drive from the GUI and matching it with the command line output of the parted or lsblk command.
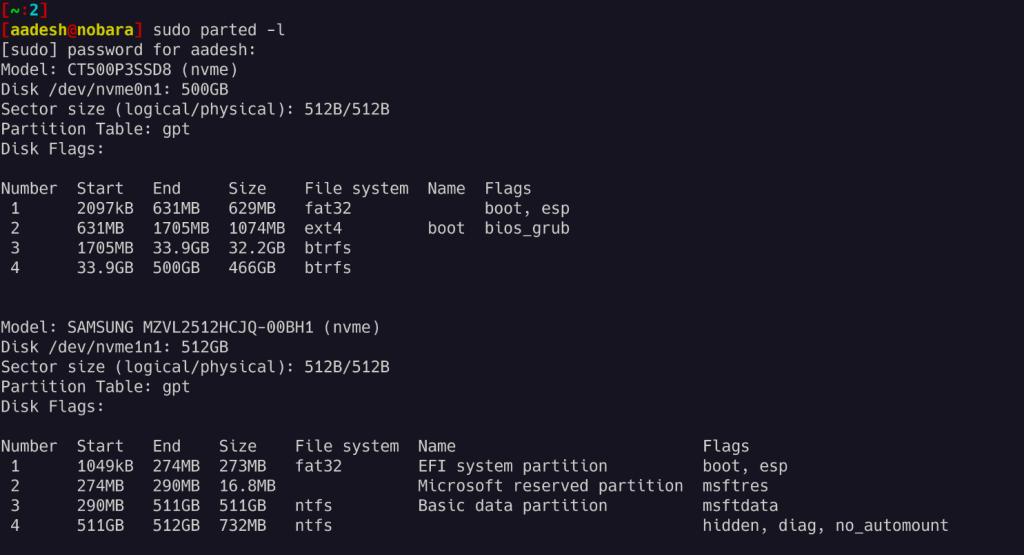
As you can see, I have two NVMe SSDs attached to my PC and my windows drive is located on the second NVME drive which is mounted at /dev/nvme1n1, if you have a hard drive then it should look something like /dev/sda or /dev/sdb.
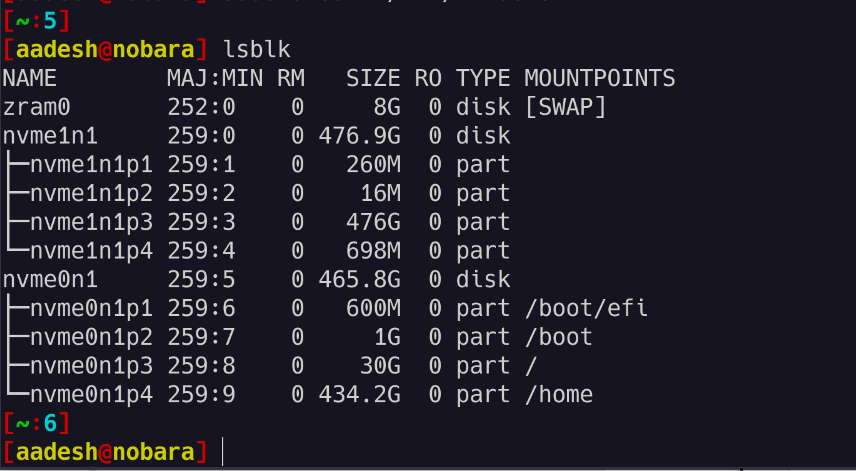
Now, you should notice in the screenshot that my data partition is listed in the 3rd position and is 511GB in size, so my partition’s name is actually /dev/nvme1n1. If you are using a hard drive then it should be something like /dev/sda1 or /dev/sdb1 etc. You can verify the partitions using the lsblk command:
Mounting the NTFS partition
Once you have recognized the partition, we can begin setting up a mount point in a directory where the drive will be mounted. Normally, the drives are mounted in the /mnt directory, so we’ll make the mounting directory there. Type the following command:
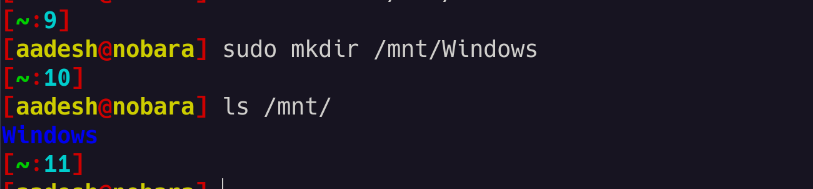
Once the directory is created, you can mount it by typing:
sudo mount /WINDOWS_PARTITIONS /MOUNT_POINT
For example, for my /dev/nvmen1p3, I have to type:
sudo mount /dev/nvmen1p3 /mnt/Windows
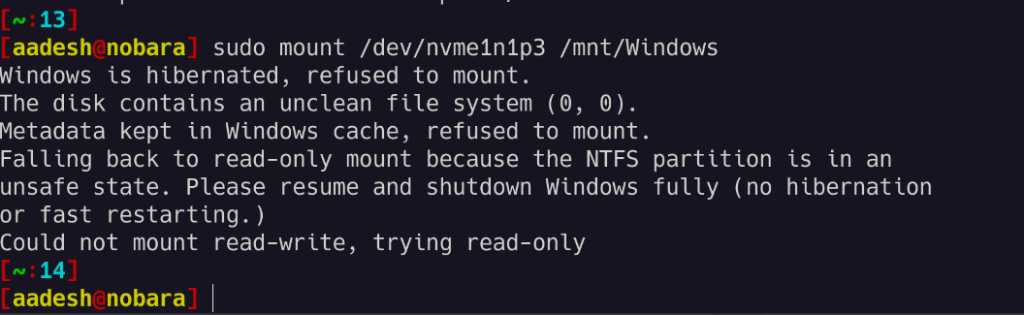
As you can see that I got an error because I didn’t shut down Windows properly (because fast boot is enabled from Windows), but I can mount the drive with read-only permission if I want to with the -ro flag like this:
sudo mount -o ro /dev/nvme1n1p3 /mnt/Windows

That’s it, you can now access your data from the Windows NTFS partition directly from your Linux PC without having to reboot.
Summary
In this tutorial, we learned how to mount and access a Windows NTFS partition on Linux in both read-only mode and with read and write access. Note that to gain write access, you need to disable Fast Boot from Windows settings so that it shuts down every time you press the power button instead of hibernating (which is the default in Windows 10 and 11).
We also learned about the NTFS-3G driver and its significance for different Linux kernel versions.
- Author
- Recent Posts
I started writing code around 20 years ago, and throughout the years, I have gained a lot of expertise from hands-on experience as well as learning from others. This website has also grown with me and is now something that I am proud of.
Getting files from a Windows share to your Linux machine may sound like a daunting task, but it’s actually simpler than you might think.
The key to unlocking those Windows shares is learning how to use the SMB protocol with Linux. Walking through a maze of file-sharing protocols like the Common Internet File System (CIFS) can feel like navigating a labyrinth. Yet, with our trusty Linux system by our side, we’re more than ready to bridge the gap between these two operating worlds. We might even make it fun! 😄

Picture this: you’re sitting at your command line, ready to wield the mighty mount command to connect the worlds of Linux and Windows. It’s like having both Batman and Superman in our superhero team, each of their strengths making our lives easier.
By setting up a Windows share, we’re enabling our Linux machine to access those files as if they’re next door neighbors, rather than distant galaxies.
Let’s bring our systems together, uniting their powers to simplify our tech adventures.
We’ll walk through creating a mount point, entering the right credentials, and setting permissions. That way, accessing files becomes as easy as pie. Remember, it’s all about bringing harmony to our digital lives. No need to keep our files apart any longer; with a few commands and a bit of wizardry, we’ll have them seamlessly working together in no time. So, let’s dive in and bring these two worlds together in perfect harmony!
JUMP TO TOPIC
- Prerequisites and Initial Setup
- Checking Linux Distribution Compatibility
- Installing Necessary Packages
- Mounting a Windows Share
- Creating a Mount Point
- Using CLI to Mount a Share
- Persisting the Mount through /etc/fstab
- Managing Permissions and Access
- Configuring File and Directory Permissions
- Handling User Access and Credentials
- Troubleshooting and Maintenance
- Common Mount Errors and Solutions
- Un-mounting Shares and Clean-up
Prerequisites and Initial Setup
To mount a Windows share on a Linux machine, we need to ensure our system is ready for the task. We’ll check if our distribution is compatible and gather the necessary packages to make it work smoothly.
Checking Linux Distribution Compatibility
Before diving into the process, let’s ensure our Linux distribution is ready to handle the connection. Popular distributions like Ubuntu, Debian, CentOS, and Fedora are typically compatible with CIFS, the protocol needed for mounting Windows shares.
Most systems will require the installation of the cifs-utils package to proceed.
First, let’s take a quick look at each distribution:
- Ubuntu/Debian: Use the
aptpackage manager. - CentOS/Fedora: Use the
dnforyumpackage managers.
If you’re using a different Linux system, check for CIFS protocol support and package manager compatibility.
The kernel version should support the necessary file systems. We also need to ensure system updates are in place—outdated software can lead to issues later on.
Installing Necessary Packages
We need specific packages on our Linux machine to mount a Windows share. The cifs-utils is a crucial one. Here’s a quick guide on how we can set it up on our systems:
-
Ubuntu/Debian: Run
sudo apt updatefollowed bysudo apt install cifs-utils. -
CentOS/Fedora: Use
sudo dnf install cifs-utilsorsudo yum install cifs-utils.
These commands will install the necessary tools for communication between our Linux distributions and Windows shares using the CIFS protocol. It’s like building a bridge from our system to the Windows world.
Keep in mind that sometimes we may also need the samba-client package, which can enhance compatibility.
Once these packages are installed, our Linux setup is ready to establish a connection with a Windows share.
We’ve all been there, trying to access files across different systems and feeling like it’s a secret quest. In this section, we’ll walk through setting up a Windows Share on Linux in clear, simple steps, with each part focusing on essential details that will save you time.
Creating a Mount Point
Before getting into the nitty-gritty of commands, our first task is to create a directory that will act as the mount point. It’s like setting the stage before a play.
- Open the terminal and use the command:
mkdir /mnt/win_share
This command sets up a space where our share will be accessed. Let’s make sure our permissions and space are ready for the job.
With the mount point ready, let’s dive into mounting the share using the command line. We’ll need a few details first: the IP address of the Windows machine and valid credentials, which is where things can sometimes get technical.
Our main hero here is the mount.cifs command. It goes like this:
sudo mount -t cifs -o username=<user>,password=<pass>,uid=1000,gid=1000 //WIN_PC_IP/<share_name> /mnt/win_share
Double-check those credentials! A mistyped username or password leads to head banging on the keyboard. Using the correct uid and gid options ensures the proper user access permissions.
Persisting the Mount through /etc/fstab
Who wants to type in these commands every time we start up our systems? Not us! Luckily, we can automate this process with the /etc/fstab file. This file helps configure filesystems to mount automatically at boot—think of it as setting your coffee maker to start brewing each morning.
Add the following line to /etc/fstab:
//WIN_PC_IP/share_name /mnt/win_share cifs username=<user>,password=<pass>,uid=1000,gid=1000,file_mode=0755,dir_mode=0755 0 0
Remember to replace placeholders with your actual information. Make sure to test the setup by running:
sudo mount -a
This command checks if /etc/fstab is configured correctly. Fix any mishaps to avoid a silent morning with no coffee… or in our case, no mounted files!
Managing Permissions and Access
When mounting a Windows share in Linux, it’s vital to get permissions and access sorted out. We need to ensure proper file and directory permissions, and manage who can access our shared resources by handling user credentials securely.
Configuring File and Directory Permissions
We’re dealing with a mix of Linux and Windows permissions, which can be tricky. To get this right, we first need to set our Linux directory with the appropriate ownership and permissions. This ensures that only the right users can access or modify files.
-
Ownership: Use the
chowncommand to assign the right user and group. We might start with something likechown user:group /mnt/share. -
File Permissions: Modify with
chmodto control who can read, write, or execute. A common setting could bechmod 755 /mnt/share, granting broad read access while keeping write permissions locked down.
Adjusting these helps prevent unauthorized changes and limits access to sensitive data. It’s like giving out keys to a select few rather than leaving the door wide open.
Handling User Access and Credentials
Let’s talk about getting the right folks in without allowing just anyone to stroll in. We often use a credentials file to manage and secure user login details. Here, we store the username, password, and domain information required to access the share.
Create a hidden credentials file in our home directory to keep things tidy and secure. A typical entry in this file might look like this:
username=ourUser
password=ourPassword
domain=ourDomain
We should restrict access to this file using chmod 600 ~/.cred, ensuring only we can read it. It’s like having our secrets in a personal vault 🏦. With these steps, we can confidently manage access without leaving our system vulnerable.
Troubleshooting and Maintenance
When mounting Windows shares on Linux, we sometimes face errors that can interrupt our workflow. Let’s talk about how to identify and resolve common problems. We’ll also cover how to un-mount these shares properly without leaving any clutter behind.
Common Mount Errors and Solutions
Ah, mount errors—they’re like the potholes of networking, aren’t they? We often encounter them when using SMB protocol to connect with our Linux servers.
One frequent issue is entering an incorrect IP address or hostname. Check twice! If the server message block is stubborn, ensure the remote Windows 10 machine isn’t blocking connections through its firewall or that smbclient is correctly configured.
Another gremlin might be related to smb version compatibility. Sometimes, we have to ensure both sides are speaking the same “language.” Try specifying the right version of SMB if connections fail.
Missing permissions? Double-check the shared folder’s settings to make sure our user account has access. It’s like having the right keys to our friend’s house.
Running the right commands like dmesg can also give us insights into errors. We all love a good mystery, but let’s not invite them where they aren’t wanted!
Un-mounting Shares and Clean-up
So, we’re done fiddling with the Windows share, but what next?
It’s crucial to tidy up, and the umount command is our trusty broom here.
It’s simple: umount /mount/point. It lets us disconnect without leaving our Linux home cluttered.
Sometimes, connections refuse to go. In that case, ensure no other process uses our mount point.
Before hitting the umount key, confirm that no files are open from the share. It’s like remembering to close all windows before locking up.
Windows · October 2, 2024
Mounting Windows shares in Linux can be a useful skill for system administrators and users who need to access files stored on a Windows server or workstation. This process allows Linux systems to interact with Windows file shares using the SMB/CIFS protocol. In this article, we will explore the steps required to mount Windows shares in Linux, including necessary packages, configuration, and troubleshooting tips.
Understanding SMB/CIFS
SMB (Server Message Block) is a network protocol used for sharing files, printers, and other resources on a network. CIFS (Common Internet File System) is a dialect of SMB that allows for file sharing over the internet. Linux systems can communicate with Windows shares using the Samba suite, which implements the SMB/CIFS protocol.
Prerequisites
Before you can mount a Windows share, ensure that you have the following:
- A Linux distribution installed (e.g., Ubuntu, CentOS, Debian).
- Access to a Windows machine with shared folders.
- Network connectivity between the Linux and Windows machines.
- Root or sudo privileges on the Linux machine.
Installing Required Packages
To mount Windows shares, you need to install the Samba client package. The installation command varies depending on your Linux distribution:
For Ubuntu/Debian:
sudo apt update
sudo apt install cifs-utils
For CentOS/RHEL:
sudo yum install cifs-utilsCreating a Mount Point
Next, you need to create a directory that will serve as the mount point for the Windows share. You can create this directory anywhere in your file system, but a common location is under the /mnt directory.
sudo mkdir /mnt/windows_shareTo mount the Windows share, you will use the mount command along with the appropriate options. The basic syntax is as follows:
sudo mount -t cifs //WINDOWS_IP/SHARE_NAME /mnt/windows_share -o username=USERNAME,password=PASSWORDReplace WINDOWS_IP with the IP address of the Windows machine, SHARE_NAME with the name of the shared folder, and USERNAME and PASSWORD with the credentials required to access the share.
Example:
sudo mount -t cifs //192.168.1.10/shared_folder /mnt/windows_share -o username=admin,password=secretUsing a Credentials File
For security reasons, it is advisable not to include your username and password directly in the mount command. Instead, you can create a credentials file:
sudo nano /etc/samba/credentialsIn this file, add the following lines:
username=YOUR_USERNAME
password=YOUR_PASSWORD
Save and close the file, then change its permissions to restrict access:
sudo chmod 600 /etc/samba/credentialsNow, you can mount the share using the credentials file:
sudo mount -t cifs //WINDOWS_IP/SHARE_NAME /mnt/windows_share -o credentials=/etc/samba/credentialsAutomating the Mount at Boot
If you want the Windows share to be mounted automatically at boot, you can add an entry to the /etc/fstab file. Open the file with a text editor:
sudo nano /etc/fstabAdd the following line at the end of the file:
//WINDOWS_IP/SHARE_NAME /mnt/windows_share cifs credentials=/etc/samba/credentials,iocharset=utf8,sec=ntlm 0 0Troubleshooting Common Issues
If you encounter issues while mounting the share, consider the following troubleshooting steps:
- Check network connectivity between the Linux and Windows machines.
- Ensure that the Windows share is properly configured and accessible.
- Verify that the Samba client is installed correctly.
- Review the system logs for any error messages related to mounting.
Conclusion
Mounting Windows shares in Linux is a straightforward process that enhances interoperability between different operating systems. By following the steps outlined in this article, you can easily access and manage files stored on Windows shares from your Linux environment. For those looking to explore more about hosting solutions, consider checking out USA VPS Hosting options available at USAVPS.
If you are rocking a dual-boot setup with Windows and Linux, you might want to access data stored in the Windows drives from the Linux system.
However, you might find that Windows drives do not appear in the file manager. This is because, in some distros, you need to manually mount them. Let’s take a look at how you can access your NTFS/Windows drives in Linux.
Step 1: Install the NTFS-3G Driver
To successfully mount and access NTFS drives on Linux, you will need to install a driver to ensure no incompatibility issues arise. The go-to driver when working with NTFS drives is NTFS-3G. It’s cross-compatible between Debian/Ubuntu derivatives, Arch Linux-based systems as well as RHEL/CentOS/Fedora systems.
To install the NTFS-3G driver on your Linux system, fire up a terminal and install it using the package manager of the distro that you’re running:
On Debian and Ubuntu, run:
sudo apt install ntfs-3g
On Arch-based systems, run:
sudo pacman -S ntfs-3g
To install the NTFS-3G driver on Fedora, CentOS, or RHEL, issue the following command:
sudo dnf install ntfs-3g
This should install the driver on your Linux system. Now you can move on to the next steps.
Step 2: Identify the NTFS Partition
A preliminary step before mounting a drive is to first identify its device ID. This is important because you might end up causing unwanted data loss by working with the wrong partition or drive.
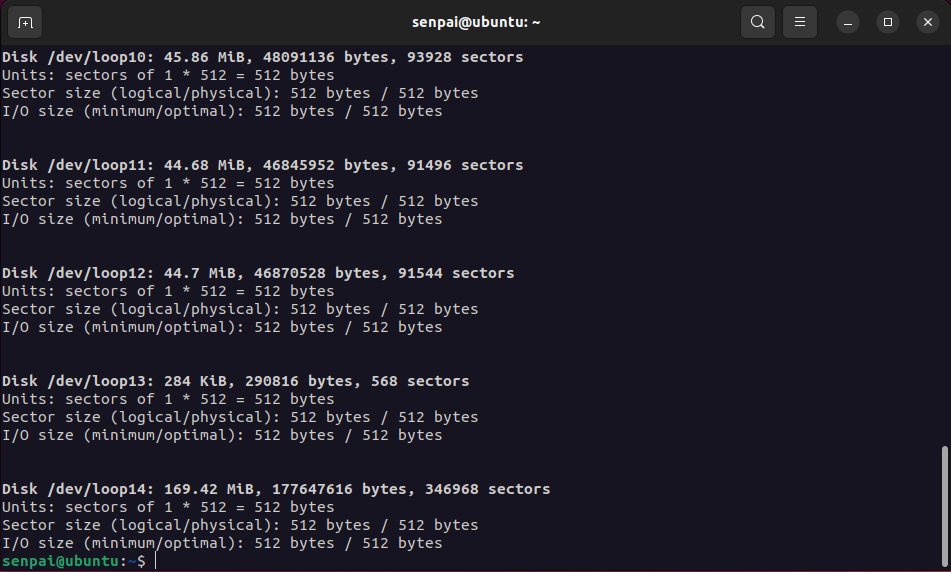
To identify all the drives and their partition types, use the fdisk command with the -l flag.
sudo fdisk -l
The output will display all the different drives and partitions along with useful information like size, available free space, partition type, and more. Take note of the device name carefully. You will be needing it later on in this guide.
Step 3: Make a Directory to Mount the Drive
In Linux, everything is treated as a file, including hardware devices. So, to mount your NTFS drives on Linux, you have to create a separate directory wherein the drive will be mounted, and its content laid out.
This process is as simple as creating a regular directory on Linux. Using the mkdir command, create a new directory in the root partition of your Linux system. For the sake of better organization, make the directory under the /mnt directory and name it «media».
sudo mkdir /mnt/media
Now that we’ve allocated a directory for the NTFS drive, we need to update the file system tables on Linux with the location of the drive.
Step 4: Update the File System Tables and Mount the Drive
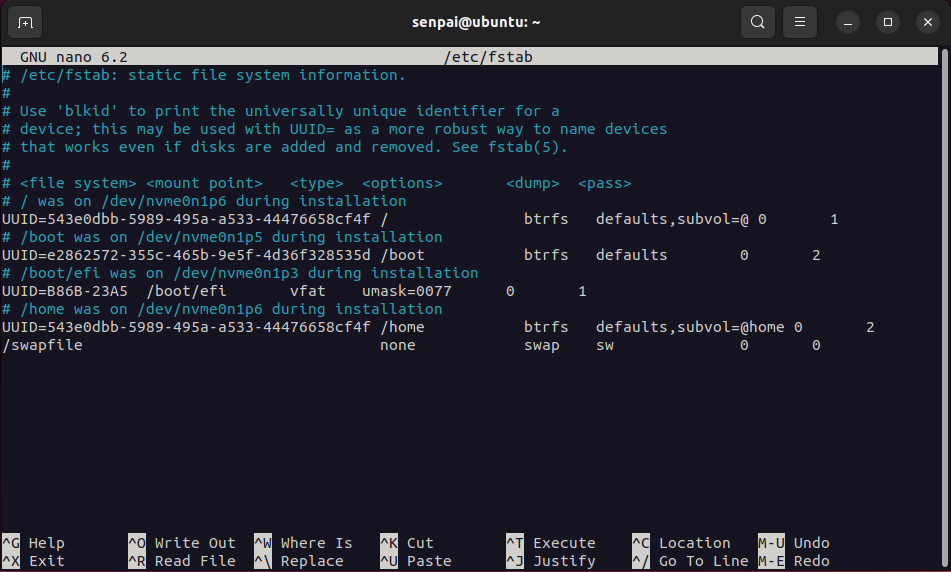
Updating the file system tables is a crucial step that enables your Linux machine to recognize and mount new storage drives. In Linux, the /etc/fstab file stores the file system configurations.
sudo nano /etc/fstab
You need to add the NTFS drive’s location and other important data to make sure that your system can mount it without any hiccups.
To update the file system table of your Linux system, use any text editor of your choice and open the /etc/fstab file.
In a new line, add the NTFS drive location, the directory that you created earlier, the driver to use (NTFS-3g), and read, write, and user access information. Make sure to separate each input with one Tab space. If you’re unsure what to type in, you can replicate the settings for any drive that’s already mounted and functional.
Write out the file once you’re done inputting the data. Fire up the terminal and use the mount command in conjunction with your device ID to mount it:
mount /dev/sda3 /mnt/media/drive_location_here
In case you wish to unmount the drive, you can do that using the umount command:
umount /dev/sda3 /mnt/media/drive_location_here
That’s all you need to do. Optionally you can restart your system, however, it won’t be required in most cases. You can now explore your NTFS drive from the terminal using the cd command or via the file manager of your Linux distro.
Now You Can Access Windows Drives in Linux
While it may be a bit tedious, it is still straightforward and a permanent process. You can now freely mount and unmount your Windows drives when logged into Linux. In case you want to permanently use the drive on Linux, you will need to format it.