
Все способы:
- Способ 1: Инструменты системы
- «Проводник»
- Windows PowerShell
- Способ 2: Daemon Tools Lite
- Выбор стандартного приложения для ISO-файлов
- Вопросы и ответы: 2
Способ 1: Инструменты системы
В Windows 10 можно монтировать ISO-образы без дополнительного ПО, одним из двух способов.
«Проводник»
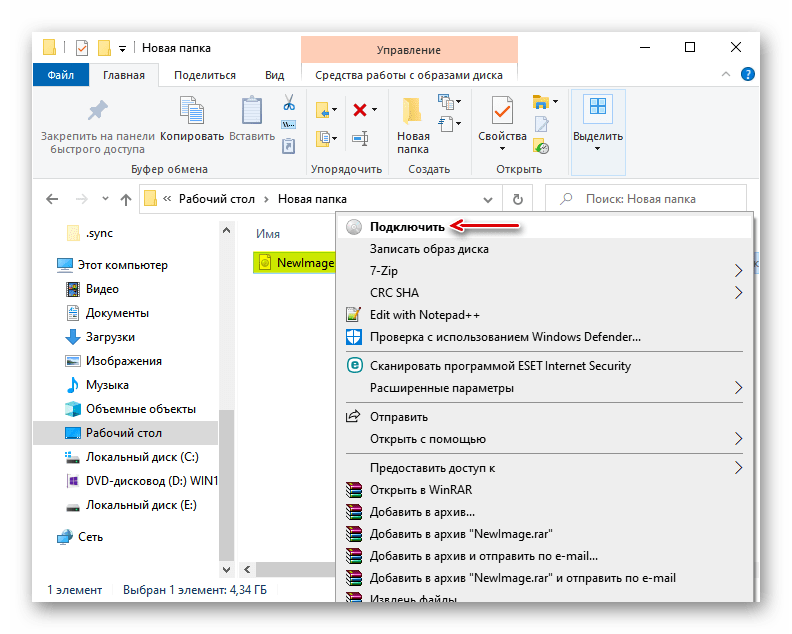
- Сочетанием клавиш Win+E открываем «Проводник» Виндовс, находим нужный файл, щелкаем по нему правой кнопкой мышки и в контекстном меню выбираем «Подключить». Эта команда назначена по умолчанию, поэтому смонтировать ISO-файл также можно двойным нажатием левой кнопки мышки.

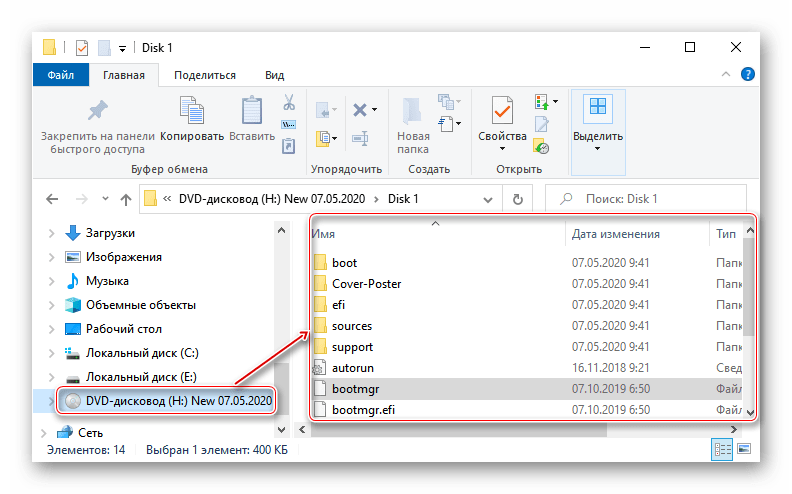
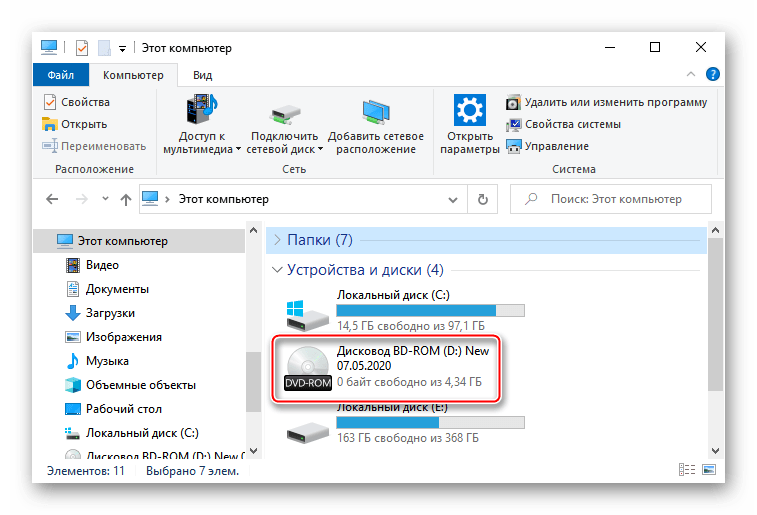
Будет создан виртуальный оптический диск, на котором можно ознакомиться с файлами, входящими в ISO-образ.

Читайте также: Запуск «Проводника» в ОС Windows 10
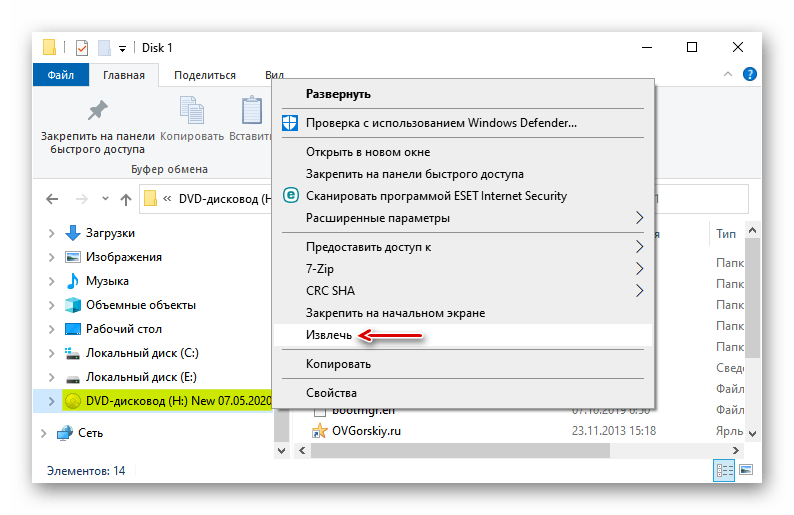
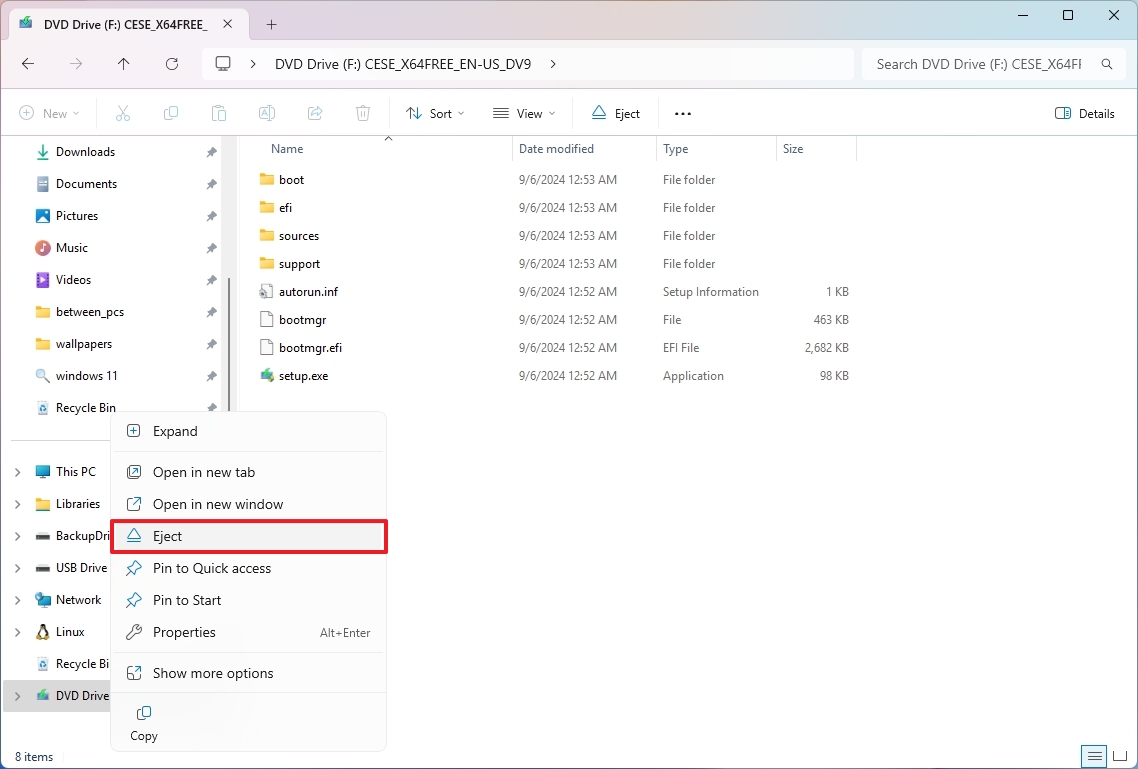
- Чтобы размонтировать образ, когда работа с ним будет закончена, щелкаем по нему правой кнопкой мышки и жмем «Извлечь».
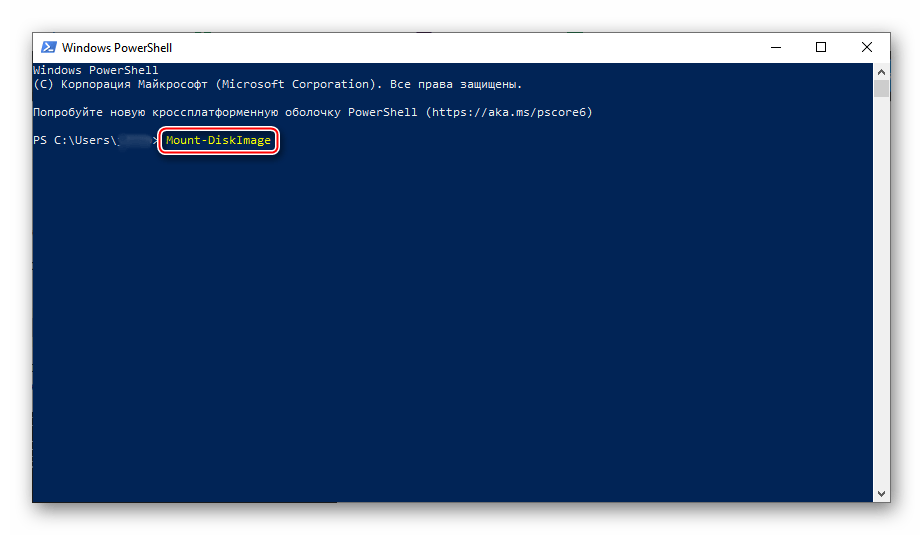
Windows PowerShell
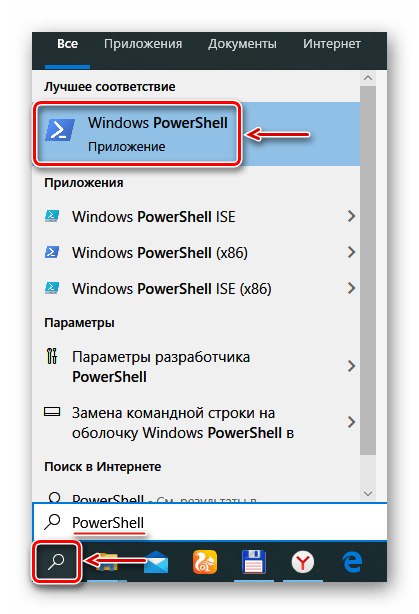
- С помощью системного поиска открываем приложение PowerShell.
- В поле консоли вводим команду:
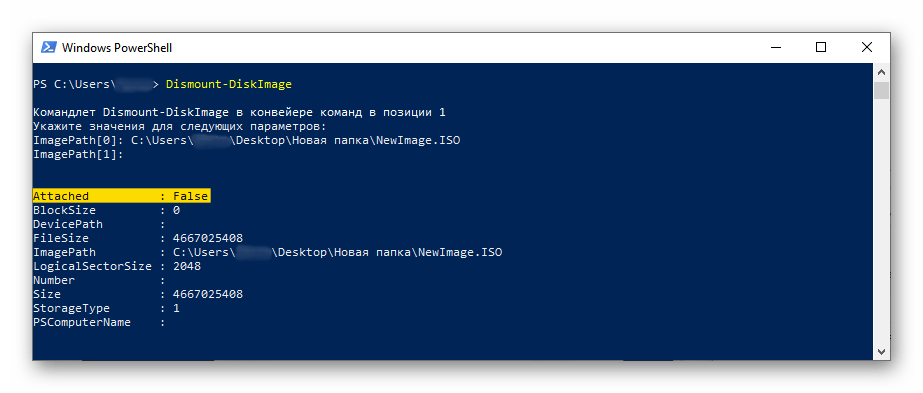
Mount-DiskImageи нажимаем «Enter».
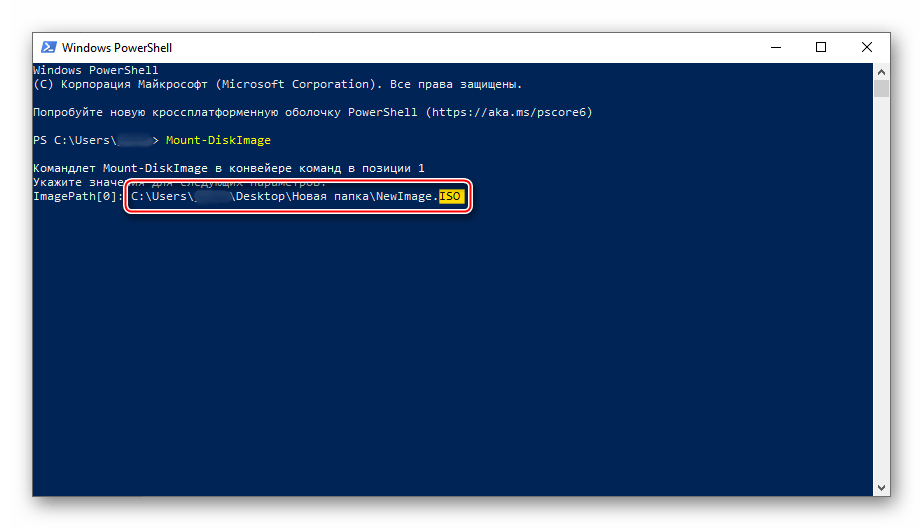
- Указываем путь к файлу. В конце обязательно должно стоять расширение .ISO.
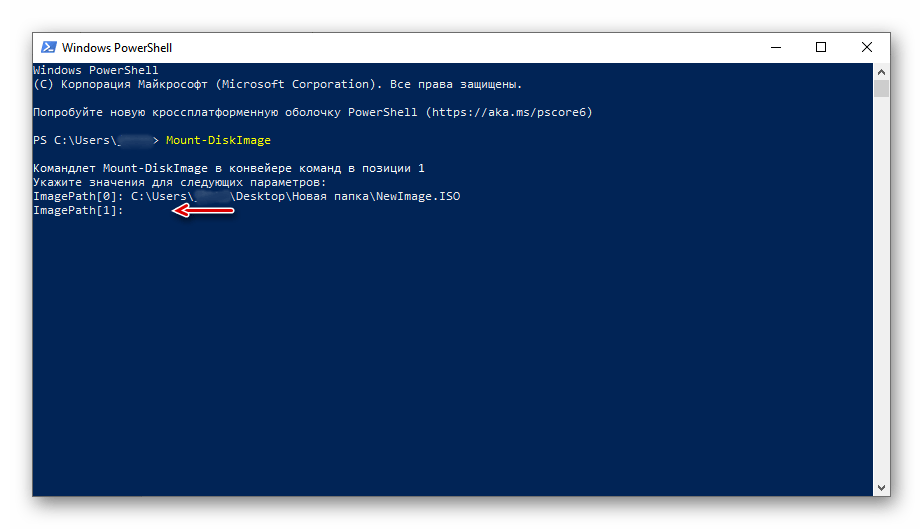
- Нас интересует только один ISO-файл, поэтому следующую строку оставляем пустой и жмем «Enter». Но при необходимости можно добавить другие пути, чтобы смонтировать сразу несколько ISO-образов.
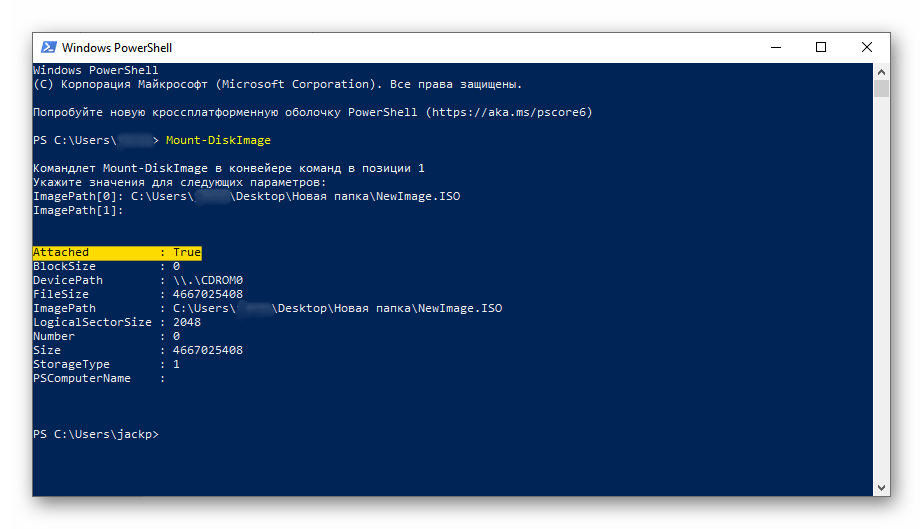
- Значение «True» в графе «Attached» указывает на то, что оптический диск создан.
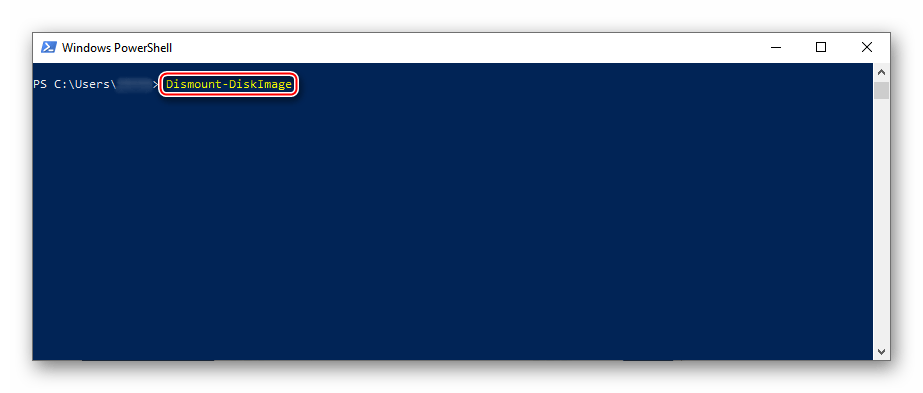
- Чтобы его размонтировать, вводим код:
Dismount-DiskImage
Снова указываем путь к месту расположения файла и нажимаем «Enter».
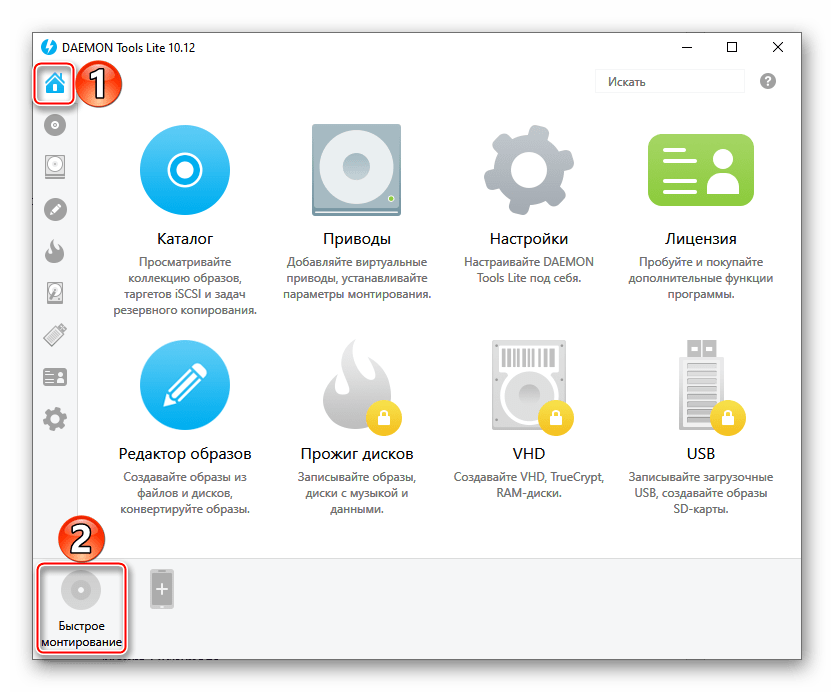
Способ 2: Daemon Tools Lite
Демон Тулс Лайт 10 – бесплатное ПО, с помощью которого можно не только монтировать популярные форматы образов и эмулировать до четырех виртуальных приводов, но и создавать собственные образы из файлов и дисков.
Скачать DAEMON Tools Lite
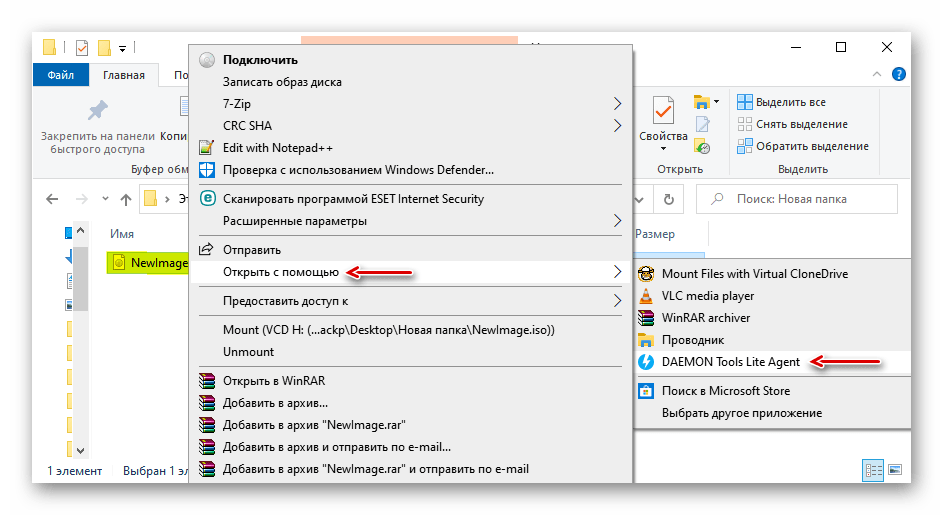
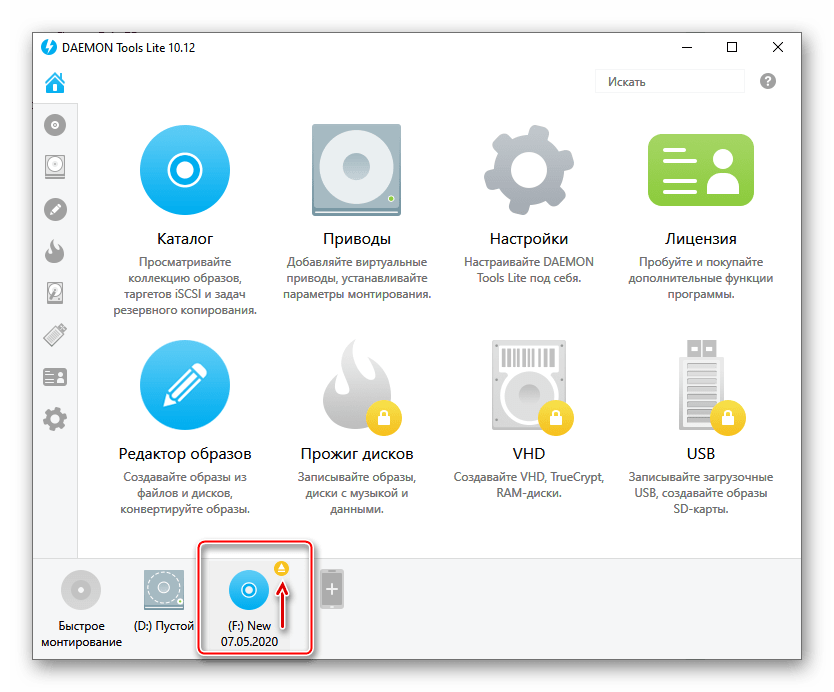
- Устанавливаем программу, находим ISO-файл, щелкаем по нему правой кнопкой мышки, нажимаем «Открыть с помощью» и выбираем Daemon Tools Lite.
- Проверяем, что образ смонтирован.
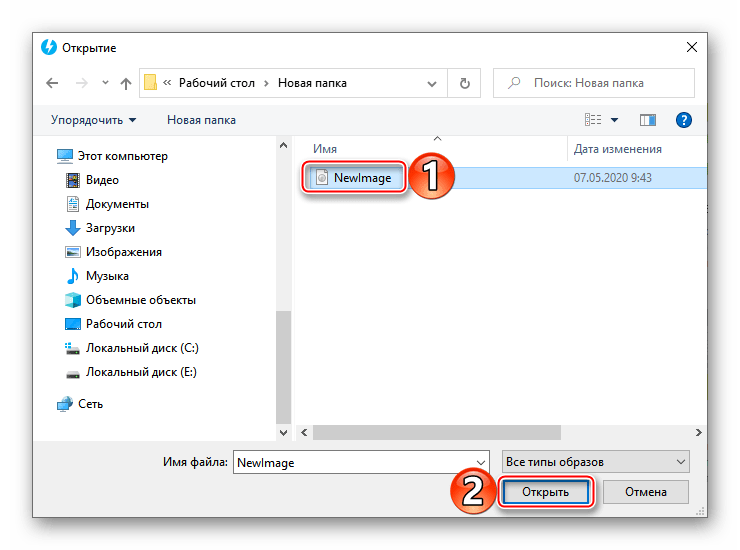
Чтобы создать виртуальный оптический диск через интерфейс DTL 10:
- Запускаем программу и в нижней части окна жмем иконку «Быстрое монтирование».
- Находим и открываем ISO-файл.
- Чтобы размонтировать его, жмем значок «Извлечь» рядом с иконкой виртуального диска.
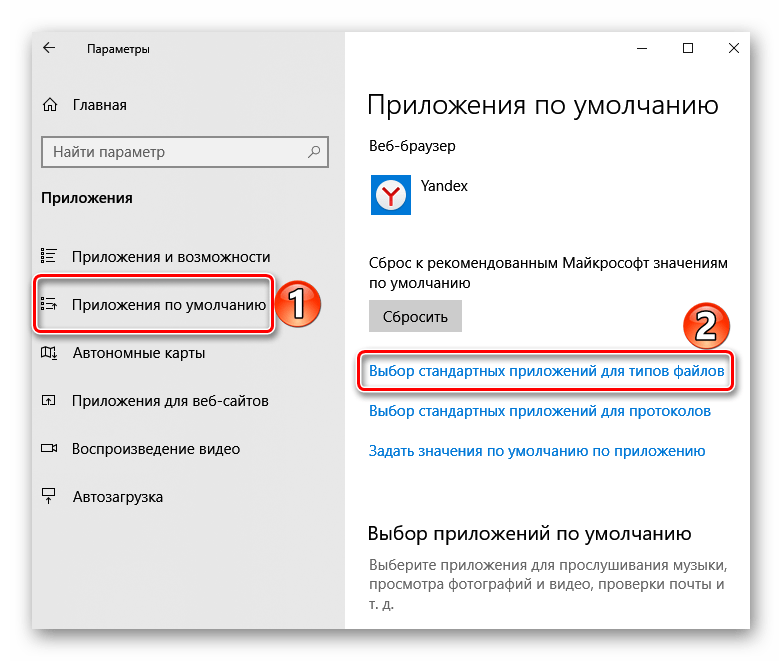
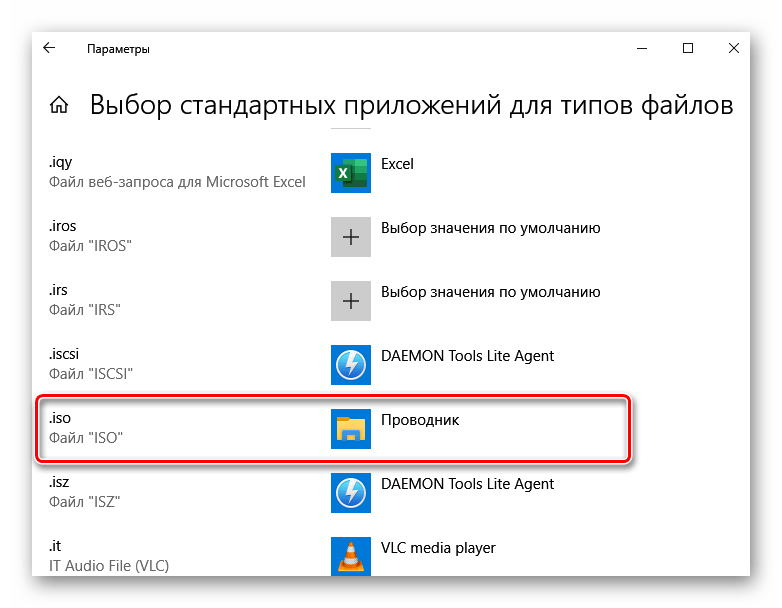
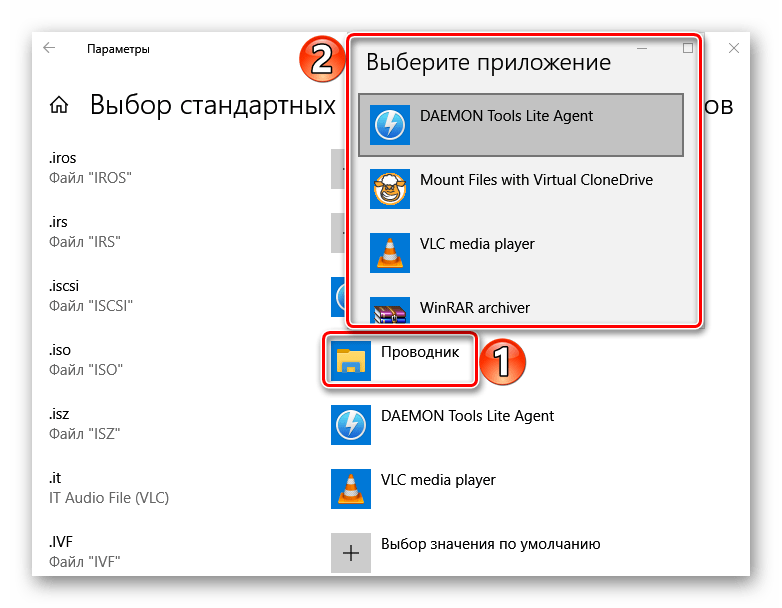
Выбор стандартного приложения для ISO-файлов
Ассоциация файлов – это механизм, с помощью которого система задает соответствие между типами файлов и программами, которые их могут открыть. Если нужно, чтобы файлы с расширением .ISO по умолчанию открывались каким-то определенным софтом, например, сторонним ПО, необходимо сделать следующее:
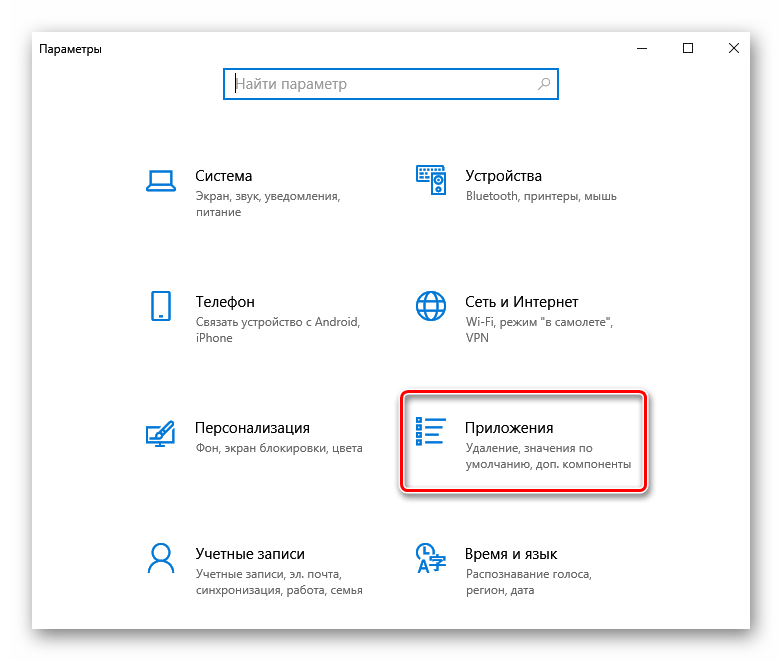
- Сочетанием клавиш Win+I вызываем «Параметры» Виндовс 10 и открываем раздел «Приложения».
- Во вкладке «Приложения по умолчанию» прокручиваем страницу вниз и жмем «Выбор стандартных приложений для типов файлов».
- В данном случае файлы ISO по умолчанию открывает «Проводник».

Чтобы изменить способ запуска, щелкаем по нему и из всплывающего списка выбираем другую программу, например, Daemon Tools Lite.
- Теперь рядом с ISO-файлами будет значок того ПО, которое вы назначили по умолчанию.
Наша группа в TelegramПолезные советы и помощь
(Image credit: Mauro Huculak)
An ISO image is a digital replica of a physical disc, such as a CD, DVD, or Blu-ray, encapsulating all its data and file structures into a single file. This format is widely adopted by software companies to distribute apps and tools efficiently, eliminating the costs and logistics associated with physical media. For instance, Microsoft uses ISO images to distribute Windows 11 (and 10) installation files as well as previews to testers and various other products.
Although many tools exist for working with images, Windows 10 and Windows 11 include the ability to mount ISO files natively without the need for extra software.
In this how-to guide, I’ll show you how to mount and unmount the ISO images using File Explorer and PowerShell commands.
How to mount ISO image with File Explorer
On Windows 11 and 10, File Explorer allows you to access the content of an image in at least three different ways: double-clicking the file, using the context menu option, or using the option available in the ribbon menu.
Mount image with double-click
To quickly mount an ISO file on Windows 11 (or 10), use these steps:
- Open File Explorer.
- Browse to the folder with the ISO image.
- Double-click the .iso file to mount it.
Once you complete the steps, the ISO file will open like any other folder, allowing you to access and extract the contents as necessary.
This action will work as long as you don’t have another app set as the default for «.ISO» extensions.
All the latest news, reviews, and guides for Windows and Xbox diehards.
To mount an ISO image with the File Explorer context menu, use these steps:
- Open File Explorer.
- Browse to the folder with the ISO image.
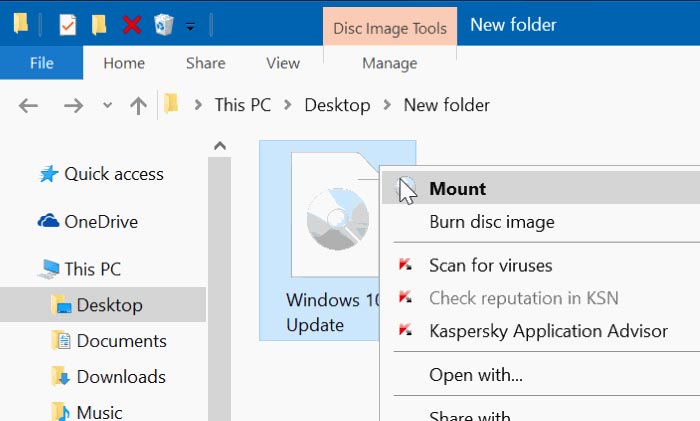
- Right-click the .iso file and select the Mount option.
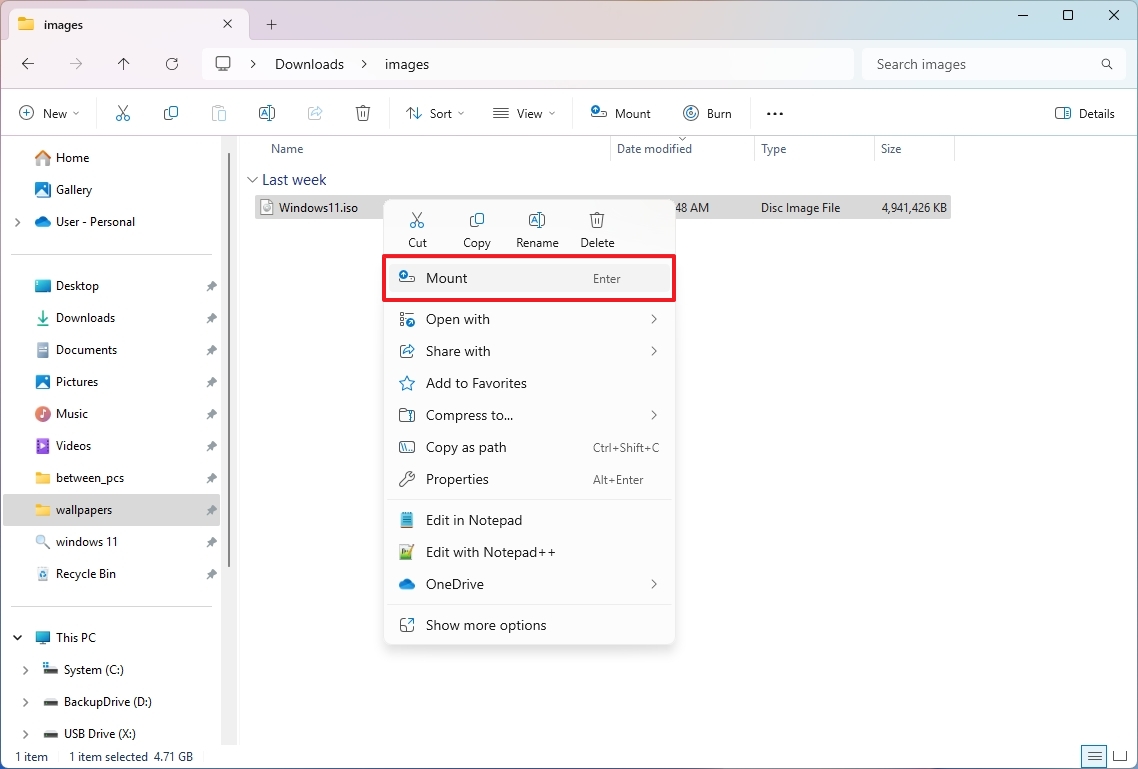
Once you complete the steps, you can access the contents of the image by selecting the virtual drive from the left navigation pane.
To mount an image with the ribbon menu, use these steps:
- Open File Explorer.
- Browse to the folder with the ISO image.
- Select the .iso file.
- Click the Mount button.
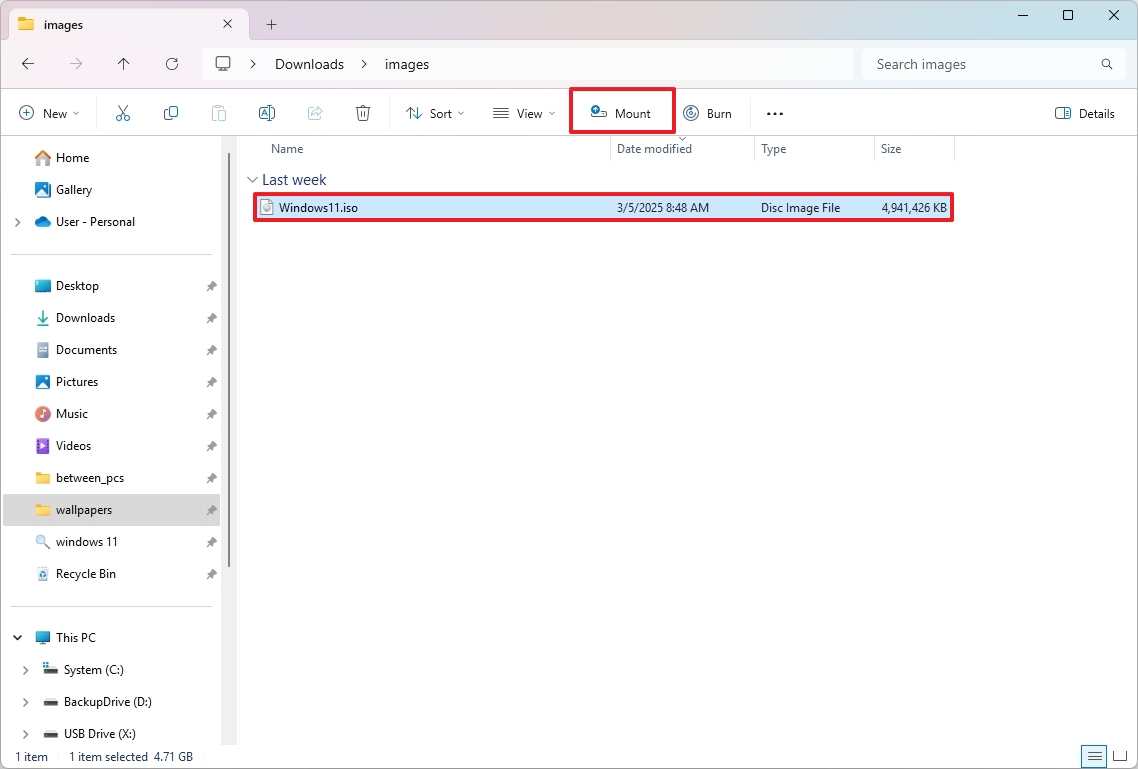
On Windows 10, the option is located in the «Disc Image Tools» tab.
Unmount image
Once you are no longer using the image, you can quickly unmount the image with these steps:
- Open File Explorer.
- Expand This PC from the left navigation pane.
- Right-click the virtual drive and select the Eject option.
After you complete these steps, the image will no longer be accessible until you mount it again.
How to mount ISO image with PowerShell
It’s also possible to mount and unmount an image using commands with PowerShell.
Mount ISO image command
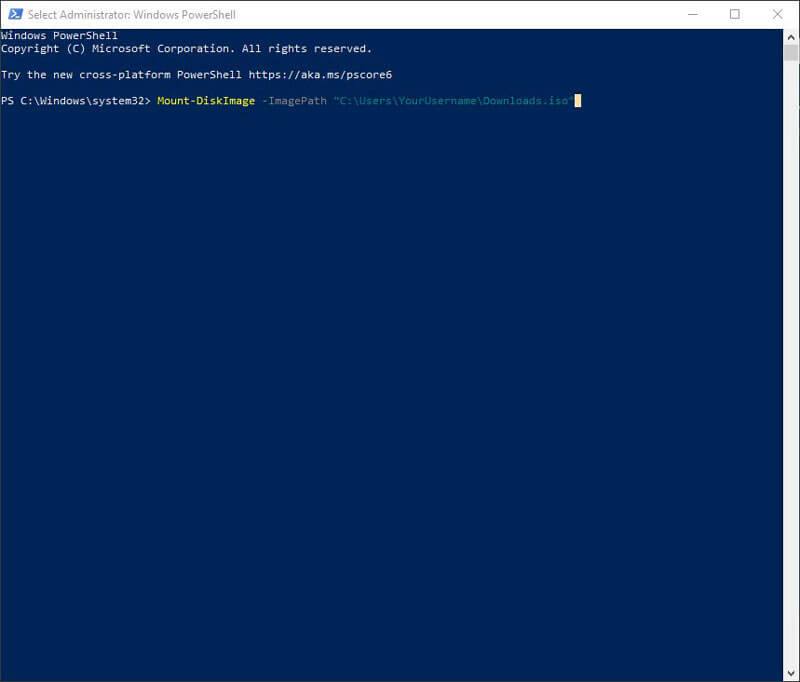
To mount an ISO image using a PowerShell command, use these steps:
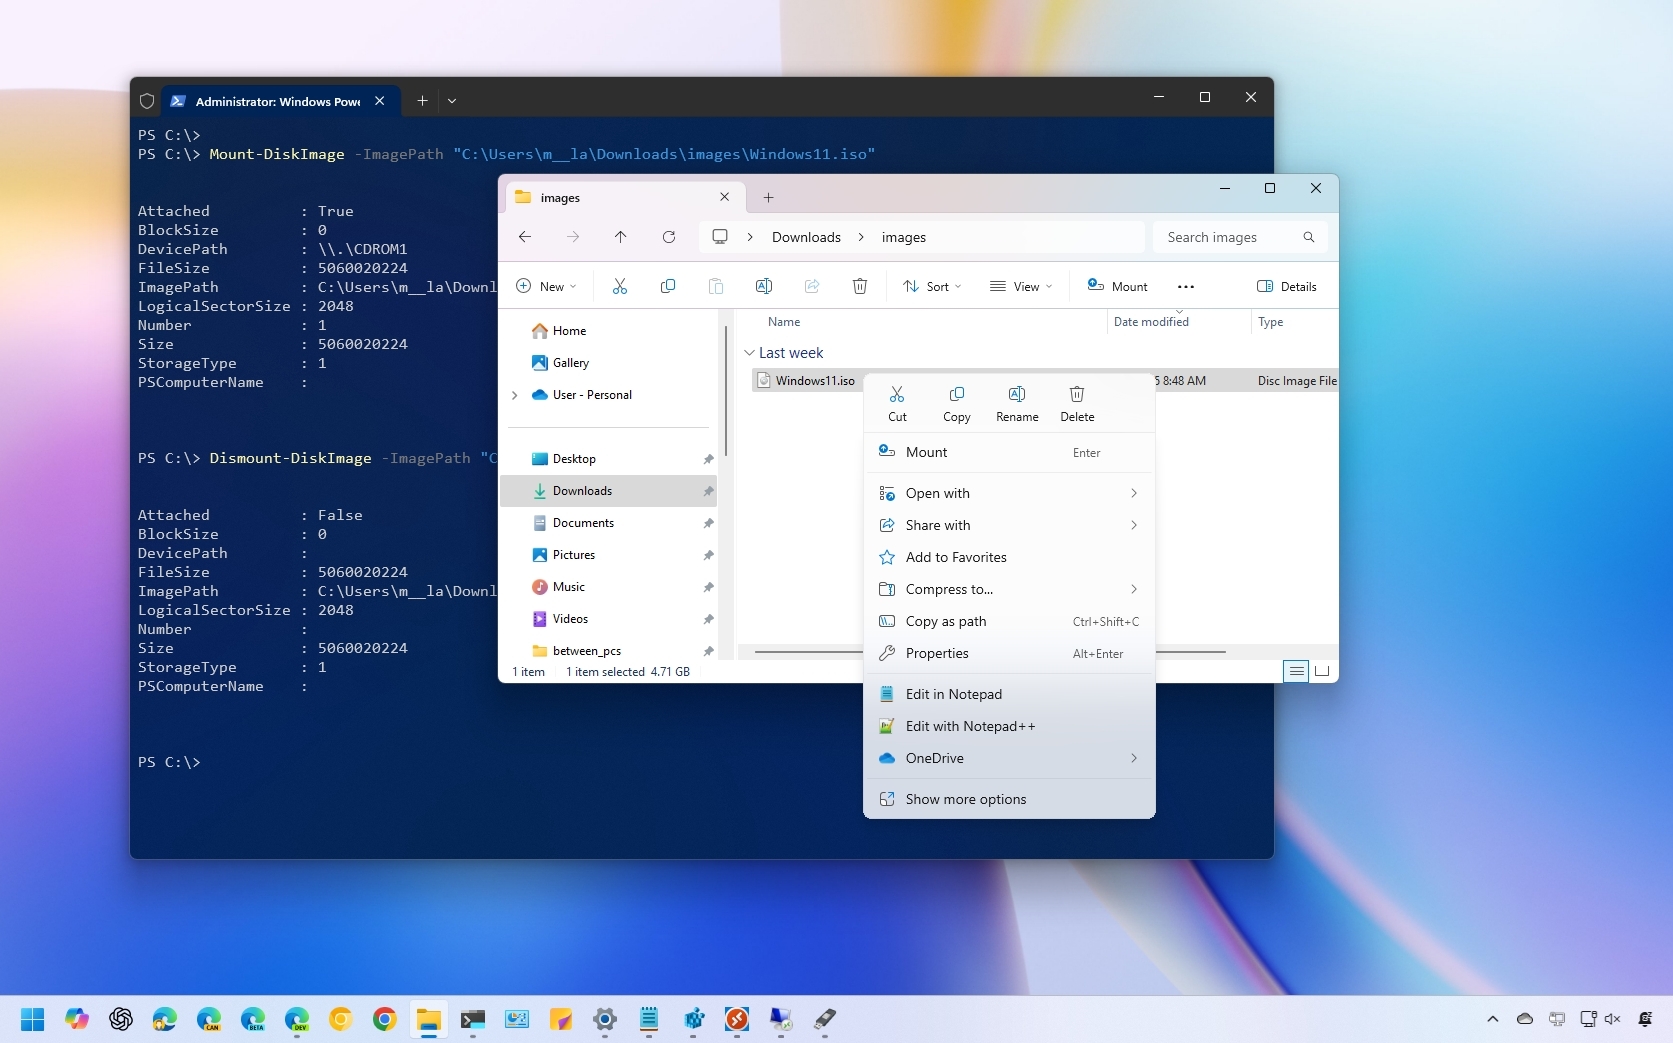
- Open Start.
- Search for PowerShell, right-click the top result, and select the Run as administrator option.
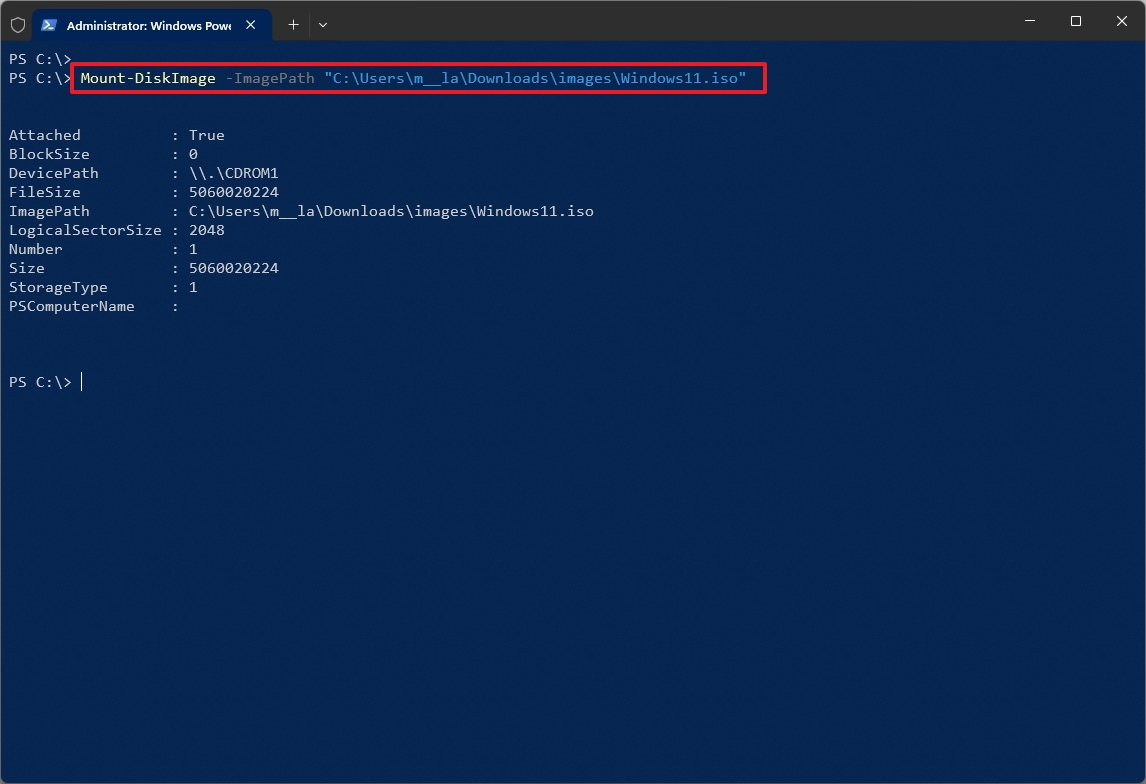
- Type the following command to mount an ISO image and press Enter: Mount-DiskImage -ImagePath «PATH\TO\ISOFILE»
In the command, make sure to replace the «PATH\TO\ISOFILE» with the actual path of the .iso file. For example, this command mounts an image in the «X:\» virtual drive: Mount-DiskImage -ImagePath «C:\Users\USERNAME\Downloads\images\Windows11.iso»
Once you complete the steps, the ISO image will mount, and you will be able to access the contents to install the application or extract the image contents from the newly-available drive letter.
Unmount ISO image command
To unmount an image with PowerShell, use these steps:
- Open Start.
- Search for PowerShell, right-click the top result, and select the Run as administrator option.
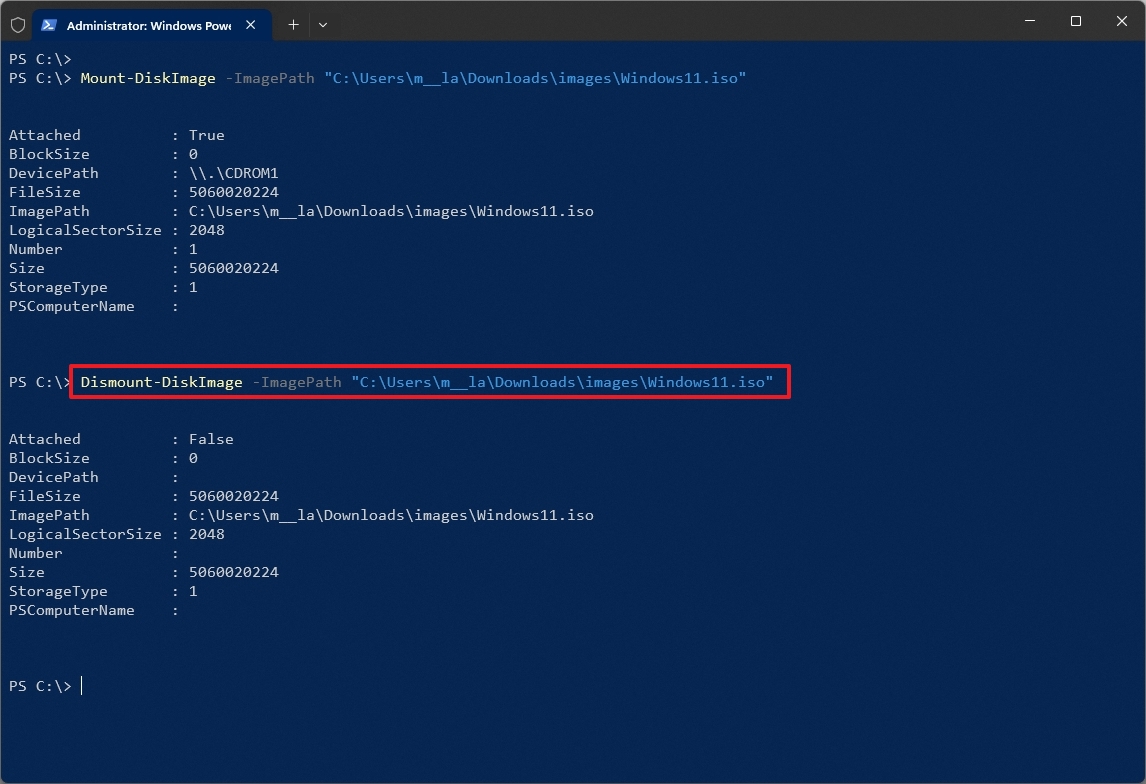
- Type the following command to mount an ISO image and press Enter: Dismount-DiskImage -ImagePath «PATH\TO\ISOFILE»
In the command, make sure to replace the «PATH\TO\ISOFILE» with the actual path of the .iso file. For example, this command removes the mount for an image in the «X:\» virtual drive: C:\Users\USERNAME\Downloads\images\Windows11.iso
After you complete the steps, the virtual drive will be removed, and the image will no longer be accessible until you mount it again.
More resources
Find in-depth guides, troubleshooting tips, and the latest updates on Windows 11 and 10 here:
- Windows 11 on Windows Central — All you need to know
- Windows 10 on Windows Central — All you need to know
Mauro Huculak has been a Windows How-To Expert contributor for WindowsCentral.com for nearly a decade and has over 15 years of experience writing comprehensive guides. He also has an IT background and has achieved different professional certifications from Microsoft, Cisco, VMware, and CompTIA. He has been recognized as a Microsoft MVP for many years.
An ISO image file is an archive file that holds the exact replica of files that remain in the physical disc (like CD, DVD or Blu-Ray discs). Even different software companies use ISO files for distributing their applications or programs. These ISO files can contain anything from Games, Windows OS, video and audio files, etc as a single compact image file. ISO is the most popular file format for disk images which has .iso as the file extension.
In order to access and use ISO files in older OS like Windows 7, Windows XP, etc, users need to install some third party application; but with the release of Windows 8, 8.1 and 10, users do not need to install any external application for running these files, and the File Explorer is enough for running. In this article, you will learn about how to mount and unmount ISO image files in different OS.
Mounting is the approach where users or vendors can create a virtual CD/DVD drive on the system so that the operating system can run an image file like it usually runs files from DVD-ROM. Unmounting is the exact opposite of mounting that is you can relate to ejecting DVD-ROM once your work is over.
Table of Contents
Method 1: Mount an ISO Image File in Windows 8, 8.1 or 10:
With the latest Windows OS such as Windows 8.1 or Windows 10, you can directly mount or unmount ISO file using the built-in tool. You can also mount virtual hard drives using the below steps. There are three different ways via which you can mount ISO image file:
1. Navigate to the ISO file location in File Explorer then double-click on the ISO file that you want to mount.
Note: This approach will not work if the ISO file is associated with a third-party program (to open).

2. Another way is to right-click on the ISO file that you want to mount and select “Mount” from the context menu.

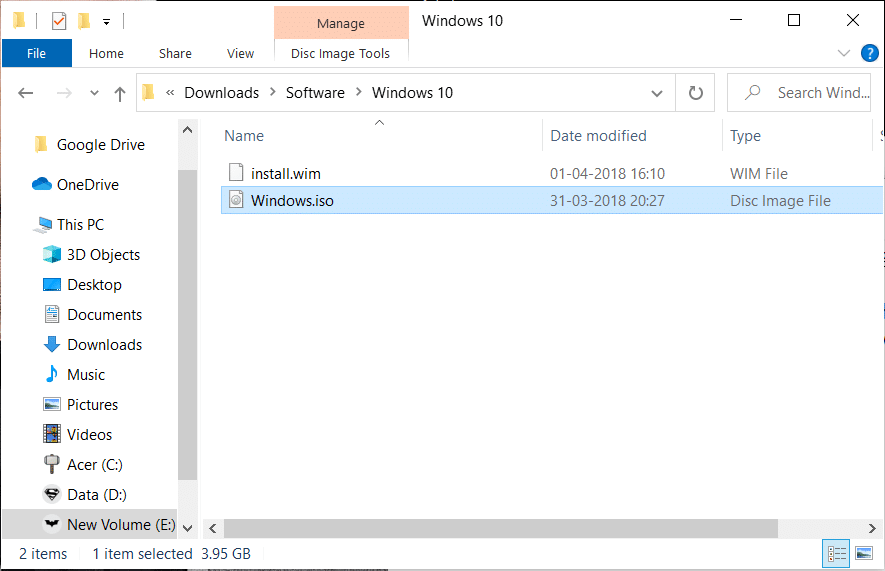
3. The final option is to mount the ISO file from File Explorer. Navigate to the location of the ISO file, then select the ISO file. From File Explorer menu, click on the Disc Image Tools tab and click on the Mount option.

4. Next, under This PC you will see a new drive (virtual) which will host the files from ISO image using which you can browse all the data of the ISO file.

5. To unmount the ISO file, right-click on the new drive (mounted ISO) and select “Eject” option from the context menu.
Also Read: Creating a Full System Image Backup in Windows 10 [The Ultimate Guide]
Method 2: Mount an ISO Image File on Windows 7/Vista
To access the content of the ISO file in older versions of Windows OS, you will need to download & install a third-party application for mounting the ISO image file. In this example, we will use the application “WinCDEmu” (which you can download from here) which is a simple open-source ISO mounting application. And this application also supports Windows 8 as well as Windows 10.

1. To use this application, you have to first download & install it from this link and give the necessary permission to complete the installation.
2. Once the installation finished, simply double-click on the ISO file to mount the image file.
3. Now start the application and you will see a window where you can choose the configuration settings for the mounted ISO drive such as drive letter and other basic options. Once done, click OK to save changes.
Method 3: How to Mount or Unmount ISO file using PowerShell:
1. Go to Start menu search type “PowerShell” and click on the search result to open.

2. Once the PowerShell window opens, simply type the command written below for mounting the ISO file:
Mount-DiskImage -ImagePath "C:\PATH.ISO"

3. In the above command make sure you change C:\PATH.ISO with the location of your ISO image file on your system.
4. Also, you can easily unmount your image file by typing the command and hit Enter:
Dismount-DiskImage -ImagePath "C:\FILE.ISO"

Also Read: Download official Windows 10 ISO without Media Creation Tool
That’s the end of the article, I hope using the above steps you will be able to mount or unmount the ISO image file on Windows 10. But if you still have any questions regarding this tutorial then feel free to ask them in the comment section.
Файлы ISO часто встречаются в нашем компьютерном опыте. Файл ISO или образ ISO аналогичен цифровой копии компакт-диска, DVD или Blu-ray. На нем хранится все с оригинального диска. Их можно использовать для установки операционной системы, запуска программного обеспечения, доступа к сохраненным данным и т. д. Но как смонтировать ISO в Windows 10 и macOS для доступа к содержимому внутри?
В этом руководстве представлены простые инструкции по установке файлов ISO на обеих платформах. Независимо от того, являетесь ли вы пользователем Windows или Mac, вы узнаете, как заставить файлы ISO работать на вас, упрощая ваши вычислительные задачи. Кроме того, мы порекомендуем лучший инструмент для создания DVD для создания ваших DVD.
Windows 8 и более поздние версии имеют встроенный инструмент для монтирования файлов ISO. Это позволяет вам получить доступ к содержимому ISO без необходимости использования стороннего программного обеспечения. У вас есть два способа смонтировать ISO в Windows.
Способ 1. Смонтируйте ISO-образ с помощью проводника.
В Windows 11, 10 или 8.1 есть удобный встроенный инструмент под названием «Проводник Windows», который можно использовать для легкого открытия и монтирования файлов ISO.
Шаг 1Найдите ISO-файл, который хотите смонтировать.
Шаг 2Щелкните правой кнопкой мыши файл ISO.
Шаг 3В контекстном меню выберите Устанавливать. Вы также можете дважды щелкнуть по нему, чтобы открыть. Windows создаст виртуальный диск и автоматически откроет содержимое ISO, сделав его доступным, как если бы это был физический компакт-диск или DVD.
Способ 2. Смонтируйте ISO с помощью Windows PowerShell.
PowerShell — это инструмент, созданный Microsoft, который предоставляет широкий спектр команд и утилит, позволяющих пользователям выполнять различные задачи, включая открытие файла ISO. Он уже установлен в вашей Windows, поэтому вы можете получить доступ к содержимому ISO и воспроизводите фильмы Blu-ray или DVD на своем ноутбуке без труда.
Шаг 1Откройте Windows PowerShell (найдите его в меню «Пуск»).
Шаг 2Выберите параметр «Запуск от имени администратора».
Шаг 3Входить Mount-DiskImage -ImagePath «путь имя_файла.iso» (замените фактический путь и имя вашего ISO-файла)
Шаг 4Нажимать Входить для монтирования файла ISO.
Часть 2. Как смонтировать ISO на Mac
Способ 1. Смонтируйте файлы ISO с помощью DiskImageMounter.
DiskImageMounter — удобный инструмент для открытия файлов образов дисков, таких как файлы ISO или DMG. Он позволяет вам просматривать содержимое этих файлов, рассматривая их так, как если бы они были настоящими дисками. Этот инструмент встроен в вашу MacOS, поэтому дополнительные загрузки не требуются.
Шаг 1Найдите ISO-файл.
Шаг 2Дважды щелкните файл ISO.
Шаг 3MacOS автоматически использует DiskImageMounter, чтобы смонтировать его как виртуальный диск и открыть содержимое.
Шаг 4Получите доступ к смонтированному ISO.
Способ 2. Смонтируйте ISO с помощью Дисковой утилиты.
Вы также можете использовать Дисковую утилиту. Это предустановленное программное обеспечение в macOS, позволяющее легко открывать файлы ISO и управлять ими. Дисковая утилита — мощный инструмент для управления устройствами хранения данных. Он может форматировать, разделять, исправлять и очищать диски и даже создавать или изменять образы дисков. В отличие от DiskImageMounter, который в основном открывает образы дисков, Дисковая утилита имеет удобный визуальный интерфейс для эффективного управления вашими дисками.
Шаг 1Открыть Дисковую утилиту
Найдите Дисковую утилиту в папке «Утилиты» в папке «Приложения». Если вы не можете его найти, воспользуйтесь поиском Spotlight (Command + пробел, затем введите «Дисковая утилита» и нажмите Enter), чтобы быстро найти и открыть его.
Шаг 2Выберите ISO-файл
В окне Дисковой утилиты нажмите на значок Файл меню. Выбирать Открыть образ диска… из раскрывающегося меню и выберите файл ISO.
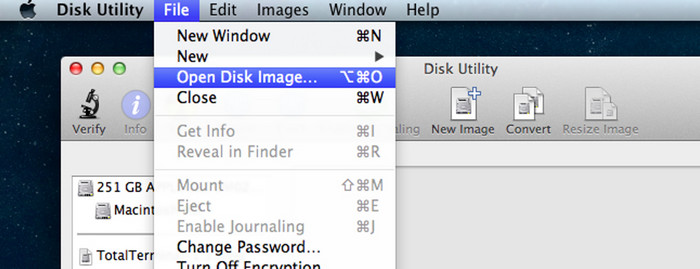
Шаг 3Установите ISO
Дисковая утилита теперь смонтирует файл ISO, и он появится на левой боковой панели окна Дисковой утилиты.
Шаг 4Доступ к смонтированному ISO
После успешного монтирования ISO вы сможете получить доступ к его содержимому. А когда вы закончите использовать файл ISO, вы можете просто щелкнуть правой кнопкой мыши, чтобы извлечь и размонтировать его.
Часть 3. Дополнительный совет: лучший создатель DVD
Если вы знаете, как открывать файлы ISO на Windows 10 и Mac, вы сможете сделать что-то еще более крутое. Пытаться Типард Создатель DVD. Это лучший DVD-рекордер программное обеспечение, которое поможет вам легко создавать DVD или Blu-ray. Вы можете превратить свои цифровые данные в физические диски. Объединив монтирование ISO и создание DVD, вы получите более простой и творческий опыт работы с цифровыми технологиями.
Используя Tipard DVD Creator, вы можете создавать свои DVD-диски всего за несколько простых шагов.
Шаг 1Загрузить и установить
Вы можете бесплатно загрузить Tipard DVD Creator на его официальном сайте. Затем установите и запустите его.
Шаг 2Выберите тип диска
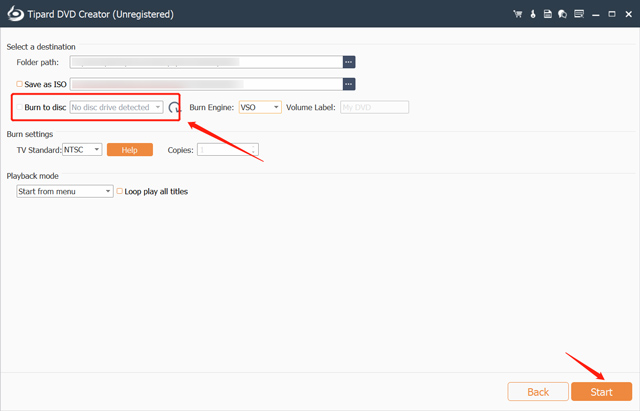
Выберите тип диска, который вы хотите записать: DVD или Blu-ray.
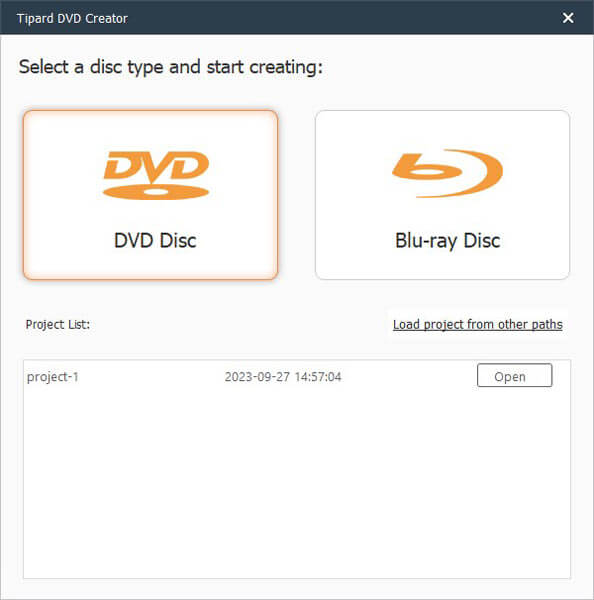
Шаг 3Добавить медиафайл(ы)
Щелкните значок Добавить медиафайл(ы) Кнопка для импорта файла ISO. У вас также есть возможность добавлять или редактировать аудио и субтитры по мере необходимости.

Шаг 4Записать на диск
Нажмите Следующий, и вы можете выбрать шаблон, добавить фоновую музыку и просмотреть его. Затем нажмите Гореть, выбирать Записать на диски нажмите Начинать. Через мгновение вы получите свой DVD.
Часть 4. Часто задаваемые вопросы по монтажу ISO
Как смонтировать и размонтировать ISO в Windows 10?
Чтобы смонтировать ISO в Windows 10, дважды щелкните файл ISO или щелкните правой кнопкой мыши и выберите Устанавливать.
Чтобы отключиться, откройте проводник, найдите виртуальный диск, представляющий смонтированный ISO, щелкните его правой кнопкой мыши и выберите Извлечь.
Почему я не могу смонтировать файл ISO?
Возможно, вам не удастся смонтировать файл IOS, если он поврежден или неполный.
Убедитесь, что файл ISO связан с правильной программой. Щелкните правой кнопкой мыши ISO, выберите Открыть си выберите Выбрать другое приложение чтобы убедиться, что он установлен правильно.
Убедитесь, что ваша операционная система Windows обновлена.
Если вы попробовали эти решения, но по-прежнему не можете смонтировать файл ISO, вы можете обратиться за помощью к техническому эксперту.
Могу ли я записать ISO на жесткий диск?
Нет, вы не можете записать файл ISO на жесткий диск, поскольку под записью обычно понимается процесс записи данных на оптический диск, например CD, DVD или Blu-ray. Однако вы можете скопировать или извлечь содержимое файла ISO на жесткий диск или устройство хранения данных.
Вывод
В заключение мы показали вам, как легко монтировать файлы ISO как на Windows 10, так и на Mac, что упрощает доступ к вашим цифровым материалам. Будь то программное обеспечение, игры или другой контент, полезно знать, как это сделать. Кроме того, мы предлагаем попробовать инструмент для создания DVD. Он позволяет создавать собственные DVD-диски с особыми воспоминаниями или творческими проектами.
Если эта статья оказалась для вас полезной, не стесняйтесь поделиться ею со своими друзьями, семьями и коллегами.
ISO files, also known as ISO images, are becoming more common these days. Optical Disk Image (ISO) is an archived file format where one or multiple files are stored into a single file. ISO images were initially created to take backups and replicate an optical CD or DVD. These could then be used to copy the data as-is onto other disks.
The ISO images have now become multipurpose and vastly used to share large files and software in a single-file format. This prevents any data corruption while preserving its formatting. You can download an ISO file off the internet like any other regular file.
Most operating systems natively support ISO files, which means they can be used (mounted) without having to use a third-party tool. Windows 11 and Windows 10 are among these operating systems. You can mount an ISO file directly onto your Windows system to use its content(s).
It is also possible to only extract the contents of an ISO file, but that requires third-party tools which we have discussed in this post.
There are multiple ways you can mount an ISO image in Windows. Let’s see how to achieve that.
Table of Contents
How to Mount ISO File in Windows 11/10
The methods to mount an ISO file are the same for both Windows 10 and 11.
Mount ISO using File Explorer
Windows Explorer/File Explorer is an application in Windows that is preinstalled to navigate through the different volumes, folders, and files. It can be used in 3 ways to mount an ISO file.
Mount ISO Image with Double-Click
Since Windows supports ISO files natively, you can mount an ISO file simply by double-clicking on it.
Use File Explorer to navigate to the ISO’s location and double-click it using your mouse. The contents of the ISO file will now appear, and the Explorer will open the ISO file like any other folder. You can now start using the contents of the ISO file if you want.
If you click on This PC from the left navigation bar in Explorer, you will see the ISO file has been mounted.

Mount ISO Image from Context Menu
Another quick way to mount an ISO file in Windows is through its context menu. The effect is the same as double-clicking it; the image is mounted and File Explorer opens the ISO file like a regular folder.
Navigate to the ISO file that you want to mount, right-click on it, and then click Mount from the context menu.

You will now see that the ISO image has been mounted successfully from the left navigation bar, or by clicking This PC.
Mount ISO Images Using Ribbon Menu
The ribbon menu is the menu that you see at the top of File Explorer. You can also mount an ISO file using the ribbon menu after you have selected it.
To mount an ISO file using the ribbon menu in Windows 11
, navigate to it using File Explorer and then click on it to select it. Once selected, click on the ellipses (3 dots) from the ribbon menu and then click Mount.

For Windows 10, navigate to the ISO image using File Explorer and then click on it to select it. Then, click Disc Image Tools from the ribbon menu and click Mount.

In both of these cases, Explorer will open the ISO file like any other folder and will mount it too.
Eject/Unmount ISO Image using File Explorer
When you are finished with your work on the ISO file or wish to mount another ISO, you can dismount this ISO file in a few easy steps using File Explorer.
Open This PC using Explorer and right-click on the CD/DVD drive where the ISO file is mounted. From the context menu, click Eject. Alternatively, you can also eject it from the navigation bar on the left through the context menu.

Another way to unmount an ISO file is through the ribbon menu. Open the mounted ISO using File Explorer, and then click Eject through the ellipses at the top (Windows 11), or through the Drive Tools menu (Windows 10).
Mount ISO using Windows PowerShell
If you prefer to use the Command Line Interface (CLI), you can also mount an ISO image using Windows PowerShell that is preinstalled in both Windows 10 and 11.
Open PowerShell by typing in powershell in Run dialog. Then use the following command to mount the ISO file. Note that the command requires you to know the complete name and path of the file to be mounted, which can be confirmed using File Explorer if you do not already know.
Mount-DiskImage -ImagePath "CompletePathToISO.iso"
Replace CompletePathToISO with the actual path and name for the ISO file that you want to mount, as we have done in the example below:
Mount-DiskImage -ImagePath "E:\ISOs\Windows11 Stable.iso"

The ISO file will now be mounted to your PC.
Eject/Unmount ISO Image using PowerShell
An ISO image can also be dismounted using File Explorer, which also requires you to know its complete path and name. Use the command below to unmount an ISO file from Windows PowerShell while replacing CompletePathToISO with the actual path and name for the ISO file.
Dismount-DiskImage -ImagePath "CompletePathToISO.iso"

Mount ISO Image using Tools
You can also mount ISO files in Windows using third-party tools. Although this is not necessary, since Windows supports ISO images natively, you can still use the following tools to mount an ISO image:
- PowerISO
- Daemon Tools Lite
- WinISO
- Virtual CloneDrive
Although there are many other free tools available on the internet, these are ones we found to be the most useful ones.
How to Extract ISO Image in Windows 11/10
Third-party tools are required to extract the contents of an ISO file since Windows cannot do it for you.
Unlike an IMG file, ISO files are not compressed. That said, there are compression/decompression tools available in the market that will extract the contents of an ISO file and place them in a regular folder. These tools only extract the contents and do not decompress them, as an ISO file is already in its regular form.
The following tools can be used to extract the contents of an ISO image:
- WinRAR
- WinZip
- 7Zip
Verdict
ISO files are becoming more common. Most large files we download from the internet are in ISO format, and there are many tools for their conversion (to and from ISO). Microsoft provides its users with the convenience of opening and using these files without having to download additional tools.