
Applies ToWindows 11 Windows 10 Windows
В Windows 11 вы сами выбираете время и способ получения последних обновлений для поддержания работоспособности и безопасности устройства.
-
Выберите Параметры запуска клиентский компонент Центра обновления Windows > выберите Проверить наличие обновлений Windows.
-
Если доступны какие-либо обновления, выберите Скачать & установить. Устройство загрузит и установит обновления. Если появится соответствующий запрос, перезапустите устройство, чтобы применить обновления.
Сведения о автоматическом получении Обновления Windows см. в статье Получение обновлений Windows, как только они будут доступны для вашего устройства.
Чтобы предотвратить неудобные установки и перезапуски при использовании устройства с Windows Обновления, см. статью Обновление устройства в часы активности.
Проверить наличие обновлений Windows
Статьи по теме
Ниже приведены дополнительные разделы, которые вам могут понадобиться.
-
Дополнительные сведения об обновлении до Windows 11 см. в разделе Windows 11: вопросы и ответы.
-
Если вы пытаетесь активировать Windows 11, дополнительные сведения см. в разделе Активация Windows.
-
При получении сообщения об ошибке при попытке обновления см. статью Устранение неполадок с обновлением Windows.
-
Если клиентский компонент Центра обновления Windows вас предупредил, что на устройстве недостаточно места для установки обновлений, см. раздел Освобождение места для обновлений Windows.
-
Если при обновлении устройства возникают проблемы с подключением к Интернету, см. статью Устранение проблем с подключением Wi-Fi в Windows.
-
Если у вас возникли проблемы с установкой обновлений, см. статью Устранение неполадок с обновлением Windows.
-
Ответы на часто задаваемые вопросы см. в статье Центр обновления Windows: вопросы и ответы.
Нужна дополнительная помощь?
Нужны дополнительные параметры?
Изучите преимущества подписки, просмотрите учебные курсы, узнайте, как защитить свое устройство и т. д.
Quick Links
-
If Your Updates Failed, Clear the Downloaded Updates First
-
From Microsoft Update Catalog
Summary
- First, clear the downloaded update files by stopping the Windows Update service and removing all files from the Windows Update cache folder.
- Then, use the options on the Settings > Windows Update screen to force install the available updates. Another way is to manually grab updates from Microsoft Update Catalog and install those updates.
- You can also use a command in Command Prompt or a cmdlet in PowerShell to find and install the available Windows updates.
If automatic updates have failed to install, you have alternate ways to manually update your Windows 11 PC. We’ll show you the available methods, so you can get the latest bug fixes and possibly new features on your computer. Let’s get started.
If Your Updates Failed, Clear the Downloaded Updates First
Before using alternate update methods, remove the downloaded update files to prevent any potential issues. The alternate methods will re-download the required update files anyway, so you won’t lose anything.
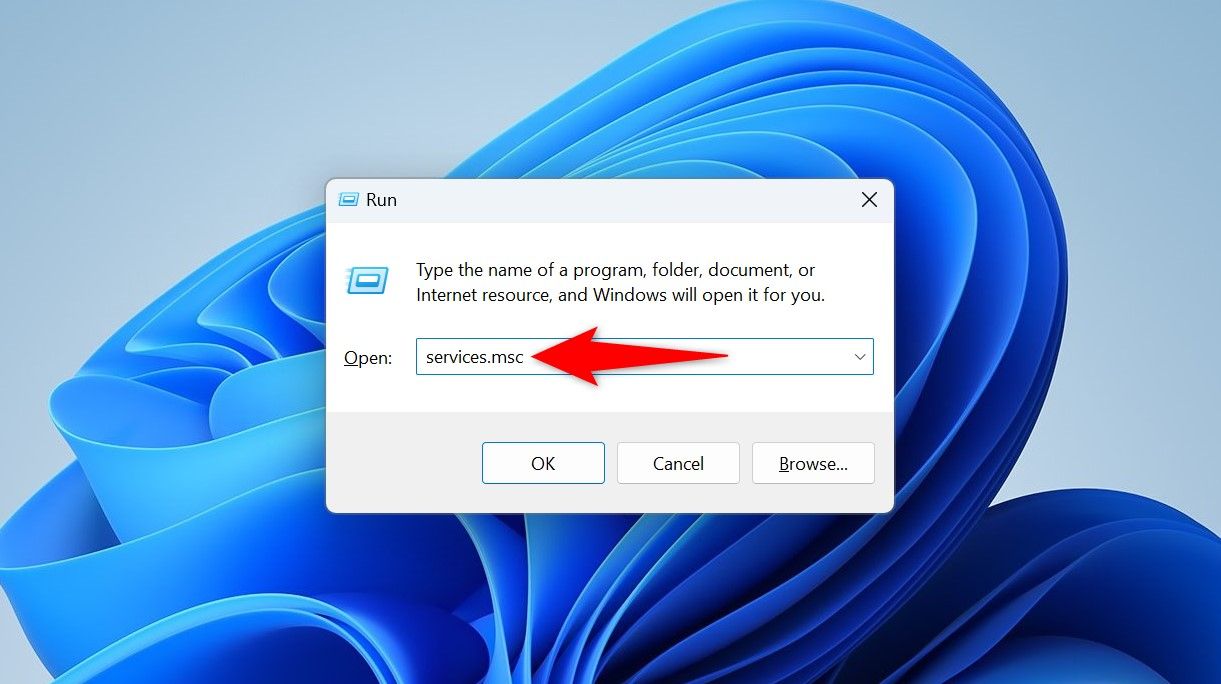
To clear the Windows Update cache, launch Run by pressing Windows+R. Type the following in the box and press Enter or select «OK.»
services.msc
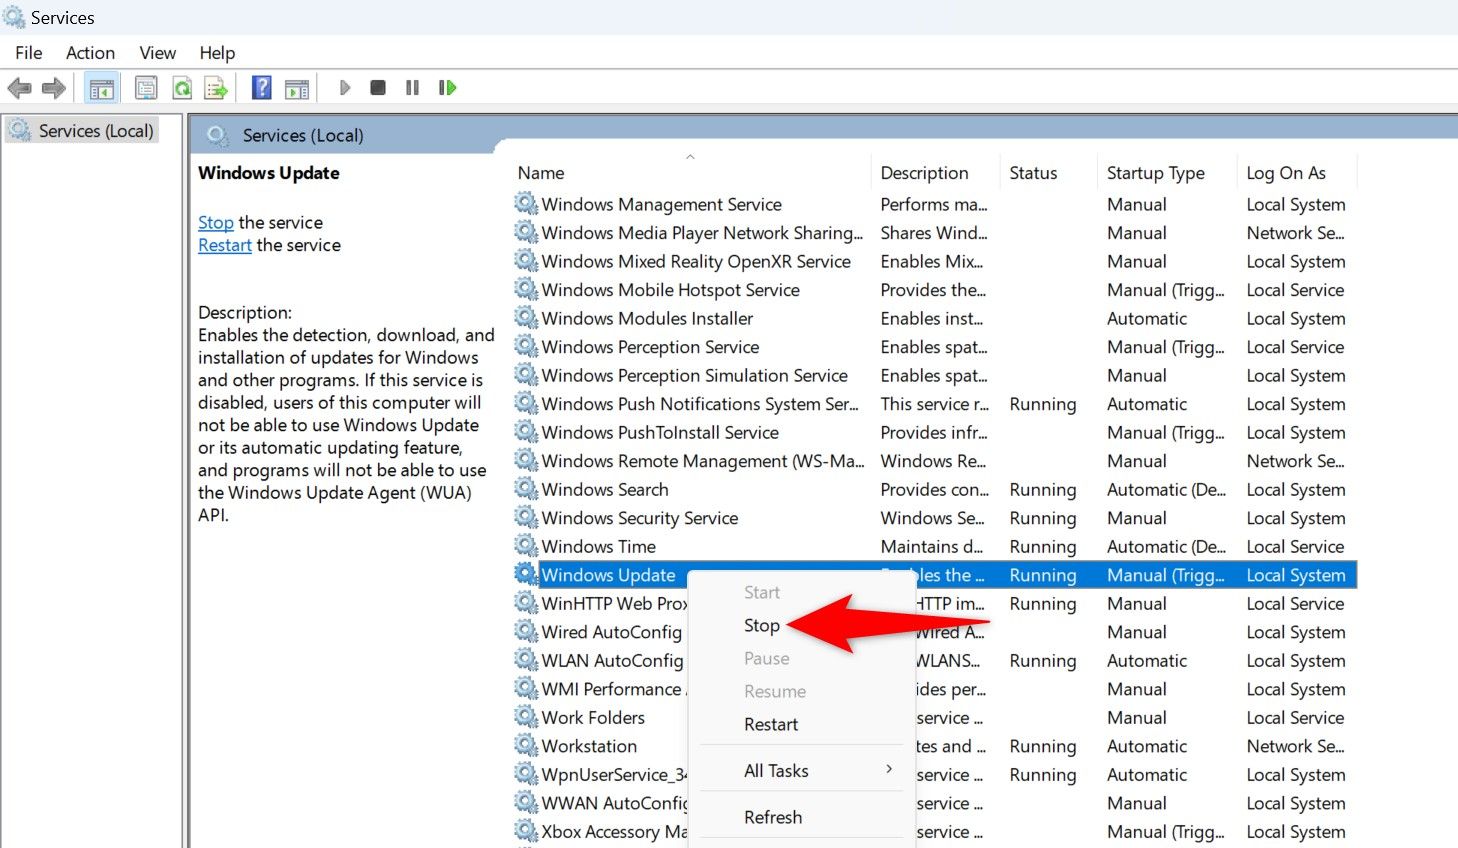
In the Services window, find the «Windows Update» service, then right-click the service and choose «Stop.» If you don’t stop this service, Windows won’t let you clear the update cache, since the files will be «in use.»
If the Windows Update service fails to stop, restart your PC and try again.
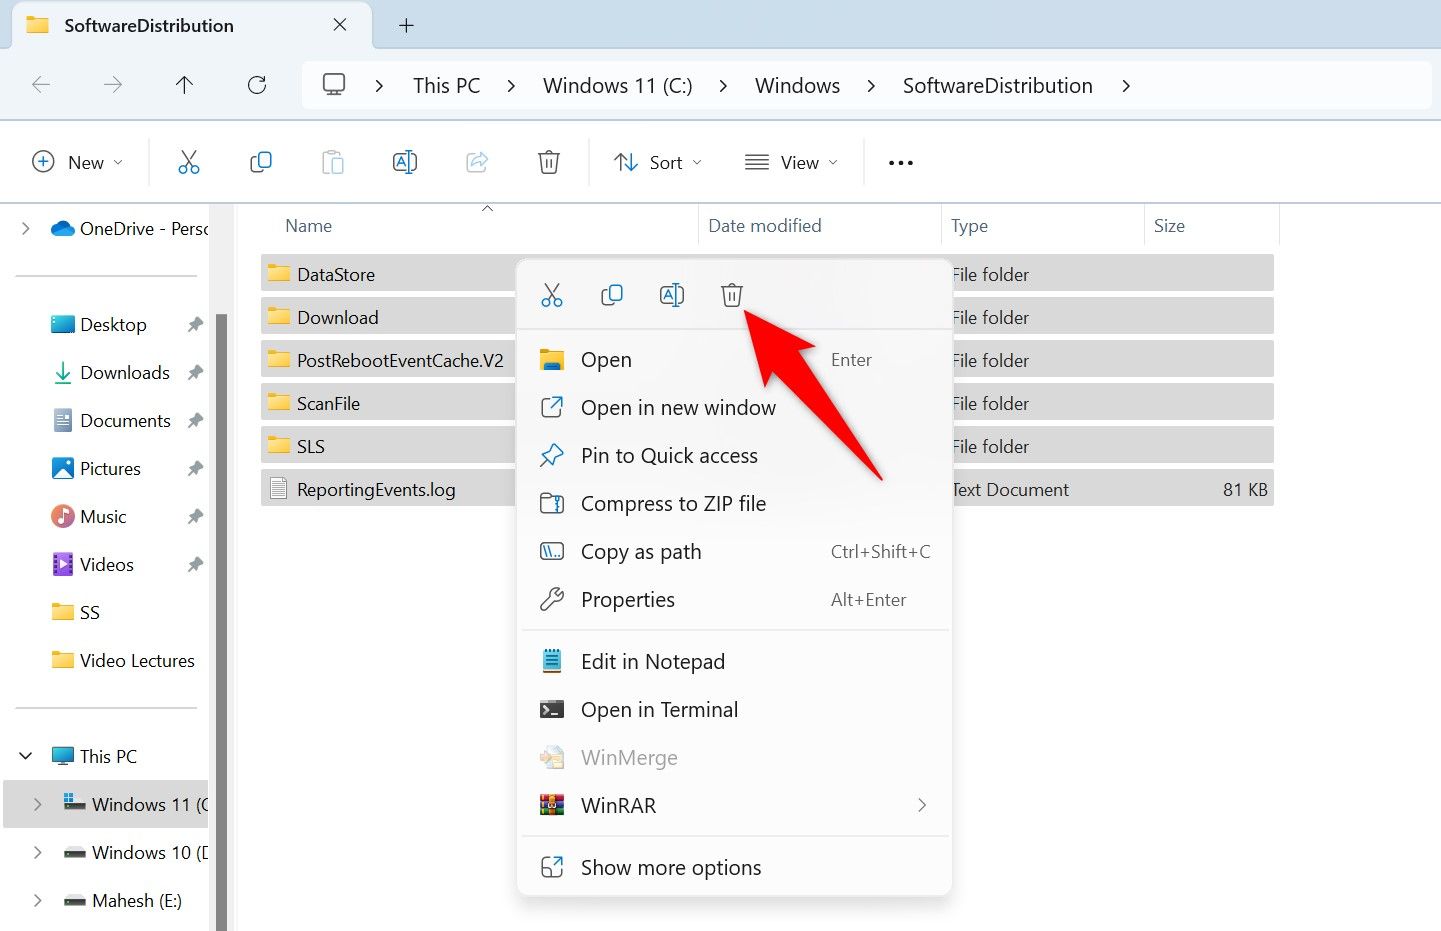
Keep the Services window open, as you’ll return here shortly. Open the Run dialog box again by pressing Windows+R. Type the following path in the box and press Enter. If you’ve installed Windows on a drive other than C, replace the drive letter in the path.
C:\Windows\SoftwareDistribution\
You’re now in the Windows Update cache folder. Select all files here by pressing Ctrl+A, right-click any of the selected files, and choose the trash can icon.
You’ve removed all the update files. Close File Explorer, return to the Services window, right-click the «Windows Update» service, and choose «Start.»
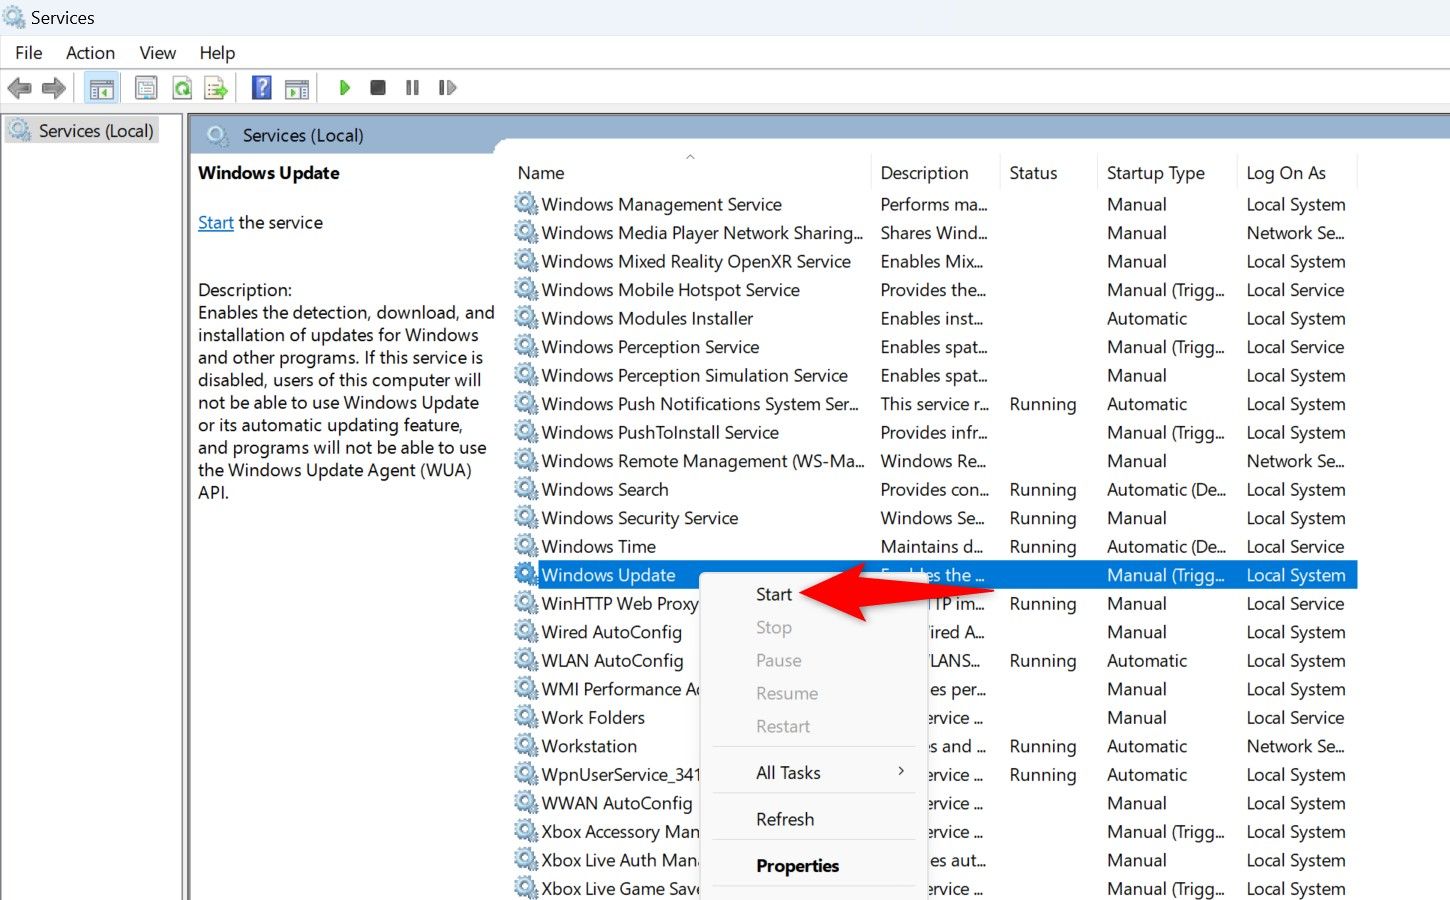
You’re set.
From Windows Settings
One way to force updates to install is by using the Settings app. Here, you can choose whether to install the available updates or only specific ones.
To use this method, launch Settings by pressing Windows+i. At the bottom of the left sidebar, choose «Windows Update.»
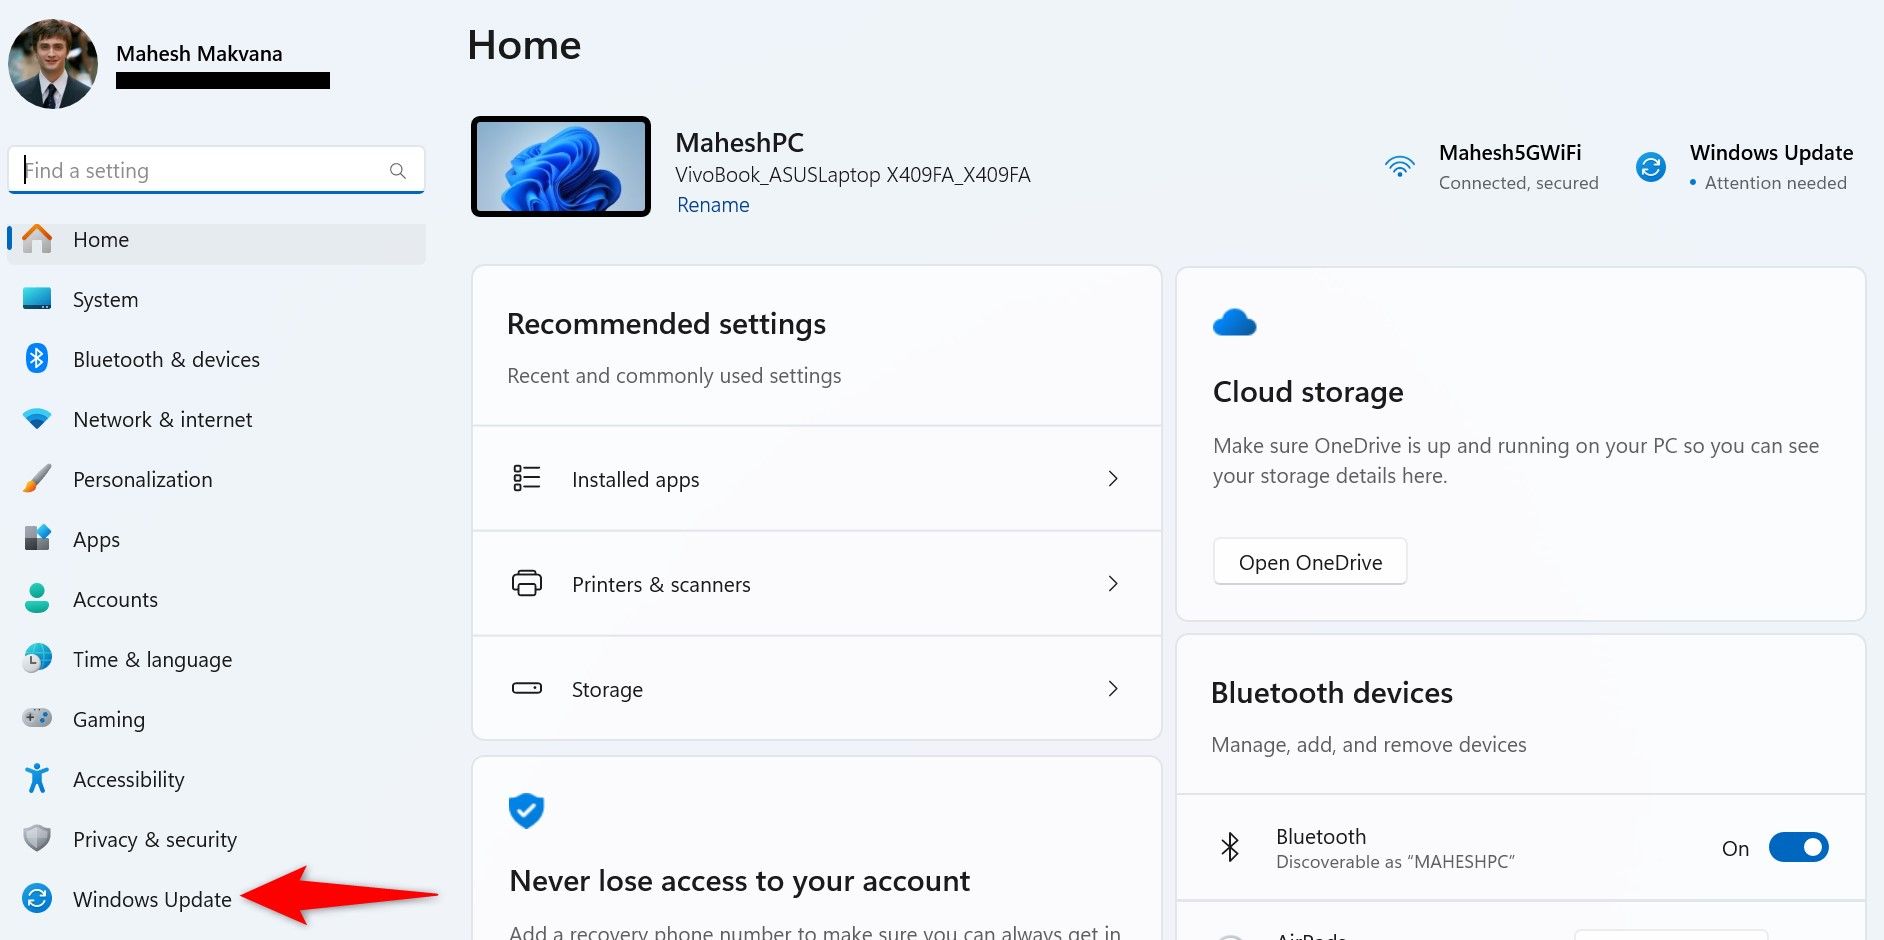
On the right pane, click «Download & Install All» to download and install the available updates. To only download and install specific updates, click the button next to those updates.
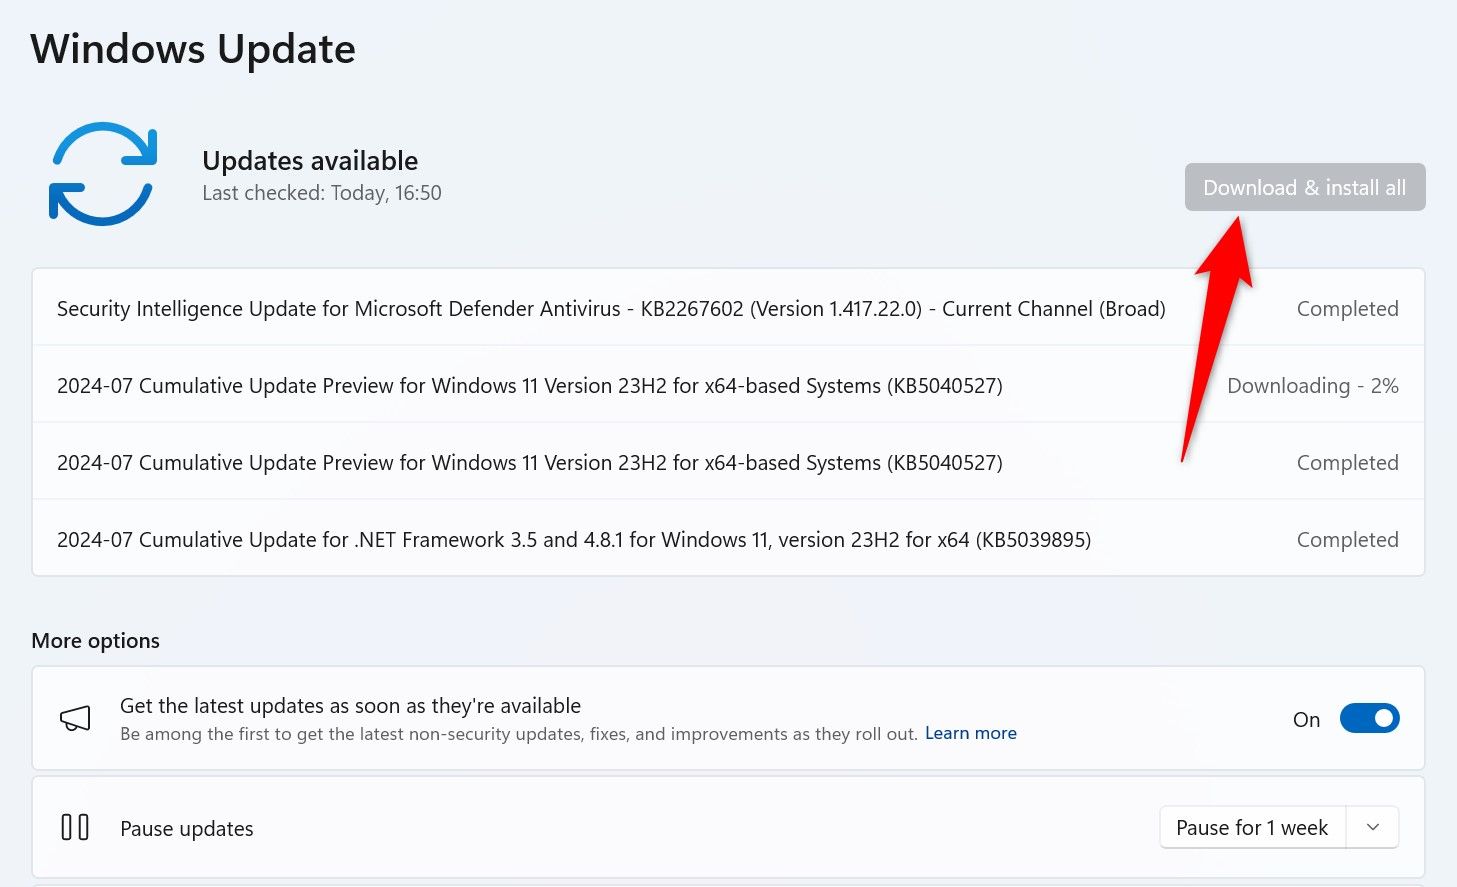
Wait while Windows obtains and installs the selected updates, then reboot your Windows 11 PC.
From Microsoft Update Catalog
Microsoft Update Catalog is a site where you can find and download any Windows update you want. This allows you to manually download an update and then install that update on your PC—all without using the Windows Update feature.
To use this method, find the name of the update you want to download. You can find this information on the Settings > Windows Update page. The update names usually start with KB.
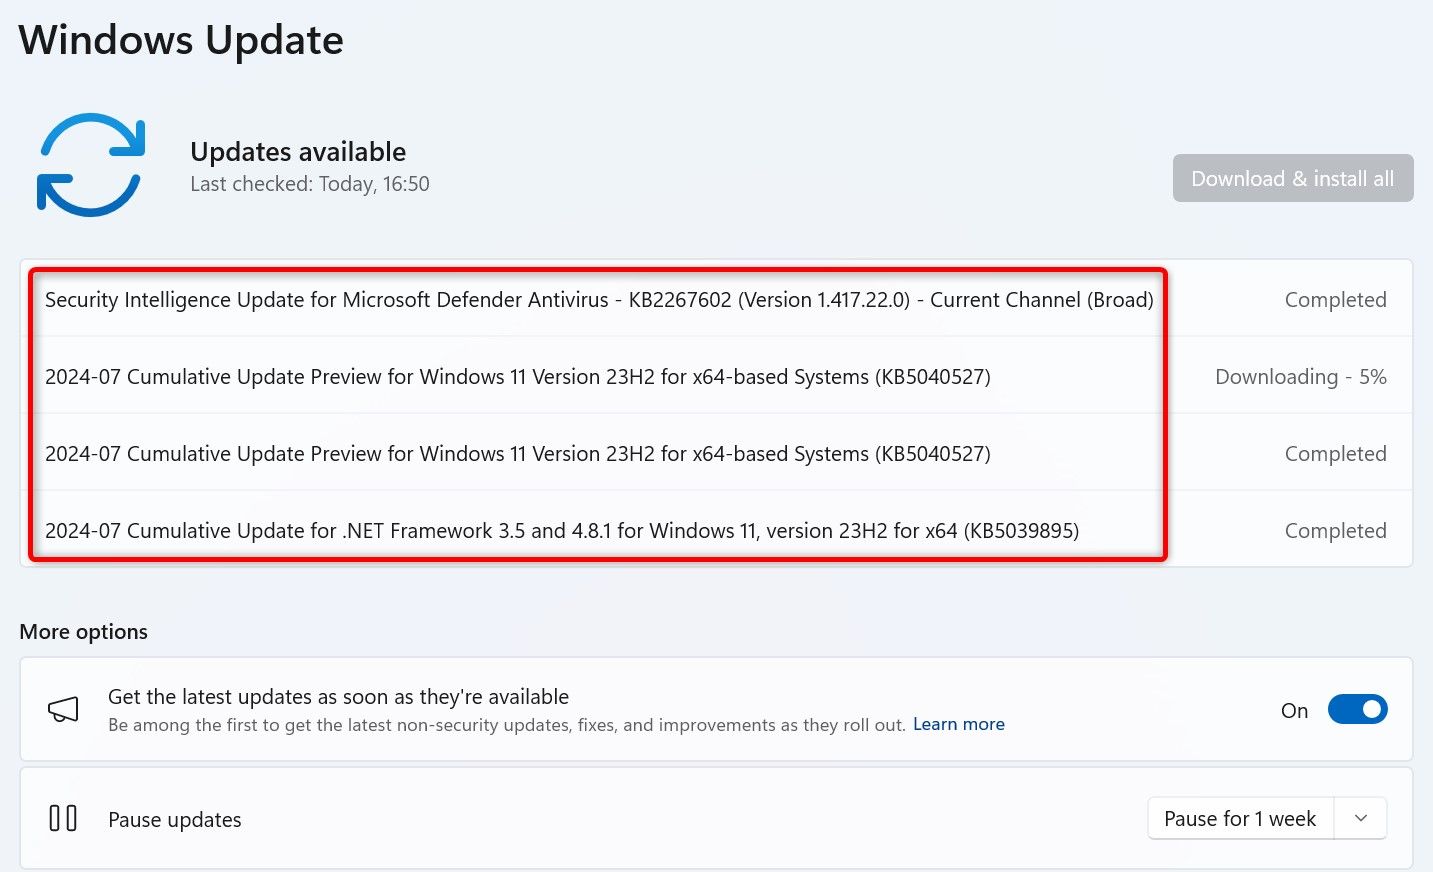
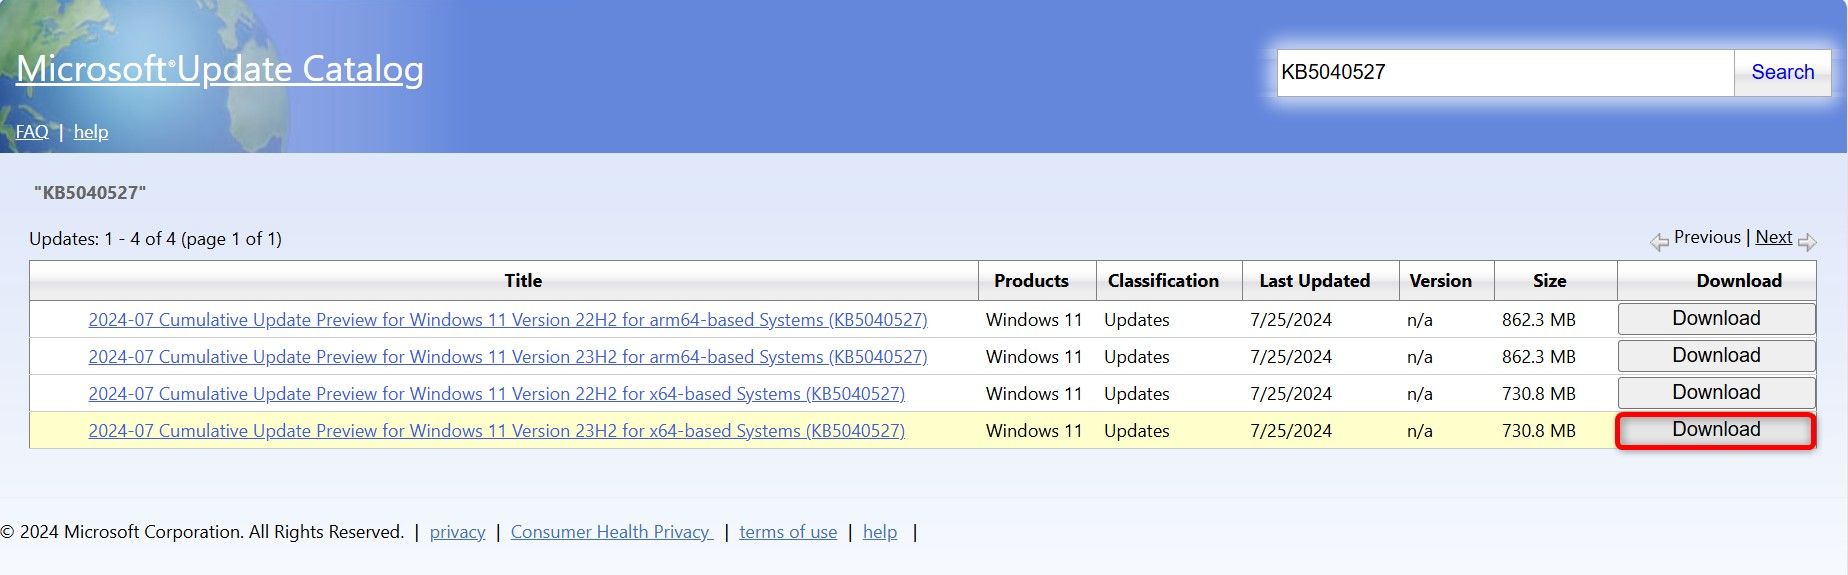
Then, launch a web browser and head to the Microsoft Update Catalog site. Select the site’s search box, type the update name you noted, and press Enter or select «Search.»
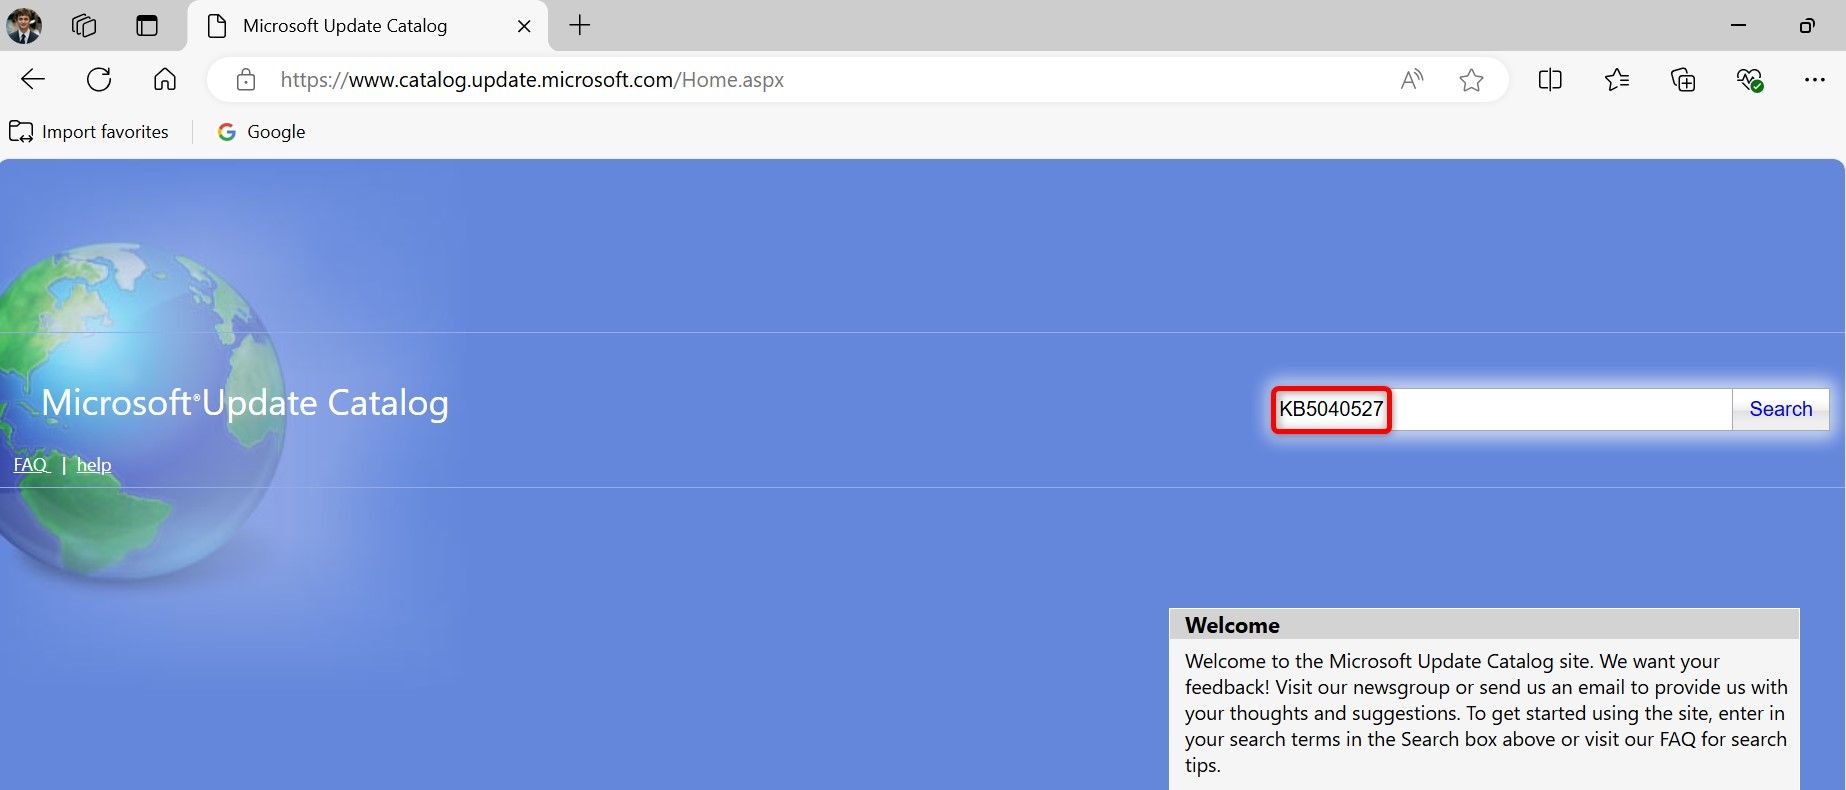
On the following screen, find the exact update and click «Download» next to that update.
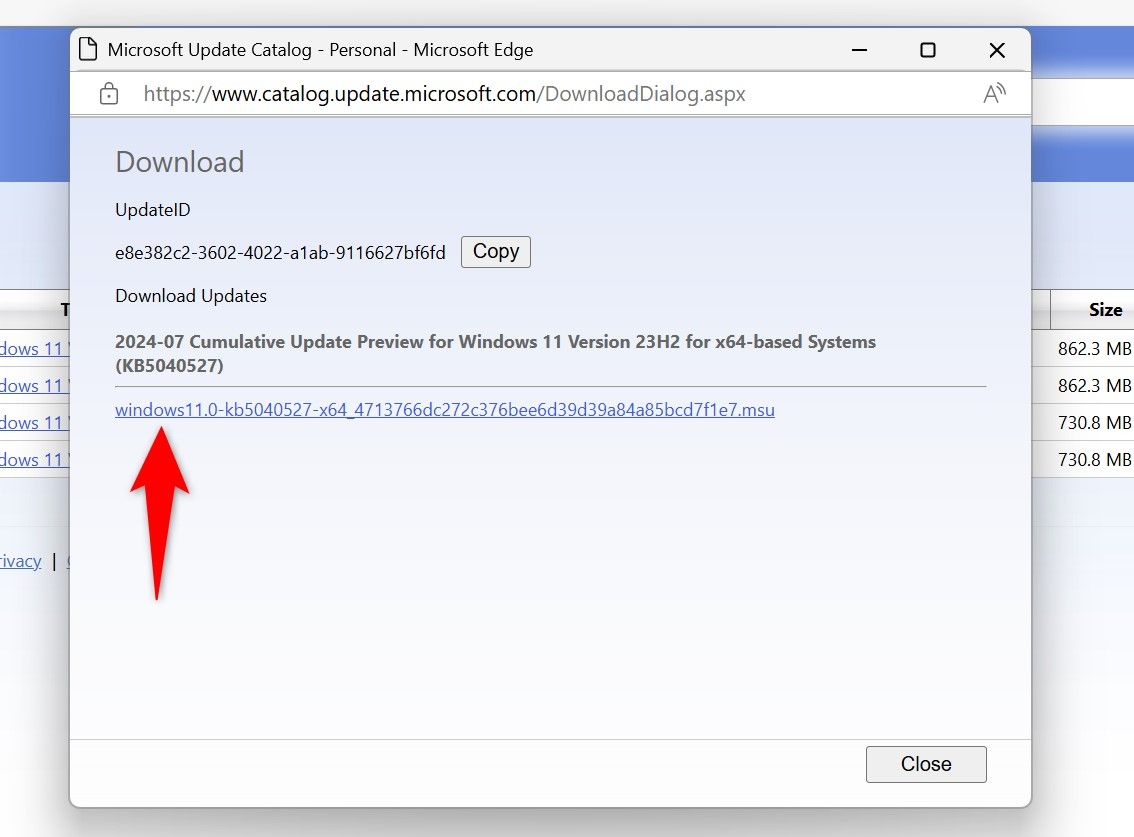
In the open window, click the update name to begin downloading the update to your PC. The download can take anywhere from a few seconds to several minutes, depending on the update size and your internet connection speed.
After downloading the update, run the update file and follow the on-screen instructions. The file will extract the update files and install the update on your system.
Using Command Prompt
Command Prompt offers a command that you can use to install an already-downloaded update on your PC. This is a great method to use when your update fails to install via the graphical user interface (GUI).
To use this method, head over to the Microsoft Update Catalog site. Select the search box, type the update name, and press Enter or select «Search.»
Find the update to download on the list and click «Download» next to the update. In the open window, select the update name to save the update to your computer.
After successfully downloading the update, open Command Prompt. Do this by pressing the Windows key, typing Command Prompt, and selecting «Run as Administrator.»
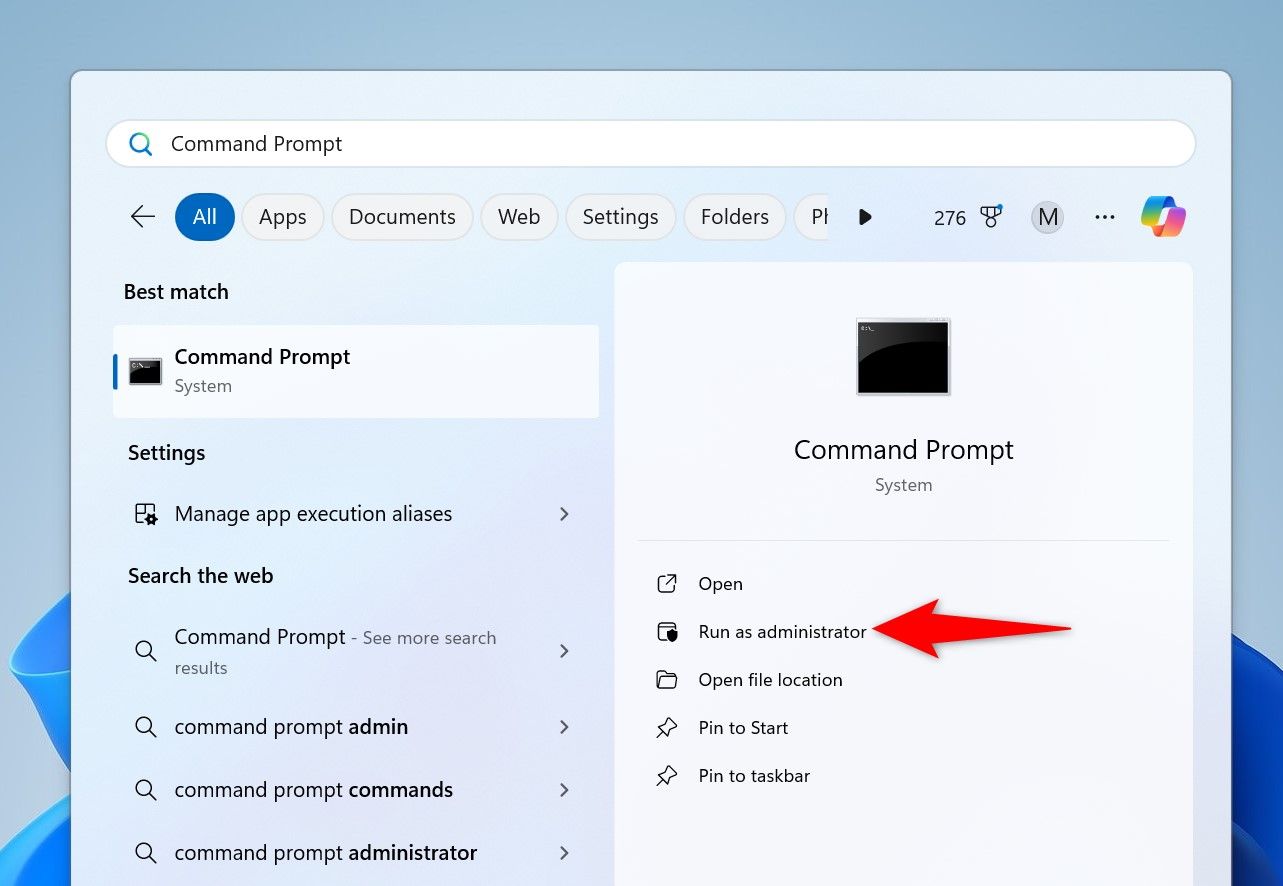
In the User Account Control prompt, select «Yes.»
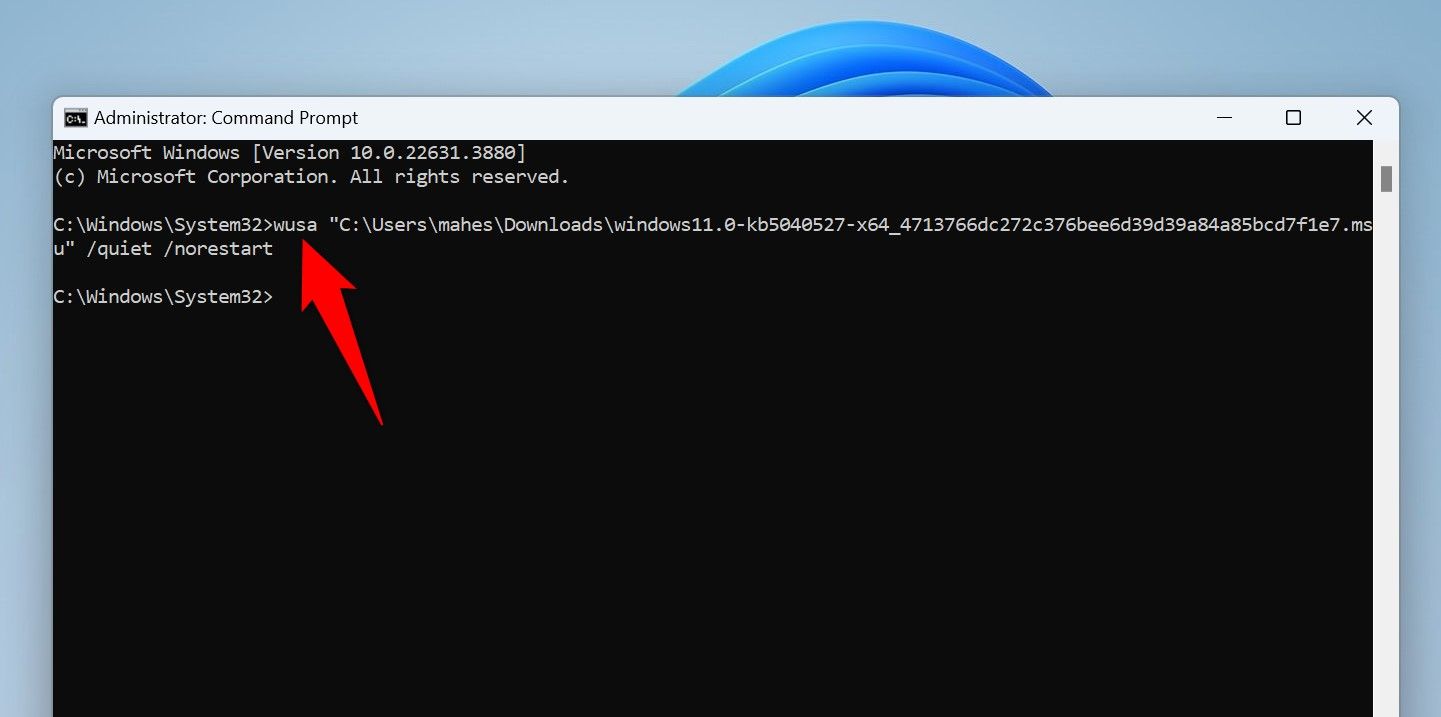
In Command Prompt, type the following command replacing UPDATE with the full path to the update file you downloaded. Then, press Enter.
wusa UPDATE /quiet /norestart
As an example, I’ll run the following command to install an update that I’ve downloaded:
wusa "C:\Users\mahes\Downloads\windows11.0-kb5040527-x64_4713766dc272c376bee6d39d39a84a85bcd7f1e7.msu" /quiet /norestart
Run the following command to check if the update was successfully installed:
wmic qfe list brief /format:pagele
If the update was successfully installed, restart your PC by running the following command. This brings the new changes into effect.
Make sure to save any unsaved work before you run the command.
shutdown /r /t 00
And your Windows PC is now up-to-date.
Using Windows PowerShell
PowerShell allows you to find all the available updates for your PC and then download and install those updates. Unlike with Command Prompt, you don’t need to manually download the updates first.
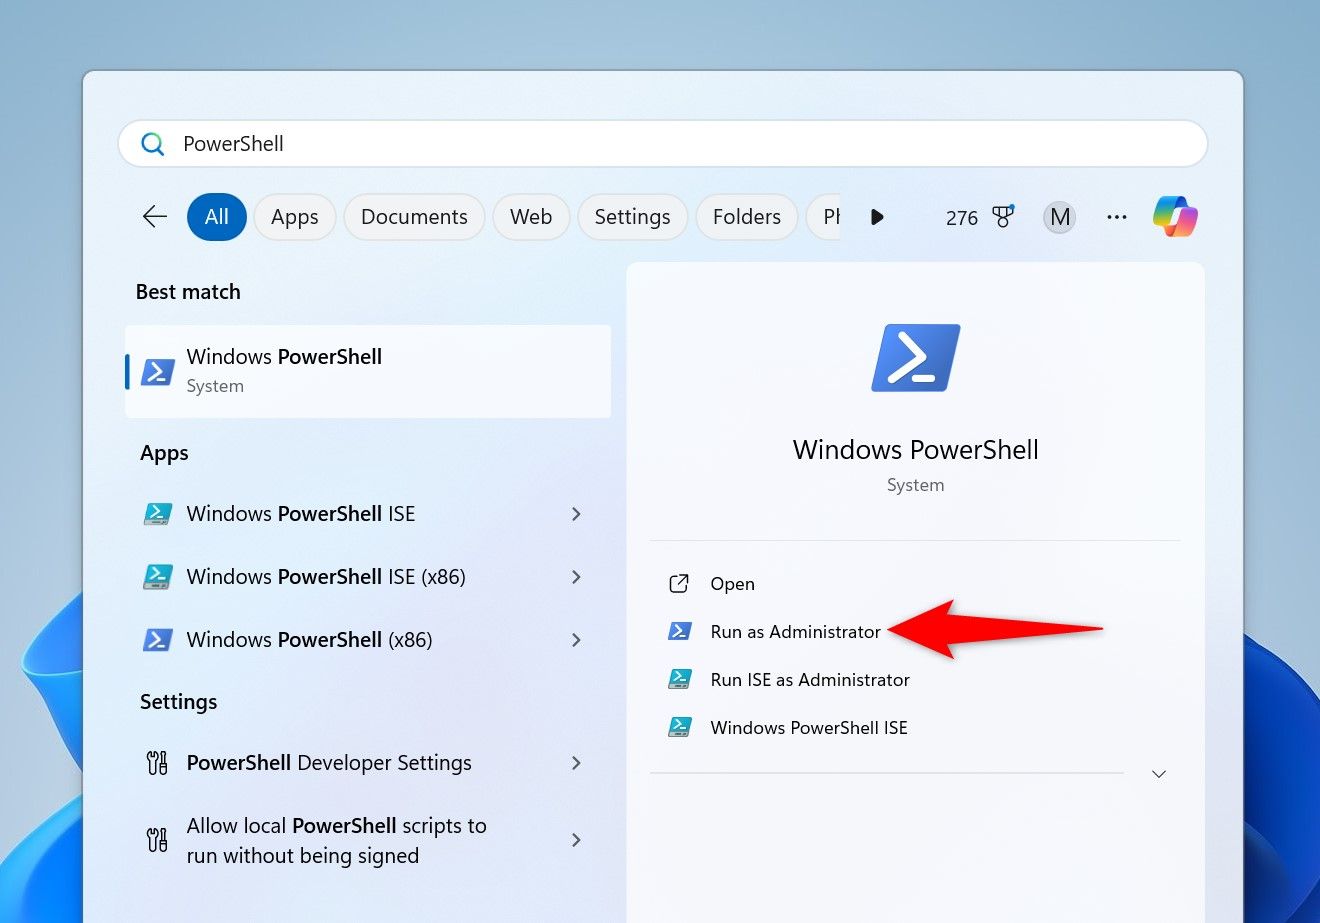
To use this method, open Windows Search, type PowerShell, and select «Run as Administrator.» In the User Account Control prompt, select «Yes.»
In PowerShell, type the following command (called a cmdlet) and press Enter. This cmdlet installs the Windows Update module to allow you to manage Windows updates from PowerShell.
Install-Module PSWindowsUpdate
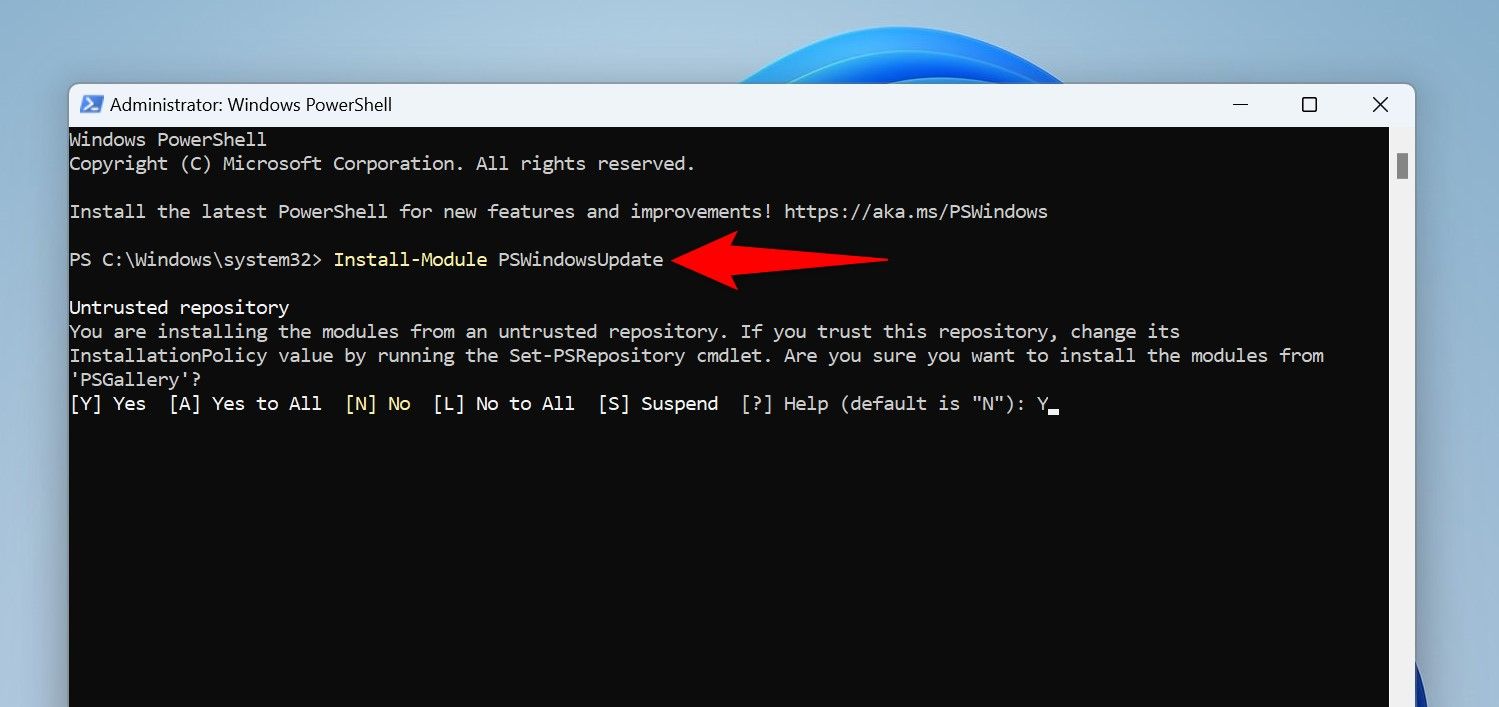
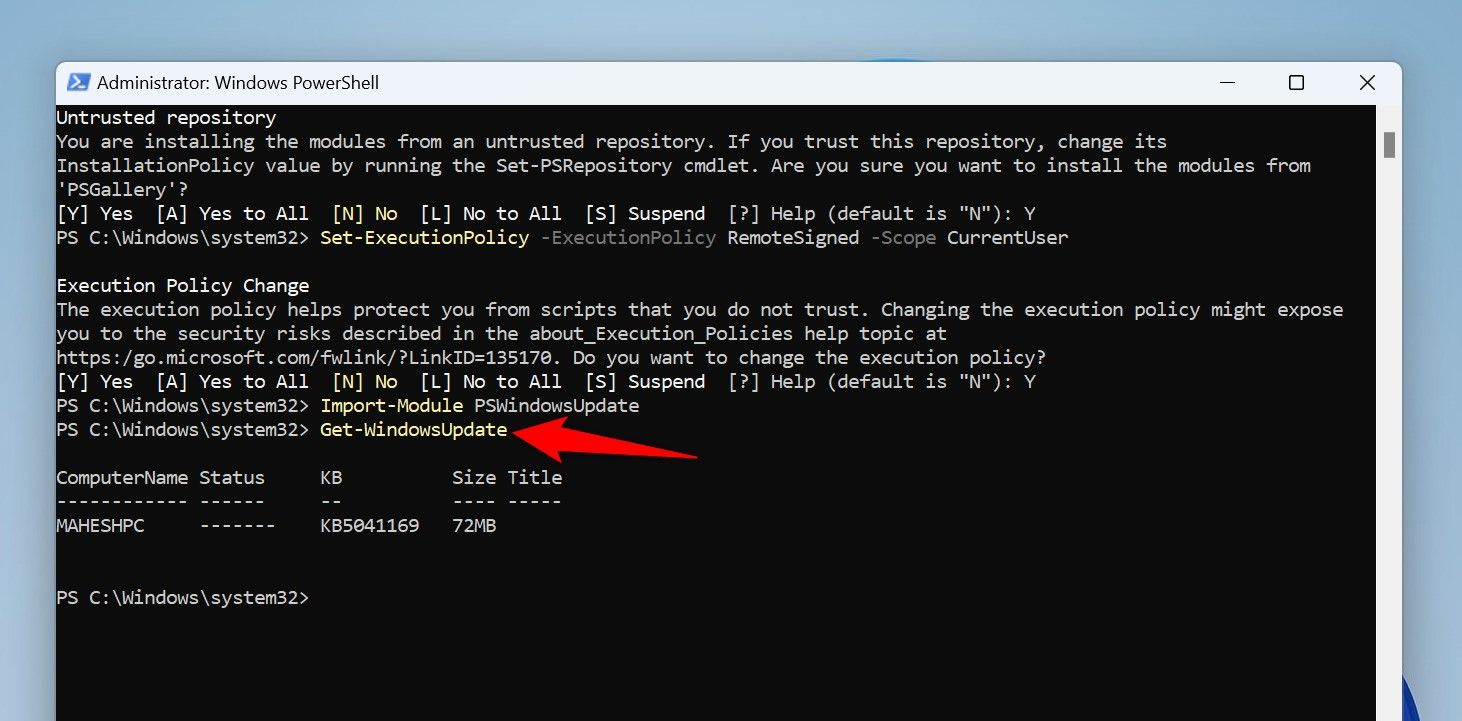
When PowerShell prompts, type Y and press Enter. Then, run the following cmdlet, type Y, and press Enter:
Set-ExecutionPolicy -ExecutionPolicy RemoteSigned -Scope CurrentUser
Next up, use the following cmdlet to launch the newly-installed module:
Import-Module PSWindowsUpdate
Find the available Windows updates by running the following cmdlet:
Get-WindowsUpdate
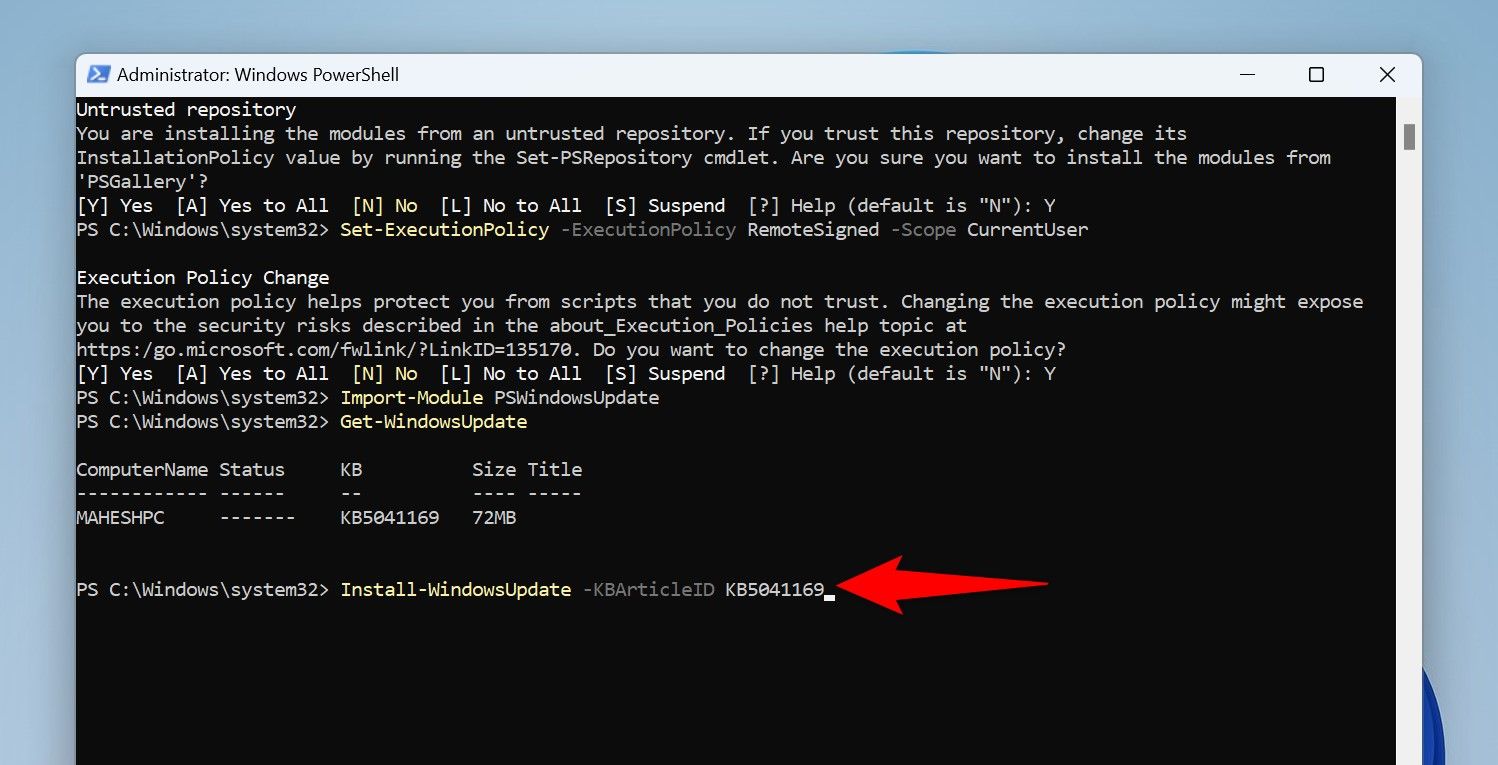
To download and install all the available updates, use the following cmdlet:
Install-WindowsUpdate
To download and install a specific update, use the following cmdlet. Make sure to replace UPDATENUMBER with the update to install in the cmdlet.
Install-WindowsUpdate -KBArticleID UPDATENUMBER
PowerShell will install all or select updates (as you specified). Then, give your PC a restart to bring the changes into effect.
And that’s how you overcome the automatic update issues and get the latest updates on your Windows 11 computer. Enjoy!
Microsoft выпускает новые обновления безопасности для своих продуктов как минимум один раз в месяц. В большинстве случаев служба Windows Update прекрасно справляется с автоматическим получением и установкой обновлений Windows. Также вы можете вручную найти, скачать и установить актуальное кумулятивное обновление безопасности для вашей редакции и версии Windows. Например, на компьютерах с отключенной службой wususerv, в изолированных от интернета сетях (если у вас не используется WSUS сервер, где можно вручную управлять тестированием и одобрением обновлений Windows), в локальной сети с лимитным подключением (metered connection) и т.д.
Содержание:
- Узнать дату установки последних обновлений Windows
- Как найти и скачать последние обновления безопасности для вашей версии Windows?
- Ручная установка кумулятивных обновлений в Windows
- Ручное обновление билда Windows 10 (Feature Update)
Каждый второй вторник месяца Microsoft выпускает новые обновления для всех поддерживаемых редакций Windows (исправления для особо критичных уязвимостей могут выпускаться быстрее, не дожидаясь этой даты. Также имейте в виду, что в Windows используется кумулятивная модель обновлений. Это означает, что для обновления Windows достаточно установить только один, последний, кумулятивный пакет безопасности.
Узнать дату установки последних обновлений Windows
Проверьте дату установки последних обновлений на вашем компьютере с помощью PowerShell команды:
gwmi win32_quickfixengineering |sort installedon -desc
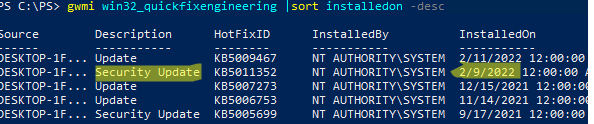
Source Description HotFixID InstalledBy InstalledOn
PCname1 Security Update KB5011352 NT AUTHORITY\SYSTEM 2/9/2022 12:00:00 AMН
В данном случае видно, что последний раз на этом компьютере обновление безопасности устанавливалось 9 февраля 2022 года.
Так же вы можете вывести историю установки обновлений с помощью командлета
Get-WUHistory
из модуля PSWindowsUpdate:
Get-WUHistory|Where-Object {$_.Title -match "KB*"} |Sort-Object date -desc
Затем вам нужно узнать версию и номер билда вашей Windows. Воспользуйтесь командой:
Get-ComputerInfo | select WindowsProductName, WindowsVersion, OsHardwareAbstractionLayer, OsArchitecture
WindowsProductName WindowsVersion OsHardwareAbstractionLayer, OsArchitecture
Windows 10 Pro 2009 10.0.19041.1566 64-bit

В моем случае мне нужно скачать последние обновления безопасности для Windows 10 20H2 x64.
Как найти и скачать последние обновления безопасности для вашей версии Windows?
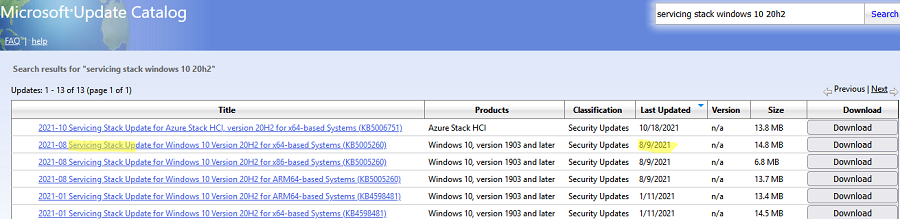
Вы можете вручную скачать последние обновления для продуктов Microsoft из каталога обновлений Microsoft Update Catalog — https://www.catalog.update.microsoft.com/Home.aspx. В каталоге вы можете найти обновления для всех поддерживаемых версий Windows (также поддерживается прямой импорт обновлений через консоль WSUS). Главная проблема, что в каталоге отсутствует удобная система поиска. Если вы не знаете номер KB, который вам нужно установить, найти и скачать пакет с обновлением довольно трудно.
Рассмотрим, как сформировать правильный запрос для поиска обновлений для вашей редакции Windows в каталоге обновлений Microsoft. Статья пишется 9 марта 2022 года, соответственно последние обновления безопасности были выпушены вчера, 8 марта (второй вторник месяца). Для поиска обновлений безопасности для Windows 10 20H2 x64 за март 2022 года, воспользуйтесь таким поисковым запросом, который нужно вставить в поисковую строку в верхнем правом углу:
windows 10 20h2 x64 3/%/2022

Каталог Microsoft Update вернул список из 3 обновлений.
Как решить какие из этих обновлений нужно скачать и установить? Конечно, можно скачать и установить вручную все эти обновления, но можно сэкономить время. Т.к. Microsoft перешла на кумулятивные обновления, вам достаточно скачать и установить последнее Cumulative Update для вашей системы.
В моем случае доступно одно большое кумулятивное обновление для Windows 10:
- 2022-03 Cumulative Update for Windows 10 Version 20H2 for x64-based Systems (KB5011487), Windows 10 version 1903 and later, Security Updates, 3/7/2022 — 655.6 MB
Щелкните по названию обновления безопасности KB5011487. В открывшемся окне с информацией об обновлении перейдите на вкладку Package Details. На этой вкладке видно какие обновления заменяет данное обновление (This update replaces the following updates:), и каким обновлением заменяется в свою очередь оно (This update has been replaced by the following updates).
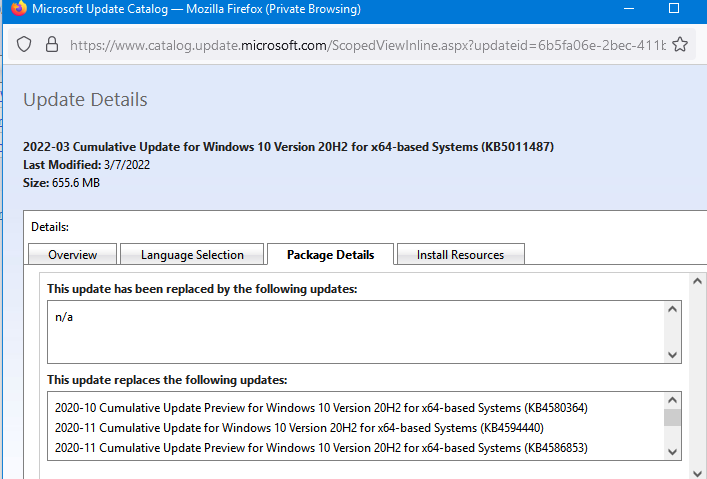
Как вы это обновление ничем не заменяется: This update has been replaced by the following updates: n/a. Значит это самое последнее и актуальное кумулятивное обновление безопасности для вашей версии Windows 10.
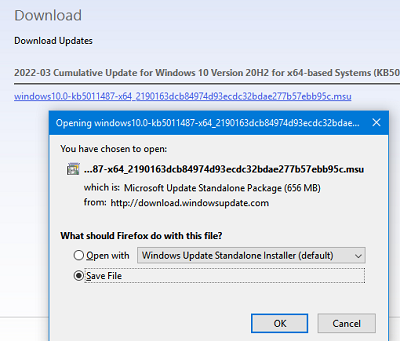
Нажмите на кнопку Download, в открывшемся окне появится прямая ссылка на загрузку MSU файла обновлений. Скачайте файл и сохраните его на диск.
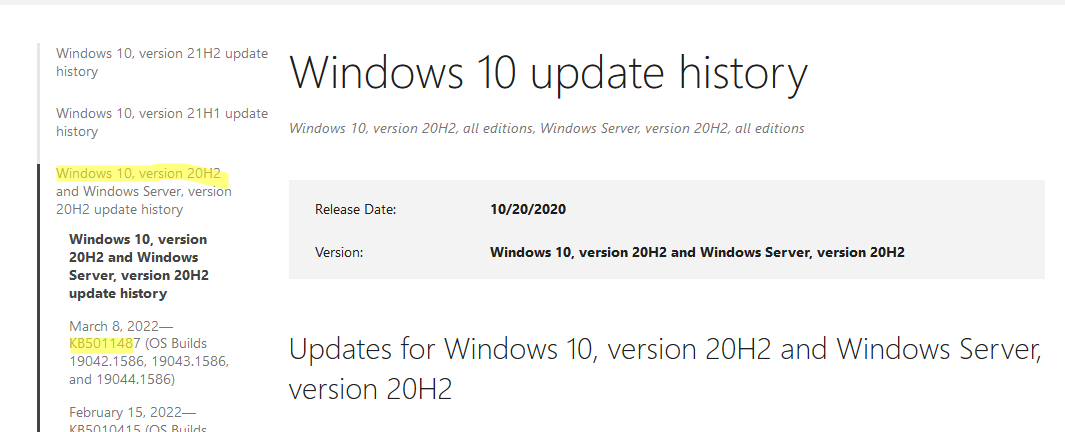
Также вы можете найти номер KB актуального кумулятивного обновления для вашей версии Windows 10 с помощью страницы https://support.microsoft.com/en-us/topic/windows-10-update-history-7dd3071a-3906-fa2c-c342-f7f86728a6e3.
В списке слева выберите вашу версию Windows 10 (в моем примере это Windows 10 20H2), затем обратите внимание на список In this release. Самая первая запись ссылается на статью базы знаний для последнего кумулятивного обновления Windows этой редакции. В нашем примере это March 8, 2022—KB5011487 (OS Builds 19042.1586, 19043.1586, and 19044.1586). Именно это обновление мы и скачали согласно методике выше.
Затем скачайте последнее доступное обновление служебного стека Windows 10 (SSU — Servicing Stack Updates). Это обновление также можно найти в Windows Update Catalog по ключевой фразе:
servicing stack windows 10 20h2
Обязательно установите Servicing Stack Update до установки накопительного обнолвения безопасности Windows.
C марта 2021 года, Microsoft перестала выпускать отдельные обновления SSU для билдов Windows 10 2004 и старше. Теперь они интегрируются в последнее кумулятивное обновление LCU (Latest Cumulative Update).
Скачать файлы обновлений Windows с помощью PowerShell
Для скачивания файлов MSU обновлений из Microsoft Update Catalog можно использовать командлет Save-KBFile из модуля KBUpdate (KB Viewer, Saver, Installer and Uninstaller) — https://github.com/potatoqualitee/kbupdate
Установите модуль из PowerShell Gallery:
Install-Module kbupdate -Scope CurrentUser
Для загрузки определенных файлов обновлений выполните команду PowerShell:
Save-KBFile -Name KB5011487, 5005260 -Architecture x64 -Path C:\Updates
Ручная установка кумулятивных обновлений в Windows
После того, как вы скачали MSU файл с актуальным кумулятивным обновлением для вашей редакции Windows 10, вы можете его установить.
Щелкните дважды по скачанному msu файлу и следуйте шагам мастера автономного установщика обновлений Windwows.
После окончания установки пакета обновлений нужно перезагрузить компьютер (если после установки обновления вы наблюдаете проблемы с работой ОС или приложений, вы можете удалить его).
Также вы можете установить обновление Windows из командной строки в тихом режиме с помощью утилиты wusa.exe (Windows Update Standalone Installer). Следующая команда установит указанное обновление в тихом режиме и отложит автоматическую перезагрузку системы после завершения установки:
wusa C:\updates\windows10.0-kb5011487-x64_2190163dcb84974d93ecdc32bdae277b57ebb95c.msu /quiet /norestart
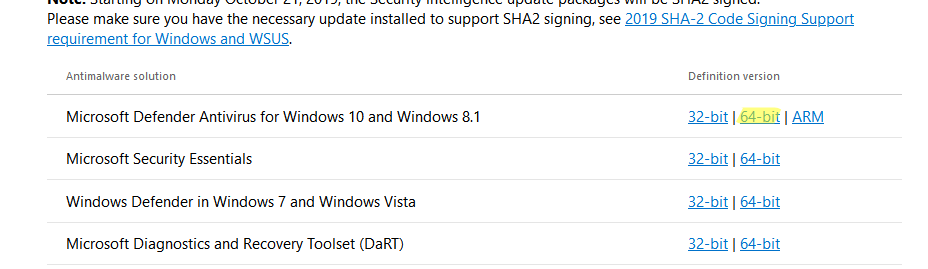
Ручное обновление сигнатур Windows Defender
Если на вашем устройстве Windows включен встроенный Windows Defender Antivirus, вы можете вручную обновить его сигнатуры. Обновление с новым набором сигнатур можно скачать с Microsoft Update Catalog, либо (проще) со страницы https://www.microsoft.com/en-us/wdsi/defenderupdates#manual.
Скачайте файл офлайн установки для вашей версии Window. Например, Microsoft Defender Antivirus for Windows 10 and Windows 8.1 64-bit.
Запустите и установите файл
fpam-fe.exe
для обновления антивирусных баз.
Ручное обновление билда Windows 10 (Feature Update)
Также вы можете вручную обновить билд Windows 10 (Feature Update). Например, вы хотите вручную обновить билд Windows 10 на своем компьютере с 20H2 (окончание поддержки 10 мая 2022) на 21H2.
Для этого перейдите на страницу https://www.microsoft.com/en-us/software-download/windows10 и нажмите кнопку Update Now.
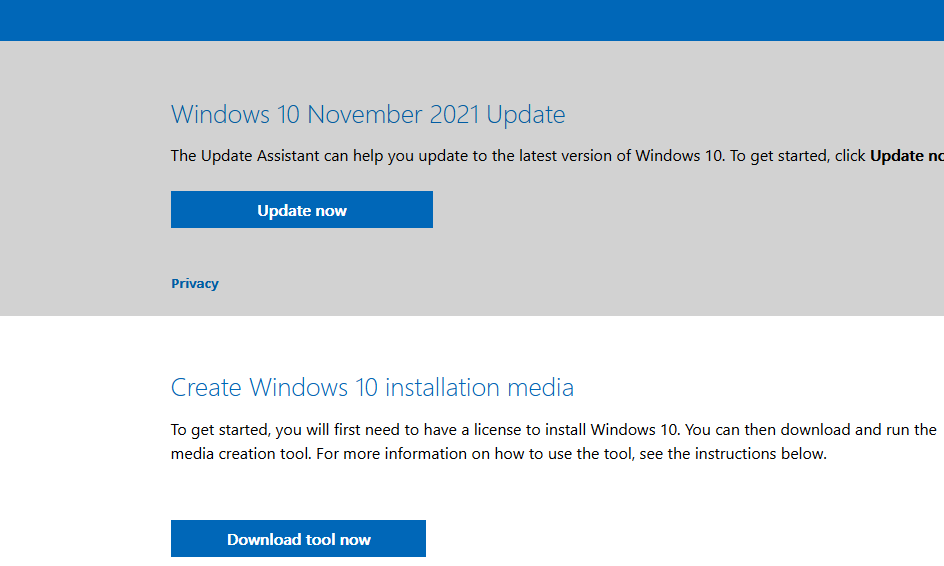
Скачайте и запустите файл Windows 10 Update Assistant (
Windows10Upgrade9252.exe)
.
Мастер предложит вам обновится до последней версии Windows 10 (Windows 10 November 2021 Update). Для такого обновления требуется подключение к интернету.
Чтобы выполнить оффлайн обновление билда Windows 10, сформируйте установочный ISO образ с новый билдом Windows 10 с помощью Media Citation Tool (позволяет создать iso образ или загрузочную флешку с Windows 10).
Затем смонтируйте ISO образ в виртуальный привод и запустите файл setup.exe. Следуйте шагам мастера обновления Windows. Подробнее это описано в статье про обновление билда Windows 10 из командной строки.
- Thread Author
-
If you’ve faced issues with automatic updates on Windows 11, you’re not alone. Many users encounter disruptions that hinder critical updates from successfully installing. Fortunately, Microsoft provides multiple methods to manually install updates, ensuring your device is always up-to-date with the latest features and security fixes. In this comprehensive guide, we’ll delve into the methods available for manually updating your Windows 11 PC.

Why Manual Updates?
Windows updates are crucial for maintaining system security, performance enhancement, and adding new features. While automatic updates are generally effective, they may sometimes fail due to various reasons—corrupt files, connectivity issues, or software conflicts. Manually installing updates can resolve these problems, allowing users to maintain control over what changes occur on their systems.
Key Takeaways
- It is advisable first to clear any existing downloaded update files before opting for alternative methods to prevent conflicts.
- You can manage updates directly through the Windows settings, Microsoft Update Catalog, Command Prompt, or Windows PowerShell.
- Each method has its advantages, catering to different user needs and technical skills.
Step 1: Clear the Downloaded Updates
Before you manually implement updates, it’s wise to clear the previous downloads. This action prevents any potential issues with corrupt or partially downloaded files affecting new installations. Here’s how you can do it:
- Open Run Dialog: Press
Windows + Ron your keyboard. - Access Services: Type
services.mscin the Run box and press Enter. - Stop Windows Update Service: In the Services window, find the «Windows Update» service, right-click it, and select «Stop.» Make sure to stop this service; otherwise, clearing the cache could fail since those files are in use.
- Remove Update Cache:
- Open Run again (
Windows + R). - Type the following path:
C:\Windows\SoftwareDistributionand press Enter. - Select all files in the folder (
Ctrl + A), right-click and delete them. [*Restart Windows Update Service: Return to the Services window, right-click «Windows Update,» and select «Start.» With the cache cleared, you can proceed to manually install the updates.
Step 2: From Windows Settings
One of the simplest ways to manually manage updates is through Windows Settings: [*Open Settings*: Press Windows + I to launch the Settings app. [Navigate to Windows Update**: In the left sidebar, click on «Windows Update.» [*Install Updates: Click on «Download & Install All» to initiate the download and installation of available updates. You may also opt to install only specific updates by selecting them individually. After the updates are installed, remember to restart your PC to apply all changes.
Step 3: Download from Microsoft Update Catalog
For those interested in specific updates or needing to download updates independently, the Microsoft Update Catalog offers a reliable solution: [*Find Update Name*: First, gather the name of the update you want. This can be found in the Windows Update section of the Settings, usually starting with ‘KB’ (e.g., KB5040527). [Navigate to Update Catalog: Open your web browser and access the Microsoft Update Catalog. [*Search for the Update*: Type the update name in the search box and press Enter. [Download the Update: Locate the correct update from the search results and click «Download.» [*Installation: Once downloaded, double-click the update file and follow the on-screen instructions to install it.
Step 4: Using Command Prompt
For tech-savvy users, the Command Prompt allows for quick installation of updates: [*Download Update*: As in the previous step, ensure you have the update file downloaded. [Open Command Prompt as Admin: Press the Windows key, type «Command Prompt,» right-click, and select «Run as Administrator.» [*Enter Installation Command*: Type the command below, replacing UPDATE with the full path to your update file.
Code:
bash wusa UPDATE /quiet /norestart[Verify Installation: To ensure the update has been applied, run this command:
Code:
bash wmic qfe list brief /format:tableIf completed successfully, restart your computer with:
Step 5: Using Windows PowerShell
Windows PowerShell is another powerful tool that simplifies the update process: [*Open PowerShell as Admin*: Search for PowerShell, right-click it, and select «Run as Administrator.» [Install Update Module: Execute the following command to manage updates:
Code:
powershell Install-Module PSWindowsUpdate Press Y when prompted to confirm installation. [*Set Execution Policy*: Set the execution policy:
Code:
powershell Set-ExecutionPolicy -ExecutionPolicy RemoteSigned -Scope CurrentUser[Import the Module: Load the module:
Code:
powershell Import-Module PSWindowsUpdate[*Check for Updates*: Use this command to see available updates:
Code:
powershell Get-WindowsUpdate[Install Updates**: Download and install all available updates:
Code:
powershell Install-WindowsUpdateConclusion
Manually updating Windows 11 can save users from the frustration of failed automatic updates. Knowing how to clear your cache, utilize settings, employ command line tools, or download updates directly can help maintain your system’s integrity and performance. In summary, here are the methods covered: [Clearing the update cache [Using Windows Settings [Downloading from Microsoft Update Catalog [Installing via Command Prompt [*Using PowerShell for managing updates For further assistance and detailed visual content, feel free to explore the original article on How-To Geek: https://www.howtogeek.com/how-to/install-updates-manually-on-windows/.
Last edited:
- Thread Author
-
-
#2
Modern Standby, known as S0 Low Power Idle, is a power-saving feature introduced in Windows 10 and fully integrated into Windows 11. This functionality allows devices to maintain a connection to networks and continue to perform background tasks while using less power. However, for some users, this can lead to unexpected battery drain and delays in waking the computer. Therefore, many users seek methods to disable Modern Standby in favor of the older S3 Sleep mode. In this article, we’ll explore how to disable Modern Standby in Windows 11 and Windows 10 and delve into the various ACPI power states that Windows employs.
Understanding Modern Standby
Modern Standby represents a significant change from traditional power management techniques. Unlike the conventional S3 Sleep mode, where the computer effectively enters a deep sleep and temporarily halts most processes, Modern Standby allows the system to remain partially active, consuming less power while still being able to connect to the internet for updates and notifications. This feature is particularly beneficial for devices that require instant wake capabilities, such as laptops and tablets. Many users have reported that while the fast wake and continual connectivity are advantages, the trade-off can be detrimental in the form of higher battery consumption. Consequently, disabling Modern Standby can help those who prefer the efficiency of the S3 mode.
Methods to Disable Modern Standby
There are several methods to disable Modern Standby, which include using Windows PowerShell, editing the Windows Registry, or employing a REG file for automated changes.
Method 1: Using Windows PowerShell
- Open Windows Terminal: Right-click the Start menu and select “Windows Terminal (Admin)”.
- Check Power Sleep States: To see the currently supported sleep states on your device, enter the following command:
Look for «S0 Low Power Idle» in the output.
- Delete the Registry Key to Enable Modern Standby: To ensure Modern Standby is enabled, use the command:
Code:
reg delete "HKLM\System\CurrentControlSet\Control\Power" /v PlatformAoAcOverride /f - Add the Registry Key to Disable Modern Standby: If you want to disable it, use this command:
Code:
reg add HKLM\System\CurrentControlSet\Control\Power /v PlatformAoAcOverride /t REG_DWORD /d 0
Method 2: Editing the Windows Registry
If you prefer interacting directly with the Windows Registry, follow these steps:
- Open Registry Editor: Type «regedit» in the Start menu and press Enter.
- Navigate to the Power Key: Go to:
Code:
HKEY_LOCAL_MACHINE\SYSTEM\CurrentControlSet\Control\Power - Create a New DWORD (32-bit) Value: Right-click on the right pane, select “New” > “DWORD (32-bit) Value,” name it
PlatformAoAcOverride. - Modify the Value: Double-click the newly created DWORD and set its value to
0to disable Modern Standby or1to enable it.
Method 3: Using a REG File
For those who would like an automated way to change settings, a REG file can simplify the process.
- Download the REG File: Obtain a zipped REG file that contains the necessary commands.
- Merge the REG File: Unzip the file and double-click it. Confirm the security warning to apply the registry changes.
- Restart Your Computer: Finally, restart your PC to ensure the changes take effect.
Overview of Windows ACPI Power States
Understanding the ACPI (Advanced Configuration and Power Interface) power states is crucial for managing power consumption and optimizing your system’s energy efficiency:
- G0 (S0 – Active State): The system is fully operational, running tasks normally.
- G1 (Sleeping States): Several sleep modes fall under this category, including:
- S0 Low Power Idle (Modern Standby): Allows devices to stay connected for updates and notifications while in a low-power state.
- S3 (Suspend to RAM): Powers down most components except RAM, which retains the system state. Waking from S3 is quicker than from a full shutdown. [*G2 (Soft Off)*: The system is turned off, but components can still respond to wake signals. [G3 (Mechanical Off)**: The system is entirely powered down and requires manual restart.
Why Disable Modern Standby?
Users may choose to disable Modern Standby for various reasons: [*Battery Management*: Users observing significant battery drains may find disabling this feature an effective solution. [Performance Issues**: Some users have reported slower system performance or compatibility issues with certain hardware when Modern Standby is enabled. [*Preferential Sleep State: Many prefer the traditional S3 mode which offers more energy savings since it fully powers down most components.
Conclusion
Disabling Modern Standby can help users regain control over their system’s power consumption and overall performance. By utilizing the methods described above, Windows users can effectively modify their power settings according to their preferences. Understanding the various ACPI power states can also provide insight into how Windows manages devices during periods of inactivity, further aiding users in optimizing battery life and performance.
Key Points Summary
[*Modern Standby* — A power-saving feature in Windows 10 and 11 that allows background activity in a low-power state. [Disabling Methods** — Users can disable it using Windows PowerShell, via Registry Editor, or by using a REG file for convenience. [*ACPI Power States — Essential for understanding system energy management, including G0, G1 (sleep states), and G2/G3 (soft off and mechanical off). By considering these options and insights, users can tailor their device’s power management to suit their needs, ultimately enhancing their overall experience with Windows. Source: WinBuzzer How to Enable or Disable Modern Standby in Windows 11 and Windows 10 — WinBuzzer
Last edited:
- Thread Author
-
-
#3
In today’s digital age, parental controls have become an essential tool for protecting children from potential online dangers. Enter Net Nanny, a renowned parental control software that allows parents to manage their children’s internet usage effectively. Available for Windows, macOS, Android, and iOS, it has earned its stripes as a trusted guardian over the years by offering features that block inappropriate content, set screen time limits, and provide monitoring tools for social media activities. If you’re looking to install Net Nanny on Windows 11, you’re in the right place!
Why Choose Net Nanny?
Net Nanny stands out for various reasons:
- Comprehensive Filtering: It can block harmful websites and inappropriate content.
- Screen Time Management: Enables parents to set time limits on device usage.
- Real-Time Monitoring: Offers insights into children’s online activity, helping caregivers stay informed about potential threats.
Overall, whether it’s to shield your kids from the vast and sometimes harsh realities of the internet or just to keep track of their screen time, Net Nanny serves as a versatile tool.
Installation Process for Windows 11
Step 1: Purchase and Download
First, you need to purchase a subscription for Net Nanny since it is a paid service. After securing your subscription:
- Visit the official Net Nanny website to download the setup file compatible with Windows 11.
Step 2: Install the Software
With the installer in your hands (or rather, in your Downloads folder), follow these steps:
- Locate the downloaded Net Nanny MSI executable file.
- Double-click the file to launch the installation process.
- Follow the on-screen prompts:
- Accept the software’s license agreement.
- Choose the installation folder, or leave it at the default setting.
- Click “Next” until the installation is complete.
Step 3: Set Up Net Nanny
Now that the software is installed, it’s time for some customization:
- Launch Net Nanny and log in using your account credentials (email and password).
- Create a child profile and configure the following settings:
- Web filtering: Block inappropriate websites.
- Time management: Set limits for app and internet usage.
- Activity monitoring: Track how your child is using various applications.
Step 4: Test the Setup
The installation wouldn’t be complete without testing!
- Open your web browser and try to access websites that you’ve restricted. This will confirm whether Net Nanny is functioning correctly.
- Utilize the software’s dashboard to view activity reports, adjust filtering settings, and manage overall controls.
Final Thoughts
Congratulations! You’ve successfully installed Net Nanny on your Windows 11 computer. With this software, you can rest easier knowing that your children are better protected from the digital world. Plus, the ability to monitor activity from any device provides flexibility and peace of mind.
In an era where children’s digital exposure is unavoidable, taking proactive steps to manage that exposure is essential. Net Nanny not only empowers parents but also serves as a comprehensive solution to ensure a safer online environment for children.
Whether it’s embarking on this installation journey or navigating the complexities of digital parenting, remember: vigilance is key, and tools like Net Nanny are invaluable allies in our parental duties.
By following these steps, you’re not just installing software; you’re investing in your child’s digital safety. Now, explore the wonders of the internet while keeping vigilant over your young ones!
Feel free to share your experiences or ask questions about the installation process below!
Source: How2shout How to Install Net Nanny on Windows 11
Last edited:
- Thread Author
-
-
#4
Whether you’re a seasoned tech enthusiast or just someone trying to get a printer to cooperate with your Windows PC, understanding how to install and manage printers is essential. In this detailed guide, we’ll walk through the process of adding both network and local printers on Windows 10 and Windows 11. We’ll also explore some common troubleshooting steps if things don’t go as planned. So grab a coffee and let’s dive in!
Why It’s Important
Having a printer connected to your Windows machine not only facilitates document printing but also enhances productivity in both personal and professional settings. While most of us assume that connecting a printer is a straightforward process, a few critical steps can save you a world of frustration.
The Basics of Printer Compatibility
Most printers work seamlessly with Windows operating systems, especially the latest versions like Windows 11 and the ever-popular Windows 10. Still, you might need additional drivers or software, which Windows often handles automatically during the installation process.
Note: If you’re using an ARM-based PC (like some Microsoft Copilot+ devices), you might face unique challenges with printer installation. In those cases, it is advisable to follow the manufacturer’s guidance closely or opt for the «Add device» feature available in the Printer & Scanner settings.
Installing Network, Wireless, or Bluetooth Printers
- Check Connection: Make sure your printer is powered on and connected to the same network as your PC. Windows will typically identify printers available on the network, including those that are Bluetooth-enabled.
- Open Printer Settings:
- Click on the Search icon on the taskbar.
- Type in «Printers» and select Printers & scanners from the search results.
- Add a Printer:
- In the Printers & scanners menu, click on Add a printer or scanner.
- Windows will search for available printers. If your printer appears, select it, and click on Add device.
- If your printer isn’t listed, click on The printer that I want isn’t listed, then choose to add it manually, following the prompts as needed.
- Permission Issues: Some installations may require administrative permissions. If this happens, ensure your user account has the required privileges or consult your IT admin.
Installing Wired or Local Printers
- Connect the Printer: Use a USB cable to connect the printer to an available USB port on your computer and power it on.
- Access the Printer Settings:
- Same as above: Search for Printers & Scanners through the taskbar.
- Add the Device: Follow the steps outlined for network printers. The process is identical whether connecting wirelessly or through a cable.
- Manual Installation: If your printer isn’t automatically detected, click on The printer that I want isn’t listed, and proceed to manually add it according to the available options.
- Driver Management: Don’t forget to check for the latest drivers on the manufacturer’s website if you’re experiencing issues. Sometimes, outdated drivers can cause connection troubles.
Troubleshooting Common Issues
Sometimes, the connection may not work flawlessly. Here are some effective troubleshooting steps to resolve common issues:
- Network Connectivity: Confirm that your PC and printer share the same network. In environments with multiple routers or wireless extenders, make sure your devices are on the same SSID.
- Check Printer Status: If your printer is listed as «offline», you can refer to the «Troubleshooting offline printer problems» guide for solutions.
- Driver Issues: If you encounter issues with connectivity, accessing the Fix printer connection and printing problems guide can often yield quick resolutions.
Related Topics You Might Explore
- Download and install the latest printer drivers — Microsoft Support: A quick reference on how to download drivers according to the manufacturer’s guidelines.
- Set a default printer in Windows — Microsoft Support: Ensuring your most used printer is your default for enhanced productivity.
- Fix printer connection and printing problems in Windows — Microsoft Support: Comprehensive solutions for those stubborn printing problems.
Wrapping Up
Installing a printer on Windows doesn’t have to be a headache. By following these straightforward steps, you’ll be able to add devices to your network or connect them directly to your PC without a hitch. Remember to always refer to your printer’s user guide for specific instructions, especially if you’re dealing with unique models or configurations!
If you’ve found this guide helpful or have your own tips and tricks, feel free to engage with the community here at WindowsForum.com! Happy printing!
Source: Microsoft Support Add or install a printer in Windows — Microsoft Support
Last edited:
- Thread Author
-
-
#5
We all know YouTube is a treasure trove of entertainment, edutainment, and downright riveting content. But let’s face facts: it’s not all suitable for the kiddos. Enter YouTube Kids, a sanctuary designed to provide a safe, engaging, and family-friendly arena where children can explore videos that are tailor-made for their developing minds. Yet, as much as we’d love for the young ones to have access on their own devices, what happens when the kids’ devices of choice aren’t smartphones but rather the trusty family Windows PC?
Fear not, for I’ve got your back in navigating this digital maze. Here’s a guide describing how to seamlessly integrate YouTube Kids onto your shiny Windows 11 or Windows 10 machine using several ingenious methods.
Method 1: The Low-Hanging Fruit — Browsing
The simplest way to dive into YouTube Kids on your Windows device is via your web browser. Friction-free and straightforward, this method requires only the most basic of digital know-how.
Steps:
- Open your browser: Whether you’re rockin’ Chrome, Edge, or Firefox, fire one up.
- Navigate to the Website: Type in
www.youtubekids.comand prepare to enter the world of child-friendly content. - Sign In: Use your Google account to log in; this will personalize and control your child’s viewing experience.
- Set a Profile: Follow the digital breadcrumbs to configure a profile—tailored to your child’s age and individual preferences.
- Dive In: With everything set, your child is free to browse and watch videos in a safe, wrapped-in-bubble-wrap digital environment.
Method 2: PWA Magic — Installing as a Web App
Progressive Web Apps, or PWAs, are here to transform how we interact with web-based services. They provide an app-like experience without the hassle of launching a browser every time.
Steps:
- Launch Chrome or Edge: Navigate to the homepage of your YouTube Kids.
- Install It: Hit those three little dots on the upper right, select Apps (in Chrome), or «Install YouTube Kids» (in Edge).
- Add to Windows: Launch the permissions to install it as an app—poof, it’s like magic. It soon appears in your Start Menu, and voila, shortcuts galore.
Method 3: The Old School Emulator Route
For those nostalgic for mobile app usage or seeking that smartphone feel on their PCs, Android emulators are at your service. Tools like BlueStacks and LDPlayer act like a friendly rabbit hole into Android’s Wonderland.
Steps:
- Download an Emulator: Deciding between BlueStacks or LDPlayer? Either serves the purpose.
- Get Started: Install and launch the emulator, signing in with your Google account.
- Google Play Store Trek: Open the Play Store inside the emulator, search, and install YouTube Kids.
- Set Up in Emulator Land: Launch and configure as though you’re working with a tablet.
Features & Benefits of YouTube Kids on Windows 11
YouTube Kids isn’t just a watered-down version of the real deal; it’s a different beast altogether with standout features:
- Parental Controls: Hone control over what, when, and how your child consumes content through customized settings.
- Age-Appropriate Curations: Videos are meticulously classified by age group—Preschoolers to Older Kids—curating their viewing based on developmental needs.
- Ad-Free Serenity: With YouTube Premium, it takes away the ads.
- Educational Bonanza: Comes packed with countless educational pieces, making screen time an asset rather than merely a time-filler.
Pro Tips for Digital Parents
- Supervise Usage: Keep those parental hawk eyes on what they watch.
- Set Screen Time: Use the parental toolbox to limit minutes in front of the screen.
- Enable Restricted Mode: Double down on safety with content blocks for a more controlled environment.
Conclusion: PWA to the Rescue!
Though YouTube Kids doesn’t yet have a traditional desktop app, web apps and creativity have your back. Take advantage of these strategies to maximize YouTube Kids on your Windows 11 or 10 machine. Remember, by leveraging YouTube’s parental controls and algorithmically curated content, you’re not just providing entertainment—you’re offering a nurturing digital experience.
Getting YouTube Kids on your Windows machine might seem intricate at first glance, but with these workaround methods, you can ensure an enriching and safe digital adventure for your little explorers. So, gear up, take control, and transform screen time into a fun and educational experience!
Source: H2S Media How to Use YouTube Kids on Windows 11 or 10
Last edited:
- Thread Author
-
-
#6
If you’re a developer, system administrator, or cybersecurity enthusiast, having OpenSSL on your Windows system is almost indispensable. Whether you’re managing SSL/TLS certificates for your website or using encryption for secure communications, OpenSSL remains a trusted tool behind the scenes. In this guide, we dive deep into two main methods to install OpenSSL on Windows 11 or 10—using Windows’ built-in package manager, Winget, for quick and hassle-free installation, and building OpenSSL from source for those who need a more customized setup.
Whether you’re a command-line wizard or much more comfortable with a graphical interface, we’ve got you covered.
Why OpenSSL Matters in the Windows Ecosystem
Before we delve into installation procedures, let’s take a moment to appreciate what OpenSSL does. At its core, OpenSSL is a robust toolkit used for implementing SSL/TLS protocols. This means it’s key to encrypting data over networks and ensuring the integrity and security of information transmission. Although OpenSSL is most commonly associated with Unix-like systems, Windows users—especially those building and testing secure applications—also benefit significantly from this toolkit.
Method 1: Installing OpenSSL Using Winget
For most Windows users, simplicity is king. Windows 11 and 10 include a handy package manager called Winget that makes installing OpenSSL as easy as typing a few commands. Follow these steps to get up and running:
Step-by-Step Installation via Command Prompt or PowerShell
- Open the Terminal with Administrative Privileges
Right-click the Start button and select “Terminal (Admin)” from the Power User menu. This ensures you have the necessary permissions. - Verify Winget Availability
To check if Winget is already installed on your machine, execute:If you see version details or a help message, you’re good to go!
- Search for OpenSSL Package
Before installation, confirm the right package name by searching for OpenSSL:Code:
shell

   winget search openssl
The package should show up, most commonly listed as something like ShiningLight.OpenSSL.Light.
- Install OpenSSL Using Winget
Now, install the package:Code:
shell

   winget install ShiningLight.OpenSSL.Light
This command downloads and installs a precompiled binary for OpenSSL on Windows.
Graphical User Interface (GUI) Option
Not too keen on using the command line? No problem. You can also install OpenSSL using a GUI installer:
- Download the Installer
Visit a trusted website that provides OpenSSL binaries for Windows (such as «sl proweb»). Choose the installer based on your system architecture: - Win64 OpenSSL v3.x.x (EXE) for 64-bit systems
- Win32 OpenSSL v3.x.x (EXE) for 32-bit systems
- Run the Installer
Double-click the downloaded.exefile to launch the installation wizard. Follow the prompts, accept the license agreement, and select the default installation path (typicallyC:\Program Files\OpenSSL-Win64for 64-bit systems). - Choose to Copy DLLs (Optional but Recommended)
When prompted, opt to copy the OpenSSL DLLs to the system directory. This step simplifies access to OpenSSL commands from any command line window.
Configuring Your System: Adding OpenSSL to the PATH
Even after the installation, one more critical step remains. Without proper configuration of the system PATH environment variable, Windows won’t recognize OpenSSL commands in Command Prompt or PowerShell.
Updating the PATH Variable
- Open Environment Variables Window
Press Win + R, typesysdm.cpl, and press Enter to open the System Properties window. Navigate to the Advanced tab, then click Environment Variables. - Edit the System PATH
Under the System Variables section, locate and select the Path variable, then click Edit. - Add OpenSSL’s Bin Directory
Click New and enter the path to OpenSSL’s bin folder (for example:C:\Program Files\OpenSSL-Win64\bin). Click OK to save the change. - Verify Installation
Open a new Command Prompt or PowerShell and type:If the installation is successful, you should see the version details of OpenSSL displayed in the terminal.
Method 2: Building OpenSSL from Source (For Advanced Users)
For tech enthusiasts who prefer absolute control over their software environment, building OpenSSL from source can be an attractive option. This method allows for custom configurations tailored specifically to your development needs. Here’s a brief rundown of the process:
Prerequisites: Installing Dependencies
- Visual Studio (with C++ Build Tools)
Download and install from Visual Studio: IDE and Code Editor for Software Developers and Teams. During installation, select “Desktop development with C++”. - Perl (Preferably Strawberry Perl)
Install Strawberry Perl from Strawberry Perl for Windows or use Winget:Code:
shell winget install StrawberryPerl.StrawberryPerl - NASM (Netwide Assembler)
Download the installer from NASM or install via Winget:Code:
shell winget install NASM.NASM - Git
To download the latest OpenSSL source code, install Git using:Code:
shell

   winget install Git.Git
Building OpenSSL from Source
- Clone the OpenSSL Repository
Open Command Prompt, navigate to your preferred folder (e.g., the root directory), and run:Code:
shell cd \ git clone https://github.com/openssl/openssl.git cd openssl - Configure the Build
Run the configuration script:Code:
shell perl Configure VC-WIN64A - Compile and Install
Build and install OpenSSL using Microsoft’s build tools:Code:
shell

   nmake

   nmake install
Voilà! You now have a custom-built version of OpenSSL tailored for your Windows system.
Frequently Asked Questions (FAQs)
- How do I check if OpenSSL is installed?
Simply open Command Prompt and type:Code:
shell

   winget search openssl
0000000
This command should display the installed version if OpenSSL is correctly set up. - How do I update OpenSSL on Windows 11?
- Step 1: Uninstall the current version via the Control Panel.
- Step 2: Reinstall the latest version using the method of your choice.
- Step 3: Restart your PC to ensure all changes take effect.
- How do I generate SSL certificates using OpenSSL?
To generate basic SSL certificates, use:Code:
shell

   winget search openssl
1111111
Replacemycert.pemandmykey.pemwith your desired names.
Final Thoughts
Whether you’re a beginner or an advanced user, installing OpenSSL on Windows 11 or 10 doesn’t have to be a daunting task. With the convenient Winget method, even users who are not comfortable with the command line can quickly get the precompiled binaries installed. On the other hand, those looking for a high degree of customization will appreciate the ability to build OpenSSL from source.
By following this comprehensive guide, you can ensure that your Windows system is well-equipped with a powerful tool essential for secure communications and modern development practices. So, why wait? Take control of your encryption needs today and see firsthand how OpenSSL can empower your projects with robust security capabilities.
Happy encrypting, and may your keys always be secure!
Source: H2S Media How to Install OpenSSL on Windows 11 or 10 via Command or GUI
Last edited:
- Thread Author
-
-
#7
Minecraft has long been a beloved sandbox playground for creative minds and survivalists alike. The addition of crossplay has taken the experience to new heights, connecting friends across various platforms. Today, we’re breaking down everything you need to know about enabling Minecraft crossplay, with a particular focus on Windows 10/11 users, and sharing insights on some of the best servers to join.
What Is Minecraft Crossplay?
In a nutshell, Minecraft crossplay allows for gamers on different devices—including PC, Xbox, PlayStation, Nintendo Switch, and mobile—to unite in the same digital universe. However, there’s a twist: crossplay is natively available only in Minecraft Bedrock Edition. Windows users running the Bedrock Edition on Windows 10/11 can easily jump into multiplayer adventures with friends, regardless of whether they’re on a console or mobile device.
For those loyal to Minecraft Java Edition, keep in mind that native crossplay isn’t on the menu. But don’t lose hope – third-party tools like GeyserMC can bridge the gap, letting Java players join Bedrock servers. Though it’s a handy solution, it does require a bit of extra configuration.
How to Enable Minecraft Crossplay
The process to get Minecraft crossplay up and running is refreshingly straightforward on most platforms. Here’s a quick guide tailored especially for Windows and other supported devices:
- Create and Link Your Microsoft Account
Minecraft Bedrock’s crossplay relies on Microsoft’s multiplayer infrastructure. If you haven’t already done so, set up a Microsoft account—which is free and only takes a few minutes. On Windows, your purchase of Minecraft from the Microsoft Store typically means your account is pre-linked, but if you’re on a console like PlayStation or Nintendo Switch, you’ll need to sign in manually within the game. - Adding Friends to Your Network
Once your Microsoft account is all set, navigate to the Friends tab in Minecraft and use the “Add Friend” option. Simply input your friend’s Gamertag (their Microsoft username), and once they accept your request, you’re all set to collaborate in your digital realms. - Join or Create a Crossplay-Compatible World
For a solo creative session or team survival adventure, ensure your multiplayer mode is enabled. Alternatively, dive into a crossplay server to join a bustling community of players. Whether you’re building epic structures or engaging in competitive mini-games, the crossplay experience in Minecraft Bedrock is seamless. - For Java Edition Enthusiasts: The GeyserMC Workaround
If your allegiance lies with Java Edition but you’re itching to experience crossplay, consider installing GeyserMC. This third-party plugin enables a bridge between Java and Bedrock, allowing you to connect to servers that support both versions (like Hypixel). While it’s not as plug-and-play as Bedrock, it offers a creative solution for those who mine with Java.
Best Minecraft Crossplay Servers
Minecraft’s multiplayer landscape is vast, and joining the right server can define your gaming experience. Here are some of the standout servers recognized for their crossplay capabilities:
- Hypixel (Java & Bedrock via GeyserMC)
Famous for a variety of mini-games including SkyBlock and BedWars, Hypixel remains a top destination. Even if you’re a Java purist, GeyserMC can help you join the fun with Bedrock players. - Cubecraft (Bedrock & Java)
Known for fast-paced SkyWars, EggWars, and even Lucky Islands, Cubecraft caters to a diverse audience eager for creative challenges and competitive play. - The Hive (Bedrock Only)
Offering entertaining modes such as Hide & Seek and Treasure Wars, The Hive is a great landing spot for those opting for pure Bedrock crossplay. - NetherGames (Bedrock Only)
With a focus on engaging game modes like BedWars and Murder Mystery, NetherGames provides a robust multiplayer environment. - PikaNetwork (Cracked Crossplay Server)
Catering to non-premium (cracked) players, PikaNetwork allows gamers to jump into crossplay without the need for an official Minecraft account. - Herobrine.org (Java & Bedrock via GeyserMC)
For fans of survival, SkyBlock, and PvP, Herobrine.org offers a unique experience bridging both platforms through GeyserMC.
Troubleshooting Common Crossplay Issues
Even the smoothest multiplayer experiences can hit a snag from time to time. Here are some pointers if you run into issues:
- Unable to Join a Friend’s World:
Verify that all players are indeed on Minecraft Bedrock Edition. Double-check that your multiplayer setting is enabled and consider restarting Minecraft or your network connection. - Connection Errors:
If you see a “Unable to Connect to World” error, inspect your network settings, particularly ensuring that your NAT type is open. This is vital for console users and can often be resolved through basic router configuration. - Platform-Specific Settings on PlayStation:
For PlayStation users, ensuring that crossplay is enabled can sometimes involve diving into the Privacy Settings under Account Management on your console.
Minecraft Crossplay vs. Java Edition: A Quick Comparison
Here’s a concise table that outlines the main differences to help you choose the best fit for your playstyle:
| Feature | Bedrock Edition (Crossplay) | Java Edition |
|---|---|---|
| Crossplay Capability | Yes | No (natively; requires GeyserMC) |
| Mods & Custom Servers | Limited | Extensive |
| Performance Optimization | Generally smoother | Can be more demanding |
| Combat Mechanics | Smoother combat | More complex PvP and redstone quirks |
For Windows users and friends on various platforms, the Bedrock Edition often makes the most sense if crossplay is your goal. But if the lure of mods and custom servers keeps you rooted to Java, third-party tools are there to serve as a bridge.
Final Thoughts
Enabling Minecraft crossplay opens up an expansive universe where friends on different devices unite, tackle challenges, and build worlds together. Whether you’re a Windows 10/11 enthusiast diving into Bedrock Edition or a Java traditionalist experimenting with GeyserMC, the opportunities to explore and create are boundless.
Have you tried setting up Minecraft crossplay on your device yet? What has your experience been like? Share your insights and tips on our forum—let’s keep the conversation going and help each other unlock the full potential of Minecraft’s vibrant community!
Happy mining and crafting, and may your servers always be lag-free!
Source: openPR How to Enable Minecraft Crossplay & Best Servers to Join
Last edited:
- Thread Author
-
-
#8
Whether you’re running Windows 10 or the ever-evolving Windows 11, getting your printer up and running shouldn’t be a headache. In today’s digital age, where productivity hangs on swift device connectivity, Microsoft’s robust support for printer installation stands out as a beacon of user-friendliness. In this article, we delve into the intricacies of adding, installing, and troubleshooting printers on Windows, while also exploring how these instructions fit into broader Windows innovations.
An Overview of Printer Installation in Windows
Microsoft’s official guide on adding or installing a printer in Windows covers all scenarios—from connecting a local, wired printer to setting up a network, wireless, or even a Bluetooth printer. Here’s a snapshot of what you need to know:
- Automatic Installation: In most cases, especially with wired and local printers, Windows automatically detects and installs the device.
- Driver Updates: Windows Update plays a key role by fetching additional or updated printer drivers.
- Multiple Installation Modes: Whether you’re using a USB cable, a network connection, or Bluetooth, Windows offers detailed step-by-step instructions for each case.
- ARM Device Caveat: A note for ARM-based PCs (for instance, certain Copilot+ devices) reminds users to add printers manually via the system settings if the auto-installer fails.
Installing a Wired or Local Printer
For many users, connecting a printer via USB or another direct cable is the simplest option. Here’s how to get started:
- Plug in and Power On:
Ensure your printer is correctly connected to your Windows device and is turned on. Windows typically recognizes the printer immediately. - Automatic Detection and Installation:
- Windows 10/11: Once you plug in the device, the system should automatically install the necessary drivers.
- Manual Check: Right-click on the Start menu and navigate to Settings > Bluetooth & devices > Printers & scanners (or Devices > Printers & scanners in Windows 10) to verify if the printer appears in the list.
- Manual Installation Steps (if needed):
- If the printer isn’t listed, click on Add a printer or scanner.
- Windows will then search for available printers. If it takes a few minutes, be patient—it may need time to populate the list.
- If the printer still doesn’t appear, select The printer that I want isn’t listed and follow the prompts to add it manually.
- Driver Updates:
After installation, always verify if any updated drivers are available through Windows Update. This can improve functionality and performance.
Summary: Wired printers usually “plug and play” on Windows, but always double-check under settings and update your drivers if functionality seems limited.
Setting Up a Network or Wireless Printer
Network printers offer a convenient solution when you’re not tethered to a single workstation. The steps are just as straightforward:
- Network Check:
Make sure your printer is connected to the same network as your Windows device. For wireless printers, this means confirming that both devices access the same wireless network. - Accessing Printer Settings:
- Open Settings > Bluetooth & devices > Printers & scanners.
- Look through your list of installed devices. If your network printer isn’t listed, use the Add a printer or scanner button.
- Automatic vs. Manual Setup:
- On selection, Windows will automatically add the printer if it can locate it on the network.
- If automatic detection fails, click on The printer that I want isn’t listed. This opens a window where you can input details like the printer’s IP address or locate it using its network name.
- Driver Installation:
As with wired printers, check Windows Update for the latest drivers to ensure full functionality and compatibility.
Summary: For network or wireless printers, connectivity is key—always verify that both the printer and your PC are on the same network, and utilize both automatic and manual methods if necessary.
Pairing a Bluetooth Printer
Bluetooth printers add another layer of connectivity for portable or space-restricted setups. The process mirrors that of other Bluetooth devices:
- Turn On Bluetooth:
Ensure Bluetooth is enabled on both your printer and Windows device. Navigate to Settings > Bluetooth & devices to manage Bluetooth functionality. - Pairing Process:
Find your printer in the list of available Bluetooth devices and select it. Follow the on-screen pairing instructions. - Additional Guidance:
If you encounter any hurdles, refer to Microsoft’s dedicated guide on pairing Bluetooth printers or scanners, which provides more insights into troubleshooting and device pairing tips.
Summary: Bluetooth printer setup requires verifying that Bluetooth is active, and then following standard pairing procedures to connect your printer with minimal fuss.
Troubleshooting Printer Issues in Windows
Even with a streamlined process, problems can arise. Here are some best practices for troubleshooting:
- Connection Check:
Verify all cables are securely plugged in if using a wired connection. For network printers, double-check your Wi-Fi settings. - Printer Settings:
Review Settings > Printers & scanners to confirm that your device’s name and status are correct. - Driver Verification:
Check Windows Update to ensure your printer’s drivers are current. Outdated drivers often limit functionality, even if the printer appears installed. - Manual Installation:
If automatic installation fails, try adding the printer manually using the dedicated guide in Windows. - Additional Resources:
Microsoft offers detailed support articles on troubleshooting printer connection issues and resolving offline printer problems.
Summary: A methodical approach to troubleshooting can quickly resolve most printer problems—verify the connection, update drivers, and follow manual installation prompts if required.
Transitioning from Windows 10 to Windows 11
It’s important to note that while Windows 10 remains a sturdy workhorse, Microsoft will end support (including free updates and security fixes) on October 14, 2025. This shift emphasizes the need to transition to Windows 11, where printer installation and overall device management have been further refined.
- Enhanced Features:
Windows 11 continues to build on the simplicity of Windows 10’s printer installation process, offering improved settings and better integration with Windows Update for driver upgrades. - Future-proofing Your Setup:
Upgrading ensures that you continue to receive both security patches and technological refinements that enhance everyday tasks, such as printing.
Summary: Transitioning to Windows 11 not only ensures continued support but also a more polished and streamlined printing experience.
Integrating Printer Setup Within the Broader Windows Ecosystem
The ease of printer installation is just one facet of Windows’ ongoing enhancements. Recent news on WindowsForum.com highlights several innovations that complement these user-friendly improvements:
- Innovative Tools and Enhancements:
Threads such as New Windows 11 Migration Tool: Simplifying File Transfers Between PCs underscore Microsoft’s commitment to seamless device management. - Broader Technological Shifts:
While printer setup remains a staple for most users, explorations into areas like quantum computing—see https://windowsforum.com/threads/352727—demonstrate the scope and vision of Microsoft’s future roadmap. - User-Centric Developments:
Other threads, including those highlighting the continued viability of classic Windows apps (e.g., Notepad without a Microsoft account, as seen in No Microsoft Account Needed: Notepad Features Confirmed for Windows 11), reflect the broader ecosystem’s aim to combine simplicity with cutting-edge features.
Summary: Printer setup is part of a larger narrative of device management and system innovation, ensuring that every component—from basic peripherals to advanced computing—works in harmony.
Conclusion
In conclusion, setting up a printer in both Windows 10 and Windows 11 is designed to be as hassle-free as possible. Whether you’re connecting a wired, network, or Bluetooth printer, the steps provided by Microsoft ensure that even beginners can have their printing needs met efficiently. Remember to:
- Check for Automatic Installations: Start by plugging in your device and allow Windows to automatically detect it.
- Manually Add Devices if Needed: Use the built-in troubleshooting steps, especially if the printer isn’t immediately recognized.
- Keep Drivers Up-to-Date: Regularly verify for updates via Windows Update.
- Plan for the Future: Consider transitioning to Windows 11 to enjoy enhanced features and continuous support.
As technology evolves, so do the tools and resources available for everyday tasks like printing. Staying informed—and checking out related discussions on WindowsForum.com—is the perfect way to keep pace with both fundamental support instructions and broader industry trends. For instance, explore further details on innovative features in threads such as New Windows 11 Migration Tool: Simplifying File Transfers Between PCs and insights into Microsoft’s futuristic projects.
By streamlining your printer setup and utilizing the support resources available, you ensure that your workflow remains uninterrupted, efficient, and ready for the advancements that tomorrow may bring.
Happy printing, and stay tuned for more updates and expert tips on Windows innovations!
Source: Microsoft Support Add or install a printer in Windows — Microsoft Support
Last edited:
- Thread Author
-
-
#9
Mastering iPerf3 Testing with QoS on Windows 10 & 11
In today’s fast-paced digital environment, ensuring that your network traffic is correctly prioritized is more critical than ever. Whether you’re a gamer looking to reduce latency, a business professional relying on VoIP, or a network admin striving for reliable bandwidth management, understanding and testing Quality of Service (QoS) is key. In this article, we break down how to use iPerf3—a powerful network testing tool—to verify and fine-tune QoS policies on Windows 10 or Windows 11.
What Is QoS and Why Test It with iPerf3?
Quality of Service (QoS) is a methodology used to manage network traffic by assigning priorities to different types of data. With QoS, you can ensure that high-priority applications (like real-time communications or interactive gaming) get the resources they need, even on bandwidth-constrained networks.
Key Benefits of Using iPerf3 for QoS Testing:
- Verification of Policies: Confirm that your QoS policies are being enforced correctly by measuring performance under predetermined DSCP (Differentiated Services Code Point) values.
- Performance Metrics: Assess bandwidth, latency, jitter, and packet loss to understand the impact of your QoS settings.
- Troubleshooting: Identify bottlenecks and misconfigurations that might degrade your network’s performance.
- Optimization Insight: Fine-tune DSCP values for different applications, ensuring that critical network traffic is delivered with minimal delay.
Prerequisites for Testing iPerf3 with QoS
Before diving into testing, make sure you have the following:
- A Windows 10/11 PC: Administrator access is required.
- iPerf3 Installed: You’ll need iPerf3 on both the testing (client) and receiving (server) machines.
- QoS Policies in Place: Set up QoS policies on your Windows device via either the Group Policy Editor or PowerShell.
- Two Devices on the Same Network: To run effective tests that simulate real-world conditions.
Step-by-Step Guide to Testing iPerf3 with QoS
Step 1: Installing iPerf3 on Windows
The easiest way to install iPerf3 is via the Windows Package Manager (winget). Open the Terminal with administrative privileges and execute the following command:
After installation, verify the installation by typing:
If you see the version details, you’re all set!
Step 2: Configuring QoS on Windows 10/11
There are two popular methods to configure QoS: the graphical Group Policy Editor and PowerShell. Each approach serves the same purpose – prioritizing network traffic – with slight differences in execution.
Method 1: Using the Group Policy Editor
- Launch the Editor: Press Win + R, type
gpedit.msc, and hit Enter. - Navigate: In the left panel, go to Computer Configuration → Windows Settings → Policy-based QoS.
- Create a New Policy:
- Right-click on Policy-based QoS and select Create a new policy.
- Enter a descriptive policy name (e.g., “iPerf3 High Priority Traffic”).
- Check Specify DSCP value and set it to a desired value (e.g., 46, which is commonly used for high-priority traffic such as VoIP).
- Application Specifics: Specify the application like
iperf3.exeso that the policy applies solely to its traffic. - Finish: Continue through the wizard, apply the settings, and then restart your system to ensure the policy takes effect.
Note: In networks with multiple QoS policies, the most recently applied policy often overrides previous settings. For example, you can define policies with varying DSCP levels for different applications:
- File Downloads: DSCP 10 (Lower Priority)
- iPerf3 Traffic: DSCP 46 (High Priority)
- Streaming Media: DSCP 34 (Medium Priority)
Method 2: Using PowerShell
If you prefer command-line management, you can achieve the same result with a single PowerShell command:
Code:
New-NetQosPolicy -Name "iPerf3 QoS test" -AppPathNameMatchCondition iperf3 -DSCPAction 46To list all the current QoS policies, run:
This concise method is ideal for scripting and automated deployments.
Step 3: Running the iPerf3 Test with QoS
After configuring QoS, you’re ready to test. This involves setting up one machine as the iPerf3 server and another as the client.
On the Server:
Open the Command Prompt (or Terminal) and run:
This command starts the iPerf3 server, ready to accept incoming test connections.
On the Client:
Open the Terminal on your client machine and execute a command similar to this:
Bash:
iperf3.exe -c <Server-IP> -t 30 -i 1 -S 0xB8Command Breakdown:
-c <Server-IP>: Specifies the IP address of the server.-t 30: Runs the test for 30 seconds.-i 1: Reports results every second.-S 0xB8: Sets the DSCP value for the session (0xB8 in hexadecimal corresponds to 46 in decimal).
| For testing various DSCP values, here’s a quick reference table: | Traffic Type | DSCP Value (Decimal) | DSCP Value (Hex) | Example Command |
|---|---|---|---|---|
| Default Best Effort | 0 | 0x00 | iperf3.exe -c <Server-IP> -t 30 -S 0x00 |
|
| Background Traffic | 10 | 0x28 | iperf3.exe -c <Server-IP> -t 30 -S 0x28 |
|
| Streaming Media | 34 | 0x88 | iperf3.exe -c <Server-IP> -t 30 -S 0x88 |
|
| VoIP (High Priority) | 46 | 0xB8 | iperf3.exe -c <Server-IP> -t 30 -S 0xB8 |
|
| Network Control | 56 | 0xE0 | iperf3.exe -c <Server-IP> -t 30 -S 0xE0 |
By testing with different DSCP values, you can confirm that your network treats high-priority traffic preferentially over other types.
Step 4: Analyzing the Test Results
Upon completion, iPerf3 provides detailed metrics which include:
- Bandwidth (Mbps): Indicates the amount of data transmitted.
- Packet Loss (%): Essential for understanding data delivery quality.
- Jitter (ms): Important when assessing real-time communication, especially in UDP tests.
For a more granular analysis, particularly of jitter and packet loss, consider switching to UDP mode using the command:
Bash:
iperf3.exe -c <Server-IP> -u -b 100M -t 30 -S 0x28In this mode:
-uenables UDP,-b 100Msets the bandwidth (adjustable based on test parameters).
Make sure to interpret these results in the context of your network’s expected performance. If the results show high jitter or significant packet loss, you may need to revisit your QoS policies or check the underlying network infrastructure for congestion issues.
Additional Tips for Effective QoS Testing
- Fine-Tuning Policies: If multiple applications are competing for resources, consider implementing separate QoS policies tailored to each application’s requirements. This helps in isolating performance issues.
- Policy Cleanup: Over time, you may need to remove outdated policies. To delete all existing QoS policies quickly, run:
Code:
powershell Get-NetQosPolicy | Remove-NetQosPolicy -Confirm:$false - Documentation & Logs: Keep a record of any changes you make to the policy settings and the resultant network performance. This will be invaluable for troubleshooting and future optimizations.
- Real-World Scenarios: In a professional environment, varying network conditions can expose configuration flaws. Regularly scheduled testing with tools such as iPerf3 helps maintain robust network performance.
For those of you wanting to dive deeper into advanced network configurations, check out our earlier discussion on managing complex network policies. As previously reported at Understanding Kerberos Realm-to-Host Mapping: Overcoming String-Length Limits, fine-tuning network parameters is crucial for seamless enterprise-level performance.
Conclusion
Testing QoS using iPerf3 on Windows 10 or 11 is more than just a technical exercise—it’s about ensuring that your network can prioritize critical applications and deliver high-performance connectivity consistently. By following this guide, you can:
- Easily install and verify iPerf3, ensuring that your testing tool is ready for use.
- Configure QoS policies using either the Group Policy Editor or PowerShell, depending on your preference.
- Conduct meaningful tests with clearly defined DSCP values for different traffic types.
- Analyze results thoroughly, identifying areas for performance improvement.
Whether you’re a seasoned IT professional or a Windows enthusiast, integrating QoS tests into your network management routine can help prevent performance hiccups and guarantee that your data flows as intended—giving you the confidence to tackle the demands of today’s digital landscape.
Stay tuned for more tips and advanced network management guides here on WindowsForum.com. Happy testing!
Key Takeaways:
- Installation: Use winget for easy iPerf3 setup.
- Configuration: Leverage Group Policy or PowerShell to implement custom QoS policies.
- Testing: Run server/client tests with DSCP-specific commands.
- Analysis: Focus on bandwidth, packet loss, and jitter to validate QoS effectiveness.
Feel free to share your experiences in the comments below or visit our forum threads for further discussions on optimizing Windows network performance.
Source: H2S Media How to Test iPerf3 with QoS on Windows 11 or 10
Last edited:
- Thread Author
-
-
#10
When your ASUS Armoury Crate refuses to install, open, or function correctly on your Windows 10 or 11 PC, frustration can quickly set in. Armoury Crate is integral for many ASUS users—especially those with ROG models—as it not only provides system monitoring and performance controls but also enables RGB lighting management and other device-specific optimizations. In this comprehensive guide, we’ll dive deep into common issues, detailed troubleshooting steps, and best practices to help you get Armoury Crate back in action.
Why Armoury Crate May Fail
Before delving into solutions, let’s explore several reasons why Armoury Crate might not work as expected:
- Remote Installation Challenges: Installing software remotely can cause unexpected glitches. Armoury Crate may require local, physical access to ensure all background services initialize correctly.
- Incompatible Installer Files: Using an installer version that isn’t tailored to your specific ASUS model or Windows version can lead to errors during the setup process.
- Network Hiccups: A slow or unstable internet connection, or even running through a VPN, could stall the installation process.
- Background Services Not Running: Armoury Crate relies on critical background services like the ASUS Optimization Service. If these services aren’t active or configured correctly, the software may crash or fail to launch.
- Security Software Interference: Overprotective antivirus and firewall settings might block components required by Armoury Crate, mistaking them for threats.
- Corrupted Installations & System Errors: A previous failed installation or corrupted files in the system can also hinder the correct functioning of the application.
Understanding these potential causes is the first step towards effective troubleshooting.
Step-by-Step Troubleshooting Guide
Follow these detailed instructions to resolve common issues with Armoury Crate.
1. Verify Local Installation
- Avoid Remote Installations:
Ensure you are physically present at the computer rather than trying to install the software remotely. Remote sessions sometimes lack the necessary permissions or context needed for the installer to execute properly.
2. Download the Correct Version
- Get the Compatible Installer:
- Visit the Official Support | ASUS Global to download the proper version of Armoury Crate.
- Select your specific ASUS model and Windows version from the dropdown menus.
This helps avoid compatibility issues that can arise with a generic installer file.
3. Check Your Internet Connection
- Stable Connection is Key:
Armoury Crate’s installation process may involve downloading additional modules in the background. Here’s what you can do: - Disconnect VPN: Temporarily disable your VPN as it might introduce excessive latency or even block certain connections.
- Use a Wired or Stable Wi-Fi Connection: Ensure your network is not experiencing interruptions. Some users have reported installations that appear stuck for minutes before finally progressing.
4. Validate the ASUS Optimization Service
- Managing Background Services:
Armoury Crate depends on the ASUS Optimization Service to function properly. Follow these steps: - Open Windows Services Manager:
PressWin + R, typeservices.msc, and hit Enter. - Locate the Service:
Find “ASUS Optimization Service” in the list. - Check Its Status:
- If it’s stopped, right-click and select Start.
- If it’s running but acting up, right-click and choose Restart.
- Configure Startup Settings:
If the service is disabled, right-click it, select Properties, and set the Startup type to Automatic. Then, click Start, Apply, and OK.
5. Uninstall and Reinstall Armoury Crate
- Starting Fresh:
If the application is still misbehaving: - Completely Uninstall the Application:
Use the official Armoury Crate Uninstall Tool from ASUS to remove all components of the software.
- Restart Your Computer:
This helps in clearing any residual processes.
- Perform a Fresh Installation:
Download the latest version from the ASUS website and reinstall.
6. Adjust Antivirus and Firewall Settings
- Security Software Can Overstep Its Bounds:
Sometimes, antivirus programs or firewalls may misinterpret certain installer actions as malicious. To troubleshoot: - Temporarily Disable Antivirus and Firewall:
Do this only during the installation process.
- Re-enable Security Afterwards:
Once installation completes successfully, turn your antivirus and firewall back on.
7. Repair or Reset Armoury Crate via Windows Settings
- Using Built-in Repair Options:
If Armoury Crate is already installed but isn’t functioning correctly: - Navigate to Windows Settings:
Go to Apps > Installed apps. - Find Armoury Crate:
Click on the three dots beside it and select Advanced options. - Repair or Reset:
First, try clicking Repair. If issues persist, select Reset.
This process helps fix minor issues without necessitating a full reinstallation.
8. Consider a System Reset as a Last Resort
- Factory Reset Your PC:
If all other methods fail and the problem might be deeper rooted in your Windows installation: - Backup Your Files:
Although you can choose options that keep your files intact, backing up essential data is always a wise precaution.
- Reset Windows:
Navigate to Settings > System > Recovery and select an appropriate reset option.
- Reinstall Armoury Crate Post Reset:
After refreshing your Windows installation, reinstall Armoury Crate from the official source.
When and Why to Use These Methods
Each troubleshooting step has its place in your diagnostic journey. Here’s a quick summary:
- Local vs. Remote Installation:
Running installations locally ensures all necessary permissions and system services interact correctly. - Installer Compatibility:
Always opt for the model-specific installer available on ASUS’s official website to avoid faulty or incompatible setups. - Network Conditions:
A problematic internet connection can stall downloads or cause interruptions. Ensuring a fast, stable connection—by disconnecting a VPN if needed—can resolve many issues. - Background Services:
The ASUS Optimization Service is indispensable for Armoury Crate. It acts as a mediator between the application and system processes. - System Interference:
Security software is essential but can sometimes thwart legitimate application processes. Temporarily disabling antivirus and firewalls can be a useful diagnostic step.
Remember, while resetting your PC is an option, it is the most drastic step. Always try more focused troubleshooting before resorting to a system-wide reset.
Real-World Scenarios and Additional Tips
Imagine you’re midway through tweaking your gaming setup on an ASUS ROG laptop, and suddenly, Armoury Crate just won’t open. Frantic reinstallations, restarting countless times, and even checking your network settings might seem daunting. These troubles rarely stem from a single cause and may very well be due to a chain reaction of small errors—from an incompatible installer to a background service misconfiguration.
Here are a few additional tips based on real-world user experiences:
- Patience Is a Virtue:
Some users have experienced installations that seemed “stuck” for over 15 minutes before progressing. If you see that the installation window is open, it might be best to leave it be for a while. - Keep Your System Updated:
Ensure your Windows installation is up-to-date. Sometimes, underlying OS updates fix compatibility issues with third-party software. - Contact ASUS Support:
If the problem persists after trying all the above steps, reaching out to ASUS support can provide you with tailored assistance for your device model.
Additionally, if you’re interested in broader troubleshooting and performance enhancement tips for Windows, you might find our previous guide on file recovery very useful. For instance, How to Recover Deleted Files in Windows 11: A Step-by-Step Guide offers practical advice on handling other common issues that Windows users face.
Broader Technology Trends and Related Insights
While this guide focuses on a specific ASUS product, it reflects broader trends in modern computing where third-party software and built-in system services interact in increasingly complex ways. As Windows evolves, users often find themselves navigating a landscape of integrated apps that offer rich functionality—at the cost of potential compatibility quirks.
Consider these trends:
- Hybrid and AI-Driven Solutions:
Recent discussions on hybrid AI tools and intelligent system management (as highlighted in our Hybrid AI Revolution: Claude 3.7 Sonnet and Microsoft’s Voice Features Transform Windows thread) are transforming how software communicates with hardware. Armoury Crate, though not based on AI, is part of that ecosystem by dynamically adjusting system performance and aesthetics. - User Empowerment through Detailed Troubleshooting Guides:
Detailed documentation and step-by-step instructions, like those above, empower even non-technical users to solve problems independently. In an era where complex software functionalities abound, these guides act as an essential resource. - Integration of System Diagnostics:
Ongoing efforts to integrate self-diagnosing software into Windows 11 promise to catch issues before they arise; however, recognizing the symptom early and troubleshooting effectively remains critical.
Together, these insights remind us that managing modern PCs often involves a mix of technical know-how and good old-fashioned perseverance.
Conclusion
ASUS Armoury Crate is designed to enhance and simplify the control over your ASUS device’s performance and aesthetic features. When it falters, following a systematic approach—from verifying your installation method and ensuring a stable network environment, to checking critical background services and adjusting security settings—can demystify the issues and restore functionality.
Here’s a quick recap of the essential steps:
- Confirm that you are installing locally.
- Download the correct version for your device.
- Ensure your network connection is fast and stable.
- Verify the ASUS Optimization Service is running as intended.
- Use the uninstaller tool if a clean slate is needed.
- Temporarily disable antivirus or firewall interference.
- Repair or reset the app via Windows settings.
- Consider a full system reset only as a last resort.
By following these troubleshooting steps, you can tackle the common issues surrounding ASUS Armoury Crate and keep your Windows system running smoothly. Happy troubleshooting!
For more in-depth guides on Windows tips and fixes—like recovering deleted files or exploring cutting-edge AI enhancements—browse our Windows Forum.
Source: The Windows Club ASUS Armoury Crate not installing, opening or working on PC
Last edited:
Introduction
Welcome to the world of Windows Updates! As a computer user, you are probably aware of the importance of keeping your operating system up to date. Regularly installing updates not only enhances the performance of your system but also ensures its security.
While Windows operating systems are designed to automatically download and install updates, there may be instances when you need to manually intervene. This could be due to various reasons such as limited internet connectivity, specific update requirements, or the need to troubleshoot issues that automatic updates may not resolve.
In this article, we will guide you through the process of manually downloading and installing Windows updates. By mastering this skill, you can take control of your system’s update management and optimize its performance.
Before we dive into the details, it’s important to note that manually downloading and installing updates requires a basic understanding of the Windows operating system and familiarity with the Microsoft Update Catalog. However, even if you’re a beginner, we will provide step-by-step instructions to help you navigate through the process effortlessly.
So, if you’re ready to become a Windows update expert, let’s get started by understanding why manual installation of updates may be necessary.
Automatic updates are generally sufficient for most users to keep their Windows operating systems up to date. However, there are situations where manual intervention becomes necessary. Here are a few reasons why you might need to manually download and install Windows updates:
- Limited Internet Connectivity: If you have a slow or unreliable internet connection, downloading large updates automatically may be a challenge. Manually downloading updates allows you to choose the timing and method that works best for you.
- Specific Update Requirements: Sometimes, certain updates are only available through manual installation. This could be due to compatibility issues or updates that require additional user input.
- Troubleshooting and Issue Resolution: Occasionally, an automatic update may fail to install correctly, leading to system issues. By manually downloading and installing updates, you can bypass any potential installation problems and ensure a smooth update process.
- Control and Customization: Manual installation gives you greater control over the updates you install and the ability to prioritize critical updates over optional ones. This customization can be helpful for system administrators or users who have specific requirements for their systems.
By taking the initiative to manually download and install Windows updates, you can ensure that your system remains up to date and secure, even in challenging circumstances. Now that we understand the reasons behind manual installation, let’s move on to gathering information on the required updates.
Gathering Information on Required Updates
Before diving into the process of manually downloading and installing Windows updates, it’s crucial to gather information on the updates that your system requires. This step ensures that you download and install the right updates for optimal performance and security.
To begin, you can open the Windows Update settings on your computer. In Windows 10, you can access these settings by clicking on the Start button, selecting “Settings,” and then choosing “Update & Security.” In earlier versions of Windows, you can find the Windows Update settings in the Control Panel.
Once you’ve accessed the Windows Update settings, you may discover that your system is already in the process of downloading or installing updates automatically. If this is the case, it’s recommended to let the automatic process complete before proceeding with manual installation.
If your system is up to date or if you have specific updates in mind, you can manually check for available updates within the Windows Update settings. Click on the “Check for updates” button to initiate a manual scan of available updates. This process may take a few minutes as Windows checks with Microsoft’s servers to determine if there are any new updates available for your system.
Once the scan is complete, Windows will display a list of available updates, along with their descriptions and important information. It’s essential to review this information carefully to understand the purpose and impact of each update. Pay attention to whether an update is labeled as “Important” or “Optional,” as this can help you prioritize which updates to download and install.
In addition to the Windows Update settings, you may also find it useful to visit the Microsoft Update Catalog website. The catalog provides a comprehensive database of updates, including those for Windows operating systems, Microsoft Office, and other Microsoft products. You can search for specific updates by their KB number or browse through categories to find relevant updates for your system.
To wrap things up in this section, gathering information on the required updates is a crucial initial step in the manual download and installation process. By understanding the purpose and impact of each update, you can make informed decisions and ensure that your system stays up to date. Next, we’ll explore how to access the Microsoft Update Catalog to find and download the updates you need.
Accessing the Microsoft Update Catalog
The Microsoft Update Catalog is a valuable resource for finding and downloading updates for various Microsoft products, including Windows operating systems. It provides a centralized platform where you can search for specific updates and access detailed information about each one. To begin using the Microsoft Update Catalog:
- Open your preferred web browser and navigate to the Microsoft Update Catalog website.
- Once on the website, you can either search for updates using keywords or enter the Knowledge Base (KB) number associated with the desired update. The KB number is a unique identifier assigned to each update by Microsoft.
- After entering the search criteria, click on the “Search” button to initiate the search process.
- The search results will display a list of updates that match your search criteria. Each update is accompanied by its title, KB number, version number, release date, and other relevant information. Take your time to review these details to ensure you select the correct update.
- When you find the update you want to download, click on the title to access the specific update page.
- On the update page, you will find additional information about the update, including a description of its purpose and any known issues or prerequisites. Make sure to review this information carefully before proceeding.
- To download the update, select the appropriate version for your system architecture (32-bit or 64-bit) by clicking on the “Download” button next to the version you need. The update file will be saved to your computer’s download location.
By accessing the Microsoft Update Catalog, you have a convenient and reliable way to find and download updates for your Windows operating system. This ensures that you have the most up-to-date and secure version for your system requirements.
Now that we’ve learned how to access the Microsoft Update Catalog and locate the necessary updates, the next step is to understand how to download these updates onto your computer. In the following section, we will discuss the process of searching for and downloading Windows updates successfully.
Searching and Downloading Updates
Searching for and downloading updates from the Microsoft Update Catalog is a straightforward process once you have identified the updates you need. To successfully search for and download Windows updates:
- Open your web browser and navigate to the Microsoft Update Catalog website as mentioned earlier.
- Enter specific search terms or the KB number of the update you’re looking for in the search bar at the top of the page.
- Click on the “Search” button to initiate the search process.
- Review the search results and click on the title of the desired update to access the update page.
- On the update page, select the appropriate version of the update for your system architecture (32-bit or 64-bit).
- Click on the “Download” button next to the selected version to start the download.
- A pop-up window may appear, asking you to confirm the download. Click on “Save” to proceed.
- Choose a location on your computer to save the downloaded update file. It’s recommended to select a location that is easily accessible and memorable, such as the Downloads folder.
- Wait for the download to complete. The speed of the download will depend on various factors, such as your internet connection speed and the size of the update.
- Once the download is finished, you will have a file with the .msu extension (Microsoft Update Standalone Package). This file contains the update package that you will install manually.
By following these steps, you can successfully search for and download Windows updates from the Microsoft Update Catalog. Remember to choose the appropriate system architecture version to ensure compatibility with your operating system.
Now that you have the downloaded update file, we will proceed to the next section, which focuses on preparing for the manual installation process. This preparation step is essential to ensure a smooth and successful installation of the downloaded updates.
Preparing for Manual Installation
Before you can manually install the downloaded updates on your Windows system, it’s crucial to make some preparations to ensure a smooth installation process. These preparations involve ensuring that your system is ready to handle the updates and taking necessary precautions.
Here are the steps to prepare for manual installation:
- Make sure to close any open applications or programs on your computer. This ensures that the installation process is not interrupted by conflicting processes.
- Ensure that you have administrative privileges on your user account. Administrative privileges are required to install updates and make system changes.
- Create a system restore point, if possible. This allows you to revert any changes made during the installation process in case any issues arise.
- If you have any other updates that need to be installed, ensure that they are available and ready to be installed as well. It’s generally recommended to install updates in a specific order to avoid any conflicts or dependency issues.
- Review the documentation or release notes provided with the updates to ensure that you are aware of any specific instructions or prerequisites for successful installation.
By taking these preparatory steps, you are proactively minimizing the chances of encountering issues during the installation process. It’s always a good idea to be prepared and have a clear understanding of the installation requirements.
With the preparations complete, you are now ready to move on to the exciting part—installing the downloaded updates manually. In the next section, we will guide you through the step-by-step process of installing the updates onto your Windows system.
Installing the Downloaded Updates
Now that you have downloaded the necessary updates and prepared your system, it’s time to embark on the process of installing the updates manually. Follow these steps to successfully install the downloaded updates on your Windows system:
- Locate the downloaded update file with the .msu extension on your computer. Double-click on the file to initiate the installation process.
- If prompted by User Account Control (UAC), click “Yes” to grant the necessary permissions to install the update.
- The update installation wizard will open, providing you with information about the update. Read through the details carefully and click on the “Next” or “Install” button to proceed.
- The installation process will start, during which you may see progress indicators or a status bar. Be patient and avoid interrupting the process.
- Once the installation is complete, you will likely be prompted to restart your computer. If so, save any unsaved work and click “Restart” to allow the system to finalize the installation.
- After your computer restarts, give it some time to configure the installed updates. This process may take a few minutes, so be patient and avoid making any changes until it’s complete.
- Once the updates are configured, your system will be up to date with the latest features, enhancements, and security patches provided by the installed updates.
It’s important to note that the installation process may vary slightly depending on the specific update and your Windows version. However, the general steps outlined above should guide you through the process smoothly.
With the downloaded updates successfully installed on your system, you are now ready to verify the installation and ensure that everything is functioning as expected. In the next section, we will discuss how to verify the successful installation of the updates.
Verifying Successful Installation
After manually installing the downloaded updates on your Windows system, it’s crucial to verify that the installation was successful and that the updates are functioning as intended. Verifying the installation helps ensure that your system is up to date and that the updates have been applied correctly. Here’s how you can verify the successful installation:
- Restart your computer if you haven’t done so already. Restarting allows any pending updates or configurations to take effect.
- Once your system has booted up, go to the Windows Update settings to check for any remaining updates. Open the Settings app, click on “Update & Security,” and then select “Windows Update.”
- Click on the “Check for updates” button to initiate a manual scan for available updates. If no updates are found, it indicates that the previously downloaded updates have been installed successfully.
- If updates are found, proceed with the installation, as these might be additional updates that weren’t available at the time of your initial installation.
- Additionally, check for any specific changes or new features that were introduced by the installed updates. For example, new options or settings may be available in certain applications, security improvements may have been made, or system stability may have been enhanced.
- Ensure that your system is functioning as expected after the update installation. Test various functions, such as opening applications, connecting to the internet, and using peripherals, to confirm that everything is working correctly.
- Monitor your system for any unusual behavior or issues that may arise after the update installation. If you encounter any problems, consult Microsoft’s support documentation or their community forums for assistance.
By following these verification steps, you can have confidence that the updates have been successfully installed on your Windows system and that your system is up to date. Regularly verifying the installation of updates is key to maintaining a secure and optimized system.
With the successful verification of the update installation, you are now ready to enjoy the benefits of an updated Windows system. In the next section, we will discuss some common issues that you may encounter during the manual update installation process and how to troubleshoot them effectively.
Troubleshooting Common Issues
While manually downloading and installing updates on your Windows system is usually straightforward, there may be instances where you encounter issues during the process. In this section, we will address some common issues that you may experience and provide troubleshooting tips to help you overcome them:
- Installation Failure: If an update fails to install, double-check that you have administrative privileges and sufficient disk space available. Try restarting your computer and installing the update again. If the problem persists, check for error codes and search for specific solutions on Microsoft’s support website.
- Compatibility Issues: Certain updates may have compatibility requirements or conflict with other software or drivers on your system. Review the documentation or release notes for the update and ensure that your system meets the necessary prerequisites. If compatibility issues arise, consider updating or uninstalling conflicting software or drivers.
- Internet Connectivity Problems: If you encounter issues while downloading updates, check your internet connection for stability. If you have a slow or unreliable connection, consider using a different network or downloading the updates on another device and transferring them manually to your system.
- Missing or Corrupted Files: If you receive an error indicating that certain files are missing or corrupted during installation, you can try running the System File Checker (SFC) tool. Open Command Prompt as an administrator and run the command “sfc /scannow” to scan and repair system files. Restart your computer and attempt the installation again.
- Update Compatibility for Older Windows Versions: Some updates may only be available for newer versions of Windows. If you are using an older version and are unable to find specific updates, it may be a limitation of your operating system. Consider upgrading to a newer Windows version to access the latest updates and security patches.
- Insufficient System Resources: Installing updates may require significant system resources, such as memory and processing power. If you encounter performance issues during installation, close unnecessary applications and consider temporarily disabling security software to allocate more resources to the update process.
If you encounter any other specific issues during the manual update installation process, it’s recommended to search for error codes or descriptions of the problem online. Microsoft’s support website, forums, and online communities can provide valuable insights and solutions for troubleshooting specific issues.
By following these troubleshooting tips and seeking assistance when needed, you can overcome common issues and ensure that the manual update installation process goes smoothly on your Windows system.
Now that we have explored troubleshooting tips, we can conclude our guide to manually downloading and installing Windows updates. By taking control of the update process, you optimize your system’s performance and security. Remember to regularly check for updates and stay up to date with the latest patches and enhancements for your Windows system.
Conclusion
Manually downloading and installing Windows updates provides you with control and flexibility over your system’s update process. In this comprehensive guide, we covered the importance of manual updates, how to gather information on required updates, accessing the Microsoft Update Catalog, searching and downloading updates, preparing for installation, installing the downloaded updates, verifying successful installation, and troubleshooting common issues. By following these steps, you can effectively manage and optimize your Windows system.
Remember that regular updates are crucial for the security, performance, and stability of your computer. While automatic updates are convenient for most users, manual installation can be particularly useful in scenarios where you have limited connectivity, specific update requirements, or encounter issues that automatic updates fail to resolve.
Whether you are a beginner or an experienced user, understanding the manual update process empowers you to take control of your system’s update management. Stay proactive by regularly checking for updates, reviewing the documentation, and installing the latest patches and security enhancements provided by Microsoft.
By staying up to date with Windows updates, you ensure that your system is equipped with the latest features, bug fixes, and security measures. Embrace the process of manually downloading and installing updates to maintain a secure, efficient, and reliable Windows environment.
Thank you for following this guide. We hope it has been informative and helpful in your journey of managing your Windows system’s updates.