

I have talked a lot about creating bootable USB of Linux in Windows. How about the other way around? How about creating a bootable Windows 10 USB in Linux?
If you are uninstalling Linux from dual boot or if you want to reinstall Windows completely or you simply want to have a Windows installation disk ready, you’ll need a bootable Windows 10 USB or DVD.
In this tutorial, I am going to show you how to create a Windows 10 bootable USB in Linux.
There are two ways to do that and I have discussed both in this tutorial.
- The first method is mounting the ISO image of Windows to a USB disk formatted in ExFAT system. This works most of the time but there could be instances where it wouldn’t boot.
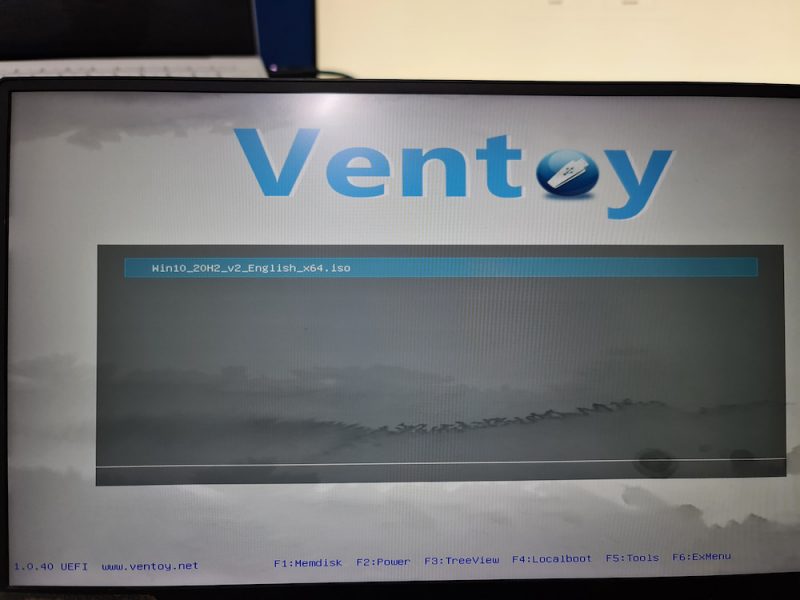
- The second method is to use a tool like Ventoy. It creates a UEFI compatible bootable disk.
📋
I am using Ubuntu for this tutorial but the steps should be valid for other Linux distributions as well.
Creating a Bootable Windows 10 USB in Linux
Prerequisite: Get Microsoft Windows 10 ISO and a USB of at least 8 GB in size
You can download Windows 10 ISO from Microsoft’s website. You have to specify the Windows 10 version, language and then you should see the link to download Windows 10.
Note that the Windows 10 ISO download link is valid for 24 hours only. So use a download manager in Linux to download the ~5-6 GB file and finish it within 24 hours.
Since the ISO and its content are more than 4 GB in size, I recommend a USB of at least 8 GB in size.
I have also made a video of this tutorial so that you can see the steps in action.
Step 2: Properly format the USB for creating bootable Windows USB
Insert your USB. You have to format it so make sure that you don’t have important data on the USB key.
In Ubuntu, press Super key (Windows key) and search for ‘Disks’. You have to use this tool to format the USB key.

In the Disks tool, make sure to select your USB drive and hit format.
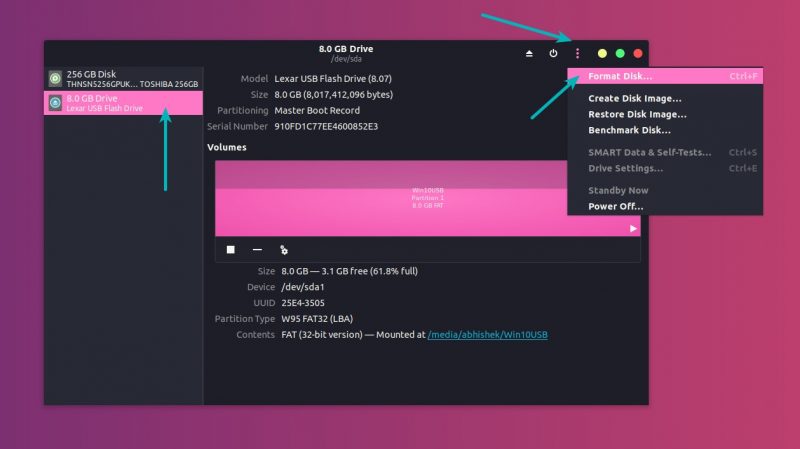
It will ask to choose a partitioning scheme. It could be either MBR or GPT. Select one of them and hit Format.
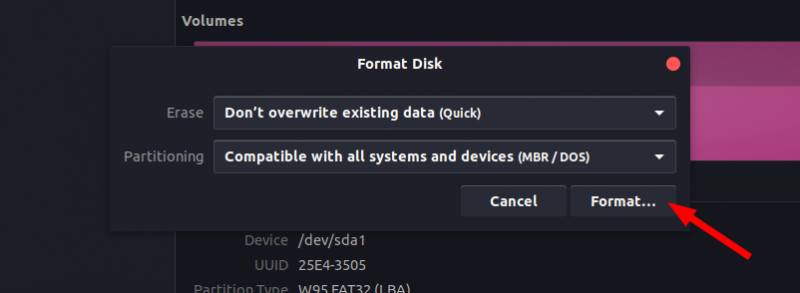
It will show you a warning that you data will be erased.

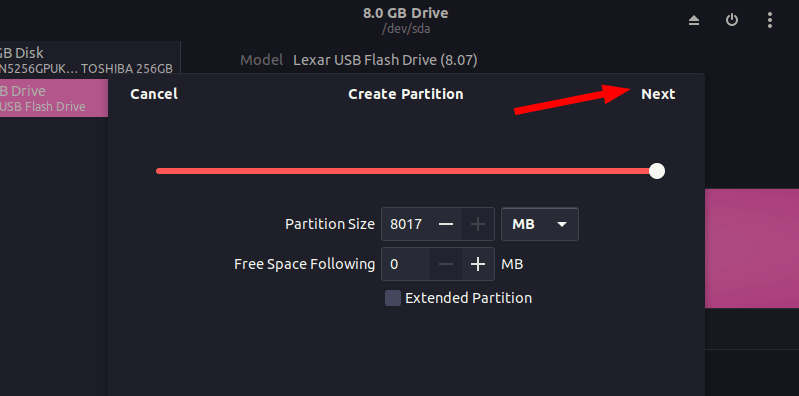
The formatting of USB is not over yet. Now, you need to create a partition on the newly formatted USB.
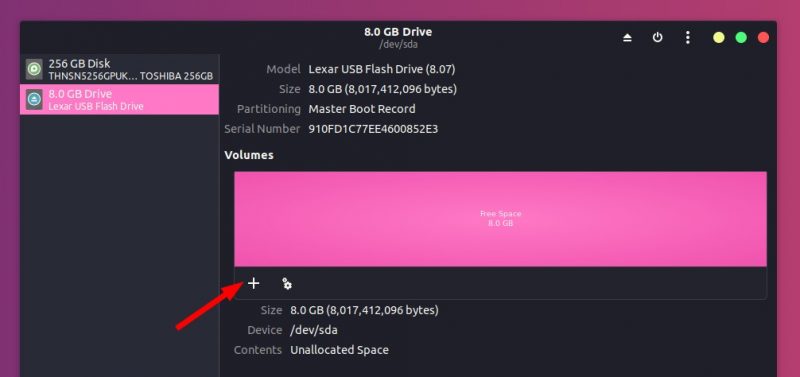
Select the entire USB disk as the partition size.
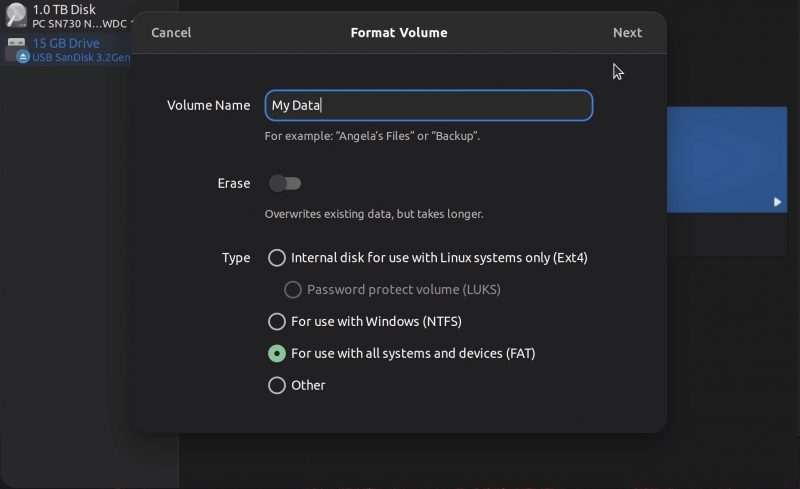
Give a name to your USB and then go to the Other option in the Type of disk. It’s because you have to format the USB in exFAT filesystem.
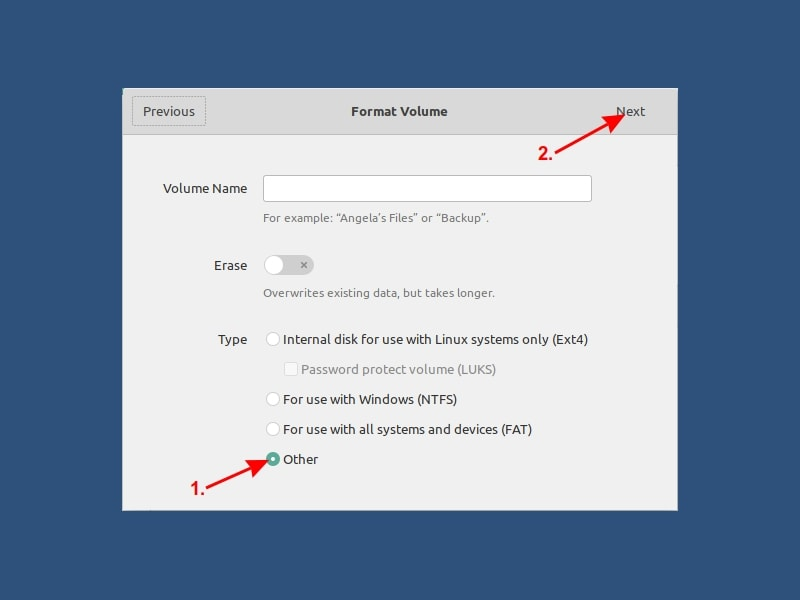
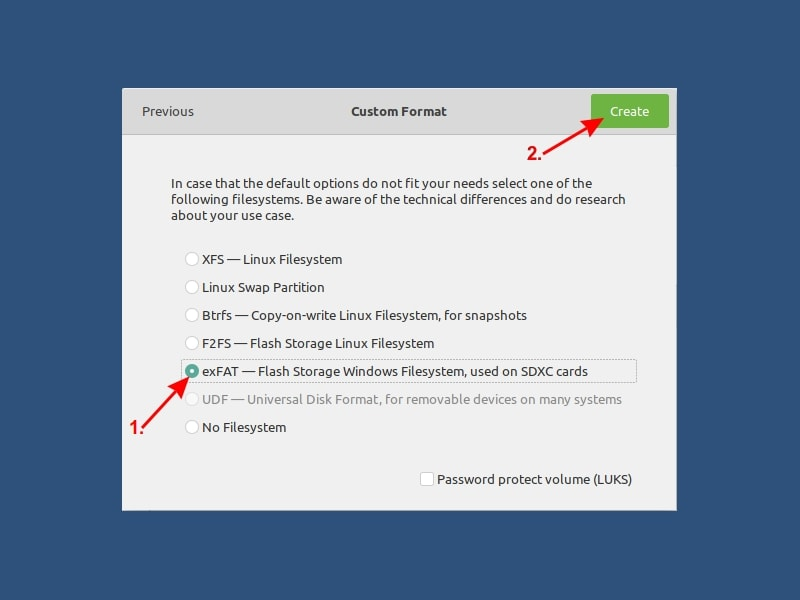
Here, choose exFAT as the filesystem type. The exFAT file system will you to copy files larger than 4 GB.
Once done, your USB should be automatically mounted. It is now ready for creating a bootable Windows 10 USB disk.
Step 3: Copy the content of the ISO to USB
Now, it’s time to copy the content of the Windows 10 ISO to the newly formatted USB.
You may ask, Abhishek, there is only one file, which is the ISO file itself. What are you talking about?
ISO is basically an archive format and you can see its content like any zip file in Linux. But to do that, you need to use ‘Disk Image Mounter’ tool that is installed by default in Ubuntu.
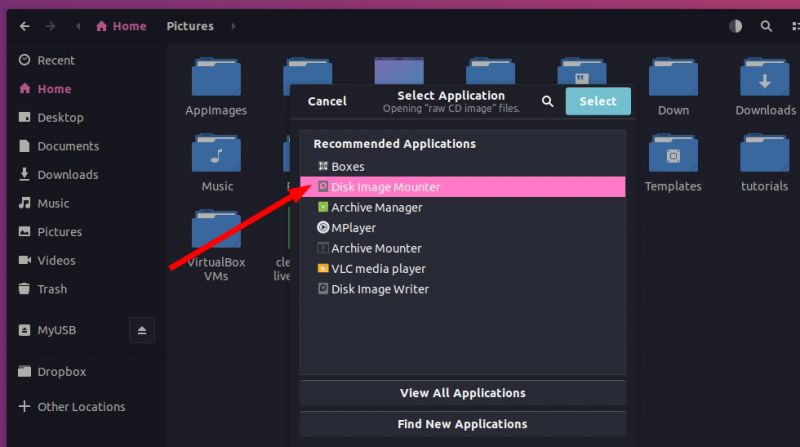
Go to your Windows 10 ISO, select it and right click on it. Now select ‘Open with other application’.
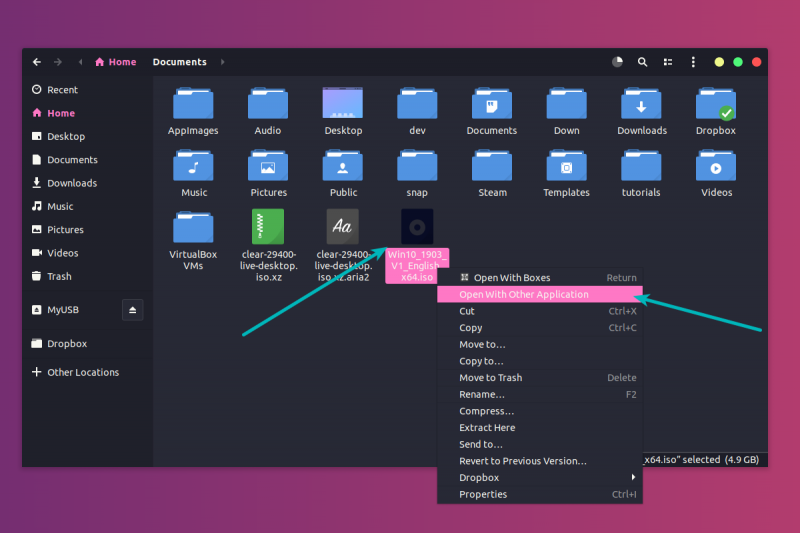
In the applications list, select Disk Image Mounter:
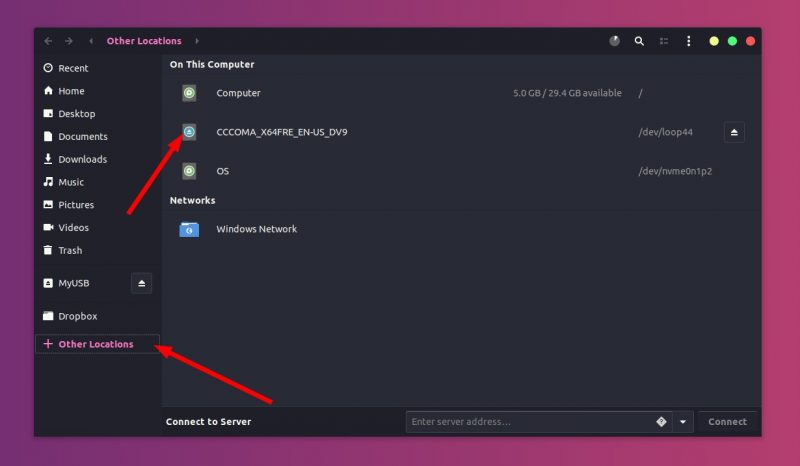
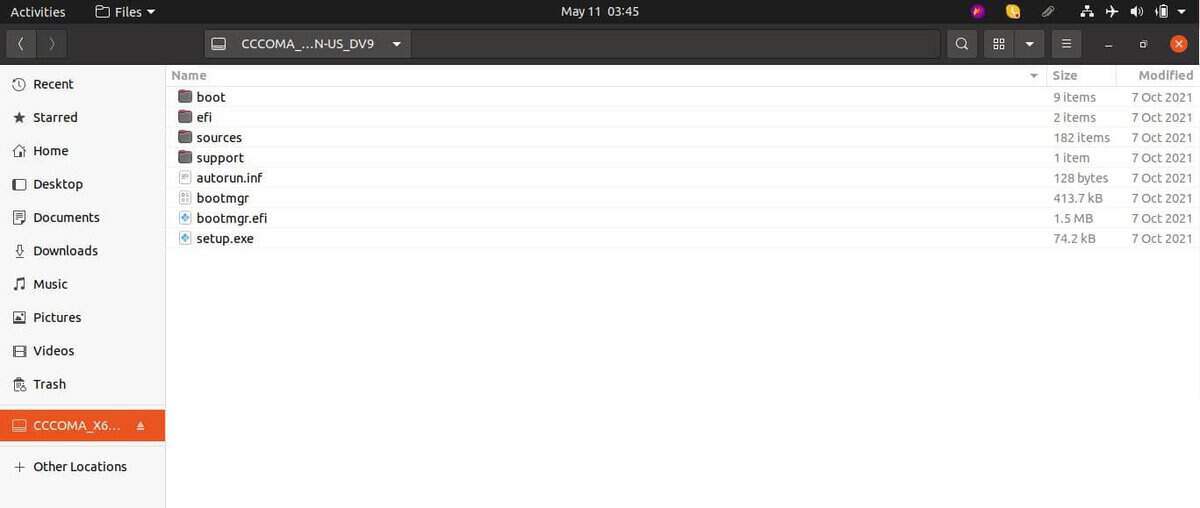
The ISO will be mounted. You may not see it in the left sidebar but if you click on the Other Locations, you should see it. Click on it to enter this mounted ISO folder.
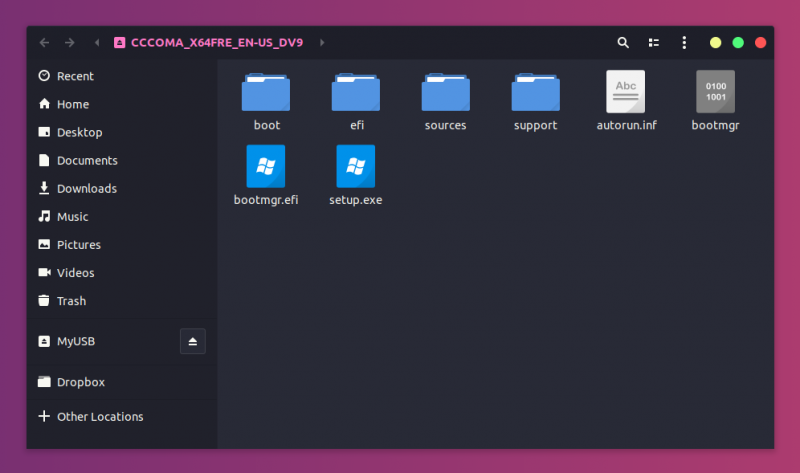
You’ll see its content. All you need to do is select all the files (Ctrl+A), copy it (Ctrl+C) and paste them in the USB drive (Ctrl+V).
Wait for the copying process to finish as it may take some time in copying 4-5 GB of data. Once it’s done, you have a bootable Windows 10 USB in your hand.
Unmount the USB and use it with any system you want, restart the system and change the boot settings to boot from the USB.
📋
Some readers find that this method is not working well. No worries. You can use Ventoy for your Windows USB.
Method 2: Create bootable Windows 10 USB using Ventoy
Ventoy is an open source tool for making live USBs. You can use it to create a multi-boot USB, persistent Linux live USB and bootable Windows USB.
I find Ventoy an unorthodox tool. It is slightly tricky to use and this is the reason I am writing this step-by-step tutorial.
Step 1: Prepare your USB drive
Ventoy formats the USB disk while creating the bootable disk. However, I noticed it failed to do so for an already bootable Linux disk. For this reason, I advise you to format the USB disk before you proceed further.
Plug in and then format the USB disk. You can do that by right-clicking on the mounted disk and then selecting the format option.

It doesn’t matter which filesystem you choose during formatting. It will be formatted again by Ventoy in the later steps.
💡
Some readers suggested using the NTFS file system gave them better result.
Once it is formatted, keep it plugged in and go on to the next step of installing Ventoy.
Step 2: Download and install Ventoy on Linux
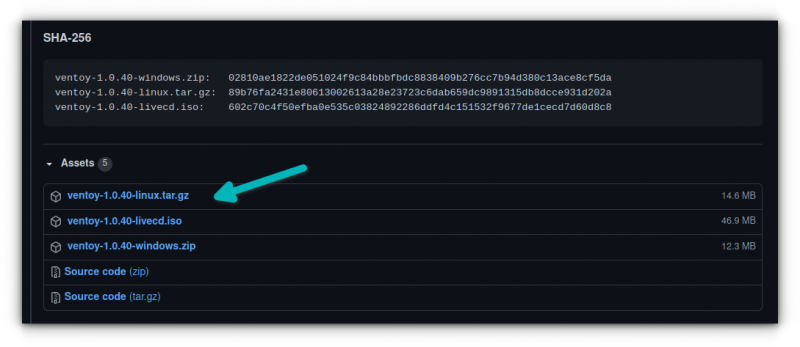
Ventoy is a mix of GUI and CLI tool. It can be used on any Linux distribution. Download Ventoy for Linux from the release page of its GitHub repository.
You’ll find the .tar.gz file with Linux in its name. This is the file you should download.
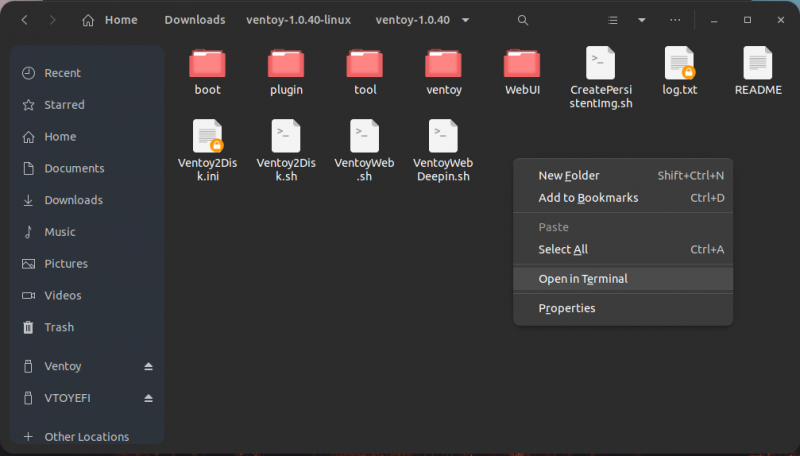
Once downloaded, extract the tar gz file. Simply right click on it and extract it.

Go inside the extracted folder, and you’ll find a few scripts in it. You need to run one named VentoyWeb.sh. To do that, you’ll have to use the command line.
Now if you are familiar with Linux command line, I presume that you can easily find your way to the file by using the cd command.
Alternatively, you can use the “open in terminal” feature of the file manager to open the location in a terminal.
Once you are in the correct directory in the terminal, use the following command to run Ventoy:
sudo ./VentoyWeb.shVentoy runs inside a browser. It will give you the URL when you run it. Copy this URL and paste it in a browser.
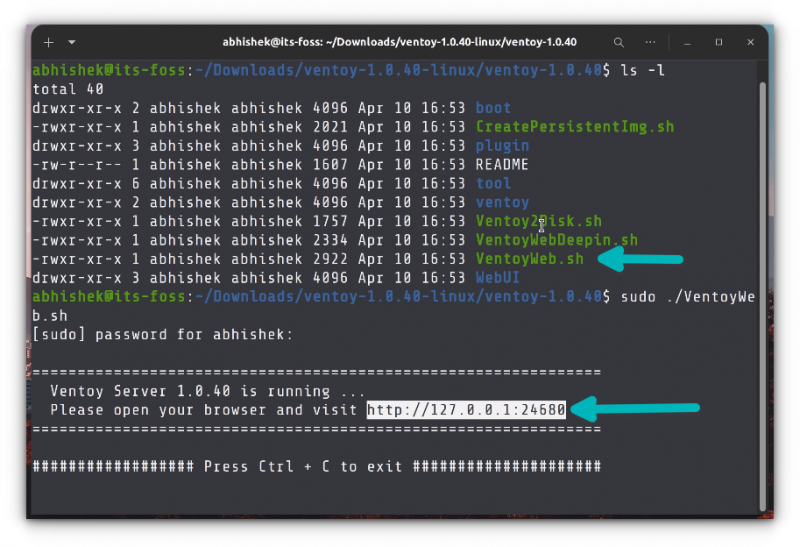
It will open a web page with Ventoy running in it and if the USB is already plugged in, it should recognize it. If not, press the refresh button.
Step 3: Use Ventoy to create bootable Windows 10 USB disk
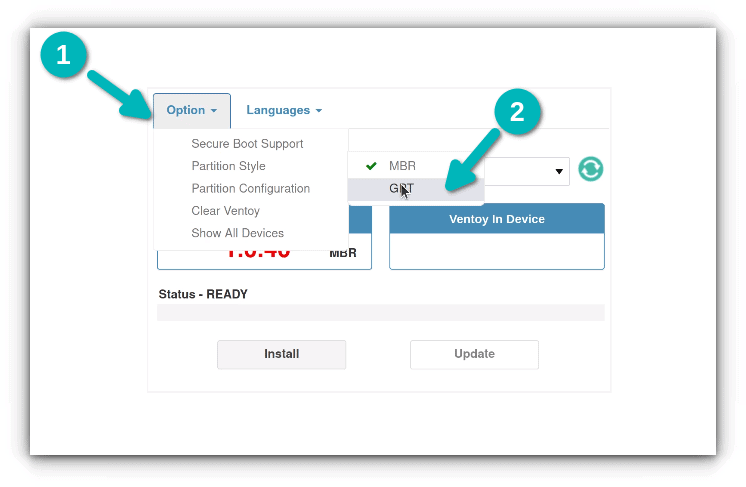
Though Ventoy has the option to create a bootable disk with secure boot, it is experimental and may not work.
Considering you are going for a UEFI installation, it will be wise use GPT for partitioning scheme.
Once things are set, hit the install button. It will show you a couple of obligatory warnings. If the installation completes successfully, you should see a success message.
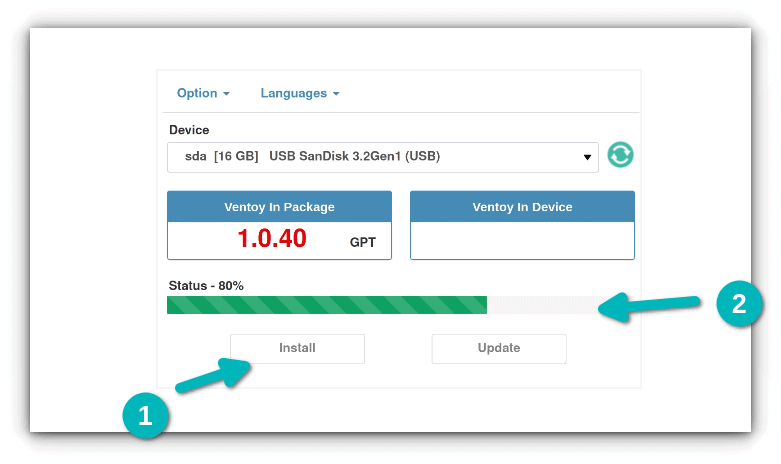
Note: If you do not see Ventoy disk mounted after the successful installation, please plug out the USB and then plug it in again.
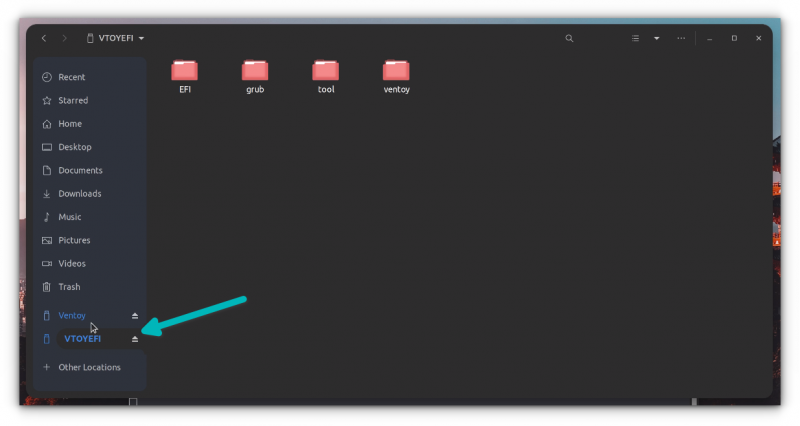
When you hit the install button, it creates two partitions on the USB disk.
- VTOYEFI: A small partition for the UEFI files.
- Ventoy: A big, empty partition in ExFAT format where you’ll copy the ISO image.
Yes. That’s what you need to do. Copy the ISO image of the Windows 10 into the bigger ExFAT partition on the USB disk.
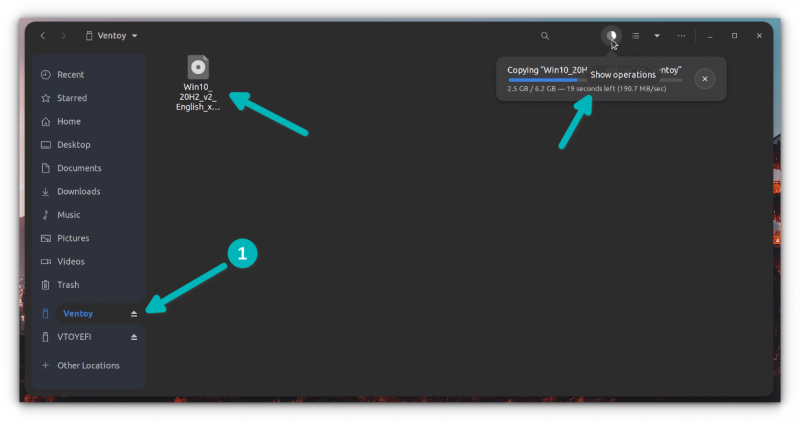
Once the copying finishes, DO NOT RUSH to plug out the USB just yet. Click on the unmount option from the file manager. Chances are that some files are still being written and it may show an error message.

Wait for a few more minutes and you should see a message that it is safe to remove the disk. Now you can unplug it and use it on whichever system you want.
Step 4: Using the bootable Windows 10 disk
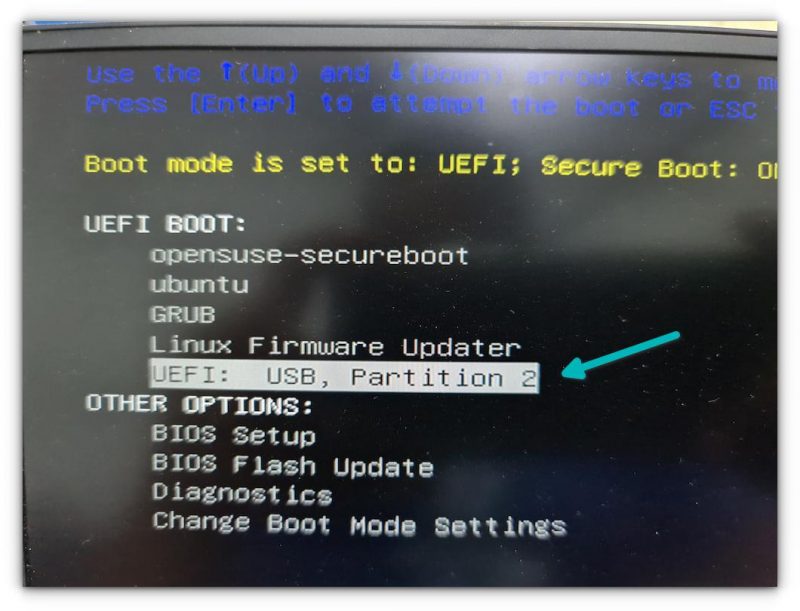
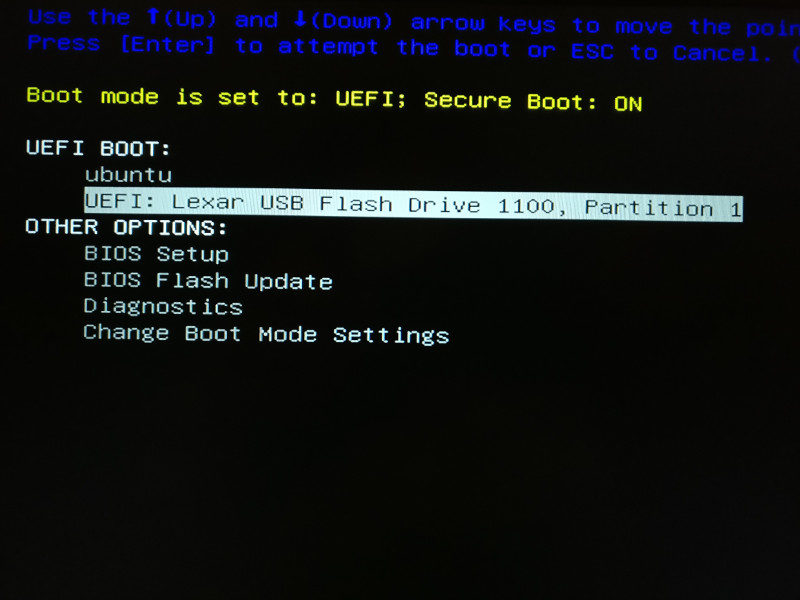
Alright! You are almost there. Plug in your bootable Windows USB you created in the previous section. Start the computer and go to the BIOS setting by using the F2/F10 or F12 key at the time you see the logo of your computer’s manufacturer.
In here, look for the secure boot settings and disable it. If the secure boot is enabled, chances are that your system won’t allow you to boot from the USB disk (to secure your system and data at boot time).
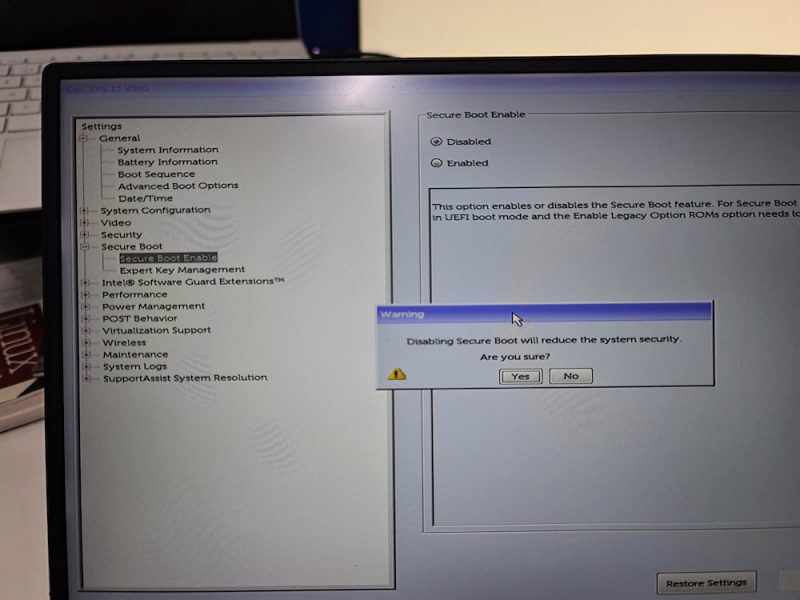
After disabling the secure boot, go into the boot order and then choose the UEFI USB Disk to boot from. Some systems will give this option after you press F12 or F10 button.
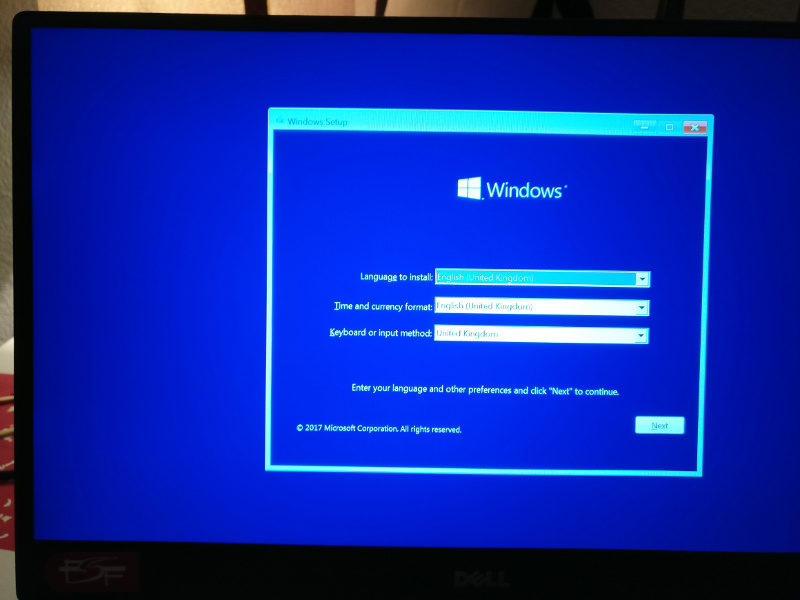
It takes a couple of minutes to start the Windows disk. You should see a screen like this and it will give you the option to repair boot or install Windows.
I think you can take things from here. Enjoy it 
There is another popular tool WoeUSB that can also be used for this purpose.
Step 4: Using Windows 10 bootable USB
Once the bootable USB is ready, restart your system. At boot time, press F2 or F10 or F12 repeatedly to go to the boot settings. In here, select to boot from USB.
You’ll see that Windows 10 is being booted and it gives you the option to install or repair your system. You know what to do now from here.
I hope you find this tutorial useful for creating bootable USB of Windows 10 in Linux. If you have questions or suggestions, please feel free to leave a comment.
- Author
- Recent Posts
I started writing code around 20 years ago, and throughout the years, I have gained a lot of expertise from hands-on experience as well as learning from others. This website has also grown with me and is now something that I am proud of.
A Windows 10 bootable USB is a handy tool. Whether you’re fixing issues or installing an operating system, having this trusty gadget in your digital toolbox saves the day.
Creating a Windows 10 bootable USB on Linux is simpler than it sounds. Despite common myths, Linux users are not left out in the cold. They can easily build their own bootable USBs without breaking a sweat.

Linux provides various tools that make the process a breeze. Tools like WoeUSB and the built-in ‘Disks’ utility guide users step by step.
Once the USB is formatted and the ISO image is ready, it’s just a matter of running a few commands to set everything up. Navigating this labyrinth of steps can seem daunting, but knowing these tools means you’re halfway there already!
Those who dive into this world of Linux-powered bootable USB creation might feel like digital pioneers. Picture it, like crafting your own sword before a grand adventure, where the USB is your most reliable ally. With a little patience and know-how, anyone can gear up and prepare their digital toolkit for whatever Windows-related tasks lie ahead.
JUMP TO TOPIC
- Preparing the Linux Environment
- Update and Upgrade Your Linux System
- Install Required Packages
- Obtaining the Windows 10 ISO
- Download the ISO Image from Microsoft
- Verify the ISO File
- Mount the ISO Image for Preview
- Creating the Bootable USB
- Using a Command-Line Utility
- Using a Graphical User Interface Tool
- Formatting the USB Drive
- Finalizing the Process
- Setting up the Boot Order in BIOS/UEFI
- Testing the Bootable USB
Preparing the Linux Environment
Preparing the Linux environment is crucial for creating a bootable USB. This involves updating your system and installing necessary packages to ensure smooth sailing. Here’s a roadmap to guide the process.
Update and Upgrade Your Linux System
Before diving in, bring the system up to date. This helps in avoiding conflicts.
For Ubuntu, Debian, or Linux Mint, use the Terminal.
sudo apt update && sudo apt upgrade
Meanwhile, Fedora or CentOS users should enter:
sudo dnf update && sudo dnf upgrade
Arch Linux and Manjaro lovers, try:
sudo pacman -Syu
Updating the system means getting the latest security patches and software packages. This simple task can save time and headaches down the road. It ensures everything is ready for the next steps.
Install Required Packages
Once updated, it’s time to get the packages needed for creating a bootable USB. Depending on the distribution, woeusbgui or woeusb needs installation. For GUI fans, woeusbgui is more user-friendly.
On Ubuntu, adding a PPA is helpful, like so:
sudo add-apt-repository ppa:nilarimogard/webupd8
sudo apt-get update
sudo apt install woeusb woeusbgui
For Debian and other deb-based distros, direct .deb files can be downloaded.
Fedora and Arch Linux users:
# Fedora
dnf install woeusb
# Arch Linux
yay -S woeusb
Ensure all dependencies are handled smoothly during installation.
The installation process might differ slightly, but the goal is the same. It’s like laying the groundwork for something amazing. With the right packages in place, creating a bootable USB becomes a breeze.
Obtaining the Windows 10 ISO
To create a Windows 10 bootable USB on Linux, the first step is acquiring the Windows 10 ISO file. This involves downloading it from Microsoft, verifying its integrity, and optionally previewing its contents.
Download the ISO Image from Microsoft
Microsoft provides the Windows 10 ISO download directly from their website. Users should visit the Microsoft Windows download page and choose the desired version, whether it’s the 32-bit or 64-bit variant.
Tip: Ensure there’s enough space on your computer to store the ISO file, as it can be several gigabytes in size. 🖥️
After selecting the version, the user needs to select “Download now.” It typically requires a stable internet connection to ensure a complete download without interruptions. After downloading the file, keep it in an easily accessible location.
Verify the ISO File
Verification is important to ensure the downloaded file is intact and hasn’t been tampered with. This step ensures smooth installation later on.
Users can use checksums, such as SHA256, provided by Microsoft on their website to verify the ISO image. This involves comparing the checksum of the downloaded ISO with the one listed on the website.
Note: Tools like sha256sum can be used in the terminal to generate checksums. 🔍
If the checksums match, the file is verified. If not, it’s wise to download the ISO again, as the file may be corrupted.
Mount the ISO Image for Preview
In a Linux environment, it can be helpful to mount the ISO image to check its contents. This allows users to explore the files within without burning it to a disk or a USB first.
Using tools like Disk Image Mounter, users can easily mount the file by right-clicking the ISO and selecting mount options. This can reassure users of the ISO’s contents and readiness.
After mounting, the ISO’s file structure becomes visible. Users can check out important files that a legitimate Windows 10 ISO should include, like setup files and boot folders. Once done, ensure to unmount the image to avoid system clutter.
Creating the Bootable USB
Creating a Windows 10 bootable USB on Linux involves selecting the right tools and understanding specific commands. Each method has its advantages, from command-line power to the simplicity of graphical interfaces.
Using a Command-Line Utility
To create a Windows 10 bootable USB via the command line, tools like WoeUSB come in handy. For this method, he must first install WoeUSB, which requires root privileges.
They should ensure the USB device is connected and unmount it with lsblk.
Use sudo woeusb --device /path/to/windows.iso /dev/sdx, replacing placeholders with actual paths. This command formats and writes the Windows ISO file to the USB flash drive, making it bootable.
It’s an efficient way when someone prefers using terminal environments.
Using a Graphical User Interface Tool
For those who shy away from the command line, GUI tools like WoeUSB GUI and Ventoy offer hassle-free methods. Once installed, he can open the GUI, which usually involves selecting the Windows ISO and target USB device.
Systems like Ventoy allow creating multiple boot options by simply copying ISO files to the USB device. WoeUSB GUI offers a straightforward interface where users drag and drop the ISO, configure settings, and click to proceed.
It’s as easy as pie for them who like visual interfaces.
Formatting the USB Drive
Before creating a bootable USB, formatting the drive to an NTFS partition is crucial.
While Linux supports many file systems, NTFS is necessary for Windows booting. Commands like sudo mkfs.ntfs /dev/sdx ensure the drive is properly formatted.
They can also use apps with formatting capabilities if they are uncomfortable with commands. It’s kind of like preparing the canvas before painting. With the USB properly formatted, the installation will proceed without a hitch.
Finalizing the Process
Completing the setup requires adjusting the boot order in the BIOS or UEFI and verifying the bootable USB on a computer. This ensures the USB is ready and boots up smoothly.
Setting up the Boot Order in BIOS/UEFI
To begin, restart the computer and enter the BIOS or UEFI firmware settings. This usually involves pressing a key like F2, Del, or Esc right after starting the computer.
Once inside, look for something like Boot Order or Boot Priority. Move the USB to the top of the list. This tells the system to check the USB first when starting up.
UEFI might look different than BIOS, but the idea remains the same. It’s like cooking pasta—same ingredients, different pot!
Testing the Bootable USB
With everything set, insert the USB stick again, and reboot.
The computer should boot from the USB. If done right, a Windows installation screen should appear.
If not, double-check the boot order. Sometimes, sneaky settings trip folks up, so stay sharp!
Watch as it loads, confirming the USB works. You’ve just navigated through the maze like a pro!
In rare cases, if problems arise, consider checking for corrupt files, or try another USB port. Remember, computers can surprise you, like a cat deciding when to be petted.
How to Make a Windows 10 Bootable USB on Linux
Creating a Windows 10 bootable USB drive on Linux is easier than you think. You’ll need a Windows 10 ISO file, a USB stick with at least 8 GB of space, and a few handy Linux commands. Follow these steps, and you’ll have a bootable USB drive ready in no time.
In the following steps, you’ll learn how to create a Windows 10 bootable USB using a Linux system. This will involve downloading the ISO file, preparing the USB drive, and using a couple of Linux commands to finish the job.
Step 1: Download the Windows 10 ISO file
First, you need to download the Windows 10 ISO file from Microsoft’s official website.
Head over to the Microsoft website and select the version of Windows 10 you want to download. Save the ISO file to a location you’ll remember.
Step 2: Insert the USB Drive
Next, insert your USB drive into your Linux computer.
Make sure it has at least 8 GB of storage space. All data on this USB drive will be erased, so back up any important files before continuing.
Step 3: Identify the USB Drive
Open a terminal and type lsblk to identify the USB drive location.
This command lists all block devices. Find your USB drive in the list, noting its path (e.g., /dev/sdb). Be extremely careful to select the correct drive to avoid data loss.
Step 4: Format the USB Drive
Format the USB drive using the mkfs.vfat command.
Type sudo mkfs.vfat /dev/sdx (replace sdx with your specific USB drive path). This prepares the USB drive to receive the ISO files.
Step 5: Mount the ISO and USB Drive
Create two directories to mount the ISO file and USB drive.
Type mkdir ~/iso and mkdir ~/usb to create these directories. Use sudo mount -o loop /path/to/windows.iso ~/iso and sudo mount /dev/sdx1 ~/usb to mount them.
Step 6: Copy Files to USB Drive
Copy all files from the ISO directory to the USB directory.
Use the command sudo cp -r ~/iso/* ~/usb/ to transfer the files. This step may take a few minutes, so be patient.
Step 7: Make the USB Bootable
Use the sync command to make sure all files are written to the USB drive.
Simply type sync and press Enter. This ensures the data is properly stored on your USB drive.
After you complete these steps, you can boot from the USB drive to install Windows 10. Restart your computer, enter the BIOS or UEFI settings, and select the USB drive as the boot device. Install Windows 10 by following the on-screen instructions.
Tips for Making a Windows 10 Bootable USB on Linux
- Always double-check the drive location (
/dev/sdx) to avoid formatting the wrong drive. - Keep a backup of your important data before formatting the USB drive.
- Ensure your USB drive has a minimum of 8 GB storage space.
- Close all unnecessary applications to speed up the copying process.
- If you encounter errors, try using a different USB port or drive.
Frequently Asked Questions
Can I use any USB drive to create a bootable USB?
Yes, as long as the USB drive has at least 8 GB of storage space.
What if I download the wrong ISO file?
You can download the correct version from Microsoft’s website and start the process again.
Do I need any special software on Linux to create a bootable USB?
No, you can create a bootable USB using built-in Linux commands.
Will this process work for other versions of Windows?
Yes, you can use similar steps for other versions, but ensure you download the correct ISO file.
What should I do if my computer doesn’t recognize the bootable USB?
Check the BIOS or UEFI settings and ensure the USB drive is set as the primary boot device.
Summary
- Download the Windows 10 ISO file.
- Insert the USB drive.
- Identify the USB drive.
- Format the USB drive.
- Mount the ISO and USB drive.
- Copy files to USB drive.
- Make the USB bootable.
Conclusion
Creating a Windows 10 bootable USB on Linux might seem daunting, but it’s quite straightforward if you follow the steps outlined above. Whether you’re a Linux newbie or a seasoned pro, you can easily accomplish this task with a little patience and attention to detail.
By following these steps, you transform your ordinary Linux machine into a versatile tool capable of installing Windows 10. Need to set up a new PC or fix an old one? This bootable USB will come in handy.
Remember to always keep a backup of your data and double-check your commands. If you want more in-depth reading, consider exploring other Linux utilities like dd or WoeUSB for creating bootable USB drives. Happy computing!
Matt Jacobs has been working as an IT consultant for small businesses since receiving his Master’s degree in 2003. While he still does some consulting work, his primary focus now is on creating technology support content for SupportYourTech.com.
His work can be found on many websites and focuses on topics such as Microsoft Office, Apple devices, Android devices, Photoshop, and more.
Most Linux users do not bother with the Windows operating system. But, if you’re a professional user, sometimes, you will need to get back to Windows for testing and checking purposes. However, besides experimenting and developing, there are many tools that run well in Windows and won’t even run on Linux. In these circumstances, you might need to get back to the Windows operating system. If you need to get a dual-boot arrangement system on your PC, you will need to create a bootable Windows ISO file on the USB from your Linux system to get the secondary OS.
Create a Windows Bootable USB on Linux
In Ubuntu and other Linux distros, there are a few powerful tools that let you create a bootable USB drive of Windows ISO files. Besides these, in Ubuntu and many other distributions, you can directly create a bootable disk and mount the files on a temporary directory.
Before I go into the steps where I will show the methods, I assume that you have the ISO file downloaded on your filesystems and you know the BIOS method of your PC and what type of filesystem partition you need, like MBR or GPT. In this post, we will see how to create a Windows bootable USB on Linux.
Method 1: Create a Windows Bootable USB on Linux with WoeUSB
In this method, we will see how we can create a bootable USB file of Windows from a Linux host machine through the app called WoeUSB. The WoeUSB is one of the oldest and most effective tools for making bootable files.
Step 1: Install WoeUSB on Linux
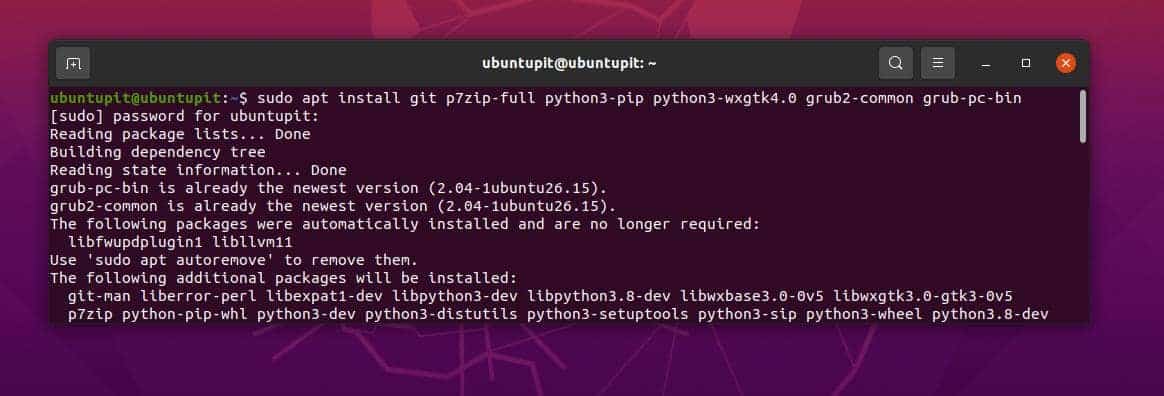
As the WoeUSB is a third-party app, so we will need to install the tool first on your Linux system. The installation process of the WoeUSB tool is easy and straightforward. First, you need to get the package dependencies on your machine. Please execute the below-mentioned command according to your distribution.
Install WoeUSB dependencies on Ubuntu/Debian System
sudo apt install git p7zip-full python3-pip python3-wxgtk4.0 grub2-common grub-pc-bin
Get the dependencies on Arch Linux
sudo pacman -S p7zip python-pip python-wxpython
Install WoeUSB dependencies on Fedora/Red Hat Linux System
sudo dnf install git p7zip p7zip-plugins python3-pip python3-wxpython4
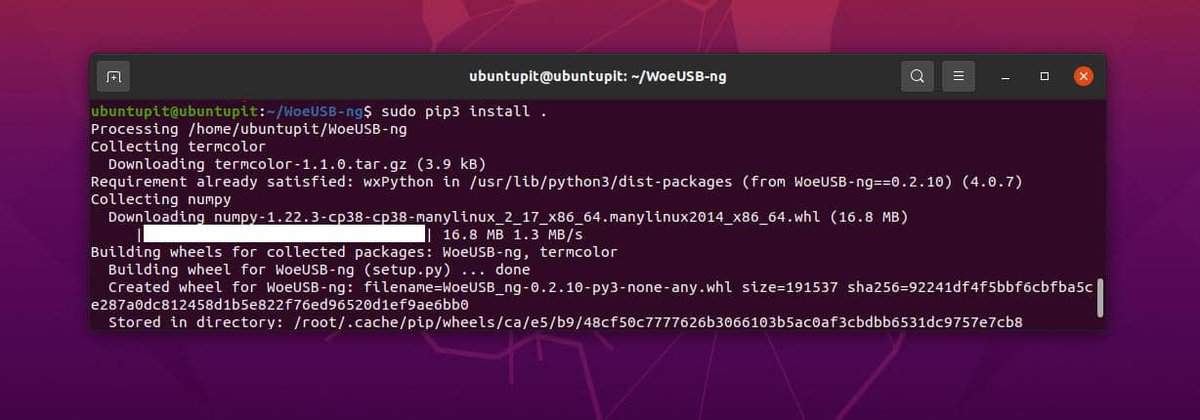
Now, we will need to clone the Git repository of the WoeUSB on our system. The below-mentioned commands would be executed on all major systems.
git clone https://github.com/WoeUSB/WoeUSB-ng
cd WoeUSB-ng
Finally, Execute the below-mentioned comment on the terminal shell to get the tool installed on your system. Please don’t ignore the dot (.) at the end of the command.
sudo pip3 install .
Step 2: Open WoeUSB
Once we are done with installing the WoeUSB, we can now fire up the tool and get started. We can use either the conventional method or we can just type the below command on the shell and hit Enter.
woeusbgui &
Step 3: Create the Windows Bootable USB
So far we have seen how to install the WoeUSB tool and how to open the tool on a Linux system. When you open this told you will see that the tool is a graphical user interface-based tool. Here I have pointed out the steps that you will need to do now to create a Windows bootable USB file on Linux.
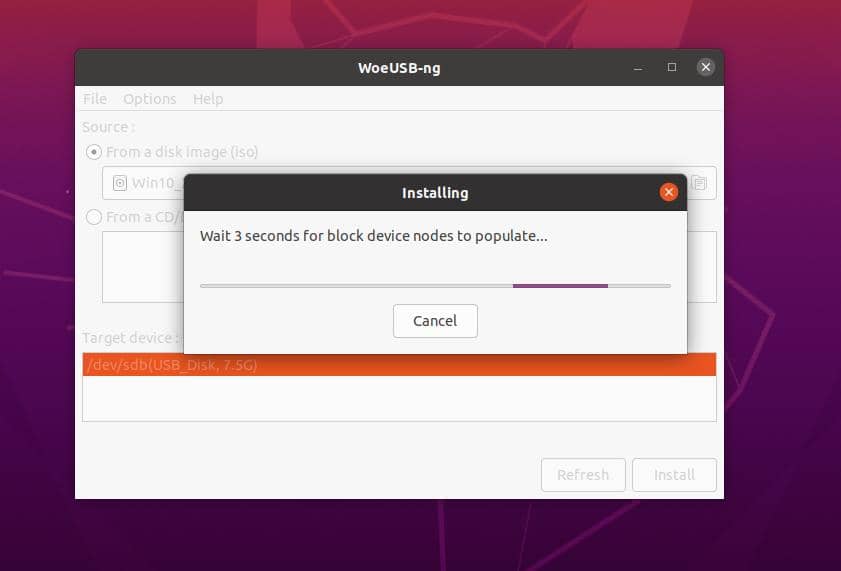
- At first, you will need to click on the from disk image menu to select your Windows ISO file on the tool.
- Now under the target device, you will select the USB pen drive or the USB disk drive where you want to create the bootable Windows files.
- Finally, click on the install button to late the tool to create the bootable file.
- Please wait until the tool finishes creating the bootable file and don’t close the window until it finishes.
It will take a while to initialize the process, the progress status will be displayed on the WoeUSB tool.
Method 2: Create a Windows Bootable USB on Linux with balenaEtcher
The Etcher tool is pretty similar to the WoeUSB tool that we have seen earlier. To create the bootable USB stick with this tool, you will need to get the tool first on your Linux system.
Step 1: Instal the Etcher Tool on Linux
As the Etcher tool is very famous, the developers have already made both GUI and CLI methods available to install this too. Here, we will see both GUI and CLI methods to install the Etcher tool.
1. GUI Method to Install Etcher
The Etcher tool is very famous among the Raspberry Pi board and micro-computer users. This tool is very handy for creating and burning ISO files very effectively and it ensures an errorless output. You can download the Etcher AppImage tool from here for your Linux system.
After you download the AppImage file, extract the file on your system. Then right-click on the file and hover over the Properties tab.
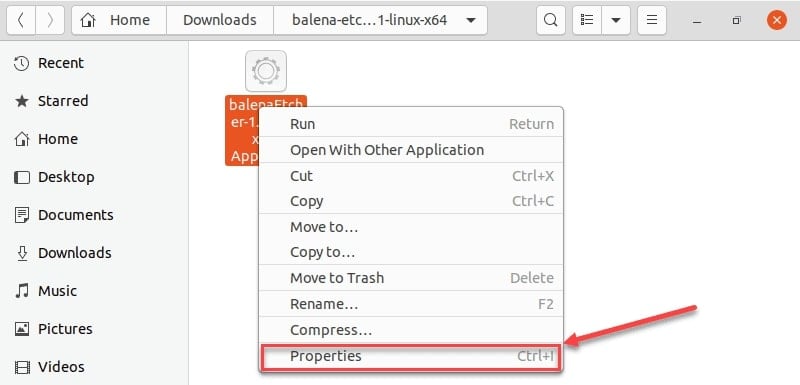
Then go to the Permissions tab, and finally check the Allow executing file as a program. You can now double-click on the AppImage file to run the Etcher tool.
2. CLI Method to Install Etcher
If you find any issues installing the Etcher tool with the above-mentioned GUI method, or you prefer to use the CLI method; this step is totally for you.
First, you will need to execute the below-mentioned echo command on the new terminal shell to get the resource file on your system.
echo "deb https://deb.etcher.io stable etcher" | sudo tee /etc/apt/sources.list.d/balena-etcher.list
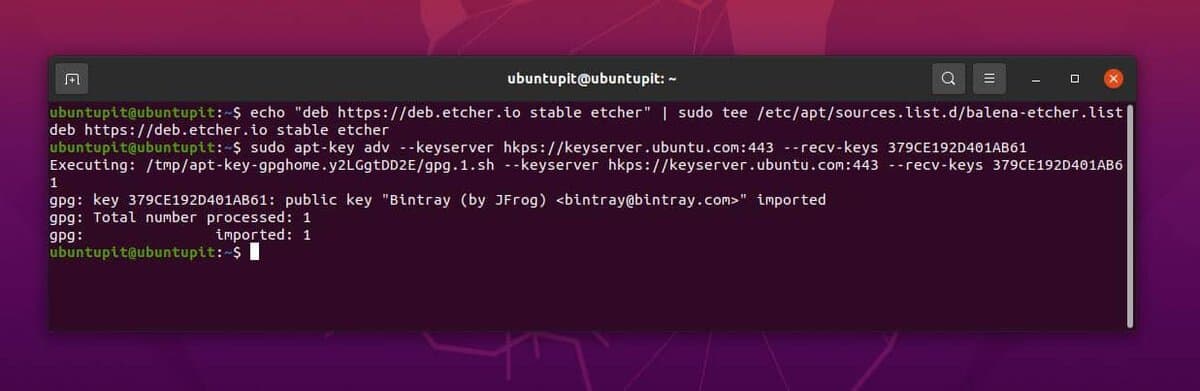
Now please execute the below-mentioned APT command on your shell to get the repository queries on your Debian or other Linux systems.
sudo apt-key adv --keyserver hkps://keyserver.ubuntu.com:443 --recv-keys 379CE192D401AB61
Finally, you can now update your aptitude repositories and run the below-mentioned comment to install the Etcher tool on your system.
sudo apt update
sudo apt install balena-etcher-electron
Step 2: Use Etcher Tool to Create A Windows Bootable USB
So far we have seen how to install the Etcher tool on a Linux System. we will now see how to use this tool to create a bootable USB disk for Windows. Once you open the tool you will find all the options and buttons are self-explanatory that you will not need some additional help or guideline to operate this tool.
Please note when you choose a Windows ISO file on the Etcher tool, it might show a warning with a suggestion to use the WoeUSB or Rufus tool for creating the Windows bootable file. However, you can ignore that warning and proceed.
Please be mindful while you choose the USB device because this Etcher tool is going to erase all the data from the USB device. If you accidentally choose any other directory or folder you cannot go reverse to back up the data. Nonetheless, Here I am adding the steps in a few points so that you can get the steps easily.

- First, you will need to open the Etcher tool on your system.
- Now you will need to choose the ISO file from your file system that you want to use for creating the USB disk.
- After you choose the ISO file you will now need to choose the USB device.
- Finally, click on the flash button from the Etcher tool it will instantly initiate creating the bootable device.
Method 3: Mount ISO on the FileSystem
This method is pretty much basic and you won’t need any additional third-party software or tools to make a bootable disk on your Linux System. In this method, we will use the in-built file manager and the disk mounting tool that Linux already offers with the operating system.
When you have the ISO file downloaded to your system, you can just right-click on the file and choose Open with Disk Image mounter on the system. This method will automatically convert the ISO files into a bootable format under the filesystem and allow you to copy the entire bootable files into a USB disk.
Please note, that the bootable files will stay for a temporary basis mounted on the system. If you reboot the system the mounted bootable files will be gone. So before rebooting or restarting, please copy the files into a USB disk.
Insights!
In the entire post, we have seen how to create a Windows bootable USB on Linux. In the above post, I have mentioned two excellent tools for creating the bootable device, there are other tools available on the web as well.
Please be careful when you choose a third-party app on your system, there are many tools that do not work for creating a bootable USB device on Linux. Before you install an app, please read the reviews carefully to check if this is a hoax or not.
In the entire post, we have seen three different options for making a bootable USB on Linux. These methods are executable in all major distributions. Besides these, you can also try using the Unetbootin tool for creating a bootable USB disk.
If you find this article has been useful for you, please do not forget to share this post with your friends and the Linux community. We also encourage you to write down your opinions in the comment section regarding this article.
Creating a bootable USB drive for Windows 10/11 in Linux can be challenging for some users, especially those new to Linux. A bootable USB drive is essential when installing Windows on a computer, as it allows you to bypass traditional installation methods such as a CD/DVD or over the network. It can also be used for system recovery or troubleshooting purposes.
This article is a step-by-step guide on creating a bootable Windows 10/11 USB drive in Linux. It will cover everything you need to know, from the tools you need to the actual installation process. So if you’re a Linux user wanting to install Windows on your computer or create a bootable USB drive for system recovery purposes, this article is for you.
Creating a bootable Windows 10/11 USB in Linux
Prerequisites
Before you can create a bootable Windows 10/11 USB drive in Linux, you will need to make sure you have the following prerequisites:
- A Linux distribution installed on your computer. Ubuntu, Arch Linux, Fedora, and CentOS are popular Linux distributions you can use. (I will use Ubuntu 22.04 for illustration purposes)
- A Windows 10/11 ISO file. You can download the latest Windows 10/11 version from the official Microsoft website.
- A USB drive with at least 8GB of storage capacity.
Using WoeUSB
WoeUSB is a powerful tool that allows you to create bootable Windows USB drives from ISO images on Debian-based distros. There are two methods to install WoeUSB: using the PPA repository or using a bash script. Let’s explore both methods:
Installing WoeUSB on Debian-based Linux derivatives
Follow the section below to find out how to install WoeUSB on Debian-based Linux derivatives:
Step 1: Downloading and Installing WoeUSB
There are several distinct methods that can be used to download and install WoeUSB on Debian-based distros. To get a glimpse at some of them, check out the subsequent sections:
Method 1: Using PPA to Install WoeUSB
Step 1: Add the WoeUSB PPA
Launch the terminal by pressing “CTRL+ALT+T” and add the WoeUSB PPA to your Ubuntu system with the following command:
sudo add-apt-repository ppa:tomtomtom/woeusb -y
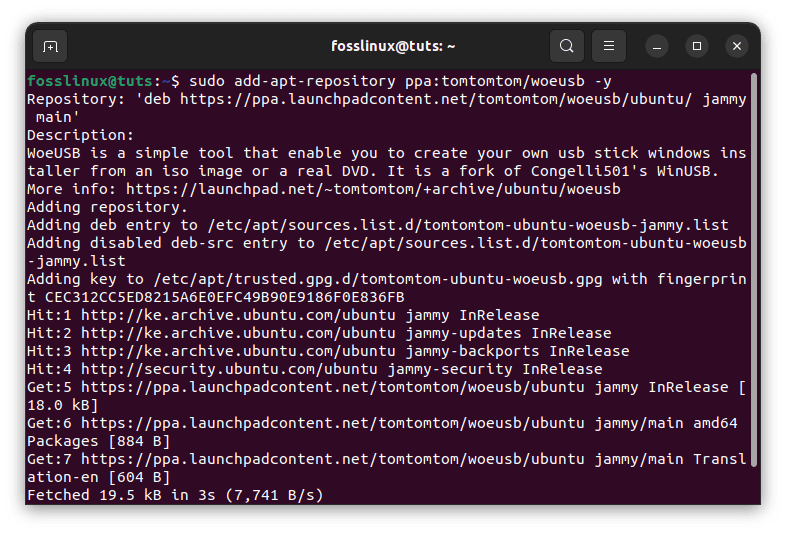
Add woeusb PPA
Step 2: Update Ubuntu Core Libraries
After adding the PPA, it’s essential to update the core libraries of Ubuntu:
sudo apt update
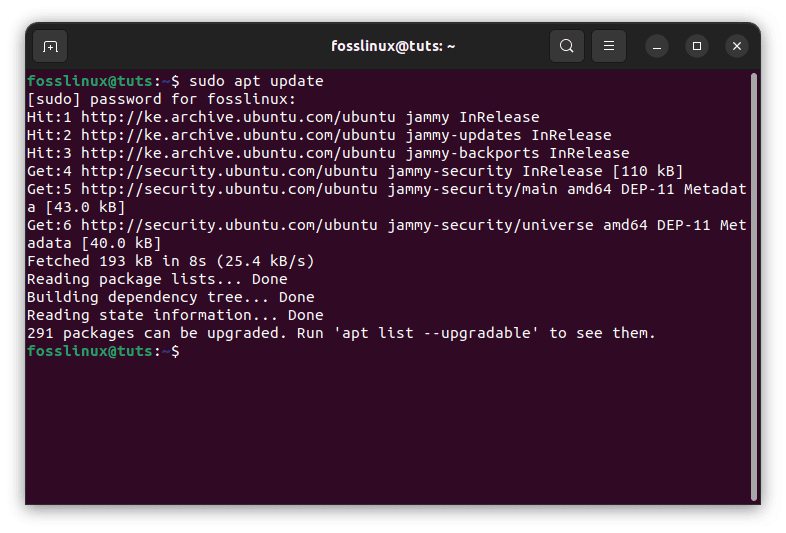
Update system resources
Step 3: Install WoeUSB
Once the repositories are updated, you can install both the CLI and the GUI support for WoeUSB with the following command:
sudo apt install woeusb woeusb-frontend-wxgtk -y
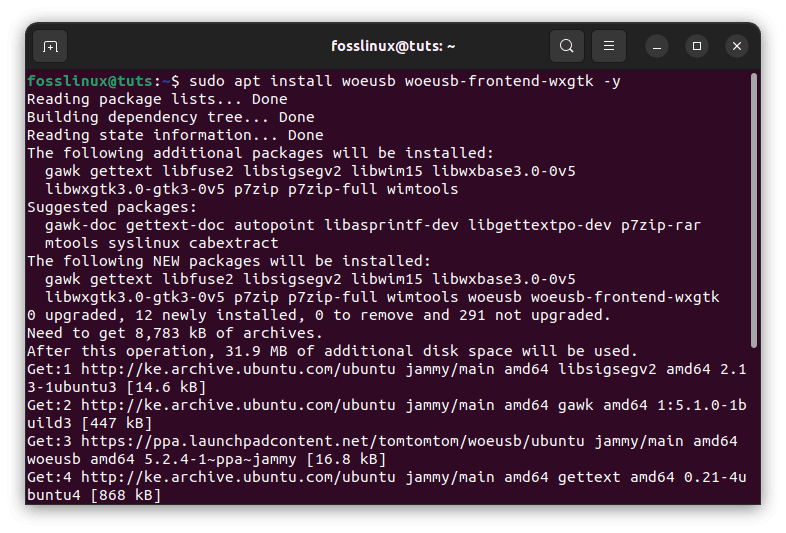
Install woeusb
If you only need the CLI (Command Line Interface) of WoeUSB, you can install it separately:
sudo apt install woeusb -y
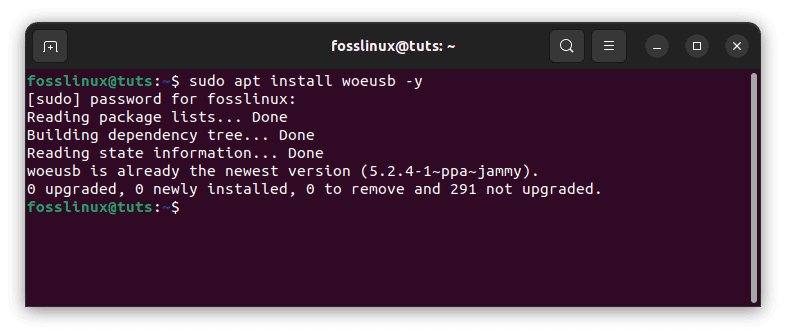
Install woeusb cli
To verify that WoeUSB is successfully installed, run the following command:
woeusb -h
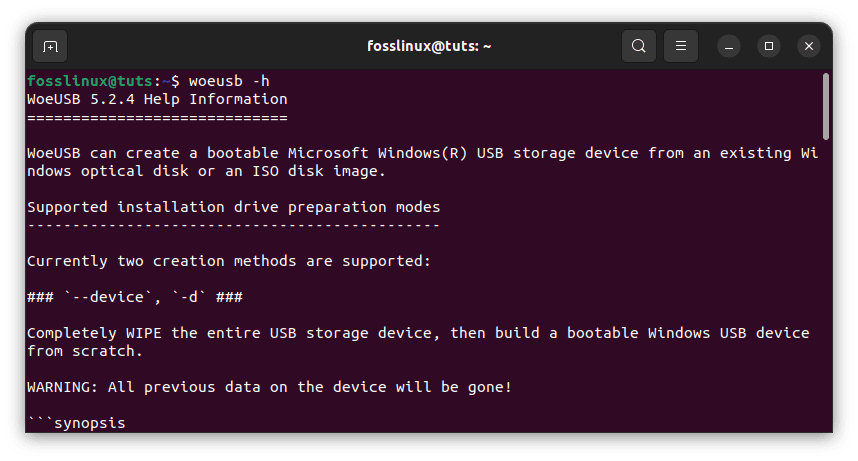
Verify is woeusb was successfully installed
This command will display the version and possible usage of the WoeUSB tool.
Launching the WoeUSB GUI
To launch the WoeUSB GUI, run the following command:
woeusbgui
Launch woeusb
The WoeUSB GUI will be launched and ready to use.
Method 2: Install WoeUSB Using a Bash Script
The second method involves installing WoeUSB using a bash script available on GitHub. Follow these steps:
Step 1: Download the Script
Download the latest bash script of WoeUSB from the GitHub repository. The downloaded file will appear in the “Downloads” directory of Ubuntu.

Download woeusb bash script
Step 2: Make the Script Executable
Open the terminal and make the bash script executable with the following command:
cd Downloads

chmod +x woeusb-5.2.4.bash
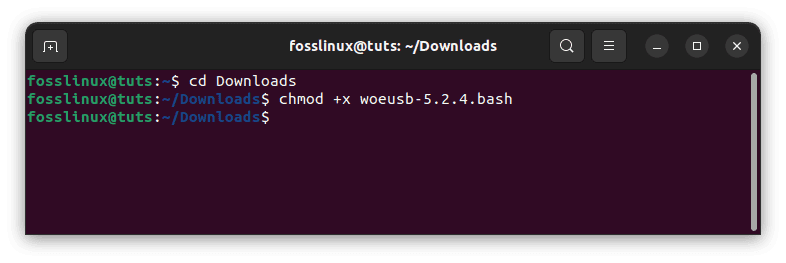
Make script file executable
Step 3: Install the Wimtool Utility
Before executing the script, install the “wimtools” utility, which is required for WoeUSB to function properly:
sudo apt install wimtools
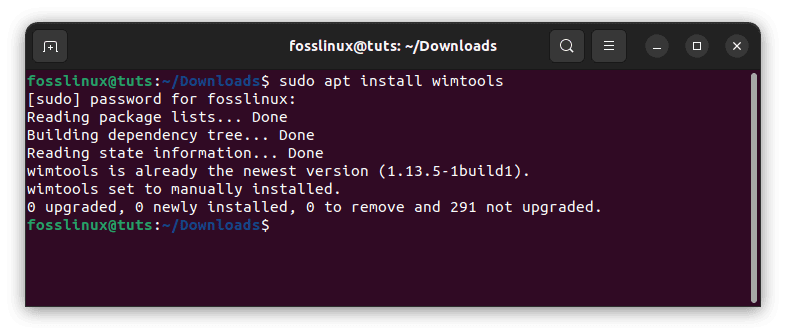
Install the wimtools utility
Step 4: Execute the Bash Script
Run the bash script with the following command:
./woeusb-5.2.4.bash
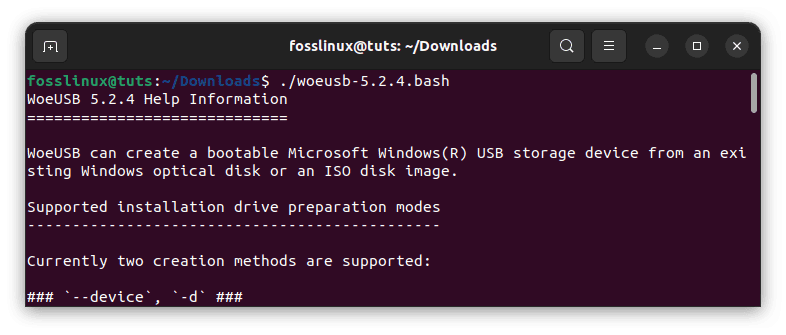
Execute the bash script file
The WoeUSB Command Line Interface will now be ready to use.
Installing WoeUSB on Other Linux Distros
WoeUSB is not limited to Ubuntu or Debian-based Linux distributions; it can be installed on various other Linux distros as well. The installation process could differ slightly depending on the package manager used by the specific Linux distro. Below are the steps to install WoeUSB on Arch Linux, Fedora, and CentOS:
Installing WoeUSB on Arch Linux
To install WoeUSB on Arch Linux, follow the steps provided below:
Step 1: Open a Terminal
First, open a terminal on your Arch Linux system. You can do this by clicking the “CTRL+ALT+T” keyboard combination or by searching for “Terminal” in the application launcher.
Step 2: Install WoeUSB
Use the following command to install WoeUSB from the AUR (Arch User Repository):
yay -S woeusb-git
The above command assumes you have an AUR helper like “yay” installed. If you don’t have an AUR helper, you can install “woeusb-git” manually by cloning the AUR repository and building the package. Here’s how you can do it:
git clone https://aur.archlinux.org/woeusb-git.git cd woeusb-git makepkg -si
Enter your password when prompted to proceed with the installation.
Step 3: Launch WoeUSB
Once the installation is complete, you can start WoeUSB by running the following command in the terminal:
woeusbgui
The WoeUSB graphical user interface (GUI) will be launched, and you can now use it to create bootable Windows USB drives from ISO images.
WoeUSB is now successfully installed on your Arch Linux system. You can employ this powerful tool to create bootable USB drives for Windows 11/10 and other Windows operating systems. Enjoy the convenience of WoeUSB’s user-friendly interface and create bootable media effortlessly.
Installing WoeUSB on Fedora
To install WoeUSB on Fedora, use the following steps:
Step 1: Open a Terminal
Open a terminal on your Fedora system. You can do this by clicking the “CTRL+ALT+T” keyboard combination or by searching for “Terminal” in the application launcher.
Step 2: Install WoeUSB
Use the following command to install WoeUSB from the official Fedora repositories:
sudo dnf install woeusb
Enter your password when prompted to proceed with the installation.
Step 3: Launch WoeUSB
Once the installation is complete, you can start WoeUSB by running the following command in the terminal:
woeusbgui
The WoeUSB graphical user interface (GUI) will be launched, and you can now use it to create bootable Windows USB drives from ISO images.
WoeUSB is now successfully installed on your Fedora system. You can employ this powerful tool to create bootable USB drives for Windows 11/10 and other Windows operating systems.
Installing WoeUSB on CentOS
Please note that CentOS may not have an official package for WoeUSB. However, you can still use the WoeUSB bash script method, as shown in the “Install WoeUSB Using a Bash Script” section in the previous instructions. The bash script method allows you to install WoeUSB on CentOS without relying on specific repositories or package managers.
To use the bash script method, follow the steps provided in the previous section (“Install WoeUSB Using a Bash Script”). This method works on various Linux distros, including CentOS.
Once you have installed WoeUSB on your preferred Linux distro, you can use it to create bootable Windows USB drives from ISO images, just like on Ubuntu. WoeUSB provides a user-friendly interface for this purpose and is a reliable tool for creating bootable media. With WoeUSB, you can effortlessly create bootable Windows 11/10 USB drives on different Linux distributions.
Step 2: Insert the USB Drive
Insert the USB thumb drive into any available USB port on your Linux computer.
Step 3: Launch WoeUSB
Navigate to the ‘Activities’ section, look for ‘WoeUSB’ and launch it. If that method fails, launch your terminal and move to section 4 below and follow the subsequent steps to create a bootable Windows 10/11 USB drive using WoeUSB:
Step 4: Select the Windows ISO
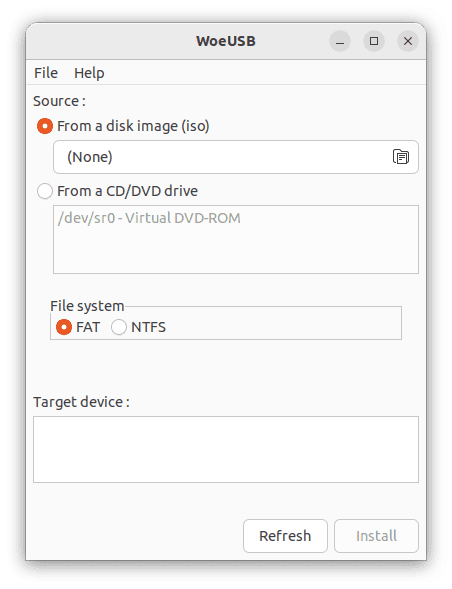
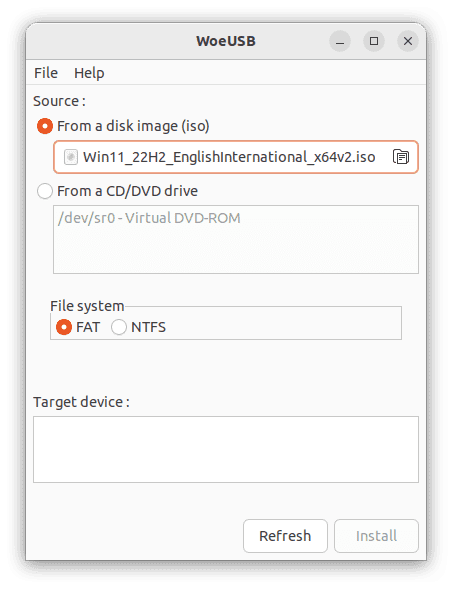
Open the WoeUSB graphical user interface (GUI) by running the following command in the terminal:
woeusbgui
Launch woeusb
Click on the “From a Disk image (iso)” option in the GUI.
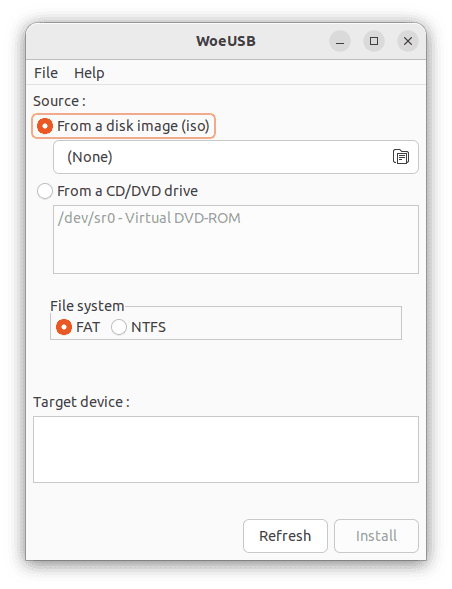
Select iso option
Navigate to the location where the downloaded Windows 11/10 ISO file is located.
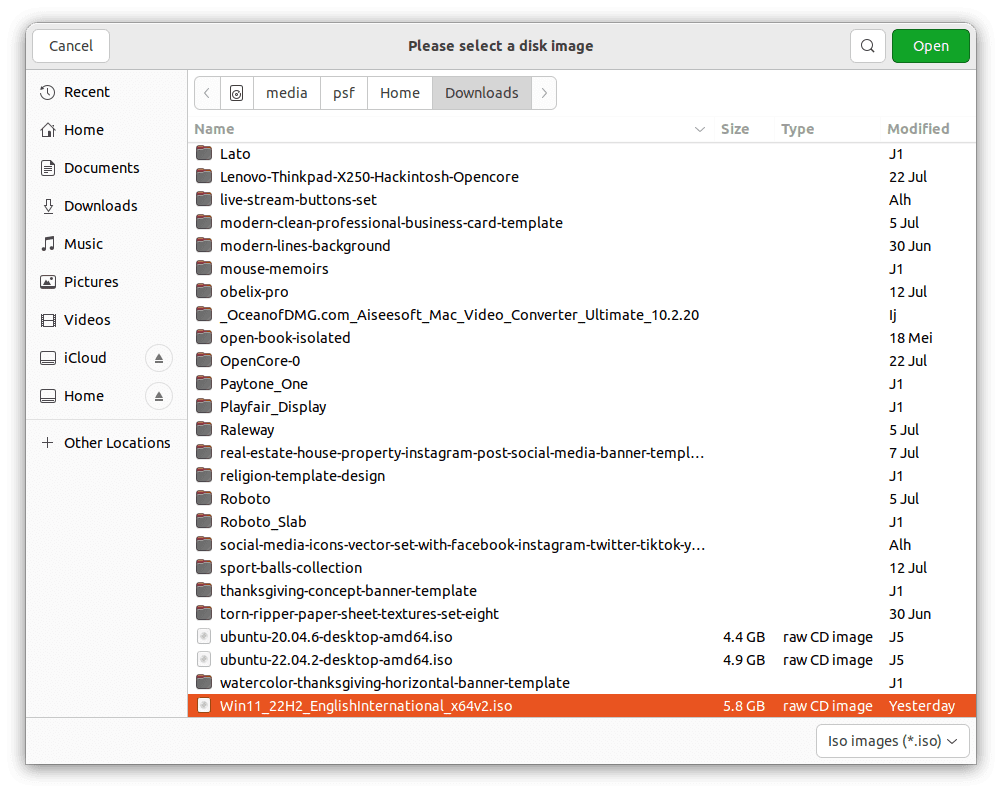
Choose downloaded iso image
Select the downloaded Windows ISO file and click “Open” to load it into WoeUSB.
Click open to load it into woeusb
Step 5: Select the USB Drive
Choose the target USB drive you inserted earlier from the list of available drives in the WoeUSB GUI. Double-check the USB drive name to avoid accidentally overwriting any critical data.
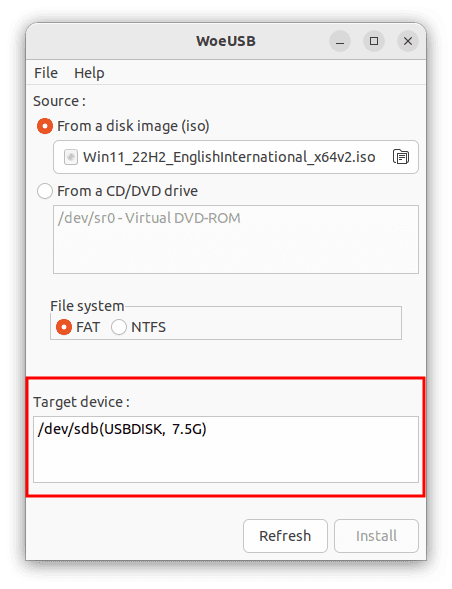
Choose target device
Step 6: Start the Creation Process
Once you have ascertained the Windows ISO and the USB drive in the WoeUSB GUI, click the “Install” button to start creating the bootable Windows USB drive. WoeUSB will format the USB thumb drive and copy the contents of the downloaded ISO file onto it. This process might take some time to complete depending on several factors, such as computer specs.
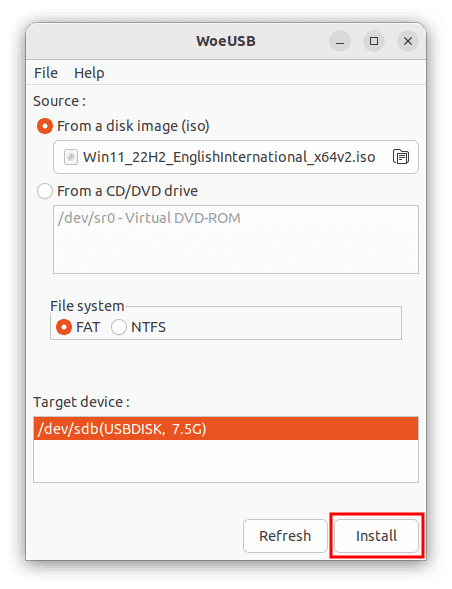
Click install button to start the creation process
Step 7: Eject the USB Drive
After the creation process is finished, you will receive a notification from WoeUSB. First, safely eject the USB drive from your computer.
Installation process complete
Congratulations, you have successfully created a bootable Windows 10/11 USB drive in Linux using WoeUSB! However, it is essential to note that this is not the only method available for creating a bootable USB thumb drive for Windows 10/11 on Linux. Continue reading to explore other alternative methods for achieving the same result.
Step 8: Boot from the USB Drive
To install Windows 10/11 on a computer, restart the PC and access the boot menu while powering on the PC by pressing the appropriate key (usually F12 or Esc). Select the bootable USB flash drive as the primary boot device. Note that the key to access the computer’s boot menu may vary depending on your system’s manufacturer. Refer to your system’s user manual or search online for specific instructions.
Step 9: Install Windows
Your PC will boot from the selected USB drive, and you can install Windows 11/10 by following the on-screen instructions.
Following the steps above, you can create a bootable Windows 11/10 USB drive on Linux using WoeUSB. WoeUSB simplifies the process and ensures a successful installation. Enjoy installing Windows 11/10 on your desired computer.
Note: These steps should help you install and use WoeUSB on Arch Linux, Fedora, and CentOS. Remember to adjust the version numbers and filenames based on the latest releases.
Command-line way of creating a Windows installer USB drive
In addition to the method we discussed earlier using WoeUSB, there are other methods you can use to create a bootable Windows 10/11 USB in Linux. In this section, we will discuss some of these methods.
Using dd Command
One of the straightforward methods to create a bootable Windows 10/11 USB in Linux is using the dd command. This method works well for creating bootable USB drives for any operating system, including Windows.
Here are the steps to follow:
Step 1: Download the Windows ISO
Download the Windows ISO from the official Microsoft website. Make sure to download the correct ISO file for your system architecture.
Step 2: Insert the USB Drive
Insert the USB drive into your computer’s USB port.
Step 3: Identify the USB Drive
Identify the device name of the USB drive using the following command:
sudo fdisk -l
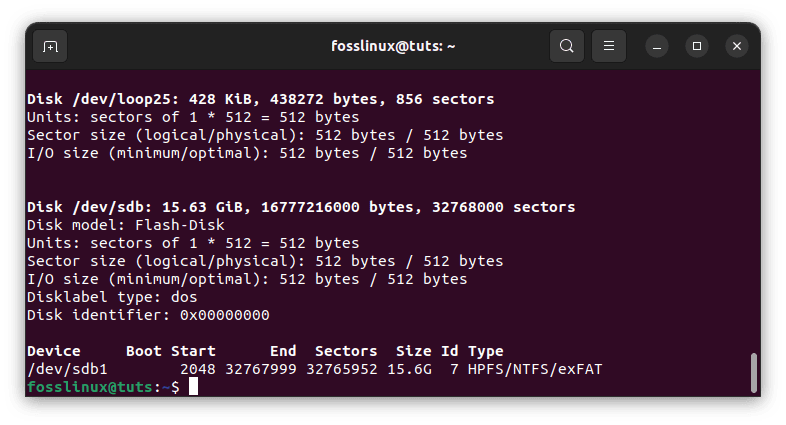
Check the USB drive name
This will list all the storage devices connected to your computer. Look for the device name of your USB drive. It will be in the format /dev/sdx, where x is a letter representing the device identifier.
Note: Be careful when selecting the device name for your USB drive, as choosing the wrong device can result in data loss.
Step 4: Unmount the USB Drive
Unmount the USB drive using the following command:
sudo umount /dev/sdx
Replace /dev/sdx with the device name of your USB drive. For my case, I will execute the following code:
sudo umount /dev/sdb1
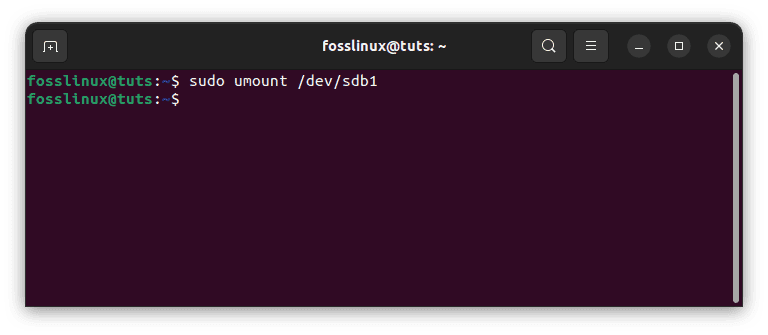
Unmount disk
Step 5: Write the Windows ISO to the USB Drive
Write the Windows ISO to the USB drive using the following command:
sudo dd bs=4M if=/path/to/windows.iso of=/dev/sdx status=progress && sync
Replace /path/to/windows.iso with the path to the Windows ISO file and /dev/sdx with the device name of your USB drive.
Example:
sudo dd bs=4M if=/home/fosslinux/Documents/Win11_22H2_EnglishInternational_x64.iso of=/dev/sdb1 status=progress && sync
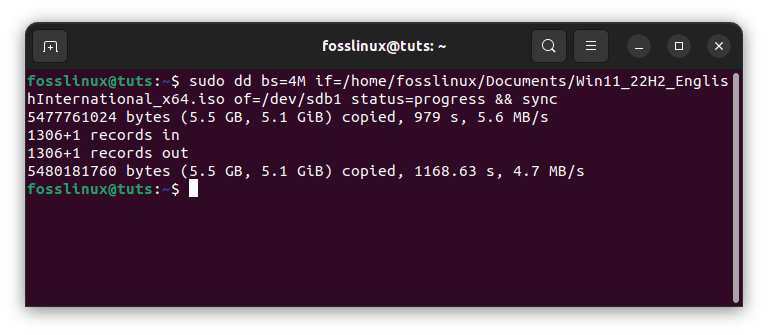
Write the Windows ISO to USB
The bs=4M option sets the block size to 4 megabytes, which can improve performance. The status=progress option displays the progress of the write operation. The sync command ensures that all data has been written to the USB drive before the command exits.
Step 6: Eject the USB Drive
Once the write operation is complete, eject the USB drive from your computer.
Using the bootable drive to install Windows 10/11
Now that you have created a bootable Windows 10/11 USB drive in Linux, you can install Windows on your computer. The installation process will vary depending on whether your computer uses BIOS or UEFI.
Installation Process for BIOS
To install Windows using the bootable USB drive on a computer that uses BIOS, follow these steps:
Step 1: Insert the USB Drive
Insert the bootable USB drive into your computer’s USB port.
Step 2: Boot from the USB Drive
Restart your computer and press the key to access the boot menu. The key to accessing the boot menu may vary depending on your computer’s manufacturer. Standard keys include F2, F12, and Del.
Select the USB drive from the boot menu and press Enter to boot from it.
Step 3: Install Windows
Follow the on-screen prompts to install Windows on your computer. You may need to enter the product key during the installation process.
Installation Process for UEFI
To install Windows using the bootable USB drive on a computer that uses UEFI, follow these steps:
Step 1: Insert the USB Drive
Insert the bootable USB drive into your computer’s USB port.
Step 2: Boot from the USB Drive
Restart your computer and access the UEFI firmware settings. The key to access the UEFI firmware settings may vary depending on your computer’s manufacturer. Standard keys include F2, F12, and Del.
Enable Legacy Boot or Compatibility Support Module (CSM) and disable Secure Boot in the UEFI firmware settings.
Save the changes and exit the UEFI firmware settings.
Step 3: Install Windows
Restart your computer and press the key to access the boot menu. The key to accessing the boot menu may vary depending on your computer’s manufacturer. Standard keys include F2, F12, and Del.
Select the USB drive from the boot menu and press Enter to boot from it.
Follow the on-screen prompts to install Windows on your computer. You may need to enter the product key during the installation process.
That’s it. Wait for the installation process to complete. Once it does, enjoy your newly installed Windows OS!
Important aspects to consider while creating a bootable drive
One thing to remember when creating a bootable Windows USB drive in Linux is that it may take longer than making one in Windows, depending on your chosen method. Some ways, such as the dd command, may take longer to complete, but they are generally more reliable.
Additionally, you must ensure you have enough storage space on your USB drive for the Windows ISO file and any other files you may need. A standard 8GB USB drive should be sufficient for most purposes, but you may need more space if you have a large ISO file or need to store additional files on the drive.
Finally, double-checking your work before using the bootable USB drive to install or repair Windows on a computer is always a good idea. Ensure the USB drive is formatted correctly and that you have selected the correct ISO file before proceeding. This will help ensure that the installation or repair process goes smoothly without any issues.
Overall, creating a bootable Windows 10/11 USB drive in Linux is a valuable skill, primarily if you frequently work with Windows computers or need to repair a computer with a corrupted or non-functional operating system. With the right tools and patience, you can create a bootable USB drive that will allow you to install or repair Windows easily.
Conclusion
Creating a bootable Windows 10/11 USB drive in Linux is a valuable skill for anyone who needs to install Windows on a computer or create a bootable USB drive for system recovery purposes. With the help of the free and open-source tool WoeUSB, the process can be done easily and quickly.
In this article, we covered the prerequisites; we discussed two methods for creating a bootable USB drive: WoeUSB and the dd command. Each method has its own advantages and disadvantages, and you should choose the one that works best for you. Besides, we discussed how to use the bootable drive to install Windows 10/11 and the step-by-step process for creating a bootable Windows 10/11 USB drive in Linux. We have also provided examples of the installation process for both BIOS and UEFI systems.
No matter which method you choose, download the correct Windows ISO file and follow the instructions carefully. With attention to detail and patience, you can create a bootable Windows 10/11 USB drive in Linux that will allow you to install or repair Windows on any computer.
We hope this article has been helpful to you in creating a bootable Windows 10/11 USB drive in Linux. If you have any questions or feedback, please comment below. Thank you for reading!