

(Image credit: Mauro Huculak)
On Windows 11 (or 10), PowerShell is a command-line interface (CLI) to run commands and scripts to automate tasks and change settings on your device, similar to Command Prompt. However, PowerShell is a more powerful CLI, offering more tools and flexibility. In addition, unlike Command Prompt, PowerShell is available across platforms, including Windows, macOS, and Linux.
A script is a collection of instructions written to a text file (using the «.ps1» extension) that PowerShell understands and executes in sequence to run different actions.
The only caveat is that the default security protocol prevents scripts from running on your computer. This means that when double-clicking a «.ps1» file, the system won’t do anything, and if you try to run the script within PowerShell, you will see the «cannot be loaded because running scripts is disabled on this system» error message. However, running scripts on your device is possible. You only need to enable the correct execution policy.
In this how-to guide, I will walk you through the steps to create and run your first script file on PowerShell using Visual Studio Code, Notepad, and the PowerShell Integrated Scripting Environment (ISE) console, whether you use Windows 10 or 11.
How to create PowerShell script file on Windows 11 and 10
It’s possible to create PowerShell script files using any text editor or the legacy ISE application. However, the Visual Studio Code editor is the preferred option for writing scripts moving forward.
Create a script with VS Code
Visual Studio Code (VS Code) is a free, extensible, cross-platform code editor that works to write virtually any programming language. And when adding the PowerShell extension, you get an interactive scripting editing experience, which even comes with IntelliSense (code-completion) support.
You can still use PowerShell ISE, but Visual Studio Code with the PowerShell extension is meant to be the new default experience. Also, consider that the legacy experience won’t get any new features and doesn’t support PowerShell 7 or future releases.
All the latest news, reviews, and guides for Windows and Xbox diehards.
Install VS Code
To install Visual Studio Code on Windows 11 (or 10), use these steps:
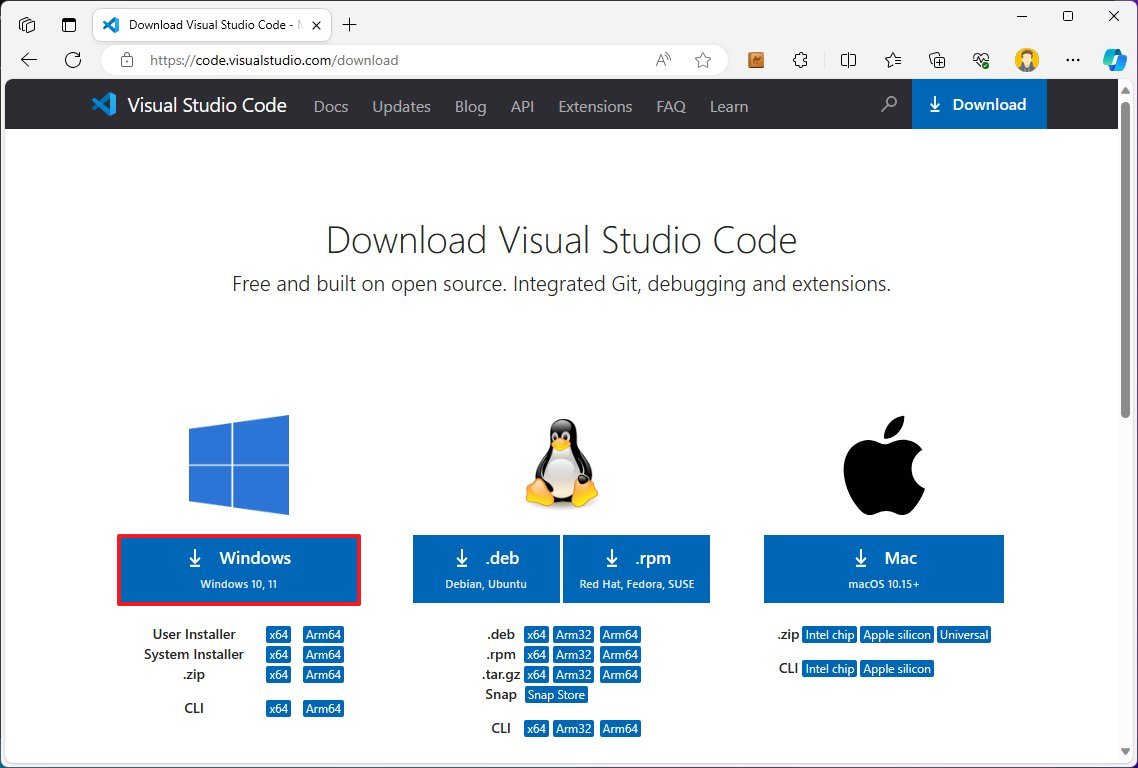
- Open the Visual Studio Download page.
- Click the Windows button to download the installation file.
- Double-click the installer to begin the process.
- Select the «I accept the agreement» option.
- Click the Next button.
- Confirm additional tasks as necessary.
- Click the Next button again.
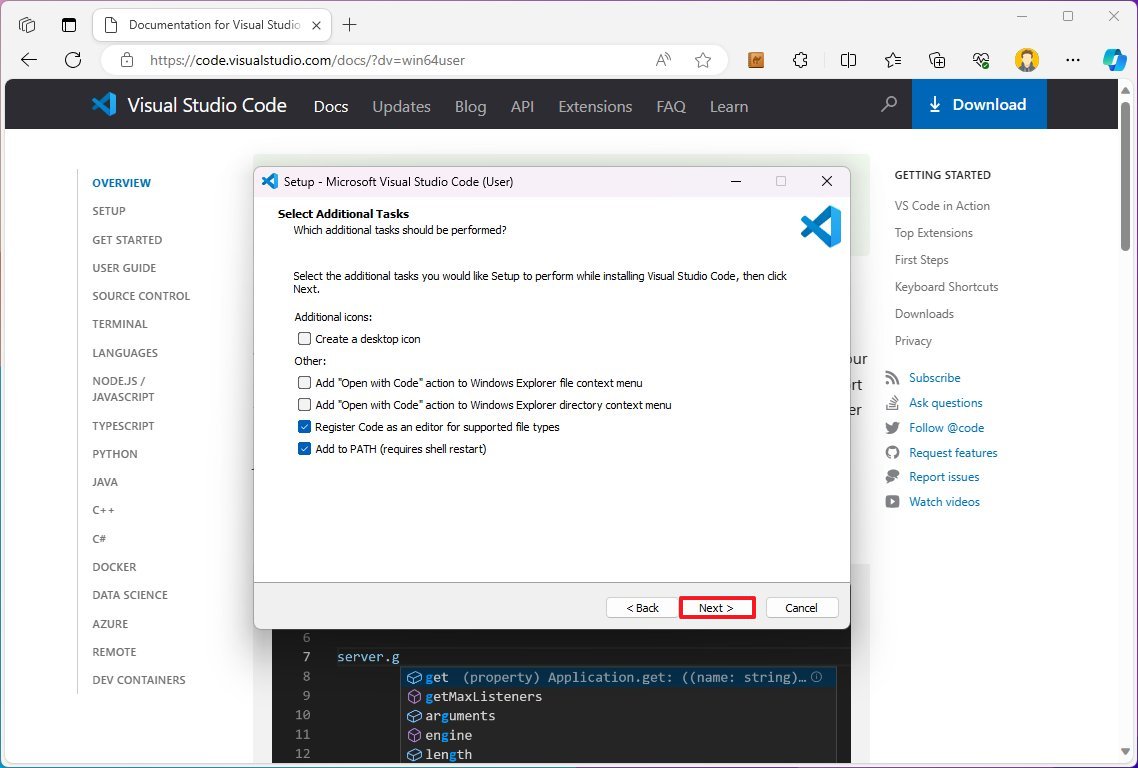
- Click the Install button.
- Click the Finish button.
Once you complete the steps, you can continue installing the PowerShell extension for VS Code.
Install PowerShell extension
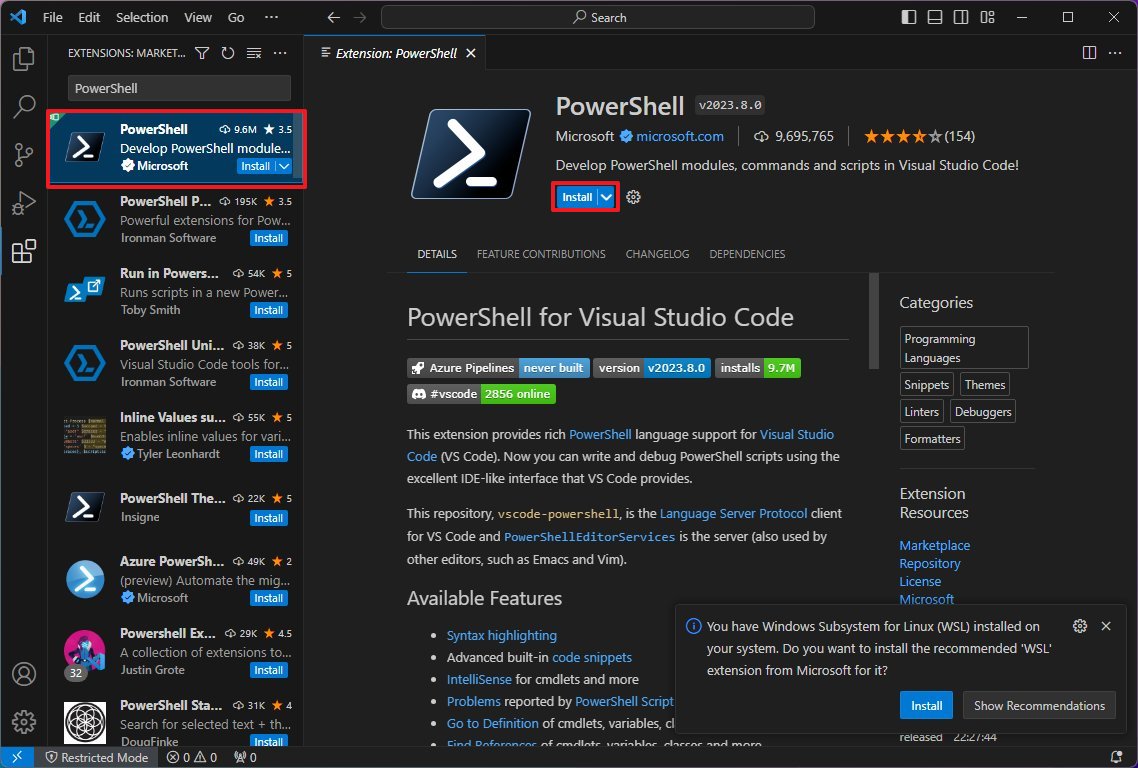
To install the PowerShell extension on VS Code, use these steps:
- Open VS Code.
- Click the Extensions tab («Ctrl + Shift + X» keyboard shortcut) from the left pane.
- Search for PowerShell and select the top result.
- Click the Install button.
- Click the «Trust Workspace & Install» button.
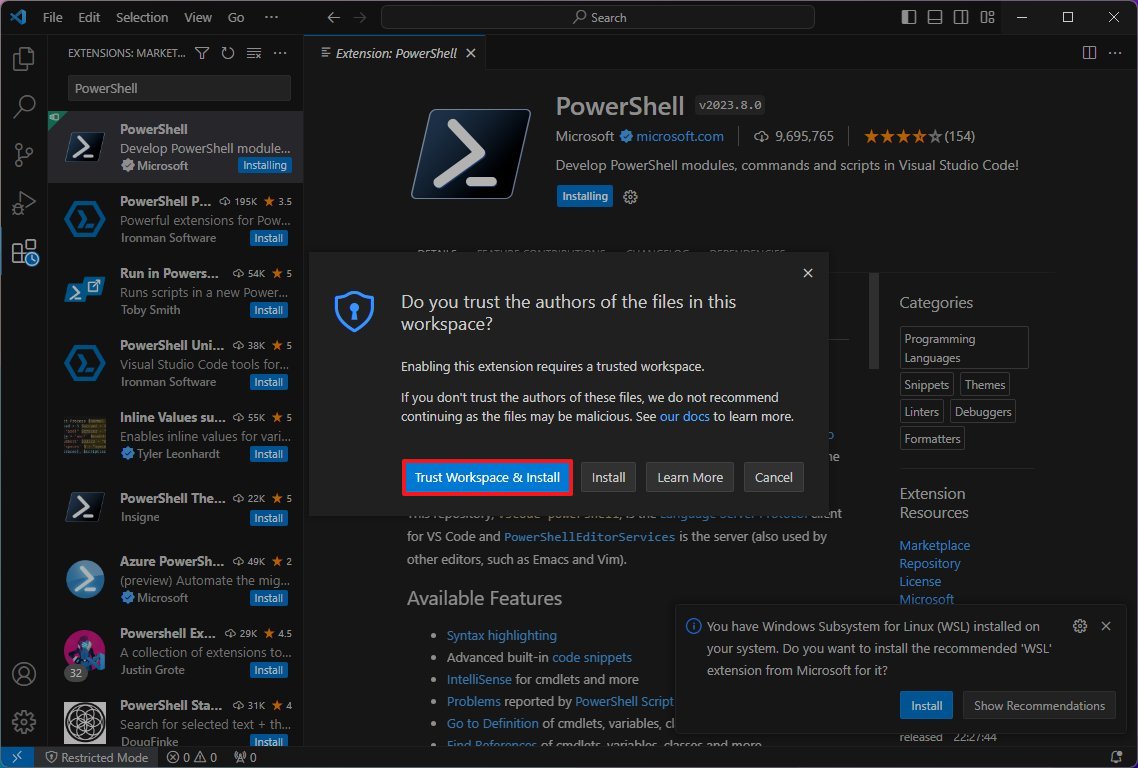
After you complete the steps, you can start writing PowerShell scripts from Visual Studio Code.
Create PowerShell script with Visual Studio Code
To create a script with Visual Basic Code on Windows 11 (or 10), use these steps:
- Open VS Code.
- Click the File menu and select the «New Text File» option.
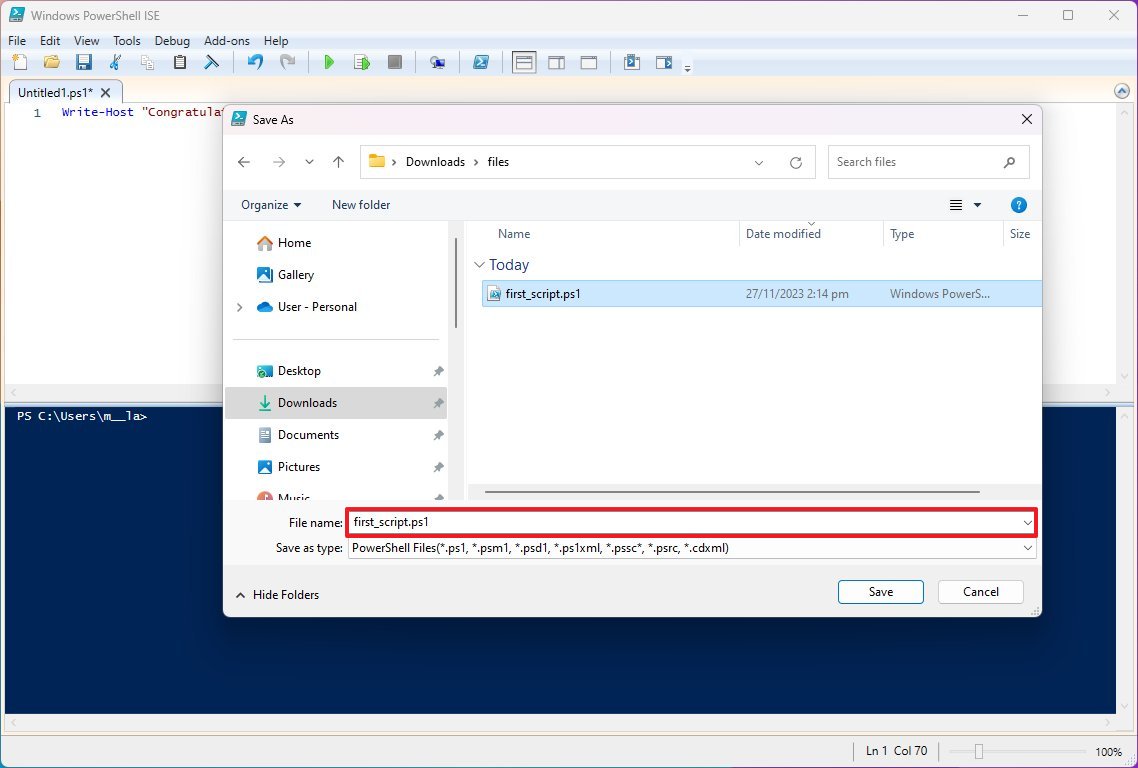
- Click the File menu and select the Save As option.
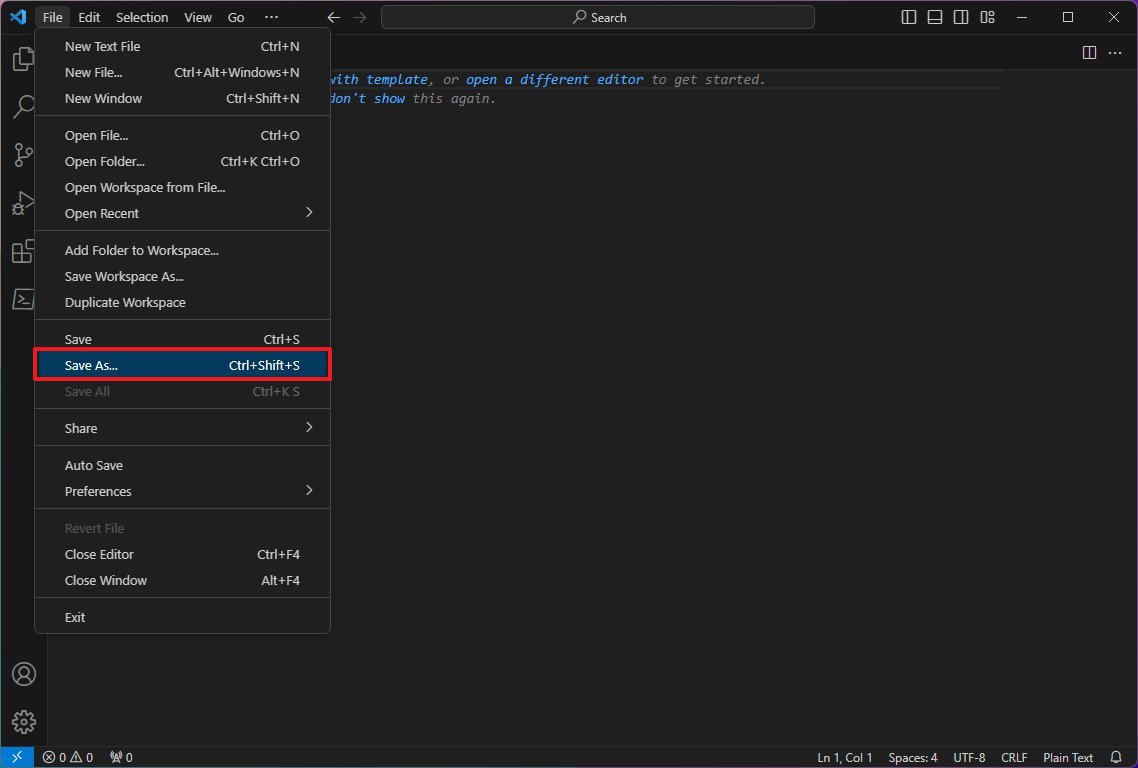
- In the «File name» field, specify a name for the file with the «.ps1» extension — for example, first_script.ps1.
- Click the Save button.
- Write a new or paste the script you want to run — for example, Write-Host «Congratulations! Your first script executed successfully»
- Quick note: The above script will output on the screen that says: «Congratulations! Your first script executed successfully.»
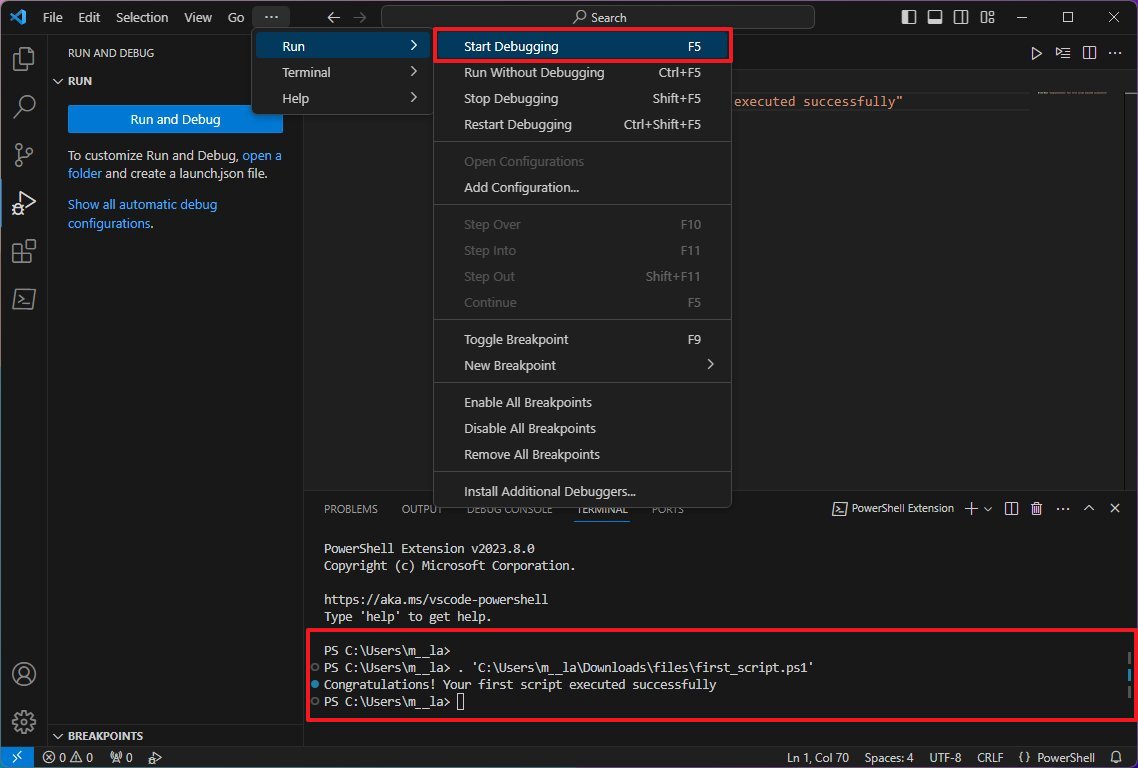
- (Optional) Open the Run menu, select the Start Debugging option from the command bar, or press the F5 key) to run the script.
- Click the File menu.
- Click the Save option.
Create PowerShell script with Notepad
To create a PowerShell script with the Notepad app, use these steps:
- Open Start.
- Search for Notepad, and click the top result to open the app.
- Write a new or paste your script in the text file — for example, Write-Host «Congratulations! Your first script executed successfully»
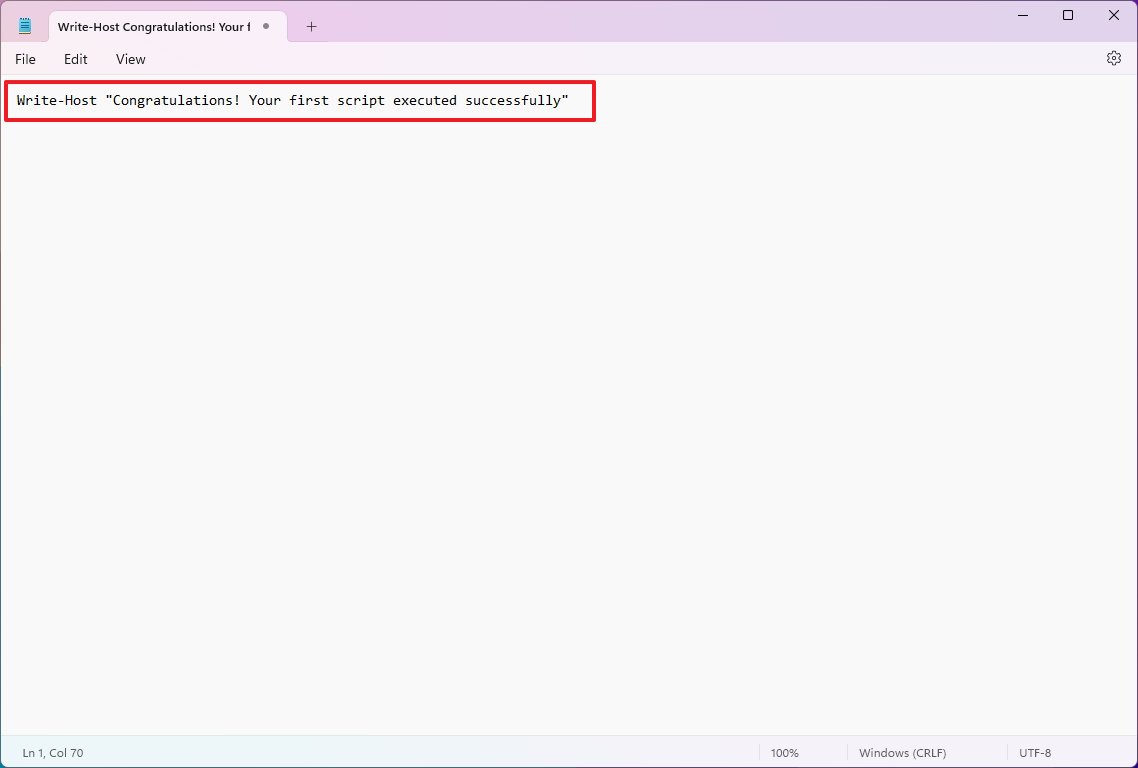
- Quick note: Although the Notepad app looks a little different on Windows 11, the instructions will also apply.
- Click the File menu.
- Select the Save As option.
- Confirm a descriptive name for the script — for example, first_script.ps1.

- Click the Save button.
Create PowerShell script with Integrated Scripting Environment
You can also use the built-in PowerShell ISE app to code your scripts on Windows.
The Integrated Scripting Environment (ISE) is a complex tool, but you can get started using these easy steps:
- Open Start.
- Search for Windows PowerShell ISE, right-click the top result, and select the Run as administrator option.
- Click the File menu.
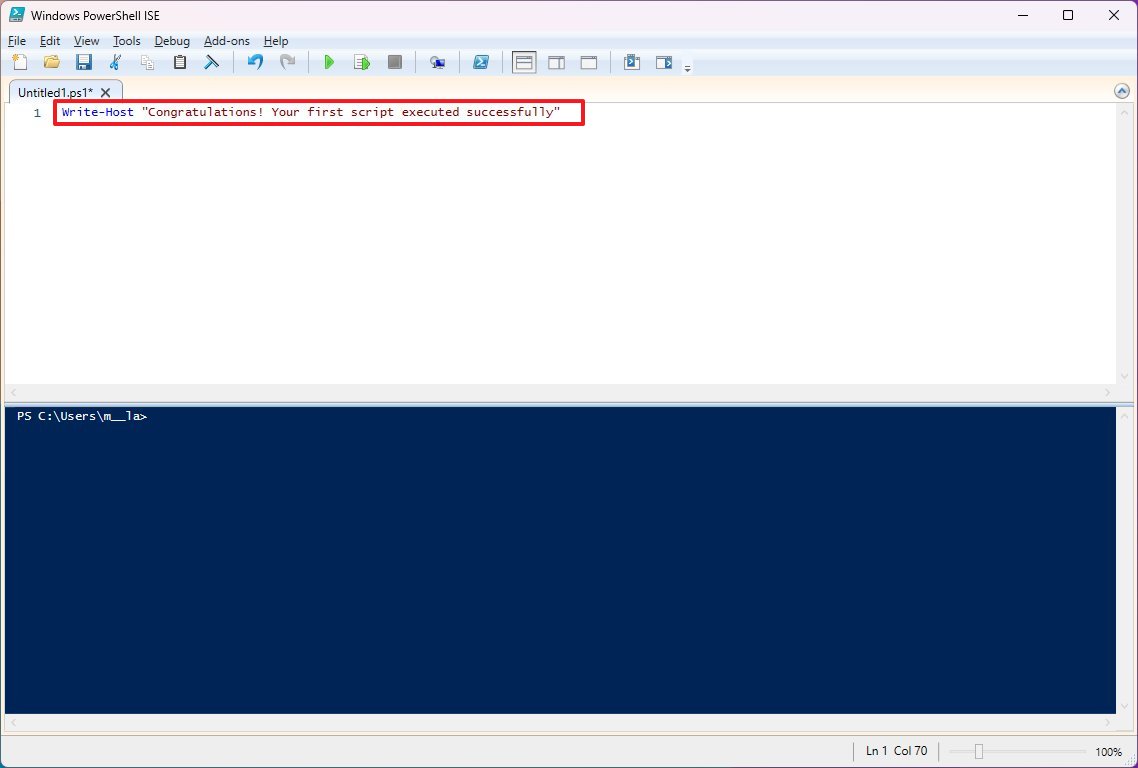
- Select the New option to create a new empty «.ps1» file.
- Write a new script or paste the script you want to run — for example, Write-Host «Congratulations! Your first script executed successfully»
- Click the File menu.
- Click the Save option.
- Type a name for the script — for example, first_script.ps1.
- Select the folder to save the script file.
- Click the Save button.
- (Optional) Click the Run button on the top-right side (or press the F5 key) to run the script.
Once you complete the steps using Notepad, Visual Studio Code, or PowerShell ISE, the script will be ready to run, but it will fail due to the default system settings. The reason is that the default PowerShell settings are configured to block the execution of any script. (The only exception is if you run the script’s contents within Visual Studio Code or PowerShell ISE.)
How to run PowerShell script file on Windows 11 and 10
Whether you use Windows 11 or 10 on your computer, you must change the execution policy to run a script with PowerShell.
To change the execution policy to run PowerShell scripts on Windows 11 (or 10), use these steps:
- Open Start.
- Search for PowerShell, right-click the top result, and select the Run as administrator option.
- Type the following command to allow scripts to run and press Enter: Set-ExecutionPolicy RemoteSigned
- Type «A» and press Enter (if applicable).
- Type the following command to run the script and press Enter: & «C:\PATH\TO\SCRIPT\first_script.ps1»
In the above command, change «PATH\TO\SCRIPT» to the location of your script. For example, this command runs a script stored in the «Downloads» folder: & «C:\Users\username\Downloads\first_script.ps1»
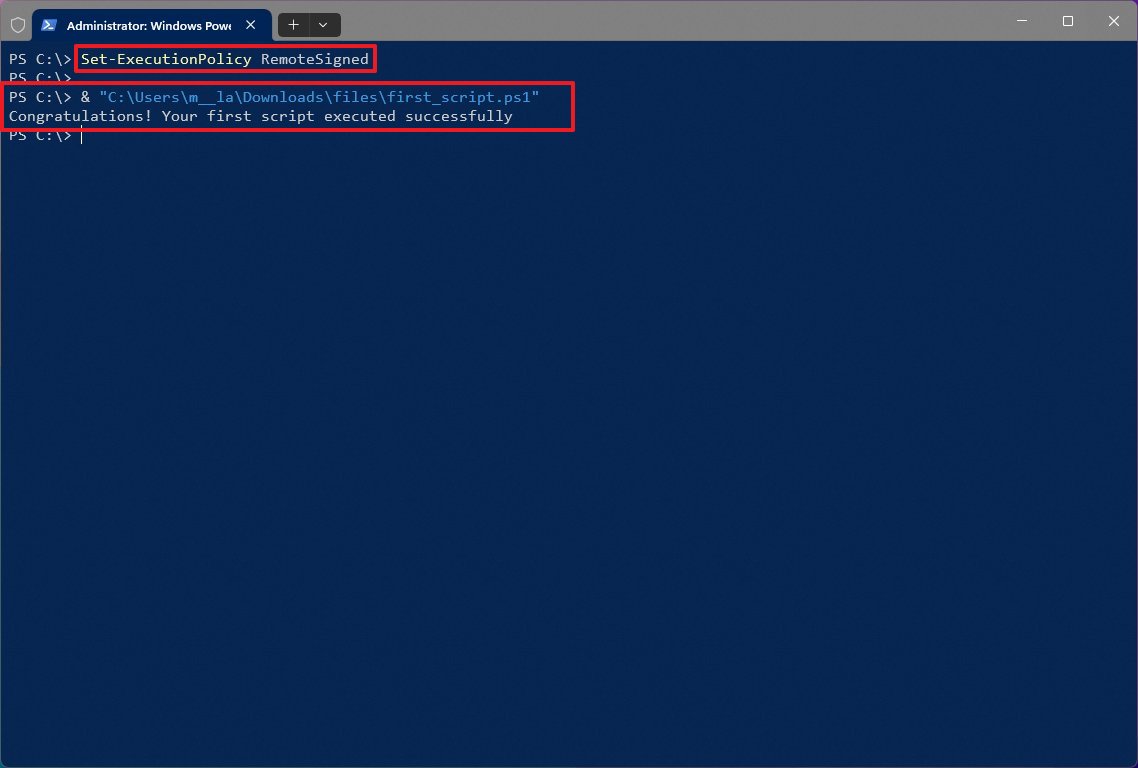
After you complete the steps, the script will run, and if it was written correctly, you should see its output on the screen without issues.
PowerShell includes four execution policies that apply to the operating system:
- Restricted — Prevents any script from running.
- RemoteSigned — Allows scripts created on the computer, but scripts created on another device won’t run unless they include a trusted publisher’s signature.
- AllSigned — All the scripts will run, but only if a trusted publisher has signed them.
- Unrestricted — Runs any script without any restrictions.
It’s recommended to allow local scripts to run a script only from a trusted source. If you don’t plan to run scripts regularly, it’s best to restore the default settings to block untrusted scripts using the same instructions outlined above, but in step 4, use the «Set-ExecutionPolicy Restricted» command.
More resources
For more helpful articles, coverage, and answers to common questions about Windows 10 and Windows 11, visit the following resources:
- Windows 11 on Windows Central — All you need to know
- Windows 10 on Windows Central — All you need to know
Mauro Huculak has been a Windows How-To Expert contributor for WindowsCentral.com for nearly a decade and has over 15 years of experience writing comprehensive guides. He also has an IT background and has achieved different professional certifications from Microsoft, Cisco, VMware, and CompTIA. He has been recognized as a Microsoft MVP for many years.
Last Updated :
29 Sep, 2022
In Windows, the batch file is a file that stores commands in a serial order. The command line interpreter takes the file as an input and executes in the same order. A batch file is simply a text file saved with the .bat file extension. It can be written using Notepad or any other text editor. A simple batch file will be:
// When echo is turned off, the command prompt doesn't appear in the Command Prompt window.
ECHO OFF

// The following command writes GeeksforGeeks to the console.
ECHO GeeksforGeeks

// The following command suspends the processing of a batch program and displays the prompt.
PAUSE
After saving it with a .bat extension. Double click it to run the file. It prints shows:
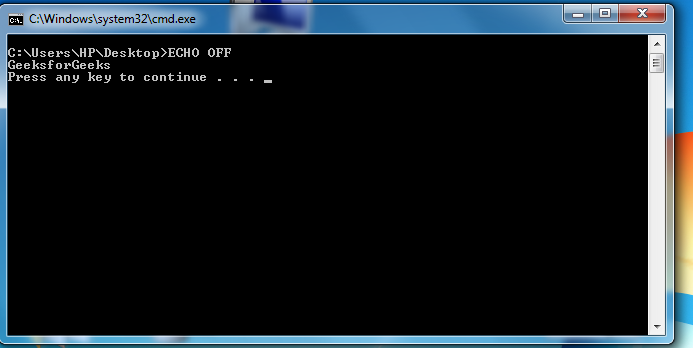
In the above script, ECHO off cleans up the console by hiding the commands from being printed at the prompt, ECHO prints the text “GeeksforGeeks” to the screen, and then waits for the user to press a key so the program can be ceased. Some basic commands of batch file:
- ECHO – Prints out the input string. It can be ON or OFF, for ECHO to turn the echoing feature on or off. If ECHO is ON, the command prompt will display the command it is executing.
- CLS – Clears the command prompt screen.
- TITLE – Changes the title text displayed on top of prompt window.
- EXIT – To exit the Command Prompt.
- PAUSE – Used to stop the execution of a Windows batch file.
- :: – Add a comment in the batch file.
- COPY – Copy a file or files.
Types of “batch” files in Windows:
- INI (*.ini) – Initialization file. These set the default variables in the system and programs.
- CFG (*.cfg) – These are the configuration files.
- SYS (*.sys) – System files, can sometimes be edited, mostly compiled machine code in new versions.
- COM (*.com) – Command files. These are the executable files for all the DOS commands. In early versions there was a separate file for each command. Now, most are inside COMMAND.COM.
- CMD (*.cmd) – These were the batch files used in NT operating systems.
Lets take another example, Suppose we need to list down all the files/directory names inside a particular directory and save it to a text file, so batch script for it will be,
@ECHO OFF

// A comment line can be added to the batch file with the REM command.
REM This is a comment line.

REM Listing all the files in the directory Program files
DIR"C:\Program Files" > C:\geeks_list.txt

ECHO "Done!"
Now when we run this batch script, it will create a file name geeks_list.txt in your C:\ directory, displaying all the files/folder names in C:\Program Files. Another useful batch script that can be written to diagnose your network and check performance of it:
// This batch file checks for network connection problems.
ECHO OFF

// View network connection details
IPCONFIG /all

// Check if geeksforgeeks.com is reachable
PING geeksforgeeks.com

// Run a traceroute to check the route to geeksforgeeks.com
TRACERT geeksforgeeks.com

PAUSE
This script displays:
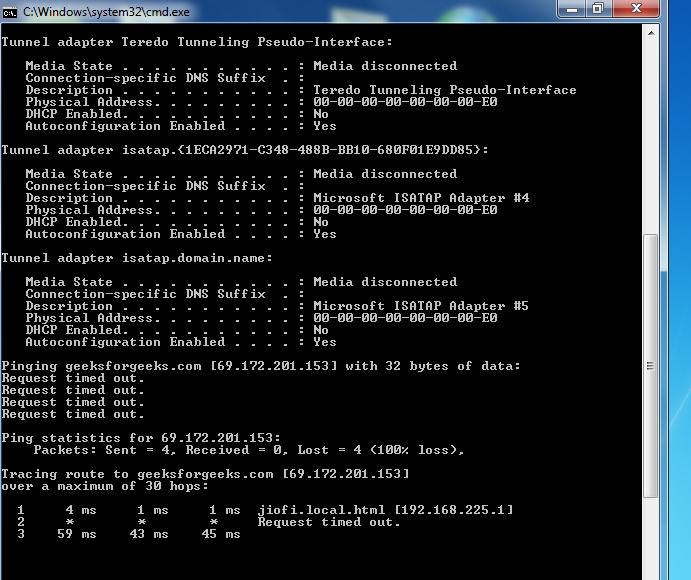
This script gives information about the current network and some network packet information. ipconfig /all helps to view the network information and ‘ping’ & ‘tracert’ to get each packet info. Learn about ping and traceroute here.
Навигация по странице
- Как сделать и запустить скрипт PowerShell?
- Как запустить скрипт в PowerShell?
- Как разрешить выполнение неподписанного скрипта PowerShell?
- Как запустить скрипт PowerShell в фоновом режиме?
- Как запустить скрипт через PowerShell с параметрами?
- Как запустить скрипт PowerShell с помощью ярлыка?
- Полезные сценарии для Windows
- Что такое командные скрипты Windows?
- Что такое Bat-скрипты Windows?
- Что такое исполняемые скрипты Windows?
- Какое расширение имеют файлы скриптов PowerShell?
- Какие скрипты PowerShell используются администраторами?
Выполнение скриптов в PowerShell
PowerShell представляет собой новую командную оболочку для операционной системы Windows, созданную Microsoft с целью полного замещения и улучшения cmd. Эта оболочка уже включена в состав операционных систем Windows 7 и выше. Если у вас старая версия операционной системы или вы хотите загрузить более новую версию PowerShell. Windows — операционная система, пользующаяся огромной популярностью среди миллионов пользователей по всему миру. В ее арсенале множество функций и возможностей, однако некоторые из них остаются недостаточно известными обычным пользователям. В данной статье мы расскажем о нескольких полезных сценариях, способных сделать вашу работу с Windows более эффективной и удобной.
Политика исполнения PowerShell-скриптов представляет собой механизм безопасности, управляющий условиями загрузки конфигурационных файлов и запуска сценариев в данной среде. Её основное предназначение — предотвращение выполнения потенциально вредоносных сценариев.

Как сделать и запустить скрипт PowerShell
Создать скрипт PowerShell довольно просто. Вот шаги, которые вы можете выполнить, чтобы создать свой первый скрипт:
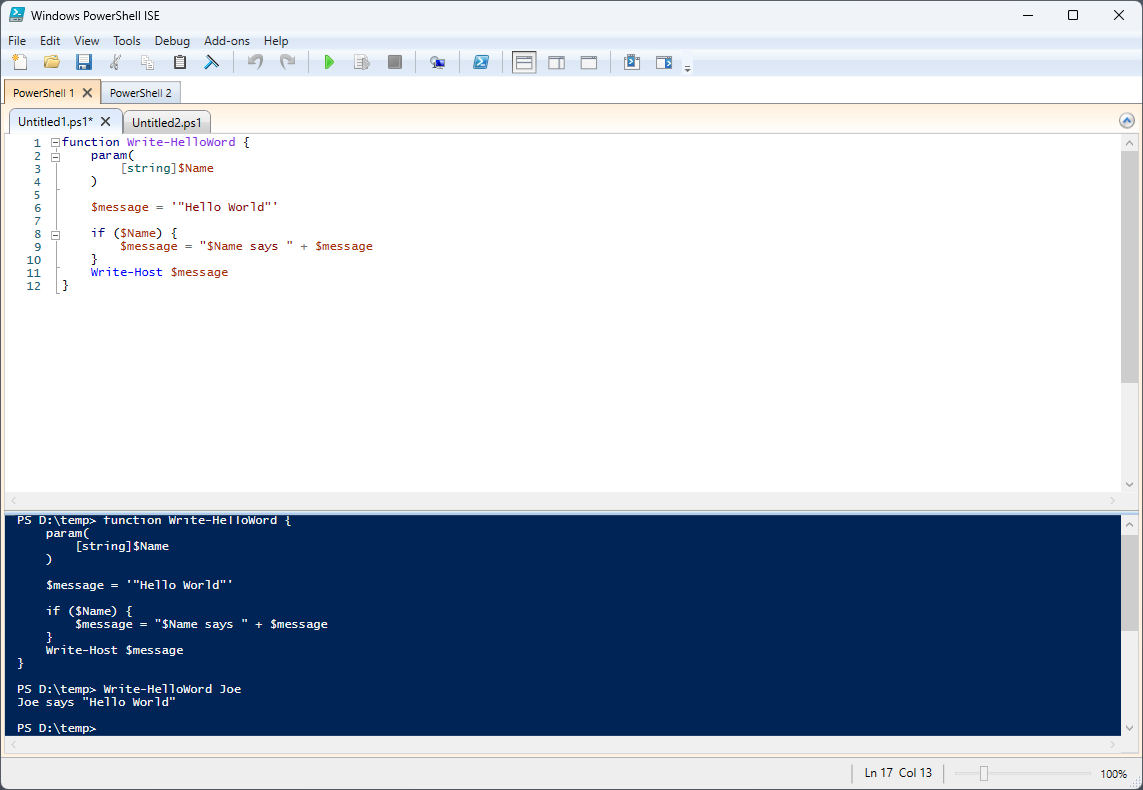
1. Откройте редактор PowerShell ISE:
PowerShell ISE (Integrated Scripting Environment) предоставляет удобную среду для написания и отладки скриптов. Вы можете его найти в меню «Пуск» (Start) под разделом «Стандартные» (Standard) или выполнить команду `PowerShell_ise` в командной строке.
2. Напишите свой скрипт:
В окне редактора PowerShell ISE напишите свой скрипт. Ниже приведен пример простого скрипта, который выводит «Hello, World!» в консоль:
Write-Host «Hello, World!»
3. Сохраните скрипт:
- Нажмите `Ctrl + S` или выберите «Файл» (File) -> «Сохранить» (Save).
- Укажите имя файла и добавьте расширение `.ps1` (например, `MyScript.ps1`).
4. Запустите скрипт:
- Выберите весь текст скрипта.
- Нажмите `F5` или выберите «Запустить сценарий» (Run Script) в PowerShell ISE.
Примеры более сложных скриптов:
#Скрипт, создающий новую папку:
$folderPath = «C:\Path\To\NewFolder»
New-Item -ItemType Directory -Path $folderPath
#Скрипт, удаляющий все файлы старше 7 дней в папке:
$folderPath = «C:\Path\To\Folder»
$limitDate = (Get-Date).AddDays(-7)
Get-ChildItem $folderPath | Where-Object { $_.LastWriteTime -lt $limitDate } | Remove-Item
#Скрипт, проверяющий статус службы:
$serviceName = «wuauserv»
$serviceStatus = Get-Service -Name $serviceName | Select-Object Status
Write-Host «The status of service $serviceName is: $($serviceStatus.Status)»
Ваши скрипты могут включать более сложные команды, использовать условия, циклы и вызывать функции. Как только вы освоите основы, вы сможете создавать более мощные и гибкие скрипты PowerShell.

Скрипты для Windows — не просто строки кода, а волшебные ключи, открывающие дверь в мир автоматизации. В руках умелого пользователя они становятся инструментом, способным не только сэкономить время, но и превратить рутинные задачи в захватывающее путешествие по потокам байтов и командам.
Как запустить скрипт в PowerShell?
Существует несколько способов запуска скрипта, вот основные из них:
- Запустить оболочку PowerShell и выполнить в ней скрипт, указав путь к файлу и его имя (например, C:\Scripts\test.ps1) или перейдя в каталог скрипта командой cd C:\Scripts и выполнить его с помощью команды .\test.ps1.
- Оболочку можно найти и запустить разными способами. Один из них — через меню «Пуск». Для Windows 7 пройдите по следующему пути: «Все программы» — «Стандартные» — «Windows PowerShell» и запустите оболочку «Windows PowerShell». Для Windows 10 найдите группу по букве «W» и в ней выберите «Windows PowerShell».
- Запустить «Интегрированную среду сценариев Windows PowerShell ISE», которая представляет собой среду разработки, позволяющую редактировать и отлаживать скрипты PowerShell. Откройте программу, выберите «Открыть» или в меню Файл выберите «Открыть» и укажите нужный скрипт, затем нажмите F5 или кнопку «Выполнить скрипт». Поиск Windows PowerShell ISE можно осуществить так же, как и оболочки PowerShell, через меню «Пуск».
- Запустить стандартный командный интерфейс и ввести следующую команду:
PowerShell -file <имя_скрипта> (например: PowerShell -file myscript.ps1)
Если вы ранее не запускали скрипты PowerShell, возможно, вы получите сообщение о том, что файл <имя_скрипта> не может быть загружен, так как выполнение скриптов запрещено для данной системы. В этом случае введите «get-help about_signing» для получения дополнительной информации. Это связано с безопасностью и предотвращением случайного выполнения вредоносного кода, поэтому все скрипты должны быть подписаны цифровой подписью.
Как разрешить выполнение неподписанного скрипта PowerShell?
- В оболочке PowerShell перед запуском скрипта выполните следующую команду для разрешения выполнения неподписанных скриптов в текущем сеансе оболочки:
Set-ExecutionPolicy RemoteSigned -Scope Process
- При запуске из стандартного командного интерфейса используйте параметр -executionpolicy, например:
PowerShell -executionpolicy RemoteSigned -file <имя_скрипта>
Оба способа устанавливают политику только для текущего сеанса, при этом политика безопасности выполнения скриптов PowerShell, установленная в реестре, остается неизменной. Если вы хотите изменить политику безопасности выполнения скриптов «навсегда», используйте следующий способ:
- Разрешить выполнение навсегда: запустите оболочку PowerShell от имени «Администратора» и выполните команду:
Set-ExecutionPolicy RemoteSigned
Однако рекомендуется избегать этого способа, чтобы не подвергать ваш компьютер возможным угрозам, поскольку это разрешает выполнение всех скриптов всегда.
Примечание: Если скрипт был загружен из интернета, чтобы избежать запроса на подтверждение выполнения, используйте параметр Bypass вместо RemoteSigned — это полное отключение любых запросов и предупреждений.

Как запустить скрипт PowerShell в фоновом режиме?
Для этого используйте параметр -WindowStyle, который может принимать значения: Normal, Minimized, Maximized и Hidden. Чтобы запустить неподписанный скрипт в фоновом режиме, выполните команду:
PowerShell -executionpolicy RemoteSigned -WindowStyle Hidden -file <имя_скрипта>
Также при желании вы можете добавить -NonInteractive, чтобы скрипт не задавал никаких вопросов. Таким образом, скрипт выполнится незаметно для пользователя. Однако будьте внимательны, используя этот способ.

Как запустить скрипт через PowerShell с параметрами?
Запуск осуществляется аналогично запуску обычной программы или bat-файла с параметрами. Например, чтобы запустить скрипт с параметрами из командной строки, используйте следующую команду:
PowerShell -executionpolicy RemoteSigned -file <имя_скрипта> param1 param2 «еще один текстовый параметр«
В самом скрипте параметры могут быть получены так:
param ($var1, $var2, $var3)
echo $var1, $var2, $var3
В интегрированной среде PowerShell ISE скрипт с параметрами можно запустить аналогично, используя область команд.

Как запустить скрипт PowerShell с помощью ярлыка?
Это можно сделать двумя способами:
- Создать файл bat/cmd, в котором прописать команду для запуска скрипта (с параметрами, как описано выше).
- Создать ярлык на PowerShell, который находится в папке c:\Windows\System32\WindowsPowerShell\v<версия>\. В свойствах ярлыка в поле «Объект» добавьте необходимые параметры.
Таким образом, например, чтобы запустить скрипт PowerShell при входе пользователя, просто создайте ярлык, как описано во втором пункте, и поместите его в автозагрузку. Также создание ярлыка с использованием одного из вышеописанных методов позволяет легко запускать скрипт от имени администратора или от имени любого другого пользователя, как обычную программу.
Скриптовый язык PowerShell — мощный инструмент для решения различных задач. Однако следует использовать его с осторожностью, поскольку он может быть использован не только для полезных, но и для вредоносных целей. Будьте внимательны при работе с ним.
Полезные сценарии для Windows
1. Скрипт выключения Windows (или перезагрузки):
Простейшая операция выключения компьютера. Откройте блокнот и введите:
shutdown -s -t 0
Сохраните файл с расширением *.cmd* (например, *shutdown.cmd*). При запуске этого файла компьютер выключится. Замените «-s» на «-r» для перезагрузки. Параметр «-t» устанавливает таймер; в данном случае, он равен 0 секунд, но можно установить, например, на 60 для выключения через 60 секунд.
2. Удаление ненужных приложений:
С помощью следующего скрипта можно удалить предустановленные приложения:
get-appxpackage -name *APPNAME* | remove-appxpackage
Замените *APPNAME* на название ненужного приложения. Хотя удаление можно выполнить стандартным способом или через программы, этот скрипт делает процесс более удобным.
3. Управление процессами:
Воспользуйтесь PowerShell для борьбы с медленными процессами. Выведите все службы:
Get-Service
Или получите информацию о конкретной службе с кодовым именем *NAME*:
Get-Service *NAME*
Создайте файл, который закрывает процессы с повышенным потреблением ресурсов:
Stop-Service -Name *ANTIVIRUS*
Stop-Service -Name *BROWSER*
Замените *ANTIVIRUS* и *BROWSER* на соответствующие названия.
4. Переименование группы файлов:
Решите проблему однотипных файлов с помощью скрипта группового переименования:
$path = «$comp\desktop\journey\russia»
$filter = ‘*.jpg’
get-childitem -path $path -filter $filter | rename-item -newname {$_.name -replace ‘HGNMD’,’RUSSIA’}
Укажите путь, расширение и выполните замены в строке.
5. Поиск файлов:
Используйте PowerShell для поиска файлов в директории:
Get-Childitem C:\Windows\*.log
Для более сложного поиска в подпапках:
Get-ChildItem C:\Windows\* -Include *.log -Recurse -Force
6. Справка:
Пользуйтесь командой *Get-Help* для получения информации:
Get-Help Services
Для более подробной справки по конкретной команде:
Get-Help —Name *CMDLET*
7. Получение информации о системе:
Используйте PowerShell для получения данных о системе, например, уровне заряда аккумулятора:
Add-Type -AssemblyName System.Windows.Forms
[Windows.Forms.PowerStatus].GetConstructor(‘NonPublic, Instance’, $null, [Type[]]@(), $null ).Invoke($null)
Информация об архитектуре процессора удаленного компьютера:
[PSObject].Assembly.GetType(‘System.Management.Automation.PsUtils’).GetMethod(‘GetProcessorArchitecture’, [Reflection.BindingFlags]40).Invoke($null, @())
Проверка прав администратора текущего пользователя:
[PSObject].Assembly.GetType(‘System.Management.Automation.Utils’).GetMethod(‘IsAdministrator’, [Reflection.BindingFlags]40).Invoke($null, @())
Эти простые и полезные сценарии помогут вам эффективнее управлять вашей системой Windows.
Командные скрипты Windows
Это общий термин, который включает в себя различные типы скриптов и командных файлов, используемых в операционной системе Windows для автоматизации задач. Включают в себя как скрипты на языке командной строки (например, скрипты CMD), так и на более современных языках, таких как PowerShell. Например, Bat-скрипты (*.bat), PowerShell-скрипты (*.ps1), а также другие сценарии, созданные для автоматизации определенных задач.
Bat-скрипты Windows
Bat-скрипты, или файлы пакетных команд (Batch-файлы), представляют собой текстовые файлы, содержащие команды и инструкции для выполнения в командной строке Windows. Основаны на языке пакетных команд (Batch scripting language). Расширение файла: *.bat* (например, *myscript.bat*).
Пример простого bat-скрипта:
«`batch
@echo off
echo Hello, World!
pause
Выполняемые скрипты Windows
Это скрипты, которые могут быть выполнены в среде операционной системы Windows и обычно предназначены для автоматизации различных задач. Включают в себя bat-скрипты (командные файлы), PowerShell-скрипты, а также другие типы скриптов, которые можно выполнять в Windows. Общее отличие между bat-скриптами и PowerShell-скриптами заключается в языке программирования, используемом для написания команд и инструкций. Bat-скрипты используют язык пакетных команд, который является устаревшим и имеет ограниченные возможности по сравнению с PowerShell, который представляет более современный и мощный язык с разнообразными функциональными возможностями для автоматизации задач в Windows.
Какое расширение имеют файлы скриптов PowerShell
PowerShell-скрипты имеют расширение *.ps1*, и для их выполнения часто требуется предварительная настройка политики выполнения скриптов (Execution Policy), чтобы разрешить запуск скрипта через PowerShell в системе.
Скрипты PowerShell для администратора
PowerShell — мощный инструмент для сисадминов Windows, предоставляя широкий набор команд и сценариев для автоматизации и управления системой. Ниже приведены несколько примеров PowerShell-скриптов, которые могут быть полезны администраторам:
1. Создание резервной копии файлов:
$sourcePath = «C:\Path\To\Source»
$destinationPath = «D:\Backup»
$timestamp = Get-Date -Format «yyyyMMddHHmmss»
$backupFolder = «$destinationPath\Backup_$timestamp»
Copy-Item -Path $sourcePath -Destination $backupFolder -Recurse
2. Мониторинг дискового пространства:
$threshold = 80
$disks = Get-WmiObject Win32_LogicalDisk | Where-Object { $_.DriveType -eq 3 }
foreach ($disk in $disks) {
$freeSpacePercentage = [math]::Round(($disk.FreeSpace / $disk.Size) * 100, 2)
$diskLetter = $disk.DeviceID
if ($freeSpacePercentage -lt $threshold) {
Write-Host «Warning: Disk $diskLetter is running low on free space ($freeSpacePercentage%)»
# Можно добавить уведомление администратора
}
}
3. Создание нового пользователя:
$username = «NewUser»
$password = ConvertTo-SecureString «SecurePassword123» -AsPlainText -Force
$fullname = «New User»
$description = «Description of the new user»
$ou = «OU=Users,DC=Domain,DC=com»
New-ADUser -SamAccountName $username -UserPrincipalName «$username@domain.com» -Name $fullname -GivenName $fullname -Surname $username -Description $description -AccountPassword $password -Enabled $true -PassThru -Path $ou
4. Мониторинг событий в журнале событий:
$logName = «System»
$events = Get-WinEvent -LogName $logName -MaxEvents 10
foreach ($event in $events) {
Write-Host «Event ID $($event.Id): $($event.Message)»
}
5. Обновление всех установленных модулей PowerShell:
Get-Module -ListAvailable | ForEach-Object {
Update-Module -Name $_.Name -Force
}
6. Удаление временных файлов в системной директории:
$tempPath = [System.IO.Path]::GetTempPath()
Remove-Item «$tempPath\*» -Force
7. Создание отчета о состоянии служб:
$services = Get-Service | Select-Object DisplayName, Status, StartType
$services | Export-Csv -Path «C:\Path\To\ServiceReport.csv» -NoTypeInformation
8. Настройка правил брандмауэра:
New-NetFirewallRule -DisplayName «Allow-SSH» -Direction Inbound -Protocol TCP -LocalPort 22 -Action Allow
9. Удаление неиспользуемых профилей пользователей:
$inactiveDays = 90
$userProfiles = Get-WmiObject Win32_UserProfile | Where-Object { $_.Special -eq $false }
foreach ($profile in $userProfiles) {
$lastUseDate = $profile.LastUseTime
$difference = (Get-Date) — $lastUseDate
if ($difference.Days -ge $inactiveDays) {
Remove-WmiObject -InputObject $profile -Confirm:$false
Write-Host «User profile $($profile.LocalPath) deleted.»
}
}
Эти примеры предоставляют общее представление о том, как PowerShell может использоваться администраторами для автоматизации различных задач в Windows-среде. Помните, что некоторые команды могут потребовать выполнения от имени администратора.
Для вызова скриптов PowerShell, вы можете использовать команду `Invoke-Expression` или просто указать путь к файлу скрипта. Предположим, у вас есть следующие скрипты: `ClearDisk.ps1`, `InstallPrograms.ps1`, `BackupScript.ps1`, и `UpdateSystem.ps1`.
1. Скрипт очистки диска (ClearDisk.ps1):
# ClearDisk.ps1
# Ваш код для очистки диска
# Пример: удаление временных файлов
Remove-Item -Path «$env:TEMP\*» -Recurse -Force
Как вызвать:
# Используйте Invoke-Expression
Invoke-Expression -Command «.\ClearDisk.ps1»
# Или просто указывайте путь к файлу скрипта
.\ClearDisk.ps1
2. Скрипт автоматической установки программ (InstallPrograms.ps1):
# InstallPrograms.ps1
# Ваш код для автоматической установки программ
# Пример: установка программы Chocolatey и установка пакетов
Set-ExecutionPolicy Bypass -Scope Process -Force; iex ((New-Object System.Net.WebClient).DownloadString(‘https://chocolatey.org/install.ps1’))
choco install packageName -y
Как вызвать:
# Используйте Invoke-Expression
Invoke-Expression -Command «.\InstallPrograms.ps1»
# Или просто указывайте путь к файлу скрипта
.\InstallPrograms.ps1
3. Скрипт резервного копирования (BackupScript.ps1):
# BackupScript.ps1
# Ваш код для создания резервной копии
# Пример: копирование файлов в другую директорию
$sourcePath = «C:\Path\To\Source»
$destinationPath = «D:\Backup»
Copy-Item -Path $sourcePath -Destination $destinationPath -Recurse
Как вызвать:
# Используйте Invoke-Expression
Invoke-Expression -Command «.\BackupScript.ps1»
# Или просто указывайте путь к файлу скрипта
.\BackupScript.ps1
4. Скрипт автоматического обновления системы (UpdateSystem.ps1):
# UpdateSystem.ps1
# Ваш код для автоматического обновления системы
# Пример: обновление всех установленных модулей PowerShell
Get-Module -ListAvailable | ForEach-Object {
Update-Module -Name $_.Name -Force
}
Как вызвать:
# Используйте Invoke-Expression
Invoke-Expression -Command «.\UpdateSystem.ps1»
# Или просто указывайте путь к файлу скрипта
.\UpdateSystem.ps1
Убедитесь, что вы находитесь в той же директории, что и ваши скрипты, или укажите полный путь к файлу скрипта.
В этой статье мы коснулись всех аспектов создания, запуска и использования скриптов в Windows. Надеемся, что эти советы и примеры помогут вам освоить этот увлекательный мир автоматизации и сделают вашу работу более эффективной и приятной.
Are you interested in working with shell scripts on Windows? Thanks to a recent addition by Microsoft, you can now use Windows Subsystem for Linux to make this happen.
Once you enable shell scripts in Windows 10, you can start creating shell scripts of your own. Shell scripts are great for automating simple tasks. You can also work on open-source Linux-based projects if that’s an area of interest to you. Finally, you’ll learn how to execute shell scripts on Windows 10. Continue reading to learn more.
What is Linux?
Linux is an open-source operating system that is highly popular among computer enthusiasts. Linux competes with other computer operating systems like Microsoft’s Windows, Apple’s macOS, and mobile operating systems like Android and iOS.
The Linux operating system was originally developed by Linus Torvalds back in 1991. The Linux kernel was designed as a Unix-like operating system. Unix was an early operating system created by Bell Labs in 1969. Today, modern Linux distributions are still Unix-like, meaning they retain the basic structure and properties that Unix had. An example of a non-Unix operating system would be Microsoft Windows.
The top Linux distributions have changed over the years, but as of 2022, Ubuntu, Debian, CentOS, Fedora, and Red Hat rank as the top 5 most popular options.
What is Bash?
When Linus Torvalds created Linux, he included a Unix shell called Bash. Bash had been created just two years before, in 1989 by Brian Fox. Bash has been the longtime default for Linux and was also the default for Apple macOS until it was replaced by Z shell in 2019.
Until 2016, Windows users could not use the Linux kernel or Bash at all. Windows first introduced the Windows Subsystem for Linux (WSL) beta with Windows 10 version 1607 update. About a year later, in October 2017, WSL was fully released in Windows 10 version 1709. Microsoft developed WSL for hobbyists and developers who want to work on open-source Linux-based projects.
It’s important to note that WSL is not preinstalled on Windows 10. If you would like access to create and run shell scripts on Windows 10, you will need to manually install WSL or join the Windows insider program.
What is a shell script?
A Shell script is a type of script that cannot be run without a Unix shell. Further, a shell script is a series of commands that are executed line by line by the command line.
You can use shell scripts to automate processes and avoid repetitive tasks. Instead of manually completing each step in a series, you can execute a script, and the command line will handle the rest.
For example, if you find yourself regularly stopping processes that are hogging your CPU, you can automate this process with a script. When you execute the script, it may be designed to find a set of processes using CPU resources and request to kill them.
Enabling shell scripts in Windows 10
- Click on the Start (Windows) button and enter “Control Panel” into the search bar. Click Open on the Control Panel result on the right-hand side.

- Within the Control Panel window, find and click on Programs.

- Now, from the Programs window, find Click Turn Windows features on or off underneath the Programs and Features header.

- In the Windows Features window, scroll to the very bottom of the window. Check the Windows Subsystem for Linux option. Then click OK.

- Windows will automatically install the necessary files. When the installation is complete, select Restart Now.

- When your computer restarts, you need to install Ubuntu from the Microsoft store.

- After installation, make sure you open Ubuntu and see it up. You are now ready to use scripts on your Windows 10 machine.
If you encounter any issues with Ubuntu or bash commands not working correctly, you may want to check that Virtualization is turned on in your BIOS. The most updated WSL version, WSL 2, runs the Linux kernel using virtualization technology. This means a virtual machine needs to be able to run on your system.
Now that Windows Subsystem for Linux and Ubuntu has been installed, you are ready to start creating shell scripts in Windows 10. You may be tempted to write bash scripts with Notepad, but this is not recommended. Because Notepad is designed for Windows/DOS systems, the line endings will differ from those that are found at the end of Unix/Linux line endings.
Text editors for shell scripts
You should use software that is designed to convert to Unix/OSX end-of-line characters. The best open-source software available for this is Notepad++. Amazingly, Notepad++ is lovingly maintained and developed by a single individual, Don Ho.
If you try Notepad++ and don’t like it, you can try another fan favorite, nano. Nano is a text editor for Unix/Linux systems. You can easily create shell scripts that will run in bash, using nano. Download nano to get started.
Example shell scripts
Let’s look at some basic shell scripts, so you can learn more about what you are going to be coding and see how some formatting and syntax work.
1. Hello World!
echo "Hello World!"This script will print out the infamous Hello World! Notice that echo can be used as a print command when not combined with any other modifiers. It will print the string on a new line. If you add the -n modifier, the output will print on the same line.
2. Sum two numbers
If you want to do some basic arithmetic, you might have a script that looks like:
# Add two numbers together
((sum=25+35))

# Print the sum of the numbers
echo $sum
Note that the # symbol is used to make comments that are not expressed. The output of this script will print the sum of 25+35, which is 60.
3. Take user input
The following script will ask for the user’s name and then use the read command to take the user’s input. Then the user’s name is passed into the following expression, ultimately welcoming you to Windows Subsystem for Linux.
echo "What is your name?"
read name
echo "Welcome $name to Windows Subsystem for Linux."
Write basic shell scripts in Windows 10
Continue reading to learn how to write basic shell scripts in Windows 10 using Notepad++.
- Click the Start button and search for “Notepad++” and click Run as administrator on the right-hand side.

- Now you can create your script.

- Once your script is complete, you need to use the EOL Conversion option available in Notepad++. Click Edit and locate EOL Conversion from the dropdown menu. Hover over this option and then select UNIX/OSX Format from the next dropdown menu.

- Now select File and then Save As. Make sure to name your file something you will recognize and add .sh to make it a shell script file.

- Once the shell script is saved, continue to the next section to learn how to run your own shell scripts.
How to run shell scripts (.sh files) on Windows 10
You’ve created your first shell scripts, and it’s time to execute the sh file. Remember that when using WSL, you can only use Linux commands and utilities. Windows 10 programs will not work in bash scripts. To execute a script file, follow these step-by-step instructions:
- Click on the Start (Windows) button and enter “Command Prompt” into the search bar. Click Run as administrator on the Command Prompt result on the right-hand side.
- Navigate to the folder where the script file is saved. You move around in the command prompt using the cd command. For example, if you want to access the Documents folder, you would enter the following and press Enter:
cd C:\Users\Username\OneDrive\Documents
Note: Username would be the username that you set up for yourself when you registered your computer.

- Now enter bash file-name.sh, where file-name is the whatever you’ve named your script file.
bash file-name.sh
The script will execute, and if there are any outputs or print statements included in the script, the output will be returned.
Bash scripts running on Windows 10
You’ve made it far and learned a ton of information in one go. Command-line utilities, different operating systems, and learning to write and execute shell scripts can be difficult topics. In fact, these topics will take time to master. You have a ton of learning to do for scripting, but resources are available to help you all over the internet.
Within this guide, you learned the basics of Linux and Bash. You learned what shell scripts are and that you need to specifically enable Windows Subsystem for Linux (WSL) to use them. You learned how to create shell scripts using Notepad++ and how to execute the scripts in bash. Enjoy experimenting!
While the standard Windows command prompt (also known as cmd) is not the most powerful option available, it is still fairly full featured and has most of the scripting constructs you would expect.
To begin simply create a new file and give it a .bat extension. Open it in your favorite text editor and get to scripting.
Writing Output to the Screen
You can use the echo command to write output to the screen.
Note that you do not need to enclose the string Hello World! in single or double quotes. If you enclose the string in quotes they will be included in the terminal output.
One Windows oddity is that it echos each command to the terminal, even when run from within a batch script. In most cases this is not a desired behavior. To remedy the problem be sure to turn off echoing at the beginning of your batch script using the following line:
The at symbol (@) stops the command(s) that follow on the line from being echoed to the terminal.
Batch Script Comments
Comments in a batch script come in two varieties, by using the rem command, or by using double colon characters:
Let’s get started with our first batch script, demo.bat:
Creating and Referencing Variables
Use the set command to store data in variables for later use. Below the value of variable MYVAR is set to the string Hello:
To reference the variable enclose the variable name in percent characters (%):
You can also mix variable references directly with string data, the cmd shell will automatically make the correct replacements:
Capturing User Input
You can use the set command with the /p parameter to obtain input from the user:
You can also use the pause command to temporarily stop script execution until the user hits a key.
Comparing with If Statements
If statements can be written on a single line or multiple lines. Here is a single line example that tests to see if the variable VAR is equal to 5, and if it is it will display VAR is 5 to the screen:
Here is the same example with the multi-line syntax, which allows you to include multiple commands within the if statement:
The Windows cmd shell also supports the else construct:
Here are the operators you can use when comparing values using if statements:
Controlling Program Flow with Goto
The goto command is one of the primary elements used to control program flow in batch scripts. As with other languages, goto allows you to jump to a specific location in your script defined by a label. The goto command can be used to jump forward or backward in the batch script.
In the example below the script will jump to the line of code labeled as Place1 if MYVAR is equal to 1, and it will jump to Place2 if MYVAR is equal to 2.
Note that when the batch script jumps to a label such as Place1, it will execute all of the code that follows until the end of the file, another jump occurs, or the script otherwise exits.
For Loops
In batch scripts for loops can be used to iterate over numeric ranges and lists. Here is an example of looping from 0 to 10 (inclusive) with a step value of 1, the value of variable i will be printed to the screen during each iteration of the loop:
The /l parameter specifies that the for loop will iterate over a range.
You can also iterate over a list that contains any combination of numbers or letters:
Processing Script Parameters
Batch scripts can handle parameters just like any other command line program. To access a parameter within the script simply use the percent symbol [%] followed by the parameter’s index. Indexes begin at 1.
Here is how param.bat looks when executed:
Special parameters also exist which can be referenced as follows:
%0 The name of the batch script as called
%* Returns all parameters
Functions
Batch scripts also support function-like constructs. Functions are defined using the same syntax as a goto label. In the example below the function is called Function1. You can use the call command to call the function. The exit command at the end of the function will exit the function and return processing back to where the call occurred. The /b option for exit allows you to specify a function return value. As is typical of command line programs, you should return 0 if the function succeeds, and a non-zero value if an error occurred.
Error Handling
In a batch script you can automatically take an action based on the success or failure of a command. For example, you can use double ampersands to specify an action to occur if the command succeeds:
Use the double pipe to specify an action to occur if the command fails:
To determine whether or not the last executed command failed or succeeded you can reference the special system variable %ERRORLEVEL%:
Batch Script Example
Here is a more complete example of a Windows batch script. It begins by looping over each of the parameters passed to the script. If a parameter is equal to Carl, it will print Carl is cool! to the screen, other wise it will print Hi <parameter> to the screen.
Here is the output from example.bat when executed with the parameters Dave, Carl, and Paul:
Links and References
-
Windows Commands
-
call
-
echo
-
goto
-
if
-
set
-