An ISO image can contain the entire contents of a CD, DVD, or any other external drive. An ISO image is like a box that contains all components of an element that can be used to remodel the original content.
An ISO image is even capable of keeping files of the installed operating system. With the availability of ISO images, we can make bootable USB flash drives and install any OS to our systems.
You may need to convert a folder to an ISO file if you need to share the contents of the folder in a single file or recompile an image after making modifications to it.
Want to convert a folder to an ISO image? Here’s how:
You can convert folders with video files to ISO images. If you want to compress the size of your ISO image which contains videos, check out how to compress video files without losing quality.
You can convert any file or folder into an ISO file so it can compress the actual size of the data and you can easily share it anywhere you want to.
TIP: You can also create a system backup/clone of your working PC using the image software.
Table of Contents
Here are a few tools to get the job done.
How to Convert Files and Folders to ISO Images
AnyToISO
AnyToISO freeware tool is available for Windows 10 and 11 that can easily convert any folder or file to ISO.
When it is installed, a window will appear. There are 3 options in the respective tabs:
- You can extract any files from the zip or archive folder
- You can make an ISO image of CD/DVD.
- You can create an ISO image of any file or folder.
Follow the steps below to convert a file or a folder into an ISO image using AnyToISO:
- Download AnyToISO and proceed with the installation wizard to install the tool.
- Switch to “Folder to ISO” tab and then click Browse for folder in front of Source folder.
- Now select the folder that you want to convert.
- AnyToISO will now fill in the other details automatically. Click Make ISO to begin creating an ISO image out of the selected folder.
The ISO image will now begin creating itself. This step may take a moment depending upon the size of the folder. Once done, you can find the ISO image in the destination directory as designated by the AnyToISO tool.

ImgBurn
ImgBurn is another great tool that will convert a file or a folder into an ISO image. Follow the steps below to download, install, and then use ImgBurn to create an ISO file:
- Open the ImgBurn download page, click on any of the mirror download links, and download the tool from there.
- Once the setup has been downloaded, double-click it to begin the installation process and then follow through with the installation wizard.
- Once installed, run the tool. From the main menu, click “Create image file from files/folders“.
- On the next screen, click on the Browse for a file or Browse for a folder button (depending upon whether you want to convert a file or folder).
- From the browsing window, navigate to and select the file/folder you want to convert.
- Now click the Browse button under Destination and select a location to save the converted ISO image.
- Click the Build button.
- From the popup confirmation window, click Yes.
- You will now be notified that a volume label has not been given and the tool will set one itself. Click Yes again.
The conversion process will now take place. Once converted, you will find the converted ISO file at the designated location.
Folder2ISO
Folder2ISO is a portable tool that does exactly what its name is – convert folders to ISO images! Proceed with the following steps to convert a folder into an ISO image:
- Download Folder2ISO and proceed with the extraction.
- As the tool is portable, it does not require installation. Execute the Folder2ISO tool.
- Click Select folder and navigate and select the folder that you wish to convert.
- Now click Select Output and choose a name and a destination for the converted ISO image.
- Click Generate ISO to begin the conversion.
The tool will now create an ISO file out of the selected folder.
ISO Workshop
ISO Workshop is another freeware with a Graphical User Interface (GUI) that you can use to create an ISO image out of a folder. Here is how:
- Open the ISO Workshop download page and click Download in front of the said software.
- Run the downloaded .exe setup file and follow through with the installation wizard to install the software.
- Now run the ISO Workshop software and click Make ISO.
- A new window will now open. From the popup, click Ok.
- Now click the “+” (plus) sign from the top, navigate to the folder that you want to convert and click Add.
- (Optional) Repeat the last step to add more folders.
- When added, click Close.
- Now click Make from the top menu in the tool.
- Now set a name and a destination for the converted ISO file and click Save.
- The tool will now begin creating the ISO file out of the selected folder(s). When done, click Ok.
You will find that the ISO image has been saved to the selected destination.
WinCDEmu
Perform the following steps to convert a folder into an ISO image directly from its context menu using WinCDEmu:
- Download WinCDEmu and install the tool.
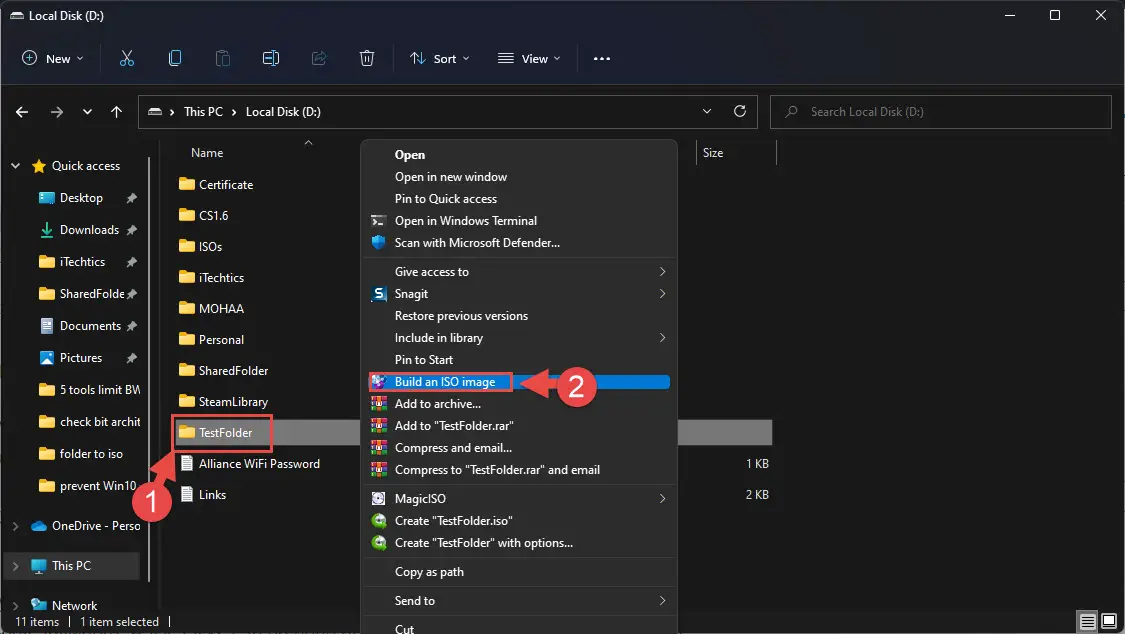
- Once installed, right-click the folder that you want to make an ISO image out of, and click Build an ISO image from the context menu.
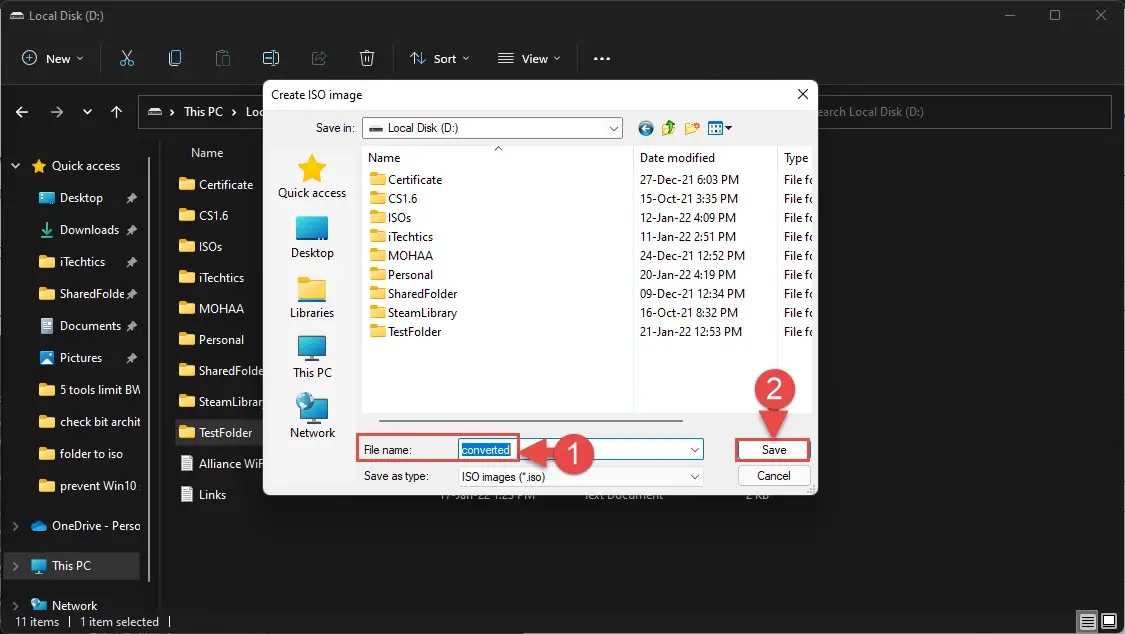
- From the popup window, enter a File Name and click Save.
- The tool will now begin the conversion.
It is that easy to convert any folder into an ISO file with WinCDEmu on a Windows computer.
Closing Words
Learn how to convert DMG to ISO images.
So, these are very convenient and simple ways to make any folder or file into an ISO image and share it with anybody, anywhere. Basic tasks can be done using any of the given tools discussed in this post.
Have fun and keep on making ISO images to transfer/share big programs over internet. What method do you use to convert a set of files and folders into an ISO image?
How to Create ISO From DVD/CD in Windows 10?
If you want to know about this, then you are in the right place.
In our recent posts, we have already shared a quick guide on how you can create iso from files or folder for Windows 7 & more.
And now I am again writing a similar post related to these topics.
Moreover, I can indeed say that you are only here because of two reasons, one if you want to convert DVD to ISO or you want to make a backup copy of your Windows 10 CD disc.
And if you were not thinking of the same then I suggest you to always try to make iso file from DVD or CD of installation discs like operating system and other important software for later use.
Whatever the reason it is, I am here to help you out.
So, without further delay, let’s get started…
Table of Contents
But before we dive in further, here is a quick overview.
However, ISO Image files are a great way to make an identical copy of any CD or DVD because they not only contain the data files but also copy the bootable properties of an optical disc. But the worst thing is that Microsoft doesn’t provide any official utility in their system.
And since there is no in-built tool for this, many users ask different questions like the one which I have answered.
Q. How to Create ISO File From DVD in Windows 10?
Ans. Creating an ISO Image file from a CD or DVD is pretty easy using some free third-party software. Just you have to install them and then follow the given mentioned steps.
So, let’s get started…
1. Using ImgBurn
ImgBurn is one of the best free iso creator for Windows 10 using which you can easily perform all tasks related to CD/DVD. Moreover, this is the same tool that we used to create iso from bootable USB in our previous posts and now we are using it for this task.
And here are the steps to follow:-
1. First, download and install the ImgBurn tool from the given link. After installation is completed, Open or Run the installed application.
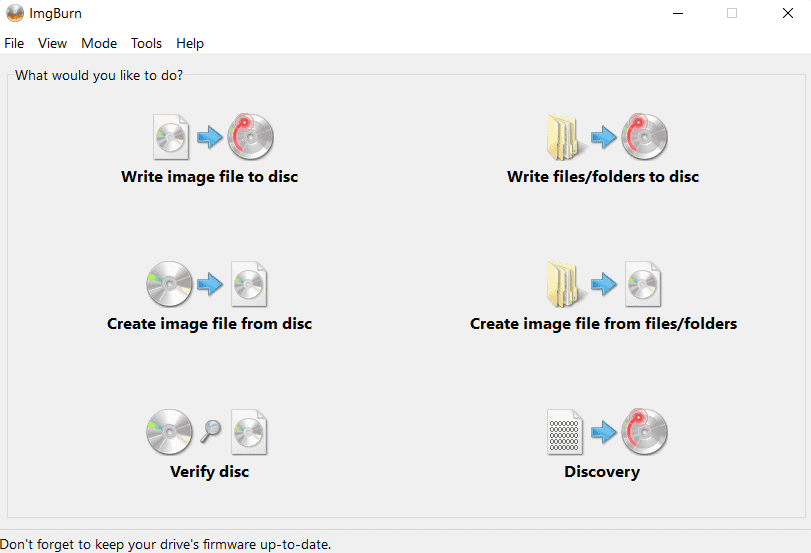
2. Now insert the DVD/CD into your computer or laptop and then click on the Create image file from disc button from the wizard.
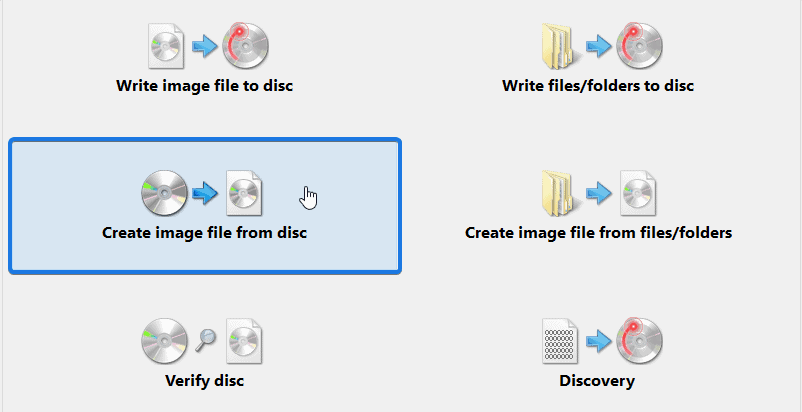
3. After that, it will automatically detect the DVD from the CD ROM. Now click on Browse for a file… icon, next to Destination, and then select the folder where you want to save the converted ISO file.
4. At last, click on the Read button to copy from the disc.

And then Imgburn will start buffering the data and making copies from the disc. Now, wait for 2-3 minutes while your ISO file is getting created.

Note:- Please make sure that DVD/CD you are using is in perfect working condition without any severe scratches on it.
2. Using WinX DVD Ripper Platinum
As one of the best DVD coping software, WinX DVD Ripper Platinum provides you with a 3-click solution to create ISO files from DVDs on both Windows and Mac. Moreover, users can easily use WinX DVD Ripper Platinum to convert ISO image files to MP4, AVI, WMV, MOV, HEVC, FLV, etc. for easy playback on iPhone, iPad, Android, and other portable devices. With the unique level-3 hardware acceleration, it enabled to guarantee a superfast DVD conversion speed with no quality loss.
Here is the step-by-step guide:-
1. Free download WinX DVD Ripper Platinum from the given link. Run the installed application after it is downloaded.
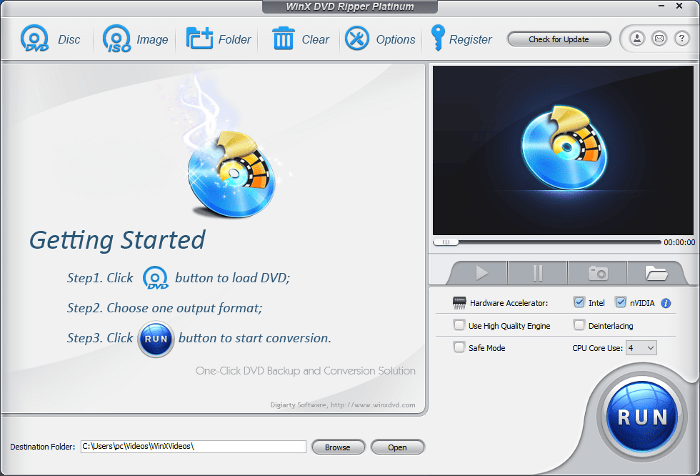
2. Insert the source DVD into DVD-ROM, then click the “DVD Disc” button to load it.
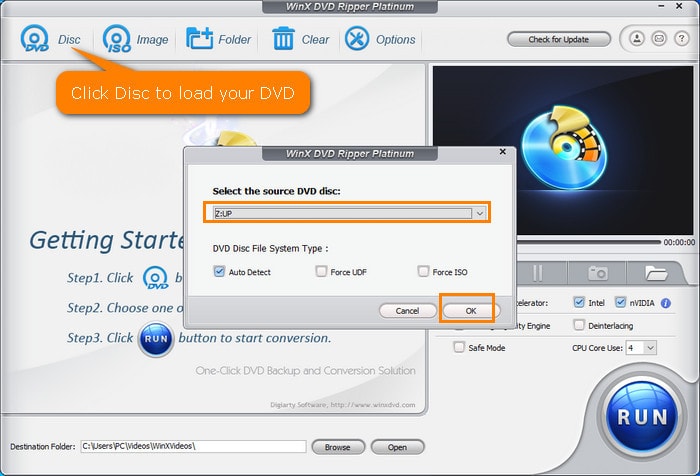
3. An “Output Profile” window will appear after the DVD information is loaded. Choose “DVD Backup Profile” and you will see the “Clone DVD to ISO Image” option.
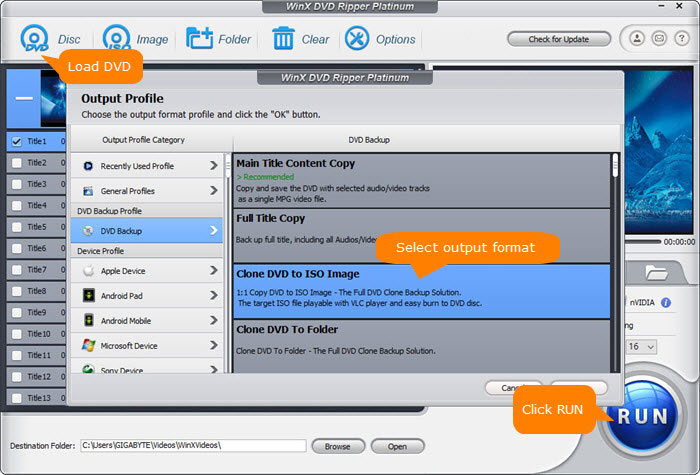
4. Select a destination folder to store the file and hit the “Run” button to start ripping ISO from the DVD.
3. Using WinCDEmu
WinCDEmu is another freeware utility that is well known for mounting disc images in Windows operating system. Basically, it makes a virtual CD drive using device drivers which enables you to access Image files without having a physical drive.
Earlier, I was only using this utility for mounting purposes but later I realized that I can also create iso from DVD of my Windows 10 disc.
And here are the steps to follow:-
1. First, download WinCDEmu from the given link.
2. Now double-click on the setup file that you have downloaded and then click on the Install button.
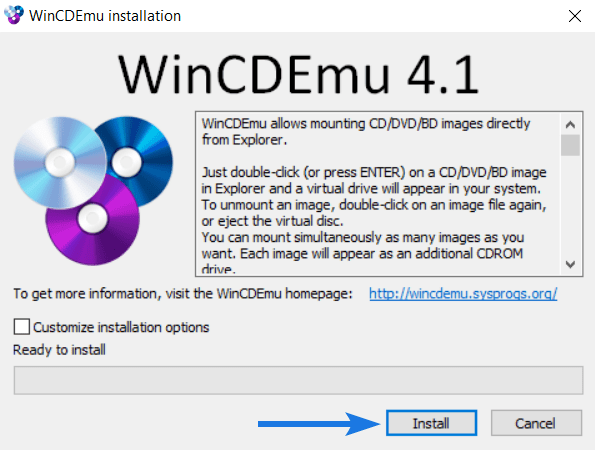
3. Once installation is completed, insert the DVD into your laptop or computer system that you are using.
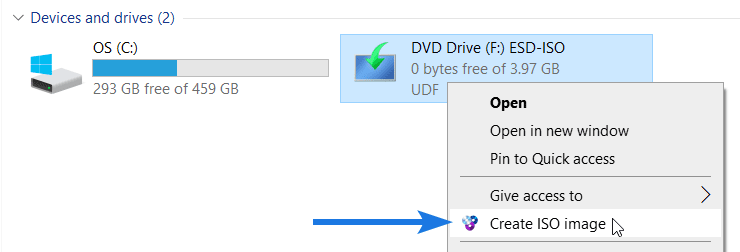
4. Now go to This PC, then right-click on the DVD drive, and then select the Create an ISO image option.
5. After that, navigate & select the location and then enter the filename, click on the Save button.
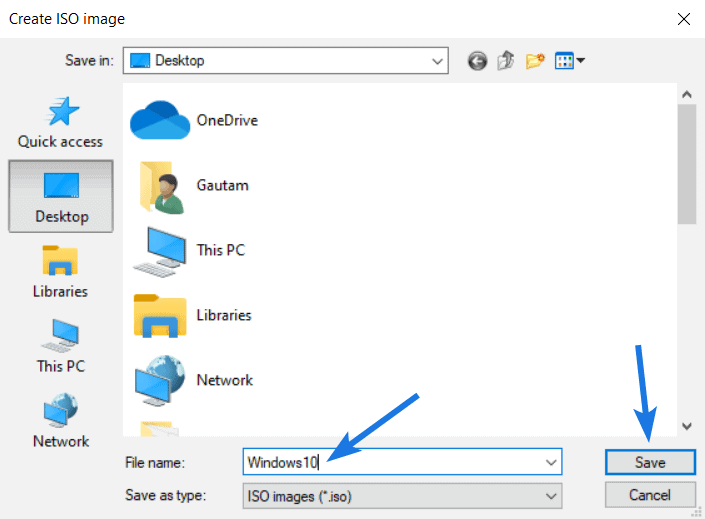
6. At last, it will start creating the ISO. ( may take a few minutes )
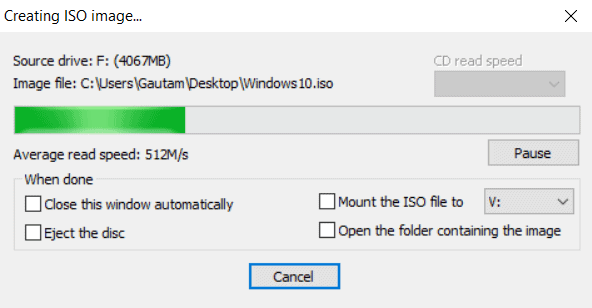
And Done! One thing which I really liked about these image files is that you can easily create bootable USB from ISO file anytime.
Now let’s move to the last way…
4. Using CDBurnerXP
CDBurnerXP is a great free tool that helps you to perform all disc-related tasks like burning, creating, copying, erasing, and converting CD to ISO. Moreover, it was first released in 2007 and comes in both 32-bit & 64-bit with a multilanguage interface.
However, the interface looks a little outdated like the XP version but does the work perfectly. Apart from that, I have seen many users “How do I create an iso file from a cd in Windows 10” using this tool.
And for them, here are the steps:-
1. First, download and install CDBurnerXP from the given link.
2. Once installation is done, insert the CD into your computer or laptop that you are having or using it.
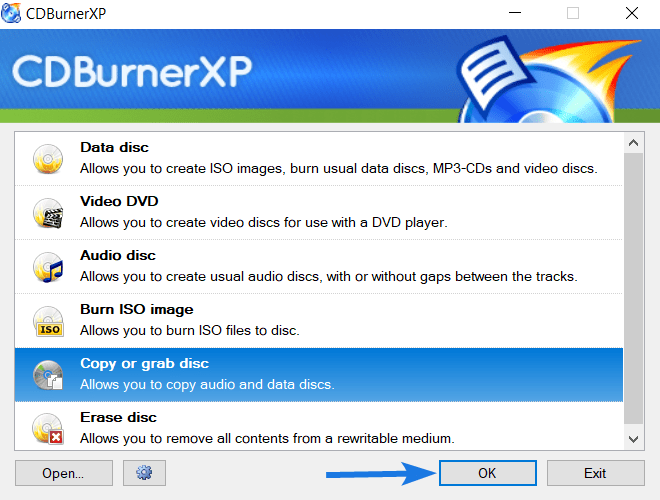
3. Now open the CDBurnerXP application, select the Copy or grab disc option and then click the OK button.
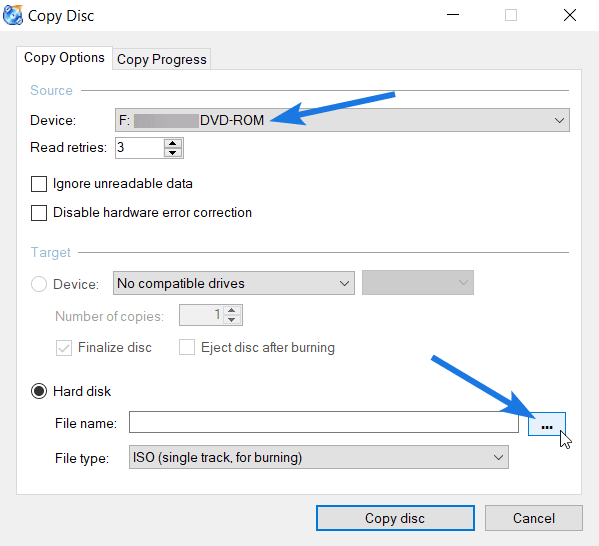
4. After that, select the Device from the source section, and then under the Hard disk section, click on the 3 dot box.
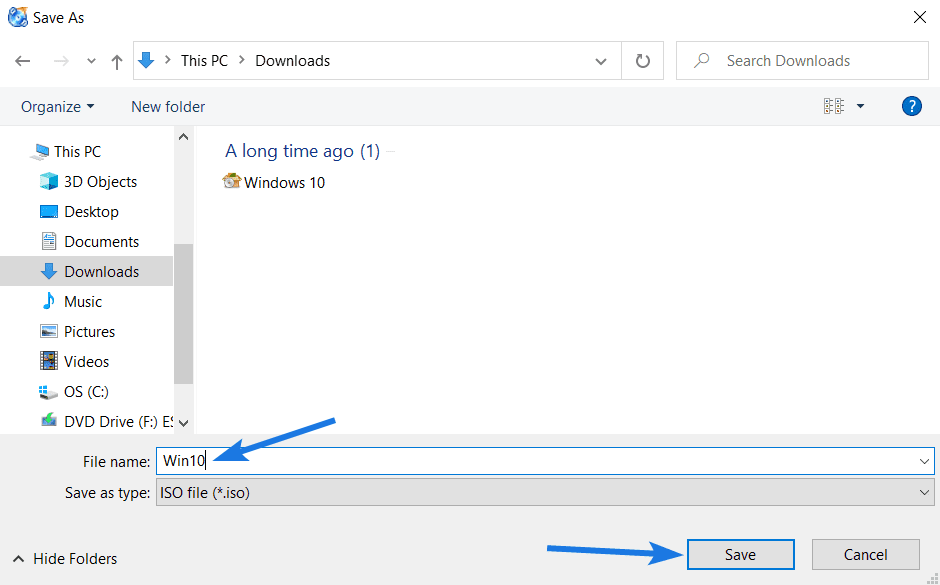
Now, browse & select the folder location where you want to save the .ISO file on your PC and then enter the File name, click on the Save button.
5. At last, click on the Copy disc button, and then it will start creating an ISO image from CD & once it’s completed, click on the OK button.
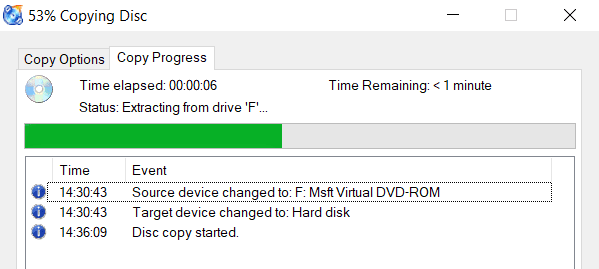
And Done! Now navigate to the directory or location that you selected earlier and you will find the file right there.
Some FAQs
Can you create ISO from DVD?
If you want to create an ISO image file from DVD then use any CD-burning software such as ImgBurn, WinX DVD Ripper Platinum, CDBurnerXP, etc.
How do I copy a DVD to an ISO for free?
Copying a DVD to an ISO file is also known as burning/creating an ISO and for that you can follow the given steps.
1. Download and Install ImgBurn.
2. Open the app and click on “Create image file from disc”.
3. Select the “Source” and then select “Destination”.
How do I make an ISO from a CD?
If you want to make an ISO image from a CD, then follow these steps:-
1. Download and Install WinCDEmu.
2. Open the application and insert the CD.
3. Go to “This Computer” and select the disc drive.
4. Right-click on the drive icon & select “Create ISO image”.
How do I write ISO on a CD?
You can easily write or burn ISO files on a CD by following these simple steps.
1. Download and Install CDBurnerXP.
2. Run the app and click on “Burn ISO image”.
3. Select the source device as “CD ROM”.
4. Select the destination target where it should be stored.
5. Enter the filename and save the ISO file.
That’s it for now…
Conclusion
So, that’s how you can easily make an ISO from a CD or DVD on Windows 10 system for free. Furthermore, you can also use these ISO Image files for installing Win10 from a USB on your Computer PC or Laptop.
Earlier, the majority of users used to store these images for backup purposes, so that if any time the optical disc got damaged or corrupted they can use these copies for later use.
Stay tuned for the latest posts…
Feel free to share your thoughts via comments and also tell us about this post on How to Create ISO From DVD/CD in Windows 10 [ 3 Ways ].
If you liked this post, don’t forget to share it…
Many options for working with ISO files are included with Microsoft Windows 10. Here’s how to mount, burn, or create an ISO image in Windows 10.
Mounting ISO File
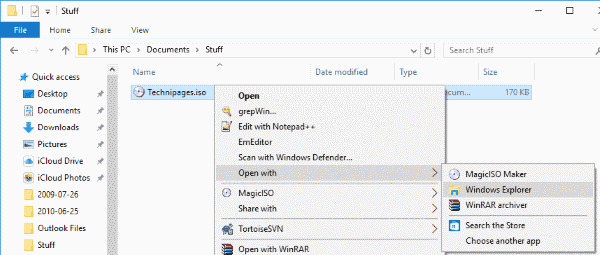
- If you have an existing ISO file and wish to mount it as a disc drive, simply right-click the file and select “Open with” > “Windows Explorer“.
- The contents of the ISO will then show as a DVD or CD drive in Windows Explorer just like it’s on a disc in a drive.
You can unmount the ISO file when you’re done with it by right-clicking the drive in Windows Explorer and selecting “Eject“.
Burning ISO File
If you have an existing ISO file you wish to burn to disc, simply insert a disc in your drive, right-click the ISO file in Windows Explorer, then choose “Share” > “Burn to disc“.
Creating ISO File
Creating an ISO file is one thing Windows 10 cannot do without a third party solution. You can follow these steps.
- Download and install Magic ISO.
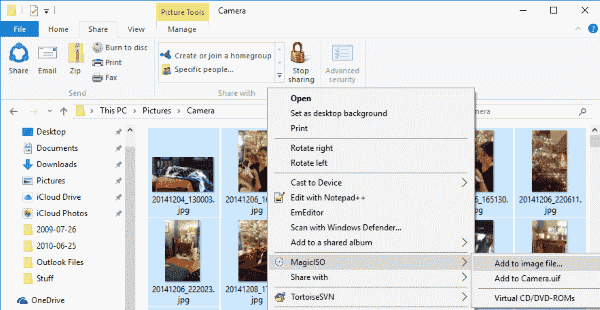
- After installing the software, you will now have an option to highlight files, right click, and select “Add to image file…“.
- Once the software opens, you can choose “File” > “Save“, then save it as a Standard ISO Image file.
If you are not a fan of Magic ISO, Infrarecorder is free and does a fine job as well.
Author Mitch Bartlett
Through my career that spans over 20 years I have become an expert in Microsoft Systems Administration, Android, and macOS. I started this site as a technical guide for myself and it has grown into what I hope is a useful knowledgebase for everyone.
Просмотров 16,899
Как отличный способ компакт-диска на вашем компьютере, файлы ISO могут эффективно помочь вам сделать резервную копию компакт-диска в Интернете, а также могут позволить вам воспроизводить DVD-диск, установив его в качестве виртуального дисковода на вашем компьютере. Что такое ISO? Как создать ISO в Windows 10? Обычно используемый программным обеспечением InstallShield, файл ISO относится к образам дисков CD или DVD на основе стандарта ISO-9660, опубликованного Международной организацией по стандартизации. Файл ISO содержит образы программ, которые были установлены на компьютере. Он может создавать различные пакеты программного обеспечения. Иногда некоторые программы слишком велики, поэтому люди будут использовать файлы ISO для сбора и распространения большого объема данных более аккуратным способом. Люди предпочтут использовать файлы ISO, когда им нужно дублировать или создавать резервные копии CD и DVD. Поэтому, когда вам потребуется доступ к содержимому CD или DVD, вы можете просто обратиться к файлу ISO для получения подробной информации. Обычно файл ISO создается во время процесса записи DVD, если вы выбираете опцию, и файл ISO сохраняется в папке на жестком диске вашего компьютера. Поскольку ISO играет такую важную роль в резервном копировании файлов, будет крайне необходимо знать основные шаги по созданию ISO в Windows 10. Далее вам будут доступны различные решения с помощью нескольких создателей ISO.
- Часть 1: Как создать ISO-образ в Windows 10 с помощью Leawo DVD Creator
- Часть 2: Как создать ISO-образ в Windows 10 с помощью ImgBurn?
- Часть 3: Как создать ISO в Windows 10 с помощью Power ISO?
- Часть 4: Простое сравнение трех методов
Часть 1: Как создать ISO-образ в Windows 10 с помощью Leawo DVD Creator
Для того, чтобы создать ISO Windows 10, вам нужно подготовить мощную программу для записи ISO, которая может легко помочь вам создать файл ISO. Прежде всего, я представлю Leawo DVD Creator для создания ISO в Windows 10. Leawo DVD Creator действительно фантастичен как в своих всеобъемлющих функциях записи, так и в скорости записи без потери качества. Этот DVD-создатель также может легко позволить вам записывать файлы, включая видео, изображения или папки, в файл ISO. Более того, его процесс записи файлов ISO довольно прост. Помимо функции создания ISO в Windows 10, которая считается одной из самых мощных программ для записи DVD в последние годы, Leawo DVD Creator поможет вам записать ваши неподходящие файлы на DVD-диск с сохранением индивидуальных функций. Leawo DVD Creator, вы можете записать более 180 форматирует видео со скоростью в 6 раз выше, чем у других.
DVD Creator
☉ Быстро конвертируйте видео форматов MP4, AVI, MKV в формат DVD.
☉ Создавайте диски DVD-5, DVD-9, папки или образы ISO без потери качества.
☉ Создание слайд-шоу из фотографий и запись их на DVD одним щелчком мыши.
☉ Легко редактируемые эффекты, от 2D до 3D поддержка конвертации.
☉ Встроенные шаблоны меню и редактирование меню диска с персональными настройками.
Благодаря поддержке технологии ускорения Intel Quick Sync, Leawo DVD Creator обеспечивает высокую скорость записи при записи видео на DVD. Кроме того, Leawo DVD Creator может сохранить качество исходного видео при записи видео на DVD и гарантирует, что воспроизведение DVD будет выглядеть так же хорошо, как и исходное видео. Кроме того, вы можете редактировать видео, чтобы сделать его в своем собственном стиле, например, обрезать, кадрировать, добавлять водяные знаки к видео и так далее. И вы можете изменять шаблоны меню диска и элементы в меню диска с высокой скоростью и высоким качеством, чтобы получить настроенный DVD-диск. Далее, давайте сосредоточимся на подробных шагах по созданию ISO в Windows 10. В общем, процесс создания ISO в Windows 10 с Leawo DVD Creator больше всего похож на запись фрагмента DVD-диска.
Шаг 1. Скачать Leawo Загрузите DVD Creator на официальном сайте, а затем установите его на свой компьютер.
Шаг 2. Вставьте пустой DVD-диск в привод компьютера.
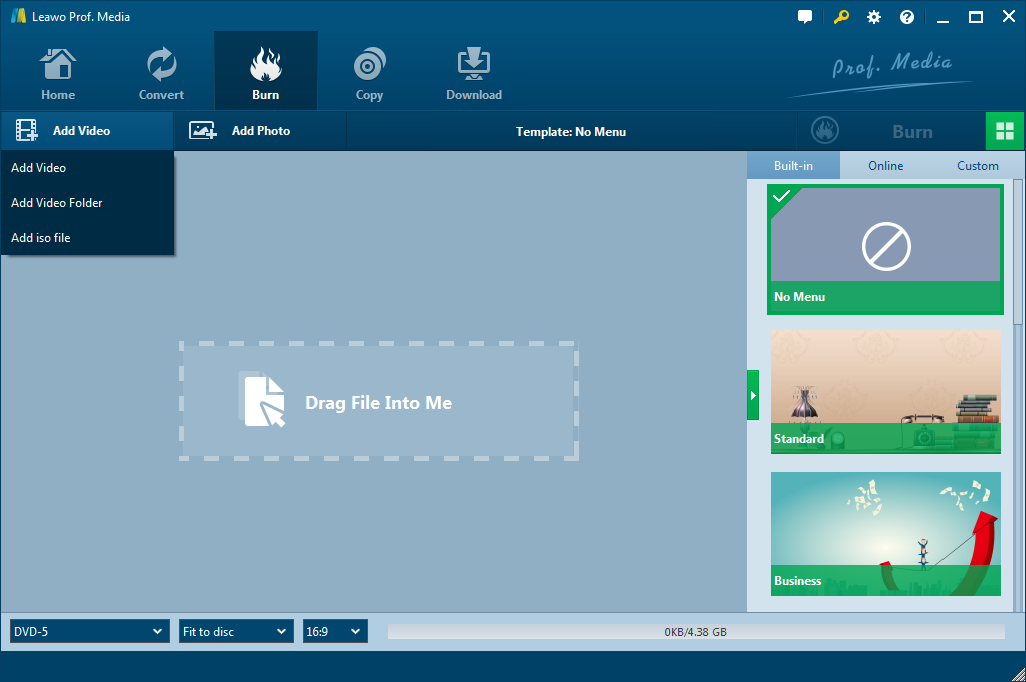
Шаг 3. Откройте программу и импортируйте нежеланные видео или другие файлы на главную панель программы, нажав «Добавить видео», или вы можете просто перетащить целевые видео или файлы напрямую в программу. Кроме того, вы можете выбрать тип диска между DVD-9 и DVD-5, а также соотношение сторон видео между 4:3 и 16:9.
Шаг 4. Установите шаблоны меню диска. Вы можете выбрать из библиотеки шаблонов в правой колонке или создать собственное меню диска. Существует множество типов шаблонов для вас разработать и создать меню DVD, включая «Праздник», «Стандарт», «Природа» и т. д. Кроме того, вы можете самостоятельно создать шаблон в соответствии со своими предпочтениями.
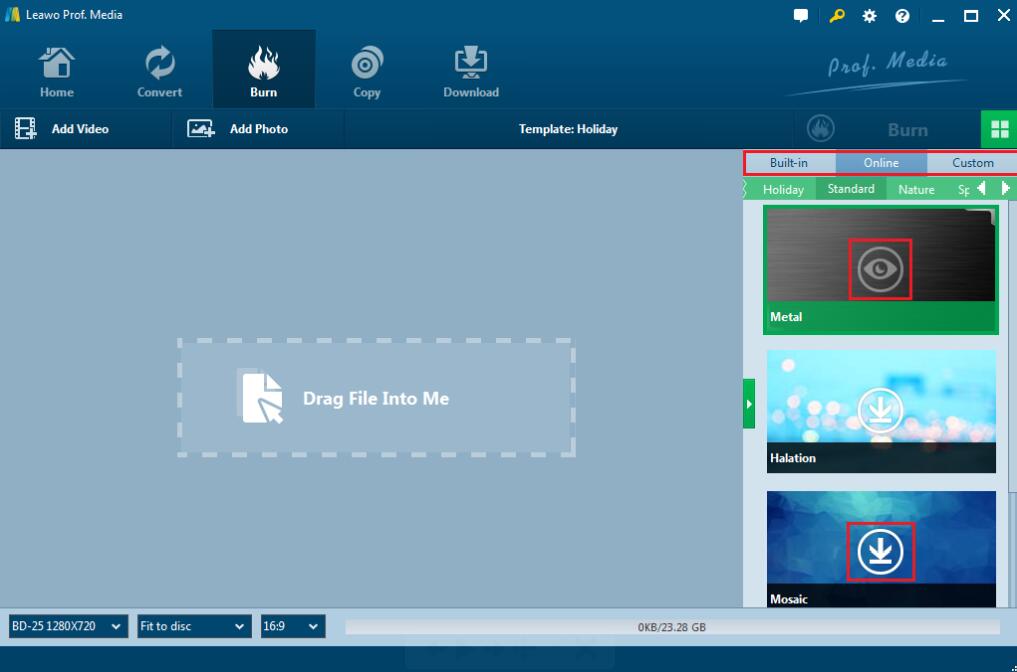
Шаг 5. Начните записывать DVD. После того, как все шаблоны будут выбраны, нажмите на зеленый значок «Записать» в правом верхнем углу, чтобы начать процесс записи DVD. Вам также потребуется подтвердить опции «Записать на», «Метка диска» и «Сохранить на».
Здесь вам следует уделить больше внимания, если вы хотите создать ISO в Windows 10. Под опцией «Записать в» вы можете найти «Файл ISO», что означает, что файл ISO может быть автоматически сохранен и создан во время процесса записи DVD, если вы поставите галочку в поле. Просто поставьте галочку в поле, а затем нажмите значок «Записать», чтобы начать запись файла ISO. После завершения вы сможете найти файл ISO на своем компьютере.

Видео гид по Leawo DVD Creator
Часть 2: Как создать ISO-образ в Windows 10 с помощью ImgBurn?
рядом Leawo DVD Creator, вы можете обратить свой взор на другой популярный создатель ISO или, можно сказать, DVD-рекордер – ImgBurn. Как создать ISO в Windows 10 с помощью ImgBurn? Как следует из названия, ImgBurn фокусируется на записи DVD из образов или создании образов с DVD. Он довольно легкий, но очень профессиональный в своих функциях записи. Далее, пожалуйста, выполните следующие шаги.
Шаг 1. Загрузите ImgBurn и установите его на свой компьютер.
Шаг 2. Откройте инструмент и выберите, какую операцию вы хотите, чтобы ImgBurn выполнил для вас? Здесь выберите «Создать файл образа с диска».
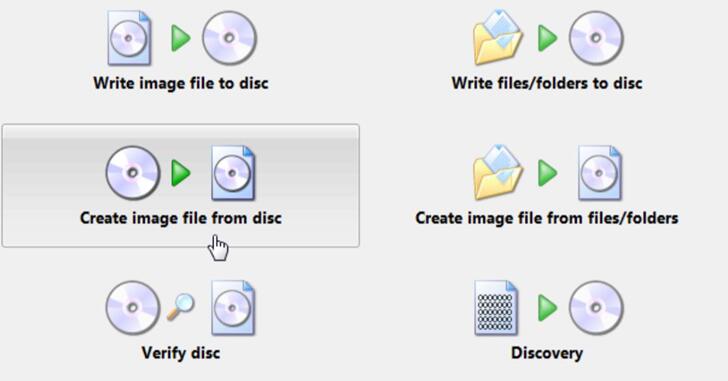
Шаг 3. Затем вы увидите главную панель выбора, как показано ниже. Выберите «Источник», «Назначение» для файла ISO.
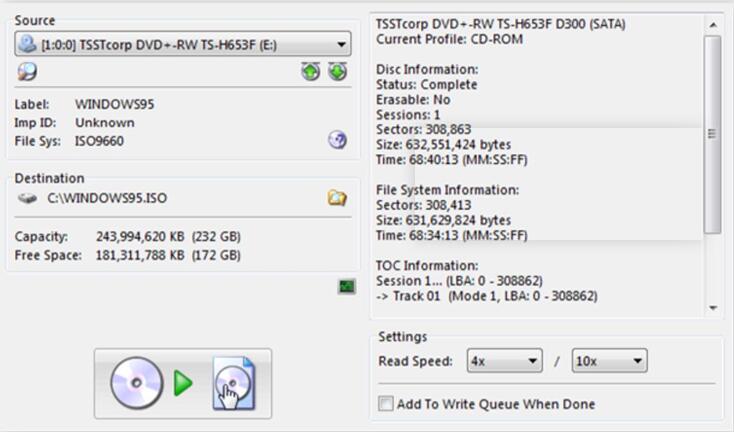
Шаг 4. После того, как все параметры установлены, нажмите кнопку создания ниже, чтобы начать процесс создания ISO. Просто подождите и наберитесь терпения; вы получите файл ISO в Windows 10.
Часть 3: Как создать ISO в Windows 10 с помощью Power ISO?
И последнее, вы также можете найти много Leawo Альтернативы DVD Creator и ImgBurn в Интернете, здесь вы также можете попробовать другой инструмент ISO, который называется Power ISO. Как профессиональный инструмент, разработанный для создания ISO в Windows 10, Power ISO может легко удовлетворить ваши основные требования. Для его руководства, пожалуйста, обратитесь к следующим шагам.
Шаг 1. Загрузите Power ISO из Интернета и установите его на свой компьютер.
Шаг 2. Откройте программу и добавьте файлы, которые вы хотите создать в ISO, нажав «Новый», чтобы выбрать «Data CD/DVD», если вы хотите создать файл ISO в Windows 10 с CD или DVD. Если вы хотите создать ISO из других файлов, вы можете просто нажать кнопку «Добавить», чтобы выбрать файлы в программу.
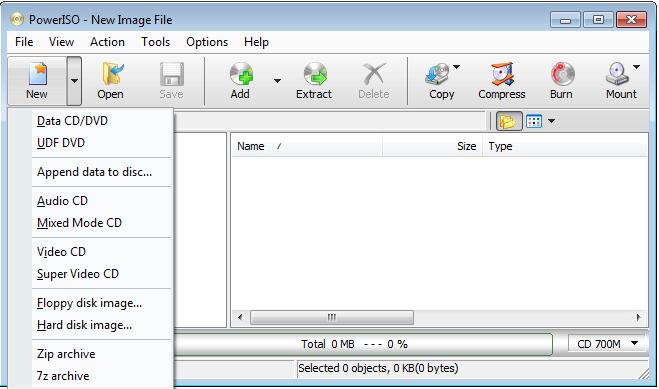
Шаг 3.Установите свойства файла ISO, нажав «Файл» в главном интерфейсе сверху и выбрав опцию «Свойства», чтобы войти в панель настроек. Вы можете выбрать собственную предпочтительную файловую систему CD/DVD помимо ISO, когда у вас возникнут потребности.
Шаг 4.После того, как вы установили все свойства, нажмите «Сохранить» в верхнем меню. Затем вам будет предложено ввести имя для файла ISO. Просто подождите и наберитесь терпения, файл ISO будет создан в течение короткого периода времени.
Часть 4: Простое сравнение трех методов
Согласно сравнительной таблице, становится ясно, что Leawo DVD Creator может удовлетворить ваши требования по записи различных типов DVD-дисков, а также может легко создавать соответствующие файлы ISO в Windows просто. Но для ImgBurn вы также можете попробовать его, если хотите записать образ на диск. Но он ограничен тем, что вы можете создать только образ ISO с его помощью, а также в нем нет настройки для ваших видео. Power ISO менее всеобъемлющ и практичен по сравнению с двумя вышеперечисленными. Если у вас есть только базовые требования для создания файла ISO, то, возможно, вы можете попробовать его.
Leawo DVD Creator |
ImgBurn |
Мощность ИСО |
|
| функции | Выполняет функции видеоконвертера, устройства записи DVD, видеоредактора, создателя фотослайдов, создателя ISO | Действовал только как средство записи изображений | Базовый DVD-рекордер и создатель ISO-образов |
|
Поддерживаемые форматы |
AVI, MP4, DAT, WEBM, RMVB, RM, MPG, MPEG, VOB, MOV, M4V, QT, FLV, F4V, NSV, NUT, MKV, MTS/M2TS/TS/TP/TRP(AVCHD, H.264, VC-1, MPEG-2 HD), MOD, TOD, DV, WMV, ASF, 3GP, 3G2, DVR-MS, 180+ форматы, файлы, изображения | Поддерживаются только изображения | CD/DVD-файлы |
| Скорость горения | В 18 раз быстрее | Не очень гладко | Средний |
| Качество вывода | Сохранено 100% оригинальное качество, сохранен файл ISO | Высокий | Высокий |
| Индивидуальные функции | Различные выходные форматы для использования, можно редактировать видео, чтобы придать ему собственный стиль, включая добавление субтитров, звуковых дорожек, обрезку, кадрирование, 3D эффекты, водяные знаки | Свободно записывать образ на диск и создавать образ с диска | Базовые функции, возможность выбора файловых систем CD/DVD и типов ISO |
| Процесс создания ISO | Очень просто и понятно | Хорошо | Хорошо |
| Интерфейс | Очень просто и понятно | Сбросить | Не совсем ясно |
Любые названия продуктов третьих лиц, товарные знаки, логотипы и изображения, иногда упоминаемые на этом сайте, принадлежат их владельцам. Они могут включать, но не ограничиваться YouTube, Apple, Amazon, Adobe, Netflix и т. д. Leawo Программное обеспечение не зависит от всех этих владельцев собственности.
Способ 1: UltraISO
В качестве первого варианта рассмотрим бесплатную версию программы UltraISO, поскольку это решение является самым популярным среди остальных. За пример мы взяли формат ISO, ведь образы дисков чаще всего распространяются именно так. В Windows 10 взаимодействие с данным инструментом осуществляется следующим образом:
Скачать UltraISO
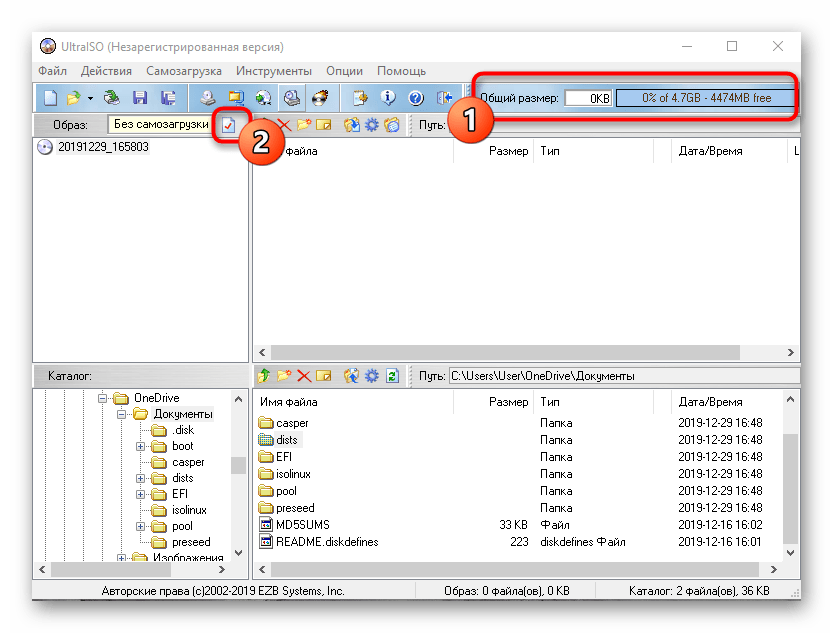
- Перейдите по указанной выше ссылке, чтобы загрузить и установить UltraISO. После запуска воспользуйтесь встроенным обозревателем для перемещения всех необходимых файлов в образ.
- Убедитесь в том, что все директории и отдельные элементы, которые должны входить в ISO-образ, успешно перенесены в верхнюю часть приложения.
- Нажмите на кнопку сохранения или надпись «Без самозагрузки», чтобы приступить к записи готового образа.
- Подтвердите свои намерения сохранить внесенные изменения.
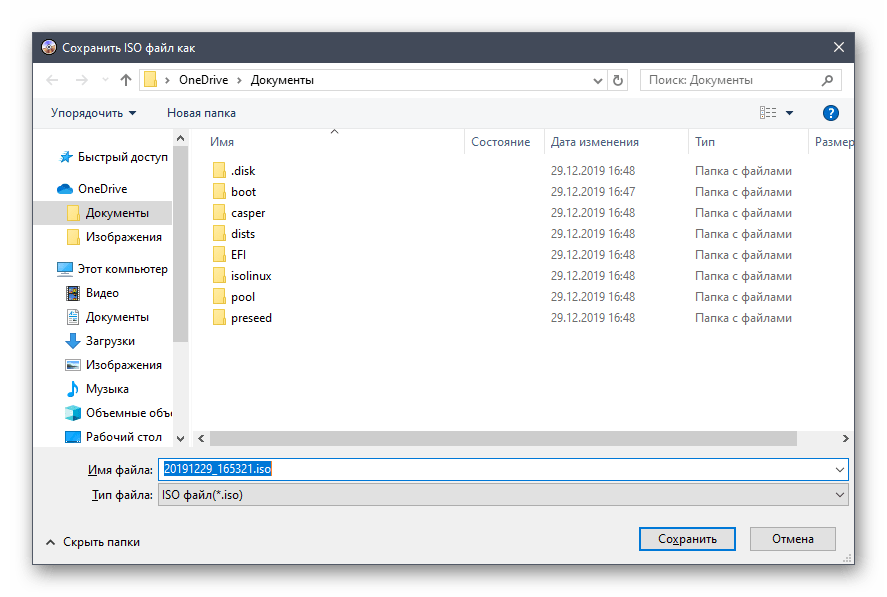
- Откроется стандартный «Проводник» операционной системы. Здесь выберите место для ISO-образа и задайте ему подходящее название, после чего нажмите на «Сохранить».
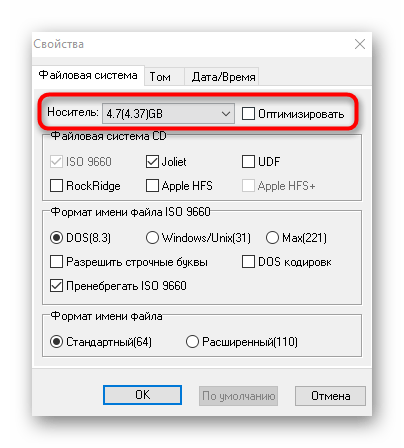
- Если вы получили уведомление о том, что размер образа превышает допустимые границы, значит, в качестве виртуального диска выбрана модель с маленьким объемом пространства, что видно вверху возле надписи «Общий размер». Изменяется эта характеристика в свойствах диска.
- В открывшемся окне разверните список «Носитель» и выберите подходящий пункт.
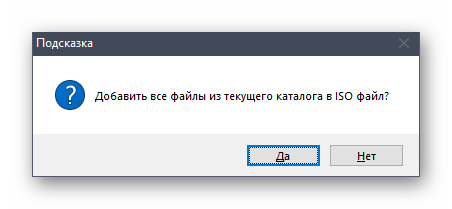
- Дополнительно отметим, что вы можете добавлять сразу все файлы из каталога, нажав на кнопку «Извлечь».
- При появлении подсказки подтвердите добавление.
- После этого можно щелкнуть на кнопку «Сохранить».
- Повторно задайте расположение образа и его название, поскольку предыдущие настройки были сбиты, если сохранение произвести не удалось.

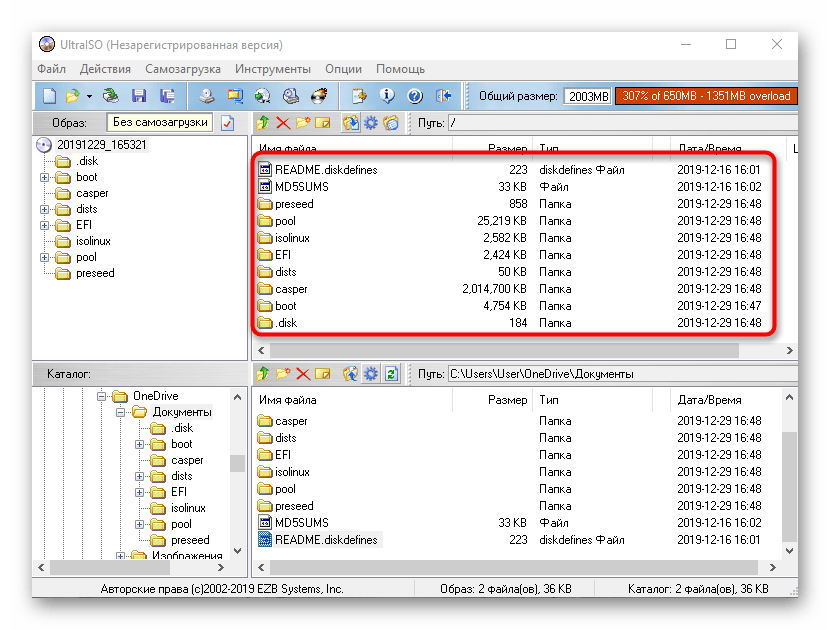
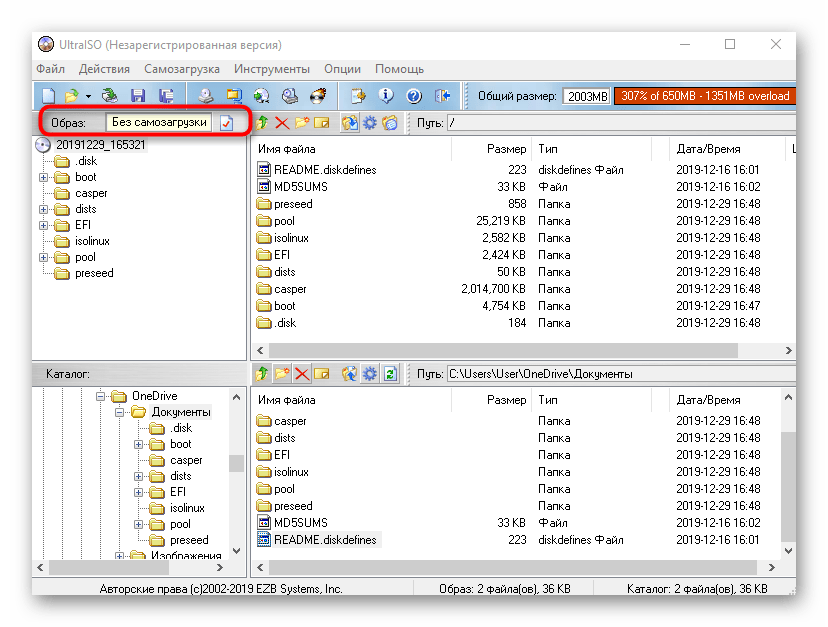

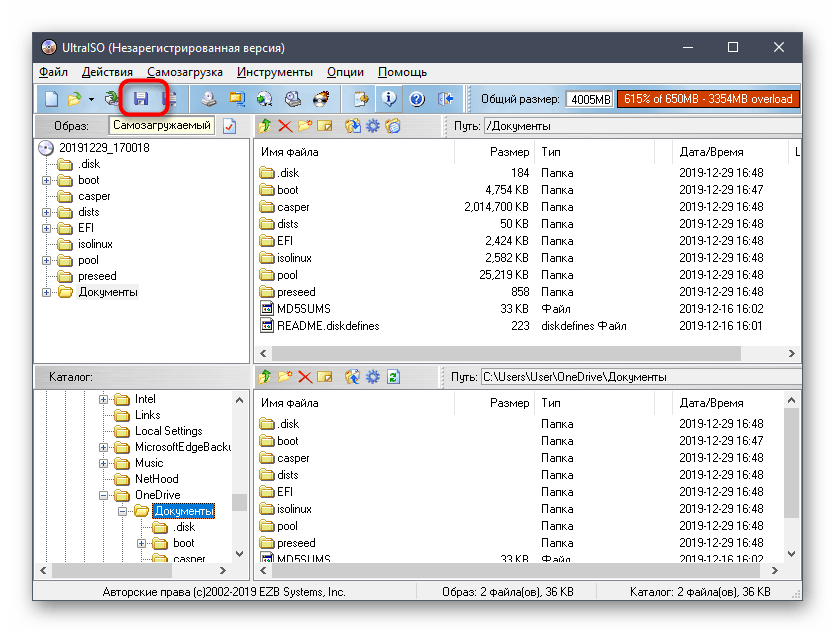
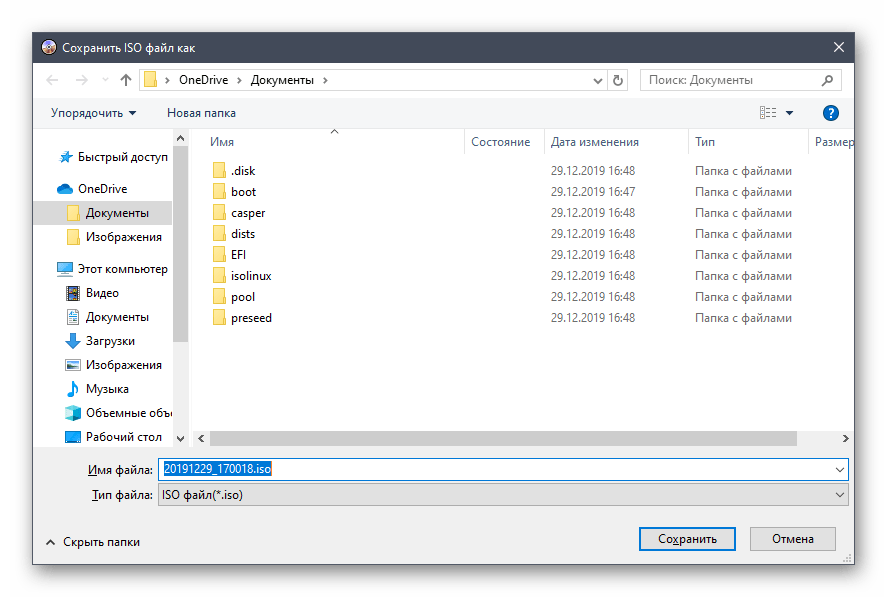
Как видим, в управлении UltraISO нет ничего сложного. Сразу же после сохранения перейдите в указанную папку, чтобы проверить образ диска, например, подключив его к виртуальному приводу через стандартное средство ОС или ту же используемую ранее программу.
Способ 2: PowerISO
PowerISO — еще одно популярное ПО, которое имеет пробную версию, позволяющую создавать образы дисков без каких-либо ограничений. Именно ей мы и предлагаем воспользоваться, если предыдущее решение вам по каким-либо причинам не подошло.
Скачать PowerISO
- После успешной инсталляции и запуска PowerISO в главном меню на верхней панели отыщите кнопку «Добавить».
- Через нее открывается встроенный обозреватель. Отыщите там необходимые файлы и директории, выделите их, а затем кликните на «Добавить».
- Изначально образ может хранить в себе только 700 МБ информации, поскольку выбран тип CD. Измените эту характеристику из всплывающего списка, который открывается нажатием по кнопке в правом нижнем углу программы.
- После успешного добавления всех объектов в образ остается только сохранить его, щелкнув левой кнопкой мыши по соответствующей кнопке на верхней панели.
- В появившемся окне выберите место расположения образа, его формат и название.
- Дождитесь завершения операции. Она может занять определенное время, что зависит от размера итогового ISO.

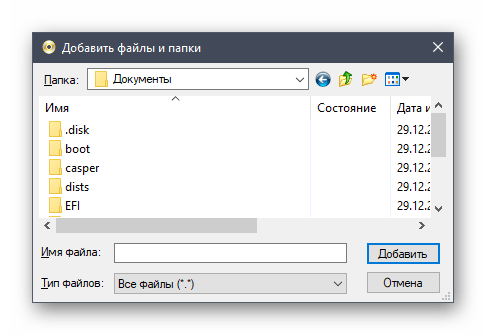
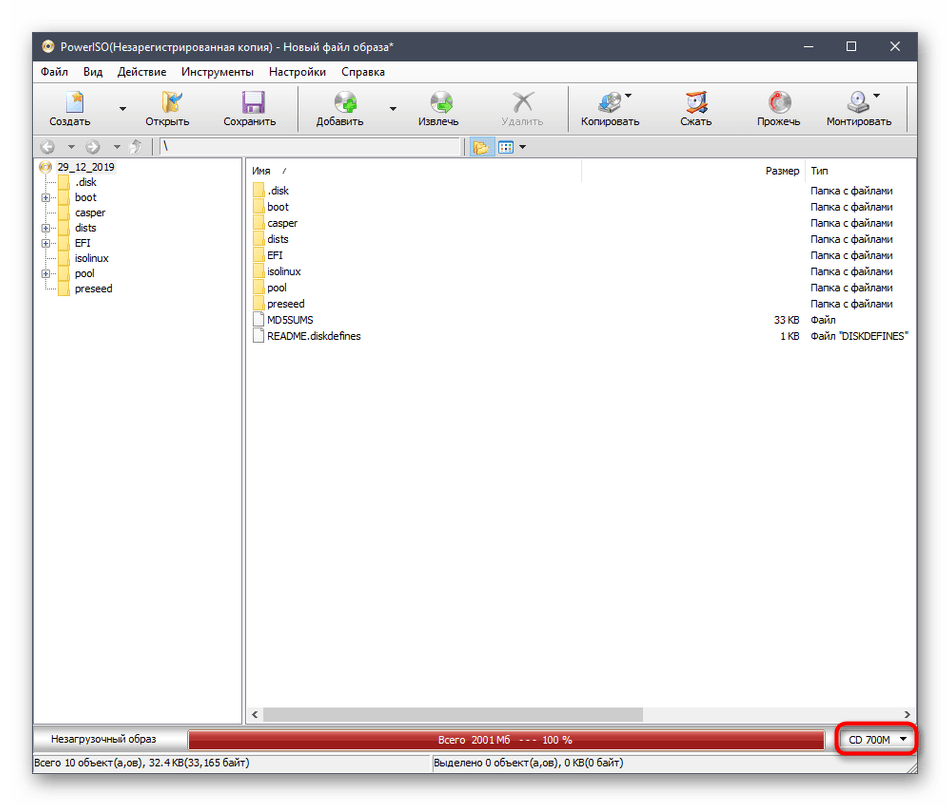

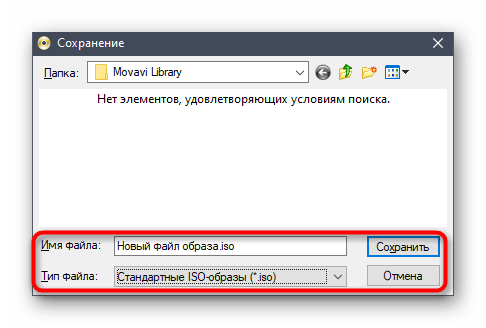
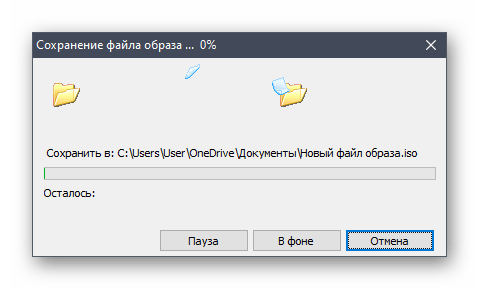
В PowerISO присутствует русский язык интерфейса, а принцип управления будет максимально понятен даже начинающим пользователям, поэтому никаких трудностей с созданием образа здесь возникнуть не должно.
Способ 3: CDBurnerXP
CDBurnerXP — последний инструмент нашего сегодняшнего материала, распространяющийся бесплатно. Мы рекомендуем ознакомиться с ним тем юзерам, кто не желает загружать пробные версии перечисленных выше решений. Принцип создания образа в Windows 10 через CDBurnerXP выглядит так:
Скачать CDBurnerXP
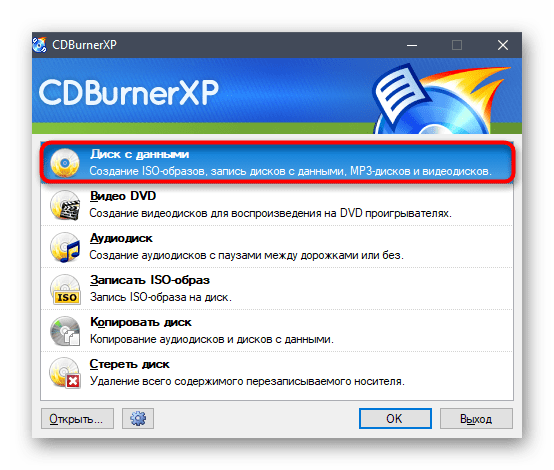
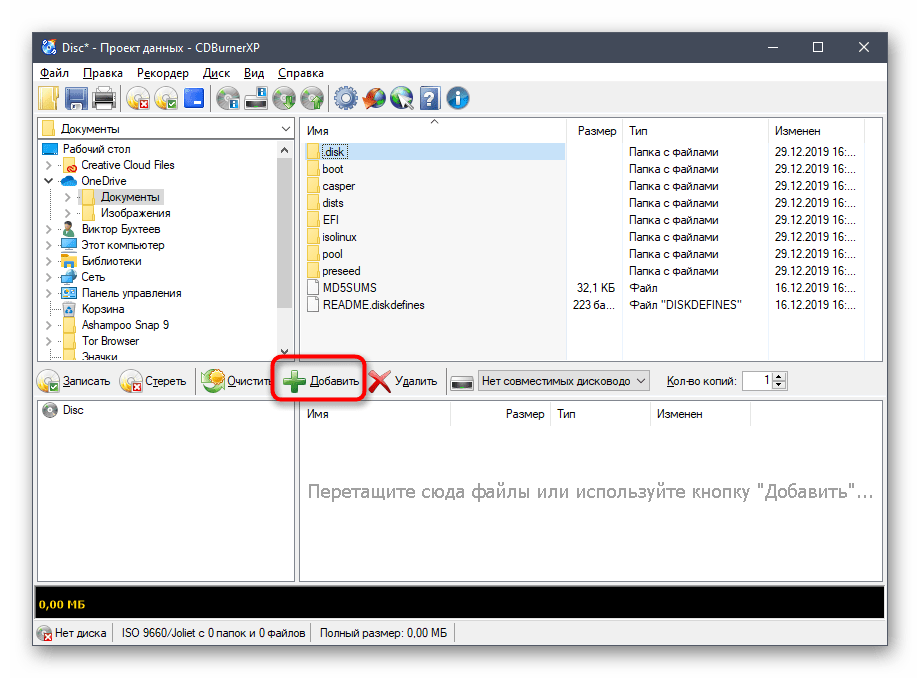
- В приветственном окне следует выбрать первый пункт «Диск с данными».
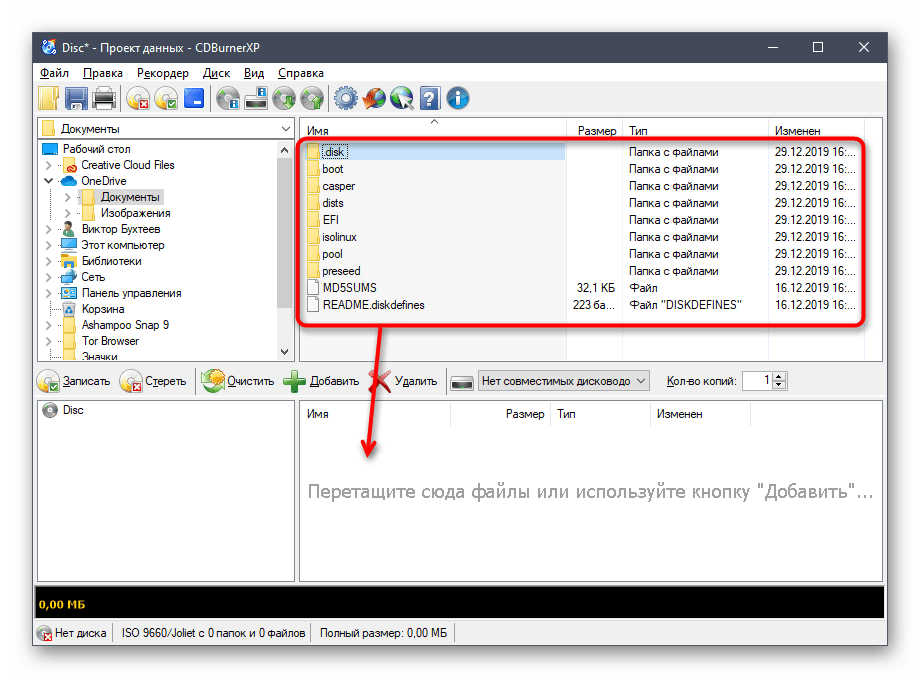
- Затем используйте встроенный обозреватель, чтобы перетащить файлы в соответствующую область.
- Это же можно сделать через стандартный «Проводник», кликнув на «Добавить».
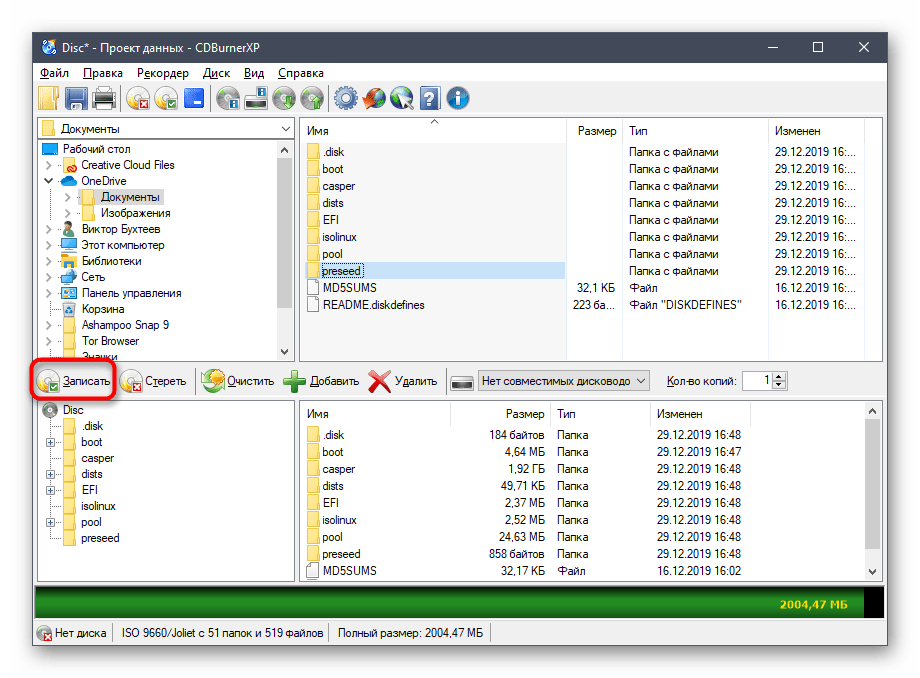
- Если хотите сохранить образ сразу на подключенный диск, нажмите на «Записать» и дождитесь окончания процедуры.
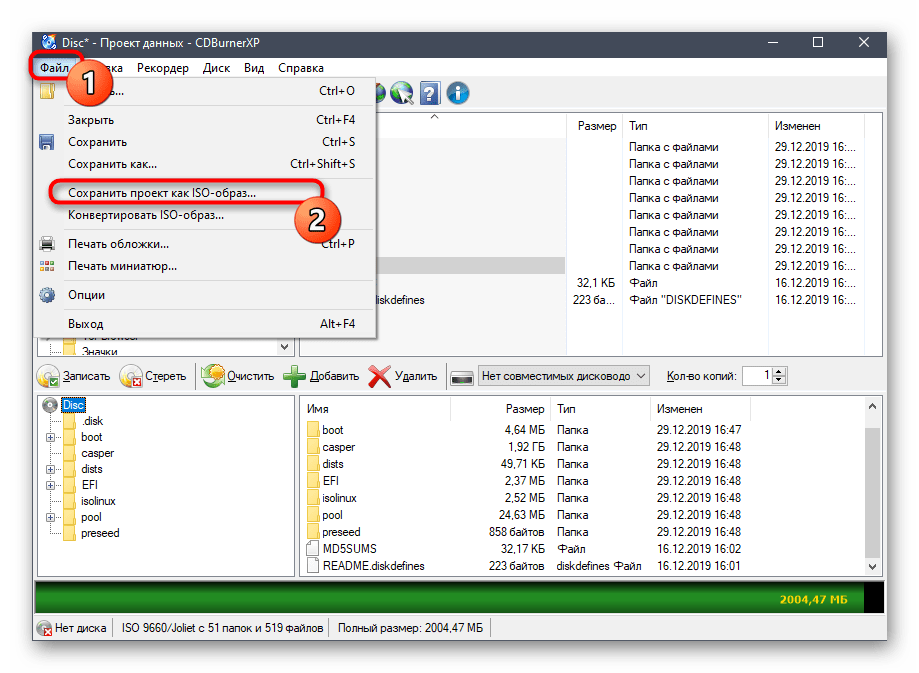
- Для сохранения образа ISO в разделе «Файл» нажмите на «Сохранить проект как ISO-образ».
- Через «Проводник» задайте название файлу и выберите место для его расположения.

В завершение сегодняшней статьи хотим отметить, что для Windows 10 существует еще множество программ, предназначенных для создания образов дисков из имеющихся файлов. Если ни один из приведенных выше вариантов вам не подошел, обратите внимание на статью по ссылке ниже. Там вы найдете детальные обзоры на всех популярных представителей подобного софта и точно подберете оптимальное для себя решение.
Подробнее: Программы для создания образа диска
Наша группа в TelegramПолезные советы и помощь


