
Last Updated :
06 Jun, 2024
In the big world of technology, knowing the basics can help you feel more comfortable and skilled when using computers and other devices. One important basic thing to know is how to find your IP address. Your IP address is like your digital home address, it’s essential for how computers talk to each other over networks.
For Windows users, uncovering this piece of information can seem daunting at first glance, but fear not; with a few simple steps, you can easily find your IP address and gain a deeper understanding of your network connection.

In this article, We will guide you to find your IP address on Windows, before that let’s know Why is IP address needed.
How to Find Your IP Address on Windows
- Why is IP Address Needed?
- What is my IP Address?
- Method 1: Find Your IP Address on Windows Using Settings
- Method 2: Find Your IP Address on Windows Using Control Panel
- Method 3: Find Your IP Address on Windows Using Command Prompt
- Method 4: Find Your IP Address on Windows Using PowerShell
- Method 5: Find Your IP Address on Windows Using Google Search
Why is IP Address Needed?
IP address of windows are essential for communication between devices on a network. They serve as unique identifiers, allowing devices to find and connect to each other across the vast expanse of the internet or within a local network. Without IP addresses, devices would not be able to communicate effectively, hindering activities such as browsing the web, sending emails, sharing files, streaming media, and much more.
In essence, IP address of windows enable the routing and delivery of data packets between devices, ensuring that information reaches its intended destination accurately and efficiently. They play a fundamental role in the functioning of the internet and are crucial for maintaining seamless connectivity in today’s digital world.
What is my IP Address?
Now, let’s look see different methods to check your IP Address on your Windows PC.
Method 1: Find Your IP Address of Windows 11 Using Settings
If you’re looking to quickly find your IP address of windows on your Windows computer, the Settings option provides a straightforward method. Here’s how you can do it:
Step 1: Press Win + I to open settings. Then among the left-side options, select Network & Internet.
Step 2: Select Wi-Fi or Ethernet depending on your type of connection.
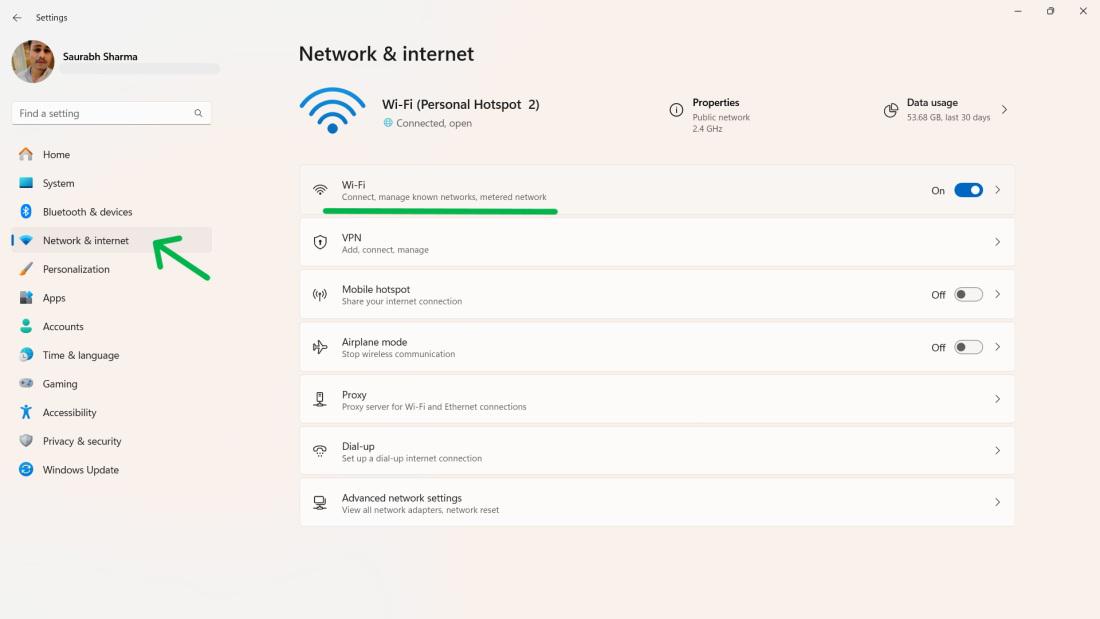
Step 3: Then, Click on your Wifi Properties.
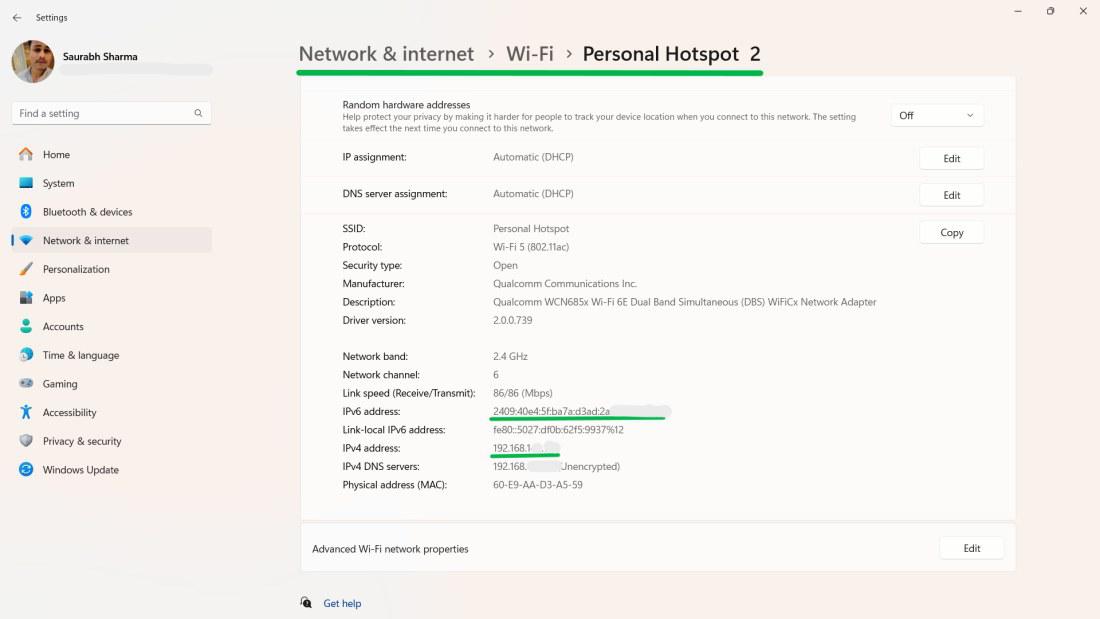
Step 4: If you scroll down to the bottom an IP address will be shown.
Method 2: Find Your IP Address of Windows Using Control Panel
Here in this section, we have mentioned the steps to find IP address using control panel. Using this step one can easily find IP on any Windows versions like Windows 7, Windows 8, WIndows 8.1, Windows 10 and Windows 11 follow these simple steps:
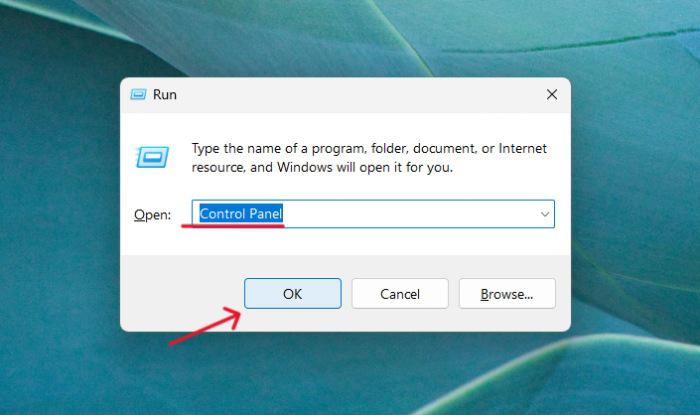
Step 1: To launch the Run dialog, use the Windows key + R.
Step 2: Type «control» or «Control Panel» and hit Enter.
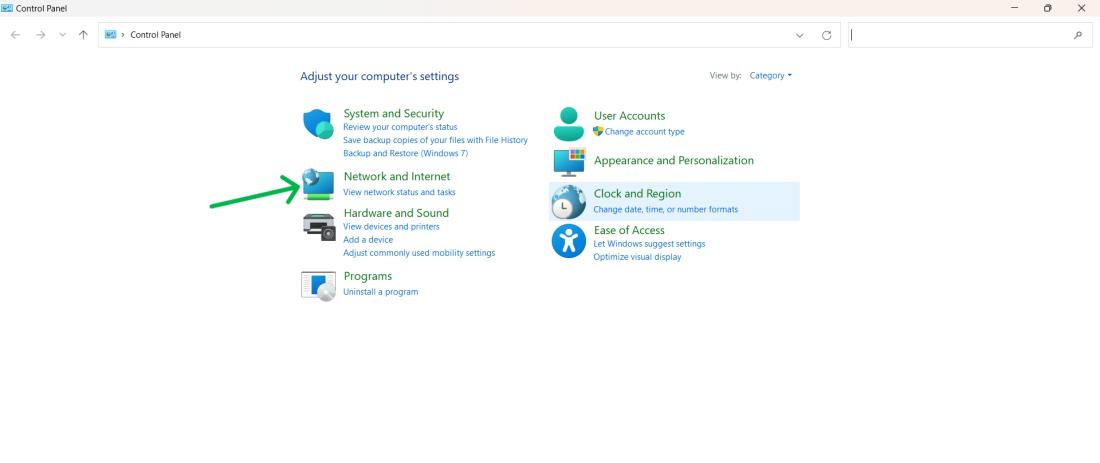
Step 3: Navigate to «Network and Internet«
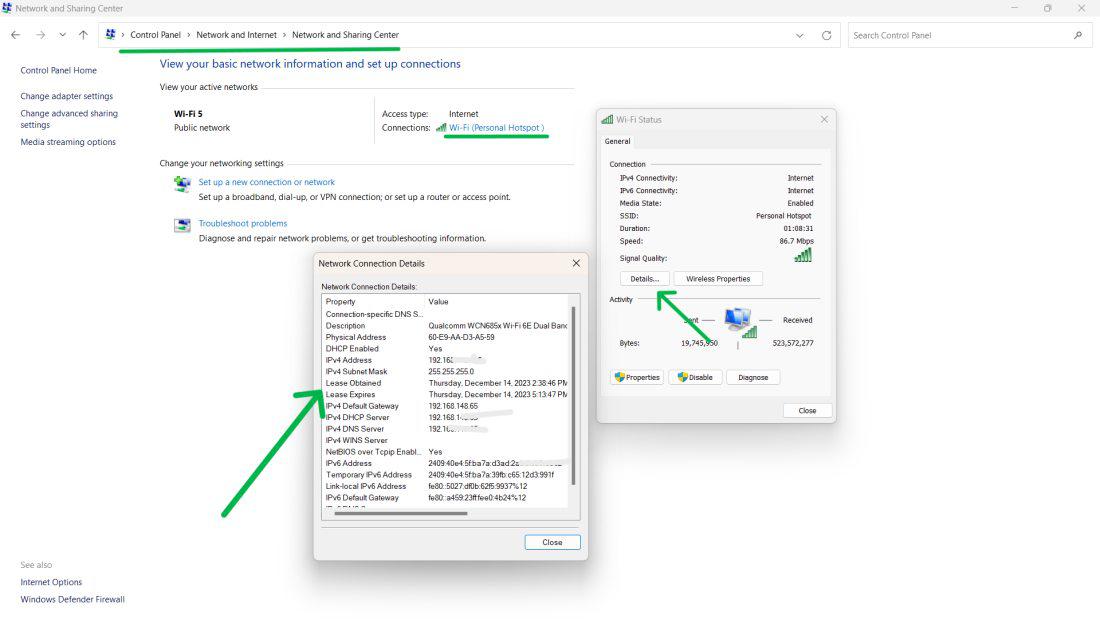
Step 4: Click on «Network and Sharing Center» option.
Step 5: Under View your active networks, select Wi-Fi (Your wifi name).
Step 6: Click on Connection’s a ‘Wi-Fi Status» window will pop up. In the Warning section, by clicking on Details we can get to another window.
On the window you can see, a new pop-up window will appear, with your IP address in it.
Method 3: Find Your IP Address of Windows Using Command Prompt
If you prefer a quick and efficient way to check IP address in Windows CMD, you can use the Command Prompt. Here’s how:
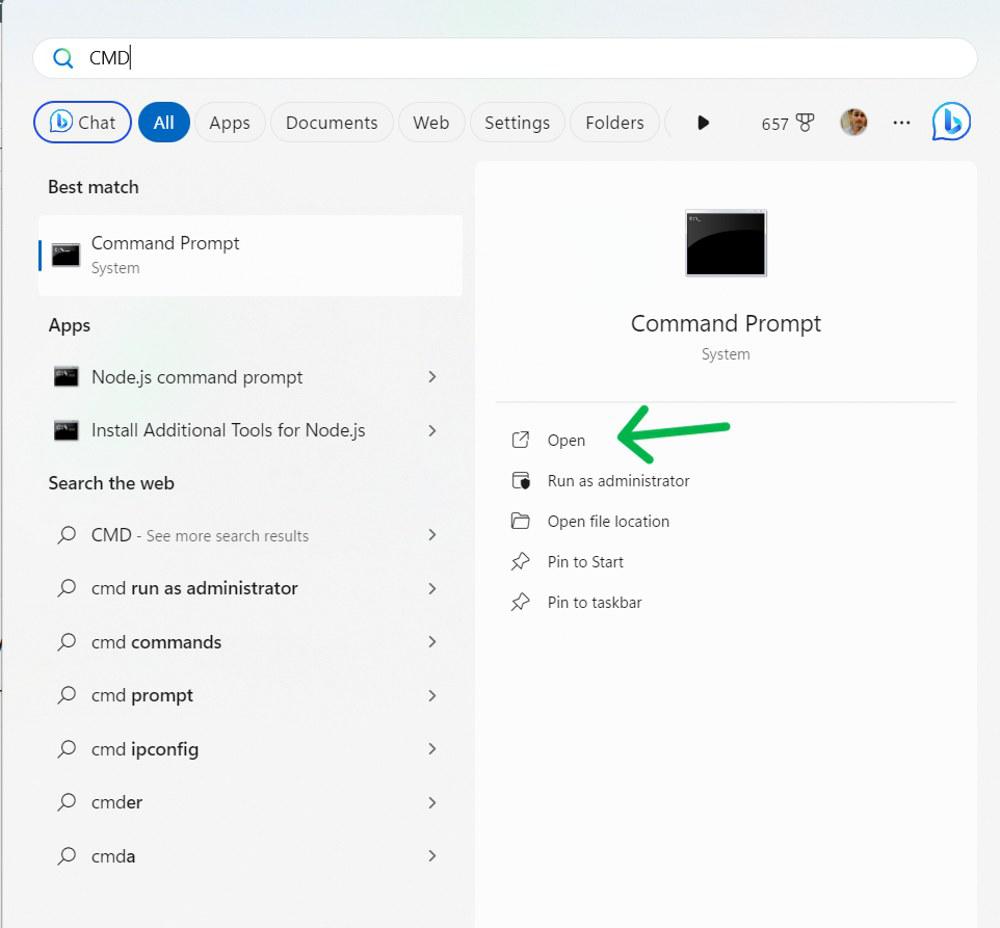
Step 1: Press Windows + S then on search bar type «Command Prompt«. or «CMD«
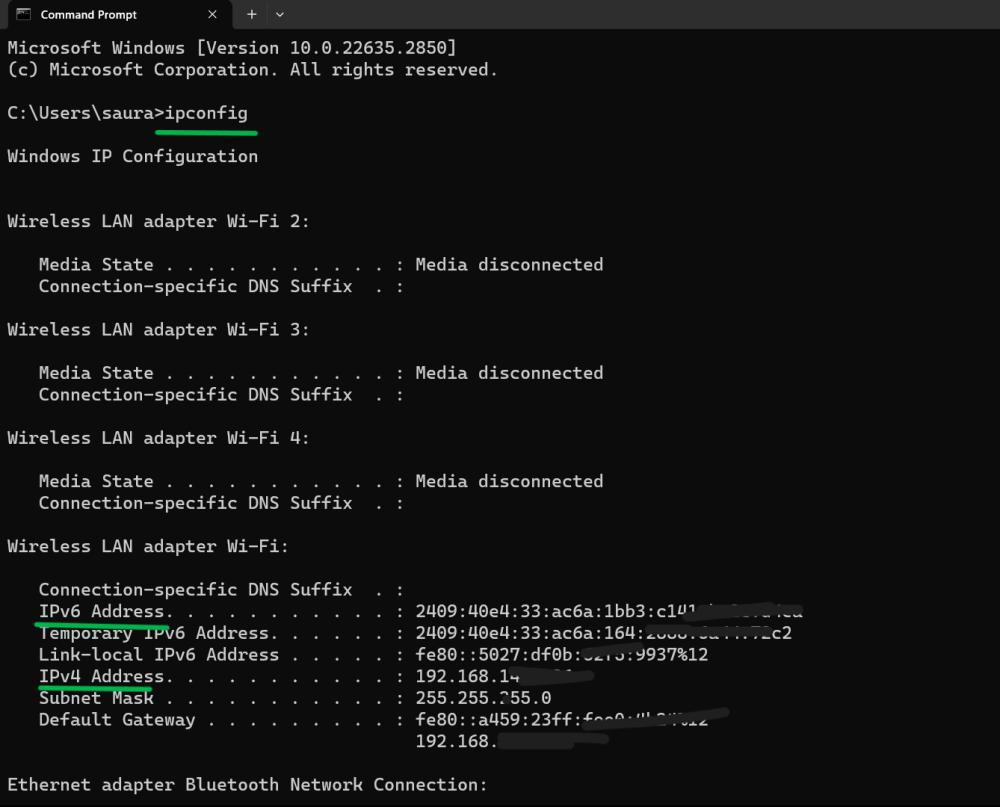
Step 2: Enter the following command and press enter
ipconfig
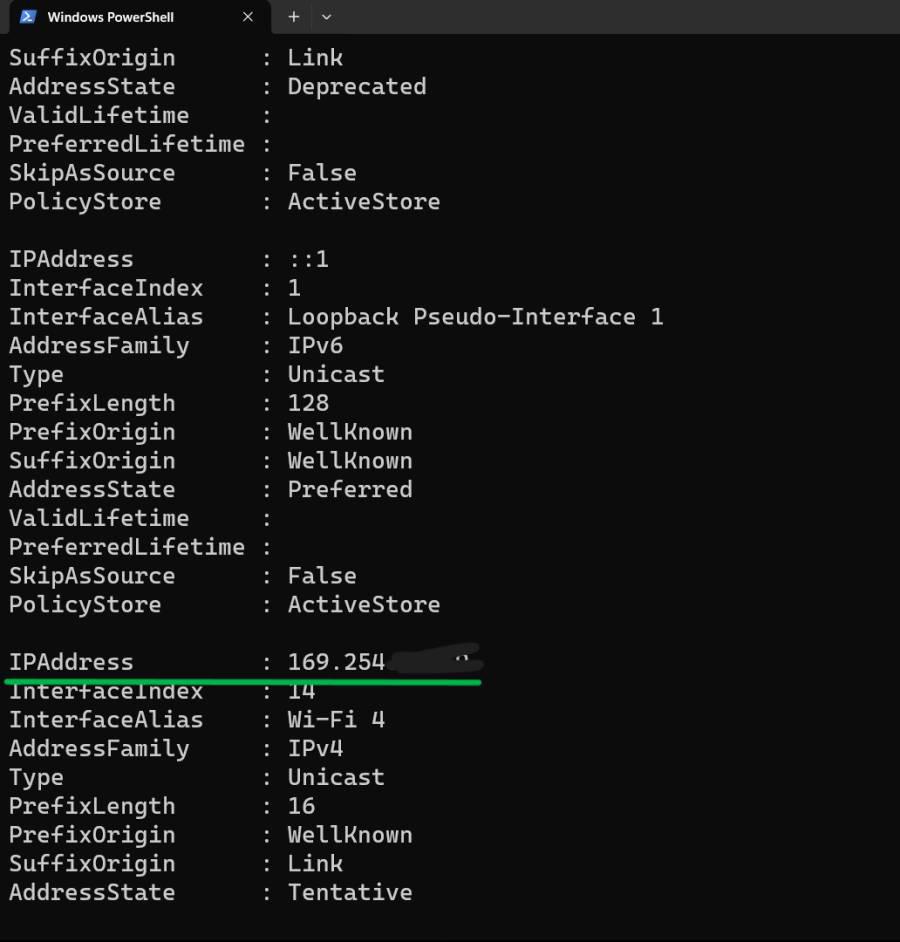
Method 4: Find Your IP Address of Windows Using PowerShell
If you’re looking for an alternative method to find your IP address on Windows, PowerShell can be a handy tool. PowerShell is a powerful command-line interface that allows you to execute commands and scripts to manage your Windows system. Here’s how you can use PowerShell to quickly retrieve your IP address:
Step 1: Press Windows + S then on search bar type «Windows PowerShell.»
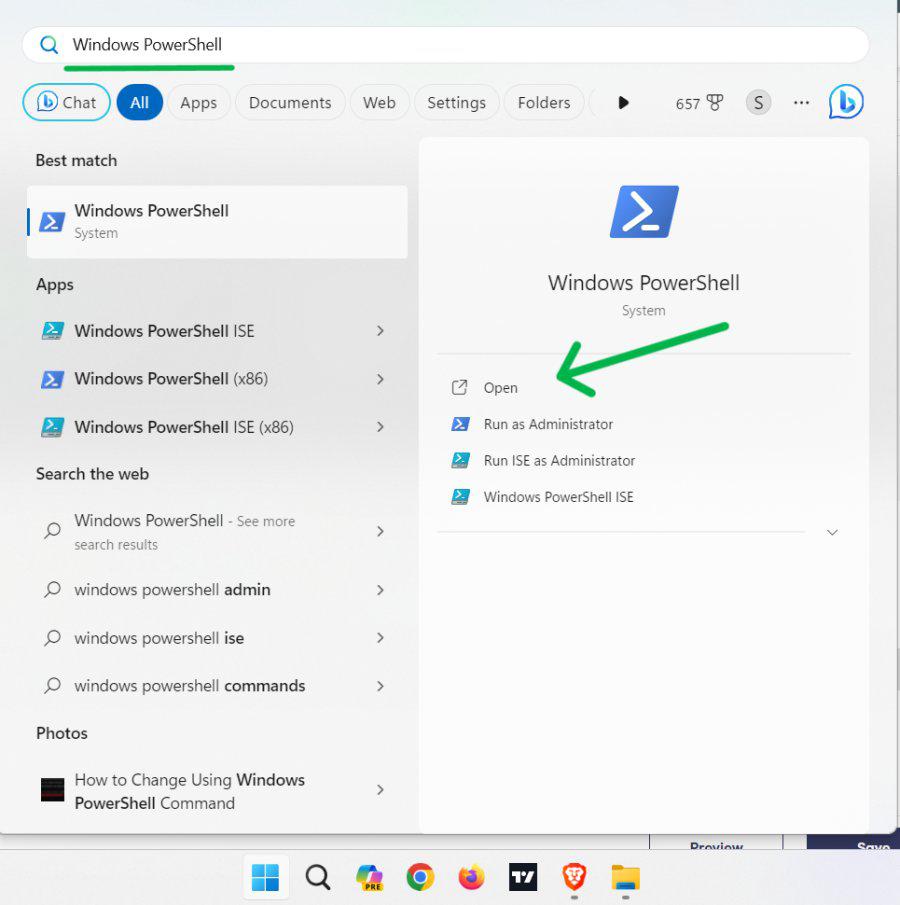
Step 2: Type the following command and scroll down
Get-NetIPAddress
Method 5: Find Your IP Address of Windows Using Google Search
You can find your Public IP Address by browsing on Google. Your public IP address is different from private IP address.
Check out: Difference between Private and Public IP addresses?
Step 1: Open your preferred web browser. Here we are using Google chrome browser.
Step 2: Type «What Is My IP Address» into the browser search bar.
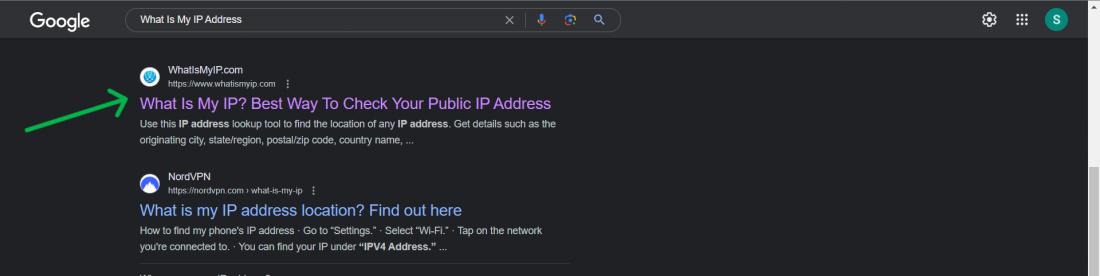
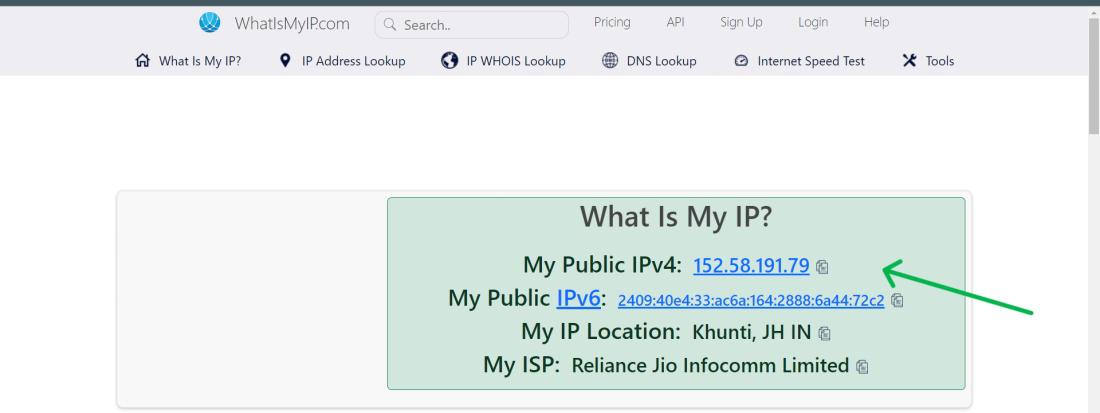
Step 3: The website will display your public IP address
Conclusion
In conclusion, knowing how to find your IP address on Windows is essential for troubleshooting network problems, setting up servers, or configuring network devices. By following the simple methods outlined in this article, you can quickly locate your IP address and gain valuable insights into your network configuration.
Whether you prefer using the Command Prompt, checking network settings, or utilizing third-party tools, there’s a method that suits your needs. So, next time you need to find your IP address on Windows, you’ll know exactly where to look. Empower yourself with this essential skill and stay connected with ease on your Windows device.
Download Article
Easy ways to find your public or private IP address on a PC
Download Article
- Find Your Public IP Address Using Google
- Find Your Public IP Address Using a Website
- Find Your Local IP Address Using the Windows Settings Menu
- Finding Your Local IP Address in Control Panel
- Finding Your Local IP Address in Command Prompt
- Finding Your Public IP Address on Your Router
- Finding Your IP Address on Linux
- Video
- Q&A
- Tips
|
|
|
|
|
|
|
|
|
Do you need to find your IP address? Your PC’s IP address is its unique locater on the internet. If your PC is connected to a local network as well as the internet, it will have two IP addresses—one that marks its location on the local network, and one that marks its public location on the internet. You may need to know your IP address for setting up port forwarding, configuring internet software, remote desktop computing, or troubleshooting problems with your internet connection. This wikiHow article teaches you how to find out both your internal and external IP addresses on any Windows PC.
How Do I Find My IP Address on My Computer?
- Google «what is my IP address.» Google will show your IP address at the top of the search results.
- Alternatively, use a website like What Is My IP Address to find your IP.
- You can also find your IP address in your computer settings. Go to «Settings,» «Network & Internet,» «Wi-Fi,» then «Hardware Properties.»
-

The IP address you’ll find with this method is your public IP address which is assigned to you by your internet service provider (ISP).[1]
Tip: If you’re using your computer behind a router or wireless access point, your local IP address will be different than your public IP address. See one of the methods to find out your local IP address.
-
Navigate to https://www.google.com. You can use Google to find your IP address just as easily as you can use it to find other information.
Advertisement
-
Your IP address will now appear at the top of the search results above «Your public IP address.» It looks like four groups of up to three numbers, separated by periods, such as 10.0.0.1.


Advertisement
-
-
Your IP address looks like four groups of numbers separated by periods (i.e, 10.0.0.1). The website should detect your IP address automatically. It will be listed next to «IPv4 address» or «IPv6 address.»


Advertisement
-
It’s the icon with the Windows logo in the taskbar at the bottom of the screen. You can use the Windows Settings menu to find your private IP address.[2]
- If you want to check your local IP address on a Mac, you can do so using the Network menu in System Preferences. You can also find your IP address on other internet-connected devices.
-
It’s next to the gear icon. On Windows 10, it’s in the sidebar to the left of the Windows Start menu. On Windows 11, it’s listed in the list of pinned apps at the top of the Windows Start menu.[3]
-
On Windows 10, it’s next to the wireframe globe. On Windows 11, it’s in the menu to the left next to the Wi-Fi fan symbol.[4]
-
If you are using a wireless internet connection, click Wi-Fi. If you are using a wired connection, click Ethernet. In Windows 10, both these options are at the top of the menu bar on the left side. On Windows 11, both these options are in the main menu near the top.[5]
-
It’s in the main menu on both Windows 10 and Windows 11.
-
Your local IP address will be listed next to «IPv4 address» or «IPv6 address.». It’ll be towards the bottom of the Hardware Properties information page.[6]


Advertisement
-
You can also open it by clicking the magnifying glass or circle icon next to the Start menu or by clicking the Start menu itself.[7]
- If you’re using Windows 7, click the Start menu, select Control Panel, type adapter into the search bar, and then skip to step 3.
-
As you type, a list of matching search results will appear.[8]
-
It will be in the list of search results in the Search menu.
-
Your active network connection will be the Wi-Fi or Ethernet connection that does not have a red ‘x’ next to the icon. For example, if you’re currently connected via a wireless network, double-click the «Wi-Fi» connection to view its info. [9]
-
You will find your IP address next to «IPv4 address» or «IPv6 address.»
- If you’re on a local network behind a router (common when connected to Wi-Fi), this address may be internal only. See the «Using Google» method to find out your public IP address.


Advertisement
-
To open the command prompt, click the Windows Start menu and type CMD. Then click Command Prompt.
-
This will display your network connection information.
-
Your active connection may be labeled Wireless Network Connection, Wireless LAN adapter, Ethernet adapter, or Local Area Connection. It may also be labeled by the manufacturer of your network adapter.
-
Your local IP address will be listed next to «IPv4 Address» or «IPv6 address» below your active network adapter.
- The IP address is four sets of digits, with up to three digits per set. For example, it might look like 10.0.0.1
- If you’re on a local network behind a router (common when connected to Wi-Fi), this address may be internal only. You can find your public IP address using Google.
- If you’re behind a router, the router’s local IP address is the one listed next to «Default Gateway.»


Advertisement
-
Almost all routers can be accessed through a web interface where you can see and adjust settings. Enter the IP address of the router in the address bar of a web browser.[10]
- For example, you may type https://10.0.0.1 into your browser’s address bar if that’s the address of your router.
- Other common addresses are 192.168.1.1, 192.168.0.1, and 192.168.2.1.
- To find out the exact address of your router, use the steps described in this method to pull up the IP information. The router’s IP address will appear next to «Default Gateway.»
-
The username and password combination varies by router make and model, but most are super basic if you haven’t changed that information. Try some of these combinations for different router brands:
- Username: admin Password: admin
- Username: admin Password: password
- Username: admin Password: (leave blank)
- If none of these work, search for the name and model of your router on the internet along with the text «admin password.»
-
The name of the page may vary depending on the make and model of your router. Look for a page that displays your network information.
- If you are using a Netgear router with the Netgear Genie configuration software, click the Advanced tab.
-
You should find it on the Router Status, Internet, or WAN page. The IP address is 4 sets of digits, with up to three digits per set, such as 199.27.79.192.
- This is the IP address that your router is assigned by the ISP. Most external IP addresses are dynamic, which means they change from time to time.


Advertisement
-
You can check your local IP address using the Terminal. You can use the keyboard shortcut Ctrl + Alt + T to open the Terminal on most Linux distributions.[11]
-
This displays your internal IP address info, which is usually assigned to you by your local router. The IP address for each interface (Ethernet, Wi-Fi, etc.) appears next to «inet addr.»[12]
- If your computer is connected via Ethernet, the «inet addr» you’re looking for us likely called eth0. If you’re using Wi-Fi, it’s likely under wlan0.
- The IP address will be four groups of up to three numbers, separated by periods. For example, it might look like 192.168.1.4
-
This displays your public IP address, which is the external address assigned to you by your ISP.[13]


Advertisement
Add New Question
-
Question
How can I change my IP address?
-
Question
My laptop won’t connect to the Internet and it needs an IP address. How can I fix this?
You need to connect with an eathernet cable and go to the ACP and change the network IP. I suggest you talk to your network provider.
-
Question
How do I change the IP address on my computer?
If you’ve got a dynamic IP with your ISP (call them to check), you can reset your router to get a new global IP. If you want to change your local IP, that’s something you do within your router’s settings.
See more answers
Ask a Question
200 characters left
Include your email address to get a message when this question is answered.
Submit
Advertisement
-
Most external IP addresses are dynamic, which means they change from time to time.
Thanks for submitting a tip for review!
Advertisement
Video
References
About This Article
Article SummaryX
1. Go to www.google.com and search «find my IP» to find your public IP address.
2. Open the Start Menu and click Settings.
3. Click Network & Internet.
4. Click Wi-Fi if you are using a wireless connection or Ethernet if you are using a wired connection.
5. Click Hardware Properties.
6. Check your local IP address next to «IPv4 address» or «IPv6 address.»
Did this summary help you?
Thanks to all authors for creating a page that has been read 6,802,546 times.
Reader Success Stories
-
Kana Natarajan
Mar 8, 2016
«Excellent instructions to find your IP address. Thanks to the author for writing easy and simple steps.»
Is this article up to date?
The IP address or Internet Protocol address is a numerical label used in networks to identify and locate network devices, from computers and smartphones to printers, TVs, and other devices. The IP address can be a useful piece of information, especially when you want to set up your home router or connect to other devices on a network. But how do you see a computer’s IP address in Windows? In this tutorial, I cover six methods guaranteed to work in Windows 10 and Windows 11:
NOTE: If you are unsure of what an IP address is and what purpose it serves, I recommend you to read: What is an IP address and a subnet mask, in simple terms?
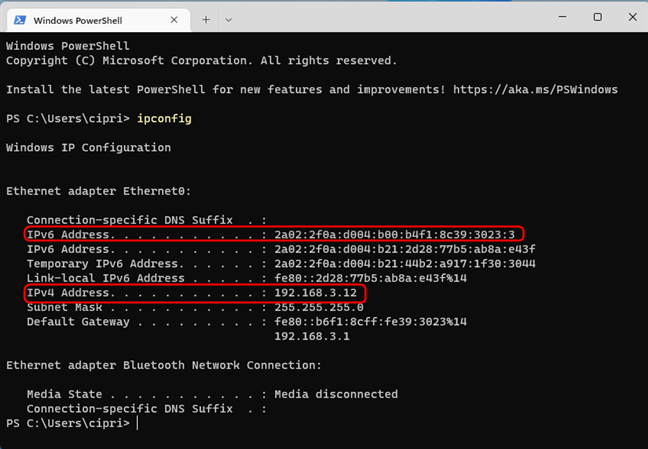
1. How to find your IP address using CMD, PowerShell, or Windows Terminal
You can open the Command Prompt, PowerShell, or even the Windows Terminal, type the following command, and press Enter:
ipconfig
For each network adapter inside your Windows computer, you see its IPv4 and IPv6 addresses. The first is found in the IPv4 Address field, while the second is stored in the IPv6 Address field.
Find your IP address with ipconfig
You can also add a variable to this command to filter the data shown by this command to show only the addresses you’re interested in, like this:
ipconfig | findstr /C:Address
Notice how you see only the Address fields. One thing that may confuse you is that a network adapter can use two different IPv6 addresses at the same time, not just one, as is the case with IPv4 addresses.
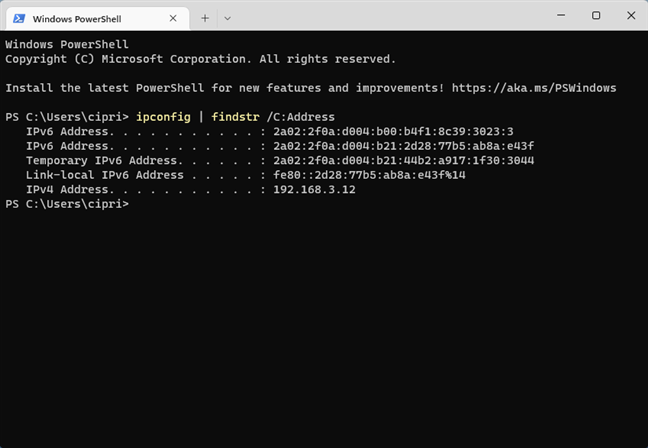
Find your IP address with ipconfig | findstr /C:Address
This second command variant is not that useful when you have multiple network adapters (Wi-Fi, Ethernet, VPN, etc.) on your computer because you can’t tell which address corresponds to each adapter. Therefore, if you have multiple network cards inside your PC, use the first command variant.
To learn more about the parameters accepted by ipconfig and what each of them does, run:
ipconfig /?
TIP: If you are interested in reading about other networking commands you can run using the Command Prompt, check this tutorial: Command Prompt (CMD): 10 network-related commands you should know.
2. How to find your IP address using PowerShell or Windows Terminal
You can also start PowerShell or open Windows Terminal and run other commands to find your computer’s IPv4 and IPv6 addresses on the local network. Inside the PowerShell window or a PowerShell tab in Windows Terminal, type this command and press Enter:
gip
You see details about each network adapter on your computer, including the IP addresses you were looking for, in the IPv6Address and IPv4Address fields.

Find your IP address with gip
Another command which returns the same results is:
Get-NetIPConfiguration
Don’t forget to press Enter to execute it. Then, you see details about each network adapter inside your computer, presented in a similar format. Look for the IPv6Address and IPv4Address fields to get the information you want.
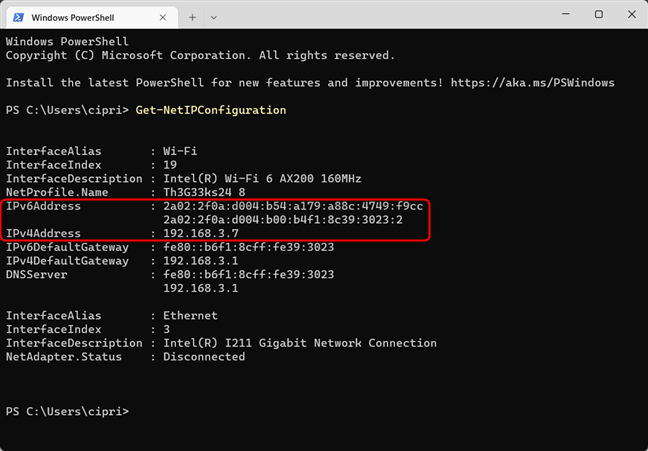
Find your IP address with Get-NetIPConfiguration
TIP: Do you need to find the IP address of your router? Read this guide: How do I find my router’s IP address?
3. How to see your IP address in the Settings app
This information is available in the Settings app too. However, the steps involved are a bit different depending on whether you’re using Windows 10 or Windows 11. To help you out, we created a separate subchapter for each Windows operating system.
How to see your IP address in the Settings app from Windows 11
If you’re on a Windows 11 laptop or desktop computer, open the Settings app (Windows + I). In the left sidebar, choose Network & internet. On the right, select Wi-Fi or Ethernet, depending on the type of network connection you use.
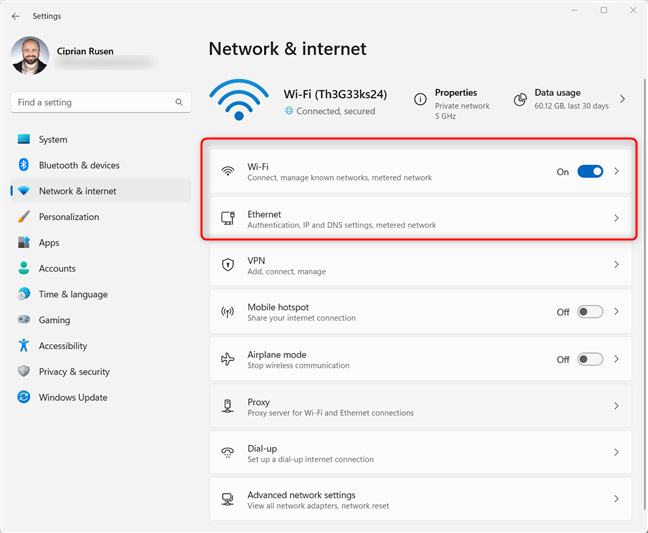
In Windows 11 Settings, go to Network & internet
I’m using a Windows 11 laptop without an Ethernet port, and you might be too. Therefore, I chose Wi-Fi. Then, click or tap on the Properties button for your active Wi-Fi connection.
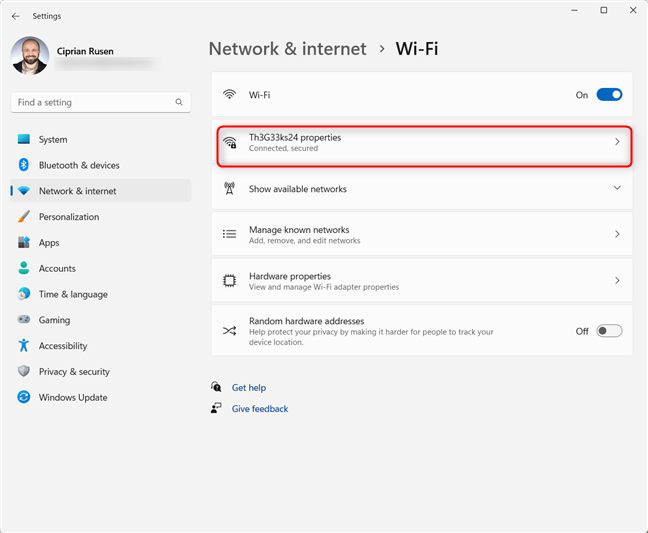
Access the Properties of your active Wi-Fi connection
Now you see all the technical properties of your wireless connection. Scroll down until you see the IPv6 address and IPv4 address fields.

Find your IP address in the highlighted fields
If you’re using a desktop PC with a cable network connection, choose Ethernet instead of Wi-Fi, and you immediately see the properties of your connection. Scroll down to see the IPv4 and IPv6 addresses.
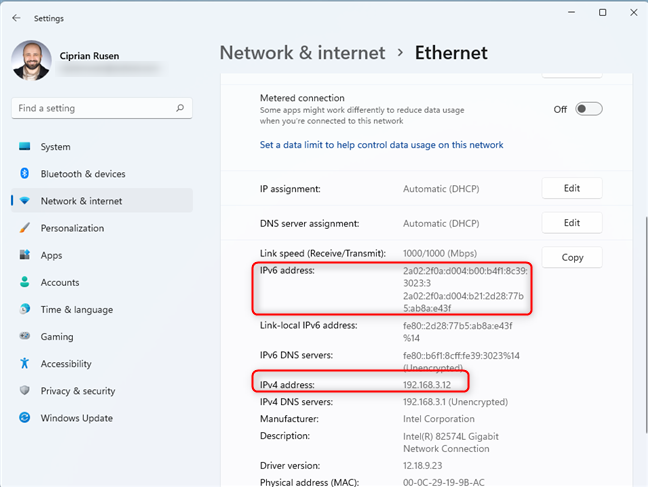
Find the IP address for an Ethernet connection in Windows 11
Close the Settings when you’re done.
How to see your IP address in the Settings app from Windows 10
On your Windows 10 PC, open Settings (Windows + I) and go to Network & Internet. You are shown a list of networking settings and categories. If you are connected to a wireless network, choose Wi-Fi on the left, and, on the right, click or tap on the name of the network you are connected to.
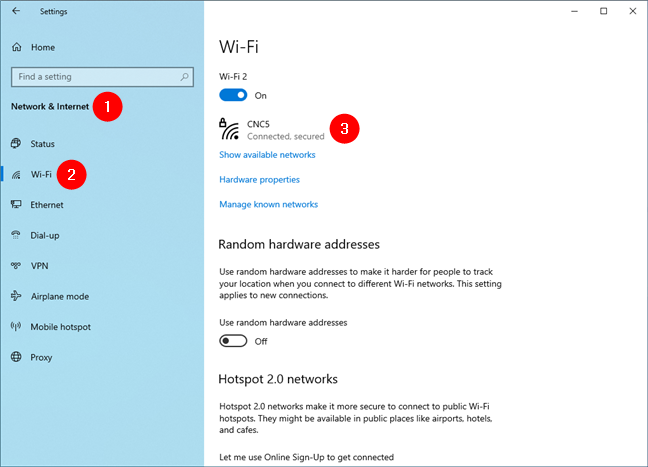
Click or tap Wi-Fi and then on the network’s name
Windows 10 will then list a whole series of properties for your Wi-Fi connection. Scroll down until you find the fields for the IPv6 and IPv4 addresses highlighted below.
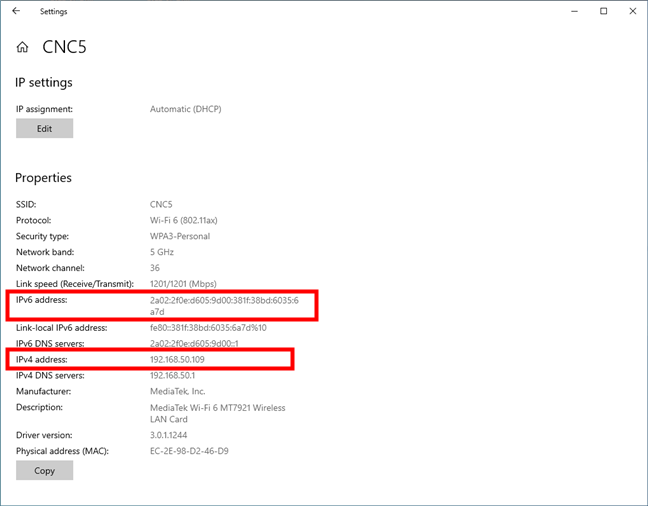
Find the IP address for a Wi-Fi connection in Windows 10
If you are connected using a network cable, in the left sidebar, choose Ethernet and then click or tap on the network’s name on the right.
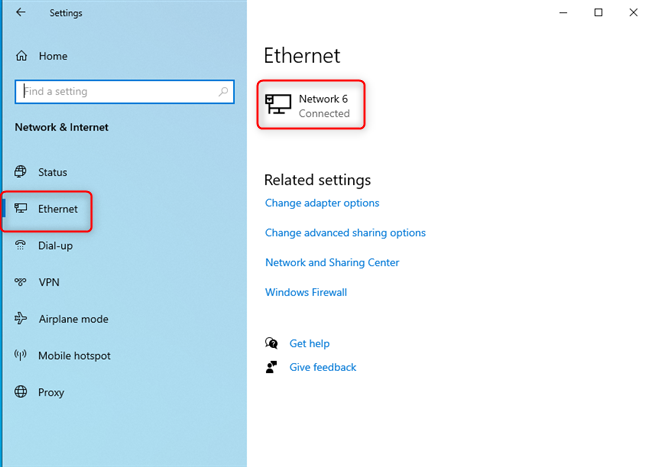
Click or tap Ethernet and then on the network’s name
Scroll down the list of network properties until you find the entries for the IPv6 and IPv4 addresses highlighted below.

Find the IP address for an Ethernet connection in Windows 10
Close the Settings app when you’re done.
4. How to find your IP address in the Control Panel
If you’re on an older version of Windows, you can also use the Control Panel to find this information. This works in Windows 10 and Windows 11 too, and the steps involved are the same in all versions:
Open the Control Panel and go to Network and Internet. Then, click on Network and Sharing Center.
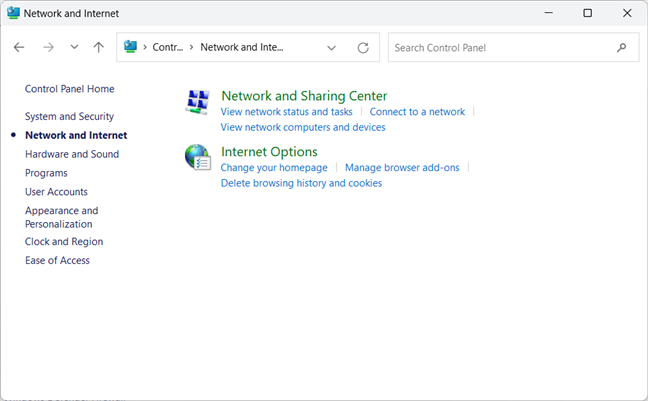
In Control Panel, go to Network and Internet > Network and Sharing Center
In the left column, click “Change adapter settings.”
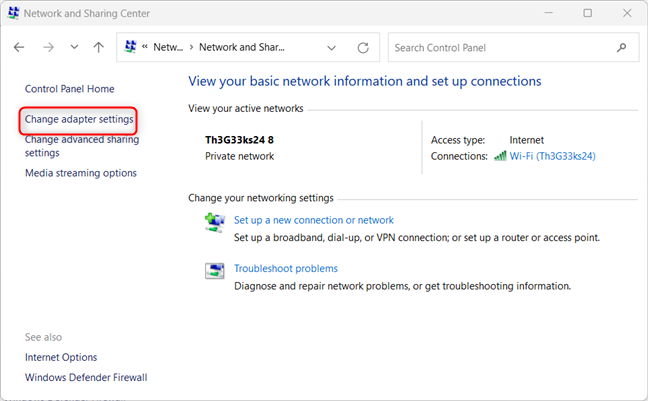
Click Change adapter settings
You see all the network adapters on your PC. Some of them may be virtual network adapters, like those installed by VPNs or Virtual Machines. Double click on the network adapter for which you want to see the IP address.
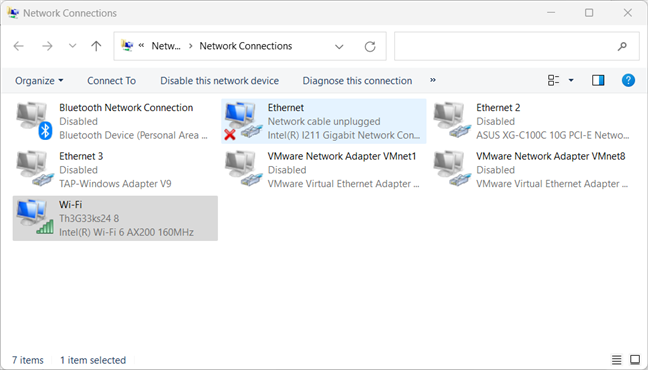
Double click on the network adapter
This action opens the Status window of that adapter. Next, click the Details button to see a series of details about that network adapter.
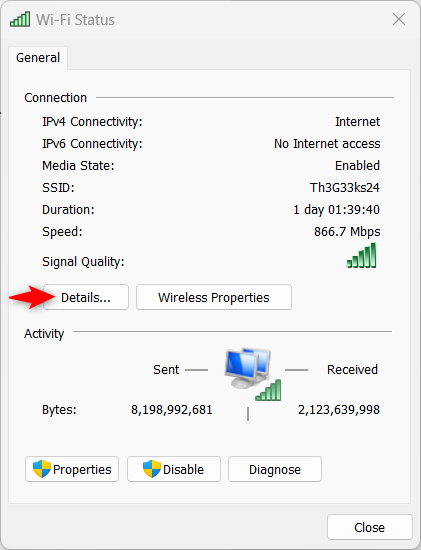
Click on Details
Scroll through the list of details until you find the IPv4 and IPv6 address fields highlighted below.
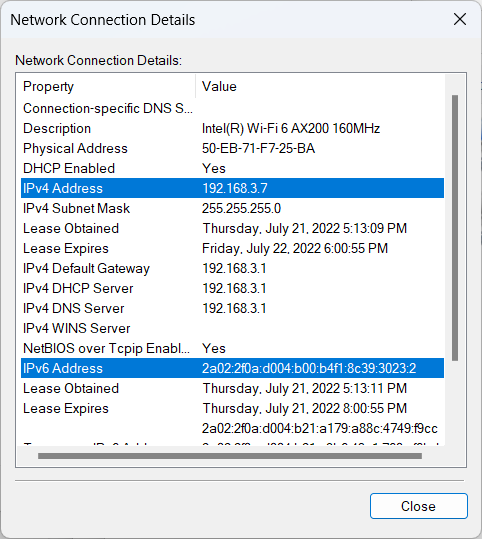
See the IP address
When done, click Close.
TIP: You may also want to find the MAC address of your PC.
5. How to find your IP address with System Information
You can use the Search bar in Windows 10 or the Search button in Windows 11 to look for “system information.” Click or tap on the app’s name in the search results list.
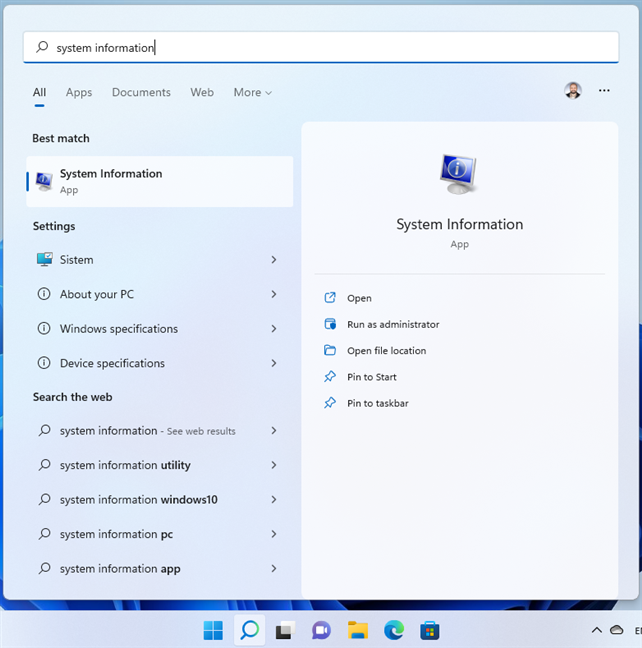
Search for system information
In System Information, in the left column, expand Components followed by Network and then Adapter. On the right side, you see detailed information about each network adapter on your computer. Scroll down the list until you find the network card you are interested in. There, you see a field named IP Address that shows both the IPv4 and the IPv6 address on the same line.
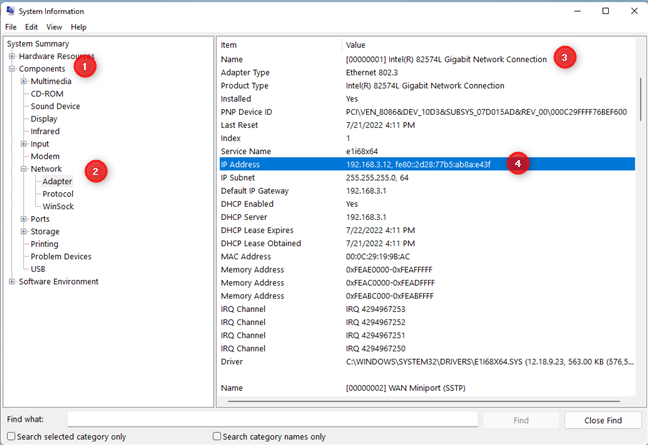
View the IP Address in System Information
TIP: If you want to know more about System Information, read: How to see details about your PC’s hardware and software using System Information.
6. How to learn your IP address using Task Manager
The Task Manager can also tell you the IP address you’re using on the local network. To fire it up, press Ctrl + Shift+ Escape on your keyboard or use any of the other ways of opening Task Manager. If you’re using Windows 10, and you start the Task Manager in the compact view, click or tap More details. Then, select the Performance tab and look for your network adapter. If you are connected to a wireless network, choose Wi-Fi. If you’re using a cable connection, choose Ethernet. Then, on the right side, you see the IPv6 and IPv4 addresses.
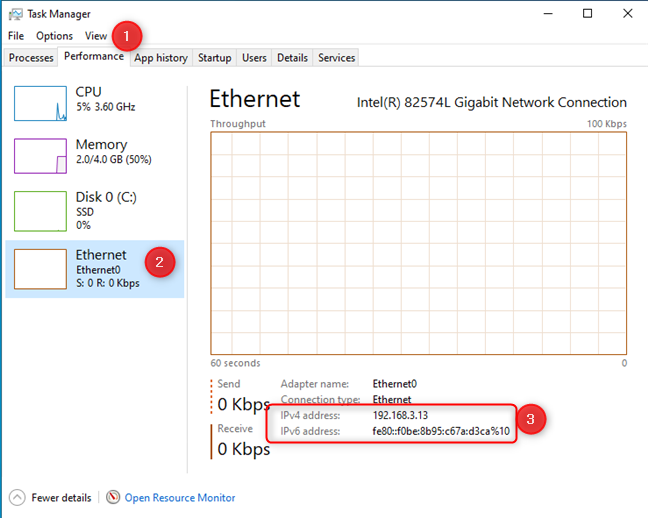
View the IP address in Task Manager (Windows 10)
Things are similar in Windows 11. However, when you fire up the Task Manager, there’s no annoying compact view. Instead, you just select the Performance tab on the left and click or tap on Wi-Fi or Ethernet, depending on your network connection. Then, on the bottom-right, you see your computer’s IPv6 and IPv4 addresses.
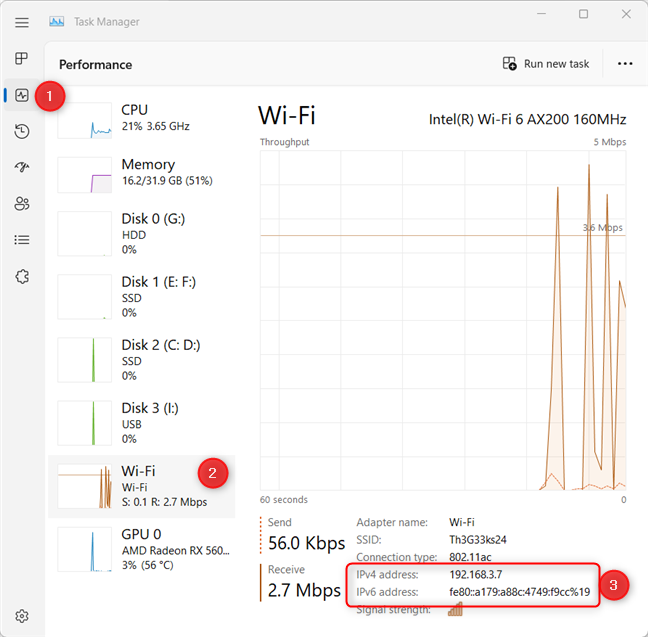
View the IP address in Task Manager (Windows 11)
Do you know other ways of finding your IP address?
When writing this guide, I aimed to make it the most complete tutorial on this topic available right now on the internet. I hope I was successful in my mission and managed to help everyone reading it. However, if you know other ways of finding the IP address of a Windows PC, don’t hesitate to share it in a comment using the options below. I promise to update this guide based on your feedback.