
ZLIB — это библиотека сжатия-распаковки, необходимая для библиотеки NVIDIA cuDNN. Итак, если вы хотите написать программу искусственного интеллекта или машинного обучения с использованием NVIDIA CUDA и NVIDIA cuDNN, вам необходимо установить библиотеку ZLIB в вашей операционной системе Windows 10/11.
В этой статье мы покажем вам, как загрузить и установить библиотеку ZLIB в операционных системах Windows 10 и Windows 11.
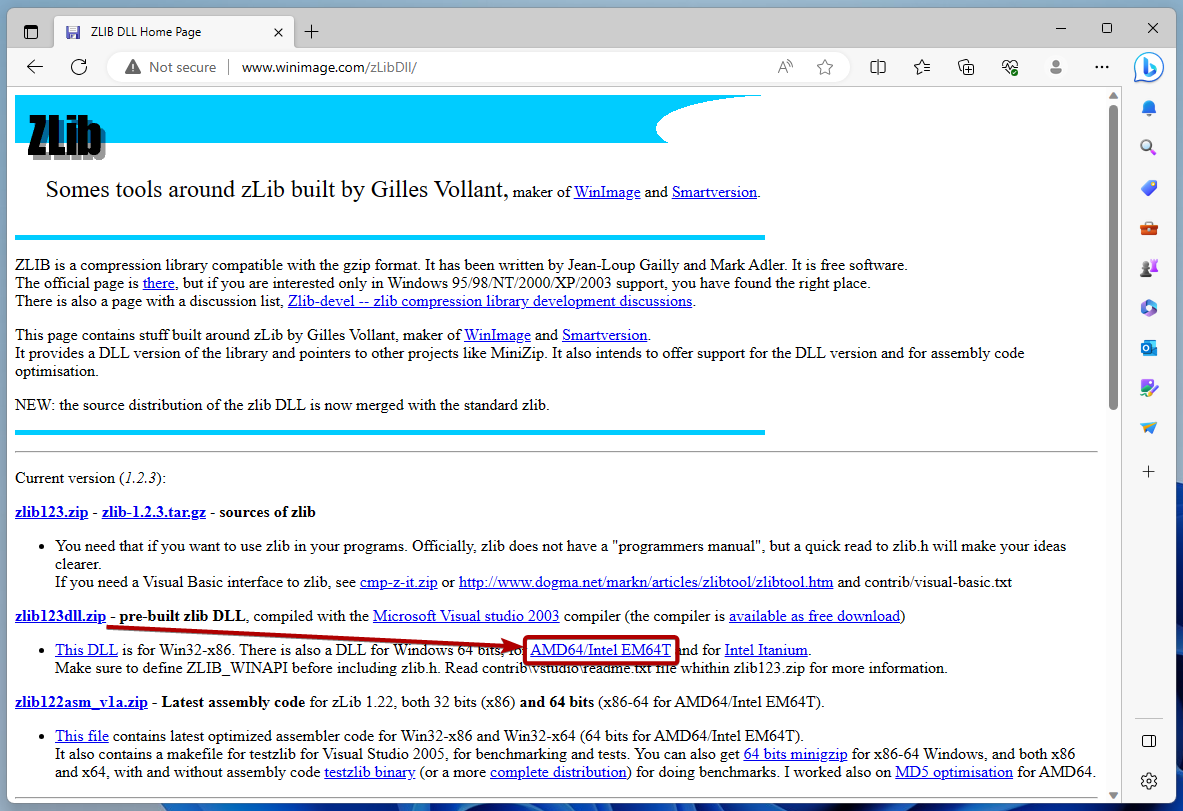
Чтобы загрузить ZLIB для Windows, посетите http://www.winimage.com/zLibDll/ в своем любимом веб-браузере.
После загрузки страницы нажмите «AMD64/Intel EM64T» в разделе «zlib123dll.zip», как показано на следующем снимке экрана:
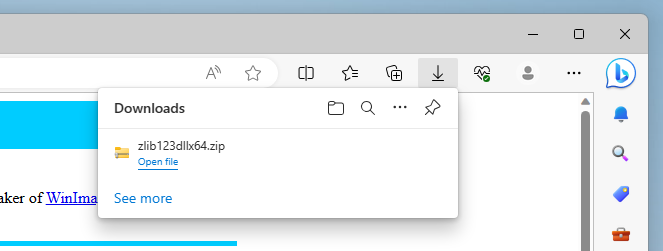
Ваш браузер должен загрузить архив ZLIB.
Извлечение архива ZLIB и перемещение его в нужное место
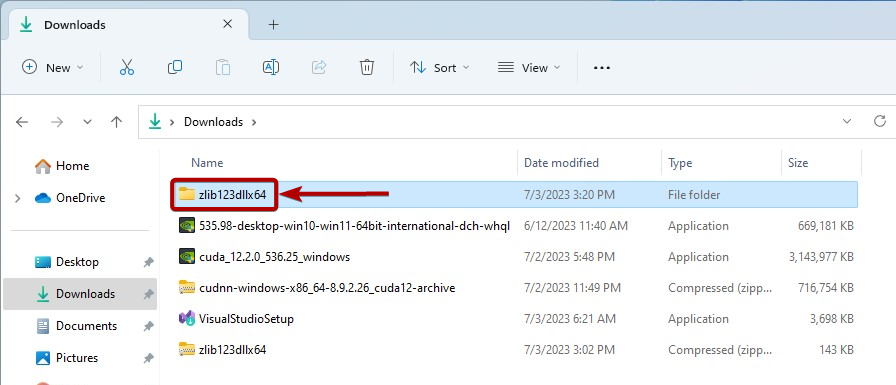
После загрузки ZLIB перейдите в папку «Загрузки» Windows, щелкните правой кнопкой мыши (ПКМ) «Архив ZLIB» и нажмите «Извлечь все…», как показано на следующем снимке экрана:
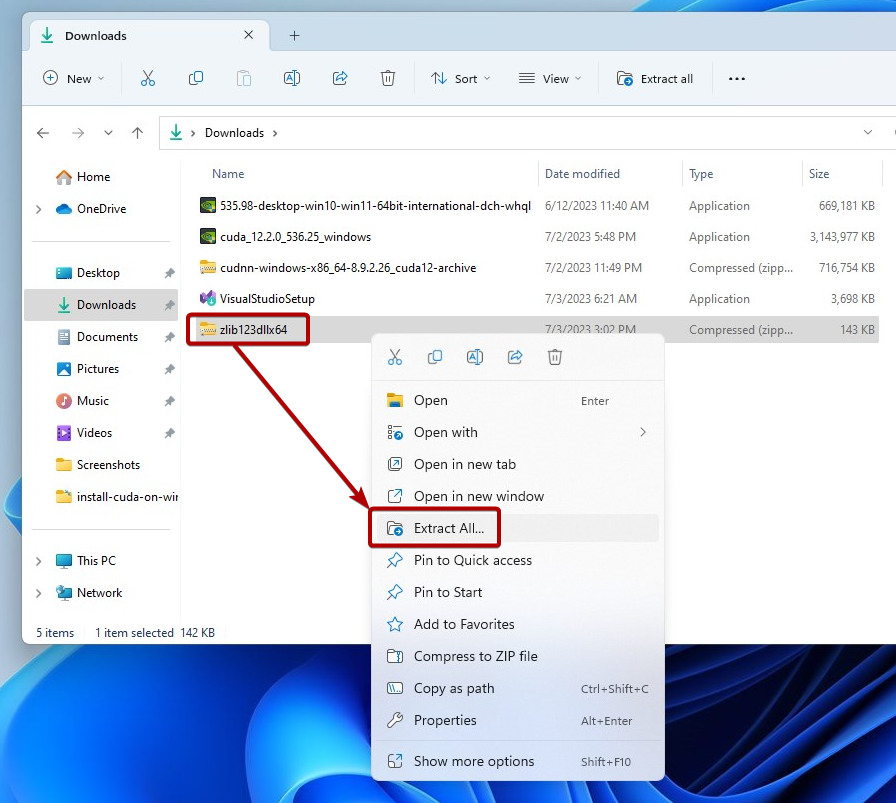
Нажмите «Извлечь».
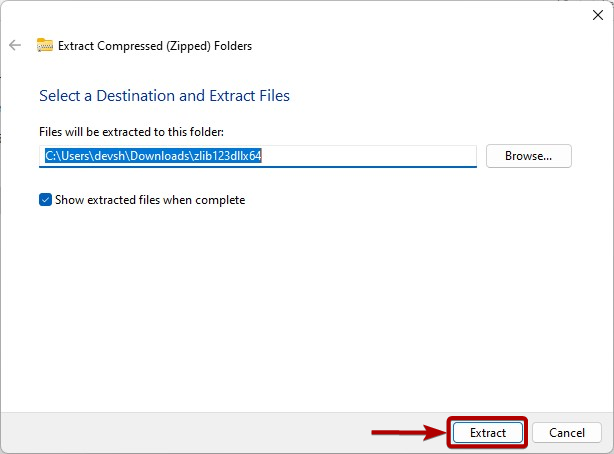
Архив ZLIB следует извлечь в папку «Загрузки» Windows. Затем скопируйте/вырежьте извлеченную папку ZLIB.
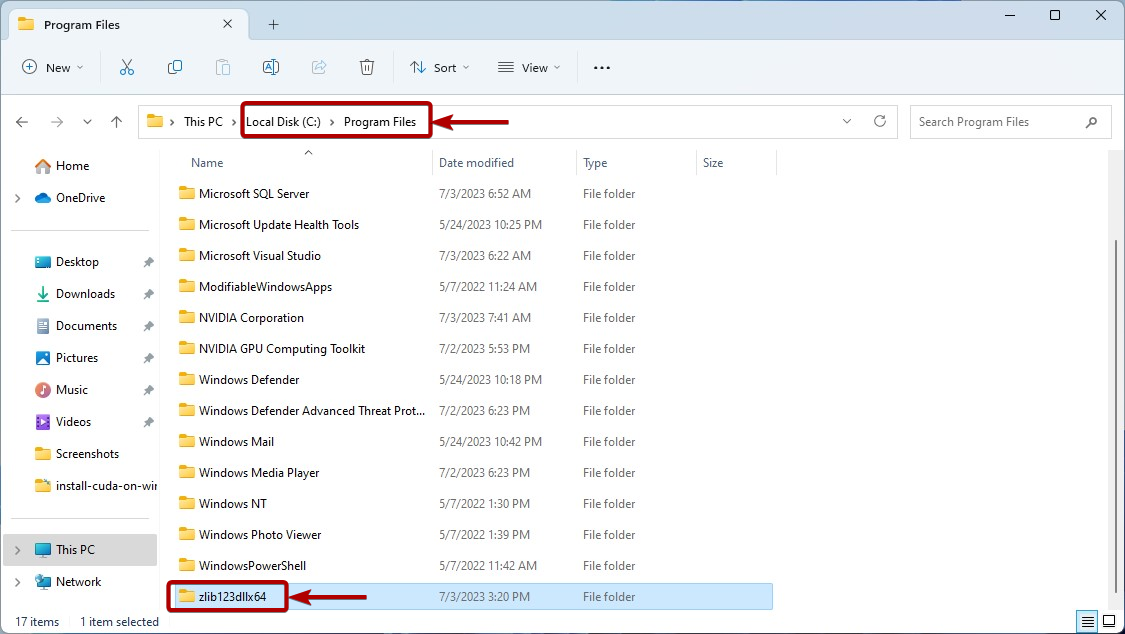
Вставьте папку ZLIB в папку C:\Program Files Windows, как показано на следующем снимке экрана:
Добавление папки ZLIB в путь Windows 10/11
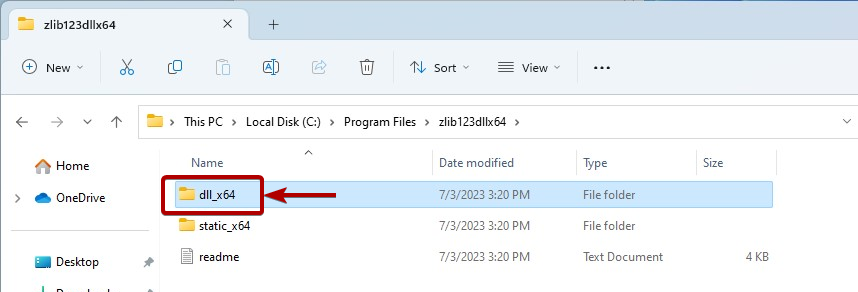
Прежде чем добавлять папку ZLIB в путь Windows 10/11, перейдите к папке ZLIB, которую вы только что вырезали/скопировали, в папку C:\Program Files Windows. Затем перейдите в папку ZLIB «dll_x64», как показано на следующем снимке экрана:
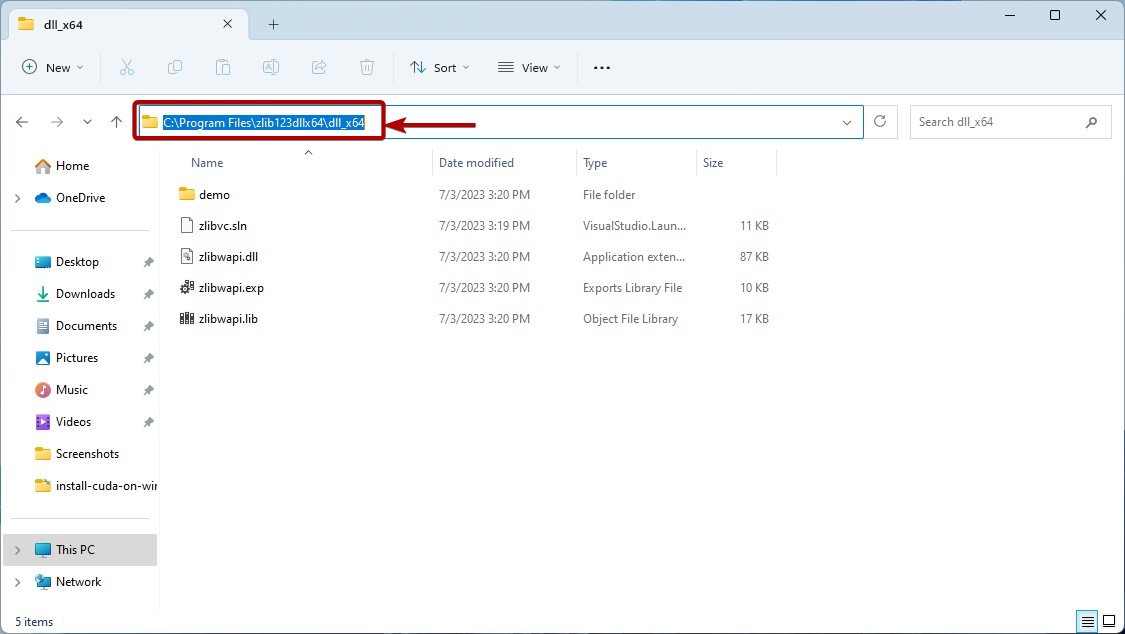
Скопируйте путь к папке ZLIB DLL.
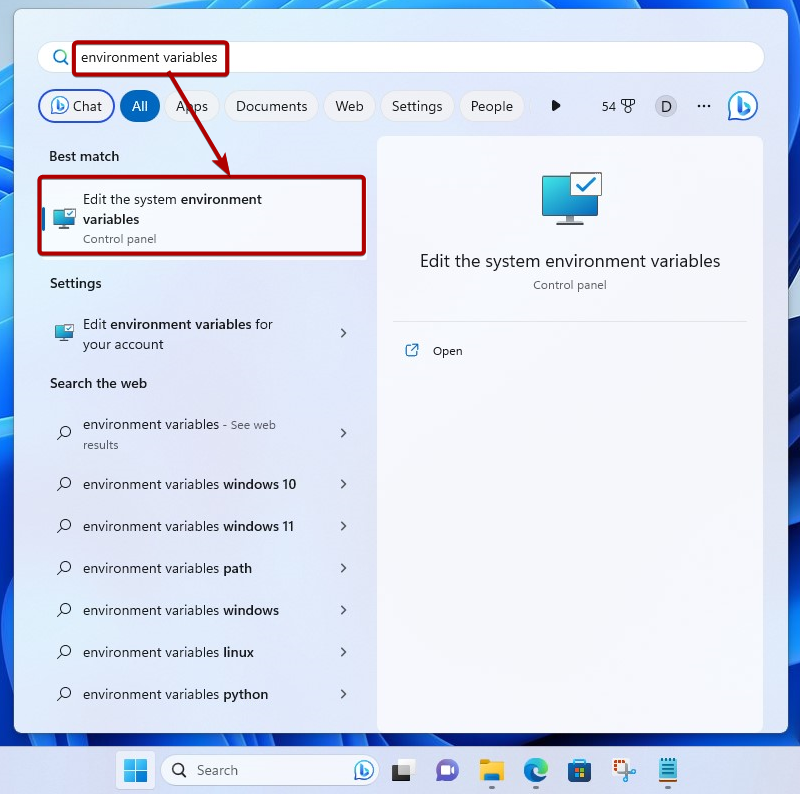
Теперь найдите термин «переменные среды» в меню «Пуск» и щелкните значок «Изменить переменные среды системы», как показано на следующем снимке экрана:
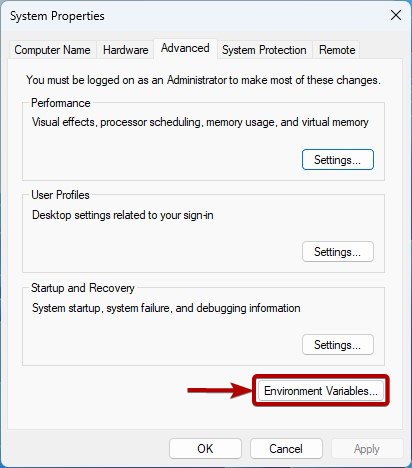
Нажмите «Переменные среды».
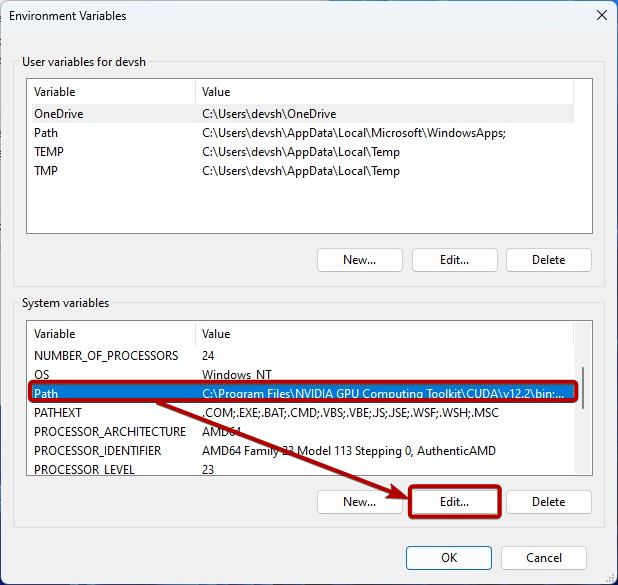
Выберите «Путь» в разделе «Системные переменные» и нажмите «Изменить».
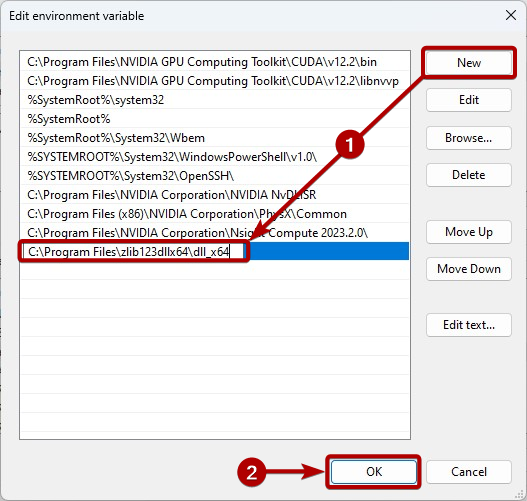
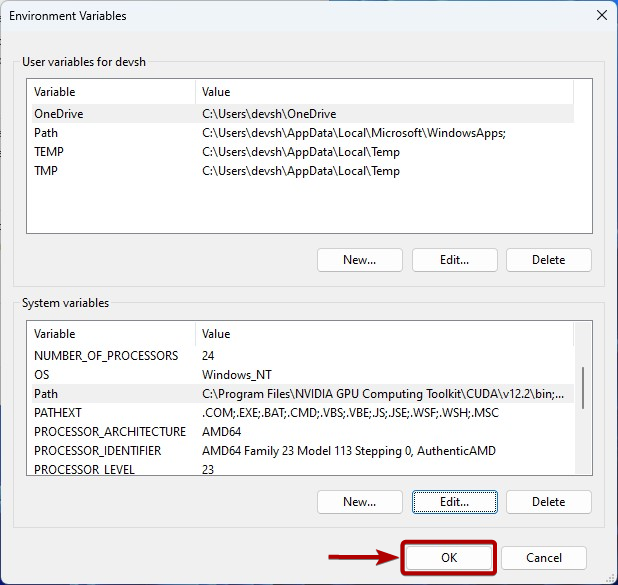
Нажмите «Создать» и вставьте скопированный путь к ZLIB DLL, чтобы добавить его в системную переменную «Путь» Windows [1].
Когда все будет готово, нажмите «ОК» [2].
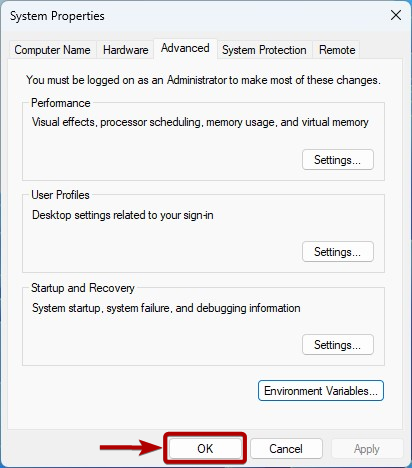
Нажмите «ОК».
Нажмите «ОК».
Теперь NVIDIA cuDNN должна иметь возможность доступа к файлам ZLIB DLL по мере необходимости.
Заключение
Мы показали вам, как загрузить и установить библиотеку ZLIB в операционных системах Windows 10 и Windows 11, чтобы требования библиотеки NVIDIA cuDNN были выполнены и библиотека NVIDIA cuDNN могла ее использовать.
Просмотров: 2 445
zlib.install
Windows one-line installer for zlib library.
Usage
Open your command prompt as Administrator and enter
powershell -Command "(Invoke-WebRequest -Uri https://git.io/JnHTY -OutFile install_zlib.bat)"; ./install_zlib.bat; del install_zlib.bat
It will by default build a 64-bits library.
Set the environment variable ARCH to Win32 before-hand otherwise:
set ARCH=Win32
powershell -Command "(Invoke-WebRequest -Uri https://git.io/JnHTY -OutFile install_zlib.bat)"; ./install_zlib.bat; del install_zlib.bat
Requirements
- Install Visual Studio with C++. Make sure to select Desktop Development with C++ while doing so.
- Make sure you have CMake: https://cmake.org/download/
- Make sure you have PowerShell: https://duckduckgo.com/?q=install+powershell+on+windows
The video https://www.youtube.com/watch?v=IsAoIqnNia4 presents a step-by-step tutorial
on how to install Visual Studio with support for C++.
Uninstall
!! BE CAREFUL! MAKE SURE YOU UNDERSTAND IT. !!
Open your command prompt as Administrator and enter
rd /s /q "%PROGRAMFILES%"\zlib
rd /s /q "%PROGRAMFILES(X86)%\zlib"
Как и в предыдущих версиях ОС, в Windows 10 есть скрытая встроенная учетная запись Администратора, скрытая и неактивная по умолчанию. Однако в некоторых ситуациях она может оказаться полезной, например, при невозможности каких-либо действий с компьютером и создания нового пользователя, для сброса пароля и не только. Иногда, наоборот, требуется отключить этот аккаунт.
В этой инструкции подробно о том, как активировать скрытую учетную запись Администратор Windows 10 в различных ситуациях. Также будет рассмотрено, как отключить встроенную учетную запись администратора.
Отмечу, что если вам просто нужен пользователь с правами администратора, то правильные способы создать такого пользователя описаны в материалах Как создать пользователя Windows 10, Как сделать пользователя администратором в Windows 10.
Включение скрытой учетной записи Администратора в обычных условиях
Под обычными условиями далее понимается: вы можете зайти в Windows 10, и ваша текущая учетная запись также имеет права администратора на компьютере. При данных условиях, активация встроенной учетной записи не представляет никаких проблем.
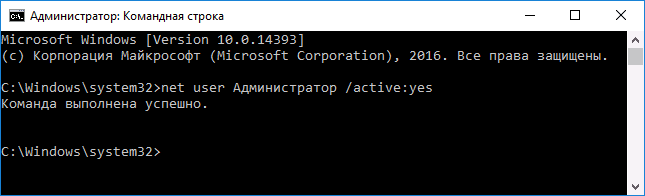
- Запустите командную строку от имени Администратора (через меню правого клика по кнопке «Пуск»), есть и другие способы открытия командной строки Windows 10.
- В командной строке введите net user Администратор /active:yes (если у вас англоязычная система, а также на некоторых «сборках» используйте написание Administrator) и нажмите Enter.

- Готово, можно закрыть командную строку. Учетная запись администратора активирована.
Для входа в активированную учетную запись вы можете либо выйти из системы, либо просто переключиться на вновь активированного пользователя — и то и другое делается путем нажатия Пуск — Значок текущей учетной записи в правой части меню. Пароль для входа не требуется.
Выйти из системы также можно через правый клик по пуску — «Завершение работы или выход из системы» — «Выход».
О включении этой учетной записи Windows 10 в «необычных» условиях — в последней части статьи.
Как отключить встроенную учетную запись Администратор Windows 10
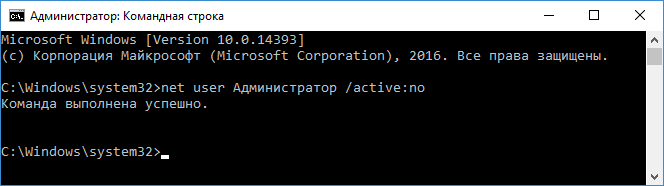
В общем случае, чтобы отключить учетную встроенную учетную запись администратора достаточно тем же способом, который описан в первой части руководства, запустить командную строку, после чего ввести ту же команду, но с ключом /active:no (т.е. net user Администратор /active:no).
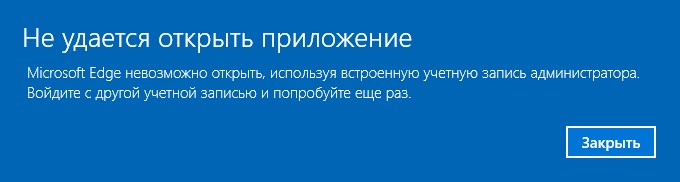
Однако, часто встречающаяся в последнее время ситуация — когда такая учетная запись единственная на компьютере (возможно, это особенность каких-то нелицензионных версий Windows 10), а причина, по которой пользователь желает ее отключить — частично не работающие функции и сообщения наподобие «Microsoft Edge невозможно открыть, используя встроенную учетную запись администратора. Войдите с другой учетной записью и попробуйте еще раз».
Примечание: прежде чем выполнять описанные далее шаги, если вы продолжительное время проработали под встроенным администратором, и у вас есть важные данные на рабочем столе и в системных папках документов (изображений, видео), перенесите эти данные в отдельные папки на диске (так будет проще их потом разместить в папках «обычного», а не встроенного администратора).
В этой ситуации правильным путем решения проблемы и отключения встроенной учетной записи администратора Windows 10 будет следующий:
- Создайте новую учетную запись одним из способов, описанных в статье Как создать пользователя Windows 10 (откроется в новой вкладке) и предоставьте новому пользователю права администратора (описано в той же инструкции).
- Выйдите из текущей встроенной учетной записи Администратор и зайдите во вновь созданную — пользовательскую, а не встроенную.
- Войдя, запустите командную строку от имени администратора (используйте меню правого клика по пуску) и введите команду net user Администратор /active:no и нажмите Enter.
При этом, встроенная учетная запись администратора будет отключена, а вы сможете пользоваться обычной учетной записью, также с необходимыми правами и без ограничения функций.
Как включить встроенную учетную запись администратора, когда вход в Windows 10 невозможен
И последний возможный вариант — вход в Windows 10 невозможен по той или иной причине и вам требуется активировать учетную запись Администратор для того, чтобы произвести действия по исправлению ситуации.
В данном контексте существует два наиболее распространенных сценария, первый из которых — вы помните пароль своей учетной записи, но вход в Windows 10 почему-то не происходит (например, после ввода пароля компьютер зависает).
В данном случае возможный путь решения проблемы будет таким:
- На экране входа в систему нажмите по изображенной справа внизу кнопке «питания», затем, удерживая Shift, нажмите «Перезагрузка».
- Загрузится среда восстановления Windows Перейдите к разделу «Поиск и устранение неисправностей» — «Дополнительные параметры» — «Командная строка».
- Потребуется ввести пароль учетной записи для запуска командной строки. В этот раз вход должен сработать (если пароль, который вы помните — верный).
- После этого, используйте первый способ из этой статьи для включения скрытой учетной записи.
- Закройте командную строку и перезагрузите компьютер (или нажмите «Продолжить. Выход и использование Windows 10»).
И второй сценарий — когда пароль для входа в Windows 10 неизвестен, либо, по мнению системы, неверный, и вход невозможен по этой причине. Здесь вы можете использовать инструкцию про включение учетной записи Администратор с загрузочной флешки или же материал Как сбросить пароль Windows 10 — в первой части инструкции описывается, как в данной ситуации открыть командную строку и произвести необходимые манипуляции для сброса пароля, но, в той же командной строке вы можете и активировать встроенного Администратора (хотя для сброса пароля это необязательно).
Кажется, это все, что может пригодиться на указанную тему. Если же какой-то из вариантов проблем не был мной учтен, или инструкции не удается использовать — опишите, что именно происходит в комментариях, я постараюсь ответить.
Download Article
Step-by-step administrator login guide for Windows 10
Download Article
- Making an Account an Administrator (Control Panel)
- Making an Account an Administrator (Settings)
- Enabling Administrator Account in CMD
- Enabling Administrator Account in PowerShell
- Logging In as an Administrator
- Video
- Expert Q&A
- Tips
|
|
|
|
|
|
|
An administrator (admin) account can change security settings, install and uninstall software, access every file, and change settings for other users. When you first start up Windows 10 or 11, you’re walked through the setup of the first user account, which is set to administrator. This wikiHow will show you how to log in as an administrator in Windows 10.
Administrator Login: Quick Steps
- Open the Control Panel.
- Go to User Accounts > User Accounts.
- Click Change account type on your account.
- Select Administrator and click Change account type.
-

If you want to make your own account an administrator on this PC or give admin rights to another account, you can do so in the Control Panel. You will need the current administrator password to do this. To get started, type control panel into the Windows search bar, then click Control Panel.[1]
- Alternatively, you can use the command line to open the control panel.
- You can also use this method to give administrator rights to another user account on this PC.
-
It’s the green text next to an icon that resembles a person. It’s on the right side.
Advertisement
-
It’s next to an icon that resembles two people. This will show you a page with information about the Windows user account you are currently logged in to.
-
In the profile box on the right side of the User Accounts page, you’ll see “Administrator” under the username if the account is an administrator. If you’re already an administrator, you don’t need to proceed—you have full admin access to the system.
- You can check the status of other accounts by click Manage another account in this menu.
- If you are not using a Microsoft account, you will see «Local Account» above «Administrator.»
-
If your account isn’t an administrator, you can change it to one (if you know the administrator login information). To do so:[2]
- Click Change your account type.
- Click the Administrator option.
- Click Change account type.
- Type the admin password when prompted.
- You’re done! Your user account can now perform all tasks as an administrator.


Advertisement
-
If you want to make your own account an administrator on this PC, or give admin rights to another account, it’s easy to do in Settings. You will need to be using an administrator account to do this, or have the password for an administrator-level account. Start by opening the Start menu and selecting Settings.
-
This opens the Accounts settings.
-
You’ll see this in the left panel on Windows 10. If you’re using Windows 11, select Other users in the right panel instead.[3]
-
You may need to click the name of the user first.
-
When prompted, enter the administrator password or click Yes to confirm. This makes the selected account an administrator.
- The «Administrator» account type gives the selected account full admin permissions. Whenever this account logs in to this particular computer, it will be an administrator and can perform all tasks that the administrator account can.


Advertisement
-
If you want to be able to log in with the «Administrator» username and password, you will need to enable the Administrator account, which is disabled by default. To get started, press the Windows key and type cmd.[4]
- You will need to be logged in to an account that has administrative permissions to enable the Administrator account in Windows 10.
-
Click Yes in the box that pops up to continue.
-
You’ll see text confirming your entry. If you see an error, you may have mistyped the command. The default Windows 10 administrative account is active but not password protected.
-
To log in as an administrator, the account will need a password. To set the admin password, type net user administrator * and press Enter. When prompted, enter and confirm a new password for the administrator account.[5]
-
You can access the option to Sign out from your profile picture in the Start Menu. Or, to keep your account logged in, select Switch User instead to return to the login screen.
-
If you don’t see it, click Other Accounts and enter .\Administrator as the username.
-
Click the submit arrow button. This will log you into Windows as an administrator.


Advertisement
-
To enable the administrator account in PowerShell, you’ll need to run PowerShell as an administrator. To do this:
- Press the Windows key on your keyboard.
- Type powershell into the Search bar.
- Right-click Windows PowerShell and select Run as administrator.
- Click Yes to continue.
-
At the prompt, type net user administrator /active:yes and press Enter. This enables the «Administrator» user, but it will not work until you create a password.
-
To do this, you’ll need to enter the following command, but replace «NewPassword» with the password you would like to assign to the Administrator account:
- Set-LocalUser -Name "Administrator" -Password (ConvertTo-SecureString -AsPlainText "NewPassword" -Force).
- Once the password is assigned, you can now log in with the Administrator account.


Advertisement
-
If you’re logged in to Windows already and want to switch to an Administrator account, you can click the Start menu, select your profile photo, and click Sign Out to return to the login screen.
- Alternatively, click your profile photo and select Switch user if you don’t want to log your current account out of the system.
- If you’re at the login screen, skip to step 3 instead.
-
If you are not prompted to enter a username, choose this option to bring up the username and password fields.[6]
-
If you’re signing in as the local «Administrator» account, type .\Administrator as the username, then type the password of the local admin account. Once your password is accepted, you’ll be logged in to the computer as an administrator.
- If you need to log in as the domain administrator, use domain_name\Adminstrator instead.
-
After entering your password, click the arrow to log in as an administrator.


Advertisement
Add New Question
-
Question
I typed in the command on CMD and it said «Access is denied». So what do I do now?
Kyle Smith is a wikiHow Technology Writer, learning and sharing information about the latest technology. He has presented his research at multiple engineering conferences and is the writer and editor of hundreds of online electronics repair guides. Kyle received a BS in Industrial Engineering from Cal Poly, San Luis Obispo.
wikiHow Technology Writer
Expert Answer
Try checking the administrator status of your account by going to Control Panel > User Accounts > User Accounts. If you’re not an administrator but you know who is, ask them for the admin password. Or, ask them to make your account an administrator.
Ask a Question
200 characters left
Include your email address to get a message when this question is answered.
Submit
Advertisement
Video
Thanks for submitting a tip for review!
Advertisement
About This Article
Article SummaryX
1. Run Command Prompt as an administrator.
2. Type net user administrator /active:yes and press Enter.
3. Close Command Prompt.
4. Log out.
5. Click the Administrator account from the login page.
Did this summary help you?
Thanks to all authors for creating a page that has been read 304,575 times.
Is this article up to date?
ZLIB is a ubiquitous compression and decompression library used behind the scenes by numerous applications and systems. In the world of AI and machine learning (ML), ZLIB forms a core dependency for GPU-accelerated libraries like NVIDIA cuDNN and CUDA.
Before diving into integrating these high-powered GPU libraries into your ML projects, getting ZLIB installed correctly is an essential first step.
In this expansive 2600+ word guide, I will provide you with end-to-end knowledge and insights on installing ZLIB flawlessly on Windows, as an experienced developer and coder.
We will cover:
- What ZLIB is and Why it is Needed
- Downloading the Correct ZLIB DLL Version
- Extracting and Moving ZLIB Files to Program Files
- Adding the ZLIB Folder to Your System PATH
- Validating Your ZLIB Installation
- Troubleshooting Guide
- Alternative Install Methods
- Building ZLIB from Source Code
- Final Thoughts on ZLIB Installation
So whether you are encountering ZLIB dependencies for the first time, or are a seasoned ML developer, this guide aims to give you new perspectives and fool-proof best practices.
Let‘s get started!
What is ZLIB and Why is it Needed?
ZLIB refers to a ubiquitous data compression library written in C. It provides a rich set of functions to compress and decompress data effectively.
Some key characteristics of ZLIB are:
- Open-source and free to use
- Cross-platform – works on Windows, Linux, macOS etc
- Idiomatic C style API for ease of use
- Support for one-shot compression/decompression
- Streaming compression and decompression
- Low memory footprint
In terms of use cases, ZLIB powers compression behind many file formats and protocols used on the internet today:
- ZIP, GZIP – Leverages ZLIB‘s DEFLATE algorithm
- HTTP, FTP – Utilizes ZLIB for content encoding
- PNG images – Relies on ZLIB for lossless data compression
- SQLite databases – Uses ZLIB to compress its database pages
- Node.js – Has ZLIB available for built-in compression
In the context of developing machine learning applications, ZLIB forms a vital prerequisite for NVIDIA‘s cuDNN library.
Why is ZLIB Needed for cuDNN?
NVIDIA cuDNN is a popular GPU-accelerated library for deep neural networks. It provides highly optimized implementations of routines for DL frameworks like TensorFlow, PyTorch and Caffe.
Under the hood, cuDNN uses ZLIB‘s compression algorithms for optimizing network inference and training performance. Specifically, it helps to:
- Serialize trained neural network models more efficiently
- Reduce model size for faster loading and transfers
- Decompress weight data faster using ZLIB‘s high throughput
So in summary, if ZLIB is missing on your Windows development box, cuDNN (and CUDA) will fail to initialize and operate properly. Having ZLIB setup correctly avoids this entire class of errors.
Now that you understand why ZLIB matters, let‘s move on to the installation process itself.
Downloading the Correct ZLIB DLL Version
ZLIB offers both 32-bit and 64-bit dynamic link libraries (DLLs) for usage. The correct version to install depends on:
- Your Windows version (64-bit vs 32-bit)
- Bit-ness of libraries you intend to use (cuDNN and CUDA are 64-bit)
Recommended:
Always opt for the 64-bit ZLIB DLLs given 64-bit apps are the norm today.
| DLL Version | Use Case |
|---|---|
| 32-bit ZLIB | Only needed for 32-bit Windows or apps |
| 64-bit ZLIB | For most modern software including cuDNN / CUDA |
With this context, follow the next steps to download the 64-bit ZLIB library:
-
Open your favorite browser and navigate to: http://www.winimage.com/zLibDll
-
Scroll down to the zlib123dll.zip section
-
Click the link for AMD64/Intel EM64T to download 64-bit DLLs
This will download the zlib123dll.zip bundle containing ZLIB headers and DLLs.
Extracting and Moving ZLIB Files to Program Files
The downloaded ZIP archive needs to be extracted before ZLIB can be utilized.
Modern Windows versions come with built-in ZIP extraction capabilities. But for added flexibility, I recommend using the open-source 7-Zip tool.
Follow along to extract ZLIB using 7-Zip:
-
Install 7-Zip from https://www.7-zip.org/
-
Right-click on
zlib123dll.zipand Select 7-Zip > Extract Here -
This will extract the ZIP contents to the same Download folder
With the files unpacked, we need to copy the necessary pieces into a standard location.
The recommended location is:
C:\Program Files\Here is how to move ZLIB there:
- Open the extracted zlib-1.2.13 folder
- Select the entire folder
- Copy or Cut it
- Go to
C:\Program Files\ - Paste the zlib-1.2.13 folder there
This will copy the ZLIB headers, DLLs and libraries over.
Adding the ZLIB Folder to Your System PATH
At this point, ZLIB has been installed to C:\Program Files successfully.
However, being able to use ZLIB across terminals and IDEs has an additional step – updating the system PATH variable.
The PATH variable stores a set of folders that Windows searches through when trying to locate executable binaries and DLLs used by applications.
We need to add the DLL folder path to this list. Here is how:
-
Launch Windows Explorer
-
Navigate to
C:\Program Files\zlib-1.2.13 -
Go inside the dll_x64 folder
-
Copy the path from the address bar
C:\Program Files\zlib-1.2.13\dll_x64 -
Press Windows key + R to open the Run dialog
-
Type
sysdm.cpland hit Enter to launch System Properties -
Click the Environment Variables button
-
Under User variables, double click on Path
-
In the Edit User Variable dialog, click New
-
Paste the zlib dll_x64 folder path
C:\Program Files\zlib-1.2.13\dll_x64 -
Click OK to close all dialog boxes
And we are done! This appends the missing ZLIB piece to the Path variable.
Applications that rely on it (cuDNN or cuda) will now be able to initialize without errors.
Validating Your ZLIB Installation
After installing core libraries, it is good practice to add diagnostic checks to validate the setup.
Here are some ways to confirm zlib is working as expected:
1. Check zlib DLL path
Open a new Command Prompt and run:
where libzlib.dllThis will output the location of libzlib.dll that applications will use.
You should see a result like:
C:\Program Files\zlib-1.2.13\dll_x64\libzlib.dllIf the path looks okay, ZLIB was registered with Windows properly.
2. Test compression in Python
Here is a Python snippet that uses ZLIB to compress a string:
import zlib

data = b"Hello World"
compressed = zlib.compress(data)

print(compressed)
# x\x9cK\xca\xcf()/M\xce\xcfQ\x05\x00!\xbf\x9e
The ability to import zlib and execute compression routines confirms Python has access to the DLLs.
3. Initialize cuDNN and CUDA without errors
The acid test is being able to import and initialize GPU-accelerated libraries without issues.
Here is sample PyTorch code:
import torch
import torch.nn as nn
import torch.backends.cudnn as cudnn

print(f"CUDA Available: {torch.cuda.is_available()}")
print(f"cuDNN Version: {cudnn.version()}")
If your ZLIB configuration and PATH variable are set right, this should print cuDNN version without errors.
With these checks, you can be confident in your ZLIB installation.
Troubleshooting ZLIB Issues
In case you are encountering issues with missing ZLIB dependencies, here are some tips for troubleshooting:
1. Check for 64-bit vs 32-bit mismatches
- Verify if you downloaded 32-bit ZLIB but are trying to use 64-bit cuDNN/CUDA
- Review if your OS, Python/C++ installs etc are all 64-bit
- Mixing 32 and 64 bit binaries causes DLL load failures
2. Confirm ZLIB path order in PATH variable
- Try moving zlib folder path to start of PATH list
- Windows searches PATH dirs in order and loads 1st found DLL
3. Use Verbose failure logging in code
- Enable verbose checks and logging when importing libraries
- Help debug why dependencies are not loading
4. Reinstall ZLIB or cuDNN
- Try downloading a fresh copy and reinstalling
- Corrupted install or partial downloads can also fail
5. Review Windows registry
- As an advanced step, check if ZLIB files are registered as DLLs
- Use regedit and verify zlib keys under SOFTWARE\Classes
I hope these tips help to isolate and fix any ZLIB installation problems. Feel free to reach out if any specific questions.
Alternative ZLIB Installation Methods
While this guide uses the standalone ZLIB DLL from winimage.com, there are alternatives to installing zlib:
1. Install ZLIB through vcpkg or Conan
- vcpkg and Conan are C++ package managers
- Can integrate ZLIB as a dependency via them
2. Build ZLIB during cuDNN install
- The NVIDIA cuDNN setup has options to build ZLIB
- Adds it to CUDA toolkit installation process
3. Use ZLIB as a Python wheel
- For pure Python usage, pypi zlib wheel available
- Simpler than native DLL install
Evaluating these options first to see if they meet your needs can avoid needing the full standalone ZLIB DLL setup.
Building ZLIB from Source Code
Experienced C++ developers may prefer compiling ZLIB from source for complete control and customization.
Here is an overview of steps:
- Download zlib source code
- Install dependencies like CMake, Visual Studio
- Use CMake to generate Visual Studio solution
- Build zlib project in Debug and Release variants
- Output DLLs get created to mirror runtime install
Pros of custom compiling:
- Fine tune compilation flags as needed
- Avoid relying on pre-built binary releases
- Integrates naturally with existing codebase
Cons to weigh:
- Added complexity around tools like CMake/VS
- Need to reproduce install steps across new machines
- Troubleshooting build issues adds time
So while building from source is a valid approach, the simplicity of using readily available binaries makes it preferable for most use cases.
Final Thoughts on ZLIB Installation
Getting data compression utility ZLIB installed might seem like a mundane setup task.
However, spending some time getting it right is an investment that pays dividends each time it enables cutting-edge libraries like cuDNN to operate seamlessly.
To recap key learnings:
1. Know your target architecture (32 vs 64-bit OS and applications)
2. Install ZLIB DLLs to a standard centralized location avoid polluting AppData
3. Updating the User PATH variable is vital to make ZLIB discoverable
With this 2600+ word extensive guide covering all aspects around ZLIB – from explaining what ZLIB provides to alternative build approaches – I hope you feel equipped to install ZLIB flawlessly going forward.
Do reach out to me for any assistance or if you have suggestions to further improve this guide!