
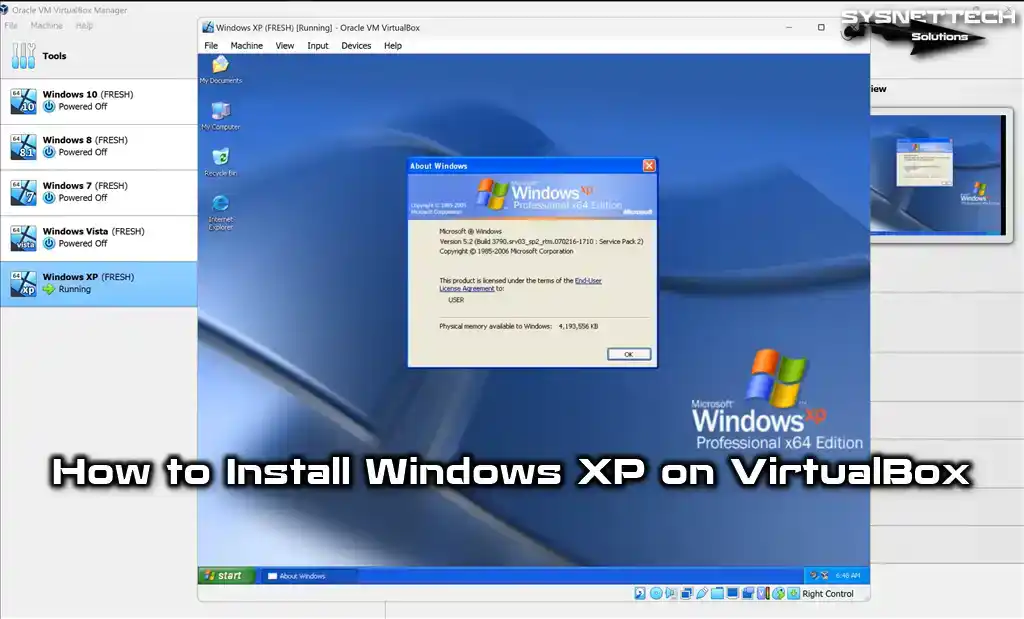
Windows XP is extremely outdated. But that has not stopped Windows enthusiasts from using it. The operating system is so light that every modern machine can run it. If you have Oracle VM VirtualBox, you can even install Windows XP on a Linux device.

But how do you use VirtualBox? Once VirtualBox is in place, how do you install Windows XP on VirtualBox? This guide will give you answers:
How to Install Windows XP on Virtual Box
Step 1. Download Virtual Box and Windows XP ISO
Do you have VirtualBox? If you don’t, download the program. It will mimic your computer by providing a platform to house the operating system. This goes without saying. Download VirtualBox from a trustworthy source.
Download Windows XP ISO
Download Virtual Box
Step 2. Launch the program
Go to ‘Machine’ and then ‘New.’ The goal is to access the virtual machine creation wizard. You can also find it in the tool menu.

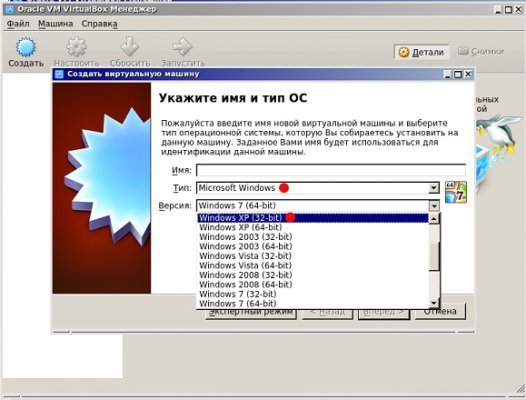
Step 3. Enter the name of the operating system in the Name field
Make sure you type ‘Windows XP.’ Once you enter the name, the program will adjust the Type and Version field values accordingly.
However, you should pay attention to the version of windows. The program may specify a 32-bit OS when you prefer 64-bit or vice versa. Fortunately, you can change this value manually.

You can also specify the location where you want to install the virtual machine. Use the Machine Folder section to make this change. If you don’t alter the location, the program will use the default location.

Naturally, you have to configure the specs of the virtual machine to match the demands of the operating system. XP needs 512MB of RAM. But you can settle for 4GB, especially if you have a modern machine with a lot of RAM.
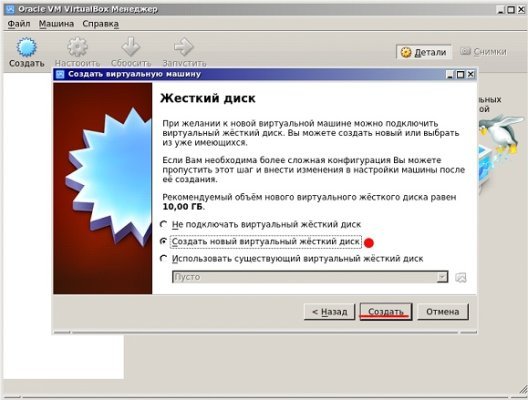
Step 4. A virtual machine needs a virtual hard disc
You can create one by going to the virtual hard disc settings. The settings will give you the option of either making a virtual hard disc or using an existing virtual hard disc file.

The second option applies to consumers with an XP virtual disc on the computer. You can also choose a third option where you don’t create a virtual hard disk.
Step 5. VirtualBox will prompt you to select a hard disk file type
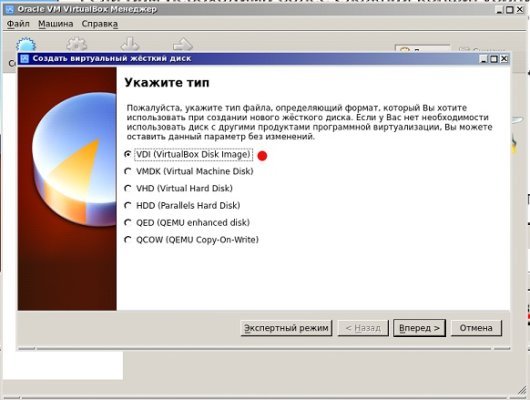
Your options include VDI, VHD, and VMDK. You can choose any file type that suits you. However, many professionals will recommend the VirtualBox Disk Image (VDI).
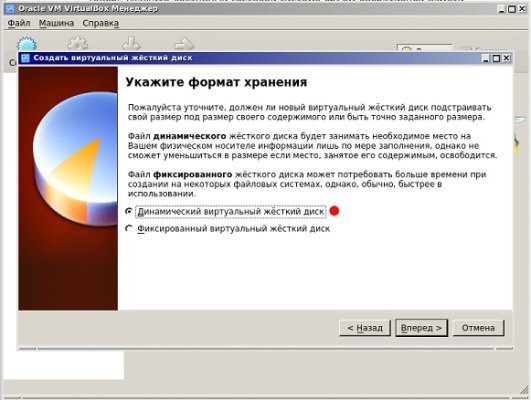
The program will eventually ask you to specify the storage. VirtualBox wants to know if it should allow the virtual hard disk space to expand as the need arises or if it should set a maximum size.
The ‘Fixed Size’ option will limit the size of the virtual hard disk. ‘Dynamically Allocated’ is the superior option because it allows the virtual machine to manage the resources it has on hand.
Once this is done, you have the option of changing the file location and size. But you can skip this step if the default options are adequate.
Step 6. All that is left at this point is to click ‘Create’ to make the virtual hard disk
Once this is done, you can use the settings tab to adjust the hardware components.
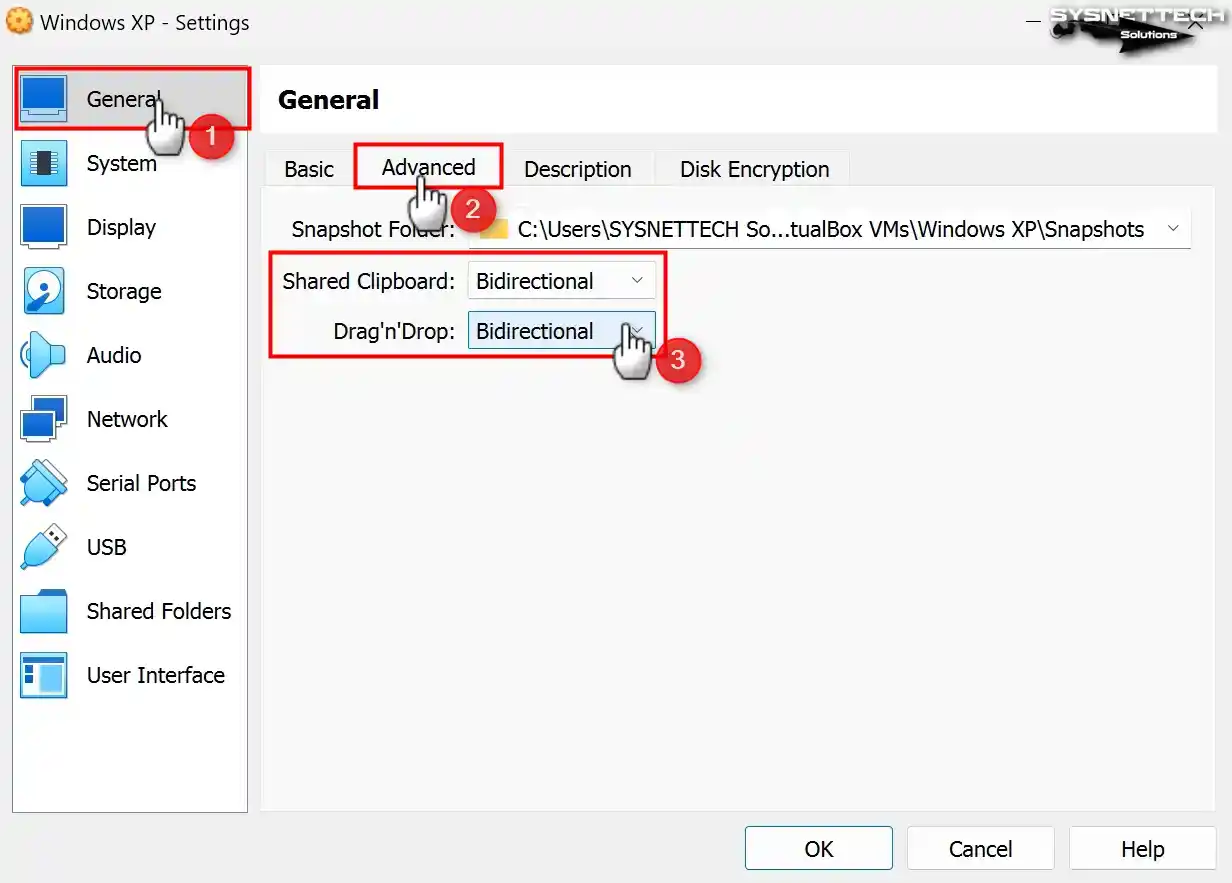
Do you want to transfer files from the host and virtual machine or vice versa? You can also enable that setting at this stage. Go to ‘General’ and look for ‘Shared Clipboard’ and ‘Drag n’ Drop.’ Set the options to ‘Bidirectional.’

Step 7. Now, with your virtual machine in place, you can start the process of installing XP
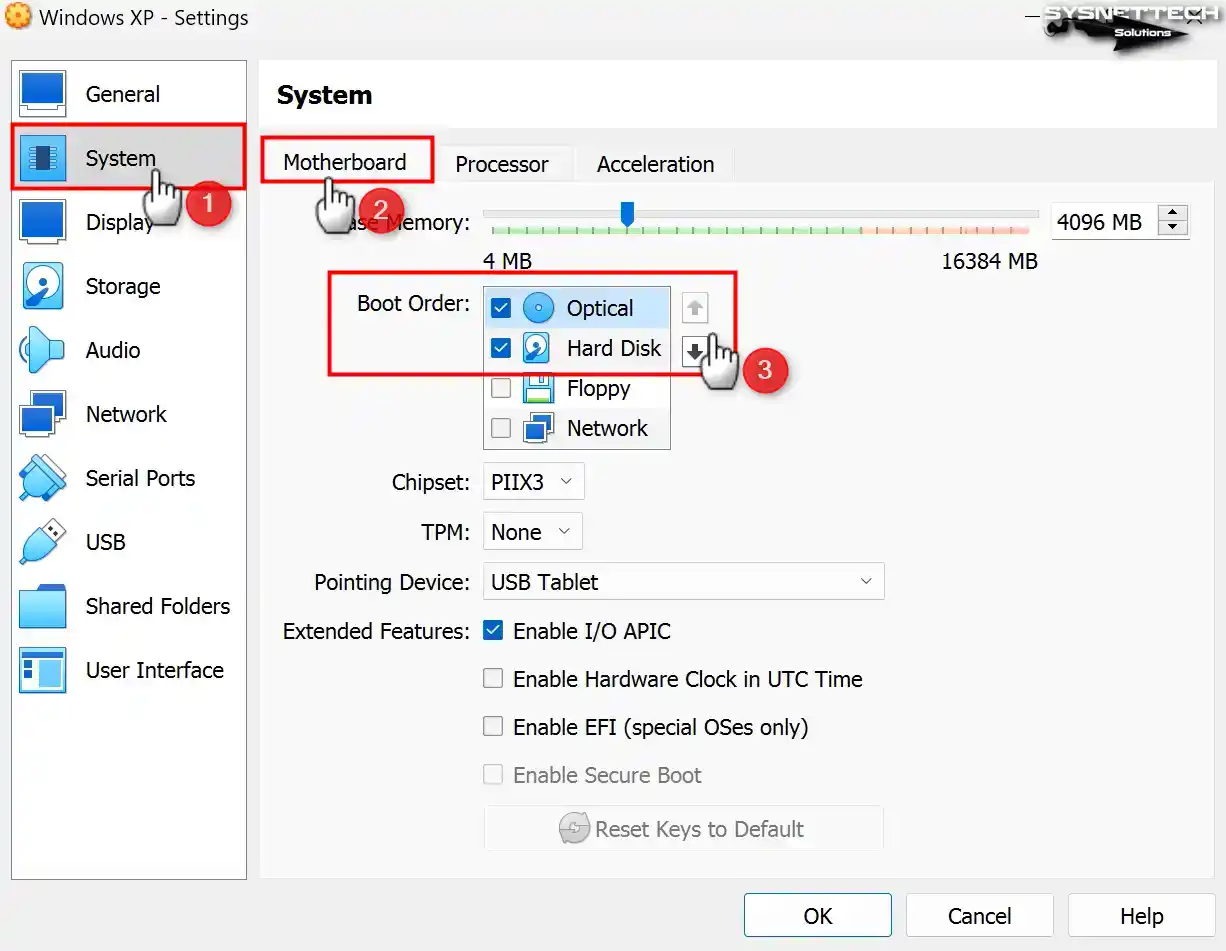
But before you proceed, stay in the settings. Go to ‘System’ and ‘Motherboard.’ Go to ‘Boot Order’ and consider the options. You can make the optical device, hard disk, floppy, or network the primary boot device.

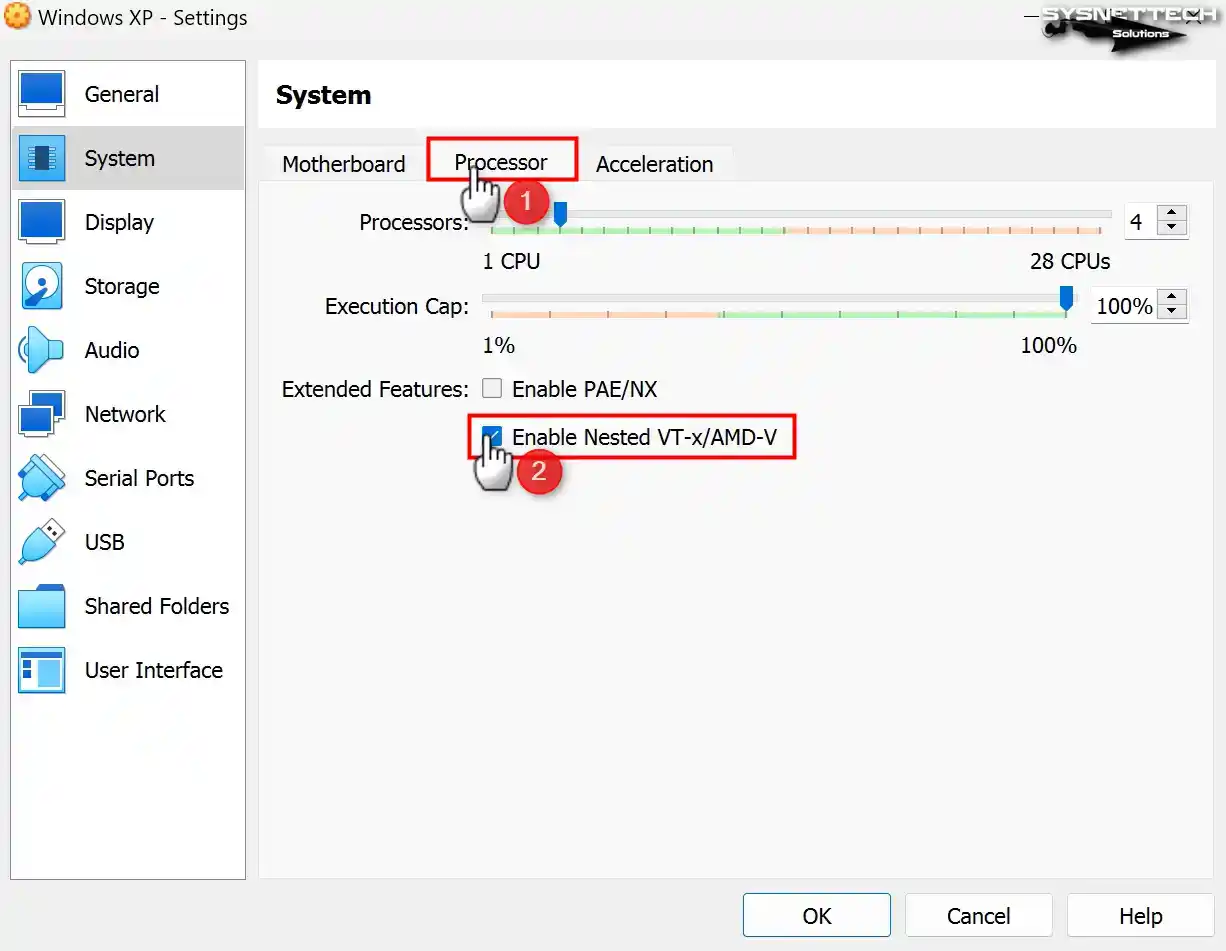
Go to ‘Processor’ and set the core count. Keep this value at four or above. Although, the host processor may influence your decision.
Step 8. Don’t ignore that last tab
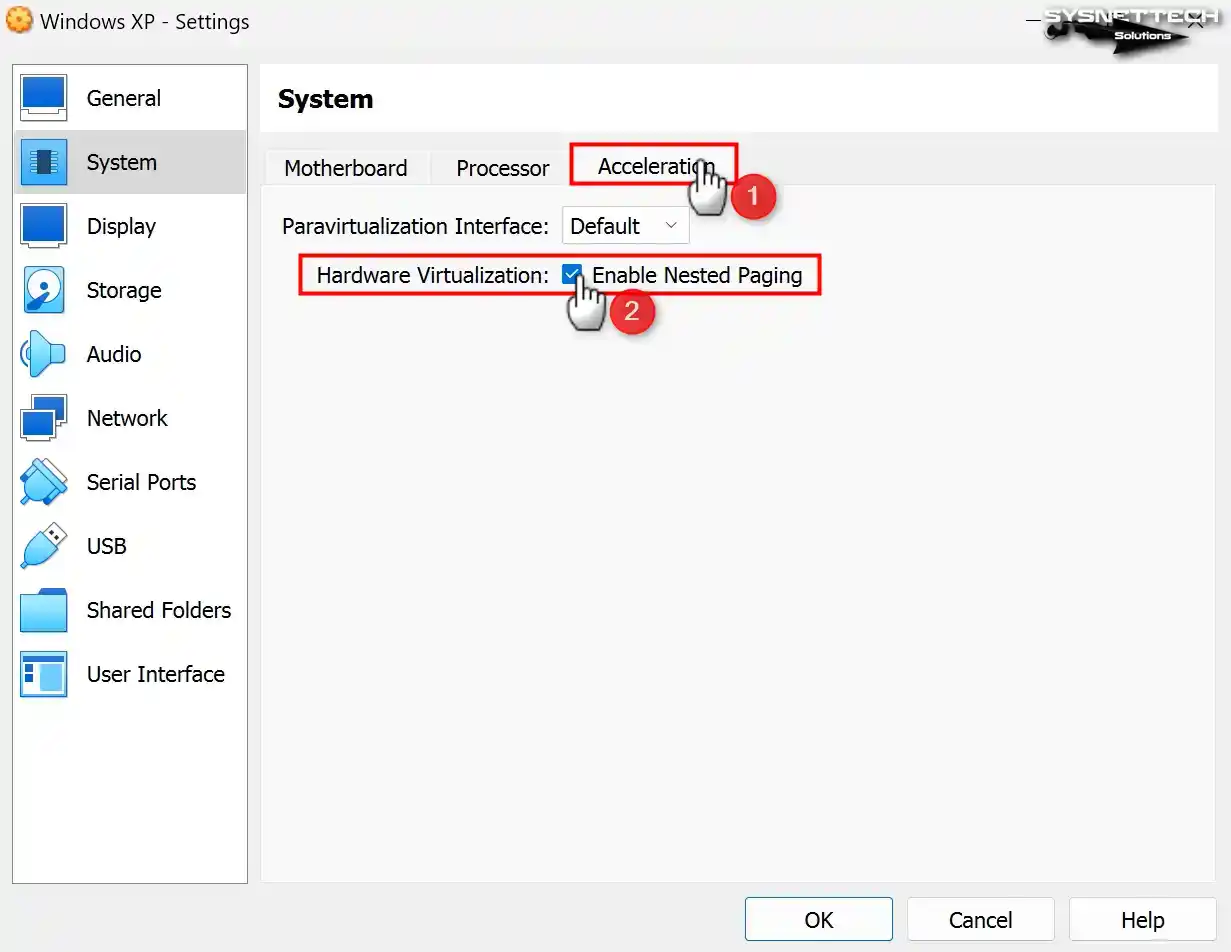
It isn’t mandatory, but you should take a moment to visit ‘Acceleration’ to determine whether you want to manually alter the ‘Hardware Virtualization’ and ‘Paravirtualization Interface options.
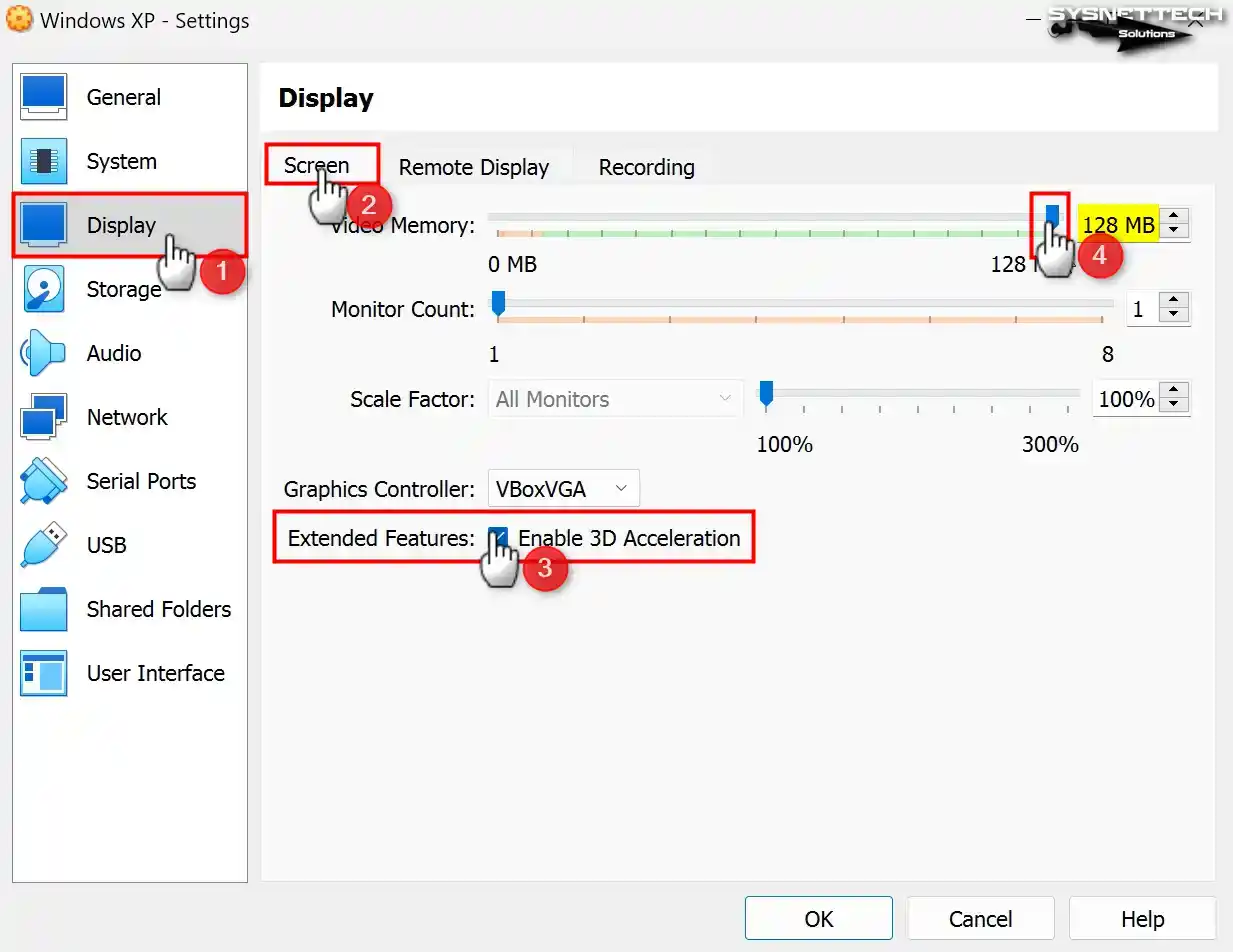
Step 9. Next is ‘Display’ and ‘Screen.’
This allows you to configure the ‘Monitor Count,’ ‘Scale Factor,’ and ‘Graphics Controller.’ You can also enable 3D acceleration. The ‘Remote Display’ and ‘Recording’ tabs don’t matter.

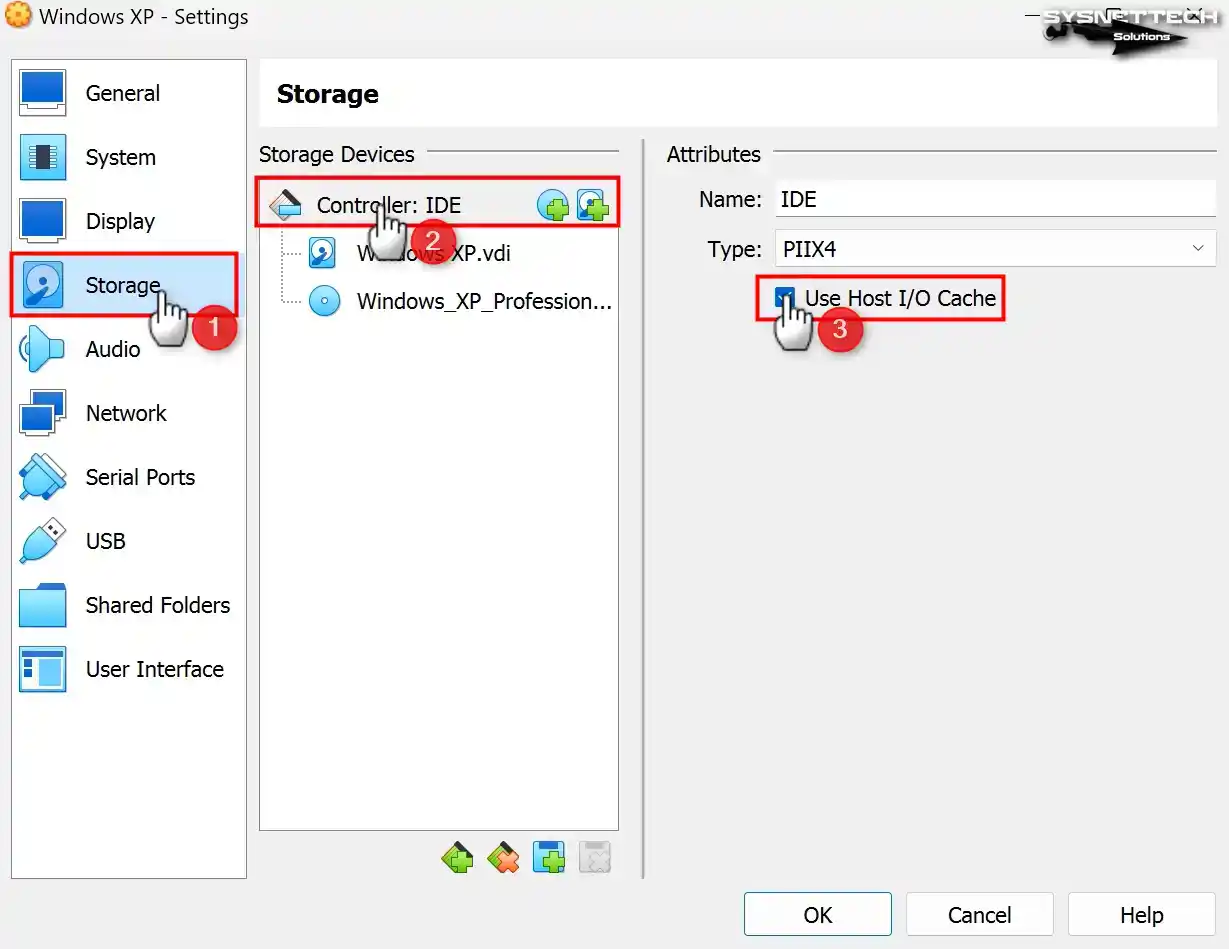
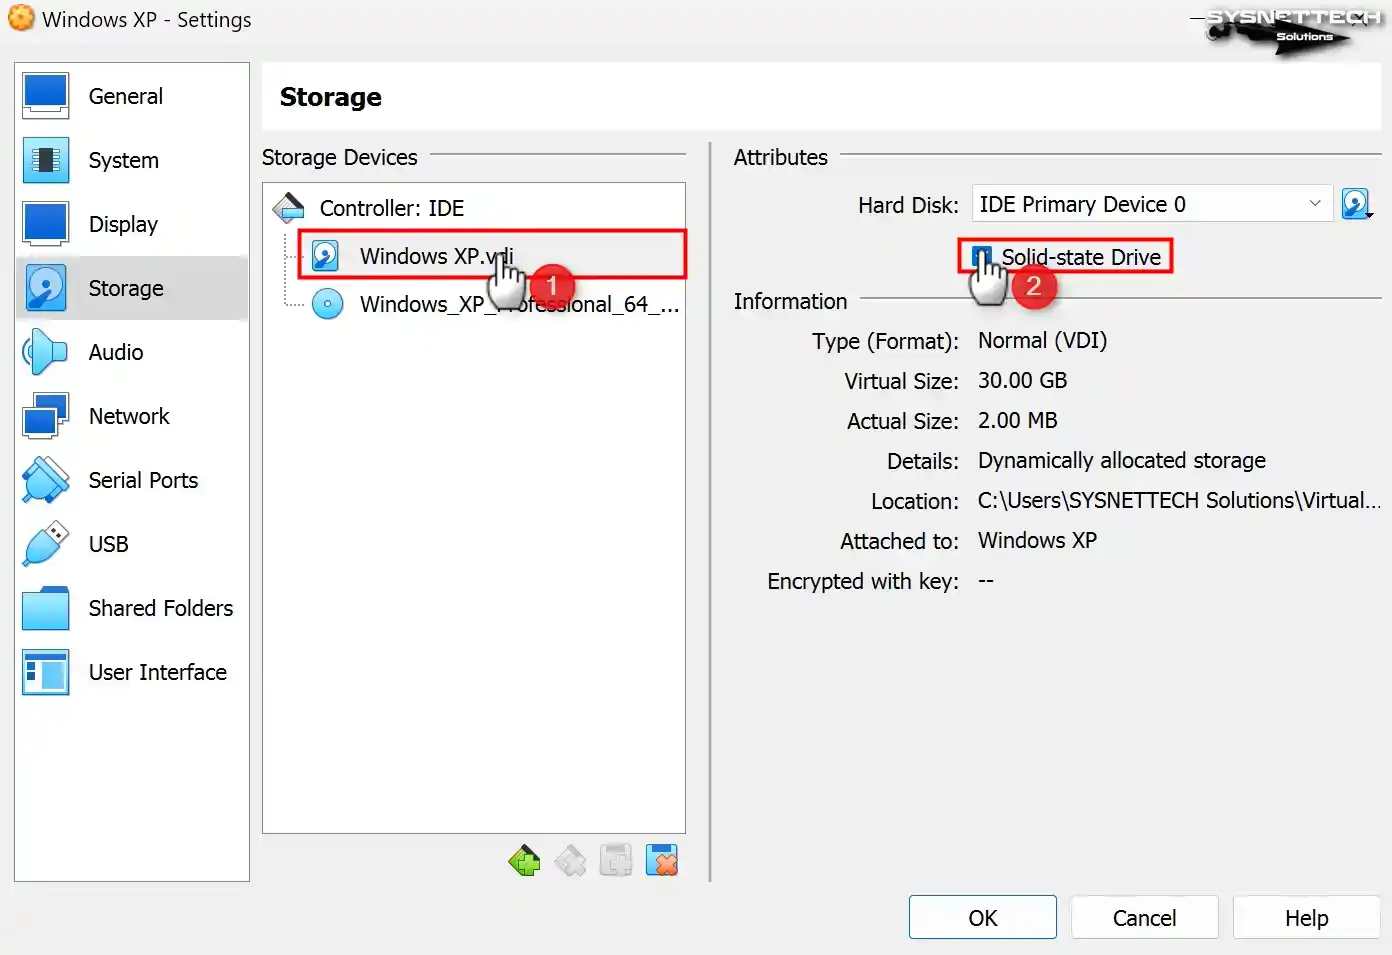
Turn your attention to ‘Storage.’ Enable the Host I/O cache. Other important steps include checking the ‘Solid-State Drive’ option, adding the XP ISO file you downloaded, and clicking ‘Start.’
Step 10. Wait for VirtualBox to show the start-up window before selecting the ISO image and then ‘Start.’
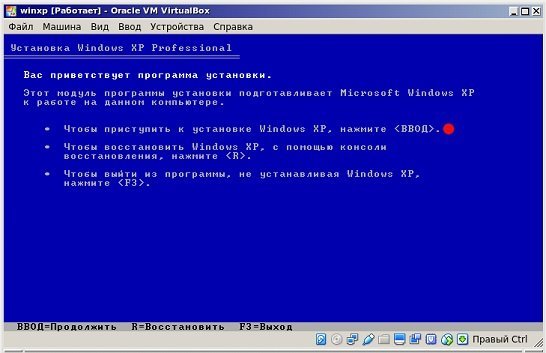
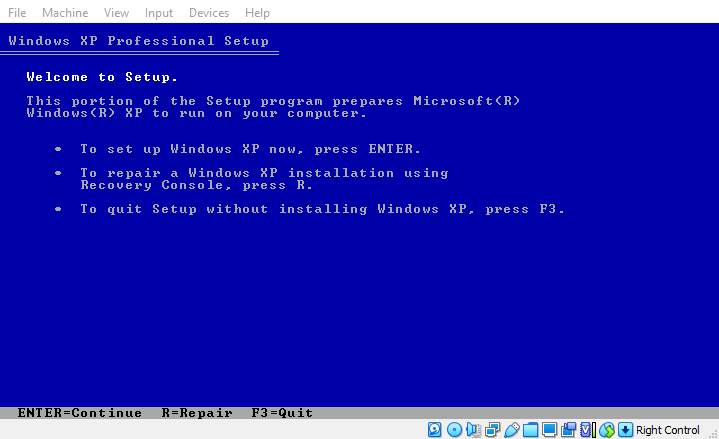
At this point, you can install XP the way you usually would on any other machine. The operating system will display a start screen. Choose between setting up Windows, repairing Windows, and quitting.

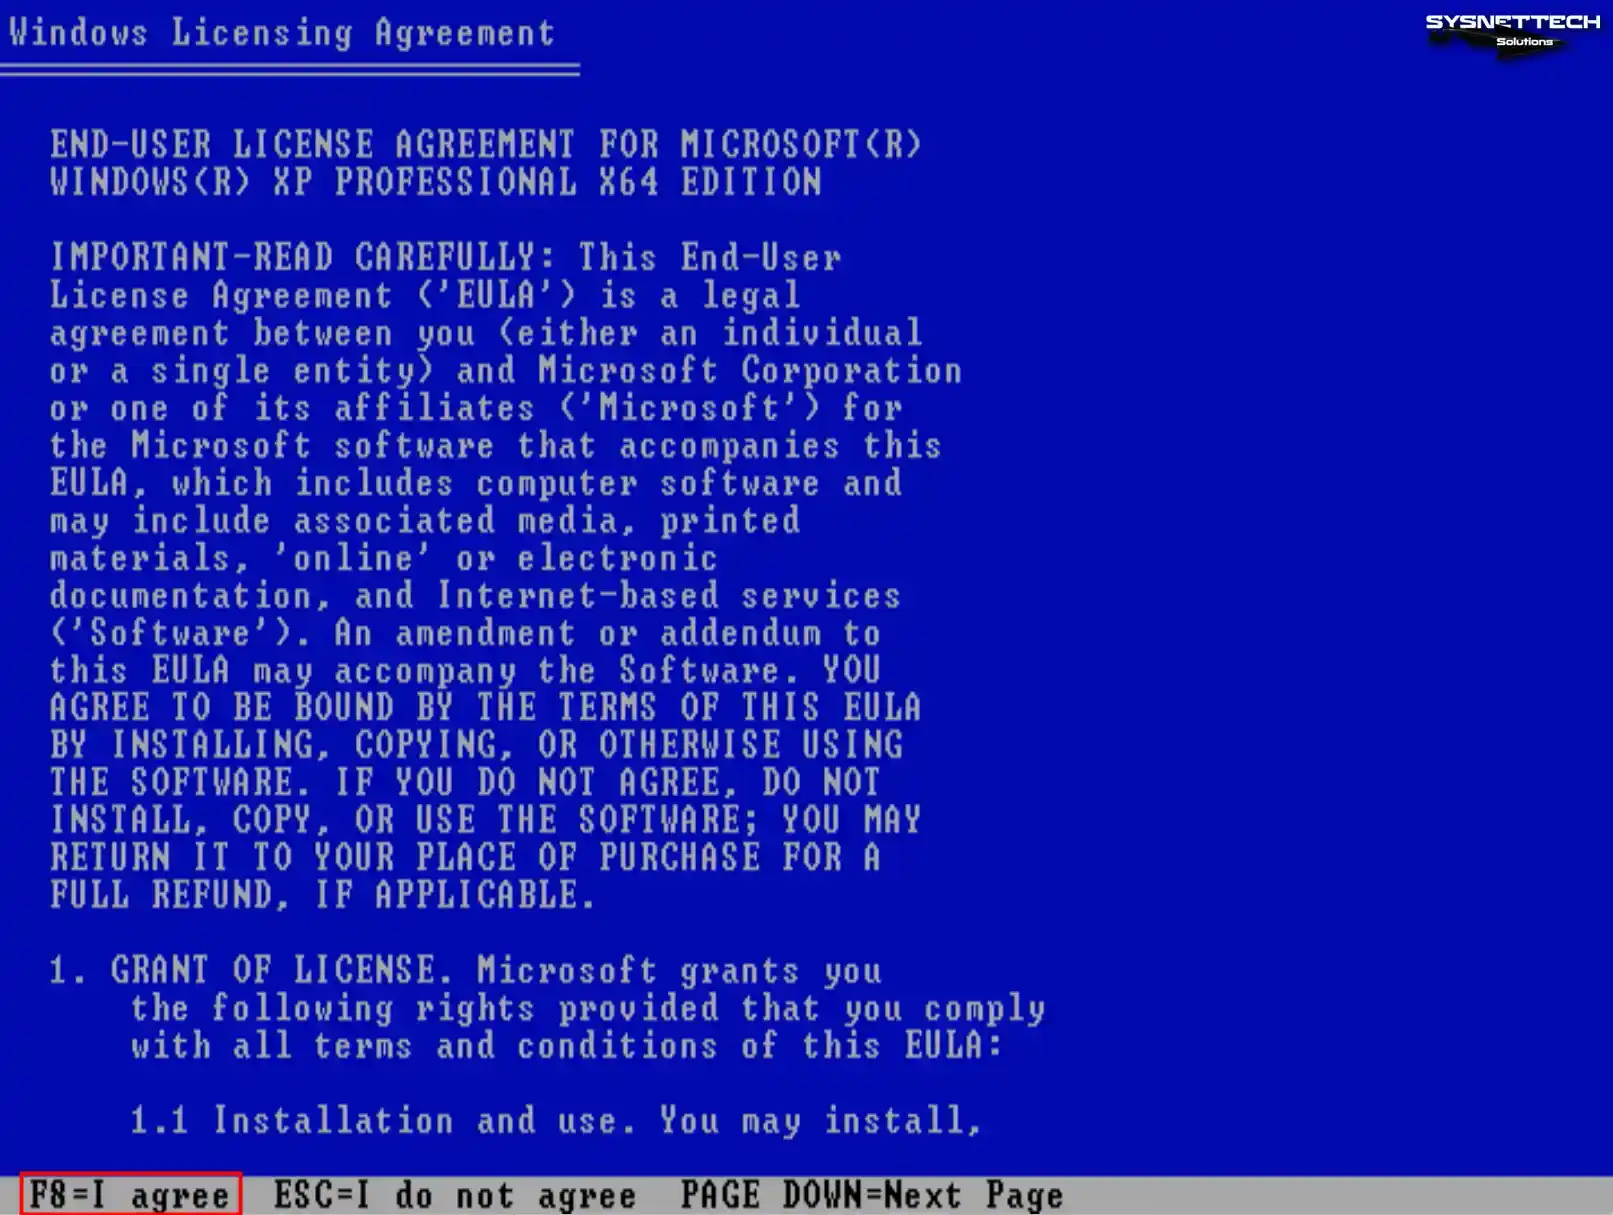
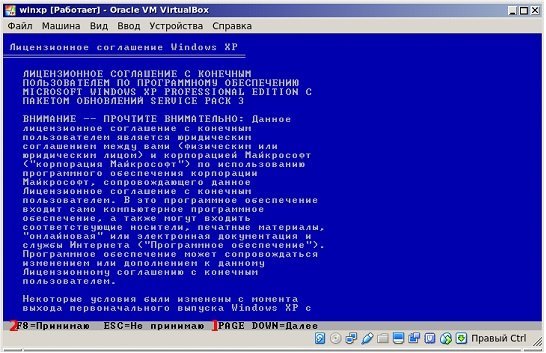
XP will show you a relatively long license agreement. Read it and accept. You can’t install XP without agreeing to the information in this document.
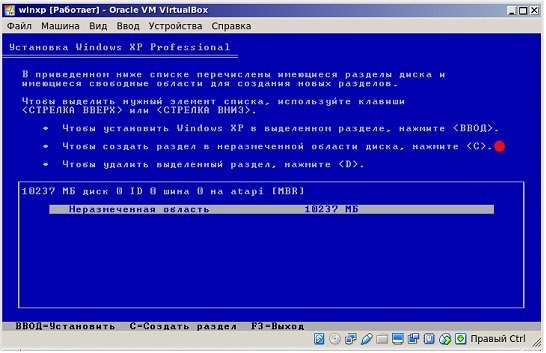
Step 11. The installer will ask you to organize your disk space, creating partitions where necessary
Format the virtual disk. Make sure you select NFTS. It is superior to other options.

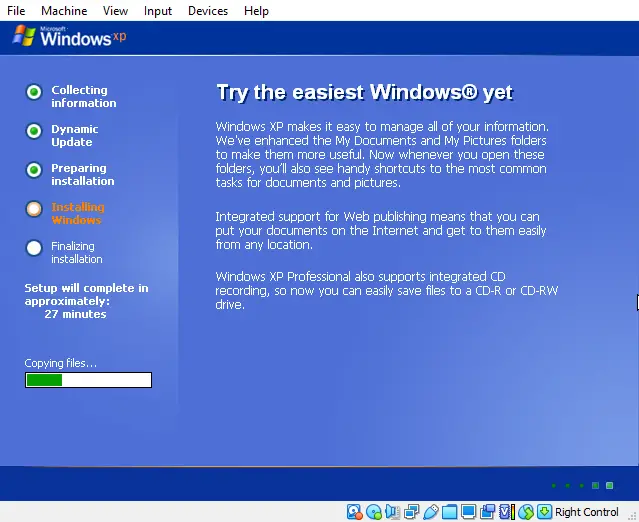
Once the formatting process starts, a yellow bar will show you your progress. When it gets to the end, the installer will copy all the relevant files to the disk.
Step 12. It requires to restart
The virtual machine will either restart automatically or prompt you to restart it by pressing a button. But you’re not done. The configuration process will continue once the virtual machine starts.
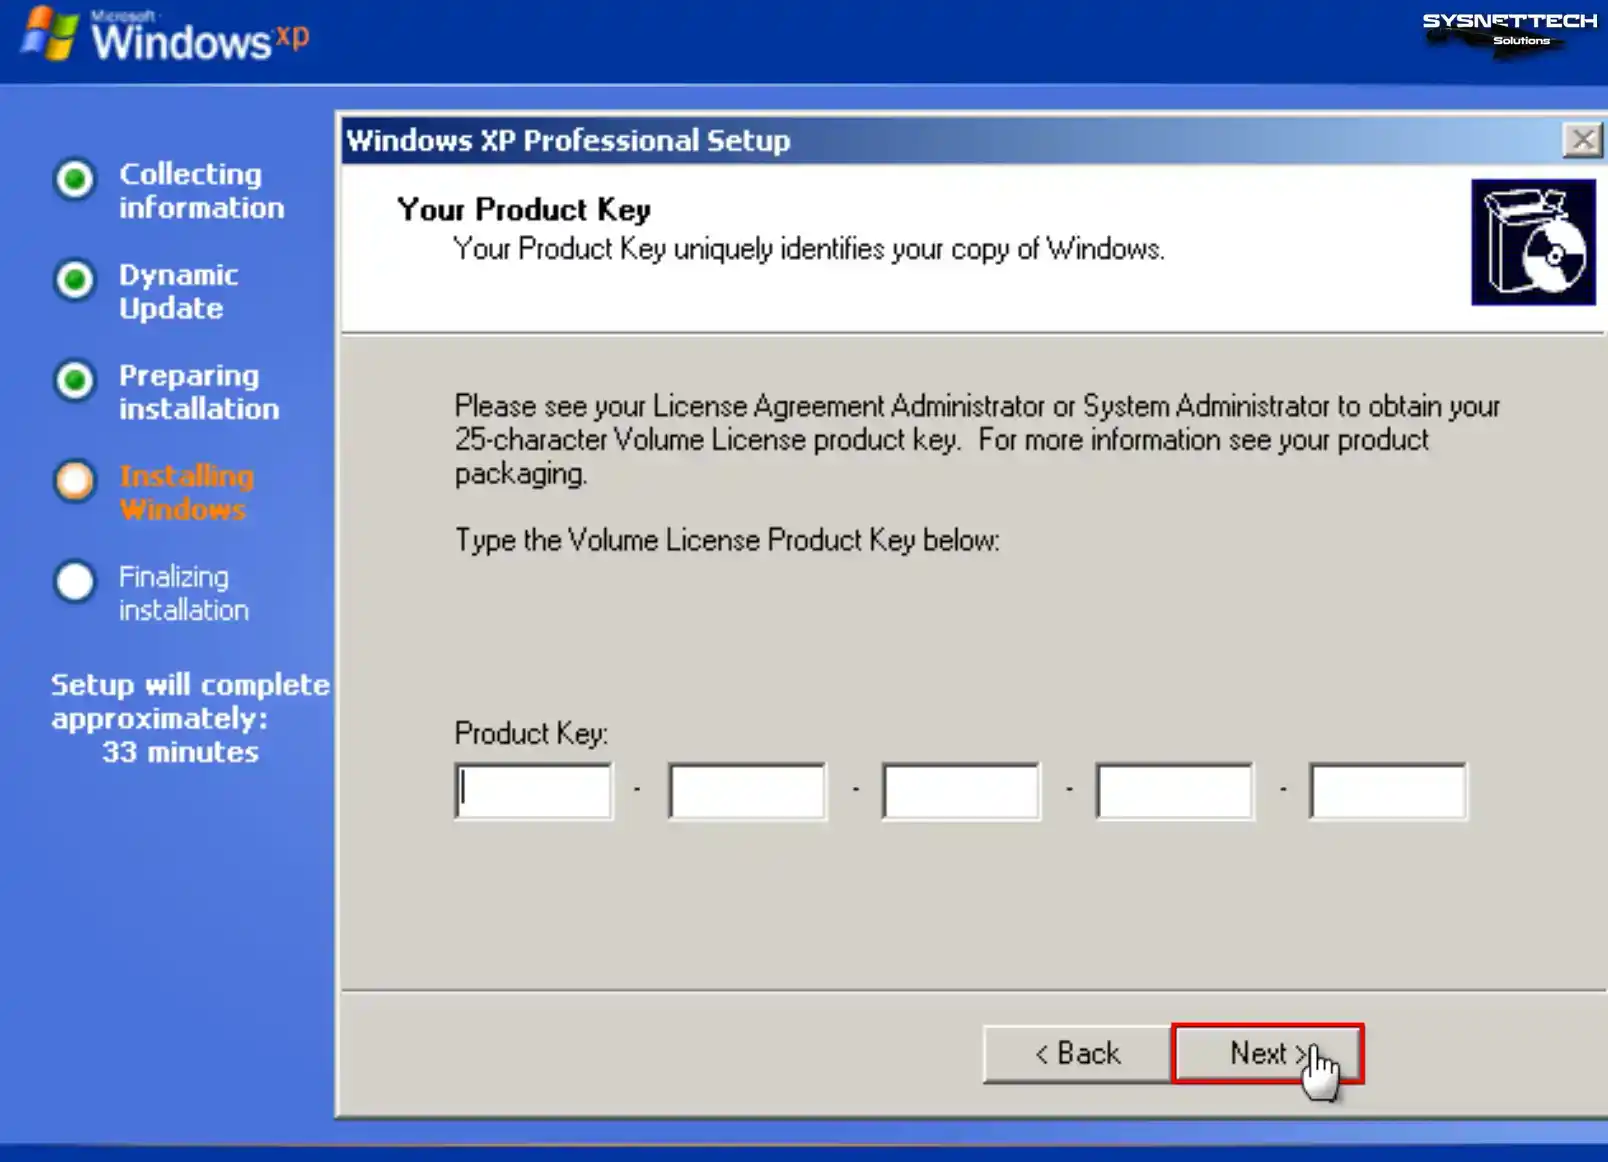
You need to enter some basic information, including your region, language of choice, date, time, and name. You must also provide the product key to authenticate your copy of the operating system.
You can create multiple profiles to accommodate the other users of the virtual machine. Don’t forget to adjust your network settings.
With the operating system configured, you can sit back and watch as the installer finishes installing XP.
Step 13. The virtual machine will restart once more
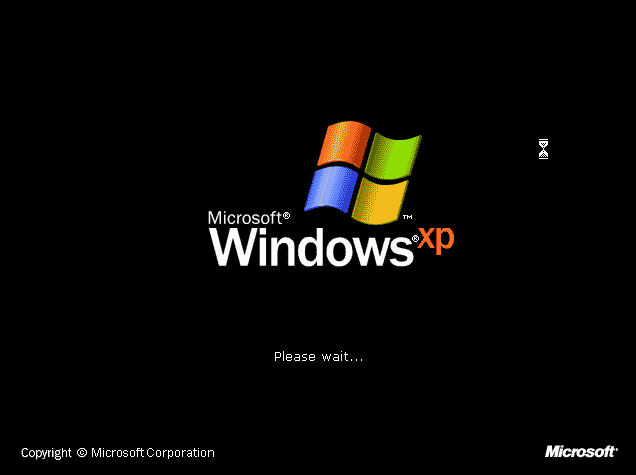
When it boots up, it will show you the Windows XP desktop.

You can start using the operating system however you wish. As you can see, the hardest part is creating the virtual machine. XP is not that difficult to install.
Related: Can you develop iOS apps on Windows in 2022
Related: Run Kali Linux on Windows 10
Tags: install Windows XP on Virtual BoxWindows XP Virtual box
Do you want to run Windows XP SP1 x64 Professional using Oracle VM VirtualBox 7.0 on your Windows 11 & 10 operating systems? In this article, I will tell you how to run an old operating system on a virtual machine. Windows XP may still be valuable for specific applications. I will also emphasize the importance of security and compatibility when running old OSes.
First of all, as we know, virtualization provides a secure and compatible environment. Thus, you must meet the hardware requirements to run Windows XP effectively. For this reason, I will also show you how to configure a more accurate and proper virtual machine. As a result, you can create a computing environment with our professional guide.
How to Set Up Windows XP x64 SP1 Pro on Windows 10 / 11 using Oracle VM VirtualBox 7
On October 25, 2001, Microsoft developed and launched the Windows XP operating system, emphasizing facilitating its utilization across various devices. These devices include home and business computers, laptops, desktops, media devices, and tablets.
The most significant difference of this operating system type, whose first code name is Whistler, is that it supports 32-bit and 64-bit architectures.
By prioritizing performance, stability, and security, Windows XP delivers an optimized user experience. It is the first operating system to have product activation methods to prevent software piracy, which has threatened software developers.
Key features of Windows XP include Internet Explorer 6, Windows Media Player, downgrade/rollback device drivers, remote assistant, advanced firewall, system restore, wireless connectivity, application compatibility mode, and CD Burner.
Although Microsoft ended support for the XP system on April 8, 2014, many people still use this system today. This can create a severe vulnerability to both the local and Internet networks. Hence, we advise against installing Windows XP on your host computer instead of Windows 10 or 11.
However, users who want to use and experience Windows XP or play old games can install it on virtual machines. Thus, they can choose a safer way to use XP on an up-to-date operating system.
Before creating a virtual machine on your host, your processor must support the virtualization feature. Without this support, setting up a virtual computer on your host would not be possible. I recommend checking the virtualization feature of your CPU.
How to Create a New Virtual Machine for Windows XP
After installing the Oracle VM VirtualBox virtualization software on your host operating system, you must set the VM settings correctly to use Windows XP without any problems. Creating a VM that matches the hardware capacity of your physical host computer is essential in terms of performance and compatibility.
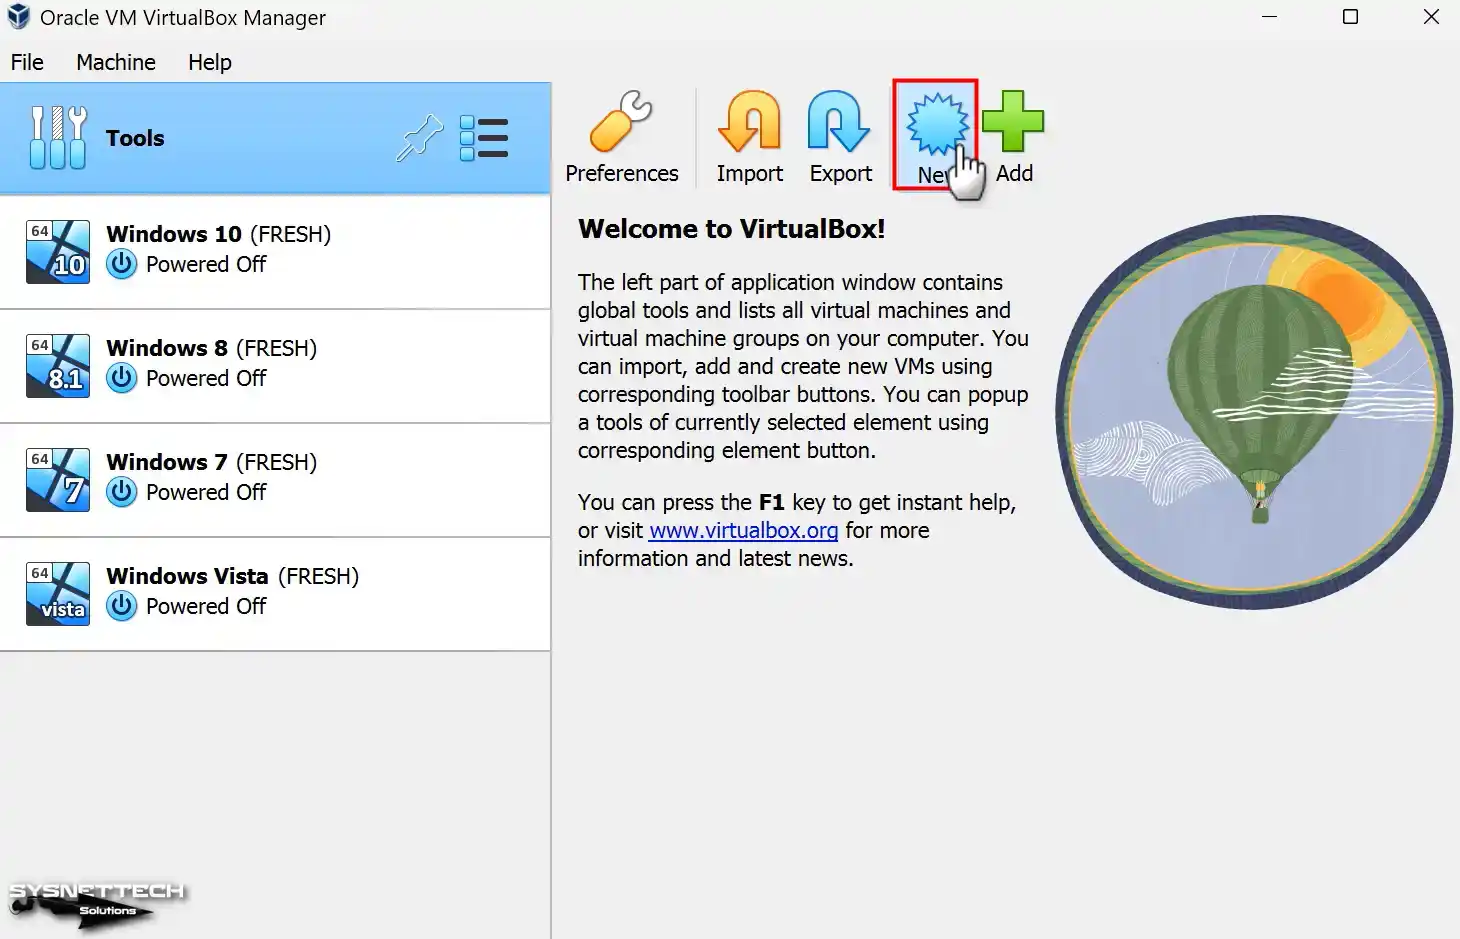
Step 1
Open your Oracle VirtualBox program and open the virtual machine creation wizard from the tool menu on the program’s homepage or the New shortcut.
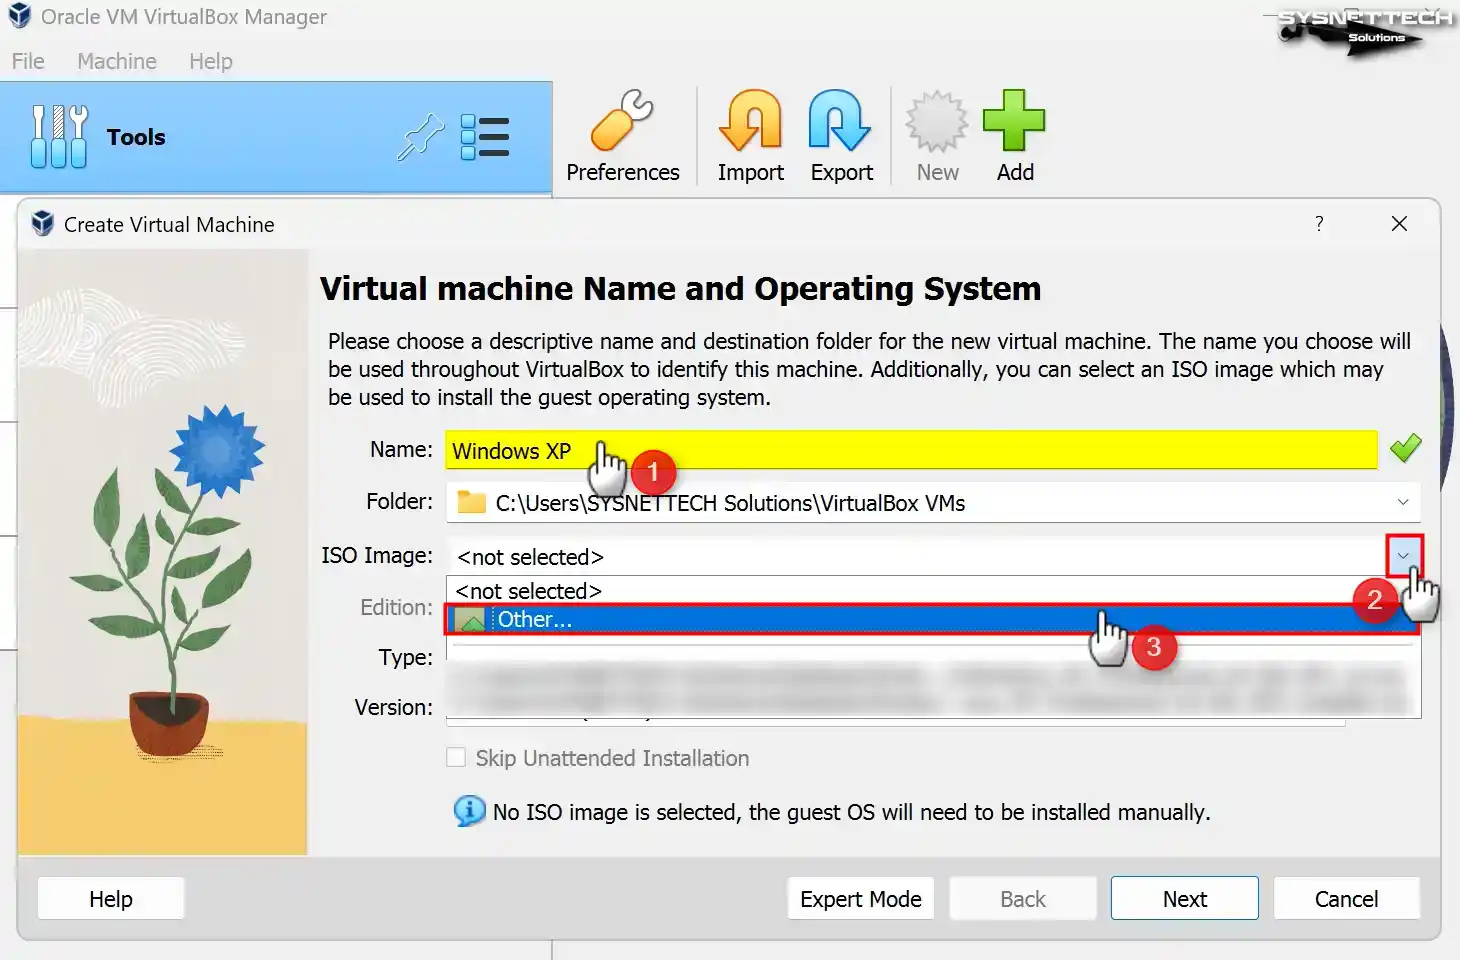
Step 2
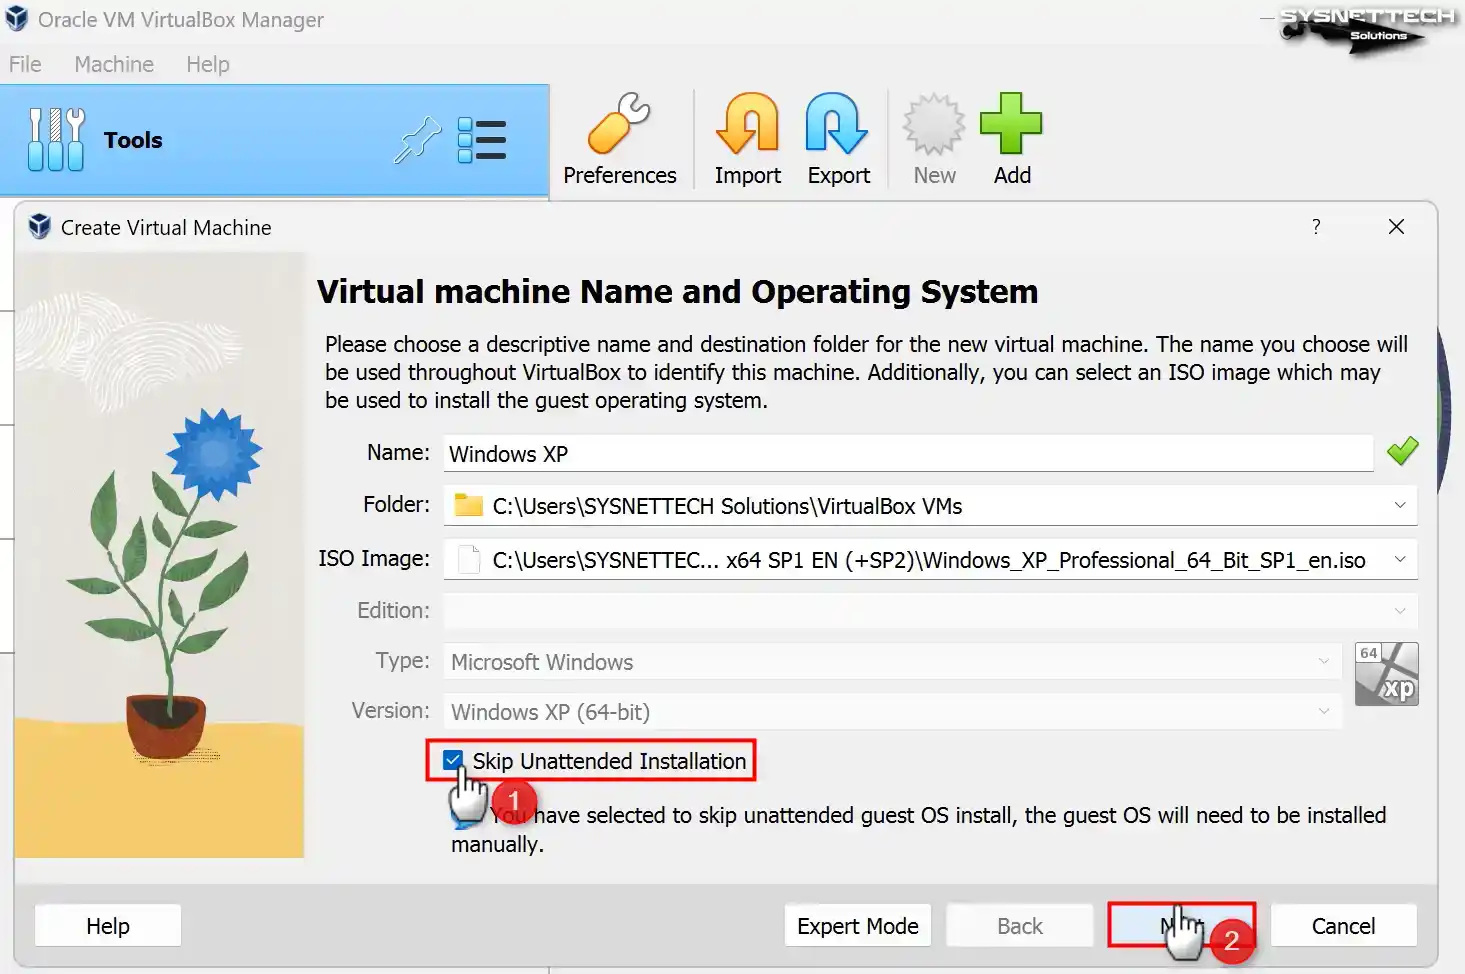
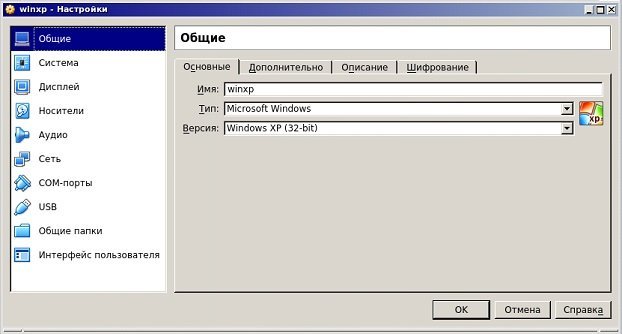
When the virtual machine preparation window appears, the initial step is to enter the name of the operating system you intend to install into the designated Name field. After entering Windows XP in the Name field, the values in the Type and Version fields will be automatically adjusted according to your typing system.
If you see the 32-bit value in the Version field after typing Windows XP and you will install 64-bit, configure this value manually.
You can change the position where you install the virtual machine in the Folder section. Suppose you desire to install the operating system on an external SSD or HDD storage device. In this case, you can pick “Other” from the pop-up window and select the installation location from your host PC.
Select Other from the ISO Image menu to add a Windows XP ISO file to the virtual pc.
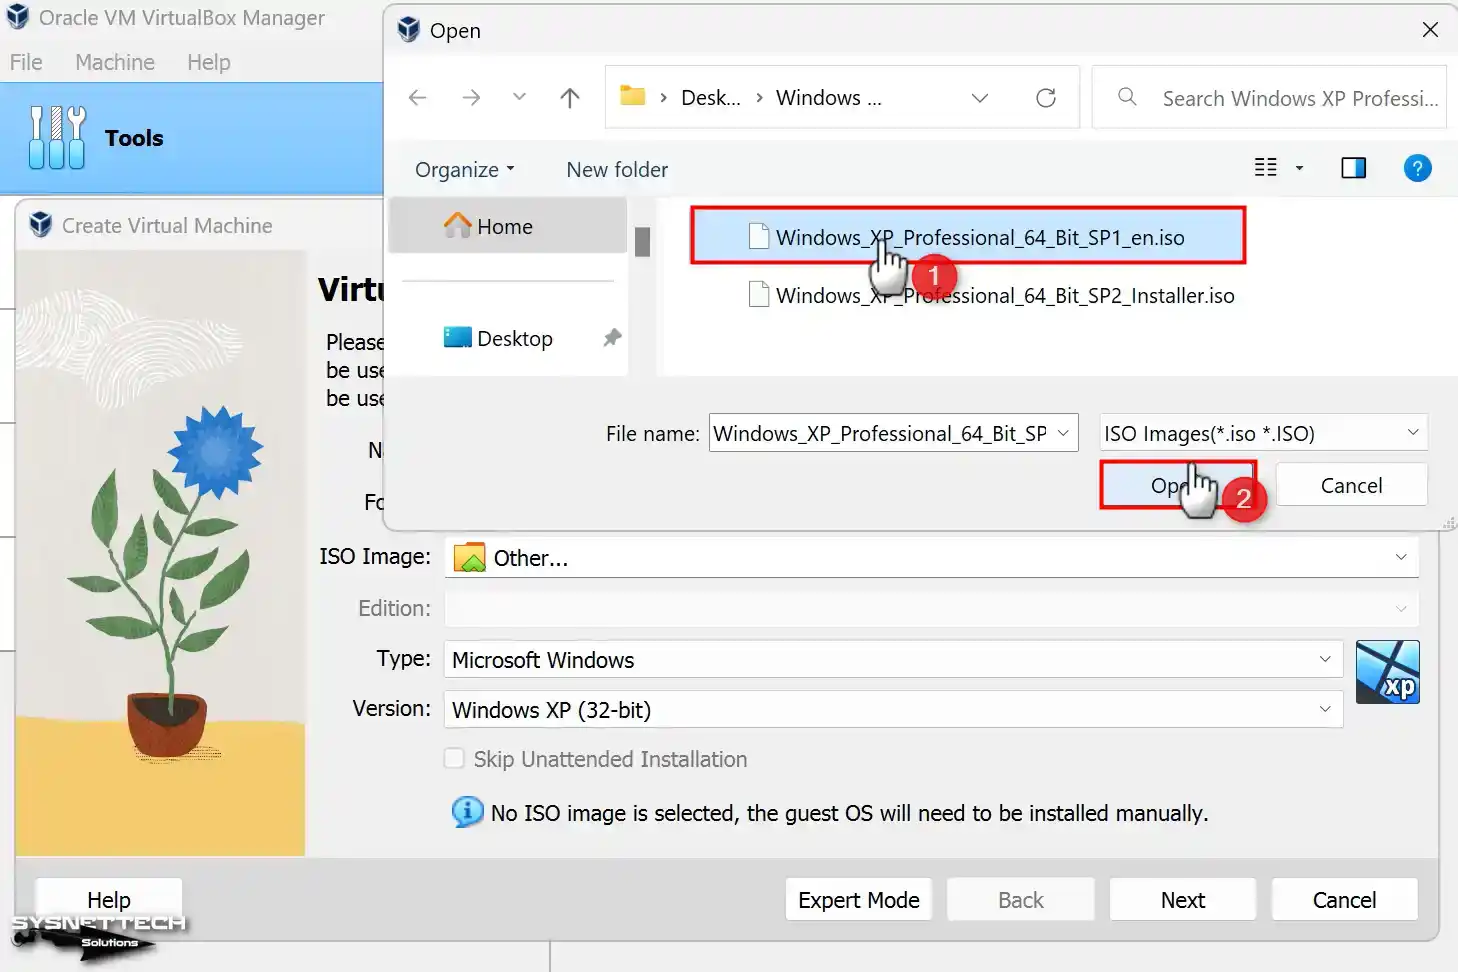
Step 3
Select the Windows XP Professional 64 Bit SP1 image file you downloaded to your computer from the table below the article and open it.
Step 4
In the 7.x versions of VirtualBox, you can see the unattended installation option as the user interface has changed. Using this option, you can prepare a system with preconfigured usernames or product key settings.
If you prefer to install the system manually, select Skip Unattended Installation and click Next.
Step 5
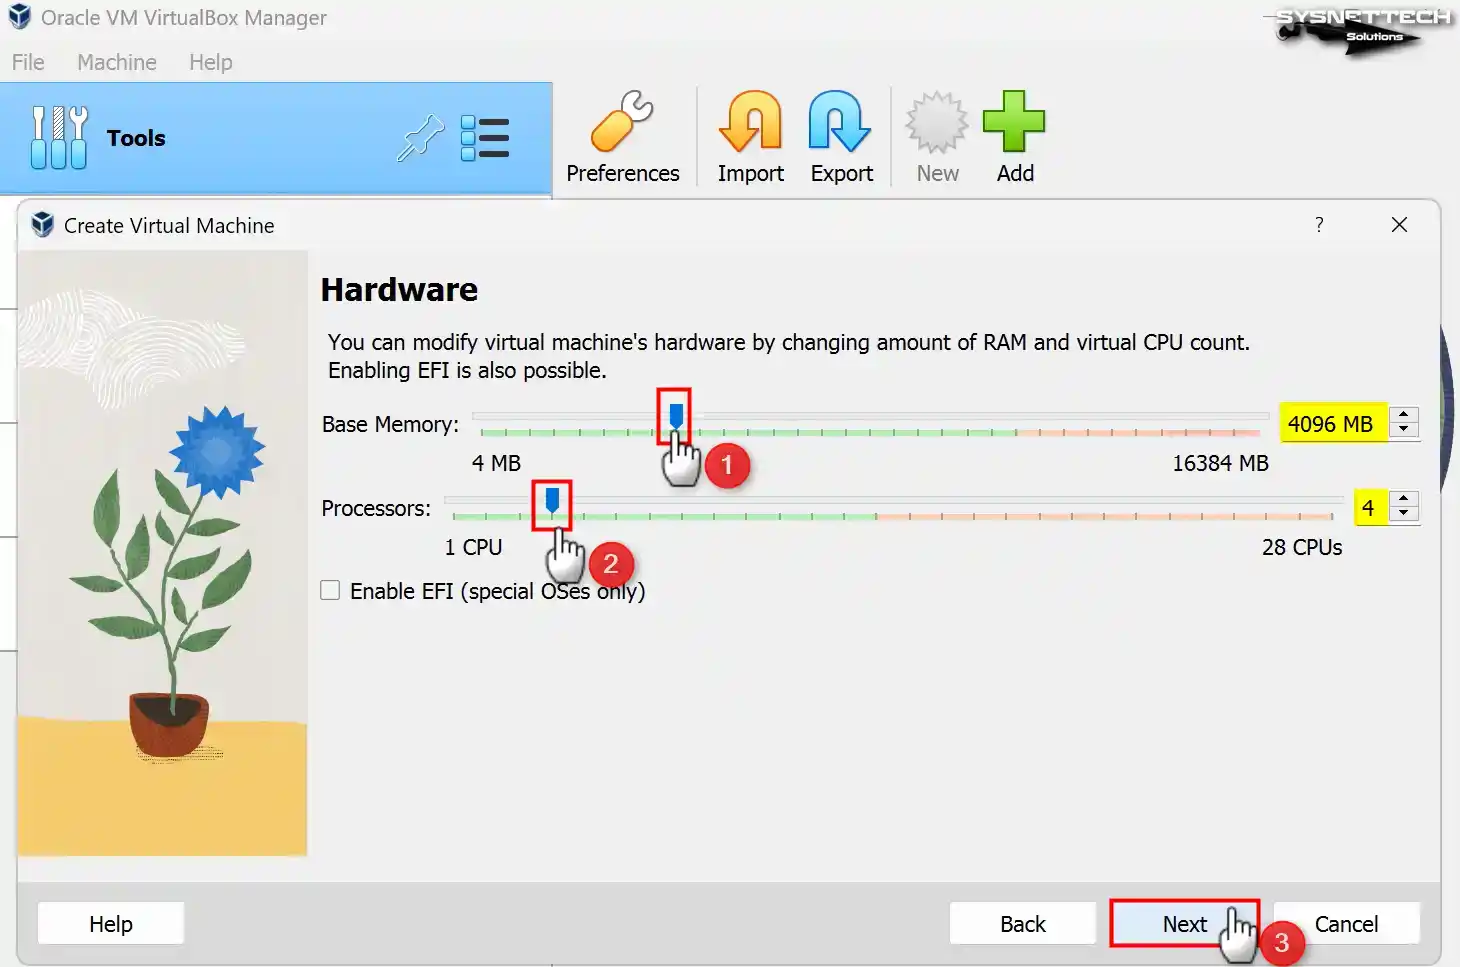
Configure a RAM size of 4096 MB (4 GB) for Windows XP as the base memory size. Suppose your host computer possesses a substantial amount of RAM. In that case, it is proposed to configure this value to a minimum of 4 GB or 8 GB.
In addition, configure the number of virtual processors to 4 so you can use your virtual computer more efficiently.
Step 6
Since you will install Windows XP from scratch in the virtual HDD settings, you must select the Create a Virtual Hard Disk Now option. If you have installed an XP virtual disk, you must select the Add an existing hard disk file option.
In VirtualBox 6.x versions, you can see the old settings on the virtual disk screen. For a sample, if you do not use a VM installed on VirtualBox with other virtualization software, choose VDI (VirtualBox Disk Image). You can use the VDI disk type in other software, but Oracle always recommends using the VDI type.
If you want to use as much disk space as the capacity of the virtual disk file on the disk where you will install the virtual machine, you can choose Fixed Size. Fixed Size can improve the performance of the VM, but it unnecessarily fills up the host disk space.
Therefore, by selecting Dynamically Allocated, only the disk space needed by the VM will be automatically allocated over the host disk. Do not change the path in File Location and Size to save the virtual disk to the installation location you set in the first step of the VM wizard.
Regarding Windows XP, you can modify the virtual disk extent to a minimum of 30 GB. However, it is advisable to determine the disk size based on your specific work requirements.

Step 7
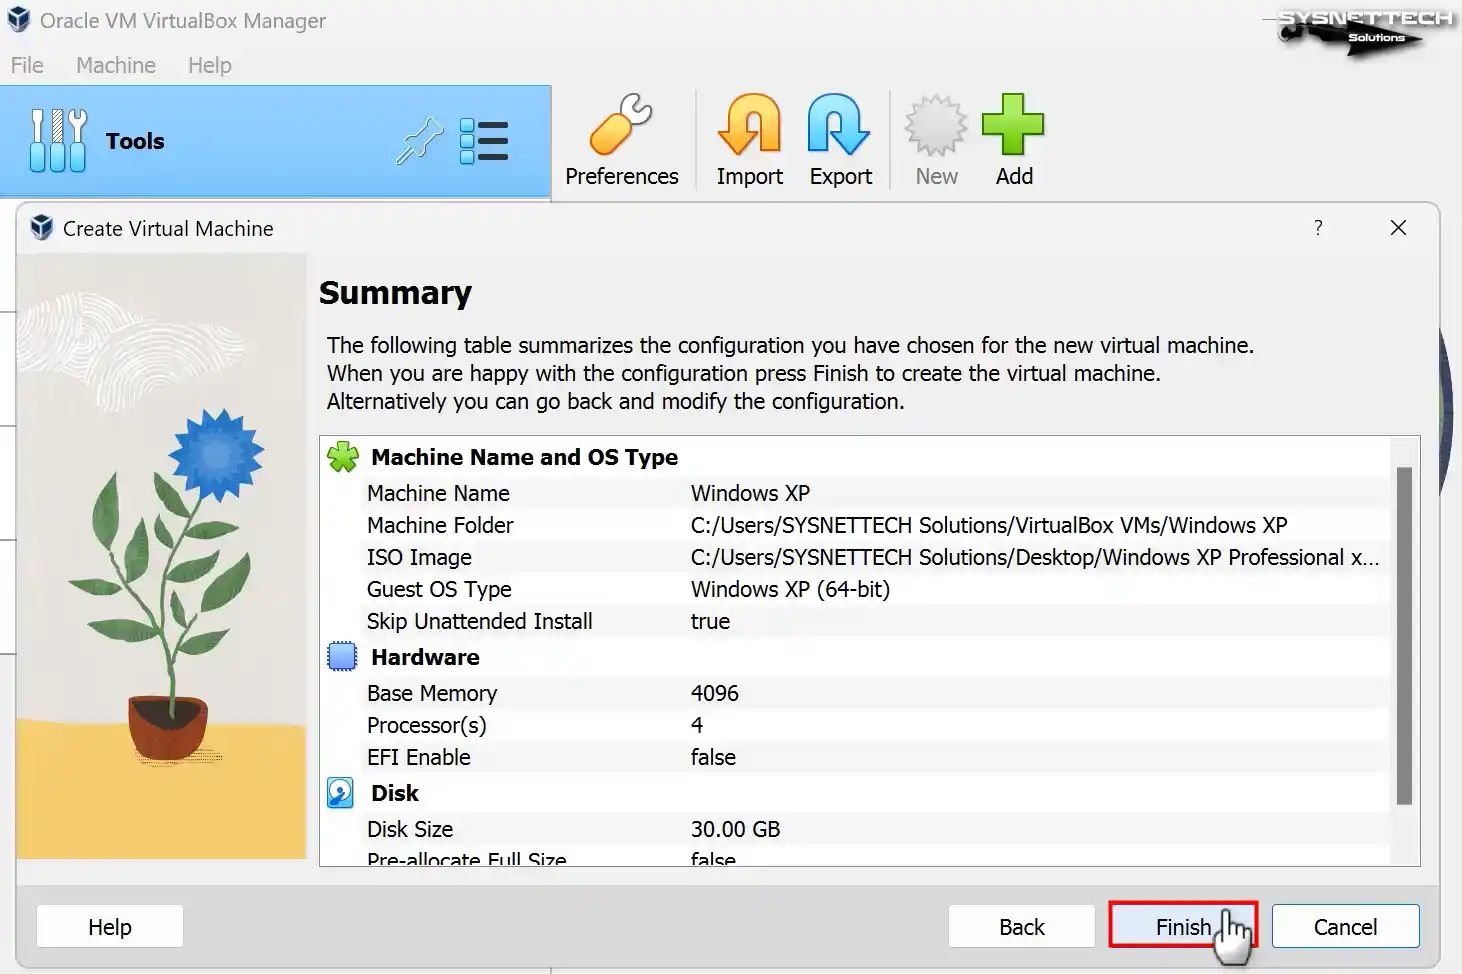
After adjusting the hardware settings of the Windows XP guest machine, check again and close the VM wizard.
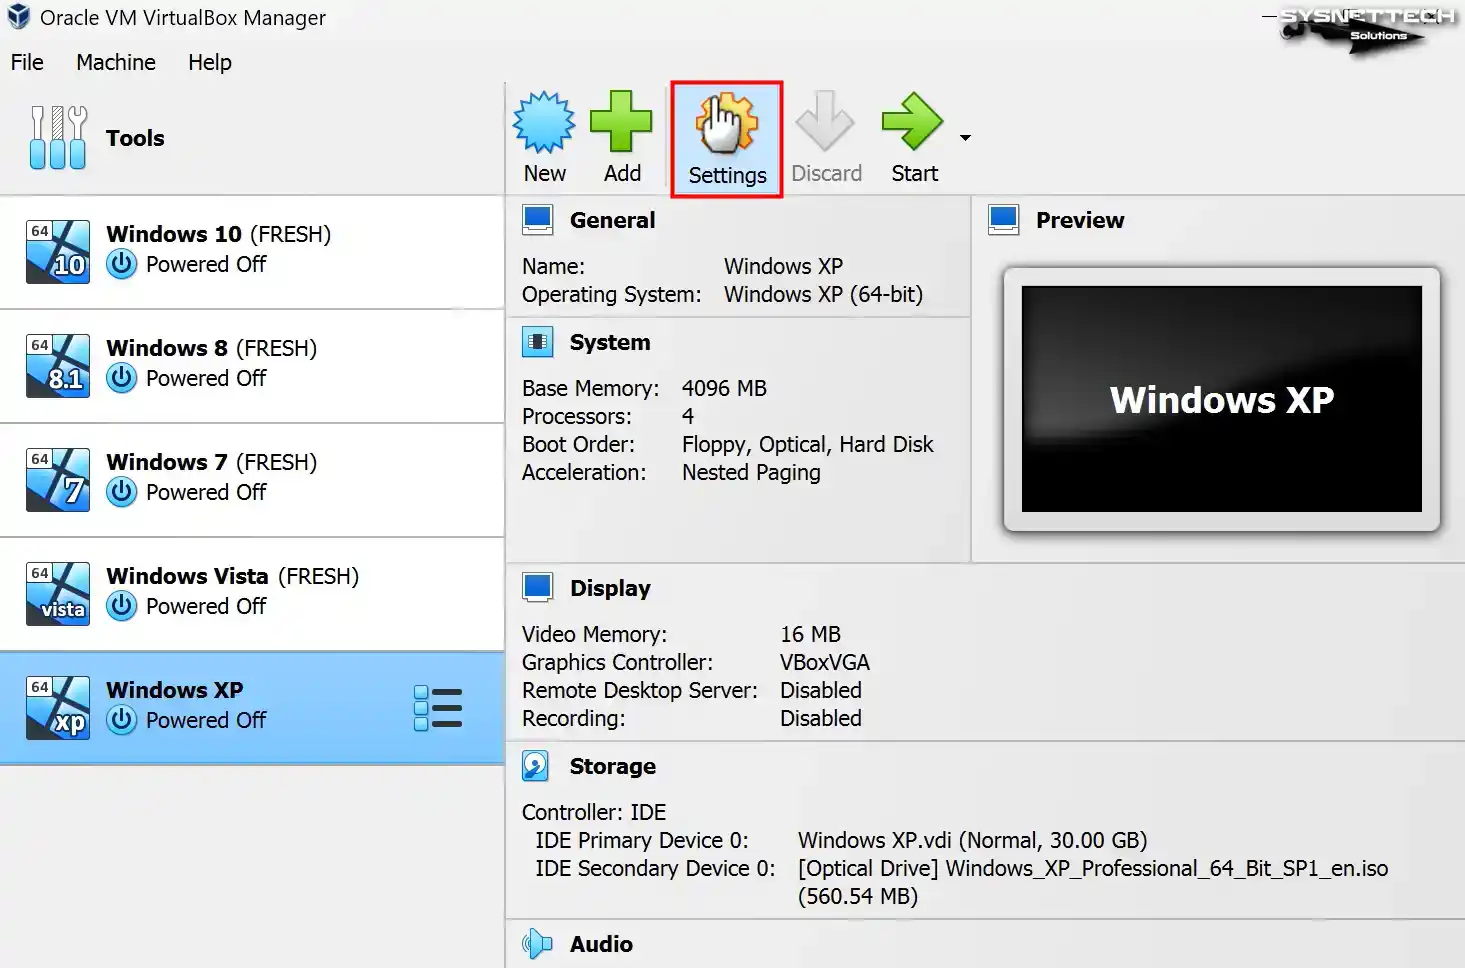
Step 8
Click Settings to configure the hardware settings of the guest operating system.
Step 9
To permit file sharing between the host and the virtual machine in the settings window of the VM, configure the Shared Clipboard and Drag and Drop features as Bidirectional in the General / Advanced tab.
So you can share files or copy/paste text from the host to the VM and from the VM to the host.
Step 10
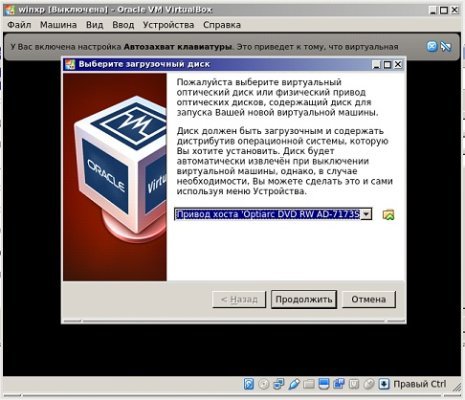
To install Windows XP on the virtual pc, select the Optical device as the direct boot device in the Boot Order index in the System / Motherboard settings to add the ISO file to the optical drive.
Step 11
If you plan to use virtualization software on your virtual computer, enable the Nested VT-x/AMD-V feature from the processor device.
Step 12
Enable Nested Paging for better memory management between your host and VM.
In certain conditions, it may be necessary to manually choose the virtualization interface within the Acceleration tab located in the virtual PC system settings.
The Paravirtualization Interface is in Default mode by default. The default mode will automatically select a virtualization engine according to the installed system type. Still, since no VTx interface is set for XP, you can change the value here to Hyper-V.
Step 13
Enable 3D acceleration in the Display / Screen settings of the virtual machine and configure the Video Memory size to 128 MB.
Note: Please take note that although you enable 3D graphics acceleration on Windows XP in VirtualBox version 6.1, the Direct3D feature is regrettably no longer supported. If you wish to utilize Direct3D support, installing one of the 6.0 versions of VirtualBox on your system is advised.
Step 14
By default, the Host I/O Cache feature for the IDE controller is enabled in the storage volumes of the virtual PC. If the Host I/O cache is not allowed, enable it for virtual disk performance.
Step 15
Check the Solid-State Drive (SSD) option to configure the WindowsXP.vdi virtual disk file as an IDE SSD.
Step 16
After preparing your Virtual PC, click the Start button to proceed to the steps of installing Windows XP on VirtualBox.

How to Install Windows XP in VirtualBox
After preparing the Windows XP virtual computer, you need to install Windows using the system’s ISO image. After running the VM with the image file as the startup disk, when the setup wizard opens, you should install it as if installing the Windows platform on a real computer.
Step 1
At the Windows XP Professional Setup screen, you must press Enter to begin installing Windows immediately. Otherwise, press F3 to exit the wizard or R to repair your system.

Step 2
You must press Page Down to read the full text of the Windows XP license agreement in the setup wizard. After reading the license agreement, press the F8 key to accept and continue the installation.
Step 3
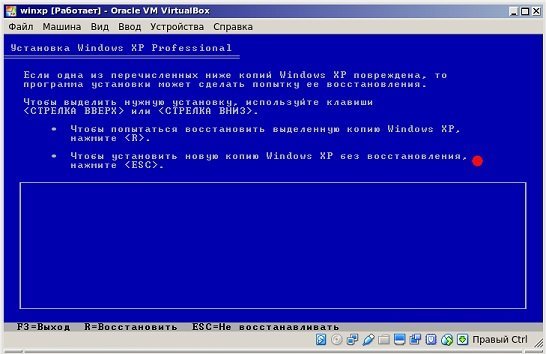
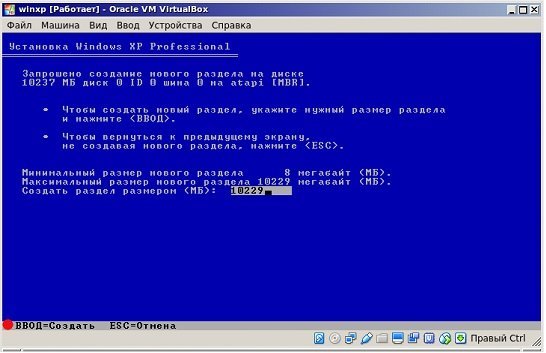
Press the C key to configure the unallocated disk space. You can also press Enter to have the wizard automatically organize the disk space and format the system disk.
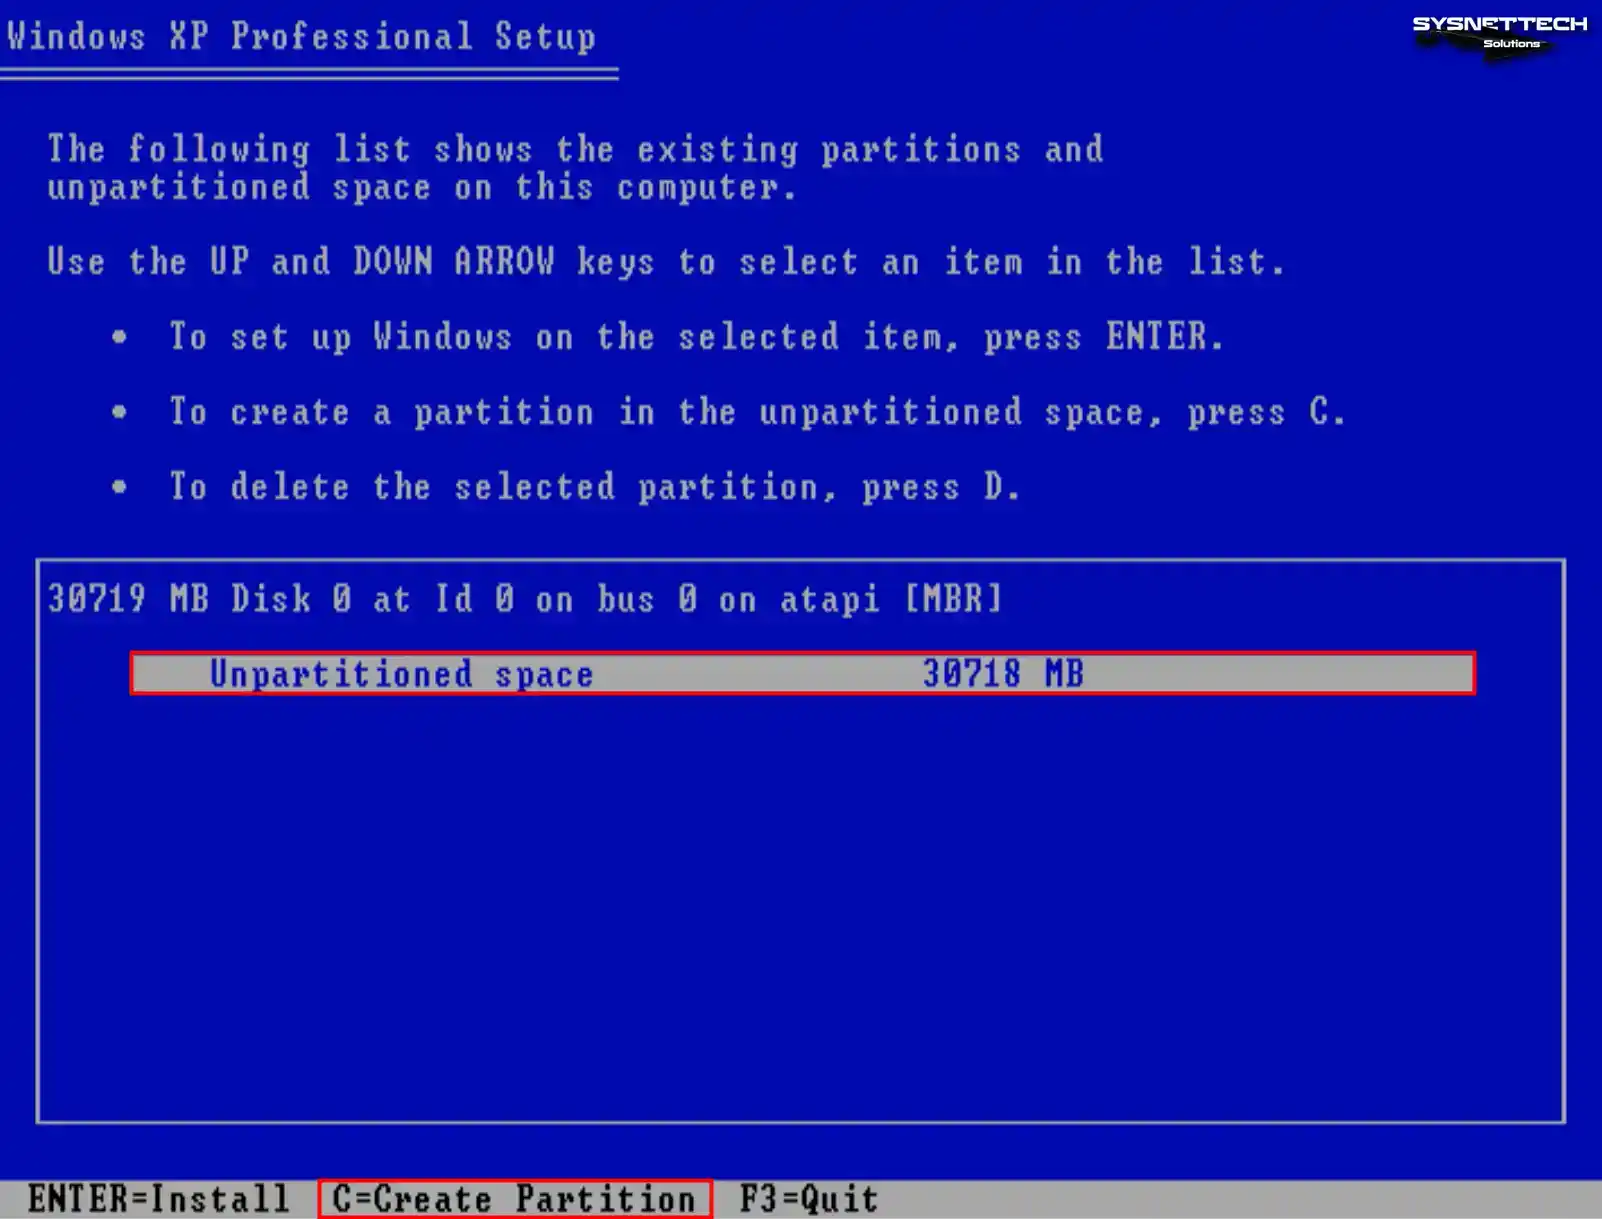
Step 4
To make a new partition, you need to edit the disk space to be allocated after clicking C. You should use the entire disk space, as virtual machines generally use smaller disk space.
For example, if you configure the virtual disk size to 100 GB, allocating 20 GB for system setup and 80 GB for backup may make more sense.
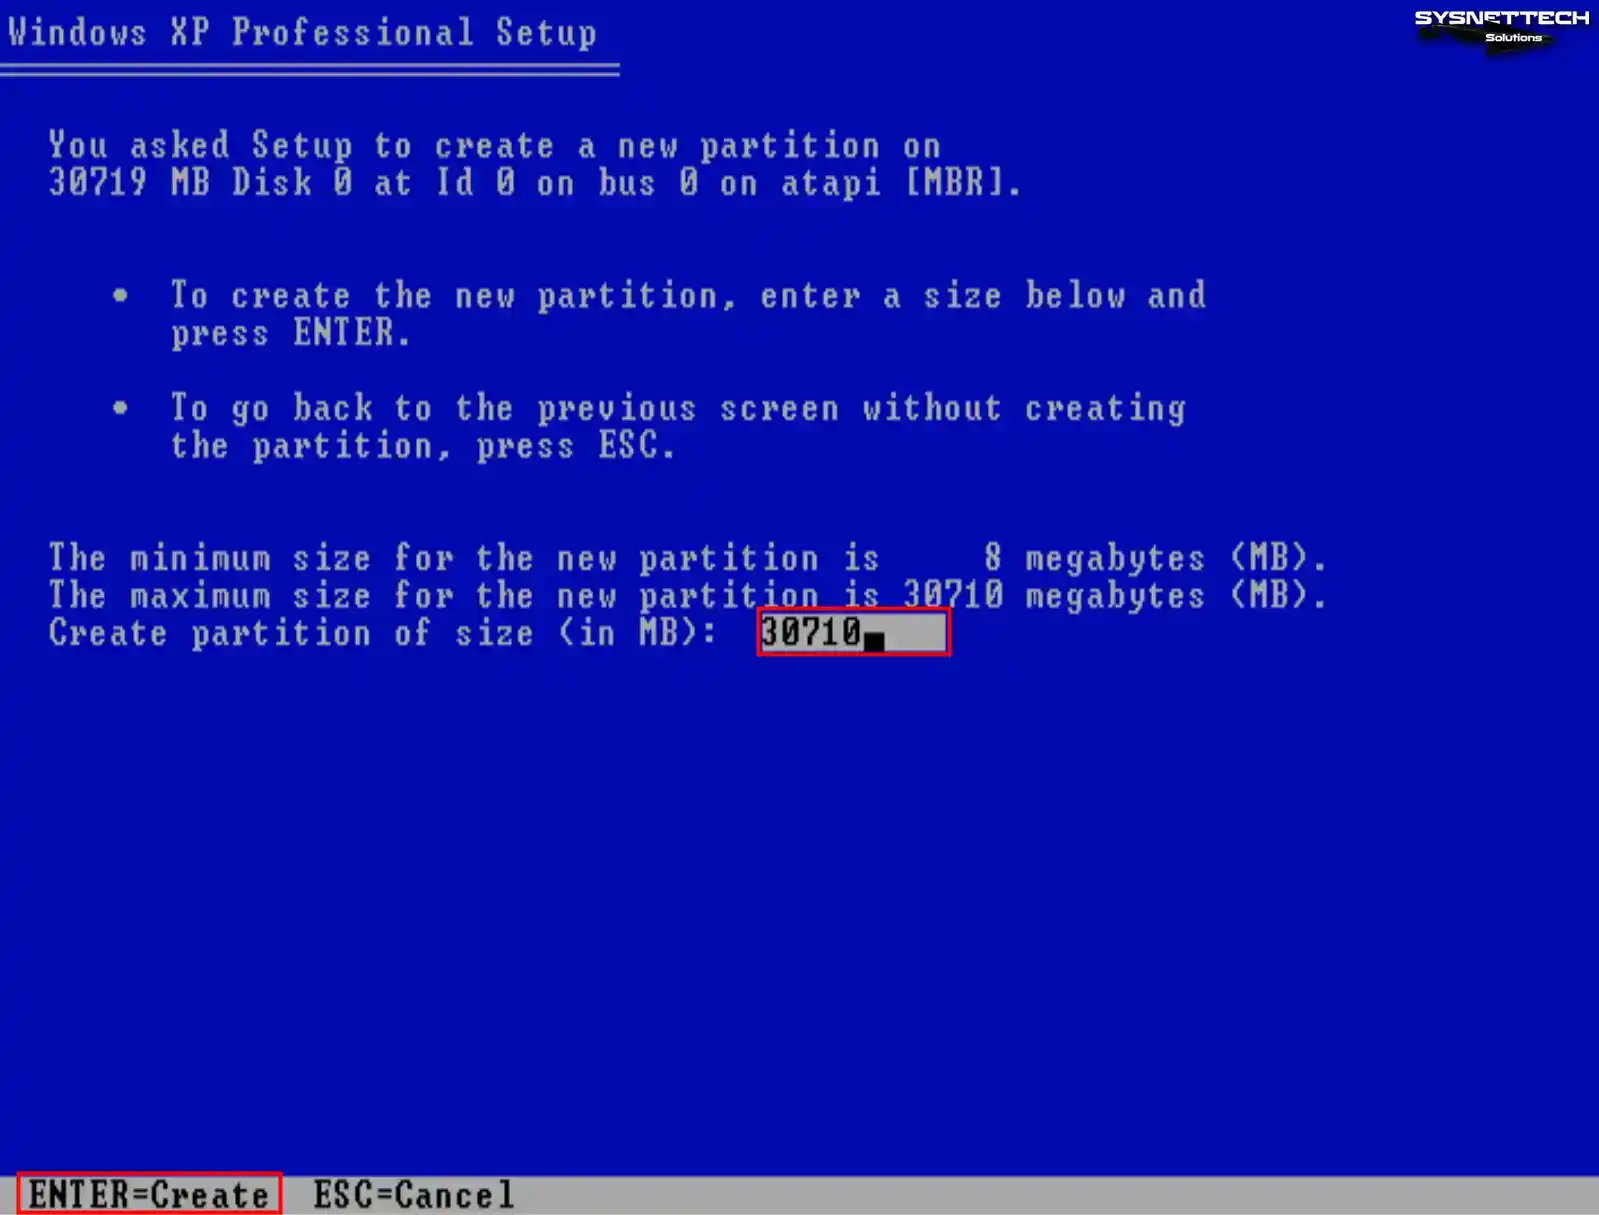
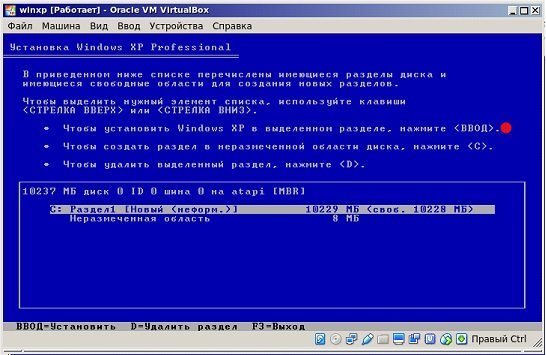
Step 5
Press Enter to start the Windows XP installation on the new partition you created.
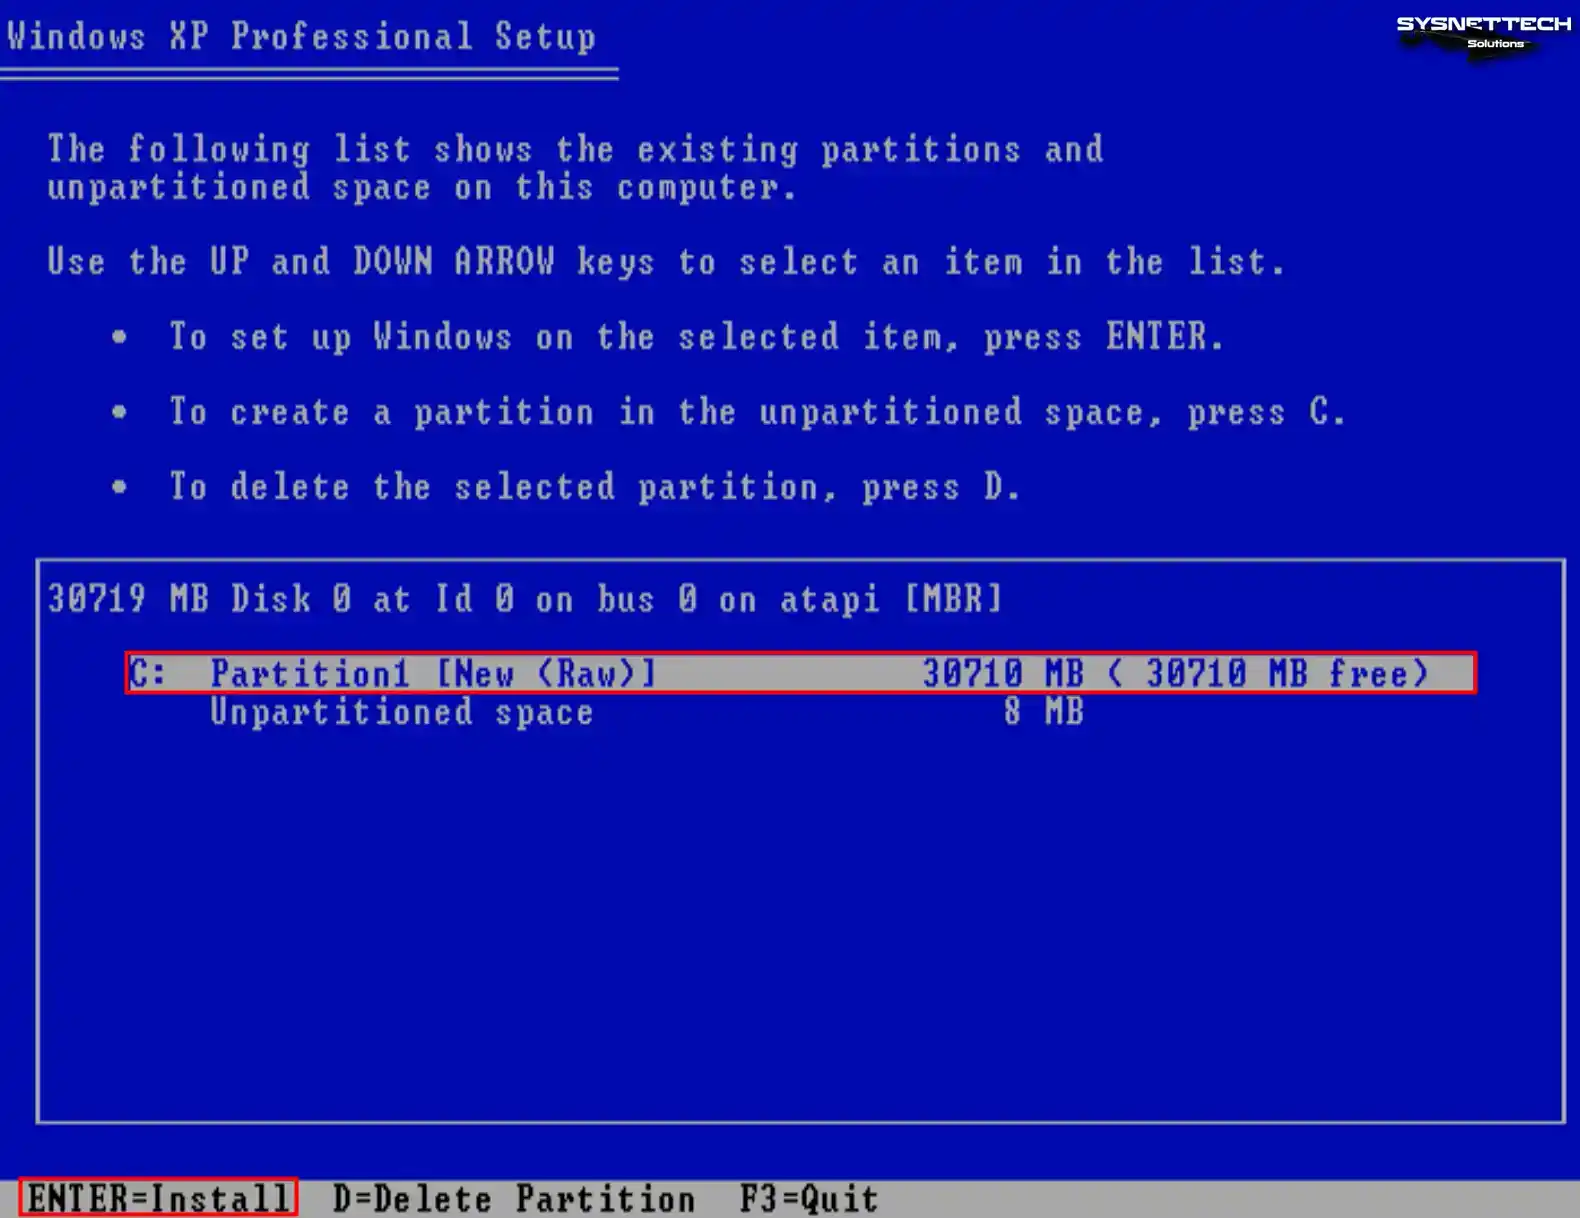
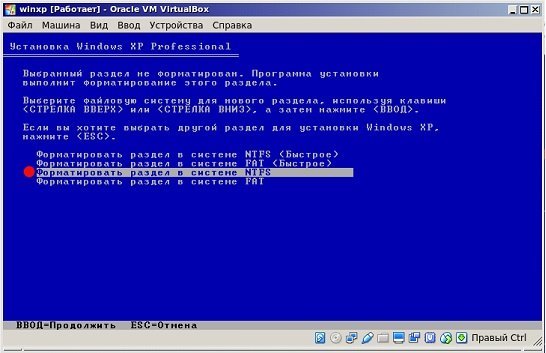
Step 6
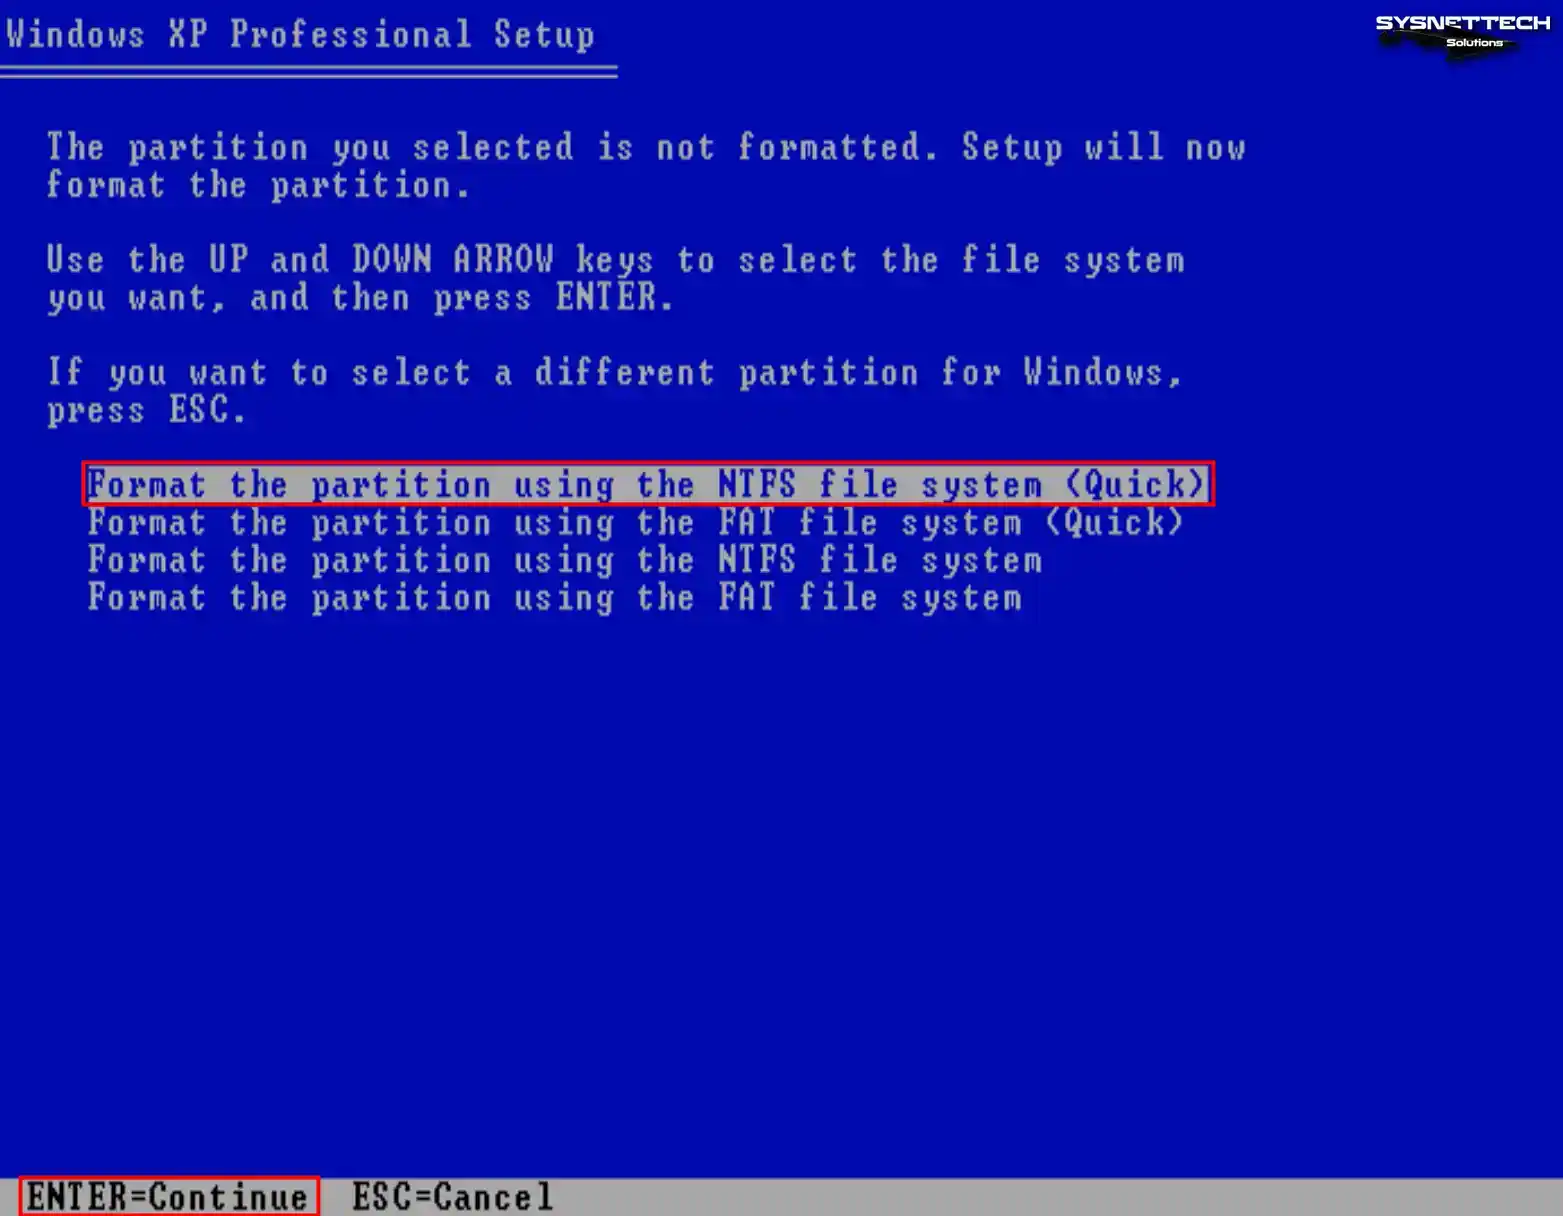
Quickly format the virtual disk of the guest machine using the NTFS file system.
Step 7
Wait while the setup wizard formats your virtual disk.

Step 8
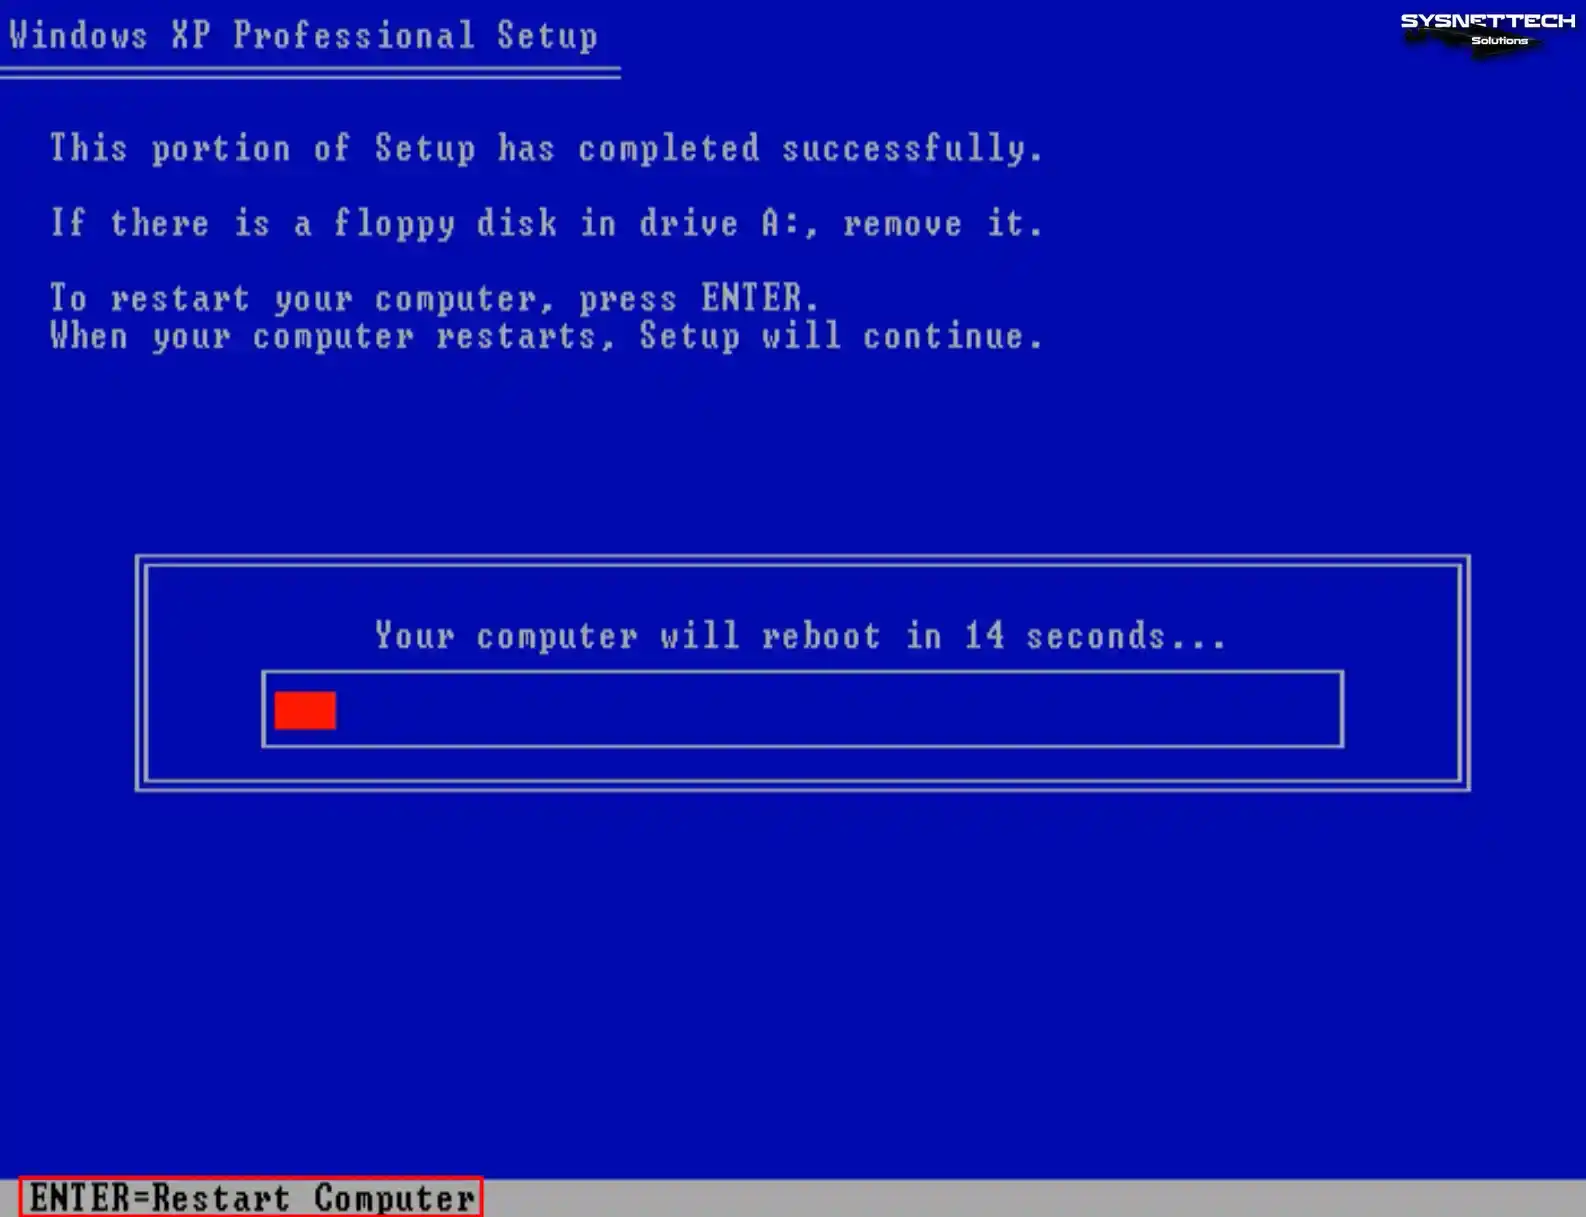
Once the virtual disk has been formatted to facilitate file copying, the XP system files will commence their transfer onto the disk.
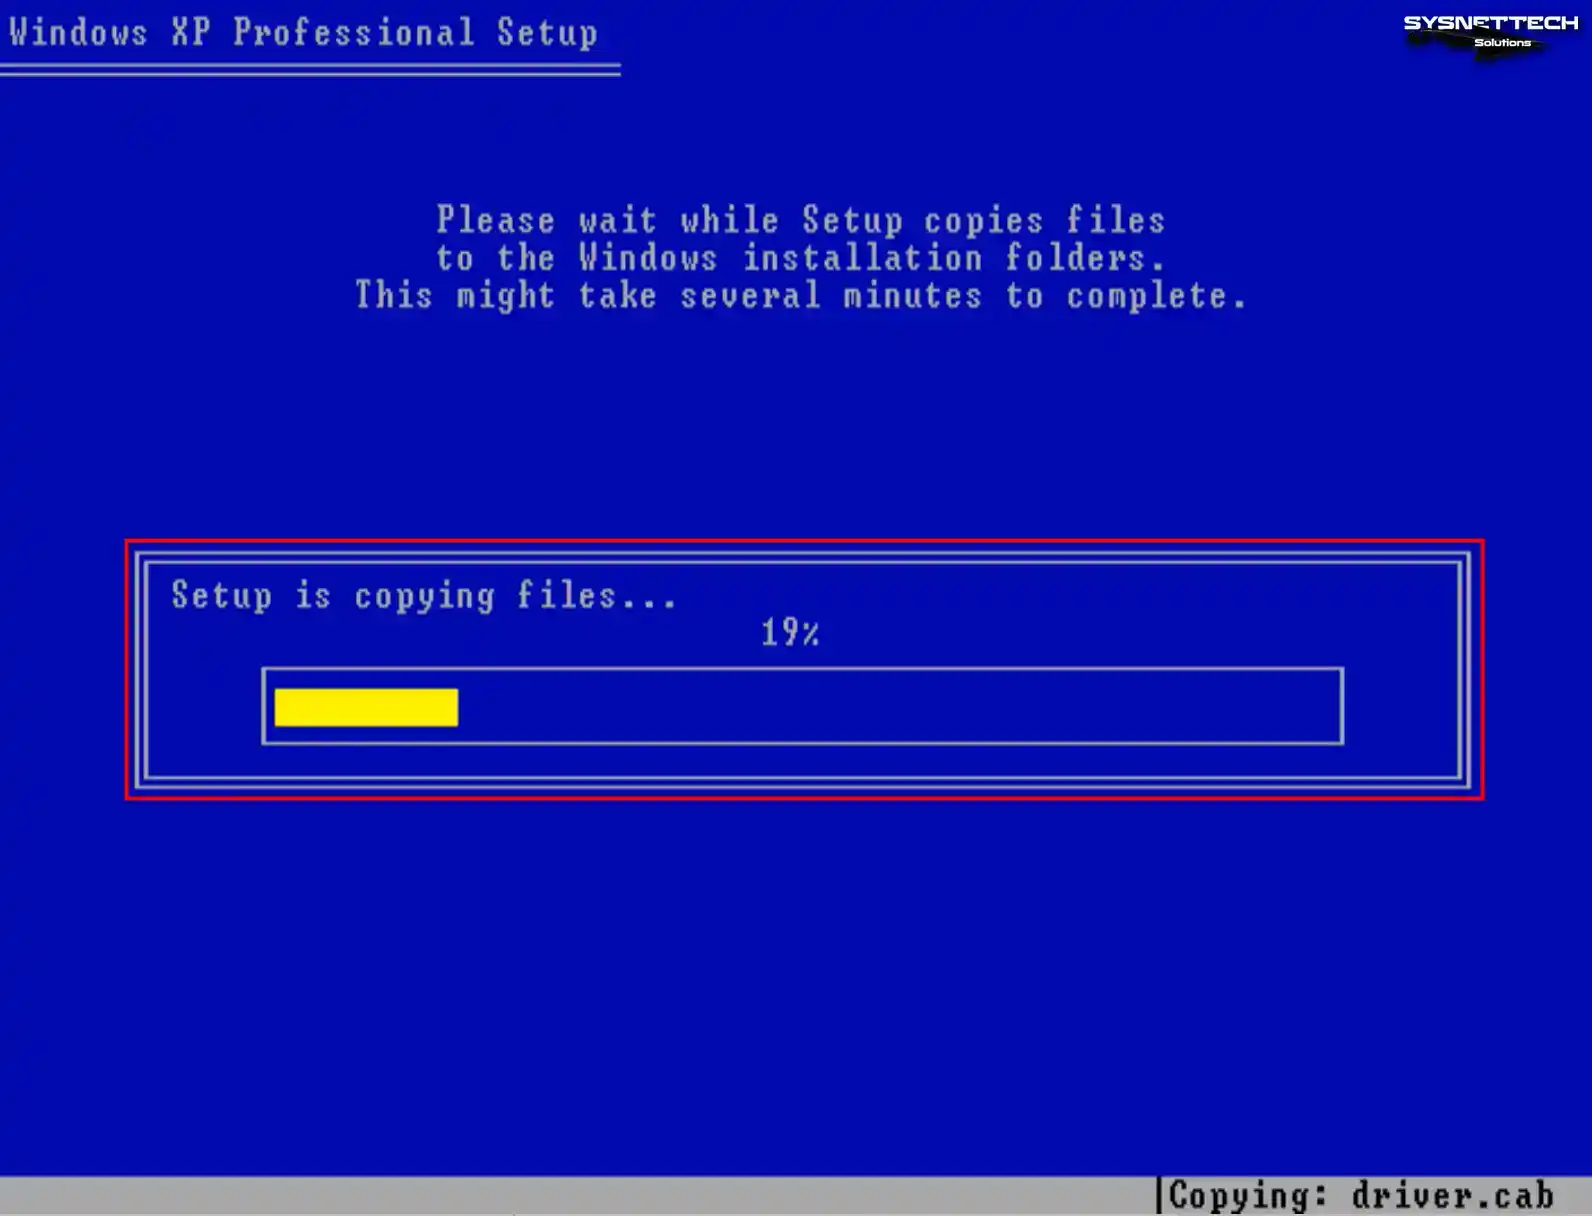
Step 9
After copying the system files, your virtual computer will restart automatically in 15 seconds. You can press Enter to reboot your virtual system immediately. After your guest machine restarts, the installation will continue.
Step 10
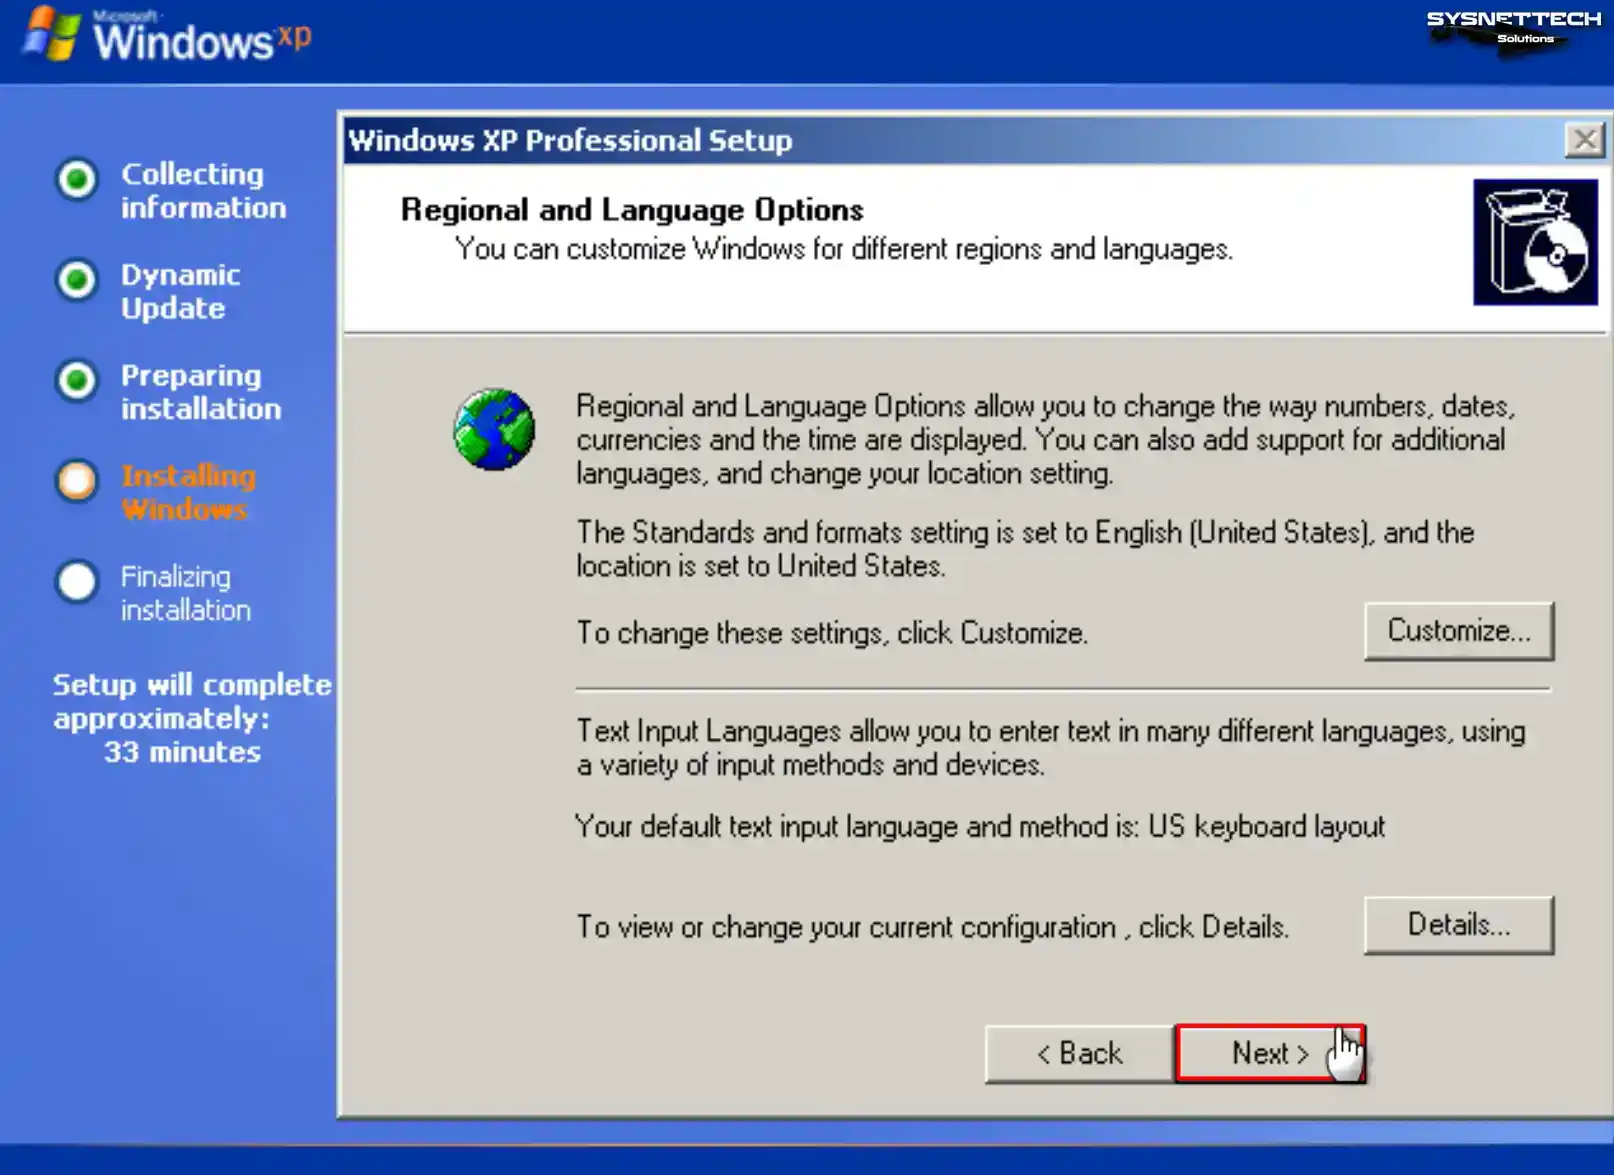
Configure the region and language options of Windows XP according to your country.
Step 11
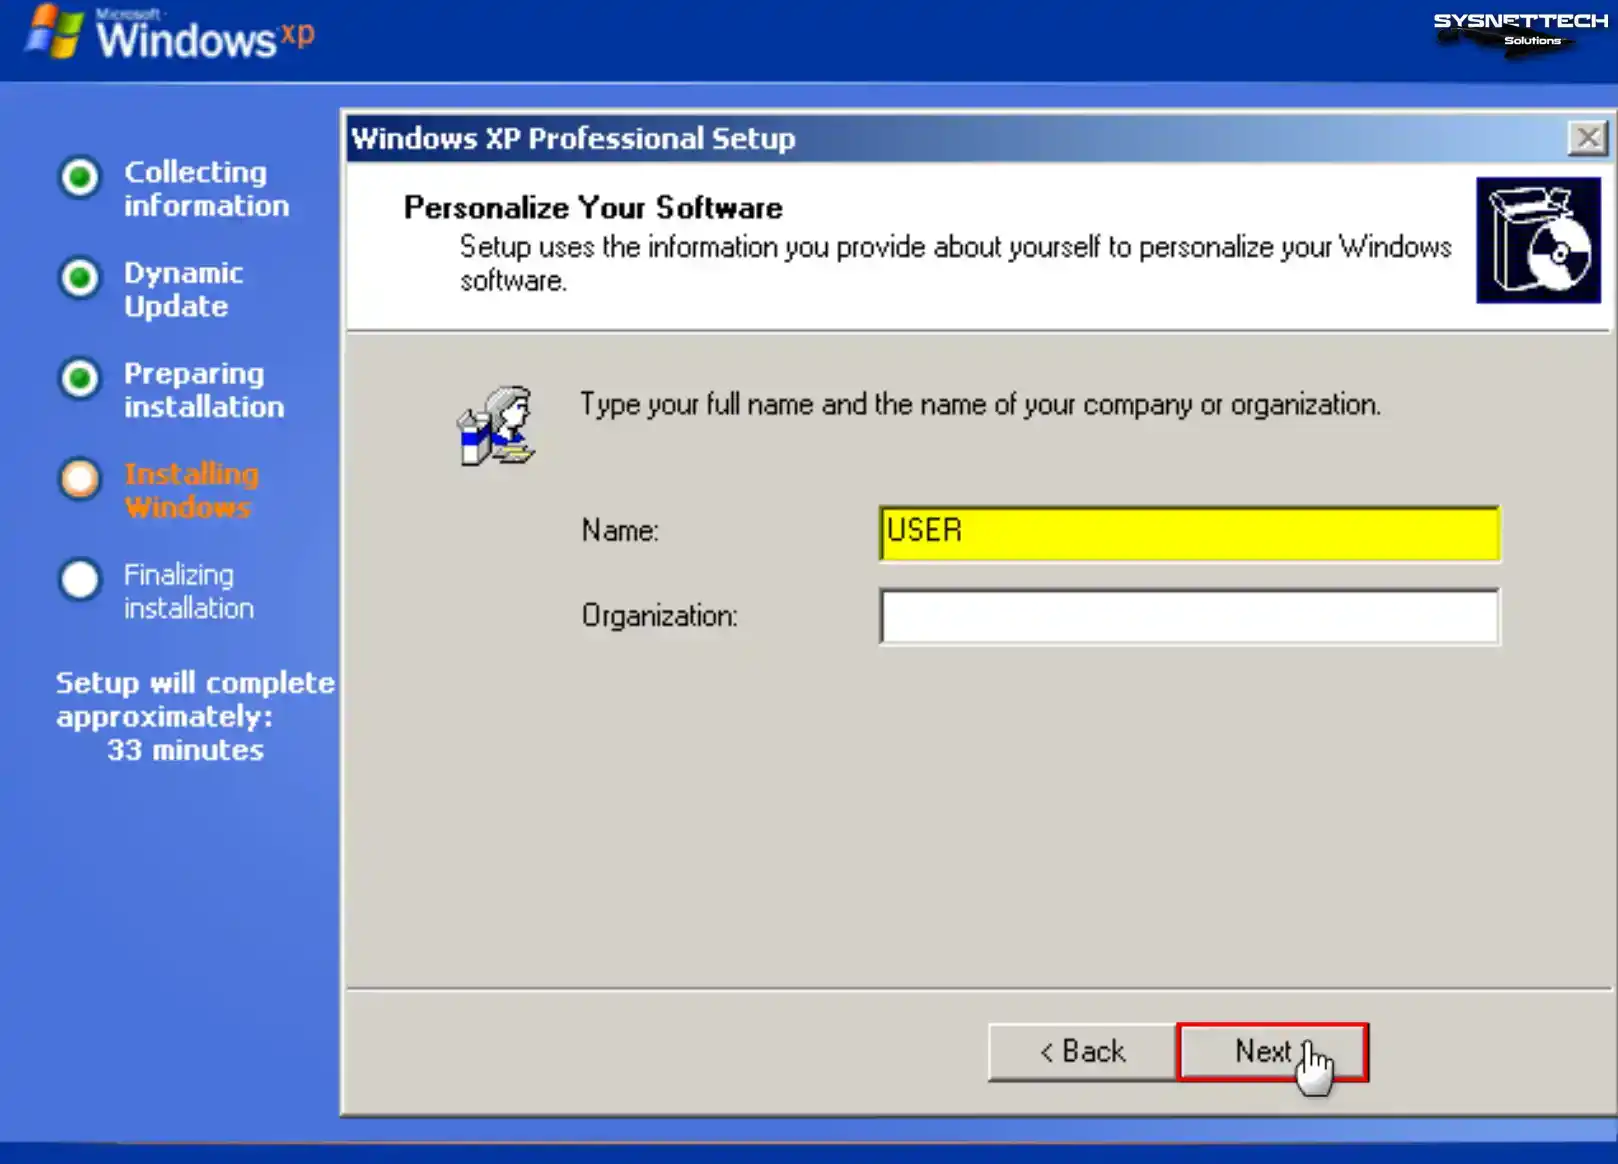
Type a name for the user account you will use in your virtual system and click Next.
Step 12
Enter the Windows XP Pro product key you have and click Next.
Step 13
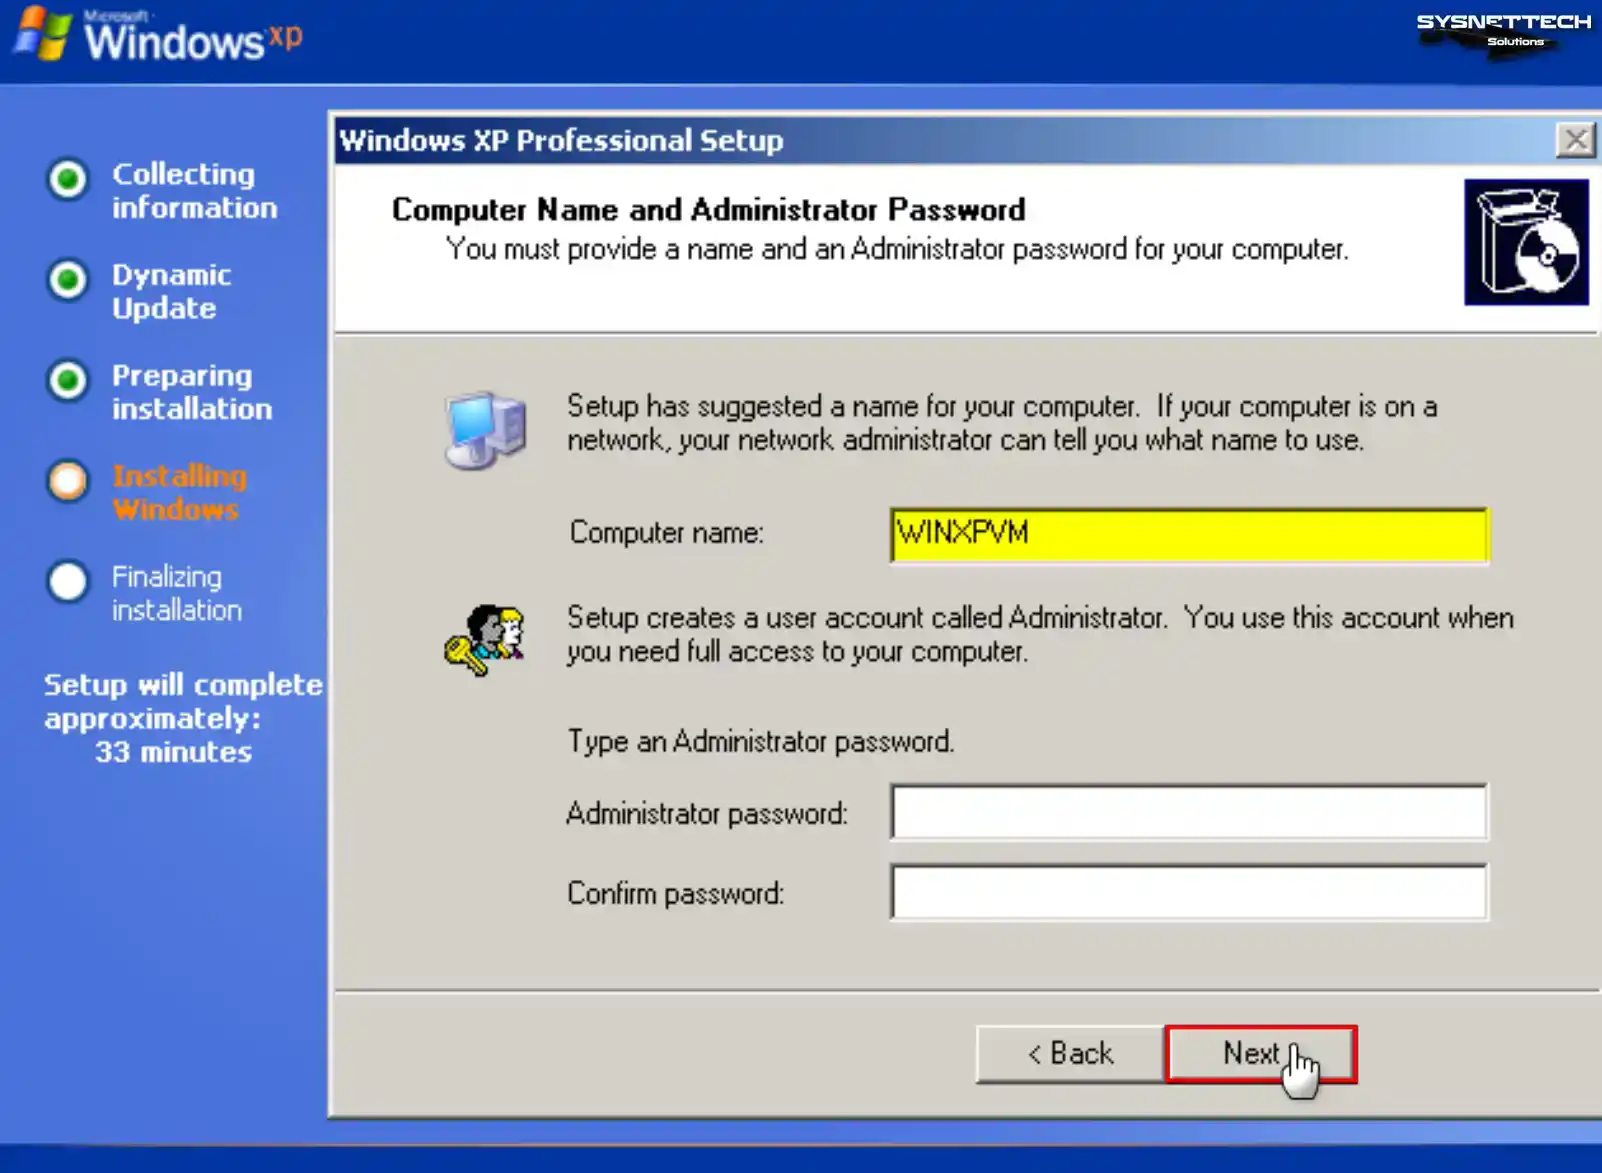
If you use your Windows guest machine in a network environment with multiple computers, ensure the computer name differs from other devices.
Type the PC name you want to use in the Computer Name field and create a new password for the Administrator account with full authority in your virtual system, or leave the relevant fields blank to avoid making a password, and click Next.
Step 14
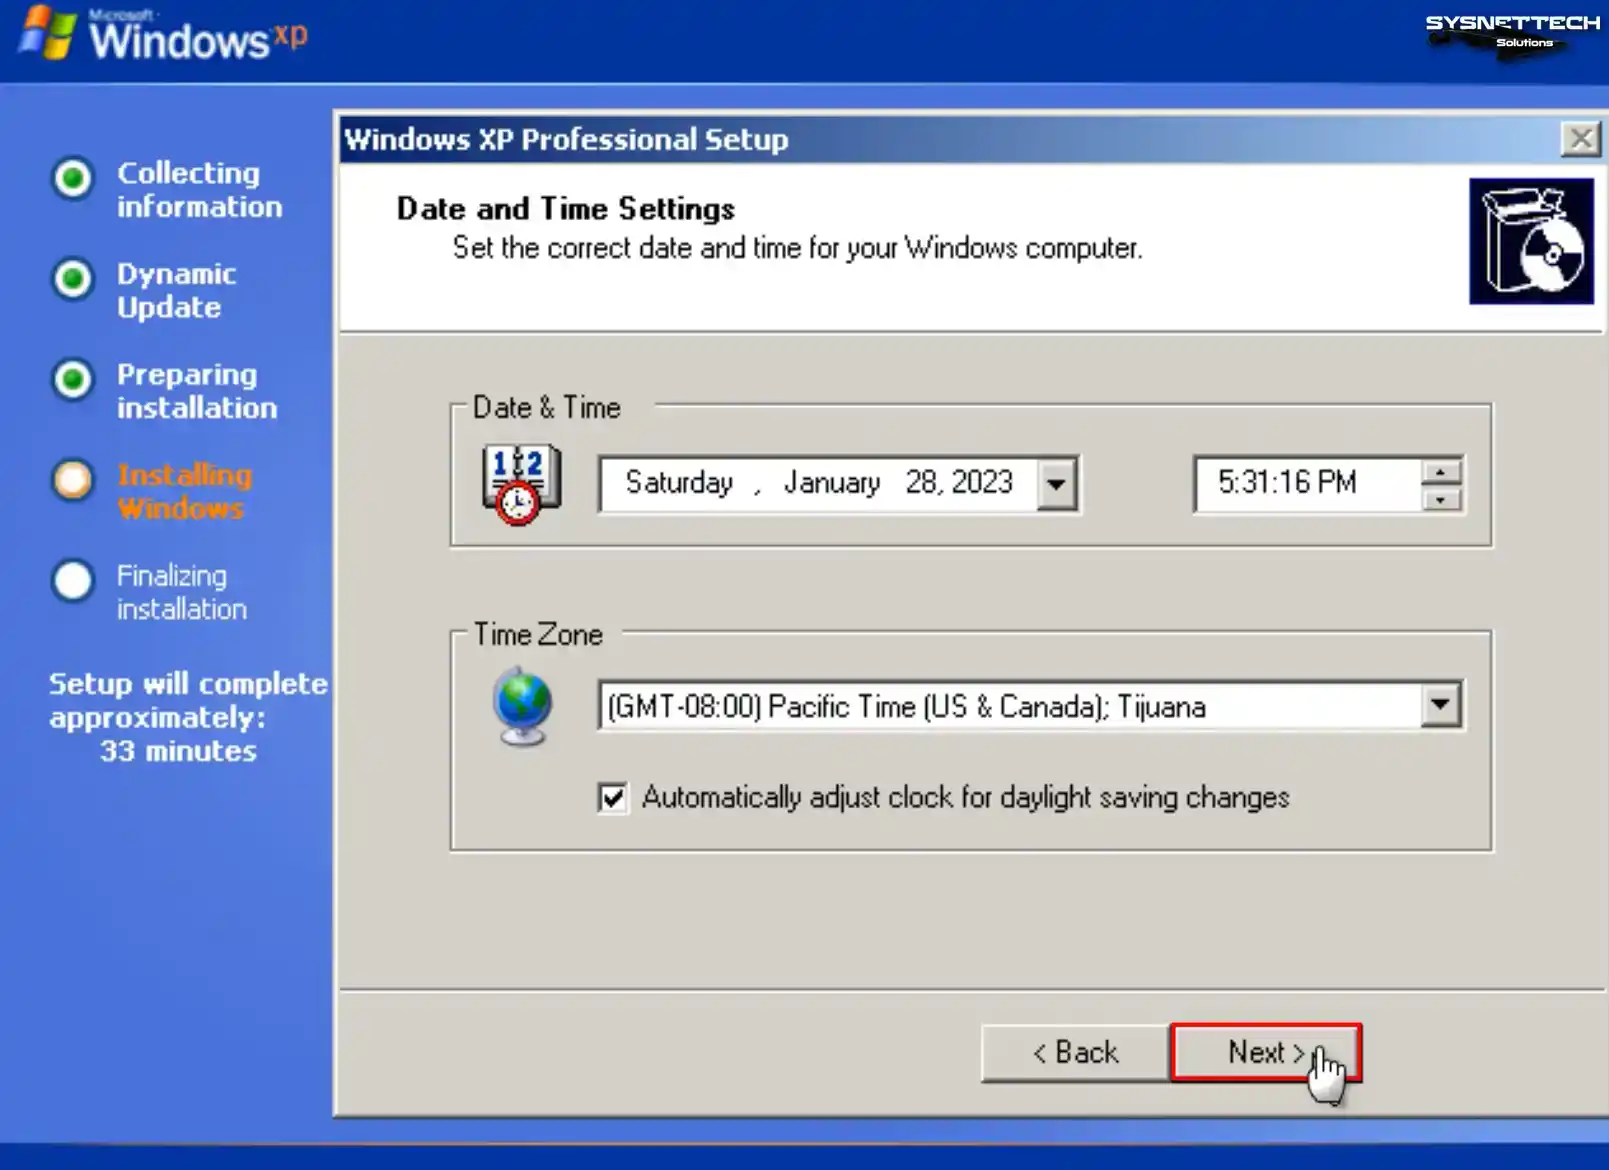
Configure your virtual computer’s date, time, and time zone settings according to your location and click Next.
Step 15
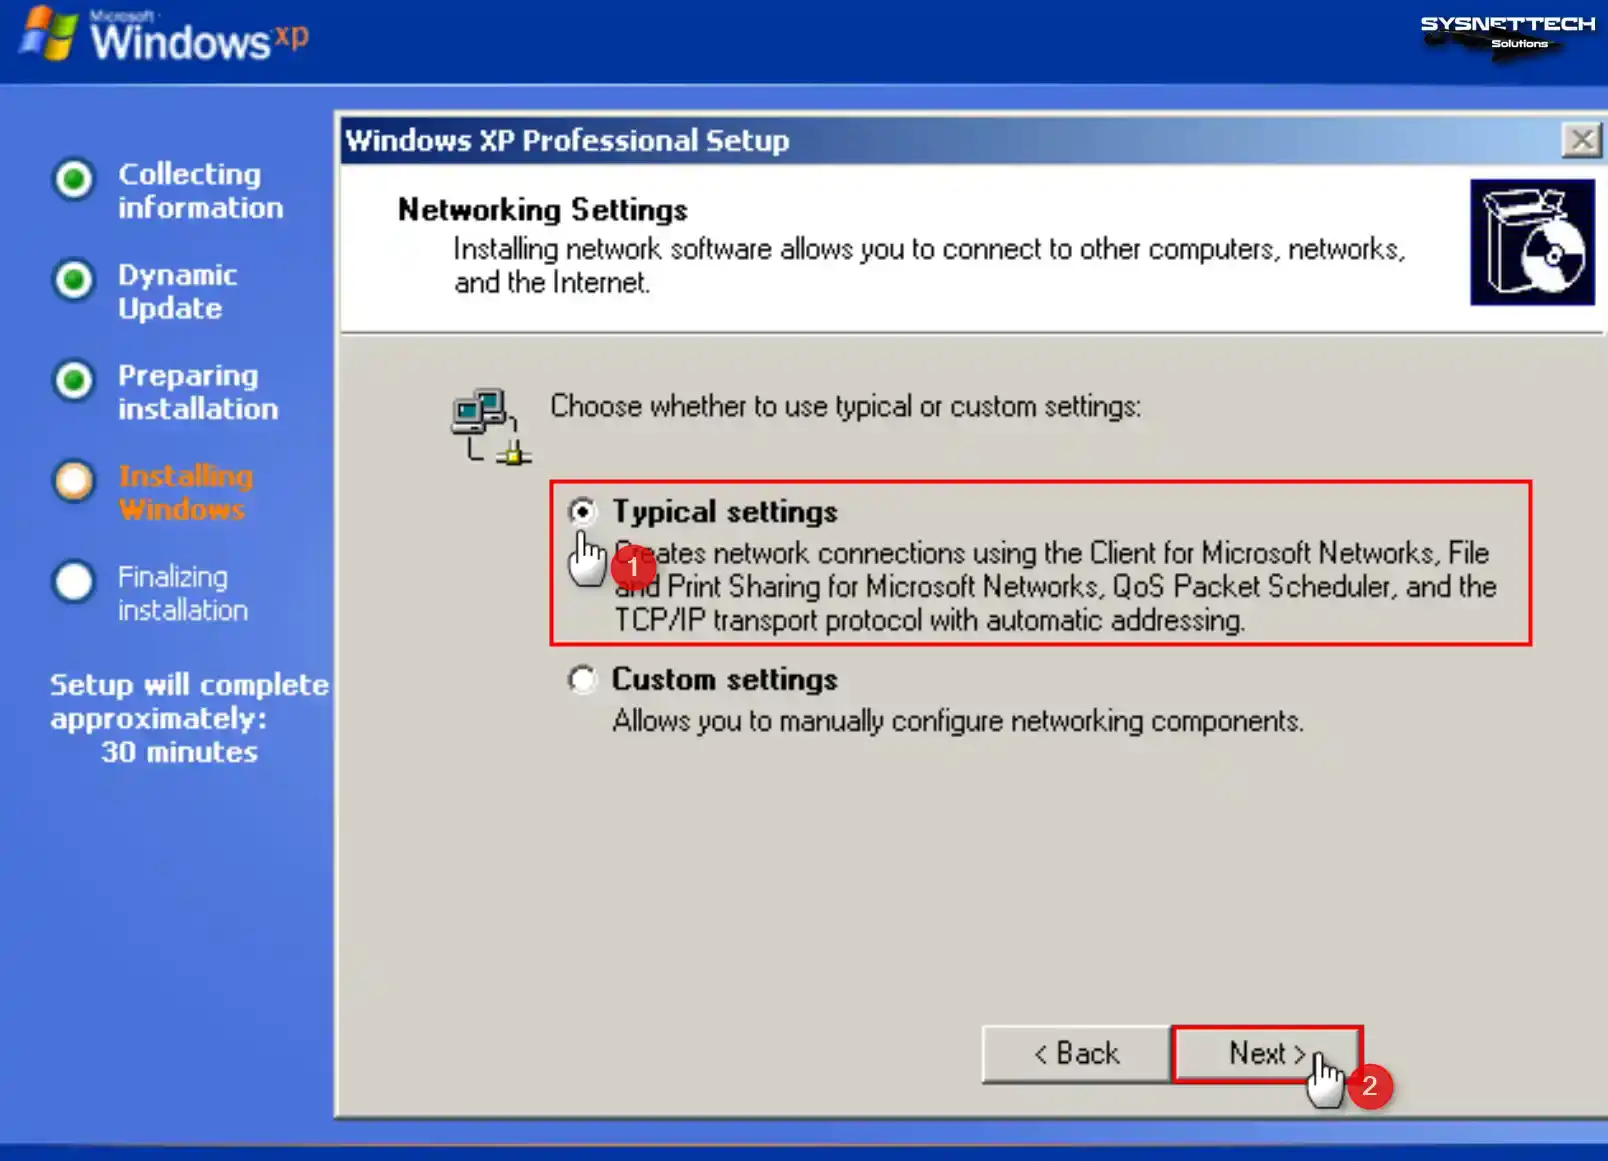
To use your VM in your physical network environment in the Networking Settings window, tick Custom Settings and make the relevant settings. You can also continue the installation by selecting Typical Settings in general.
Step 16
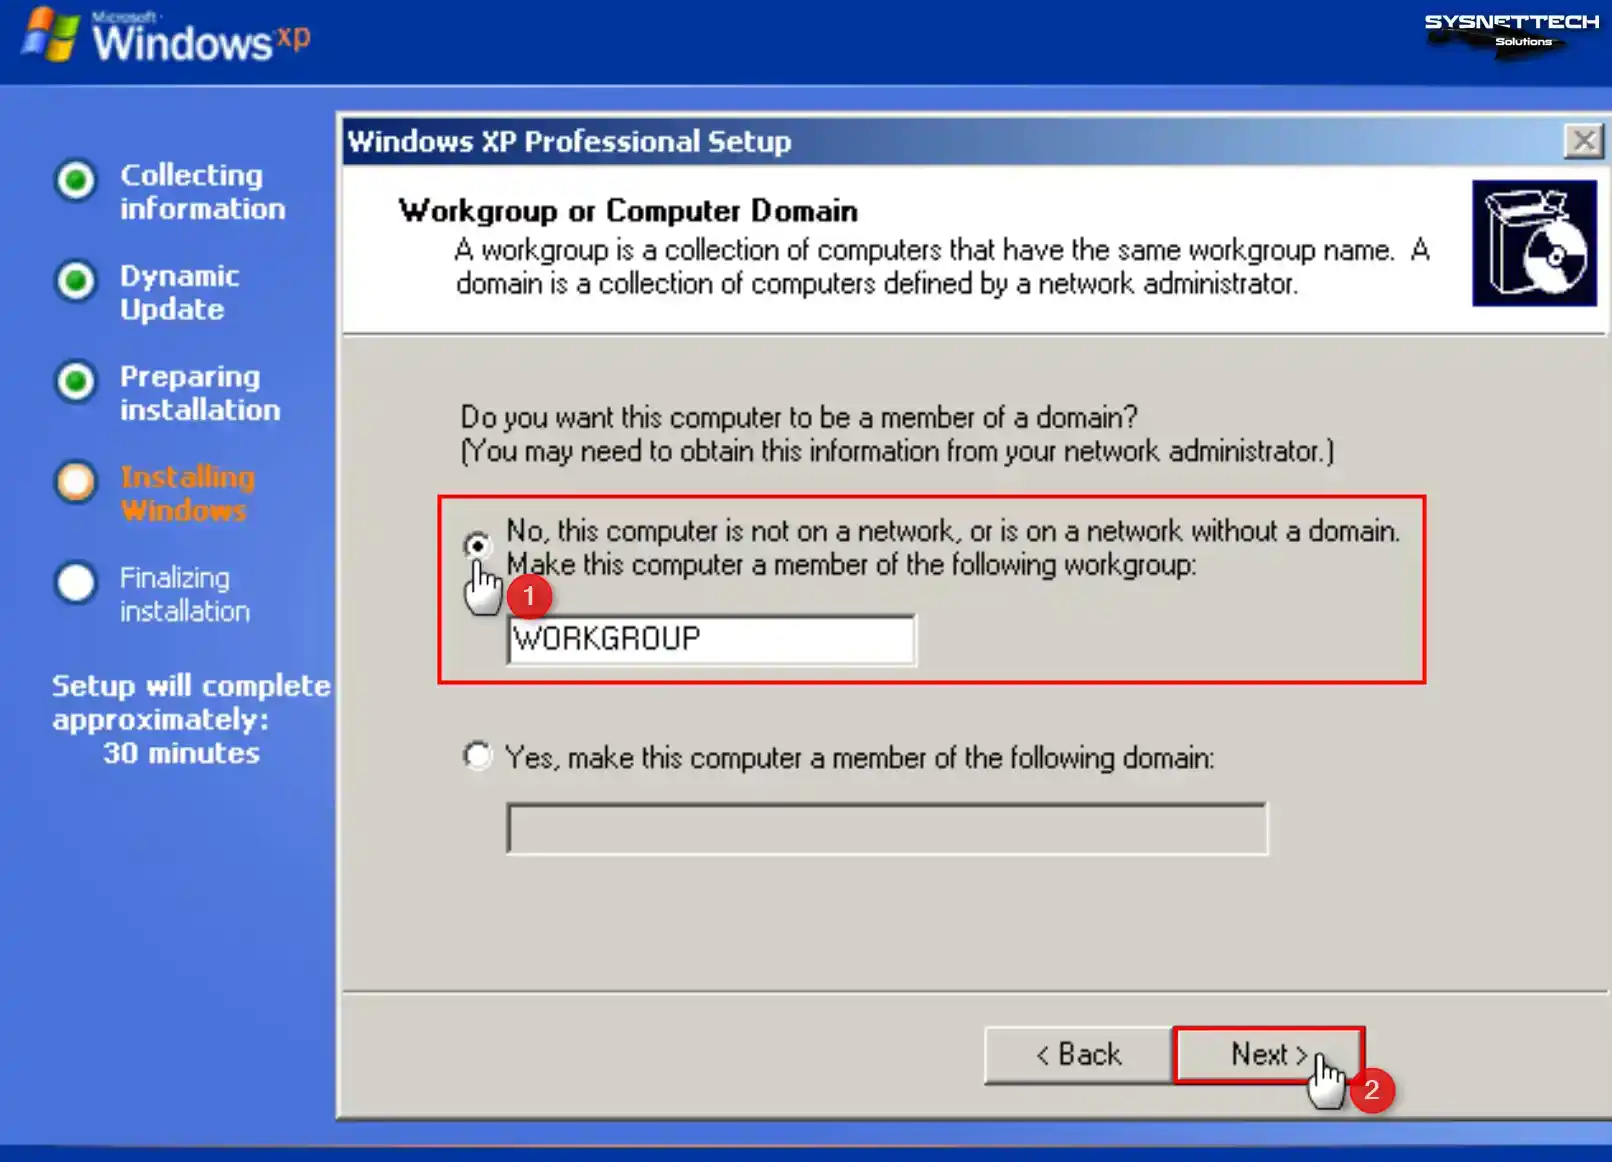
According to your network structure, if you make the virtual machine a member of a Domain environment that provides an Active Directory service, you must select the Yes option and type your Domain information.
To use your VM for personal use without subscribing to a Domain environment, select WORKGROUP and click Next.
Step 17
Wait while Windows XP is installed on the guest machine.

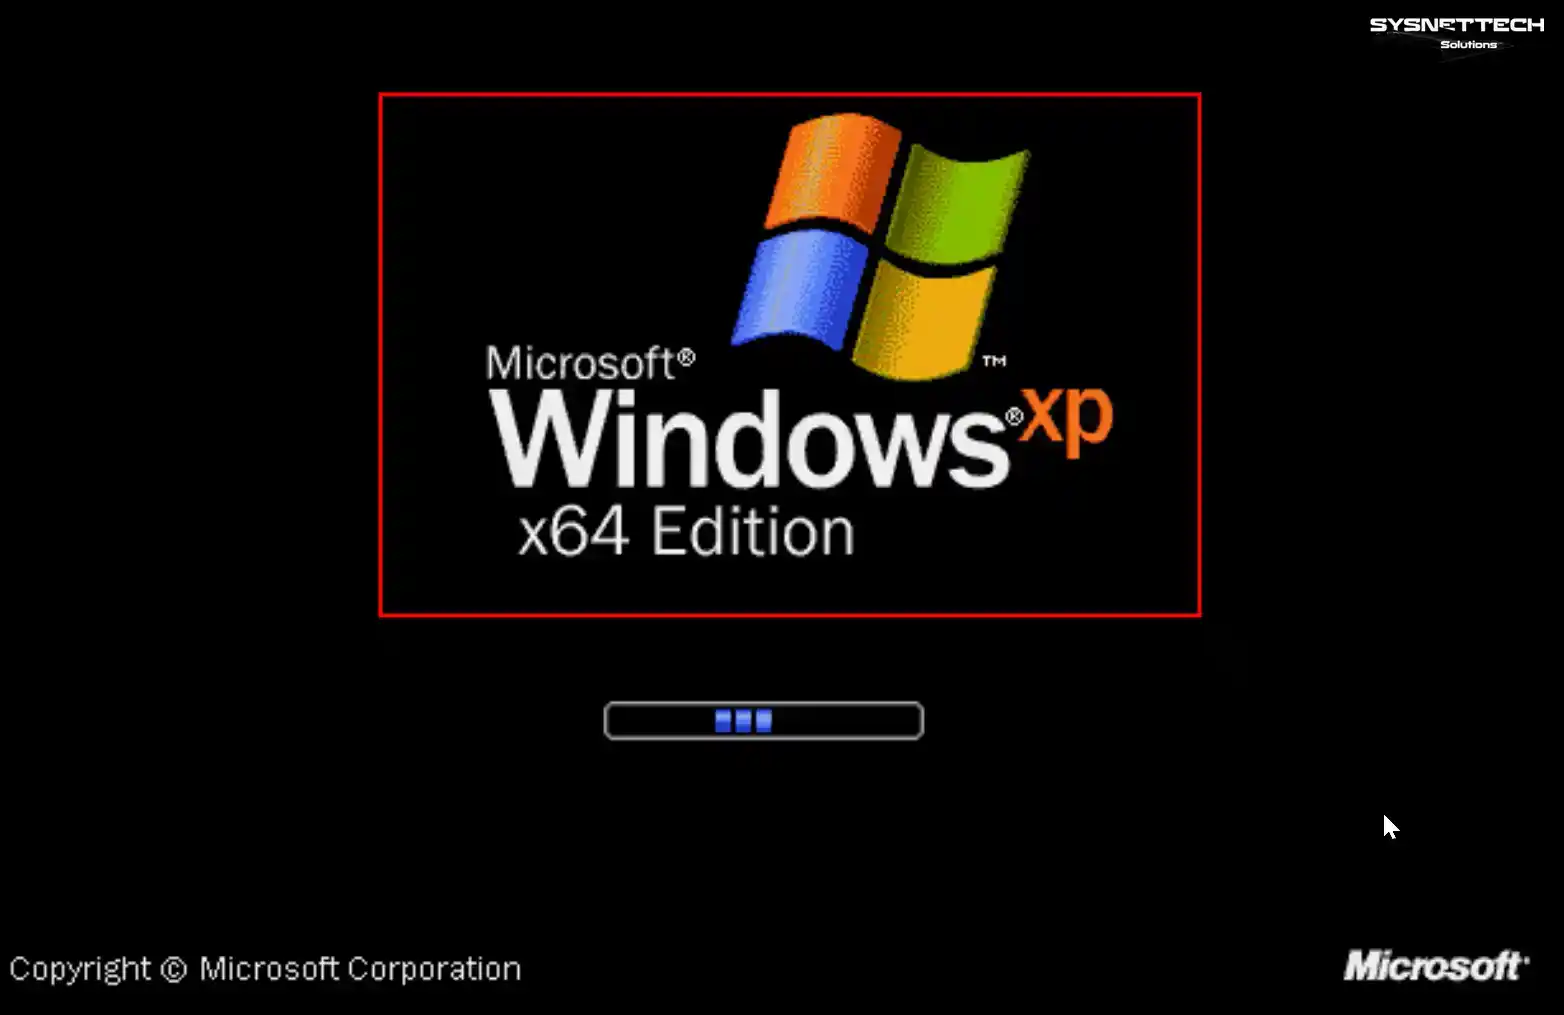
Step 18
Wait while the Microsoft Windows XP x64 operating system boots up.
Step 19
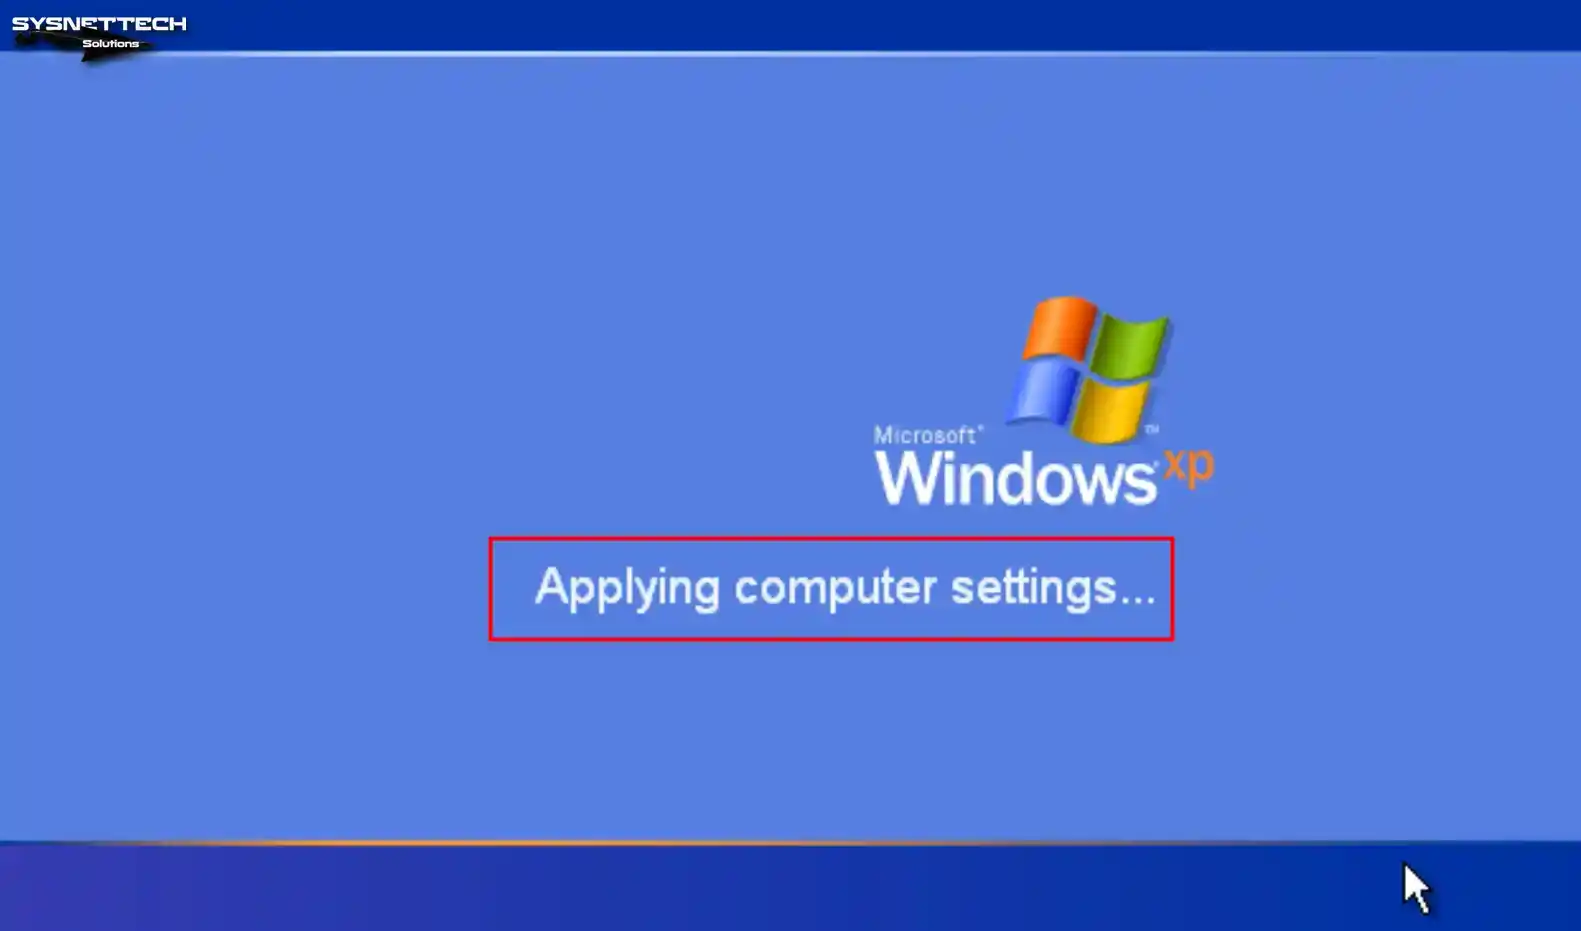
After the Windows XP system files are copied, your system will reboot, and your desktop environment will be ready.
Step 20
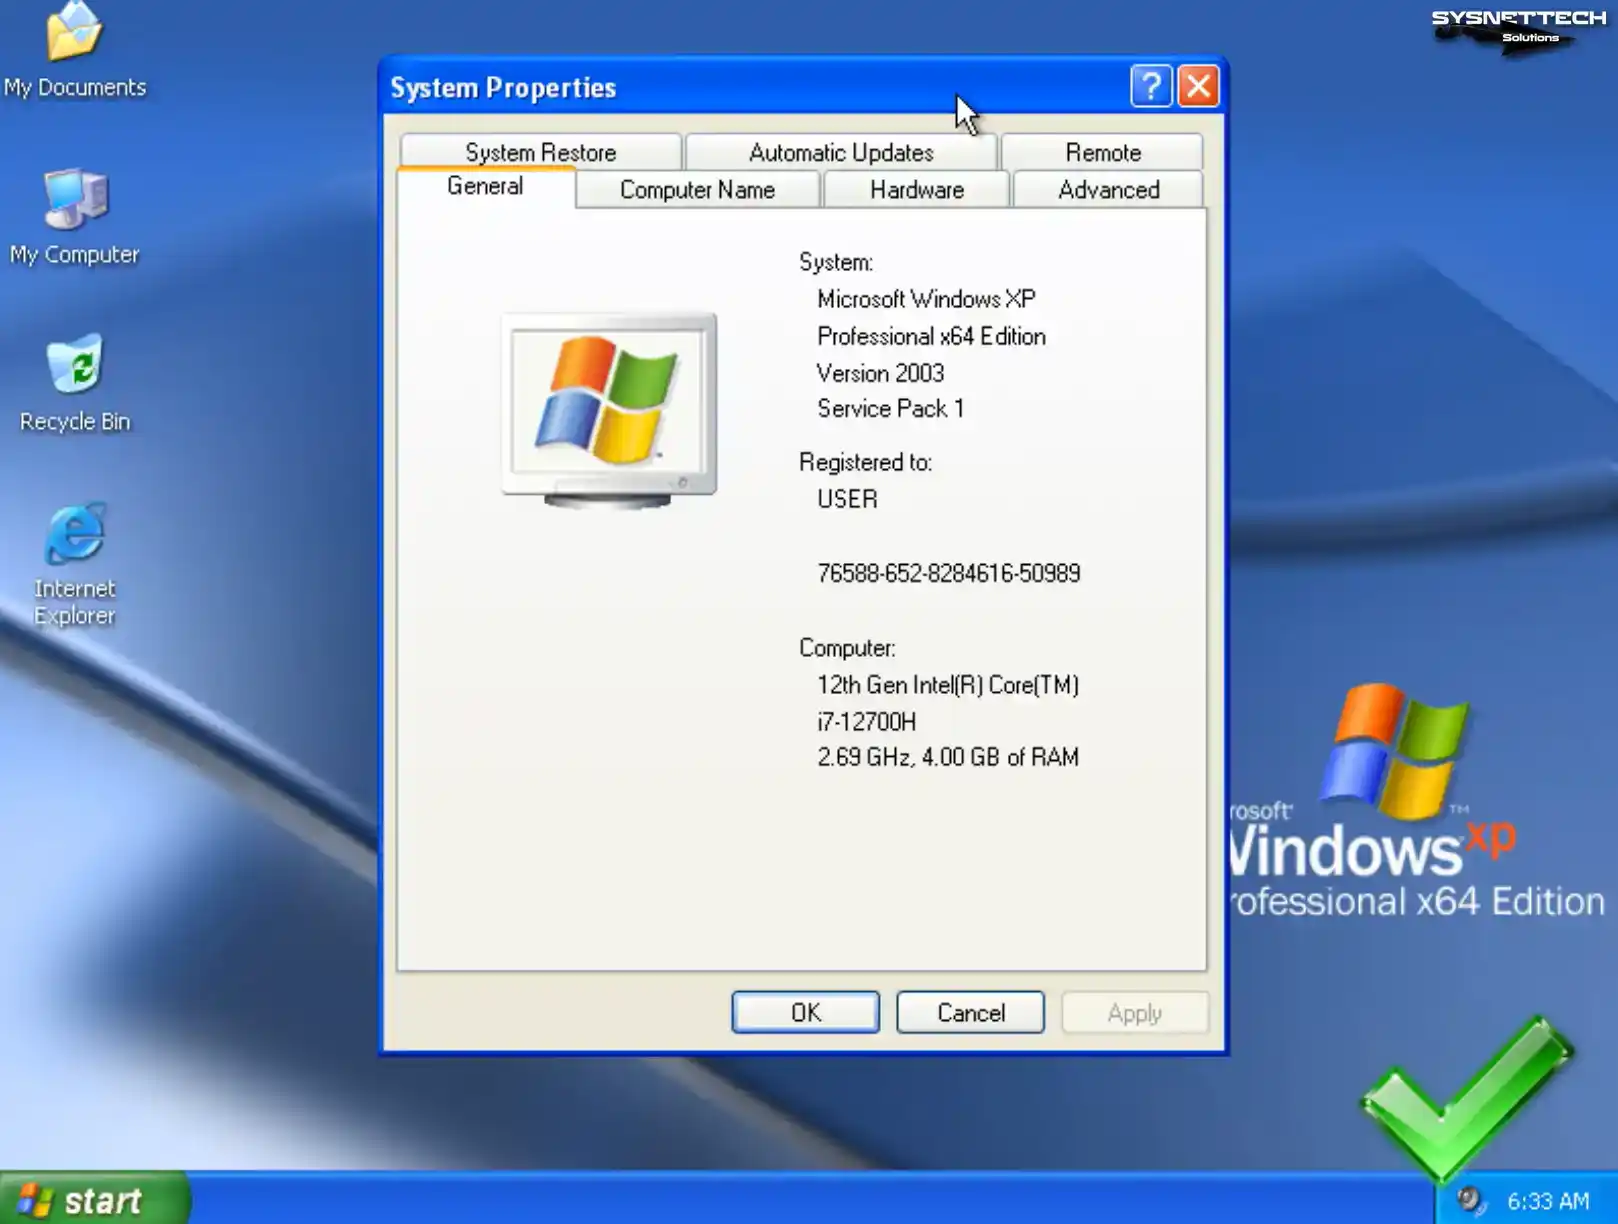
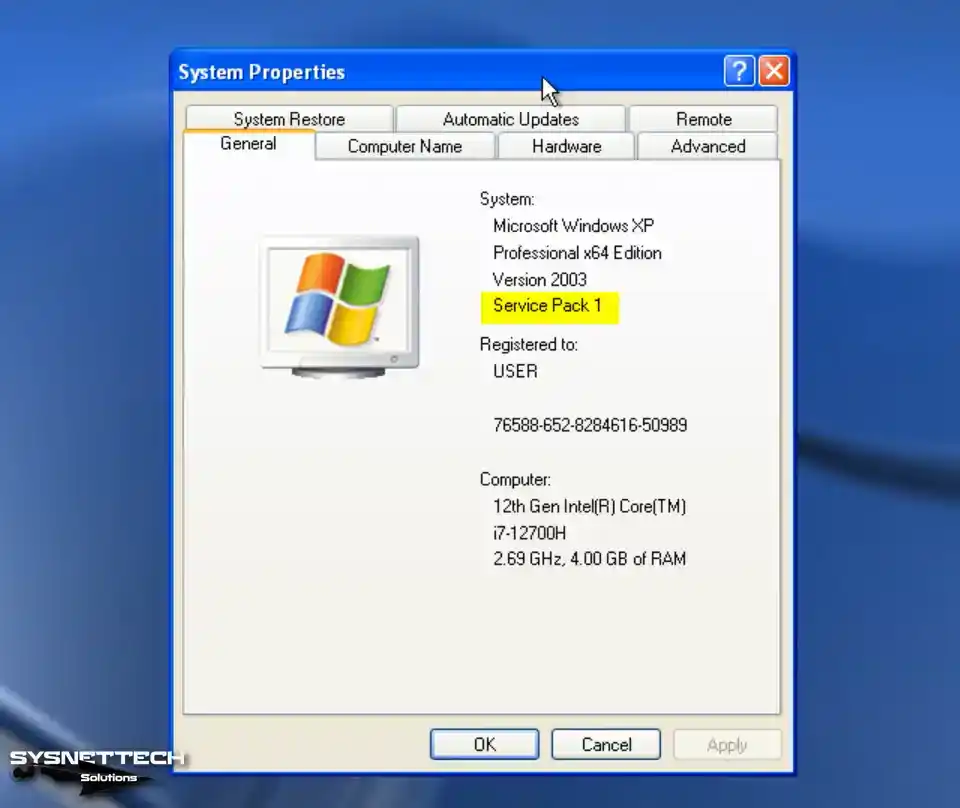
Right-click on My Computer, then click System Properties from the options that appear, and check the system information.
How to Install Guest Additions in Windows XP
After installing Windows XP within the virtual machine, it is essential to install Guest Additions to unlock various functionalities. These include achieving full-screen resolution, facilitating file transfer between the host and the VM, and enabling the utilization of the host computer’s hardware within the VM.
Step 1
To view the Computer Management window, right-click the My Computer icon and select Manage. Once the window appears, navigate to Device Manager and review the drivers that are not installed on your system.
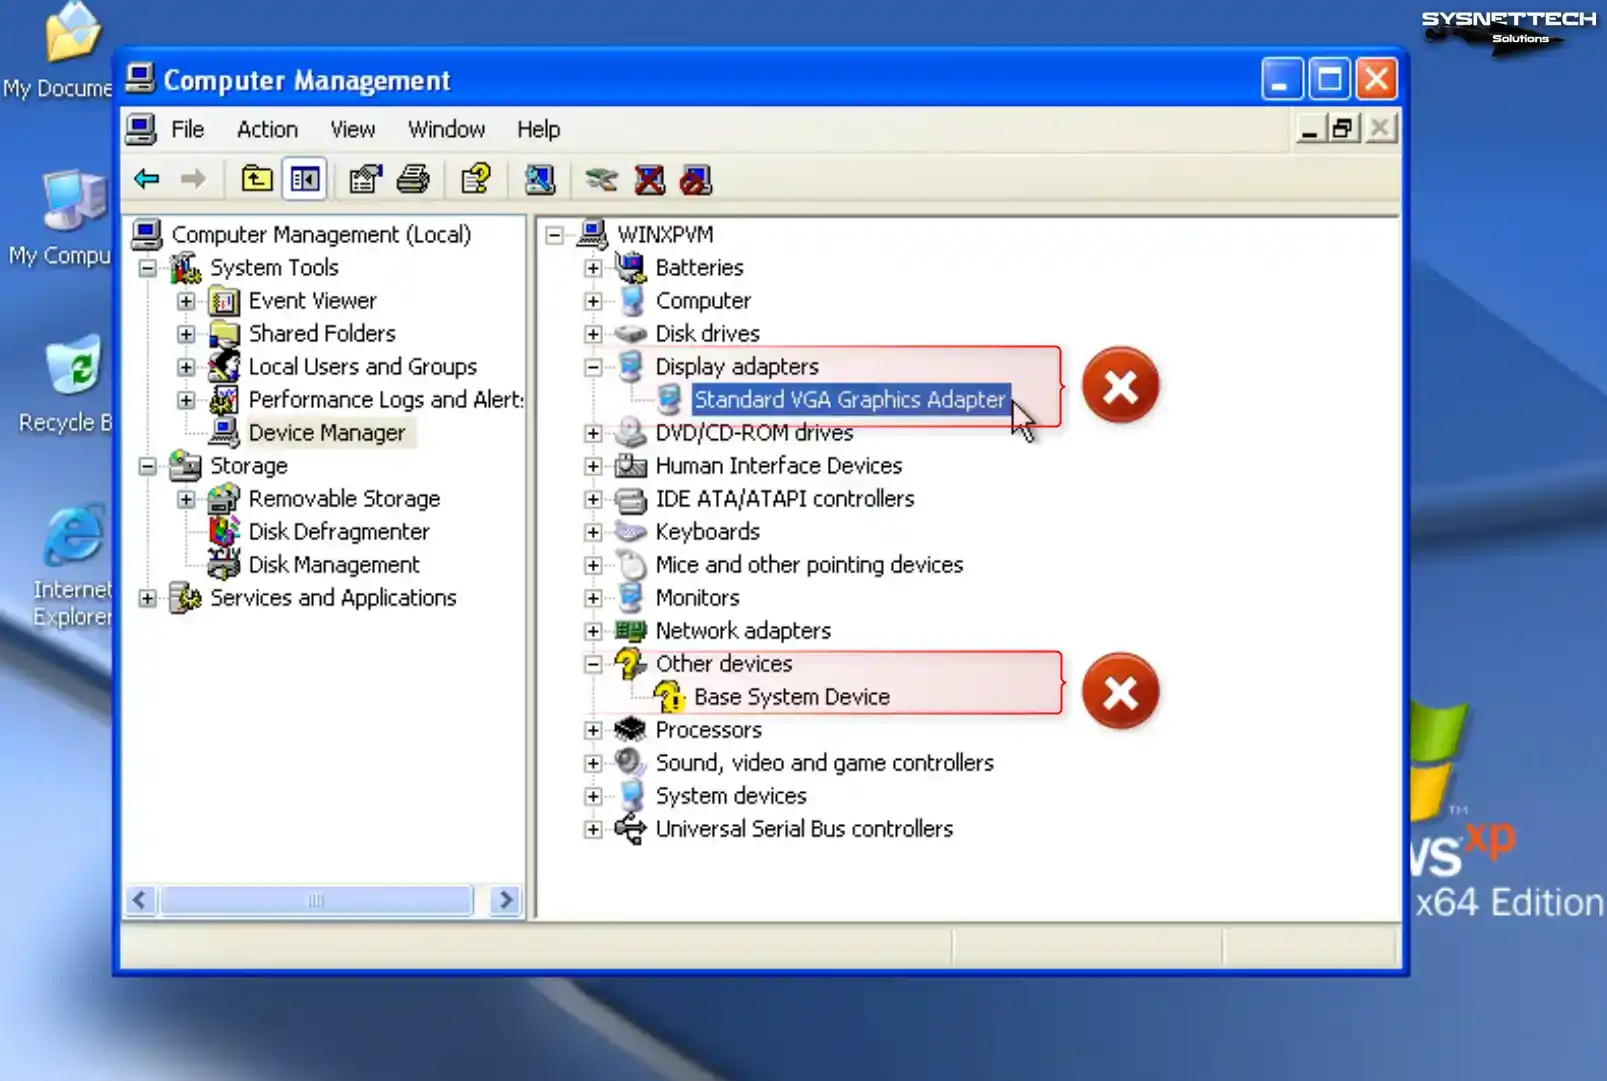
Step 2
Under normal circumstances, when installing Guest Additions on Windows XP, you will encounter an Unsigned Driver warning. This is not an error, but the driver for some devices cannot be fully installed.
To overcome the barrier imposed by unsigned drivers, you must modify a setting in the Group Policy settings. To continue, access the Start menu, enter “gpedit.msc” in the designated text box, and proceed by clicking OK.
When the Group Policy Object Editor is accessed, go to Windows Settings > Security Settings > Local Policies > Security Options and click “Devices: Unsigned driver installation behavior” from the options under Security Options.
Change the Devices: Unsigned driver installation behavior setting to Silently Succeed, and restart your virtual computer after clicking OK.

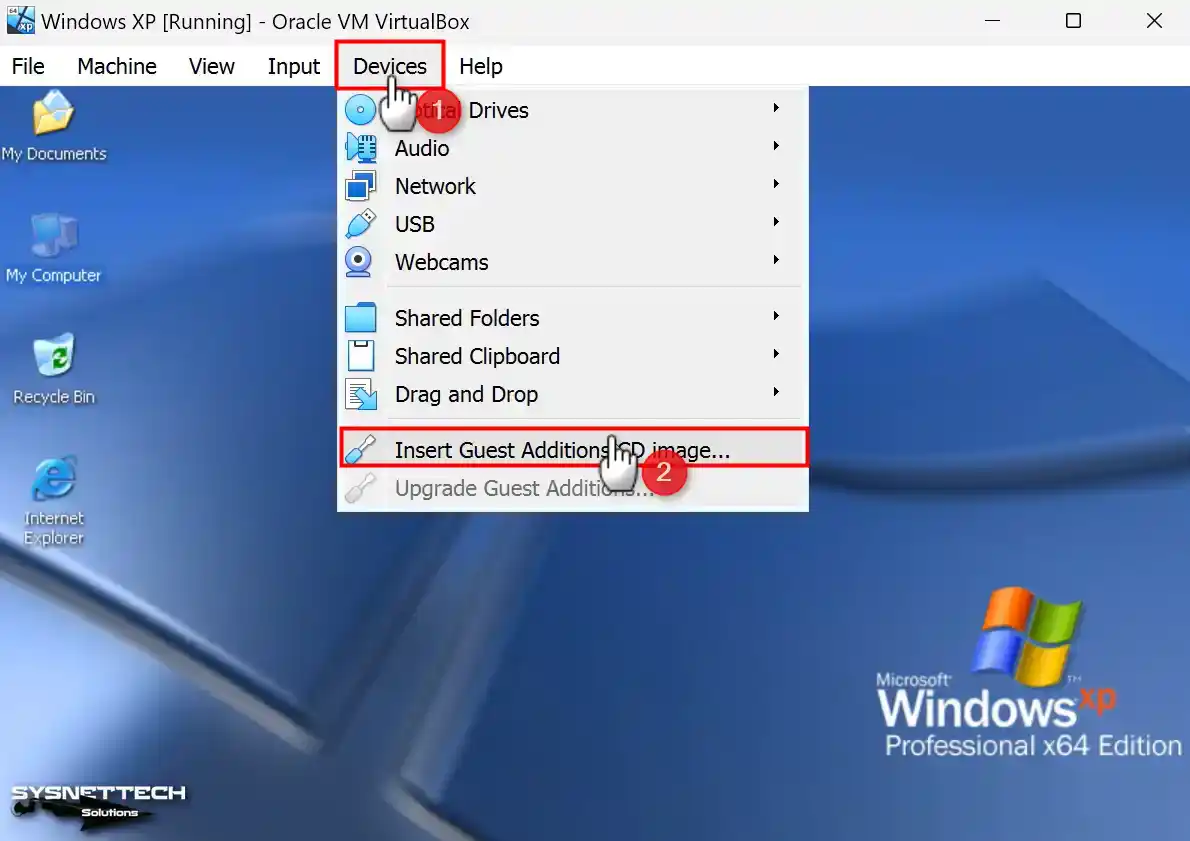
Step 3
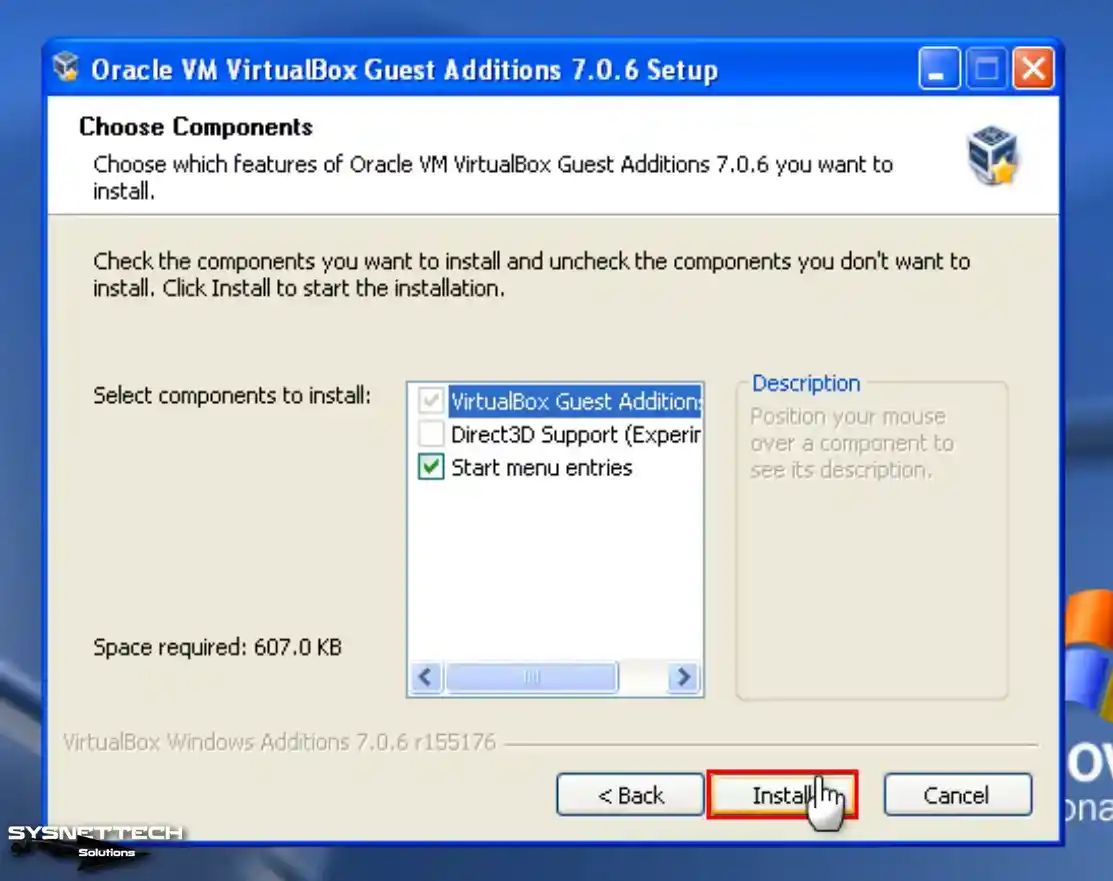
After your guest system is turned on, click Devices / Insert Guest Additions CD Image to install the guest add-ons software.
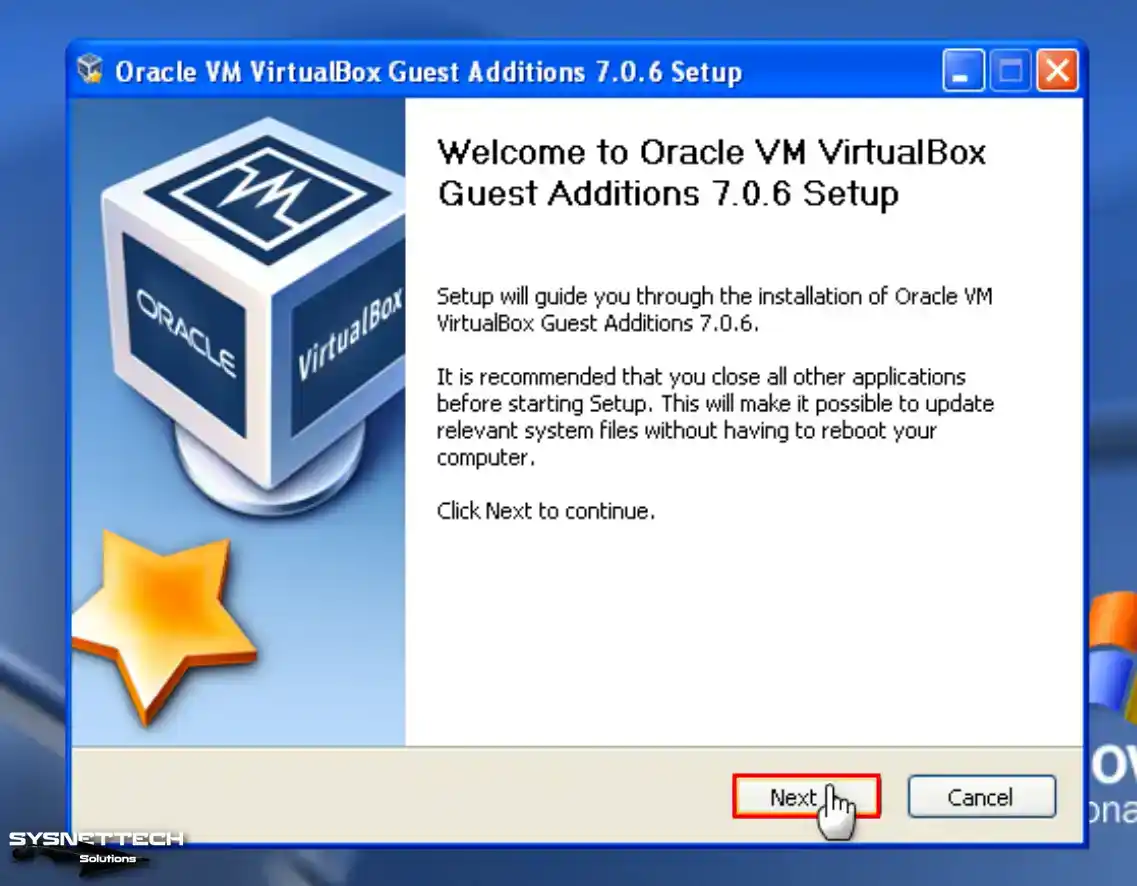
Step 4
When the Guest Additions installation wizard starts, click Next to continue.
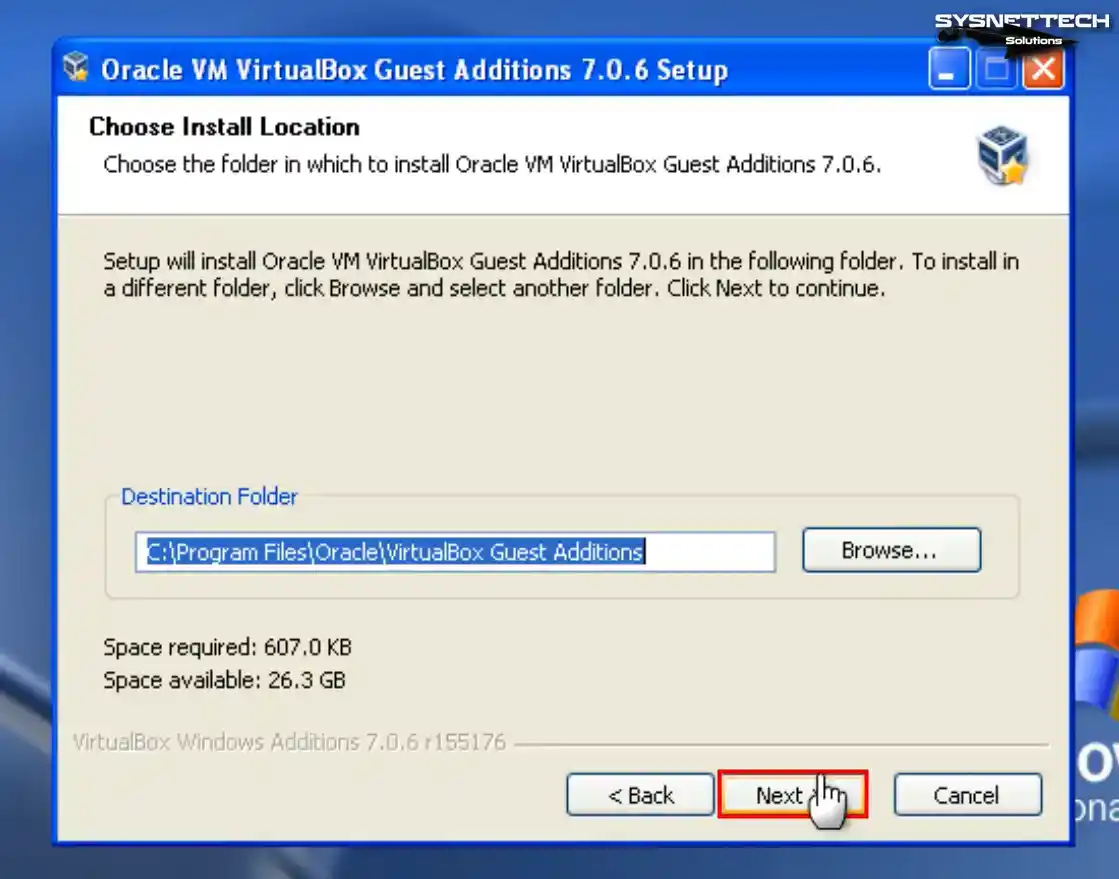
Step 5
Continue without changing the installation location of the guest add-on software.
Step 6
You can see that Direct3D Support is not enabled in the Choose Components window of the setup wizard. Direct3D support for older operating systems has been discontinued in version 6.1 of VirtualBox. Therefore, installing the 6.0 version of VirtualBox is imperative to utilize this feature.
Step 7
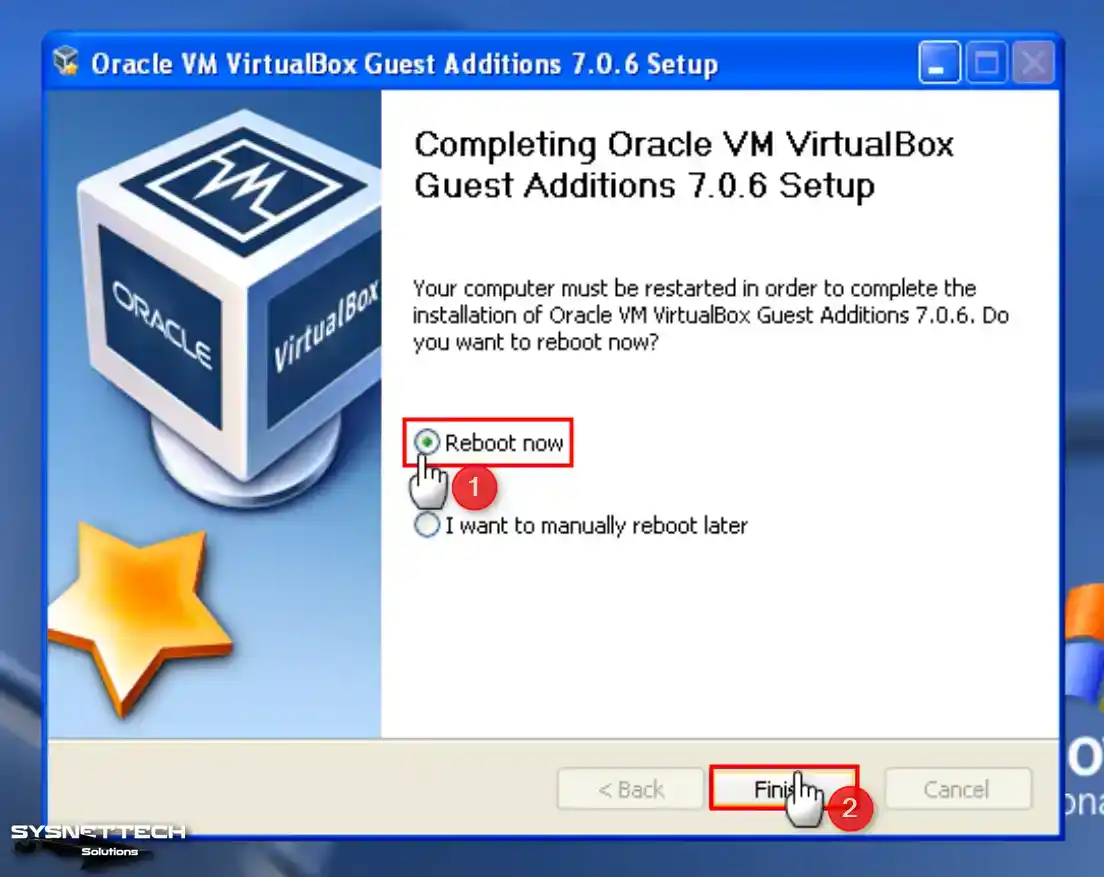
After installing the tools of your guest system, restart your system.
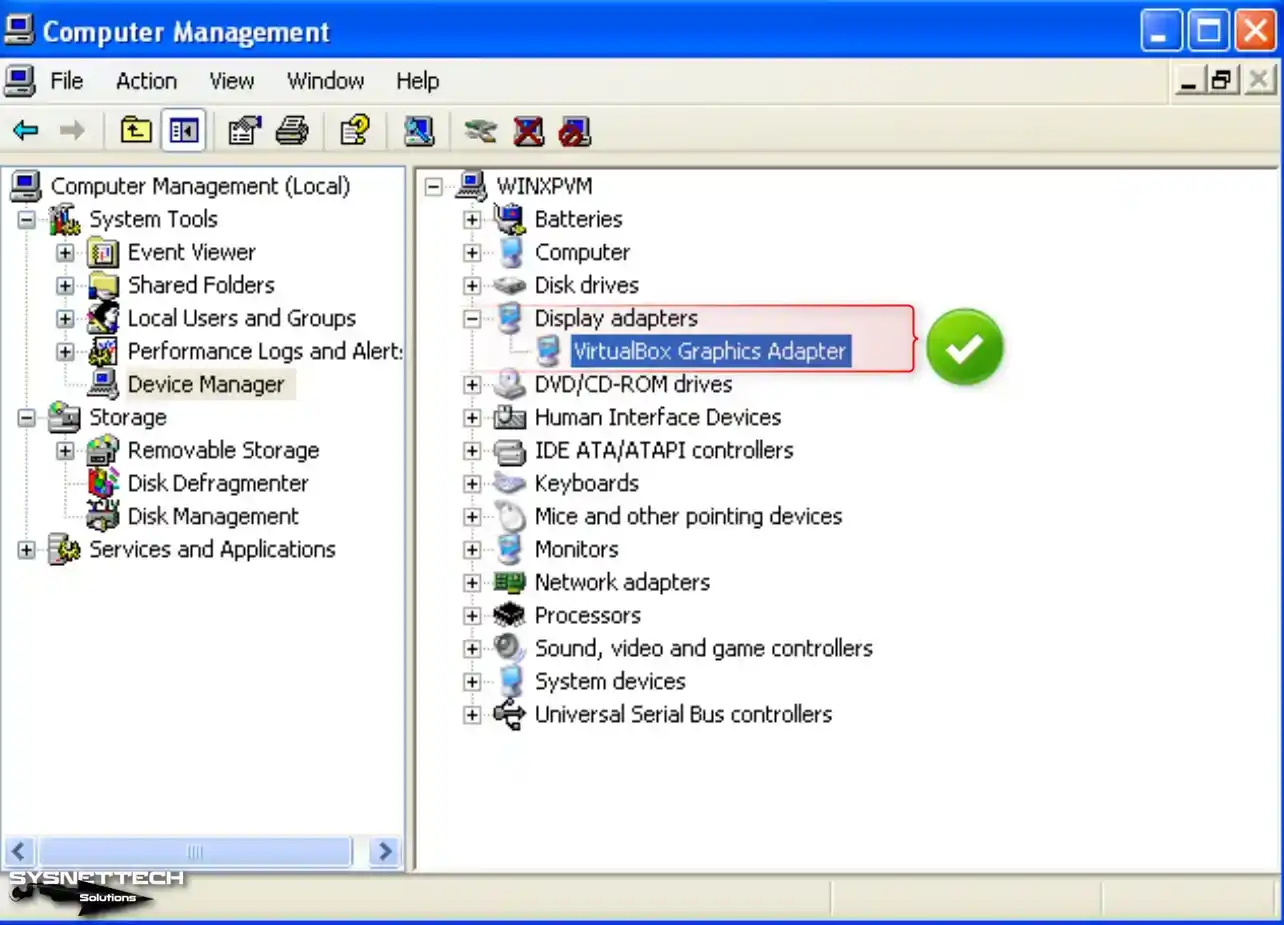
Step 8
After restarting your VM, view Device Manager again; you can see all drivers installed successfully.
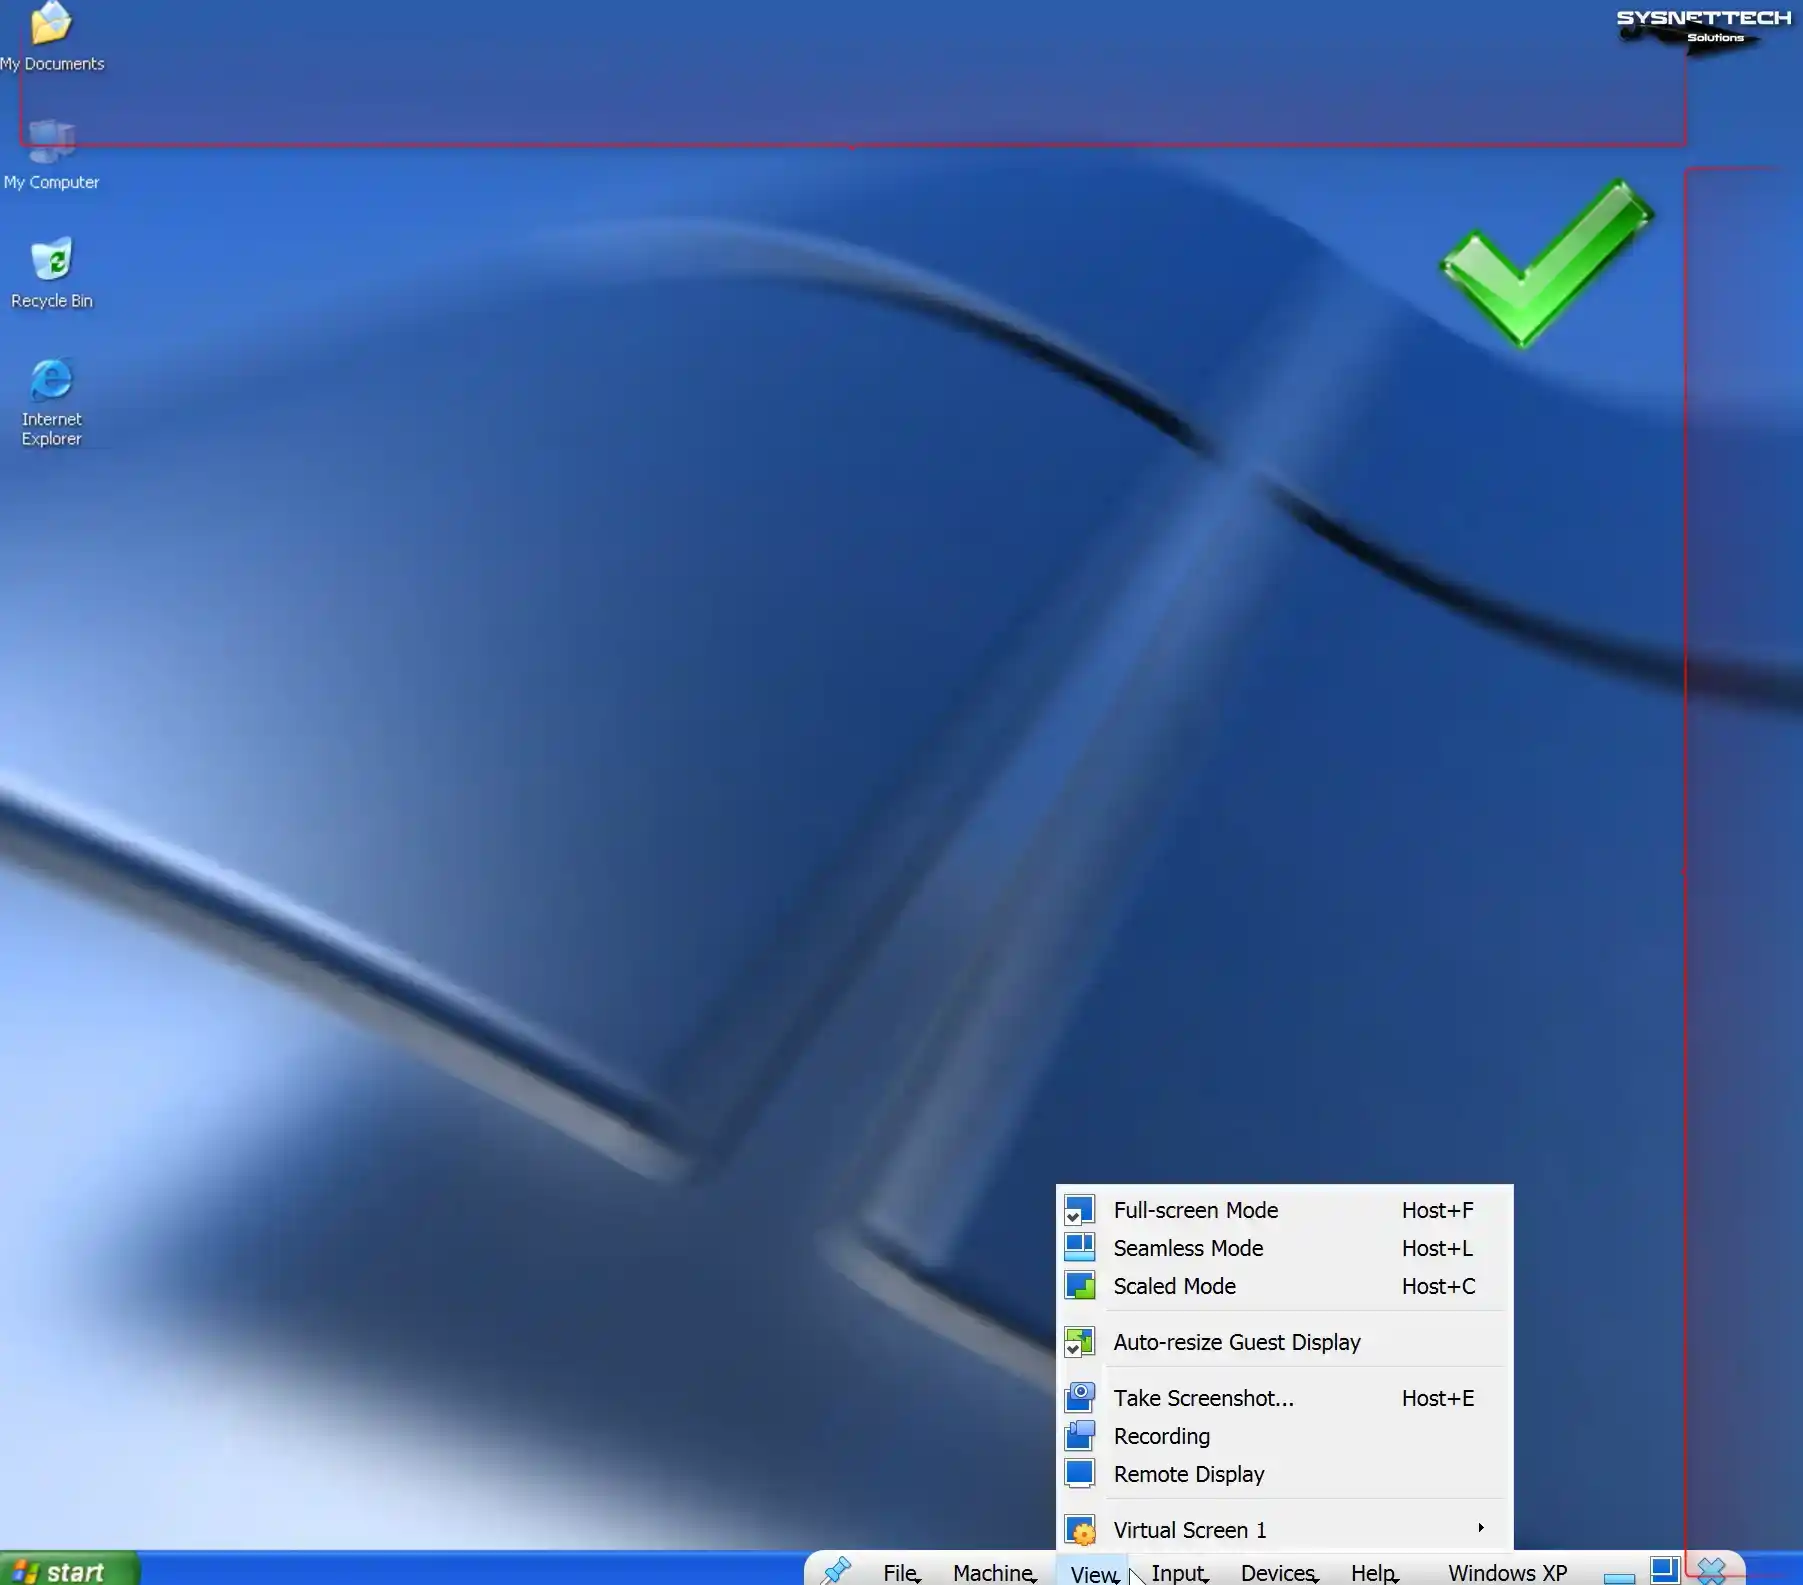
Step 9
You can use your virtual machine in full-screen resolution or scaled mode with the options in the View tab from the tool menu of VirtualBox.
Step 10
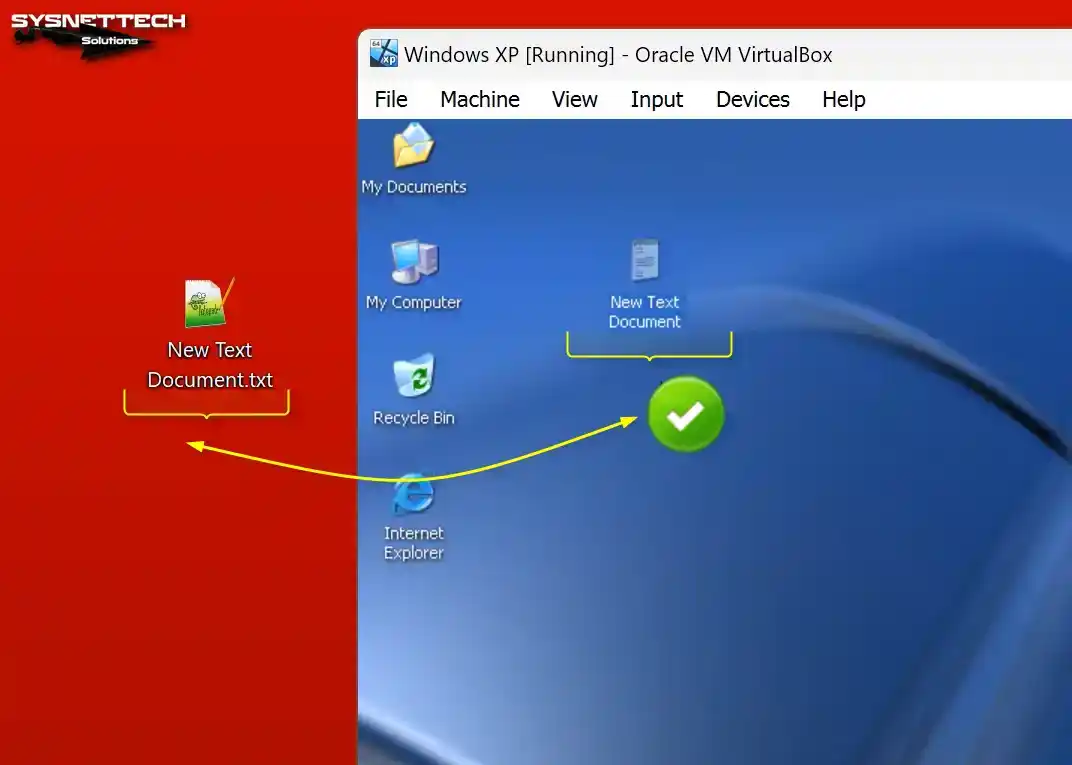
When employing the drag-and-drop method, you will observe the successful transfer of a text document from the desktop of your host computer to your virtual computer.
How to Configure a Shared Folder
Unfortunately, folder copying to the virtual machine fails on old systems. Before copying a folder, you must archive it using WinRAR or 7-Zip and then copy it to the VM.
Since it takes time to archive a folder with larger file sizes, you can transfer data faster by creating a public folder for your VM on your host computer and configuring the Shared Folder.
Step 1
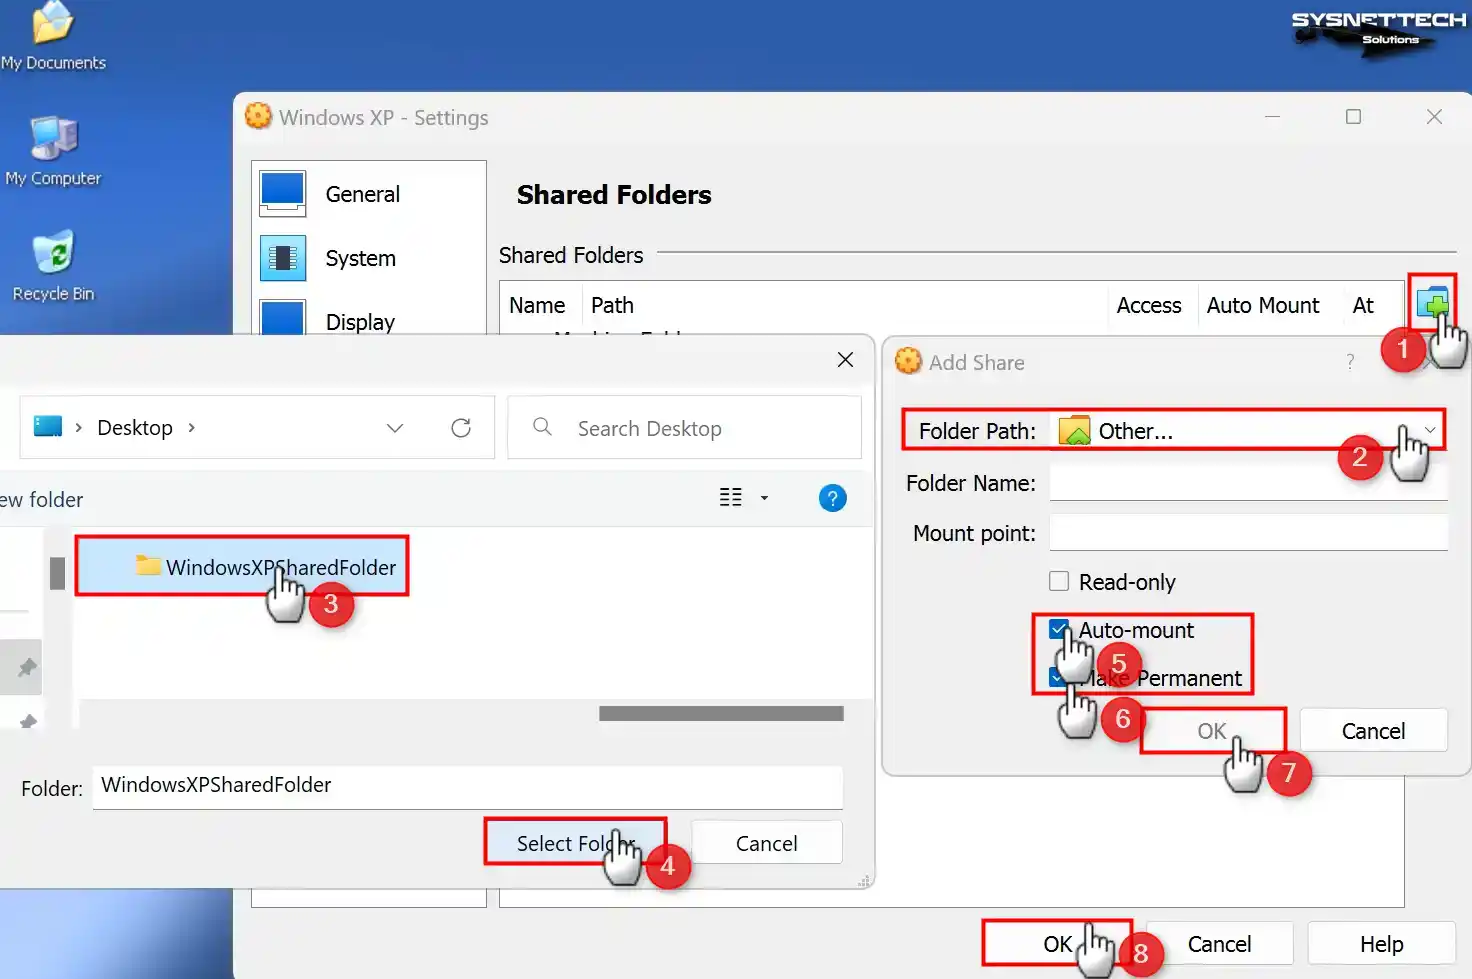
Click Devices / Shared Folders / Shared Folders Settings on your Windows XP virtual PC.

Step 2
Click the green + button in Shared Folders settings and open the Add Share window. Specify the folder you created on your host PC in the Folder Path section.
Check the Auto-Mount and Make Permanent options and click OK to add the shared folder as a network drive.
Step 3
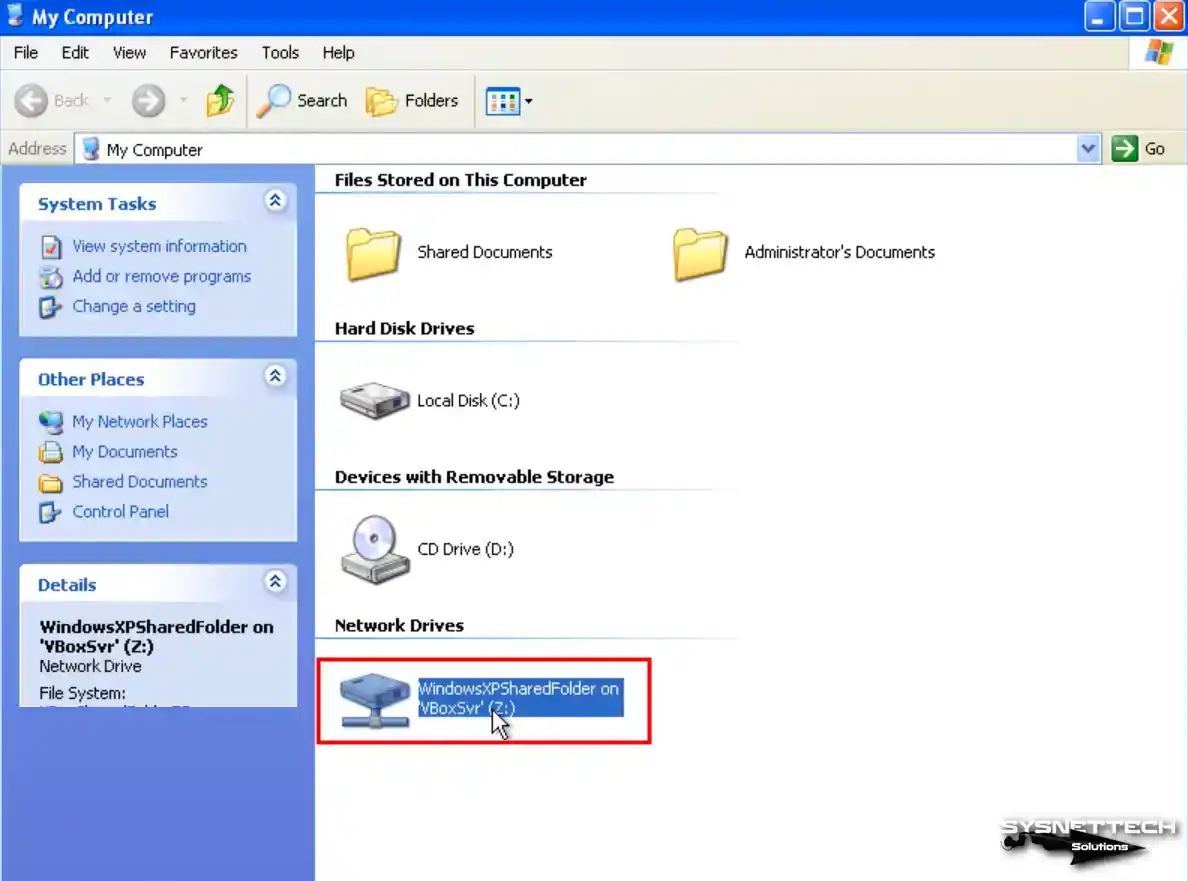
Upon opening the My Computer window, you will notice the inclusion of the Shared Folder as a network drive.
After viewing the network connections, switch to the Folder structure and click Entire Network / VirtualBox Shared Folders on the left. You can see that you can approach the folder on the host over the network.
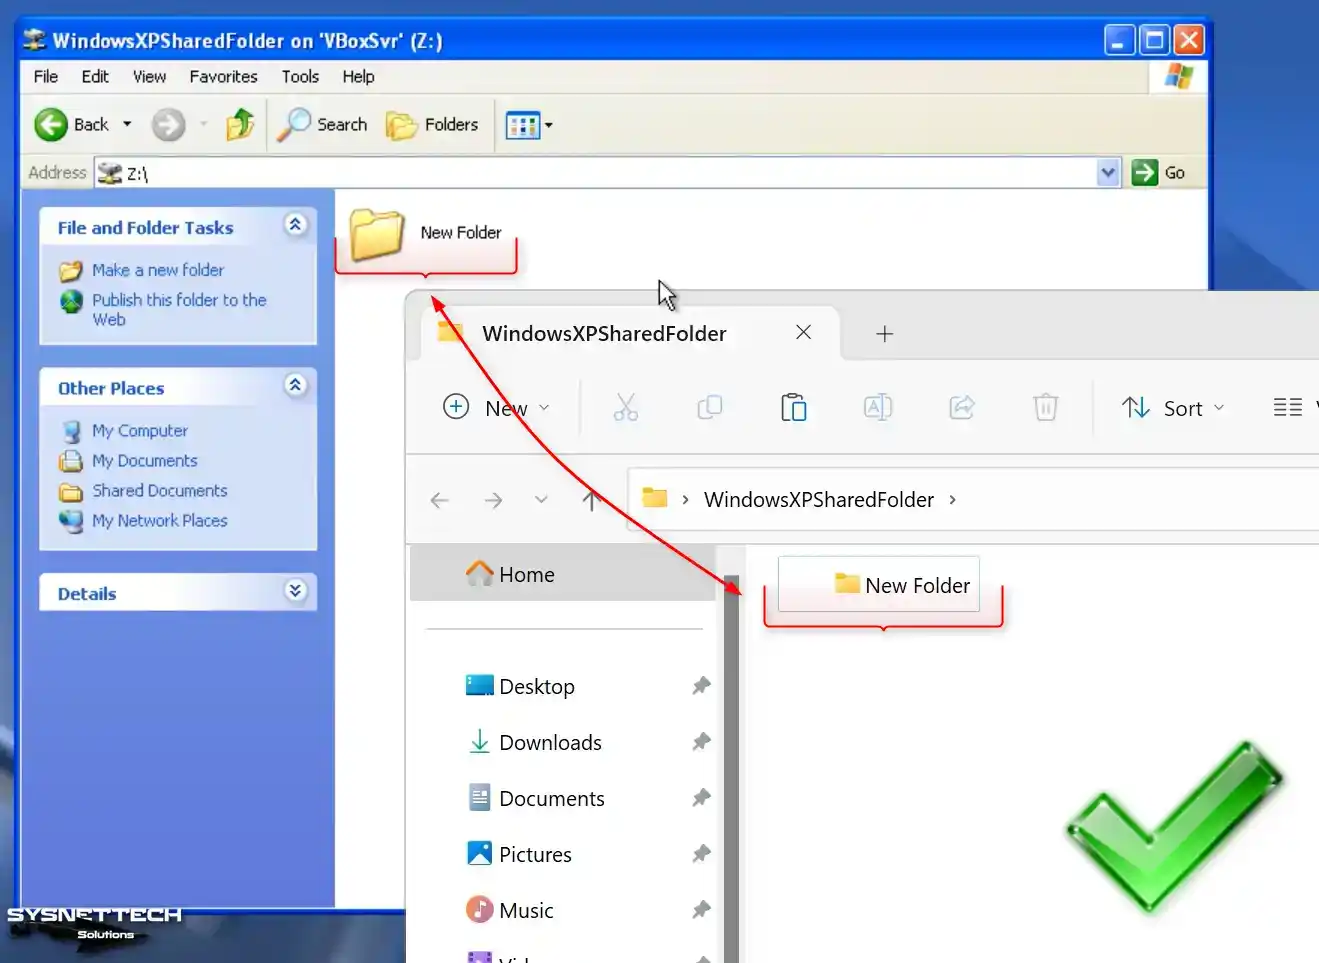
Step 4
Create a folder in the shared folder on your host system and check that this folder is created simultaneously in your VM.
How to Check Internet Connection in Windows XP VM
Network and Internet connection settings are automatically configured after installing a virtual system with Oracle VM VirtualBox or other virtualization software. If the services of your virtualization software become corrupted, you may encounter difficulties in accessing the Internet.
Network settings of Windows XP guest machines running on Oracle VM are configured with a NAT coupler by default, and a different block is created than the IP block you use in your existing network.
Step 1
Open Run and execute the CMD command to check if the Internet connection is working smoothly in your virtual system. After opening the CMD prompt, ping the Google servers using the ping 8.8.8.8 command.
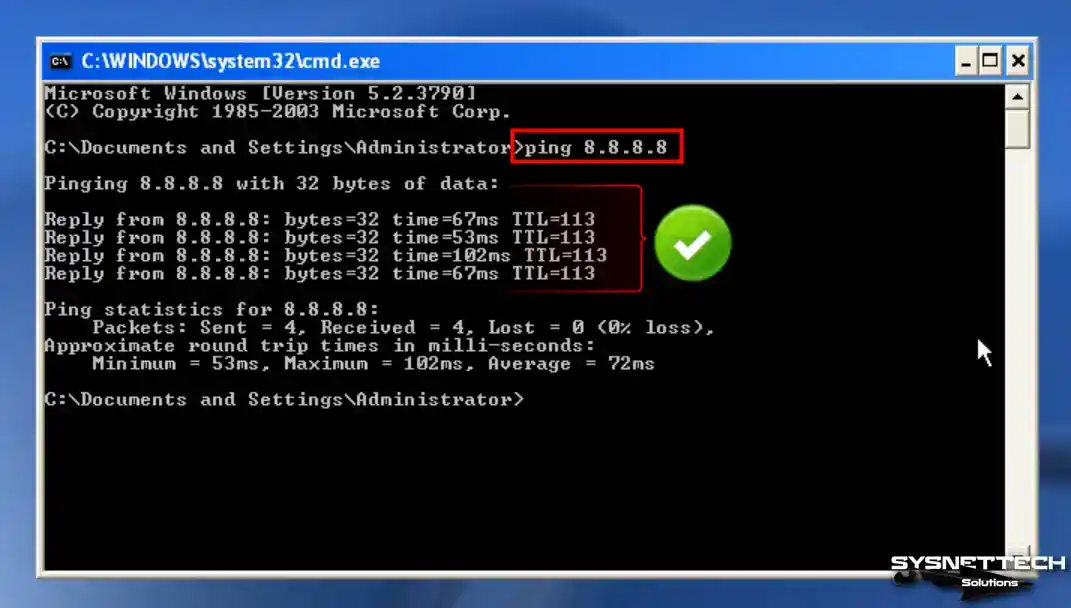
Step 2
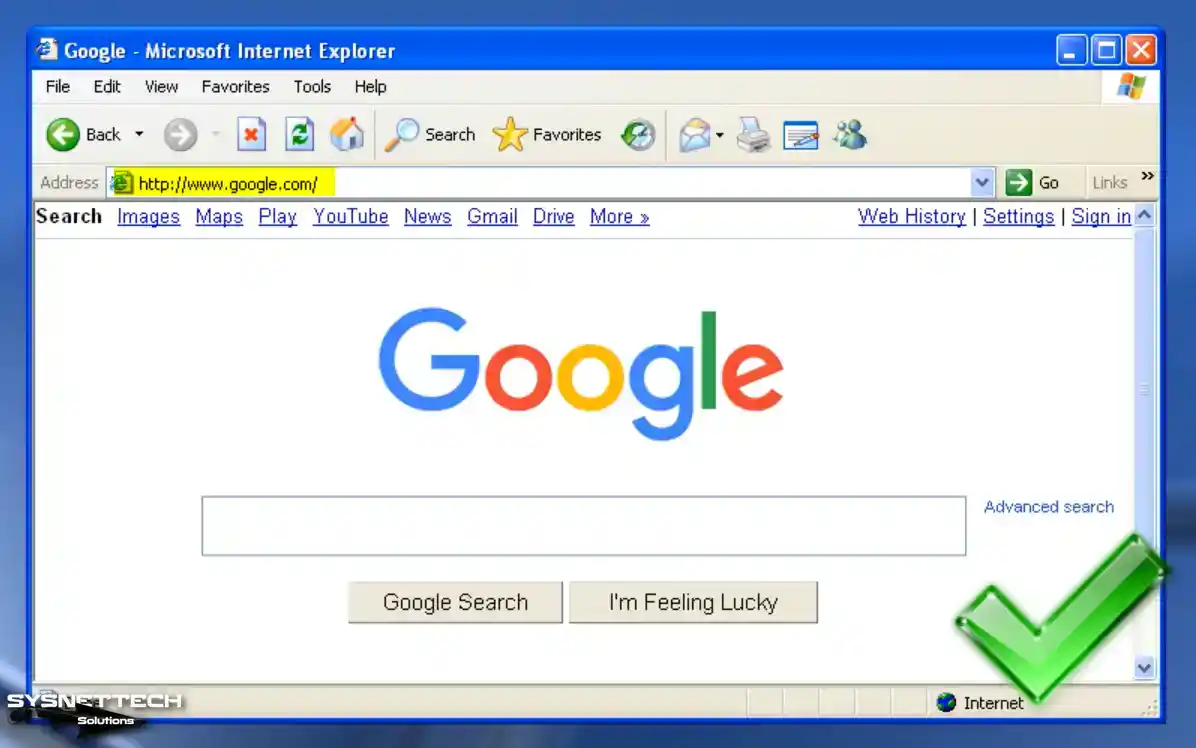
Once the ping test is successful, visit the Google homepage through the Internet Explorer browser to verify the health of your Internet connection.
How to Enable and Install USB 3.0 Driver
By default, enabling USB 3.0 support on a Windows XP virtual machine is not typically feasible. However, you can resolve this issue by substituting the USB controller. While USB 2.0 devices can be operated in the virtual machine without problems, enabling 3.0 or 3.1 supports faster file transfers using the more advanced technology.
Step 1
Before enabling USB 3.0 on your Windows XP guest machine, it is recommended to download the RENESAS Driver from the table located at the bottom of the article. Once downloaded, copy the driver to your system and proceed to double-click the setup file to initiate the wizard.
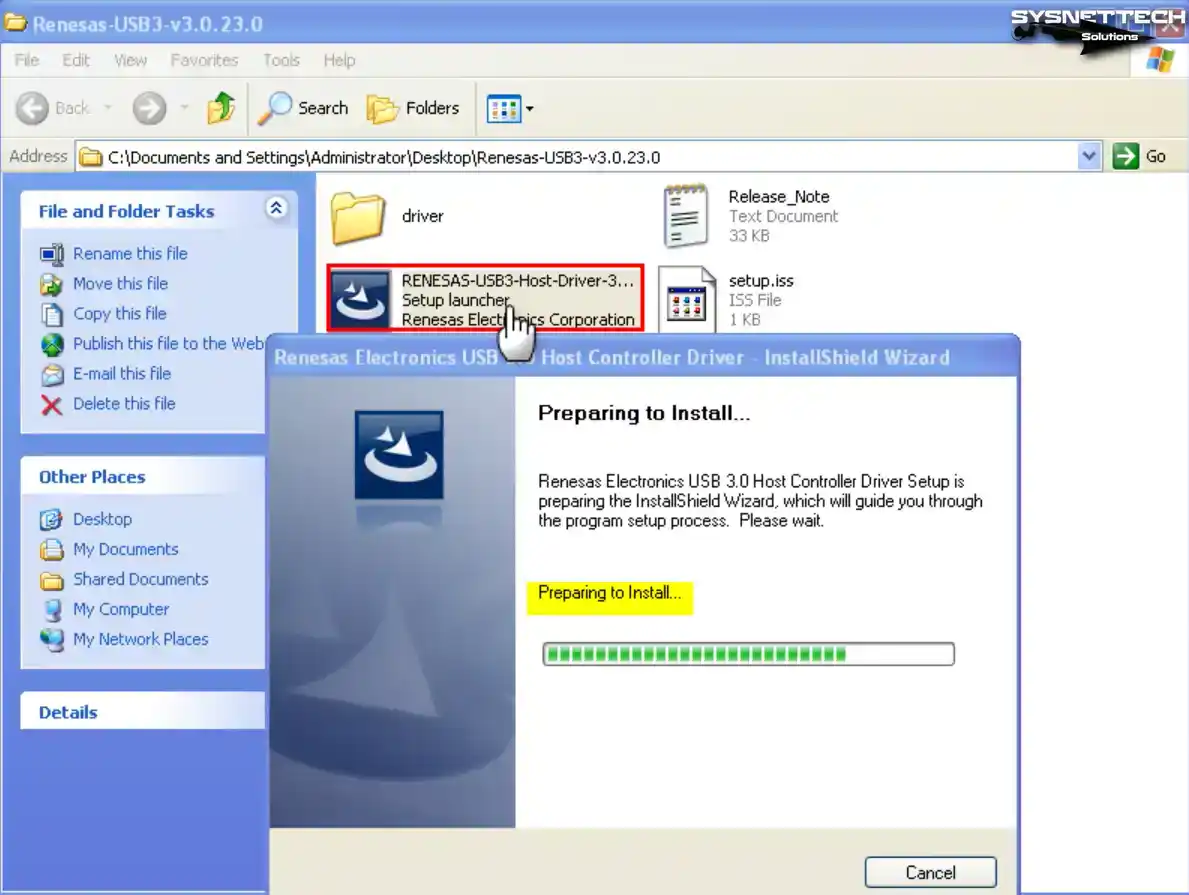
Step 2
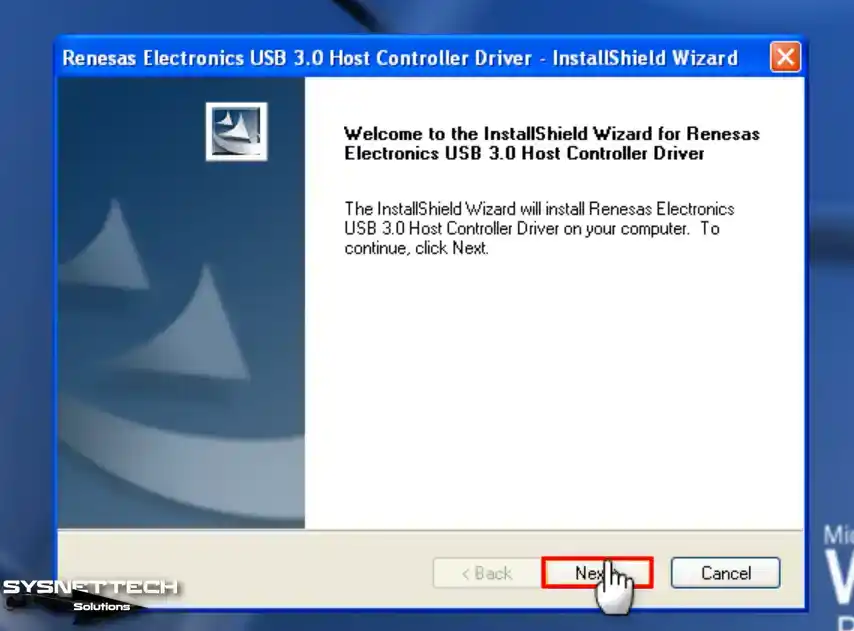
Click Next in the Renesas Electronics USB 3.0 Host Controller Driver wizard.
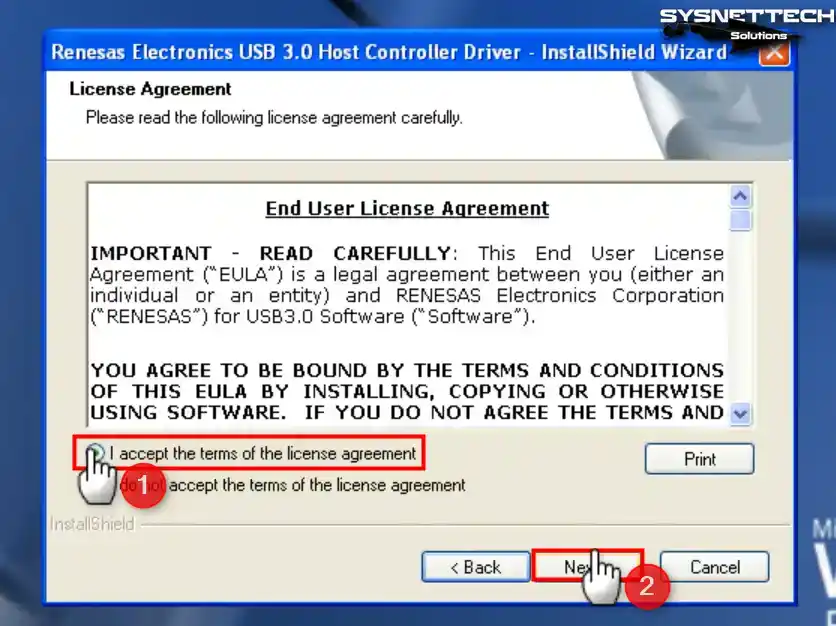
Step 3
Accept the license agreement of the Renesas Electronics USB driver software and click Next.
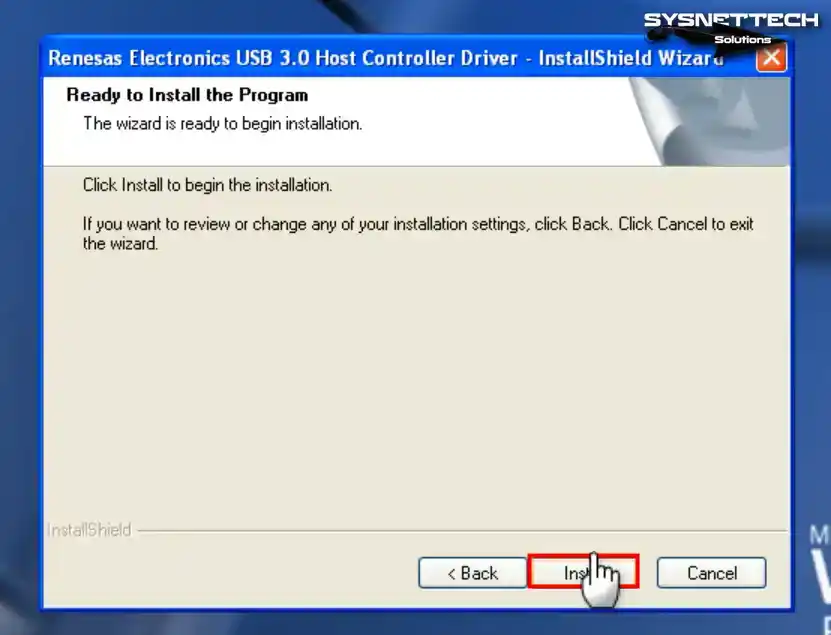
Step 4
Click the Install button to build the USB 3.0 driver.
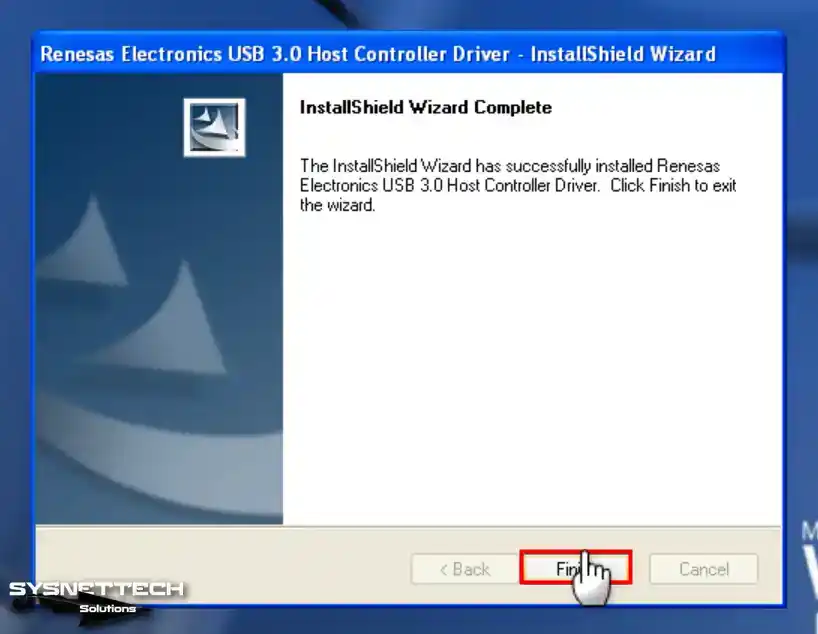
Step 5
After installing the USB 3.0 driver on Windows XP, close the wizard by clicking Finish.
Step 6
Close the Oracle VM VirtualBox on your host PC, go to its installed location, right-click, and click Open in Terminal.
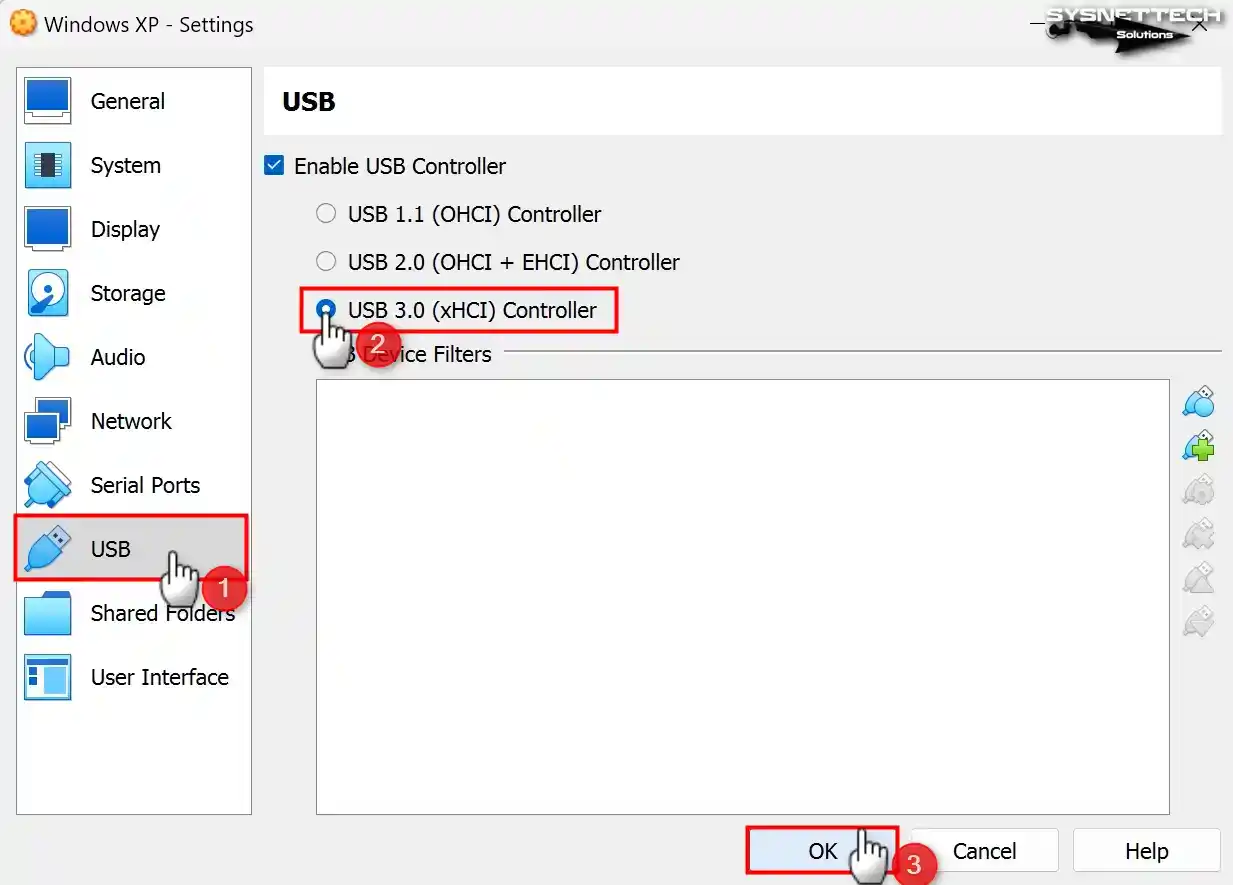
./VBoxManage setextradata 'Windows XP' VBoxInternal/Devices/usb-xhci/0/Config/ChipType uPD720201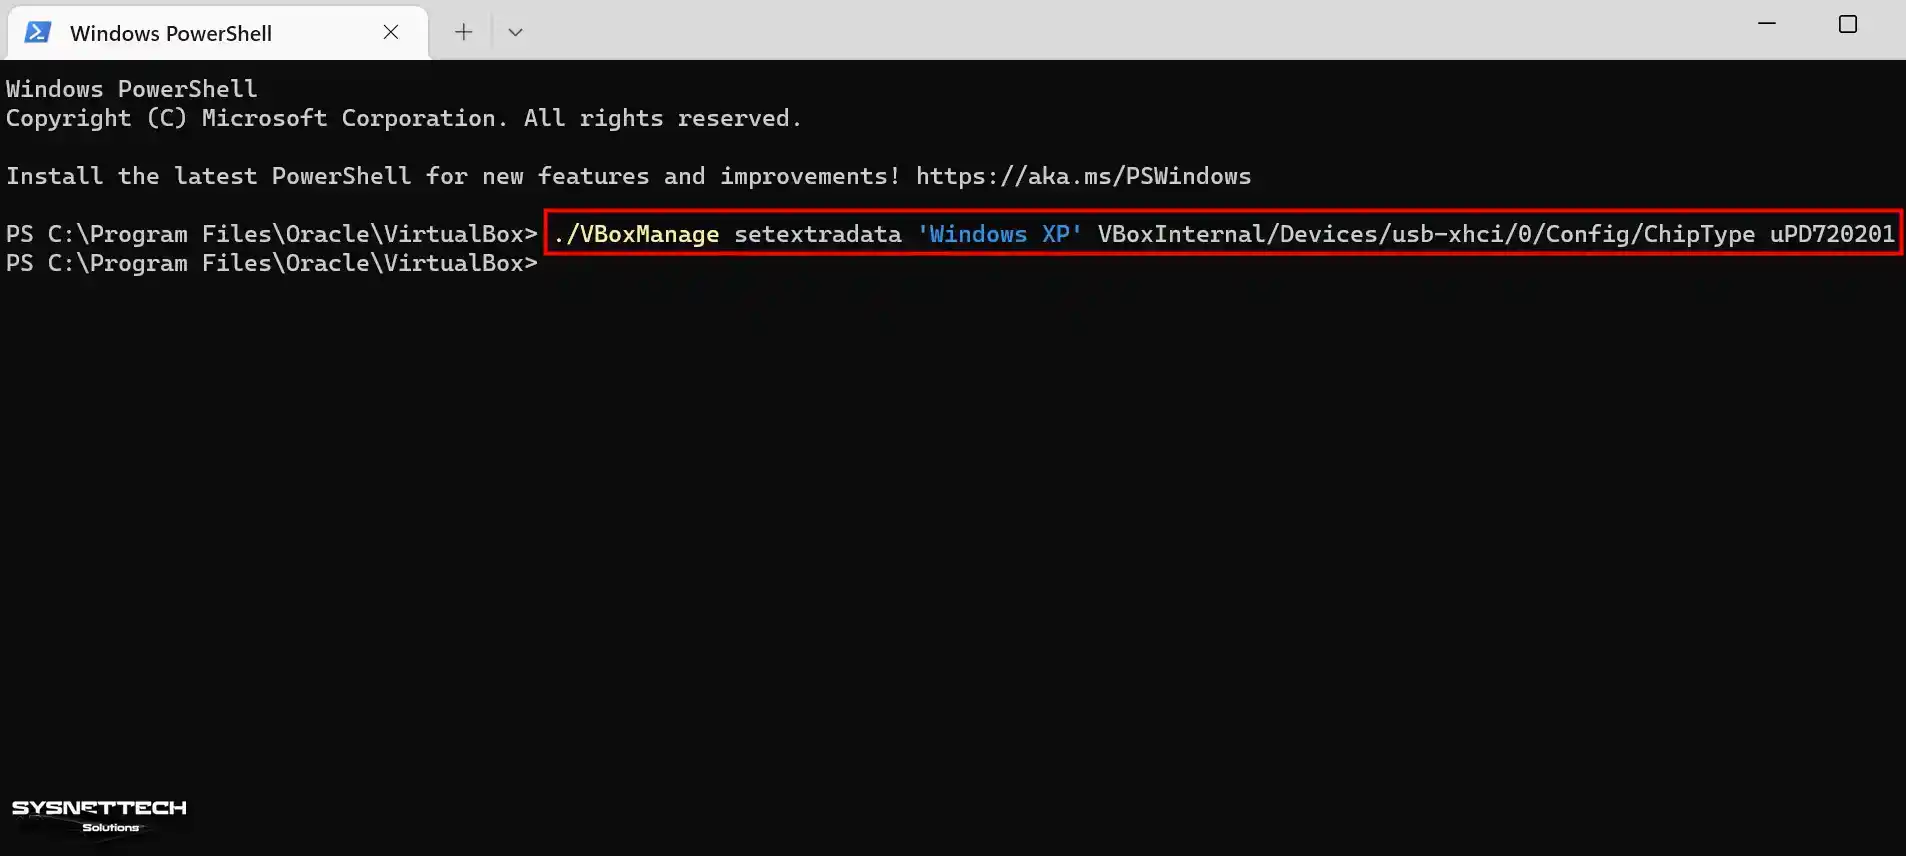
Step 7
Open the Oracle program, select USB 3.0 (xHCI) Controller from the USB controller types, and click OK.
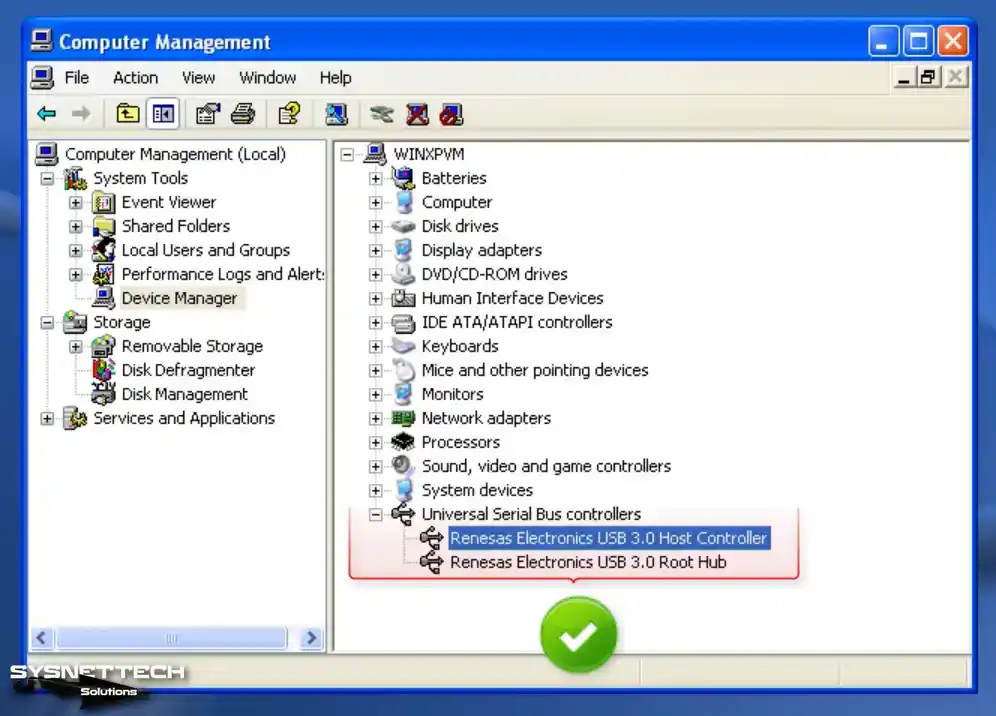
Step 8
Open the Oracle program again, and after running your virtual PC, open Device Manager and check the Universal Serial Bus (USB) Controller device.
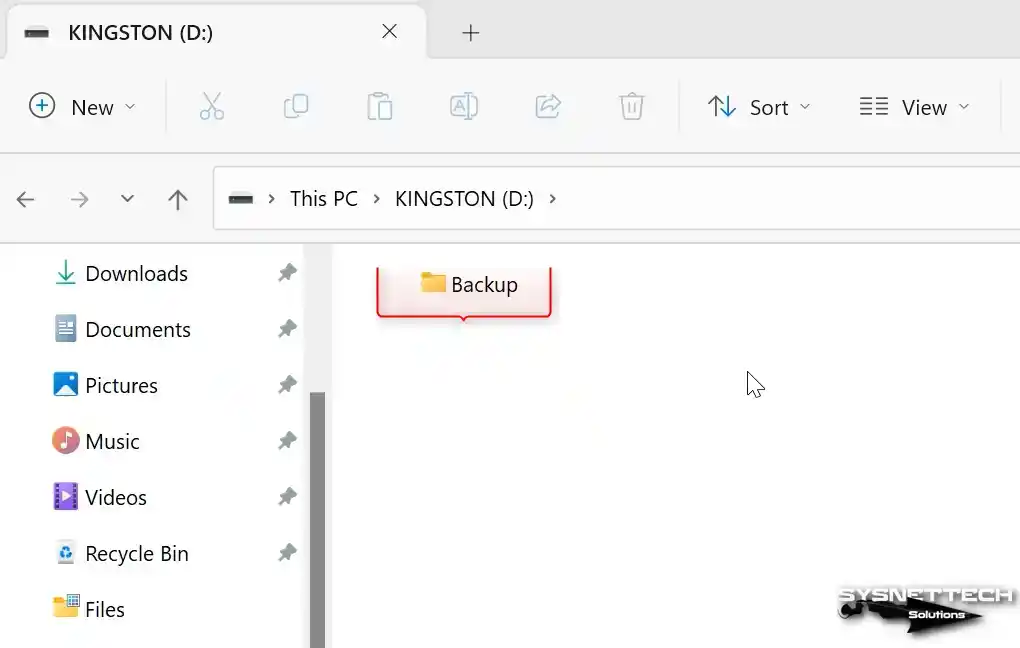
Step 9
Connect your flash stick to one of the USB 3.0 ports on your computer and establish a folder called “Backup” inside it as an illustrative instance.
Step 10
After inserting your flash memory, click Devices> USB> Kingston DataTraveler 3.0 on the virtual machine.

Step 11
After adding your flash memory to your virtual PC, Mass Storage drivers will be installed automatically. When you view My Computer, you can see your KINGSTON USB stick or any other brand.
Upon inspecting the Device Manager, you will find the USB 3.0 memory under Disk Drives.

How to Change Video Memory to 256 MB
A maximum of 128 MB of GPU memory can be set for Windows XP in Oracle software, but there is a simple way to increase this Size.
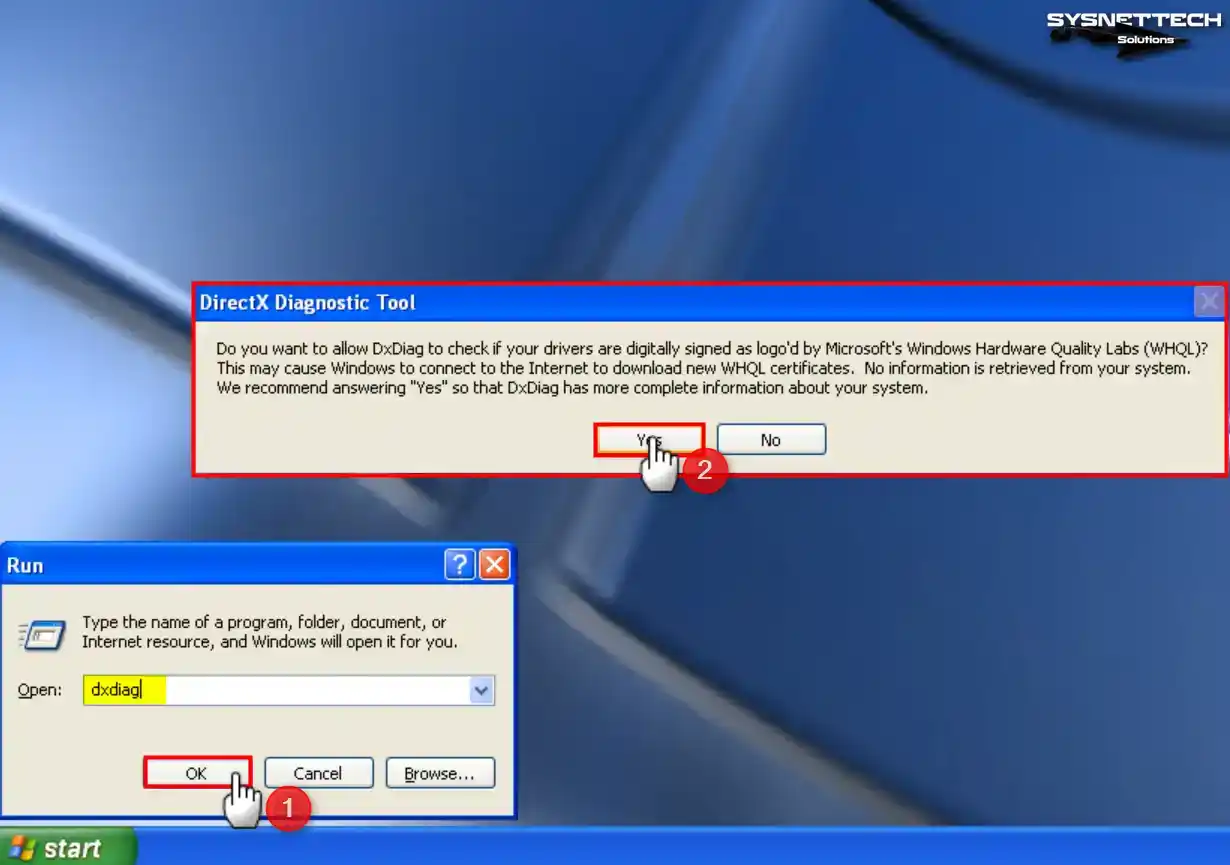
Step 1
First, execute the dxdiag command in the Run window on your virtual machine and click Yes in the DirectX Diagnostic Tool window.
Step 2
Click the Display tab on DirectX Diagnostic Tools, check the Total Memory size, and check that the GPU memory is 128 MB.
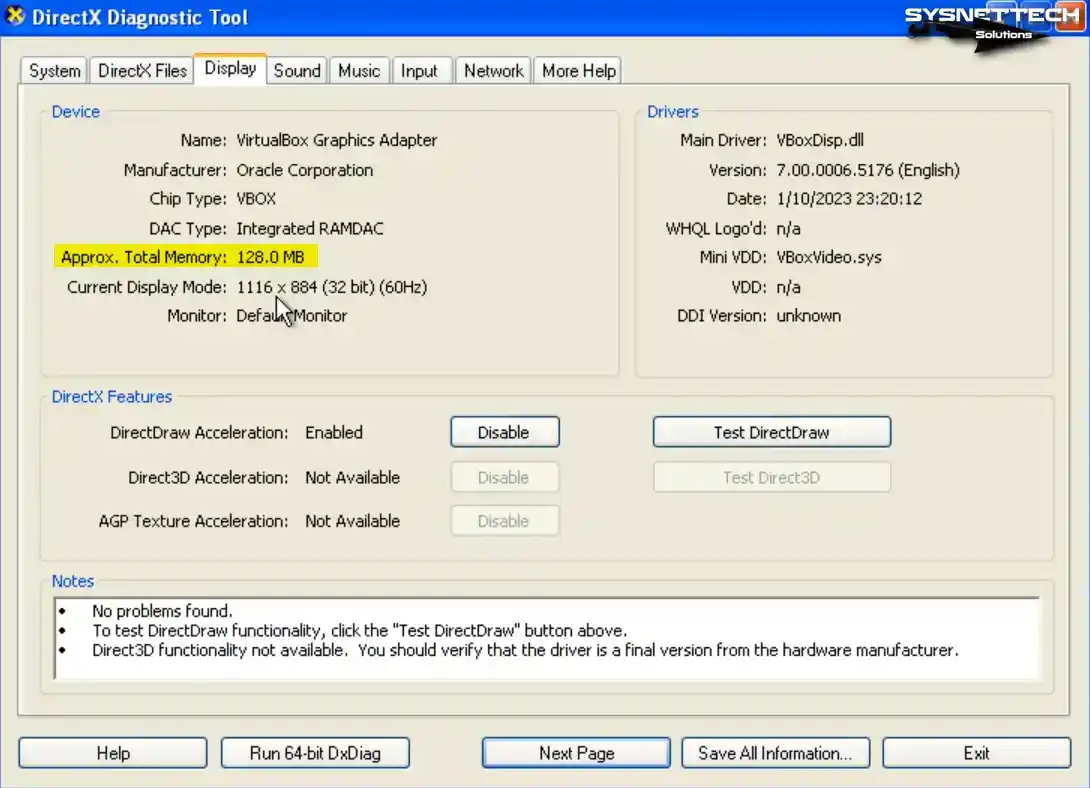
Step 3
Close your virtual computer and VirtualBox program, open PowerShell again in the location where VirtualBox is installed, and execute the following command.
./VBoxManage modifyvm 'Windows XP' --vram 256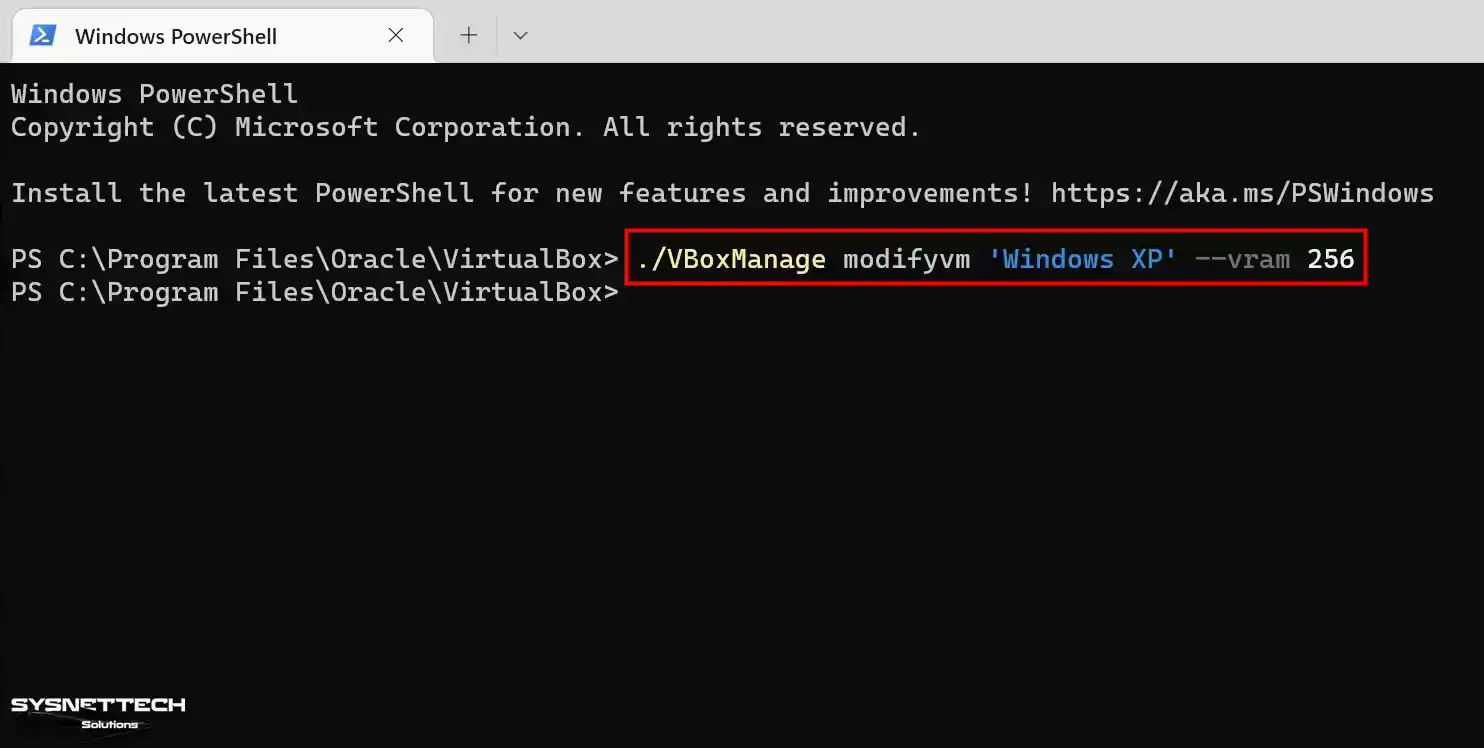
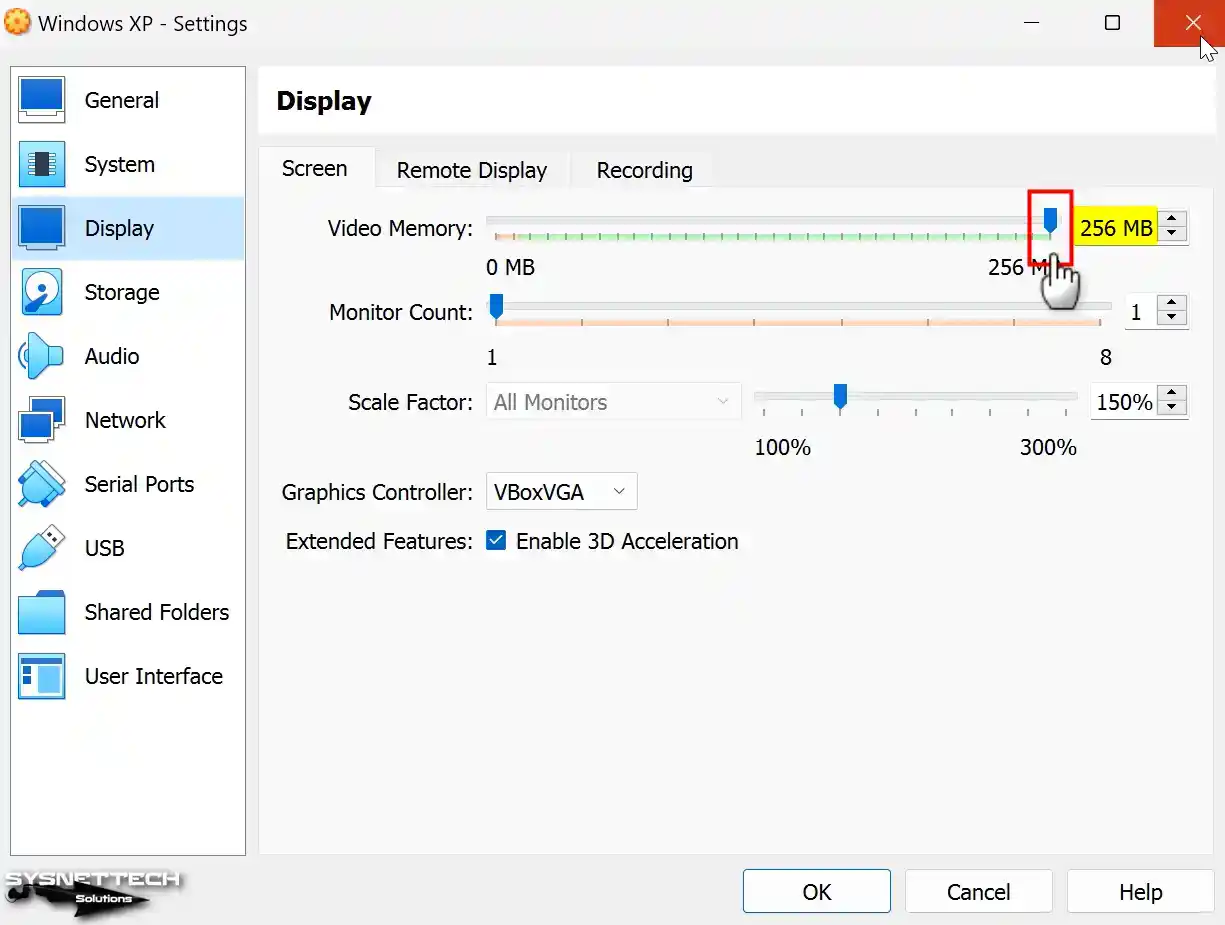
Step 4
Run Oracle VM VirtualBox, and after checking your VM’s settings, the Display / Screen / Video Memory size is 256 MB, and you will see that the operation was successful.
Step 5
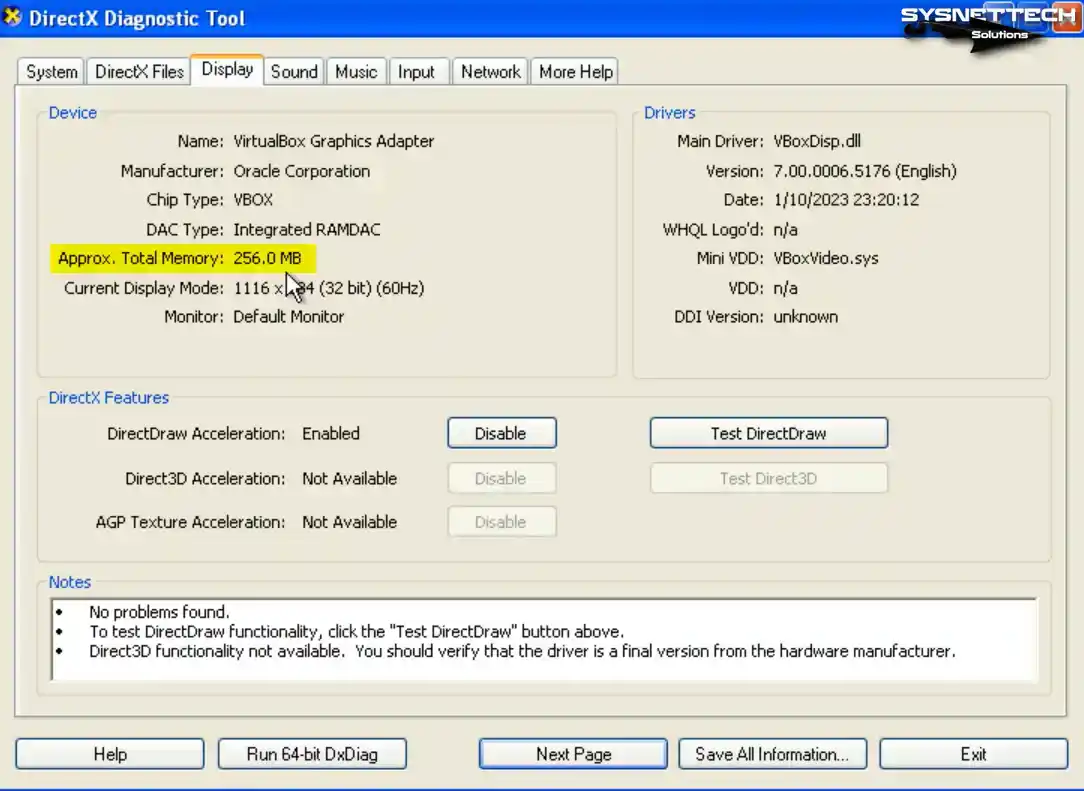
When you run your Windows XP guest machine and open the dxdiag tool again, you can see that the total graphics memory size in the Display tab is 256 MB.
How to Upgrade Windows XP SP1 to SP2
If you desire to upgrade to SP2 on the guest appliance after installing the Service Pack 1 (SP1) edition of Windows XP, obtain the ISO image from the table at the base of the article and proceed with the following steps.
Step 1
First, to view the properties of the XP system installed on your VM, right-click My Computer, open Properties, and check the Service Pack version.
Step 2
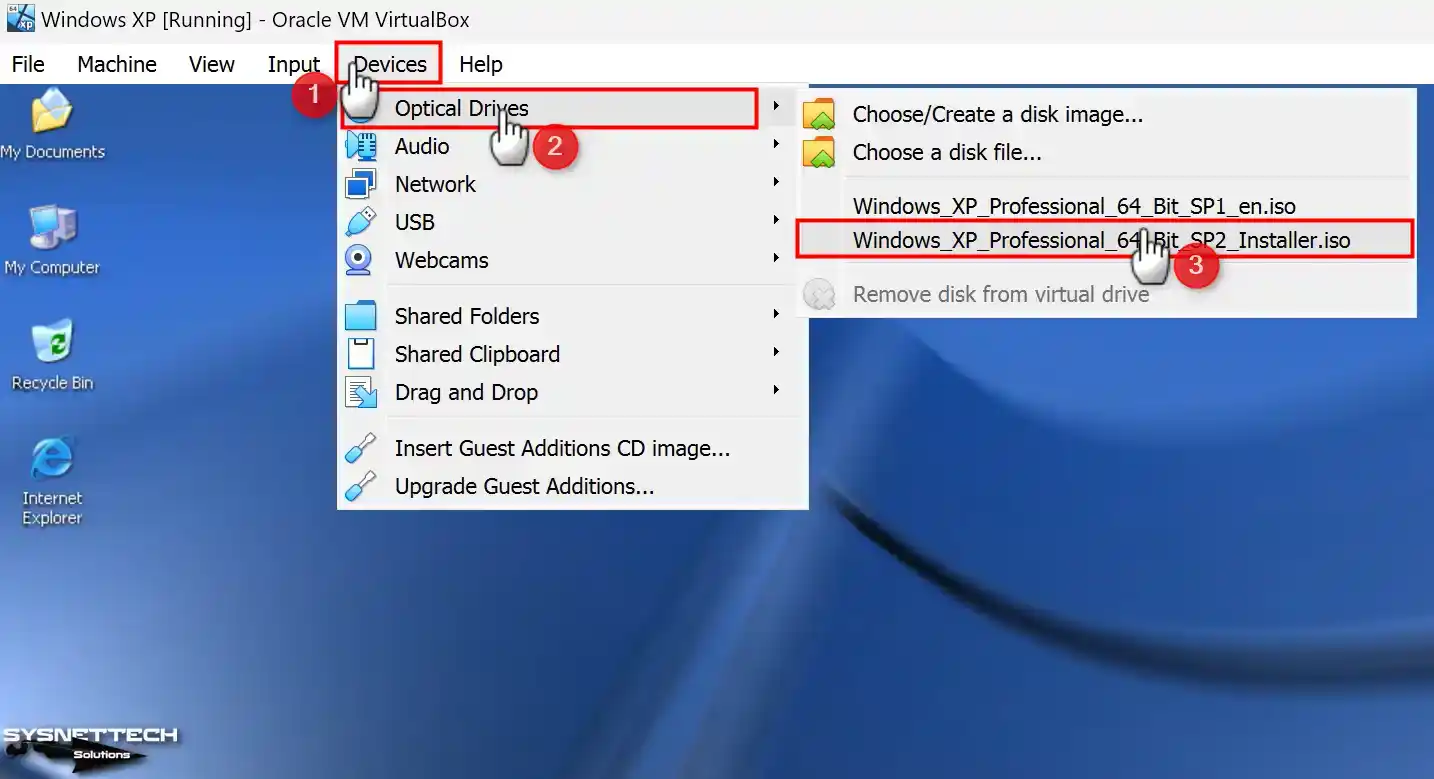
To add the SP2 ISO file to the VM, click Devices> Optical Drivers, select a disk file, choose the Installer image you downloaded to your computer, and click Open.
Step 3
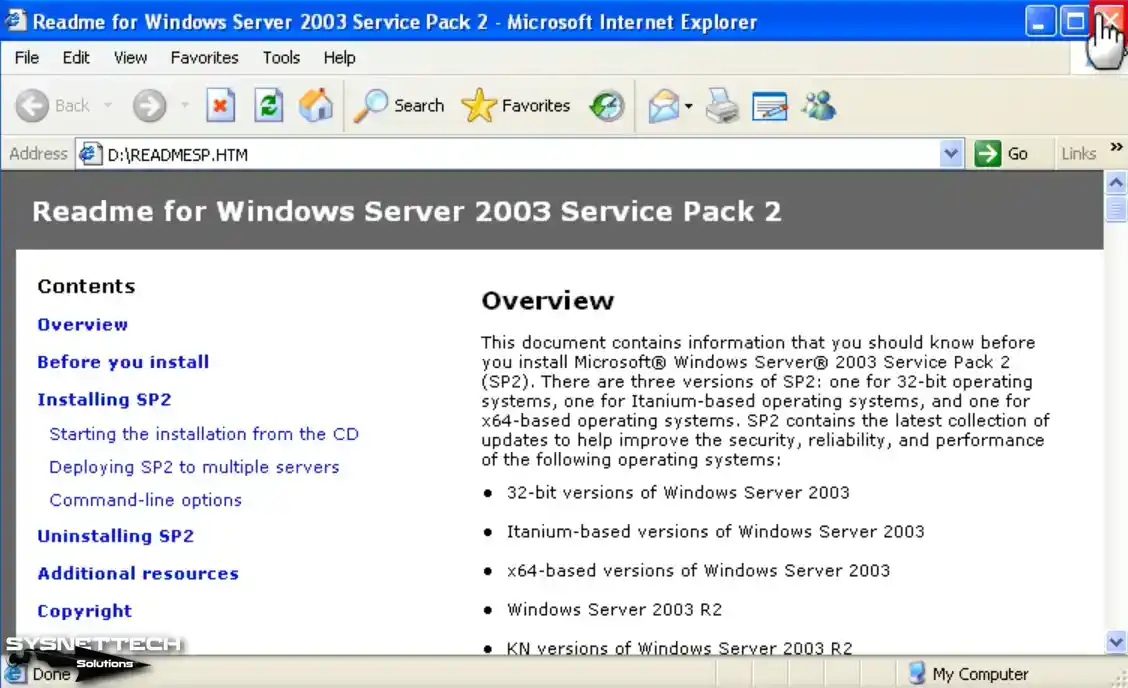
When the Readme HTML page opens automatically on your virtual system, close it.
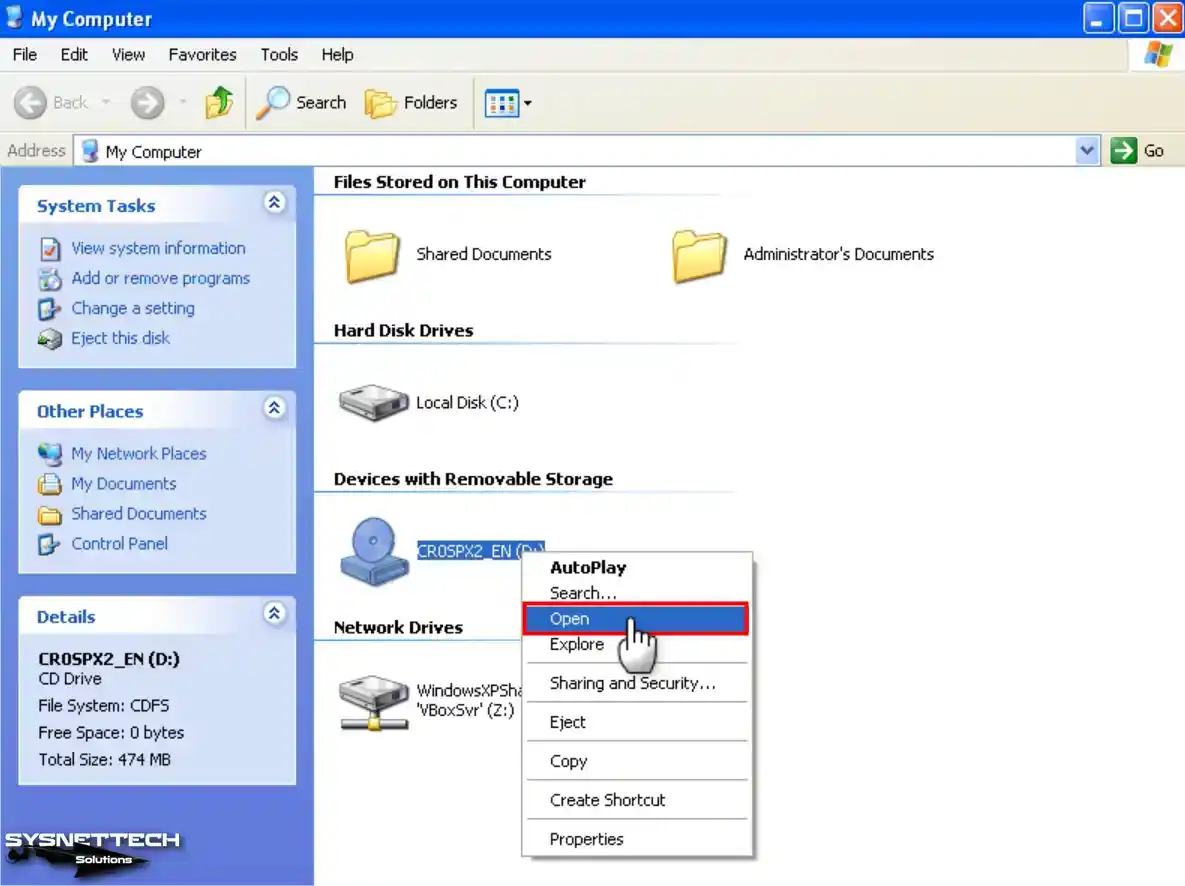
Step 4
Open My Computer, right-click on the CD drive, and select “Open.”
Step 5
Double-click the SRSP2 command script in the Service Pack 2 CD image and start the installation. Click Next in the Windows x64 Service Pack 2 installation wizard.
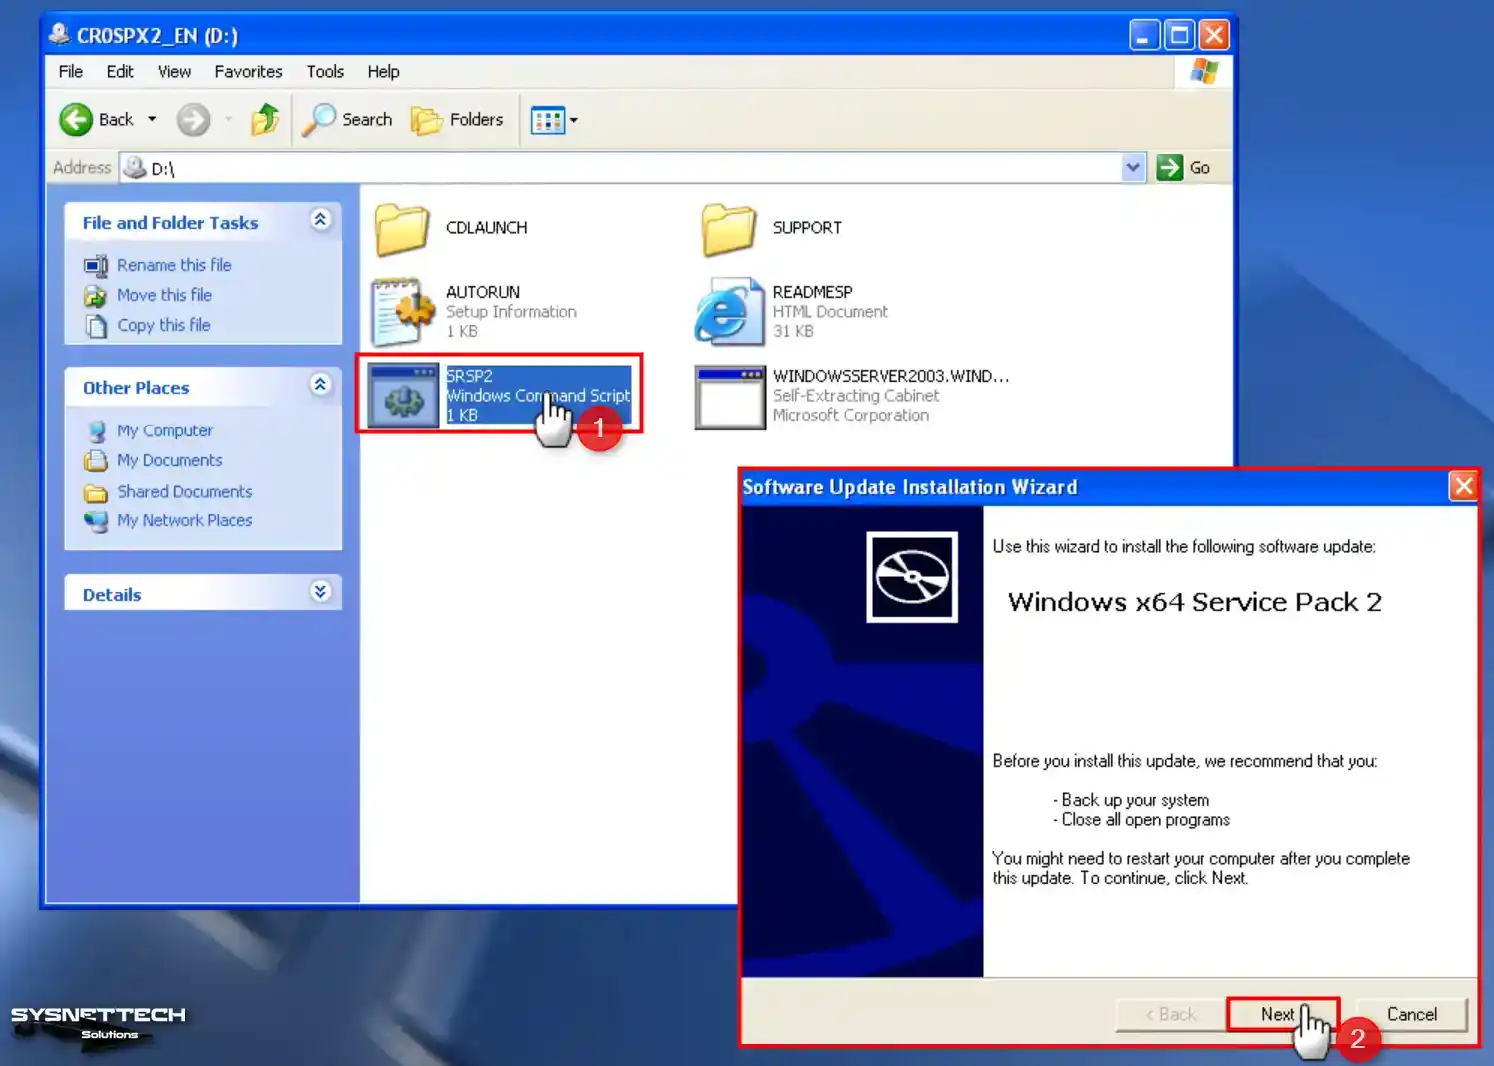
Step 6
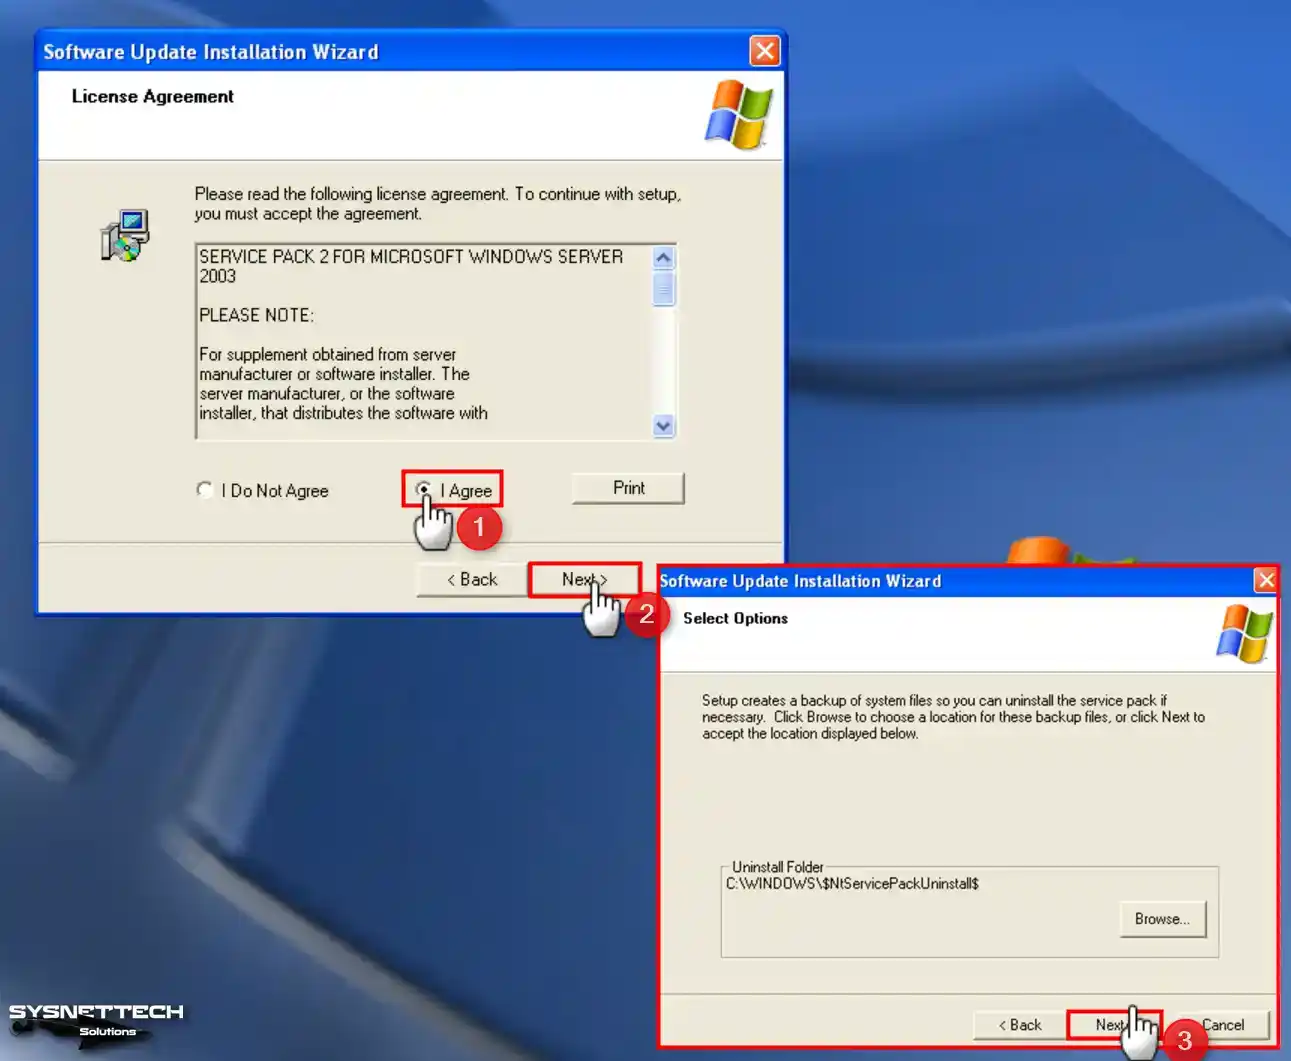
Accept the SP2 license agreement and click Next. If you want to downgrade Windows XP from SP2 to SP1 later, note the location in the Uninstall Folder. Continue with ‘Next’ to proceed with SP2 installation.
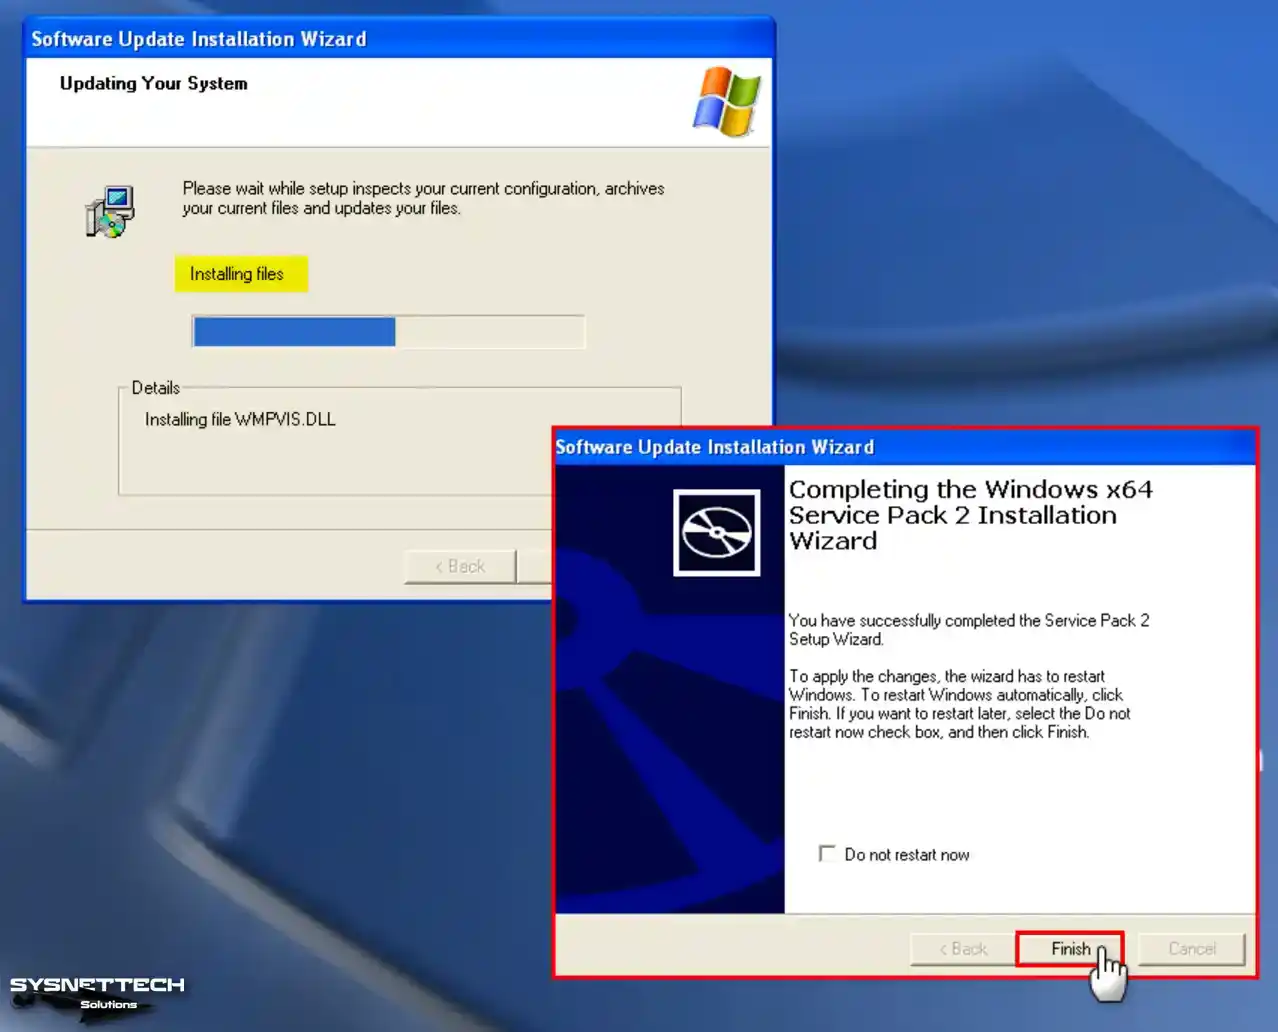
Step 7
Wait while your virtual Windows XP system updates to SP2. When the SP2 setup wizard is complete, click Finish to restart your virtual system.
Step 8
Upon revisiting the system properties, you will notice that Service Pack 2 (SP2) has been effectively installed.

Video
Installing Old Versions
Windows XP ISO ve USB Driver Download
| File | Links |
|---|---|
| Renesas USB 3.0 Driver | Download |
| Windows XP Pro x64 SP1 ISO + SP2 (EN) | Download |
Conclusion
As a result, you can run a Windows XP SP1 x64 Professional virtual machine with Oracle VM VirtualBox 7.0. You can install XP and enjoy its advantages with the steps I have outlined in this article. However, you can maintain the security and compatibility of your current modern operating system.
It would be best if you also prioritized security when using outdated operating systems. Virtualization offers a controlled solution for interacting with old software. As a result, this method is effective for experiencing old OSes in a secure environment.
Что дает виртуальная машина пользователю? Возможность работать на двух операционных системах на одном компьютере, тестировать разные программы без риска для основной ОС.
Через установленную виртуальную машину можно осуществить запуск ПО или приложений в ОС, для которых они в принципе не предназначались. Это очень удобная опция, полезная веб-дизайнерам, разработчикам веб-продуктов, обычным пользователям, любящим постоянно испытывать что-то новое на своем ПК.
Например, пользователь может установить уже немного устаревшую версию ОС на новую или принципиально иную — например, Линукс на Windows или наоборот. Давайте рассмотрим, как быстро установить Windows XP на вашу виртуальную машину. После этого можно будет уже установить любую программу для тестирования или приложение.
VirtualBox — бесплатное программное обеспечение для виртуализации, разработанное компанией Oracle. Оно позволяет создавать виртуальные машины на компьютере, что позволяет запускать несколько операционных систем на одном физическом устройстве. С помощью VirtualBox вы можете установить и запустить различные операционные системы, такие как Windows, Linux, macOS и другие, на вашем компьютере, даже если ваш текущий операционный системой отличается от устанавливаемой.
Это полезно, например, для тестирования программного обеспечения в разных средах, изоляции приложений или для обучения без риска повлиять на основную операционную систему. VirtualBox обладает широким спектром функций, таких как поддержка различных форматов виртуальных дисков, сетевые возможности для виртуальных машин, возможность создания снимков состояния виртуальной машины и многое другое
Некоторые из возможных причин и способы их решения:
- Ваш компьютер соответствует минимальным требованиям VirtualBox. Проверьте объем оперативной памяти, процессор и свободное место на жестком диске.
- Виртуализация включена в настройках BIOS/UEFI вашего компьютера. Без этой функции VirtualBox не сможет запустить виртуальные машины.
- Иногда другие программы, такие как антивирусное ПО или программы виртуализации других производителей, могут мешать работе VirtualBox. Попробуйте временно отключить такие программы и попробовать снова запустить VirtualBox.
- Убедитесь, что у вас установлены последние версии драйверов для вашего оборудования и обновления для операционной системы.
- Если все остальное не помогло, попробуйте переустановить VirtualBox. Убедитесь, что вы устанавливаете последнюю версию программы с официального сайта Oracle.
Если после всех этих шагов проблема не решится, может быть полезно обратиться за помощью к специалисту по компьютерным технологиям или на форумы поддержки VirtualBox для получения дополнительной информации и помощи.
Открываем и запускаем VirtualBox, кликаем кнопку «Создать». Сначала в открывшемся окошке впишем имя машине, выбираем тип ОС и версию. Например, операционная система под названием Windows XP 32bit. Затем Next (Далее).
Выделяем достаточный для функционирования системы объем оперативной памяти. ОС-ка Windows XP тратит немного, поэтому достаточно 1 ГБ, однако можно указать про запас размер побольше. Далее снова нажимаем кнопку Next.
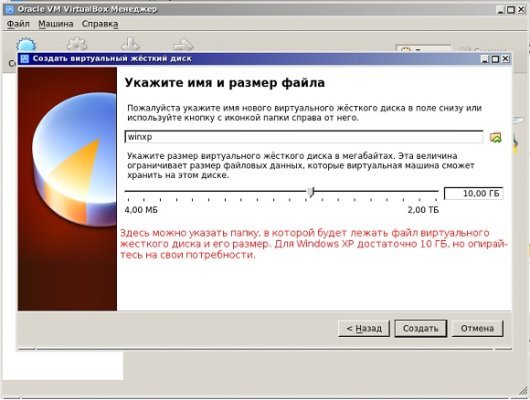
Теперь появляется окошко, в котором начинаем создавать жёсткий диск. Отмечаем функцию «Создать новый виртуальный жёсткий диск», кликаем «Создать». Осталось выбрать тип диска или оставить параметры по умолчанию.
Выберите формат хранения – фиксированный или динамический на свое усмотрение. Фиксированный формат позволяет создать диск выбранного объема. Некоторые считают, что на таком диске работа выполняется быстрее.
При выборе динамического формата диск заполняется постепенно. Однако если удалить ненужные файлы, объем диска не уменьшится. Указываем теперь имя жёсткого диска. Пусть это будет Windows XP плюс объем. Например, укажем объем 40 Гб — этого достаточно для диска. Нажимаем «Создать».
Происходит автоматический возврат в главное окошко VirtualBox, где слева теперь видно только что созданную Windows XP. Выделяем её мышкой и кликаем «Настроить» на панели меню.
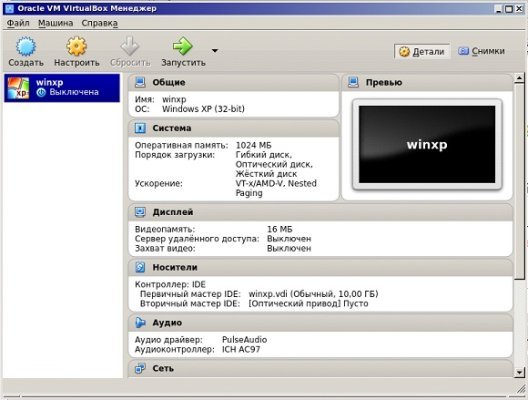
В открывшемся окне настроек находим раздел «Носители», кликаем по диску, на котором надпись «Пусто». В атрибутах справа выбираем значок оптического диска, опцию «Выбрать образ оптического диска».
Нужно выбрать ISO образ, кликнуть по «Открыть». Жмем «ОК» в окошке VirtualBox. Следующий шаг — непосредственная установка.
Когда подготовленная виртуальная машина настроена, становится возможна установка Windows. Кликаем по «Запустить». Открывается уже знакомое окно, которое обычно появляется при установке системы на ПК. Сразу можно посмотреть какие опции здесь предусмотрены: тестирование оперативной памяти, сброс пароля. Выбираем второй пункт в любом случае – «Установка Windows XP».
На экране появляется окошко управляемое стрелками. Выбираем «С Internet Explorer 8 (базовая)». Появляется основное окно установки. Какое-то время копируются некоторые файлы необходимые для установки системы.
Появляется окошко, через которое предлагается установка Windows XP. Кликаем Enter. Появляется следующее окошко для разметки области. Если оставляем неразмеченной кликаем по клавише «C».
Нужно выбрать для системы достаточный объем жёсткого диска. Хватит 20 Гб. Этот раздел не отформатированный, поэтому кликаем Enter и переходим к форматированию. Выбираем «Форматировать раздел в NTFS <Быстрое>». Произойдет быстрое форматирование. Ждем, когда оно закончится.
Теперь программа копирует основные файлы, а виртуальная машина перезагрузится. После запуска появляется окошко с параметрами. Выбираем из перечня «Загрузка с жёсткого диска» для того, чтобы установка программы Windows XP пошла дальше. На экране отображается установка и время до ее окончания.
Виртуальная машина снова перезагружается и появляется всем знакомый логотип Windows XP, возможность установить некоторые параметры (например, часовой пояс) и рабочий стол в голубом свете Windows XP.
На этом наконец установка системы Windows XP завершатся. Виртуальная машина абсолютно готова к работе.
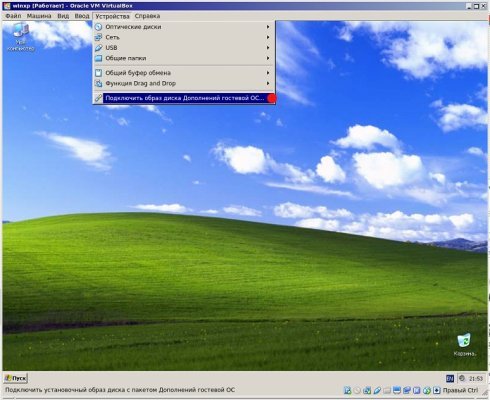
Чтобы облегчить работу, возможна установка дополнительных настроек на Windows XP и VirtualBox. Например, чтобы перекидывать папки из одной ОС в другую, организуйте двунаправленность опция Drag and Drop. В меню найдите пункт «Устройства» и отметьте эту опцию, отметьте «Двунаправленный». Точно те же действия проведите в «Общем буфере обмена». Можно установить драйвера USB и подключить принтер.
Кстати, иногда при попытке запуска ОС Windows виртуальная машина показывает ошибку 0x80004005. Дальнейшая установка становится невозможна. Такое возможно из-за нескольких причин:
- Некорректно работающая версия VirtualBox.
- Вероятный конфликт Hyper-V с VirtualBox на 64-разр. системах.
- Отключение виртуализации в BIOS.
Это решаемые проблемы. Например, в БИОС нужно включить настройку Intel Virtualization Technology. В разных версиях БИОС путь к ней может различаться, поэтому лучшее ее искать по словам virtualization, virtual. Для включения нужно перевести курсор в состояние Enabled.
Если виртуальная машина не обновилась, проверьте наличие обновления через Менеджер виртуальных машин либо переустановите программу. Если у вас возник конфликт Hyper-V с VirtualBox, отключите гипервизор через Панель управления в разделе Программы и компоненты. Достаточно снять галочку с Hyper-V. Кстати, некоторые проблему с возникающей ошибкой решают более кардинальным способом — клонируют программу, удаляют старую и запускают клон.
Виртуальная машина готова к работе. Теперь ей можно пользоваться в любой время.
If you are the nostalgic type, then you most likely remember the days of running Windows XP on your home computer. Most people loved the performance and reliability that Windows XP had to offer and miss the simple interface and how it didn’t require high end hardware to run.
Watch Video: How to Install Windows XP as a Virtual Machine in VirtualBox.
Obviously, you are not going to install Windows XP on your main computer since it is not supported by Microsoft for security updates or any other type of updates. Plus, you may find that some of your hardware will not be supported and there will be no XP drivers available for it.
One way to run Windows XP on your computer is by configuring it as a virtual machine. Desktop virtualization is very common these days and you can use software such as Hyper-V, VMware Workstation, VMware Player and Oracle VirtualBox to create virtual machines running a variety of operating systems. In this article, we will be showing you how to install Windows XP as a virtual machine in VirtualBox.
In order to install Windows XP as a virtual machine in VirtualBox, you will need to install the VirtualBox software on your computer. VirtualBox is free to use and will run on Windows, Linux and macOS. You can download it from their website here. You will also need to download the Windows XP ISO image file from here.
Once you have VirtualBox installed, open the VirtualBox Manager and click on the New button. Here you will need to name your VM whatever you like and choose the path for the virtual machine files if you do not want to use the default folder. In the section that says ISO Image, browse to the location of the Windows XP ISO file that you downloaded. VirtualBox should detect that the OS is Windows XP and add that to the Version box. You should then check the box that says Skip Unattended Installation.

Next, you can assign how much memory and how many processors you want to allocate to your Windows XP virtual machine. You should be fine with 4GB or so and should not allocate too much in case your host computer does not have that much RAM installed. One processor should be fine as well.

For the hard disk, you can change it from the default 10GB to whatever size you like assuming you have the disk space on your host for this virtual hard drive. For the hard drive type and variant, you can use the default VDI (VirtualBox Disk Image). If you check the box for Pre-allocate Full Size, then VirtualBox will use the entire size of the virtual disk on your host hard drive rather than expand its size as needed within the guest OS.

Now that you have your Windows XP virtual machine configured, you can select it and then click on the Start button to start the VM and begin the Windows XP installation process.

When you get to the section where it asks for a license key, you can use the one below.
MRX3F-47B9T-2487J-KWKMF-RPWBY
Once you have Windows XP installed, you can then go to the Devices menu from the VM console and choose Insert Guest Additions CD Image to install the VirtualBox Guest Additions. This extra software is a suite of software and drivers installed inside a virtual machine to enhance its functionality with things such as mouse pointer integration between the host and VM, improved graphics performance, shared folders, time synchronization, drag and drop functionality and more.
For additional training resources, check out our online training courses.
Check out our extensive IT book series.
Whether you want to do some retro gaming, software testing, or are simply in for a quick nostalgia trip, we’re about to show you how to quickly set up a Microsoft Windows XP virtual machine in VirtualBox software – with ease and in around 10 minutes total! So, let’s dive into this short, simple and straight to the point step by step Win XP VM setup tutorial, and let us guide you to get your virtual machine working as fast as possible.
- Windows XP Virtualization – What Do You Need
- Where To Get The Windows XP ISO Image?
- Do I Need a Windows XP Product Key For a Virtual Machine?
- Are There Any Other Ways You Can Enjoy Windows XP These Days?
- Installing The VirtualBox Software
- Windows XP in VirtualBox – Step-by-step Tutorial
- And There It Is! – Fully Functional Virtualized Windows XP Instance
Windows XP Virtualization – What Do You Need
The only three things you’ll need for this tutorial are:
- Windows XP ISO – a single ISO image file of the Windows XP installation media disc, you can obtain it in various places online or source it from an actual original Win XP install disc. More on that in a short while.
- Oracle VM VirtualBox Software (free) – freeware hypervisor software that we’re going to use for virtualizing the Windows XP OS. It can be downloaded here.
- A popular alternative to this piece of software is VMware – this one is also available for free, albeit for personal use only. We will be using VirtualBox in this tutorial.
- A PC (or rather motherboard) with virtualization capabilities – most modern motherboards do support virtualization by default. If it’s not, the option to enable it will be hidden somewhere in your BIOS. Search for options labeled: Virtualization, VT-x, AMD-V, or SVM, depending on your hardware.
- If virtualization is not enabled in your BIOS, the hypervisor software won’t be able to work properly, and you won’t be able to use your virtual machines.

This is the question that’s asked the most when it comes to anything virtual machine related. The quick answer is simple: do a quick Google search and you’ll be presented with more than a few sources for various operating system installation media ISO images.
The longer and more appropriate answer is: many sites including ours aren’t really keen on providing the ISO images of older commercial operating systems (especially those developed by Microsoft), simply because while these systems are long discontinued, Microsoft themselves still haven’t officially released clean installation media sources for most of their recalled OS products.
This makes the process of ripping a physical Windows installation disk (this is how you make an .iso file that’s used to install the system in a VM), somewhat a grey-area endeavor. The same goes with making these kind of files available for free online.
With that said, it’s true that there are still many Windows XP ISO images floating around online, but we cannot take the responsibility of checking if the one you find and pick will be safe to use and will not contain malware. This is something you should do on your own.
Do I Need a Windows XP Product Key For a Virtual Machine?
Yes, a Windows XP product key is needed during the OS installation process in the virtual machine environment, but then again, there are lots of working keys available all over the internet that you can use here.
As Windows XP is recalled and new licenses are no longer sold, you might have to resort to activating the system in your VM by using already existing keys – this is done in the very beginning during the OS installation process in the virtual machine.
Once again, currently the only way to really use Windows XP in a virtual machine “legally” is to find an old, preferably sealed Windows XP installation disk packed with a dedicated product key and then use these to install the OS in your virtual machine hypervisor software.
That’s just how it is: keep in mind that Microsoft doesn’t provide official downloads for any of the Windows XP installation media .iso images, and they do not endorse using previously used unoriginal product keys for activating copies of Windows XP in a virtualization environment.
This is why virtualizing older Microsoft Windows operating systems may be considered a “grey-hat” activity by some. In reality, as there currently is no real way of purchasing these older operating system licenses, the only way to actually make use of their feature sets is either through virtualization, or on original hardware having an original activated copy of such system installed.
Are There Any Other Ways You Can Enjoy Windows XP These Days?

In general, as we already mentioned, there are 2 main ways you can get the full Windows XP OS experience on your PC today. Here they are.
- Virtualization – the best way, enabling you to make use of full feature set of the virtualized OS while staying safe from malicious software.
- OS Install On An Old PC – whether you find an old Windows XP PC, or you decide to install it on an unused computer, this is one of the more elaborate ways to enjoy the system on actual hardware, without emulation or virtualization involved.
These are pretty much the only ways you can get into a part of the original Windows XP experience these days. From all of these methods, virtualization is the most efficient and safest one if done correctly.
Installing The VirtualBox Software
The very first thing you’ll need to do is to install the free VirtualBox hypervisor software which you can download right here.
The hypervisor software will allow us to create our Windows XP virtual machine, tweak some initial settings, import our .iso image and then proceed with the actual OS installation on our newly created VM. Let’s get started then!
Windows XP in VirtualBox – Step-by-step Tutorial
Here is how to get Windows XP to work in VirtualBox in a few simple steps. First, simply open the VirtualBox software.
After you’ve opened VirtualBox, select the “New” button which you can find in the middle of the top bar. This will initiate the process of creating a new Virtual machine.
Don’t worry about the .iso image yet, but keep in mind that we will need it later after we finish setting up our virtual machine.
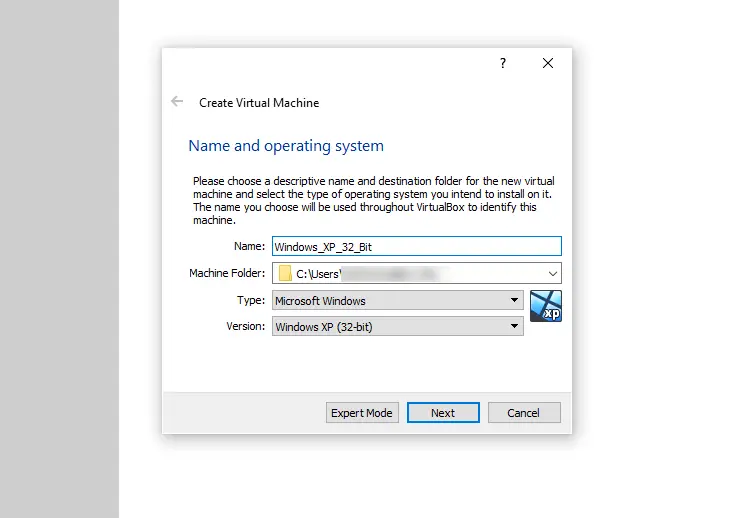
Pick a name for your virtual machine. The best thing to do here is to name it after the operating system it will be hosting – and that’s just what we did here.
After you’ve done that, select the following options: Type: Microsoft Windows and Version: Windows XP (32/64-bit) – pick the appropriate version depending on which .iso image you have. Then, press “Next”.
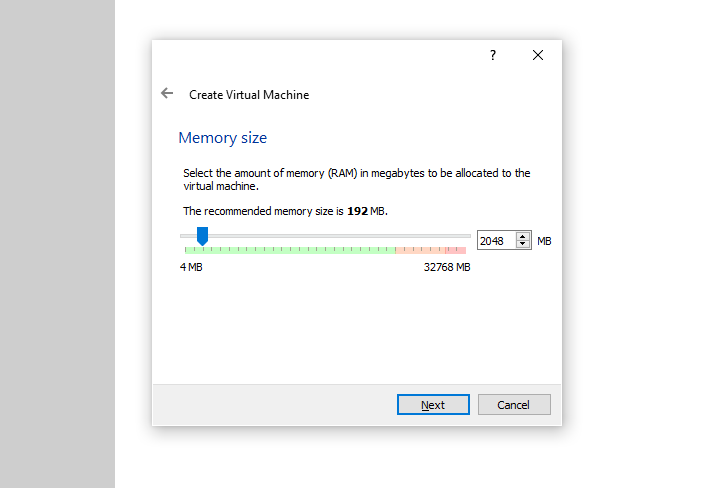
Now, pick an appropriate amount of RAM for your virtual machine. This will depend on the actual way you’ll be using your VM in the end, and on the overall amount of RAM available on your host machine.
We recommend picking 2048 MB (2 GB) here, although you can just as well go with as little as the software recommended 192 MB if you don’t have much host memory to spare.
Generally, we don’t recommend assigning less than 512 MB (0.5 GB) and more than 8192 MB (8 GB) for Windows XP on VirtualBox. For light retro gaming and commercial software tests you should be fine with 2-4 GB in most cases.
Remember that this can always be changed later, after shutting down your virtual machine. When you’re finished, click “Next”.
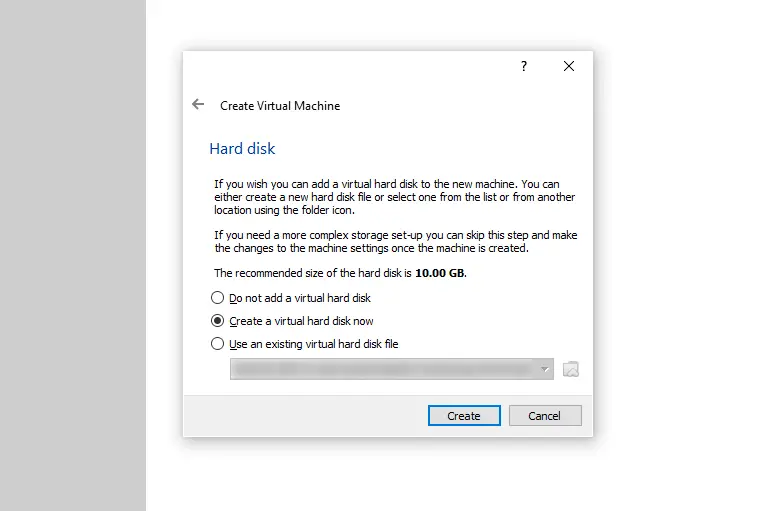
Now it’s time to create a new virtual hard disk – this will be the disk space that will be available to you once you boot your virtual Windows XP PC.
Select the “Create a virtual hard disk now” option, and press the “Create” button.
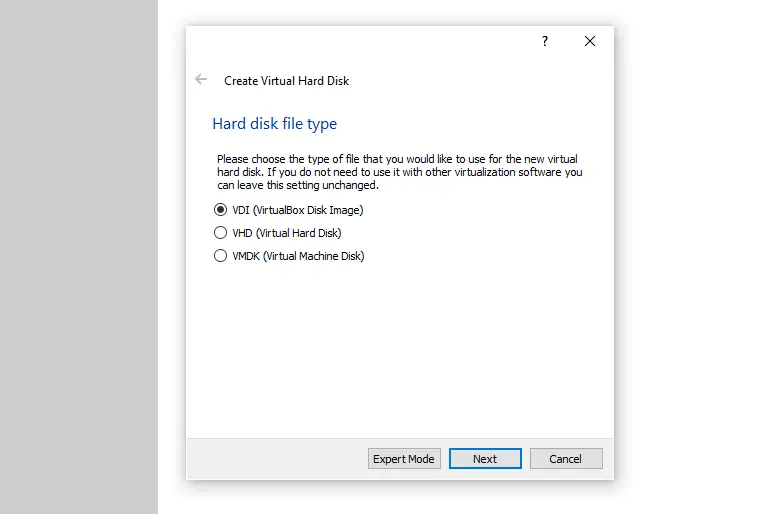
Select the type of the virtual disk – as we won’t be using this particular virtual disk file with any other software than VirtualBox, we can safely create the default “VDI (VirtualBox Disk Image)” file type and click “Next”.
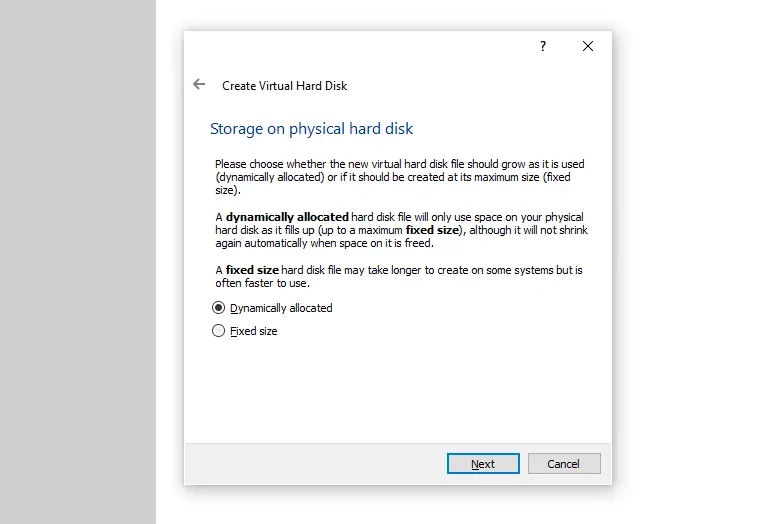
Now you’re faced with two options: you can either create a “Dynamically allocated”, or “Fixed size” virtual hard drive.
The first one will only use your physical host disk space as it gradually fills up with data, and the second one will take up all the set space from the beginning.
While the dynamic storage allocation can be slower than utilizing a fixed-size virtual drive, dynamic storage allocation is more beneficial when you use lots of smaller virtual machines for testing purposes and don’t have that much disk space to spare on your host system.
Select “Dynamically allocated” and press “Next”.
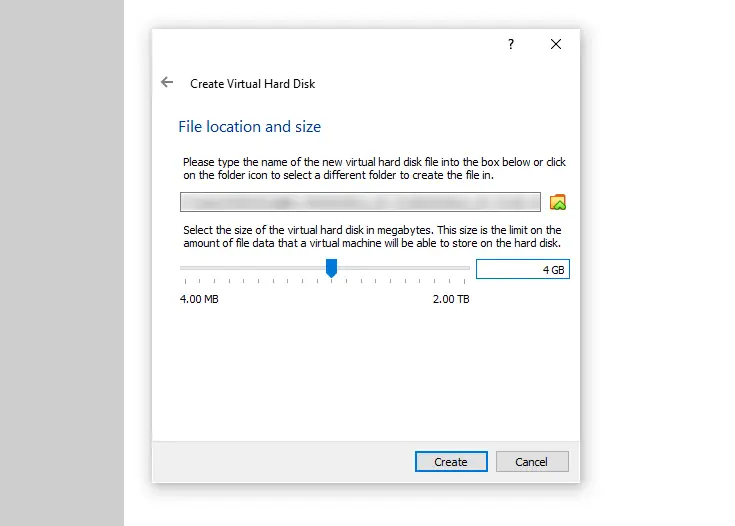
As Windows XP has an install size of around 1.5 GB, we won’t be needing more than 4GB on our virtual hard drive.
Choose a directory for your virtual hard drive file (or leave it as default), and set your virtual hard disk size to 4 GB. Then, click “Next”.
Now, your new “empty” Windows XP virtual machine has been created successfully, but it still needs two things. First, settings tweaking, second, importing the Windows XP ISO image. We’re going to do all this right now.
Click on the orange settings cog on the main VirtualBox screen with your new VM selected to enter the settings menu of your newly created virtual machine.
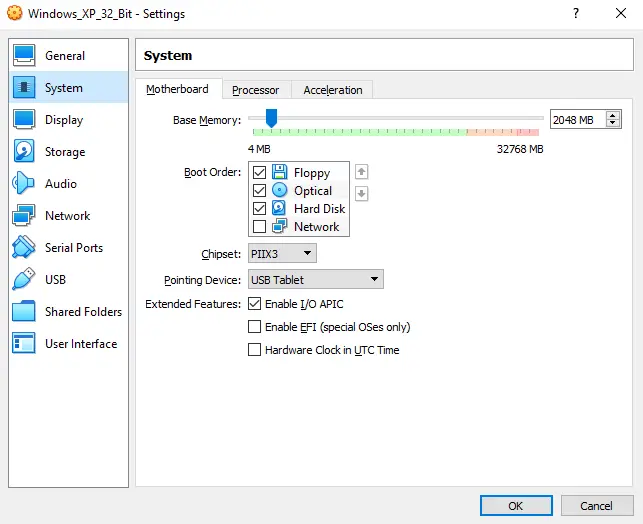
Head over to the “System” submenu on the left, and select the first “Motherboard” tab.
In here, you can see the amount of memory you’ve assigned to your virtual machine. You can change this anytime you want if your VM is not running.
If you want your virtual machine to utilize more than one CPU core (and we do want that), check the “Enable I/O APIC” checkbox in this window.
After that, head over to the “Processor” tab.

Now, in the “Processor” tab, drag the “Processor(s)” slider to your desired amount of CPU cores that you want your virtual machine to utilize. Let’s set this slider to “2”. Leave other settings in this tab as is.
If you don’t enable the “Enable I/O APIC” feature in the “Motherboard” tab, you won’t be able to support more than one virtual processor, so make sure that it is on.
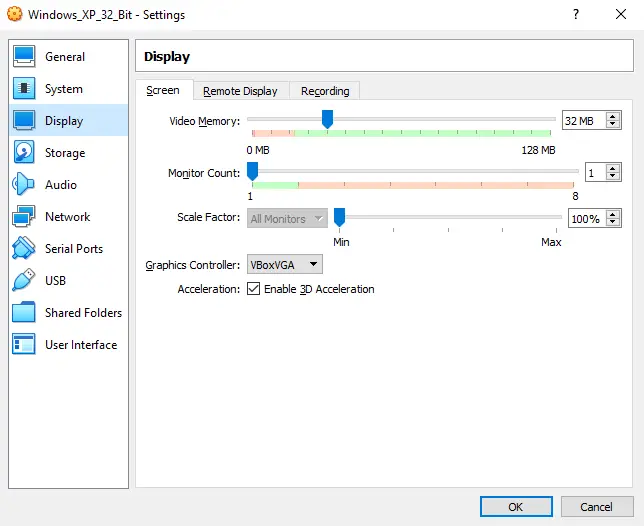
Go over to the “Display” submenu and the “Screen” tab. In there, you will be able to set the amount of memory you want to assign to your virtualized graphic card. Set the “Video Memory” slider to 32 MB.
After you’ve done that, check the “Enable 3D Acceleration” box. Now you can head over to the “Network” submenu.
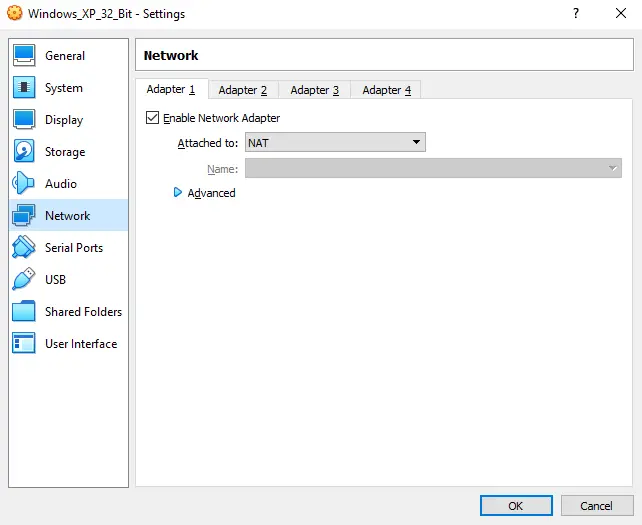
In the “Network” tab, check if the “Adapter 1” is enabled and set to “Attached To: NAT”.
This way you’ll be able to access the internet through your virtual machine – neat!
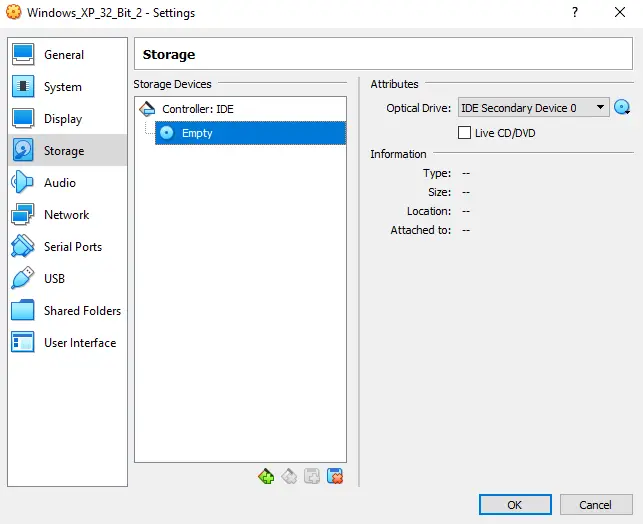
Now the most important part yet – importing our ISO image. Head over to the “Storage” submenu and locate the virtual optical disc drive (highlighted blue on the image above). Then press the little blue disc on the top left of the window.

Here, select the “Choose a disk file…” option. Now you will be prompted to select your OS installation disc ISO image file (if you don’t know what that is, go back to the beginning of this article).
After you select the file, it will get imported into the virtual optical disc drive. It’s the direct equivalent of putting the OS installation CD into an actual physical disc drive on a real computer – just virtualized!
Now, it’s finally time to close the settings window and start up your virtual machine by pressing the “Start” button in the main VirtualBox window with your newly created VM selected.
We’re halfway there!
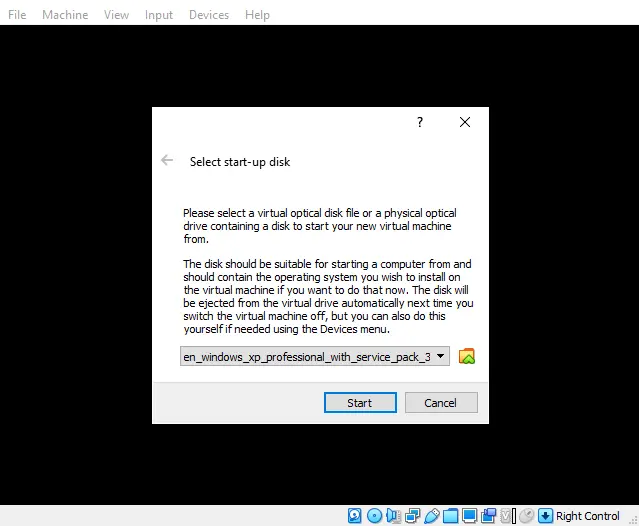
After booting up your new virtual machine, you will be prompted to select the start-up disk / ISO image to use – select the one you’ve just imported in the previous step!
Now, the actual installation process of Windows XP will begin on your VM.
This is the exact same install setup that you would face when installing Windows XP from “real” physical installation media on an actual hardware.
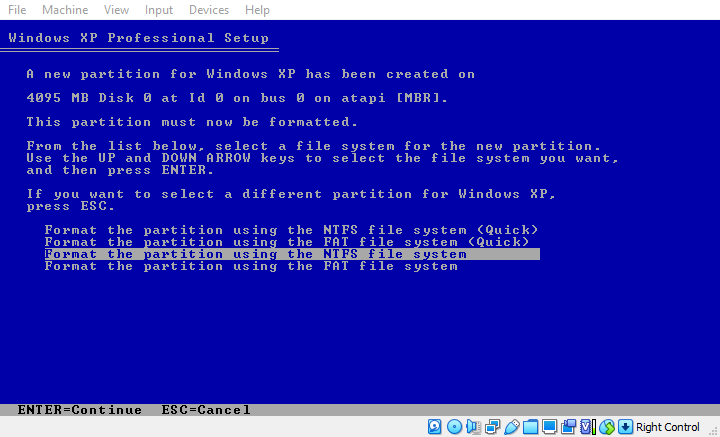
The only step that might be non-obvious here is one of the first ones where you have to select the “Format the partition using the NTFS file system” option (shown on the image above). Click the enter key to confirm your choice.
Now the only thing you have to do is to finish the regular Windows XP installation process.
We won’t be going through all the steps here, as these are pretty self-explanatory – all the things you have to do are stated explicitly on-screen in the installer GUI. This was the “easiest Windows version” after all, as proclaimed by the installation wizard itself!
After the installation process is complete you will be faced with the well-known Windows XP loading screen. This is the end of the road – you now have a fully functional copy of Windows XP running in your virtual machine!
And There It Is! – Fully Functional Virtualized Windows XP Instance
And that’s it! You’ve successfully installed Windows XP on your virtual machine and now can use all the features of the system virtualized locally on your host machine. All that with internet access!
Remember that Windows XP is a discontinued and largely outdated OS which should not be used for any work involving critical user data, especially when connected to the internet.