Chromebook, известные своей скоростью, простотой и безопасностью, завоевали огромную популярность. Тем не менее, бывают моменты, когда возникает необходимость в приложениях Windows, которые не так легко найти в Chrome OS. Это руководство направлено на разъяснение процесса установки Windows на вашем Chromebook, чтобы вы могли полностью раскрыть потенциал обеих операционных систем.
Chromebook популярны своей доступностью, портативностью и длительным сроком службы батареи. Однако у них есть несколько ограничений, таких как более ограниченная библиотека приложений и меньшая совместимость с определенным программным обеспечением. По этой причине некоторые пользователи хотят использовать Windows на своих Chromebook.
Вот несколько причин, по которым пользователи могут захотеть использовать Windows на Chromebook:
-
Для запуска приложений, доступных только для Windows. Существует много популярных приложений для Windows, которые недоступны в Chrome OS, таких как Microsoft Office, Adobe Photoshop и некоторые видеоигры. Установив Windows на Chromebook, пользователи могут использовать эти приложения, не переключаясь на другое устройство.
-
Для получения большей гибкости и контроля. Chrome OS является относительно легкой операционной системой, но для некоторых пользователей она может быть ограничивающей. Например, Chrome OS не позволяет устанавливать приложения из-за пределов магазина Google Play. Установив Windows, пользователи получают больше гибкости и контроля над своим устройством.
-
Для использования Chromebook в качестве устройства с двойной загрузкой. Некоторые пользователи хотят иметь возможность переключаться между Chrome OS и Windows на своем Chromebook. Это может быть полезным для тех, кто должен запускать приложения, доступные только для Windows, но также хочет воспользоваться преимуществами Chrome OS, такими как длительное время работы от батареи и функции безопасности.
Важно отметить, что установка Windows на Chromebook не всегда проста и прямолинейна. Некоторые модели Chromebook не совместимы с Windows, и процесс установки может быть сложным. Кроме того, работа Windows на Chromebook может быть менее плавной, чем на специализированном ноутбуке под управлением Windows.
В целом, есть несколько причин, по которым пользователи могут захотеть использовать Windows на Chromebook. Тем не менее, важно взвесить плюсы и минусы перед принятием решения установить Windows.
Часть 2. Как установить Windows на Chromebook?
В этом разделе мы рассмотрим три различных метода установки Windows на Chromebook, предоставляя подробные пошаговые руководства с иллюстрациями для лучшего понимания.
Метод 1: Использование USB-флешки
Требования:
-
Chromebook, совместимый с Windows.
-
USB-флеш-накопитель с, как минимум, 8 ГБ свободного пространства.
-
Файл установки Windows 10 в формате ISO.
Шаги:
Шаг 1: Скачайте файл установки Windows 10 с официального веб-сайта Microsoft.
Шаг 2: Создайте загрузочный USB-накопитель с Windows 10 с использованием программы, такой как Rufus.
Шаг 3: Загрузите свой Chromebook с USB-накопителя.
Шаг 4: Следуйте инструкциям на экране для установки Windows.
Этот метод является наиболее распространенным для установки Windows на Chromebook. Тем не менее, он также является самым сложным и затратным по времени.
Метод 2: Использование Parallels Desktop
Требования:
-
Chromebook с, как минимум, 8 ГБ оперативной памяти и 32 ГБ хранилища.
-
Подписка на Parallels Desktop.
-
Файл установки Windows 10 в формате ISO.
Шаги:
Шаг 1: Скачайте и установите Parallels Desktop на свой Chromebook.
Шаг 2: Создайте новую виртуальную машину для Windows.
Шаг 3: Выберите файл установки Windows 10 в формате ISO в качестве источника виртуальной машины.
Шаг 4: Следуйте инструкциям на экране для установки Windows.
Этот метод является самым простым способом установки Windows на Chromebook, однако для его использования требуется подписка на Parallels Desktop.
Метод 3: Использование CloudReady от Google
Требования:
-
Chromebook, совместимый с CloudReady.
-
USB-флеш-накопитель с, как минимум, 8 ГБ свободного пространства.
Шаги:
Шаг 1: Скачайте образ установки CloudReady с веб-сайта Google.
Шаг 2: Создайте загрузочный USB-накопитель с CloudReady, используя программу, например, Rufus.
Шаг 3: Загрузите свой Chromebook с USB-накопителя.
Шаг 4: Следуйте инструкциям на экране для установки CloudReady.
Этот метод является хорошим вариантом для пользователей, которые хотят установить легкую версию Windows на свой Chromebook. Тем не менее, CloudReady не имеет всех функций Windows 10.
В целом, лучший метод установки Windows на Chromebook зависит от ваших индивидуальных потребностей и предпочтений. Если вы уверены в своих навыках и готовы к сложным процедурам, вы можете использовать Метод 1 для установки Windows 10 напрямую на свой Chromebook. Если вы предпочитаете более простой вариант, вы можете воспользоваться Методом 2 для установки Windows 10 в виртуальной машине с использованием Parallels Desktop. Если вам нужна легкая версия Windows, вы можете воспользоваться Методом 3 для установки CloudReady.
Лично я использовал все три этих метода для установки Windows на Chromebook. Я обнаружил, что Метод 1 был самым сложным и затратным по времени, но при этом обеспечивал лучшую производительность. Метод 2 был самым простым вариантом, но я заметил, что Windows 10 работала медленнее в виртуальной машине. Метод 3 был хорошим вариантом для установки легкой версии Windows, но я обнаружил, что CloudReady не имел всех функций, которые мне были нужны.
Часть 3. Лучшее бесплатное приложение для Chromebook — WPS Office
WPS Office выделяется современным и мощным набором офисных инструментов, идеально подходящим для пользователей Chromebook. Его интуитивный интерфейс и удобные функции делают его идеальным выбором как для начинающих, так и для опытных профессионалов. В отличие от других офисных программ, WPS Office обеспечивает беспроблемный опыт для пользователей Chromebook на их собственной системе.
Вот несколько преимуществ WPS Office:
-
Бесплатное и с открытым исходным кодом
-
Совместимо с форматами Microsoft Office
-
Доступно для нескольких платформ, включая Chromebook
-
Простой интерфейс и удобные функции
-
Мощные возможности, такие как слияние почты, сводные таблицы и макросы
WPS Office более подходит для пользователей, которые:
-
Нуждаются в бесплатном и открытом офисном пакете
-
Нуждаются в офисном пакете, совместимом с Microsoft Office
-
Нуждаются в офисном пакете, доступном для нескольких платформ, включая Chromebook
-
Нуждаются в офисном пакете, который легко использовать
-
Нуждаются в офисном пакете с мощными функциональными возможностями
По сравнению с Smartsheet, WPS Office является более универсальным офисным пакетом. Smartsheet — это инструмент управления проектами, который также может использоваться для создания и редактирования электронных таблиц. WPS Office лучше подходит для пользователей, которым нужен традиционный офисный пакет, в то время как Smartsheet — для тех, кто ищет инструмент управления проектами.
Я использовал WPS Office на своем Chromebook в течение последнего года, и я был очень впечатлен. Он быстр, надежен и обладает всеми функциями, которые мне нужны. Я особенно ценю тот факт, что он бесплатен и с открытым исходным кодом.
Я определенно рекомендую WPS Office всем, кто ищет бесплатный и мощный офисный пакет для своего Chromebook. Это отличная альтернатива Microsoft Office.
Как скачать и использовать WPS Office на Chromebook
Шаг 1: Откройте Google Play Store на своем Chromebook.
Шаг 2: Введите в поисковую строку «WPS Office» и выберите первый результат.
Шаг 3: Нажмите «Установить».
Шаг 4: После завершения установки, нажмите «Открыть».
После установки WPS Office вы можете использовать его для создания и редактирования документов, электронных таблиц и презентаций. Чтобы открыть файл, коснитесь значка приложения WPS Office, затем выберите тип файла, который вы хотите открыть.
FAQs
1. Возможно ли запускать программы Windows на Chromebook?
Справка: Нет, Chromebook не может запускать программы Windows. Chromebook предназначен для работы под управлением операционной системы Chrome OS от Google, которая является основанной на Linux. Программы Windows не совместимы с операционными системами на основе Linux.
2. Могу ли я вернуться к Chrome OS после установки Windows?
Справка: Да, вы легко можете переключаться между Chrome OS и Windows, перезагружая свой Chromebook и выбирая желаемую операционную систему при запуске.
3. Есть ли потенциальные риски или недостатки, о которых нужно помнить, устанавливая Windows на Chromebook?
Справка: Хотя установка Windows на Chromebook теоретически возможна, важно знать, что этот процесс может аннулировать гарантию устройства и, возможно, вызвать проблемы с производительностью. Кроме того, у некоторых моделей Chromebook могут быть ограничения при работе под управлением Windows, поэтому рекомендуется заранее изучить информацию о совместимости. Всегда создавайте резервные копии ваших данных перед предпринятием значительных изменений в системе.
Резюме
Это исчерпывающее руководство помогает пользователям в установке Windows на Chromebook, предлагая им решение для доступа к приложениям, не поддерживаемым Chrome OS. Оно описывает три метода, начиная от использования USB-флешки до использования CloudReady от Google, каждый с подробными пошаговыми инструкциями и личными советами. Кроме того, в статье подчеркивается растущая популярность Chromebook, учитывая общую потребность в совместимости с Windows. Особое внимание уделяется представлению WPS Office, универсального и удобного офисного инструмента для пользователей Chromebook, который отмечается за свою простоту и удобство. Руководство предоставляет ссылки и инструкции пользователям о том, как эффективно скачать и использовать WPS Office на их Chromebook.
Installing Windows on a Chromebook can unlock advanced software capabilities and provide a traditional desktop experience. However, it requires some technical steps because Chromebooks are optimized for Chrome OS. This guide will take you through all the detailed steps, and methods when attempting to install Windows 10 or 11 on a Chromebook.
Pre-requisites:
- Compatibility: Please ensure that your Chromebook supports the developer mode.
- Hardware Requirement: Also, ensure that your system has the following specifications:
- Processor: Intel-based CPUs
- Storage: 64GB
- RAM: 8GB
- Windows 10 ISO File: You may download it from the Windows official website
- USB Flash Drive: FAT 32 with 16GB storage
- External Hardware: Mouse and a Keyboard
- Required Software:
- Rufus (preferably)
- Drivers specific
How to Install Windows 10 on Chromebook with USB
Below, we have segregated a simple way to get Windows 10 or 11 using a USB drive. Following are the 6 basic steps:
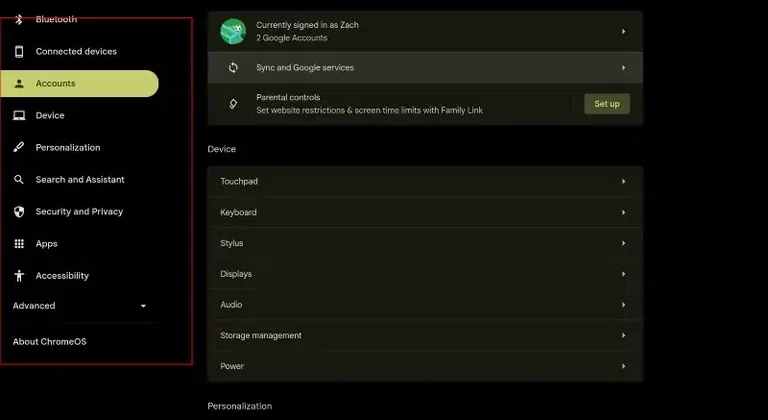
Step 1: Backup Your Data
Before you proceed with the Windows Installation, ensure to back up your data first. As you move into the Developer Mode, all your data will be wiped out.
Step 2: Enable Developer Mode
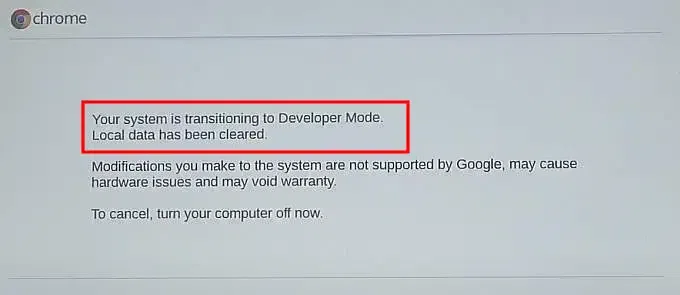
- Enter the Recovery Mode.
- Press Esc + Refresh + Power
- Now, your laptop will enter the recovery mode
- Enable Developer Mode.
- Press Ctrl+D and proceed ahead
- You may be asked with a few action, follow them
- Now, your Chromebook will erase all its local data
- Disable OS Verification
- Your Chromebook will reboot now
- Press Ctrl+D when prompted to disable OS verification
Step 3: Install a UEFI Firmware
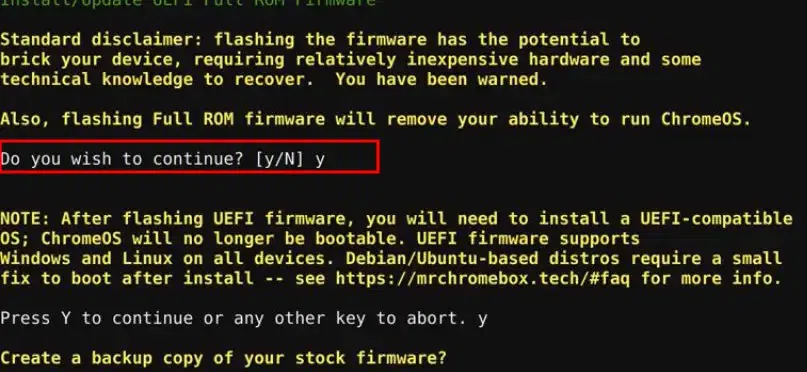
Since Chromebook does not officially supports Windows so we need to replace the system’s firmware with the supporting one.
- Download and Install Chromebox’s UEFI Firmware:
- Open Terminal in Developer Mode
- Type the following command and choose the FULL ROM Firmware option:
curl -LO https://mrchromebox.tech/firmware-util.sh && sudo bash firmware-util.sh
- Do note that you need to keep a copy of your original Firmware which you may require in future.
Step 4: Create a Bootable Windows 10 USB
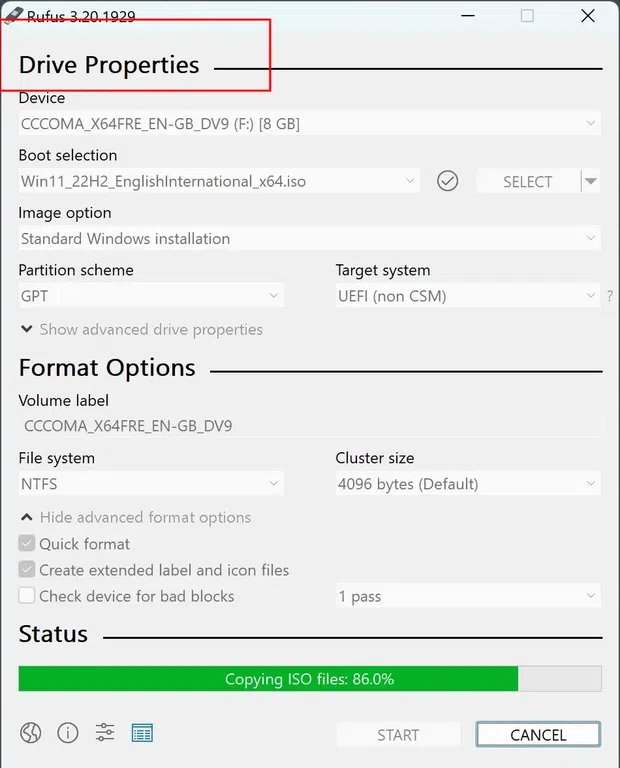
- Insert USB drive in your system
- Use Rufus
- Open Rufus and choose Windows 10 ISO
- Create the bootable USB after choosing the partition scheme
- Now, plug the USB in your Chromebook
Step 5: Boot Chromebook from USB
- Turn off Chromebook
- Insert the bootable Windows USB
- Access the boot menu
- Hit the Esc button multiple times while start up
- This will allow your Chromebook to enter the boot mode
- Choose the USB drive as the BOOT DEVICE
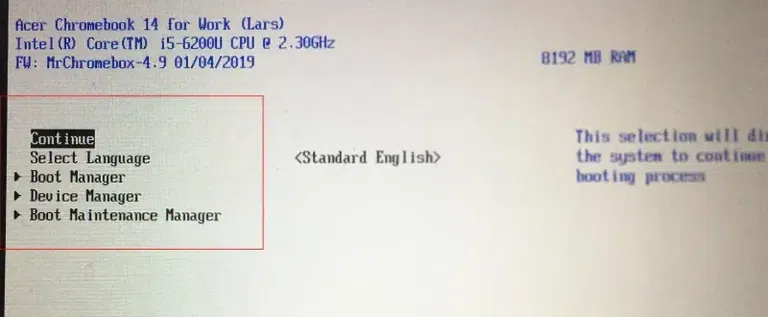
Step 6: Install Windows 10
- Follow the Windows installation Wizard
- Format your SSD to install Windows 10
- Finish the installation process
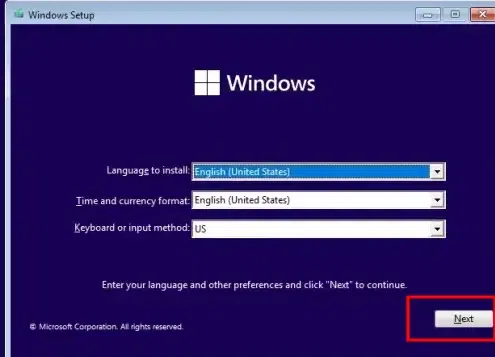
Note: Once the installation gets completed, Windows driver such as touchpad, sound drivers, Wi-Fi, etc. may not work without installing additional drivers. You can download it from the online resource and reboot your system.
How to Install Windows 10 on Chromebook without USB
Now let’s dive in to learn about installing Windows 10 and Windows 11 without using any USB drive.
Step 1: Linux Beta Option
Open Chromebook Settings & go for the Linux Beta option. Under that, click on the Turn On option.

Step 2: Go to Recommended Space
Now, go for the Recommended Space which is 5 GB & click on Next.
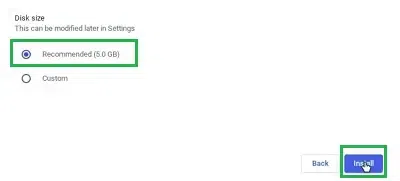
Step 3: Execute the command to Finish the Installation
Now, the Linux Terminal will be opened on the Chromebook as the process is completed. You have to execute the following command to make the Chromebook ready for installation.
sudo apt update

Step 4: Visit the Official site for Windows Installation
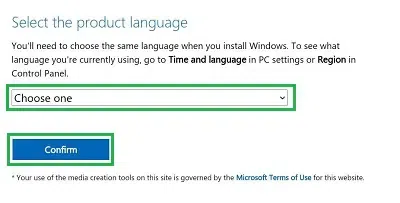
Now, Browse to the Official Page of Windows & select the Edition of Windows 10. Click on Confirm to continue in the process.
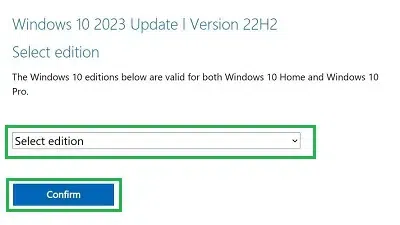
Now, select the Product Language & click on Confirm to continue.
Step 5: Choose the compatible version
You may be asked to choose the compatible version for your system. Now, click over 64-bit Edition to download the Windows ISO File.
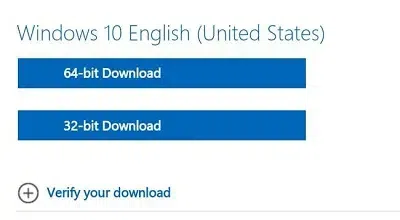
Once the file is downloaded, open the Chromebook File Application. The ISO File will be downloaded in the Download Folder. Move the File to the Linux Beta Folder.
Step 6: Open App Drawer
Now open the App Drawer on your Chromebook. Now, under the Linux Apps, click on the Chromebook Virtual Machine which is only dedicated & available on Chromebooks.
Click on the Browse option & select the ISO File. Now, click on the Forward.
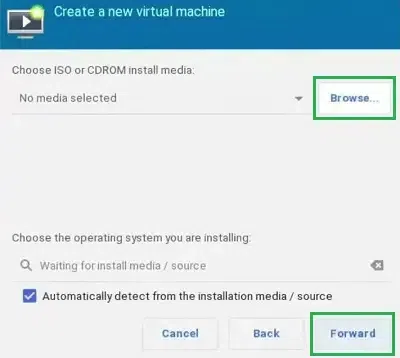
Step 7: Select the ISO file
Now, click on the ISO Image option & click Forward.
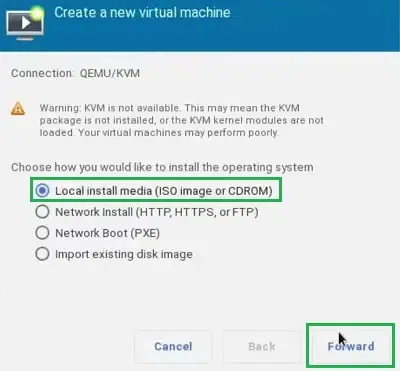
Step 8: Adjust Disk Size
After that, increase the Disk Size to a minimum of 40 GB to hold the Windows 10 OS. Now, click on the Forward option.
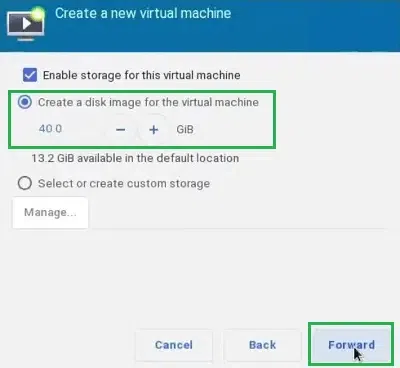
Step 9: Finish the download
At last, click on the Finish & the Windows OS will start execution.
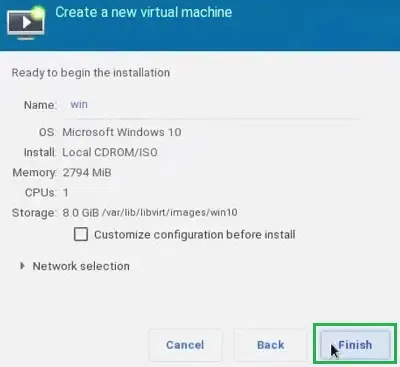
Alternate Methods — Install Windows 10 on Chromebook
You may also try for alternate methods to get Windows 10 or 11 if you find it difficulty or looking out for additional methods to download and install Windows in your Chromebook.
1. Using Network Boot (PXE)
Not all Chromebook supports Network Boot so make sure tat you can proceed with this method. Below are the quick steps to perform Windows Boot Installation:
Step 1: Enter Developer Mode
- Press Esc + Refresh + Power keys simultaneously
- This will allow your system to enter the Developer mode

Step 2: Setup PXE Boot
- Connect your Chromebook to a network server configured for Windows Installation

Step 3: Install Windows
- Now, simply follow the provided instructions on your screen
- Reboot your system to install and setup Windows in your Chromebook

2. Using Third Party Tools
You can also choose any third party tool to get Windows on your Chromebook.
Step 1: Windows ISO File
- Go to Windows official website to download the ISO file
- Now, upload the ISO file to any cloud storage (such as Drive, icloud, etc.)
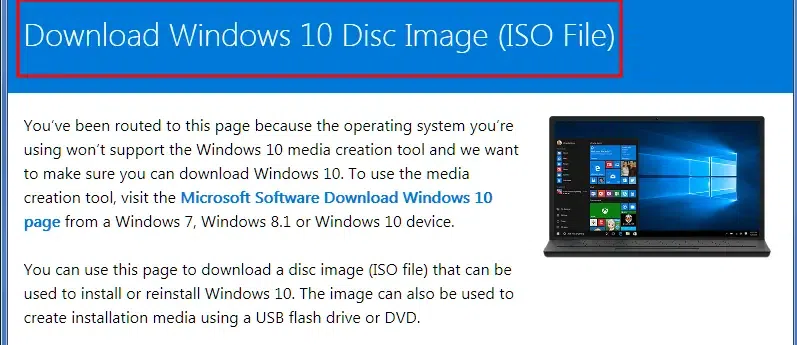
Step 2: Install Tools
- Now, install any tool in your system to to perform a safe Windows 10 installation
- Tools like VirtualBox or GalliumOS can be used in the Linux Beta Environment
Step 3: Patch Files
- Now, access the uploaded ISO file from the cloud
- Patch it through the VirtualBox to setup Windows 10 installation.
- This will allow your system to Install Windows on Chromebook with cloud.
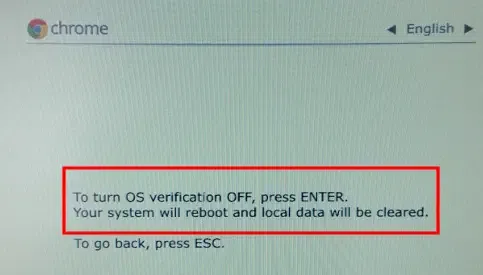
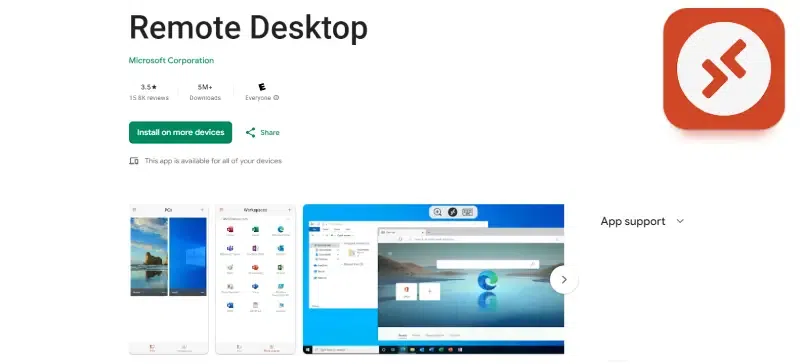
3. Using Remote Desktop Client on Chromebook
You can also go with the remote desktop mode for installing Windows 10 or 11 or your Chromebook. Here’s how to perform:
Step 1: Setup Compatible Software
- Install and setup the RDP software
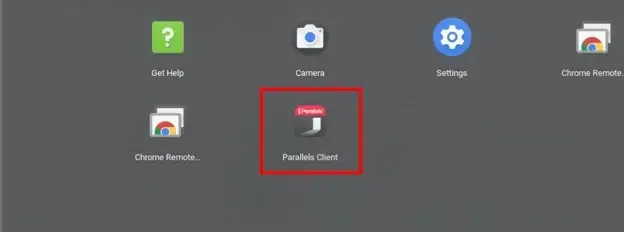
Step 2: Connect it with your PC
- Simply connect your PC or Virtual Windows Server
In the end, we can conclude that the Installation of Windows on a Chromebook is not a big deal. If you have followed all the above steps, the Windows Installation Process will become a breeze for you. So, without waiting any longer, use the above steps & Get New Windows 10 along with ChromeOS on your Chromebook.
Points to Consider Before You Switch
- Installing Windows 10 on your Chromebook might void your current Warranty so make sure to take that decision carefully.
- As you’re aware of the fact that ChromeOS is a light-weight whereas Windows OS is a bit heavy so installing Windows 10 on your Chromebook might affect your system’s health and performance.
- Google Chromebooks are loaded wit ARM processor mostly so there are chances that your installation might failed and you might get compatibility issue.
- Even if you supass all the hurdles, the chances are likely that you mgit face issue with your hardware/drivers which has been encountered in such cases.
A Warning before Installing Windows 10 on ChromeBook
Chromebooks are designed to be used with the Chrome OS, and as such, installing Windows on a Chromebook is not recommended. While it is possible to do so, there are a number of potential issues that you may encounter, including:
-Incompatible hardware: Chromebooks use a different type of hardware than traditional laptops, and as such, some hardware components may not be compatible with Windows. This could lead to reduced performance or even hardware damage.
-Lack of support: Since Chromebooks are not designed for use with Windows, you will likely not be able to get any support from the manufacturer if you encounter any problems.
-Increased security risks: By installing Windows on a Chromebook, you are opening yourself up to all of the security risks that come with using Windows. This includes viruses, malware, and other malicious software.
If you still decide to install Windows on your Chromebook, there are a few things you should keep in mind.
- First, make sure that you have a backup of your Chrome OS device. This will allow you to revert back to Chrome OS if you encounter any problems.
- Second, be sure to install all of the latest drivers for your Chromebook. This will help to ensure that your hardware is compatible with Windows.
- Finally, make sure to install a good antivirus program to protect your device from security threats.
Can I Put Windows 10 on a Chromebook?
No, you cannot install Windows 10 on a Chromebook. Chromebooks are designed to run Google’s Chrome OS, which is a different operating system than Windows 10. so any attempt to install Windows 10 on a Chromebook would likely result in the Chromebook becoming unusable.
But there are some methods that allow you to run Windows 10 on a Chromebook, such as using a virtual machine or installing the Windows 10 operating system on a separate partition. however, these methods are not recommended as they can void your Chromebook’s warranty and cause other problems. If you insist on running Windows 10 on your Chromebook, be sure to back up your Chromebook first as you may lose all of your data during the process.
What Are The Requirements for Installing Windows on Chromebook?
There are a few things you’ll need in order to install Windows on your Chromebook:
- – A Windows 10 or Windows 11 ISO file
- – A 4GB or larger USB drive
- – A Chromebook that supports booting from USB
- – A Chromebook with a powerful Intel Core i3, i5, or i7 CPU.
[Tutorial]How to Install Windows 10 on Chromebook 11 without USB
Installing Windows 10 on a Chromebook is possible, but it’s not as simple as installing the operating system on a traditional computer. Chromebooks use a different type of architecture than traditional computers, so you’ll need to follow a few extra steps to get Windows 10 up and running.
Here’s a step-by-step guide to installing Windows 10 on a Chromebook:
Part 1. Flash the Chromebook BIOS
Before attempting to install Windows 10 on a Chromebook, you will need to flash the Chromebook BIOS with a custom firmware that allows you to boot from a USB drive. This process, also known as «replacing the BIOS» or «installing a custom BIOS,» involves modifying the firmware on your Chromebook, which can be risky and may void your warranty.
- Step 1. Enable Developer Mode onyour Chromebook by pressing Esc + Refresh + Power.
- Step 2. Open a terminal window by pressing «Ctrl + Alt + T» and enter the command «shell» to enter the shell prompt.
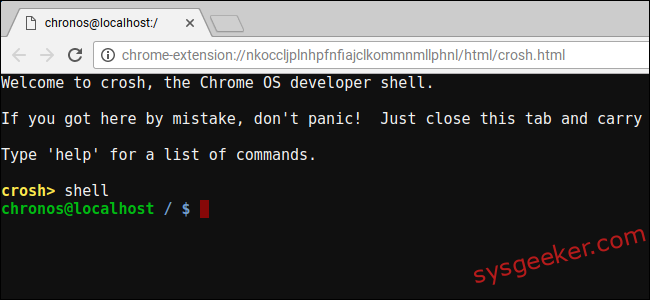
- Step 3. Now, start to download and install the Chromebook firmware utility called «MrChromebox» by entering following command.
cd;curl -LO -k https://mrchromebox.tech/firmware-util.sh && sudo bash firmware-util.sh
- Step 4. Select the «Custom coreboot Firmware (Full ROM)» option in the list by typing «3» and pressing «Enter«.
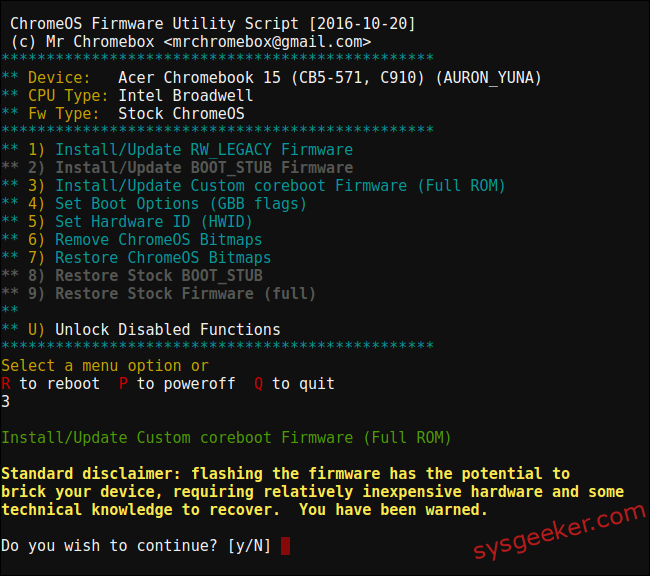
- Step 5. Agree to flash the firmware by typing «Y» and then by «U» to install the UEFI firmware. If you’re running Windows, don’t select the «Legacy» option.
- Step 6. Follow the prompts to download and flash the custom firmware onto your Chromebook.
Part 2. Create a Windows 10 Bootable USB Installer
Once you have flashed the Chromebook BIOS, you can then proceed to install Windows 10 on your Chromebook by creating a bootable USB drive with the WonderISO tool and booting from it on your Chromebook.
Step 1. Download the Windows 10 ISO file.
The first step is to download the Windows 10 ISO file from Microsoft. You can do this by visiting the Microsoft website and selecting the «Download» button.
Step 2. Create a bootable USB drive using the ISO file.
Next, you’ll need to create a bootable USB drive using the ISO file. This can be done using a tool like WonderISO. It is a powerful ISO image file processing software that allows you to create, edit, extract, and burn ISO image files. It is designed to make it easy to handle your ISO image files.
Free DownloadFree Download
Just download and install WonderISO tool on your another working Windows or Mac computer, and select «BURN» button.
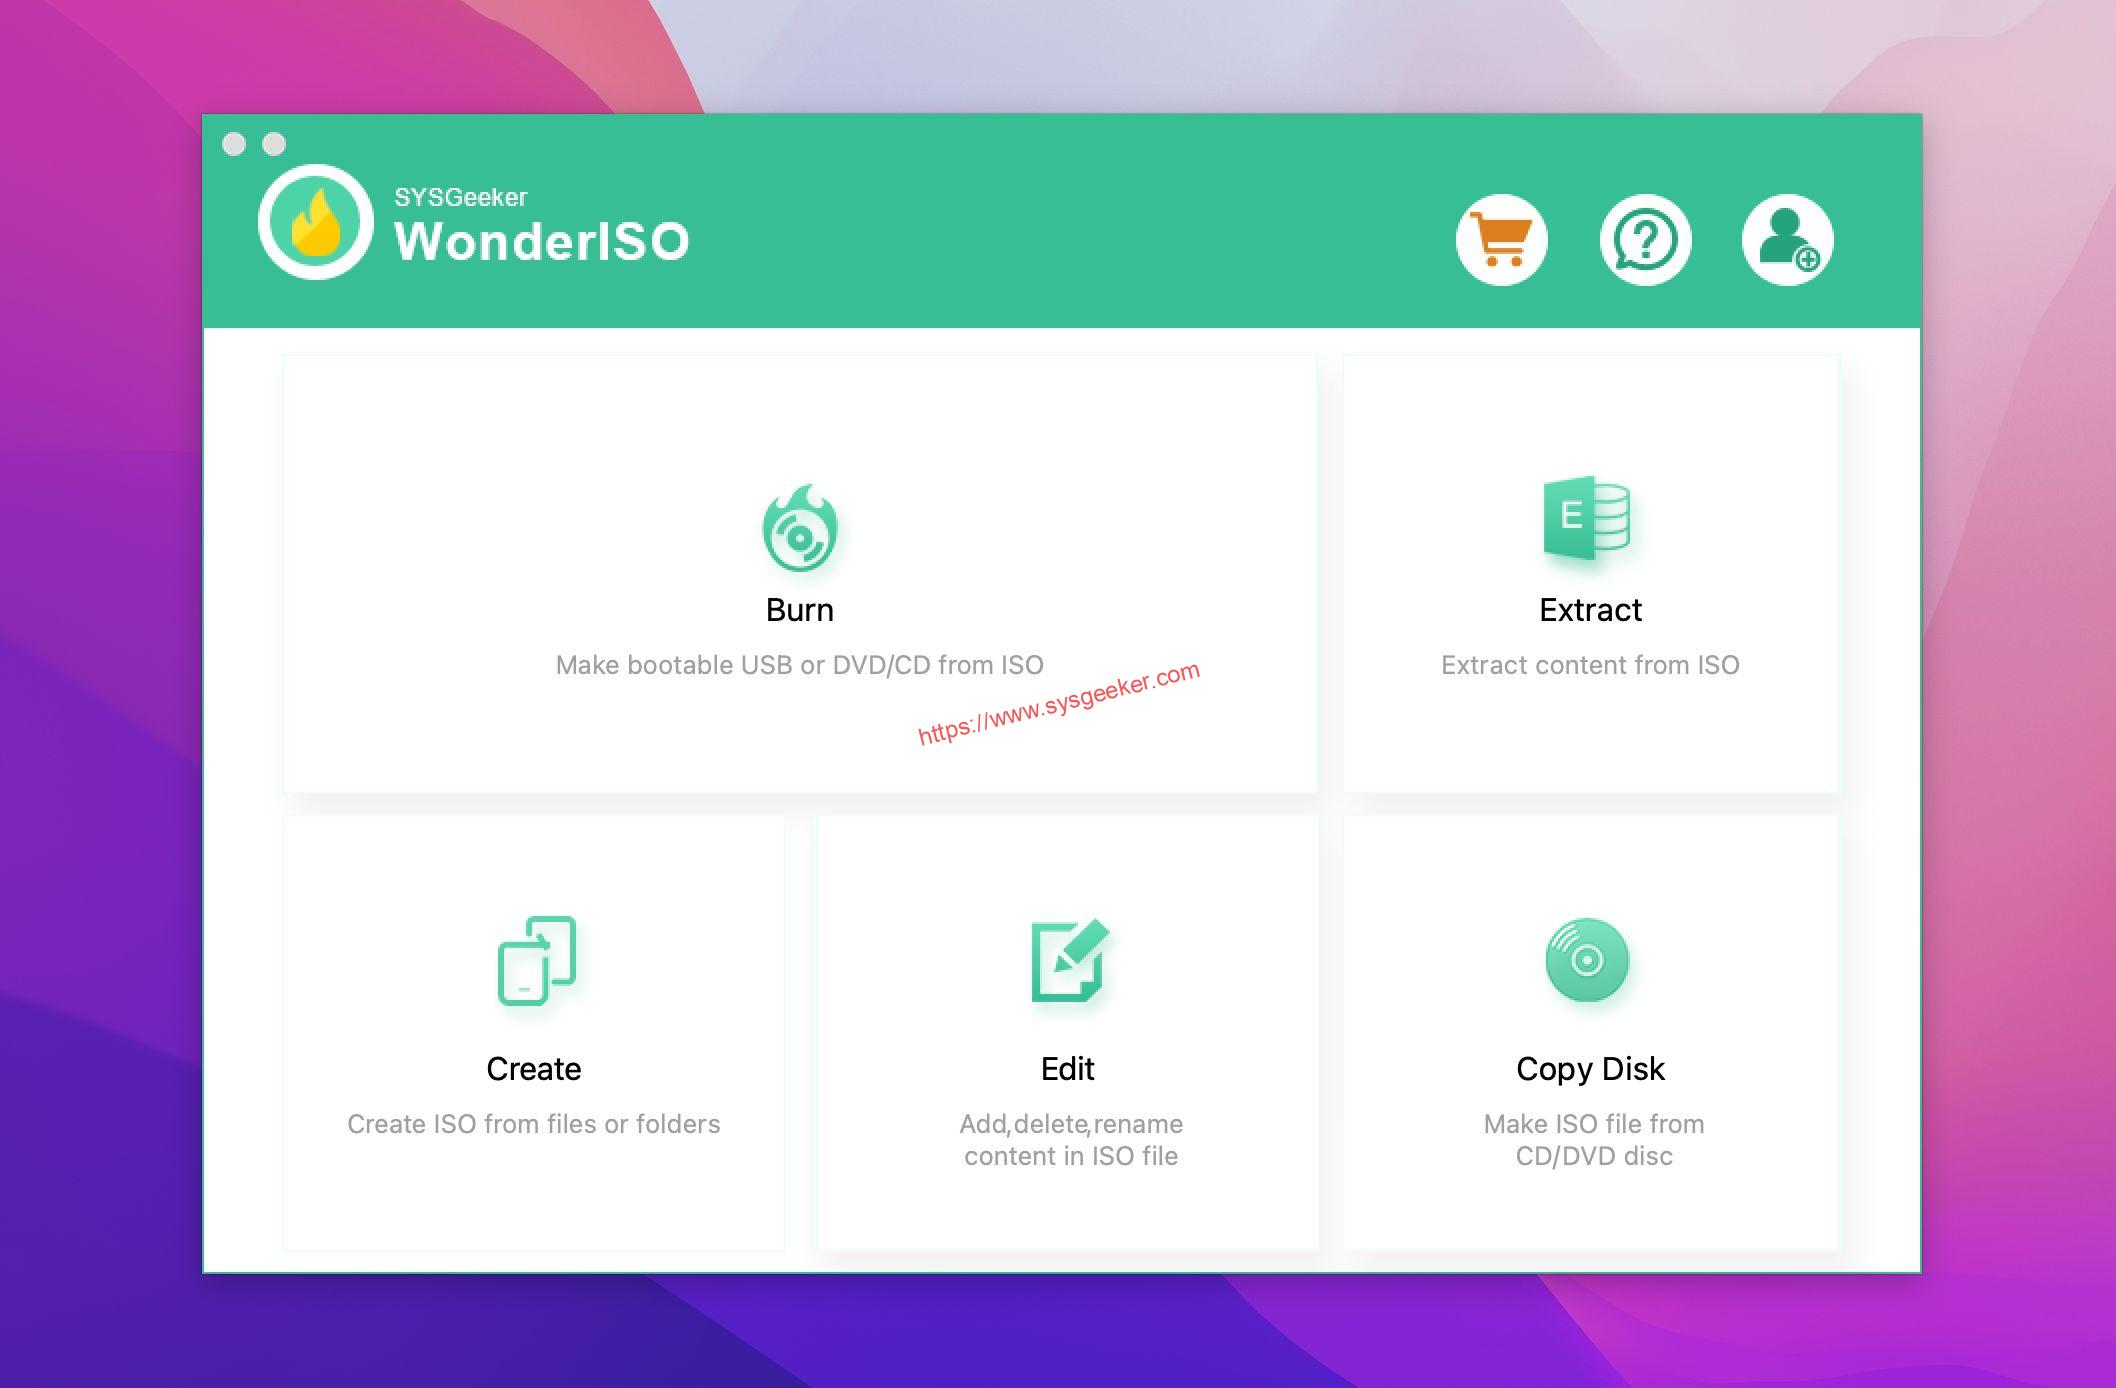
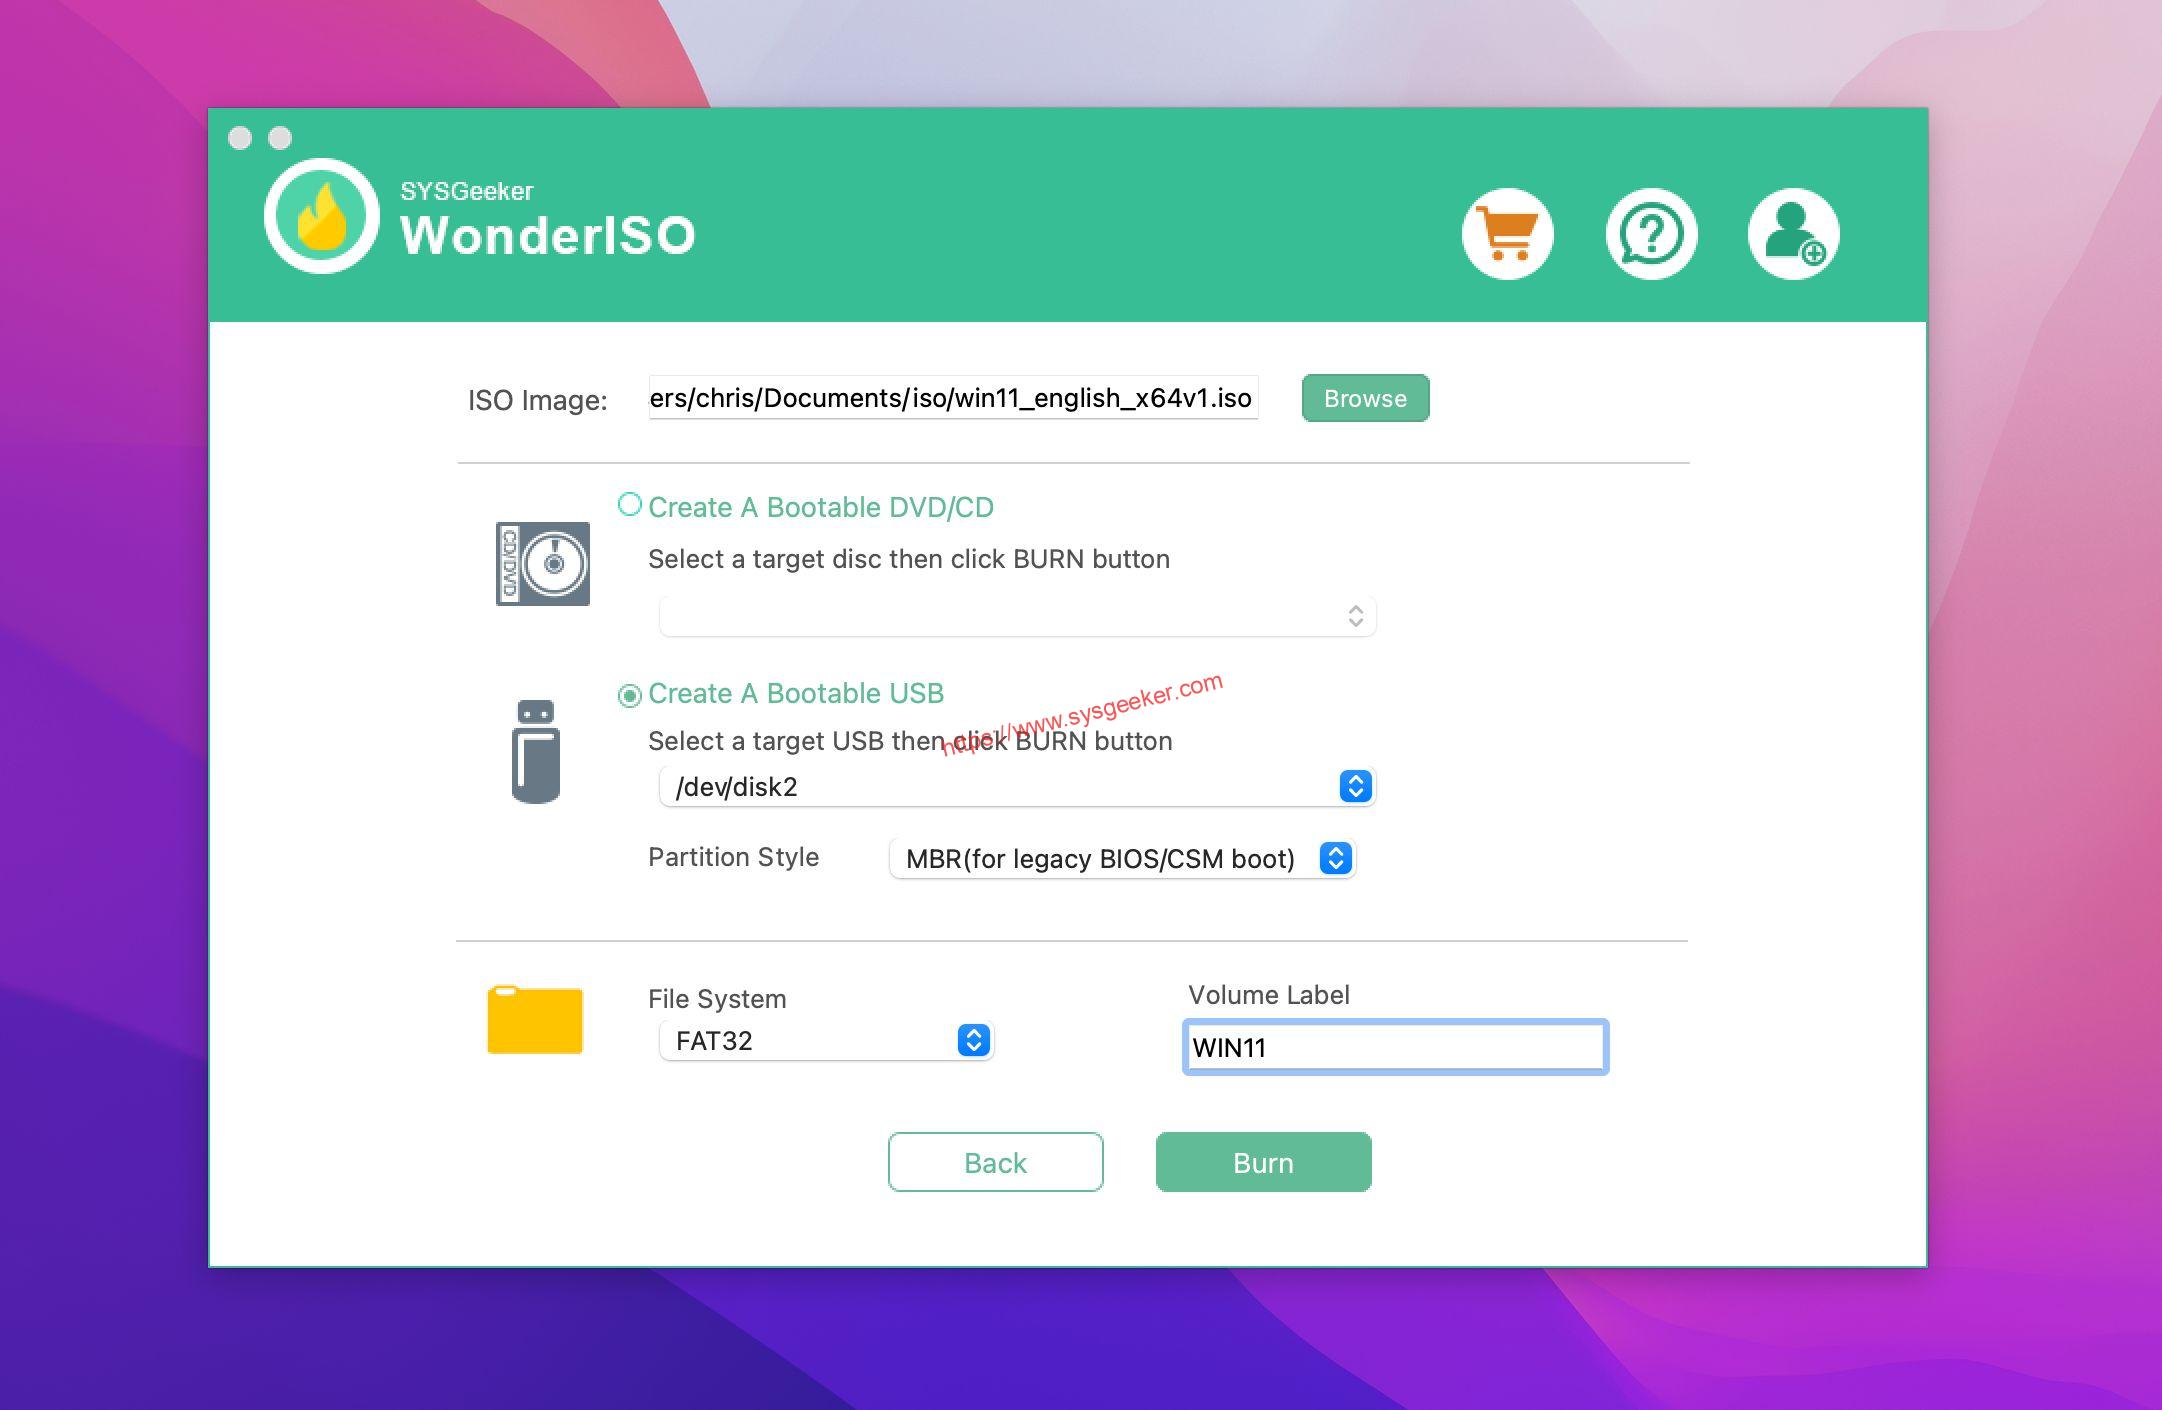
In the next window, click «Browse» button to import your Windows 10 or Windows 11 ISO file, and connect your USB drive to computer. Click «Burn» button to start make your windows bootable USB installer.
Free DownloadFree Download
Once you’ve created the bootable USB drive, insert it into your Chromebook.
Step 3. Enable Developer Mode on your Chromebook.
Developer Mode is a special mode that allows you to make changes to your Chromebook that are normally not allowed. In order to install Windows 10, you’ll need to enable Developer Mode.
To do this, press and hold the Esc + Refresh keys, then press the power button. This will reboot your Chromebook into Developer Mode.
4. Boot from the USB drive.
Once you’ve enabled Developer Mode, you can boot from the USB drive. To do this, press and hold the Esc + Refresh keys, then press the power button. This will reboot your Chromebook into the boot menu. From here, select the option to boot from the USB drive.
5. Follow the prompts to install Windows 10.
Once you’ve booted from the USB drive, you’ll be prompted to install Windows 10. Follow the prompts to complete the installation.
7. Reboot your Chromebook.
Once you’ve installed the Chrome OS recovery image, you can reboot your Chromebook. To do this, press and hold the Esc + Refresh keys, then press the power button. This will reboot your Chromebook into Chrome OS.
That’s it! You’ve now successfully installed Windows 10 on your Chromebook.
Is Windows safer than Chrome OS?
There is no simple answer to this question as it depends on a number of factors. However, in general, Windows is considered to be more secure than Chrome OS. This is because Windows has been around for longer and has had more time to develop its security features.
Additionally, Windows is a more popular operating system, which means that there are more people working on security for Windows than for Chrome OS. That said, Chrome OS has been gaining ground in recent years, and its security features have been improving. Additionally, Chrome OS is based on Linux, which is a very secure operating system. So, while Windows is generally considered to be more secure than Chrome OS, both operating systems are fairly secure and offer a good level of protection for users.
Conclusion:
Installing Windows 10 on a Chromebook is possible, but it’s not as simple as installing the operating system on a traditional computer. Chromebooks use a different type of architecture than traditional computers, so you’ll need to follow a few extra steps to get Windows 10 up and running. Additionally, there are a few potential risks associated with running Windows on a Chromebook, such as incompatible hardware, lack of support, and increased security risks. So, if you still decide to install Windows on your Chromebook, be sure to back up your Chromebook first and install all of the latest drivers.
FAQs
Q1. Can Chromebook run Windows programs?
No, Chromebooks cannot run Windows programs. Chromebooks are designed to run Google’s Chrome OS, which is a Linux-based operating system. Windows programs are not compatible with Linux-based operating systems.
Q2. How do I upgrade my Chromebook to Windows 10
Chromebooks are not able to be upgraded to Windows 10, as they use a different operating system. However, there are a few options for running Windows 10 on a Chromebook. One is to use a virtual machine, which will allow you to run Windows 10 within the Chrome OS. Another option is to install Windows 10 using the Chrome OS Developer Mode, which will give you a dual-boot system. Finally, you can also purchase a Windows 10-compatible Chromebook, which will come with Windows 10 pre-installed.
Q3. Can you change a Chromebook to Linux?
Yes, you can change a Chromebook to Linux, but there are a few things to keep in mind before doing so. First, Chromebooks are designed to run Chrome OS, so you may not have all the features and functionality you’re used to with Linux. Second, you’ll need to be comfortable with the command line interface, as that’s how you’ll be interacting with the Chromebook once it’s running Linux. Finally, you’ll need to be able to backup and restore your Chromebook, as the process of changing to Linux will erase all your data.
Q4. Can a Chromebook replace a laptop?
A Chromebook can replace a laptop for certain users, but not all. Chromebooks are designed to be used with an internet connection, and are not as powerful as laptops. They are, however, more portable and have a longer battery life. Chromebooks are also cheaper than laptops, so they may be a good option for users who do not need the full power of a laptop.
Q5. Is there a Windows emulator for chromebook?
No, there is no Windows emulator for Chromebook. However, there are a few options that allow you to run Windows applications on a Chromebook. One option is to use a remote desktop application, which will allow you to access a Windows computer from your Chromebook. Another option is to use an application that allows you to run Windows applications in a virtual environment.
Q6. Can you change a Chromebook to Linux?
Chromebooks are designed to be used with the Chrome OS operating system. However, it is possible to change a Chromebook to Linux. This can be done by using the Crosh shell and the Developer Mode.
The Crosh shell is a command line interface that can be used to troubleshoot and modify settings on a Chromebook. The Developer Mode is a special mode that allows for more control over the Chromebook. It is possible to install Linux using the Developer Mode.
There are a few things to keep in mind when changing a Chromebook to Linux. First, the Chromebook will need to be in Developer Mode. This can void the warranty. Second, Linux is not as stable as Chrome OS. This means that there may be more crashes and bugs. Third, not all Chrome OS features will work with Linux.
Overall, changing a Chromebook to Linux is possible but it is not recommended for most users. It is best to stick with the Chrome OS operating system.
If you’ve got a Chromebook and are itching to run Windows on it, you’re in luck. Although Chromebooks are designed to run Chrome OS, with a bit of patience and the right steps, you can install Windows. You’ll need a few tools and some technical know-how, but once set up, you’ll be able to switch between the two operating systems. This article will guide you through the process, ensuring you have Windows running smoothly on your Chromebook.
Installing Windows on your Chromebook involves replacing the default operating system with Windows. This guide will walk you through the process, step by step, setting you up to use Windows applications on your Chromebook.
Step 1: Backup Your Data
Before diving in, ensure you have a backup of all your essential files.
Backing up your data is crucial because installing Windows will erase everything on your Chromebook. Use Google Drive or an external hard drive to save your important files.
Step 2: Enable Developer Mode
Turn on Developer Mode to allow installation of other operating systems.
Developer Mode opens up the Chromebook to a whole new world of possibilities but be warned, it will also erase all data, so double-check your backups.
Step 3: Download a Windows ISO
Get a Windows ISO file from the official Microsoft website.
An ISO file is simply a digital copy of a physical CD or DVD and is necessary for installing Windows. Make sure to get the right version for your needs.
Step 4: Create a Bootable USB Drive
Use a tool like Rufus to copy the Windows ISO onto a USB drive.
Creating a bootable USB drive is essential as it will be used to install Windows on your Chromebook. Rufus simplifies this process, making it almost as easy as pie.
Step 5: Boot from the USB Drive
Insert the USB into your Chromebook and restart it, booting from the USB drive.
This involves entering the boot menu on your Chromebook, selecting the USB drive, and starting the Windows installation process.
After completing these steps, your Chromebook will start up with Windows instead of Chrome OS. The installation might take a while, so grab a coffee and sit tight. Once done, you can enjoy the versatility of having two operating systems on your device.
Tips for Installing Windows on Chromebook
- Always ensure your data is backed up to prevent loss during installation.
- Check your Chromebook model’s compatibility with Windows before proceeding.
- Keep your Chromebook charged or plugged in during the installation to avoid interruptions.
- Have a reliable internet connection for downloading necessary files.
- Be patient, as the installation process can take some time.
Frequently Asked Questions
Can I switch back to Chrome OS after installing Windows?
Yes, but you’ll need to reinstall Chrome OS, which will erase Windows and any data on the device.
Will installing Windows void my Chromebook’s warranty?
It might, as altering the system’s software can sometimes void warranties. Check with your manufacturer.
Is it safe to enable Developer Mode?
Developer Mode is generally safe, but it does make your device more vulnerable if not handled with care.
Can all Chromebooks run Windows?
Not all Chromebooks can run Windows smoothly. Check the hardware specifications of your device first.
Do I need a Windows license key?
Yes, you’ll need a valid Windows license key to activate Windows after installation.
Summary
- Backup your data.
- Enable Developer Mode.
- Download a Windows ISO.
- Create a bootable USB drive.
- Boot from the USB drive.
Conclusion
Congratulations! You’ve taken the leap and installed Windows on your Chromebook. While Chromebooks are designed for simplicity and security with Chrome OS, installing Windows brings a whole new level of versatility to your device. Whether it’s for software compatibility, gaming, or simply the familiarity of Windows, you’ve now got the best of both worlds.
Remember, with great power comes great responsibility. Keep your system updated and secure, and continue exploring the endless possibilities that come with having Windows on your Chromebook. If you encounter any issues, don’t hesitate to seek help from online communities or forums. They are often filled with individuals who have gone through similar processes and can provide valuable insights.
Now that your Chromebook can run Windows, you can enjoy a more robust computing experience. Consider exploring applications exclusive to Windows and see how they enhance your productivity or leisure activities. If you want to delve deeper, numerous resources can guide you in optimizing your dual-boot setup. Enjoy your new setup, and may it serve you well in all your digital endeavors!
Kermit Matthews is a freelance writer based in Philadelphia, Pennsylvania with more than a decade of experience writing technology guides. He has a Bachelor’s and Master’s degree in Computer Science and has spent much of his professional career in IT management.
He specializes in writing content about iPhones, Android devices, Microsoft Office, and many other popular applications and devices.
Read his full bio here.
quick Answer
- Installation with USB: Create a bootable USB drive, enable Developer Mode, disable hardware write protection, flash firmware, and boot from the USB to install Windows 11.
- Installation without USB: Enable Developer Mode, activate Linux, install VirtualBox, download Windows 11 ISO, and create a virtual machine to install Windows 11.
Do you want to install Windows 11 on your Chromebook but don’t have a USB drive? No problem! This guide with show you an easy step-by-step process to install Windows 11 on a Chromebook without USB. Additionally, we’ll also see how to install it using a USB drive for those who have one available.
Disclaimer: Installing Windows 11 on a Chromebook may void your device’s warranty and could lead to potential data loss or hardware issues. We highly recommend you back up all essential data before proceeding. We at Droid Thunder will take no responsibility for any damages or issues. By following these instructions, you agree to proceed at your own risk.
Method 1: Install Windows 11 on Chromebook without USB
To get Windows 11 on your Chromebook without USB, we’ll use a virtual machine, thus bypassing the need for a USB drive. First, let’s go over the things you need to do to ensure that your Chromebook is ready for a smooth installation process.
What You’ll Need
- A compatible Chromebook: Not all models support Windows.
- A stable Internet connection: Needed to download files and drivers.
- Power Supply: Charge your Chromebook to avoid interruptions during installation.
- Backup Data: Save important data because the installation can cause data loss.
- Check Storage Space: Ensure your Chromebook has at least 64GB of free space.
- Chromebook should support KVM (Kernel-based Virtual Machine).
Related: Install Chrome OS and Dual Boot with Windows
Step-by-Step Installation Guide
Ready to flash Windows OS on your Chromebook? Follow along as we walk you through the process, step by step.
Step 1. Enable Developer Mode
- Turn off your Chromebook.
- Press and hold the Esc + Refresh + Power shortcut keys to reboot into recovery mode.
- A message saying ‘Chrome OS is missing or damaged. Please insert a recovery USB stick SD card’ will appear.
- Press Ctrl + D to enable Developer Mode. Press Enter to confirm.
Step 2. Install Linux Environment
- Open Chromebook Settings.
- On the left side menu, click on Advanced and select Developers.
- Under Developers, find and turn on the Linux Development Environment.
Note: If you do not see the Linux option, it might be because your device does not support Linux apps.
- Click Next to start the Linux Development Environment setup.
- On the next screen, write a Username and set the disk size to 10 GB.
- Tap Install to start the Linux installation process.
- Upon completion, the Linux Terminal window will open on your screen.
- Now, type the following command in the Terminal window and hit Enter.
sudo apt-get update && sudo apt-get install virtualbox -y
- This command will update your package list and install VirtualBox on your Chromebook.
Step 3: Download Windows 11 ISO
- Go to the official Microsoft Windows 11 ISO download page.
- Select the edition of Windows 11 you wish to install and confirm your choice.
- Choose the language and confirm it.
- Click the download link for the Windows 11 ISO file and save it to a known location in your Linux files.
Note: Make sure to move the downloaded ISO file to the Linux Files directory.
Step 4: Set Up Windows 11 in VirtualBox
- Open VirtualBox from your Linux apps.
- Click New to create a new virtual machine.
- Name your VM as Windows 11.
- Select Microsoft Windows for the type and Windows 11 for the version.
- Allocate RAM and CPU cores. Aim for at least 4GB (4096 MB) if your Chromebook can handle it without affecting performance.
- When asked for a hard disk, select Create a virtual hard disk now and follow the prompts to allocate disk space.
- Choose Create a virtual hard disk now.
- Click Next and select the recommended file type (VDI).
- Choose Dynamically Allocated.
- Set the size of the virtual hard disk (60 GB or more recommended).
- Click Create.
- Select your new virtual machine and click Settings.
- Go to the Storage section, click on the empty optical drive icon under Controller: IDE, and then click on the disk icon on the right to choose a disk file.
- Select the Windows 11 ISO file you downloaded earlier.
- Click OK to close the settings.
Related: Install Chrome OS Flex on Windows and Mac
Step 5: Install Windows 11 on Chromebook
- Start the Virtual Machine.
- Click Start to boot up the virtual machine, which will launch the Windows 11 installation process.
- Choose your language, time, and keyboard preferences, then click Next.
- Click Install now.
- If prompted, enter your Windows product key, or choose ‘I don’t have a product key’ to proceed.
- Select the version of Windows 11 you wish to install and accept the license terms.
- Choose Custom: Install Windows only (advanced) for the type of installation.
- Complete the rest of the Windows 11 installation.
Step 6: Configure Windows 11
Once the installation is complete, you can configure Windows 11 settings such as region, keyboard layout, and account setup.
With this guide, you’ve successfully installed Windows 11 on your Chromebook without a USB drive. This installation through VirtualBox offers a versatile way to get Windows applications running on your device while retaining Chrome OS functionality. Enjoy exploring Windows on your Chromebook!
Method 2: Install Windows 11 on Chromebook with USB
To run Windows 11 on your Chromebook with USB, we’ll use a bootable USB drive, which provides a straightforward and reliable method for installation. First, let’s go over the necessary steps to prepare your Chromebook and create a bootable USB drive for a smooth installation process.
What You’ll Need
- A Powerful Chromebook with an Intel or AMD x86-based processor.
- A USB drive with at least 16GB of storage.
- Stable Internet Connection
- A second computer with Windows to create a bootable USB.
- A Windows 11 installation ISO file.
- Rufus or a similar tool for creating a bootable USB
Step-by-Step Installation Guide
Step 1. Enable Developer Mode
- Power off your Chromebook.
- Press Esc + Refresh + Power to enter Recovery Mode.
- Press Ctrl + D to turn on Developer Mode.
- Press Enter and wait for the system to reboot.
Step 2. Create a Bootable USB for Windows 11
- Download the Windows 11 ISO file.
- Create a bootable Windows 11 USB drive using Rufus.
Step 3. Configure Chromebook for Boot from USB
- Turn off your Chromebook.
- Press Esc + Refresh + Power to enter Recovery Mode.
- Press Ctrl + D to skip the OS verification.
- Press Ctrl + L to enter the BIOS setup.
- Change the boot order to prioritize the USB drive.
Step 4. Install Windows 11 on Chromebook with Bootable USB
With your Chromebook configured and the bootable USB ready, it is time to install Windows 11.
- Insert the USB drive into your Chromebook.
- Turn on the Chromebook and press any key when prompted to boot from USB.
- Follow the on-screen instructions to install Windows 11.
Bottom Line
Finally! This is how you can flash the Windows 11 Operating System on a Chromebook without USB and with USB. This process can give you access to various apps and features.
If you are stuck during installation, if your USB is not recognized, or if you are missing some drivers, then please comment below. We’re here to help you out.
