
Table of Contents
- Microsoft Windows Installation Guide
- External links
- Where to get Windows?
- Wine
- Windows version highlights
- Windows versions 1.0-3.11
- Microsoft Windows 95+
- Guides to installing Windows
While DOSBox-X, as the name implies primarily targets DOS applications and games, early Windows versions where in fact little more than glorified DOS applications, and as such can also be run.
From Windows 1.0 up to Windows 3.11, you can typically run Windows directly from the integrated DOS provided by DOSBox-X.
Instructions can be found below for the different major versions.
Later Windows 95, 98 and ME however require that you run the underlying DOS they came with, and as such instead of using the integrated emulated DOS that DOSBox-X provides, you will need to boot them inside DOSBox-X.
Again, instructions are provided below.
Wine
If you’re running Linux on an x86 or x86-64 PC, you can also try running Windows games and applications using Wine.
Especially 32-bit Windows games and applications, typically work quite well, and this may be an easier and faster solution and provide better integration with your desktop environment.
16-bit or mixed 16/32-bit Windows games and applications are more problematic with Wine as modern 64-bit Linux distributions typically have the required kernel functionality for running 16-bit code (e.g., X86_16BIT and MODIFY_LDT_SYSCALL) disabled at kernel compile time.
Windows version highlights
Windows versions 1.0-3.11
For these versions you often have the choice to run them directly in DOSBox-X itself, using the emulated integrated DOS, or if you install a real DOS first and run Windows on top of that.
There are various limitations that Windows imposes that are dependent on the version. A few milestones:
-
MS Windows 1.01 (released Nov 20, 1985)
-
Initial release
-
-
MS Windows 1.02 (released May 1986)
-
International release
-
-
MS Windows 1.03 (released Aug 1986)
-
Additional screen and printer drivers
-
-
MS Windows 1.04 (released Apr 1987)
-
Adds limited support for the IBM PS/2
-
-
MS Windows/386 2.01 (released Sep 1987)
-
Compaq OEM release with limited drivers
-
Adds support for protected mode
-
Adds EMS emulation
-
-
MS Windows 2.03 and MS Windows/386 2.03 (released Dec 8, 1987)
-
Adds overlapping windows
-
Adds 16 colour VGA support
-
-
MS Windows/286 2.10 and MS Windows/386 2.10 (released May 27, 1988)
-
Adds HIMEM.SYS
-
-
MS Windows/286 2.11 and MS Windows/386 2.11 (released Mar 13, 1989)
-
Minor changes to memory management
-
Adds AppleTalk support
-
Adds updated printer drivers
-
-
MS Windows 3.0 (released May 22, 1990)
-
Revamped UI
-
Can support up to 16MB RAM
-
Virtual memory support (swap)
-
-
MS Windows 3.0a with Multimedia Extensions (released Oct, 1991)
-
OEM releases only
-
Adds audio and video playback support
-
Adds CD-ROM support
-
Adds Joystick support
-
-
MS Windows 3.1 (released Apr 6, 1992)
-
Real (8086) mode support dropped
-
Can support up to 256MB RAM
-
Adds TrueType
-
Adds 32-bit disk access
-
-
MS Windows for Workgroups 3.1 (released Oct, 1992)
-
Adds support for SMB file and printer sharing
-
-
MS Windows 3.11 (released Nov 8, 1993)
-
Bug fix release
-
-
MS Windows for Workgroups 3.11 (released Nov 8, 1993)
-
Standard (286) mode support dropped
-
Microsoft Windows 95+
These versions must be installed in a virtual HDD image.
-
MS Windows 95 (released Aug 24, 1995)
-
Major redesign of the UI
-
Adds MS-DOS 7.0
-
-
MS Windows 95 OSR1 (aka 95A) (released Dec 29, 1995)
-
Adds IE 2.0
-
Adds Infrared support
-
-
MS Windows 95 OSR2 (aka 95B) (released Aug 22, 1996)
-
Updates IE to 3.0
-
Adds Firewire, UDMA and IRQ steering support
-
Adds support for FAT32
-
Updates MS-DOS to 7.1
-
Adds support for DirectX 2.0a
-
-
MS Windows 95 OSR2.1 (aka 95B) (released Aug 27, 1997)
-
Adds (limited) USB and AGP support
-
-
MS Windows 95 OSR2.5 (aka 95C) (released Nov 26, 1997)
-
Updates IE to 4.0
-
Adds Active Desktop
-
Updates DirectX to 5.0
-
-
MS Windows 98 (released Jun 25, 1998)
-
Add Windows Driver Model (WDM) support
-
Adds Disk Cleanup, Windows Update, Multi-monitor and Internet Connection sharing
-
Updates IE to 4.01
-
Adds Outlook Express, Windows Address Book, FrontPage Express, Microsoft Chat, Personal Web Server and NetShow
-
Adds support for DVD (UDF 1.02 read support)
-
Updates DirectX to 5.2
-
Includes a FAT16 to FAT32 migration utility
-
Includes RealPlayer 4.01, Flash Player and Shockwave Player
-
Adds support for the Euro currency symbol
-
-
MS Windows 98SE (released May 5, 1999)
-
Updates IE to 5.0
-
Updates DirectX to 6.1
-
Removes RealPlayer and WinG
-
-
MS Windows ME (released Sep 14, 2000)
-
Updates MS-DOS to 8.0
-
Adds support for USB Mass Storage
-
Installing Microsoft Windows 3.x in DOSBox-X
Table of Contents
- Installing Microsoft Windows 3.x in DOSBox-X
-
Overview
- Editions this applies to
-
README.1ST
- Useful links
- General Notes
- Windows 3.0 specific notes
- Windows 3.0a with Multimedia Extensions specific notes
- DOSBox-X config file
-
Preparing for installation
- Example of extracting files from disk images
- Mounting an installation CD-ROM
- Installing in a mounted folder
- Install Windows 3.x into a DOS HDD image
- Starting Windows 3.x after installation
- Steps to take after installation
- Enabling 32-bit File and Disk access
-
Enabling networking
-
Enabling NE2000 in your DOSBox-X config file
- backend=pcap
- backend=slirp
- Setting up NE2000 networking
-
Enabling NE2000 in your DOSBox-X config file
-
Enabling sound
- Enabling external MIDI in Windows 3.1x
- Enabling external MIDI in Windows 3.0a with MM Extensions
-
Enabling printing
- Print to PostScript
- Epson emulation
- Installing Win32s
- Starting a Windows game from DOS
- Outstanding issues
Overview
This guide will give a general description of installing Windows 3.x in DOSBox-X, in addition to addressing some common issues.
Editions this applies to
-
Windows 3.0
-
Supports up to 16MB RAM.
-
Improved UI.
-
Improved memory management (286+ only).
-
-
Windows 3.0a
-
Allows programs to call into real-mode when started in standard mode.
-
Bug fixes for the installer to alleviate crashes.
-
-
Windows 3.0a with Multimedia Extensions
-
Adds Multimedia Extensions 1.0.
-
Multimedia extensions do not support real mode (8086/8088 CPUs).
-
Adds support for recording and playing digital audio files.
-
Adds support for MIDI devices.
-
Adds support for screensavers.
-
Adds support for analogue joysticks.
-
Adds support for audio CD-ROMs.
-
-
Windows 3.1
-
Supports up to 256MB RAM.
-
Dropped support for real mode (8086/8088 CPUs).
-
Includes updated Multimedia Extensions.
-
Adds TrueType font support.
-
Adds optional 32-bit disk access (386 Enhanced Mode only).
-
Adds the Windows Registry.
-
-
Windows 3.11
-
Bug fix release.
-
-
Windows for Workgroups 3.1
-
Adds SMB file sharing (NBF or IPX protocols only).
-
Adds VSHARE.386.
-
-
Windows for Workgroups 3.11
-
Adds 32-bit file redirectors.
-
Drops support for standard mode (286 CPUs).
-
-
Windows for Workgroups 3.11a
-
Windows 3.2
-
Chinese language release of Windows 3.1.
-
| Edition | Min CPU | Min RAM | Max RAM | Min HDD space | Min DOS |
|---|---|---|---|---|---|
|
3.0 |
8086 |
1MB |
16MB |
8MB |
3.1 |
|
3.0a |
8086 |
1MB |
16MB |
8MB |
3.1 |
|
3.0a MM |
286 |
2MB |
16MB |
30MB |
3.1 |
|
3.1 |
286 |
2MB |
256MB |
8MB |
3.1 |
|
3.11 |
286 |
2MB |
256MB |
8MB |
3.1 |
|
3.1 WfW |
386 |
3MB |
256MB |
14MB |
3.3 |
|
3.11 WfW |
386 |
3MB |
256MB |
14MB |
3.3 |
Windows 3.x was available for both Retail and via OEM, with exception of Windows 3.0a with Multimedia Extensions which was available only through OEMs.
OEM versions may include and default to different drivers in SETUP for things like video and sound.
README.1ST
There are already some guides to installing Windows 3.x in DOSBox, and those guides will also work with DOSBox-X.
Some examples:
-
Windows 3.1x DOSBox Guide on Vogons by user Dominus
-
How to Install Windows 3.1 in DOSBox, Set Up Drivers, and Play 16-bit Games on How-To Geek
-
Windows 3x on DOSBox guide on sierrahelp.com
This guide does not look to replicate those guides. Instead, this guide will have some install guidance and hints and tips not covered on those pages, or that are specific to DOSBox-X. It is not intended to be a comprehensive guide.
Useful links
-
VOGONS Vintage Driver Library
-
Wikipedia: Windows 3.0
-
Wikipedia: Windows 3.1x
-
Fandom: Windows 3.1
-
BetaWiki: Windows 3.0
-
BetaWiki: Windows 3.00a Multimedia Edition
-
BetaWiki: Windows 3.1x
General Notes
-
Some parts of the installation can take a considerable amount of time. You can speed this up somewhat by using the DOSBox-X Turbo mode.
From the drop-down menu select «CPU» followed by «Turbo (Fast Forward)».
But if you decide to use this, be sure to disable Turbo mode whenever you need to enter data or make choices, as it can cause spurious keypresses to be registered causing undesirable effects.
It can also cause problems with double click with the mouse not working and audio will also not sound properly, so be sure to disable it when using Windows in DOSBox-X.
Windows 3.0 specific notes
-
Unless noted otherwise, Windows 3.1 drivers are not backward compatible with Windows 3.0.
Windows 3.0a with Multimedia Extensions specific notes
-
This edition was available only to OEMs (Original Equipment Manufacturers), as such Windows will be customized to the systems it was shipped with.
Examples of such customization, are an OEM specific launcher, OEM specific applications, but also that the installer may default to custom audio and video options. -
For versions distributed on CD, the installation can be started by going into the
MWINdirectory on the CD and runningSETUP.EXE. -
Unlike regular Windows which installs by default to
C:\WINDOWSthis edition installs by default toC:\MWINDOWS.
DOSBox-X config file
It is recommended that you create a custom DOSBox-X config file for running Windows 3.x
[sdl]
autolock=true

[dosbox]
title=Windows 3.x
memsize=16
# uncomment the next line if you want to use Windows 3.0
#machine=svga_et4000

[dos]
hard drive data rate limit=0
floppy drive data rate limit=0

[cpu]
cputype=pentium
core=normal

[pci]
voodoo=false

[ide, primary]
int13fakeio=true
int13fakev86io=false

[render]
scaler=none

[autoexec]
Copy the above config and save it as win3x.conf
Notes
-
The above config uses 16MB RAM as that is the maximum supported by Windows 3.0, but for Windows 3.1 and 3.11 you can go up to 256MB, as such for these Windows versions
memsize=256is the largest safe value. -
There are Windows 3.0 and 3.1 drivers for the Tseng Labs ET3000 and ET4000 (
machine=svga_et3000andmachine=svga_et4000respectively), but for the defaultmachine=svga_s3(S3 Trio64) there are apparently only Windows 3.1 drivers. -
The default S3 video option will offer the broadest range of resolutions and colour depths but do require you to install the correct drivers.
Preparing for installation
Practically all Windows 3.x versions were shipped on floppies, requiring anywhere between 5 and 15 disks, depending on media-type and windows version.
And while it is possible to install Windows 3.x from floppy images in DOSBox-X, the disk-swap process for this is rather tedious for substantial number of disks.
As such it is highly recommended to make a directory such as «INSTALL» and copy the contents of ALL the diskettes into this directory.
This way there is no need to swap disks during the installation process.
Example of extracting files from disk images
There are several ways to extract the contents of disk images, such as 7zip on Windows or «Disk Image Mounter» on Linux.
In this example, DOSBox-X itself is used to mount a disk image, copy its contents into a folder, unmount the disk image and do the next.
MOUNT C /home/myuser/winroot
C:
MD INSTALL
IMGMOUNT A DISK01.IMG -U
COPY A:\*.* C:\INSTALL
IMGMOUNT A DISK02.IMG -U
COPY A:\*.* C:\INSTALL
IMGMOUNT A DISK03.IMG -U
COPY A:\*.* C:\INSTALL
IMGMOUNT A DISK04.IMG -U
COPY A:\*.* C:\INSTALL
IMGMOUNT A DISK05.IMG -U
COPY A:\*.* C:\INSTALL
IMGMOUNT A -U
Your new INSTALL directory now holds the contents of all 5 disks in this example.
Mounting an installation CD-ROM
If you have a «Windows 3.0a Multimedia Edition» CD-ROM image, you can simply mount it in DOSBox-X, and run the SETUP program.
e.g.
IMGMOUNT D win30me.iso
D:
CD MWIN
SETUP.EXE
The installer is normally found on the CD as \MWIN\SETUP.EXE.
Installing in a mounted folder
Notes
-
This method is the easiest, but has a few limitations:
-
Will not allow for 32-bit disk IO with Windows 3.1x.
-
Create a directory on your system that you’re going to use (mount) as your Windows 3.x C: drive.
Valid examples:
-
For Windows hosts
-
C:\winroot
-
C:\users\myuser\win31
-
-
For Linux hosts
-
/home/myuser/winroot
-
/home/myuser/windows/win311
-
|
Note |
For users running Windows natively on their computer, do NOT mount the root of your C: drive as the DOSBox C: drive! (e.g., MOUNT C C:\ should NOT be done), as it will cause confusion and potential conflicts between the host system C:\WINDOWS directory and that of Windows 3.x.
|
Now create a directory underneath that, which will hold your Windows 3.x installation files.
e.g., C:\users\myuser\win31\INSTALL or /home/myuser/winroot/INSTALL and copy the installation files into it.
You are now ready to start DOSBox-X from the command-line, using the newly created win3x.conf.
This assumes that the dosbox-x program is in your path and win3x.conf is in your current directory.
dosbox-x -conf win3x.conf
You now need to mount your new folder as the C: drive in DOSBox-X and start the installation.
MOUNT C /home/myuser/winroot
C:
CD INSTALL
SETUP
Adjust the path for mounting the C: drive as needed.
|
Note |
If your path has spaces in it, you need to enclose it in quotes. e.g., MOUNT C "C:\Users\John Doe\winroot"
|
The Windows installation will now take place.
Once the installation process has finished, you will be asked if you want to start windows or exit to DOS.
Exit to DOS and type EXIT to close DOSBox-X.
Now edit your win3x.conf config file and add the following lines into the [autoexec] section at the end of the file.
@ECHO OFF
MOUNT C /home/myuser/winroot
C:
IF EXIST C:\WINDOWS\IFSHLP.SYS GOTO WFW
IF EXIST C:\MWINDOWS\WIN.COM GOTO MWINDOWS
IF EXIST C:\WINDOWS\WIN.COM GOTO WINDOWS
GOTO END

:WFW
echo Starting Windows for Workgroups 3.1x
SET PATH=%PATH%;C:\WINDOWS;
SET TEMP=C:\WINDOWS\TEMP
DEVICE C:\WINDOWS\IFSHLP.SYS
C:\WINDOWS\NET.EXE START
C:\WINDOWS\WIN.COM
GOTO END

:MWINDOWS
echo Starting Windows 3.0a with Multimedia Extensions
SET PATH=%PATH%;C:\MWINDOWS;
SET TEMP=C:\MWINDOWS\TEMP
C:\MWINDOWS\WIN.COM
GOTO END

:WINDOWS
echo Starting Windows for 3.x
SET PATH=%PATH%;C:\WINDOWS;
SET TEMP=C:\WINDOWS\TEMP
C:\WINDOWS\WIN.COM
GOTO END

:END
EXIT
Adjust the MOUNT path above for mounting the C: drive as needed.
Install Windows 3.x into a DOS HDD image
This method brings with it a bit of added inconvenience.
For instance, you will need to do your own DOS memory management and load DOS drivers for CD-ROM access.
You can also not mount a host directory in DOSBox-X when you boot a disk image.
Even host directories that you mounted prior to booting the disk image will become unavailable.
Everything needs to be done using IMAGE files.
The first step is to create a DOS HDD image, for which you can follow the PC DOS and MS-DOS Installation Guide.
You need at least DOS 3.1 for Windows 3.0 and 3.1x, and DOS 3.3 for Windows for Workgroups.
However, it is recommended to use a newer version such as DOS 6.x
Once you have a DOS HDD image, temporarily mount it in DOSBox-X to transfer your INSTALL folder into your DOS HDD image, together with any drivers and add-ons you might need (preferably already unzipped, such that you don’t need to do that in DOS or Windows 3.x, as they lack support for that by default).
Something like:
IMGMOUNT C hdd.img
MOUNT D .
XCOPY D:\INSTALL C:\INSTALL /I /S
XCOPY D:\DRIVERS C:\DRIVERS /I /S
XCOPY D:\ADDONS C:\ADDONS /I /S
EXIT
Adjust paths in the above example as needed.
Now edit your win3x.conf config file and in the [autoexec] section at the end, add the following lines:
IMGMOUNT C hdd.img -reservecyl 1
BOOT C:
Now start DOSBox-X with your win3x.conf config file from the command-line:
dosbox-x -conf win3x.conf
It should boot to the C: prompt, and you can start the installation process.
After the installation is finished, you can install your drivers and add-ons.
Starting Windows 3.x after installation
After the installation is finished, you can start Windows 3.x from the command-prompt with the following command:
dosbox-x -conf win3x.conf
You can optionally create a shortcut on your desktop to start Windows 3.x directly.
Steps to take after installation
Once Windows 3.x is installed, here is some additional software you may want to install or update:
-
Updated Video and Audio drivers
-
Win32s 1.30c
-
Video for Windows 1.1e
-
WinG API 1.0
-
QuickTime 2.1.2
-
Adobe Acrobat Reader
-
Adobe Type Manager 3.02
Enabling 32-bit File and Disk access
-
Introduced with Windows 3.1, 32-Bit Disk Access allows Windows to bypass the 16-Bit BIOS.
-
Introduced with Windows 3.11, 32-Bit File Access allows Windows to bypass the 16-Bit DOS FAT code.
Enabling these features means that Windows must leave 32-bit protected mode less often, and should therefore, at least in theory, be faster.
However, based on benchmarks, there is no advantage at this time to enabling these features in DOSBox-X, and it may reduce performance!
32-Bit Disk Access (also called FastDisk) uses the WDCTRL driver built into WIN386.EXE that is included with Windows 3.1x, which should work in DOSBox-X if the following conditions are met:
-
You must use a real DOS in DOSBox-X.
-
Your HDD image must have 1023 cylinders or less (max 504MB).
-
When creating you harddisk image in DOSBox-X you may want to use
IMGMAKE hdd.img -t hd_520, which will give you exactly a 504MB HDD.
-
-
You can only have one HDD.
-
You cannot have a CD-ROM as a slave on the same IDE controller as the HDD.
-
You must have set
int13fakeio=trueandint13fakev86io=falsein your DOSBox-X config file. -
You must mount your HDD image file with
-reservecyl 1. -
You must mount your HDD image file with device number 2, and not the drive letter (this is likely a bug in DOSBox-X).
-
You must edit
C:\WINDOWS\SYSTEM.INIand in the[386enh]section add the following 2 lines (preferably between the*pageswapand*biosxlatdrivers):-
device=*int13 -
device=*wdctrl
-
-
In the same file, at the bottom of the
[386enh]section add the line:-
32BitDiskAccess=ON
-
32-Bit File Access has no such requirements and can be enabled seemingly on any system.
To enable these features, open the «Main» folder, followed by «Control Panel».
Now double-click on the «386» chip icon titled «Enhanced».
Then click on the «Virtual Memory…» button.
Under Disk Status you can see what access methods Windows is currently using.
Now click on the «Change>>» button.
At the bottom there are options for «Use 32-Bit Disk Access» and «Use 32-Bit File Access».
If the 32-Bit Disk Access option is greyed out, it probably means your configuration is not compatible with the option.
There are 3rd party 32-Bit Disk Access drivers which may allow it to function on larger disks, but have not been tested in combination with DOSBox-X.
Most 3rd party drivers only work in combination with specific hardware. The Ontrack ontrackw.386 driver does work in DOSBox-X but seems to have similar restrictions.
Enabling networking
To enable networking, you first need to enable NE2000 network adapter emulation in your win3x.conf config file and select an appropriate back-end for the NE2000 emulation.
Enabling NE2000 in your DOSBox-X config file
Starting with DOSBox-X 0.83.12 there are two different back-ends to the NE2000 adapter emulation.
The default back-end is backend=pcap.
backend=pcap
The PCAP back-end uses something called «Promiscuous mode».
This has the advantage that DOSBox-X can support various legacy network protocols, such as IPX and NetBIOS Frames (aka NetBEUI) in addition to TCP/IP.
This mode not only allows communication between DOSBox-X instances on the same network, but also with legacy PCs on the same network.
However, for this to work DOSBox-X needs to have very low-level access to your real network adapter.
In some cases, this is not possible, such as:
-
Network Adapter or Driver not supporting Promiscuous mode (most WIFI, WAN and BT adapters fall into this category).
-
Your Ethernet switch not allowing multiple MAC addresses on a single port or doing any kind of MAC address whitelisting.
-
Sandboxed versions of DOSBox-X (e.g., Flatpak) not allowing the required low-level access.
To enable NE2000 emulation with the pcap back-end, add the following to your win3x.conf config file:
[ne2000]
ne2000=true
nicirq=10
backend=pcap

[ethernet, pcap]
realnic=list
The list value for realnic= will need to be replaced by a value representing your actual network adapter.
See Guide: Setting up networking in DOSBox-X for more information.
backend=slirp
Unlike the PCAP back-end, the SLIRP back-end does not require Promiscuous mode.
As such it will work with WIFI, WAN and BT adapters, and it will work in most sandboxed environments.
But obviously, it has its own limitations.
-
It is not supported in all platforms, such as Windows Visual Studio builds.
-
It only supports the TCP/IP protocol (other protocols must be TCP/IP encapsulated).
-
It is effectively behind a NAT (Network Address Translation) gateway, meaning that you can communicate outbound, but no systems on the LAN can instantiate a new connection to it. Which means that two DOSBox-X instances on the same LAN using
backend=slirpcannot communicate with each other.
To enable NE2000 emulation with the slirp back-end, add the following to your win3x.conf config file:
[ne2000]
ne2000=true
nicirq=10
backend=slirp
Setting up NE2000 networking
This only applies to Windows for Workgroups (WfW).
If you install WfW inside DOSBox-X with networking support, you need to run DEVICE C:\WINDOWS\IFSHLP.SYS and C:\WINDOWS\NET START before starting Windows if run from DOSBox-X’s internal DOS.
Windows for Workgroups by default only supports SMB networking over NBF (NetBIOS Frames aka NetBEUI) or IPX.
There is no support by default for the TCP/IP protocol.
There were 3rd party WinSock solutions, but those were meant for dial-up internet access and are not specific to WfW.
You can however install Microsoft TCP/IP-32, which was sold separately, to add TCP/IP support to WfW.
Enabling sound
DOSBox-X by default emulates a Creative Labs SoundBlaster 16.
Download and install the SB16 driver package.
This needs to be run from DOS.
Pay close attention during installation to the IRQ.
The emulated SB16 in DOSBox-X defaults to IRQ7, while the SB16 driver package assumes IRQ5.
So, unless you changed the SB IRQ in your DOSBox-X config file, change the IRQ during installation to IRQ7.
Enabling external MIDI in Windows 3.1x
By default, the SB16 Windows 3.1x drivers will emulate MIDI playback using the OPL chip.
However, DOSBox-X has built-in support for General MIDI emulation (which is enabled by default), and which sounds much better.
To set it up, first ensure the SB16 drivers are installed.
Then in Windows 3.1x go to «Control Panel» and open «MIDI Mapper».
In Windows 3.1x go to «Control Panel», and open «MIDI Mapper.
If there is no «MIDI Mapper» icon in «Control Panel», the Sound Blaster drivers were not installed.
Select the «SB16 All MIDI» option from the drop-down menu and press the «Close» button.
You should now be able to open the Windows 3.1x Media Player and playback C:\WINDOWS\CANYON.MID.
Enabling external MIDI in Windows 3.0a with MM Extensions
The same can be carried out with Windows 3.0a with Multimedia Extensions, but the «SB16 All MIDI» option will not be listed.
Instead in the «MIDI Mapper» dialogue box click on the «New…» button.
You will be asked for a name and description.
You can name it anything you like, for instance «SB16 Ext MIDI», and click the «OK» button.
You do not have to enter anything for the Description.
You will then get a «MIDI Setup» window.
The only thing you want to change here is the «Port Name» to «SB MIDI Out» for all 16 lines.
You may also notice that for each line the active checkbox gets checked, this is correct.
Once finished click the «OK» button and confirm the save.
You should now be able to open the Windows 3.0a Media Player and playback C:\MWINDOWS\MMDATA\CANYON.MID.
Enabling printing
Print to PostScript
For the best print quality, you will want to print to a PostScript printer in Windows 3.x.
First, setup your DOSBox-X config to print to a file as such:
[dosbox]
captures=capture

[parallel]
parallel1=file timeout=2000
Next in Windows 3.x, select any PostScript printer such as the «QMS ColorScript 100», during printer setup connected to LPT1.
When you print, a .prt file in your captures= directory will be created, which despite the extension, is actually a PostScript file.
On Linux and macOS, PostScript files are natively supported and can be viewed and printed.
On a Windows host, it is necessary to install a separate PostScript viewer such as GSview.
Epson emulation
As an alternative, you can use the integrated Epson printer emulation, but the output quality will be significantly less compared to PostScript.
First, setup your DOSBox-X config to emulate an Epson printer as such:
[parallel]
parallel1=printer

[printer]
printer=true
printoutput=ps
multipage=true
timeout=2000
Next in Windows 3.x, select any Epson dot-matrix printer during printer setup, such as:
-
For Windows 3.0, the «Epson LQ-850/950/1050» option, connected to LPT1
-
For Windows 3.1, the «Epson LQ-850» (or «LQ-1050» for wide formats), connected to LPT1
-
For Windows 3.11, the «Epson LQ-860» (or «LQ-1050» for wide formats), connected to LPT1
|
Warning |
Make sure that you do not configure the Epson printer driver for a graphics resolution other than 180×180, or the output will be corrupted. |
When you print, a PostScript file with the .ps extension will be created in your current working directory.
The emulated Epson printer settings can be adjusted as documented on the above linked wiki printing guide.
Installing Win32s
Win32s is a 32-bit application runtime environment for Windows 3.1x.
Some games and applications require it.
Win32s version 1.30c is the latest version.
It installs and runs without problems in DOSBox-X.
But be aware, that unless your running Windows 3.1x under real DOS, then DOSBox-X’s integrated SHARE feature will be enabled by default which emulates most of the DOS SHARE.EXE functions.
Win32s requires that SHARE.EXE is loaded, so your options are either to use the SHARE functions as implemented by DOSBox-X or install Windows 3.1x in real DOS in DOSBox-X.
|
Warning |
While DOSBox-X’s integrated SHARE feature was improved compared to that of vanilla DOSBox, it may not fully implement all of DOS SHARE.EXE functions, and as such may not be 100% safe for some applications. |
Starting a Windows game from DOS
If you want to silently start a Windows game, without seeing the Windows 3.x splash screen or program manager, and when you exit the game that it exits Windows, here are the steps to take:
First install the game normally in Windows.
You can then start the game from DOS simply by appending the Windows game executable behind the WIN.COM executable as such:
This will prevent the Windows splash screen being shown and will directly start the game without first going to the Program Manager (progman).
The second step you may want to take, is that when you exit the game, you also exit Windows 3.x. For this you need a 3rd party utility called «RUNEXIT.EXE», and place it in your PATH. Now simply start the game as follows:
WIN RUNEXIT \path\to\game.exe
Like before it will start the game without the Windows splash screen, but now when you Exit the game it will also Exit Windows. This way you can launch Windows games from a DOS batch file, or from a DOSBox launcher such as DBGL.
Outstanding issues
-
Using 32Bit Disk and File lowers performance.
-
32Bit Disk and File, requires mounting the HDD image using drive number.
Introduction
Windows 3.1 was released by Microsoft in 1992 as a successor to Windows 3.0. It was the first version of Windows to gain widespread popularity and was the first to introduce features such as TrueType fonts and a built-in multimedia player. While Windows 3.1 is now considered obsolete, it can still be a fun and nostalgic experience to run it on modern hardware using an emulator such as DOSBox.
In this article, we will guide you through the process of installing Windows 3.1 in DOSBox, setting up drivers, and playing 16-bit games. We will cover the necessary steps and provide detailed instructions to help you relive the golden age of computing.
Installing Windows 3.1 in DOSBox
DOSBox is a free and open-source emulator that allows you to run old DOS applications on modern operating systems. It emulates an x86 computer with DOS and supports a wide range of DOS games and applications. To install Windows 3.1 in DOSBox, follow these steps:
- Download and install DOSBox from the official website (www.dosbox.com).
- Create a new folder on your computer where you will install Windows 3.1. For example, you can name it «Windows 3.1.»
- Download a copy of the Windows 3.1 installation disks in the form of disk images (commonly known as «floppies»). You can find these disk images online or create your own from original installation disks.
- Copy the disk images to the folder where you installed DOSBox.
- Open DOSBox and mount the folder where you installed Windows 3.1 as a virtual drive. Use the following command:
mount c - Now, mount the first Windows 3.1 installation disk image as drive A. Use the following command:
imgmount a -t floppy - Run the installer by changing to drive A (type «A:» in the DOSBox prompt) and running the setup program (e.g., «setup.exe»).
- Follow the on-screen instructions to install Windows 3.1. You will be prompted to insert additional disk images during the installation process.
- Once the installation is complete, restart DOSBox, and Windows 3.1 should boot up.
Setting Up Drivers
After installing Windows 3.1, you will need to set up drivers for sound, graphics, and networking to ensure that your system runs smoothly and can play 16-bit games effectively. Here is how you can set up drivers in Windows 3.1:
-
Sound Driver:
- Download a sound driver compatible with Windows 3.1 from the manufacturer’s website or a third-party source.
- Install the sound driver in Windows 3.1 by going to Control Panel > Drivers > Add, and selecting the appropriate driver.
- Follow the on-screen instructions to install the sound driver and restart Windows 3.1.
-
Graphics Driver:
- Download a graphics driver compatible with Windows 3.1 from the manufacturer’s website or a third-party source.
- Install the graphics driver in Windows 3.1 by going to Control Panel > Drivers > Add, and selecting the appropriate driver.
- Follow the on-screen instructions to install the graphics driver and restart Windows 3.1.
-
Network Driver:
- If you want to connect to the internet in Windows 3.1, you will need to install a network driver compatible with your network adapter.
- Download a network driver compatible with Windows 3.1 from the manufacturer’s website or a third-party source.
- Install the network driver in Windows 3.1 by going to Control Panel > Drivers > Add, and selecting the appropriate driver.
- Follow the on-screen instructions to install the network driver and configure your network settings.
Playing 16-bit Games
Now that you have installed Windows 3.1 in DOSBox and set up drivers, you can start playing 16-bit games from the golden age of gaming. Windows 3.1 was a popular platform for gaming in the early ’90s, and many classic games were released for it. Here are some steps to help you play 16-bit games in Windows 3.1:
- Download 16-bit games compatible with Windows 3.1 from online archives or game websites.
- Install the games in Windows 3.1 by running the setup program or copying the game files to the appropriate directory.
- Run the games by double-clicking on the game’s executable file or shortcut. You can also create shortcuts on the Windows 3.1 desktop for easy access to your favorite games.
- Enjoy playing classic 16-bit games such as SimCity, Doom, and Prince of Persia on your Windows 3.1 system in DOSBox.
Conclusion
In this article, we have shown you how to install Windows 3.1 in DOSBox, set up drivers, and play 16-bit games. By following the steps outlined in this guide, you can experience the nostalgia of the early days of computing and gaming on modern hardware. Windows 3.1 may be considered obsolete by today’s standards, but it still holds a special place in the hearts of many enthusiasts. So, dust off your virtual floppy disks and fire up DOSBox to relive the magic of Windows 3.1 and its classic games.
После выхода Linux 3.1 появился повод посмотреть на предыдущую операционную систему с таким номером. А почему бы и нет?
Нам понадобятся:
— DOSBox
— Собственно образ Windows 3.1 (например)
Сложность: тривиально
Если хочется работать в русской версии, то и искать надо тоже русскую. В оригинальной Windows даже такой страны, как Россия, не указано.
Если вы хотите поставить Windows на DOSBox, сперва настройте DOSBox. Это само собой разумеется, но всё-таки.
Создайте отдельную папку, например, win3.1. Это будет диск C: для DOSBox’а. Создайте в нём ещё один каталог для установщика, например, setup.
Смонтируйте или распакуйте в setup диск с Виндой. Напоминаю команду для Linux: sudo mount -o loop win3.1.iso setup/
Откройте DOSBox в каталоге win3.1.
Перейдите в каталог setup и наберите команду setup.

Установка достаточно прямолинейна, можно просто жать на Enter. После окончания установки программа попробует перезагрузить компьютер, после чего DOSBox должен закрыться. Откройте его заново и наберите команду win. Если ничего не произошло, то надо выполнить батник AUTOEXEC.BAT, а затем уже набрать команду win. И перед вами возникнет логотип Windows.
Что дальше? Ну, можно поставить какой-нибудь CorelDraw 2.0 и позабавиться с ним. Или можно поиграть в «Сапёра» 8×8. Или просто посмотреть вокруг и закрыть Windows, потому что всё равно без выхода в DOS в нём не обойтись.

Если есть желание, можно настроить звук. Драйвер для SoundBlaster 16 можно взять отсюда. Там же есть ещё несколько дров для Windows 3.x, но проблемы возникают чаще всего только со звуком. Ставить придётся через DOS с выключенной виндой. Если будут проблемы, не забудьте проверить эмуляцию SoundBlaster со стороны DOSBox.
Что точно не получится запустить:
— веб-камеру
— принтер (и не пытайтесь)
— флоппи (не отобразится в File Manager, но его возможно достать через DOS)
— доступ к FAT32 и 32-битным файлам
— очевидно, доступ к файлам вне DOSBox (только через mount)
Закончить хочу цитатой из Википедии:
Windows 3.1 (изначально носившая кодовое имя Janus), выпущенная 18 марта 1992 года, была расширенной Windows 3.0. Она включала систему шрифтов TrueType (и предустановленный набор довольно качественных шрифтов), что впервые сделало Windows серьёзной платформой для настольных издательских систем. Аналогичные возможности можно было получить в Windows 3.0 при помощи приложения Adobe Type Manager. Эта версия Windows также включала простую антивирусную программу Microsoft Anti-Virus for Windows, которая позже стала известна тем, что определяла программу установки Windows 95 как содержащую компьютерный вирус.
…
1 ноября 2008 Microsoft прекратила выдачу лицензий на её [Windows 3.1] использование.
Если эта публикация вас вдохновила и вы хотите поддержать автора — не стесняйтесь нажать на кнопку
Table of Contents
- Installing Microsoft Windows 95 in DOSBox-X
- Overview
- Windows CD-ROM editions this guide applies to
- External links
- DOSBox-X config file
- General installation Notes
- Dynamic vs Normal core
- Turbo mode
- Creating a Harddisk image
- Installation Method
- Requirements
- Starting the installation
- Copying the contents of the CD-ROM
- Running SETUP.EXE
- Booting Windows 95 after installation
- Steps to take after installation
- Mounting CD or Diskette images
- Enabling networking
- Enabling NE2000 in your DOSBox-X config file
- Setting up NE2000 networking in Windows 95
- Emulated video adapter and video mode
- VESA driver
- Emulated sound card
- Enabling General MIDI
- Enabling printing
- Print to PostScript
- Epson emulation
- 3dfx Voodoo
- Glide pass-through
- Hard Disk Read-ahead optimization
- Host Folder mounts
- Known limitations
- Outstanding issues
Overview
This guide will give a general description of installing Windows 95 in DOSBox-X, in addition to addressing some common issues.
Windows CD-ROM editions this guide applies to
-
Windows 95 (RTM; Original release) — Retail Full
-
Windows 95 (RTM; Original release) — OEM Full
-
Windows 95 OSR1 (aka 95A) — OEM Full
-
Windows 95 OSR2 (aka 95B) — OEM Full
-
Windows 95 OSR2.1 (aka 95B) — OEM Full
-
Windows 95 OSR2.5 (aka 95C) — OEM Full
|
Note |
This guide is meant for the Windows 95 CD-ROM editions. The Windows 95 diskette edition can also be used, but requires a lot of tedious disk swapping and is therefore not recommended. |
|
Note |
Windows 95 Upgrade editions have additional requirements and are not covered by this guide. |
If you don’t know which Windows 9x version to install, we recommend that you install Windows 98SE.
If you want to stick with Windows 95, we recommend to use Windows 95 OSR2 or later.
External links
DOSBox-X config file
You first need to create a DOSBox-X config file.
[sdl]
autolock=true

[dosbox]
title=Windows 95
memsize=64


vmemsize=8
vesa modelist width limit=0
vesa modelist height limit=0

[dos]
# Set 'ver=7.1' if using Win95 OSR2 (95B) or later
ver=7.0
hard drive data rate limit=0
floppy drive data rate limit=0

[cpu]
cputype=pentium_mmx
core=normal

[sblaster]
sbtype=sb16vibra

[fdc, primary]
int13fakev86io=true

[ide, primary]
int13fakeio=true
int13fakev86io=true

[ide, secondary]
int13fakeio=true
int13fakev86io=true
cd-rom insertion delay=4000

[render]
scaler=none

[autoexec]
Copy the above config and save it as win95.conf
|
Note |
If using Windows 95 OSR2 (or later) with FAT32 volumes, be sure to change the DOS version to 7.1 (ver=7.1 or from the DOSBox-X prompt: ver set 7.1) or else you will get errors mounting the FAT32 volume.
|
|
Note |
You can increase the allocated RAM up to the Windows 95 maximum of 480MB by setting memsize=480.Larger values may be possible with tweaks but are not covered here. |
General installation Notes
-
If you get a prompt stating that C:\WINDOWS already exists, ignore it, and continue the installation.
-
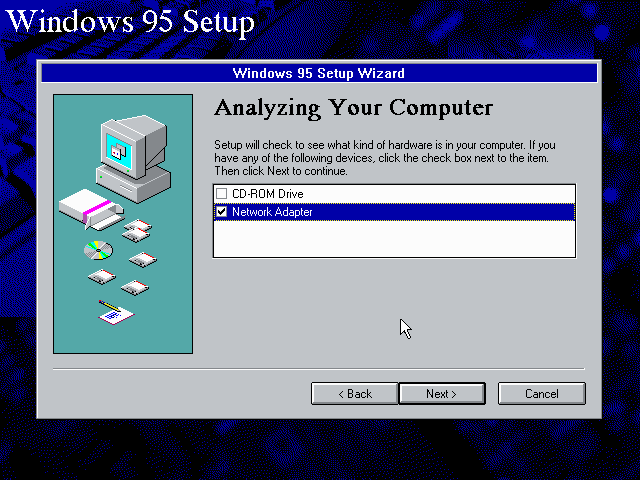
During the installation you may be asked if you have a CD-ROM, Network card or sound card that you want it to scan for. If you have NE2000 enabled in your DOSBox-X config file, you may want to check the Network adapter check box. Your DOSBox-X CD-ROM and Sound Card will be detected regardless if you check its box or not.
-
In case you installed Windows 95 OSR2.5 you may have noticed that you did not get IE4 and the Active Desktop features. This is because this is an optional installation. On the CD, simply run \WIN95\IE4SETUP.EXE to install it. While there is no real advantage to either feature, installing it does bring some new and updated libraries such as MSVCRT.DLL and COMCTL32.DLL that some programs need.
Dynamic vs Normal core
The dynamic_x86 core, which should perform much better, has been sufficiently enhanced that it can now be used for most use-cases with Windows 95.
However, for now we still recommend that you do the installation of Windows 95 using core=normal until issue #2215 is resolved.
But after the installation is finished you should be able to change to core=dynamic_x86.
Should you run into problems such as application crashes or a Windows 95 blue-screen that cannot be reproduced with core=normal, please report the problem on the DOSBox-X Git issues page.
One known issue is that opening a DOS window in Windows 95 will cause a crash when not using core=normal.
Turbo mode
Some parts of the installation, but also starting Windows 95 can take a considerable amount of time.
You may be able to speed this up considerably (depending on the host CPU) by using the DOSBox-X Turbo mode, which can be enabled from the drop-down menu bar by selecting «CPU» followed by «Turbo (Fast Forward)».
This turbo mode is not like the old Turbo button on retro PCs, but functions more like a fast-forward, and therefore should not be used when interacting with the guest OS.
By default, the moment you press a key on the keyboard, turbo mode will disengage.
|
Warning |
Using the mouse not disengage turbo mode, and double-clicks will be almost impossible to achieve as long as turbo mode is active. |
You may also want to enable turbo mode by default to allow Windows 95 to startup quicker by merging the following settings into your DOSBox-X config file.
|
Note |
This will cause some audio distortion on Windows 95 startup, if you have the Windows startup sound enabled. |
Creating a Harddisk image
|
Note |
In addition to the below DOSBox-X command line utility, it is possible to create harddisk images from the DOSBox-X menu. Go to the «DOS» menu and select «Create blank disk image…». This option allows for various common harddisk types to be created, for less common types you need to use the command line utility. |
|
Note |
When creating your HDD image with IMGMAKE, instead of specifying a custom size, you can choose a pre-defined template. The pre-defined HDD templates can be seen by running IMGMAKE without arguments.
|
-
Diskette (floppy) images are always created as FAT12.
-
If your reported DOS version is 7.0 or lower, then harddisk images up to 2GB will use FAT16 by default.
-
If your reported DOS version is 7.1 or higher, then harddisk images up to 512MB will use FAT16 by default.
-
Larger size harddisk images will use FAT32 by default (larger than 2GB can only be created as FAT32).
Alternatively, you can use the -fat option to instruct IMGMAKE to create a certain FAT type (assuming that is possible for the harddisk size).
|
Note |
Only Windows 95 OSR2 or later supports FAT32, for older Windows 95 releases you can only use FAT16 up to 2GB. |
First you need to start DOSBox-X from the command-line, using your newly created win95.conf.
This assumes that dosbox-x is in your path and win95.conf is in your current directory.
dosbox-x -conf win95.confThen in DOSBox-X you need to create a new harddisk image file with IMGMAKE.
This example uses an 2GB hard disk image with a single FAT16 formatted partition.
This is the maximum size for FAT16 and supported by all Windows 95 releases.
IMGMAKE hdd.img -t hd_2gig -fat 16Or if you’re using Windows 95 OSR2 or later, you can create a FAT32 volume.
Technically the FAT32 filesystem is capable of supporting partitions up to 2TB, but the generic IDE driver in Windows 95 cannot handle volumes greater than 32GB.
Larger partition sizes may be possible with 3rd party drivers but are not covered here.
In later Windows versions, starting with Windows 2000, Microsoft won’t let you format a volume bigger than 32GB with FAT32 using its built-in formatting tool, this was presumably to push migrations to NTFS and later exFAT.
IMGMAKE hdd.img -t hd_8gigOr if you want to create a larger disk, you can create a custom type.
This is an example of a 16GB (16*1024=16384 MB) disk, which due to its size, will be formatted as FAT32.
IMGMAKE hdd.img -t hd -size 16384Installation Method
Other installation methods are possible than the one described below.
This method is however considered to be the quickest one with the least number of steps.
Requirements
-
DOSBox-X 0.83.10 or later, these instructions will NOT work with other DOSBox forks.
-
Windows 95 CD-ROM image (named «Win95.iso» in the example below).
Getting this image file is outside the scope of this guide.
Starting the installation
This assumes you have already started DOSBox-X with the win95.conf config file and created your harddisk image.
First mount the harddisk image you created earlier:
|
Note |
If you get an error saying that «This operation requires DOS version 7.10 or higher», than you’re trying to mount a FAT32 volume, and have not set your reported DOS version in your DOSBox-X config to 7.1. FAT32 volumes are only supported if your installing Windows 95 OSR2 or later. |
You will also need to mount the Windows 95 CD-ROM. There are a few ways of doing so, but this guide assumes you have a ISO image.
If you have a copy of the Windows 95 CD-ROM as an ISO (or a cue/bin pair), you can mount it as follows:
Copying the contents of the CD-ROM
While not strictly necessary, as it is possible to run SETUP.EXE directly from the CD-ROM (if you have the CD-ROM automatically mounted in your [autoexec] section of the config file).
It is recommended to copy the installation files (contents of the WIN95 directory on the CD-ROM) to your HDD image, as it will prevent Windows 95 from asking for the CD-ROM when it needs additional files later.
XCOPY D:\WIN95 C:\WIN95 /I /EThe files in the above example are copied to the C:\WIN95 directory.
|
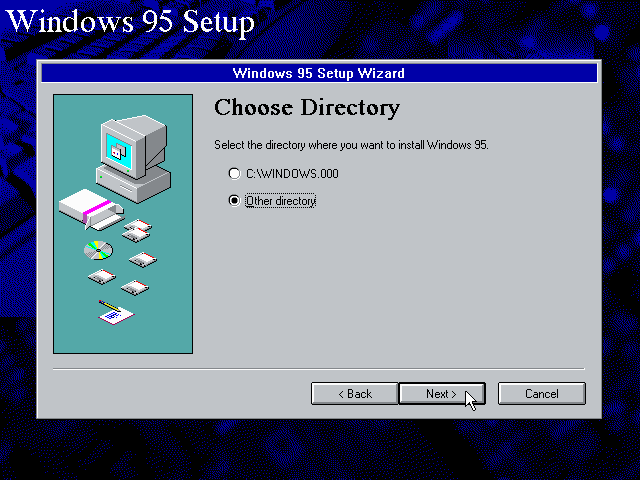
Note |
You may want to use «C:\WINDOWS\OPTIONS\CABS» instead, as that is the directory that OEM installs normally use. But if you do, be aware that the installer will complain that C:\WINDOWS already exists. When you get the warning below, select «Other directory» and click «Next >» to continue. On the screen afterwards, change the directory to «C:\WINDOWS» and continue the installation. |
Running SETUP.EXE
You can now run SETUP.EXE.
Now run through the installation process.
The actual steps will not be covered in this guide but are pretty self-explanatory and detailed guides on the Windows 95 install process can be found online such as YouTube.
When the installer reboots DOSBox-X, and you’re back at the DOSBox-X Z:\ prompt, type EXIT.
Now edit your win98.conf config file.
At the end of the file, in the [autoexec] section, add the following lines:
IMGMOUNT 0 empty -fs none -t floppy
IMGMOUNT 1 empty -fs none -t floppy -size 512,15,2,80
IMGMOUNT C hdd.img -ide 1m
IMGMOUNT D empty -t iso -ide 2m
BOOT C:|
Note |
The current DOSBox-X release seems to have a bug where Win95 will only see the first floppy drive. |
Save the config file, and at the command-prompt of your host PC you can type the below command to continue with the next phase of the installation process.
This is also the command you use, after the installation is finished, to start Windows 95 in DOSBox-X.
dosbox-x -conf win95.confBooting Windows 95 after installation
After the installation is finished, you can start Windows 95 from the command-prompt of your host PC, with the following command:
dosbox-x -conf win95.confYou can optionally create a shortcut on your desktop to start Windows 95 directly.
Steps to take after installation
Once Windows 95 is installed, here is some additional software you may want to install or update:
-
Install Microsoft .NET framework version 1.0 and 1.1 (includes Visual C++ 2003 runtime)
-
Install Unofficial Windows 95 OSR2 Service Pack 1.05
-
Install/Update to Microsoft Internet Explorer 5.5SP2 (rarely needed)
-
Install Microsoft WinG API 1.0 (needed by just a few games, and those games typically include it)
-
Install Microsoft DCOM 4.71.1015.0 (DCOM95.EXE)
-
Install/Update to Microsoft DirectX 8.0a
-
Install/Update to Microsoft Windows Media Player 6.4
-
Install Adobe Acrobat Reader 5.05
-
Install/Update to Adobe Flash Player 8.0.24.0
-
Install Adobe PostScript driver 4.2.6
-
Install Apple QuickTime 5.0.5
-
Install the 3dfx Voodoo 3.01.00 reference drivers
Mounting CD or Diskette images
DOSBox-X supports mounting CD and diskette (floppy) images, and making those available to an OS booted in DOSBox-X.
To do so, an empty diskette or CD drive needs to be attached before booting a guest OS such as Windows 95, or diskette or CD images need to be attached (which will automatically cause an appropriate drive type to be emulated).
-
Disks can be changed after booting a guest OS from the drop-down menus under «DOS» → «Change current floppy image…»
-
CDs can be changed after booting a guest OS from the drop-down menus under «DOS» → «Change current CD image…»
For example, to specifying multiple image files with the IMGMOUNT command:
IMGMOUNT A disk1.img disk2.img disk3.img
IMGMOUNT D cd1.iso cd2.iso cd3.iso
You can then swap between disk images with the «DOS» → «Swap floppy drive» or «Swap CD drive» option from the drop-down menus, or using the hot-key.
Enabling networking
To enable networking, you first need to enable NE2000 adapter emulation in your win95.conf config file and select an appropriate back-end for the NE2000 emulation.
Enabling NE2000 in your DOSBox-X config file
There are two different back-ends to the NE2000 adapter emulation.
The default is backend=auto, which implies backend=slirp if SLIRP support is available, otherwise backend=pcap is implied if PCAP support is available.
backend=pcap
The PCAP back-end uses something called «Promiscuous mode».
This has the advantage that DOSBox-X can support various legacy network protocols, such as IPX and NetBIOS Frames (aka NetBEUI) in addition to TCP/IP.
This mode not only allows communication between DOSBox-X instances on the same network, but also with legacy PCs on the same network.
However, for this to work DOSBox-X needs to have very low-level access to your real network adapter.
In some cases, this is not possible, such as:
-
Network Adapter or Driver not supporting Promiscuous mode (most wireless adapters fall into this category).
-
Your Ethernet switch not allowing multiple MAC addresses on a single port or doing any kind of MAC address whitelisting.
-
Sandboxed versions of DOSBox-X (e.g., Flatpak) not allowing the required low-level access.
To enable NE2000 emulation with the pcap back-end, add the following to your win95.conf config file:
[ne2000]
ne2000=true
nicirq=10
backend=pcap

[ethernet, pcap]
realnic=list
The list value for realnic= will need to be replaced by a value representing your actual network adapter.
See Guide: Setting up networking in DOSBox-X for more information.
backend=slirp
Unlike the PCAP back-end, the SLIRP back-end does not require Promiscuous mode.
As such it will work with wireless adapters, and it will work in most sandboxed environments.
But obviously, it has its own limitations.
-
It is not supported in all platforms, such as Windows Visual Studio builds.
-
It only supports the TCP/IP protocol (other protocols must be TCP/IP encapsulated).
-
It is effectively behind a NAT (Network Address Translation) gateway, meaning that you can communicate outbound, but no systems on the LAN can instantiate a new connection to it. Which means that two DOSBox-X instances on the same LAN using
backend=slirpcannot communicate with each other.
To enable NE2000 emulation with the SLIRP back-end, add the following to your win95.conf config file:
[ne2000]
ne2000=true
nicirq=10
backend=slirp
Setting up NE2000 networking in Windows 95
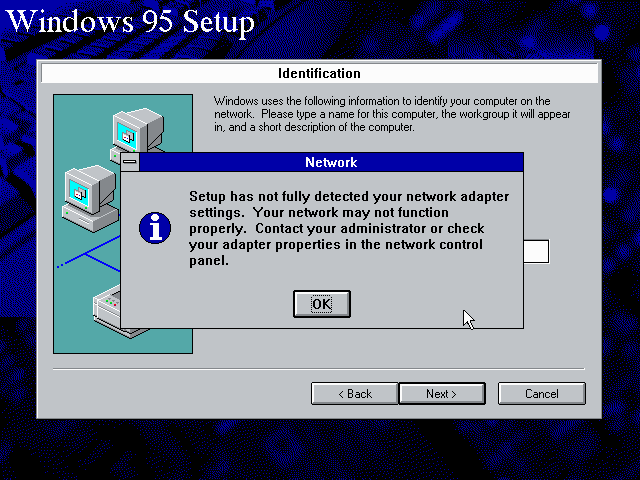
Detection during installation
Windows 95 setup wizard will ask if you want to detect additional hardware during installation.
The exact options presented may vary depending on the Windows 95 edition.
You can tick the «Network adapter» checkbox, and it should continue and find the emulated NE2000 adapter.
It will however, not give you the possibility to set the resources at this point, and you will need to do so in device manager afterwards.
Once the Windows 95 installation is finished, right-click on «My Computer» on the desktop and select «Properties».
Now in the «System Properties» dialogue, select the «Device Manager» tab.
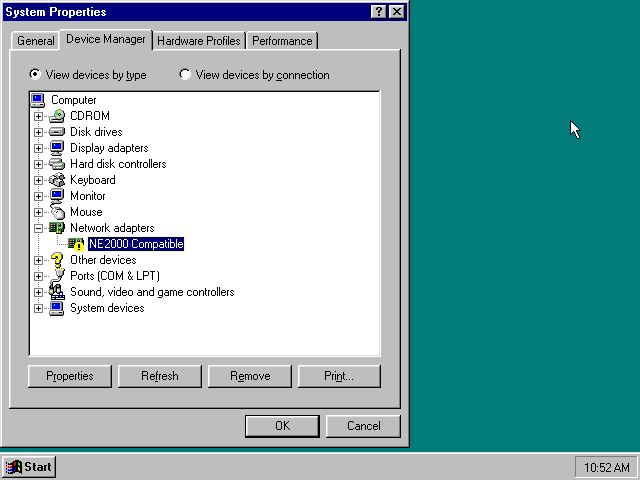
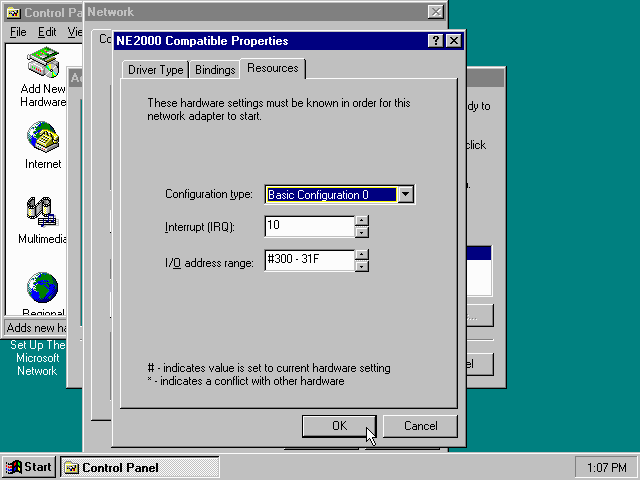
Highlight the «NE2000 Compatible» entry and click on the «Properties» tab and then click the «Set Configuration Manually» button.
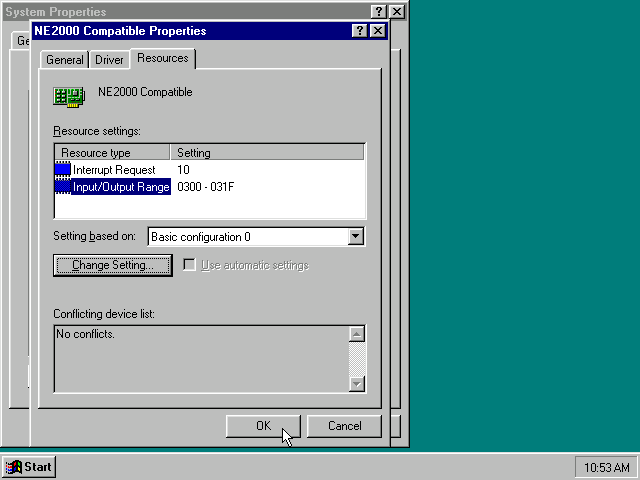
Now you need to highlight the «Interrupt Request» entry and click the «Change Setting…» button. You can now change the IRQ to 10 to match the nicirq= value in your DOSBox-X config file.
Next, highlight the «Input/Output Range» entry, and again click the «Change Setting…» button. Now change the value to «0300 — 031F».
Once you’re finished adjusting the resources, click the «OK» button, and Windows 95 will prompt you to shut down to apply the settings, after which you need to restart Windows 95 in DOSBox-X.
|
Note |
By default, Windows 95 only enables Novell’s IPX/SPX protocol. Most Windows 95 applications expect TCP/IP which you will need to manually enable in the Network settings. |
NE2000 Detection after installation
If you enabled NE2000 support in your DOSBox-X config file after Windows 95 installation, go to «Start», «Settings» and «Control Panel» and double-click on «Add New Hardware».
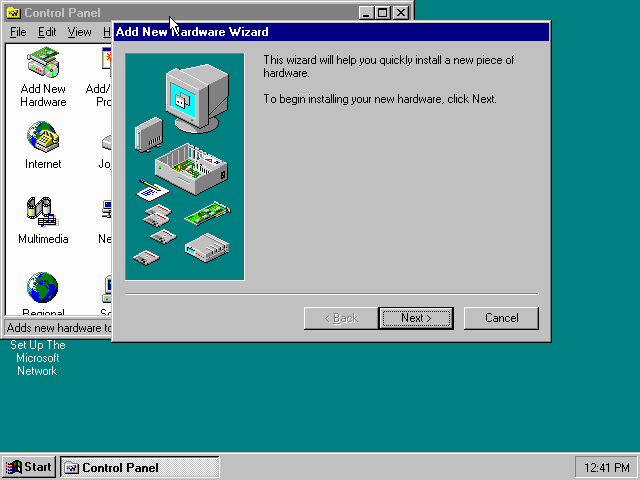
In the «Add New Hardware Wizard» dialogue, click the «Next >» button to continue.
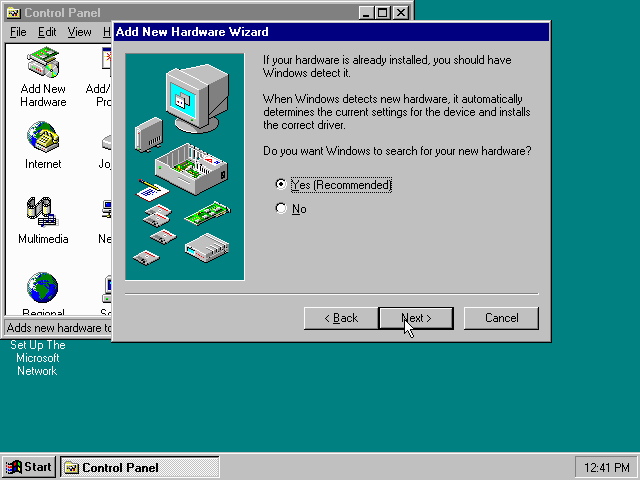
Now select «Yes (Recommended)» and click the «Next >» button to continue.
It will ask for another confirmation.
Again, simply click the «Next >» button.
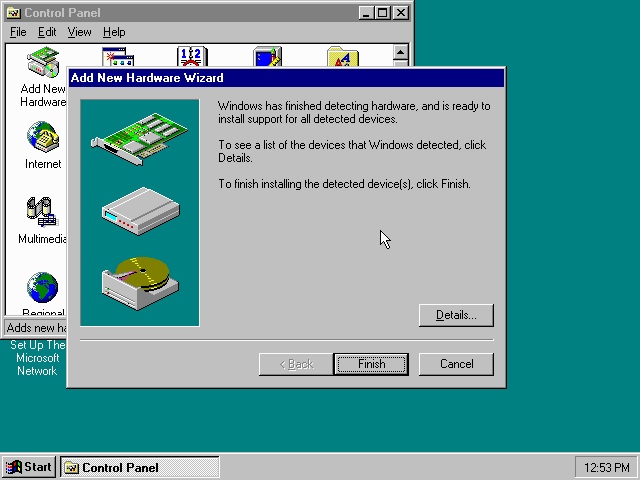
If it detected new hardware, you should get this dialogue.
You can click the «Details…» button to see what it found, after which you can click on «Finish».
It will now want you to provide some details, click on «OK».
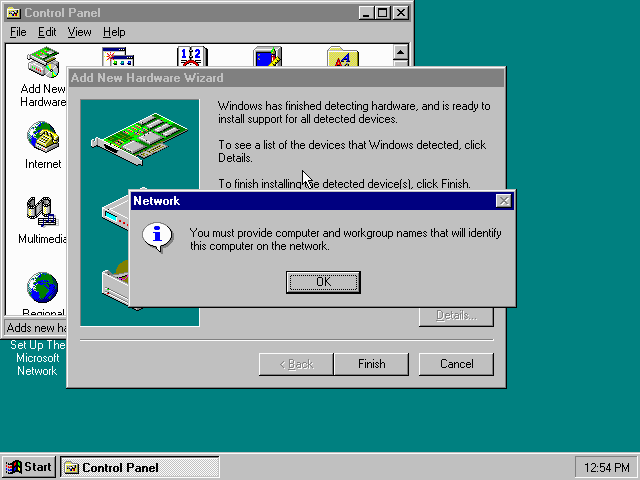
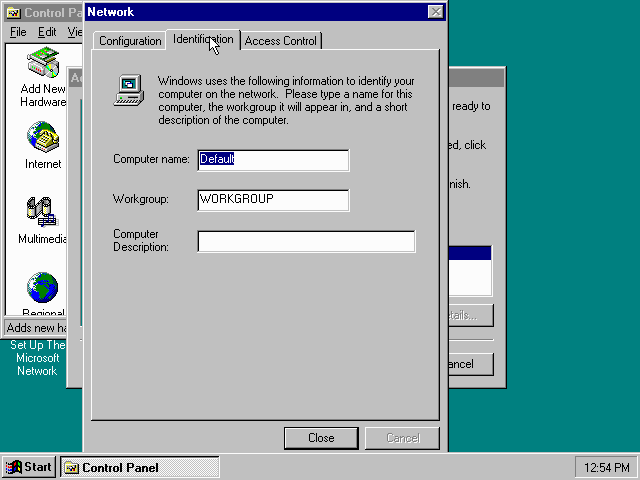
You must at a minimum enter a value in the «Workgroup» field.
If you don’t know what to type, just type «WORKGROUP».
You may also want to provide a more descriptive «Computer Name».
Don’t close the dialogue just yet though, click on the «Configuration» tab instead.
Highlight the «NE2000 Compatible» entry and click the «Properties» button.
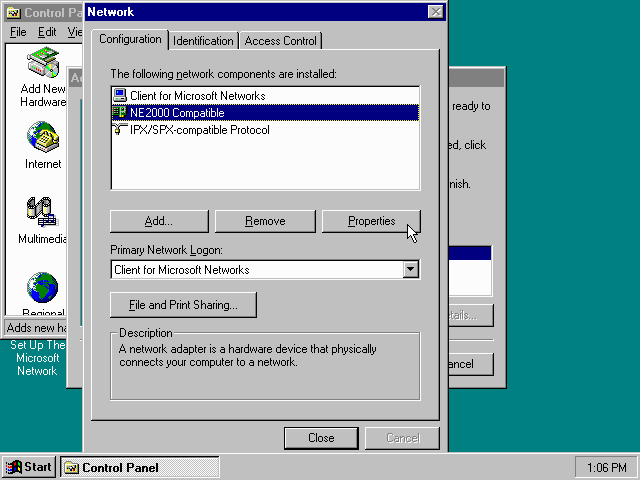
On the «NE2000 Compatible Properties» dialogue, select the «Resources» tab, and adjust the IRQ to 10 to match the nicirq= value in your DOSBox-X config file.
Then click «OK» to finish.
Lastly, while you’re in the Network settings dialogue, you may also want to add the TCP/IP protocol, which is not enabled by default on Windows 95.
On the Configuration tab, click on «Add», then select «Protocol» and click again «Add…»
You will now be presented with the «Select Network Protocol» dialogue.
Select manufacturer: «Microsoft», and for Network Protocols: «TCP/IP», and click the «OK» button.
|
Note |
In the Network settings, you can optionally remove the «IPX/SPX-compatible Protocol» that was automatically installed, as few Windows programs need it. |
|
Note |
By default, TCP/IP will try to get its network configuration over DHCP, which should work in most cases. If you need to manually specify the settings, highlight «TCP/IP», and click the «Properties» button. |
Once you’re finished, Click OK to close the Network settings window, and the TCP/IP driver will be installed, and Windows will prompt you to restart your computer.
Confirm, and Windows 95 will reboot.
After the reboot you should have working TCP/IP networking.
Emulated video adapter and video mode
The default video adapter that DOSBox-X emulates is the S3 Trio64, which is the best emulated video adapter that DOSBox-X offers, with the widest range of resolutions and colour depths.
There is a newer S3 video driver for Win95, version 2.11.03, dated June 12, 1996.
This update adds some additional video modes. But it does not add support for 8MB video RAM, or wide-screen video modes.
The available video modes with the updated S3 Trio64 driver are:
-
4-bit colour (16): 640×480
-
8-bit colour (256): 640×480, 800×600, 1024×768, 1152×864, 1280×1024 and 1600×1200
-
16-bit colour (65536): 640×480, 800×600, 1024×768 and 1280×1024
-
24-bit colour (16.7M): 640×480
-
32-bit colour (16.7M + alpha): 640×480, 800×600 and 1024×768
A few enhancements have been made to the emulated S3 Trio64, compared to a real S3 Trio64:
-
No real S3 Trio64 was ever produced with more than 4MB video memory, under DOSBox-X you can optionally configure 8MB.
-
The real cards never supported wide-screen resolutions, wide-screen VESA modes can optionally be enabled in DOSBox-X.
However, these enhancements cannot be used in Windows 95 with the S3 video driver due to driver limitations.
As such you will be limited to the above video modes with this driver.
|
Note |
If you use an older S3 driver you may experience graphical problems (green tint) in 32-bit colour mode. These problems may not be completely solved by upgrading to the latest driver. The only known solution for now if you used an older driver is to re-install Win95 and use the 2.11.03 driver instead. |
VESA driver
First add the following lines to your DOSBox-X config file in the section:
allow high definition vesa modes=true
allow unusual vesa modes=true
allow low resolution vesa modes=false
Download and extract the latest VBEMP driver package and install the driver from the 032MB directory.
With these settings modes up to 1920×1080 in 32bit colour, or 1920×1440 in 16bit colour are possible.
|
Note |
Using the VBEMP driver does have a negative graphics performance impact, which when measured in WinBench96 Graphics WinMark, can be a reduction of up to 59%. |
Emulated sound card
The emulated sound card used in this guide is the SB16 Vibra, instead of the default SB16.
This is simply because the SB16 Vibra is an ISA PnP card, and therefore automatically detected by Windows.
There is no other real advantage of using the emulated SB16 Vibra over the SB16.
|
Note |
One often heard complaint of the real SB16 Vibra is its CQM synthesis, which was used as a low-cost replacement of the OPL3 chip found on earlier cards. However, DOSBox-X does not really emulate the CQM, instead it uses the same OPL3 emulation as for the regular SB16 model. Therefore, the CQM sound quality issues with the real SB16 Vibra do not apply to DOSBox-X. |
An optional driver update to 4.38.14 is available on the VOGONS Vintage Driver Library (ignore that the download claims it is for Windows 98, the update is for both Windows 95 and 98).
|
Warning |
There have been reports from some users that with sound enabled, that Windows 9x games crash. If you encounter similar issues, try to set sbtype=none and see if the game works.
|
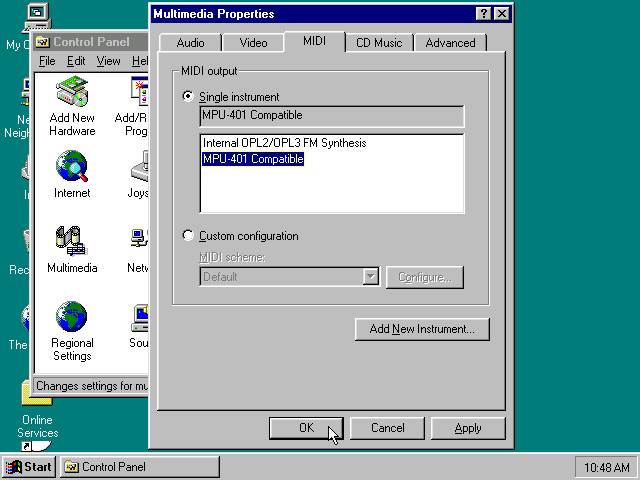
Enabling General MIDI
If you have a working DOSBox-X General MIDI setup, either emulated or real, you can use that in Windows 95.
Go to «Start», «Settings» and open «Control Panel», and then double-click on «Multimedia».
Now on the «MIDI» tab, change the «Single instrument» option to «MPU-401 Compatible», and click OK to close the window.
Enabling printing
Print to PostScript
For the best print quality, you will want to print to a PostScript printer in Windows 95.
First, set up your DOSBox-X config to print to a file as such:
[dosbox]
captures=capture

[parallel]
parallel1=file timeout=2000
You can either use the PostScript driver bundled with Windows 95, or alternatively install the newer Adobe PostScript 4.2.6 driver.
If using the bundled driver, select any PostScript printer such as the «QMS ColorScript 100 Model 30», during printer setup connected to LPT1.
Once the printer is installed, open the printers properties, and on the «Details» tab click on the «Spool Settings…» button.
In the «Spool Settings», you must select «Print directly to the printer» and click OK.
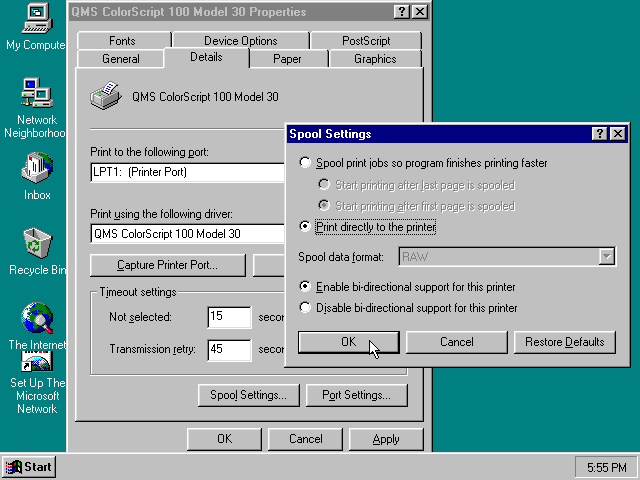
|
Warning |
Failing to change the spool setting, when printing to a file, will result in corrupted PostScript files! |
|
Note |
If two files end up being generated instead of just one for a printjob, you will want to revert the above spool setting. And perhaps try changing the spool setting to «Start printing after last page is spooled». |
When you print, a .prt file in your captures= directory will be created, which despite the extension, is actually a PostScript file.
On Linux and macOS, PostScript files are natively supported and can be viewed and printed.
On a Windows host, it is necessary to install a separate PostScript viewer such as GSview.
Epson emulation
As an alternative, you can use the integrated Epson printer emulation, but the output quality will be significantly less compared to PostScript.
First, set up your DOSBox-X config to emulate an Epson printer as such:
[parallel]
parallel1=printer

[printer]
printer=true
printoutput=ps
multipage=true
timeout=2000
Next in Windows 95, select any Epson dot-matrix printer, such as the «Epson LQ-860+» option during printer setup connected to LPT1
|
Warning |
Make sure that you do not configure the Epson printer driver for a graphics resolution other than 180×180, or the output will be corrupted. |

When you print, a PostScript file with the .ps extension will be created in your current working directory.
The emulated Epson printer settings can be adjusted as documented on the above linked wiki printing guide.
3dfx Voodoo
The emulated 3dfx Voodoo PCI device is enabled by default in DOSBox-X, but Windows 95 lacks drivers for it by default.
As such a «PCI Multimedia Video Device» will show in Device Manager with a yellow exclamation mark.
A driver package is available here (v3.01.00) to enable support.
If for some reason you do not want 3dfx Voodoo emulation, it can be disabled by adding the following lines to your DOSBox-X config:
[voodoo]
voodoo_card=false
Glide pass-through
Glide pass-through is an optional DOSBox-X feature, and not required to use a 3dfx Voodoo game with Windows 95.
It can provide better performance, but can also be rather tricky to get working properly. As such it is not recommended for most users.
If you decide to try this method, first ensure the game works without glide pass-through using the standard 3dfx Voodoo emulation.
There are a few points you need to be aware of.
-
The DOSBox-X and glide-wrapper installed on the host need to be the same architecture.
So, if you’re using a 64bit DOSBox-X, you need to use a matching 64-bit glide-wrapper. -
The Linux SDL2 DOSBox-X does not work with OpenGlide, this is a limitation of OpenGlide (see OpenGlide issue #20).
The work-around is to use the SDL1 DOSBox-X instead.
You need to set the following DOSBox-X config option:
You will also need a specially patched GLIDE2X.DLL file which you can place in either the C:\Windows\System directory of Windows 95, or in the game directory.
But be aware that some games come with their own GLIDE2X.DLL, which typically gets installed in the game directory.
If so, you will have to remove this DLL file for glide pass-through to work.
Hard Disk Read-ahead optimization
In «System Properties», select the «Performance» tab, and click the «File System…» button.
A separate «File System Properties» window will open.
On the «Hard Disk» tab you can specify the Read-ahead optimization.
Based on benchmark results (WinBench 96), it seems that setting this to «None» gives the best performance in combination with DOSBox-X, although the difference is marginal.
This is no doubt because the host system is better at caching then the Windows 98 cache function.
Host Folder mounts
Starting with DOSBox-X 2022.08.0, there is optional support to dynamically convert a host folder mount to an emulated FAT harddisk for use when you need to boot a guest OS, such as Windows 95.
This can be accomplished in one of two ways. Either when you issue the boot command, you add the option -convertfat. e.g. boot c: -convertfat.
Or by setting the following option in your DOSBox-X config file:
[sdl]
convertdrivefat = true
When you now boot from a real image file, it will attempt to convert ALL folder mounts at the time of booting to emulated FAT Harddisks.
|
Note |
You cannot boot from such an emulated FAT harddisk. You will still need some other bootable image file to actually boot a guest OS. |
|
Note |
This conversion is dynamic, effectively creating an emulated FAT harddisk out of a folder mount. This converted FAT harddisk is not automatically stored permanently. You can however, store it as a permanent image file that you can later mount with IMGMOUNT, using the «Drive» > «drive letter» > «Save to disk image» option from the menus.Please see the «Creating harddisk images from folder mounts» section in the Guide: Managing image files in DOSBox-X for more information. |
|
Note |
There is currently no support for creating emulated CD-ROM or Floppy drives out of folder mounts with this method. Any CD-ROM or Floppy folder mounts will also be converted to harddisk folder mounts, and may not actually work for the intended purpose. |
One thing to note, is that there is no way to specify the FAT type to use for the conversion.
The FAT type will be automatically selected based on the aggregate size of files in the folder, plus 250MiB (this can be adjusted with the convert fat free space option in the DOSBox-X config file).
If the total space of files + 250MiB does not exceed 2GiB, it will convert it into a FAT16 disk. Otherwise, it will become a FAT32, which in turn will require a guest OS with FAT32 support.
Alternatively, you can also make the emulated FAT drive read-only by using the -convertfatro option with the boot command. Or by setting convert fat free space=0 option in the DOSBox-X config file.
Known limitations
-
If you intend at any point to use a Floppy or CD during your usage of Windows 95, you must attach either a floppy and/or CD image before starting Windows 95, or an empty floppy or CD-ROM drive.
If a floppy or CD drive is not present when starting Windows 95 the drive is simply missing, and you cannot add it without rebooting the guest OS. -
When mounting a CD-ROM image using
imgmount, before booting Windows 95, you may have to specify the IDE device to attach it to for it to work properly in Windows 95. e.g.imgmount d game_cd.iso -ide 2mto make the CD-ROM drive appear as the master device on the secondary IDE controller.
Outstanding issues
-
Resolve «Drive A is using MS-DOS compatibility mode file system»