
Windows is one of the most flexible operating systems that can also be installed on an SD card. There are several reasons why you should consider installing Windows on an SD card, such as if you’re a journalist, a businessperson, a government official, or you travel a lot and don’t want to use an untrusted computer.
In this case, you can install Windows on an SD card, plug the SD card into the computer, access Windows using that, and once done, securely unplug. This way, no one can access your data.
If this sounds exciting and you want to know how to install Windows on an SD card, continue reading!
📖You may be interested:
Install Windows on an SD card [Step-by-Step Guide]
Make sure an SD card has a respectable IOPS value before installing Windows on it, and then you must turn the SD card into a bootable SD card.
Here’s how to do that:
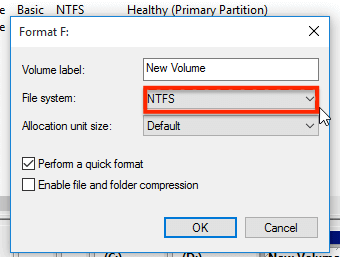
Step 1. Connect the SD card to the PC and format it to the NTFS file system using the Windows «Diskpart» or «Disk Management» tool.
Step 2. Visit the Microsoft website and download the Windows 10/11 Installation Media Creation Tool. Run the file after it has downloaded.
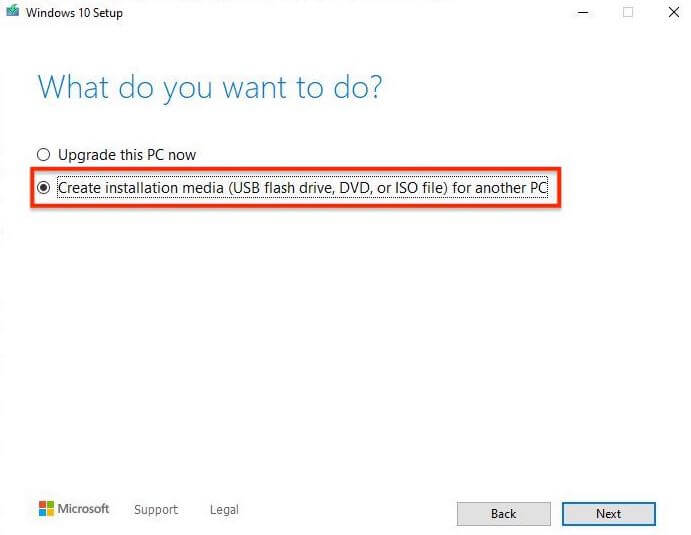
Step 3. Select the option «Create installation media (USB flash drive, DVD, or ISO file) for another PC.»
Step 4. Now, select the language, your Windows architecture, and the Windows edition.
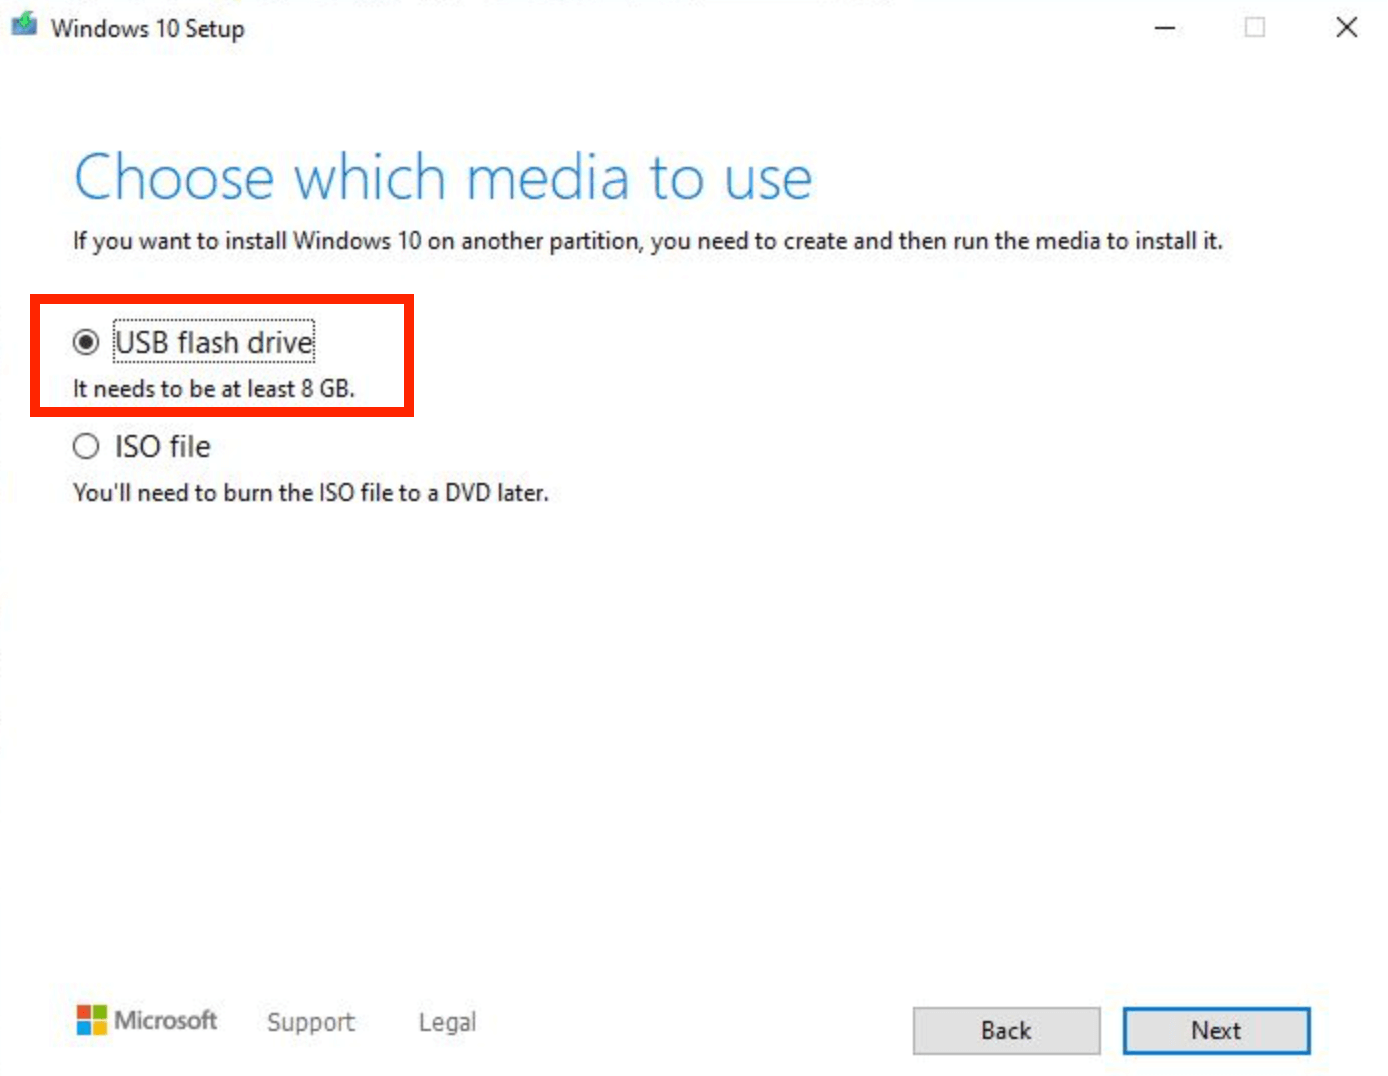
Step 5. Choose the option «USB flash drive» and select your SD card.
Now, after you’ve turned your SD card into a bootable SD card, here’s what you need to do to install Windows on it:
Step 1. Restart your PC and open the BIOS menu by pressing the BIOS key.
Step 2. In the firmware section, check if «UEFI boot mode» is enabled or disabled. If it is enabled, disable it and then enable «legacy support/BIOS.»
Step 3. Now, change the boot order and select your SD card as the first bootable device.
Step 4. Save the changes and exit out of the BIOS window.
Step 5. Now restart your PC, and you will boot Windows using an SD card.
[Easy] One-Click to Install Windows on a Portable USB
Installing Windows on an SD card requires many steps, and you must have a certain knowledge of the computer to finish the process. If you want to make it easier, EaseUS OS2Go is a fantastic tool that helps install Windows OS on a Windows-verified and non-verified portable USB. You can create Windows To Go directly using an ISO file with BIOS and UEFI support.
Using this program, you can also clone Windows OS to a portable USB, from Windows 7 up to Windows 11.
Use EaseUS OS2GO to quickly install Windows on your portable USB if you don’t want to deal with the hassle of downloading the Windows creation tool from Microsoft’s website and then going through a drawn-out installation process.
And if you want to install Microsoft’s latest Windows 11 on your SD card, you can do that easily using EaseUS OS2GO. You can create a Windows 11 installation USB drive that can bypass Windows 11 system requirements.
Now, use it to install your Windows operating system on a portable USB so you can take and use it anywhere.
Step 1. Install EaseUS OS2Go on your Windows computer, it will display your system drive’s used space. Plug in a USB drive that is larger than the system drive used space. Choose the target USB drive and click Next to continue.

Step 2. EaseUS OS2Go will notify you that the following operation would delete all data on your drive. Make sure that you have backed up all the important data. Click the Continue button to proceed.

Step 3. Adjust disk layout. The default disk layout on the target drive will be exactly the same as the resource drive. You could also edit the layout according to your needs. Tick the option there if you’re using a Solid State Drive as the Windows bootable drive. Next, click Proceed.

Step 4. Then EaseUS OS2Go will start to create the portable USB drive. It usually takes a while depending on your OS and Network condition. When the progress reaches 100%, the USB drive should be bootable now.

Step 5. Insert the portable Windows USB and start your computer. Press the required key (F2, DEL, F10…) to access BIOS. Choose to boot from the USB disk.
Note: Please make sure that the boot mode (UEFI or Legacy) of the portable USB and your target computer are the same, otherwise you may not be able to boot.
Fixing issues that are preventing from installing Windows on an SD card
A lot of the users reported that the Windows creation tool doesn’t detect SD cards, and some reported that SD cards aren’t recognized by the BIOS when trying to change the boot order. A few users even reported different problems; however, these are the most common ones.
The solution to the first problem is very easy. Use EaseUS OS2GO and install Windows 11 on an SD card easily, or clone your own Windows on an SD card.
For the second issue, update the BIOS of your computer, and then it should detect your SD card as a bootable device. You can then select it under the BIOS and boot Windows off your SD card.
Conclusion
Unlike other operating systems, Windows is really flexible and advanced, which is what makes it the most popular operating system on Earth. You can install and boot Windows using regular hard drives and SSDs, as well as unconventional methods like installing and booting Windows from an SD card, or on a portable USB with EaseUS OS2Go easily. We hope this article has helped you successfully install Windows on an SD card.
FAQs on Installing Windows on An SD Card
Do you have any other questions about installing Windows on an SD card? We answer a few of them below.
1. How do I put Windows 10 on my SD card for Steam Deck?
The steps are basically simple, first, create a Windows ISO file, and afterward, download Steam Deck’s drivers. Using Rufus, install Windows on your SD card. Now insert the SD card into the Steam Deck and restart it. In the Steam Deck boot selection menu, select your SD card, and then let it boot Windows. After a successful startup, install the drivers.
2. How do I make my SD card bootable for Windows 10?
You can make your SD card bootable for Windows 10 using Disk Management, Diskpart, and Explorer.
Readers help support Windows Report. We may get a commission if you buy through our links.
Read our disclosure page to find out how can you help Windows Report sustain the editorial team. Read more
Installing Windows on an SD card can be a game-changer, especially if you have a readily available slot on your laptop. Make sure that you have an SD card with a reasonable IOPS value. In other words, it has to have a decent read/write speed. Of course, it also need to have the right necessary storage space for the OS you choose (at least 16 GB, 32 GB recommended).
How do I install a bootable Windows on an SD card?
1. Format the SD card
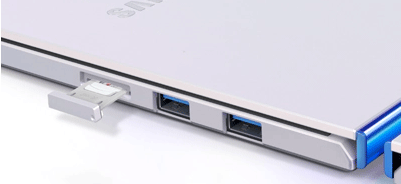
- Connect the SD card to your computer.
- Open the Disk Management tool by right-clicking on This PC or My Computer, selecting Manage, and then choosing Disk Management.

- Locate your SD card, right-click on it, and choose Format.
- Select the NTFS file system and click OK.

Formatting the SD card ensures it is ready for the Windows installation process.
2. Download Windows Installation Media
- Go to the Microsoft website and download the Windows Installation Media Creation Tool.

- Run the tool and choose Create installation media (USB flash drive, DVD, or ISO file) for another PC.

The Media Creation Tool will prepare the necessary files to install Windows. The example is for Windows 11, but you can also get the one for Windows 10.
3. Create the bootable SD card and change the boot order in BIOS
- Select the language, Windows version, and architecture you need.
- Choose USB flash drive and select your SD card from the list.
- Restart your computer and enter the BIOS/UEFI settings (usually by pressing a key like F2, DEL, or ESC during boot).
- Disable UEFI boot mode and enable Legacy Support/BIOS.
- Change the boot order to prioritize the SD card.
- Save the BIOS settings and exit.
Changing the boot order ensures the computer boots from the SD card first.
4. Install Windows
Your computer will restart and boot from the SD card, starting the Windows installation process. Follow the on-screen instructions to complete the Windows installation.
This step-by-step guide helps you turn your SD card into a bootable device and install Windows on it, making it a portable operating system you can use on various computers.
Basically, there is no notable difference from making a bootable SD card or a bootable USB flash drive.
After installing Windows on your system, don’t forget to change back the boot order in BIOS.
Using a third-party tool to install Windows on an SD card
There are lot of tools out there such as EaseUS OS2Go, AOMEI Partition Assistant, or Rufus that can help you create a bootable Windows SD card. They guide you through the whole process a bit easier, but you still need to enter BIOS and change the boot order by yourself.
We also have a list of the best tools to create multi-boot drives and install multiple OSes.
How do I install Windows on a MicroSD card for Steam Deck?
- Format the MicroSD card to NTFS using the Diskpart tool or Disk Management.
- Download Windows ISO and Steam Deck drivers. Click on the highlighted links for the appropriate guides if you don’t know how to perform the operations.
- Use a tool like Rufus to burn the Windows ISO to the MicroSD card.
- Select the MicroSD card as the device, choose the ISO file, and click Start.
- Rufus simplifies creating bootable media, which is necessary for installation.
- Insert the MicroSD card into the Steam Deck.
- Restart the Steam Deck and access the boot selection menu (usually by pressing a button during startup).
- Select the MicroSD card as the boot device and install Windows.
Following these steps, you can successfully install and run Windows on your Steam Deck via a microSD card. This method lets you easily switch between SteamOS and Windows on your Steam Deck, providing flexibility for gaming and other tasks. We also have a complete guide on how to install Windows on Steam Deck if you need more information.
Troubleshooting common issues
- SD card not recognized by Windows Creation Tool – Try using a dedicated tool to create the bootable Windows SD card. For instance, EaseUS OS2Go provides an alternative method when the standard Windows creation tool fails.
- BIOS doesn’t recognize the SD card – Update your computer’s BIOS to the latest version. Also, ensure the SD card is properly inserted and compatible.
By following these steps, you can address common problems and ensure a smooth installation process for Windows on an SD card.
Each solution offers a detailed, user-friendly approach to installing Windows on an SD card, catering to different needs and technical proficiencies. To avoid future issues, always ensure your SD card is compatible with your device and keep your BIOS updated.
Claudiu Andone
Windows Toubleshooting Expert
Oldtimer in the tech and science press, Claudiu is focused on whatever comes new from Microsoft.
His abrupt interest in computers started when he saw the first Home Computer as a kid. However, his passion for Windows and everything related became obvious when he became a sys admin in a computer science high school.
With 14 years of experience in writing about everything there is to know about science and technology, Claudiu also likes rock music, chilling in the garden, and Star Wars. May the force be with you, always!
Windows 11 is the latest operating system from Microsoft, featuring a sleek interface, improved performance, and enhanced security features. While most users prefer USB drives for Windows installation, a micro SD memory card can also serve as an efficient alternative. This guide will provide a comprehensive step-by-step process on how to install Windows 11 from a micro SD memory card, ensuring a smooth transition for your laptops and desktops.
Prerequisites
Before diving in, it’s essential to gather the necessary tools and equipment:
-
A micro SD memory card: Ensure that it has at least 8 GB of storage for the installation files. A faster card (Class 10 or UHS) will lead to quicker installations.
-
A Windows 11 ISO file: Obtain this from the official Microsoft website. Make sure your device meets the Windows 11 system requirements.
-
A compatible computer: You’ll need a device to create the bootable micro SD card.
-
Card reader: If your device doesn’t have an integrated micro SD slot, you’ll require an external card reader.
-
Rufus or similar software: This tool helps create bootable drives. Rufus is widely used for its simplicity and effectiveness.
-
Backup your data: Installation processes may lead to data loss. Back up all essential files.
Step 1: Download Windows 11 ISO
-
Visit the Microsoft Website: Navigate to the official Microsoft Windows 11 download page.
-
Select Download Options: Look for the section that lets you download the Windows 11 ISO file. You may have the option to download directly or use the Media Creation Tool for more flexibility.
-
Choose the ISO Release: Ensure you select the correct version, either home or pro, based on your license.
-
Start Download: Save the ISO file to an easily accessible location on your computer.
Step 2: Prepare the Micro SD Memory Card
-
Insert the Micro SD Card: Use your card reader if needed. Ensure that your computer recognizes the card.
-
Format the Card: Open File Explorer, right-click on the micro SD card drive, and select ‘Format.’ Use the following settings:
- File System: ExFAT or FAT32
- Allocation unit size: Default
- Check “Quick Format”
-
Confirm Formatting: Click ‘Start’ and wait for the process to finish. This step ensures that the micro SD card is clean for the installation files.
Step 3: Create a Bootable Micro SD Memory Card
Using Rufus, you will convert the ISO file into a bootable format:
-
Download and Launch Rufus: If you don’t have it installed, download it from the official website. You don’t need to install it, as it runs directly.
-
Select Device: In Rufus, ensure to pick your micro SD card from the ‘Device’ dropdown menu. Double-check this to avoid overwriting other drives.
-
Select the ISO file: Click on ‘SELECT’ and browse to the location of your downloaded Windows 11 ISO file.
-
Partition Scheme: For modern systems (with UEFI), select GPT. For older systems (BIOS), select MBR.
-
File System: Refers to FAT32 for maximum compatibility, especially if you plan to boot from a variety of devices.
-
Creating the Bootable Micro SD: Click ‘START’ and wait for Rufus to create the bootable drive. This process may take some time. Ensure that you do not interrupt the operation.
-
Completion: Once completed, safely eject your micro SD memory card.
Step 4: Configure BIOS/UEFI Settings
To boot from the micro SD card, you might need to change the boot order in BIOS/UEFI settings:
-
Enter BIOS/UEFI: Restart your computer and press the required key during boot (usually F2, F10, DEL, or ESC). The specific key may vary based on your device.
-
Navigate to Boot Menu: Look for the boot options under the BIOS settings.
-
Change Boot Order: Set your micro SD card as the primary boot device by moving it to the top of the boot order list.
-
Save Changes and Exit: Press F10 or select the option to save and exit the BIOS/UEFI setup.
Step 5: Install Windows 11
-
Boot from Micro SD Card: When the computer restarts, it should boot from the micro SD card automatically. If it does not, you may need to revisit the BIOS/UEFI settings.
-
Windows Setup Begins: You’ll be greeted with the Windows 11 installation screen. Choose your preferred language, time, and keyboard layout, and click ‘Next.’
-
Install Now: Click on ‘Install Now’ to continue.
-
Activation: You will be prompted for a product key. Enter your Windows 10 key if upgrading, as they are valid for Windows 11. If you don’t have one, choose «I don’t have a product key,» and you can activate it later.
-
Select Installation Type: Choose “Custom: Install Windows only (advanced)” for a clean installation.
-
Partition Selection: Select the partition where you want to install Windows 11. If you are installing it over the existing OS, you may choose that drive, delete, or format it according to your needs. Be cautious: this step can erase data.
-
Proceed with Installation: Once you’ve made your selection, click ‘Next.’ The installation will proceed, and your computer will restart a few times.
-
Personalization and Setup: After the installation, you will go through personalization settings, including choosing your region, keyboard layout, and other preferences.
-
Sign in with Microsoft Account: Create or log into a Microsoft account if prompted. You may also opt for local account setup.
-
Final Configuration: Follow the on-screen instructions to finish setting up your Windows 11 installation. This includes choosing privacy settings and preferences.
Step 6: Post-Installation Setup
-
Install Drivers: After the installation is complete, check for any driver updates. Access the Device Manager or use Windows Update to ensure all hardware components operate correctly.
-
Install Necessary Software: Reinstall programs and applications that you need for your daily use, including antivirus software.
-
Backup Your System: Consider creating a backup image of your new Windows 11 installation for easy recovery in the future.
-
Personalize Your Experience: Customize your desktop layout, theme, and settings to suit your preferences.
Troubleshooting Tips
-
Boot Failure: If your computer does not recognize the micro SD card, ensure it is inserted correctly and recheck the BIOS settings.
-
Installation Errors: If you encounter issues during installation, verify the integrity of the Windows ISO file. You can do this using checksums provided by Microsoft.
-
Slow Performance: Using a slower micro SD card can lead to sluggish performance. Ensure you opt for a fast card for best results.
-
Data Loss Concerns: Always have a backup of your important files before initiating an installation process, especially when formatting drives.
Conclusion
Installing Windows 11 from a micro SD memory card is a practical solution for users lacking available USB drives or those seeking an alternative. By following the detailed steps outlined in this guide, you can successfully set up your system with Windows 11 and enjoy the enhanced features and performance it offers. Always prioritize safety through back-ups and be mindful of configurations within your BIOS/UEFI. Happy computing!
Installing Windows on an SD card is an interesting option for users that wish to have a portable version of the operating system. This process can be especially beneficial for laptops with SD card slots, allowing for easy boot and usage of Windows across various computers. The steps involved in this guide will help you format your SD card, download the required installation media, and successfully create a bootable SD card to install Windows.

Table of Contents
-
introduction
-
requirements
-
installation-process
-
format-the-sd-card
-
download-windows-installation-media
-
create-the-bootable-sd-card
-
install-windows [#third-party-tools [#installing-on-steam-deck [#troubleshooting [#conclusion
Introduction to Installing Windows on an SD Card
Installing Windows on an SD card provides flexibility for users who may want to run the operating system on different hardware without needing to worry about internal storage limitations. This method can be particularly useful in scenarios where a user may not have direct access to a physical installation medium like a USB stick or where using an SD card is simply more convenient.
Requirements for Installation
To successfully install Windows on an SD card, you will need:
- An SD card with at least 32 GB capacity (with a high read/write speed recommended).
- Access to a Windows computer for the installation process.
- The Windows Installation Media Creation Tool from Microsoft.
- Basic understanding of BIOS settings and disk management.
Step-by-Step Installation Process
Step 1: Format the SD Card
The first step in this process involves formatting the SD card to ensure that it is clean and ready for the Windows installation files. This is how you can format the SD card: [*Connect Your SD Card*: Insert the SD card into your computer’s SD card slot or an external card reader. [Open Disk Management**: Right-click on the Start menu and select «Disk Management.» [*Locate and Format the SD Card: Find your SD card in the list, right-click on it, and choose «Format.» Select «NTFS» for the file system and proceed to format it. This also prepares the SD card for the installation. By formatting the SD card, you make sure that any existing files do not interfere with the Windows installation process.
Step 2: Download Windows Installation Media
Next, you will need to download the Windows installation media: [*Visit Microsoft’s Website*: Go to the official Microsoft website and find the Windows Installation Media Creation Tool. [Run the Tool: Launch the tool and select the option for creating installation media for another PC. [*Select Version and Architecture*: Choose the appropriate language, Windows version (Windows 10 or 11), and architecture (32-bit or 64-bit) as required. [Choose the SD Card: Specify that you want to create a bootable USB, and select the SD card you previously formatted. This process downloads the necessary Windows files and sets up the SD card for installation.
Step 3: Create the Bootable SD Card and Change the Boot Order in BIOS
Creating a bootable SD card involves setting it up to be a bootable drive. Here’s how: [*Change Boot Order*: Restart your computer and enter the BIOS/UEFI settings—this is often done by pressing F2, DEL, or ESC during startup. [Disable UEFI Boot Mode: On the BIOS menu, disable UEFI mode and enable Legacy Support (or something similar, depending on your motherboard). [*Set Boot Priority*: Make sure that the boot order is set to prioritize the SD card before other boot devices. [Save and Exit: Ensure you save your changes before exiting the BIOS. This setup is crucial, as it tells your computer to boot from the SD card first.
Step 4: Install Windows
After setting up the bootable SD card, you can proceed with the installation: [*Reboot the Computer*: Leave the SD card in the slot and reboot the computer. [Follow On-Screen Prompts**: Your computer should now boot from the SD card and guide you through the Windows installation process. Follow the instructions provided on the screen. This step allows you to set up Windows just as if you were installing it from a USB flash drive.
Using Third-Party Tools for Installation
If the above steps seem complicated, there are third-party tools available that can simplify the process of creating a bootable Windows SD card. Programs like:
- Rufus
- AOMEI Partition Assistant
- EaseUS OS2Go These tools guide you through the creation of a bootable SD card, but you will still need to manage the BIOS settings manually. They often provide user-friendly interfaces that may ease the installation experience, especially for those less experienced with disk management.
Installing Windows on a MicroSD Card for Steam Deck
In addition to standard SD cards, the Steam Deck provides an opportunity for installing Windows on MicroSD cards. The steps are similar: [*Format the MicroSD*: Use Diskpart or Disk Management to format the card to NTFS. [Download Windows ISO**: Obtain the Windows ISO and relevant Steam Deck drivers. [*Use Rufus or Similar Tool: Open Rufus, select the MicroSD card, choose the ISO file, and burn the ISO to the card.
- Boot from MicroSD: Insert the card into the Steam Deck, reboot, and access the boot menu to select the MicroSD card for installation. This feature allows Steam Deck users to switch between SteamOS and Windows, expanding their device’s capability for gaming and more.
Troubleshooting Common Issues
While this installation method is generally straightforward, some users may run into problems. Here are common issues and their solutions:
- SD Card Not Recognized: If Windows fails to recognize the SD card, consider using a dedicated tool like EaseUS OS2Go. It may provide alternatives if the default creation tool does not function.
- BIOS Doesn’t Recognize SD Card: Make sure your BIOS is up to date. Compatibility can often be an issue, so check that the SD card is properly seated and recognized in BIOS settings. These troubleshooting tips can help ensure a smooth installation process and minimize frustration.
Conclusion
Installing Windows on an SD card opens up flexible computing opportunities, especially for mobile users or those wanting portable operating systems. By following the steps outlined above, users can successfully format an SD card, create a bootable installation medium, and install Windows. This process can be beneficial for moving between systems or giving an old laptop a new breath of life. For more detailed guides or alternative methods, keep an eye on WindowsReport and explore their wealth of technology resources while ensuring your system remains compatible and efficient .
Last edited:
Do you want to boot from SD card to install/run systems? Then, you should know whether you can do that and how to do that. In this post, MiniTool Partition Wizard will give you a step-by-step guide.
Why Need to Boot from SD Card?
SD card, whose full name is Secure Digital Memory Card, is a memory card widely used in portable devices, such as digital cameras, personal digital assistants, and multimedia players. Moreover, it is also used in most laptops.
Most laptops may come with SD card slots. But in most cases, you don’t need to use SD cards in PC. Only if you are engaged in work related to photos and design, this slot brings a lot of conveniences.
Besides, some people ask how to boot from SD card. In this case, you will use this slot. If this slot is broken, you buy an SD card reader and then connect the SD card to the USB slot.
When you ask how to boot from SD card, I guess you want to:
- Make a bootable SD card to install Windows on another PC.
- Make a bootable Windows on the SD card.
As for the detailed steps on how to boot from SD card, you can refer to the following contents.
How to Boot from SD Card?
Stage 1: Make a Bootable SD Card
To boot from SD card, you should make a bootable SD card in advance. According to your needs, ways to make a bootable SD card are different. Please refer to the following 2 methods:
Method 1. Create an SD Card Windows Installation Media
Step 1: Connect the SD card to PC and format it to NTFS file system. There are many methods for you to format the SD card. You can use the Windows built-in tools like Explorer, Disk Management, and Diskpart. You can also use third-party software like MiniTool Partition Wizard.
Step 2: Download Windows 10 Installation Media Creation Tool from Microsoft’s official website. Run this tool and you need to do some options:
- Choose installation media creation method. Please check the option Create installation media (USB flash drive, DVD, or ISO file) for another PC.
- Choose Language, Windows Edition, and Architecture according to your needs.
- Choose which media to use. You can try choosing USB flash drive to see whether the SD card is listed under the USB flash drive. If not, please go back and choose the ISO file
Step 3: Follow the on-screen instructions to make an SD card installation media or create an ISO file. If you have chosen the ISO file option and made an ISO file on PC, you should use burning software like Rufus to burn the ISO file into the SD card. Here is the guide on how to burn the ISO file with Rufus:
- Install and launch the Rufus program.
- Under Drive Properties, select the SD card as the Device, select the ISO file as the Boot selection, and choose Standard Windows Installation as the Image option. Then, leave the other options at their default values and click the Start
Through this method, you can make a Windows installation media with the SD card.
Method 2. Install a Complete OS on the SD Card
To install a complete OS on the SD card, you can also use Rufus. You just need to change the Image option to Windows to Go. But if you want to clone your computer OS and apps (installed on C drive) to the SD card, you can try migration tools like MiniTool Partition Wizard.
If your SD card is large enough to hold all data, you can even clone the whole computer onto it. Here is the tutorial:
MiniTool Partition Wizard DemoClick to Download100%Clean & Safe
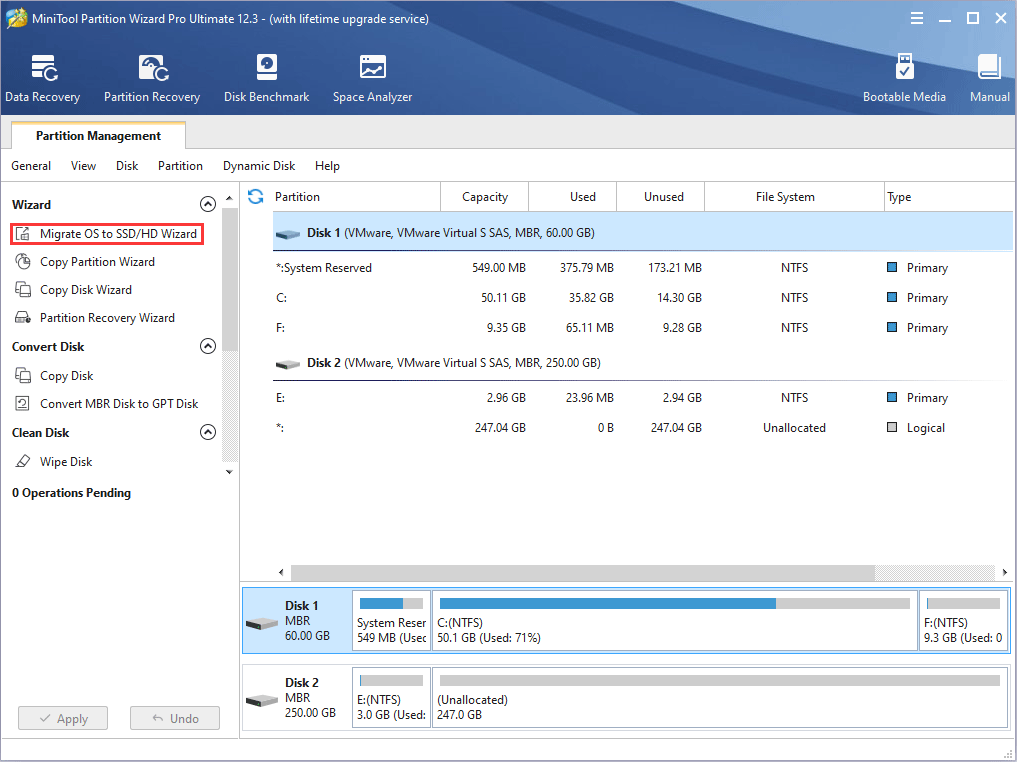
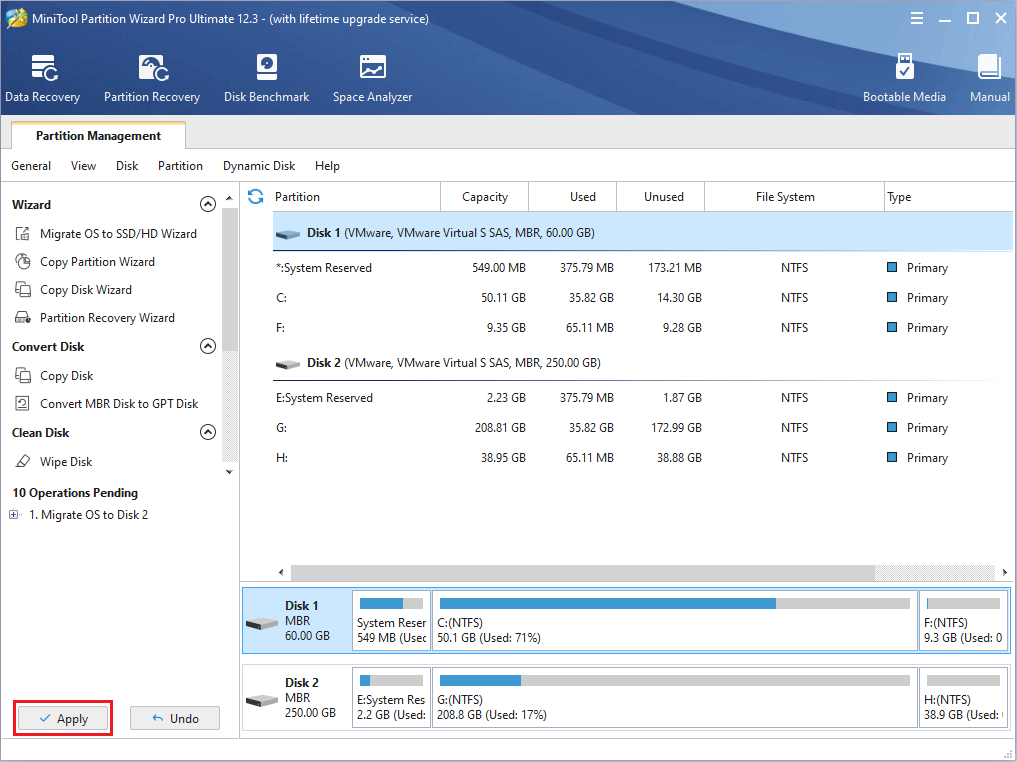
Step 1: Connect the SD card to the PC. Launch MiniTool Partition Wizard and open this software. Go to its main interface and click on Migrate OS to SSD/HDD in the action panel (the OS migration feature is not free).
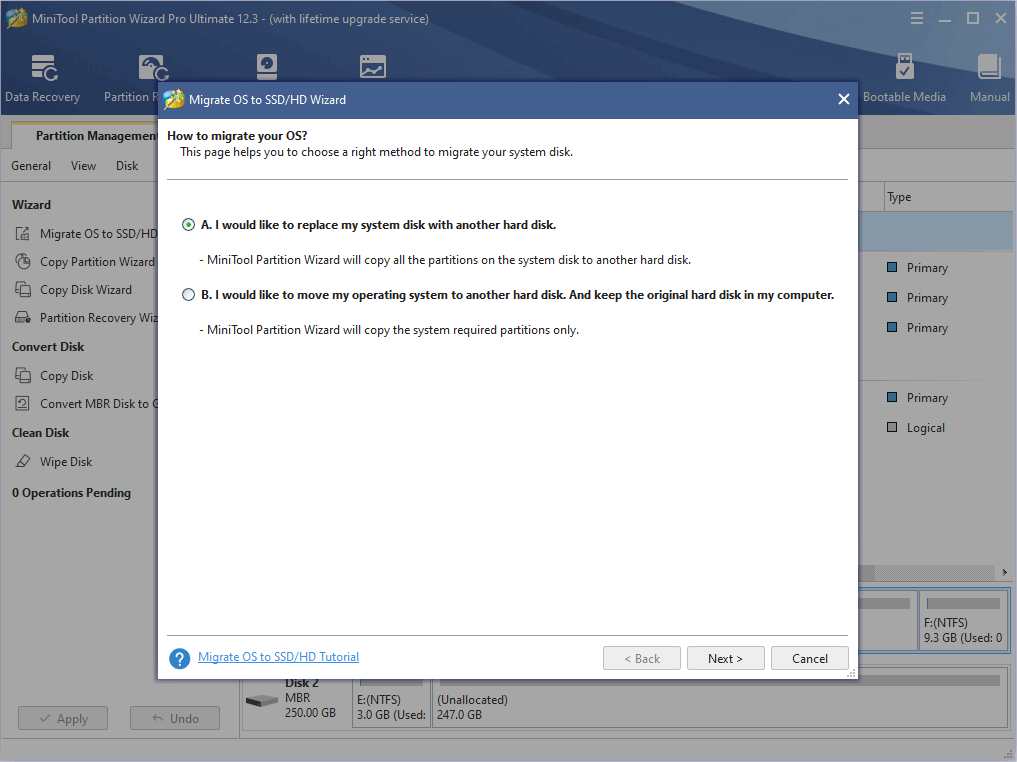
Step 2: Choose the right method to migrate the system disk and click Next. Option A allows you to clone the whole system disk, while option B only allows you to migrate the OS.
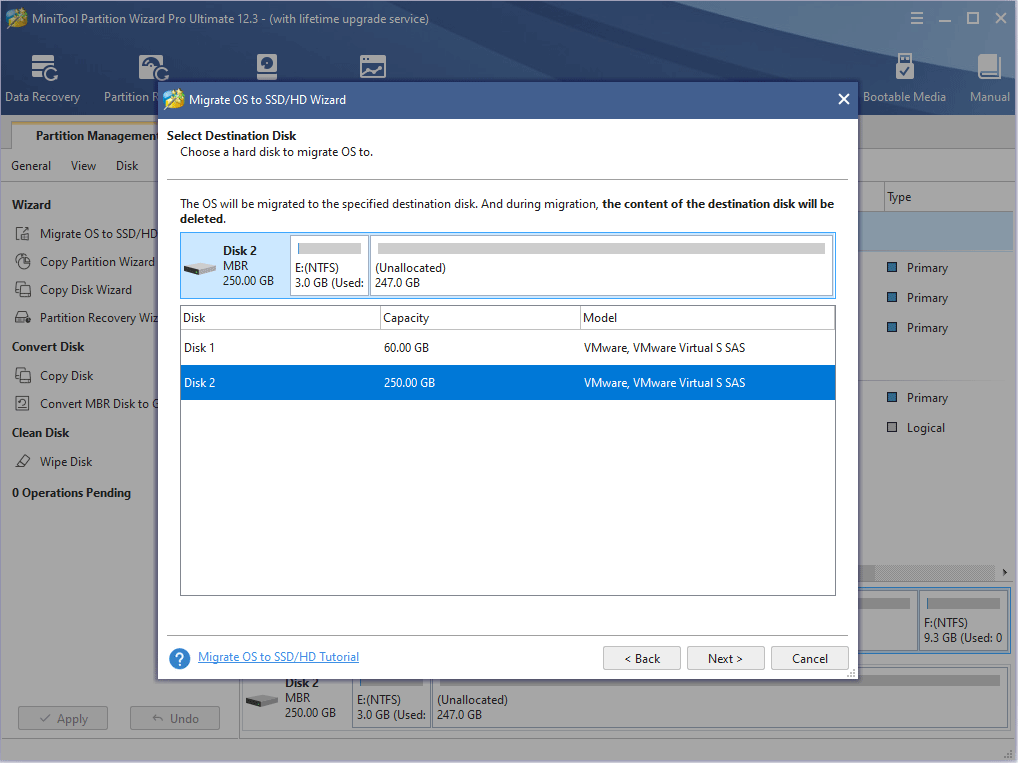
Step 3: Choose the SD as the destination disk and then click Next. For option A, please make sure the used space in the PC drive is smaller than the SD card. For option B, please make sure the used space in the C drive is smaller than the SD card. Only in these cases, the OS migration can succeed.
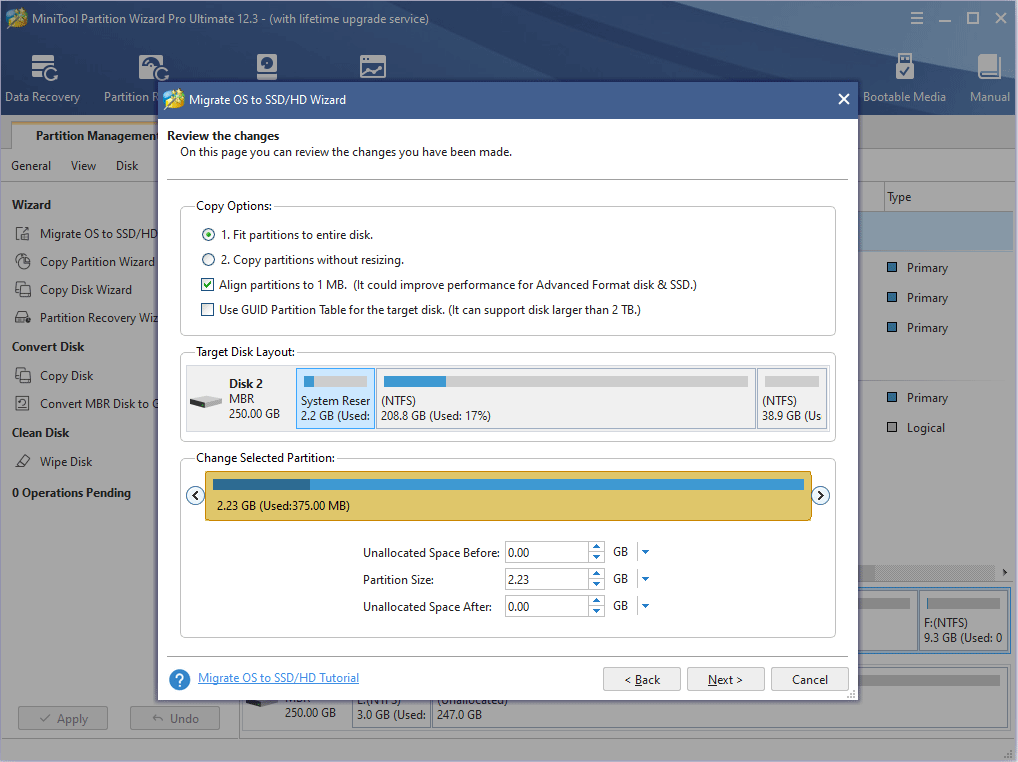
Step 4: Review changes and click the Next button. In this step, you can keep default settings.
Step 5: Read a note on how to boot from the destination disk and click the Finish button. Then, click the Apply button to execute pending operations.
Stage 2: Make the Computer Boot from SD Card
After making a bootable SD card, you should restart the computer and enter its firmware to make the PC boot from the SD card. To do this, you can refer to the following guide:
- Restart PC and press the BIOS key during the booting process. You can search online to know the specific BIOS key of your PC model. Sometmies, the BIOS key will appear on the screen. If you don’t know the BIOS key, you can try F2.
- When you enter Firmware, please disable UEFI boot mode. You should go to boot option, disable secure boot/UEFI and enable legacy support/BIOS.
- Go to boot order to place the SD card at the first boot sequence.
- Save changes and exit the firmware. The PC will then boot from SD card.
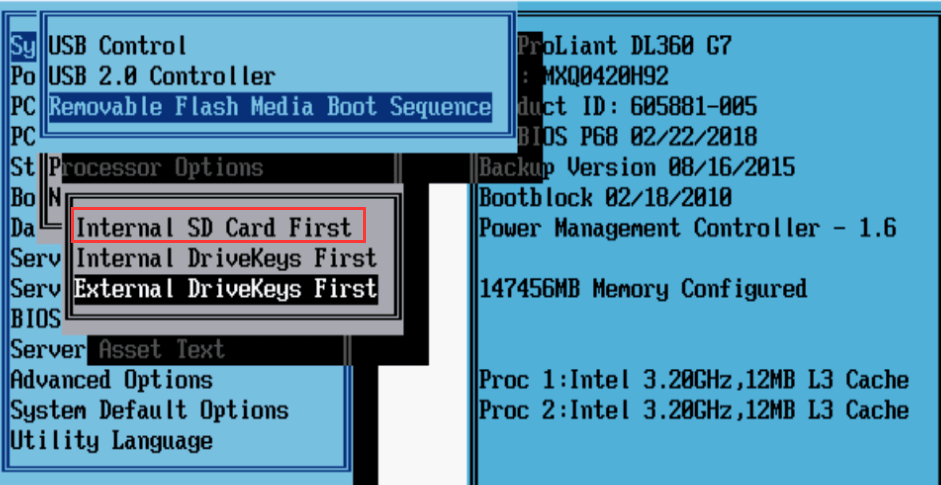
Although the detailed operations may vary depending on the different motherboards, the general guideline is the same: enter firmware > disable UEFI and enable BIOS > change boot order to make the SD card the first boot device.
Why we need to do these operations. The reasons are as follows:
1. Why do you need to change the boot order?
If you insert a bootable SD card into the PC, there are actually 2 bootable devices on the PC. One is the built-in hard drive that has the original Windows system installed and the other one is the SD card. But the PC will boot from hard drive by default. To change this behavior, you should change the boot order in firmware.
If you want to know about the boot process, please read this post: What Is Computer Booting?
2. Why do you need to disable secure boot and enable legacy support?
UEFI has Secure Boot mode enabled. This mode uses keys, and any operating system or hardware driver that wants to be loaded on this motherboard must pass the authentication of these keys. If the software fails, the motherboard will refuse to load it. The purpose is to prevent malicious software from intruding and infecting boot sector.
However, if you want to boot it from other software including some Linux OS, Windows 7 and earlier versions, etc, disabling Secure Boot temporarily is recommended. Please note that you should turn on this feature later, otherwise the original system will not boot.
Problems When Booting from SD Card
1. BIOS Doesn’t Recognize SD Card
Some people report that they can’t find the SD card option in BIOS. Is there any method to solve this problem?
In general, whether the PC can boot from SD card is determined by BIOS. Most BIOS only has drivers for hard drives, USB drives, and CD-ROM devices and they don’t have the driver for SD card. This is reason why BIOS can’t recognize SD card.
Note: BIOS is a step before booting into OS. After booting into Windows, your PC can recognize SD cards. But in the BIOS step, if manufacturers don’t write SD card driver into BIOS (ROM), you can’t choose the SD card as the boot device.
Therefore, to solve the “SD card not recognized by BIOS” problem, you can try the following 2 methods:
- Try every boot option in BIOS to see whether there is an option for SD card.
- Update BIOS. If the current BIOS version doesn’t offer the SD card boot option, you can search online to see whether the manufacturer of the motherboard has offered a BIOS version that offers the SD card boot option. If this version is for your motherboard model, you can try updating BIOS to this version.
2. What SD Card Should I Use?
If you want to install a complete OS on an SD card, you should choose an SD card that has a good IOPS value, otherwise the boot speed will be very slow. You may know that SD card is divided into several classes, but the class is usually depending on sequential read and write speed. If you want to but an SD card for camera, you can refer to them.
But if you want to buy an SD card for operating system, you should refer to its IOPS. In this case, please refer to this post: A1 VS A2 SD Card: Compare Them and Make a Wise Choice. In general, the A1 and A1 SD cards are used in phones. And therefore, they are capable of running operating systems.
Here is a post talking about how to boot from SD card. If you want to boot your PC from an SD card, you can read this post to know whether you can do that and how to do that.Click to tweet
Bottom Line
Is this post helpful to you? Do have questions about this post? Do you have other ideas about how to boot from SD card? Please leave a comment in the following zone. In addition, if you have difficulty in migrating OS, please feel free to contact us via [email protected]. We will get back to you as soon as possible.
Boot from SD Card FAQ
Can we boot from SD card?
This depends on your BIOS. If your PC’s BIOS has SD card driver and can recognize SD card, you can boot from SD card. Or, you can use an SD card reader to serve the SD card as a USB drive.
Can I run Windows 10 from an SD card?
If your PC’s BIOS can recognize SD card, you can burn a Windows 10 system into an SD card and boot your PC from this SD card.
Can you install Windows from an SD card?
If your BIOS can recognize SD card, you can do that. If your BIOS doesn’t recognize SD card, you can use an SD card reader to connect the SD card to a USB port.
How do I make my SD card bootable to normal?