

When it comes to dual boot, the general idea is that you have a system preinstalled with Windows and then you install Linux alongside Windows. On the boot, you select whether you want to use Windows or Linux.
How about the opposite situation? What if you have a system that has only Linux installed on it and you want to install Windows alongside Linux in dual boot mode?
In this tutorial, I’ll show you exactly how you can install Windows after Ubuntu Linux in dual boot.
Dual booting Windows on an existing Ubuntu Linux system
I tested this tutorial on an Ubuntu system with UEFI and GPT partitioning scheme. In theory, the same steps should be applicable to most Linux distributions, if not all.
Requirements
Here’s all the stuff you need to carry out the procedure safely and easily:
- A bootable Windows 10 USB stick (USB key, Pen Drive) of at least 8 GB in size
- A live Ubuntu USB stick (USB key, Pen Drive) of at least 4 GB in size
- A computer with UEFI boot and only Ubuntu Linux installed on it
- Internet connection is needed for creating the bootable Windows and live Linux disk
- A way to back up your important data on an external disk (optional yet recommended)
You may also manage this tutorial with just one USB key. You create the live Linux USB first, make the partition for Windows using this live Linux USB, and then use the same USB key as a bootable Windows USB.
I highly recommend that you read the entire tutorial first before you start following the steps.
Step 0: Make a backup of important data
Here’s the thing. You are going to play with disk partitions and boot settings. If you mess it up, you’ll lose the data.
Having a back up on an external disk will give you a safety net. In the worst case, if things go wrong, you can install either of Windows or Linux and copy the data back on your system.
How do you make a backup? The simplest method is to have an external USB or SSD disk and copy files from Documents, Music, Pictures and other folders where you have kept your files.
Step 1: Create a bootable Windows USB
If you have access to a Windows system, you can follow the instructions on the Microsoft website to create a bootable Windows media.
If you only have a Linux system, creating a bootable Windows USB could be tricky. Thankfully, a handy open source tool called Ventoy helps a lot in this case.
I have written in detailed about creating bootable Windows 10 USB on Linux. Please refer to the guide for detailed instructions. I’ll mention the crucial parts here.
Plug in your USB with at least 8 GB of size and format it. Now, download the ISO of Microsoft Windows.
Next, download the latest Ventoy release. Extract the folder and run the VentoyWeb.sh script with sudo. It will give you the URL when you run it. Copy this URL and paste it in a browser.
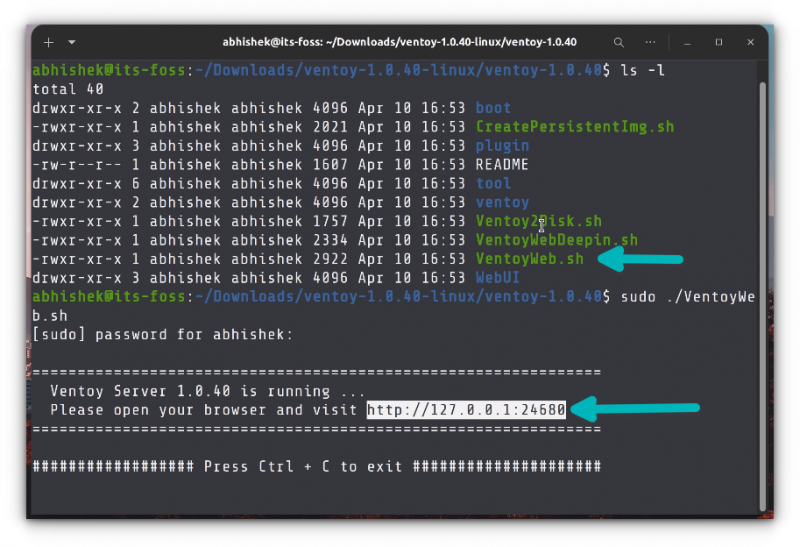
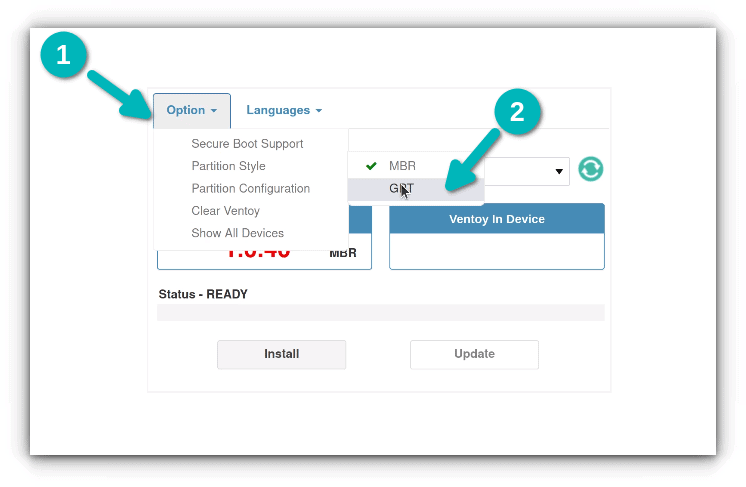
It will open a web page with Ventoy running in it. Go for UEFI installation and hit the install button.
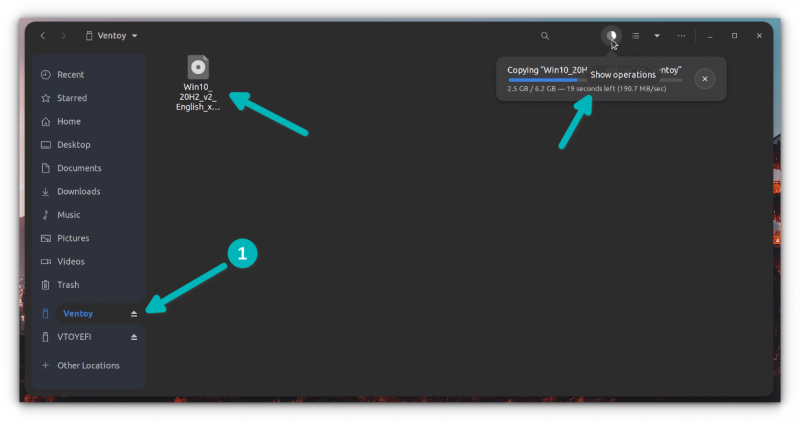
Once installed, you’ll see two partitions on the USB disk: VTOYEFI and Ventoy. You need to copy the download Windows ISO image to Ventoy partition.
Once the copying finishes, DO NOT RUSH to plug out the USB just yet. Click on the unmount option from the file manager.
Okay. So now that you have a bootable Windows USB, it will be a good idea to test it out and see if works.
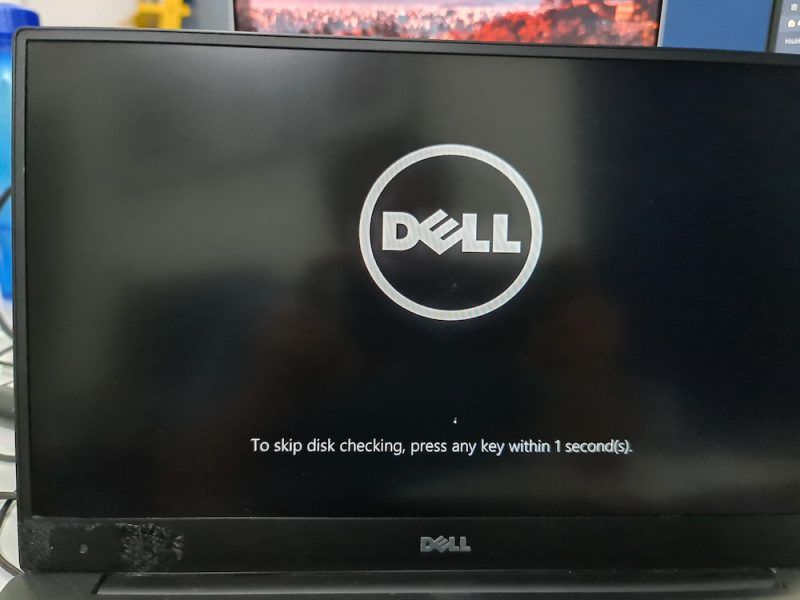
How do you do that? Plug in the Windows USB, reboot your system. When the system is turning on again and showing the logo of your system’s manufacturer, press F2/F10/F12 keys to access the BIOS settings.
When you are in the BIOS, choose to boot from the USB. In some cases, you may have to disable secure boot from the BIOS settings.
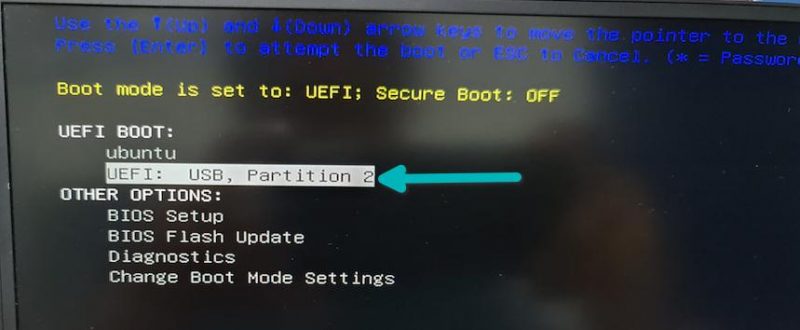
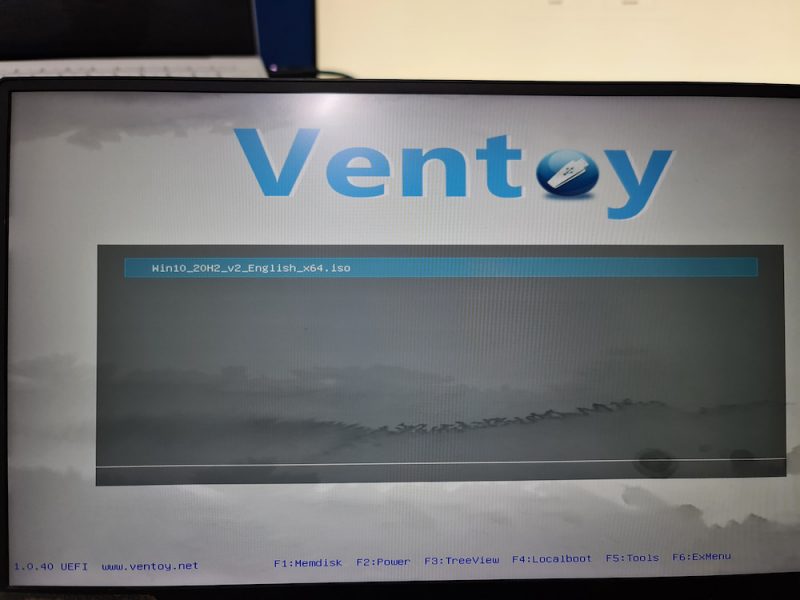
If the bootable Windows USB creation was a success, you should see Ventoy screen and select to boot into Win10.
After this, you’ll see some screen about Windows installation. Don’t go with the installation part yet. Close it and power down your system and then boot into Linux again.
This check was necessary because you need to have a working bootable Windows USB. Without that, there will be no point in following the rest of the tutorial.
Remove the bootable Windows USB at this stage.
Step 2: Create a live Ubuntu Linux USB
You may wonder why you need a live Ubuntu USB here when you already have Linux installed properly.
The reason is that you need to modify the existing partition and make some free space where you’ll be installing Windows. But you cannot modify an already mounted partition in Linux. When you are using Linux, your disk is mounted. You won’t be able to modify it and create a new partition in it.
This is why you need a live Linux USB. You boot from the live USB and make the necessary partition on the disk from the live session.
Now that you know the reason, let’s go on with creating live Ubuntu USB. First, download the ISO image of Ubuntu from its website. Any version of Ubuntu will work.
Now, plug in the USB with at least 4 GB in size.
On Ubuntu, you can find the Startup Disk Creator tool. You may also use Etcher on Linux. The choice is yours. Here, I’ll use Startup Disk Creator.
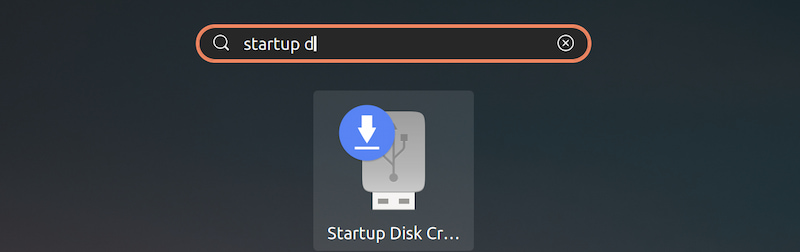
The process is really simple. Your plugged in USB should be recognized. It should also automatically find the Ubuntu ISO. If not, you can always browse to it. With that set, just hit the “Make Startup Disk” button.

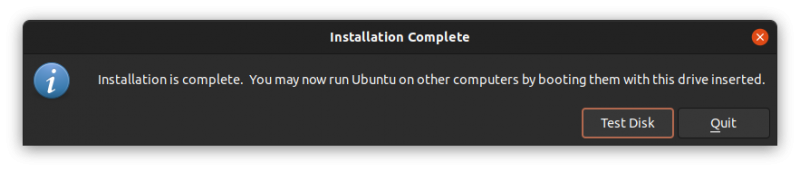
It should take a few minutes to create the live Ubuntu USB. You can hit the Quit button below.
Step 3: Boot from live USB and make free space for Windows
Alright. Now you boot from the live Linux USB.
Restart the system. When it is powering on and displaying the manufacturer’s logo, press F2/F10/F12 keys to access the BIOS settings. In here, go to the boot order and boot from the Linux USB.
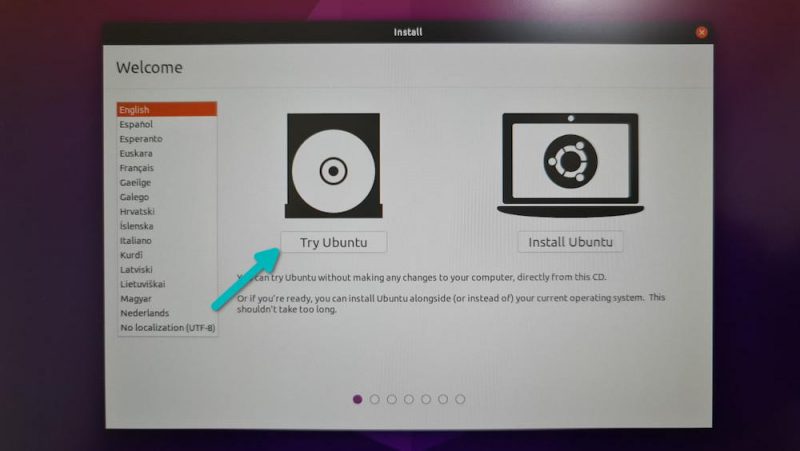
When you see this screen, go for Try Ubuntu.
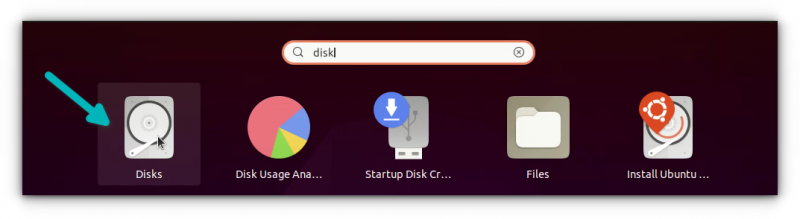
Now that you are in the live session, open the Disk application. It is already installed.
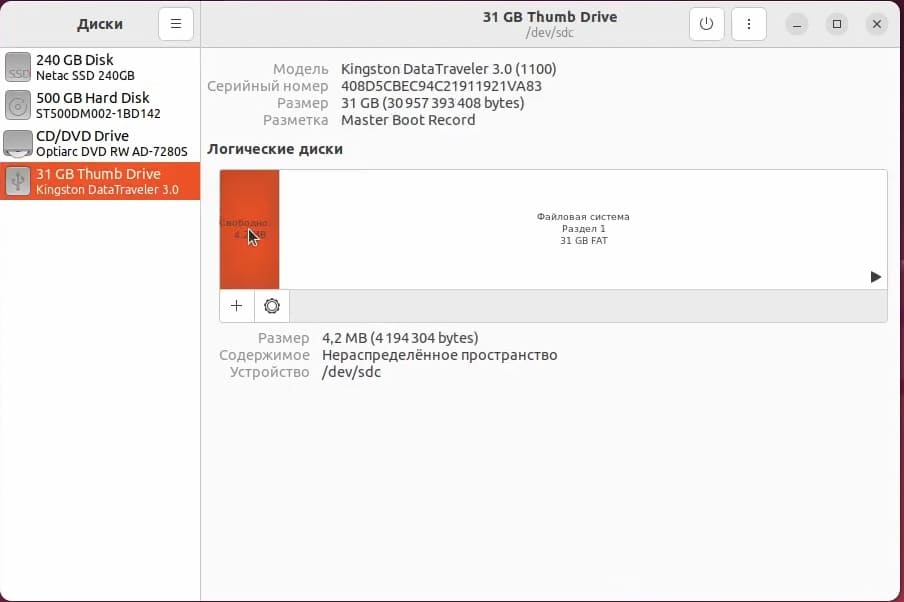
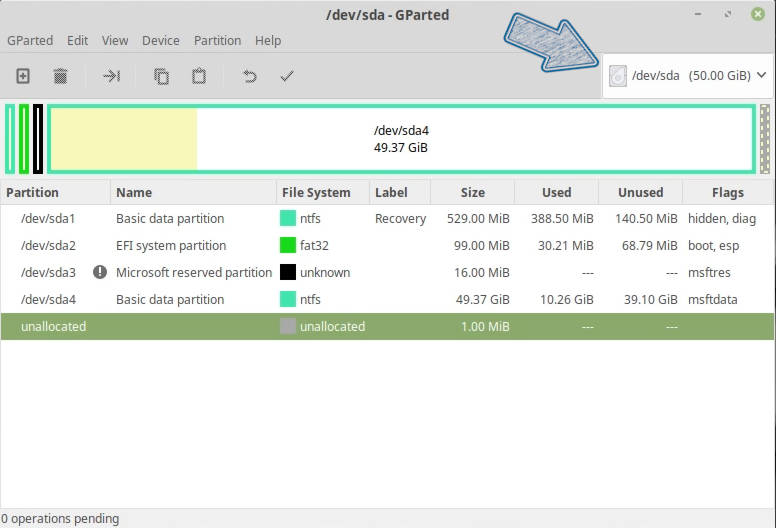
In the Disks application, carefully select the main hard disk/SSD of your computer. This is where you have Linux installed. As you can see in the picture below, I have ESP partition (for UEFI boot settings) and a single Linux partition. This is the partition that needs to be resized to make free space for Windows.
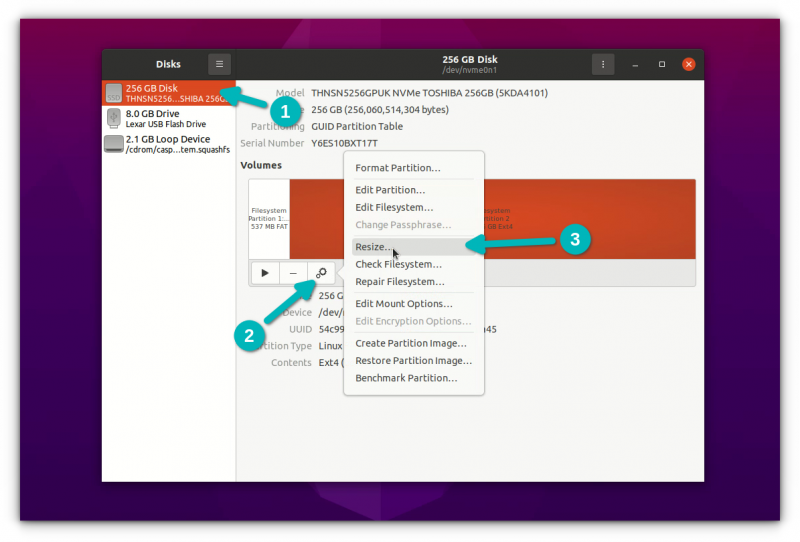
If you have a root, swap and home partition setup, you should resize the home partition.
In the resizing, it will show a minimal size. You cannot shrink the disk below this point. You’ll be leaving some extra space for Linux usage, of course.
Note that the “partition size” is for Linux partition. In the picture below, I reduced the Linux partition to 120 GB from 256 GB. This gives a 136 GB of free space for Windows installation.
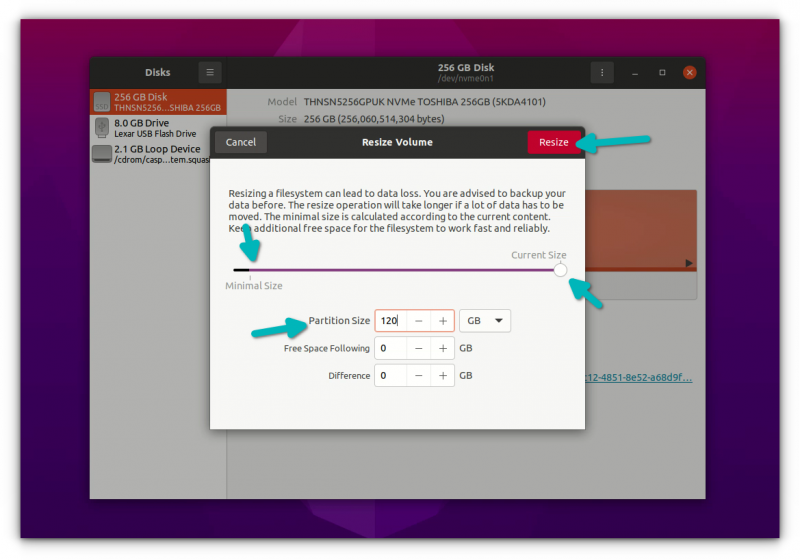
When you hit the resize button, it could take up to a couple of minutes to complete the resizing process.
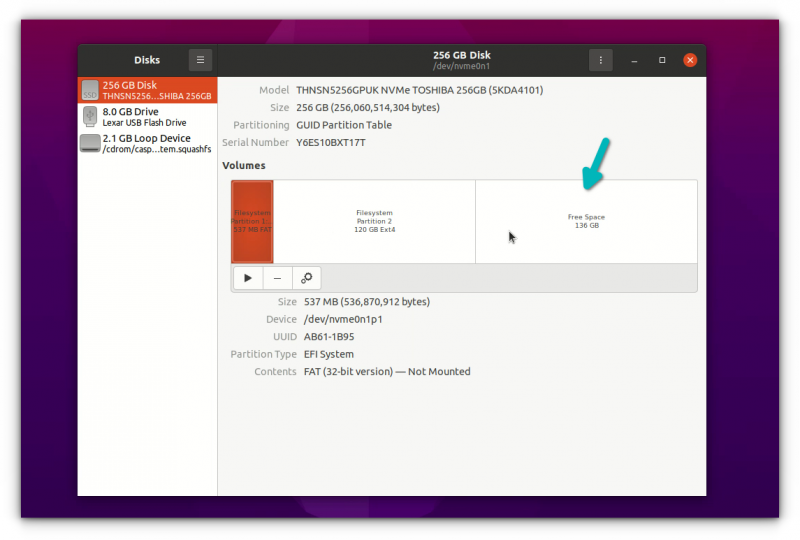
As you can see in the picture below, now I have three partitions on my system. One is 500 MB of ESP partition (for UEFI boot), 120 GB of Ext4 partition for Linux and 136 GB of free space.
You now have dedicated free space where you are going to put Windows. Shut down your system now.
Step 4: Boot from Windows USB and start installing Windows
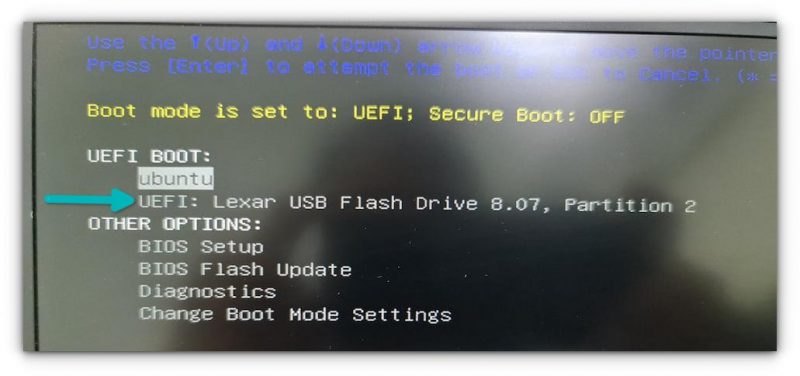
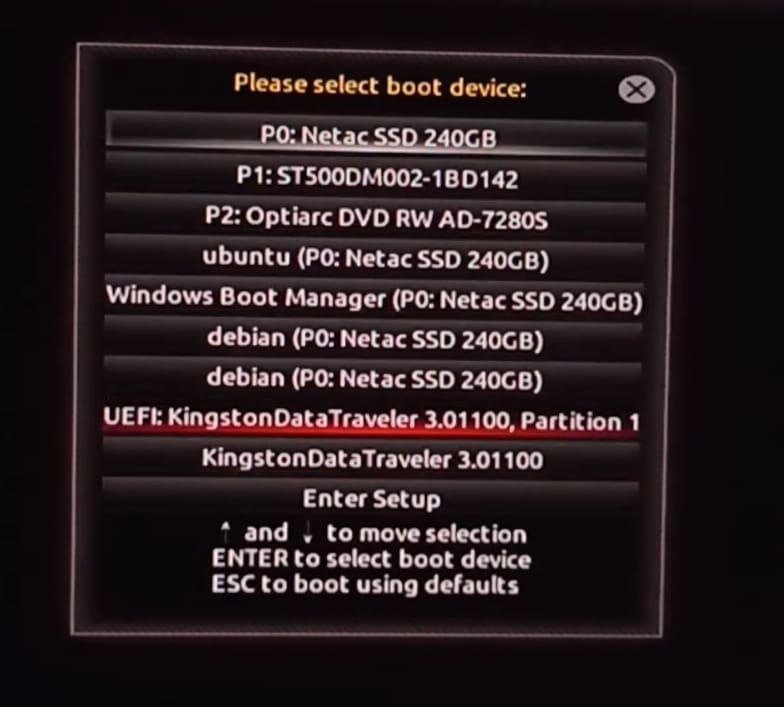
Plug in your bootable Windows UBS. Once again, restart your system, access the BIOS settings and boot from the USB. By now, you know how to do this. You already did this in step 1 while checking the bootable Windows USB.
You should see the Ventoy screen if you created the bootable Windows USB with it. Hit enter.
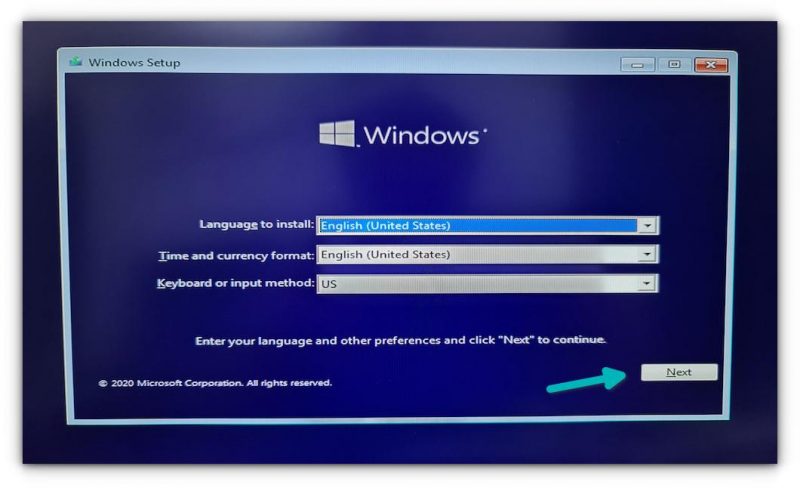
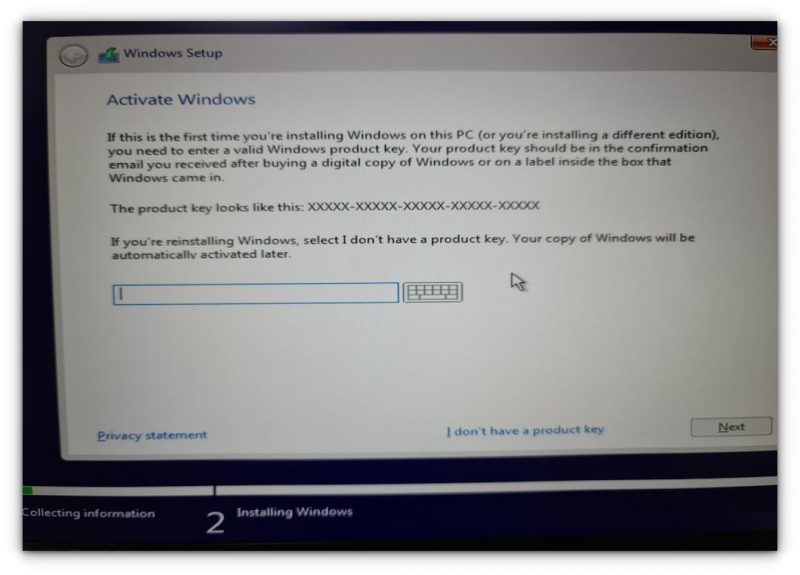
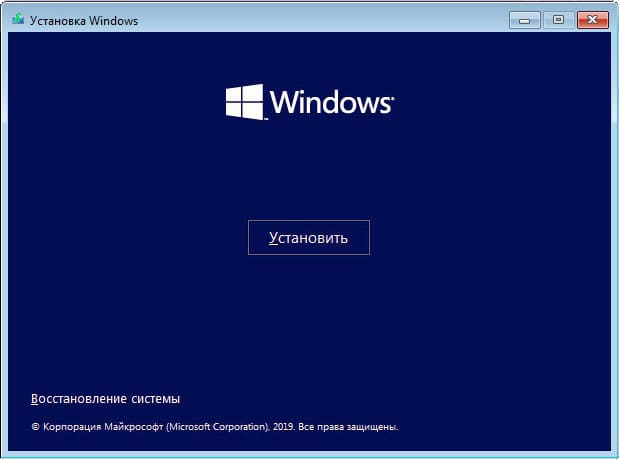
You should see the Windows logo. After a few seconds, you’ll see the option to choose the language, time and keyboard.
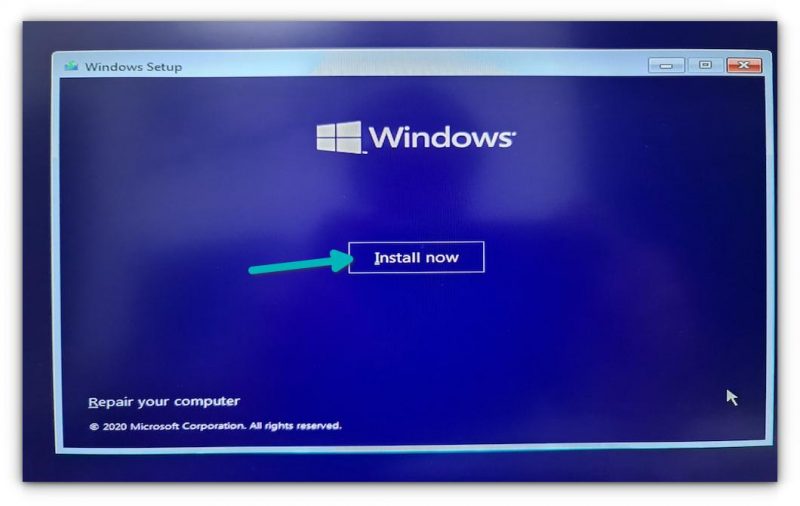
The next screen will give you the option to start the installation. Hit “Install Now”.
In the next few screens, it will ask for the Windows license key. If you don’t have it, skip it. You can activate Windows later as well. You’ll be asked to choose a Windows version and accept the end user license.
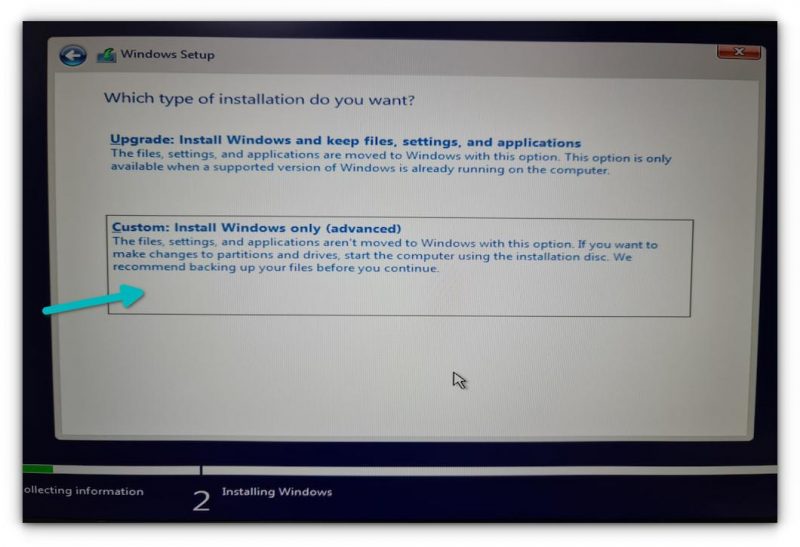
In the next screen, go with the Custom install option.
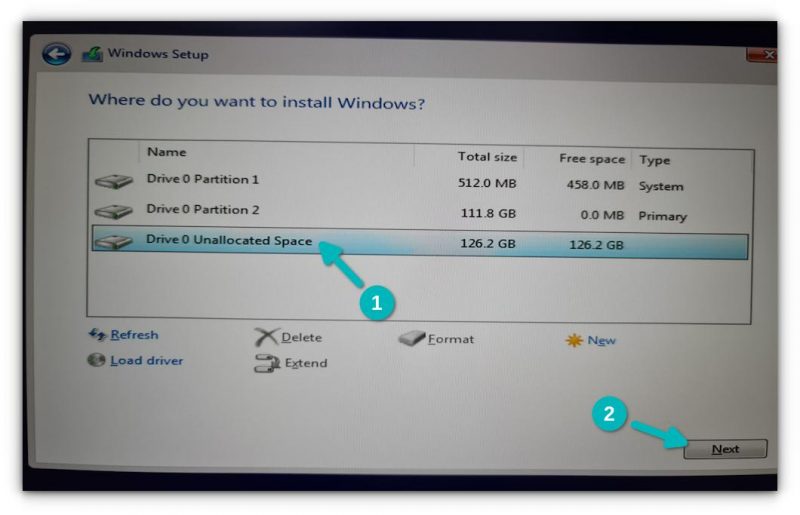
Now you’ll come to the partition screen. Select the free space (unallocated space) you had created in the step 3 and hit the Next button.
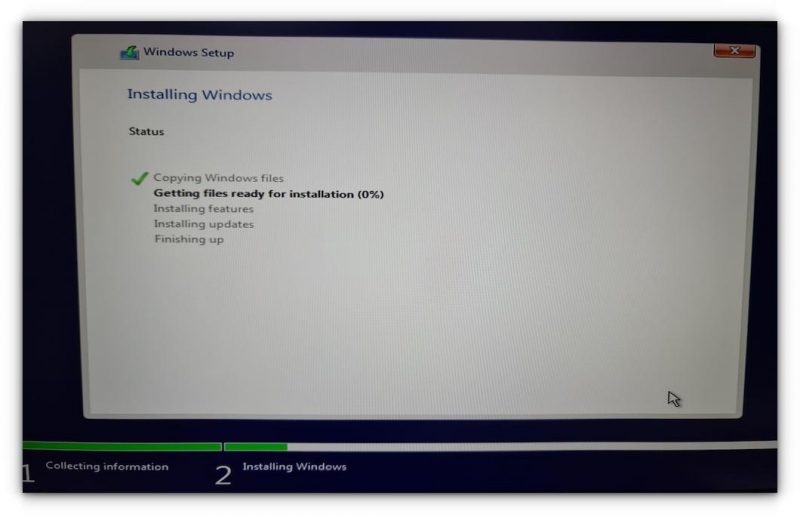
It will take a couple of minutes in copying the files and install Windows.
After that, your system will restart automatically and this time it will boot into Windows directly.
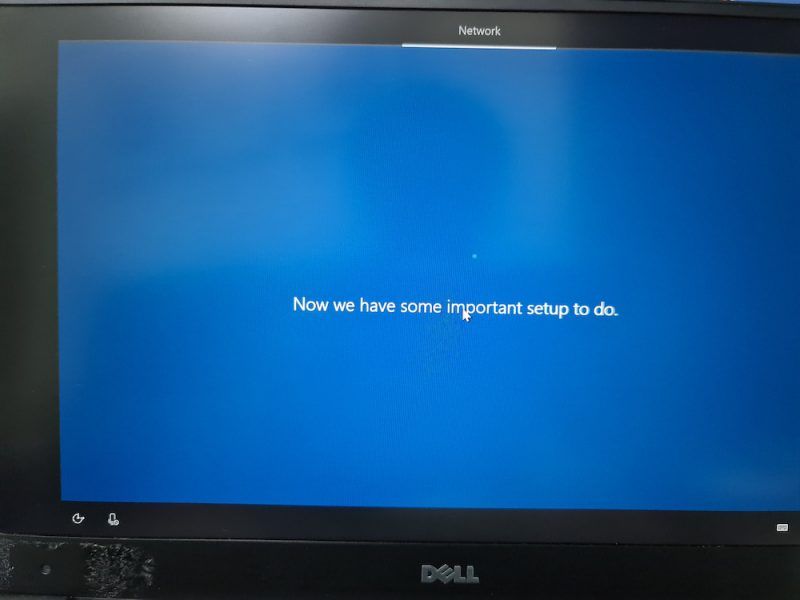
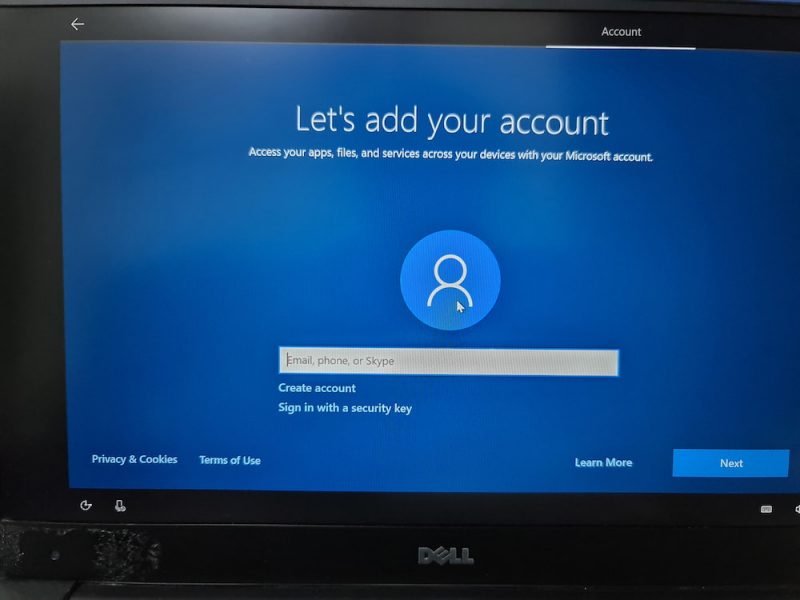
Windows installation is not over entirely. On the next boot, you’ll be asked to configure Windows for your usage and this is super annoying but super easy to follow.
I am not going in detail for this part because I know you can handle the configuration part, which is waiting and hitting next button most of the time. I am sharing a few screenshots just for the reference, though.


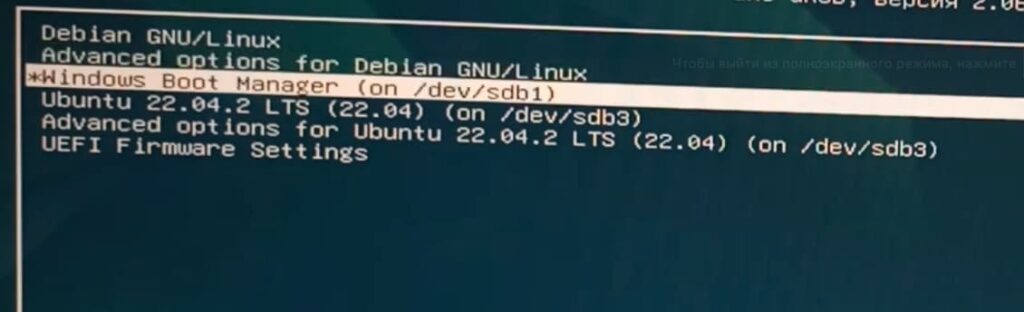
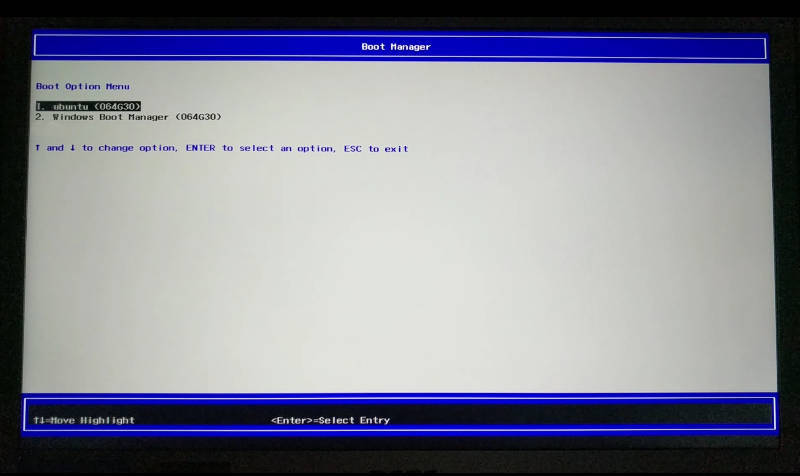
Once you have installed Windows successfully, chances are that you’ll be booting into Windows by default. You need to get the Grub dual boot screen back.
Step 5: Get the Grub bootloader back
Once again, restart your system and when it is powering on, go to BIOS settings. From the boot sequence or boot order, move Ubuntu up the order. You may have to use arrow keys or F5 or F6 and the screen may look different for different system.
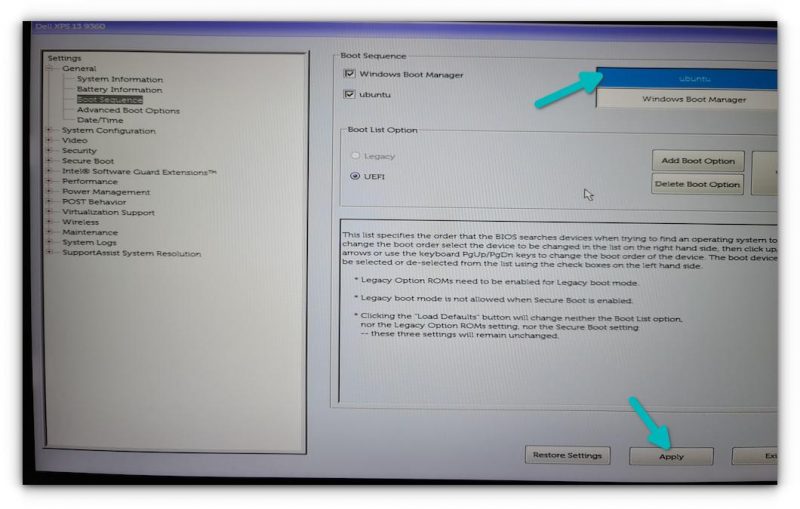
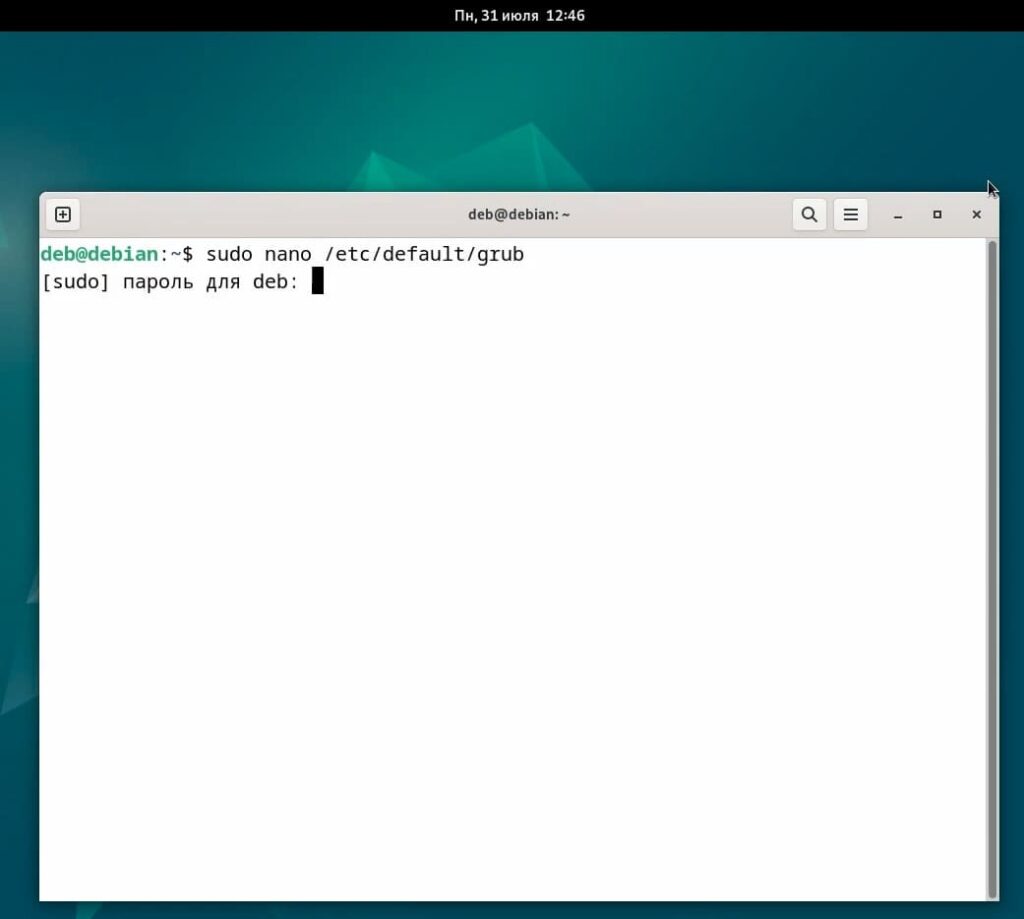
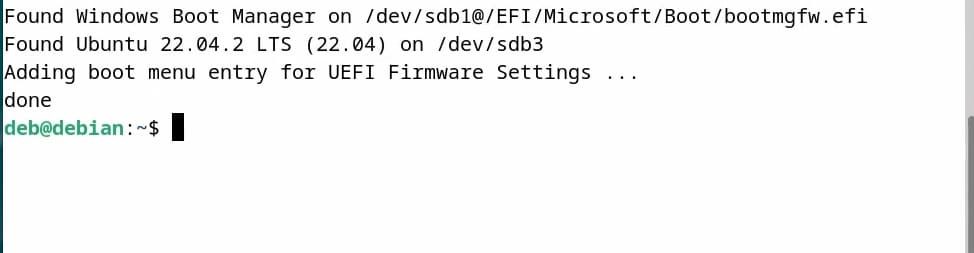
Save and exit and this time you should be booting into Ubuntu. The battle is not over yet. The grub bootloader might not be aware of the presence of Windows. This is why it is a good idea to update grub in Ubuntu.
All you have to do is to open a terminal and use the following command:
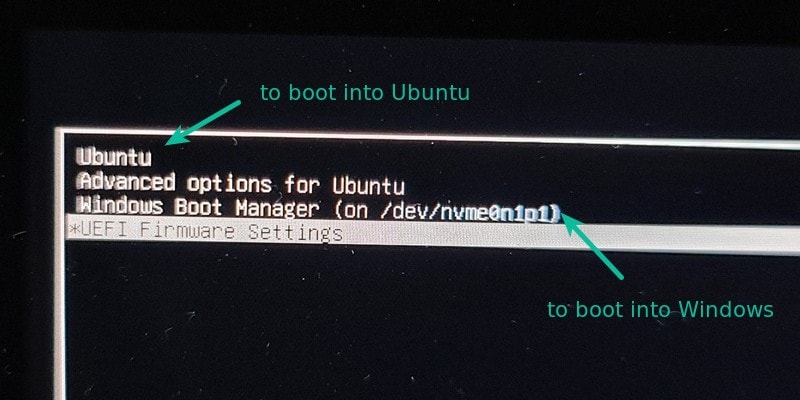
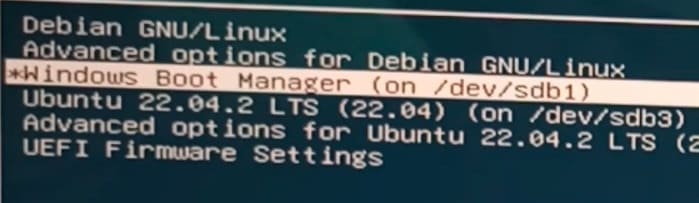
sudo update-grubRestart your system once again. You should be greeted with the familiar grub boot screen that gives you the option to choose between booting into Ubuntu and Windows.
🔨 Troubleshooting tip: Don’t see Windows Boot Manager in Grub?
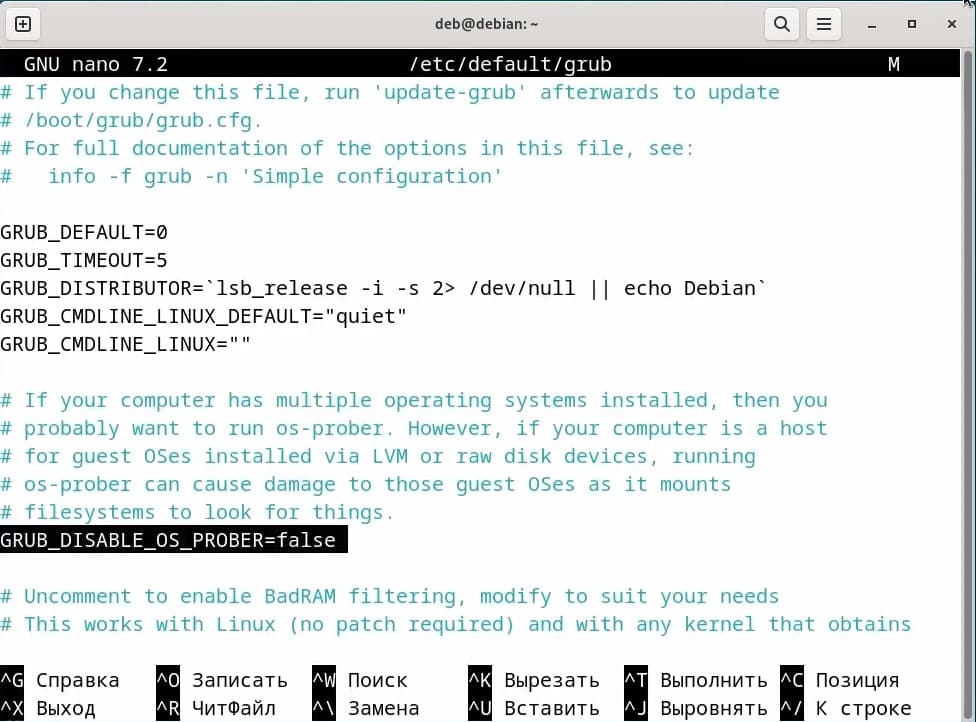
Install os-prober (usually installed already) and then edit the /etc/default/grub file to add GRUB_DISABLE_OS_PROBER=false to this file. Save this file, update grub and Grub should see Windows option in the grub screen now.
Did you succeed?
And that brings us to the end of this long journey. It takes some time and effort, but if you want to install Windows after installing Ubuntu, this can surely be done.
If you still have questions, please let me know in the comment section and I’ll try to answer you.
В этой статье мы разберем, как установить Windows 10 рядом с дистрибутивами Linux (например, Ubuntu и Debian). Мы рассмотрим процесс выделения свободного места на диске, запись образа Windows на флешку, установку и настройку загрузчика GRUB, чтобы в конце иметь возможность выбирать при загрузке между Linux и Windows.
Приобрести оригинальные ключи активации Windows всегда можно у нас в каталоге от 1099 ₽
1) Выделение свободного места под Windows 10
1. Если ваш диск уже содержит дистрибутивы Linux, освободите примерно 50 ГБ для Windows.
2. Для изменения размеров диска или освобождения места воспользуйтесь:
— Утилитой «Диски» (встроена в некоторые дистрибутивы linux).
— Приложением GParted (поддерживает расширенные функции управления разделами).
3. Освободить пространство можно как на том же диске, где уже установлены Linux, так и на другом физическом диске. Главное — обеспечить наличие неразмеченной области подходящего размера.
2) Подготовка установочной флешки с Windows 10
1. Загрузите ISO-образ Windows 10, найти нужный вам образ можно у нас в каталоге.
2. С помощью утилиты WoeUSB (или аналогичной) запишите образ на флешку:
— В Linux: WoeUSB, Ventoy
— В Windows: Rufus.
Можно воспользоваться нашей инструкцией.
3. Перезагрузите компьютер и в BIOS/UEFI выберите загрузку с USB-флешки.
3) Установка Windows 10
1. При появлении меню загрузки выберите загрузку с флешки (учтите режим — UEFI или Legacy).
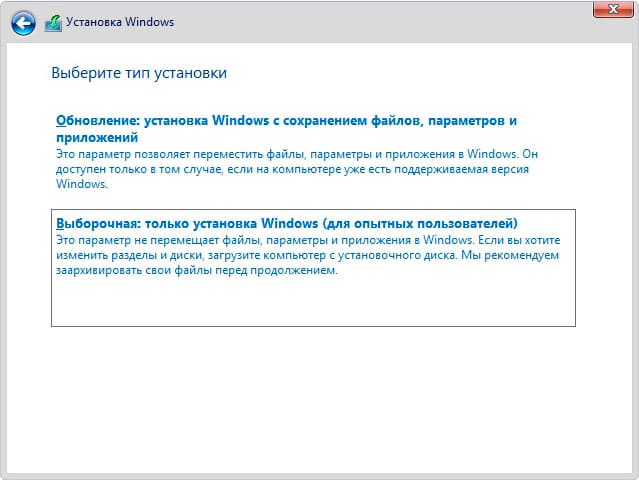
2. Начнется стандартная установка Windows, где необходимо выбрать вариант «Выборочная (только установка Windows)».
3. Найдите свободное место, которое вы заранее подготовили (около 50 ГБ).
4. Установите Windows 10 на это неразмеченное пространство.

5. Дождитесь окончания установки и перезагрузки — по умолчанию теперь будет загружаться Windows 10.
4) Восстановление загрузчика GRUB (Linux)
1. Перезагрузите компьютер и войдите в BIOS/UEFI (обычно клавиша F2 или Del).
2. Установите загрузку с Linux (например, Debian) в качестве приоритетного варианта.
3. Сохраните настройки и выйдите из BIOS/UEFI — должно загрузиться меню GRUB, однако Windows может быть не видно в списке.
5) Добавление Windows 10 в список GRUB
1. Загрузитесь в установленный Linux (Ubuntu, Debian и т.д.).
2. Откройте (с правами суперпользователя) файл настроек GRUB. Обычно он расположен по пути:
/etc/default/grub либо воспользуйтесь графической утилитой GRUB Customizer.
3. Убедитесь, что в конфигурации присутствует запись для Windows, иначе — добавьте вручную или используйте автоматический поиск.
4. Запустите команду обновления GRUB:
sudo update-grub
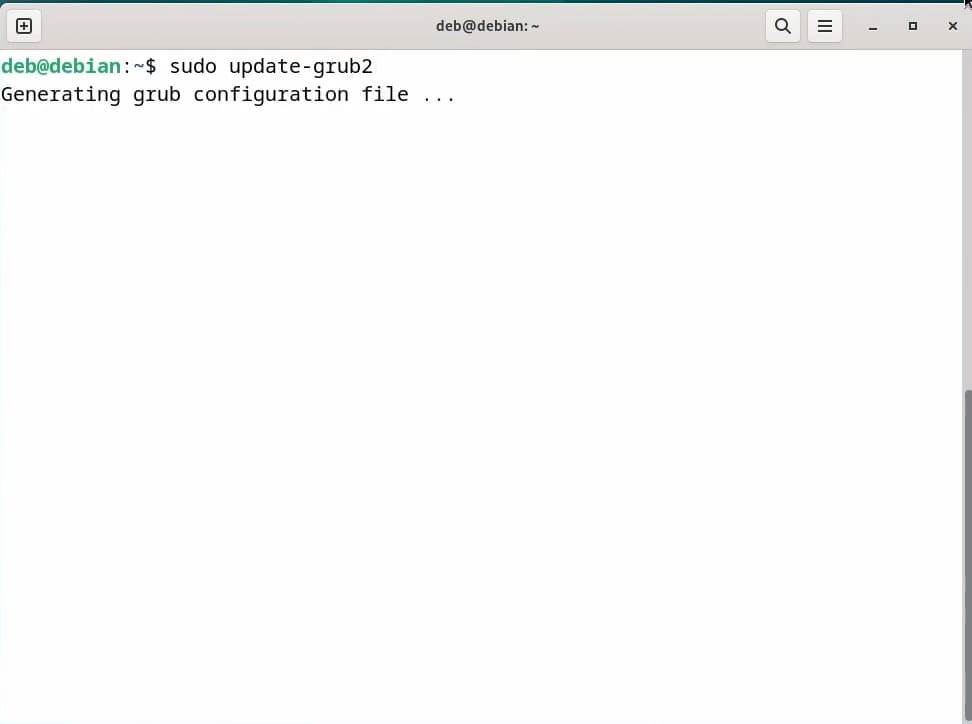
5. После перезагрузки система должна обнаружить Windows 10 в меню GRUB.
Теперь у вас на одном компьютере установлены Windows 10 и Linux (Ubuntu, Debian или другой дистрибутив). При включении компьютера меню загрузчика GRUB позволит выбирать, какую ОС запускать. Если Windows не появилась в списке, используйте команду update-grub или отредактируйте конфигурационный файл GRUB вручную. При необходимости можно воспользоваться GRUB Customizer для упрощения процесса. Теперь вы можете комфортно работать как в Linux, так и в Windows без переустановки операционных систем.
Лицензионный ключ активации Windows от
This tutorial gives a step-by-step guide on how to dual-boot Linux Mint 22 (Wilma) and Windows 11, with the Linux distro installed on an external drive and GRUB, the Linux boot manager, installed on the same drive that the distro is installed on. You’ll learn how to manually partition the external hard drive for the Linux Mint installation and how to make sure that GRUB is installed on that external hard drive, so there will be no interference between Windows 11 boot manager and GRUB.
If your computer has 2 internal drives, a better approach is to install Windows 11 and Linux Mint 22 on separate drives.
Before you proceed, make sure that you have completed the following preliminary tasks:
- Disable Secure Boot, Fast Boot, and Fast Startup in Windows 11.
- Download the installation ISO image of Linux Mint 22. All three desktop environment variants (Cinnamon, Mate, and Xfce) supported by Linux Mint use the same installer, so the steps in this tutorial apply to any ISO image you download, regardless of the variant you choose.
- Flashing the ISO image to a USB stick in Windows 11 or flashing the ISO image to a USB stick in Linux is the final preliminary task you need to complete.
Pre-Disk partitioning installation steps
The computer used for this tutorial is a store-bought Lenovo IdeaPad, so it came with Windows 11 pre-installed on an NVMe (M.2) drive. The external hard drive for the installation of Linux Mint 22 is an SSD, but you could use any storage drive that you have, like an HDD or even the same type of M.2 drive that Windows 11 was installed in.
When you have the installation USB stick ready, shut the PC down, then insert both the installation USB stick and the target external drive into available USB ports.
Now, reboot the PC, pressing the F12 key repeatedly as the computer boots up until the boot menu appears. If the F12 key does not bring up the boot menu, consult your computer’s documentation to find the key that does. As shown in Figure 1, you should see an entry for Windows 11 boot manager and an entry for the installation USB stick. Use the down arrow key to select the latter, than press the Enter button.
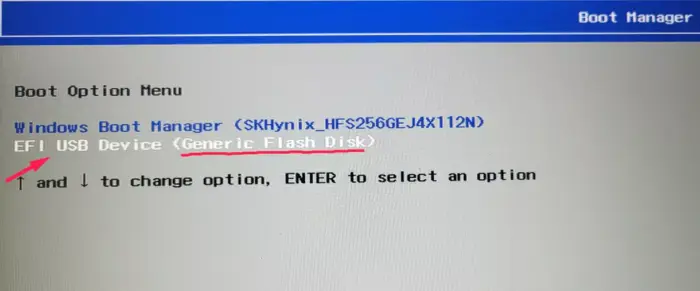
Figure 1: The boot menu on the Lenovo IdeaPad laptop used for this tutorial showing entries for the Windows 11 boot manager and the installation USB stick.
The computer should reboot into the Linux Mint live desktop. Then double-click on the Install Linux Mint icon on the desktop to launch the installer. Your language should be automatically selected in the first installation window shown in Figure 2. Otherwise, select, then click Continue.
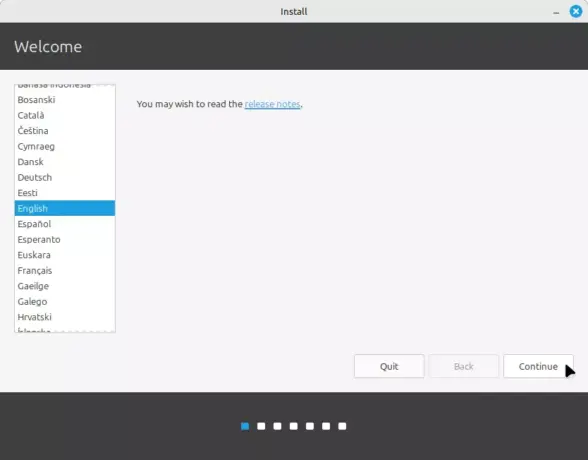
Figure 2: Linux Mint 11 installation
In the next window, shown in Figure 3, the installer should auto-detect your keyboard layout. If not, click the Detect Keyboard Layout button, then on Continue.
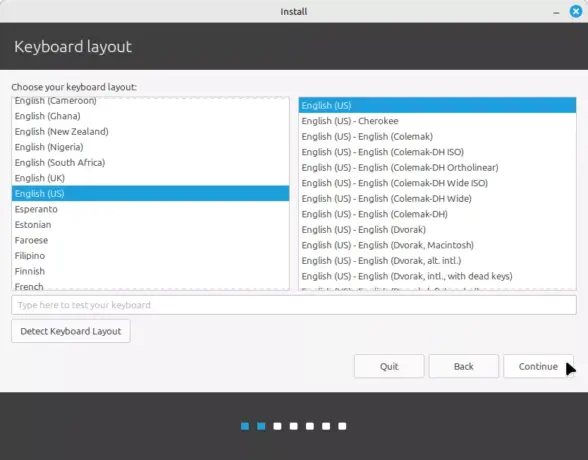
Figure 3: Linux Mint 22 installation keyboard
Installing non-free (proprietary) multimedia codecs makes it possible to use those after installation, so it’s always a good idea to install them by selecting Install multimedia codecs. Continue.
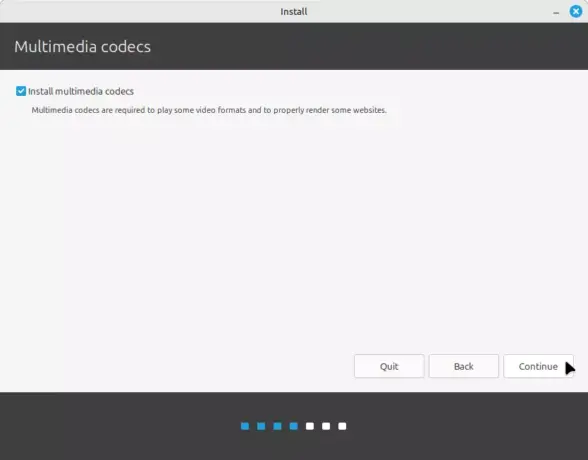
Figure 4: Install multimedia codecs.
Whether you see the message window shown in Figure 5 depends on whether you did or did not shutdown your computer before connecting the external hard drive that Linux Mint 22 will be installed on. You’ll see the message window if you did not shut the computer down before attaching the external hard drive. Click Yes to let the installer unmount the drive’s partitions.
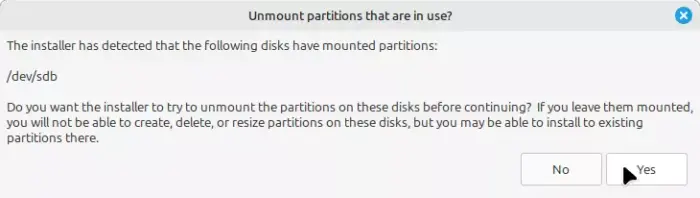
Figure 5: Unmount external hard drive’s partitions.
Disk partitioning installation steps
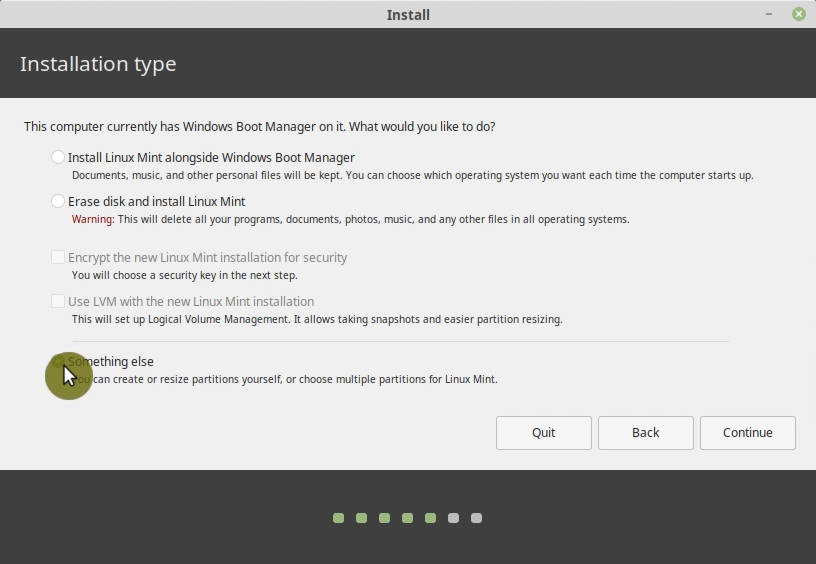
The next window you see in the installation process lets you choose how the installer should install Linux Mint on the detected hard drives. Because you want to install Linux Mint 22 on the external hard drive, the option to select in this step of the installation process shown in Figure 6 is Something else. That should make it possible for you to manually partition the external hard drive. Continue.
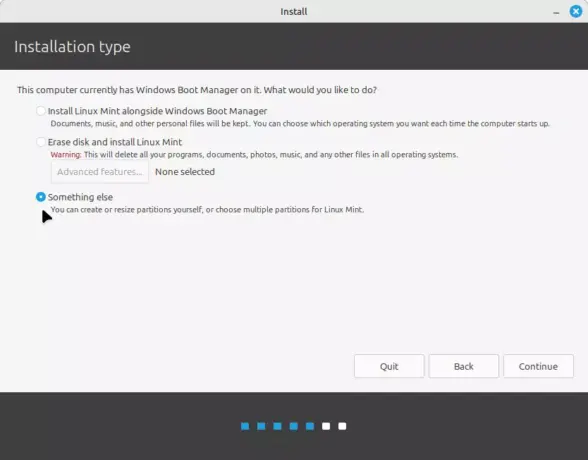
Figure 6: Selecting the right installation type.
In the next window shown in Figure 7, you’ll see all the disks and disk partitions detected by the installer, except for those of the USB stick that the installer is running on. You can see that Windows 11 is installed in the NVMe drive (/dev/nvme0n1). Because of the limitations of the window, you’ll have to scroll down to see the external hard drive (/dev/sdb) and its partitions (see Figure 8 after this).

Figure 7: Windows 11 partitions as seen by the Linux Mint 22 installer.
As shown in Figure 8, the external hard drive used for this tutorial had existing partitions on it.

Figure 8: Existing partitions on the external drive on which Linux Mint 22 will be installed on.
If yours is the same, select each partition and delete it by pressing the – button. Do that until only a free space is left.
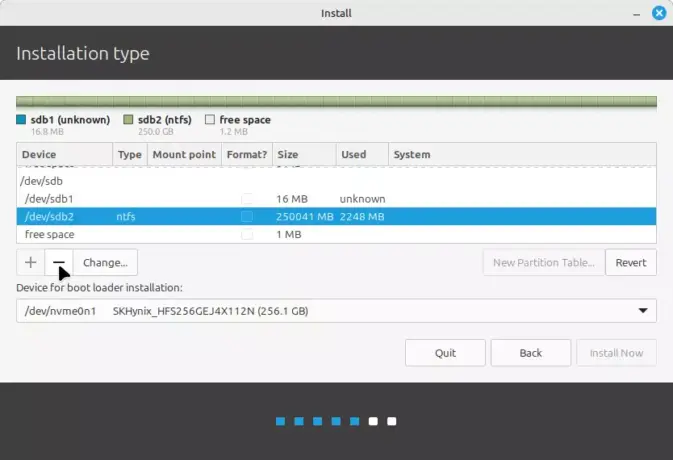
Figure 9: Deleting existing partitions from the external hard drive.
Now you can start creating partitions. To do that, select the free space and click on the + button. (Do this for each partition you want to create.)
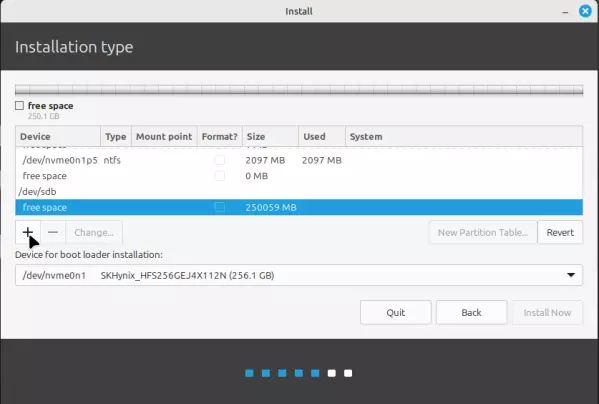
Figure 10: Free space for creating partitions for installing Linux Mint 22.
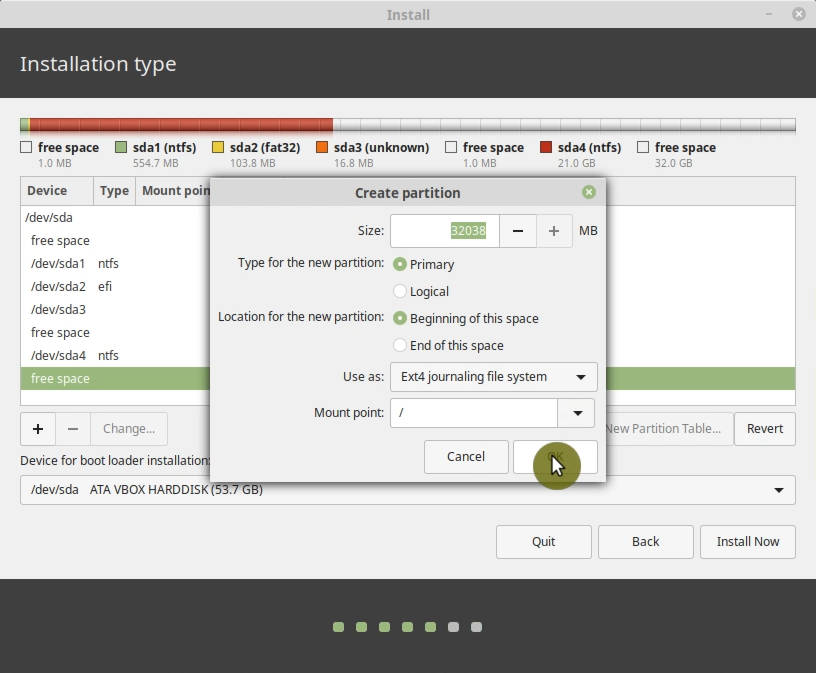
That will open a window where you can create the first partition, which will be used to install the boot manager (GRUB) files. The EFI System Partition automatically created on Windows 11 and Linux distros is usually about 270 MB in size, so assigning that amount of disk space to this partition should do just fine. Keep other options as shown and select EFI System Partition from the Use as dropdown. Click OK.
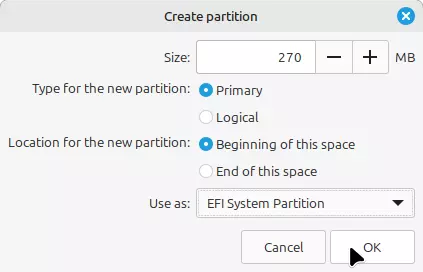
Figure 11: Creating the Linux Mint 22 EFI System Partition
The next partition created for the system used in this tutorial was assigned the rest of the disk space available on the external drive. Again, leave other options as shown and select Ext4 journaling file system from Use as and / from Mount point. OK.
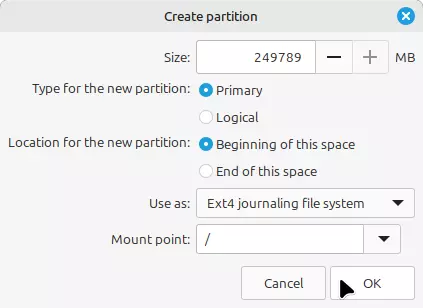
Figure 12: Creating the root partition for the installation of Linux Mint 22.
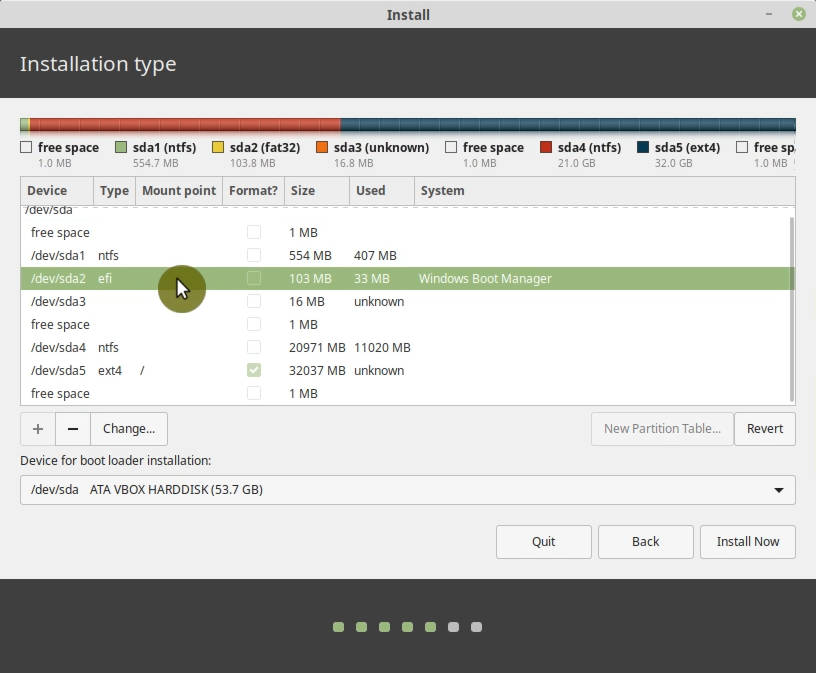
After creating all the partitions you need, the next task is to tell the installer where to install the boot loader (GRUB) files. By default, it will want to install it in the EFI System Partition of the internal drive, the one where Windows 11 is installed on. That’s not a good idea, so the recommended place to install GRUB is in the EFI System Partition you created earlier. You do that by selecting the device where that partition is from the Device for boot loader installation dropdown. In this case, it’s /dev/sdb. Click Continue after selecting the equivalent device for your installation.
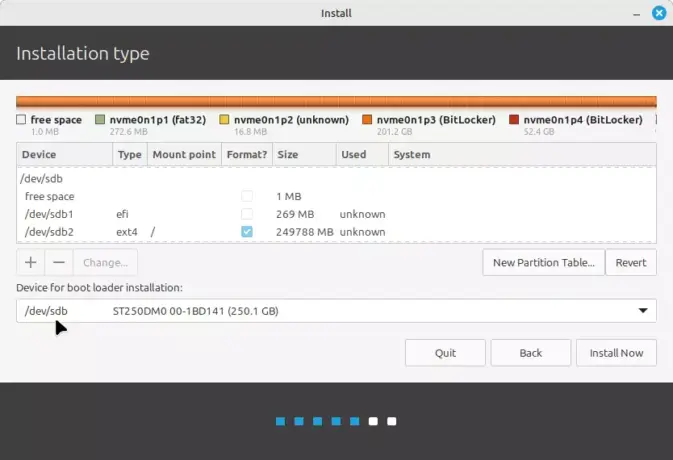
Figure 13: Choosing where to install the boot loader files for Linux Mint 22.
This is just the installer informing you what it’s going to do, which is, format the partitions you created earlier. Continue to begin installing the system.
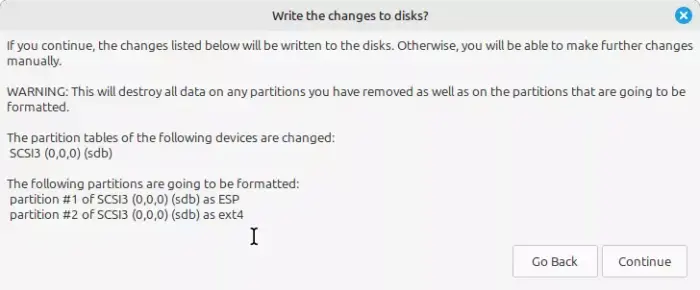
Figure 14: Partitions to be formatted by the Linux Mint 22 installer.
Post-disk partitioning installation steps
If you computer is connected to the Internet, the installer will detect your timezone automatically. Otherwise, select it by clicking on the timezone map. Continue.
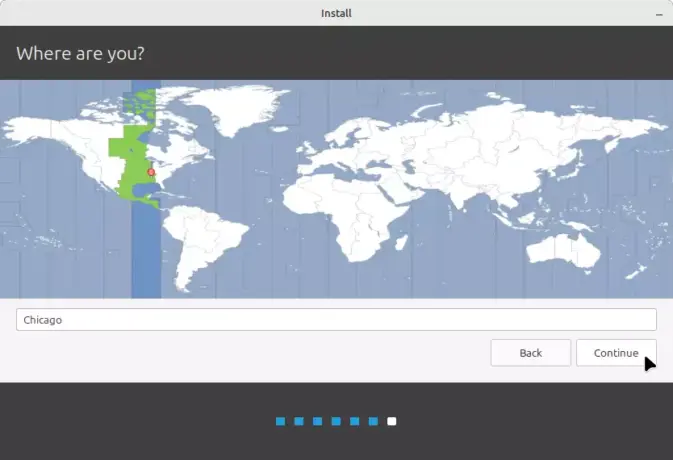
Figure 15: Timezone setting during the installation of Linux Ming 22.
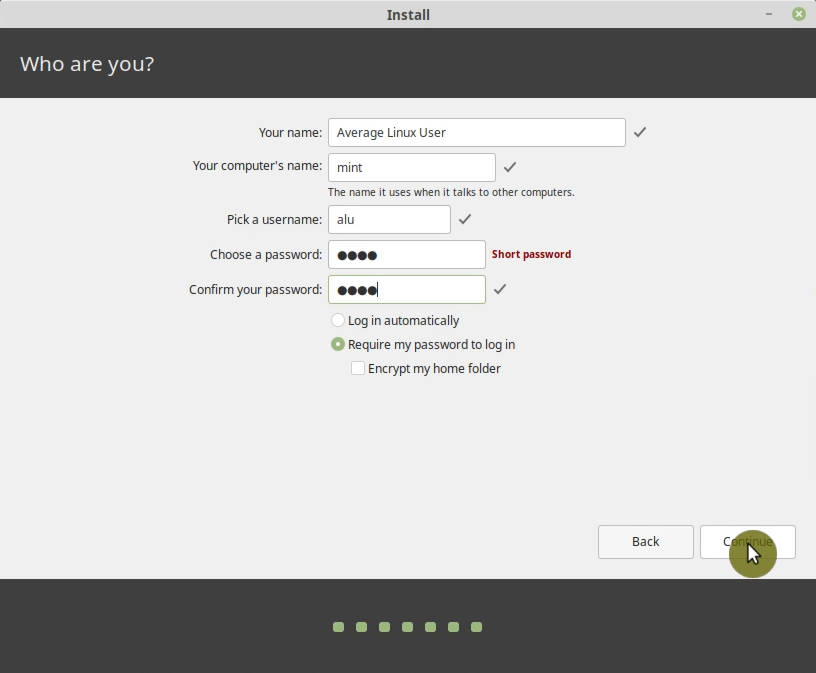
The final task to do while the installer is still installing software is to create the user account you’ll use on the system. It’s always a good security practice to require a password to log in. And you may opt to encrypt your home folder. Continue.
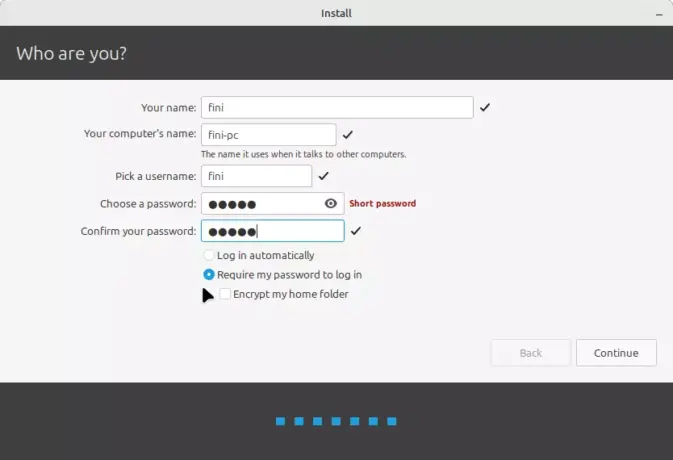
Figure 16. Creating a user account for Linux Mint 22.
Once installation is completed, the installer will prompt you to either continue using the live system or restart the computer. Unless there’s something else you want to do on the live system, choose Restart Now to reboot into your new installation of Linux Mint 22 Wilma.
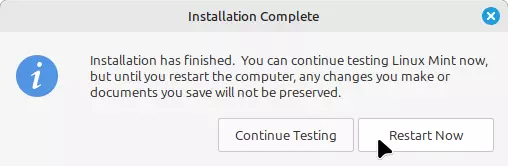
Figure 17: A prompt from the Linux Mint 22 installer.
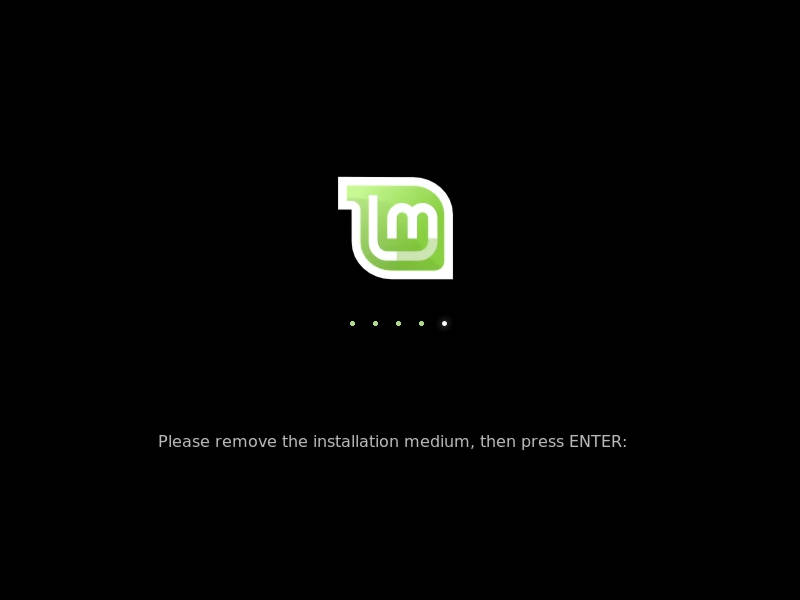
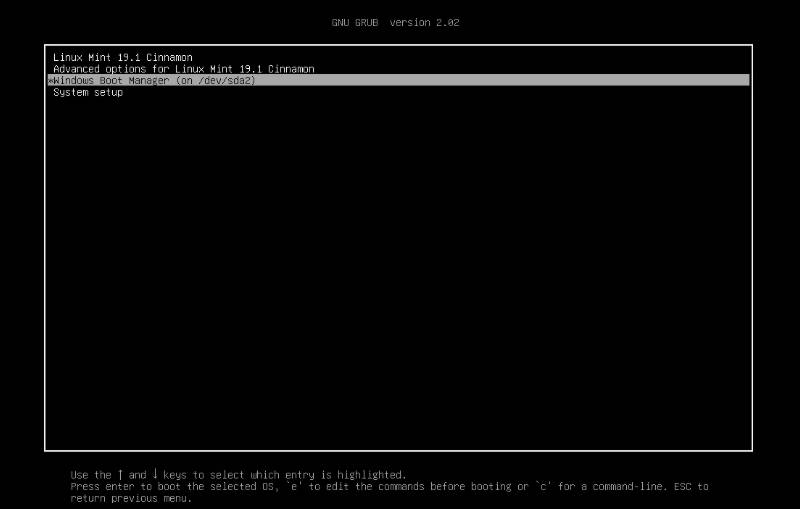
Finally, you’ll be prompted to “Please remove the installation medium, then press Enter:” Pressing Enter after removing the installation medium should trigger a reboot. If it does not, press or press and hold the power button to shut the computer down, then press the power button again to restart. If all went well, you should see a GRUB menu similar to the one shown in Figure 18, with an entry for Linux Mint 22 and also for Windows 11, so you can choose what OS to boot into.
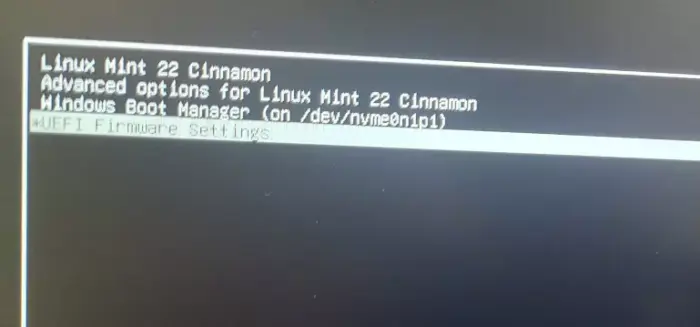
Figure 18: Linux Mint 22 GRUB boot menu
Miscellaneous items
If you press the F12 key as the computer reboots, the boot menu shown should now contain and entry for Linux Mint 22 and the Windows Boot Manager entry.
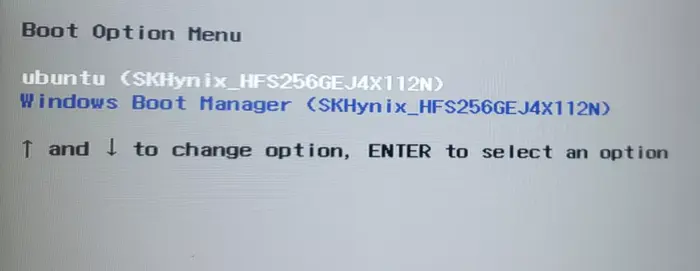
Figure 19: Lenovo IdeaPad boot menu showing Windows 11 and Linux Mint 22 boot manager entries.
If at any time you’re dropped to a grub prompt as you attempt to reboot the computer after selecting the Linux option from the boot menu, pressing the Ctrl-Alt-Delete key combination should prompt another reboot and bring up a proper GRUB boot menu.
Last Updated :
07 Nov, 2022
Dual booting is the process of installing two operating systems on a single machine. In reality, such a system allows for the installation of various operating systems. However, how does the computer know which operating system to boot? The boot area can be occupied by a boot loader that comprehends various file systems and numerous operating systems. One of the operating systems on the disc can be booted once it has been loaded. The disc may be divided into several partitions, each of which houses a distinct operating system. A boot manager application presents a menu when a computer turns on, enabling the user to select the operating system to use.
Linux Mint is a community-driven Linux distribution based on Ubuntu. It has a lot of packages. It’s one of the most popular, safe, and reliable desktop Linux distributions. In this article, we’ll install it alongside windows aka dual boot Windows and Linux Mint.
Prerequisites:
- A USB drive at least of 8GB.
- HDD or SSD having at least 20 GB free space.
Procedure to Dual Boot
Follow the below steps to dual-boot Windows and Linux mint.
Step 1: Download your favorite Linux Mint flavor from https://www.linuxmint.com/download.php
Step 2: Create a bootable USB drive so that you can boot Linux Mint. You can do this by using the Rufus https://rufus.ie/en/ tool which is a very good tool for this purpose.
Note: If you’re using UEFI based system (most probably) then use the GPT partition scheme as shown in Step 2 below image, otherwise use MBR.

Step 3: Make a partition for Linux Mint to install.
a) Open your disk management application by Pressing Win key -> Search to create and format ->

b) Select the disk on which you’ve enough space in my case Disk 0 then right-click and select Shrink Volume and shrink as per your requirement. Since I have a lot of space so I shrunk 200 GB (1 GB = 1024MB)

Step 4: Boot the USB drive.
Plug in your USB drive and restart the computer, while booting depending on your system press F9 or F10, or F12. You can easily find your boot menu key using Google. Since the computer gets restarted so I can not take a screenshot of the restart so I didn’t add that in this step.
NOTE: Be careful while performing the below steps
Step 5: Start the installation by clicking on Install Linux Mint

b) Select the language which you are comfortable with.

Step 6: Installation type.
a) Automatic Partitioning — The installer will format the HDD or SSD drive (where your Windows is installed) and it will take care of creating the required partitions.
NOTE: Use this option only if you don’t mind the partition layout and size.

If you selected this option then confirm auto partitioning. Click on Continue

b) Manual Partitioning
Something else — Use this option in case you want to create partitions as per your need. Click on Continue

Step 7: Create partitions for Linux Mint installation. You can choose home and root partition sizes as per your need.
For UEFI-based systems:
- EFI — 1 GB
- swap — 2 GB
- /home — 100 GB
- / (root) — Remaining (97 GB)
For Legacy BIOS systems:
- /boot — 1 GB
- swap — 2 GB
- /home — 100 GB
- / (root) — Remaining (97 GB)
Select the free space and then click on ‘+’ at the bottom left to create a partition. Make sure you select the correct free space in my case I knew I’ve shrunk 200 GB of space so I got confirmed by seeing the size of the free space.

For EFI partition:

For Legacy BIOS systems:

For swap partition:

For /home partition:

For / (root) partition:

Step 8: Review your partition and click on Install Now.

Step 9: Click on Continue to create the partition as per the plan.

Step 10: Additional configuration.
a) Select your Timezone

b) Enter user information along with the password.

Step 11: Linux Mint installation.

Linux Mint installation has been completed, restart your computer.

Step 12: Reboot and choose the Linux Mint to boot.

As you can see we’ve successfully installed Linux Mint alongside Windows.
You will learn everything you need to know about dual-booting Linux and Windows.
I assume you already have Windows installed on your computer and you only need to install Linux to dual boot. This post will guide you through the following key points of the dual boot installation:
- Essential BIOS settings for successful dual boot.
- How to shrink your Windows partition to get free space for Linux.
- How to install Linux, using Linux Mint as an example.
- How to set the boot order in your computer to see the menu where you can choose between Linux and Windows to boot.
- Finally, I will explain why I am not a fan of dual-booting and why I recommend using Windows in a virtual machine as I showed in this post.
*NOTE: Before you apply any actions from in this post, please back up all your important data.*
BIOS settings
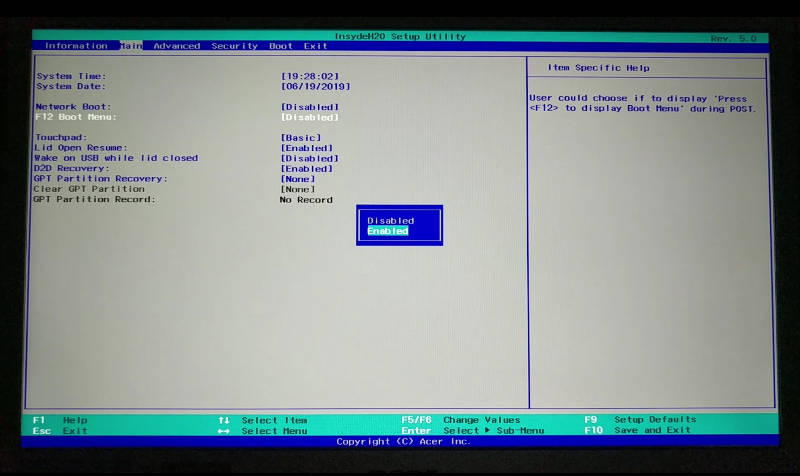
Unfortunately, most of the computers have BIOS configured specifically for Windows, and likely you won’t be able to install Linux on it without changing some settings. BIOS interface may differ from one computer to another but the main settings are the same.
I will use the BIOS of my Acer Swift 1 laptop as an example here.
Get into BIOS
First, you need to get into BIOS, usually, you just need to press a specific key during the boot. In my Acer Swift 1, I press F2. Just google your computer model and bios key term, and you will find the key you need to press. Sometimes, you may also see it on the screen during the boot:

Set the BIOS password
Next, you may need to set a password in your BIOS because it won’t allow you to change any security settings without a password. This is the menu to set the password on my Acer Swift 1:
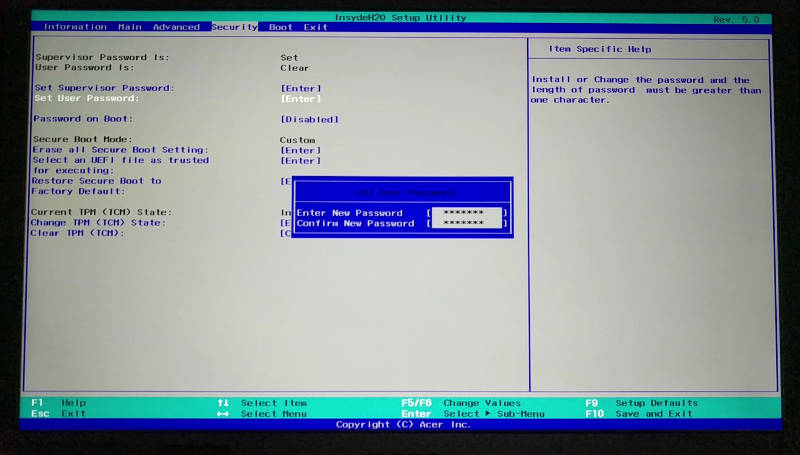
You should be able to find the same in your BIOS. It is also possible that you can proceed without setting a password.
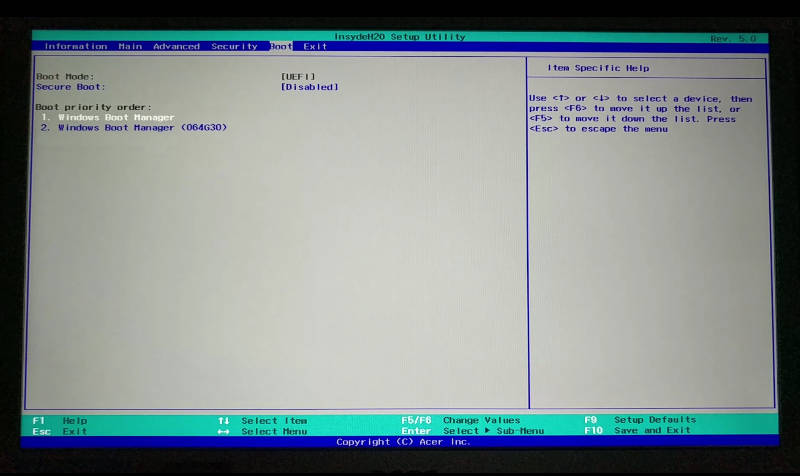
Disable Secure booting and change the Boot order
Next, you need to go to the Boot menu and disable Secure booting and move your bootable USB flash drive to the first place in the boot order:
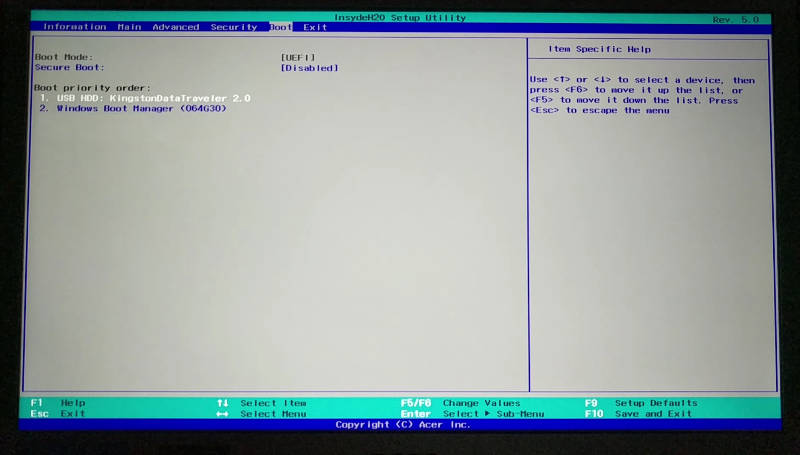
Check this description of the commands on the right or bottom of your BIOS interface, it explains how to navigate and change options in your BIOS.
I am not going to stop here on how to create a bootable USB drive. I have already explained how to create a bootable USB from the command line or using graphical programs.
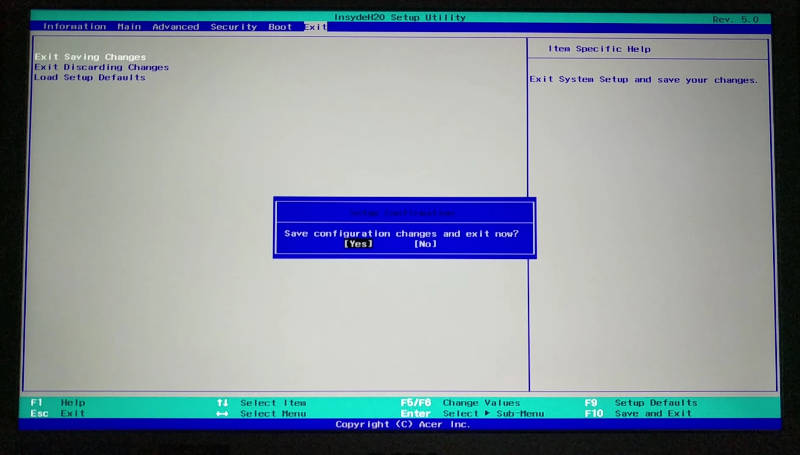
Save BIOS settings
In the end, go to the exit menu and exit BIOS with saving the changes:
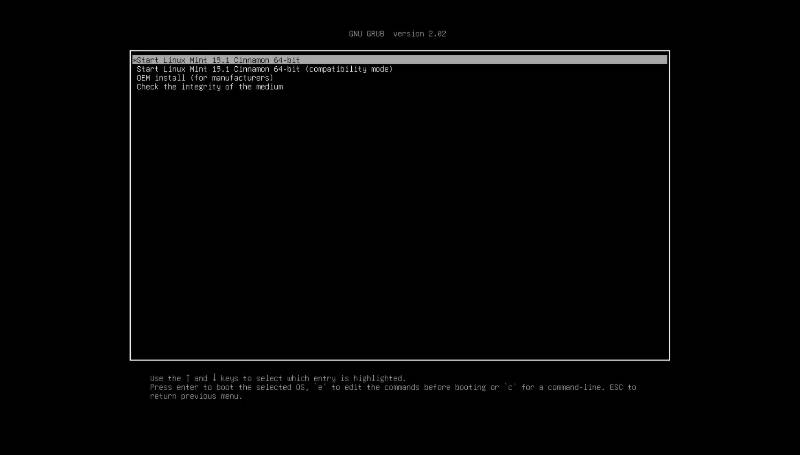
If you have done everything correctly, you should boot in your Live USB Linux system:
Get free space for Linux
Boot into Live Linux session
Boot from the Live Linux USB. I will use Linux Mint installer as an example here, if you use Ubuntu or any Ubuntu-based distro, the process will not differ at all. If your distro is not Ubuntu-based, you still need to do the same steps as you will see in this post but the installer may look slightly different.
To install Linux alongside Windows, you can actually select such an option in the installation wizard:
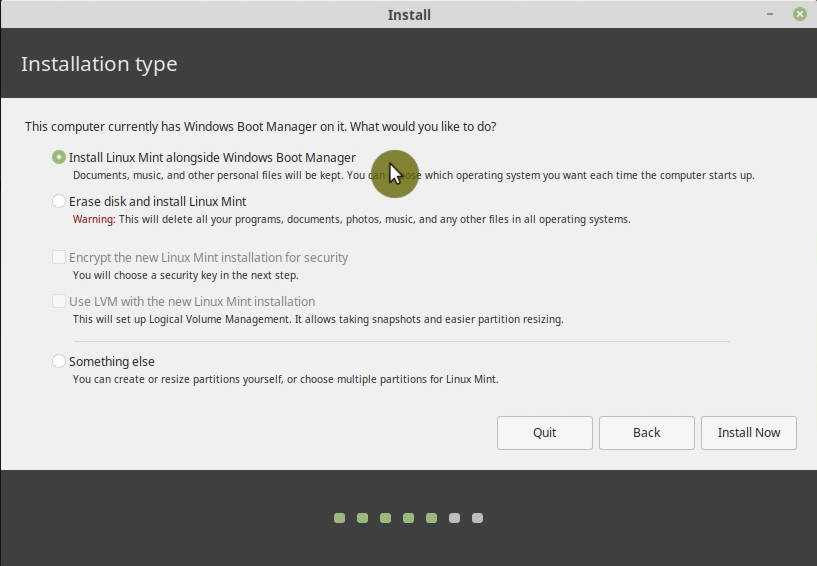
It will automatically find free space on your hard drive and install Linux there. However, if you want to have little more control over how much space you allocate to Windows and Linux, you can get free space and assign it for Linux manually.
Shrink the Windows partition with GParted
Most of the Linux distros have GParted included in a Live ISO. If it is not, install it from the Software Center. Then open GParted and select the hard drive with your Windows installed:
Your Windows hard drive will be partitioned similarly to the one you see above. Most likely it will have the EFI partition, and this means you need to install Linux in the EFI mode too.
To shrink the Windows partition to get free space for Linux, you need to select the largest partition, click on the Partition menu in GParted, and select resize.
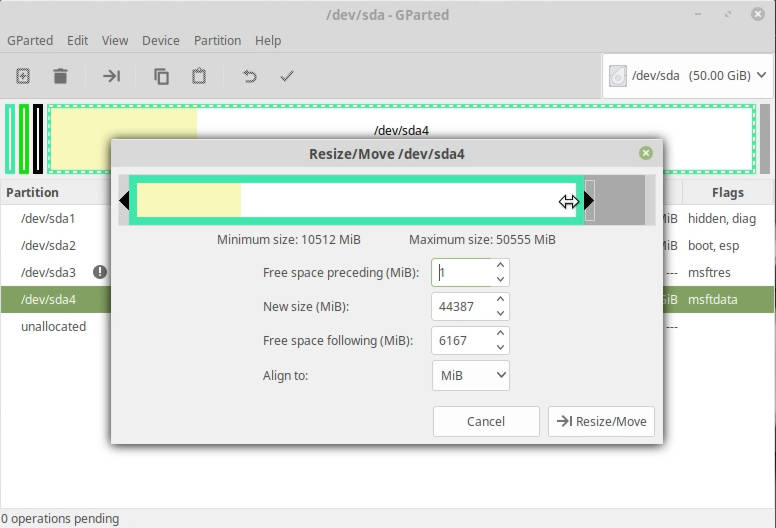
All white space is free space. So, you can shrink this partition with your mouse, or by selecting its size precisely with the number. You can take a maximum of free space for Linux if you aim to use mainly Linux, but leave some free space for Windows too, because it may not be able to work without free space left.
Click resize. Read this warning to know the risk and click OK. You will see how your partitions will look like after you apply the resizing:
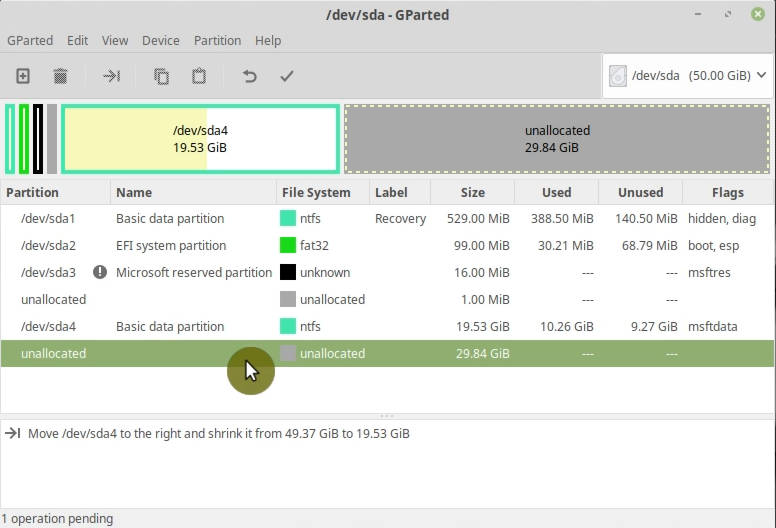
So far, no changes to your hard drive have been applied. It is only a plan of action. You still can cancel everything, if you have done a mistake somewhere. However, if you are happy with this partition table. Click apply. This action will be irreversible.

Resizing will take some time. Hopefully, it will finish successfully and you can proceed with the installation.
Install Linux
To install Linux, click on the Install icons on your desktop or in your menu.
The installation process is pretty standard.
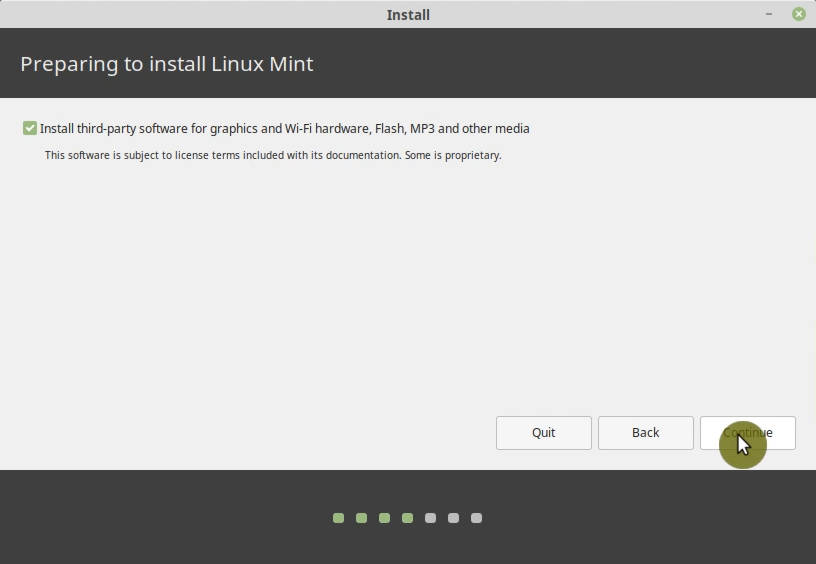
I recommend to include the third party software in the installation:
Select Manual partitioning
As I mentioned before, you can select the option to Install Linux alongside Windows automatically, but I personally prefer the manual way. That’s why we shrank the Windows partition and released some free space for Linux. Manual way not only gives more control but it also helps to understand what happens to your system when you install two systems alongside each other. So, select Something else here:
Create Linux Partition
The new screen will show you the partitions of your hard drive. You need to select the free space we have created in the previous step. Then click on the add sign, to create a Linux partition in this free space:
You can keep all the options at default here but importantly you need to assign / as a mounting point to this partition.
You can also split this free space into two parts and assign one to the system / and one to /swap. But I believe it is much better to use a swap file instead. Ubuntu installer creates a swap file by default.
I already explained the difference between a swap file and swap partition previously.
Check the EFI partition
Next, you need to select the EFI partition, it is usually of several hundred megabytes in size. Make sure it is detected as EFI:
Boot loader installation
Boot loader installation doesn’t matter here because it will be UEFI installation, so the boot loader will be installed in the EFI partition. You can keep the default selection.
Format column
Finally, check that only the new Linux partition will be formatted in the Format column. Because if you have other partitions selected for formatting, be careful you will lose all the data stored in those partitions. If everything is fine, click Install.
Finalize the installation
While the system is installing, select your location, provide your user information, set the password, etc.:
And then just wait until the system is installed.
After the installation, reboot the system and do not forget to remove your installation USB when you are requested to do so:
Boot into the new system
You should see this GRUB menu after the reboot. Here you can select between Linux, which will boot by default in 10 sec, and Windows:
Boot options in BIOS
If it happened that after the reboot, you booted directly in your Windows and you did not see any Linux menu, do not get upset. Likely, you have done everything right and you just need to change the boot order in your BIOS. Like I had to do in my Acer Swift 1.
In the Main tab, find the Boot menu and enable it:
Change the Boot order
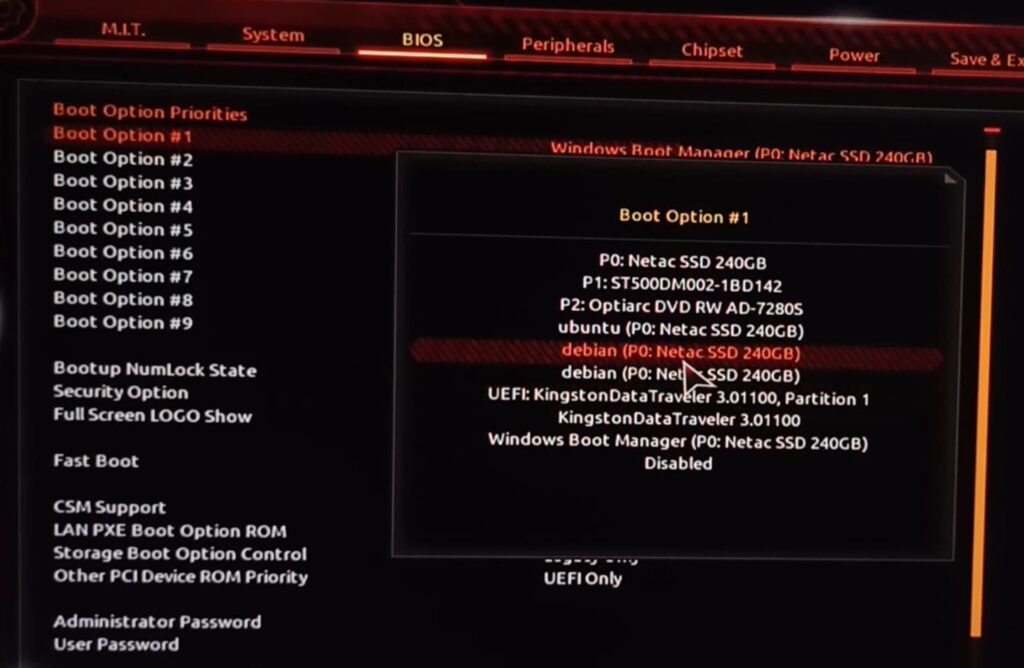
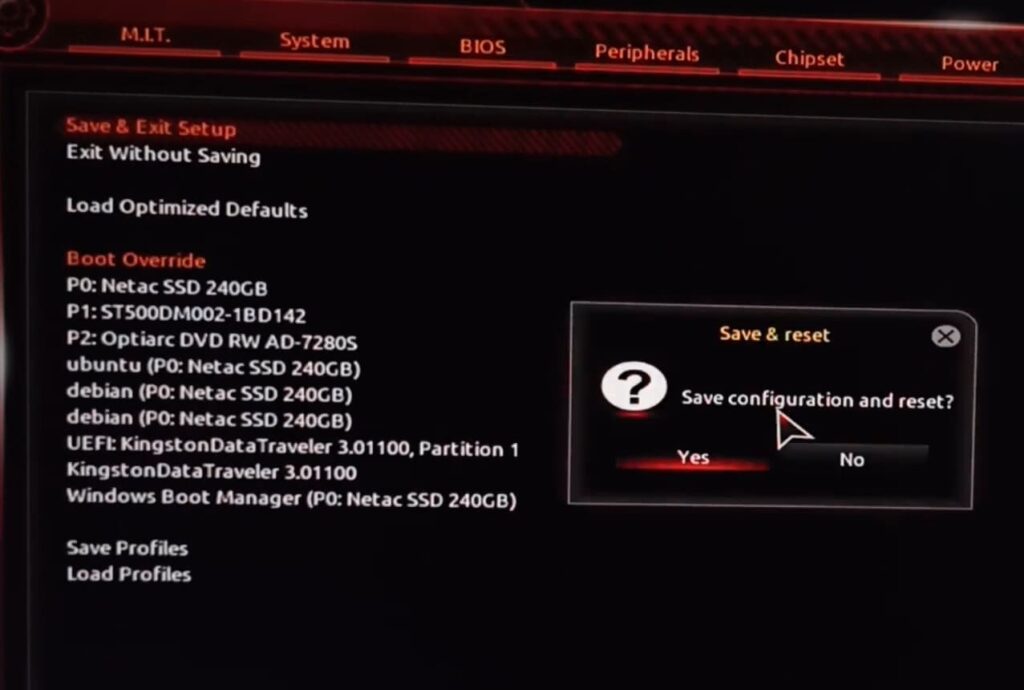
Then go to the Boot order and you should see an additional boot option there that appeared after you installed Linux. In my case, it is still called Windows Boot Manager without the code in brackets. This is actually my Linux boot file. I do not know why BIOS branded it as Windows. So, I make it a first boot option:
And save the BIOS changes. After the reboot, you should see the GRUB menu with the choice of boot options.
If you still boot into Windows by default, try to open the boot menu during the start of your system by pressing the F12 key (or whatever key is assigned to your BIOS Boot menu). It should bring this BIOS boot menu:
Where I can choose Ubuntu and my Linux Mint will boot. So, the BIOS Boot menu helps to make sure that Linux works, you just need to check your boot order settings, maybe Linux is not the first option there. Try different orders until you get Linux booting the first.
Why I do not recommend dual-booting
There are three main reasons I stopped dual-booting and this is also why I do not recommend dual boot.
-
If you use Windows in dual boot, it is possible that some updates of Windows may break your Linux installation. Theoretically, it should not happen, but it happens. Maybe Windows changes the Linux bootloader in the UEFI partition. I do not know.
-
If you dual boot, you will never switch to Linux. If you are used to Windows, you will tend to boot into Windows more often and you won’t like to reboot to get to Linux. So, you will not use Linux much and thus will never switch to Linux completely.
-
On the other hand, if you prefer Linux, Windows will just take too much space on your hard drive that is never used. So, this is not good either.
I recommend using Windows in a Virtual machine such as VirtualBox. This way your Windows can be accessed from within Linux. Windows will be less powerful than if it was installed in dual boot, but you still can do most of the things you would normally do. A virtual machine also isolates your Windows file system and this provides better protection against viruses. You can read my post on how to install Windows 10 in VirtualBox and maybe you will like that option more than dual-booting.