
Загрузить PDF
Загрузить PDF
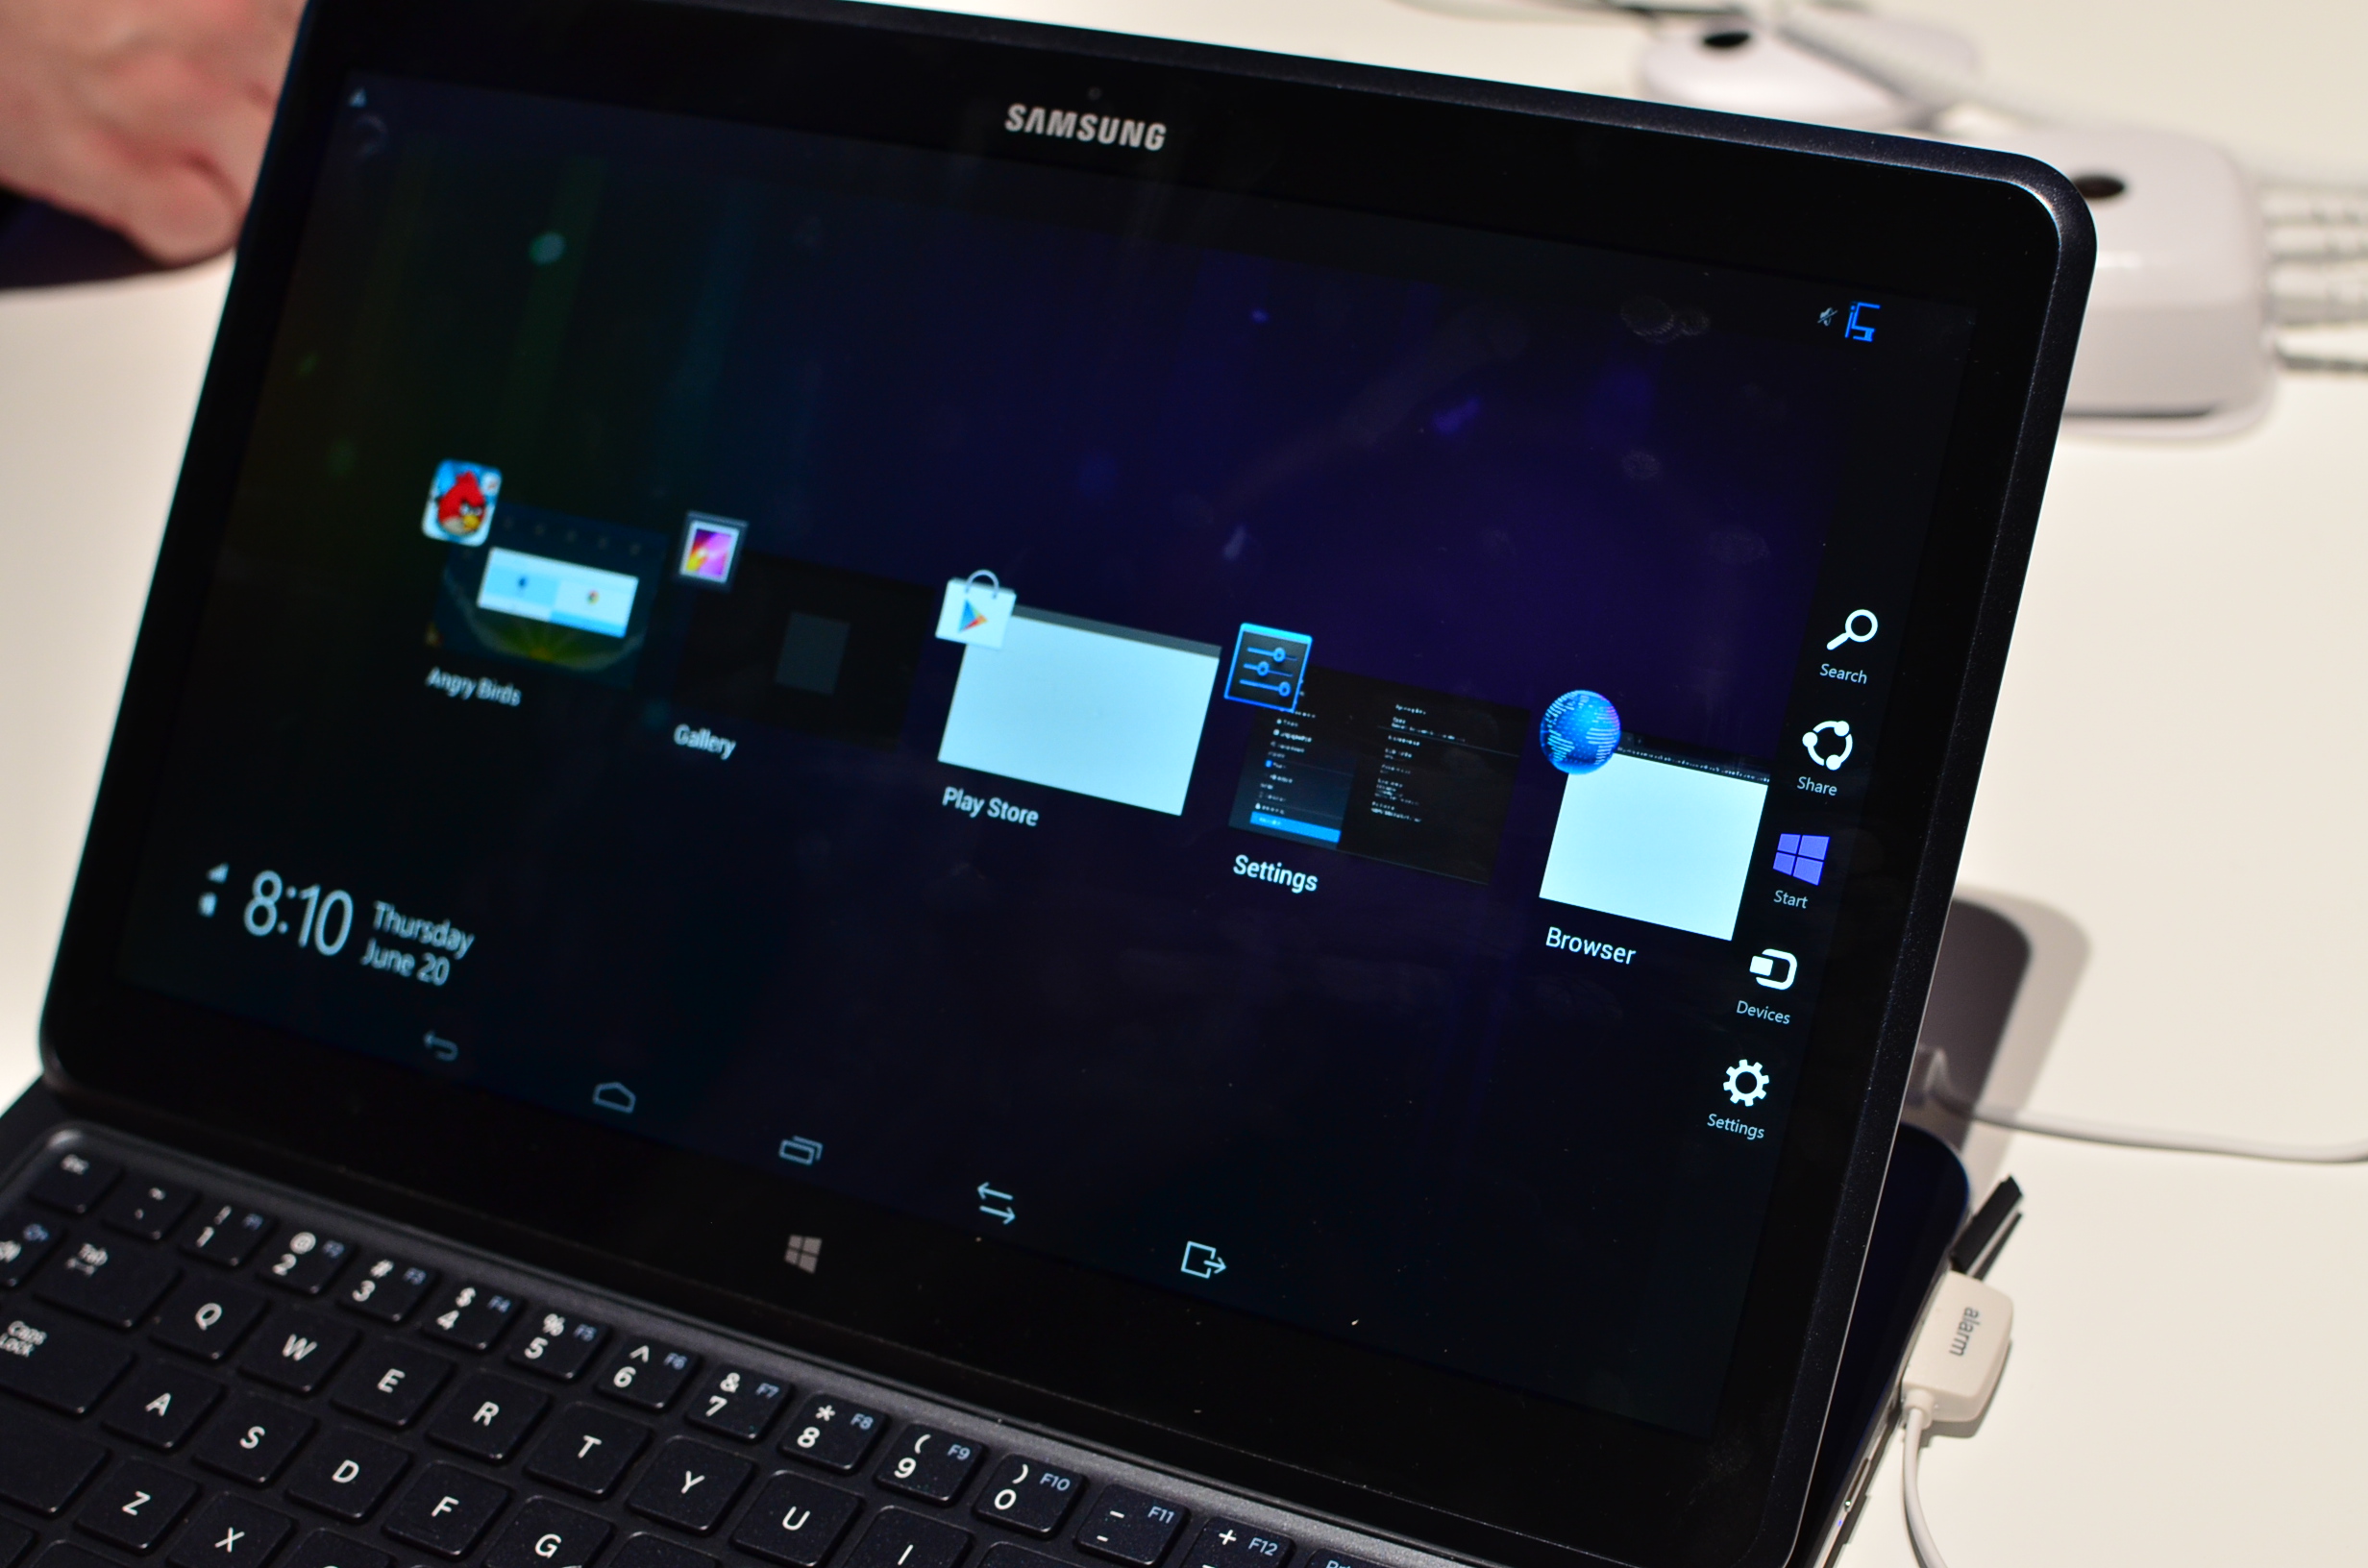
Установка Windows 8 на планшет Android позволит вам использовать приложения, эксклюзивные для Microsoft Windows, а также обеспечит внешний вид и функции Windows 8. Windows 8 можно установить на Android с помощью программы Change My Software на любом компьютере с ОС Windows.
-

-
Выберите раздел «Для разработчиков», затем поставьте галочку рядом с параметром «Отладка по USB». Это позволит компьютеру вносить изменения в Android при его подключении через USB-порт.[1]
-

Запустите браузер на компьютере с ОС Windows и поищите программу Change My Software в Интернете. Без этой программы у вас не получится установить Windows 8 на планшет Android.
-
Скачайте приложение, воспользовавшись основной ссылкой или зеркалом для скачивания. Пройдя по ссылке для загрузки Change My Software, вы окажетесь на стороннем сайте, который откроется в новой вкладке браузера.
- Некоторые сайты, прежде чем позволить вам скачать Change My Software, могут попросить заполнить опросник. Если перед скачиванием программы от вас потребуют заполнить опрос, попробуйте перейти по другому зеркалу.
-
В нем содержатся сжатые файлы, необходимые для запуска Windows 8 на планшете.
-
Дважды щелкните по файлу .rar, чтобы извлечь его содержимое с помощью WinZip, а затем дважды щелкните по установочному файлу .exe. На экране появится мастер установки Change My Software.
-
Следуйте инструкциям на экране, чтобы установить Change My Software на свой компьютер. По завершению установки программа запустится автоматически.
-
Подключите планшет Android к компьютеру при помощи USB-кабеля, а затем нажмите «Android > Windows 8».
-
Убедитесь, что программа обнаружила ваш Android, а затем нажмите Continue/Продолжить.
-
Change My Software сразу же приступит к процессу загрузки драйверов Windows 8 на планшет Android. Это может занять несколько минут.
-
Подождите, пока на экране не появится сообщение «Download successful/Загрузка прошла успешно», а затем нажмите Install/Установить. Установка Windows 8 займет несколько минут, в ходе которых планшет может несколько раз перезагрузиться.
- Не ставьте галочку рядом с надписью Remove Android/Удалить Android, если не хотите установить Windows 8 без возможности альтернативной загрузки ОС Android. Change My Software по умолчанию позволяет запускать на планшете как Windows 8, так и ОС Android. Учтите, что переустановка ОС на планшете приведет к отмене гарантии производителя на устройство.
-
Дождитесь, когда Change My Software сообщит, что установка Windows 8 завершена, а затем отсоедините планшет от компьютера. На планшете появится экран с выбором операционной системы.
-
Нажмите на Windows 8, затем следуйте инструкциям на экране, чтобы приступить к работе с Windows 8. В дальнейшем операционную систему на планшете можно будет выбрать после перезагрузки.[2]
Реклама


Советы
- Если вы захотите убрать Windows 8 с планшета, подключите его к компьютеру и снова запустите Change My Software. В главном меню выберите Restore to original condition/Восстановить исходное состояние. После чего программа удалит Windows 8 с вашего планшета и восстановит операционную систему Android.
Реклама
Предупреждения
- Используйте Change My Software на свой страх и риск, и помните, что она не поддерживается ни Microsoft Windows, ни Android. Если в результате работы Change My Software ваш планшет выйдет из строя, выполните следующие действия, чтобы перезапустить планшет и вернуть его к заводским настройкам. В большинстве случаев сброс к заводским установкам позволяет обратить или устранить любые текущие проблемы с устройством.
Реклама
Об этой статье
Эту страницу просматривали 10 861 раз.
Была ли эта статья полезной?
-
Quick Links:
- Introduction
- Requirements
- Preparation Steps
- Installation Methods
- Dual Boot Setup
- Using a Virtual Machine
- Installation Guide
- Troubleshooting Common Issues
- Conclusion
- FAQs
Introduction
As technology evolves, the lines between different operating systems blur. If you’ve ever wondered how to install Windows 8 on your Android tablet, you’re not alone. This guide will walk you through the process, highlighting methods, tips, and essential tools to make the transition as smooth as possible.
Requirements
Before diving into the installation, ensure you have the following:
- An Android tablet with sufficient storage (at least 16GB free space is recommended).
- A copy of the Windows 8 installation ISO file.
- OTG cable (On-The-Go) for connecting USB drives.
- A compatible keyboard and mouse for easier navigation.
- Backup of all important data on the tablet for safety.
Preparation Steps
Preparation is crucial for a successful installation. Follow these steps:
- Backup your Android data to avoid losing important files.
- Ensure your tablet is fully charged or connected to a power source.
- Download and install a suitable app like Rufus (for creating bootable USB) on your PC.
- Obtain the Windows 8 ISO file legally from Microsoft’s official site.
- Format your USB drive to FAT32 to ensure compatibility.
Installation Methods
There are primarily two methods to install Windows 8 on your Android tablet:
Dual Boot Setup
This method allows you to run both Android and Windows 8 on your tablet, giving you the flexibility to choose the operating system at startup. Here’s how to set it up:
- Download a dual-boot manager like Linux Lite.
- Follow the instructions to create a partition on your tablet for Windows.
- Install Windows 8 to the newly created partition using your bootable USB.
Using a Virtual Machine
For those who prefer not to modify their tablet’s existing operating system, using a virtual machine is a viable alternative. This method runs Windows 8 within an app on your Android device.
- Install a virtualization app, such as VMware.
- Load the Windows 8 ISO into the virtual machine environment.
- Configure the settings (allocate RAM and storage) for optimal performance.
- Start the virtual machine and proceed with the Windows installation.
Installation Guide
Now, let’s go through the detailed installation process, focusing on the dual boot setup first:
Step-by-Step Installation for Dual Boot
- Boot your tablet into recovery mode (this process varies by device).
- Use the recovery menu to access the partition management tool.
- Resize the Android partition to create space for Windows 8.
- Insert your bootable USB and restart the tablet.
- Select the USB drive from the boot menu.
- Follow the on-screen instructions to install Windows 8 on the designated partition.
- After installation, configure the boot manager to select between Android and Windows at startup.
Step-by-Step Installation Using a Virtual Machine
- Launch the virtualization app.
- Create a new virtual machine and choose Windows 8 as the operating system.
- Load the ISO file into the virtual disk section.
- Set the RAM to at least 2GB for better performance.
- Start the virtual machine and follow the Windows installation prompts.
Troubleshooting Common Issues
Here are some common issues you may encounter during the installation process and how to address them:
- Boot Failure: Ensure that the USB drive is properly formatted and that the BIOS is set to boot from USB.
- Insufficient Space: Check the partition sizes and ensure there’s adequate space for Windows 8 installation.
- Performance Issues in Virtual Machine: Adjust the RAM and CPU settings allocated to the VM.
Conclusion
Installing Windows 8 on an Android tablet can seem daunting, but with careful preparation and following this guide, you can successfully enjoy the benefits of both operating systems. Whether you choose a dual boot setup or a virtual machine, ensure that you backup all your important data and follow the instructions closely for a smooth experience.
FAQs
1. Is it safe to install Windows 8 on an Android tablet?
Yes, as long as you follow the instructions carefully, use reliable software, and backup your data.
2. Can I uninstall Windows 8 later if I don’t like it?
Yes, you can remove the Windows partition or the virtual machine app to revert to solely using Android.
3. Will I be able to use all Windows applications?
Not all applications may work perfectly, especially those requiring advanced hardware support.
4. What if my tablet doesn’t support dual boot?
You can still use the virtual machine method to run Windows without altering your Android installation.
5. Can I install a different version of Windows?
Yes, similar methods apply for other Windows versions, but compatibility may vary.
6. Will this process void my warranty?
Modifying the operating system may void the warranty; check with your manufacturer.
7. What are the minimum specifications for running Windows 8 on my tablet?
At least 2GB of RAM and 16GB of storage are recommended for optimal performance.
8. What are the risks involved in this installation?
Risks include data loss, bricking the device, or software incompatibility.
9. How do I switch back to Android from Windows?
Restart your tablet and select the Android option from the boot manager (if dual booting).
10. Can I install other operating systems on my tablet?
Yes, many tablets support Linux distributions and other operating systems using similar methods.
Source: Anandtech.com
Preparation
Before starting, understanding the limitations and potential risks involved in installing Windows 8 on an Android tablet is crucial. Here are some key points to consider:
Hardware Compatibility
- Ensure your device has the necessary hardware specifications to run Windows 8.
- Typically, this includes a dual-core processor, at least 2 GB of RAM, and sufficient storage space.
Software Compatibility
- Windows 8 is designed for traditional PCs and may not be optimized for tablet hardware.
- Issues with touch input, screen resolution, and other tablet-specific features might occur.
Data Loss
- Installing Windows 8 will erase all data on your Android tablet.
- Back up any important files, contacts, and apps before proceeding.
Software Requirements
- Specific software tools are needed to convert your Android tablet into a Windows 8 device.
- These tools include Android-x86, VirtualBox, or VMware.
Step 1: Prepare Your Device
Backup Your Data
- Connect your Android tablet to a computer via USB.
- Use a backup app like Google Drive or Dropbox to transfer your data.
- Alternatively, manually copy important files to a USB drive.
Disable Secure Boot
- If your tablet has UEFI firmware, disable Secure Boot to allow the installation of non-UEFI-compatible operating systems like Windows 8.
Update Your Android Tablet
- Ensure your Android tablet runs the latest version of its operating system.
- This helps in identifying any potential issues with the installation process.
Step 2: Download Necessary Tools
Android-x86
- Download the latest version of Android-x86 from its official website.
- Choose the version matching your tablet’s architecture (e.g., x86 or x64).
VirtualBox or VMware
- Download VirtualBox or VMware from their official websites.
- These virtualization software will help create a virtual machine for installing Windows 8.
Windows 8 ISO File
- Obtain a legitimate copy of the Windows 8 ISO file from Microsoft or an authorized retailer.
Step 3: Convert Your Android Tablet to Run Android-x86
Boot from USB
- Create a bootable USB drive using the downloaded Android-x86 ISO file.
- Insert the USB drive into your Android tablet and restart it.
Boot into Android-x86
- Your tablet should now boot into Android-x86.
- Follow the on-screen instructions to complete the installation process.
Install Drivers
- Once booted into Android-x86, install drivers for your tablet’s hardware components like Wi-Fi, Bluetooth, and USB.
- Find these drivers on the manufacturer’s website or through online forums.
Configure Network Settings
- Set up network settings to ensure internet connectivity.
- This is crucial for downloading additional software and updates.
Step 4: Install VirtualBox or VMware
Download and Install VirtualBox or VMware
- Follow the installation instructions provided by VirtualBox or VMware to install the software on your computer.
Create a Virtual Machine
- Launch VirtualBox or VMware and create a new virtual machine.
- Choose the operating system as «Windows» and select «Windows 8» from the list of available options.
Allocate Resources
- Allocate sufficient RAM and CPU resources to the virtual machine.
- Ensure enough disk space is allocated for the virtual machine.
Install Windows 8 in the Virtual Machine
- Mount the Windows 8 ISO file within the virtual machine settings.
- Start the virtual machine and follow the on-screen instructions to complete the installation process.
Step 5: Configure Windows 8
Activate Windows 8
- Activate your copy of Windows 8 using a valid product key.
- This will unlock all features and functionalities of the operating system.
Update Windows 8
- Connect to the internet and update Windows 8 to the latest version available.
- This ensures all security patches and bug fixes are applied.
Install Essential Software
- Install essential software like Microsoft Office, Adobe Reader, and other productivity tools.
- Consider installing antivirus software to protect your virtual machine from malware.
Configure Network Settings
- Set up network settings within Windows 8 to ensure seamless connectivity with your Android tablet.
Step 6: Integrate Your Android Tablet with Windows 8
Share Files Between Devices
- Use cloud storage services like Google Drive or Dropbox to share files between your Android tablet and Windows 8 virtual machine.
- Alternatively, manually transfer files using USB drives.
Remote Desktop Access
- Enable remote desktop access on both devices to access files and applications remotely.
- This feature is particularly useful for projects requiring both Android and Windows environments.
Sync Data Across Devices
- Use services like Microsoft OneDrive or Google Drive to sync data across both devices.
- This ensures files are always up-to-date and accessible from any device.
Installing Windows 8 on an Android tablet is a challenging but rewarding process. By following these steps carefully, you can successfully convert your device into a dual-boot setup that allows running both Android and Windows 8 environments. Always back up your data before proceeding and ensure the necessary hardware specifications to run Windows 8 smoothly. Some features might not work perfectly due to hardware incompatibilities or software limitations. Despite these challenges, many users have successfully integrated their Android tablets with Windows 8, enhancing productivity and versatility in using different operating systems on a single device.
Was this page helpful?
This wikihow article will teach you how to run Windows 8 on an Android tablet. While you can’t replace your Android operating system with Windows 8 or install Windows 8 directly onto your Android device, there’s an emulator app called Limbo that lets you run any version of Windows 8. Keep in mind that most Android tablets aren’t designed to run a computer-based operating system so the device works. will slow down drastically when using Windows 8.
Step
Part 1 of 4: Downloading Limbo

Step 1. Open
Google Play Store on tablets.
This application has the «Play» button logo on a white background.

Step 2. Tap the search bar
It’s at the top of the screen.

Step 3. Type in limbo pc emulator
Thus, the Play Store will search for the Limbo emulator application.

Step 4. Type Limbo PC Emulator QEMU ARM x86
It’s at the top of the drop-down menu below the search bar. You will be taken to the Limbo download page.

Step 5. Tap INSTALL
It’s a green button on the right side of the screen.

Step 6. Tap ACCEPT when prompted
If you have, Limbo will be downloaded to the tablet.

Step 7. Wait for Limbo to finish downloading
Limbo is a small app so you can continue downloading Windows 8 while Limbo is downloading.
Part 2 of 4: Downloading Windows 8

Step 1. Enable downloads from unknown sources
This allows you to download and install programs from the site instead of going through the Google Play Store:
-
open
Android7settingsapp Settings (Settings)
- Tap Security or Lock screen and security (lock and screen security)
-
Tap the «Unknown sources» button
Gray
- Tap OK if requested.

Step 2. Open a web browser
Tap the web browser icon of your choice (for example,
Chrome).

Step 3. Go to the Windows 8 ISO site
Go to https://www.microsoft.com/en-us/software-download/windows8 in a tablet browser.

Step 4. Scroll down and select the operating system
Tap the » Select edition » dropdown box, tap Windows 8.1 in the drop-down menu, and tap the button Confirm (confirm) blue under the edition.

Step 5. Scroll down and select a language
Tap the «Choose one» drop-down box, tap the selected language, and tap Confirm (confirmation).

Step 6. Tap on 32-Bit Download
It’s a blue button at the bottom of the page. Once done, the Windows 8 files will start downloading to the tablet’s SD card.
The download may take about 1 hour to complete; just make sure the tablet is connected to the internet and a charger

Step 7. Wait for the download to complete
Once that’s done, you can proceed with adding the Windows 8 files to the Limbo folder.
Part 3 of 4: Adding Windows 8 to Limbo

Step 1. Open a file explorer application
Depending on the tablet manufacturer, the name of this app may vary.
If you don’t have a built-in file explorer app, download it from the Google Play Store. One of the most popular file explorer applications is ES File Manager

Step 2. Go to the Windows 8 file
Tap the location where the downloaded Windows 8 files are saved. In most cases, this folder is titled Downloads (download) in the » Internal Storage » or «SD Card» (SD card) folder.

Step 3. Tap and hold the Windows 8 file
If so, a menu or option will appear.

Step 4. Tap Copy or Move.
You’ll see one of these options in a pop-up menu, or at the bottom or top of the screen.
Sometimes you need to tap the button ⋮ in one corner of the tablet and choose Copy or Move.

Step 5. Locate the limbo folder
Return to the main page of the file explorer application, select Internal Storage tablet, and tap the folder limbo.
- If you don’t find limbo in internal storage, try searching in SD Card. You may need to restart your tablet for the limbo folder to appear.
- If you select the option Move (move), you will be asked to select a destination folder.

Step 6. Tap Paste or Move.
Again, you’ll see this option in the pop-up menu or the top/bottom of the screen, or tap the button ⋮ to open this option. Once done, the Windows 8 ISO file will be copied to the folder limbo. Once the copying is complete, you will be able to run Windows 8.
Part 4 of 4: Running Windows 8

Step 1. Open Limbo
Tap the computer-shaped icon to open Limbo.

Step 2. Tap I Acknowledgment
It’s at the bottom of the screen.

Step 3. Tap OK
You will be taken to the main Limbo page.
A pop-up window will appear and you need to press the button OK there; this window usually contains a version history log so you don’t have to read it.

Step 4. Tap the “Load Machine” dropdown box
It’s located at the top right of the screen. A drop down menu will appear.
Usually this box contains the words None (there is not any).

Step 5. Check the New box
You will find it in the drop down menu. If so, the window will open.

Step 6. Enter a name
Type in a name (for example, windows  for your operating system.

Step 7. Tap CREATE
Place it at the bottom of the window. This step will select Windows 8 as the operating system.

Step 8. Change CPU model options
Tap the «CPU Model» drop-down icon, then tap qemu32 in the dropdown menu.

Step 9. Select the RAM option
Tap the «RAM Memory (MB)» drop-down icon, then tap minimal 512.
If the tablet has RAM with a capacity of up to gigabytes, try selecting the option 1024.

Step 10. Check the box «Hard Disk A»
It’s in the «Storage» section of the page, although you’ll need to scroll down a bit to see it.

Step 11. Tap on the “Hard Disk A” dropdown options icon
It’s to the right of the «Hard Disk A» heading. A drop down menu will appear.

Step 12. Tap OPEN
This option is in the menu. If you have, a list of the tablet’s internal storage folders will open.

Step 13. Select the Windows 8 file
Scroll down and tap limbo, then find the Windows 8 file and tap to select it. You may need to tap the checkbox ✓ or buttons (for example, OPEN or OK) to confirm.

Step 14. Scroll down and check the «Fullscreen» box
It’s in the «User interface» section of the page. Once the last option is selected, you are free to run Windows 8.

Step 15. Scroll up and tap on the “Play” button
It’s a triangular icon at the top of the Limbo page. If you have, Windows 8 will start running on the tablet.
Keep in mind that your tablet will run very slowly while using Windows 8
Tips
- You can install several operating systems, including Windows XP and Windows 10, on Android using Limbo.
- The tablet takes a few minutes to start using Windows.
Warning
Do not trying to install the operating system on Android using a program called «Change My Software». This program is designed to complete a survey and make the phone stop working.
Before we dive into the details of this process, it’s essential to note that installing Windows 8 on an Android tablet isn’t for the faint-hearted. You should have some experience and knowledge about the process involved in flashing custom ROMs. Also, it’s crucial to back up your device data before proceeding with the installation process, as you may lose your saved data during the process.
Step 1: Choose the right Android tablet
Before we look into the details of installing Windows 8, it’s essential to ensure that your Android device is compatible with the requirements needed to install Microsoft Windows 8. The critical requirements include a minimum of 2GB of RAM, storage capacity, and a processor that supports the installation process.
Step 2: Download the required tools and software
To install Windows 8 on your Android tablet, you need to download several tools and software, including the Windows 8 RT ISO image file, Debian Kit, Limbo PC Emulator app, and Eclipse IDE software.
Step 3: Install the Debian Kit app
To get started, you need to install the Debian Kit app on your Android tablet. The app will help you access the command prompt console required to run various commands and programs necessary for the installation process.
Step 4: Install the Limbo PC Emulator app
The Limbo PC Emulator app is crucial in the installation of Windows 8. The app will enable you to create a virtual machine environment that supports the Windows 8 RT ISO image file. The app isn’t available on the Play Store. Hence you need to download it from a trusted website.
Step 5: Install the Eclipse IDE software
The Eclipse Integrated Development software isn’t a requirement for the installation of Windows 8 on your Android tablet. However, it’s a vital tool in helping you customize and modify the Windows 8 installation to suit your preferences.
Step 6: Create the virtual machine
Once you’ve installed the Debian Kit and Limbo PC Emulator app, you can proceed to create the virtual machine environment. In the Limbo PC Emulator app, tap on “New” to create a new virtual machine. You’ll be prompted to provide a name for the virtual machine, assign the memory size, and select the operating system.
Step 7: Configure the virtual machine
After creating the virtual machine, you need to configure it to support the Windows 8 RT ISO image file. In the configuration settings, select the “Hard disk A” option and choose the “Use an existing image” option. Select the Windows 8 RT ISO image file and save the configuration settings.
Step 8: Install Windows 8
With the virtual machine environment set up, you can proceed to install Windows 8 RT. The installation process will take some time, and you need to follow the prompts to complete the process. Once the installation process is complete, you can access the Windows 8 operating system from your Android device.
In conclusion, installing Windows 8 on an Android tablet is a complex process that requires some experience and knowledge about custom ROMs, virtual machines, and software configuration. The process outlined in this article isn’t exhaustive, and you should seek additional information before proceeding with the installation process. However, the steps provided in this article will give you a general understanding of the process involved in installing Windows 8 on your Android tablet.