
В этой инструкции подробно и с картинками будет описан весь процесс установки Windows 7 на ноутбуке, пошагово, с начала и до конца. В частности, мы рассмотрим загрузку с дистрибутива, все диалоговые окна, появляющиеся во время процесса, разбивку диска при установке и все остальное до того самого момента, когда у нас загрузится операционная система.
Важно: прочтите, прежде чем приступить к установке
Перед тем, как начать руководство, я хотел бы предостеречь начинающих пользователей от некоторых частых ошибок. Сделаю это в виде своего рода пунктов, прочтите внимательно, пожалуйста:
- Если на Вашем ноутбуке уже установлена Windows 7, причем та, с которой он приобретался, но Вы хотите заново установить операционную систему, потому что ноутбук стал тормозить, Windows 7 не загружается, поймали вирус или случилось что-то подобное: в этом случае, Вам лучше не использовать эту инструкцию, а воспользоваться скрытым разделом восстановления ноутбука, с помощью которого в описанной выше ситуации можно восстановить ноутбук к тому состоянию, в котором Вы приобретали его в магазине, причем практически вся установка Windows 7 на ноутбук пройдет автоматически. Как это сделать описано в инструкции Как восстановить заводские настройки ноутбука.
- Если Вы хотите поменять имеющуюся на ноутбуке лицензионную ОС Windows 7 на какую-либо пиратскую сборку Windows 7 Максимальная и именно с этой целью нашли эту инструкцию, я настоятельно рекомендую оставить все как есть. Поверьте, вы не приобретете ни в производительности ни в функциональности, а вот проблемы в дальнейшем, скорее всего, будут.
- При всех вариантах установки, кроме тех, когда ноутбук был приобретен с DOS или Linux, настоятельно рекомендую не удалять раздел восстановления ноутбука (ниже опишу, что это такое и как его не удалять, для самых начинающих) — дополнительные 20-30 Гб дискового пространства не сыграют особой роли, а раздел восстановления очень может пригодиться, например, когда Вы захотите продать свой старый ноутбук.
- Вроде бы все учел, если о чем-то забыл, отметьтесь в комментариях.
Таким образом, в этой статье будет идти речь о чистой установке Windows 7 с форматированием системного раздела жесткого диска, в тех случаях когда восстановление предустановленной операционной системы невозможно (уже удалили раздел восстановления) или не является нужным. Во всех остальных случаях, рекомендую просто вернуть ноутбук в заводское состояние штатными средствами.
В общем, поехали!
Что нужно, чтобы установить Windows 7 на ноутбуке
Все, что нам потребуется — это дистрибутив с операционной системой Windows 7 (диск DVD или загрузочная флешка), сам ноутбук и какое-то количество свободного времени. Если у Вас нет загрузочного носителя, то вот как их сделать:
- Как сделать загрузочную флешку Windows 7
- Как сделать загрузочный диск Windows 7
Замечу, что загрузочная флешка — более предпочтительный вариант, который работает быстрее и, в общем-то, удобнее. Особенно с учетом того, что на многих современных ноутбуках и ультрабуках перестали устанавливать приводы для чтения компакт-дисков.
Кроме этого, учтите, что в процессе установки операционной системы мы удалим все данные с диска C:, поэтому, если имеется что-то важное, сохраните это куда-либо.
Следующий шаг — установить загрузку с флешки или с диска в БИОС ноутбука. О том, как это сделать можно прочесть в статье Загрузка с флешки в Биос. Загрузка с диска настраивается тем же самым образом.
После того, как Вы установили загрузку с нужного носителя (который уже вставлен в ноутбук), компьютер перезагрузится, и напишет «Press any key to boot from dvd» на черном экране — нажмите любую клавишу в этот момент и начнется процесс установки.
Начало установки Windows 7
Прежде всего, Вы должны будете увидеть черный экран с полосой прогресса и надписью Windows is Loading Files, затем — эмблему Windows 7 и надпись Starting Windows (в случае, если для установки Вы используете оригинальный дистрибутив). На этом этапе какие-либо действия от Вас не требуются.
Выбор языка установки
Нажмите для увеличения
На следующем экране Вас спросят о том, какой язык использовать при установке, выберите свой и нажмите «Далее».
Запуск установки
Нажмите для увеличения
Под эмблемой Windows 7 появится кнопка «Установить», которую и следует нажать. Также на этом экране можно запустить восстановление системы (ссылка слева внизу).
Лицензия Windows 7
Следующее сообщение будет гласить «Начало установки…». Тут хочу отметить, что на некотором оборудовании, данная надпись может «висеть» в течение 5-10 минут, это не означает, что Ваш компьютер завис, дождитесь следующего этапа — принятия условий лицензии Windows 7.
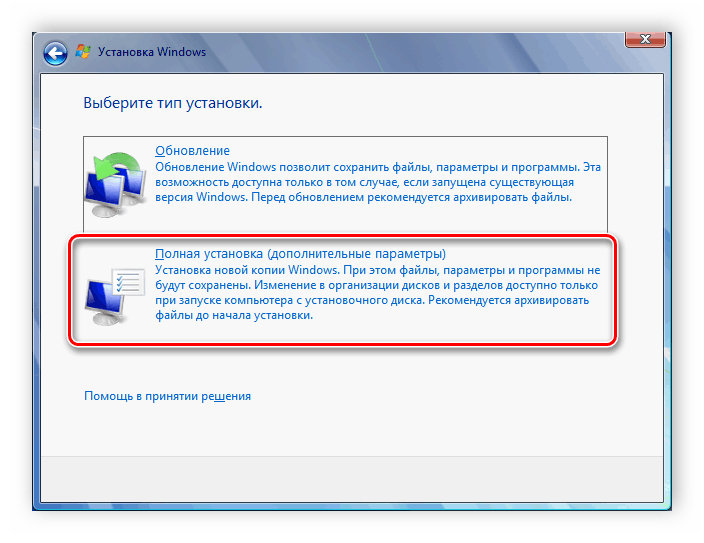
Выбор типа установки Windows 7
После принятия лицензии появится выбор типов установки — «Обновление» или «Полная установка» (иначе — чистая установка Windows 7). Выбираем второй вариант, он эффективнее и позволяет избежать многих проблем.
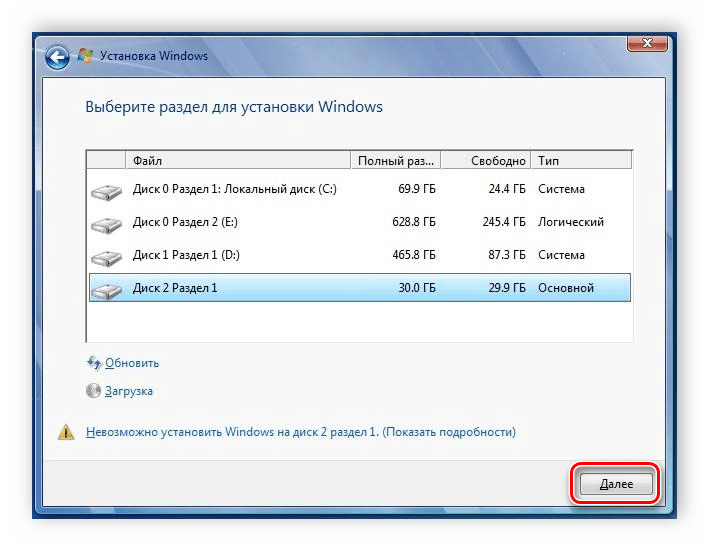
Выбор раздела для установки Windows 7
Этот этап является, пожалуй, самым ответственным. В списке Вы увидите разделы Вашего жесткого диска или дисков, установленных на ноутбуке. Может также случиться, что список будет пустым (характерно для современных ультрабуков), в этом случае воспользуйтесь инструкцией При установке Windows 7 компьютер не видит жестких дисков.
Обратите внимание, что если у Вас отображается несколько разделов с разными размерами и типами, например «Производитель», лучше не трогайте их — это и есть разделы восстановления, кэширующие разделы и другие служебные области жесткого диска. Работайте только с теми частями, которые Вам знакомы — диск C и, если есть диск D, которые можно определить по их размеру. На этом же этапе Вы можете разбить жесткий диск, о чем подробно написано здесь: как разбить диск на разделы (однако я не рекомендую этого делать).
Форматирование раздела и установка
В общем случае, если не требуется разбивать жесткий диск на дополнительные разделы, нам потребуется нажать ссылку «Настройка диска», затем — форматировать (или создать раздел, если вы подключили к ноутбуку совершенно новый, не использовавшийся ранее, жесткий диск), выбрать отформатированный раздел и нажать «Далее».
Установка Windows 7 на ноутбук: копирование файлов и перезагрузка
После нажатия кнопки «Далее» начнется процесс копирования файлов Windows. В процессе компьютер перезагрузится (и не один раз). Я рекомендую «поймать» самую первую перезагрузку, зайти в БИОС и вернуть там загрузку с жесткого диска, затем перезагрузить компьютер (установка Windows 7 будет продолжена автоматически). Ждем.
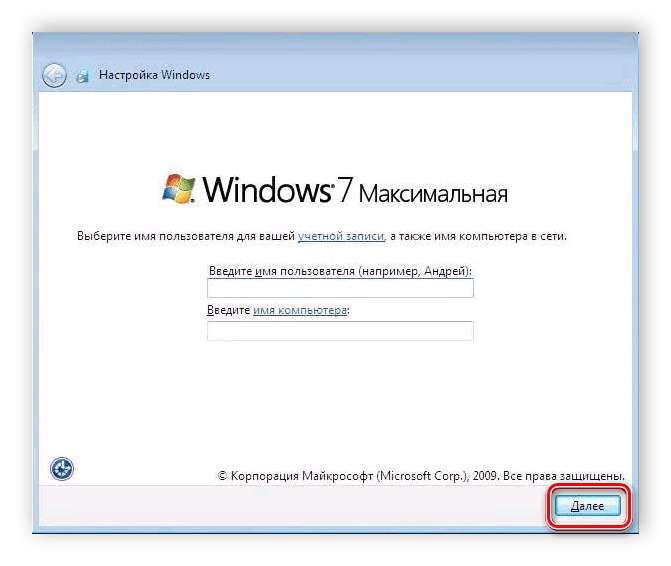
После того, как мы дождались окончания копирования всех необходимых файлов, нам будет предложено ввести имя пользователя и имя компьютера. Сделайте это и нажмите кнопку «Далее», установите, при желании, пароль для входа в систему.
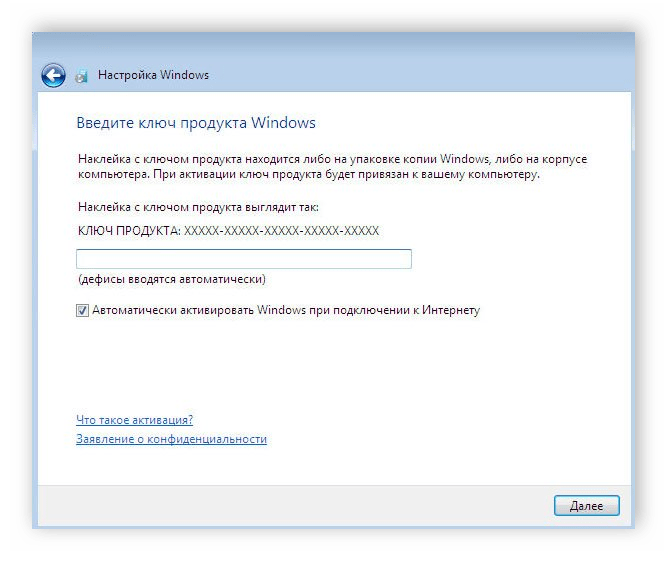
На следующем этапе нужно ввести ключ Windows 7. Если Вы нажмете «Пропустить», то Вы сможете ввести его позднее или пользоваться не активированной (пробной) версией Windows 7 в течение месяца.
На следующем экране Вас спросят о том, как Вы хотите обновлять Windows. Лучше оставить «Использовать рекомендуемые параметры». После этого также можно будет установить дату, время, часовой пояс и выбрать используемую сеть (при условии ее наличия). Если Вы не планируете использование локальной домашней сети между компьютерами, лучше выбрать «Общественная». В дальнейшем это можно будет изменить. И снова ждем.
Windows 7 успешно установлен на ноутбук
После того, как установленная на ноутбук операционная система Windows 7 завершит применение всех параметров, подготовит рабочий стол и, возможно, еще раз перезагрузится, можно сказать, что мы завершили — у нас получилось установить Windows 7 на ноутбук.
Следующий этап — установка всех необходимых драйверов для ноутбука. Об этом я напишу в ближайшие пару дней, а сейчас лишь дам рекомендацию: не используйте никаких драйвер паков: зайдите на сайт производителя ноутбука и скачайте все последние драйвера для своей модели ноутбука.
Все способы:
- Как установить Windows 7 на ноутбук с UEFI
- Шаг 1: Настройка UEFI
- Шаг 2: Установка Windows
- Шаг 3: Установка драйверов и необходимого софта
- Вопросы и ответы: 6
Без операционной системы ноутбук не может работать, поэтому ее устанавливают сразу же после приобретения устройства. Сейчас некоторые модели распространяются уже с установленной Windows, однако если у вас чистый ноутбук, то все действия необходимо осуществить вручную. В этом нет ничего сложного, потребуется только следовать инструкции, приведенной ниже.
Как установить Windows 7 на ноутбук с UEFI
На замену BIOS пришел UEFI, и сейчас во многих ноутбуках используется именно этот интерфейс. С помощью UEFI осуществляется управление функциями оборудования и загрузка операционной системы. Процесс установки ОС на ноутбуки с данным интерфейсом немного отличается. Давайте разберем каждый шаг подробно.
Шаг 1: Настройка UEFI
Дисководы в новых ноутбуках встречаются все реже, а установка операционной системы производится с использованием флешки. В случае если вы собираетесь ставить Windows 7 с диска, то настройку UEFI осуществлять не нужно. Просто вставьте DVD в дисковод и включите устройство, после чего можно сразу переходить ко второму шагу. Тем пользователям, кто использует загрузочную флешку, потребуется выполнить несколько простых действий:
Читайте также:
Инструкция по созданию загрузочной флешки на Windows
Как создать загрузочную флешку Windows 7 в Rufus
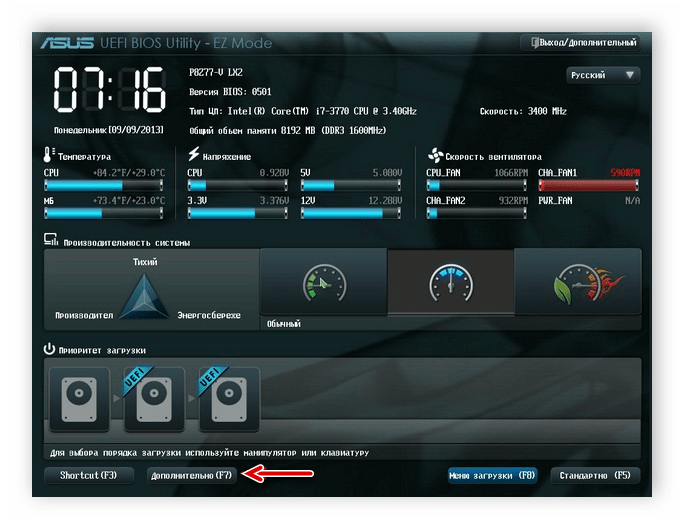
- Запустив устройство, вы сразу же попадете в интерфейс. В нем нужно перейти в раздел «Дополнительно», нажав на соответствующую клавишу на клавиатуре или выбрав его мышкой.
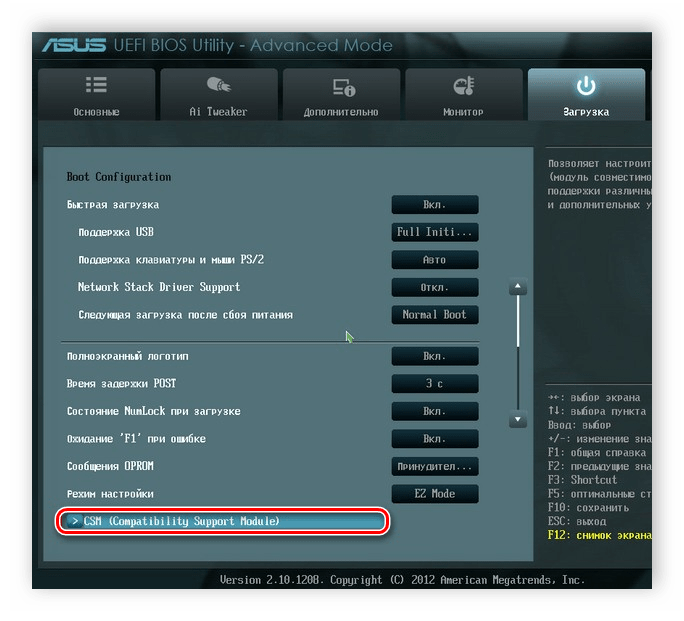
- Перейдите во вкладку «Загрузка» и напротив пункта «Поддержка USB» поставьте параметр «Full Initialization».
- В этом же окне опуститесь в самый низ и перейдите в раздел «CSM».
- Здесь будет присутствовать параметр «Запуск CSM», необходимо перевести его в состояние «Enabled».
- Теперь отобразятся дополнительные настройки, где вас интересует «Параметры загрузочных устройств». Откройте всплывающее меню напротив данной строки и выберите «Только UEFI».
- Осталось возле строки «Загрузка с устройств хранения» активировать пункт «Both, UEFI First». Далее вернитесь в предыдущее меню.
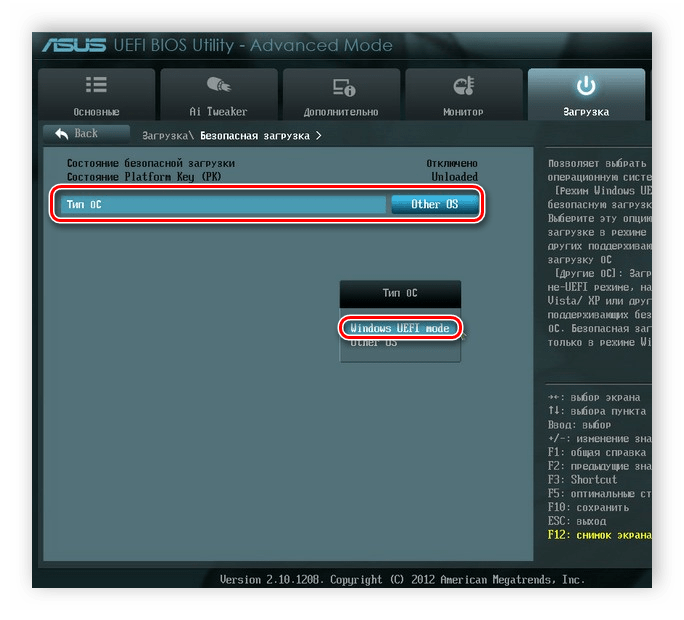
- Здесь появился раздел «Безопасная загрузка». Перейдите в него.
- Напротив «Тип ОС» укажите «Windows UEFI Mode». После вернитесь в предыдущее меню.
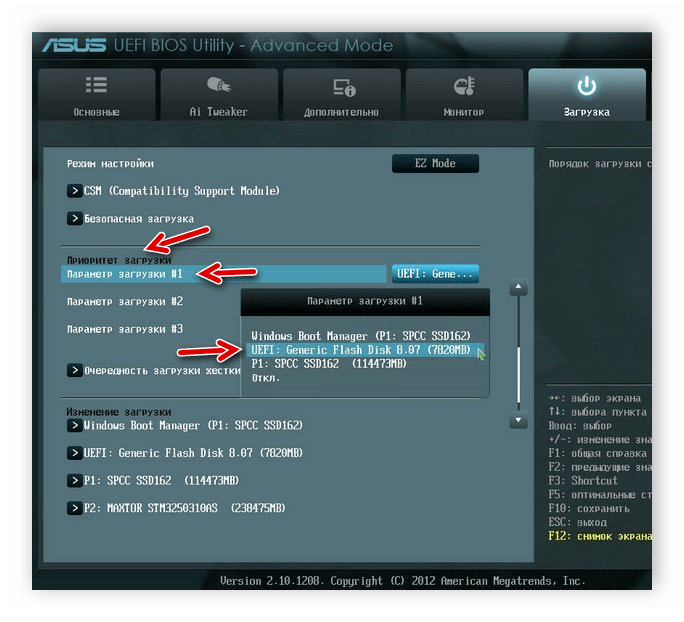
- Все еще находясь во вкладке «Загрузка», опуститесь в самый низ окна и найдите раздел «Приоритет загрузки». Здесь напротив «Параметр загрузки #1» укажите вашу флешку. Если не можете запомнить ее название, то просто обратите внимание на ее объем, он будет указан в этой строке.
- Нажмите F10, чтобы сохранить настройки. На этом процесс редактирования интерфейса UEFI окончен. Переходите к следующему шагу.


Шаг 2: Установка Windows
Теперь вставьте загрузочную флешку в разъем или DVD в дисковод и запустите ноутбук. Диск автоматически выбирается первым в приоритете, а вот благодаря выполненным ранее настройкам теперь и USB-флешка будет запускаться первой. Процесс установки не сложен и требует от пользователя выполнить всего несколько простых действий:
- В первом окне укажите удобный для вас язык интерфейса, формат времени, денежных единиц и раскладку клавиатуры. После выбора нажмите «Далее».
- В окне «Тип установки» выберите «Полная установка» и переходите к следующему меню.
- Выберите необходимый раздел для установки ОС. В случае надобности вы можете его форматировать, удалив при этом все файлы предыдущей операционной системы. Отметьте подходящий раздел и нажмите «Далее».
- Укажите имя пользователя и имя компьютера. Данная информация будет крайне полезной, если вы захотите создать локальную сеть.
- Осталось только ввести ключ продукта Windows, чтобы подтвердить его подлинность. Он находится на коробке с диском или флешкой. Если ключа на данный момент не имеется, то доступно включение пункта «Автоматически активировать Windows при подключении к интернету».

Читайте также: Подключение и настройка локальной сети на Windows 7
Теперь начнется установка ОС. Она продлится некоторое время, на экране будет отображаться весь прогресс. Обратите внимание, что ноутбук будет перезагружен несколько раз, после чего процесс автоматически продолжится. В конце произведется настройка рабочего стола, и вы запустится Windows 7. Вам останется установить самые необходимые программы и драйвера.
Шаг 3: Установка драйверов и необходимого софта
Хоть операционная система и установлена, однако ноутбук еще не может полноценно функционировать. Устройствам не хватает драйверов, а для удобства пользования также требуется наличие нескольких программ. Давайте разберем все по порядку:
- Установка драйверов. Если ноутбук имеет дисковод, то чаще всего в комплекте идет диск с официальными драйверами от разработчиков. Просто запустите его и произведите установку. В случае отсутствия DVD можно заранее скачать на накопитель офлайн-версию Driver Pack Solution или любой другой удобной программы для установки драйверов. Альтернативный метод — ручная установка: вам достаточно поставить только сетевой драйвер, а все остальное можно загрузить с официальных сайтов. Выбирайте любой удобный вам способ.
- Загрузка браузера. Поскольку Internet Explorer не пользуется популярностью и не очень удобный, то большинство пользователей сразу же загружают другой браузер: Google Chrome, Opera, Mozilla Firefox или Яндекс.Браузер. Через них уже происходит скачивание и установка необходимых программ для работы с различными файлами.
- Установка антивируса. Ноутбук нельзя оставить без защиты от вредоносных файлов, поэтому мы настоятельно рекомендуем выбрать для себя наиболее подходящий.
Подробнее:
Лучшие программы для установки драйверов
Поиск и инсталляция драйвера для сетевой карты
Читайте также:
Программы для прослушивания музыки на компьютере
Как установить Adobe Flash Player на компьютер

Подробнее:
Выбор антивируса для слабого ноутбука
Теперь, когда на ноутбуке стоит операционная система Windows 7 и все необходимые важные программы, можно смело приступать к комфортному пользованию. После завершения установки достаточно перейти обратно в UEFI и изменить приоритет загрузки на жесткий диск или оставить все как есть, но вставлять флешку только после старта ОС, чтобы запуск прошел корректно.
Наша группа в TelegramПолезные советы и помощь
To install Windows 7 on a laptop for the first time, you will need to follow a series of steps:
1. Insert the Windows 7 installation disc into your laptop’s CD/DVD drive.
2. Restart your laptop and press the appropriate key (e.g., F12 or Esc) to enter the boot menu.
3. From the boot menu, select the option to boot from the CD/DVD drive.
4. Follow the on-screen instructions to install Windows 7.
5. When prompted, select the partition where you want to install Windows 7 and format it.
6. Wait for the installation to complete, and then follow the post-installation setup process to configure your Windows 7 installation.
It’s important to note that Windows 7 is an older operating system, and Microsoft no longer provides updates or support for it. It’s recommended to upgrade to a newer version of Windows such as Windows 10 for the best security and performance.
Video Tutorial:What is the first step in installing Windows 7?
How to install operating system Windows 7 step by step?
To install Windows 7, you will need the installation media, which can be a CD/DVD or a USB flash drive. Here are the step by step instructions to install Windows 7:
1. First, insert the installation media into your computer and reboot your computer.
2. When asked to, press any key to boot from the installation media.
3. Select your language preferences and click «Next.«
4. Click «Install Now.«
5. Read the license terms and check the box next to «I accept the license terms» and click «Next.«
6. Choose the installation type you want – «Upgrade» to keep your files and settings, or «Custom» to install a fresh copy of Windows.
7. Select the drive where you want to install Windows and click «Next.«
8. Wait for Windows setup to copy files, install features, and update your computer.
9. After everything is done, you will be asked to set up your computer. Follow the on-screen instructions to customize your settings, create a user account, set the time and date, and activate Windows.
After finishing the installation, you will have a fresh copy of Windows 7 installed on your computer.
How to install Windows 7 on a laptop without a CD?
Installing Windows 7 on a laptop without a CD requires using a bootable USB drive or an external hard drive. You can create a bootable USB drive by formatting the USB drive and creating a Windows 7 bootable image file. You can use a tool like Rufus to create the bootable USB drive.
Once the bootable USB drive is ready, plug it into the laptop and change the boot order in the BIOS to ensure that the laptop boots from the USB drive. Once the laptop starts booting from the USB drive, follow the on-screen instructions to install Windows 7 on the laptop.
Before starting the installation process, ensure that the laptop meets the system requirements for Windows 7 and that all important files and data are backed up to avoid data loss.
How do I reinstall Windows 7 from USB on my laptop?
To reinstall Windows 7 from a USB on your laptop, you will need a USB drive with at least 4 GB of storage space and a copy of the Windows 7 installation media. Follow these steps to reinstall Windows 7:
1. Insert the USB drive into your laptop and boot from it.
2. Select the language and other preferences you want to use during the installation process.
3. Click «Install Now» and accept the license terms.
4. Choose the «Custom» installation option.
5. Select the partition where you want to install Windows 7.
6. Follow the on-screen instructions to complete the installation process.
Keep in mind that reinstalling Windows 7 erases all data from your hard drive, so be sure to back up any important files before proceeding with the installation.
How do I install Windows 7 on a new computer?
To install Windows 7 on a new computer, you will need a Windows 7 installation media such as a DVD or USB drive, a valid product key, and a compatible computer system with the necessary hardware requirements.
Here are the steps to install Windows 7 on a new computer:
1. Insert the Windows 7 installation media into your computer and restart it.
2. Follow the on-screen instructions to boot from the installation media and choose your preferred language, time, and currency settings.
3. Click «Install now» to start the installation process.
4. Read and accept the license terms, and choose the installation type (Custom or Upgrade).
5. Select the hard disk or partition where you want to install Windows 7 and click «Next» to start the installation.
6. Wait for the installation to complete and restart your computer.
7. Follow the on-screen instructions to customize your desktop settings, create user accounts, and connect to your network.
8. Once the installation is complete, activate your copy of Windows 7 using your product key.
It is important to note that as of 2023, Microsoft has ended support for Windows 7, meaning that the operating system will no longer receive security updates or technical assistance from Microsoft. Therefore, it is recommended to upgrade to a newer version of Windows such as Windows 10 or Windows 11 that has better security and features.
How do I install Windows 7 directly from my computer?
To install Windows 7 directly from your computer, you’ll need to have an installation disc or a USB drive with the Windows 7 operating system files. First, insert the installation disc or USB drive into your computer and restart it. When your computer starts up, enter the BIOS settings to change the boot order so that the computer boots from the installation disc or USB drive. Save the changes and restart the computer again.
Once the Windows 7 installation process begins, follow the on-screen instructions to complete the installation. You’ll be prompted to enter your Windows 7 product key, select the drive or partition where you want to install Windows 7, and customize some settings to fit your preferences. After completing these steps, Windows 7 will be installed on your computer, and you can start using it.
Download Article
An easy walkthrough to install Windows 7 from a disc or flash drive
Download Article
- Installing Windows 7 with an Installation Disc
- Upgrading to Windows 7
- Installing with a Flash Drive or External Drive
- Windows 7 Set-Up
- Video
- Q&A
- Things You’ll Need
|
|
|
|
|
|
Note: As of January 14, 2020 Microsoft is no longer supporting Windows 7, which means it will no longer receive essential security fixes. It is highly recommended that you consider upgrading to a newer version of Windows, such as Windows 10, or Windows 11, as they actually run well even on old machines.
Are you installing Windows 7? You don’t need to be a professional or refer to a confusing manual in order to do so. You can install Windows 7 from a disc or flash drive. You can also upgrade to Windows 7 from an older version of Windows. Doing a clean install will wipe all the data off your computer and install Windows 7 as if it’s a new computer. Doing an upgrade will keep all your data and replace an older version of Windows with Windows 7. You will need a Windows 7 product key, or purchase Windows 7 within 30 days.
Installing Windows 7
- Backup your files and restart your computer.
- Press Del, Esc, F2, F10, or F9 the moment your computer powers on.
- Find the boot options menu in your BIOS.
- Choose the CD-ROM drive as the first boot device of your computer.
- Place the Windows 7 disc in your disc drive.
- Save your changes and restart the computer.
- Choose your Windows Setup options and follow each step of the installation guide.
-

The installation process will delete all data on your hard drive. It is recommended that you back up all files you want to keep before installing a new operating system. You can backup your files to another hard drive, an external hard drive, a flash drive, or a cloud-based service like Google Drive, or Dropbox.
-

Press the power button on your computer and then click Restart in the power options menu.
Advertisement
-
Depending on the make and model of your computer, pressing one of these buttons immediately after you power on your computer will enter the system BIOS.
- Some computers tell you which button to press to enter the BIOS as the computer starts up.
-
The boot options menu of your BIOS may vary in location or name from the illustration, but you may eventually find it if you search around.
- If you can’t find the boot options menu, search the name of your BIOS (most likely located in the BIOS menu) online for help.
-
Although this method may vary among computers, the boot options menu is typically a menu of movable device names where you should set your CD, DVD or Blu-ray drive as the first boot device. It can also be a list of devices that you can set the order of their boot on. Consult a manual or the internet for help if you’re stuck.
-
Press the button on your CD, DVD, or Blu-ray drive. Then place the Windows 7 installation disc in the disk tray and push it back in the drive.
-
Press the button indicated on the screen or select the save option from the BIOS menu to save your configuration.
-
Either turn off the computer by choosing the shut-down option in your current operating system, or hold the power button until the computer powers off.
-
Start your computer from the disc. After you have placed the disc into the disc drive, start your computer. When the computer starts, press a key if you are asked if you would like to boot from the disc by pressing any key. After you choose to start from the disc. Windows Setup will begin loading.
- If you are not asked to boot from the disc, you may have done something wrong. Retry the previous steps and make sure you have selected the correct drive in the BIOS boot menu.
-
Once Windows Setup loads, you’ll be presented with a window. Use the drop-down menus to select your preferred language, keyboard type, and time/currency format, then click Next in the lower-right corner.
-
It’s the blue button in the center of the screen.
-
Read over the Microsoft Software License Terms. Then click the checkbox next to I accept the license terms, and click Next in the lower-right corner.
-
This option allows you to do a clean install of Windows 7. This will erase all your files on the installation drive.
- If you do not want to erase all your files, select Upgrade instead. This option requires an existing Windows installation. You can only upgrade from one Windows edition to another. For example, if you have Windows Vista Home Basic Edition, you can only upgrade to Windows 7 Home Basic Edition. You would not be able to upgrade to Windows 7 Home Premium.
-
A hard drive is a physical part of your computer that stores data, and partitions «divide» hard drives into separate sections. Click the hard drive or partition you want to install Windows 7 on.
- If the hard drive has data on it, You’ll need to use the following steps to Delete or Format the drive. Be aware that this will permanently erase all data from the disk.
- Select the hard drive from the list of hard drives.
- Click Drive options (advanced).
- Click Delete or Format from Drive options.
- If your computer doesn’t have any partitions yet, create one to install Windows on it.
- Select the hard drive from the list of hard drives.
- Click Drive options (advanced).
- Select New from Drive options.
- Select the size, and click OK.
- If the hard drive has data on it, You’ll need to use the following steps to Delete or Format the drive. Be aware that this will permanently erase all data from the disk.
-
Once you’ve decided on where to install Windows, select it and click Next. Windows will begin installing. Your computer may start and restart several times during the installation process.[1]


Advertisement
-
Boot up your computer as normally into your current operating system.
-
The Windows 7 Upgrade Advisor scans your computer to see if you can upgrade it to Windows 7.
- In order to upgrade to Windows 7, you must upgrade to the same version of Windows you already have. For example, if you have Windows Vista Home Premium Edition, you can only upgrade to Windows 7 Home Premium Edition. You cannot upgrade from Windows Vista Home to Windows 7 Professional.
-
Use the following steps to prepare your computer for a Windows installation:
- Back up your files. It’s a good idea to back up any files you want to keep in case there is a problem during the upgrade. You can back up for your files using another hard drive, an external hard drive, a flash drive, or a cloud service such as Google Drive or Dropbox.
- Scan your computer for malware. Malware can prevent Windows from installing correctly.
- Disable or uninstall any antivirus software because they may interfere with the Windows installation.
- Uninstall some unnecessary programs to speed up the upgrade. You can install them after Windows 7 has finished.
- Update Windows with Windows Update.
- Delete some unnecessary files to speed up the upgrade.
- Back up your hard drive in case the installation fails and you lose your files. (optional).
-
Eject the tray of your CD/DVD drive and place the Windows installation disk into the disk drive and then close it.
-
By default, it’s the icon with the Windows logo in the lower-left corner.
- Alternatively, you can boot your computer from the disc as outlined in Method 1 and select Update from the installation screen.
-
This is displays all drives on your computer.
- If you are using a newer version of Windows, click Windows Explorer. It has an icon that resembles a folder with a blue clip. Then click This PC or your computer name.
-
This displays the contents of the disk. Allow Setup to start.
-
This launches the Windows 7 installation program.
-
It’s the blue button in the center of the screen.
-
The updates are intended to fix known problems with Windows Setup and installing updates makes your installation smoother and more stable. To get updates, click Go Online to get the latest updates for installation (recommended). To skip updates, click Do not get the latest updates for installation.
-
Read over the Microsoft Software License Terms, and click the checkbox next to «I accept the license terms». Then click Next.
-
It’s the first option in the menu. This checks your compatibility and installs Windows 7.[2]


Advertisement
-
Connect a USB flash drive to your computer. Use a free USB port to connect a USB flash drive to your computer. The USB flash drive needs to have a minimum of 4 gigabytes of disc space.
-
Make sure the flash drive has no other files on it before copying the Windows ISO file.
-
An ISO file is the raw data from a CD, DVD, or Blu-ray drive. It is also known as a disk image. Note: This download may take a while, depending on your internet speed.
- A list of download links is available here.
- If the link to the website does not work, click here to download a list of the links.
-
Download and install the Windows 7 USB/DVD Download Tool from this link. This tool will be used to copy the Windows 7 ISO file to the USB flash drive.
-
Double-click the «en-US.exe» file after it finishes downloading. Then click Install to install the program. Follow the on-screen instructions in the Installation Wizard.
-
Once the Windows 7 USB/DVD Download Tool is finished downloading and installing, open the program from the Windows Start menu.[3]
-
On the Choose ISO file screen of the Windows 7 USB/DVD Download Tool, click Browse, and then navigate to the save location of the Windows 7 ISO file and click it to select it. Then click Next to continue.
-
It’s the blue button in the lower-right corner the «Choose Media type:» screen.
-
Use the drop-down menu on the «Step 3 of 4» screen to select the USB drive you want to copy the ISO file to and then click the green button that says «Begin Copying».
- If you receive an error that says Not Enough Free Space, click the Erase USB Device button, which will erase all of the files on the drive. Be aware that this will erase all files on the flash drive.
-
Press the power button on your computer and then click Restart in the power options menu.
-
Depending on the make and model of your computer, press one of these buttons immediately after you power on your computer will enter the system BIOS.
- Some computers tell you which button to press to enter the BIOS as the computer starts up.
-
The boot options menu of your BIOS may vary in location or name from the illustration, but you may eventually find it if you search around.
- If you can’t find the boot options menu, search the name of your BIOS (most likely located in the BIOS menu) online for help.
-
Although this method may vary among computers, the boot options menu is typically a menu of movable device names where you should set your USB drive as the first boot device. It can also be a list of devices that you can set the order of their boot on. Consult a manual or the internet for help if you’re stuck.
-
With the USB drive connected to your computer via a free USB port, start your computer. When the computer starts, press a key if you are asked if you would like to boot from the USB drive by pressing any key. After you choose to start from the USB drive. Windows Setup will begin loading.
-
Once Windows Setup loads, you’ll be presented with a window. Use the drop-down menus to select your preferred language, keyboard type, and time/currency format, then click Next in the lower-right corner.
-
It’s the blue button in the center of the screen.
-
Read over the Microsoft Software License Terms, and click the checkbox next to «I accept the license terms». Then click Next in the lower-right corner.
-
This option allows you to do a clean install of Windows 7. This will erase all your files on the installation drive.
- If you do not want to erase all your files, select Upgrade instead. This option requires an existing Windows installation.
-
A hard drive is a physical part of your computer that stores data, and partitions «divide» hard drives into separate parts.
- If the hard drive has data on it, delete the data off of it, or format it Be aware that this will permanently erase all data from the disk.
- Select the hard drive from the list of hard drives.
- Click Drive options (advanced).
- Click Format from Drive options.
- If your computer doesn’t have any partitions yet, create one to install Windows on it.
- Select the hard drive from the list of hard drives.
- Click Drive options (advanced).
- Select New from Drive options.
- Select the size, and click OK.
- If the hard drive has data on it, delete the data off of it, or format it Be aware that this will permanently erase all data from the disk.
-
Once you’ve decided on where to install Windows, select it and click Next. Windows will begin installing. Your computer may start and restart several times during the installation process.
-

After Windows is finished installing, remove the USB drive.
-
After you have finished installing Windows 7 and have removed the USB drive, reboot your computer and allow it to boot up as normal.


Advertisement
-
The first time you start your computer after installing Windows 7, you will need to go through a setup process.
-
Type your password and click Next. If you don’t want a password, leave the text boxes blank and then click Next. This is the password you will need to sign in to Windows using your account.
-
Your product key is located on the case of your Windows 7 disc if you purchased the disc. To skip entering your product key, just click Next, but Windows will run on a 30-day trial, and you’ll have to enter a key once the 30 day trial time is up.
-
You can select «Use recommended settings», «Install important updates only», or «Ask me later».
- Use recommended settings automatically sets update and security settings recommended by Microsoft.
- Install important updates only configures your computer only to install necessary updates.
- Ask me later disables your security until you have made a decision.
-
Use the drop-down menu to select your time zone, and then use the calendar and clock to select today’s date and the current time.
-
Once the computer connects to your network, Windows will go through the process of setting up your desktop.
- If the computer is connected to your own personal network, choose Home network.
- If you are connected to the network at your workplace, choose Work network.
- If you’re connected to a public network from places such as restaurants and shops,


Advertisement
Add New Question
-
Question
In booting from disk, once the «Windows is loading files» progress bar finishes, I get the «starting Windows» screen, then I get the blue screen of death saying «iqrl not less or equal.» What does this mean, and how can I get Win 7 to install on this PC?
Make sure the files on the disk are not corrupted and retry the installation.
-
Question
My laptop is not playing CD/DVDs, and the CD-ROM drive does not appear in my PC. What can I do?
You can use your flash drive, make it bootable and install your OS, or you can follow Part 2 for further details.
-
Question
If I have a bunch of programs and files on my Local C: drive, will they all be erased?
Yes, because formatting erases all content from a hard drive. Back up your data to a USB drive or the cloud before beginning.
See more answers
Ask a Question
200 characters left
Include your email address to get a message when this question is answered.
Submit
Advertisement
Video
Thanks for submitting a tip for review!
Things You’ll Need
- 1 gigahertz (GHz) or faster 32-bit (x86) or 64-bit (x64) processor
- 1 gigabyte (GB) RAM (32-bit) or 2 GB RAM (64-bit)
- 16 GB available hard disk space (32-bit) or 20 GB (64-bit)
- DirectX 9 graphics device with WDDM 1.0 or higher driver
Disc Installation
- Windows 7 Setup Disc
- Disc Drive
- Compatible Computer
USB Installation
Clean Installation
- USB Drive (4 GB minimum size)
- Internet Connection (to download the ISO and USB extraction software)
- A computer to extract the files to the USB drive on.
- USB ports
- Compatible Computer
Upgrade Installation
- An existing installation of Windows (Windows XP or Vista recommended)
- USB Drive (4 GB minimum size)
- Internet Connection (to download the ISO and USB extraction software)
- A computer to extract the files to the USB drive on.
- USB ports
- Compatible Computer
References
About This Article
Article SummaryX
To install Windows 7, first restart your computer and enter the code on the screen to access your computer’s BIOS, which is usually Delete, Escape, F10. Once you’re in the BIOS, select the “Boot options” menu and choose the CD rom drive as your computer’s first boot device. Then, click on the save button to save your settings and turn off your computer. Next, turn the computer on and insert the Windows CD into the CD drive. When you are prompted to do so, press any key to allow the system to boot from the disk. After the system has loaded, follow the on-screen instructions to choose your preferred settings, like language and keyboard type. You should also read and accept the license agreement and select “Custom installation.” On the following screen, choose the hard drive where you want to save Windows before clicking “Next” to begin the installation. For tips on how to install Windows 7 as an update, read on!
Did this summary help you?
Thanks to all authors for creating a page that has been read 4,615,749 times.
Reader Success Stories
-
«Your picture-to-picture guide helped me a great deal. Really appreciate your time and effort in making the guide.»
Is this article up to date?
Installing Windows 7 step by step Select preferred language and click Next. In the following window, hit Install now. Accept the license terms. Select the installation type. Specify, where exactly you want to install Windows. The installation wizard will copy required files to the computer and launch the installation.
Can Windows 7 be installed on any laptop?
You can install Windows 7 from a disc or flash drive. You can also upgrade to Windows 7 from an older version of Windows. Doing a clean install will wipe all the data off your computer and install Windows 7 as if it’s a new computer.
What are the steps to install Windows 7?
How to Install Windows 7 Step 1 – Place Windows 7 DVD in your dvd-rom drive and start your PC. Step 2 – The next screen allows you to setup your language, time and currency format, keyboard or input method. Step 3 – The next screen allows you to install or repair Windows 7.
How can I install Windows 7 on my laptop without CD?
Download Windows 7 from the Microsoft page: https://www.microsoft.com/en-us/software-download/windows7. Enter your product key to verify > confirm the language > click either 64-bit Download or 32-bit Download. 4. After the downloading, plug in your USB flash drive and copy the downloaded ISO file to it.
How can I install Windows 7 for free?
The only legal way to get a completely free copy of Windows 7 is by transferring a licence from another Windows 7 PC for which you didn’t pay a penny – perhaps one that’s been passed on to you from a friend or relative or one you’ve picked up from Freecycle, for example.
How can I install Windows 7 on my laptop for free?
select Windows 7 64 bit and proceed to download. select Windows 7 64-bit or 32-Bit version and proceed to download. # To begin your download using Download Manager, click Download. After you have converted it to a .
Is 1 GB RAM enough for Windows 7?
If you want to run Windows 7 on your PC, here’s what it takes: 1 gigahertz (GHz) or faster 32-bit (x86) or 64-bit (x64) processor* 1 gigabyte (GB) RAM (32-bit) or 2 GB RAM (64-bit) 16 GB available hard disk space (32-bit) or 20 GB (64-bit).
Is 2GB RAM enough for Windows 7?
2GB is a good amount for Windows 7 32bit. Even if you install the 64bit version of Windows 7 2GB of RAM is fine for what you’re using the computer for. But if you start gaming or running memory intensive programs you should add more RAM. Have Questions About Installing Windows 7?Dec 10, 2009.
Can I run Windows 7 on 512MB RAM?
If you are going to use Windows 7 with 512MB RAM, choose a 32-bit version. Choosing Home Premium, Professional or Ultra won’t affect memory usage, but Home Premium probably has everything you need. You will get a lot of paging and slow performance on 512MB RAM.
How long does Windows 7 take to install?
A clean Windows 7 upgrade, over a new or restored Vista installation, should take 30-45 minutes. That matches up perfectly with the data reported in Chris’s blog post. With 50GB or so of user data, you can expect the upgrade to complete in 90 minutes or less. Again, that finding is consistent with the Microsoft data.
Does installing Windows 7 delete everything?
Normally, it will cause no issues to reinstall windows 7 without losing programs, but you can never be more careful about your data. Therefore, you should create a system image backup that includes all your installed programs just in case the reinstall of Windows 7 goes wrong.
How do I reinstall Windows 7 without a disk?
Restore without installation CD/DVD Turn on the computer. Press and hold the F8 key. At the Advanced Boot Options screen, choose Safe Mode with Command Prompt. Press Enter. Log in as Administrator. When Command Prompt appears, type this command: rstrui.exe. Press Enter.
Can I install Windows 7 directly from ISO?
Right-click on the ISO file, select Open with and then select “Mount files with Virtual Clone Drive” to mount your ISO file. Step 3: Go back to My Computer (or Just Computer) and then double-click on the Virtual Clone Drive icon to start Windows 7 installation process.
Where can I download Windows 7 installer?
Visit Microsoft.com to download the Windows 7 USB/DVD Download Tool (see Resources). Double-click the executable file to launch the Download Tool installer and follow the on-screen instructions to perform the installation.
Can I still buy Windows 7?
Windows 7 can still be installed and activated after end of support; however, it will be more vulnerable to security risks and viruses due to the lack of security updates. After January 14, 2020, Microsoft strongly recommends that you use Windows 10 instead of Windows 7.
Is Windows 7 available for free?
You can find Windows 7 for free everywhere on the internet and it can be downloaded without any hassle or special requirements. When you purchase Windows, you don’t actually pay for the Windows itself. You are actually paying for the Product Key which is used to activate the Windows.
Can I install Windows 7 without a product key?
The beauty of Windows 7 and one of the hidden features of Windows 7 is that this version of Windows can be re-installed on the same PC without having to enter the product key, legally. # Your Windows 7 PC must be bootable and your PC must have an optical drive (DVD drive).
Can I download Windows 7 without a product key?
You can get a download for 7, but you need a product key to activate and use it.