
UPDATED 10/17/2024: If you have a computer with unsupported hardware, you may upgrade to Windows 11, but not through Windows Update. Instead, you must use a bootable USB flash drive or ISO file to manually perform a clean install or in-place upgrade.
Microsoft left the loophole open but didn’t mention it anywhere in the documentation, and it is not supported. According to the company, installing Windows 11 on unsupported hardware is an option for organizations. However, anyone could upgrade at their own risk, knowing there is no system stability and driver compatibility guarantee.
In other words, you can manually continue the setup if you install Windows 11 on incompatible hardware. However, you must acknowledge that the upgrade will be “unsupported.” Microsoft defines an “unsupported state” as a computer that doesn’t meet the minimum system requirements. As a result, it won’t be entitled to receive updates from Windows Update. Although these devices may continue to receive updates anyway, the company isn’t obligated to provide security and driver updates or technical support.
In this guide, I will teach you how to install Windows 11 (version 24H2 and 23H2) on a computer with incompatible hardware. Since the device does not officially support the new version of Windows, using these workarounds is not recommended unless you know the risks and understand that stability, compatibility, and updates are not guaranteed.
If you’re planning to install the latest release of Windows 11, you should use instructions for version 24H2. Usually, a clean installation is the better approach as it will result in fewer issues. You may still be able to use other different methods, but they have been tested up to version 23H2. Regardless of the method you choose, a smooth installation experience isn’t guaranteed because the computer is already not supported.
Also, you can always automate the installation with an answer file that can be integrated into the Windows 11 USB flash drive.
- Install Windows 11 24H2 on unsupported hardware
- Upgrade Windows 11 24H2 on unsupported hardware
- Install Windows 11 on unsupported hardware from USB
- Upgrade to Windows 11 on unsupported hardware from ISO file
- Upgrade to Windows 11 on unsupported hardware from Command Prompt
- Upgrade to Windows 11 on unsupported hardware from Registry
- Install Windows 11 on unsupported hardware from Rufus
Important: Microsoft now requires the POPCNT instruction inside the processor to install Windows 11 24H2 and higher releases. Otherwise, the computer will fail to boot. However, you will continue to be able to install it on unsupported processors. The only exclusion will be processors from AMD and Intel released before 2008.
Although you can still use the other methods outlined in this guide, the installation process has changed with the release of Windows 11 24H2. If you plan to install the latest version of the operating system, downloading the ISO file and using the Rufus tool is perhaps the easiest way to proceed on unsupported hardware. Alternatively, you can also create a USB bootable media with Ventoy to perform a clean installation of a device that doesn’t meet the minimum hardware requirements.
Also, you must ensure the computer can boot from a USB flash drive, which means you may need to change the UEFI settings or start the device in the boot menu. Since the firmware settings are different on every computer, you must check your manufacturer’s support website for more specific details.
Using Rufus to clean install
Follow these instructions to perform a clean installation of version 24H2 using Rufus.
1. Download Windows 11 24H2 ISO file
To download the official Windows 11 24H2 ISO file, use these steps:
-
Open Microsoft Support website.
-
Select the Windows 11 option under the “Download Windows 11 Disk Image (ISO) for x64 devices” section.

-
Click the Download button.
-
Select the installation language.
-
Click the Confirm button.
-
Click the Download button to save the ISO file on the computer.


Once you complete the steps, you can use the image of Windows 11 to create an installation media.
2. Create Windows 11 24H2 bootable media
To create a Windows 11 24H2 bootable media, connect a USB flash drive of at least 8GB and use these steps:
-
Open Rufus website.
-
Click the link to download the latest version under the “Download” section.
-
Choose the USB flash drive from the “Device” setting.
-
Double-click the executable to launch the tool.
-
Click the Select button.

-
Select the Windows 11 24H2 ISO file.
-
Click the Open button.
-
Continue with the default settings after the download.
-
(Optional) Specify a name for the drive under the “Volume label” setting.
-
Click the Start button.
-
Check the “Remove requirement for 4GB+ RAM, Secure Boot and TPM 2.0” option to install version 24H2 on unsupported hardware.

-
Check the “Remove requirement for an online Microsoft account” option to bypass the internet and Microsoft account requirements and create a local account.
-
(Optional) Check the “Create a local account with username” option and specify an account name to create a local account automatically.
-
Check the “Disable BitLocker automatic device encryption” option to prevent the setup from enabling BitLocker during the installation (if applicable).
-
Click the OK button.


Once you complete the steps, the tool will create a bootable media for unsupported hardware.
If you choose the option to create a local account automatically, the setup will create the account without a password. After the installation, don’t forget to create a password and PIN from the “Sign-in options” settings page.
3. Windows 11 24H2 unsupported PC clean install process
To perform a clean install of Windows 11 24H2 on unsupported hardware, use these steps:
-
Start the PC with the Windows 11 24H2 USB flash drive.
-
Press any key to continue.
-
Choose the installation language and format.

-
Click the Next button.
-
Choose the keyboard and input method.

-
Click the Next button.
-
Select the “Install Windows 11” option.

-
Check the “I agree everything” option to confirm this process will delete everything on the computer.
-
Click the Next button.
-
Click the “I don’t have a product key” option.

Quick note: The computer will activate automatically if you’re reinstalling the operating system. If this is a new computer that never included a version of Windows, you will have to provide a product key.
-
Select the edition of Windows your license key activates (if applicable).
-
Click the Next button.
-
Click the Accept button
-
Select each partition on the hard drive where you want to install Windows 11 24H2 and click the Delete button. (Usually, “Drive 0” is the drive that contains all the installation files.)
-
Select the hard drive (Drive 0 Unallocated Space) to install the latest version of the operating system.
-
Click the Next button.
-
Click the Install button.

-
Choose your region setting on the first page of the out-of-the-box experience (OOBE) after the installation.

-
Click the Yes button.
-
Select your keyboard layout setting.
-
Click the Yes button.
-
Click the Skip button if you do not need to configure a second layout.
-
The computer will automatically connect to the network using an Ethernet connection. You must set up the connection manually on a wireless connection (a security key may be required).
-
(Optional) Confirm a name for the computer.
-
Click the Next button. (The device will restart automatically.)
-
Select the “Set up for personal use” option for Windows 11 Pro. This option is not available for the “Home” edition.
-
Click the Next button.
-
Click the Sign in button.
Quick note: If you select the option to skip the internet and online account and choose the option to create a local account, the wizard will skip this part and continue with the initial setup.
-
Confirm your Microsoft account email to create a Windows 11 account.
-
Click the Next button.
-
Confirm your Microsoft account password.
-
Click the Next button.
-
Click the Create PIN button.
-
Create a new four-digit PIN.
-
Click the OK button.
-
Confirm the privacy settings that best suit your situation by turning on or off the toggle switch for each setting.
-
Click the Next button.
-
Click the Next button again.
-
Click the Accept button.
-
Click the More options setting.
-
Click the “Set up as a new PC” option.
-
Click the “Set up as a new PC” option again (if applicable).
-
(Optional) On the “Let’s customize your experience” page, select one or more ways you plan to use the device to allow suggestions during the experience.
-
Click the Accept button to continue. Or click the Skip button to skip this part of the setup.
-
(Optional) Use the code to link your Android phone or click the Skip option.
-
Click the Next button.
-
Click the “Not now” button if you will be using a browser other than Microsoft Edge (if applicable).
-
Click the “Skip for now” option to skip the PC Game Pass promotion (if applicable).
-
Click the “No, thanks” button to skip the Microsoft 365 setup (if applicable).


Once you complete the steps, Windows 11 24H2 will finish the clean installation on the computer with unsupported hardware.
You can also follow these instructions in my video tutorial on my channel.
Using Ventoy to clean install
Follow these instructions to perform a clean installation of Windows 11 24H2 using Ventoy.
1. Create Windows 11 24H2 USB with Ventoy
To create a Windows 11 24H2 USB with Ventoy, connect a flash drive with enough space (8GB or more) and use these steps:
-
Open Ventoy GitHub page.
-
Click the ventoy-x.x.xx-windows.zip file under the “Assets” section and download it to your computer.

Quick note: You may need to force and keep the file as the browser may detect it as malicious.
-
Open File Explorer.
-
Open the Zip folder location.
-
Double-click the open the ventoy-x.x.xx-windows.zip file.
-
Click the Extract all button from the command bar.

-
Click the Browse button.
-
Select a location to extract the files.
-
Click the Select Folder button.
-
Click the Extract button.
-
Open the ventoy-x.x.xx folder.
-
Double-click the Ventoy2Disk.exe file to launch the installer.
-
Choose the USB flash drive from the “Device” setting.
-
Click the Install button.

-
Click the OK button.
-
Click on This PC from the left pane of File Explorer.
-
Open the Ventoy drive.
-
Copy and paste the Windows 11 24H2 ISO files to make them bootable.


After you complete the steps, you can use the USB flash drive to start the computer with the Ventoy tool to launch the Windows 11 24H2 installation.
2. Windows 11 24H2 unsupported PC clean install process
To perform a clean install of Windows 11 24H2 with Ventoy, use these steps:
-
Start the PC with the Ventoy USB flash drive.
-
Select the Windows 11 24H2 ISO file from the Ventoy menu and press Enter to continue with the setup.
-
Press any key to continue.
-
Choose the installation language and format.
-
Click the Next button.
-
Choose the keyboard and input method.
-
Click the Next button.
-
Select the “Install Windows 11” option.
-
Check the “I agree everything” option to confirm this process will delete everything on the computer.
-
Click the Next button.
-
Click the “I don’t have a product key” option.
Quick note: The computer will activate automatically if you’re reinstalling the operating system. If this is a new computer that never included a version of Windows, you will have to provide a product key.
-
Select the edition of Windows your license key activates (if applicable).
-
Click the Next button.
-
Click the Accept button
-
Select each partition on the hard drive where you want to install Windows 11 24H2 and click the Delete button. (Usually, “Drive 0” is the drive that contains all the installation files.)
-
Select the hard drive (Drive 0 Unallocated Space) to install the latest version of the operating system.
-
Click the Next button.
-
Click the Install button.
-
Choose your region setting on the first page of the out-of-the-box experience (OOBE) after the installation.
-
Click the Yes button.
-
Select your keyboard layout setting.
-
Click the Yes button.
-
Click the Skip button if you do not need to configure a second layout.
-
The computer will automatically connect to the network using an Ethernet connection. You must set up the connection manually on a wireless connection (a security key may be required).
-
(Optional) Confirm a name for the computer.
-
Click the Next button. (The device will restart automatically.)
-
Select the “Set up for personal use” option for Windows 11 Pro. This option is not available for the “Home” edition.
-
Click the Next button.
-
Click the Sign in button.
Quick note: If you select the option to skip the internet and online account and choose the option to create a local account, the wizard will skip this part and continue with the initial setup.
-
Confirm your Microsoft account email to create a Windows 11 account.
-
Click the Next button.
-
Confirm your Microsoft account password.
-
Click the Next button.
-
Click the Create PIN button.
-
Create a new four-digit PIN.
-
Click the OK button.
-
Confirm the privacy settings that best suit your situation by turning on or off the toggle switch for each setting.
-
Click the Next button.
-
Click the Next button again.
-
Click the Accept button.
-
Click the More options setting.
-
Click the “Set up as a new PC” option.
-
Click the “Set up as a new PC” option again (if applicable).
-
(Optional) On the “Let’s customize your experience” page, select one or more ways you plan to use the device to allow suggestions during the experience.
-
Click the Accept button to continue. Or click the Skip button to skip this part of the setup.
-
(Optional) Use the code to link your Android phone or click the Skip option.
-
Click the Next button.
-
Click the “Not now” button if you will be using a browser other than Microsoft Edge (if applicable).
-
Click the “Skip for now” option to skip the PC Game Pass promotion (if applicable).
-
Click the “No, thanks” button to skip the Microsoft 365 setup (if applicable).
Once you complete the steps, the latest version of Windows 11 will install on the computer with unsupported hardware.
Upgrade Windows 11 24H2 on unsupported hardware
You can also perform an in-place upgrade from Windows 11 23H2 or 22H2 to version 24H2 in two ways. You can run a special command to bypass the restrictions and continue with the upgrade, or you can create a custom USB installer with Rufus that removes the hardware restrictions. If you have a device running Windows 10, I recommend using the clean installation process instead.
Using Command Prompt upgrade
To use commands to upgrade your computer to Windows 11 24H2, follow these instructions.
1. Download Windows 11 24H2 ISO file
To download the ISO file for the new feature update, use these steps:
-
Open Microsoft Support website.
-
Select the Windows 11 option under the “Download Windows 11 Disk Image (ISO) for x64 devices” section.
-
Click the Download button.
-
Select the installation language.
/li>
-
Click the Confirm button.
-
Click the Download button to save the ISO file on the computer.
Once you complete the steps, you can use the ISO file of Windows 11 to create an installation media.
2. Windows 11 24H2 unsupported PC upgrade process
To upgrade a computer that doesn’t meet the Windows 11 24H2 requirements, use these steps:
-
Open File Explorer (Windows key + E).
-
Open the Windows 11 24H2 ISO file location.
-
Right-click the ISO file, select the Open with submenu, and choose the Windows Explorer option.
-
Confirm the letter for the drive with the installation files.
-
Open Start.
-
Search for Command Prompt, right-click the top result, and choose the Run as administrator option.
-
Type the following command to open the location with the installation files and press Enter:
J:
In the command, change the letter “J” for the letter that corresponds to your drive.
-
Type the following command to run the Windows 11 setup bypassing the hardware requirements and press Enter:
setup.exe /product server
Quick tip: If the command doesn’t work, in the installation drive, open the “Sources” folder with the
cd sourcescommand and run thesetupprep /product servercommand to launch the setup again.
-
(Optional) Click the “Change how Windows Setup downloads updates” option.

-
Select the “Not right now” option.
-
Click the Next button.
-
Check the “Keep files, settings, and apps” option.
-
Click the Install button to upgrade while keeping files and apps.


After you complete the steps, the setup will upgrade the system to Windows 11 24H2 without going through the Out-of-box Experience (OOBE) and keeping your files and apps.
You can also follow these instructions in my video tutorial on my channel.
Using Rufus tool upgrade
Follow these instructions to create a custom USB installation media to upgrade your computer to version 24H2.
1. Create Windows 11 24H2 USB with Rufus
To create a USB media installer for unsupported hardware, connect a USB flash drive of at least 8GB and use these steps:
-
Open Rufus website.
-
Click the link to download Rufus 4.6 (beta) or higher under the “Download” section.
-
Double-click the executable to launch the tool.
-
Click the Settings button (third button from the left) at the bottom of the page.

-
Use the “Check for updates” drop-down menu and select the Daily option under the “Settings” section.

-
Click the Close button.
-
Click the Close button again.
-
Open Rufus again.
-
(Optional) Use the drop-down menu and select the USB flash drive to create the installation media under the “Device” section.
-
Use the drop-down menu and select the “Disk or ISO image” option under the “Boot selection” section.
-
Click the down-arrow button (on the right side) and select the Download option.

-
Click the Download button.
-
Select the Windows 11 option.

-
Click the Continue button.
-
Select the “24H2” option to choose the Windows 11 2024 Update under the “Release” section.
-
Click the Continue button.
-
Select the Windows 11 Home/Pro/Edu option.
-
Click the Continue button.
-
Select the language of Windows 11.
-
Click the Continue button.
-
Select the x64 architecture option.
-
Click the Download button.
-
Select the location to save the Windows 11 24H2 ISO file automatically.
-
Continue with the default settings after the download.
-
(Optional) Specify a name for the drive under the “Volume label” setting.
-
Click the Start button.
-
Check the “Remove requirement for 4GB+ RAM, Secure Boot and TPM 2.0” option to install version 24H2 on unsupported hardware.
-
Check the “Remove requirement for an online Microsoft account” option to bypass the internet requirement and create a local account.
-
(Optional) Check the “Create a local account with username” option and specify an account name to create a local account automatically.
-
Check the “Disable BitLocker automatic device encryption” option to prevent the setup from enabling BitLocker during the installation.
-
Click the OK button.


2. Windows 11 24H2 unsupported PC upgrade process
To upgrade a computer that doesn’t meet the Windows 11 24H2 requirements, use these steps:
-
Connect the custom Windows 11 24H2 USB to your computer.
-
Open File Explorer (Windows key + E).
-
Select the USB flash drive from the left navigation pane.
-
Right-click the Setup.exe file and choose the Run as administrator option.

-
Click the Yes button to continue (if applicable).
-
Click the Accept button.
-
Click the Next button.
-
Check the “Keep files, settings, and apps” option.
-
Click the Install button to upgrade while keeping files and apps.

After you complete the steps, the modified setup will proceed with the upgrade without going through the Out-of-box Experience (OOBE) and keeping your files and apps.
Install Windows 11 on unsupported hardware from USB
Using the ISO file to perform a clean installation, you must create a bootable media using a third-party tool like Rufus or Command Prompt to start the setup process with a USB flash drive.
In addition, you must make sure the device can start from USB, which means you will have to change the UEFI settings. Since most computers have different settings, check your manufacturer’s support website for more specific details.
To install Windows 11 on an unsupported PC, use these steps:
-
Start the unsupported PC with the Windows 11 USB flash drive.
-
Press any key to continue.
-
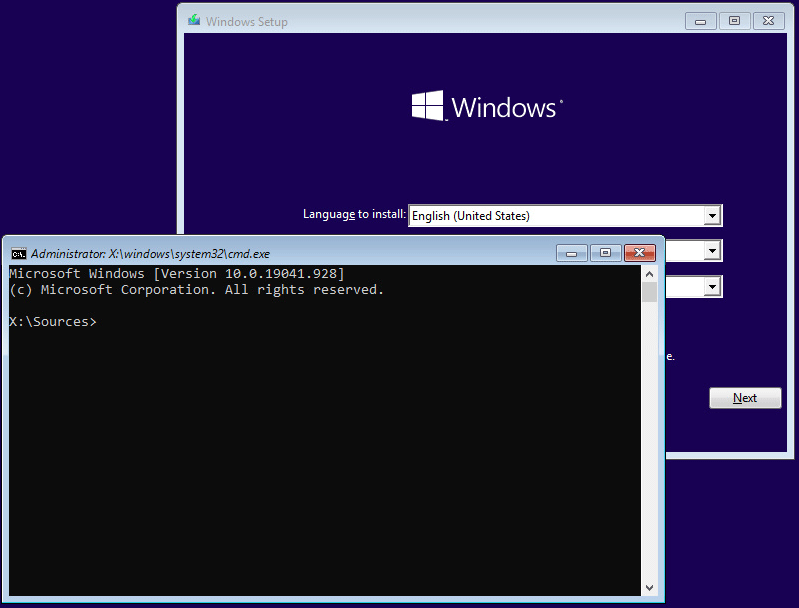
Use the “Shift + F10” keyboard shortcut to open Command Prompt on the first “Windows Setup” page.
-
Type the following command and press Enter:
regedit

-
Navigate the following path:
HKEY_LOCAL_MACHINE\SYSTEM\Setup
-
Right-click the Setup (folder) key, select New, and then the Key option.

-
Name the key LabConfig and press Enter.
-
Right-click the LabConfig (folder) key, select New, and then the DWORD (32-bit) Value option.
-
Name the key BypassTPMCheck and press Enter.
-
Double-click the newly created key and set its value from 0 to 1.

-
Click the OK button.
-
Right-click the LabConfig (folder) key, select New, and then the DWORD (32-bit) Value option.
-
Name the DWORD BypassSecureBootCheck and press Enter.
-
Double-click the newly created key and set its value from 0 to 1.

-
Click the OK button.
-
Close the Registry.
-
Close the Command Prompt console.
-
Click the Next button.

-
Click the Install now button.

-
Click the “I don’t have a product key” option if you are reinstalling. If Windows 11 has been previously activated after the installation, reactivation will happen automatically.

-
Select the edition of “Windows 11” that your license key activates (if applicable).
-
Check the “I accept the license terms” option.
-
Click the Next button.
-
Select the “Custom: Install Windows only (advanced)” option.

-
Select each partition in the hard drive you want to install Windows 11 and click the Delete button. (Typically, the “Drive 0” is the drive that contains all the installation files.)

Warning: Deleting a partition also deletes all data on the drive. Also, it is not necessary to delete the partitions from a secondary hard drive.
-
Select the hard drive (“Drive 0 Unallocated Space”) to install Windows 11 on an unsupported device.

-
Click the Next button.
-
Select your region setting after the installation on the first page of the out-of-the-box experience (OOBE).
-
Click the Yes button.
-
Select your keyboard layout setting.
-
Click the Yes button.
-
Click the Skip button if you do not need to configure a second layout.
-
The computer will automatically connect to the network using an Ethernet connection. If you have a wireless connection, you must set up the connection manually (a security key may be required) and click the Next button.
-
Confirm a name for the computer.
Quick note: This is an optional step, but it’s highly recommended to set a name to make it easier to identify the device in the network, on your Microsoft account, and when restoring your computer from backup. Also, after completing this step, the setup will restart to apply the new name, but it’ll start where you left off to continue with the settings.
-
Click the Next button. (The device will restart automatically.)
-
Select the “Set up for personal use” option if configuring Windows 11 Pro. The “Home” edition does not have this option.
Quick tip: Use the “Set up for work or school” option to skip the Microsoft account and create a local account.
-
Click the Next button.
-
Click the Sign in button.
-
Confirm your Microsoft account email or phone number to create an account.
-
Click the Next button.
-
Confirm your Microsoft account password.
-
Click the Next button.
-
Click the “More options” setting.
Quick tip: You can also click the “Restore from this PC” button to restore your files, apps, settings, and credentials from the system backup available in your OneDrive account. You can learn more about the Windows Backup app in this guide.
-
Click the “Set up a new device” option to continue or select the backup to restore.
-
Click the Create PIN button.
-
Create a new four-digit PIN.
-
Click the OK button.
-
Scroll down and confirm the privacy settings that best suit your situation by turning on or off the toggle switch for each setting.
-
Click the Accept button.
-
(Optional) On the “Let’s customize your experience” page, select one or more ways you plan to use the device to allow the setup to suggest tools and service customizations during this experience.
-
Click the Accept button to continue. Or click the Skip button to skip this part of the setup.
-
Click the Skip button for the Android phone link process.
-
Click the “Continue without” button to skip the Microsoft 365 setup.
-
Click the Decline button to skip the OneDrive offer.
-
Click the “Skip for now” button to skip the Game Pass subscription promotion.


Once you complete the steps, Windows 11 will install in an unsupported state, so you may not get security or driver updates.
Upgrade to Windows 11 on unsupported hardware from ISO file
Alternatively, you can perform an in-place upgrade of Windows 11 with an ISO file on a device that doesn’t meet the system requirements. However, you must run a script to bypass the TPM, Secure Boot, and processor check.
1. Bypass Windows 11 requirement checks
To bypass the minimum system requirements to install Windows 11, use these steps:
-
Open MediaCreationTool.bat GitHub page.
-
Click the Code button from the top-right corner and the Download Zip option.

-
Select the MediaCreationToo.bat-main folder and click the Extract all button.

-
Click the Browse button.
-
Select the extraction location and click the Select folder button.
-
Click the Extract button.
-
In the extracted folder, inside the MediaCreationToo.bat-main folder, open the bypass11 folder.
-
Right-click the “Skip_TPM_Check_on_Dynamic_Update.cmd” file and select the Run as administrator option.

-
Click the More info option.
-
Click the Run anyway button.


Once you complete the steps, you can mount an ISO file to begin the installation of Windows 11 on unsupported hardware (see steps below). If the script is not working, restart the computer and run it several times.
2. Upgrade to Windows 11 from ISO
To upgrade an incompatible computer to Windows 11 with an ISO file, use these steps:
-
Open Microsoft Support website.
-
Under the “Download Windows 11 Disk Image (ISO)” section, select the Windows 11 option.
-
Click the Download button.
-
Select the installation language.
-
Click the Confirm button.
-
Click the Download button to save the Windows 11 ISO file on the device.
-
Right-click the ISO file, select the Open with submenu, and choose the Windows Explorer option.
-
Click on the mounted drive from the left navigation pane.
-
Double-click the Setup file to begin the Windows 11 upgrade process.
-
(Optional) Click the “Change how Windows Setup downloads updates” option.
-
Select the “Not right now” option.
-
Click the Next button.
-
Click the Install button to upgrade while keeping files and apps.
If you want to start fresh with a clean installation of Windows 11, click the “Change what to keep” option, select the “Nothing” option, click the Next button, and then click the “Install” button.
After you complete the steps, the setup will continue to upgrade the laptop or desktop computer to the Windows 11 2022 Update (version 22H2). However, Windows 11 will run in an unsupported state that won’t guarantee updates, nor will you receive support from Microsoft.
Upgrade to Windows 11 on unsupported hardware from Command Prompt
Also, it’s possible to perform an in-place upgrade from an installation media with a single special command that will allow the system to bypass the system requirements.
Although this method continues to work at the time of writing, as of build 25977, you can no longer use this command. However, it’s still possible to bypass the check with the setupprep /product server command is available in the “Sources” folder in the installation media.
To upgrade a computer that doesn’t meet the Windows 11 requirements through Command Prompt, use these steps:
-
Open Microsoft Support website.
-
Under the “Download Windows 11 Disk Image (ISO)” section, select the Windows 11 option.
-
Click the Download button.
-
Select the installation language.
-
Click the Confirm button.
-
Click the Download button to save the Windows 11 ISO file on the device.
-
Right-click the ISO file, select the Open with submenu, and choose the Windows Explorer option.
-
Confirm the letter for the drive with the installation files.
-
Open Start.
-
Search for Command Prompt, right-click the top result, and choose the Run as administrator option.
-
Type the following command to open the location with the installation files and press Enter:
J:
In the command, change the letter “J” for the letter that corresponds to your drive.
-
Type the following command to run the Windows 11 setup bypassing the hardware requirements and press Enter:
setup.exe /product server
Quick tip: If the command doesn’t work, in the installation drive, open the “Sources” folder with the
cd sourcescommand and run thesetupprep /product serverto launch the setup again.
-
(Optional) Click the “Change how Windows Setup downloads updates” option.
-
Select the “Not right now” option.
-
Click the Next button.
-
Click the Install button to upgrade while keeping files and apps.
Once you complete the steps, the setup will continue to upgrade to the latest version of Windows 11. However, Windows 11 will run in an unsupported state that won’t guarantee updates, nor will you receive support from Microsoft.
Also, note that the setup will now be labeled as “Windows Server,” but it’ll install the client version of the operating system.
While this command works to upgrade a device running Windows 10 or an older version of Windows 11, it’s important to mention that there will be times when it may not work, and you may end up with a message about the setup not being able to determine if your computer is compatible. You can try the command a few more times, but if it doesn’t work, you should try a different method.
Upgrade to Windows 11 on unsupported hardware from Registry
Although it’s not supported, Microsoft has published a workaround to bypass the Windows 11 requirements to continue the setup by editing the Registry. However, the computer needs a TPM 1.2 chip, and UEFI firmware with Secure Boot enabled. (These steps may or may not work on Windows 11 22H2.)
1. Edit Registry to bypass official checks
To bypass the minimum system requirements to upgrade to Windows 11, use these steps:
-
Open Start.
-
Search for regedit and click the top result to open the Registry Editor.
-
Navigate to the following path:
HKEY_LOCAL_MACHINE\SYSTEM\Setup\MoSetup
-
Right-click the MoSetup (folder) key, select the New submenu, and choose the “DWORD (32-bit) Value” option.
-
Name the key AllowUpgradesWithUnsupportedTPMOrCPU and press Enter.
-
Double-click the newly created key and set its value from 0 to 1.


Once you complete the steps, you can mount an ISO file or connect a USB media to begin the installation of Windows 11 on unsupported hardware.
2. Upgrade to Windows 11 using ISO file
To begin the Windows 11 upgrade process, use these steps:
-
Open Microsoft Support website.
-
Under the “Download Windows 11 Disk Image (ISO)” section, select the Windows 11 option.
-
Click the Download button.
-
Select the installation language.
-
Click the Confirm button.
-
Click the Download button to save the Windows 11 ISO file on the device.
-
Right-click the ISO file, select the Open with submenu, and choose the Windows Explorer option.
-
Click on the mounted drive from the left navigation pane.
-
Double-click the Setup file to begin the Windows 11 upgrade process.
-
(Optional) Click the “Change how Windows Setup downloads updates” option.
-
Select the “Not right now” option.
-
Click the Next button.
-
Click the Accept button to agree to the terms.
-
Click the Install button to upgrade while keeping your files and apps.

If you want to start fresh with a clean installation of Windows 11, click the “Change what to keep” option, select the “Nothing” option, click the “Next” button, and then click the “Install” button.
Once you complete the steps, the setup will continue with the upgrade on your device to Windows 11.
Install Windows 11 on unsupported hardware from Rufus
Alternatively, you can create a Windows 11 bootable USB that bypasses the TPM 2.0, Secure Boot, and memory requirements on unsupported hardware using the Rufus tool.
1. Create bootable USB with Rufus
To create a bootable USB of Windows 11 to bypass hardware requirements, use these steps:
-
Open Rufus website.
-
Click the link to download the latest version.
-
Double-click the rufus.4.x.exe file to launch the tool.
-
Under the “Device” section, use the drop-down menu and select the flash drive to create the Windows 11 bootable USB media.
-
Click the Select button.
-
Select the Windows 11 ISO file.
-
Click the Open button.
-
Select the “Standard Windows Partition” option in the “Image option” setting.
-
Select the GPT option in the “Partition scheme” setting.
-
Select the UEFI (non CSM) option in the “Target system” setting.
-
Under the “Volume label” section, specify a descriptive name for the Windows 11 bootable USB flash drive – For example, Windows 11 Bypass.
-
Use the default settings for the File system and Cluster size options.
-
Check the Quick format option.
-
Check the “Create extended label and icon files” option.
-
Click the Start button.
-
Check the “Remove requirement for 4GB RAM, Secure Boot, and TPM 2.0” option to install Windows 11 on unsupported hardware.
-
Check the “Remove requirement for an online Microsoft account” option to use a local account and bypass the internet requirements.
-
Click the OK button.


Once you complete the steps, Rufus will create a bootable USB media with the hardware requirements turned off, and you can now proceed to install a fresh copy of Windows 11 or an in-place upgrade on unsupported hardware with the same steps as a regular installation.
2. Clean Windows 11 install on unsupported hardware
To perform a clean install of Windows 11 from a Rufus USB on unsupported hardware, use these steps:
-
Start the unsupported PC with the Windows 11 USB flash drive.
-
Press any key to continue.
-
Click the Next button.
-
Click the Install now button.
-
Click the “I don’t have a product key” option if you are doing a reinstallation. If Windows 11 was previously activated after the installation, reactivation would happen automatically.
-
Select the edition of “Windows 11” that your license key activates (if applicable).
-
Check the “I accept the license terms” option.
-
Click the Next button.
-
Select the “Custom: Install Windows only (advanced)” option.
-
Select each partition in the hard drive you want to install Windows 11 and click the Delete button. (Typically, the “Drive 0” is the drive that contains all the installation files.)
Warning: When you delete a partition, it also deletes all data on the drive. Also, it is not required to delete the partitions from a secondary hard drive.
-
Select the hard drive (Drive 0 Unallocated Space) to install the operating system.
-
Click the Next button.
-
Select the hard drive (“Drive 0 Unallocated Space”) to install Windows 11 on your device.
-
Click the Next button.
-
Select your region setting after the installation on the first page of the out-of-the-box experience (OOBE).
-
Click the Yes button.
-
Select your keyboard layout setting.
-
Click the Yes button.
-
Click the Skip button if you do not need to configure a second layout.
-
The computer will automatically connect to the network using an Ethernet connection. If you have a wireless connection, you must set up the connection manually (a security key may be required) and click the Next button.
-
Confirm a name for the computer.
Quick note: This is an optional step, but it’s highly recommended to set a name to make it easier to identify the device in the network, on your Microsoft account, and when restoring your computer from backup. Also, after completing this step, the setup will restart to apply the new name, but it’ll start where you left off to continue with the settings.
-
Click the Next button. (The device will restart automatically.)
-
Select the “Set up for personal use” option if configuring Windows 11 Pro. The “Home” edition does not have this option.
Quick tip: Use the “Set up for work or school” option to skip the Microsoft account and create a local account.
-
Click the Next button.
-
Click the Sign in button.
-
Confirm your Microsoft account email or phone number to create an account.
-
Click the Next button.
-
Confirm your Microsoft account password.
-
Click the Next button.
-
Click the “More options” setting.
Quick tip: You can also click the “Restore from this PC” button to restore your files, apps, settings, and credentials from the system backup available in your OneDrive account. You can learn more about the Windows Backup app in this guide.
-
Click the “Set up a new device” option to continue or select the backup to restore.
-
Click the Create PIN button.
-
Create a new four-digit PIN.
-
Click the OK button.
-
Scroll down and confirm the privacy settings that best suit your situation by turning on or off the toggle switch for each setting.
-
Click the Accept button.
-
(Optional) On the “Let’s customize your experience” page, select one or more ways you plan to use the device to allow the setup to suggest tools and service customizations during this experience.
-
Click the Accept button to continue. Or click the Skip button to skip this part of the setup.
-
Click the Skip button for the Android phone link process.
-
Click the “Continue without” button to skip the Microsoft 365 setup.
-
Click the Decline button to skip the OneDrive offer.
-
Click the “Skip for now” button to skip the Game Pass subscription promotion.
Once you complete the steps, Windows 11 will install on a computer that doesn’t meet the minimum requirements for processor, memory, and security components.
If you want to perform an in-place upgrade, then connect the bootable media on the unsupported computer, run the “Setup.exe” installer, and continue with the on-screen directions like a regular upgrade.
Update Octrober 17, 2024: This guide has been updated to ensure accuracy and reflect changes to the process.
If you want to use Windows 11 but your PC cannot meet the system requirements, how can you install Windows 11 on unsupported PCs or hardware? This is not easy as a normal installation but you can perform this task by following some methods below mentioned by MiniTool Solution.
Windows 11, a brand new operating system, has been released for some time. Although it is still in the test phase, many Windows users want to try this new Windows version. But unfortunately, for some persons, this new OS has strict system or hardware requirements. Perhaps you are also the one. To learn more information, go to this post – Basic Windows 11 System Requirements for PCs & Laptops.
But if your PC cannot meet these requirements, you cannot install Windows 11. Well then, does this mean you cannot use this new operating system? Absolutely not! In this post, we will describe how to install Windows 11 on unsupported PCs/hardware by following some effective ways.
Back up Your PC Before Installation of Windows 11 on Unsupported Hardware
Before installing Windows 11 on any PC (not restricted to the unsupported PC), creating a backup for the machine is very important since nobody can make sure everything is OK.
It is best to create a system image before Windows 11 installation. If you find the new system is not good as expected (some system issues always appear due to the instability) and you want to roll back to Windows 10, the system image is useful. To avoid losing important data after the installation of Windows 11, you can back up your critical files.
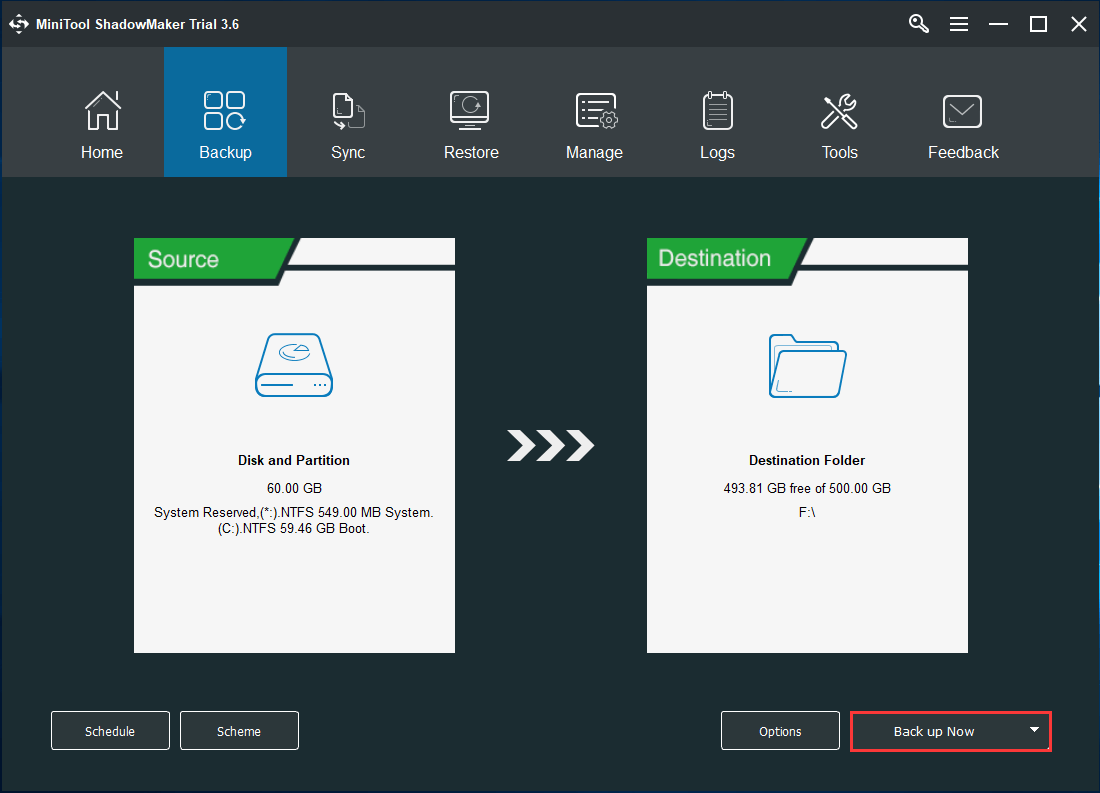
How to back up your PC? MiniTool ShadowMaker can be your good assistant since it can easily help you create a system image and back up files & folders. Only a few steps are required. Importantly, this software allows you to create a bootable USB hard disk, flash drive, or CD/DVD using Media Builder to boot the PC for recovery when the system fails to load.
Just get MiniTool ShadowMaker by clicking the following download button.
MiniTool ShadowMaker TrialClick to Download100%Clean & Safe
Step 1: Launch this PC backup software after installing it.
Step 2: Directly move to the Backup interface, you will find this software will back up the system by default. You only need to specify a destination path for the system image file.
Step 3: Click Back up Now to execute system backup immediately.
If you need to back up your important files, go to Source to select items you want to back up and then follow the above steps to start file backup. To know more information, refer to How to Backup Files on Windows 10? Try These Top 4 Ways.
In addition to PC backup before Windows 11 installation, you can do some other things and see them in this post – Get Ready for Windows 11: What to be Aware of & What to Do.
Next, let’s go to see how to install Windows 11 on old PCs with unsupported hardware.
How to Install Windows 11 on Unsupported Hardware/PCs?
Note: These methods below are only effective in Windows 11 test stage. After Windows 11 official version is released, if your hardware doesn’t support the new system, you had better upgrade the PC, buy a new computer or roll back to Windows 10 via a clean install. To enjoy the new system, you can install Windows 11 on VirtualBox or VMware Workstation.
Related articles:
- How Do You Install Windows 11 In Oracle VM VirtualBox
- Yes, You Can Install Windows 11 On VMware Workstation Player
Method 1: Manually Enroll in the Dev Channel to Upgrade to Windows 11
To upgrade to Windows 11, firstly you should join Windows Insider Program.
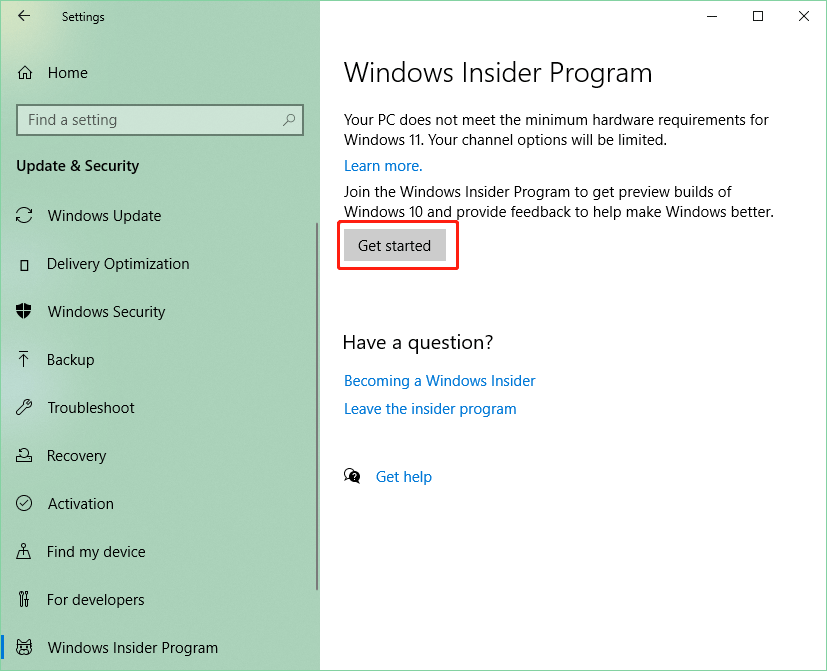
1. Just press Win and I to open the Settings app, go to Update & Security and choose Windows Insider Program from the left side of the pane.
2. Then, click the Get started icon.
3. Next, you will be asked to link your Microsoft account.
4. Pick your Insider settings and confirm the selection. Then, restart the PC.
If the PC doesn’t meet the system requirements of Windows 11, there will be only one option for you to choose – Release Preview Channel.
And a message appears saying “Your PC does not meet the minimum hardware requirements for Windows 11. Your device may continue to receive Insider Preview builds until Windows 11 is generally available, at which time it is recommended to clean install to Windows 10.”
Don’t worry, you can still enroll into the Dev Channel to install Windows 11 on unsupported PCs by changing registry keys.
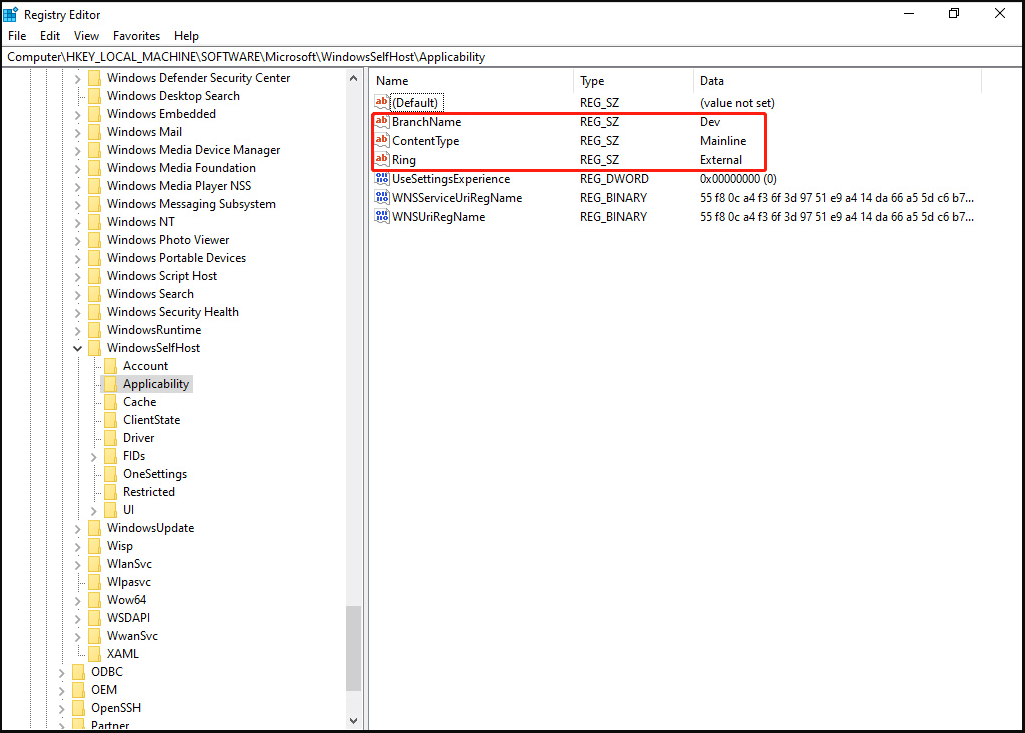
Enroll in the Dev Channel via Registry Editor
- Type regedit to the search box and click Registry Editor to open this tool.
- Go to HKEY_LOCAL_MACHINE\SOFTWARE\Microsoft\WindowsSelfHost\UI\Selection.
- Double-click UIBranch and change its value data to Dev. Also, respectively set the value data of UIContentType and UIRing to Mainline and External.
- Navigate to HKEY_LOCAL_MACHINE\SOFTWARE\Microsoft\WindowsSelfHost\Applicability.
- Double-click the BranchName key and change its value data to Dev.
- Modify the value data of ContentType to Mainline, and set the value data of Ring to External.
- Save all the changes and then restart your PC.
Go to Settings > Update & Security > Windows Insider Program and you should now be in the Dev Channel.
To install a Windows 11 preview build, go to Windows Update and Windows will check for Windows 11 updates. Once it finds available updates, Windows will download and install them. After installing Windows 11 on unsupported hardware/PC, you can start to customize the new system settings based on your likes.
Method 2: Use a Script to Install Windows 11 on Unsupported PC
If you don’t have a Microsoft account, you can still enroll in the Dev Channel of the Windows Insider Program. A script is required.
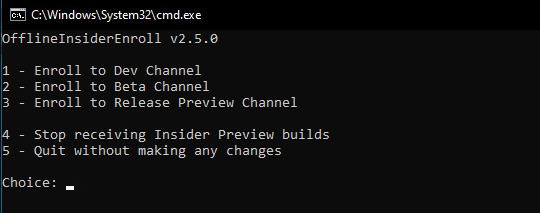
- Go to the GitHub website and download the OfflineInsiderEnroll script.
- Unzip the zip file and right-click the cmd file to choose Run as administrator. This will open a Command Prompt window with some options.
- Type 1 and press Enter to enroll in Dev Channel.
After you go to Windows Insider Program from the Settings menu, you can find something about the enrolling result. Go to Windows Update and start Windows 11 update and installation.
Method 3: Create a Hybrid Installer to Install Windows 11 on Old PCs with Unsupported Hardware
If the above 2 ways cannot work for you to install Windows 11 on unsupported PCs, this way is available for you. Just follow the instructions below.
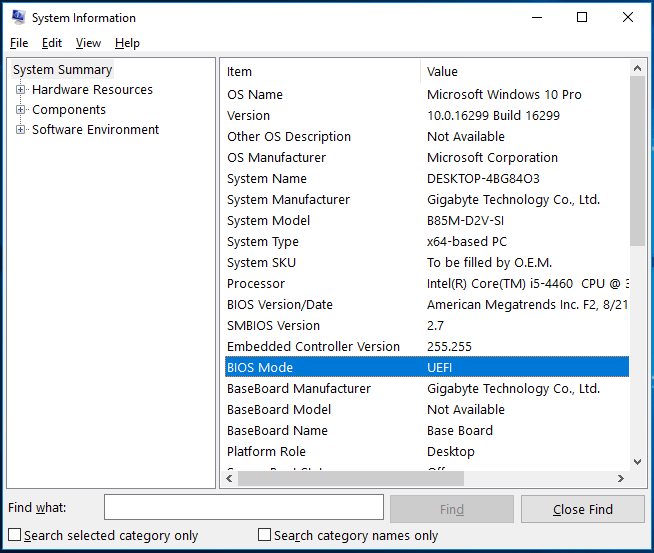
Step 1: Check Boot Mode of Your PC
1. Type Win + R, type msinfo32, and press Enter.
2. Locate BIOS Mode and you can see it is UEFI or Legacy.
Step 2: Burn Windows 10 ISO to a USB Drive
1. Go to download a Windows 10 Insider iso file from the Microsoft website. Or go to https://uupdump.net/ to get an iso file of Windows 10 Insider.
2. Download Rufus and use it to burn the iso file to your USB flash drive.
Tip: If your PC uses UEFI boot, here choose GPT as the partition scheme. If it uses legacy, use MBR.
Step 3: Create a Hybrid Installer
1. Download a Windows 11 Preview Builder iso file from its official website.
2. Open the USB drive where you have burned Windows 10 iso file and go to the Sources folder.
3. Locate install.wim or install.esd, then write down the extension.
4. Rename the file to install1.wim or install1.esd.
5. Go to the location where you have saved the Windows 11 iso file and right-click it to choose Mount.
6. Open the DVD drive and go to the sources folder.
7. Find the file – install.wim or install.esd and see if the extension matches with the one you have noted down. If they are matched, go to the next step.
8. Copy & paste the install file to the source folder from Windows 11 iso to Windows 10 iso.
If you find the extensions differ, for example, Windows 10 has install.esd and Windows 11 has install.wim, you need to perform an extra step – convert the install file to the correct type.
Convert WIM to ESD
There are many ways for you to convert WIM to ESD, for example, using Command Prompt, PowerShell, or a professional converter. If you are not a professional, using a converter is easy. Here, we show you how to use the PowerISO trial edition. Just get it from the Internet and then install it on your PC.
1. Copy the Windows 11 install.wim file to Desktop.
2. Launch PowerISO to its main interface.
3. Go to Tools > WIM ESD Converter.
4. Under the Convert WIM to ESD section, choose the source WIM file you want to convert and specify a destination path. Then, click Convert to start the conversion.
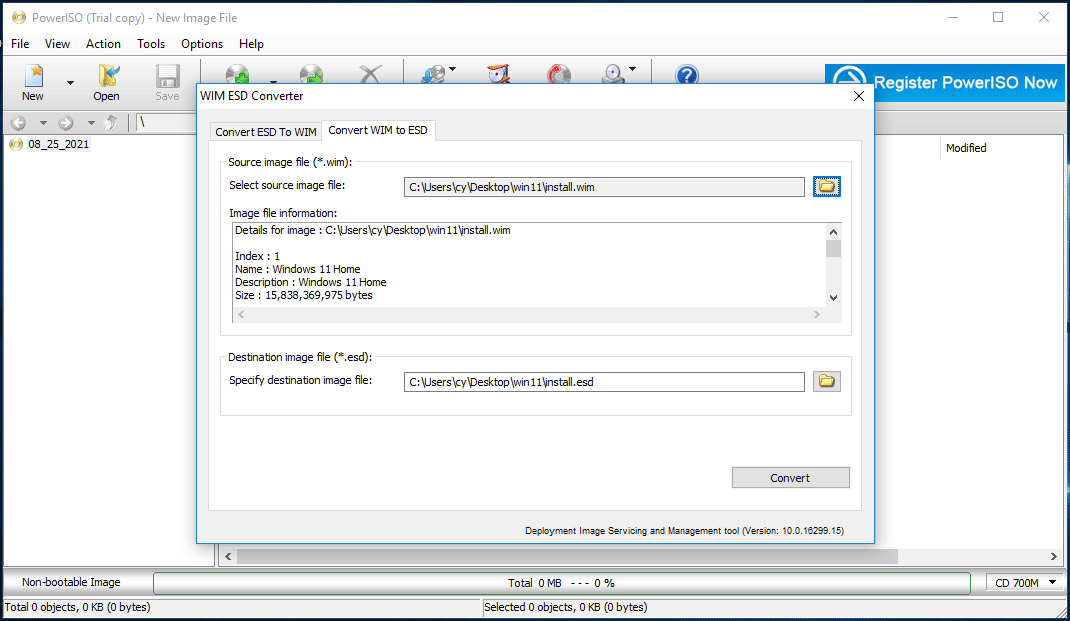
After finishing the conversion, copy the Windows 11 install file to the sources folder of Windows 10. Next, you can install Windows 11.
Step 4: Upgrade or Install Windows 11 on Unsupported PCs
Option 1: Use the Setup.exe to Upgrade to Windows 11
- Open the bootable USB drive and click the setup.exe file.
- Windows will pop up a window and follow the on-screen instructions to finish the update.
Option 2: Install Windows 11 from a USB Drive
- Boot the Windows system from the USB.
- Follow the setup process to finish the Windows 11 installation.
If the setup fails, follow the fix:
1. Reboot the system to the first screen of the USB drive setup.
2. Press Shift + F10 to open Command Prompt.
3. Type regedit and press Enter.
4. Go to File > Load Hive.
5. Click This PC and locate your system drive. Go to C:\Windows\System32\config. Note that the system drive may not be C drive.
6. Double-click the SYSTEM file and enter a key name – SYSTEM1. Then, click OK. Also, do the same thing to SOFTWARE.
7. Go back to Registry Editor and navigate to this path: HKEY_LOCAL_MACHINE\SYSTEM1\Setup.
8. On the left side, make some changes to the value data of some keys:
- CmdLine blank (nothing in the Value data field)
- OOBEInProgress 0
- RestartSetup 0
- SetupPhase 0
- SetupType 0
- SystemSetupInProgress 0
9. Go to another path: HKEY_LOCAL_MACHINE\SOFTWARE1\Microsoft\Windows\CurrentVersion\OOBE.
10. Create two new keys – SkipMachineOOBE and SkipUserOOBE by right-clicking the empty area and choosing New > DWORD (32-bit) Value. Double-click each key and set the value data of both to 1.
Since the initial post-install setup for Windows is disabled, you need to create a user account manually by following the steps below.
- Open Command Prompt, type copy C:\Windows\System32\Utilman.exe C:\ and press Enter. Replace the C drive with your system drive.
- Type copy /y C:\Windows\System32\cmd.exe C:\Windows\System32\Utilman.exe and press Enter to replace the Utilman program.
- Restart your PC.
- Run CMD again and perform this command – wpeutil reboot to let Windows restart normally.
- You can only see the Other User option on the login screen. Just click Accessibility to get Command Prompt.
- Perform the command – net user /add USERNAME PASSWORD. Use your user name and password.
- Run this command – net localgroup administrators USERNAME /add.
- Reboot your PC from the USB drive again.
- Launch Command Prompt via Shift + F10 and then perform this command – copy /y C:\Utilman.exe C:\Windows\System32\Utilman.exe.
- Reboot the PC and now you can log in to the system and finish Windows 11 setup settings. Later, safely delete the Utilman.exe file from the C drive.
Method 4: Replace the Compatibility Check File to Install Windows 11 on Unsupported PC
This way is more like a supplement to methods 1 and 2. If you run into compatibility check issues, try to replace the appraisererrer.dll file in the Windows 11 setup with the one in the older version of Windows 10 and then install this new operating system.
Step 1: Extract File from Windows 10 ISO
- According to users, some issues appear when trying build 21354 and build 19043. To make sure success, you can download Windows 10 build 17763 iso file from the Internet.
- Right-click the iso file and mount it as a drive. Open this drive, go to the sources folder and copy the appraiserres.dll file to Desktop.
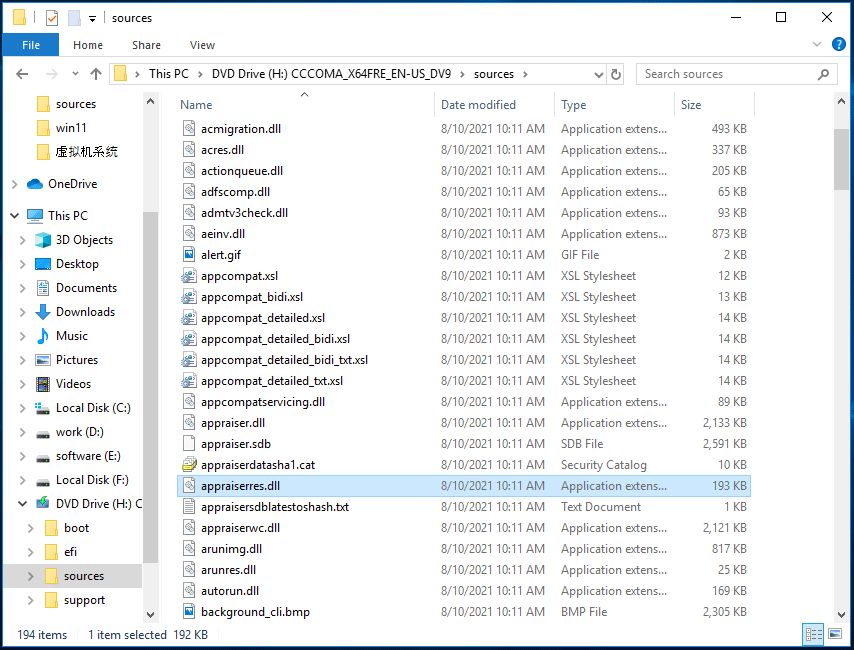
Step 2: Replace Appraisererrer.dll in Windows 11
Option 1: Copy the File to the Windows 11 Setup (Windows Update)
- Go to C:\$WINDOWS.~BT\Sources in File Explorer.
- Rename the appraiserres.dll file as appraiserres1.dll.
- Copy the appraiserres.dll file you have extracted from Windows 10 iso to the folder.
- Go to C:\$WINDOWS.~BT and double-click the setup.exe file to finish operations.
Option 2: Copy the File to the Windows 11 Setup (Windows ISO)
- Download a Windows 11 iso file and burn it to a flash drive using Rufus.
- Go to the sources folder, rename the appraiserres.dll file as appraiserres1.dll.
- Replace the appraiserres.dll file with the one you have got.
- Double-click Setup.exe to start the installation of Windows 10.
Before you upgrade, you had better disable Check for updates since this may lead to installation failure. Then, finish the setup.
Final Words
That’re all the methods to install Windows 11 on unsupported PCs/hardware. Try one way if your computer is not compatible with this new operating system. Of course, we cannot guarantee that this post will continue to apply to Windows 11 as the new preview builds and the final version are released by Microsoft.
If you have any suggestions, send an email to [email protected] or leave a comment below.
Applies ToWindows 11
Important:
Updated December 12, 2024
This support article was originally published on October 4, 2021, when Windows 11 was first released to the public. At the time of publication and still today, the intention behind this support page is to detail considerations for customers to understand the implications of installing Windows 11 against Microsoft’s recommendation on devices that don’t meet system requirements for Windows 11. If you installed Windows 11 on a device not meeting Windows 11 system requirements, Microsoft recommends you roll back to Windows 10 immediately.
Windows 11 minimum system requirements remain unchanged and can be found in the article Windows 11 specs, features, and computer requirements.
Installing Windows 11 on a device that doesn’t meet Windows 11 minimum system requirements isn’t recommended. If Windows 11 is installed on ineligible hardware, your device won’t receive support from Microsoft, and you should be comfortable assuming the risk of running into compatibility issues.
Devices that don’t meet these system requirements might malfunction due to compatibility or other issues. Additionally, these devices aren’t guaranteed to receive updates, including but not limited to security updates.
The following disclaimer applies when attempting to install Windows 11 on a device that doesn’t meet the minimum system requirements:
This PC doesn’t meet the minimum system requirements for running Windows 11 — these requirements help ensure a more reliable and higher quality experience. Installing Windows 11 on this PC is not recommended and may result in compatibility issues. If you proceed with installing Windows 11, your PC will no longer be supported and won’t be entitled to receive updates. Damages to your PC due to lack of compatibility aren’t covered under the manufacturer warranty. By selecting Accept, you are acknowledging that you read and understand this statement.
Supported ways to move to Windows 11
To learn about supported ways to move to Windows 11 and follow Microsoft’s recommendations, see the following articles:
-
Getting ready for the Windows 11 upgrade.
-
Upgrade to Windows 11: FAQ.
Rolling back to Windows 10
When Windows 11 is installed on a device that doesn’t meet the minimum system requirements, a watermark is added to the Windows 11 desktop. A notification might also be displayed in Settings to advise that the system requirements aren’t met.
If a device that doesn’t meet the minimum system requirements for Windows 11 experiences issues after upgrading to Windows 11, Microsoft recommends going back to Windows 10.
To go back to Windows 10 on an unsupported Windows 11 device, follow these steps:
-
On the Windows 11 unsupported device:
-
Right-click on the Start menu and select Settings > System > Recovery.
Or
-
Select the following Recovery shortcut:
Recovery
-
-
In the System > Recovery window that opens, under Recovery options, next to Go back select the Go back button.
Note: If there isn’t a Go back section or button under Recovery options, going back to Windows 10 is no longer possible. The Go back option is only available for 10 days following an upgrade to Windows 11, after which time the files needed to perform this function are removed to free up disk space on the device.
-
If the User Account Control window appears, select the Yes button. If the User Account Control window asks for an admin user name and password, enter a user name and password of an account that has administrator privileges. Once the user name and password are entered, select the Yes button.
-
In the Go back to Windows 10 window that opens, select the Next button
-
In the Check for updates? window, select the No, thanks button.
-
In the What you need to know window, read the information in the window and then select the Next button.
-
In the Don’t get locked out window, read the information in the window. If the password to sign into Windows 10 is known, select the Next button. Otherwise select the Cancel button to cancel going back to Windows 10 until the password can be reset.
-
In the Thanks for trying Windows 11 window, select the Go back to Windows 10 button.
Windows proceeds going back to Windows 10.
Related articles
Upgrade to Windows 11: FAQ.
Getting ready for the Windows 11 upgrade.
Ways to install Windows 11.
Managing Windows 11 «System requirements not met» message in your organization.
Need more help?
Want more options?
Explore subscription benefits, browse training courses, learn how to secure your device, and more.
- Home
- Blog
-
Step-by-Step Procedure to Install Windows 11 on Unsupported Hardware
/
/

Windows 11 is one such operating system that doesn’t require an introduction. If somebody doesn’t know about Microsoft and Windows operating systems, he might not be from this planet. Rather than wasting time to talk about the Windows 11 operating system, let’s talk about one of the most common concerns most people are worried about, especially those who have PCs older than 2018 or earlier. We are talking about the installation of Windows 11 on older PCs. With the release of Windows 11, Microsoft set some new hardware requirements to install Windows 11, which kept many old computers away from Windows 11. Let’s discuss what are those special requirements and how to install Windows 11 by bypassing them, what are the different ways to install Windows 11 on unsupported hardware, and finally, how to upgrade Windows 11 on unsupported hardware.
If you are not aware, Microsoft announced the Windows 10 end-of-life (EOL) date, it’s October 2025. This doesn’t mean that your Windows 10 will stop working on Oct 2025, but Microsoft will no longer provide official support for Windows 10 or it may stop releasing OS updates. So, it is recommended to go to the new operating system, for now, Windows 11, before the EOL of Windows 10. Well, you may say that there is plenty of time to do so, but our answer is if you delay this, you are going to miss a lot of new features and security updates. Before we jump into the actual problem, let’s see what are the basic requirements to install Windows 11.
What are the Basic Requirements to Install Windows 11?
As per Microsoft, your machine should have all these things required to install Windows 11.
-
Processor: 1 GHz or faster with 2 or more cores on a compatible 64-bit processor. Intel 8th gen Coffee Lake or newer or AMD Zen 2 or newer required. Older processors like Intel 7th gen or AMD Zen 1 won’t work.
-
RAM: 4 GB minimum. 8GB is recommended.
-
Storage: 64 GB minimum on the system drive. NVMe SSD is recommended for best performance.
-
System Firmware: UEFI, Secure Boot capable. Legacy BIOS systems are not supported.
-
TPM: Trusted Platform Module (TPM) version 2.0. This is for enhanced security and encryption.
-
Graphics card: DirectX 12 compatible with WDDM 2.0 driver. Integrated graphics fine on recent Intel, AMD, and Qualcomm chips.
-
Display: 720p display 9″ or larger.
-
Internet connection: Required for Windows 11 installation and updates.
Check out the Windows 11 supported Intel Processors here: https://learn.microsoft.com/en-gb/windows-hardware/design/minimum/supported/windows-11-22h2-supported-intel-processors
Check out the Windows 11 supported AMD Processors here: https://learn.microsoft.com/en-gb/windows-hardware/design/minimum/supported/windows-11-22h2-supported-amd-processors
What Blocks Older PCs from Installing Windows 11?
While many PCs and laptops can upgrade to Windows 11, some older devices don’t meet the minimum hardware requirements set by Microsoft. The two main things often blocks include, not having a TPM 2.0 module or an unsupported CPU.
These are a few key things that commonly prevent older PCs from being able to install Windows 11:
-
Processor: Windows 11 requires at least an Intel 8th gen or AMD Zen 2 CPU. Older CPUs like 7th gen Intel or AMD Zen/Excavator won’t work. This tends to be the biggest blocker.
-
TPM 2.0: The Trusted Platform Module is used for enhanced encryption and security. Windows 11 requires TPM 2.0, but many older PCs only have TPM 1.2 or no TPM chip at all.
-
Secure Boot: Windows 11 requires UEFI firmware with Secure Boot enabled. Older PCs may have legacy BIOS instead of UEFI or have UEFI without Secure Boot.
-
RAM: While 4GB RAM is the minimum, 8GB is recommended for a smooth experience. Older systems may only have 2-4GB installed.
-
Storage: The OS drive needs at least 64GB. Some older systems may have small 128-256GB hard drives that don’t meet this.
-
Graphics: Windows 11 requires a DirectX 12 capable GPU. Very old integrated graphics may not support DX12.
How to Check Your PC is Compatible with Windows 11?
Microsoft has released a free tool “Health Check App” that helps you check your PC is compatible with Windows 11. You can download and install this small program from Microsoft’s website.
Once installed, open the PC Health Check app, and it will start scanning your computer’s components. It will look at your CPU model, how much RAM you have installed, your TPM version, firmware type, storage space, graphics driver, and other factors.
The app compares these against the minimum and recommended specifications for Windows 11. When the scan completes, it will show you an overall compatibility report.
So the Microsoft PC Health Check app simplifies validating if your current computer meets Windows 11 requirements. It can save you time over manually checking each hardware spec individually.
What are the Different Ways to Install Windows 11 on Unsupported Hardware?
Video Source:
Just because your computer doesn’t meet the official requirements doesn’t mean you can’t install Windows 11. There are a few methods that allow you to get around the hardware checks and upgrade or clean install Windows 11, even on unsupported devices.
Rufus USB Method
One option to get Windows 11 running on incompatible hardware is to use a handy little tool called Rufus. This utility allows you to take the Windows 11 ISO download from Microsoft and modify it to create a bootable USB installer drive.
Rufus injects some tweaks into the ISO that will automatically bypass the hardware checks for things like TPM 2.0 and CPU generation during the installation. So you can boot the Rufus-modified USB drive and cleanly install Windows 11, even on an unsupported PC.
In-Place Upgrade Method
Another method is to upgrade your existing Windows 10 installation to Windows 11. You can download the official Windows 11 ISO, mount it as a virtual drive in Windows 10, and then edit the registry to allow the upgrade to proceed on unsupported hardware.
Microsoft actually provides registry edit steps for this unofficially on their site. Once the registry hack is in place, you can launch the Windows 11 installer within Windows 10. Choosing the “keep files and apps” option will then upgrade Windows 10 to Windows 11 while retaining your data.
Manual Registry Edit
More advanced users can try booting the unmodified Windows 11 installer USB, pressing Shift+F10 to open a command prompt, and using the Regedit tool to manually edit the registry to bypass hardware checks. Once the edits are complete, restart the setup process and complete the clean install as normal.
However, in this post, We will walk you through two different ways to install Windows 11 on unsupported hardware:
-
Method 1: Clean Install with Rufus
-
Method 2: In-Place Upgrade from Windows 10
We will also cover the risks and disclaimers you need to be aware of before trying this. Let’s get started!
Download the Windows 11 ISO
The first step for either installation method is getting the Windows 11 ISO file. This is the installer image we’ll use to upgrade or clean install Windows 11.
To download the ISO, go to Microsoft’s website and click the “Download Now” link underneath “Download Windows 11 Disk Image (ISO) for x64 devices.” Make sure to pick the 64-bit version.
The file is around 5GB in size, so allow time for the download. I recommend saving it in a dedicated folder. We’ll need this file for both installation methods.
Method 1: How to Install Windows 11 on Unsupported Hardware?
Our first method of installing Windows 11 on unsupported hardware will be doing a clean install using a handy utility called Rufus. This will completely wipe your computer and do a fresh Windows 11 setup.
Step 1. Download Rufus
Rufus is a small program for Windows that allows you to take an ISO file and turn it into a bootable USB drive. It’s often used to create bootable USB installations of operating systems like Windows or Linux.The key reason we’ll use Rufus here is that it can modify the Windows 11 ISO to automatically add registry tweaks that bypass the hardware checks during installation. This allows the setup to proceed even on unsupported hardware.
To get Rufus, visit rufus.ie and download the latest version. It’s a small ~1.4 MB download.
Step 2. Bypass the minimum requirements to create Windows 11 bootable USB
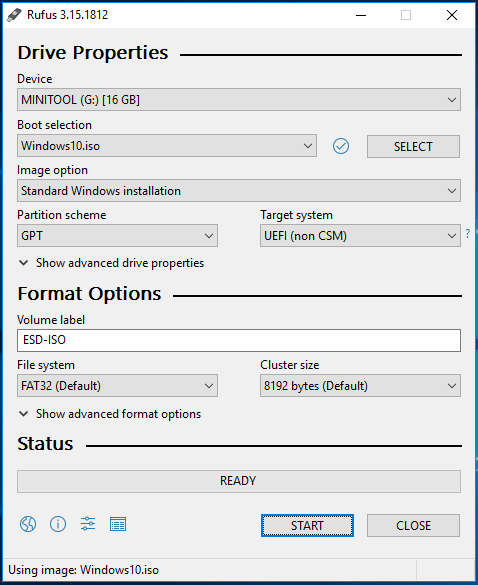
With the Windows 11 ISO file and Rufus downloaded, insert a blank USB flash drive into your computer. This will become your Windows 11 installer drive. The drive needs to be at least 8GB in size, and any data will be deleted.
Launch Rufus, and you’ll see it automatically picked up my USB drive. Under “Boot Selection” click SELECT and choose the Windows 11 ISO file you downloaded earlier. As soon as you click on the “Start” button, a window with a few more options will pop up. This is the most critical step where you will bypass the minimum requirements.
Keep all the other Rufus settings on default, except make sure to check the box for “Remove Requirements…” as shown below:
Step 3. Create the Windows 11 bootable USB
Finally, click START in Rufus to turn the USB drive into a Windows 11 installer. This will take several minutes to complete.
Step 4. Install Windows 11
With the installer drive ready, it’s time to do the clean install. This will wipe all data from the PC so make sure to back up anything important first!
To start, insert the installer USB and reboot the computer. You’ll need to bring up the boot menu to select the USB drive as the temporary boot device.
On my Dell, I pressed F12 on boot to get the menu. On an HP, you may press ESC or F9. Refer to your computer’s manual for the proper keystroke. Select the USB drive and boot from it.
You’ll be entered into the Windows 11 installer. Click “Install Now” to begin the clean install. Make sure to choose “Custom Install” rather than Upgrade when prompted.
The tweaks in the installer USB will automatically bypass hardware checks. Follow the rest of the on-screen prompts to finish the Windows 11 clean install.
After the installation, Windows 11 should be up and running on your unsupported hardware! Just be aware of the risks outlined later in this guide.
Refer to these blog posts to install Windows 11. We are not going to repeat the whole installation process here. Because it doesn’t matter a lot whether you install Windows 11 on a virtual platform or physical machine. The installation process remains the same.http://thesecmaster.com/step-by-step-procedure-to-install-windows-11-on-vmware/
http://thesecmaster.com/how-to-run-windows-11-on-mac-using-vmware-fusion/
That’s it!
Method 2: How to Upgrade to Windows 11 on Unsupported Hardware?
If you don’t want to wipe your computer, the second method we’ll cover is upgrading to Windows 11 directly from a Windows 10 installation. This retains all your apps, data, and settings.
We’ll need to edit the registry to bypass hardware checks, following official but not recommended steps from Microsoft.
Step 1: Mount the Windows 11 ISO
Download the Windows 11 ISO file from Microsoft if you don’t have it already. Right-click the ISO and select “Mount”. This will mount it as a virtual DVD drive on your system. If you don’t see the Mount option, use an application like WinRAR or PowerISO to browse the files inside the ISO file.
Open the mounted drive, right-click setup.exe and select Run as Administrator. On the first window, click Next.
The setup will check for compatibility issues and fail on unsupported hardware. Click Close when it fails – this sets up the registry keys we need.
Step 2: Edit the Registry
Next, we’ll manually edit the registry to bypass hardware checks. Press Windows+R to open the Run dialog and type regedit.
Navigate to:
HKEY_LOCAL_MACHINE\SYSTEM\Setup\MoSetup
Right-click the MoSetup folder and select New > DWORD. Name it AllowUpgradesWithUnsupportedTPMorCPU and press Enter.
Double-click the new key and set its Value Data to 1. This enables the registry hack.
Check out Microsoft’s article “Ways to install Windows 11” for registry settings.
Step 3: Start the Upgrade
Now rerun the Windows 11 setup exe again as Administrator. This time, when it checks compatibility, it should proceed.
Make sure to pick “Keep personal files and apps” on the next screen. The upgrade will now proceed, retaining your data but replacing Windows 10 with Windows 11.
Afterwards, your original Windows 10 applications and files should all still be available in Windows 11. You’ve successfully upgraded to Windows 11 on unsupported hardware! That’s it.
Risks Associated with Installing Windows 11 on Unsupported Hardware
Before you attempt either installation method, it’s important to understand the risks involved. We should warn you that we are not responsible for the installation process. You should try it on your own risk.
You should be aware of these risks before proceeding with installation:
-
Microsoft does not recommend or support installing Windows 11 on unsupported PCs. You may encounter crashes, bugs, or compatibility issues.
-
Your computer will no longer pass Windows 11 compatibility checks. Microsoft can refuse to provide updates in the future.
-
There is a small chance of data loss when trying these methods. Make sure your important files are backed up.
-
Future Windows updates may re-enable hardware checks and prevent Windows from booting.
Officially, you should only install Windows 11 on supported hardware. That said, millions of people are running Windows 11 on unsupported devices with few issues so far. Just be aware of the risks before proceeding.
Will Microsoft Block Updates?
A big question is whether Microsoft will cut off Windows Updates for unsupported hardware running Windows 11. So far, they have continued providing normal updates to these systems.
Windows 11 has only been out since August 2021, however there is still a possibility Microsoft could change policy and prevent updates in the future.
Again, make sure you fully understand the risks. Installing Windows 11 on incompatible hardware is not officially recommended or supported by Microsoft.
Signs Your Hardware May Not Work
These registry tweaks and tools can bypass hardware checks, but that doesn’t guarantee Windows 11 will work properly on your system. Very old computers may still have trouble running Windows 11.
Warning signs include:
-
Frequent crashes or blue screens after installing Windows 11.
-
Severe performance issues or lag when running apps.
-
Critical driver errors for components like network adapters, graphics cards or storage.
-
General instability, freezes or failure to boot.
If you experience any of the above, Windows 11 may be too much for your aging hardware to handle. You can still revert back to Windows 10 following the clean install or upgrade.
Bypassing Other Requirements
This guide focused on the two primary compatibility issues – lack of TPM 2.0 and an unsupported CPU. But there are a few other minimum requirements to run Windows 11:
-
RAM: 4GB minimum
-
Storage: 64GB minimum
-
System Firmware: UEFI + Secure Boot
-
Graphics Card: DirectX 12 compatible
-
Display: 720p display greater than 9″ diagonally
The Rufus method can bypass RAM and Secure Boot checks. But you’ll still need a UEFI firmware, 64GB drive, DX12 GPU, and 720p display at a minimum.
Very old computers may fail to work properly even if you somehow bypass all requirements. Again, proceed at your own risk when installing Windows 11 on unsupported PCs.
Bottom Line
I hope this guide covered the main methods for installing Windows 11 on unsupported hardware. To recap:
-
Download the Windows 11 ISO from Microsoft.
-
For a clean install, use Rufus to make an installer USB with tweaks.
-
For in-place upgrade, edit the registry to bypass checks.
-
Understand Microsoft does not recommend this, and you proceed at your own risk.
It remains to be seen if Microsoft will actively block updates for these systems. But so far they seem to be allowing it with just a warning.
Let me know in the comments if you successfully installed Windows 11 on an older unsupported PC! I’m curious to hear your experiences. Thanks for reading!
We hope this post helps you learn what are those special requirements and how to install Windows 11 by bypassing them, what are the different ways to install Windows 11 on unsupported hardware, and finally, how to upgrade Windows 11 on unsupported hardware.
We thank you for reading this blog post. Visit our website, thesecmaster.com, and social media pages on Facebook, LinkedIn, Twitter, Telegram, Tumblr, & Medium and subscribe to receive updates like this.
You may also like these articles:
Arun KL
Arun KL is a cybersecurity professional with 15+ years of experience in IT infrastructure, cloud security, vulnerability management, Penetration Testing, security operations, and incident response. He is adept at designing and implementing robust security solutions to safeguard systems and data. Arun holds multiple industry certifications including CCNA, CCNA Security, RHCE, CEH, and AWS Security.
Guide
When you purchase through links on our site, we may earn an affiliate commission. Here’s how it works.
· Hot!

Microsoft released Windows 11 version 24H2 earlier this month, and we have already published a guide on how to update without waiting in a long line. However, that guide is only for supported systems that meet Windows 11’s hardware requirement. What if you have an unsupported computer, but you still want to try Windows 11 version 24H2? Here are three ways to get it.
Important: There are no workarounds systems with processors that do not support SSE4.2 instructions. Windows 11 version 24H2 will not boot on such systems, so the only option is to install Windows 11 version 23H2 or older, as described in this guide (the Windows Insider method also won’t work).
Quick links:
- I want to update my unsupported PC to Windows 11 version 24H2
- Option 1 (easy)
- Option 2 (slightly more complicated)
- I want to clean-install Windows 11 version 24H2 on an unsupported PC
How to update an unsupported PC to Windows 11 version 24H2?
Sadly, some of the previous tricks, such as the setup.exe /product server command or Compatibility Troubleshooter for the Windows 11 Installation Assistant, no longer work in Windows 11 version 24H2. The first returns an «unknown command» error, while the second throws another error in the preparation stage.
Fortunately, there are still ways to update an unsupported PC to Windows 11 version 24H2 without using third-party applications.
Here is a simpler method that is very similar to the old setup.exe /product server command. The idea is the same, but the command is slightly different.
- Go to the official Windows 11 website and download a Windows 11 24H2 ISO.
- Mount the image and go to the Sources folder.
- Hold the Shift key and right-click a blank space, then select «Open PowerShell window here.»

- In the PowerShell window, type cmd and press Enter.
- Type setupprep.exe /product server and press Enter.
- Follow the on-screen instructions in a new window. Note that although the setup screen shows «Windows Server,» you are still installing a regular edition that matches your current SKU.


That is it.
Here is another slightly more complicated method that involves editing the system registry. If you are not comfortable with that, stick to the first option.
- Press Win + R and type regedit to launch Windows Registry Editor.
- Paste the following into the address bar: HKLM\SOFTWARE\Microsoft\Windows NT\CurrentVersion\AppCompatFlags.
- Click Edit > New > Key and rename it to HwReqChk.
- Click Edit > New > Multi-string Value.
- Rename the new value to HwReqChkVars.
- Double-click the value and paste the following:
SQ_SecureBootCapable=TRUE
SQ_SecureBootEnabled=TRUE
SQ_TpmVersion=2
SQ_RamMB=8192
Ignore the error message about empty strings.
- Save the changes.
- Download Windows 11 version 24H2 ISO from the official website and mount the image.
- Click setup.exe and follow the on-screen instructions.


How to install Windows 11 24H2 on an unsupported PC?
Note: One of the older methods described in this article (the one with merging a reg file) no longer works.
- Download the Windows 11 version 24H2 image from the official website.
- Download Rufus from its website. It is a free, open-source app for creating bootable media.
- Connect your USB drive and open Rufus.
- Select the drive from the Device drop-down list.
- Select «Disk or ISO image» and click Select.
- Find the Windows 11 24H2 image and then leave everything else in the app as is.
- Click Start.
- Check the «Remove requirement for 4GB+ RAM, Secure Boot, and TPM 2.0» option. Without it, Windows 11 24H2 will not install on your computer.
- Wait for the app to finish the process.

Once everything is done, restart your computer and boot from the USB drive. The setup app will let you install Windows 11 without issues on an unsupported computer with an older processor or no TPM/Secure Boot.
24H2 image background by INESby on Pixabay.