
Installing a virtual machine on Windows 10 is a straightforward process that allows users to run different operating systems on their computer without altering the primary OS. By utilizing third-party software such as VirtualBox or VMware, you can create a simulated computer environment within your existing Windows system. This guide will walk you through the steps to set up a virtual machine, covering everything from downloading the necessary software to launching your first virtual session.
Installing a Virtual Machine on Windows 10
In this guide, we’ll install a virtual machine on Windows 10 using VirtualBox, a popular and free software option. Follow these steps to get started with your virtual environment.
Step 1: Download VirtualBox
First, go to the VirtualBox website and download the latest version of VirtualBox for Windows.
Downloading VirtualBox is the first step to getting your virtual machine up and running. VirtualBox is a trusted application that simulates a computer within your computer.
Step 2: Install VirtualBox
After downloading, open the installer file and follow the on-screen instructions to install VirtualBox on your computer.
The installation process is simple and similar to installing any other software on Windows. Make sure to grant necessary permissions and choose default settings unless you have specific preferences.
Step 3: Download an Operating System ISO
Find and download the ISO file for the operating system you want to run on your virtual machine, like Linux or another version of Windows.
An ISO file is a digital copy of an operating system’s disc. Many Linux distributions are freely available online, while other OS might require a purchase.
Step 4: Create a New Virtual Machine
Open VirtualBox, click ‘New,’ and follow the prompts to create a new virtual machine. Select your downloaded ISO file when prompted for an installation disc.
During this step, you’ll name your virtual machine and choose system resources like memory and storage size. You’ll also specify the operating system type.
Step 5: Start the Virtual Machine
Once your virtual machine is set up, click ‘Start’ to launch it. Your new operating system will boot up in a separate window.
Starting the virtual machine initiates the OS installation process within VirtualBox. Follow the standard installation steps for your chosen OS.
Once you complete the installation, your new virtual machine will run alongside your existing Windows 10 system. You can switch between the two as needed, experimenting with different configurations and software on the virtual machine without affecting your main computer.
Tips for Installing a Virtual Machine on Windows 10
- Ensure your computer’s hardware can support virtualization. Check the BIOS settings to enable virtualization technology.
- Allocate resources wisely. Don’t assign too much RAM or CPU to the virtual machine, as it might slow down your main system.
- Keep software updated. Regularly check for updates for VirtualBox and guest additions.
- Use snapshots. Take snapshots of your virtual machine to save its state. This comes in handy if you need to revert to a previous setup.
- Explore network settings. VirtualBox allows different networking modes; experiment with these to suit your needs.
Frequently Asked Questions
What is a virtual machine?
A virtual machine is a software-based simulation of a physical computer. It allows multiple operating systems to run on a single hardware platform.
Can I run any operating system on a virtual machine?
Most operating systems can run on a virtual machine, but it’s essential to check compatibility with the virtual machine software.
Is VirtualBox free to use?
Yes, VirtualBox is open-source software, which makes it free for personal and educational use.
How do I delete a virtual machine?
In VirtualBox, right-click on the virtual machine you wish to delete, choose ‘Remove,’ and decide whether to delete all files.
Do I need a separate license for Windows on a virtual machine?
Yes, running Windows on a virtual machine requires a separate license from your primary Windows installation.
Summary
- Download VirtualBox.
- Install VirtualBox.
- Download an OS ISO.
- Create a new virtual machine.
- Start the virtual machine.
Conclusion
Installing a virtual machine on Windows 10 opens up a world of possibilities for tech enthusiasts and professionals alike. Whether you’re testing software, learning about a new operating system, or just tinkering, a virtual machine provides a safe and isolated environment. You can explore without fear of damaging your primary OS. As you become more familiar with virtual machines, you’ll discover advanced features and configurations that could enhance your computing experience.
For those looking to dive deeper, consider exploring other virtual machine software like VMware or Hyper-V, which offer additional features and capabilities. With a virtual machine, the boundaries of your digital world expand, and the only limit is the hardware you have at your disposal.
Now that you know how to install a virtual machine on Windows 10, why not give it a try and see what new opportunities you can unlock?
Matt Jacobs has been working as an IT consultant for small businesses since receiving his Master’s degree in 2003. While he still does some consulting work, his primary focus now is on creating technology support content for SupportYourTech.com.
His work can be found on many websites and focuses on topics such as Microsoft Office, Apple devices, Android devices, Photoshop, and more.
If you need to run more than one operating system on your laptop or PC there are several ways to do it. You can have separate hard drives for each OS, and connect only the one you need before you press the power button. Or, you can dual-boot two or more operating systems on the same hard drive, with each version of Windows or Linux – say – in its own partition. Here, though, we’ll show you how to install another operating system in a virtual machine so you can start it up on your Windows desktop whenever you need it. No need to reboot, no need to have multiple hard drives or separate partitions. Plus, it’s free!
What is a virtual machine?
A Virtual Machine is exactly what it sounds like. It’s like having a second PC or laptop, but instead of being a physical thing, it’s software.
On a virtual machine you can run any operating system you like, so long as it’s compatible with the virtualisation software you’re using. It could be a second copy of Windows 10, but it could also be a Linux distribution or an older version of Windows.
The benefit of a virtual machine is that you can try out a new OS without affecting your files, or you can install and test apps without the risk of messing up your real Windows 10 installation.
You can also create multiple virtual machines, meaning you can run Windows 10, Ubuntu, Fedora and other operating systems and swap quickly between them.
Virtual machines (VMs) can be quite resource hungry, so you might want to avoid having all of those operating systems open at once, or your machine may slow to a crawl. RAM tends to be the main bottleneck for performance with VMs.
How do I install Hyper-V on Windows 10?
There are several well-known VM programs available, but probably the best place to start is with
Oracle VM Virtualbox, which is free.
However, the 64-bit versions of Windows 10 Pro, Enterprise and Education have Hyper-V built in which means you don’t need additional software such as Virtualbox, but you may have to enable it first.
Type ‘Hyper-V’ in the search box and then click on ”Turn Windows features on or off’ if it appears. Then tick the box next to Hyper-V in the list.

Once Hyper-V is installed, you’ll need to reboot your laptop or PC.
How do you set up a virtual machine on Windows 10?
First, you’ll need enough free hard drive space to install the operating system of your choice. You’ll also need that operating system, typically as an ISO file. If relevant, you’ll also need a licence / product key for it.
Windows will generally work for a short period before it demands activation, but you could also download the
Windows 10 Enterprise 90 day evaluation ISO which may give you enough time to do what you need to do.
If you have Hyper-V and the latest Windows 10 Update, then it’s simply a case of searching for Hyper-V Quick Create and following the on-screen instructions (you can select your own image source if you don’t want to use one of the supplied ones).
For those who can’t or don’t want to use Hyper-V, download and install
Virtualbox, which is the software we’ll use here. It’s a similar process in pretty much all virtualisation software, though.
Launch Virtualbox and you’ll be presented with a mostly empty menu welcoming you to the software. To create a new Virtual Machine you’ll first need to click on the New icon in the top left corner of the window. Next you’ll be asked to name the VM and select which type it is from the drop-down menus. We’re installing Windows 10 here, but you can choose between Linux, BSD, Solaris, IBM OS/2, Mac OS X or Other (which includes DOS).

After selecting your operating system and the exact version you’ll need to allocate the Memory size that the VM will have access to. VirtualBox will recommend an amount, and we suggest you go with that then click next.
Now you’ll be asked if you wish to add a virtual drive for the VM. Agree to this by clicking the Create button, then select VDI (Virtual Disk Image) from the list, click next, then select the Fixed Size option on the next page. Finally you’ll be asked to name the drive and confirm it’s size (again go with the recommended amount). Click Create to complete the process.

When the virtual drive has been created you can now begin installing your operating system. To do this click the Start arrow. In the window that appears (Select start-up disk) click on the folder to the right of the drop-down menu that appears next to ‘Empty’. Here you can navigate to the Windows 10 ISO file that you downloaded earlier.

Once you’ve selected the ISO click Start and the OS will be installed on your virtual machine. Once that’s done, you can use your virtual operating system in a Window, just like any other app. To shut it down, click the File menu and choose ‘Close’ and then ‘Save the machine state’.
In some instances we have seen compatibility issues with certain PCs. Solutions range from needing to update the BIOS to disabling Hyper-V on your system. If you do encounter any errors, then the best thing is to enter any error codes into Google and hunt down the solution that is relevant for your specific system, as there would obviously be too many possibilities to list in this article.
Installing a Virtual Machine on Windows 10: A Step-by-Step Guide
Introduction
Virtualization has become an essential tool for developers, IT professionals, and individuals who need to run multiple operating systems on a single machine. Windows 10, being a powerful operating system, supports virtualization through its Hyper-V feature. In this article, we will guide you through the process of installing a virtual machine on Windows 10.
Hardware Requirements
Before you start, make sure your computer meets the minimum hardware requirements for virtualization:
- CPU: Intel Core i3 or AMD equivalent
- RAM: 4 GB or more
- Storage: 20 GB or more of free disk space
- Graphics: Integrated graphics or a dedicated graphics card
- Network: A stable internet connection
Software Requirements
You will need the following software to install a virtual machine on Windows 10:
- Hyper-V: The built-in virtualization software on Windows 10
- Virtual Machine Software: A virtualization software such as VMware, VirtualBox, or Microsoft Hyper-V Converter
- Operating System: The operating system you want to install the virtual machine on
Installing Hyper-V
To install Hyper-V on Windows 10, follow these steps:
- Go to the Control Panel: Click on the Start button and select Control Panel.
- Click on System and Security: In the Control Panel, click on System and Security.
- Click on Advanced: In the System and Security window, click on Advanced.
- Click on Virtual Machines: In the Advanced window, click on Virtual Machines.
- Click on Add: In the Virtual Machines window, click on Add.
- Select the Virtual Machine Type: Choose the type of virtual machine you want to install (e.g., Windows 10, Linux, etc.).
- Click on Next: Click on Next.
- Select the Virtual Machine Settings: Choose the settings for your virtual machine, such as the operating system, RAM, and disk space.
- Click on Finish: Click on Finish.
Installing a Virtual Machine
Once Hyper-V is installed, you can install a virtual machine on it. Here’s how:
- Select the Virtual Machine: In the Virtual Machines window, select the virtual machine you want to install.
- Click on Create: Click on Create.
- Choose the Operating System: Choose the operating system you want to install the virtual machine on.
- Select the Virtual Machine Settings: Choose the settings for your virtual machine, such as the operating system, RAM, and disk space.
- Click on Next: Click on Next.
- Select the Virtual Machine Files: Choose the location and file name for the virtual machine files.
- Click on Finish: Click on Finish.
Installing a Virtual Machine Software
You can install virtualization software such as VMware, VirtualBox, or Microsoft Hyper-V Converter on your computer. Here’s how:
- Download the Software: Download the virtualization software you want to install from the official website.
- Run the Installer: Run the installer and follow the prompts to install the software.
- Launch the Software: Launch the virtualization software and follow the prompts to create a new virtual machine.
Creating a Virtual Machine
Once you have installed the virtualization software, you can create a virtual machine. Here’s how:
- Select the Operating System: Choose the operating system you want to install the virtual machine on.
- Select the Virtual Machine Settings: Choose the settings for your virtual machine, such as the operating system, RAM, and disk space.
- Click on Create: Click on Create.
- Choose the Virtual Machine Files: Choose the location and file name for the virtual machine files.
- Click on Finish: Click on Finish.
Configuring the Virtual Machine
Once the virtual machine is created, you can configure it. Here’s how:
- Select the Virtual Machine: Select the virtual machine you want to configure.
- Click on Settings: Click on Settings.
- Choose the Virtual Machine Settings: Choose the settings for your virtual machine, such as the operating system, RAM, and disk space.
- Click on Apply: Click on Apply.
- Click on Save: Click on Save.
Troubleshooting
Here are some common issues you may encounter when installing a virtual machine on Windows 10:
- Hyper-V Not Recognized: Check that Hyper-V is installed and enabled in the Control Panel.
- Virtual Machine Not Recognized: Check that the virtual machine is created and configured correctly.
- Virtual Machine Not Running: Check that the virtual machine is running correctly and that the operating system is installed.
Conclusion
Installing a virtual machine on Windows 10 is a straightforward process that requires some basic knowledge of virtualization software and operating systems. By following these steps, you can create a virtual machine and run multiple operating systems on a single machine. Remember to always follow the manufacturer’s instructions and to check for any updates or patches before installing a virtual machine.
Table: Virtual Machine Hardware Requirements
| Hardware Requirement | Description |
|---|---|
| CPU | Intel Core i3 or AMD equivalent |
| RAM | 4 GB or more |
| Storage | 20 GB or more of free disk space |
| Graphics | Integrated graphics or a dedicated graphics card |
| Network | A stable internet connection |
Table: Virtual Machine Software Requirements
| Software Requirement | Description |
|---|---|
| Hyper-V | The built-in virtualization software on Windows 10 |
| Virtual Machine Software | A virtualization software such as VMware, VirtualBox, or Microsoft Hyper-V Converter |
| Operating System | The operating system you want to install the virtual machine on |
Table: Virtual Machine Installation Steps
| Step | Description |
|---|---|
| Go to the Control Panel | Click on the Start button and select Control Panel |
| Click on System and Security | In the Control Panel, click on System and Security |
| Click on Advanced | In the System and Security window, click on Advanced |
| Click on Virtual Machines | In the Advanced window, click on Virtual Machines |
| Click on Add | In the Virtual Machines window, click on Add |
| Select the Virtual Machine Type | Choose the type of virtual machine you want to install (e.g., Windows 10, Linux, etc.) |
| Click on Next | Click on Next |
| Select the Virtual Machine Settings | Choose the settings for your virtual machine, such as the operating system, RAM, and disk space |
| Click on Finish | Click on Finish |
Unlock the Future: Watch Our Essential Tech Videos!
Do you want to try a different operating system but don’t want to risk installing it on your main computer? Perhaps you need to test software on various platforms but don’t want to set up different computers? Don’t fret. You can install VirtualBox on Windows 10 and create guest VMs instead.
VirtualBox is a free virtualization program that makes it extremely convenient to set up virtual machines on different operating systems. This tutorial will teach you how to install VirtualBox on Windows 10 and the basics to get you started.
Prerequisites
This tutorial will be a hands-on demonstration. If you’d like to follow along, be sure you have the following.
- A Windows 10 computer. This guide uses Windows 10 21H2 64bit, but VirtualBox should work fine on any recent version of Windows 10 or 11.
- An ISO file for the operating system you want to install. This ISO could be of any VirtualBox-supported guest OSes.
- Free storage space. How much you need will depend on the size of the ISO you’re using, but in general, there should be at least 20 GB of free disk space.
- RAM. How much you need will depend on the operating system you want to install and how you plan on using it.
Installing VirtualBox on Windows 10
To install VirtualBox on Windows 10, you must first download the appropriate installation file for your host. From there, the installation process uses a Wizard interface, which should not be too complicated, even for a beginner.
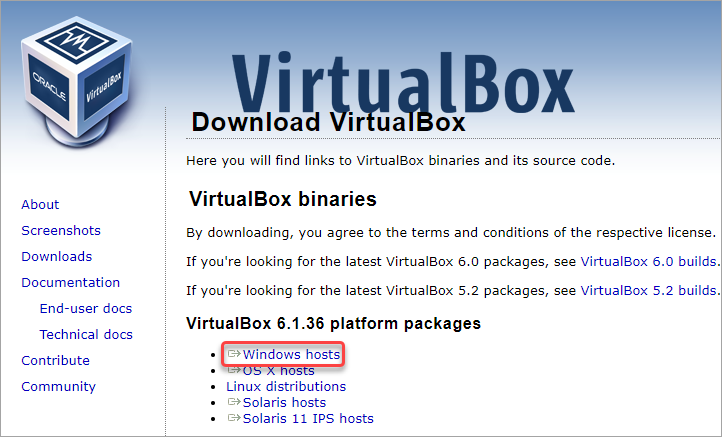
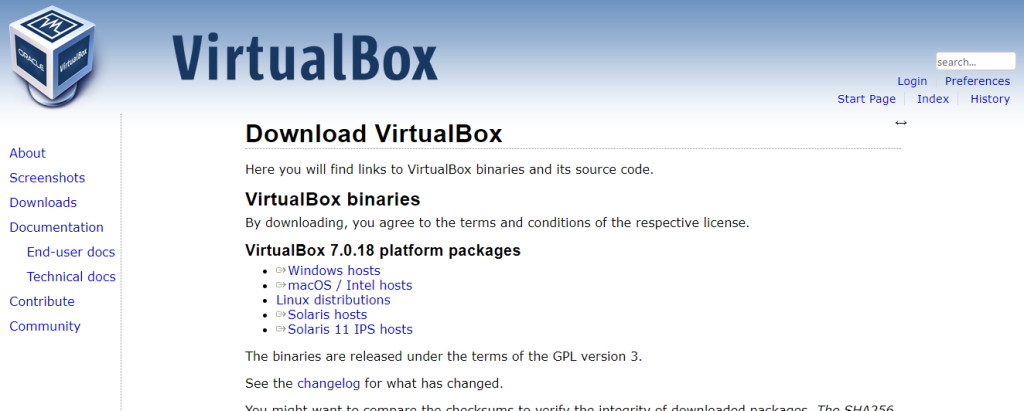
1. Open a browser and open the VirtualBox downloads page and click the Windows hosts link. The latest VirtualBox version as of this writing is 6.1.36. Save the installer somewhere you can quickly locate it, like your Downloads folder.
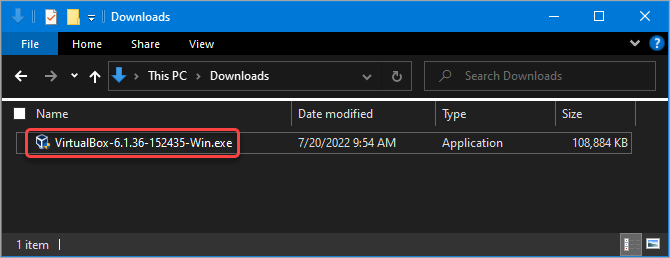
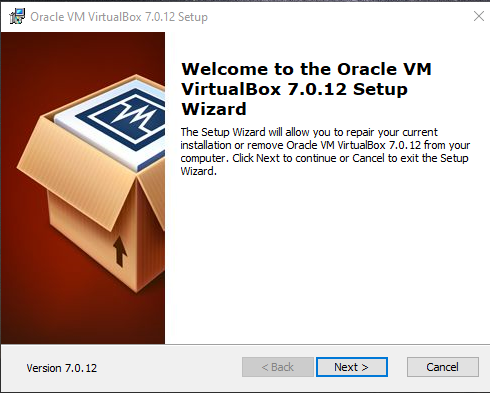
2. Locate the VirtualBox installer file using your File Explorer. Double-click the file to launch the VirtualBox Setup wizard.
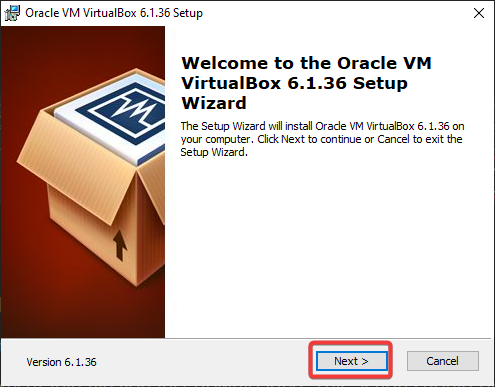
3. Click Next on the first screen. This action tells the Wizard that you want to install VirtualBox.
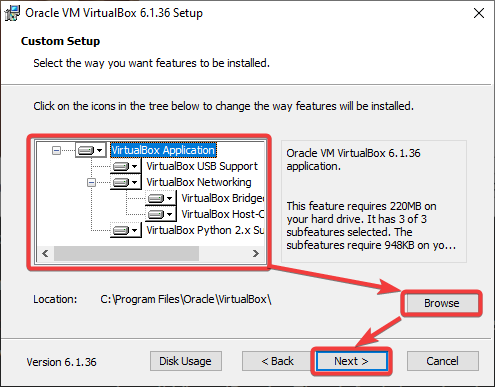
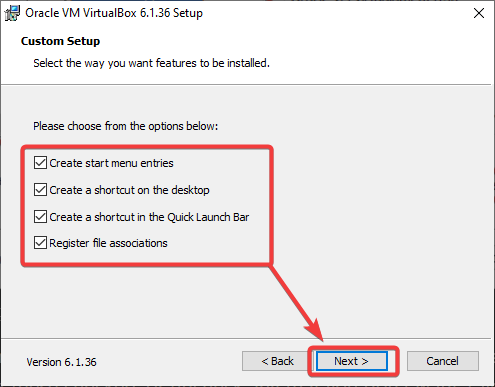
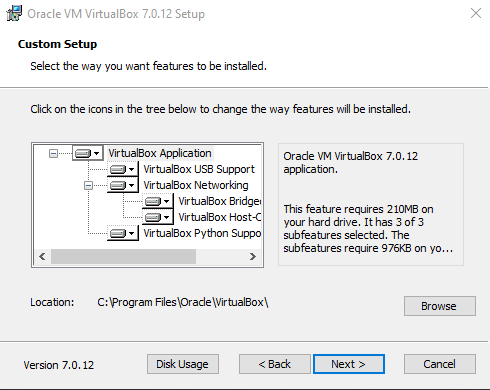
4. Do the following actions on the Custom Setup screen.
- You’ll see a list of the features the Wizard will install. In this example, leave the default selection.
- Browse and select the location you want to install VirtualBox in. The default location is fine, but feel free to change it if you prefer.
- Click Next when you’re ready to continue.
5. On the next screen, you’ll see a list of the shortcuts and file associations the installation will create. Check or uncheck the items you wish to include or exclude and click Next. This example leaves all options checked.
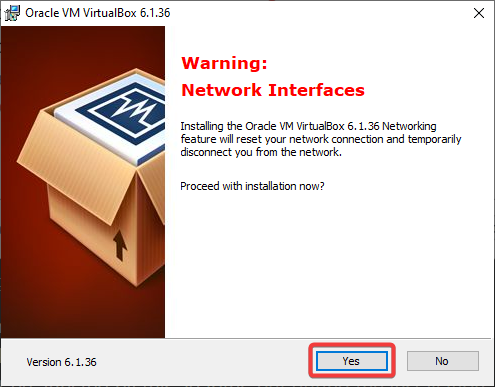
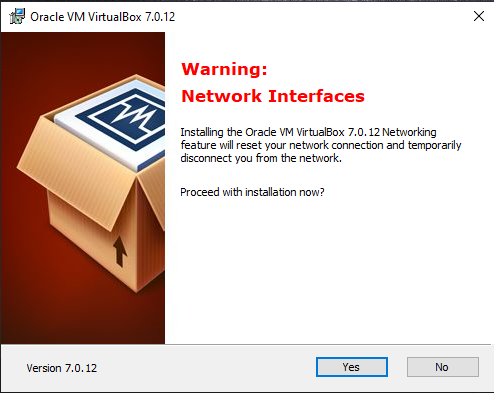
6. On the next screen, you’ll see a warning about networking. The setup process will install a virtual network adapter, which may cause your network connection to disconnect momentarily. Click Yes to continue.
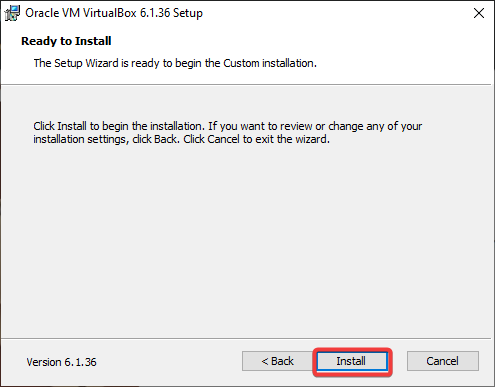
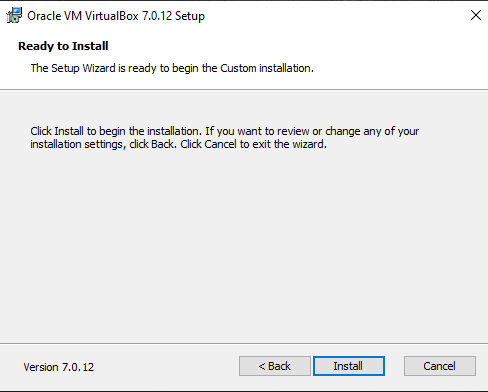
7. Finally, you’ll see a screen asking you to confirm the installation. Click Install to install VirtualBox on Windows 10.
8. The installation process takes several minutes, depending on your system speed. Click Finish to close the Wizard after the installation and start using VirtualBox.

Creating Your First Virtual Machine
After you install VirtualBox on Windows 10, your can create your first virtual machine.
Windows 11 had compatibility issues with VirtualBox, such as VMs cannot start, crashing, and having corrupted displays. But Microsoft confirmed that such issues no longer exist in VirtualBox 6.1.28 and later versions, so you can also apply all the steps below on Windows 11.
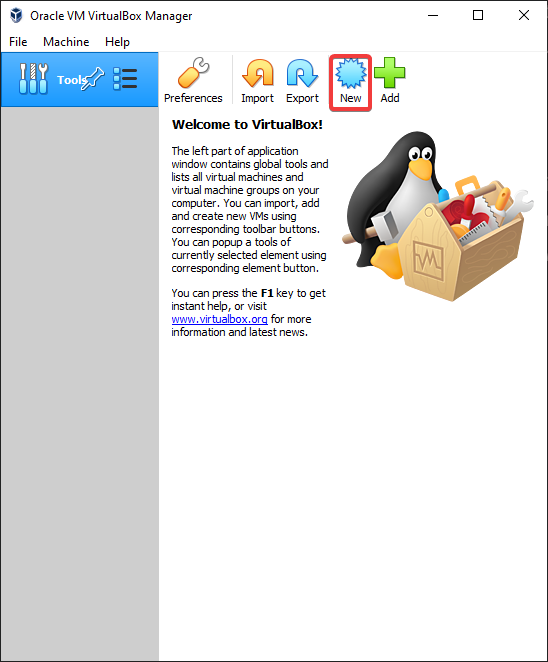
1. First, click the New button in the top-right corner of the VirtualBox window. This action brings up the Create Virtual Machine wizard. This Wizard lets you configure your new VM with the settings you want.
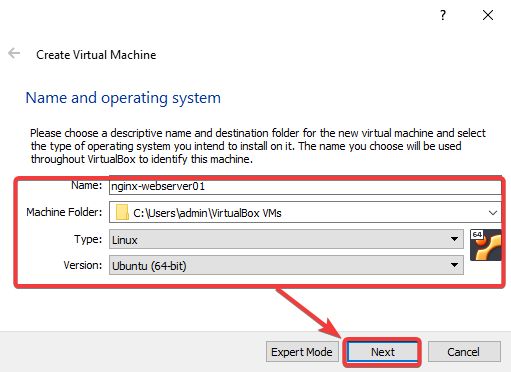
2. Configure the following on the Name and operating system page.
- Name: Give your VM a name. This name can be anything you want.
TIP: Name the VM based on its intended purposes, such as nginx-web-server or windows10-development, so you can better identify the VM later.
- Machine Folder: Specify the location to store your virtual machine files. You can leave the default location or click the Browse button to select a different one.
TIP: Ensure there’s enough space on your drive for your VM. A Linux VM can be as small as 4GB, but a Windows VM will need at least 20GB.
- Type: VirtualBox offers many different types of OSes. Select the operating system you want to install from the drop-down menu. This tutorial selects Linux for the type.
TIP: If the OS you want does not appear in the list, you can select Other at the bottom. This option tells VirtualBox to try to autodetect the features of your OS in the best possible way.
- Version: Select the version of the operating system you want to install from the drop-down menu. This tutorial goes with Ubuntu 20.04 LTS 64bit, so its version is Ubuntu (64-bit).
- Click Next to continue.
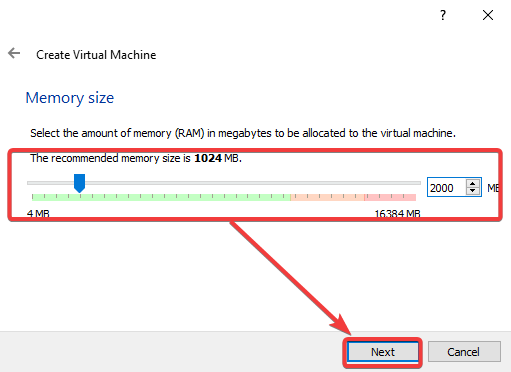
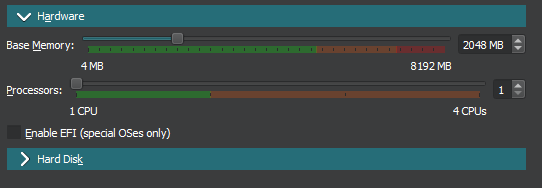
3. On the Memory size page, set how much memory (RAM) your VM will have. You can choose between 4MB (this value is too low for any OS) to 16384MB. The default is 1024MB, but you can increase it.
Generally, 2000MB is a good starting point for a Linux VM, while 4096MB for a Windows VM.
Be careful not to allocate too much memory to your VM. If you do, your host computer may start to lag or become non-responsive. On the other hand, if you set too little memory for the VM, your guest OS and apps may not have enough resources to run correctly. Choose the memory size wisely.
Click Next to continue.
4. On the Hard disk screen, decide whether to create a new hard disk for your guest VM or use an existing one. This example chooses to create a new hard disk since.
This virtual hard disk will be your guest VM’s primary hard disk that holds all the data, such as the guest OS, apps, and other files.
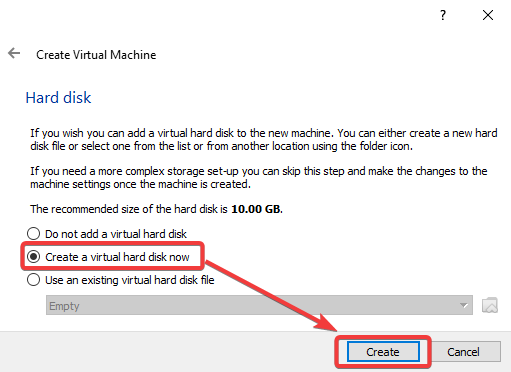
You can select Use an existing hard disk if you have an ISO image or VDI file that already contains a guest operating system.
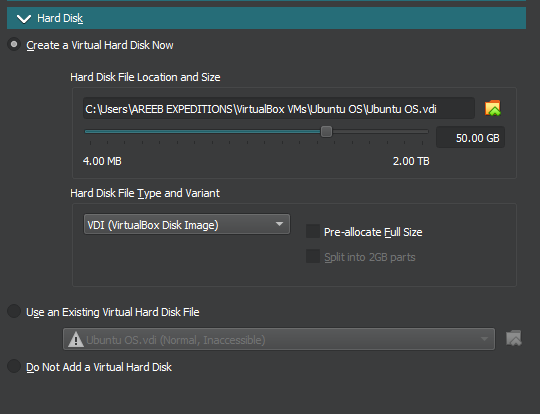
5. On the Hard disk file type page, select VDI (VirtualBox Disk Image) and click Next to continue. This file type is the default for VirtualBox.
You may choose the corresponding option if you plan to use the virtual hard disk with other virtualization solutions, like VMware or Hyper-V.

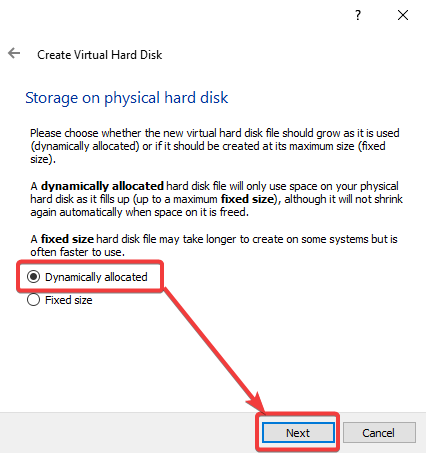
6. On the Storage on physical hard disk, select Dynamically allocated or Fixed size, depending on how you want to provision the virtual disk file size allocation. This example chooses the Dynamically allocated option. Click Next to continue.
7. On the File location and size screen, specify the location and maximum size of the new virtual disk, and click Create.
A good rule of thumb is to allocate at least 10GB for a Linux VM and 40GB for a Windows VM.
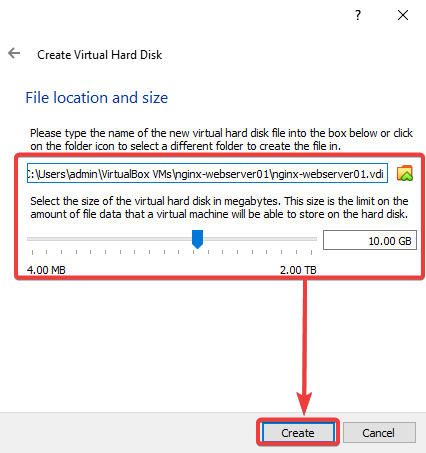
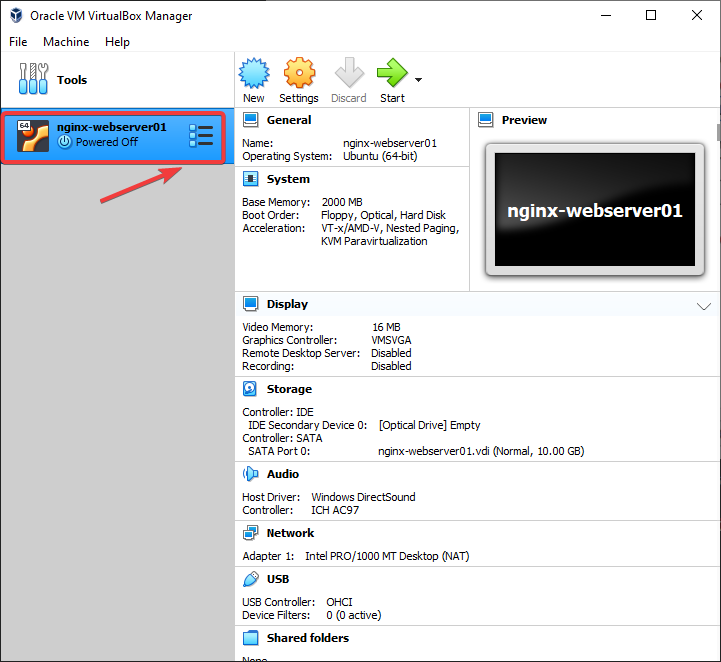
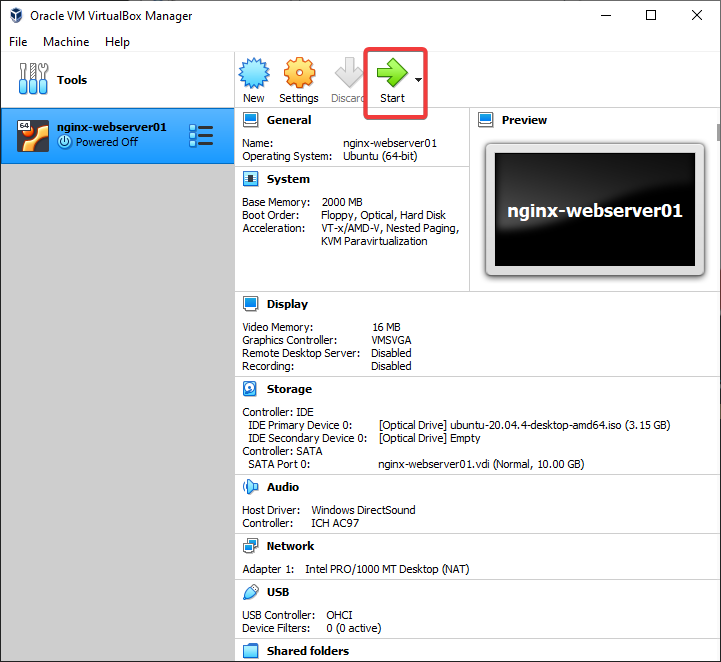
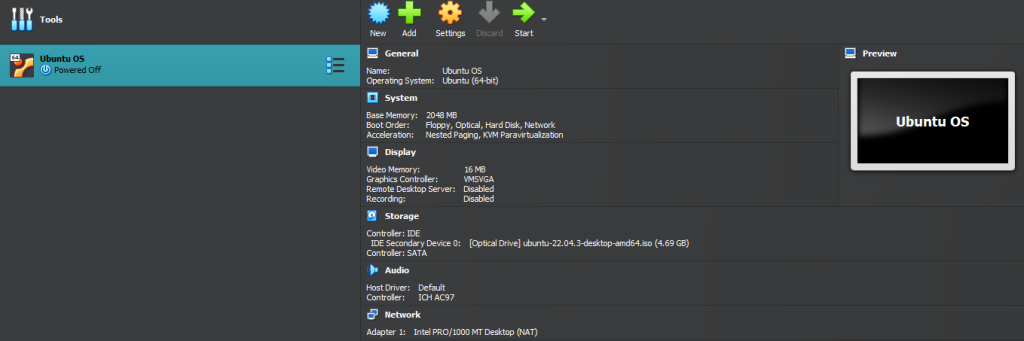
You have a new virtual VM, as shown in the VirtualBox Manager window below.
Installing the Guest Operating System
You’ve created a new virtual machine, but it’s useless without an operating system. In this section, you’ll learn how to install a guest operating system on your new VM.
You need an ISO file with the OS installation files to install the guest OS. You can download ISO files for many popular operating systems from the internet. For example, you can get a Ubuntu 20.04 ISO file from the Ubuntu official website.
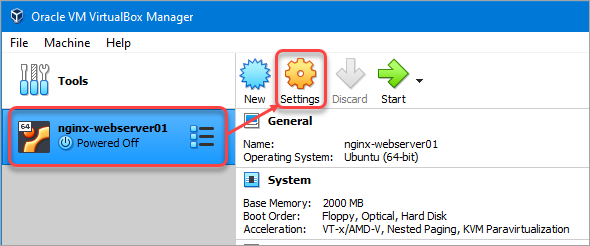
1. Click your VM on the list and click Settings.
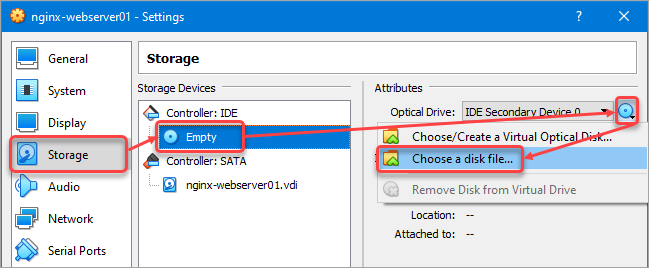
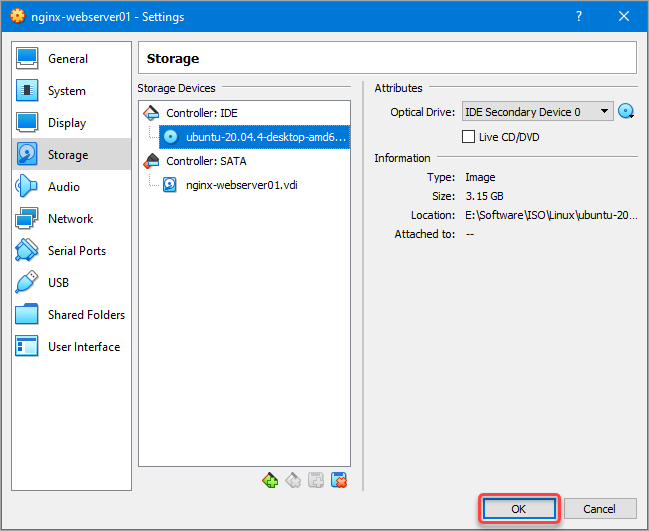
2. On the Settings window, click Storage → Empty disk → the Optical Drive icon → Choose a disk file.
3. Locate the ISO file and click Open. This example chooses the ubuntu-20.04.4-desktop-amd64.iso file.
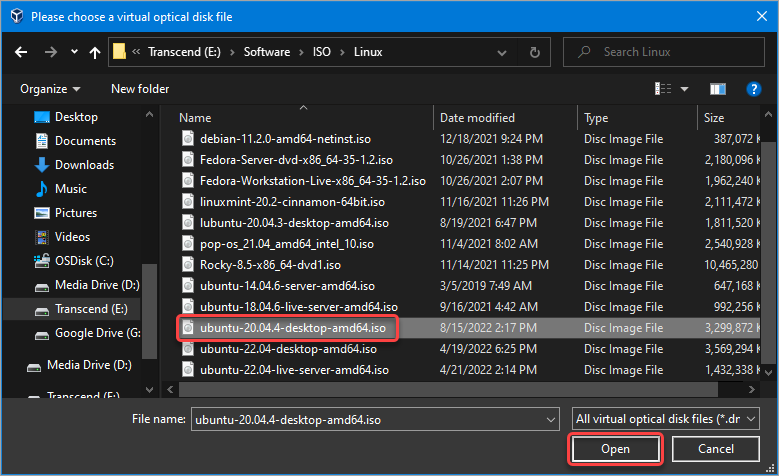
4. After loading the ISO file, click OK.
5. Start your VM by clicking the Start button in the VirtualBox Manager window. The VM will boot from the ISO file. Install the operating system as you would on a physical machine.
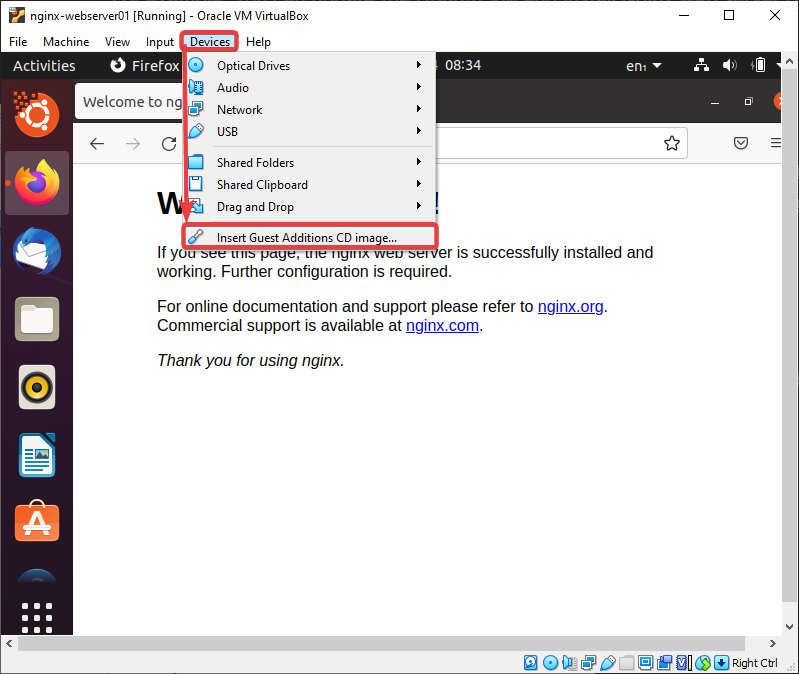
6. Once the installation is complete, one more task related to your new VM is to install the Virtual Box Guest Additions. The Guest Additions enable features like the shared clipboard, shared folders, mouse integration, display resize options, etc.
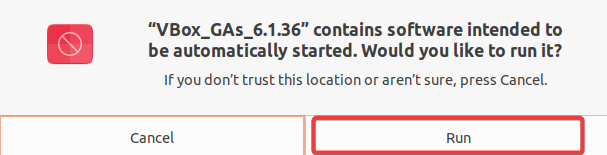
To install the Guest Additions, click the Devices menu and Insert Guest Additions CD Image. Doing so mounts the VBoxGuestAdditions.iso to your guest VM.
7. Provide your user password at the prompt and click Authenticate.
8. Next, click Run to allow the Guest Additions installation.
9. Follow the on-screen instructions to finish the installation. Once the installation is complete, reboot your VM for the changes to take effect.
Conclusion
This article taught you how to install VirtualBox on Windows 10 and create your first virtual machine. You also learned how to install the guest operating system on the VM and how to install the Guest Additions.
Now that you have a basic understanding of VirtualBox, you can experiment with different OSes and learn more about virtualization. With this new skill, why not create a WireGuard VPN connection inside a VM and access the internet safely from a public Wi-Fi network?
VirtualBox a free and open-source virtualization software by Oracle is used to run various operating systems within your existing Windows 10 environment. This enables you to test new software, explore different operating systems, or even run legacy applications that might not be compatible with your current system.
This guide will walk you through the procedure to install VirtualBox Windows 10 ensuring a smooth and successful setup and an overview of how to use VirtualBox in Windows 10.
Understanding Virtualization
Virtualization essentially creates a virtual machine a software program that mimics a physical computer. This virtual machine can then run its operating system, separately from the host machine. This allows you to experiment with different operating systems without affecting your primary system or provides a safe environment to test untrusted software. Here are some of the key benefits of using VirtualBox:
- Install and run various operating systems like Linux, macOS, or older versions of Windows within your Windows 10 environment.
- Test new software or applications in a sandboxed environment without risking your main system.
- Keep legacy applications that might not be compatible with your current operating system functional.
- VirtualBox allows you to allocate specific resources like RAM and CPU cores to each VM optimizing resource utilization.
System Requirements
Before proceeding, ensure your Windows 10 system meets the minimum requirements to run VirtualBox effectively:
- 64-bit processor.
- Minimum 4GB of RAM with at least 2GB allocated for the VM.
- 300MB Hard Disk for VirtualBox application and additional space for each virtual machine.
- Hardware Virtualization extensions are enabled in your BIOS settings.
Enabling Hardware Virtualization might require restarting your system. Refer to our post How to Enable Windows Sandbox in Windows where you can find techniques on how you can verify virtualization.
Installing VirtualBox in Windows 10
Now that you understand the benefits and have checked your system requirements, let’s proceed with the download process:
1. Open your preferred web browser then navigate to the official VirtualBox download page. Under “Windows hosts” click the link to download virtualbox for Windows 10.
2. Locate the downloaded installer file in your Downloads folder or wherever you saved it. Double-click the installer file to launch the VirtualBox Setup Wizard. In the welcome screen, click “Next” to proceed with the installation.
3. The next screen presents customization options for the virtual box installation which include:
- VirtualBox will be installed in the C directory.
- Creates a shortcut icon for VirtualBox on your desktop for easy access.
- Creates an entry for VirtualBox in your Start menu.
- Network adapter allows you to choose the adapter that VirtualBox will use.
- USB option allows you to configure USB device access for virtual machines.
4. Once you’ve reviewed the customization options click “Next” to proceed then a Warning Network interface option appears click “Yes” to proceed with the installation.
5. Ready to Install wizard appears, Click “Install” to begin the installation.
6. After the installation is complete, click “Finish” to complete the installation process.
Ready to Experience the Power of VM Hosting!
Take your virtualization journey to the next level with Ultahost’s VM hosting increasing the performance, flexibility, and security of Kernel-based Virtual Machine technology for your business.
Creating the First Virtual Machine
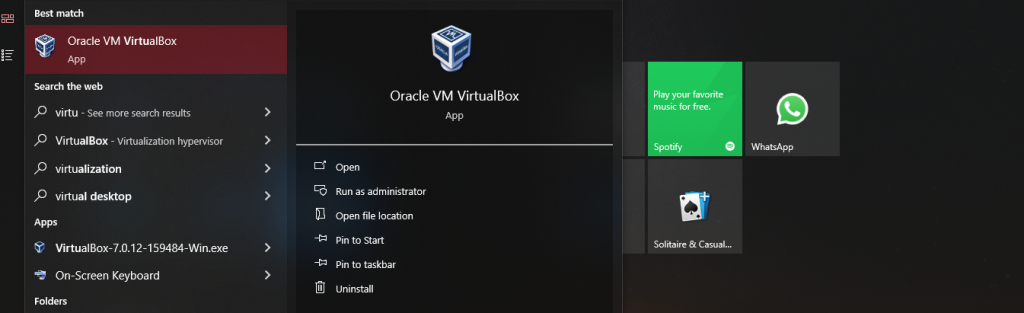
After completing the installation you can launch VirtualBox by searching for it in the Start Menu or using the desktop shortcut.
The VirtualBox Manager window will open. This is the main interface where you will manage your virtual machines. To create your first virtual machine, click the “New” button in the toolbar.
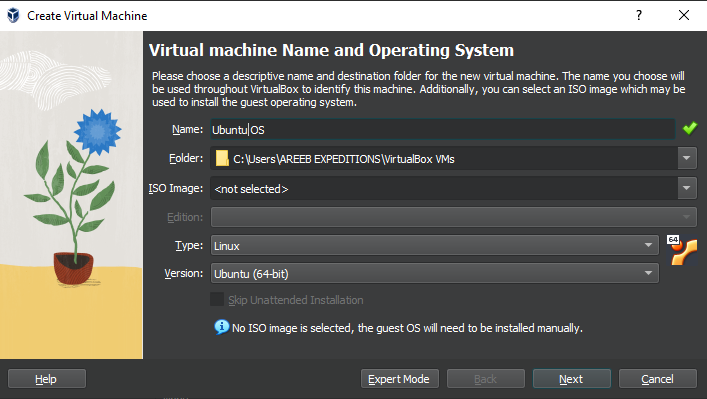
The “Create Virtual Machine” wizard will guide you through the setup process. You’ll be prompted to specify various options including:
- Name and operating system: Choose a descriptive name for your virtual machine and select the type of operating system you plan to install.
- RAM memory: Allocate a sufficient amount of RAM for your virtual machine.
- Hard disk: Choose how you want to create the virtual hard disk. You can either create a new virtual hard disk dynamically or allocate a fixed size upfront.
After completing the setup you can see the VirtualBox interface shows the operating system installed in vbox. Click “Start” to run the operating system.
Now successfully you can run the Linux operating system through VirtualBox. It is important to check the system requirements for the guest operating system you plan to install within the virtual machine.
Additional Notes
Following are the additional notes on how to install virtual box in Windows 10:
- Network Adapter Selection: The default network adapter selection should work in most cases. However, if you encounter network connectivity issues with your virtual machines, you can try changing the network adapter in the VirtualBox settings.
- VirtualBox Extension Pack: The VirtualBox Extension Pack provides additional features like USB 2.0 and 3.0 support, seamless mode, and better video performance. While not essential it can enhance your virtual machine experience.
- Sharing Folders: VirtualBox allows you to easily share folders between your host Windows 10 machine and the guest operating system running inside the virtual machine.
Conclusion
With VirtualBox set up, you can now explore the virtualization techniques experiment with different operating systems, or create secure environments to test software. Remember to allocate sufficient resources for your virtual machines to ensure optimal performance.
Ultahost’s Windows 10 VPS offers superior processing power memory and storage compared to running VMs on your local machine. Focus on running demanding applications or managing complex virtual environments seamlessly, let Ultahost provide the power and resources you need to virtualize with confidence.
FAQ
What is VirtualBox?
VirtualBox is a free software that lets you run multiple operating systems on one computer.
Is VirtualBox compatible with Windows 10?
Yes, VirtualBox can be installed and used on computers running Windows 10.
Do I need technical skills to install VirtualBox?
No, you can follow simple step-by-step instructions to install VirtualBox on Windows 10.
Can I run macOS or Linux on Windows 10 using VirtualBox?
Yes, VirtualBox allows you to create virtual machines running various operating systems including macOS and Linux on a Windows 10 PC.
Is VirtualBox safe to use?
Yes, VirtualBox is a reputable and secure software developed by Oracle.