
Contribute to this page
Toggle table of contents sidebar
What you will learn
-
How to enable and install WSL on Windows 10 and Windows 11
-
How to install
Ubuntu 24.04 LTSusing the Microsoft Store or WSL commands in the terminal
What you will need
-
Windows 10 or 11 running on either a physical device or virtual machine
-
All of the latest Windows updates installed
Install WSL
You can install WSL from the command line. Open a PowerShell prompt as an Administrator (we recommend using Windows Terminal) and run:
It is recommended to reboot your machine after this initial installation to complete the setup.
Install Ubuntu WSL
There are multiple ways of installing distros on WSL, here we focus on two: the Microsoft Store application and WSL commands run in the terminal. The result is the same regardless of the method.
Method 1: Microsoft Store application
Find the distribution you prefer on the Microsoft Store and then click Get.
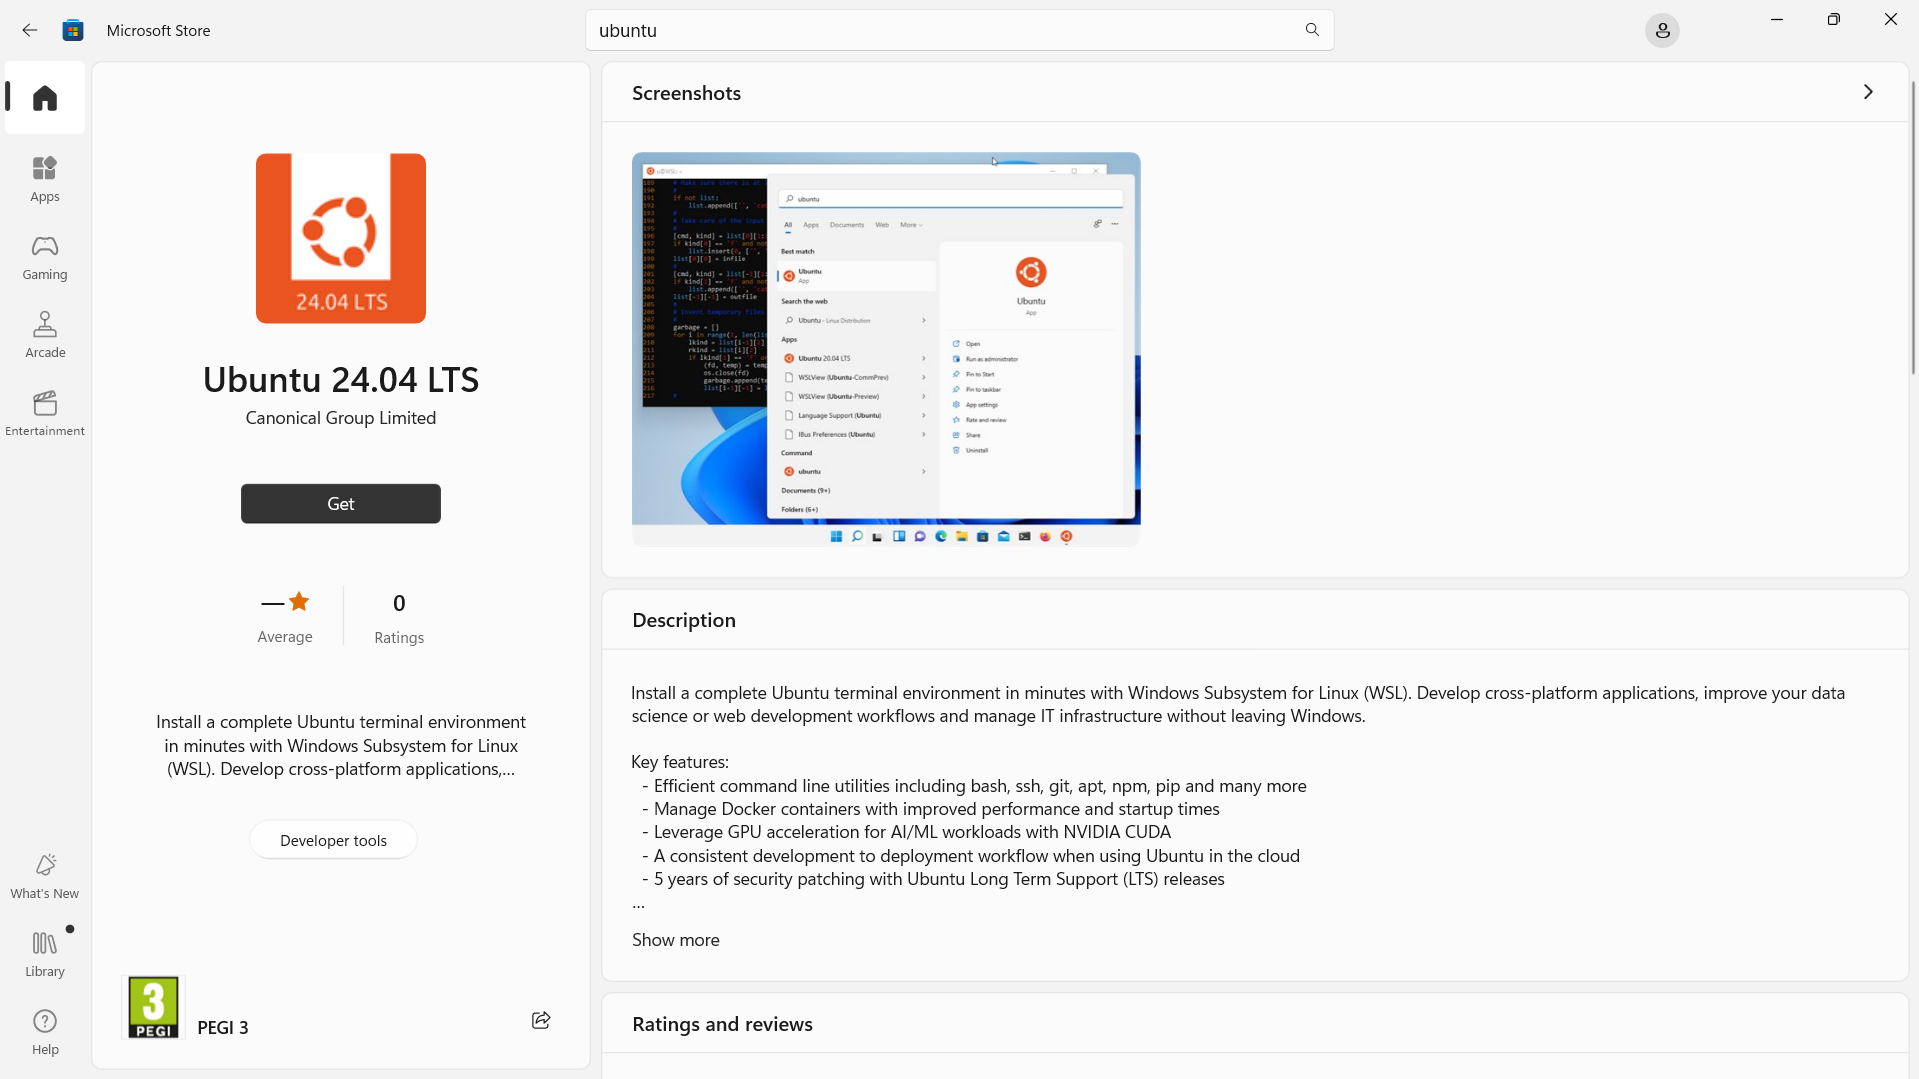
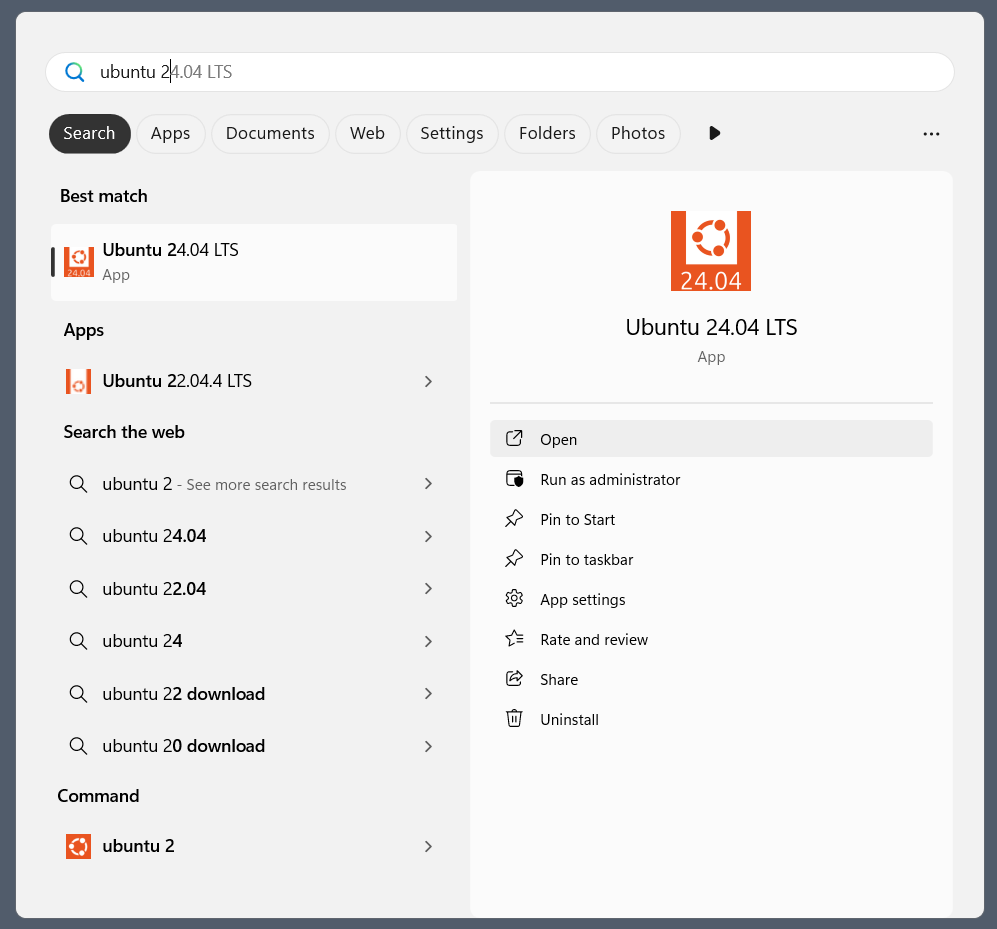
Ubuntu will then be installed on your machine. Once installed, you can either launch the application directly from the Microsoft Store or search for Ubuntu in your Windows search bar.
Method 2: WSL commands in the terminal
In a PowerShell terminal, you can run wsl --list --online to see an output with all available distros and versions:
The following is a list of valid distributions that can be installed.
The default distribution is denoted by '*'.
Install using 'wsl --install -d <Distro>'.

  NAME                                   FRIENDLY NAME
* Ubuntu                                 Ubuntu
  Debian                                 Debian GNU/Linux
  kali-linux                             Kali Linux Rolling
  Ubuntu-18.04                           Ubuntu 18.04 LTS
  Ubuntu-20.04                           Ubuntu 20.04 LTS
  Ubuntu-22.04                           Ubuntu 22.04 LTS
  Ubuntu-24.04                           Ubuntu 24.04 LTS
...
Your list may be different once new distributions become available.
You can install a version using a NAME from the output:
> wsl --install -d Ubuntu-24.04
You’ll see an indicator of the installation progress in the terminal:
Installing: Ubuntu 24.04 LTS
[==========================72,0%==========                 ]
Use wsl -l -v to see all your currently installed distros and the version of WSL that they are using:
  NAME            STATE           VERSION
  Ubuntu-20.04    Stopped         2
* Ubuntu-24.04    Stopped         2
Note on installing images without the Microsoft Store
If you do not have access to the Microsoft Store or need to install
a custom image it is possible to import a distribution as a tar file:
> wsl --import <DistroName> <InstallLocation> <InstallTarFile>
Appx and MSIX packages for a given distro can also be downloaded and installed.
Please refer to Microsoft’s documentation for more detailed information on these installation methods:
-
Importing Linux distributions
-
Installing distributions without the Microsoft Store
Warning
You should always try to use the latest LTS release of Ubuntu, as it offers the best security, reliability and support when using Ubuntu WSL.
Currently we do not have a recommended location from which to download tar and Appx/MSIX files for Ubuntu distros.
Run and configure Ubuntu
To open an Ubuntu 24.04 terminal run the following command in PowerShell:
Once it has finished its initial setup, you will be prompted to create a username and password. They don’t need to match your Windows user credentials.
Finally, it’s always good practice to install the latest updates by running the following commands within the Ubuntu terminal, entering your password when prompted:
$ sudo apt update
$ sudo apt full-upgrade -y
Enjoy Ubuntu on WSL
In this guide, we’ve shown you how to install Ubuntu WSL on Windows 10 or 11.
We hope you enjoy working with Ubuntu in WSL. Don’t forget to check out our blog for the latest news on all things Ubuntu.
Further Reading
-
Setting up WSL for Data Science
-
Whitepaper: Ubuntu WSL for Data Scientists
-
Microsoft WSL Documentation
-
Ask Ubuntu
🖥️ Install Ubuntu 24.04 with GUI in Windows 11 using WSL2 🎨
Welcome to the guide! In this repository, you’ll learn how to install Ubuntu 24.04 with a graphical user interface (GUI) on Windows 11 using WSL2 (Windows Subsystem for Linux). WSL2 allows you to run a full-fledged Ubuntu environment on your Windows machine without the need for dual-booting or using a virtual machine, making it an incredibly efficient way to work with Linux.
🚀 Why Ubuntu 24.04 with GUI on WSL2?
WSL2 is a lightweight, fast, and convenient way to run Linux distributions on your Windows 11 machine. By using Ubuntu 24.04 with a GUI on WSL2, you unlock the power of Linux while maintaining the familiarity of Windows. Here are some of the advantages:
-
Performance: WSL2 uses a real Linux kernel, offering near-native Linux performance.
-
Seamless Integration: Access Linux files from Windows and vice versa.
-
No dual booting: Run both Windows and Linux side by side.
-
Great for developers: Supports the same Linux tools, command-line utilities, and applications.
-
High performance: with the latest WSL2 architecture.
-
Access to Linux GUI apps alongside your favorite Windows apps.
🔧 Prerequisites
Before getting started, make sure your system meets the following requirements:
-
Windows 11 installed on your PC
-
WSL2 enabled on your system
-
Windows Subsystem for Linux Update is up-to-date
-
Virtual Machine Platform feature enabled in Windows.
If you don’t have WSL2 enabled yet, follow the setup instructions provided below.
📝 Step-by-Step Installation Guide
1️⃣ Step 1: Enable WSL on Windows 11
- Open PowerShell as Administrator and run the following command to enable WSL:
- Restart your system to apply the changes.
2️⃣ Step 2: Set WSL2 as the Default Version
To ensure that future installations use WSL2 (which has improved performance and full system call compatibility), set WSL2 as the default version by running the following command in PowerShell:
wsl --set-default-version 2
3️⃣ Step 3: Verify WSL Version
Once WSL is installed and the default version is set, verify the WSL version by running the following command:

Ensure that Version 2 is shown as the default.
4️⃣ Step 4: (Method — 1) Install Ubuntu 24.04 via Microsoft Store
-
Open the Microsoft Store and search for Ubuntu 24.04.

-
Click on Get and then Install.
-
After installation, launch Ubuntu 24.04 from the Start menu.
-
Follow the on-screen setup, including creating a username and password.

5️⃣ Step 5: (Method 2) Install Ubuntu 24.04 using Command Line
If you prefer using the command line to install Ubuntu, follow these steps:
-
Open PowerShell as Administrator.
-
Run the following command to list the available distributions:

- Install Ubuntu 24.04 using this command:
wsl --install -d Ubuntu-24.04
- Follow the setup instructions after installation.
6️⃣ Step 6: Update and Upgrade Ubuntu Packages
After installing Ubuntu, it’s important to update the package lists and upgrade the system to ensure you have the latest software and security patches.
- Update and Upgrade Packages:
sudo apt update && sudo apt upgrade -y
- Full System Upgrade (to upgrade all packages including kernel and essential system packages):
sudo apt update && sudo apt full-upgrade -y
7️⃣ Step 7: Install a GUI and XRDP for Ubuntu 24.04
To install a graphical desktop environment and access it via Remote Desktop, follow these steps:
- Install XFCE Desktop and XFCE goodies (a lightweight and fast desktop environment):
sudo apt install xfce4 xfce4-goodies -y
- Install XRDP (Remote Desktop Protocol server) to enable remote desktop access:
- Backup the XRDP configuration file:
sudo cp /etc/xrdp/xrdp.ini /etc/xrdp/xrdp.ini.bak
- Modify XRDP port number to avoid conflicts with the default port:
sudo sed -i 's/3389/3390/g' /etc/xrdp/xrdp.ini
- Increase XRDP color depth for better display quality:
sudo sed -i 's/max_bpp=32/#max_bpp=32\nmax_bpp=128/g' /etc/xrdp/xrdp.ini
sudo sed -i 's/xserverbpp=24/#xserverbpp=24\nxserverbpp=128/g' /etc/xrdp/xrdp.ini
- Start the XRDP service to allow remote connections:
sudo /etc/init.d/xrdp start
8️⃣ Step 8: Configure XRDP to Use XFCE4 Desktop
To ensure that XRDP starts the XFCE desktop environment correctly when you connect via Remote Desktop, you need to modify the XRDP startup script:
- Open the startwm.sh file for editing:
sudo nano /etc/xrdp/startwm.sh
- Comment out the last two existing lines: In the file, find the following lines at the bottom:
test -x /etc/X11/Xsession && exec /etc/X11/Xsession
exec /bin/sh /etc/X11/Xsession
Comment these lines by adding # at the beginning:
#test -x /etc/X11/Xsession && exec /etc/X11/Xsession
#exec /bin/sh /etc/X11/Xsession
- Add the command to start XFCE4: Below the commented lines, add the following command:

- Save and exit the Nano editor:
- Press Ctrl+S to save the changes.
- Press Ctrl+X to exit the editor.
- Restart the XRDP service to apply the changes:
sudo /etc/init.d/xrdp start
This step ensures that when you log in via Remote Desktop, the XFCE desktop environment will be launched, giving you access to the graphical interface of Ubuntu 24.04.
9️⃣ Step 9: Launch the Ubuntu GUI via Remote Desktop
-
Open Remote Desktop Connection on your Windows machine (search for «Remote Desktop» in the Start menu).
-
Enter
localhost:3390as the remote address (since we changed the port to 3390).
-
Login using the username and password you set during the Ubuntu setup process.
-
You should now see the full XFCE desktop environment, allowing you to interact with a GUI on your Ubuntu 24.04 system.


🔄 Step 10: Verify Installation and Enjoy
After logging in, you should see the full Ubuntu desktop interface. You can now run graphical Linux applications (e.g., GIMP, Visual Studio Code, etc.) alongside your Windows apps.
⏰ How to Start Ubuntu 24.04 with GUI After Shutdown or Restart
💻 Step 1: (Method — 1) Open Ubuntu 24.04 via WSL
-
Open PowerShell or Command Prompt on your Windows 11 machine.
-
Start WSL and launch Ubuntu 24.04 by running:
- If Ubuntu does not start automatically, you can specify the distribution with:
🖥️ Step 2: (Method — 2) Open Ubuntu 24.04 App directly from the Start Menu
If you prefer using the Ubuntu app directly, follow this method:
- Open Ubuntu 24.04 from Start Menu:
-
Click on the Start Menu and scroll down to All Apps.
-
Find and click on the Ubuntu 24.04 logo.
-
When the Ubuntu app opens, it will take you directly to the Ubuntu shell.
-
Open Remote Desktop Connection:
-
On your Windows 11 machine, open the Remote Desktop Connection app (search in Start menu).
-
Enter
localhost:3390as the computer address and click Connect.
- If the above step gives any Error Message
Start the XRDP Service:
- In the Ubuntu terminal, start the XRDP service by running:
sudo /etc/init.d/xrdp start
- Then repeat the point 3.
- Login to XFCE Desktop:
- Enter your Ubuntu username and password to access the XFCE desktop environment.
🎥 Demo
🛠️ Troubleshooting
❗ Issue: Ubuntu GUI Not Displaying
- Ensure the XRDP service is running:
sudo /etc/init.d/xrdp status
-
Ensure the Remote Desktop Connection is set to the correct port (localhost:3390).
-
Restart WSL:
📚 Useful Resources
- Official WSL Documentation
- Ubuntu Official Documentation
- XRDP
- XFCE Desktop Environment
- XFCE Documentation
- WSL2 Overview
- VS Code Remote WSL Extension
💡 Additional Tips & Tricks
-
Running Linux GUI Apps: You can directly run GUI apps without launching the full desktop. For example, run Gedit using:
-
File Sharing: Access Windows files from Ubuntu at
/mnt/c/Users/<your-username>and vice versa. -
Customize Your Desktop: Use themes and tweak XFCE settings to personalize your Linux desktop experience.
👨💻 Author
- @SCSBalaji
🤝 Contributing
Feel free to contribute to this repository. If you have suggestions, find bugs, or want to add new features, please open an issue or submit a pull request!
Contributions are always welcome!
⚖️ License
This project is licensed under the MIT License — see the LICENSE file for more details.
💬 Support
For support, join our Telegram Discussion Group.
❓ Frequently Asked Questions (FAQs)
1. What is WSL2?
WSL2 (Windows Subsystem for Linux version 2) is a compatibility layer that allows you to run a Linux distribution (like Ubuntu) on Windows without the need for a virtual machine or dual-booting. It offers full system call compatibility, faster performance, and the ability to run Linux applications directly within Windows.
Learn more: WSL2 Overview
2. Why should I use WSL2 instead of a virtual machine (VM)?
WSL2 is lighter and faster than a VM, offering seamless integration with Windows. You can access Linux apps, services, and files directly from Windows, use fewer system resources, and avoid the need for a separate hypervisor or virtual machine software.
3. Can I use any Linux distribution with WSL2?
Yes, many Linux distributions are available for installation via WSL2, including Ubuntu, Debian, Fedora, Kali Linux, and more. In this guide, we focus on Ubuntu 24.04.
4. How do I check if WSL is installed on my system?
You can check whether WSL is installed by opening PowerShell or Command Prompt and running:

If no distributions are listed, follow the steps in this guide to install WSL.
5. What is the difference between WSL1 and WSL2?
- WSL1: Uses a translation layer to map Linux kernel calls to Windows.
-WSL2: Includes a full Linux kernel, providing better performance and compatibility, especially for system-level tasks.
WSL2 is the recommended version for running GUI applications and heavier tasks.
6. How do I verify that WSL2 is my default version?
You can verify the default version of WSL by running the following command:
If it says version 2, you’re using WSL2. If not, use:
wsl --set-default-version 2
to set WSL2 as the default.
7. What is XFCE, and why use it for a GUI?
XFCE is a lightweight, fast, and stable desktop environment for Linux. It’s perfect for WSL2 because it uses fewer system resources, making it ideal for running Linux with GUI on Windows.
Learn more: XFCE Documentation
8. Why do I need XRDP to run Ubuntu with a GUI?
XRDP is a remote desktop server that allows you to connect to your Ubuntu system with a graphical interface. It enables you to use the Remote Desktop Connection tool on Windows to access Ubuntu’s desktop environment via WSL2.
9. How can I access Ubuntu’s GUI after setting everything up?
To access Ubuntu’s GUI, follow these steps:
-
Start WSL: Open Ubuntu from PowerShell, Command Prompt, or the Start menu.
-
Start the XRDP service:
sudo /etc/init.d/xrdp start
- Open Remote Desktop Connection in Windows and connect using localhost:3390.
10. How do I change the default port for XRDP?
In this guide, we change the default XRDP port from 3389 to 3390 to avoid conflicts with other services. You can modify the port in the XRDP configuration file (/etc/xrdp/xrdp.ini) as shown in Step 7 of this guide.
11. What should I do if I cannot connect to Ubuntu via Remote Desktop?
If you have trouble connecting:
-
Ensure that XRDP is running:
sudo /etc/init.d/xrdp start
-
Make sure you are using the correct port (3390).
-
Restart the XRDP service or reboot your Windows machine and try again.
12. How do I update Ubuntu packages?
Run the following commands to update and upgrade your system:
sudo apt update && sudo apt upgrade -y
For a more comprehensive upgrade, use:
13. Can I install other desktop environments besides XFCE?
Yes! You can install other desktop environments like GNOME, KDE, or LXDE. However, XFCE is lightweight and optimized for WSL2, making it a better choice for most users.
14. How do I stop the XRDP service?
To stop the XRDP service, run:
sudo /etc/init.d/xrdp stop
This will stop the service and prevent Remote Desktop access until you start it again.
15. How do I change the default Ubuntu distribution in WSL2?
If you have multiple distributions installed, you can set a default one using:
wsl --set-default Ubuntu-24.04
16. How do I remove Ubuntu from WSL2?
If you want to uninstall Ubuntu from WSL2, run the following in PowerShell:
wsl --unregister Ubuntu-24.04
This will remove all files and configurations for that distribution.
17. Can I use VS Code or other development tools with Ubuntu WSL2?
Yes! Visual Studio Code (VS Code) has excellent integration with WSL. You can install the Remote — WSL extension to run, edit, and debug code directly in your Ubuntu environment.
Learn more: VS Code Remote WSL Extension
18. Do I need to reconfigure the GUI setup every time I start WSL?
No, you only need to start the XRDP service using:
sudo /etc/init.d/xrdp start
After that, you can connect via Remote Desktop without reconfiguring.
How to Install Ubuntu Alongside Windows 11: A Step-by-Step Guide
In recent years, Linux distributions like Ubuntu have gained immense popularity alongside established operating systems such as Windows. If you are a Windows 11 user seeking to explore the vast capabilities of Ubuntu, you’re in the right place. This comprehensive guide will walk you through the process of installing Ubuntu alongside Windows 11, ultimately creating a dual-boot system that allows you to choose either operating system upon startup.
Why Dual Boot Ubuntu with Windows 11?
Before we delve into the installation process, let’s consider why you might want to dual boot Ubuntu with Windows 11:
-
Open Source Freedom: Ubuntu is a fully-fledged open-source operating system, providing access to a wide array of free software and libraries.
-
Security and Privacy: Linux-based systems are generally considered more secure than their Windows counterparts. With Ubuntu, you can enjoy enhanced privacy features as well.
-
Software Development: If you’re a developer, Ubuntu can offer a better experience for programming and web development, thanks to its support for various languages and development tools.
-
Resource Efficiency: Ubuntu (particularly lighter flavors) can efficiently run on older hardware, maximizing your computer’s lifespan.
-
Exploration and Learning: If you’re curious about Linux, dual booting gives you the opportunity to learn without compromising your existing Windows system.
Prerequisites
Before you start, ensure you have the following:
-
Backup Your Data: Always back up important files and data before altering partition sizes or installing a new OS.
-
USB Drive: At least 4GB of storage for the Ubuntu installation ISO file.
-
Ubuntu ISO File: Download the latest version of Ubuntu from the official Ubuntu website.
-
Rufus (Windows Utility): If you’re using Windows 11, download Rufus to create a bootable USB stick.
-
Free Disk Space: Make sure you have ample disk space available for Ubuntu. It’s recommended to allocate at least 20 GB.
-
A Computer with UEFI Support: Most modern machines support UEFI, and this guide assumes you are using UEFI rather than BIOS.
Step 1: Preparing Your Windows 11 PC
-
Check System Compatibility:
- Make sure that your hardware is compatible with Ubuntu by reviewing the system requirements on the Ubuntu website.
-
Backup Your Data:
- Before you proceed, it’s essential to back up your system to avoid potential data loss.
-
Disable Fast Startup:
- Fast Startup can interfere with the booting of other operating systems. To disable it:
- Open Control Panel > Hardware and Sound > Power Options > Choose what the power buttons do.
- Click on «Change settings that are currently unavailable» and uncheck «Turn on fast startup (recommended).»
- Fast Startup can interfere with the booting of other operating systems. To disable it:
-
Adjust Disk Space:
- In Windows 11, you need to create unallocated space on your hard drive for Ubuntu.
- Right-click on the Start Menu and select «Disk Management.»
- Right-click on the primary partition (usually C:) and select «Shrink Volume.»
- Choose the amount of space you want to shrink, ideally at least 20 GB, and execute the shrink operation.
Step 2: Creating a Bootable USB Drive
-
Download Rufus:
- Go to the Rufus official website and download the latest version.
-
Run Rufus:
- Insert your USB drive and open Rufus.
- In Rufus, select your USB drive under «Device.»
- In the «Boot selection» section, click on «Select» and choose the downloaded Ubuntu ISO file.
- Keep the default partition scheme (GPT) and file system (FAT32).
- Click on «Start» to create the bootable USB. Confirm any prompts that appear.
Step 3: Booting from USB
-
Access UEFI Settings:
- Restart your computer and access the UEFI/BIOS during startup (often by pressing Esc, F2, F10, or Del, depending on your manufacturer).
-
Enable USB Boot:
- Ensure that USB booting is enabled in the UEFI settings. You may also set the USB drive as the first boot device.
-
Boot from USB:
- Save and exit the UEFI settings. Your computer should boot into the Ubuntu installation USB.
Step 4: Installing Ubuntu
-
Selecting «Try Ubuntu»:
- When the USB boots successfully, you will see the GRUB menu. Select «Try Ubuntu» to run it without installing.
-
Launch the Installer:
- Once the Ubuntu desktop environment loads, click on the «Install Ubuntu» icon.
-
Keyboard Layout:
- Choose your preferred keyboard layout and click «Continue.»
-
Updates and Other Software:
- You will have the option to download updates during installation and include third-party software. If you have a reliable internet connection, selecting both is recommended.
-
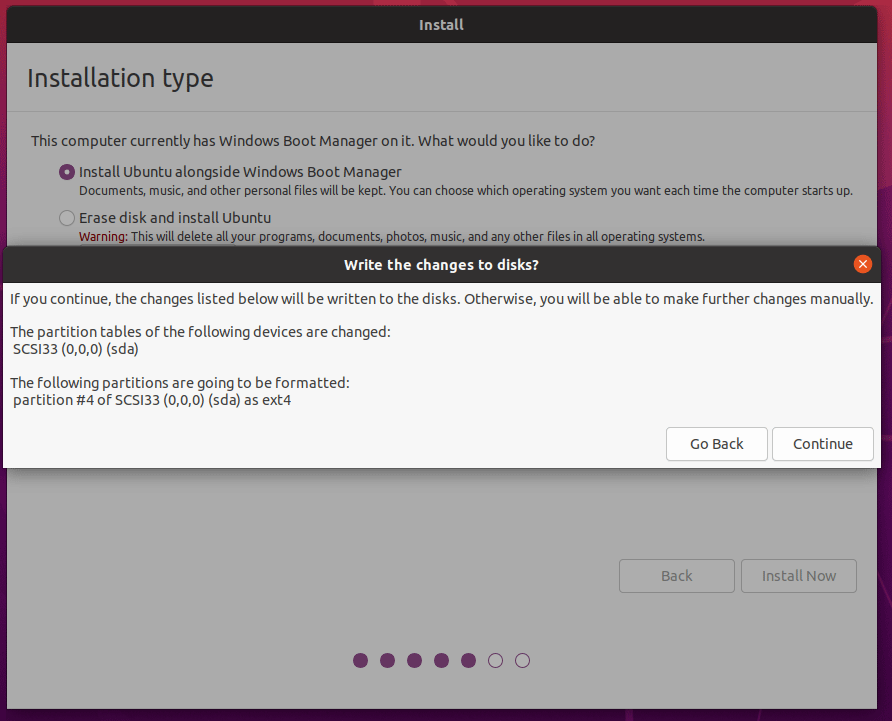
Installation Type:
- Choose the installation type. Select the option «Install Ubuntu alongside Windows Boot Manager.» This option will automatically handle the partitioning.
-
Allocate Disk Space:
- Adjust the space allocated for Ubuntu using the slider provided. Ensure you have allocated enough space (at least 20 GB is recommended).
Step 5: Completing the Installation
-
Choose Your Location:
- Select your time zone based on your geographic location and click «Continue.»
-
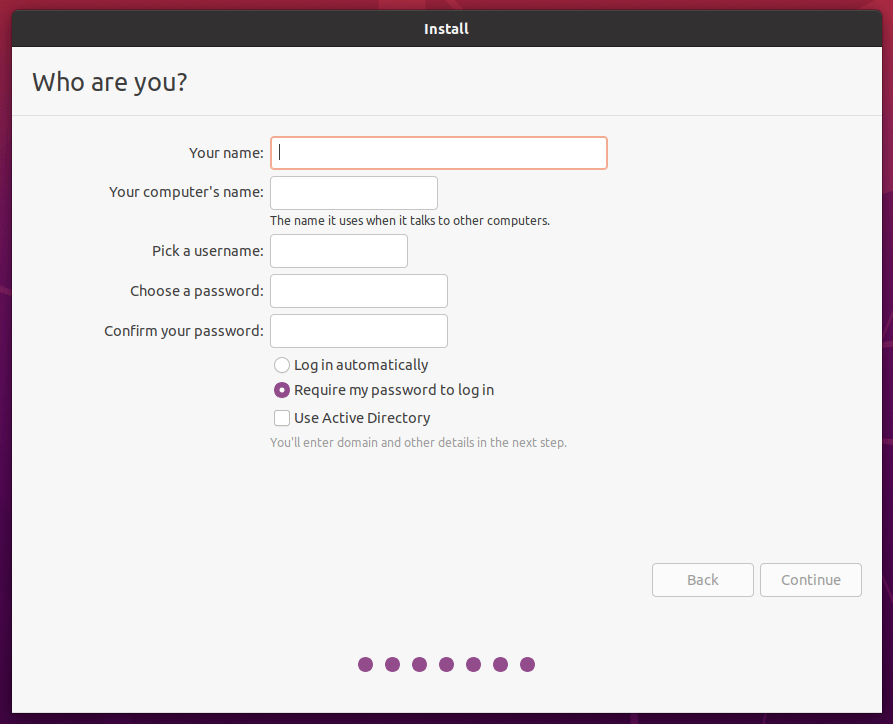
Create User:
- Enter your name, the computer’s name, username, and password. This username will be used to log in to Ubuntu.
-
Install:
- After reviewing your selections, click on «Install Now.» A confirmation dialog will appear summarizing the changes to be made to your disk. Confirm to proceed.
-
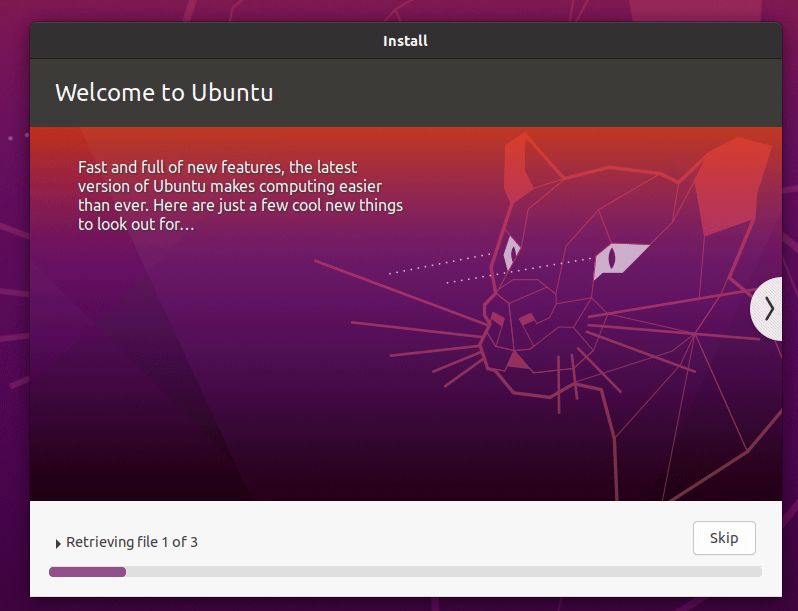
Wait for Installation:
- The installer will now copy files and install Ubuntu. This process may take several minutes. You will see a progress bar that indicates the installation status.
-
Restart:
- Once the installation is complete, you will be prompted to restart the computer. Remove the USB drive when prompted.
Step 6: Configuring the Boot Loader
Now that Ubuntu is installed, you may want to configure the boot loader:
-
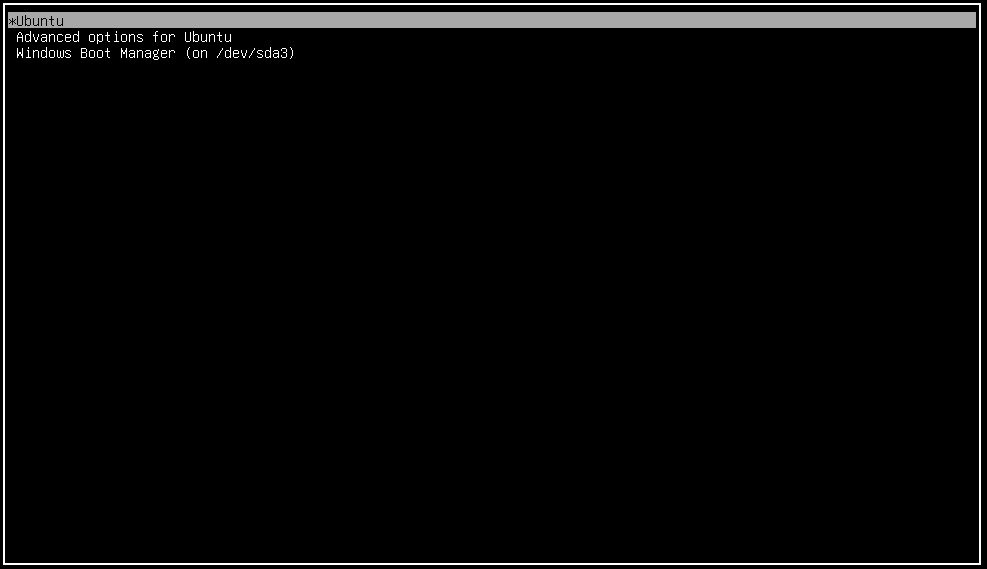
Boot Menu:
- After restarting, you should see a GRUB menu that allows you to choose between Windows 11 and Ubuntu. If you don’t see this menu, you may need to access the UEFI settings again to ensure the Ubuntu boot option is recognized.
-
Set Default OS:
- If desired, you can set which operating system boots by default. This can be done from within Ubuntu by editing the GRUB configuration file:
- Open a terminal and type
sudo nano /etc/default/grub. - Change the
GRUB_DEFAULTline to the appropriate entry number or name. - Save and exit the editor (Ctrl + X, then Y, and Enter).
- Update GRUB with the command:
sudo update-grub.
- Open a terminal and type
- If desired, you can set which operating system boots by default. This can be done from within Ubuntu by editing the GRUB configuration file:
Step 7: Post-Installation Configuration
After successfully installing Ubuntu and confirming dual-boot functionality, consider these post-installation configurations:
-
Install Additional Drivers:
- Open «Settings» > «About» > «Software & Updates» > «Additional Drivers». This will search for proprietary drivers that may help with performance and hardware compatibility.
-
Update Your System:
- Open a terminal and run the command
sudo apt update && sudo apt upgradeto ensure that your software is up to date.
- Open a terminal and run the command
-
Install Software:
- Explore and install additional applications via the Ubuntu Software Center. Popular choices include:
- Browsers: Google Chrome, Firefox.
- Development Tools: Visual Studio Code, Git.
- Media Players: VLC.
- Explore and install additional applications via the Ubuntu Software Center. Popular choices include:
-
Backup System:
- Consider setting up a backup tool in Ubuntu to regularly back up files and system settings.
-
Familiarize Yourself with Ubuntu:
- Spend time exploring Ubuntu and learning about its features, settings, and applications. Resources such as forums, online communities, and tutorials can be invaluable.
Conclusion
Congratulations! You have successfully installed Ubuntu alongside Windows 11, creating a dual-boot system that allows you to utilize the benefits of both operating systems. This setup enables you to seamlessly switch between Windows and Ubuntu, depending on your needs.
As you continue to explore Ubuntu, you will likely discover its powerful capabilities, versatile software, and thriving community. Whether you’re using it for development, daily tasks, or simply to learn, Ubuntu is a fantastic choice. Embrace your journey into the world of Linux, and feel empowered to experiment and customize your experience to best fit your needs. Enjoy your dual-boot setup!
Both Windows 11 and Ubuntu are very popular. You may want to install Ubuntu on Windows 11. This post from MiniTool shows you how to do that in 3 ways. You can have a try.
Should I Install Ubuntu on Windows 11?
Windows 11 is the latest major release of Microsoft’s Windows NT operating system, released on October 5, 2021. As of July 2023, Windows 11, at 24% worldwide is the 2nd most popular Windows version in use.
Ubuntu is a Linux distribution based on Debian and composed mostly of free and open-source software. It is the most popular Linux distro and many people like to use it to learn Linux and Unix or develop programs.
Some people may want to install Ubuntu on a Windows 11 PC to develop cross-platform applications without leaving Windows, or for other reasons. Then, they can use the following methods.
- Use Windows Subsystem for Linux (WSL).
- Use VM software like VMware.
- Dual boot Windows 11 and Ubuntu.
Which method should you use? You can decide after reading the pros and cons of these ways.
- WSL: WSL 2 also uses VM technology. Its advantages are lightweight, fast startup, easy installation, and close integration with Windows. Its disadvantage is that it doesn’t support GUI. If you just want to run Linux command-line tools, Bash shell scripts, and GNU/Linux command-line applications, WSL is recommended.
- VM: It offers the full Ubuntu experience and has a nice interactivity with Windows 11. In addition, it runs Ubuntu in an isolated environment. If there is something wrong with Ubuntu, Windows 11 won’t be affected. The defect is that running Ubuntu over Windows 11 may affect the PC’s performance.
- Dual Boot: It offers the best Ubuntu experience and performance. Its defects are low security, bad interactivity, and limited hard drive storage. As usage increases, Ubuntu may require more disk space. You may need to resize the partition.
How to Install Ubuntu on Windows 11? Keep reading to get the detailed guide.
Use WSL to Install Ubuntu on Windows 11
The Windows Subsystem for Linux lets developers run GNU/Linux tools – including most command-line tools, utilities, and applications – directly on Windows and without the overhead of a traditional virtual machine or dual-boot setup. The latest version is WSL 2.
How to install Ubuntu on Windows 11 using WSL 2? You can refer to the following guide.
Step 1: Install WSL.
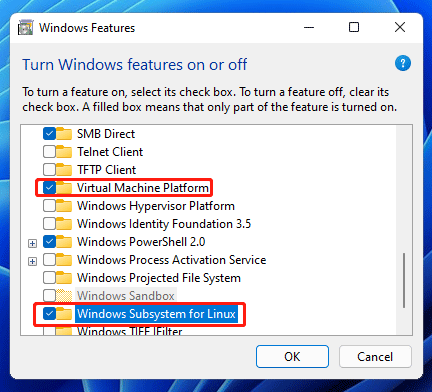
- In the Windows Search bar, type “turn Windows features on or off” and then open the corresponding app.
- Scroll down to check the boxes in front of Virtual Machine Platform and Windows Subsystem for Linux. Then, click OK.
- Restart your computer when required.
Step 2: Download and install the Linux kernel update package.
- Download WSL2 Linux kernel update package for x64 machines. This download link is offered by Microsoft.
- Run this tool and complete the setup.
Step 3: Install Ubuntu.
- Open the Microsoft Store and search for Ubuntu.
- Select an Ubuntu version to get it. You can also launch Ubuntu here. Then, you can start to configure and use Ubuntu.
Use VMware to Install Ubuntu on Windows 11
VMware is one of the most popular virtual machine programs. Using this software, you can install Ubuntu on a Windows 11 PC. How to install Ubuntu on Windows 11 using VMware? Here is the guide:
Step 1: Download and install VMware on your Windows 11 PC.
Step 2: Go to the Ubuntu official website to download the Ubuntu ISO. I recommend you download the LTS version because it is more stable.
Step 3: Install Ubuntu on VMware.
- Launch VMware and click File > New Virtual Machine.
- Select Custom (advanced) and keep going on.
- When it asks you where to install operating system from, select Use ISO image. Then, click the Browse button to select the Ubuntu ISO file you downloaded just now.
- The Ubuntu system will use Easy Install, which will install the guest operating system and VMware Tools automatically after the virtual machine is created.
- On the Easy Install Information window, enter Full Name, User Name, and Password. User Name and Password are used to log in to Ubuntu. Full Name is the name of the Ubuntu computer (hostname).
- Name the Ubuntu VM and select the installation location of the VM.
- Configure the processor. Make sure the total processor cores are 2 or more because Ubuntu requires a 2GHz dual-core processor or better.
- Allocate the memory for the virtual machine. 2GB to 4GB is recommended.
- Keep going on until you are asked to Specify Disk Capacity. At least 25GB is required.
- Keep clicking the Next buttons and then Finish the Ubuntu VM creation.
- The Ubuntu VM will power on and go through the installation process automatically. All you need to do is wait until the installation process is completed.
Dual Boot Windows 11 and Ubuntu
Can I install Ubuntu on Windows 11? The answer is YES, but Secure Boot should be disabled first. Here is how to dual boot Windows 11 and Ubuntu.
Tips:
It’s recommended to install Windows 11 first and then install Ubuntu secondly.
#1. Create a Bootable USB Drive for Ubuntu
Step 1: Download the Ubuntu ISO file and then download a burning program like Rufus.
Step 2: Prepare a USB flash drive with at least 8 GB of storage capacity and then insert it into your computer.
Step 3: Launch Rufus. Under Device, select the USB drive. Under Boot selection, click SELECT and choose the Ubuntu ISO file you downloaded just now. Make sure the Partition scheme is GPT because Windows 11 only supports UEFI and the system disk must be a GPT disk.
Step 4: Keep other parameters as the default and click Start. Confirm the burning operation and wait until the burning process is completed. After that, close Rufus.
#2. Make Unallocated Space for Ubuntu Installation
To dual boot Windows 11 and Ubuntu, you need to create a separate unallocated space for the Ubuntu installation.
If your computer only has one partition and this partition has enough free space, you can use Disk Management to shrink the partition to get the unallocated space. Make sure the unallocated space is at least 25GB.
However, if your computer has multiple partitions, MiniTool Partition Wizard is better. This free disk partition software can get unallocated space from multiple partitions. In addition, it can convert MBR to GPT without data loss, clone hard drive, and recover hard drive data.
Here is how to get unallocated space using MiniTool Partition Wizard.
MiniTool Partition Wizard FreeClick to Download100%Clean & Safe
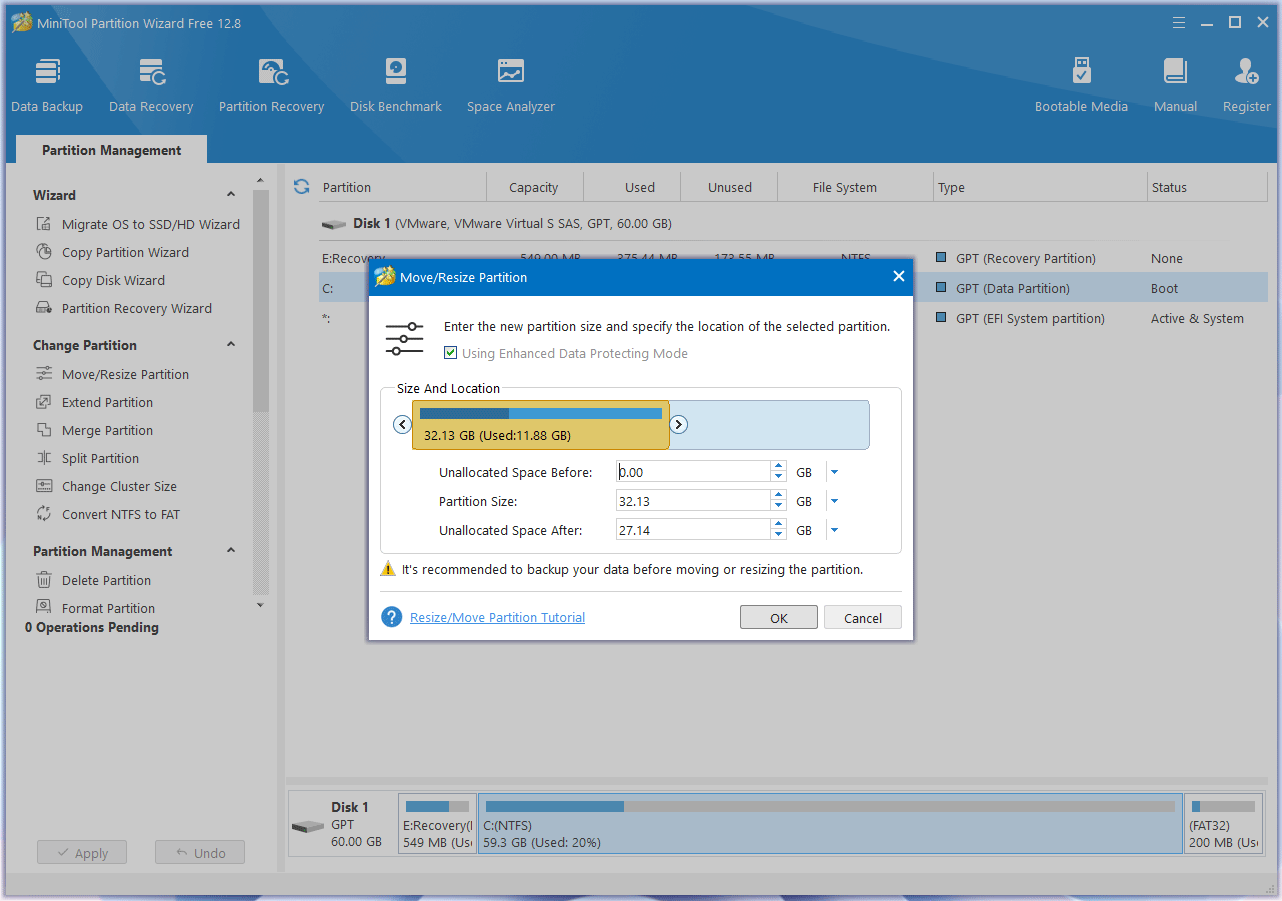
Step 1: Launch MiniTool Partition Wizard. Right-click a partition and choose Move/Resize.
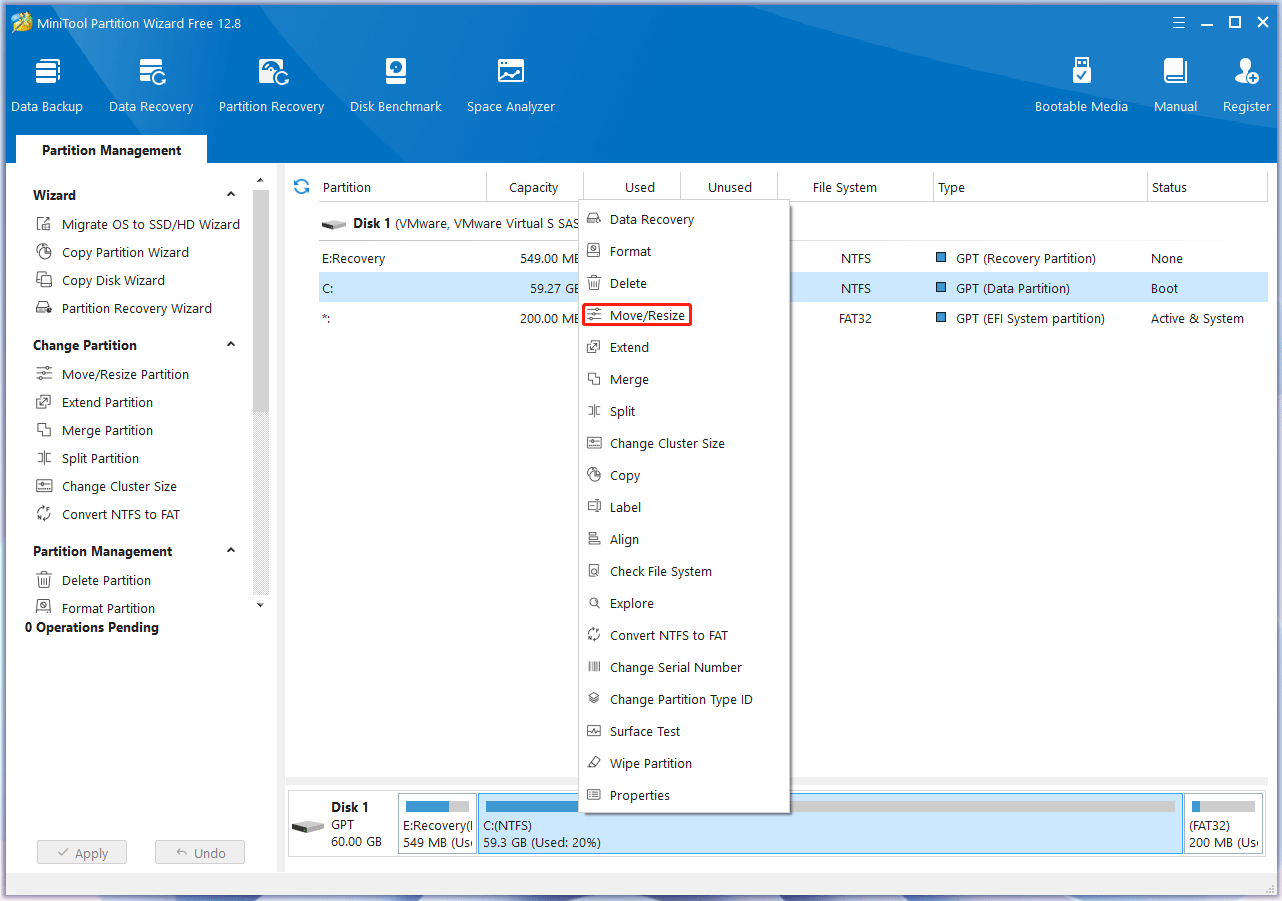
Step 2: On the pop-up window, under Size And Location, drag the arrow icons to shrink the partition. Drag the partition block to change the location of the partition. In this way, the location of the unallocated space is also changed. Then, click OK.
Tips:
If you need to take unallocated space from multiple partitions, use the same way to move/resize other partitions. Then, make sure you have merged the unallocated space into one.
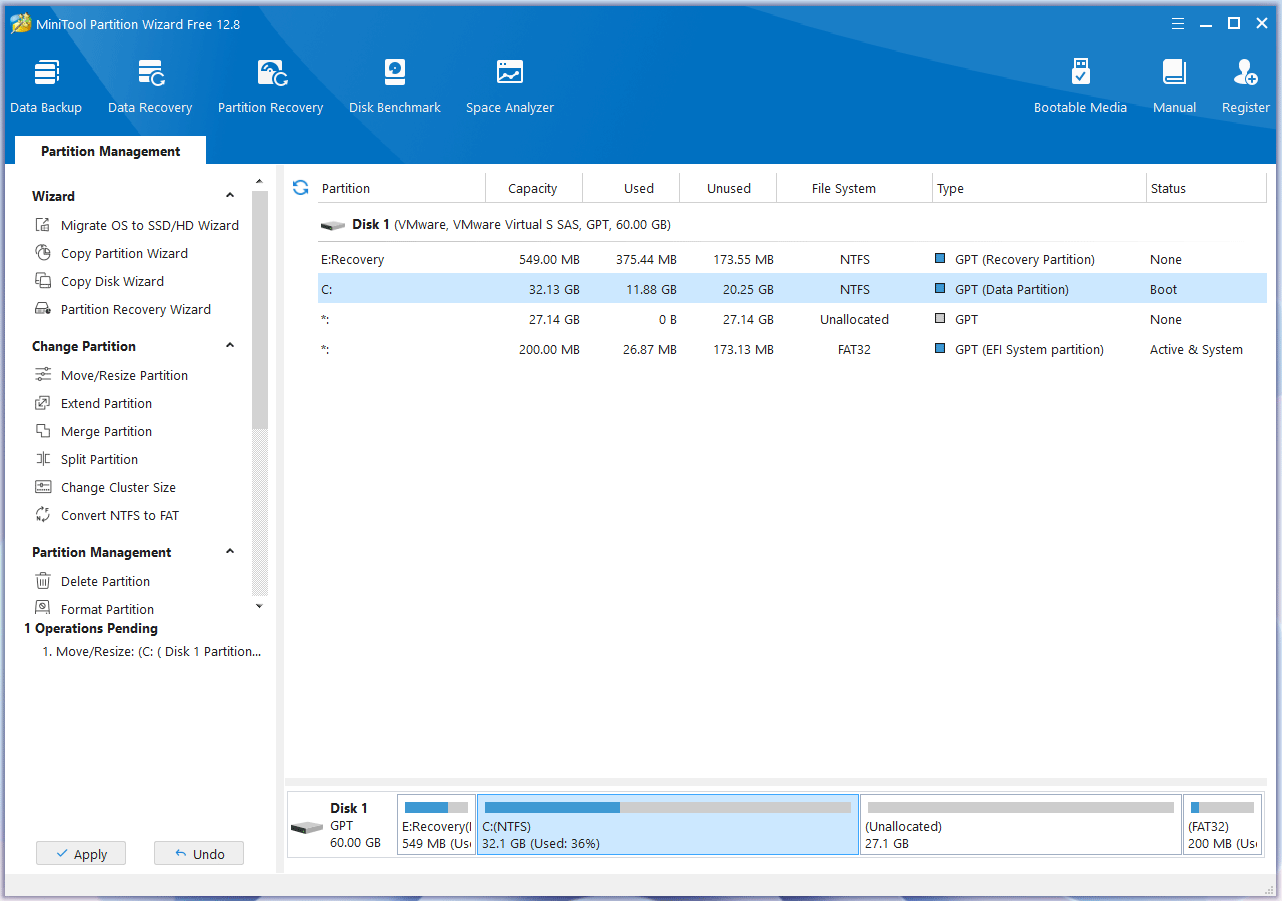
Step 3: Check the layout of the partition and then click Apply to execute the operation. Click Yes to confirm the operation. If you have moved/resized the C drive, a PC restart is needed.
#3. Install Ubuntu on Windows 11
Now, you need to follow the guide below to dual boot Windows 11 and Ubuntu.
Step 1: Shut down the Windows 11 computer and insert the bootable USB drive into your computer.
Step 2: Power on your computer. Press the BIOS key once the PC logo appears to enter the firmware. The BIOS key should appear at the bottom of the PC logo screen. If you don’t see it, you can also search for it online according to your PC model.
Step 3: In the firmware, go to the Boot or Security tab, find the Secure Boot option, and make sure it is Disabled, because this option will prevent Ubuntu from booting
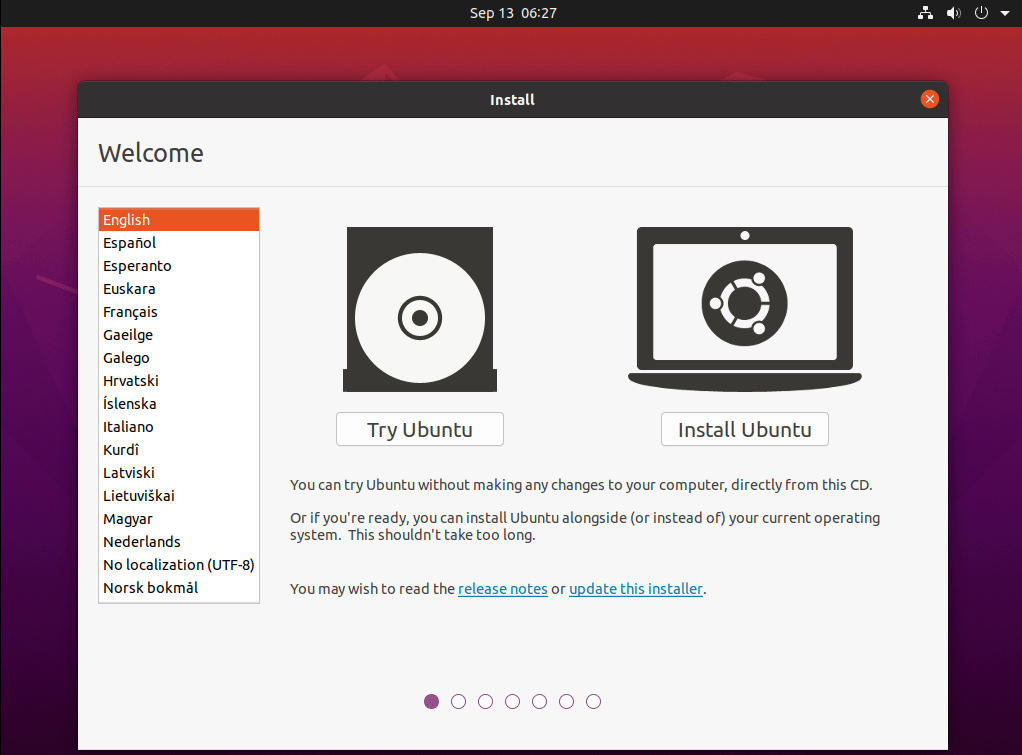
Step 4: Go to the Boot tab to set the USB drive as the boot device. Then, press F10 to save changes and exit the firmware. Several options are offered to you and you need to choose Ubuntu. Ubuntu will check the disk. After the checking process is completed, you will come to the Ubuntu Install page. Click Install Ubuntu.
Step 5: Choose some installation options.
- Choose the Keyboard layout. English (US) is recommended.
- Choose Updates and other software. Keep the default options.
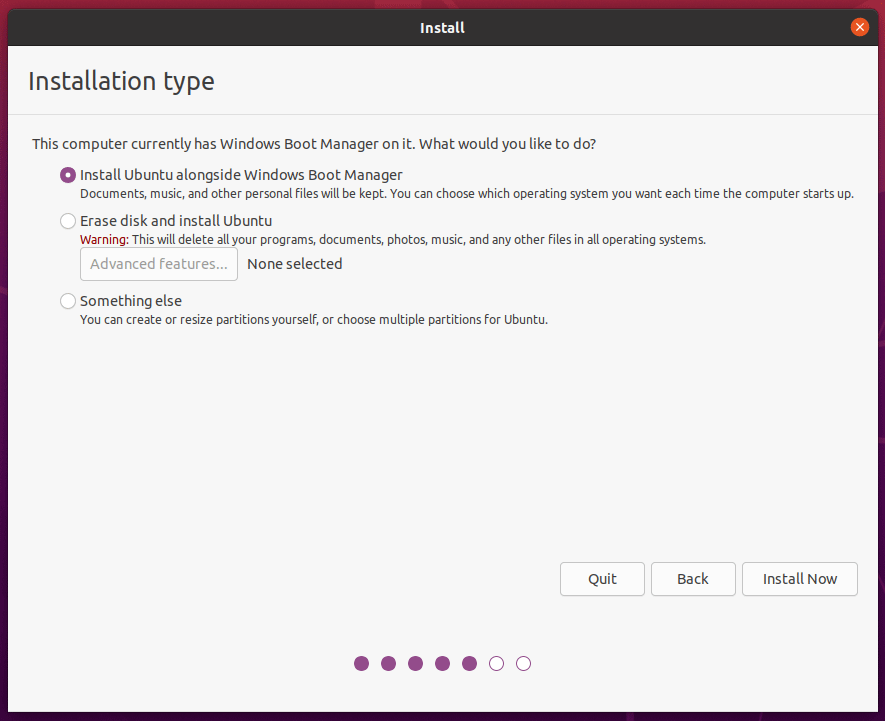
- Choose Installation type. Install Ubuntu alongside Windows Boot Manager is recommended. Then, click Install Now.
Tips:
If you want to create and resize the partitions for Ubuntu by yourself, choose Something else. This option requires you to have some knowledge about the Ubuntu partitions.
Step 6: Ubuntu will detect the unallocated space and partition it. Click Continue to confirm that you want to write changes to disks.
Step 7: Choose your zone. This is related to the time displayed by Ubuntu. Then, enter Your name and Your computer’s name. Pick a username and choose a password.
Step 8: The Ubuntu installation will begin. You just need to wait until the installation process is completed. Restart your computer when it asks. Then, you can remove the USB drive.
#4. Switch Between Windows 11 and Ubuntu
If you want to boot from Ubuntu, you should do as follows:
- Power on your computer and enter the firmware.
- Disable Secure Boot.
- Exit the firmware.
- Choose Ubuntu.
If you want to boot from Windows 11, you should do as follows:
- Power on your computer and enter the firmware.
- Enable Secure Boot. If you don’t do this, you will encounter errors when booting Windows 11.
- Exit the firmware.
- Choose Windows Boot Manager.
Do you need to install Ubuntu on Windows 11? Here are 3 different ways (WSL, VM, and dual boot) for you.Click to Tweet
Bottom Line
Is this post useful to you? Do you know other ways to install Ubuntu on Windows 11? Have you encountered issues when installing Ubuntu on Windows 11? Leave your comment in the following zone.
In addition, if you encounter problems when using MiniTool Partition Wizard, please feel free to contact us via [email protected]. We will get back to you as soon as possible.
Installing Ubuntu on Windows 11 is a straightforward process that can be done using a feature called Windows Subsystem for Linux (WSL). This allows you to run a Linux distribution alongside your Windows operating system. In just a few steps, you’ll be able to enjoy the best of both worlds on your computer.
Step by Step Tutorial: Installing Ubuntu on Windows 11
Before you dive into the world of Ubuntu on Windows 11, it’s important to understand what these steps will do. Essentially, you’ll be enabling WSL, installing the Ubuntu app, and setting up your new Linux environment.
Step 1: Enable the Windows Subsystem for Linux
Open the Windows Features dialog box and check the box for «Windows Subsystem for Linux.»
Enabling the Windows Subsystem for Linux is the first crucial step. You’ll need to open the Start Menu, search for «Turn Windows features on or off» and click on it. In the Windows Features dialog box that pops up, scroll down until you find «Windows Subsystem for Linux» and check the box next to it. Click OK, and your system will apply the changes and prompt you to restart your computer.
Step 2: Restart Your Computer
Restart your computer to apply the changes made in Step 1.
After enabling WSL, a system restart is necessary to ensure that all changes are applied properly. Simply click on the restart prompt or manually restart your computer and wait for it to boot up again.
Step 3: Install Ubuntu from the Microsoft Store
Once your computer restarts, open the Microsoft Store, search for «Ubuntu,» and click on the «Get» button to install it.
With your system back on, open the Microsoft Store from the Start Menu or search for it. In the search bar of the Microsoft Store, type in «Ubuntu» and select the first result that appears. There will be a «Get» button. Click on it, and the Ubuntu app will begin to download and install.
Step 4: Launch Ubuntu and Set Up Your User Account
After installation, launch Ubuntu from the Start Menu and follow the prompts to set up your username and password.
Once Ubuntu is installed, you can launch it from the Start Menu. On the first launch, Ubuntu will take a few minutes to set up. It will then ask you to create a new user account. This account is separate from your Windows account. Choose a username and password that you’ll remember, as you’ll need these every time you launch Ubuntu.
Step 5: Update and Upgrade Ubuntu
Run the command sudo apt update && sudo apt upgrade in the Ubuntu terminal to update and upgrade your system.
Now that you’re in your new Ubuntu shell, it’s always a good idea to make sure everything is up to date. To do this, type in the command sudo apt update && sudo apt upgrade and press ENTER. You’ll be prompted to enter the password you just created. This process may take some time, depending on your internet speed and the number of updates available.
After completing these steps, you’ll have a fully functional Ubuntu environment running on your Windows 11 system.
What Happens After Installation
Once Ubuntu is installed on your Windows 11 computer, you’ll have access to a plethora of Linux tools and applications. You can use the Ubuntu terminal to run Linux commands, install additional software packages, and even run graphical Linux applications if you choose to enable this feature.
Tips for Installing Ubuntu on Windows 11
- Make sure your Windows 11 system meets the minimum requirements for WSL.
- It’s a good idea to back up your important files before making changes to your system.
- If you’re new to Linux, familiarize yourself with basic terminal commands.
- Explore the Microsoft Store for other Linux distributions if Ubuntu doesn’t suit your needs.
- Remember that running Ubuntu on Windows 11 through WSL is not the same as dual-booting. You won’t have to partition your hard drive or choose between operating systems at startup.
Frequently Asked Questions
Do I need a powerful computer to run Ubuntu on Windows 11?
No, you don’t need a powerful computer, but you should check WSL requirements to ensure compatibility.
Can I access my Windows files from Ubuntu?
Yes, you can access your Windows files from the Ubuntu terminal by navigating to the /mnt/c directory.
Is running Ubuntu on Windows 11 free?
Yes, both WSL and the Ubuntu app on the Microsoft Store are free to use.
Can I uninstall Ubuntu if I no longer need it?
Absolutely, you can uninstall Ubuntu just like any other app from the Microsoft Store.
Will installing Ubuntu affect my Windows 11 warranty?
No, installing Ubuntu through WSL is supported by Microsoft and won’t affect your warranty.
Summary
- Enable the Windows Subsystem for Linux.
- Restart your computer.
- Install Ubuntu from the Microsoft Store.
- Launch Ubuntu and set up your user account.
- Update and upgrade Ubuntu.
Conclusion
Installing Ubuntu on Windows 11 using the Windows Subsystem for Linux is a game-changer for developers, IT professionals, and even enthusiasts who want to experiment with Linux. This seamless integration allows users to enjoy the best of both worlds without the need for complex setups like dual-booting. The process is simple and, thanks to the Microsoft Store, as easy as installing any regular Windows app. The tips provided will help ensure a smooth installation, and the FAQ section should clear up any common concerns.
Whether you’re looking to develop cross-platform applications, run server environments, or simply explore the Linux ecosystem, Ubuntu on Windows 11 has got you covered. So go ahead, give it a try, and unlock a new realm of possibilities on your Windows 11 machine.
Matt Jacobs has been working as an IT consultant for small businesses since receiving his Master’s degree in 2003. While he still does some consulting work, his primary focus now is on creating technology support content for SupportYourTech.com.
His work can be found on many websites and focuses on topics such as Microsoft Office, Apple devices, Android devices, Photoshop, and more.