
TensorFlow, a powerful open-source machine learning library developed by Google, has revolutionized the field of deep learning. Its flexible architecture and extensive capabilities make it a go-to choice for developers, researchers, and data scientists tackling complex problems like image recognition, natural language processing, and predictive modeling. Whether you’re building cutting-edge AI applications or exploring the world of machine learning, mastering TensorFlow is crucial.
This comprehensive guide will equip you with the knowledge and skills to confidently install TensorFlow on your Windows machine. Moreover, we’ll explore various installation methods, including using pip, Anaconda, and optimizing for GPU acceleration. By the end of this step-by-step guide, you’ll be ready to embark on your TensorFlow journey and unlock the potential of this powerful library.
System Requirements to Install TensorFlow on Windows
Before diving into the installation process, let’s ensure your Windows system meets the minimum requirements for a smooth TensorFlow experience.
Hardware Requirements
- CPU: A modern multi-core processor is recommended for optimal performance.
- RAM: At least 8 GB of RAM is recommended, but 16 GB or more is ideal for larger models and datasets.
- Storage: It requires a minimum of 10 GB of free disk space for the TensorFlow installation and additional data.
- GPU (Optional): While TensorFlow can run on CPUs, using a compatible NVIDIA GPU with CUDA and cuDNN drivers can significantly accelerate training and inference, especially for complex deep learning models.
Python Version
- Required Version: TensorFlow requires Python 3.x. It does not support Python 2.x any longer.
- Installation: If you don’t have Python installed, download the latest version from the official Python website.
- Other Dependencies: TensorFlow may rely on additional libraries like NumPy, SciPy, and matplotlib. Moreover, these are often automatically installed with TensorFlow. However, it’s good to have them pre-installed.
Installing TensorFlow using pip on Windows
The most common and straightforward way to install TensorFlow on Windows is using the pip package manager. Moreover, pip is a powerful tool for installing and managing Python packages, making it a convenient choice for installing TensorFlow.
pip stands for “Pip Installs Packages”. Pip for Python on Windows is the default package installer. Moreover, it allows you to easily install and manage Python libraries from the Python Package Index (PyPI), a vast repository of open-source Python packages.
Get Started with Windows Hosting for TensorFlow
Ready to take your TensorFlow projects to the next level? Discover the power and reliability of Windows Hosting with Ultahost. Start building and deploying your machine-learning models with ease. Get started today!
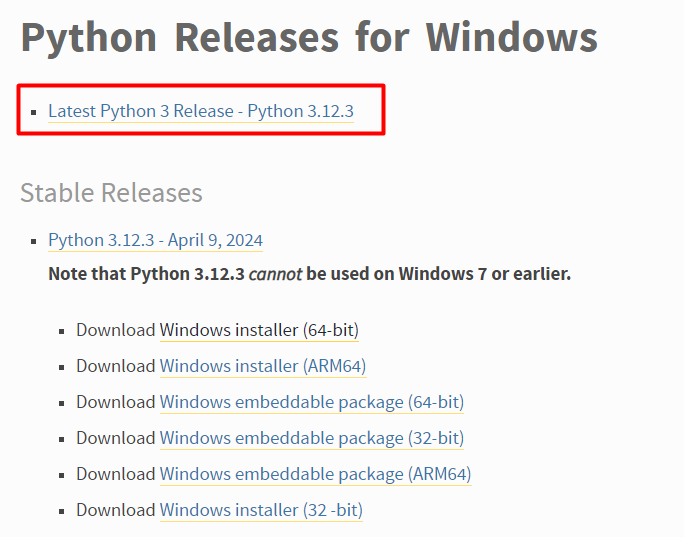
Step 1: Installing Python
If you don’t have Python 3.x installed, download the latest version from the official Python website.
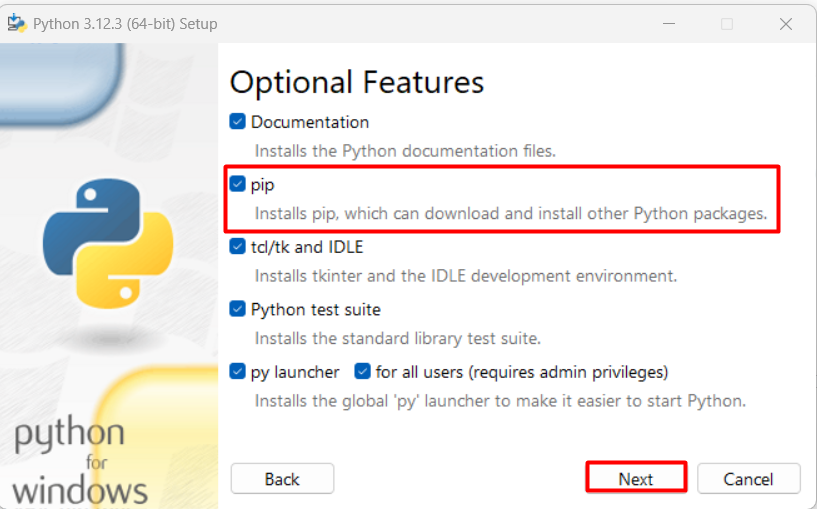
During installation, make sure to check the PIP option which you will need later to install TensorFlow:
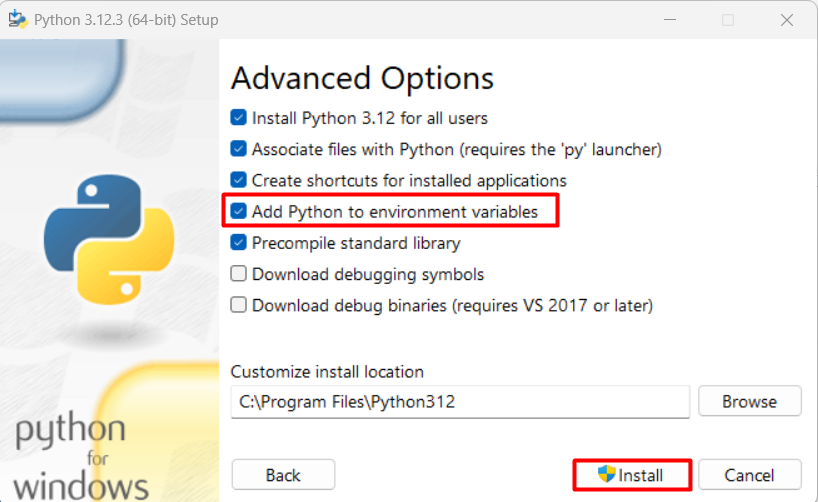
Moreover, you need to make sure to add the python path to the environment variable. Otherwise, the command prompt won’t recognize the commands associated with Python:
Step 2: Verifying Python Installation
When you install python, then you need to execute the below command in the command prompt for verification:
python -V

If you are able to see the Python version, then it means that the Python is installed and working successfully.
Step 3: Installing TensorFlow
In your command prompt or PowerShell, run the following command to install TensorFlow:
Verifying Python Installation
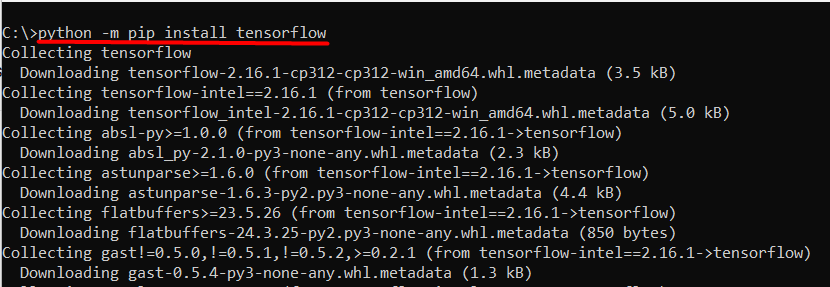
This command will download and install the latest stable version of TensorFlow.
Step 4: Verify TensorFlow Installation
Open a Python interpreter by typing python in your command prompt or PowerShell.
Import TensorFlow and print its version:
import tensorflow as tf
print(tf.__version__)
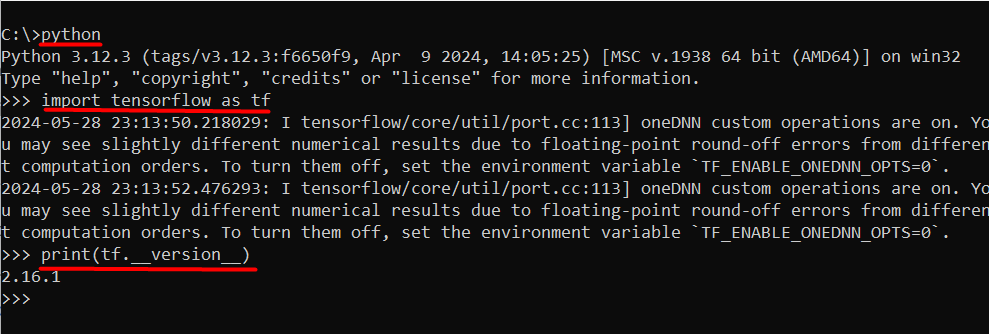
If the installation was successful, you should see the TensorFlow version printed.
Conclusion
TensorFlow is a powerful open-source machine learning library that has revolutionized the field of deep learning. To unlock its full potential, it’s crucial to master its installation on your Windows machine. Furthermore, this comprehensive guide has taken you through the step-by-step process of installing TensorFlow using pip, ensuring your system meets the minimum requirements, and verifying the installation.
By following these instructions, you’ve successfully installed TensorFlow and are now ready to embark on your machine learning journey. With TensorFlow at your fingertips, you can explore the world of image recognition, natural language processing, and predictive modeling. Moreover, remember to optimize your installation for GPU acceleration and ensure you have the required dependencies, such as Python 3.x and additional libraries like NumPy and SciPy.
Whether you’re a beginner or an experienced developer, following these steps will help you get TensorFlow up and running smoothly. For an optimized environment tailored to your Python projects, consider Python Hosting with Ultahost.
FAQ
What is TensorFlow?
TensorFlow is an open-source machine learning library developed by Google. Moreover, it is widely used for building and training neural networks and other machine learning models.
How can I install TensorFlow using pip?
- Install Python: Download and install Python from the official website.
- Upgrade pip: Open Command Prompt and run python -m pip install –upgrade pip
- Install TensorFlow: pip install tensorflow
What are the system requirements for installing TensorFlow on Windows?
- Operating System: Windows 7 or later (64-bit)
- Python Version: Python 3.5-3.8 (TensorFlow may not support newer versions)
- RAM: Minimum 4 GB (8 GB or more recommended)
- CUDA Toolkit and cuDNN: Required for GPU support (optional)
I get a ‘DLL load failed’ error when importing TensorFlow. How do I fix it?
- Ensure that the correct version of the CUDA Toolkit and cuDNN is installed.
- Verify that the CUDA and cuDNN paths are added to the system PATH.
- Check for compatibility between TensorFlow, CUDA, and cuDNN versions
What should I do if I encounter issues during installation?
- Check the official TensorFlow installation guide: TensorFlow Installation Guide
- Search for specific error messages online.
- Consult TensorFlow community forums and Stack Overflow.
Last Updated :
05 Sep, 2022
Tensorflow is a free and open-source software library used to do computational mathematics to build machine learning models more profoundly deep learning models. It is a product of Google built by Google’s brain team, hence it provides a vast range of operations performance with ease that is compatible with human behavior for ML and DL. It can run on multiple CPUs and GPUs.
Features of Tensorflow:
- Computational Framework – It is a platform that provides huge computational framework at one place. In this, computation is approached as a dataflow graph.
- Mobile Deployment – It is an easy way to build projects with mobile deployment
- High Performance – Due to its ease and varying toolkits, it gives high-performance user experience.
Downloading and Installation:
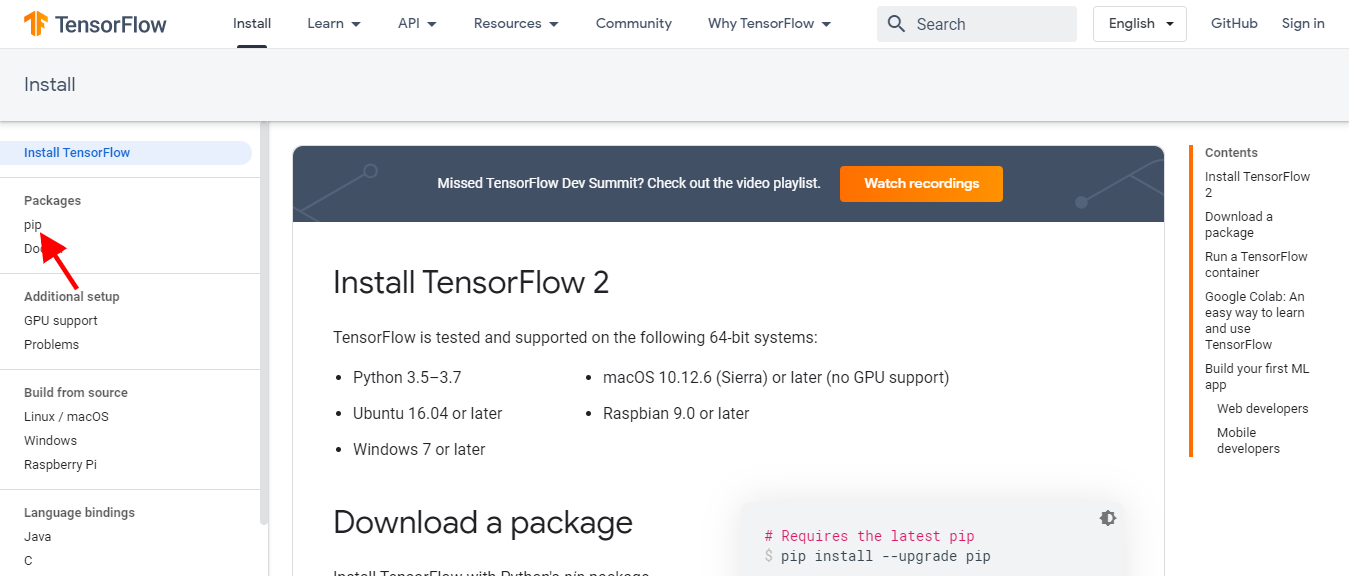
Tensorflow can be downloaded from its official Website tensorflow.org and can be installed with the help of following steps: Step 1: Click on Install on top navigation bar of Tensorflow website.

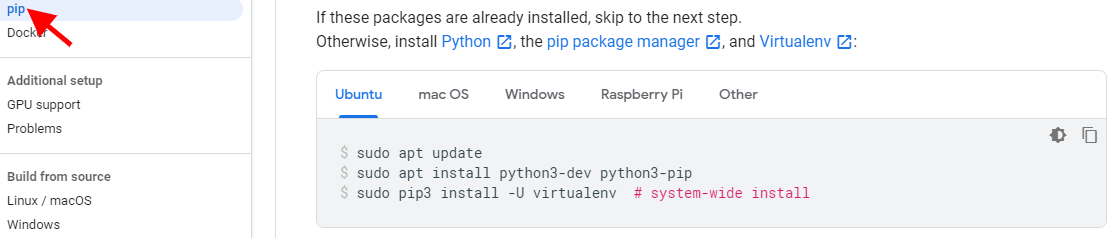
Step 2: Before proceeding we need to get python environment. Choose pip in the left side and go to python section and install python environment to work on it.

Step 3: Python environment can be downloaded from python.org. To install python on windows refer to: How to install Python on Windows?
Step 4: To install Tensorflow, we need pip for python. Usually, pip comes already installed if the python version is 3 or above. To know more about pip installation please refer: How to install pip in Windows? For all OS users check the pip section of TensorFlow as shown in the following screenshot:
Tensorflow can also be downloaded for installation on different OS:
Step 5: Creating a Tensorflow virtual environment
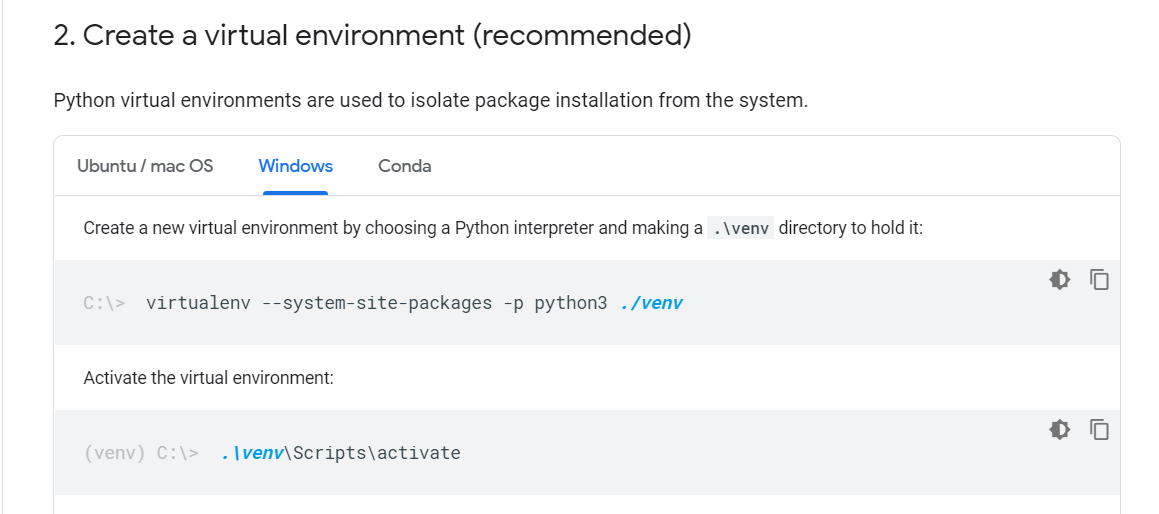
This can be done with the use of the following command:
pip install --user virtualenv

You can also create a virtual environment using Anaconda (refer here) or its lightweight installer (without graphical user interface) Miniconda (refer here)After successful installation by following instructions provided on the official website (links provided above), use this command to create a new virtual environment using conda.
conda create -n virtualenv
This will create a conda environment named “virtualenv” with the latest python version available installed on your system.
creating a new conda environment
If you want to install a specific python version, try the following:
conda create -n virtualenv python=3.7
creating environment with specific python version
Now, to activate the newly created environment, run
conda activate virtualenv
Now everything you install for your project will be installed inside this environment and you will not face conflicting dependencies with your other projects.
It is recommended that you create a new virtual environment for every project so that you don’t run into setup, installation and dependency issues.
Step 6: After setting up the virtual environment, use the following command to install Tensorflow pip package:
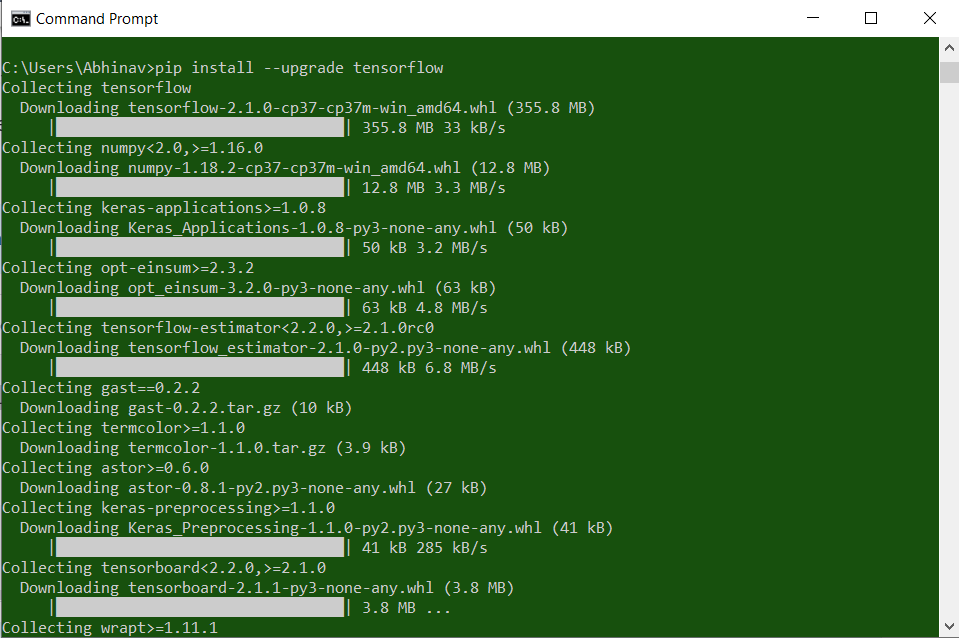
pip install --upgrade tensorflow
Once installed you can import TensorFlow in your python programming environment as you choose(here python IDE as stated in step 5).
If you are a beginner and don’t know how to install TensorFlow, I have explained the step-by-step procedure to install TensorFlow for three different platforms: Windows, Linux, and MacOS.
To install Tensorflow on your computer or systems. First, ensure you have installed Python version 3.9 to 3.11, pip version 19.0 or higher for Windows and Linux, and 20.3 or higher for macOS.
If you haven’t installed Python, visit this Python download and installation tutorial.
I will show you how to install Tensorflow on Windows, Linux, and MacOS platforms. Let’s start installing Tensorflow.
There are two versions of TensorFlow that you can install on your system: Tensorflow-CPU and Tensorflow-GPU.
Tensorflow-CPU only uses the CPU resources for computation, whereas Tensorflow-GPU uses the GPU resources. Here, I will cover only the Tensorflow-CPU; to know how to install Tensorflow-GPU, follow this link.

Install Tensorflow on Windows
To install tensorflow on Windows, open the command prompt and create a virtual environment using the command below.
python -m venv tensorflow_envAfter creating the environment ‘tensorflow_env’, activate this environment using the command below.
tensorflow_env\Scripts\activateAfter activating the environment, install the latest version of tensorflow using the command below.
pip install tensorflow
If you see something like this in the above image, tensorflow is downloaded and installed on your system without any error.
To verify the installation of Tensorflow from your Windows, first open the Python shell using the command below.
pythonThen, import the TensorFlow library by giving the alias name tf using the command below.
import tensorflow as tfAfter that, to check the installed Tensorflow, run the command tf.__version__ as shown in the command below.
print(tf.__version__)
When you run the command, print(tf.__version__), the version number of TensorFlow is returned. As you can see in the above output, the version is 2.15.0. If you see that version of Tensorflow like that, you have successfully installed Tensorflow on Windows.
Moving on to the next step, let’s see how to install it on Linux.
Install Tensorflow on Linux
To install on Linux, first, ensure you have installed Python; if not, install it. also, some of the Linux distributions have Python pre-installed. So here, I will use the Ubuntu operation and show you how to install TensorFlow.
Ensure you have installed the latest version of Ubuntu (64-bit) or version 16.04 or higher; these steps can also be used in other distributions of Linux, but Tensorflow officially supports Ubuntu.
Next, before installing, check the version of Python in your terminal using the command below.
python3.11 --versionAfter that, create a new environment. You need to install the ‘venv’ package, and then you can create an environment; use the command below to install that package.
sudo apt install python3.11-venv
Then, close and open the terminal again. Create a virtual environment ‘tensorflow_env’ using the command below.
python3.11 -m venv tensorflow_envNow, activate the environment you created using the command below.
source tensorflow_env/bin/activateAfter activating environment ‘tensorflow_env’, install the latest version of Tensorflow using the command below.
pip install tensorflow
To verify the installation of Tensorflow on Linux (Ubuntu), activate the Python shell by typing Python3.11 in your terminal and hitting enter from your keyboard.
python3.11After entering into the Python shell, import the Tensorflow library using the command below.
import tensorflow as tfThen check the version of TensorFlow you installed just now; use the command tf.__version__ as shown below.
print(tf__version__)
As you can see, the latest version of the TensorFlow is 2.15.0. Also it indicates that you have successfully installed Tensorflow on the Linux system (Ubuntu).
Remember you can follow all the above steps for other Linux distros to install Tensorflow. Again, I want to say that before installing TensorFlow, check whether you have installed Python or not, and also check the package that allows you to create an environment for your project, such as Venv.
If you don’t want to install TensorFlow in a specific virtual environment such as tensorflow_env that you have created, then simply after checking the version of Python, run the command pip install tensorflow, and this will install TensorFlow in your current directory.
Finally, let’s look at how to install TensorFlow on MacOS.
Install Tensorflow on MacOS
Again, before installing TensorFlow, ensure you have installed the Python and the virtual environment package to create an environment.
To check the python on the MacOS, run the command below.
python3.11 --versionTo install the virtual environment package ‘virtualenv’, use the below command.
brew install virtualenvNow, create a new environment, ‘tensorflow_env, ‘ using the command below in your terminal.
virtualenv tensorflow_envActivate the created environment using the command below.
source tensorflow_env/bin/activateAfter activating the environment, install the TensorFlow using the command below.
pip install tensorflowTo verify the installation of Python, open the terminal or command prompt, then type the command below to open the Python shell.
python3.11Then, import the tensorflow library using the command below.
import tensorflow as tfAfter checking the version of installed TensorFlow using the function tf.__version__ as shown below.
print(tf.__version__)If you see the version, it’s something like 2.15.0; you have installed TensorFlow successfully on your macOS system.
Conclusion
In this tutorial, I have covered how to install TensorFlow on different platforms using the command pip install TensorFlow, especially since you have installed the CPU version of TensorFlow.
Additionally, you learned how to install TensorFlow on a specific platform like MacOS, Windows and Linux (Ubuntu). you also learned how to check the tensorflow version using the tf.__version__ function.
You may like to read:
- Tensorflow iterate over tensor
- Convert list to tensor TensorFlow
- Import error no module named TensorFlow
I am Bijay Kumar, a Microsoft MVP in SharePoint. Apart from SharePoint, I started working on Python, Machine learning, and artificial intelligence for the last 5 years. During this time I got expertise in various Python libraries also like Tkinter, Pandas, NumPy, Turtle, Django, Matplotlib, Tensorflow, Scipy, Scikit-Learn, etc… for various clients in the United States, Canada, the United Kingdom, Australia, New Zealand, etc. Check out my profile.
Если вы всерьез задумали заняться машинным обучением, верным помощником вам станет TensorFlow. Эта библиотека, разработанная командой Google, содержит всё необходимое для тренировки нейросетей. Но сначала нужно ее установить, а методы установки TensorFlow достаточно серьезно различаются в зависимости от того окружения, которое вы используете.
Из общих рекомендаций выделим адрес каталога, в который мы будем устанавливать библиотеку. Путь к ней не должен содержать пробелов, кириллических и специальных символов: желательно использовать только латиницу и цифры, в крайнем случае — подчеркивания. Это позволит избежать ошибок и вылетов при загрузке.
Как установить TensorFlow в Python
Установка TensorFlow в Python может быть как предельно простой, так и немного замысловатой. Простой вариант подойдет тем, кто поставил Python только ради TensorFlow. Этим пользователям достаточно набрать в IDLE (так в Python называется IDE) следующую команду менеджера пакетов pip, который есть во всех новых версиях Python, начиная с 3.4:
pip install tensorflowДля удаления любого пакета просто замените install на uninstall.
Но такой способ установки не подойдет тем, кто уже использует Python для других целей, поскольку будут подгружены зависимости TensorFlow, в результате чего нужные вам версии определенных пакетов могут измениться. Чтобы этого избежать, сначала ставим следующий пакет:
pip install virtualenvТеперь давайте создадим виртуальное окружение (директория приведена просто для примера, замените ее на желаемую):
cd ~mkdir mymlproject
virtualenv ~/mymlproject/tensorflow
Теперь активируем нашу виртуальную среду:
source ~/mymlproject/tensorflow/bin/activateОб успешности активации будет свидетельствовать измененная запись виртуальной среды в командной строке, она будет указана в скобках: (tensorflow).
Мы почти у цели — осталось установить собственно TensorFlow, что делает следующая простая команда:
(tensorflow) pip install tensorflowВот и всё, теперь можно начать работу над оптимизацией нейросети, а когда закончите, можно выйти из виртуальной среды, набрав:
(tensorflow) deactivatecloud
Как установить TensorFlow в Windows
Установка TensorFlow в Windows также не представляет особых трудностей. Вы даже можете выбрать, какую версию установить: CPU или GPU. CPU означает, что вычисления будут обрабатываться за счет мощности центрального процессора, а в GPU к вычислениям будет подключаться графический (но пока только NVidia).
CPU устанавливается так:
pip install tensorflowА GPU так:
pip install tensorflow-gpuПри этом учтите, что для большинства задач машинного обучения вполне достаточно CPU-версии, а GPU используется в качестве помощника для тренировки моделей глубокого обучения (многослойные нейросети со сложной структурой).
Как установить TensorFlow в Anaconda
Установка TensorFlow в Anaconda — процесс несколько более сложный. Будем предполагать, что сама Anaconda у вас уже установлена. Сначала наберите в поиске (меню «Пуск») Anaconda prompt и запустите найденный файл или зайдите в Anaconda Navigator и выберите там CMD.exe Prompt. В открывшемся окне введите следующее (путь у вас будет, разумеется, свой):
(base) C:\conda create -n tensorflowНа предложение системы загрузить и установить все пакеты (их может быть много, и это нормально) ответьте нажатием Y. Далее активируем виртуальную среду, введя в консоли:
conda activate tensorflowО том, что всё сделано правильно, будет свидетельствовать замена в названии окружения с (base) на (tensorflow). Приступаем к установке:
conda install tensorflowДалее снова жмем Y и ожидаем, когда загрузится сама библиотека и все зависимости. Вот и всё, можно приступать к работе.
Как установить TensorFlow в PyCharm
Здесь это делается без какого-либо кода, а через меню создания виртуальной среды. В меню PyCharm в пункте New environment using выберите Virtualenv, а ниже укажите путь, по которому будет доступно это окружение.
Далее в меню слева жмем на пункт Project Interpreter, находим там TensorFlow (можно через встроенный поиск), кликаем внизу на Install Package и ждем окончания установки.
Проверить корректность установки можно, вернувшись в предыдущее меню Project Interpreter: в списке должна быть как сама TensorFlow, так и все ее зависимости.
Заключение
TensorFlow — это библиотека, разработанная в Google, которая содержит всё необходимое для обучения нейросетей. В инструкции мы рассмотрели способы установки TensorFlow в разных окружениях.

# Getting Started with Tensorflow (opens new window) Installation
# Understanding What Tensorflow Is
TensorFlow, a powerful library for heavy tasks, offers both GPU and CPU versions. According to Google Trends (opens new window), PyTorch (opens new window) has seen a surge in popularity, dominating papers’ implementations by over 92% (opens new window) in the last 5 years. This rise indicates a strong trend that is likely to continue. TensorFlow also provides an in-built model deployment tool called TensorFlow Serving, capable of handling high request volumes seamlessly (opens new window).
# A Brief Overview
TensorFlow is a versatile library known for its efficiency in managing hardware, computation, and visualization tasks. It plays a vital role in deep learning applications due to its robust features and flexibility.
# Why It’s Useful
TensorFlow’s ability to handle complex computations makes it indispensable for machine learning projects. Its integration with Kubernetes (opens new window) and Docker (opens new window) further enhances its utility by facilitating seamless deployment of models.
# Preparing Your Computer
Before diving into TensorFlow installation, it’s crucial to ensure your system meets the necessary requirements. Google Trends data shows the increasing demand for both PyTorch and TensorFlow frameworks, highlighting the importance of having a well-prepared environment.
# Checking System Requirements
Verify that your computer meets the prerequisites for installing TensorFlow to avoid any compatibility issues down the line.
# Setting Up Your Environment
Creating an optimal environment is key to a successful installation process. Utilize lists or bullet points to organize essential steps for setting up your computer effectively.
# How to Install Tensorflow on Windows
To proceed with installing TensorFlow on a Windows system, you have two primary methods: using pip (opens new window) or leveraging Anaconda (opens new window) for a more streamlined process.
# Install Tensorflow Using pip
# Step-by-Step Instructions
-
Open your command prompt.
-
Use the command
pip install tensorflowto initiate the installation process. -
Wait patiently for the installation to complete; this may take some time depending on your system’s specifications.
-
Once installed, you can verify the installation by running a simple TensorFlow script to ensure everything is functioning correctly.
# Verifying the Installation
-
To confirm that TensorFlow has been successfully installed, execute a test script that utilizes TensorFlow functionalities.
-
If there are no errors during the execution and you can see the expected output, congratulations! You have now successfully installed TensorFlow on your Windows machine.
# Alternative Method: Using Anaconda
# Navigating Anaconda Navigator (opens new window)
-
Launch Anaconda Navigator from your start menu or by searching for it in your applications list.
-
Navigate to the «Environments» tab within Anaconda Navigator.
-
Select ‘All’ from the drop-down menu to display all available packages.
-
Search for TensorFlow in the search bar to locate it within the list of packages.
# Finalizing the Installation
-
Once you have located TensorFlow, click on it to select it for installation.
-
Proceed with the installation process by following any additional prompts that may appear during installation.
-
After completion, you can verify that TensorFlow has been successfully installed by importing it into a Python (opens new window) script and running a basic TensorFlow operation.
# Installing Tensorflow on Mac
When it comes to installing TensorFlow on a Mac, there are specific challenges that users of Apple (opens new window) M1 notebooks encounter. The transition to Apple’s M1 chip has brought about compatibility issues that need to be addressed for a smooth installation process.
# Challenges with Apple M1 Notebooks
# Common Issues
One of the common issues faced by users of Apple M1 notebooks is the compatibility between TensorFlow and the new architecture. Since most installations were optimized for x86 systems, adapting them to work seamlessly on the M1 chip poses a significant challenge.
# Recommended Workarounds
To overcome these challenges, developers have been exploring different workarounds. One effective solution involves utilizing Miniforge (opens new window) specifically designed for the M1 chip along with Python 3.8. This combination has shown remarkable improvements in performance metrics, with a 1.7x speed increase in training (opens new window) and a 2.3x speed boost in evaluation compared to traditional installations.
# Using Jupyter Notebook (opens new window) for Installation
For those looking for a user-friendly approach to installing TensorFlow on their Mac devices, leveraging Jupyter Notebook can simplify the process significantly.
# Easy Method Demonstration
By following a step-by-step guide within Jupyter Notebook, users can navigate through the installation process seamlessly. This method provides a visual representation of each step, making it easier for beginners to grasp and implement effectively.
# Verifying Successful Installation
After completing the installation using Jupyter Notebook, it’s essential to verify its success by running basic TensorFlow operations within the notebook environment. This verification step ensures that TensorFlow is functioning correctly and ready for use in various machine learning projects.
# Final Thoughts and Troubleshooting Tips
After completing the TensorFlow installation, it’s essential to be aware of common issues that may arise and how to address them effectively.
# Common Installation Issues
# How to Identify Them
-
Installation Errors: If you encounter error messages during the installation process, it indicates a potential issue with compatibility or system requirements.
-
Version Mismatch: Incompatibility between different versions of Python and TensorFlow can lead to installation failures.
-
Dependency Problems: Missing dependencies or conflicting packages can cause disruptions in the installation flow.
# How to Solve Them
-
Error Resolution: Research the specific error message encountered to find solutions online or seek help from developer forums.
-
Version Alignment: Ensure that the versions of Python and TensorFlow are compatible by referring to official documentation for supported configurations.
-
Dependency Management: Use package managers like pip or conda to handle dependencies efficiently and resolve conflicts.
# Keeping TensorFlow Updated
# Why It’s Important
Regular updates ensure that you have access to the latest features, bug fixes, and security patches offered by TensorFlow. Staying updated also enhances performance and compatibility with other libraries and frameworks.
# Simple Steps to Update
-
Open your command prompt or terminal.
-
Use the command
pip install --upgrade tensorflowto update your existing TensorFlow installation. -
Wait for the update process to complete, ensuring a stable internet connection for smooth updating.
-
Verify the successful update by running a test script with updated functionalities to confirm that the new version is functioning correctly.