
Современные компьютеры становятся все мощнее, и, соответственно, для их нормального функционирования необходимо качественное программное обеспечение. Все чаще для игр, 3D-моделирования и видеомонтажа используются графические библиотеки OpenGL. Сегодня я расскажу, для чего они нужны в операционной системе, как определить, поддерживается ли данная технология на компьютере, и опишу несколько способов установки в Windows 7 и Windows 10.
OpenGL расшифровывается как Open Graphics Library и представляет собой интерфейс прикладного программирования API с открытым исходным кодом. Данное ПО используется для масштабирования 2D и 3D графики векторного типа, программирования, создания компьютерных игр, а также обеспечения качественного рендеринга.
Как определить, какая версия OpenGL установлена в Windows
В любой современной операционной системе, не только Windows, поддержка OpenGL встроена. Но даже несмотря на это, необходимо убедиться, действительно ли данное ПО установлено на компьютере. Проверить это очень легко — скачивать сторонние программы пользователю не придется. Нужно лишь открыть настройки видеокарты и перейти в раздел с основными сведениями. Обычно данный раздел отображается в контекстном меню рабочего стола или в скрытых значках на панели задач.
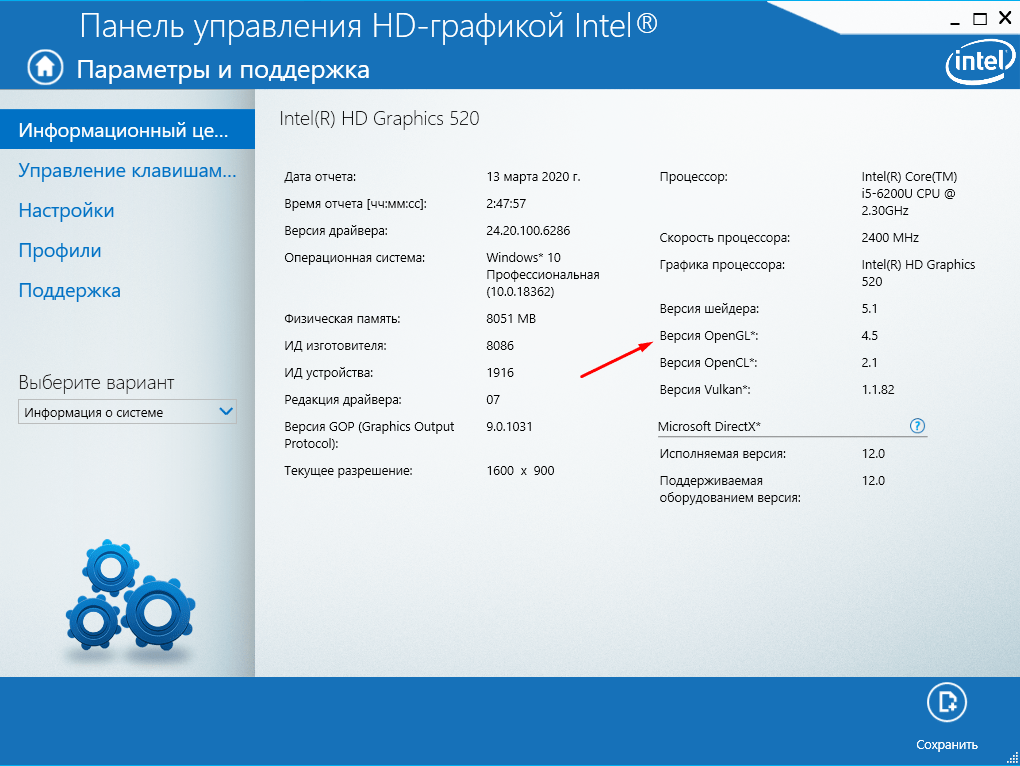
Вот так отображается версия OpenGL в настройках видеокарты Intel
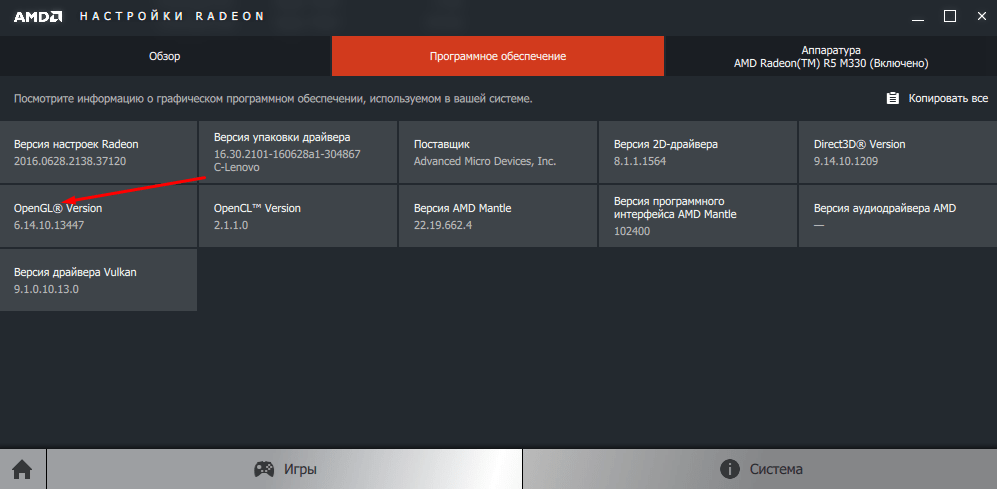
В разделе «Настройки» графических карт AMD тоже отображается установленная на данный момент версия OpenGL
Как установить OpenGL на разные видеокарты
Для установки или обновления OpenGL необходимо просто своевременно загрузить последнюю версию драйвера видеокарты. И сделать это можно как через официальный сайт производителя чипсета, так и с помощью встроенной в систему утилиты «Диспетчер устройств».
AMD
Скачивать обновления драйверов видеокарты желательно именно с официального сайта компании AMD. На нем можно подобрать конкретный тип процессора и серию. После автоматически начнется скачивание обновления. Но стоит учитывать, что на этой странице может не оказаться драйверов устаревших моделей видеокарт, но на самом сайте они есть, их лишь нужно найти. Для этого стоит вводить запрос напрямую в поисковике, а затем открывать официальную страницу и скачивать софт.

На сайте AMD предлагаются обновления отдельно для ОС Windows 7 и 10
Intel
На сайте центра загрузки компании Intel можно настроить автоматическое обновление драйверов, вручную искать программное обеспечение на нем неудобно. Поэтому в данном случае тоже можно вводить прямой запрос в поисковике по конкретной модели, чтобы не искать ее вручную на сайте. Правда, в этом случае выйдет страница поддержки, но особой разницы нет. Там точно так же будут указаны версии для конкретных операционных систем.

Здесь предлагаются обновления драйверов на официальном сайте Intel
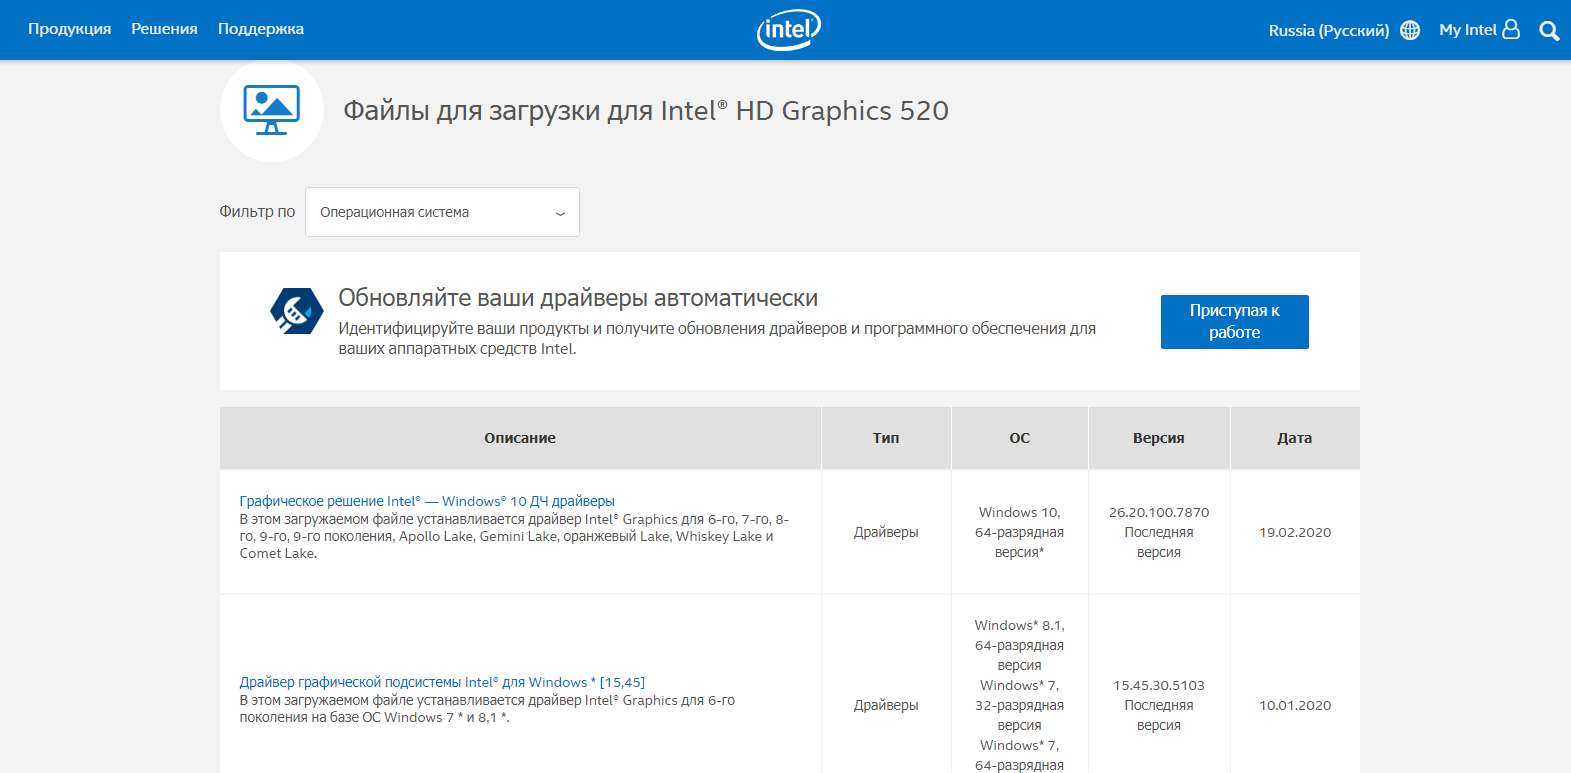
Доступно также скачивание с Центра загрузки компании, причем здесь есть фильтр по операционным системам
NVIDIA GeForce
На сайте NVIDIA поиск производится куда проще. Можно указать тип устройства, его серию, операционную систему, язык и даже вид драйвера. Есть еще вариант автоматического поиска, в котором сначала будет проведено сканирование, а уже затем при необходимости будет предложена оптимальная версия драйвера.

Компания NVIDIA предусматривает два варианта загрузки с официального сайта
Диспетчер устройств
Еще один вариант, более упрощенный и доступный, особенно в Windows 10 – поискать обновления через «Диспетчер устройств». Открыть его можно, нажав на комбинацию клавиш Win + X и найдя в контекстном меню соответствующий пункт.
Для начала я открою «Диспетчер устройств» через контекстное меню иконки «Пуск»
В новом окне открываю раздел «Видеоадаптеры», жму правой кнопкой мыши по нужному графическому процессу, затем выбираю пункт «Обновить драйвер». Система предложит установить их с компьютера или скачать онлайн. Во втором случае начнется поиск обновлений.
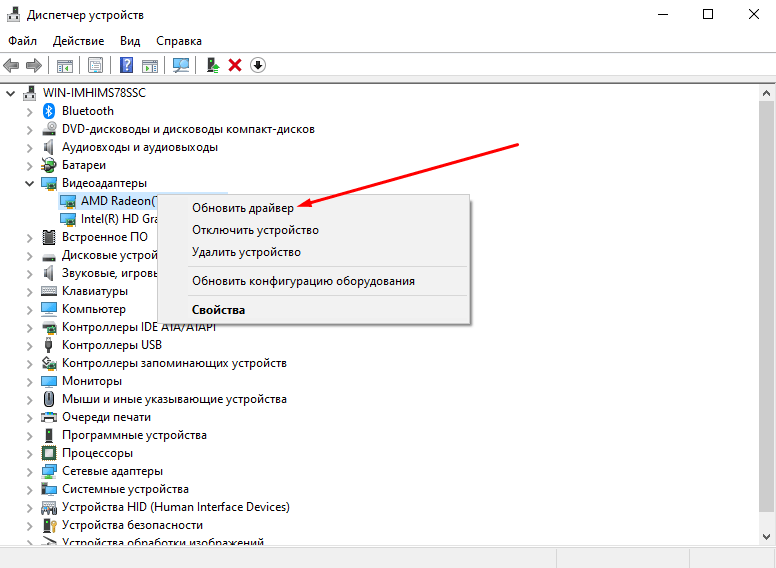
Жму правой кнопкой мыши по нужному видеоадаптеру и обновляю драйвера
Загрузка установщика из Интернета
Допустим еще вариант скачивания установщика OpenGL из сети Интернет. Правда, официального сайта в этом случае нет, поэтому данная процедура проводится на страх и риск пользователя. Если источники проверенные, можно скачать и установить приложение без особых колебаний и помех.
Заключение
Обычно OpenGL заранее бывает установлен в системе, вне зависимости от ее версии и новизны аппаратной части компьютера. Если в каких-то играх или программах требуется обновление данного ПО, можно для начала попробовать скачать и установить новую версию драйверов. После этого проблема обычно исчезает. Есть также вариант загрузки через «Диспетчер устройств» или инсталляция приложения, скачанного из сети Интернет.
Post Views: 33 973
#include <GL/glut.h>
#include<iostream>
using namespace std;
int rx = 100, ry = 125;
int xCenter = 250, yCenter = 250;
void myinit(void)
{
glClearColor(1.0, 1.0, 1.0, 0.0);
glMatrixMode(GL_PROJECTION);
glLoadIdentity();
gluOrtho2D(0.0, 640.0, 0.0, 480.0);
}
void setPixel(GLint x, GLint y)
{
glBegin(GL_POINTS);
glVertex2i(x, y);
glEnd();
}
void ellipseMidPoint()
{
float x = 0;
float y = ry;
float p1 = ry * ry - (rx * rx) * ry + (rx * rx) * (0.25);
float dx = 2 * (ry * ry) * x;
float dy = 2 * (rx * rx) * y;
glColor3ub(rand() % 255, rand() % 255, rand() % 255);
while (dx < dy)
{
setPixel(xCenter + x, yCenter + y);
setPixel(xCenter - x, yCenter + y);
setPixel(xCenter + x, yCenter - y);
setPixel(xCenter - x, yCenter - y);
if (p1 < 0)
{
x = x + 1;
dx = 2 * (ry * ry) * x;
p1 = p1 + dx + (ry * ry);
}
else
{
x = x + 1;
y = y - 1;
dx = 2 * (ry * ry) * x;
dy = 2 * (rx * rx) * y;
p1 = p1 + dx - dy + (ry * ry);
}
}
glFlush();
float p2 = (ry * ry) * (x + 0.5) * (x + 0.5) + (rx * rx) * (y
- 1) * (y - 1) - (rx * rx) * (ry * ry);
glColor3ub(rand() % 255, rand() % 255, rand() % 255);
while (y > 0)
{
setPixel(xCenter + x, yCenter + y);
setPixel(xCenter - x, yCenter + y);
setPixel(xCenter + x, yCenter - y);
setPixel(xCenter - x, yCenter - y);
if (p2 > 0)
{
x = x;
y = y - 1;
dy = 2 * (rx * rx) * y;
p2 = p2 - dy + (rx * rx);
}
else
{
x = x + 1;
y = y - 1;
dy = dy - 2 * (rx * rx);
dx = dx + 2 * (ry * ry);
p2 = p2 + dx -
dy + (rx * rx);
}
}
glFlush();
}
void display()
{
glClear(GL_COLOR_BUFFER_BIT);
glColor3f(1.0, 0.0, 0.0);
glPointSize(2.0);
ellipseMidPoint();
glFlush();
}
int main(int argc, char** argv)
{
glutInit(&argc, argv);
glutInitWindowSize(640, 480);
glutInitWindowPosition(10, 10);
glutCreateWindow("User_Name");
myinit();
glutDisplayFunc(display);
glutMainLoop();
return 0;
}
1 minute read
Introduction
Open Graphics Library is a cross-language, cross-platform application programming interface for rendering 2D and 3D vector graphics. The API is typically used to interact with a graphics processing unit, to achieve hardware-accelerated rendering.
Pre-requisites
To execute your graphics applications written using OpenGL libraries, you can use Visual Studio.
Microsoft Visual Studio is an integrated development environment (IDE) from Microsoft. It is used to develop computer programs, as well as websites, web apps, web services and mobile apps.
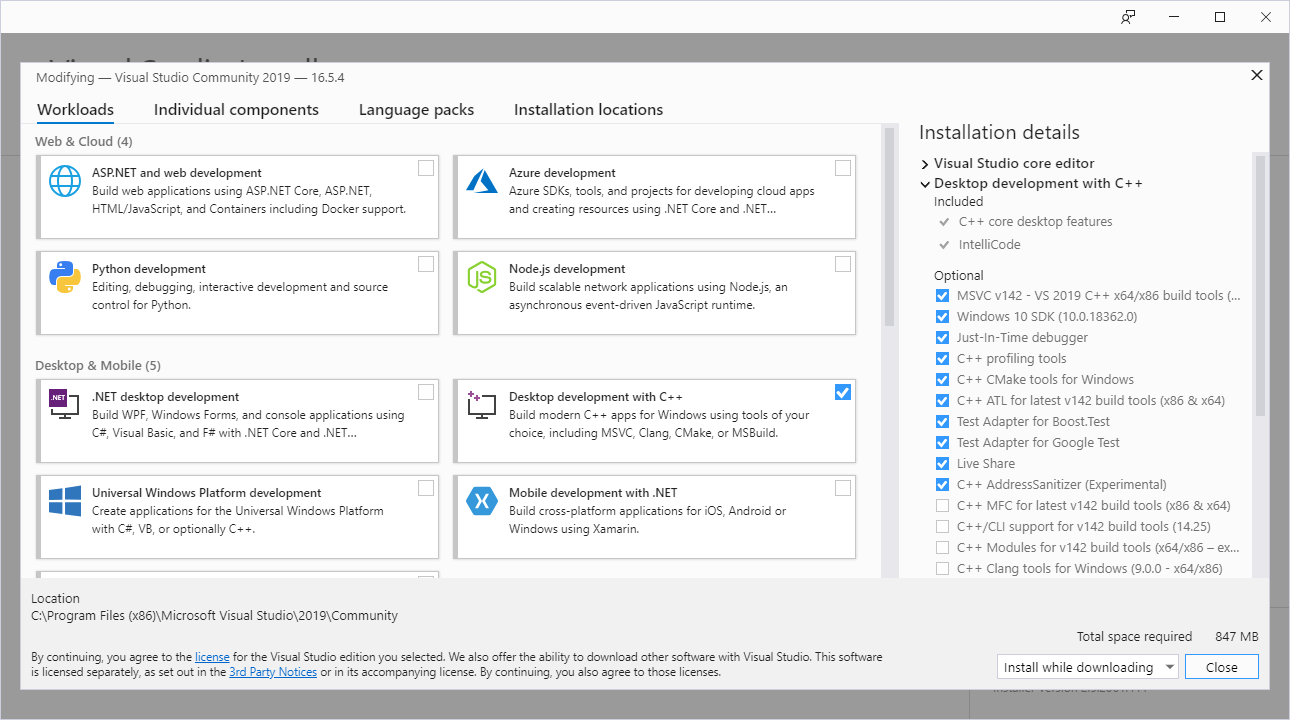
Install Visual Studio Community 2017 using the official installer with the required components as shown in the image below.

Installation
-
Download GLUT header, lib, and dll files from OpenGL. (Mentioned on this page)
-
Paste
glut.hinC:\Program Files (x86)\Microsoft Visual Studio\2017\Community\VC\Tools\MSVC\{14.16.27023}\include\GL.Create the GL folder if not present already. The {version} may differ on your system.
-
Paste
glut.libinC:\Program Files (x86)\Microsoft Visual Studio\2017\Community\VC\Tools\MSVC\{14.16.27023}\lib\x64.Paste
glut32.libinC:\Program Files (x86)\Microsoft Visual Studio\2017\Community\VC\Tools\MSVC\{14.16.27023}\lib\x86.The {version} may differ on your system. -
Paste
glut.dllandglut32.dllinC:\Windows\SysWOW64.Copy
glut32.dlltoC:\Windows\System32also. -
Open your
Windows Console Applicationproject inVisual Studio, or create a new one:File > New > Project
Visual C++ > Windows Desktop > Windows Console Application
-
Go to
Project > Properties.Select
All ConfigurationfromConfigurationdropdown menu on top left corner.Select
Configuration Properties > C/C++ > Precompiled headersand changePrecompiled Headeroption’s value toNot Using Precompiled Headers.Select
Configuration Properties > Linker > Input. Now right click onAdditional Dependenciesfound on right panel and click Edit.Now type:
opengl32.lib glu32.lib glut32.lib(Note: Each .lib in new line)
-
That’s it. You have successfully installed OpenGL. Go on and run your program.

Same installation instructions apply to freeglut files with the header files in the GL folder, lib in the lib folder, and dll in the System32 folder.
Check your installation
You can check your installation by running a simple C++ OpenGL program to draw points on a 2D canvas.
You’ll get the following output:

Contribute
This website is open source.
Improve this page
Introduction
Open Graphics Library is a cross-language, cross-platform application programming interface for rendering 2D and 3D vector graphics. The API is typically used to interact with a graphics processing unit, to achieve hardware-accelerated rendering.
Prerequisites
To execute your graphics applications written using OpenGL libraries, you can use Visual Studio.
Microsoft Visual Studio is an integrated development environment (IDE) from Microsoft. It is used to develop computer programs, as well as websites, web apps, web services and mobile apps.
Install Visual Studio 2019 using the official installer with the required components as shown in the image below. (Recommended Community 2019)
Note
This tutorial does not install the OpenGL GLUT library permanently i.e. system-wide, this is to make sure there are no version conflicts later on, so in every project you can make use of a different version of GLUT without hindering the already if installed GLUT.
freeglut is also getting old, consider using newer libraries like GLEW and GLFW for C++, which is my only reason to not install GLUT system wide.
OpenGL Project Setup
We’ll first download freeglut’s binaries for msvc as mentioned in http://freeglut.sourceforge.net/
The freeglut project does not support packaged versions of freeglut excepting, of course, the tarballs distributed here. However, various members of the community have put time and effort into providing source or binary rollups.
- Download freeglut for MSVC freeglut-MSVC.
Alternatively download freeglut 3.0.0 MSVC Package from https://www.transmissionzero.co.uk/software/freeglut-devel/
Unzip the downloaded .zip and you’ll get something like below, this includes the precompiled libraries and the required header and dll files as well.
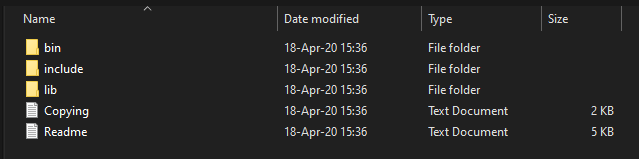
Copy the freeglut folder into C:\
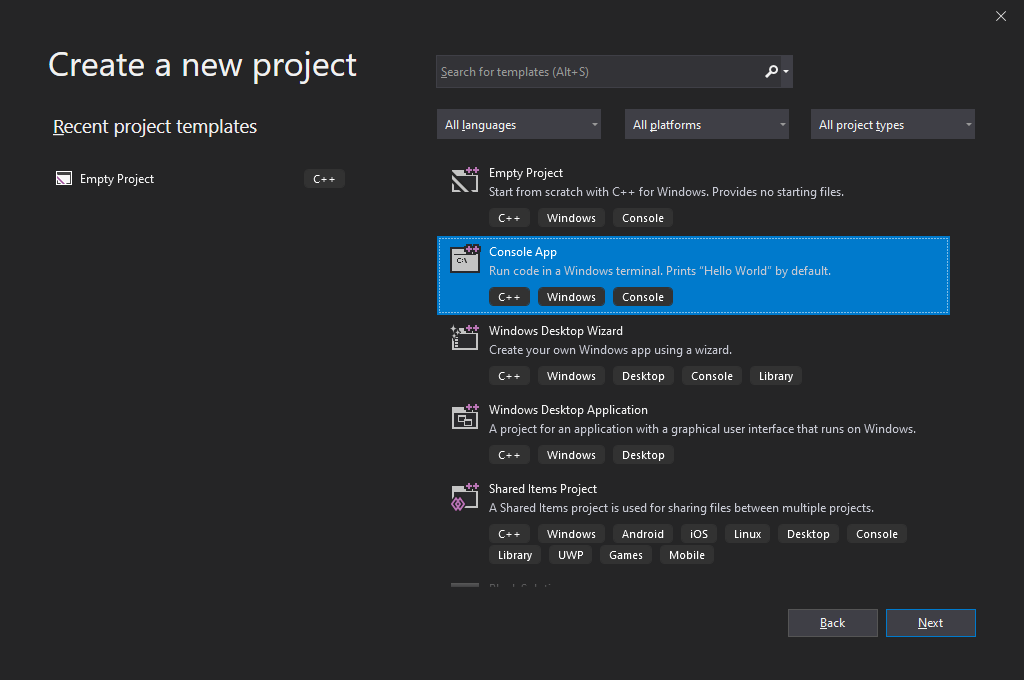
- Open Visual Studio 2019 and Create a new
Console AppProject
- Now we’ll setup the linker and include paths for our
x64application
3.1 Open Project -> Properties and click on Configuration Manager... and set it to x64
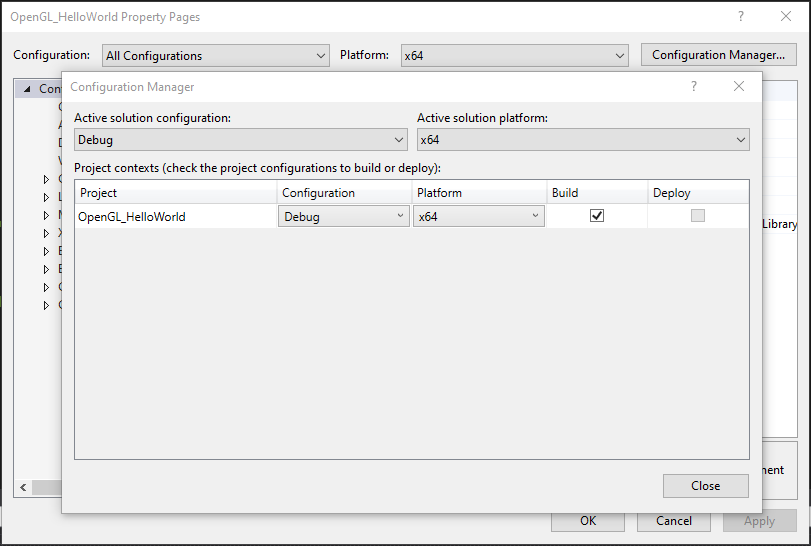
NOTE: To change a value click on the down arrow to the right and then click on <Edit...>, then you can select your directory path
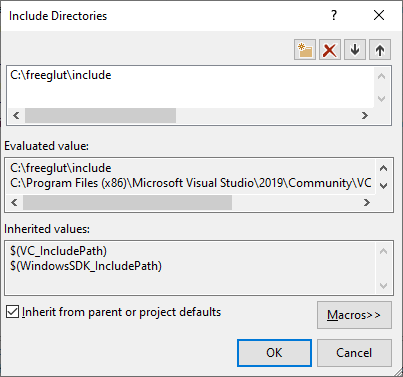
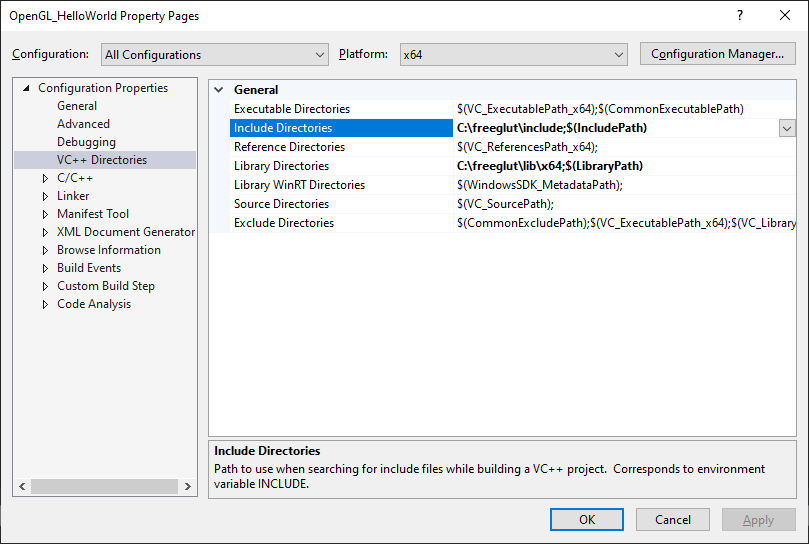
3.2 Set the Configuration Properties -> VC++ Directories to these values
i.e. Add C:\freeglut\include in Include Directories
and Add C:\freeglut\lib\x64 in Library Directories
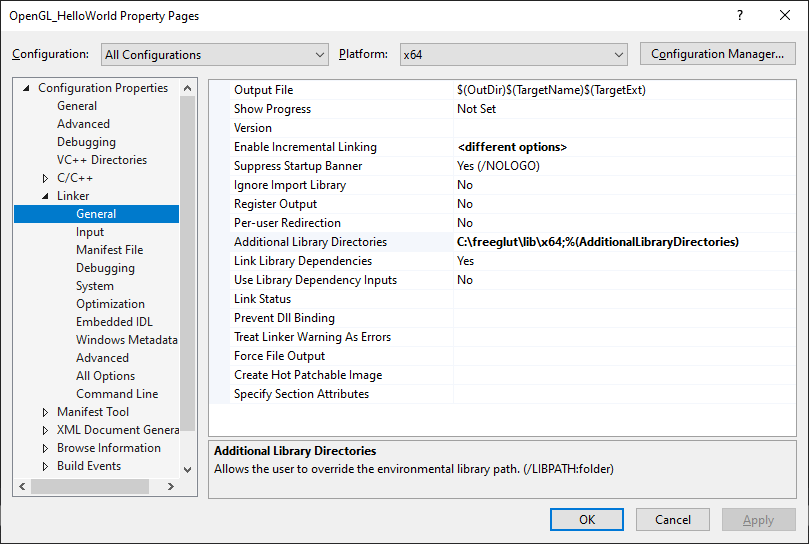
3.3 Set the Configuration Properties -> Linker -> Generalto these values
Add C:\freeglut\lib\x64 to Additional Library Directories
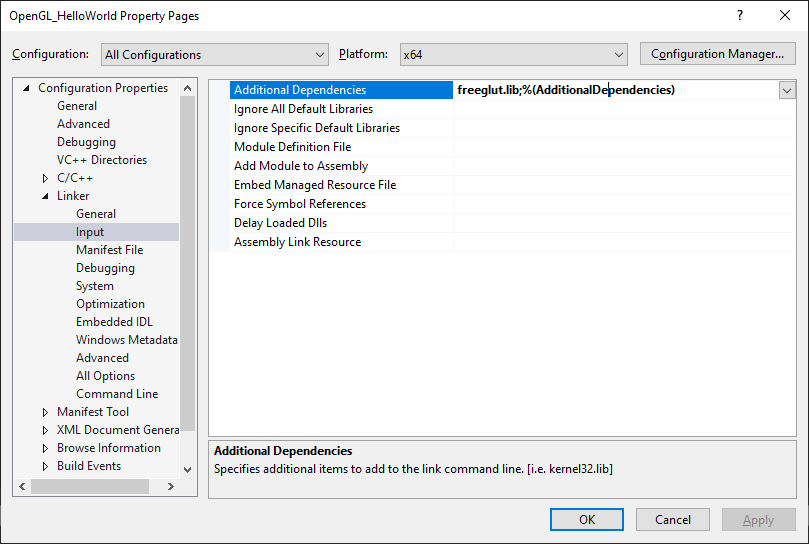
3.4 Set the Configuration Properties -> Linker -> Input to these values
Add freeglut.lib to Additional Dependencies
- Replace the code in your
<PROJECT_NAME>.cpp(in my caseOpenGL_HelloWorld.cpp) with the below code
#include <GL/freeglut.h>
void display() {
/* clear window */
glClear(GL_COLOR_BUFFER_BIT);
/* draw scene */
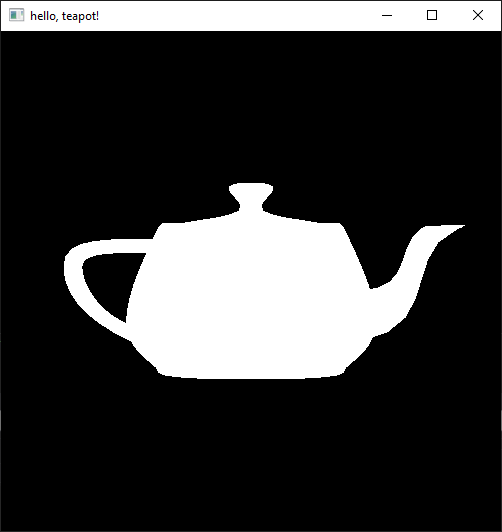
glutSolidTeapot(.5);
/* flush drawing routines to the window */
glFlush();
}
int main(int argc, char* argv[]) {
/* initialize GLUT, using any commandline parameters passed to the
program */
glutInit(&argc, argv);
/* setup the size, position, and display mode for new windows */
glutInitWindowSize(500, 500);
glutInitWindowPosition(0, 0);
glutInitDisplayMode(GLUT_RGB);
/* create and set up a window */
glutCreateWindow("hello, teapot!");
glutDisplayFunc(display);
/* tell GLUT to wait for events */
glutMainLoop();
}
- Build the Project 🚀
Build->Build Solution
If you followed the tutorial you should see something like this

- Now to run the executable we need
freeglut.dllwhich is inC:\freeglut\bin\x64
Copy freeglut.dll to <YOUR_PROJECT_DIRECTORY>\x64\Debug\, in my case C:\Users\shadowleaf\source\repos\OpenGL_HelloWorld\x64\Debug\
- Run the Executable !
Click on Debug -> Start Without Debugging
Example Project is in https://github.com/satyajitghana/satyajitghana.github.io/tree/adda469a7cd04167acf2c7622d096a63c821a350/blog/opengl-vs19/example/OpenGL_HelloWorld
That is it folks !
Made with 💖 by shadowleaf
Here are multiple non-cumbersome methods to find, download, and install the OpenGL driver for Windows 10, 11. Read on to the entire article for complete details.
When you are playing games, you can all of a sudden get an OpenGL issue, such as “can’t find the name of Intel ICD OpenGL driver.” Or, if you want a better gaming experience, you should simply make sure that the respective drivers for your Intel, AMD, and NVIDIA graphics cards are all up to date.
However, what exactly is OpenGL? And how do you update the drivers? Continue reading to get answers to such questions.
Automatically Install Latest OpenGL Driver with Win Riser Driver Updater
Finding the correct driver online is a bit cumbersome and time-consuming. We recommend using Win Riser Driver Updater to automatically get the task done, in no time. Win Riser requires only 2-clicks in order to install the latest version of all PC drivers. This utility tool installs only WHQL-tested and certified drivers. To try Win Riser Driver Updater for Free, simply click on the download button below.
What is OpenGL?
OpenGL is an acronym that stands for Open Graphics Library. This library is what allows high-performance operations to be executed smoothly on your GPU. OpenGL also supports other video drivers and applications, such as Direct X, so that you can have a more enjoyable gaming experience on your Windows computer.
OpenGL is another type of 3D graphic API that can improve the quality of your graphics and pictures in the background by communicating with your CPU and graphic card to boost the performance of your hardware.
OpenGL drivers are always pre-installed in your Windows system; however, if for some reason the drivers are not there or they have not been updated properly, then you may notice some slow performance in the new graphic card module. This is the reason why you need to update your OpenGL drivers.
How to Download, Install & Update OpenGL Driver for Windows 10, 11
There are three methods for you to perform OpenGL driver download on Windows 11, 10. Have a look at them below!
Method 1: Manual Method For OpenGL Driver Download
To update outdated drivers manually, you need to first determine the type of graphics card that is currently installed on your computer. Second, you have to determine which version of the operating system is currently running on your system. Then, you can download the most recent driver for your graphics card from the website of the graphics card manufacturer, such as the well-known companies Intel, NVIDIA, and AMD. All you need is the model number of your graphics card and the version of the operating system.
Once you downloaded the driver installer, then run it and follow the on-screen instructions to successfully install the OpenGL driver updates on Windows 10, 11. After that, reboot your computer to save new drivers.
Also Read: How To Update Graphics Drivers In Windows 10 {Simple Guide}
Method 2: Install Latest OpenGL Driver Update in Device Manager
The Device Manager is a useful program that is pre-installed on all versions of the Microsoft Windows operating system. Users have the ability to examine and manage all of the peripheral devices that are connected to a computer system. So if you are interested in performing OpenGL driver download for Windows 10, 11 with the assistance of the Device Manager program. This is the procedure to follow:
Step 1: You may open the Device Manager by simultaneously pressing the Windows logo + X key on your keyboard, and then selecting the option from the fast access menu.
Step 2: You need to identify the Display Adapters in the Device Manager, and then expand the category by double clicking on it.
Step 3: To update the driver, right-click on your display driver and choose Update Driver Software from the context menu.
Step 4: Next, click on Search Automatically For Updated Driver Software to proceed.

After that, you will need to be patient as Windows searches for and installs the most recent driver version available for your system. Once everything is done, reboot your device to apply recent changes.
Also Read: How to Update Intel HD Graphics Driver
Method 3: Use Win Riser Driver Updater To Automatically Install OpenGL Driver (Recommended)
Even on the OpenGL website’s official download page, users frequently report that it is challenging to track down the appropriate OpenGL driver. If this is the case, why not experiment with a tool that can automatically download the most recent driver? Win Riser Driver Updater is the best driver updater that is currently accessible to you.
Win Riser is an automated utility that may assist you with updating the Windows drivers, getting rid of system junk, deleting all malware files, and fixing all of your Registry files. Now, have a look at the steps below to learn how to update outdated drivers using Win Riser Driver Updater.
Step 1: Firstly, download Win Riser Driver Updater from the button located below.
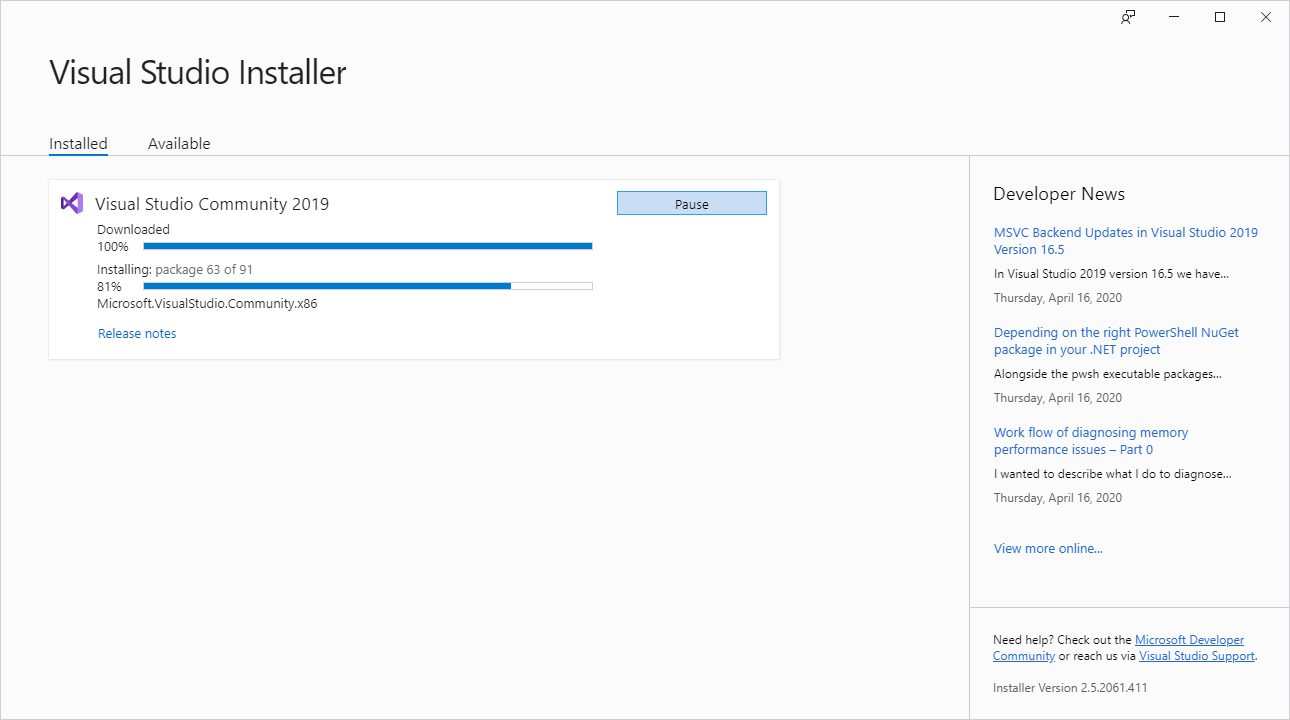
Step 2: Next, run the downloaded file and follow the on-screen instructions to install the program. After the installation is complete, the utility may immediately start up on its own and do a full scan of your computer system.
Step 3: Once scanning is finished, check the scan results and click on the “Fix Issues Now” option. However, users having the pro version are the only ones who have access to this feature. Free users have the ability to pick a variety of categories and address problems one at a time rather than all at once.

Step 4: After making all of the necessary adjustments, you will need to restart your computer.
Also Read: How Do I Know Which Intel Graphics Driver Do I Have
How to Download & Update OpenGL Driver on Windows 11, 10: Explained
It is always a good idea to update the drivers of your graphic card if you want to get the best performance possible out of your Windows PC and play the newest games without experiencing any errors or other problems. Because updating the drivers for your graphics card can be a challenging task, we have written this article to assist you in performing the OpenGL driver update with just a few clicks. The above provided were some of the best ways that you can use to find and install the latest version of graphics drivers on your Windows 10, 11 PC.
Hopefully, you found the article informative and helpful. If you have any questions, please feel free to drop your queries or further suggestions in the comments section below. For more tech-related information, subscribe to our Newsletter and follow us on Social Media (Facebook, Instagram, Twitter, or Pinterest) so you never miss out on any updates related to technology.